Citroen Jumpy Multispace (2014 year). Instruction - part 6


  Index      Citroen     Citroen Jumpy Multispace - instruction 2014 year in english


Search            


Content   ..  4  5  6  7   ..


Citroen Jumpy Multispace (2014 year). Instruction - part 6


 79

   Seats   

EASE OF USE and COMFORT

3

JUMPY-ATLANTE-VP_EN_CHAP03_ERGONOMIE ET CONFORT_ED01-2014

  Precautions 
 Following the various handling operations: 
   -   do not remove a head restraint without 

storing it and fix it to a support, 

  -   check that the seat belts are always 

accessible to the passenger and easy to 

fasten, 

  -   a passenger must not take his seat 

without adjusting his seat's head 

restraint correctly and adjusting and 

fastening his seat belt.   
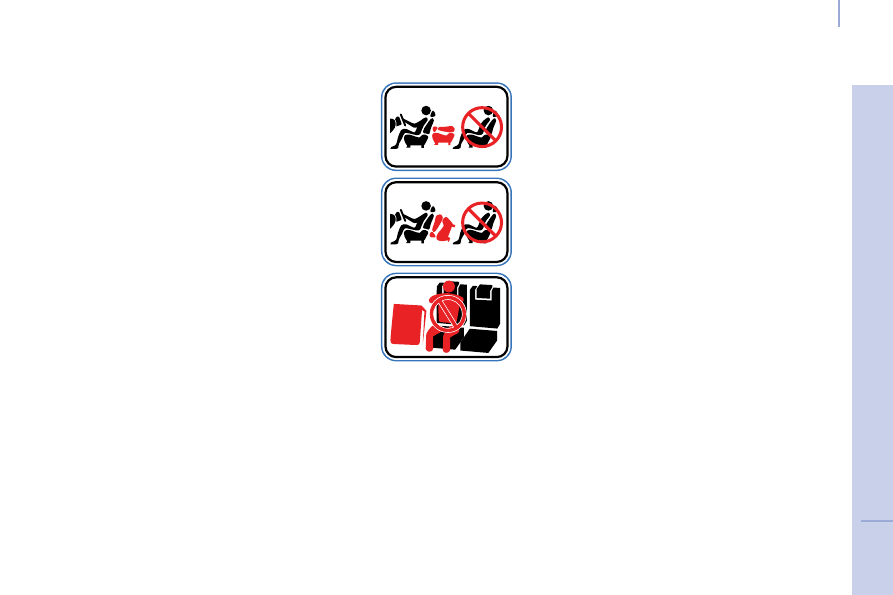
  Labels 
 While driving, it is prohibited to have a 

passenger: 
   -   in row 3 if the seat back in front (row 2) 

is in the table position. 

  -   in row 3 if the seat/bench in front (row 2) 

is in the folded position. 

  -   in row 3 if the seat in front (row 2) has 

been removed, 

  -   on the centre seat if the right-hand side 

seat is in the folded position.    

   Seats   

JUMPY-ATLANTE-VP_EN_CHAP03_ERGONOMIE ET CONFORT_ED01-2014

 SEAT  AND  BENCH 

CONFIGURATIONS 

  Examples of various layouts 

combining comfort and practicality 

 The various operations must be carried 

out while stationary. 


7 seats  


8 seats  


9 seats   


5 seats  


6 seats  

 Do not fit seats in the 3rd row without 

first fitting the corresponding seatbelts. 

 81

   Practical  information   

EASE OF USE and COMFORT

3

JUMPY-ATLANTE-VP_EN_CHAP03_ERGONOMIE ET CONFORT_ED01-2014

 CAB  FITTINGS 

 Depending on the vehicle's equipment, the 

various fittings below enhance your cab. 

  Glove  box 

 This is fitted with a lock, you can lock it 

using the key. 
 It contains three sockets for the connection 

of portable electronic equipment (video 

equipment, ...) if the vehicle is fitted with a 

colour screen. 
 It also contains cup holders and 

compartments for storing maps, a packet of 

cigarettes, an A4 format document, a pen, etc.  

  Storage  compartment  

 PRACTICAL  INFORMATION 

  Sun  visor 

 To prevent dazzle from ahead, fold the sun 

visor down. 
 A pocket is provided in the driver's sun visor 

for storing toll cards, tickets, ...  

82

   Practical  information   

JUMPY-ATLANTE-VP_EN_CHAP03_ERGONOMIE ET CONFORT_ED01-2014

  Ashtray  

  Storage tray and bottle holder (1.5 L) 

 Any liquid carried in an open receptacle 

(cup or other) may be spilt, with the risk 

of damage to switches and controls at the 

driving position and centre console. 

"Take  care".  

  Ticket  storage 

 According to the configuration of the vehicle.  

  12  volt  socket 

 The maximum power of the socket, which is 

of the cigarette lighter type, is 120 W.  

 83

   Practical  information   

EASE OF USE and COMFORT

3

JUMPY-ATLANTE-VP_EN_CHAP03_ERGONOMIE ET CONFORT_ED01-2014

  Overhead  storage  unit 

 This is located above the sun visors and has 

two compartments, with or without a cover, 

for storing a jumper, a file, ... 
 Be aware that storing a hard object in direct 

contact with the compartment may result in 

noise.  

84

   Practical  information   

JUMPY-ATLANTE-VP_EN_CHAP03_ERGONOMIE ET CONFORT_ED01-2014

 Permanently on, ignition on. 

 Front: comes on when one of the 

front or rear doors is opened. 

 Row 2 and row 3: comes on when 

one of the rear doors or the boot 

is opened, if fitted on your vehicle. 

 Permanently  off.  

  Individual  reading  lamp 

  Rear  courtesy  lamp  

 If fitted on the vehicle, these are 

switched on and off by means of a 

manual switch, with the ignition on.   

 SEATING  AREA  COURTESY 

LAMPS  

  Automatic  switching  on/off 
 The front courtesy lamp comes on when the 

key is removed from the ignition. 
 All of the courtesy lamps come on when 

the vehicle is unlocked, when one of the 

corresponding doors is opened and for 

location of the vehicle using the remote 

control. 
 They switch off gradually after the ignition is 

switched on and when the vehicle is locked. 

  Front  courtesy  lamp  

 85

   Practical  information   

EASE OF USE and COMFORT

3

JUMPY-ATLANTE-VP_EN_CHAP03_ERGONOMIE ET CONFORT_ED01-2014

  Mat fitting / removal 

 When removing the front mat, push the 

seats as far back as possible and remove 

the fixings. 
 When refitting, position the mat correctly on 

the pins and clip the fixings. Check that the 

mat is secured correctly. 

  Areas for toll cards / car park tickets 

 The athermic windscreen has two non-

reflective zones located either side of the 

base of the interior mirror. 
 They are intended for affixing toll cards and/

or car park tickets.  

 SEATING  AREA  FITTINGS 

 Depending on the vehicle's equipment, the 

various fittings below enhance your seating 

area. 

  12  volt  socket 

 This operates with the ignition off, so limit its 

use to avoid discharging the battery. 
 Maximum power: 120 W.  

 To prevent the mat from becoming caught 

under the pedals: 
   -   only use mats suited to the fixings 

already present in the vehicle. It is 

imperative that these fixings are used. 

  -   never fit one mat on top of another.   

  Grab  handle  

  Cup  holder 

 Any liquid carried in an open receptacle (cup 

or other) may be spilt, presenting a risk. 

"Take  care".  

86

   Practical  information   

JUMPY-ATLANTE-VP_EN_CHAP03_ERGONOMIE ET CONFORT_ED01-2014

  Nets on the back of the outer seats  

  Fittings / storage compartments  

  Load retaining net fixing 

 Raise the flap to gain access to the load 

retaining net fixings.  

  Storage tray and bottle holder (0.5 L)  

  Coat  hooks  

 87

   Practical  information   

EASE OF USE and COMFORT

3

JUMPY-ATLANTE-VP_EN_CHAP03_ERGONOMIE ET CONFORT_ED01-2014

  Load  space  cover 

 To  install: 
   -   position one end of the load space cover 

roller in its notch, 

  -   compress the opposite end of the roller 

and put it in place, 

  -   release it so that it engages, 
  -   unroll the load space cover to the pillars, 
  -   fix the two hooks on the pillars.  

  Stowing  rings 

 Use the stowing rings on the rear floor to fix 

the net, your loads or luggage. 
 For safety reasons, on sharp braking, it is 

recommended that heavy objects are placed 

as far forward as possible. 

 To  remove: 
   -   pull the load space cover towards you to 

disengage it from its fixings, 

  -   reinsert the load space cover in its roller, 
  -   compress it and remove it from its 

support.   

 You are advised to immobilise the load 

by securing it firmly using the stowing 

rings on the floor.  

88

  Rear  suspension  

JUMPY-ATLANTE-VP_EN_CHAP03_ERGONOMIE ET CONFORT_ED01-2014

  Metal  suspension 

 This equipment adopts long movement limiters 

which make it possible to guarantee stable 

behaviour both when loaded and when empty. 

No action on your part is required except to 

ensure that maintenance is carried out and that 

the authorised loads are complied with.  

the increasing or lightening of the load on 

the vehicle's platform is detected by two 

height sensors. When all of the doors are 

closed, the sensors trigger the automatic 

height correction and determine the optimum 

height of the sill for the vehicle's driving 

conditions. 

  Deactivation of automatic height correction 
 The control which permits deactivation of 

automatic regulation is located on the right-

hand side, at the rear of the vehicle. 

 REAR  SUSPENSION 

 Two types of suspension are available. 

 You must deactivate automatic height 

correction manually in the following 

situations: 
   -  

when  working  underneath  the  vehicle, 

  -  

when  changing  a  wheel, 

  -   when the vehicle is being transported by 

lorry, train, ferry, boat, ...   

  Rear suspension with pneumatic 

height correction 

 If fitted on your vehicle, this type of 

suspension regulates the variations in the 

height of the rear platform of your vehicle 

irrespective of the weight of the load, within 

the limit of the authorised values. On board, 

  Two  functions 


1.    Automatic  height 

correction 


2.    Manual  height 

correction    

  1 -  Automatic correction of the 

height of the rear sill 

 The pneumatic suspension automatically 

regulates the variations in the height of the 

rear platform of your vehicle. 

 The automatic height correction is 

temporarily inactive: 
   -   if a door / the tailgate is open, 
  -   when braking or when stopped at a red 

traffic signal (brake pedal pressed).  

 With the vehicle stationary: 
   -   press  and  hold, 
  -   release  the  control.  

  Return to automatic correction 

 With the vehicle stationary: 
   -   press  and  hold, 
  -   release  the  control.  

 According to the configurations, a beep may 

be heard during these operations.   

A red warning light on your 

instrument panel fl ashes if the 

height is not at its optimum level 

and requires correction, drive slowly 

until this warning lamp goes off. 

 Return to automatic height correction is 

confirmed by the LED which goes off. 

 Deactivation is confirmed by the LED which 

is on. It remains on for approximately 

30 seconds. 

 89

  Rear  suspension  

EASE OF USE and COMFORT

3

JUMPY-ATLANTE-VP_EN_CHAP03_ERGONOMIE ET CONFORT_ED01-2014

  2 -  Manual correction of the height 

of the rear sill 

 If your vehicle is fitted with this adjustment, 

the control is located on the right-hand side 

at the rear of the vehicle. 
 This manual adjustment permits "lowering" 

or "raising" of the height of the sill of the 

rear platform to facilitate operations in a 

parking area. 
 This adjustment of the height of the sill is 

restricted by a lower limit and an upper limit. 

  First  use 
 To initialise the function, press the control 

for approximately 2 seconds.  

  Malfunctions 
 If the load sill is not adjusted when the 

control is pressed, "3 beeps" indicate a 

malfunction for the following reasons: 
   -   foot on the brake pedal with the key in 

the ignition, 

  -   excessive use of the manual correction, 
  -  

low  battery  charge, 

  -  

other.  

 If the audible signal persists, contact a 

CITROËN dealer or a qualified workshop.  

 Carry out these operations with the vehicle 

still stationary and: 
   -   with the front and side doors closed, 
  -   with the parking brake applied, 
  -   do not leave your foot on the brake 

pedal.  

  Lower:  downwards  adjustment 

of the platform sill 
 Press the control downwards 

continuously. 

 Release the button to stop the movement, 

"3 beeps" indicate that you have reached 

the maximum limit, the movement stops 

automatically.  

  Raise: upwards adjustment of 

the platform sill 
 Press the control upwards 

continuously. 

 Release the button to stop the movement, 

"3 beeps" indicate that you have reached 

the maximum limit, the movement stops 

automatically.  

  Return to the optimum sill height 
 Press the control up or down twice in 

succession, the opposite of the position of 

the load sill.  

90

  Rear  suspension  

JUMPY-ATLANTE-VP_EN_CHAP03_ERGONOMIE ET CONFORT_ED01-2014

  Deactivation of manual height correction 

  Good  practice 

 When stationary and with the ignition key 

removed, excessive use of the system 

consumes battery power. 

  Long  term  parking 
 Avoid parking for a long duration on ground 

which could present a potential obstacle as 

your vehicle could lower. 
 Following a long period out of use, the 

height of the platform may change due to the 

automatic height correction on unlocking or 

on opening one of your vehicle's doors.  

 With the vehicle stationary: 

   -  

press  and  hold, 

  -  

release  the  control.  

 Deactivation is confirmed by 

the LED which is on. It remains on for 

approximately 30 seconds.  

  Return to manual height correction 

 You must deactivate the manual height 

correction in the following situations: 

   -  

when  working  underneath  the  vehicle, 

  -  

when  changing  a  wheel, 

  -   when the vehicle is being transported by 

lorry, train, ferry, boat, ...    

 Driving with the height of the rear platform: 
   -   too low, risks damaging the technical 

components underneath the vehicle, 

  -   too high, risks unstable driving.  
 If you start and the warning lamp flashes, to 

switch it off: 
   -   correct the position of the manual 

control which is still at the lower or 

upper limit, 

  -   or drive slowly at above 6 mph 

(10 km/h), until height correction returns 

to automatic mode.  

  Warning  lamp 

 Refer to the "Instruments and controls" 

section of chapter 2.   

 With the vehicle stationary: 

   -  

press  and  hold, 

  -  

release  the  control.  

 Return to manual correction is 

confirmed by the LED which goes off. 
 According to the configuration, a beep may 

be heard during these operations. 

 91

   Mirrors  and  windows   

EASE OF USE and COMFORT

3

JUMPY-ATLANTE-VP_EN_CHAP03_ERGONOMIE ET CONFORT_ED01-2014

 MIRRORS 

 If fitted on your vehicle, the mirror is 

supplemented by a 2nd lower mirror. This 

mirror is convex to broaden the field of side 

vision. Objects observed are, in reality, 

closer than they appear. Therefore, take this 

into account in order to judge the distance 

correctly. 

 MIRRORS  AND  WINDOWS 

  Electric  folding 
 If your vehicle is fitted with this function, 

the mirrors can be folded electrically from 

the inside, with the vehicle parked and the 

ignition on: 
   -  

Place  switch   

A  in the centre position. 

  -  

Pull  switch   

A   rearwards.  

  Heated  mirrors 

 If your vehicle is fitted with this function, 

press the rear screen demisting button.  

 The folding / unfolding on locking / unlocking 

can be deactivated. 
Contact a CITROËN dealer or a qualified 

workshop.   

  Electric  door  mirrors 

   -  

Move  switch   

A  to the right or to the left 

to select the corresponding mirror. 

  -  

Move  knob   

B  in all four directions to 

adjust. 

  -  

Return  switch   

A  to the centre position.  

 From the outside, lock the vehicle using the 

remote control or the key.  
  Electric  unfolding 
 The electric unfolding of the mirrors is 

possible with the remote control or the key 

on unlocking the vehicle, unless folding 

was selected using switch  

A . In this case, 

pull the switch rearwards from the centre 

position again. 

  Manual  door  mirrors 

 Move the lever in all four directions to 

adjust. 
 When the vehicle is parked, the door mirrors 

can be folded back manually. 

 If the mirror casing has come out of its 

initial location, with the vehicle stationary, 

reposition the mirror casing manually or use 

the electric folding switch. 
 There is no risk of breakage even in the 

presence of ice.  

92

   Mirrors  and  windows   

JUMPY-ATLANTE-VP_EN_CHAP03_ERGONOMIE ET CONFORT_ED01-2014

Manual rear view mirror 

 The rear view mirror has two positions: 
   -  

day  (normal), 

  -  

night  (anti-dazzle).  

 To change from one to the other, push or 

pull the lever on the lower edge of the mirror.  

 SURVEILLANCE  MIRROR 

 This mirror, placed on top of the central 

mirror, enables the driver or front passenger 

to observe all the rear seats. 
 Fitted on its own ball joint, it's manual 

adjustment is simple and provides a view of 

the rear interior of the vehicle. 
 It can also be adjusted for improved visibility 

during manoeuvres or when overtaking. 

 REAR  WINDOWS  

  2nd row side windows 
 If fitted on your vehicle, the 2nd row side 

windows can be opened. 
 Squeeze the two controls then move the 

window sideways. 4 notches are available. 
 While driving, the window must be closed or 

secured on one of the 4 notches.  

  3rd row rear quarter lights 
 These  are  fixed.   

 93

   Mirrors  and  windows   

EASE OF USE and COMFORT

3

JUMPY-ATLANTE-VP_EN_CHAP03_ERGONOMIE ET CONFORT_ED01-2014

 ELECTRIC  WINDOWS 


1.   Driver's electric window control 
  

2.   Passenger electric window control  

 The electrical functions of the electric 

windows are deactivated: 
   -  

approximately  45  seconds  after  the 

ignition is switched off, 

  -   after one of the front doors is opened, if 

the ignition is off.   

  Reinitialisation 

 Following reconnection of the battery, 

the safety anti-pinch function must be 

reinitialised. 
 Lower the window fully, then raise it, it will 

rise in steps of a few centimetres each time 

the control is pressed. Repeat the operation 

until the window is fully closed. 
 Continue to press the control for at least one 

second after the window closed position has 

been reached. 
 The safety anti-pinch does not operate 

during these operations.  

 There are two operating modes: 

  Manual  mode 

 Press or pull the control, without passing the 

point of resistance. The window stops when 

you release the control.  

  Automatic  mode 

 Press or pull the control, beyond the point 

of resistance. The window opens or closes 

fully when the control is released. Pressing 

the control again stops the movement of the 

window. 

  Safety  anti-pinch 

 If your vehicle is fitted with the safety anti-

pinch function, when the window rises and 

meets an obstacle, it stops and partially 

lowers. 
 In the event of unwanted opening of the 

window on closing, press the control until 

the window is fully open. Within the next 

4 seconds, pull the control until the window 

is fully closed. 
 The safety auto-reverse does not operate 

during these operations.  

  Good  practice 

 If the electric windows meet an obstacle 

during operation, you must reverse the 

movement of the window. To do this, press 

the control concerned. 
 When the driver operates the passenger 

electric window controls, he must ensure 

that no one is preventing correct closing of 

the windows. 
 The driver must ensure that the passengers 

use the electric windows correctly. 
 Be aware of children when operating the 

windows.  

94

   Driving  safely   

JUMPY-ATLANTE-VP_EN_CHAP04_SECURITE_ED01-2014

 PARKING  BRAKE 

 There is no advantage in engaging a gear after 

parking the vehicle, particularly if the vehicle is loaded. 

 HAZARD WARNING LAMPS 

 Press this button, the direction indicators 

flash. 
 They can operate with the ignition off. 
 The hazard warning lamps should only be 

used in dangerous situations, when stopping 

in an emergency or when driving in unusual 

conditions. 

 DRIVING  SAFELY 

  Applying 

 Pull the parking brake lever up to immobilise 

your vehicle. 
 Check that the parking brake is applied 

firmly before leaving the vehicle. 

 If the parking brake is still on or has not been 

released properly, this is indicated by this warning 

lamp which comes on on the instrument panel. 

  Pull on the parking brake lever,  

only with 

the vehicle stationary . 
 In the exceptional case of use of the parking 

brake when the vehicle is moving, apply the 

brake by pulling gently to avoid locking the 

rear wheels (risk of skidding).   

 When parking on a slope, direct your wheels 

towards the pavement and pull the parking 

brake lever up. 

 Pull the lever and press the button to lower 

the parking brake lever.  


Content   ..  4  5  6  7   ..