Citroen DS4 (2017 year). Instruction - part 17
 

  Index      Citroen     Citroen DS4 - instruction 2017 year in english


Search            


Content   ..  15  16  17  18   ..


Citroen DS4 (2017 year). Instruction - part 17


07

255

Practical information

DS4_en_Chap07_info-pratiques_ed01-2016

Never store bottles of AdBlue

®

 in your 

vehicle.

Recommendations on storage

AdBlue

®

 freezes at about -11°C and 

deteriorates above 25°C. It is recommended 
that bottles be stored in a cool area and 
protected from direct sunlight

.

Under these conditions, the fluid can be kept 
for at least a year

.

If the additive has frozen, it can be used once it 
has completely thawed out.

Before starting the top-up procedure, ensure 
that the vehicle is parked on a flat and level 
surface.

Procedure

F

  Switch off the ignition and remove the 

key, or if your vehicle has one, press the 
START/STOP button to switch off the 
engine.

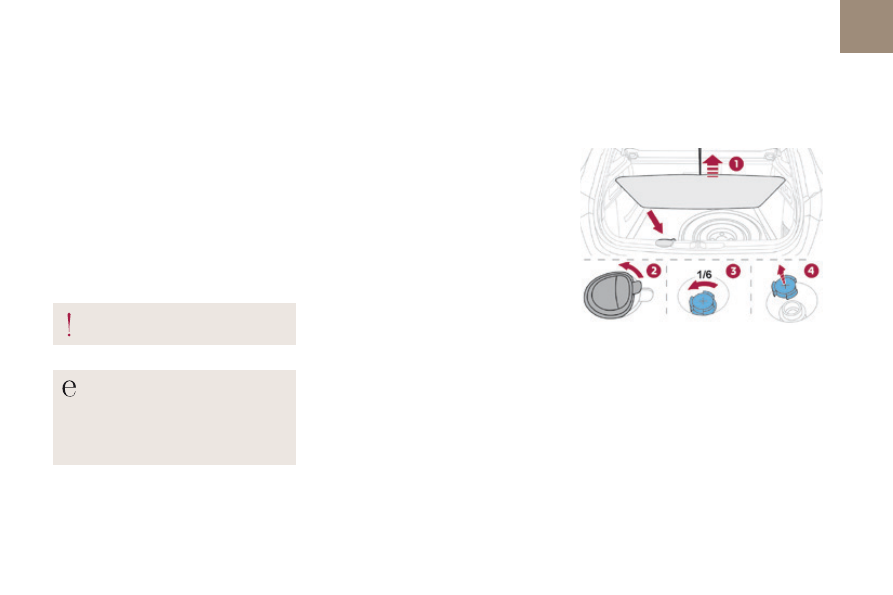
F  Raise the boot floor for access to the 

AdBlue

®

 tank.


Secure the boot floor by attaching its cord 
to the hook on the parcel shelf support.

F

  Unclip the black plastic blanking plug using 

its tab.

F

  Insert your fingers into the aperture and 

turn the blue cap a 6

th

 of a turn anti-

clockwise.

F

  Carefully lift off the cap, without dropping it.

Do not dispose of AdBlue

®

 bottles or 

containers in the household waste.
Place them in a container provided 
for this purpose or take them to your 
dealer.

07

256

Practical information

Never dispose of AdBlue

®

 additive 

bottles in the household waste. Place 
them in a special container provided 
this purpose or take them to your 
dealer.

Important: if your vehicle's AdBlue

®


tank is completely empty - which 
is confirmed by the alert displays 
and the impossibility of starting the 
engine - you must add at least 3.8 litres 
(so two 1.89 litre bottles).

If any additive is split or splashed, wash 
immediately with cold water or wipe 
with a damp cloth.
If the additive has crystallised, clean it 
off using a sponge and hot water.

Important: in the event of a top-
up after a breakdown because of 
a lack of additive

, you must wait 

around 5 minutes before switching 
on the ignition, without opening the 
driver's door, locking the vehicle, 
introducing the key into the ignition 
switch, or introducing the key of the 
"Keyless Entry and Starting" system 
into the passenger compartment

.

Switch on the ignition, then, after 
10 seconds, start the engine.

F

  Obtain a bottle of AdBlue

®

. After first 

checking the use-by date, read carefully 
the instructions on use on the label before 
pouring the contents of the bottle into your 
vehicle's AdBlue

®

 tank.

F

  After emptying the bottle, wipe away any 

spillage around the tank filler using a damp 
cloth.

F

  Refit the blue cap to the tank and turn it a 

6

th

 of a turn clockwise, to its stop.

F

  Refit the black plastic blanking plug, 

clipping it in on the flap

F

  Detach the cord from the parcel shelf 

support and lower the boot floor.

07

257

Practical information

DS4_en_Chap07_info-pratiques_ed01-2016

DS4_en_Chap08_en-cas-de-panne_ed01-2016

IN THE EVENT OF A FAULT

08

DS4_en_Chap08_en-cas-de-panne_ed01-2016

08

260

In the event of a breakdown

DS4_en_Chap08_en-cas-de-panne_ed01-2016

Temporary puncture repair kit

This kit consists of a compressor and a sealant 
cartridge.
It allows the temporary repair

 of a tyre.

You are then able to go to the nearest garage.

Access to the kit

This kit is installed in the storage box, under the 
boot floor.

It is designed to repair most punctures 
which could affect the tyre, located on 
the tyre tread or shoulder.
Its compressor can be used to check 
and adjust the pressure of the tyre.

The vehicle's electric system allows the 
connection of a compressor for long enough 
to inflate a tyre after a puncture repair or for 
inflating a small inflatable accessory.

Tyre under-inflation detection

If the vehicle is fitted with tyre under-
inflation detection, the under-inflation 
warning lamp will remain on after the 
wheel has been repaired until the 
system is reinitialised by a CITROËN 
dealer or a qualified workshop.

Only

 the 12 V socket at the front of 

the vehicle allows the connection of the 
compressor for long enough to repair or 
inflate a tyre.
The other 12 V sockets in the vehicle 
are not suited to the use of the 
compressor.

08

261

In the event of a breakdown

DS4_en_Chap08_en-cas-de-panne_ed01-2016

The speed limit sticker H must be 
affixed to the vehicle's steering wheel 
to remind you that a wheel is in 
temporary use.
Do not exceed a speed of 50 mph 
(80 km/h) when driving with a tyre 
repaired using this type of kit.

Description of the kit

A.

  "Sealant" or "Air" position selector.

B.

  On "I" / off "O" switch.

C.

  Deflation button.

D.

  Pressure gauge (in bars and psi).

E.

  Compartment housing a cable with an 

adaptor for a 12 V socket.

F.

  Sealant cartridge.

G.

  White pipe with cap for repair and inflation.

H.

  Speed limit sticker.

Type 1

08

262

In the event of a breakdown

DS4_en_Chap08_en-cas-de-panne_ed01-2016

Do not start the compressor before 
connecting the white pipe to the tyre 
valve: the sealant product would be 
expelled through the pipe.

1. Sealing

F

  Uncoil the white pipe G fully.

F

  Unscrew the cap from the white pipe.

F  Connect the white pipe to the valve of the 

tyre to be repaired.

Repair procedure

Avoid removing any foreign bodies 
which have penetrated into the tyre.

F

  Connect the compressor's electric plug to 

the vehicle's 12 V socket.

F

  Start the vehicle and leave the engine 

running.

F

  Switch off the ignition.

Take care, this product is harmful if 
swallowed and causes irritation to the eyes.
Keep this product out of the reach of 
children.

F

  Turn the selector A to the 

"sealant" position.

F

  Check that the switch B is in position "O".

08

263

In the event of a breakdown

DS4_en_Chap08_en-cas-de-panne_ed01-2016

F

  Switch on the compressor by moving 

the switch B to position "I" until the tyre 
pressure reaches 2.0 bars.


The sealant is injected into the tyre under 
pressure; do not disconnect the pipe from 
the valve during this operation (risk of 
splashing).

F

  Remove the kit and screw the cap back on 

the white pipe.


Take care to avoid staining your vehicle 
with traces of fluid. Keep the kit to hand.

F

  Drive immediately for approximately 

three miles (five kilometres), at reduced 
speed (between 12 and 37 mph (20 and 
60 km/h)), to plug the puncture.

F

  Stop to check the repair and the tyre 

pressure using the kit.

If after around 5 to 7 minutes the 
pressure is not attained, this indicates 
that the tyre is not repairable; contact 
a CITROËN dealer or a qualified 
workshop for assistance.

08

264

In the event of a breakdown

DS4_en_Chap08_en-cas-de-panne_ed01-2016

2. Inflation

F

  Adjust the pressure using the compressor 

(to inflate: switch B in position "I"; to 
deflate: switch B in position "O" and press 
button C

), in accordance with the vehicle's 

tyre pressure label (located on the left-
hand door aperture).


A loss of pressure indicates that the 
puncture has not been fully plugged; 
contact a CITROËN dealer or qualified 
workshop for assistance.

F

  Remove and stow the kit.

F

  Drive at reduced speed (50 mph [80 km/h] 

max) limiting the distance travelled to 
approximately 120 miles (200 km).

F

  Turn the selector A to the "Air" 

position.

F

  Connect the compressor's electric plug to 

the vehicle's 12 V socket.

F

  Start the vehicle again and leave the 

engine running.

As soon as possible, go to a CITROËN 
dealer or a qualified workshop.
You must inform the technician that you 
have used this kit. After inspection, the 
technician will advise you on whether 
the tyre can be repaired or if it must be 
replaced.

F

  Uncoil the white pipe G fully.

F

  Connect the white pipe to the tyre valve.

08

265

In the event of a breakdown

DS4_en_Chap08_en-cas-de-panne_ed01-2016

Removing the pipe and cartridge

F

  Turn the pipe assembly 2 to the left until it 

contacts the unit.

F  Disconnect the union 1

 from the cartridge 

by turning it a quarter turn anti-clockwise.

F

  Extract the pipe assembly 2, then 

disconnect the union 3 from the air delivery 
pipe by turning it a quarter turn anti-
clockwise.

Beware of discharges of fluid.
The expiry date of the fluid is indicated 
on the cartridge.
The sealant cartridge is designed for 
single use; even if only partly used, it 
must be replaced.
After use, do not discard the cartridge 
into the environment, take it to an 
authorised waste disposal site or a 
CITROËN dealer.
Do not forget to obtain a new sealant 
cartridge, available from CITROËN 
dealers or from a qualified workshop.

F

  Remove the pipe assembly 2.

F

  Support the compressor vertically.

F

  Unscrew the cartridge 4 from the bottom.

To fit the new cartridge and new pipe, carry out 
these operations in reverse order.

08

266

In the event of a breakdown

DS4_en_Chap08_en-cas-de-panne_ed01-2016

Checking / adjusting tyre pressures

You can also use the compressor without 
injecting any product, to check and if necessary 
adjust your tyre pressures.

F

  Connect the compressor's electrical 

connector to the vehicle's 12 V socket.

F

  Start the vehicle and let the engine run.

F

  Adjust the pressure using the compressor 

(to inflate: switch B in position "I"; to 
deflate: switch B in position "O" and press 
button C

), according to the vehicle's tyre 

pressure label.

F

  Remove the kit then stow it.

F

  Turn the selector A to the "Air" 

position.

F

  Uncoil the white pipe G fully.

F

  Connect the pipe to the tyre valve.

08

267

In the event of a breakdown

DS4_en_Chap08_en-cas-de-panne_ed01-2016

Type 2

1.

  12 V compressor, with integral pressure 

gauge.

2.

  Sealant cartridge, with integral hose.

3.

  Speed limit sticker.

Composition of the kit

The speed limit sticker must be secured 
to the interior of the vehicle in the 
driver's field of vision, to remind you 
that a wheel is in temporary use.

Do not exceed a speed of 50 mph 
(80 km/h) when driving with a tyre 
repaired using this type of kit.

Repair procedure

F

  Switch off the ignition.

F

  Secure the speed limit sticker inside the 

vehicle.

Avoid removing any foreign bodies 
which have penetrated into the tyre.

F

  Uncoil the pipe stowed under the 

compressor.

F

  Connect the pipe from the compressor to 

the sealant cartridge.

08

268

In the event of a breakdown

DS4_en_Chap08_en-cas-de-panne_ed01-2016

F

  Turn the sealant cartridge and secure it in 

the cut-out provided on the compressor.

F

  Check that the compressor switch is at 

the "O

" position.

F

  Uncoil fully the electric cable, stowed under 

the compressor.

F

  Remove the valve cap from the tyre to be 

repaired, and place it in a clean area.

F

  Connect the hose from the sealant 

cartridge to the valve of the tyre to be 
repaired and tighten firmly.

F

  Connect the compressor's plug to the 

vehicle's 12 V socket.

F

  Switch on the ignition.

08

269

In the event of a breakdown

DS4_en_Chap08_en-cas-de-panne_ed01-2016

If after around 5 to 7 minutes the 
pressure is not attained, this indicates 
that the tyre is not repairable; contact 
a CITROËN dealer or a qualified 
workshop for assistance.

Take care, the sealant product is 
harmful if swallowed and causes 
irritation to the eyes.
Keep this product out of the reach of 
children.
The use-by date is marked on the 
cartridge.
After use, do not discard the 
cartridge by the roadside, take it to 
a CITROËN dealer or an authorised 
waste disposal site.
Don't forget to obtain a new sealant 
cartridge, available from a CITROËN 
dealer or a qualified workshop.

F

  Start the compressor by placing the switch 

at the "I

" position and leave it running until 

the tyre pressure reaches 2.0 bar.


The sealant product is injected into the tyre 
under pressure; do not disconnect the pipe 
from the valve during this operation (risk of 
splashing and stains).

F

  Drive immediately for approximately 

three miles (five kilometres), at reduced 
speed (between 15 and 35 mph (20 and 
60 km/h)), to plug the puncture.

F

  Stop to check the repair and the tyre 

pressure using the kit.

F  Place the switch in the "O

" position.

F

  Remove the kit.

08

270

In the event of a breakdown

DS4_en_Chap08_en-cas-de-panne_ed01-2016

Checking / adjusting tyre pressures

You can also use the compressor, without 
injecting sealant, to check and if necessary 
adjust the tyre pressures

F

  Remove the valve cap from the tyre and 

place it in a clean area.

F

  Uncoil the pipe stowed under the 

compressor.

F

  Check that the compressor switch is at 

the "O

" position.

F

  Uncoil fully the electric cable, stowed under 

the compressor.

F

  Start the compressor by placing the switch 

at the "I

" position and adjust the pressure 

to the value shown on the vehicle's tyre 
pressure label.


To deflate: press the black button on the 
compressor pipe, at the valve connector.

F

  Once the correct pressure is reached, put 

the switch to the "O

" position.

F

  Remove the kit then stow it.

F

  Connect the compressor's plug to the 

vehicle's 12 V socket.

F

  Switch on the ignition.

F

  Screw the pipe onto the valve and tighten 

firmly.


Content   ..  15  16  17  18   ..