Citroen DS4 (2017 year). Instruction - part 15
 

  Index      Citroen     Citroen DS4 - instruction 2017 year in english


Search            


Content   ..  13  14  15  16   ..


Citroen DS4 (2017 year). Instruction - part 15


06

223

Driving

DS4_en_Chap06_conduite_ed01-2016

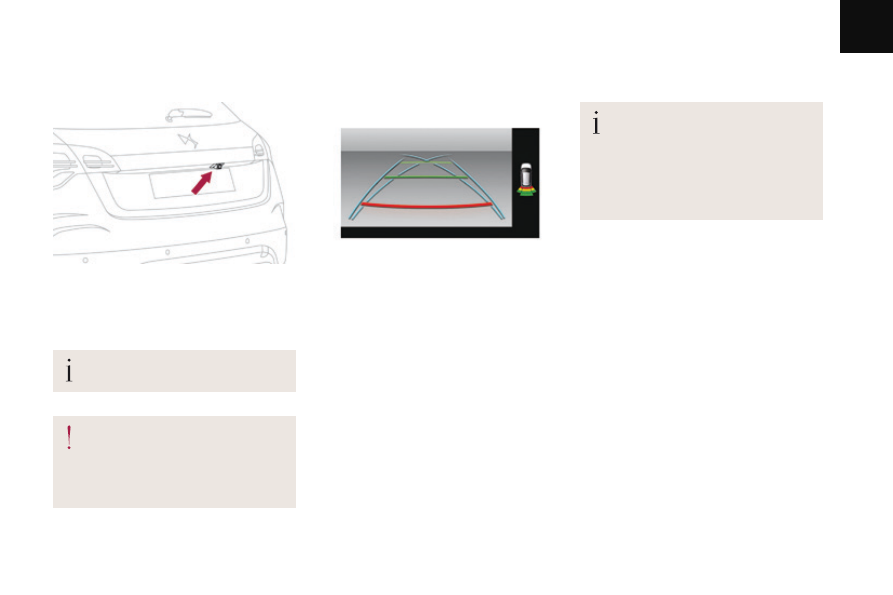
Reversing camera

The reversing camera is activated automatically 
when reverse gear is engaged.
The colour image is provided in the touch 
screen tablet.

The blue lines represent the general direction 
of the vehicle.
The blue curved lines represent the maximum 
turning circle.

The green lines represent distances of 
around 1 to 2 metres beyond the edge of the 
vehicle's rear bumper.
The red line represents the distance of around 
30 cm beyond the edge of your vehicle's rear 
bumper.

The lines displayed in the screen do not allow 
the position of the vehicle to be determined 
relative to tall obstacles (for example: vehicles 
nearby).
Some deformation of the image is normal.

High pressure jet washing

When cleaning your vehicle, keep the 
end of the high pressure lance at least 
30 cm from the camera lens.
Clean the camera lens regularly using 
a soft cloth.

The reversing camera system may be 
accompanied by parking sensors.

This system is a driving aid that does 
not replace vigilance on the part of the 
driver, who must remain in control of 
the vehicle at all times.

PRACTICAL INFORMATION

07

DS4_en_Chap07_info-pratiques_ed01-2016

07

226

Practical information

A DYNAMIC PARTNERSHIP,

DIRECTED TOWARDS THE FUTURE.

For more than 45 years, TOTAL and DS have 
shared common values: excellence, creativity and 
technological innovation.
It is in this same spirit that TOTAL has developed a 
range of TOTAL QUARTZ lubricants adapted to DS 
engines,
making them even more fuel efficient and protective of 
the environment.

Choose TOTAL QUARTZ lubricants 
for servicing your vehicle, 
this is
 your assurance of optimum 
durability and performance from your 
engine.

07

227

Practical information

DS4_en_Chap07_info-pratiques_ed01-2016

Fuel

Capacity of the tank: approximately 60 litres.

Low fuel level

When the low fuel level in the 
tank is reached, this warning lamp 
comes on in the instrument panel, 
accompanied by an audible warning 

and the display of an alert message. 
When it first comes on, around 
6 litres

 of fuel remain in the tank.

Refuelling

F

  Press this button until the automatic 

opening of the fuel flap is heard.


This button remains active for a few 
minutes after switching off the ignition. If 
necessary, switch the ignition on again to 
reactivate it.

F

  Take care to select the pump that delivers 

the correct fuel for your vehicle.

If your vehicle is fitted with Stop & 
Start, never refuel with the engine in 
STOP mode; you must switch off the 
ignition using the key, or the START/
STOP button if your vehicle has 
Keyless Entry and Starting.

Additions of fuel must be of at least 5 litres to 
be registered by the fuel gauge.
Opening the filler cap may result in an inrush of 
air. This vacuum is entirely normal and results 
from the sealing of the fuel system.

Until sufficient fuel has been added, every time 
the ignition is switched on, this warning lamp 
appears, accompanied by an audible signal 
and an alert message. When driving, this 
audible signal and alert message are repeated 
with increasing frequency, as the level drops 
towards 0.
You must refuel as soon as possible to avoid 
running out.
For more information on Running out of fuel 
(Diesel)

, refer to the corresponding section.

07

228

Practical information

If you have put in the wrong fuel for 
your vehicle, you must have the tank 
drained and refilled with the correct 
fuel before you start the engine.

Fuel supply cut-off

Your vehicle is equipped with a safety device 
which cuts off the fuel supply in the event of a 
collision.

F

  Introduce the nozzle so as to push in the 

metal non-return flap.

F

  Make sure that the nozzle is pushed in as 

far as possible before starting to refuel (risk 
of blowback).

F

  Maintain this position while refuelling.

F

  Push the fuel flap to close it.

If you are filling your tank to the top, do not 
persist after the third cut-off; this could 
cause your vehicle to malfunction.
The petrol or Diesel engine of your vehicle is 
fitted with a catalytic converter, a device which 
helps to reduce the level of harmful emissions 
in the exhaust gases.
For petrol engines, the use of unleaded fuel 
is compulsory.
The filler neck is narrower, admitting unleaded 
petrol nozzles only.

07

229

Practical information

DS4_en_Chap07_info-pratiques_ed01-2016

Travelling abroad

As Diesel fuel pump nozzles may 
be different in other countries, the 
presence of the misfuel prevention 
device may make refuelling impossible.
Not all Diesel vehicles are fitted with 
misfuel protection, so before travelling 
abroad, we recommend that you check 
with the CITROËN dealer network, 
whether your vehicle is suitable for the 
fuel pumps in the country in which you 
intend to travel.

Misfuel prevention (Diesel)*

Mechanical device which prevents filling the tank of a Diesel vehicle with petrol. It avoids the risk of 
engine damage that can result from filling with the wrong fuel.
Located in the filler neck, the misfuel prevention device appears when the filler cap is removed.

When a petrol filler nozzle is introduced into the 
fuel filler neck of your Diesel vehicle, it comes 
into contact with the flap. The system remains 
closed and prevents filling.
Do not persist but introduce a Diesel type 
filler nozzle.

Operation

It remains possible to use a fuel can to 
fill the tank.
In order to ensure a good flow of fuel, 
do not place the nozzle of the fuel can 
in direct contact with the flap of the 
misfuel prevention device and pour 
slowly.

* Depending on the country of sale.

07

230

Practical information

Fuel used for petrol engines

The petrol engines are compatible with 
bio-fuels that conform to current and future 
European standards and can be obtained from 
filling stations:

Fuel used for Diesel engines

The Diesel engines are compatible with 
biofuels that conform to current and future 
European standards and can be obtained from 
filling stations:

The only Diesel additives authorised for 
use are those that meet the B715000 
standard.

The use of any other type of (bio)
fuel (vegetable or animal oils, pure 
or diluted, domestic fuel...) is strictly 
prohibited (risk of damage to the engine 
and fuel system).

The only petrol additives authorised for 
use are those that meet the B715001 
standard.

Travelling abroad

Certain fuels could damage the 
engine of your vehicle. In certain 
countries, the use of a particular 
fuel may be required (specific 
octane rating, specific sales 
name…) to ensure correct operation 
of the engine.
For any additional information, contact 
your dealer.

-  Petrol that meets the EN228 

standard, mixed with a bio-
fuel meeting the EN15376 
standard.

-  Diesel fuel that meets 

standard EN590 mixed with 
a biofuel that meets standard 
EN14214 (possibly containing 
up to 7 % Fatty Acid Methyl 
Ester),

-  Diesel fuel that meets 

standard EN16734 mixed with 
a biofuel that meets standard 
EN14214 (possibly containing 
up to 10 % Fatty Acid Methyl 
Ester),

Paraffinic Diesel fuel that 
meets standard EN15940 
mixed with a biofuel that 
meets standard EN14214 
(possibly containing up to 7 % 
Fatty Acid Methyl Ester).

The use of B20 or B30 fuel 
meeting standard EN16709 
is possible in your Diesel 
engine. However, this use, 
even occasional, requires 
strict application of the special 
servicing conditions referred to as 
"Arduous conditions".

For more information, contact a CITROËN 
dealer or a qualified workshop.

07

231

Practical information

DS4_en_Chap07_info-pratiques_ed01-2016

Snow chains

In wintry conditions, snow chains improve traction as well as the behaviour of the vehicle when braking.

The snow chains must be fitted only 
to the front wheels. They must never 
be fitted to "space-saver" type spare 
wheels.

For more information on snow chains, contact a 
CITROËN dealer or a qualified workshop.

Advice on installation

F

  If you have to fit the chains during a 

journey, stop the vehicle on a flat surface 
on the side of the road.

F

  Apply the parking brake and position any 

wheel chocks to prevent movement of your 
vehicle.

F

  Fit the chains following the instructions 

provided by the manufacturer.

F

  Move off gently and drive for a few 

moments, without exceeding 30 mph 
(50 km/h).

F

  Stop your vehicle and check that the snow 

chains are correctly tightened.

Avoid driving with snow chains on 
roads that have been cleared of snow, 
to avoid damaging your vehicle's tyres 
and the road surface. If your vehicle 
is fitted with alloy wheels, check that 
no part of the chain or its fixings is in 
contact with the wheel rim.

Take account of the legislation in force 
in your country on the use of snow 
chains and the maximum running 
speed authorised.

Use only the chains designed to be fitted to the 
type of wheel fitted to your vehicle:

Original tyre size

Maximum link size.

215/60 R16

9 mm

215/55 R17

225/45 R18
225/40 R19

cannot be fitted with chains

It is strongly recommended that before 
you leave, you practise fitting the snow 
chains on a level and dry surface.

07

232

Practical information

Very cold climate screen*

Fitting

F

  Offer up the very cold climate screen to 

the front of the lower section of the front 
bumper.

F

  Press around its edge to engage its fixing 

clips one by one.

Removal

F

  Use a screwdriver as a lever to release 

each fixing clip in turn.

Do not forget to remove the very cold 
climate screen when:

the ambient temperature exceeds 10 °C,

towing,

driving at speeds above 75 mph 
(120 km/h).

Removable protective screen which prevents the accumulation of snow at the radiator cooling fan.

* Depending on the country of sale.

07

233

Practical information

DS4_en_Chap07_info-pratiques_ed01-2016

Towbar with quickly detachable towball

For more information on the Technical 
data

 and in particular the maximum 

trailer weight and the recommended 
nose weight, refer to the corresponding 
section.
For more information on the Driving 
advice

, in particular when towing 

a trailer, refer to the corresponding 
section.

Observe the legislation in force in the 
country in which you are driving.

Presentation

1. Carrier
2.

  Protective blanking plug.

3.

  Security ring.

4.

  Folding trailer harness socket.

5.

  Detachable towball.

6.

  Locking / unlocking wheel.

7.

  Security key lock.

8.

  Locking wheel protector.

9.

  Ball protector.

10.

  Storage bag.

The locking wheel is not in contact with the 
towball (gap of about 5 mm).
The green mark is visible.
The lock for the locking wheel is facing 
rearward.

The locking wheel is in contact with the towball.
Then green mark is hidden.
The lock for the locking wheel is facing forward.

This towbar allows the towball to be fitted and 
removed quickly and easily without the use 
of tools. Installed behind the rear bumper, the 
towbar is invisible after removing the towball 
and folding the trailer harness socket carrier.

A. Locked position

B. Unlocked position

07

234

Practical information

Before each use

Check that the towball is correctly fitted by verifying the following points:
-  the towball is correctly locked in place (position A),
-  the security key lock is on and the key removed; the locking wheel can no longer be 

operated,

-  the towball must no longer move at all in its carrier; try to shake it by hand.

During use

Never unlock the device when a trailer or load carrier is fitted to the towball.
Never exceed the maximum authorised weight for the vehicle plus trailer (Gross Train 
Weight - GTW).
Before driving, check the adjustment of the headlamp beam height.
For more information on Adjusting the headlamps, refer to the corresponding section.

After use

For journeys made without a trailer or load carrier, the trailer harness socket must be folded 
away, the towball removed and  the blanking plug inserted in the carrier. This measure 
applies particularly if the towball could hinder visibility of the number plate or lighting.

Fitting the towball

Remove the protective plug from the carrier 
and check the condition of the fixing system. 
If necessary, clean the carrier with a brush or 
clean cloth.
Take the towball from the storage bag.
Remove the protective cover from the ball and 
the protective cap from the locking wheel.
Stow the plug, cover and cap in the storage 
bag.
Check that the towball is unlocked (position B). 
If not, insert the key in the lock and turn the key 
anti-clockwise to unlock the mechanism.

07

235

Practical information

DS4_en_Chap07_info-pratiques_ed01-2016

If the key cannot be turned or removed, 
this means that the towball is not fitted 
correctly; start the procedure again.
If one of the locking conditions is not 
met, start the procedure again.
In all cases, if the marking remains 
red, do not use the towbar and contact 
a CITROËN dealer or a qualified 
workshop.

Take the towball in both hands; insert the end of 
the towball into the carrier by lifting it, then, to 
ensure that it has correctly locked in place, pull 
firmly down on the ball end of the towball.
The locking wheel automatically turns a quarter 
of a turn anti-clockwise, making a perceptible 
click; take care to keep your hands clear.

Check that the towball has correctly locked in 
place (position A

).

Turn the key clockwise to lock the towball fixing 
mechanism.
Always remove the key and keep it in a safe 
place.

07

236

Practical information

Attach the trailer to the towball.
Attach the cable on the trailer to the security 
ring located on the carrier.
Lower the trailer harness socket carrier by 
pulling down on the ring visible below the 
bumper.
Remove the protective cover from the socket 
and connect the trailer wiring harness.

Removing the towball

Disconnect the trailer harness from the socket 
on the carrier.
Detach the cable on the trailer from the security 
ring on the carrier.
Unhook the trailer from the towball.
Return the trailer harness connector carrier to 
the folded position.

Insert the key into the lock.
Turn the key anti-clockwise to unlock the 
towball fixing mechanism.

07

237

Practical information

DS4_en_Chap07_info-pratiques_ed01-2016

Be ready for the weight of the towball 
(around 3.5 kg). Risk of injury!

Grasp the towball firmly with one hand; with 
the other hand, press and turn the locking 
wheel clockwise as far as it will go.
Extract the towball downward.

Refit the protective cover for the ball and the 
protective cover for the locking wheel.
Stow the towball in its bag.
Refit the protective blanking plug to the carrier.

Maintenance

Correct operation is only possible if the towball 
and its carrier remain clean.
Before cleaning the vehicle with a high pressure 
jet wash, the towbar harness socket carrier must 
be folded away, the towball removed and the 
blanking plug inserted in the carrier.

For any work on the towbar, got to a CITROËN 
dealer or a qualified workshop.

07

238

Practical information

Towing a trailer

We recommend the use of genuine 
CITROËN towbars and their harnesses 
that have been tested and approved 
from the design stage of your vehicle, 
and that the fitting of the towbar is 
entrusted to a CITROËN dealer or a 
qualified workshop.
If the towbar is not fitted by a 
CITROËN dealer, it must still be 
fitted in accordance with the vehicle 
manufacturer's instructions.

Your vehicle is primarily designed for 
transporting people and luggage, but it may 
also be used for towing a trailer.

Driving with a trailer places greater 
demands on the towing vehicle and the 
driver must take particular care.
For more information on Driving 
advice

, particularly when towing, refer 

to the corresponding section.

For more information on Weights (and 
the towed loads which apply to your 
vehicle) refer to the corresponding 
section.

You must observe the maximum trailer 
weight, indicated on the registration 
certificate or in the technical 
specification for your vehicle.


Content   ..  13  14  15  16   ..