Citroen Jumper Dag (2008 year). Instruction - part 3


  Index      Citroen     Citroen Jumper Dag - instruction 2008 year in english


Search            


Content   ..  1  2  3  4   ..


Citroen Jumper Dag (2008 year). Instruction - part 3


3

5

2

R

EA

D

Y

 T

O

 SET

 O

F

F

Instruments and controls
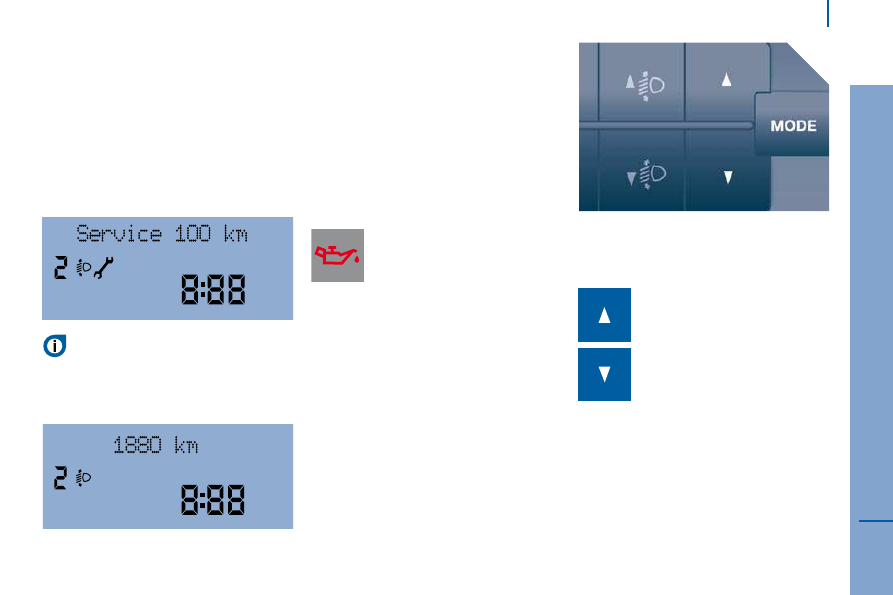
 SERVICE INDICATOR 

 For a few seconds after the ignition is 
switched on, the spanner symbolising the 
service indicator comes on: the display 
informs you when the next service is due, 
in accordance with the "Manufacturer’s" 
servicing schedule indicated in the servicing 
booklet. This information is determined in 
relation to the distance travelled since the 
previous service. 

 LIGHTING RHEOSTAT 

 The rheostat is active when the lights are on. 

  Refer to the list of checks in the 
servicing booklet which was given to 
you on delivery of the vehicle. 

 After a few seconds, the display returns to 
its usual functions. 

 Use these controls to adjust the 
brightness of the instrument 
panel. 

 There are 8 setting levels. 

  Deterioration of the engine oil 
(100 and 120 bhp engines) 

 "Oil Life" or "Suit in Oil" function: your 
vehicle’s service interval is 24,000 miles 
(40,000 km), in normal use. 

 However,  the engine control unit tests the 
degree of wear of the engine oil. 

 If your vehicle is used in arduous conditions 
and consequently suffers engine oil wear.

And if your vehicle is fitted with 
this equipment, you are warned 
by flashing of the engine oil 
pressure warning light and the 

displaying of a message on the instrument 
panel each time the vehicle is started.   

  In this case, your vehicle must be 
serviced as soon as possible.
   

 MANUAL 

 To change gear easily, always press the 
clutch pedal fully. 

 To prevent the mat from becoming caught 
under the pedal: 

   -  

 ensure that the mat is positioned 
correctly,
  

  -  

 never fit one mat on top of another.   

 Avoid leaving your hand on the gear knobas 
the force exerted, even if slight, may wear 
the internal components of the gearbox over 
time. 

 GEARBOXES AND STEERING WHEEL 

 With the vehicle stationary, first adjust your 
seat to the most suitable position. 

 Unlock the steering wheel by pulling the 
lever towards you. 

 Adjust the depth of the steering wheel, then 
lock by lowering the lever fully. 

 As a safety precaution, these operations 
must not be carried out while driving. 

  Reverse gear 

 Raise the collar under the gear knob to 
engage reverse gear. 

 Never engage reverse gear before the 
vehicle is completely stationary. 

 The lever should be moved slowly to reduce 
the noise on engaging reverse gear. 

 Your reversing manoeuvre is indicated by a 
buzzer on the outside. 

 If your vehicle is fitted with parking 
assistance, the system comes into 

operation when reverse gear is engaged and 
an audible signal is heard. 

 Refer to the "Rear parking assistance" 
section of chapter 4.  

3

6

   Gearboxes and steering wheel   

 STEERING WHEEL DEPTH 
ADJUSTMENT  

3

7

2

R

EA

D

Y

 T

O

 SET

 O

F

F

   Starting and stopping   

 STARTING AND STOPPING 

  MAR  position: running. 

 Certain accessories can be used.  

  AVV  position: starter. 

 The starter is operated. 

  PARK   position: parking. 

 The side lights can be left on, with the 
ignition off. 

 Refer to "Side lights/parking lights" in 
chapter 3. 

  STOP  position: steering lock. 

 The ignition is off. 

  Good practice when starting 

  Engine immobiliser warning light 

   If this comes on, use another key 
and have the faulty key checked 
by a  CITROËN  dealer.  

  Diesel pre-heating warning light 

 Turn the key to the  MAR  position. 

 In cold weather, wait for this 
warning light to switch off then 

operate the starter ( AVV  position) until the 
engine starts. 

 If the temperature is high enough, the 
warning light comes on for less than one 
second, you can start without waiting.  

  Door or bonnet open warning light 

 If this comes on, a door or the 
bonnet is not closed correctly, 
check!    

+ 5

%

+ 5

%

2 s

2 s

3

8

   Starting and stopping   

 Hill start assistance 

 This function, linked with the ESP, makes 
starting on a hill easier and is activated in 
the following conditions: 

   -  

the vehicle must be stationary, with the 
engine running, 

  -  

the gradient of the road must be greater 
than 5 %,  

 With the brake pedal pressed and the clutch 
pedal pressed, when you release the brake 
pedal you have approximately 2 seconds 
without rolling back and without using the 
handbrake within which to move off. 

 During the moving off phase, the function 
is deactivated automatically with gradual 
reduction of the braking pressure. 

 During this phase, a typical noise of 
mechanical releasing of the brakes may be 
heard, signalling the imminent movement of 
the vehicle. 

2

R

EA

D

Y

 T

O

 SET

 O

F

F

   Starting and stopping   

  Fault 

 When a malfunction of the 
system occurs, this warning light 
comes on accompanied by an 
audible signal and confirmed by 

a message on the display, if fitted in your 
vehicle. 

   Contact a  CITROËN  dealer to have the 
system checked. 

 The HHC (Hill Holder Control) or Hill Start 
Assistance function is a driving comfort 
feature. It is not an automatic vehicle 
parking function or an automatic handbrake.   

  Good practice when stopping 

  Minimise engine and gearbox wear 

 When switching off the ignition, let the 
engine run for a few seconds to allow the 
turbocharger to return to idle. 

 Do not press the accelerator when switching 
off the ignition. 

 There is no need to engage a gear after 
parking the vehicle.   

4

0

 LIGHTING CONTROL 

 Selection is by rotation of the white mark on 
the ring. 

  All lights off  

  Direction indicators 
(green flashing) 

 Left: downwards. 

 Right: upwards.  

 STEERING WHEEL CONTROLS 

  Side lights on  

  Dipped headlamps/main 
beam headlamps on  

  Dipped headlamps/main beam 
headlamps change 

 Pull the control fully towards you.  

  Headlamp flash 

 Pull the control towards you, regardless of 
the position of the ring.  

  Front fog lamps  

  Rear fog lamps 

 If your vehicle is fitted with fog lamps, these 
operate with the side lights, the dipped 
headlamps or the main beam headlamps. 

 Press one of these controls to switch on the 
lights. 

 The fog lamps should only be used in 
fog or when snow is falling. 

 In clear weather or in rain, both day and 
night, lit rear fog lamps dazzle and are 
prohibited. 

 Do not forget to switch them off when they 
are no longer necessary.  

   Steering wheel controls   

4

1

3

ER

G

O

N

O

MI

C

A

N

D

 C

O

MF

O

R

T

 AUTOMATIC LIGHTING 

 If your vehicle is fitted with this function, 
the side lights and dipped headlamps are 
switched on automatically if the light is 
poor and when continuous operation of the 
windscreen wipers is detected. 

 In fog or snow, the brightness sensor may 
detect sufficient light. Therefore, the lights 
will not be switched on automatically. If 
necessary, you must switch on the dipped 
headlamps manually. 

 They are switched off when the light returns 
to a sufficient level or after the windscreen 
wipers are switched off. 

 HEADLAMP BEAM 

 You are advised to adjust the height of the 
headlamp beams in accordance with the load in 
your vehicle.  

 This function can be accessed in the dipped 
headlamps and main beam headlamps position. 

 SIDE/PARKING LIGHTS 

 This system enables you to leave the side 
lights on when parked; with the ignition off, 
key in the  PARK  position or key removed. 

  Activation 

 Turn the ring to this position. 
The lights are switched off 
automatically when the ignition is 
switched off.  

 Do not cover the brightness sensor at 
the top centre of the windscreen. 

 FOLLOW ME HOME LIGHTING  

  Ignition off or key in the STOP 
position. 

 Within 2 minutes after switching 
off the engine, position the ignition 

key in the STOP position or remove it. 

 Pull the lights stalk towards the steering 
wheel.  

  The indicator light comes on the 
instrument panel. 

 Each action on the lights stalk, pulled 
towards the steering wheel, prolongs the 
follow me home lighting by 30 seconds up 
to approximately 3 minutes. When this time 
has elapsed, the lights are switched off 
automatically. 

 Deactivate this control by keeping the stalk 
pulled towards the steering wheel for more 
than 2 consecutive seconds.   

 Press this control turning the 
key one notch in the opposite 
direction to starting at the same 
time. You can then remove the 
key. 

 If your vehicle is fitted with 
this function: when you leave 
your vehicle with the automatic 
switching on of the lights 

activated (ring in position A), the side lights 
and dipped headlamps remain on for the 
selected duration (when leaving a car park 
for example).  

 Press these controls, located 
on the fascia panel, several 
times in succession to adjust the 
headlamps.  

 An indicator light on the display 
indicates the adjustment position 
selected (0, 1, 2, 3). 

   Steering wheel controls   

4

2

 WIPERS STALK 

 Slow continuous wiping: 2 notches downwards. 

 Do not cover the rain sensor, located at 
the top centre of the windscreen. 

 When washing the vehicle, switch off the 
ignition or deactivate the automatic wiping.  

   Wash-wipe and headlamp wash  

 Pull the stalk towards you, the wash-wipe 
is accompanied by a timed sweep of the 
wipers. 

 The headlamp wash is linked with the wash-
wipe, it is triggered if the dipped headlamps 
are on. 

  Windscreen wipers 

 Wiping is only active when the ignition key is 
in the  RUNNING  position. 

 The stalk has five different positions: 

 Wipers off. 

 Intermittent wiping: 

 1 notch downwards. 

 In this position, by turning the ring, four 
speeds can be selected: 

   -   very slow intermittent, 

  -   slow intermittent, 

  -   intermittent, 

  -   fast intermittent.  

  Automatic wiping with rain detector 

 If your vehicle is fitted with this equipment, 
the wiping speed is adapted automatically to 
the intensity of the rainfall. 

 Automatic wiping: 1 notch downwards. This is 
confi rmed by one wipe. Must be reactivated 
each time the ignition is switched on. 

 In this position, the sensitivity of the rain 
sensor can be increased by turning the ring. 

  Good practice 

 Check that the windscreen wiper blades can 
operate freely when using the wipers in icy 
weather. 

 Use the sill, in the lower front panel, to 
remove any accumulation of snow at the 
base of the windscreen and on the blades. 

  To change the blades, refer to the 
"Changing a wiper blade" section of 
chapter 8.  

 To top up the levels, refer to the 
"Levels" section of chapter 7.  

 Fast continuous wiping: 3 notches 
downwards. 

 Single wipe, pull the control towards the 
steering wheel.  

   Steering wheel controls   

4

3

3

ER

G

O

N

O

MI

C

A

N

D

 C

O

MF

O

R

T

 CRUISE CONTROL  

 "This is the speed at which the driver wishes 
to travel". 
 This aid to driving in free-flowing traffic 
conditions enables the vehicle to maintain a 
constant speed programmed by the driver, 
except when a considerable load is carried 
on a steep gradient. 
 In order to be programmed or activated, 
the vehicle speed must be greater than 
approximately 25 mph (40 km/h), with at 
least 4th gear engaged. 

 If your vehicle is fitted with cruise control, 
this is displayed on the instrument panel by 
an indicator light located in the rev counter. 

 Function selected. 

 Function deactivated. 

   Steering wheel controls   

4

4

  Selecting the function - ON 

 When the selection is set 
to  ON , this switches the 
function on. 
 If your vehicle is fi tted with 

this display, a message confi rms the action.  

  Temporary deactivation 

 Press the brake or clutch pedal. 

 The indicator light is switched off but the 
programmed speed remains in the memory. 

 To return to this speed, refer to the action 
"Restore - RES". 

 If the ESP or ASR comes into operation, 
the cruise control function is deactivated 
temporarily.  

  Programming a speed 

 Accelerate to the required speed, with 4th or 
5th gear engaged. 
 Move the control upwards (+) to store this 
speed. 

 Release the pressure on the accelerator 
pedal, the vehicle will maintain this speed.  

  Restore - RES 

 To restore the vehicle's programmed 
speed, gradually return to the 
chosen speed and press  RES . 

 The indicator light comes on, the cruise 
control function is restored.  

  Changing the programmed speed 
while the cruise control is in operation 

 You can: 

   -  

increase the speed in steps, by means 
of brief presses, or continuously by 
pressing and holding the control 
upwards (+ sign), 

  Temporary exceeding of the speed 

 When the cruise control is active, it is 
still possible to exceed the programmed 
speed by pressing the accelerator pedal (to 
overtake another vehicle for example).  

  -  

decrease the speed continuously 
by pressing and holding the control 
downwards (- sign).   

   Steering wheel controls   

4

5

3

ER

G

O

N

O

MI

C

A

N

D

 C

O

MF

O

R

T

  Cancelling the programmed speed 

 When the vehicle stops, after the ignition is 
switched off, the system no longer stores 
any speed.  

  Good practice 

 When changing the programmed reference 
speed by pressing and holding the control, 
take care as the speed may increase or 
decrease rapidly. 

 Do not use the cruise control on slippery 
roads or in heavy traffic. 

 On a steep gradient, the cruise control will 
not be able to prevent the vehicle from 
exceeding the programmed speed. 

 The cruise control cannot, in any 
circumstances, replace the need to comply 
with speed limits nor can it replace the need 
for vigilance and responsibility on the part 
of driver. 

 It is advisable to leave your feet near the 
pedals. 

 To prevent the mat from becoming caught 
under the pedals: 

   -  

ensure that the mat is positioned 
correctly, 

  -  

never fit one mat on top of another.    

  Switching the function off - OFF 

 Place the dial in the  OFF  position, the 
indicator light is switched off, or switch off 
the ignition to switch everything off.  

  Operating fault 

 In the event of a malfunction, the function is 
switched off and the indicator light switches off. 

   Contact a  CITROËN  dealer to have the 
system checked.  

   Steering wheel controls   

 VENTILATION 

  DE-ICING AND DEMISTING 

  Manual mode  

 Direct the control to this air 
distribution setting. 

 For faster and more effective de-icing 
and demisting of the windscreen: 

  De-icing the rear screen and mirrors 

 Only operates when the engine 
is running. Pressing this button 
activates the rapid demisting-de-
icing of the rear screen and mirrors.  

 This function switches off automatically to 
prevent excessive energy consumption. It 
stops when the engine is switched off but 
resumes when the engine is started again.  

 Pressing this button switches the function off.   

   -  

increase the air flow setting, 

  -   move the exterior air intake 

control temporarily to air 
recirculation.  

 Returning to the exterior air 
intake position permits renewal 
of the air in the passenger 
compartment.  

  Windscreen and side windows 

 The ventilation outlets located at the base 
of the windscreen and the side vents for the 
side windows increase the effectiveness of 
the de-icing and demisting. Do not obstruct 
these air outlets. 

 The pollen filter permits continuous and 
effective filtering of dust.  

 The air recirculation (which can be activated 
by the driver or the passenger) isolates the 
passenger compartment from the exterior 
atmosphere. However, this position should 
only be used temporarily, the norm is to 
drive with the control positioned with the 
exterior air intake open. 

   Ventilation   

 CORRECT USE OF THE AIR 
CONDITIONING 

 In order to be effective, the air conditioning 
should only be used with the windows 
closed. However, if the interior temperature 
remains high after a prolonged period 
parked in the sun, do not hesitate to 
ventilate the passenger compartment for a 
few minutes. 

 For even air distribution, ensure that the 
exterior air intake grille located at the base 
of the windscreen is not obstructed and that 
the side and central vents, the air outlets on 
the floor and the air extractor at the rear are 
open.  

 The air conditioning is useful in all seasons 
as it eliminates condensation and air 
humidity. 

 Operate the air conditioning system for 
5 to 10 minutes, once or twice a month, 

to keep it in perfect working order.  

 Have the filter elements (air filter and 
passenger compartment filter) replaced 
regularly. If you drive in a dusty environment, 
have them replaced twice as often.  

 It is normal that the condensation created by 
the air conditioning system results in a flow 
of water which may form a puddle under the 
vehicle when parked. 

   If the system does not produce cold air, do 
not use it and contact a  CITROËN  dealer. 

  "Leave them open" 

 For optimum distribution and diffusion of hot 
or cool air in the passenger compartment, 
there are: 4 adjustable central vents, of 
which 2 can be directed sideways (right 
or left) towards the top of the body and 
4 side vents which can be directed towards 
the passengers. The air vents directed 
towards the floor of the vehicle complete the 
equipment.   

4

7

3

ER

G

O

N

O

MI

C

A

N

D

 C

O

MF

O

R

T

   Ventilation   

4

8

 WITH MANUAL ADJUSTMENT 

 If your vehicle is fitted with these controls, 
they are located on the fascia panel on the 
centre console control panel. 

  Temperature adjustment 

 Control positioned: 

   -   in the blue zone triggers cool 

air, 

  Air flow 

 The force of the blown air, from 
the vents, varies from 1 to the 
strongest 4. Remember to adjust 
this control in order to reach the 

ambient air comfort level. To switch off the 
blower, place the control in position 0.  

  Air conditioning 

 The air conditioning mode can only operate 
with the engine running. 

 The air blower must be set to at 
least 1. 

 Pressing the button triggers the 
operation of the air conditioning, 

the diode is lit. Pressing the button again 
switches the function off and the diode is 
switched off.  

  Air distribution 

 The air supply distribution is directed by the 
control turned towards:  

 the side vents and the central 
vents, 

 the side vents, the central vents 
and the footwells, 

 the footwells, 

 the windscreen, the footwells and 
the side windows, 

 the windscreen and the side 
windows.  

  -   in the red zone triggers heating 

of the interior ambient air.   

   Ventilation   

4

9

3

ER

G

O

N

O

MI

C

A

N

D

 C

O

MF

O

R

T

   Ventilation   

  Intake of exterior air 

  Recommended settings for the air conditioning 

 For optimum operation of the system, the settings below are recommended: 

  Recirculation of interior air 

 This position should only be 
temporary. 

 Used with the air conditioning 
switched on and setting of the 

force of blown air (from 1 to 4), recirculation 
enables you to obtain the required ambient 
air comfort level with both hot or cold 
settings. 

 Recirculation temporarily prevents exterior 
odours and smoke from entering the 
passenger compartment.  

  If I require...  

  Air 

distribution  

  Temperature  

  Air flow  

  Air 

recirculation    

  AC  

  Heating  


   -   

  Cooling  


  Deicing  

Demisting  


 When your ambient air comfort level has 
been reached, return to the intake of exterior 
air position to permit renewal of the air in the 
passenger compartment and demisting. This 
operating mode is preferable.  

 This is the preferred operating 
position.  

5

0

 WITH AUTOMATIC REGULATION - 
MONO ZONE 

 If your vehicle is fitted with these controls, 
they are located on the fascia panel on the 
centre console control panel. This can be 
distinguished by its checking display.  

  AUTO mode 

 Switching on  FULL AUTO  
mode: pressing the  AUTO  
control switches on the system's 
functions, confirmed by the 
displaying of  FULL AUTO . This is 

the normal operating mode for the automatic 
air conditioning system.  

 Using the moving ring surrounding the AUTO 
control, set the comfort temperature to be 
reached according to a graduation between: 
   -   HI (High to ≈ 32) and, 
  -   LO (Low to ≈ 16).  
 The system controls the distribution, 
flow and intake of air to ensure comfort 
equivalent to the graduation displayed and 

sufficient recirculation of air in the passenger 
compartment. 

 No further adjustments are required.  

 Display for checking the status of your 
automatic air conditioning function. 

 When the engine is running and the air 
conditioning is on, this symbol and the 
message  FULL AUTO  are displayed. 

 The other components are displayed 
according to the settings selected by the user. 

  AUTO mode with personalisation 

  Switch on in  AUTO  mode, certain 
settings can be modified: the 
distribution, the air flow, the air 
conditioning and the air intake/
recirculation. 

 The display changes from  FULL AUTO  to 
 AUTO . 

 To return to fully automatic operation, press 
this button again. The display on the control 
panel changes from  AUTO  to  FULL AUTO . 

 If the system is not able to maintain the 
graduation selected following manual 
adjustments, the graduation flashes then 
 AUTO  is cleared. Press the  AUTO  control to 
return to the automatic settings.  

  Switching off the air conditioning 

 Pressing this control switches 
off the air conditioning functions. 
The snowflake is cleared from the 
display.  

  Complete switch-off 

 Pressing this control switches 
the system off. The diode and the 
display switch off.  

   Ventilation   


Content   ..  1  2  3  4   ..