Citroen Jumper Dag (2008 year). Instruction - part 2


  Index      Citroen     Citroen Jumper Dag - instruction 2008 year in english


Search            


Content   ..   1  2  3   ..


Citroen Jumper Dag (2008 year). Instruction - part 2


2

1

2

0

 KEY 

 This locks and unlocks the locks on the 
vehicle and starts the engine. 

 REMOTE CONTROL BATTERY 

 If the diode flashes when one of the remote 
control buttons is pressed, the battery must 
be changed. 

 Reference: CR 2032/3 volts. 

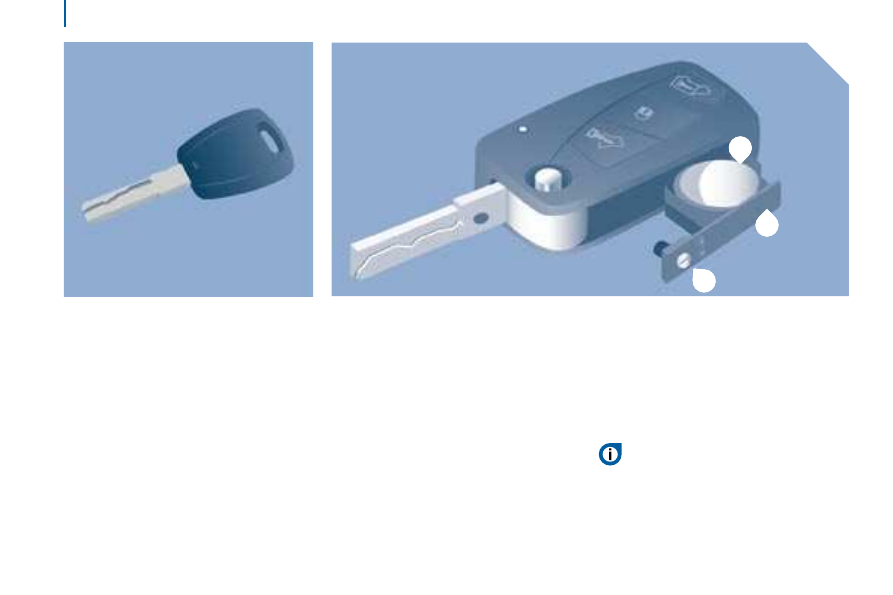
  Changing the remote control battery 

   -  

press the button to eject the key, 

  -  

turn the screw  1  from the closed padlock 
to the open padlock using a screwdriver 
with a thin tip, 

  -  

use the screwdriver as a lever to extract 
the battery holder housing  2 , 

  -  

remove the housing and change the 
battery  3  observing the polarities, 

  -  

put the battery holder housing  2  back 
inside the key and secure it by turning 
the screw  1 .  

 There is a risk of damage if the 
replacement battery does not conform. 

   Only use batteries which are identical or 

of an equivalent type to those recommended 
by a  CITROËN  dealer. Take used batteries 
to an approved collection point.  

   Accesses   

2

1

2

R

EA

D

Y

 T

O

 SET

 O

F

F

 ELECTRONIC IMMOBILISER 

 All of the keys contain an electronic 
immobiliser device. 

 This device locks the engine supply system. 
It is activated automatically when the key is 
removed from the ignition. 

 Operating the remote control, even when it 
is in your pocket, may result in involuntary 
unlocking of the doors. 

 However, if none of the doors is opened 
within approximately thirty seconds following 
unlocking, the doors relock automatically. 

 The simultaneous use of other high 
frequency equipment (mobile telephones, 
domestic alarms…), may interfere with the 
operation of the remote control temporarily. 

 The remote control does not operate while 
the key is in the ignition, even if the ignition 
is off, except for reinitialisation. 

  Good practice 

   Make a careful note of the number of the 
keys. If they are lost, your  CITROËN  dealer 
will be able to carry out his work more 
quickly and effectively if you give him this 
number and the confidential card. 

 Do not make any modifications to the 
electronic immobiliser system. 

 This warning light is switched off 
after the ignition is switched on 
and the key has been recognised, 
the engine can be started. 

   If the key is not recognised, the engine 
cannot be started. Use another key and 
have the faulty key checked by a  CITROËN  
dealer. 

 Driving with the doors locked may 
make access to the passenger 

compartment by the emergency services 
more difficult in an emergency. 

 As a safety precaution (with children on 
board), remove the key from the ignition when 
leaving the vehicle, even for a short time.  

 After the ignition is switched on, a dialogue 
is established between the key and the 
electronic immobiliser system. 

  When purchasing a second-hand vehicle:  

   -  

ensure that you are given the 
confidential card, 

  -  

  have the keys memorised by a 
 CITROËN  dealer to ensure that the keys 
in your possession are the only ones 
which can start the vehicle.  

     CONFIDENTIAL CARD 

 This is given to you on delivery of your 
vehicle with the duplicate keys. 

   It contains the identification code necessary 
for any work carried out by a dealer on the 
electronic immobiliser system. This code is 
hidden by a film, which should be removed 
only if necessary. 

 Keep your card in a safe place, never inside 
the vehicle.  

 When undertaking a long trip or journey, 
however, it is advisable to take it with you 
along with your personal papers. 

   Accesses   

2

2

 While the alarm is monitoring, any intrusion 
triggers the siren for approximately 
30 seconds, accompanied by lighting of the 
direction indicators. 

 The alarm then returns to monitoring mode 
but the triggering event is stored and is 
indicated by rapid flashing of the diode, if 
the alarm is deactivated. 

 The alarm is also triggered following an 
electrical supply cut-off, when the supply is 
restored.  

  Automatic activation 

 Depending on the country in which the 
vehicle is sold: this function activates 
monitoring automatically approximately 
2 minutes after the last door is closed. To 
avoid triggering the alarm when opening a 
door, the unlocking button on the remote 
control must be pressed again.  

  Deactivation using the key 

 Unlock the doors using the key and enter the 
vehicle. Switch on the ignition, identification 
of the key code will switch off the alarm.  

  Deactivation using the remote control 

 When this button (cab and key) is 
pressed, the alarm is deactivated 
when the vehicle is unlocked.  

  Deactivation of the anti-lift 
protection 

 Press this button to deactivate the 
protection (for example when the 
vehicle is being towed with the 
alarm set). 

 The protection remains active until the 
central unlocking of the doors is activated.  

  Good practice 

  To deactivate the siren quickly following 
unwanted triggering:
  

   -  

switch on the ignition, identification of 
the key code will switch off the alarm, 

  -  

press the unlocking button (cab and key) 
on the remote control.  

 To avoid setting the alarm, when washing 
the vehicle for example, lock the vehicle 
using the key. 

 Unlocking the vehicle using the remote 
control deactivates the siren automatically.  

 ALARM 

 If your vehicle is fitted with an ANTI-THEFT 
ALARM. 

  this provides:  

   -  

exterior perimeter protection by means 
of detectors on the doors and bonnet 
and on the electrical supply,  

  -  

anti-lift protection.  

  The equipment also includes a siren and 
a diode which can be seen from outside, 
indicating the three possible statuses of 
the alarm:
  

   -  

alarm activated (monitoring), slow 
flashing of the red diode, 

  -  

alarm not activated (not monitoring), 
diode off, 

  -  

alarm triggered (intrusion signal), rapid 
flashing of the red diode when the 
vehicle is unlocked.  

  Activation of the alarm 

 First ensure that all of the accesses are 
closed correctly. 

 The alarm is activated by 
pressing this padlock, the 
protection is active after a few 
seconds. 

   Accesses   

2

3

2

R

EA

D

Y

 T

O

 SET

 O

F

F

 FRONT DOORS 

  Child lock 

 This prevents opening of the sliding side 
door from the inside. 

 Press the control located on the edge of the 
side door.  

  Driver's door 

 Use the remote control to unlock/lock.  

 SLIDING SIDE DOOR 

 Take care not to obstruct the guide space 
on the floor in order for the door to slide 
correctly. 

  From outside 

 Pull the handle towards you then towards 
the rear.  

  From inside 

 To unlock and open, push the handle 
towards the rear. 

 Ensure that the door opens fully in order for 
the device at the base of the door to lock. 

 To release and close, pull the handle while 
sliding the door. 

 Do not drive with the sliding side door 
open.  

   Accesses   

2

4

 REAR DOORS 

  From outside 

 Pull the handle towards you. The two hinged 
doors open to 96°. 

  Opening/Closing the doors 

 To open, pull the handle towards you then 
pull the lever to open the left-hand door. 

 To close, start with the left-hand door then 
close the right-hand door.  

  Opening to 180°/270° 

 If your vehicle is fitted with this equipment, 
a retractable check strap system permits 
extending of the opening from 96° to 180° or 
270° (250° for the right-hand door). 

 Press the button, located on the door trim 
pad, to widen the angle of the door. 

 The check strap will take up its securing 
position again automatically on closing.   

   Accesses   

2

5

2

R

EA

D

Y

 T

O

 SET

 O

F

F

 LOCKING/UNLOCKING FROM INSIDE 

  Door open warning light 

 If this warning light comes on, 
check that the cab doors, the rear 
or side doors and the bonnet are 
closed correctly.  

  Good practice 

 If you decide to drive with the doors locked, 
be aware that this could make access to the 
vehicle by the emergency services more 
difficult in an emergency.  

  Cab and load space 

 Pressing permits electric central 
locking, when the doors are 
closed. 

 Pressing permits electric central 
unlocking. 

 The doors can still be opened from the 
inside. 

 If one of the doors is open or is not 
closed correctly, the central locking 
does not work. 

 The indicator light on the control: 

   -   comes on when the accesses 

are locked and the ignition is 
switched on, 

  -   then flashes when the accesses 

are locked when stationary with 
the engine off.  

 The control is not active when the vehicle 
has been locked using the remote control or 
the key from the outside.  

  Load space 

 Press to lock or unlock the side 
door and rear doors from the cab. 
The warning light remains on on 
locking.  

  Protection against attack 

 When the vehicle is started, the system 
locks the cab and load space doors 
automatically when you reach approximately 
12 mph (20 km/h). 

 If none of the doors is opened during the 
journey, the locking remains active. 

  Activation/deactivation of the function 

 The function is activated/deactivated by 
means of Mode, selecting "Autoclose". 

 Refer to the "Mode" section in 
chapter 4.   

   Accesses   

2

1

3

4

2

6

   Instruments and controls   

 INSTRUMENT PANEL 

   1.   Distance recorder in kilometres/miles. 

  2.   Display. 

  3.   Dials and gauges. 

  4.   Rev counter.  

 INSTRUMENTS AND CONTROLS 

  Instrument panel display 1 

   -  

Time, 

  -  

Kilometres/Miles travelled, 

  -  

Range, 

  -  

Consumption, 

  -  

Average speed, 

  -  

Headlamp beam height, 

  -  

Programmable overspeed warning via 
MODE, 

  -  

Service indicator.   

  Instrument panel display 2 

   -  

Time, 

  -  

Date, 

  -  

Exterior temperature, 

  -  

Kilometres/Miles travelled, 

  -  

Range, 

  -  

Consumption, 

  -  

Average speed, 

  -  

Headlamp beam height, 

  -  

Programmable overspeed warning via 
MODE, 

  -  

Service indicator, 

  -  

Warning messages displayed in the top 
section, 

  -  

Radio (frequency of the current station).   

2

7

2

R

EA

D

Y

 T

O

 SET

 O

F

F

   Instruments and controls   

 WARNING LIGHTS 

 Each time the engine is started: a series of warning lights comes on applying a self-checking test. They switch off almost 
immediately. When the engine is running: the warning light becomes a warning sign if it remains on continuously or flashes. This 
initial warning may be accompanied by an audible signal and a message on the display. "Do not ignore these warnings." 

  Warning light  

  is  

  indicates  

  Solution - action  


 Service 

 on temporarily. 

 minor faults. 

   Contact a  CITROËN  dealer. 

 continuously on, 
accompanied by 
a message on 
the display. 

 major faults. 

   Make a note of the warning message and contact a 
 CITROËN  dealer. 


 Handbrake- 
Brake fluid level 

 on. 

 that the handbrake is applied or 
has not been released correctly. 

 Releasing the handbrake switches off the warning light. 

 on. 

 that the fluid level is too low. 

   Top up with a fluid recommended by  CITROËN . 

 continuously on, 
even though the 
level is correct. 


    Stop immediately, park, switch off the ignition and 
contact a  CITROËN  dealer. 
  

 + 

 Electronic brake 
force distribution 

 on. 

 an electronic brake force 
distribution fault.  

   Stop immediately.  Consult a CITROËN dealer.  


 Low coolant 
level 

 on. 

 that the fluid level is too low. 

 Park and switch off the ignition. Allow to cool.   Refer to 
the "Levels" section of chapter 7.  Consult a CITROËN 
dealer.  

2

8

   Instruments and controls   

  Warning light  

  is  

  Solution - action  

  Solution - action  


 Coolant 
temperature  

 on with the 
needle in the red 
zone. 

 an abnormal increase. 

 Park and switch off the ignition, allow the circuit to cool. 
Visually check the level. 

 on H in the red 
zone. 

 a coolant temperature. 

 Refer to the "Levels" section of chapter 7.  Consult a 
CITROËN dealer.  


 Engine oil 
pressure  

 on while driving. 

 that the pressure is too low. 

 Park and switch off the ignition, allow the lubrication 
circuit to cool in order to check its level. Refer to the 
"Levels" section of chapter 7. 

 continuously on, 
even though the 
level is correct. 

 a major fault. 

  Consult a CITROËN dealer.  

 flashing, for a 
few seconds, 
with a message 
on the display. 

 that a service will soon be due. 

   Refer to the list of checks in the servicing booklet then 
carry out the  CITROËN  service. 


 Battery charge 

 on. 

 a fault in the charging circuit. 

 Check the battery terminals… Refer to the "Battery" 
section of chapter 8. 

 continuously on, 
in spite of the 
checks. 

 a circuit fault, an ignition or 
injection malfunction. 

  Consult a CITROËN dealer.  


 Door or bonnet 
open detection 

 on. 

 that a door or the bonnet is not 
closed correctly. 

 Check that the cab doors, the rear and side doors and 
the bonnet are closed. 

 accompanied by 
a message on 
the display. 

2

9

2

R

EA

D

Y

 T

O

 SET

 O

F

F

   Instruments and controls   

  Warning light  

  is  

  indicates  

  Solution - action  


 Seat belt not 
fastened 

 on then flashes. 

 that the driver has not fastened 
his seat belt. 

 Pull the strap then insert the tongue in the buckle. 

 accompanied 
by an audible 
signal then 
remains on. 

 that the vehicle is moving 
with the driver's seat belt 
unfastened. 

 Check that the seat belt is fastened correctly by pulling 
the strap. Refer to "Seat belts" section of chapter 5. 


 Power steering 

 on. 

 its malfunction. 

   The vehicle retains conventional steering without assistance. 
 Have the system checked by a CITROËN dealer.  


 Front/side air 
bag 

 flashing or 
continuously on.  

 the failure of an air bag.  

  Have the system checked by a CITROËN dealer.  Refer 
to the "Air bags" section of chapter 5. 


 Suspension 

 on. 

 failure of the pneumatic 
compensation. 

  Consult a CITROËN dealer.  


 ABS 

 continuously on.   failure of the system. 

   The vehicle retains conventional braking without 
assistance. However, you are advised to stop and 
contact a  CITROËN  dealer. 


 ASR 

 on. 

 that skidding of the wheels has 
been avoided. 

 The system optimises drive and improves the directional 
stability of the vehicle.  

Refer to the "Driving safety" section of chapter 5. 

 continuously on.   its malfunction 

  Consult a CITROËN dealer.  

3

0

   Instruments and controls   

  Warning light  

  is  

  indicates  

  Solution - action  


 ESP 

 flashing. 

 that it is in operation. 


 on. 

 its malfunction or failure of the 
hill start assistance. 

  Consult a CITROËN dealer.   

Refer to the "Driving safety" section of chapter 5. 


 Emission control 
system 

 flashing or 
continuously on.  

 failure of the system. 

 Have the system checked by a  CITROËN  dealer without 
delay. 


 Anti-pollution 

 on. 

 failure of the system. 

   Have the system checked by a  CITROËN  dealer without 
delay. 


 Disarming of the 
front passenger 
air bag 

 on. 

 the intentional disarming of this 
air bag when a rear facing child 
seat is installed. 

 Configure via the trip computer MODE menu. Refer to 
the "Mode" section of chapter 4. 


 Electronic 
immobiliser  

 on. 

 the ignition key inserted is not 
recognised.  

The vehicle cannot be started. 

   Use another key and have the faulty key checked by 
a  CITROËN  dealer. Refer to the "Accesses" section of 
chapter 2. 


 Front brake 
pads 

 on. 

 brake pad wear. 

   Have the pads replaced by a  CITROËN  dealer. 

3

1

2

R

EA

D

Y

 T

O

 SET

 O

F

F

   Instruments and controls   

  Warning light  

  is  

  indicates  

  Solution - action  


 Water in diesel 
filter 

 on, 
accompanied by 
a message on 
the display.  

 that there is water in the diesel 
fuel filter. 

   Have the filter bled by a  CITROËN  dealer. Refer to the 
"Checks" section of chapter 7. 


 Low fuel level 

 on with the 
gauge needle in 
zone E. 

 that the fuel reserved is being 
used. 

 Fill up with fuel without delay. The evaluation of the fuel 
reserve is a parameter which is sensitive to the style of 
driving, the profile of the road, the time elapsed and the 
distance travelled since the warning light first came on. 


 Diesel 
pre-heating 

 on. 

 that the weather conditions 
impose pre-heating. 

 Wait for the warning light to switch off before operating 
the starter. 


 Side lights 

 on. 

 manual selection. 

 Turn the ring on the lights stalk to the first position. 

 automatic switching on of the 
lights, ring in position A. 

 Adjust the sensitivity of the brightness sensor via the 
MODE menu. Refer to the "Mode" section of chapter 4. 


 Dipped 
headlamps 

 on. 

 manual selection. 

 Turn the ring on the lights stalk to the second position. 

 Main beam 
headlamps  

 pulling of the stalk towards you. 

 Pull the stalk to return to dipped headlamps. 

   Instruments and controls   

  Warning light  

  is  

  indicates  

  Solution - action  


 Direction 
indicators  

 flashing with 
buzzer. 

 a change of direction using the 
lights stalk, to the left of the 
steering wheel.  

 To the Right: press the stalk upwards.  

To the Left: press the stalk downwards.  


 Front fog lamps 

 on. 

 that the button on the centre 
console has been pressed.  

 Manual selection.  

The fog lamps only operate if the side lights or dipped 
headlamps are on.  


 Rear fog lamps 

 on. 

 that the button on the centre 
console has been pressed.  

 Manual selection. The fog lamps only operate if the 
side lights or dipped headlamps are on. When visibility 
is normal, please switch the fog lamps off. 


 Cruise control 

 on. 

 that the cruise control has been 
selected. 

 Manual selection.  

Refer to the "Steering wheel controls" section of 
chapter 3.  


 Faulty bulb 

 on. 
accompanied by 
a message on 
the display. 

 that one or more bulbs have 
blown. 

   Have the bulb changed.  

Refer to the "Changing a bulb" section of chapter 8 or 
contact a  CITROËN  dealer  


 Rear parking 
assistance 

 on. 

 failure of the system. 

 The audible assistance is no longer active.  

Have the system checked by a  CITROËN  dealer 
without delay. 

3

3

2

R

EA

D

Y

 T

O

 SET

 O

F

F

   Instruments and controls   

  Display  

  displays  

  indicates  

  Solution - action  


 Temperature/Ice 

 the ice warning, 
the temperature 
flashing 
accompanied by 
a message on 
the display. 

 weather conditions which could 
result in ice on the road. 

 Be particularly vigilant and do not brake sharply. Refer 
to the "Driving Safety" section of chapter 5". 


 Date 11:00:00 

 a setting: of 
the Date. of the 
Time. 

 a configuration via the MODE 
menu. 

 Refer to the "Mode" section of chapter 4. 


 Headlamp beam 
height 

 a headlamp 
height setting.  

 A position from 0 to 
3 depending on the load carried 

 Adjust using the control on the fascia panel.

Refer to the "Steering wheel controls" section of 
chapter 3. 


 Service spanner 

 a service 
spanner which 
remains lit. 

 that a service will soon be due. 

   Refer to the list of checks in the servicing booklet. Have 
the service carried out by a  CITROËN  dealer. 

3

3

2

R

EA

D

Y

 T

O

 SET

 O

F

F

   Instruments and controls   

  Display  

  displays  

  indicates  

  Solution - action  


 Temperature/Ice 

 the ice warning, 
the temperature 
flashing 
accompanied by 
a message on 
the display. 

 weather conditions which could 
result in ice on the road. 

 Be particularly vigilant and do not brake sharply. Refer 
to the "Driving Safety" section of chapter 5". 


 Date 11:00:00 

 a setting: of 
the Date. of the 
Time. 

 a configuration via the MODE 
menu. 

 Refer to the "Mode" section of chapter 4. 


 Headlamp beam 
height 

 a headlamp 
height setting.  

 A position from 0 to 
3 depending on the load carried 

 Adjust using the control on the fascia panel.

Refer to the "Steering wheel controls" section of 
chapter 3. 


 Service spanner 

 a service 
spanner which 
remains lit. 

 that a service will soon be due. 

   Refer to the list of checks in the servicing booklet. Have 
the service carried out by a  CITROËN  dealer. 

3

4

   Instruments and controls   

 FUEL GAUGE 

 The fuel level is tested each time the key is 
turned to the "running" position. 

 The gauge is positioned on: 

   -  

 F (Full): the fuel tank is full, 
approximately 90 litres.  

  -  

 E (Empty): the reserve is now being 
used, the warning light comes on 
continuously.   

 The reserve when the warning first comes 
on is approximately 11 litres. 

 Fuel tanks of different capacities (60 and 
125 litres) are available as an option. 

 COOLANT TEMPERATURE 

  The needle is positioned between C 
(Cold) and H (Hot):
  normal operation. 

 In arduous conditions of use or hot climatic 
conditions, the needle may move close to 
the red graduations. 

  -  

wait for the engine to cool down in 
order to check the level and top it up if 
necessary.    Follow this advice: 

 the cooling system is pressurised. In order to 
avoid any risk of scalding, unscrew the cap 
by two turns to allow the pressure to drop. 

   When the pressure has dropped, check the 
level and remove the cap to top up. 

 If the needle remains in the red zone, 
contact a  CITROËN  dealer. 

Refer to the "Levels" section of 
chapter 7. 

 Refer to the "Fuel" section of chapter 7. 

  What you should do if the needle enters 
the red zone, or if the warning light 
comes on:
  

   -  

stop immediately, switch off the ignition. 
The fan may continue to operate for 
a certain time up to approximately 
10 minutes. 

 EMISSION CONTROL 

 EOBD (European On Board Diagnosis) is 
a diagnostics system which complies with, 
among others, the standards concerning 
authorised emissions of: 

   -  

CO (carbon monoxide), 

  -  

HC (unburnt hydrocarbons), 

  -  

NOx (nitrogen oxides) or particles, 
detected by oxygen sensors placed 
upstream and downstream of the 
catalytic converters.  

 Therefore, the driver is warned of 
any malfunction of this emission 
control system by the lighting of 
this specific warning light on the 
instrument panel. 

 There is a risk of damage to the catalytic 
converter.  Have it checked by a CITROËN 
dealer.  


Content   ..   1  2  3   ..