Citroen Berlingo First Dag (2010 year). Instruction - part 6
DRIVING
78 -
If this warning light comes on,
accompanied by an audible
signal, contact a CITROËN
dealer to have the system
checked. The airbags may
no longer be triggered in the event of
a serious impact.
Front air bag malfunction
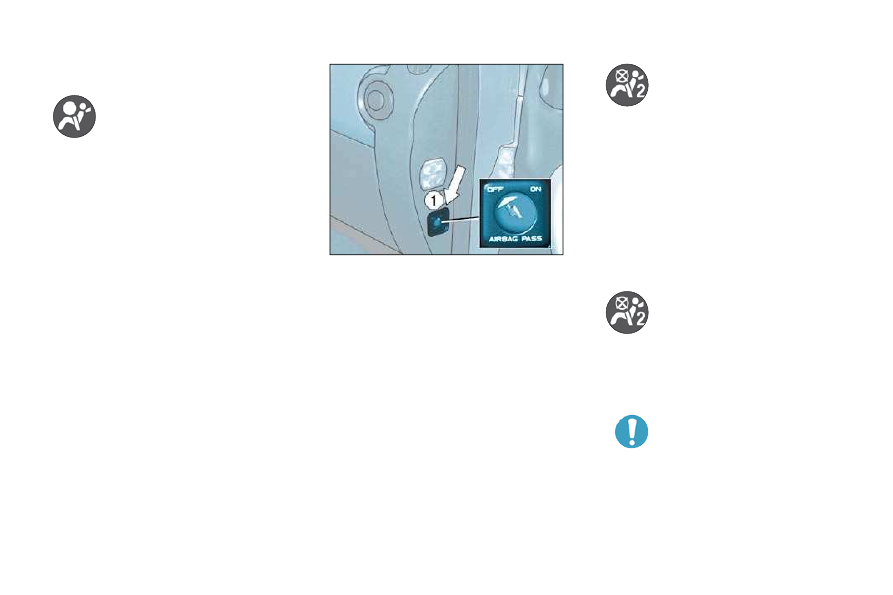
Disarming the passenger air
bag
To ensure the safety of your child,
it is essential to disarm the pas-
senger air bag when you install a
rear-facing child seat on the front
passenger seat. Otherwise, the
child would risk being killed or se-
riously injured if the air bag were
to infl ate.
With the ignition switched off ,
insert the key into the passenger
air bag disarming switch 1 , turn
it to the "OFF" position, then re-
move the key keeping the slot in
this position.
The air bag warning light on
the instrument panel is lit
throughout the period of dis-
arming.
In the "OFF" position, the passen-
ger air bag will not be triggered in the
event of an impact.
As soon as the child seat is removed,
turn the air bag slot to the "ON" po-
sition to re-activate the air bag and
thus ensure the safety of your pas-
senger in the event of an impact.
This is confi rmed by an indi-
cator light, accompanied by
a message on the display.
With
the
ignition
on
(2nd notch), illumination of this warn-
ing light indicates that the passenger
air bag is disarmed (switch in the
"OFF" position).
If the two air bag warning
lights are lit continuously, do
not install a rear-facing child
seat. Consult a CITROËN
dealer.
Disarming check