Chrysler PT Cruiser (2010 year). Manual - part 10


  Index      Chrysler     Chrysler PT Cruiser (2010 year) - manual in english


Search            copyright infringement  


Content      ..     8      9      10      11     ..


Chrysler PT Cruiser (2010 year). Manual - part 10


Compass/Temperature Display
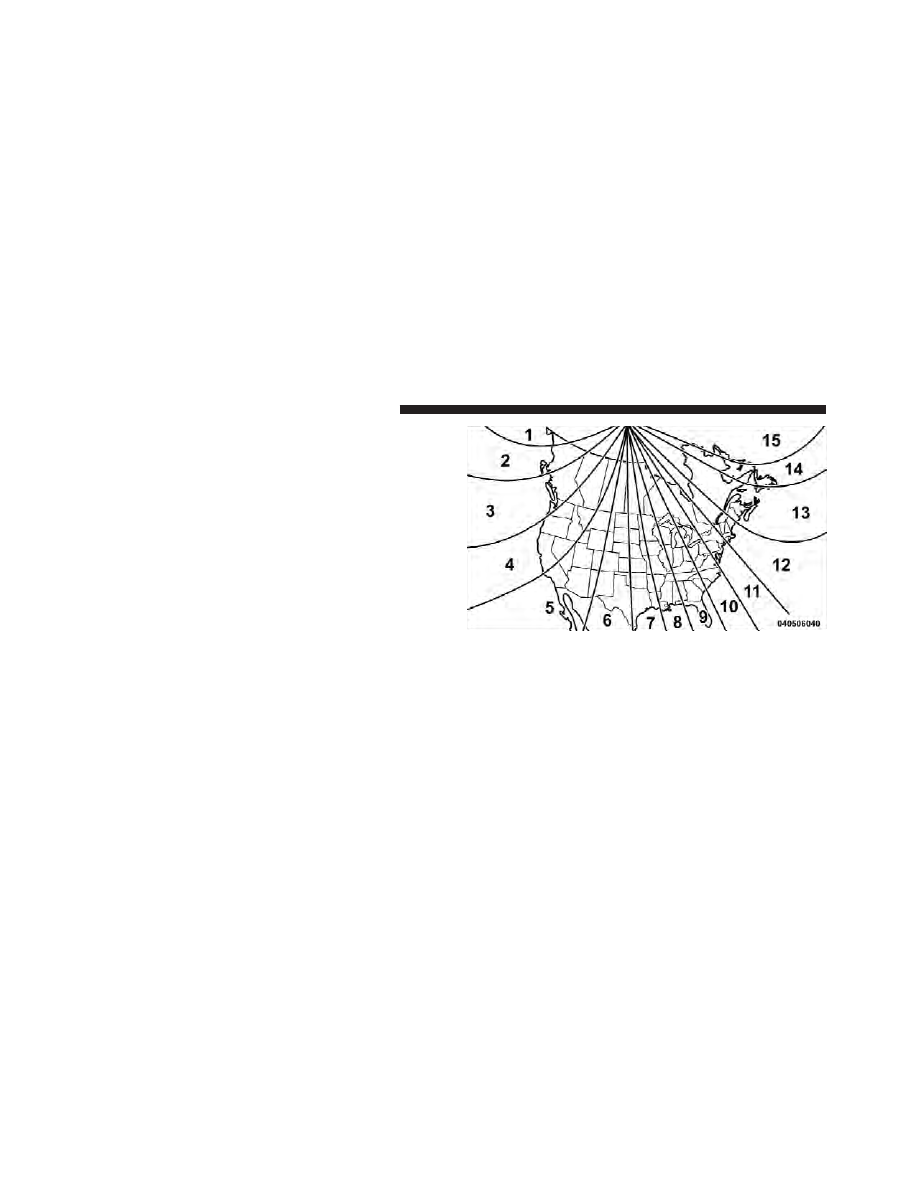
Compass Variance
Compass Variance is the difference between Magnetic
North and Geographic North. To ensure compass accu-
racy, the compass variance should be properly set accord-
ing to the variance map for the zone where the vehicle
will be driven. When properly set, the compass will
automatically account for this difference.

NOTE:

Magnetic and battery powered devices, (such as

cell phones, iPod’s, radar detectors, PDA’s and laptops)
should be kept away from the top of the instrument
panel. This is where the compass module is located and
such devices may interfere and cause false compass
readings.

To Set the Variance
Start the engine, and leave the transmission shift lever in
the PARK position. Press and hold (approximately ten
seconds) the compass/temperature RESET button until
the current variance zone number is displayed. To change

Compass Variance Map

156

UNDERSTANDING YOUR INSTRUMENT PANEL

-------------------------------------------------------------------------------------------------------------------------------------------------------------

the zone, press and release the RESET button to incre-
ment the variance one step. Repeat as necessary, until the
desired variance is achieved.

NOTE:

Zone 8 is the factory default. During program-

ming, the Zone Number will wrap around from Zone 15
to 1. Please refer to the Compass Variance Zone Map in
the following section: “Electronic Vehicle Information
Center (EVIC)”

Automatic Compass Calibration
The compass on your vehicle is self-calibrating, eliminat-
ing the need to manually calibrate the compass. When
the vehicle is new, the compass may appear erratic and
the CAL indicator message will flash in the CMTC until
the calibration is complete.

A good calibration requires a level surface and an envi-
ronment free from large metallic objects such as build-
ings, bridges, underground cables, railroad tracks, etc.

Calibrate the compass by driving slowly, under 5 mph
(8 km/h) in one or more complete circles in a area free
from large metallic objects, until the CAL indicator in the
CMTC turns off. The compass will now function
normally.

Manual Compass Calibration
If the compass appears erratic or inaccurate, and the
variance has been properly set, you may wish to manu-
ally recalibrate the compass. To manually calibrate the
compass:

1. Start the engine, and leave the transmission shift lever
in the PARK position.

2. Press and hold (approximately 10 seconds) the
Compass/Temperature RESET button until the current
variance zone number is displayed.

4

UNDERSTANDING YOUR INSTRUMENT PANEL

157

-------------------------------------------------------------------------------------------------------------------------------------------------------------

3. Release the RESET button, then press and hold again
(approximately 10 seconds), until the direction is dis-
played with the CAL indicator on continuously in the
display.

4. To complete the compass calibration, drive the vehicle
in one or more complete 360 degree circles, under 5 mph
(8 km/h) in an area free from power lines and large
metallic objects, until the CAL indicator turns off. The
compass will now function normally.

Odometer Display

When the appropriate conditions exist, the following
odometer messages will display:

CRUISE

. . . . . . . . . . . . . . . . . . . . . . Cruise Activated

gASCAP

. . . . . . . . . . . . . . . . . . . . . . . Fuel Cap Fault

noFUSE

. . . . . . . . . . . . . . . . . . . . . . . . . . Fuse Fault

These messages can be manually turned off by pressing
the right reset button (on the instrument cluster).

Trip Odometer (ODO)

This display shows the distance traveled since the last
reset. Press and release the right button (on the instru-
ment cluster) to switch from odometer, to trip A or trip B.
Press and hold the right button while the odometer/trip
odometer is displayed, to reset.

Trip A
Shows the total distance traveled for trip A since the last
reset.

Trip B
Shows the total distance traveled for trip B since the last
reset.

158

UNDERSTANDING YOUR INSTRUMENT PANEL

-------------------------------------------------------------------------------------------------------------------------------------------------------------

ELECTRONIC VEHICLE INFORMATION CENTER
(EVIC) – IF EQUIPPED

NOTE:

The compass on your vehicle is self-calibrating,

eliminating the need to manually calibrate the compass.

The Electronic Vehicle Information Center (EVIC) fea-
tures a driver-interactive display that is located in the
instrument cluster. The EVIC consists of the following:

• System Status
• Vehicle information warning message displays
• Personal Settings (Customer-Programmable Features)
• Compass heading
• Outside temperature display
• Trip computer functions
• Uconnect™ hands-free communication system dis-

plays — if equipped

• Audio mode display

Electronic Vehicle Information Center (EVIC)

4

UNDERSTANDING YOUR INSTRUMENT PANEL

159

-------------------------------------------------------------------------------------------------------------------------------------------------------------

When the appropriate conditions exist, the EVIC displays
the following messages:

• Turn Signal On (with a continuous warning chime)
• Left Front Turn Signal Lamp Out (with a single chime)
• Left Rear Turn Signal Lamp Out (with a single chime)
• Right Front Turn Signal Lamp Out (with a single

chime)

• Right Rear Turn Signal Lamp Out (with a single

chime)

• RKE Battery Low (with a single chime)
• Personal Settings Not Available – Vehicle Not In

(automatic transmission) or Vehicle Is In Motion
(manual transmission).

• Left/Right Front Door Ajar (one or more, with a single

chime, if speed is above 1 mph)

• Left/Right Rear Door Ajar (one or more, with a single

chime, if speed is above 1 mph)

• Door(s) Ajar (with a single chime, if vehicle is in

motion)

• Trunk Ajar (with a single chime)
• Headlights On
• Key In Ignition

EVIC Functions

Press the EVIC button until one of the following func-
tions are displayed on the EVIC:

• Compass/Temperature/Audio
• Average Fuel Economy
• Distance To Empty (DTE)
• Elapsed Time

160

UNDERSTANDING YOUR INSTRUMENT PANEL

-------------------------------------------------------------------------------------------------------------------------------------------------------------

• Tire Pressure Monitor (TPM)
• Personal Settings

To Reset the Display

Pressing and holding the EVIC button once will clear the
resettable function currently being displayed. Reset will
only occur if a resettable function is currently being

displayed. To reset all resettable functions, press and
release the EVIC button a second time within three
seconds of resetting the currently-displayed function
(Reset ALL will be displayed during this three-second
window).

Compass/Temperature/Audio

Press and release the EVIC button to display one of eight
compass headings to indicate the direction the vehicle is
facing, the outside temperature, and the current radio
station.

For additional information regarding the compass, refer
to

“Personal

Settings

(Customer-Programmable

Features)”.

Average Fuel Economy

Shows the average fuel economy since the last reset.
When the fuel economy is reset, the display will read
RESET, or show dashes for two seconds. Then, the

EVIC Button

4

UNDERSTANDING YOUR INSTRUMENT PANEL

161

-------------------------------------------------------------------------------------------------------------------------------------------------------------

history information will be erased, and the averaging will
continue from where it was before the reset.

Distance To Empty (DTE)

Shows the estimated distance that can be travelled with
the fuel remaining in the tank. This estimated distance is
determined by a weighted average of the instantaneous
and average fuel economy, according to the current fuel
tank level. This is not resettable.

NOTE:

Significant changes in driving style or vehicle

loading will greatly affect the actual drivable distance of
the vehicle, regardless of the DTE displayed value.

When the DTE value is less than 30 miles (48 km)
estimated driving distance, the DTE display will change
to a text display of LOW FUEL. This display will con-
tinue until the vehicle runs out of fuel. Adding a signifi-
cant amount of fuel to the vehicle will turn off the LOW

FUEL text and a new DTE value will be displayed, based
on the current values in the DTE calculation and the
current fuel tank level.

Elapsed Time

Shows the total elapsed time of travel since the last reset
when the ignition switch is in the ACC position. Elapsed
time will increment when the ignition switch is in the ON
or START position.

Compass Variance

Compass Variance is the difference between Magnetic
North and Geographic North. To compensate for the
differences, the variance should be set for the zone where
the vehicle is driven, per the zone map. Once properly
set, the compass will automatically compensate for the
differences and provide the most accurate compass head-
ing.

162

UNDERSTANDING YOUR INSTRUMENT PANEL

-------------------------------------------------------------------------------------------------------------------------------------------------------------

To Set the Variance
Follow this procedure to set the Variance:

1. Turn the ignition switch to the ON position. Leave the
shift lever in PARK.

2. Press and release the EVIC button several times until
you have displayed the Personal Settings (Customer-
Programmable Features) menu.

3. Press and release the EVIC button until “Compass
Variance” and the current variance zone number displays
in the EVIC.

4. Press and release the EVIC button to increment the
variance zone by one, (one button press per update), until
the proper variance zone number is selected according to
the map.

NOTE:

Zone 8 is the factory default. During program-

ming, the Zone Number will wrap around from Zone 15
to 1.

5. Press and release the EVIC button to exit.

Tire Pressure Monitor (TPM)

Refer to “Starting And Operating” “Tire Pressure Moni-
toring System (TPMS),” for system operation.

Compass Variance Map

4

UNDERSTANDING YOUR INSTRUMENT PANEL

163

-------------------------------------------------------------------------------------------------------------------------------------------------------------

Personal Settings (Customer-Programmable
Features)

This allows the driver to set and recall features when the
shift lever is in PARK (automatic transmission) or the
vehicle is stopped (manual transmission).

Press and release the EVIC button until “Personal Set-
tings” is displayed in the EVIC.

Use the EVIC button to display one of the following
choices:

Language
When in this display you may select different languages
for all display nomenclature, including the trip functions.
Pressing the EVIC button while in this display selects
English, Espanol, Deutsch, Italiano, or Francais depend-
ing on availability. As you continue, the displayed infor-
mation will be shown in the selected language.

NOTE:

Uconnect™ language will not change using the

EVIC.

Please

refer

to

“Language

Selection”

in

“Uconnect™ — If Equipped” for details.

Lock Doors Automatically at 15 MPH (24 km/h)
When ON is selected, all doors lock automatically when
the speed of the vehicle reaches 15 mph (24 km/h). Press
and hold the EVIC button when in this display until ON
or OFF appears, to make your selection.

Auto Unlock On Exit
When ON is selected all the vehicle’s doors will unlock
when the driver’s door is opened if the vehicle is stopped
(manual transmission) or the vehicle is stopped and the
shift lever is in PARK or NEUTRAL position (automatic
transmission). Press and hold the EVIC button when in
this display until ON or OFF appears to make your
selection.

164

UNDERSTANDING YOUR INSTRUMENT PANEL

-------------------------------------------------------------------------------------------------------------------------------------------------------------

Remote Unlock Driver’s Door 1st
When Driver’s Door 1st is selected, only the driver’s door
will unlock on the first press of the Remote Keyless Entry
(RKE) transmitter UNLOCK button. A second press is
required to unlock the remaining locked doors. When
Remote Unlock All Doors is selected, all doors will
unlock at the first press of the RKE transmitter UNLOCK
button. Press and hold the EVIC button when in this
display until Driver’s Door 1st or All Doors appears, to
make your selection.

Sound Horn On Lock
When ON is selected, a short horn sound will occur when
the RKE transmitter LOCK button is pressed. This feature
may be selected with or without the Flash Lights On
Lock/Unlock feature. Press and hold the EVIC button
when in this display until ON or OFF appears, to make
your selection.

Flash Lights On Lock
When ON is selected, the front and rear turn signals will
flash when the doors are locked or unlocked using the
RKE transmitter. This feature may be selected with or
without the Sound Horn On Lock feature activated. Press
and hold the EVIC button when in this display until ON
or OFF appears, to make your selection.

Delay Turning Headlights Off
When this feature is selected the driver can choose to
have the headlights remain on for 0, 30, 60, or 90 seconds
when exiting the vehicle. Press and hold the EVIC button
when in this display until 0, 30, 60, or 90 appears to make
your selection.

Delay Power Off to Accessories Until Exit
When this feature is selected, the power window
switches, radio, hands–free system, DVD video system,
power sunroof, and power outlets will remain active for
up to 60 minutes after the ignition switch has been turned

4

UNDERSTANDING YOUR INSTRUMENT PANEL

165

-------------------------------------------------------------------------------------------------------------------------------------------------------------

OFF. Opening a vehicle door will cancel this feature.
Press and hold the EVIC button when in this display until
OFF, 45 sec, 5 min, or 10 min appears, to make your
selection.

Turn Headlights on with Remote Key Unlock
When this feature is selected, the headlights will activate
and remain on for up to 90 seconds when the doors are
unlocked using the RKE transmitter. Press and hold the
EVIC button when in this display until OFF, 30 sec,
60 sec, or 90 sec appears, to make your selection.

Confirmation of Voice Commands — If Equipped
When ON is selected, all voice commands from the
U-Connect

威 system are confirmed. Press and hold the

EVIC button when in this display until ON or OFF
appears, to make your selection.

Display English or Metric
The EVIC, odometer, and navigation system units can be
changed between English and METRIC.

Press and hold the EVIC button when in this display until
US or METRIC appears, to make your selection.

Automatic Compass Calibration

The compass on your vehicle is self-calibrating, eliminat-
ing the need to manually calibrate the compass. When
the vehicle is new, the compass may appear erratic and
the CAL indicator message will flash in the EVIC until
the calibration is complete.

A good calibration requires a level surface and an envi-
ronment free from large metallic objects such as build-
ings, bridges, underground cables, railroad tracks, etc.

Calibrate the compass by driving slowly, under 5 mph
(8 km/h) in one or more complete circles in an area free
from large metallic objects, until the CAL indicator in the
EVIC turns off. The compass will now function normally.

166

UNDERSTANDING YOUR INSTRUMENT PANEL

-------------------------------------------------------------------------------------------------------------------------------------------------------------

NOTE:

• A good calibration requires a level surface and an

environment free from large metallic objects such as
buildings, bridges, underground cables, railroad
tracks, etc.

• Keep all magnetic objects, such as laptop computers,

iPod’s, cell phones and PDA’s (anything with a bat-
tery) away from the compass sensor which is located
in the top of the instrument panel. These devices can
interfere with compass accuracy and performance.

Manual Compass Calibration

If the compass appears to be inaccurate, you may wish to
manually calibrate the compass. Prior to calibrating the
compass, make sure the proper Compass Variance Value
is selected. (Refer to “Compass Variance” for additional
information). Then, continue to calibrate the compass as
follows:

1. Start the engine and leave the shift lever in the PARK
position.

2. Press and release the EVIC button several times until
the EVIC displays the Personal Settings (Customer-
Programmable Features) menu.

3. Press and release the EVIC button several times until
“Calibrate Compass (Yes)” is displayed. A EVIC button
press (longer than two seconds) will place the compass in
calibration mode.

4. The CAL indicator will come on continuously in the
EVIC display, to indicate that the compass is now in the
calibration mode and that the vehicle can now be driven
to calibrate. Press the EVIC button from the

⬙Calibrate

Compass (Yes)

⬙ screen to exit the EVIC Customer-

Programmable features, and return it to its normal oper-
ating mode.)

5. Drive the vehicle slowly, under 5 mph (8 km/h),
completing one or more circles (in an area free from large
metal or metallic objects) until the “CAL” indicator turns
off. The compass will now function normally.

4

UNDERSTANDING YOUR INSTRUMENT PANEL

167

-------------------------------------------------------------------------------------------------------------------------------------------------------------

SETTING THE ANALOG CLOCK

To set the analog clock at the top center of the instrument
panel, press and hold the button until the setting is
correct. The clock will adjust slowly at first, and then
more quickly the longer the button is held.

SALES CODE REF — AM/FM/CD (SINGLE-DISC)
RADIO WITH OPTIONAL Uconnect™ Multimedia
(SATELLITE RADIO) AND Uconnect™ Phone
CAPABILITY

NOTE:

The radio sales code is located on the lower right

side of your radio faceplate.

Setting The Analog Clock

REF Radio

168

UNDERSTANDING YOUR INSTRUMENT PANEL

-------------------------------------------------------------------------------------------------------------------------------------------------------------

Operating Instructions — Radio Mode

NOTE:

The ignition switch must be in the ON or ACC

position to operate the radio.

Power Switch/Volume Control (Rotary)
Push the ON/VOL control to turn the radio ON. Push the
ON/VOL a second time to turn OFF the radio.

Electronic Volume Control
The electronic volume control turns continuously (360–
degrees) in either direction without stopping. Turning the
volume control to the right increases the volume and to
the left decreases it.

When the audio system is turned on, the sound will be
set at the same volume level as last played.

For your convenience, the volume can be turned down,
but not up, when the audio system is OFF and the
ignition is ON.

MODE Button (Radio Mode)
Press the MODE button repeatedly to select between the
CD player and Satellite Radio (if equipped).

SEEK Button (Radio Mode)
Press and release the SEEK button to search for the next
listenable station in either AM/FM or Satellite (if
equipped) mode. Press the right side of the button to seek
up and the left side to seek down. The radio will remain
tuned to the new station until you make another selec-
tion. Holding the button will bypass stations without
stopping until you release it.

MUTE Button (Radio Mode)
Press the MUTE button to cancel the sound from the
speakers. “MUTE” will display. Press the MUTE button a
second time and the sound from the speakers will return.
Rotating the volume control, turning the radio ON/OFF,
or turning the ignition ON/OFF, will cancel the MUTE
feature.

4

UNDERSTANDING YOUR INSTRUMENT PANEL

169

-------------------------------------------------------------------------------------------------------------------------------------------------------------

NOTE:

In Hands-Free Phone (if equipped) mode, the

MUTE button mutes the microphone.

SCAN Button (Radio Mode)
Pressing the SCAN button causes the tuner to search for
the next listenable station in either, AM, FM, or Satellite
(if equipped) frequencies, pausing for five seconds at
each listenable station before continuing to the next. To
stop the search, press SCAN a second time.

PSCAN Button (Radio Mode)
Pressing the PSCAN button causes the tuner to scan
through preset stations in either AM, FM, or Satellite (if
equipped) frequencies, pausing for five seconds at each
preset station before continuing to the next. To stop the
search, press PSCAN a second time.

TIME Button
Press the TIME button and the time of day will display
for five seconds.

Clock Setting Procedure

1. Press and hold the TIME button until the hours blink.

2. Adjust the hours by turning the TUNE/AUDIO con-
trol.

3. After the hours are adjusted, press the TUNE/AUDIO
control to set the minutes. The minutes will begin to
blink.

4. Adjust the minutes using the TUNE/AUDIO control.

5. To exit, press any button/knob or wait five seconds.

RW/FF (Radio Mode)
Pressing the Rewind/Fast Forward button causes the
tuner to search for the next frequency in the direction of
the arrows. This feature operates in either AM, FM or
Satellite (if equipped) frequencies.

170

UNDERSTANDING YOUR INSTRUMENT PANEL

-------------------------------------------------------------------------------------------------------------------------------------------------------------

TUNE Control (Radio Mode)
Turn the rotary TUNE control clockwise to increase or
counterclockwise to decrease the frequency.

AM/FM Button (Radio Mode)
Press the button to select AM or FM modes.

Setting the Tone, Balance, and Fade
Press the rotary TUNE control, and “BASS” will display.
Turn the TUNE control to the right or left to increase or
decrease the Bass tones.

Press the rotary TUNE control a second time and “MID”
will display. Turn the TUNE control to the right or left to
increase or decrease the Mid-Range tones.

Press the rotary TUNE control a third time and “TREB”
will display. Turn the TUNE control to the right or left to
increase or decrease the Treble tones.

Press the rotary TUNE control a fourth time and “BAL”
will display. Turn the TUNE control to the right or left to
adjust the sound level from the right or left side speakers.

Press the rotary TUNE control a fifth time and “FADE”
will display. Turn the TUNE control to the left or right to
adjust the sound level between the front and rear speak-
ers.

Press the TUNE control again or wait five seconds to exit
setting tone, balance, and fade.

RND/SET Button (Radio Mode) To Set The
Pushbutton Memory
When you are receiving a station that you wish to
commit to pushbutton memory, press the SET button.
The symbol SET 1 will now show in the display window.
Select the button (1-6) you wish to lock onto this station
and press and release that button. If a button is not

4

UNDERSTANDING YOUR INSTRUMENT PANEL

171

-------------------------------------------------------------------------------------------------------------------------------------------------------------


Content      ..     8      9      10      11     ..