Chrysler PT Cruiser. Manual - part 946


  Index      Chrysler     Chrysler PT Cruiser - service repair manual 2005 year


Search            


Content   ..  944  945  946  947   ..


Chrysler PT Cruiser. Manual - part 946


REAR DOOR GLASS RUN
WEATHERSTRIP

REMOVAL

(1) Remove door trim panel, water shield as neces-

sary.

(2) Remove door glass.
(3) Pull weatherstrip from flange.
(4) Pull run weatherstrip from window frame

channel.

INSTALLATION

(1) Clean butyl material from door flange area.
(2) Place door run weatherstrip in position on win-

dow frame channel corners first (Fig. 13).

(3) Push door run weatherstrip into window frame

channel.

(4) Install door glass.
(5) Install pull cup support bracket, water dam,

and door trim panel.

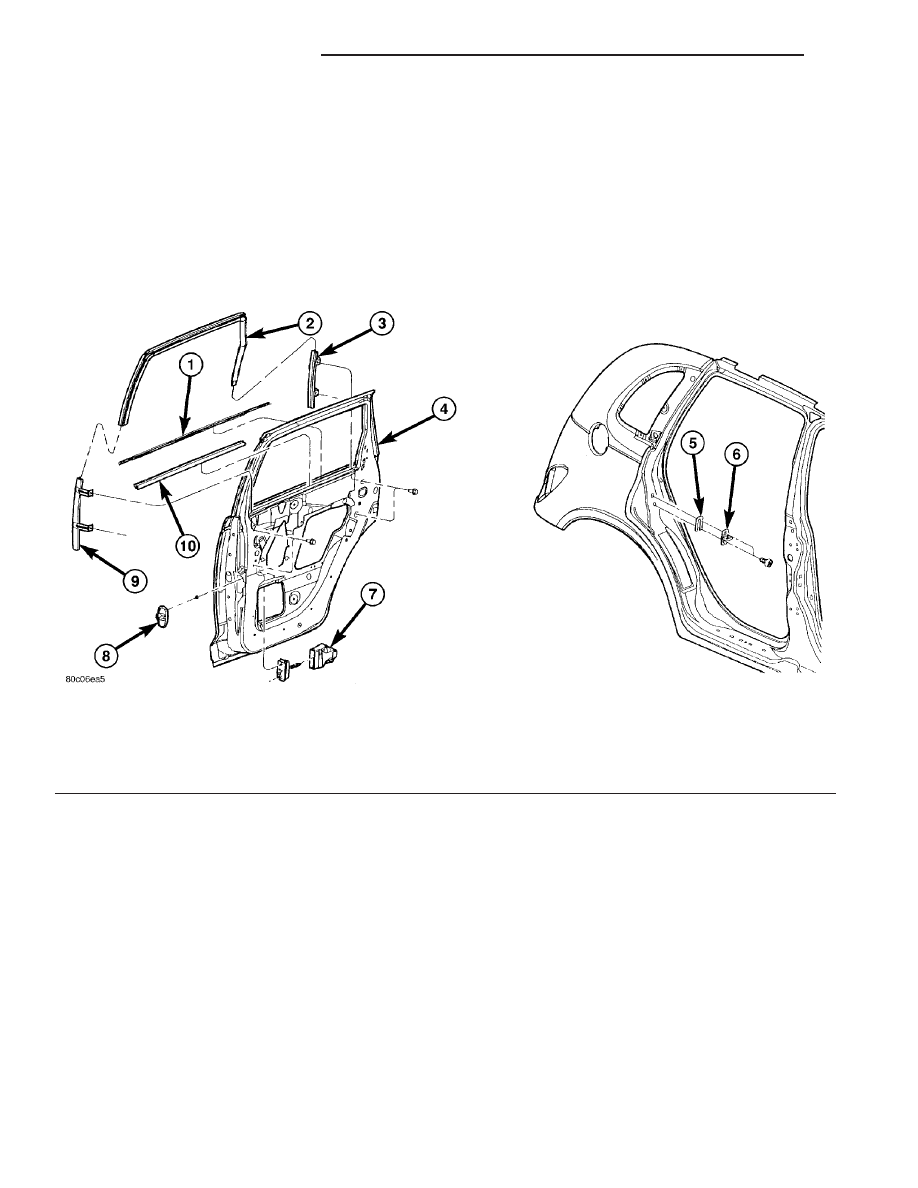
Fig. 13 Rear Door Striker

1 -REAR DOOR OUTER BELT WEATHERSTRIP

6 - REAR DOOR LATCH STRIKER

2 - REAR DOOR GLASS RUN WEATHERSTRIP

7 - REAR DOOR CHECK STRAP AND COVER

3 - REAR DOOR GLASS LOWER CHANNEL REAR

8 - REAR DOOR CHECK STRAP SEAL

4 - REAR DOOR

9 - REAR DOOR GLASS LOWER CHANNEL FRONT

5 - REAR DOOR LATCH STRIKER SPACER

10 - REAR DOOR INNER BELT WEATHERSTRIP

23 - 242

WEATHERSTRIP/SEALS

PT

REAR DOOR INNER BELT
WEATHERSTRIP

REMOVAL

(1) Remove door trim panel.
(2) Remove inner belt weatherstrip from door. If

necessary, use a rubber mallet and a block of wood,
tapping upward at each clip attaching the molding to
the door (Fig. 14).

INSTALLATION

(1) Align the weatherstrip to the “B” and “C” pil-

lars. Push down on weatherstrip to engage channel
to door panel (Fig. 14).

(2) Install door trim panel.

Fig. 14 REAR DOOR WEATHERSTRIP

1 - REAR DOOR OUTER BELT WEATHERSTRIP

6 - REAR DOOR LATCH STRIKER

2 - REAR DOOR GLASS RUN WEATHERSTRIP

7 - REAR DOOR CHECK STRAP AND COVER

3 - REAR DOOR GLASS LOWER CHANNEL REAR

8 - REAR DOOR CHECK STRAP SEAL

4 - REAR DOOR

9 - REAR DOOR GLASS LOWER CHANNEL FRONT

5 - REAR DOOR LATCH STRIKER SPACER

10 - REAR DOOR INNER BELT WEATHERSTRIP

PT

WEATHERSTRIP/SEALS

23 - 243

SILL SECONDARY
WEATHERSTRIP

REMOVAL

(1) Using a fork-type prying tool, disengage push

in fasteners attaching sill secondary weatherstrip to
door (Fig. 15).

(2) Remove weatherstrip from door.

INSTALLATION

(1) Position weatherstrip to door (Fig. 15).
(2) Press sill secondary weatherstrip fasteners into

position.

Fig. 15 Front/Rear Sill Secondary Weatherstrip

1 – FRONT DOOR GLASS RUN WEATHERSTRIP

7 – FRONT DOOR LATCH STRIKER

2 – FRONT DOOR GLASS LOWER REAR CHANNEL

8 – FRONT DOOR SILL WEATHERSTRIP

3 – FRONT DOOR INNER BELT WEATHERSTRIP

9 – FRONT DOOR CHECK STRAP AND COVER

4 – FRONT DOOR

10 – FRONT DOOR CHECK STRAP SEAL

5 – B-PILLAR

11 – FRONT DOOR OUTER BELT WEATHERSTRIP

6 – FRONT DOOR LATCH STRIKER SPACER

23 - 244

WEATHERSTRIP/SEALS

PT

HEADER / A-PILLAR
WEATHERSTRIP -PT-27

REMOVAL - PT-27 ONLY

(1) Lower convertible top.
(2) Remove door sill scuff plate. (Refer to 23 -

BODY/INTERIOR/DOOR SILL TRIM - REMOVAL).

(3) Starting on left side of vehicle (Fig. 16).
(4) Remove header molding. (Refer to 23 - BODY/

EXTERIOR/MOLDING - REMOVAL).

(5) Remove two screws on the top of header.
(6) Pull weatherstrip away to access weatherstrip

retainer.

(7) Remove four screws and weatherstrip retainer

at A-pillar.

(8) Remove one screw attaching windshield mold-

ing.

(9) Right side of vehicle.
(10) Remove two screws on the top of header.
(11) Pull weatherstrip away to access weatherstrip

retainer.

(12) Remove four screws and weatherstrip retainer

at A-pillar.

(13) Remove one screw attaching windshield mold-

ing.

(14) Pull weatherstrip away from vehicle.

INSTALLATION - PT-27 ONLY

(1) Place header and A-pillar weatherstrip into

position (Fig. 16).

(2) Starting on left side of vehicle.

(3) Install one screw attaching windshield mold-

ing.

(4) Install four screws and weatherstrip retainer

at A-pillar.

(5) Install two screws on the top of header.
(6) Right side of vehicle.
(7) Install one screw attaching windshield mold-

ing.

(8) Install four screws and weatherstrip retainer

A-pillar.

(9) Install two screws on the top of header.
(10) Install header molding. (Refer to 23 - BODY/

EXTERIOR/MOLDING - INSTALLATION).

(11) Install door sill scuff plate. (Refer to 23 -

BODY/INTERIOR/DOOR SILL TRIM - INSTALLA-
TION).

(12) Raise convertible top.

FRONT DOOR SILL
WEATHERSTRIP - PT-27

REMOVAL - PT-27 ONLY

(1) Open front door.
(2) Using a trim stick, remove door sill weather-

strip (Fig. 17).

INSTALLATION

(1)
(2) Engage weatherstrip along lower door sill (Fig.

17).

(3) Verify weatherstrip sealing.

Fig. 16 HEADER AND A-PILLAR WEATHERSTRIP

1 - WINDSHIELD OPENING FRAME
2 - ATTACHING SCREWS
3 - HEADER AND A-PILLAR WEATHERSTRIP
4 - PUSH PIN FASTENER

Fig. 17 DOOR TO ROCKER SEAL

1 - FRONT DOOR SILL WEATHERSTRIP

PT

WEATHERSTRIP/SEALS

23 - 245


Content   ..  944  945  946  947   ..