Chrysler PT Cruiser. Manual - part 729


  Index      Chrysler     Chrysler PT Cruiser - service repair manual 2005 year


Search            


Content   ..  727  728  729  730   ..


Chrysler PT Cruiser. Manual - part 729


FRONT BUMPER
REINFORCEMENT

REMOVAL

(1) Remove grille (Refer to 23 - BODY/EXTERIOR/

GRILLE - REMOVAL).

(2) Remove front fascia (Refer to 13 - FRAME &

BUMPERS/BUMPERS/FRONT

FASCIA

-

REMOVAL).

(3) Remove bolts attaching reinforcement to the

rail assembly and Remove reinforcement (Fig. 1).

(4) Remove bumper reinforcement from vehicle.

INSTALLATION

(1) Place bumper reinforcement in position (Fig. 1).
(2) Install bolts attaching reinforcement to rail

assembly.

(3) Install front fascia (Refer to 13 - FRAME &

BUMPERS/BUMPERS/FRONT FASCIA - INSTAL-
LATION).

(4) Install grille (Refer to 23 - BODY/EXTERIOR/

GRILLE - INSTALLATION).

FRONT BUMPER FASCIA

REMOVAL

(1) Remove grille. (Refer to 23 - BODY/EXTERI-

OR/GRILLE - REMOVAL).

(2) Remove three screws attaching splash shield to

fascia to access fender flange on each side of vehicle.

(3) Remove spring nuts fasteners attaching fascia

to fender flange (Fig. 2).

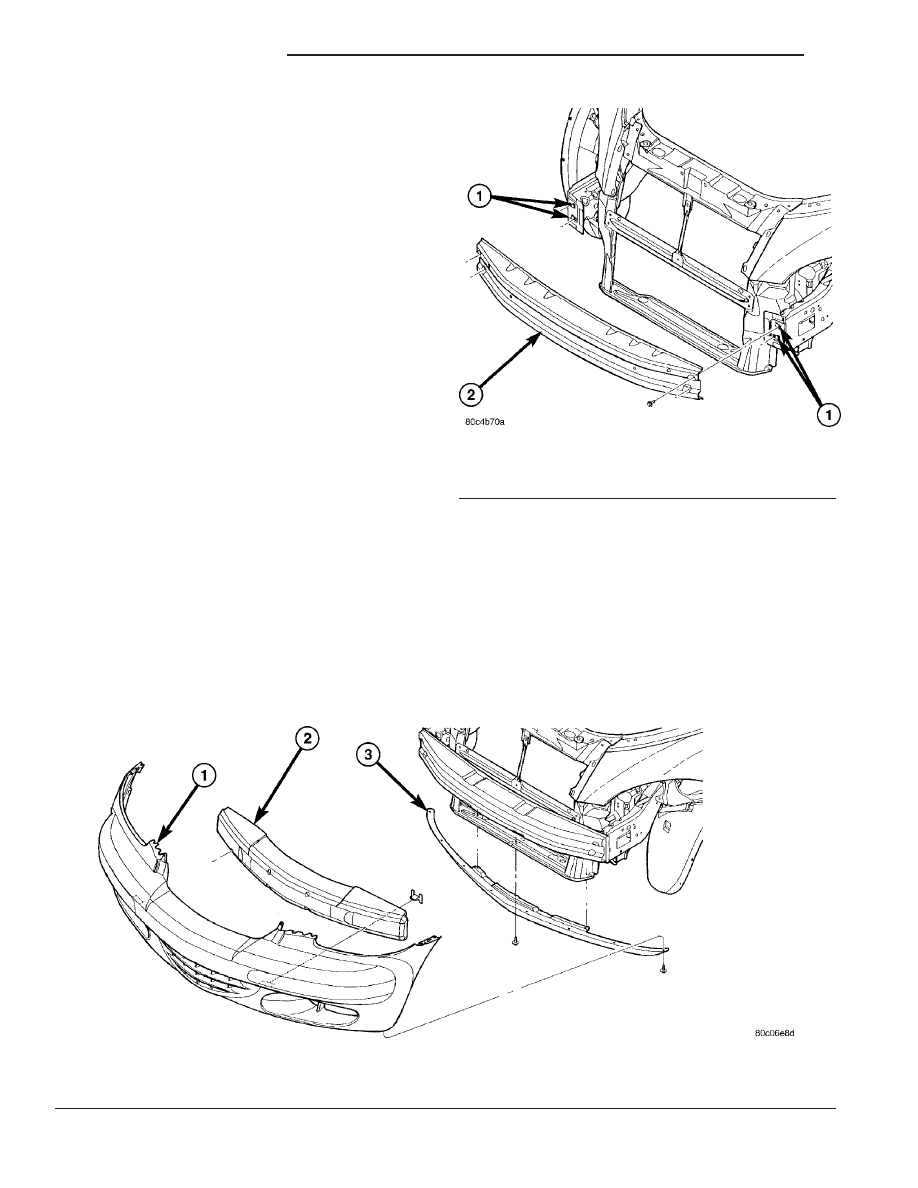
Fig. 1 Front Bumper Reinforcement

1 - U-NUT(S)
2 - FRONT BUMPER FASCIA REINFORCEMENT

Fig. 2 FRONT BUMPER FASCIA

1 - FRONT BUMPER FASCIA
2 - FRONT BUMPER ENERGY FOAM

3 - RADIATOR AIR DAM

13 - 2

FRAME & BUMPERS

PT

(4) Raise and support vehicle. (Refer to LUBRICA-

TION & MAINTENANCE/HOISTING - STANDARD
PROCEDURE).

(5) Remove three screws attaching air dam and

lower fascia to the radiator support crossmember.

(6) Lower vehicle.
(7) Remove two fasteners attaching fascia to the

fender bracket (Fig. 3).

(8) Remove fascia to access the fog lamp wire con-

nectors and disconnect, if equipped.

(9) Remove fascia from vehicle.
(10) Move fascia to a bench.
(11) Remove the air dam, retaining fasteners,

foam, and fog lamps if equipped. (Refer to 23 -
BODY/EXTERIOR/GRILLE - LOWER RADIATOR
REMOVAL).

(12)

Remove lower radiator grille, if equipped

(Fig. 4).

Fig. 4 FRONT FASCIA - LOWER GRILLE CHROME A

1 - FRONT FASCIA
2 - SPRING NUTS (6)
3 - PUSH PIN FASTENER

4 - LOWER RADIATOR GRILLE
5 - CHROME STRIPS

Fig. 3 FRONT FASCIA ATTACHING POINTS

1 - ATTACHING POINTS
2 - FRONT FASCIA

PT

FRAME & BUMPERS

13 - 3

FRONT BUMPER FASCIA (Continued)

INSTALLATION

(1) Place fascia on a work bench
(2) Install lower radiator grille chrome strips, if

equipped. Place chrome strip into position, and press
on chrome strip until it is locked into position.

(3) Install lower radiator grille, if equipped (Fig.

5). (Refer to 23 - BODY/EXTERIOR/GRILLE -
LOWER RADIATOR - INSTALLATION).

(4) Install air dam, retainer fasteners, foam and

fog lamps if equipped (Fig. 7).

(5) Place fascia in position and connect fog lamp

wire connectors.

(6) Install two fasteners attaching fascia to the

fender bracket (Fig. 6).

(7) Raise and support vehicle. (Refer to LUBRICA-

TION & MAINTENANCE/HOISTING - STANDARD
PROCEDURE).

(8) Install three screws attaching air dam and

lower fascia to the radiator support crossmember.

Fig. 5 FRONT FASCIA - LOWER GRILLE CHROME A

1 - FRONT FASCIA
2 - SPRING NUTS (6)
3 - PUSH PIN FASTENER

4 - LOWER RADIATOR GRILLE
5 - CHROME STRIPS

Fig. 6 FRONT FASCIA ATTACHING POINTS

1 - ATTACHING POINTS
2 - FRONT FASCIA

13 - 4

FRAME & BUMPERS

PT

FRONT BUMPER FASCIA (Continued)

(9) Install spring nuts fasteners attaching fascia to

fender flange (Fig. 7).

(10) Install three screws attaching splash shield to

fascia on each side of vehicle.

(11) Lower vehicle.
(12) Install radiator grille. (Refer to 23 - BODY/EX-

TERIOR/GRILLE - RADIATOR - INSTALLATION)

REAR BUMPER FASCIA

REMOVAL

(1) Open liftgate.
(2) Remove the rubber body plugs or mastic tape

patches, if equipped.

(3) Remove nuts attaching fascia to lower floor clo-

sure (Fig. 8) and (Fig. 9).

(4) Raise vehicle on hoist.
(5) Disconnect license lamp.
(6) Remove splash shield from fascia in the wheel

opening area (Refer to 23 - BODY/EXTERIOR/
FRONT END SPLASH SHIELDS - REMOVAL).

(7) Remove screws attaching fascia to lower quar-

ter panels.

(8) Remove fascia from vehicle.

INSTALLATION

(1) Position fascia on vehicle (Fig. 8) and (Fig. 9).
(2) Position fascia slots to push pins on lower

quarter panels

(3) Slide fascia forward on push pins
(4) Install screws attaching fascia to lower quarter

panels.

(5) Install splash shield in the wheel opening area

(Refer

to

23

-

BODY/EXTERIOR/FRONT

END

SPLASH SHIELDS - INSTALLATION).

(6) Connect license lamp.
(7) Lower vehicle.
(8) Install nuts attaching fascia to lower floor clo-

sure.

Fig. 7 FRONT BUMPER FASCIA

1 - FRONT BUMPER FASCIA
2 - FRONT BUMPER ENERGY FOAM

3 - RADIATOR AIR DAM

Fig. 8 REAR BUMPER FASCIA

1 - REAR BUMPER FASCIA
2 - ATTACHING SCREW
3 - STUD PLATE TO REAR FASCIA NUT

PT

FRAME & BUMPERS

13 - 5

FRONT BUMPER FASCIA (Continued)


Content   ..  727  728  729  730   ..