Chery S11 / Chery QQ. Manual - part 225
 

  Index      Chery     Chery S11 / Chery QQ - service repair manual


Search            


Content   ..  223  224  225  226   ..


Chery S11 / Chery QQ. Manual - part 225


               SQR7080 维修手册                                                                                          372 发动机机械部分


7-4-3 Check the clearance between the pistion and the 
cylinder wall 
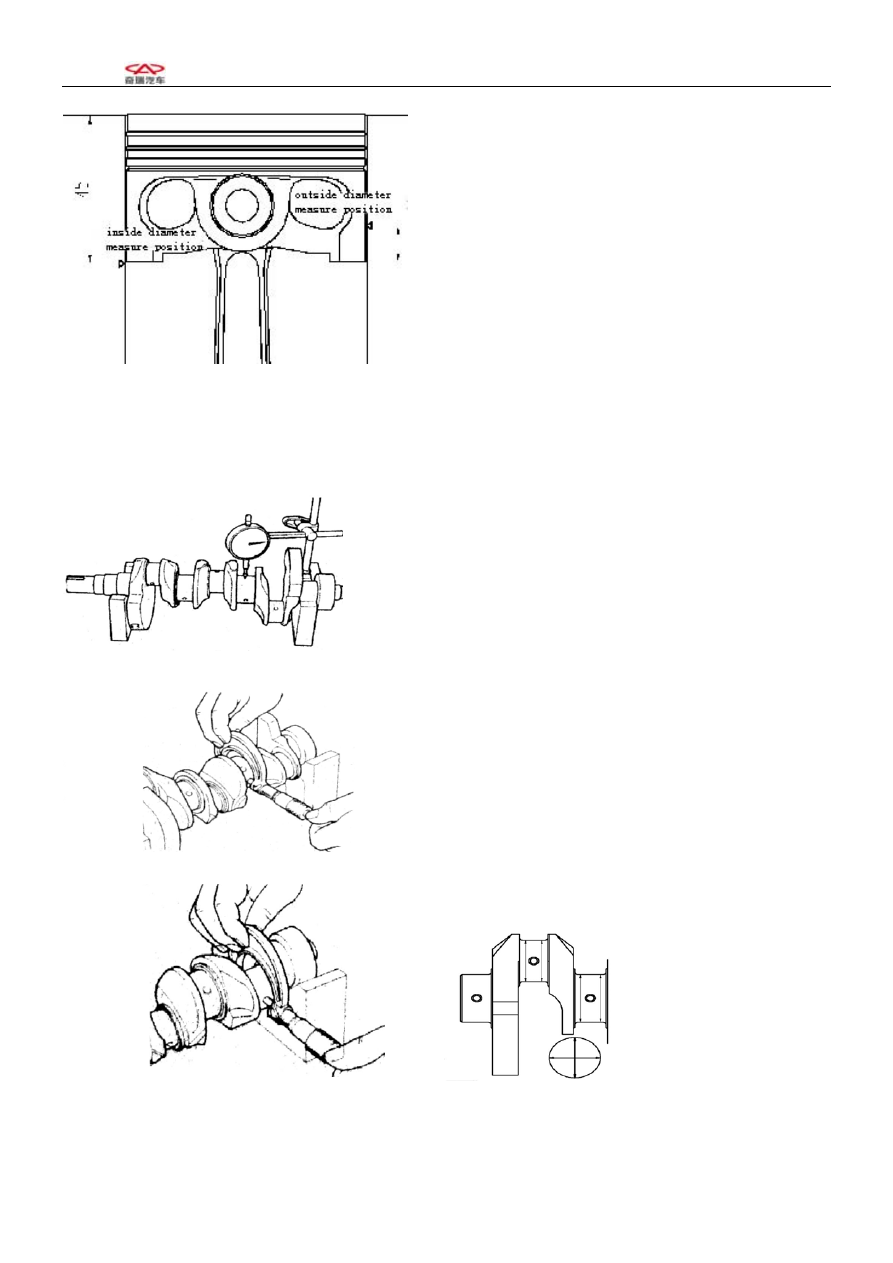
1. The postions for measuring the inner diameter of the 
cylinder and the piston skirt are as shown in the right 
figure. Replace and repair the piston or the cylinder 
body, or bore the cyliner if the measured results exceed 
the limits 
[Benchmark] 0.018~0.03 
[Limit]  0.10 
[Reference]
 The clearance between the piston and the 
cylinder hole is subject to the innermost diameter of 
cylinder in vertical direction minus the maximum 
outer diameter of the piston. 
2.After the replacement of the piston or the cylinder 
body, it is needed to confirm the clearance of the 
replaced cylinder once again. 
Datum: 0.018~0.030 


7-4-4 Crankshaft 
1. Check the coaxiality of the main shaft diameter 
(1) Use the centi-meter to measure the coaxiality. 
Replace the crankshaft if the measurement result 
exceeds t he limit. 
[Limit]  0.03mm 
[Attention]: The bending value should be 1/2 of the 
fluctuation for one circle of turning the crankshaft. 


2.  Check the tears and wears of the crankshaft 

1)Use a caliper to measure the shaft diameter , and 

work out the circularity and cylindricity. 
[Limit]    0.005mm 
(2)Use a caliper to measure the connecting rod 
diameter ,and work out the circularity and cylindricity.
[Limit]    0.004mm 


the measuring position is shown as the figure, 


43 

               SQR7080 维修手册                                                                                          372 发动机机械部分


Frontward mark 


7-4-5Assmbling of the crankshaft connecting rod 
mechanism 
1. Assembly of the piston and connecting rod 

1 ) Use special tools to assemble the piston, 

connecting rod and piston pin in the following 
specified procedures. 

 Smear lubricating oil to the connecting rod pin 

hole, and make the assembly according to the marks 
for the same unit and in the indicated direction. 

SST 

SST 


 Use SST to make the installation shown as the right 

figure. 
 

 Make adjustments and installation of the piston and 

the connecting rod shown as the right figure. 

 After smearing lubricating oil to the piston pin, use 

pressurizing device to assemble the piston and the 
connecting rod. 
[Attention]  
· Pay attention to the assembling direction when 
pressing in the piston pin; 

 The small bit of connecting rod should be heated to 

300℃ while pressing the piston pin in the piston. 

 Exert pressure in the process of pressing by 

assuring the alignment of the pin.   


2)Side face with marks should be upright,install 

steel belt assembly oil ring (gasket ring,down scrapter 
and upper scrapter),then install the secondary ring,then 
install the primary ring 
Open degree of every ring is shown as the illustration: 


From up to
down: 
No.1 ring 
No.2 ring 
Oil ring 

下刮片


Ring open angle: Down scrapeing

No.1 ring 

No.2 ring 


Gasket 

Up 

Up scrapeing 

44 

               SQR7080 维修手册                                                                                          372 发动机机械部分


3 The crankshaft main bearing cover. Assemble the 
crankshaft, shaft bush, shaft body and thruster 
according to the following instructions. 

1)The protruding thrust block on the bush    should 

match the groove on the cylinder body for installation..
[Attention] Use the bush made by the same 
manufacturer. 
 

Outward


2)Smear lubricating oil on this side (upper side) of 

the crankshaft before installing it. 
The side thrust chip  with oil sink should face 
outward (crankshaft handle) for installation on the 
cylinder body bearing stand. 
[Attention] Smear lubricating oil on the side of the oil 
sink. 

Apply oil 


3 )  Smear lubricating oil on the friction side 

opposite to the contact of the bush lower parts. Install 
the parts according to the forward indiction mark on 
the crankshaft bearing cover.     


4)After applying the lubricating oil, tighten the 

bolts in the sequence shown as the right figure for 
2—3 cycles with the specified torque. 
[Tprque]    70±3.5N.m   

5)  Rotate the crankshaft after assembling, you 

should rotate it with ease,the torque should be less 
than 1Nm 

Attention:· The torque of crankshaft rotating should 

be less than 1Nm;(The torque is for installing the 
crankshaft only,not for installing the piston connecting 
rod) 

45 

               SQR7080 维修手册                                                                                          372 发动机机械部分


4. Assemble the piston connecting rod Ay, connecting 
rod bush and connecting rod bearing cover according 
to the following instructions.   

1)The openings of the air ring and oil ring should 

match the specified direction. 

2)Use nylon sleeves for the bolts of the connecting 

rod to prevent from scraping the cyliner hole and axial 
diameter 

3 ) Apply lubricating oil to the piston I, the 

connecting rod and the surfaces of the other related 
moving parts. 
 

Nylon bar 
SST 


4)Make sure the frontwards indication mark on the 

piston. Should be frontwards and assemble the piston 
connecting rod Ay with SST. 
[Attention] The cylinder number on the piston 
connecting rod Ay should be identical to the cylinder 
number. 

Frontward 


5)Assemble the connecting rod bearing cover and 

bush according to the following instructions. 

 Smear a little lubricating oil on the bolt and screw 

nut stand before they are mounted according to the 
indication mark. 

 Tighten the left and right screw nuts alternately for 

a couple of times with the specified torque. 
  [Torque]:   40±2N.m  
[Attention] The connecting rod and the rod bush 
should be bought from the same supplier. 


46 


Content   ..  223  224  225  226   ..