Chery S11 / Chery QQ. Manual - part 216
 

  Index      Chery     Chery S11 / Chery QQ - service repair manual


Search            


Content   ..  214  215  216  217   ..


Chery S11 / Chery QQ. Manual - part 216


SQR7080  Maintenance Manual           372 Engine Mechanical System 


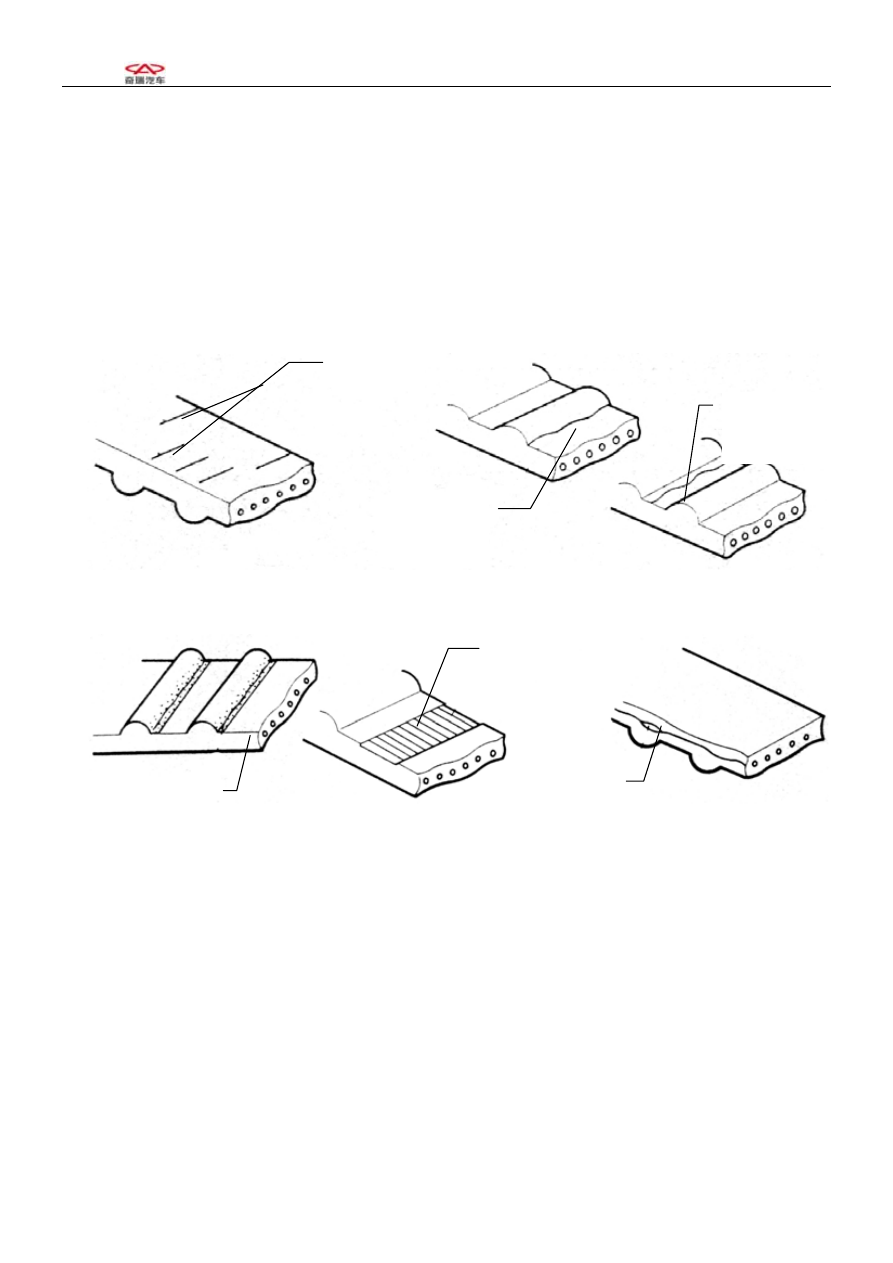
1 Make careful and detailed checks on the timing belt. Replace with new parts if any of the 
conditions shown in the figure occurs. 
(1)

Cracks on the back side rubber; 

(2)

Cracks of teeth roots, cracks clearing off the fabric lining layer; 

(3)

Tears and wears of fabric lining layer, missing rear teeth, broken teeth, etc. 


(4)

Abnormal tears and wears on belt sides 


            Chap

Chap 

Tears and
wears 

Drop-off 

of belt core

MIS

Abnormal 

tears and

 wears 


7


SQR7080  Maintenance Manual           372 Engine Mechanical System 


1 Even if the damages on the outer appearance can not be confirmed, the belt should be replaced 
under any of the following circumstances: 
(1)

If the water in the water pump is leaked, which makes it necessary to refill the water 

continuously; 
(2)

There are much oil stains on the belt, the belt should be replaced for the rubber will be 

damaged when it is expanded; 

Specifications and model of the timing belt 

Model 372-1007081 

Belt wide 

25

.3mm 


Timing belt tensioner 
Turn the belt tensioner supporting stand bolts to see if there are any abnormal sounds. Check to see if 
there are any damages on the contacting surface of the belt. 
Specifications and model of the timing belt tensioner 
 

Model 372-1007030 

Wide 

27.0

mm 

Outside diameter 

φ50mm 


Check to see if there are any damages on the outer appearance 
Specifications and model of clockwise pulley 

EF


                Model     

Item 

GL、ZL、GS、ZS


Diameter of camshaft timing 

gear  (mm) 

φ110.7

+0.1

-0.2

Diameter of crankshaft timing 

gear  (mm) 

φ54.65

+0.7

-0.13


2-3-4 
Baffle of crankshaft timing gear 
Check to see if there is any deformation 
Standard size of crankshaft clockwisewheel: 


Wide 28.6mm 


8


SQR7080  Maintenance Manual           372 Engine Mechanical System 


9


Installation 
1 Installation of crankshaft timing gear 


2 Installation of timing belt 
(1)On the upper thrust point of the first cylinder 
compression 
① 

Place the camshaft timing gear around the front 

end of the air exhaust camshaft so as to make the 
positioning groove on the gear be aligned with the 
positioning pin on the end surface of the camshaft. 
Then use screws to fix the clockwise gear, with the 
torque of 100 ± 5N.m. 


 (2) Make sure that the punched mark on the 
crankshaft clockwise pulley is aligned with the mark 
of the oil pump. 


3)Install timing pulley accordingly. 

Timing mark


Timing mark 

Timing mark 

Clockwise 


SQR7080  Maintenance Manual           372 Engine Mechanical System 


10


3 Install the tensioner 
(1)

Adjust the tension of the timing belt 

As shown in the figure, make the space between the 


edge of the stretching wheel and the water pump case 
arc to be about 8mm;   

Tig

hten the bolt of the stretching wheel with a 

torque of 25 ± 3N.m. Use a screwdriver to swing the 
stretcher toward the right.. 


 Turn the crankshaft for two circles towards the 

engine rotating  direction, so that the camshaft pulley 
and the crankshaft pulley matches the clockwise marks 
respectively. 


 Use hands to press down for about 5mm. The force 

for pressing the clockwise belt is about: [Referrence]
20~30  N 
Notice: When the deflection of the timing belt fails to 
meet the specifications, the key is to adjust the 
above-mentioned stretcher fastening bolt by widening 
the spacing. 
Tighten the S/A fixing bolt of the stretcher with the 
specified torque of 25 ± 3N.m 


4 Install the baffle of the crankshafte timing pulley 
[Attention] Install the baffle towars the direction 
shown in the right figure. 


Content   ..  214  215  216  217   ..