Chery B11. Manual - part 142


  Index      Chery     Chery B11 - service repair manual


Search            


Content   ..  140  141  142  143   ..


Chery B11. Manual - part 142


Chery Eastar Service Manual                    Body Dimension and Accessories 

18 


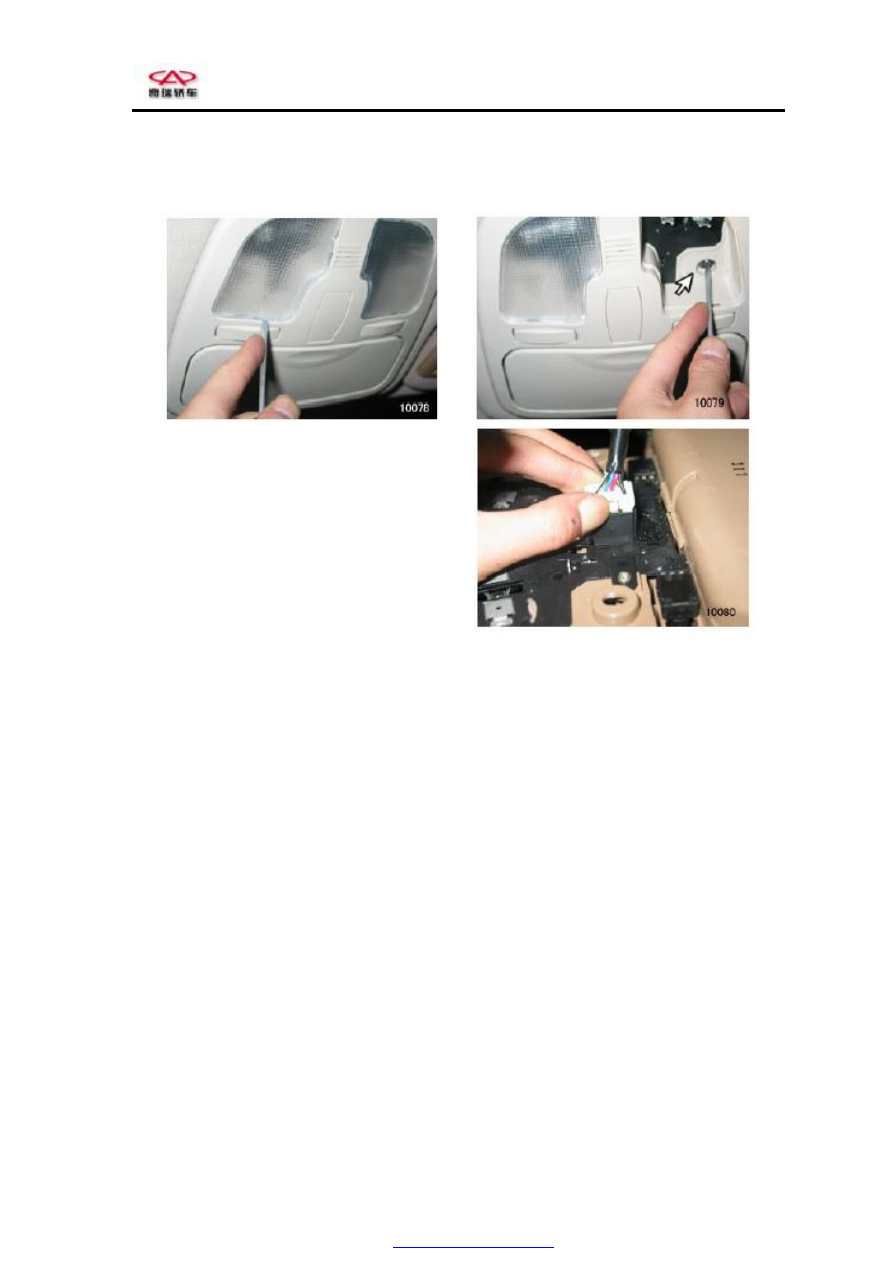
②  Pry  out  the  glass  cover  of  left/right  map 

lamp from the front, and loosen the screws. 


③  Detach  the  harness,  and  remove  the  wire  of 

map lamp. 


Assembling  requirements:  The  metal  clips  of  pillar  trim  shall  be  assembled  to  its  proper  position, 

without  the  looseness  phenomenon.  The  shield  shall  match  better  with  the  ceiling  and  weather  strip. 

The  adjusting  baffle  of  seat  belt  tied  on  B  and  C  upper  shields  shall  operate  freely  and  smoothly 

without influencing the adjustment  of seat belt.  The tightening  force  of screw shall be appropriate to 

ensure  that  no  looseness  phenomenon  occurred  when  the  sun  visor  operates  normally.  The  sun  visor 

shall  operate  freely  and  smoothly  when  it  works  normally,  without  such  phenomena  as  noise,  seized 

and etc. The fixed mounting shall be able to clamp the sun visor well, and it is prohibited that the sun 

visor falls down during operation. The positions of assembly holes of sun visor, passenger armrest and 

ceiling fixing clip shall correspond to the positions of screw holes of vehicle body, with the tolerance 

of  central  engagement  factor  of  ±l.5  mm,  to  ensure  that  the  sun  visor,  passenger  armrest  and  fixing 

clip are assembled to its  proper positions without any influence  on the appearance.  The height of the 

front end of ceiling shall not disturb the assembly  of  front windshield, and the corner of front end of 

ceiling  shall  be  invisible  from  the  outside,  the  viewing  angle  of  which  shall  be  in  the  horizontal 

direction with the same height as the roof. The rim of ceiling shall match well with the door opening 

weather  seal  and  luggage  weather  seal,  without  the  exposure  of  ceiling’s  corner  and  untightness  of 

edge. And it is prohibited that there are the warp outward and sag in the corner of ceiling, which may 

cause the fit unevenness of pressing plates of weather seal. The arch of rim of ceiling shall match well 

with that of the upper shield of A, B and C columns, and the fit clearance shall be less than 0.2 mm. 

Assemble in the reverse order of disassembly. 

PDF created with pdfFactory Pro trial version 

www.pdffactory.com

Chery Eastar Service Manual                    Body Dimension and Accessories 

19 


Disassembly/Assembly of Rear Seat Reading 
Lamp 

l. 

Pry out the glass cover. 


2. 

Unscrew  the  two  fixing  screws,  and  detach  the 

harness and remove the reading lamp. 


Disassembly of Three Auxiliary Handgrip 

l. 

Pry out the decorative cover. 


2. 

Unscrew  the  two  fixing  screws  and  remove  the 

and grip. 


Assemble in the reverse order of disassembly. 


PDF created with pdfFactory Pro trial version 

www.pdffactory.com

Chery Eastar Service Manual                    Body Dimension and Accessories 

20 


Disassembly  of  Fixed  Mounting  of  Rear 
Curtain 

l. 

Pry out the fixed mounting. 


2. 

Pull  out  the  inner  roof  downwards  slowly  from 

the front windshield. 


3. 

Please  take  care  the  inside  and  outside  of  shield 

lining after filling adhesive during reassembly. 


Disassembly of Floor Carpet 

Disassemble the following parts: 

1. 

Remove  the  cushioning  of  front/rear  seat.  (See 

Disassembly of Seat) 

2. 

Remove  the  front/rear  saddle.  (See  Disassembly 

of Instruments) 

3. 

Remove  the  front/rear  door  frame  plates  and  B 

column trim. (See Disassembly of Seat Belt) 


4. 

Pry out the bolt cover of left foot pedal. 


PDF created with pdfFactory Pro trial version 

www.pdffactory.com

Chery Eastar Service Manual                    Body Dimension and Accessories 

21 


5.  Remove  the  two  fixing  bolts  for  left  foot 

pedal pad. 


6.  Remove the fixing bolts for the exterior trim of fuel tank cap switch, and take out the exterior trim 

Assemble in  the reverse  order of disassembly.  Assembling requirements:  The  doorsill  platen shall be 

edged into the lower shield of B column, and the both ones shall match well, without ripple and other 

phenomena. All parts of platen shall be assembled in its proper positions, and fully attach to the floor 

of vehicle body, without any swollen color, wrinkle and other defects.


Disassembly of Rear Manual Curtain Infolding and Window Brake Lamp 

1. 

Disassemble the rear seat assy. (See Disassembly of Seat

2. 

Unscrew the fixing bolts of seat belt and seat plate. (See Disassembly of Seat Belt

3. 

Unscrew the four fixing nuts 

4. 

Take out the trim, unscrew the eight fixing bolts, and remove the rear curtain 


PDF created with pdfFactory Pro trial version 

www.pdffactory.com


Content   ..  140  141  142  143   ..