Chery B11. Manual - part 124


  Index      Chery     Chery B11 - service repair manual


Search            


Content   ..  122  123  124  125   ..


Chery B11. Manual - part 124


Chery B11 Service Manual


Air Conditioner-19 


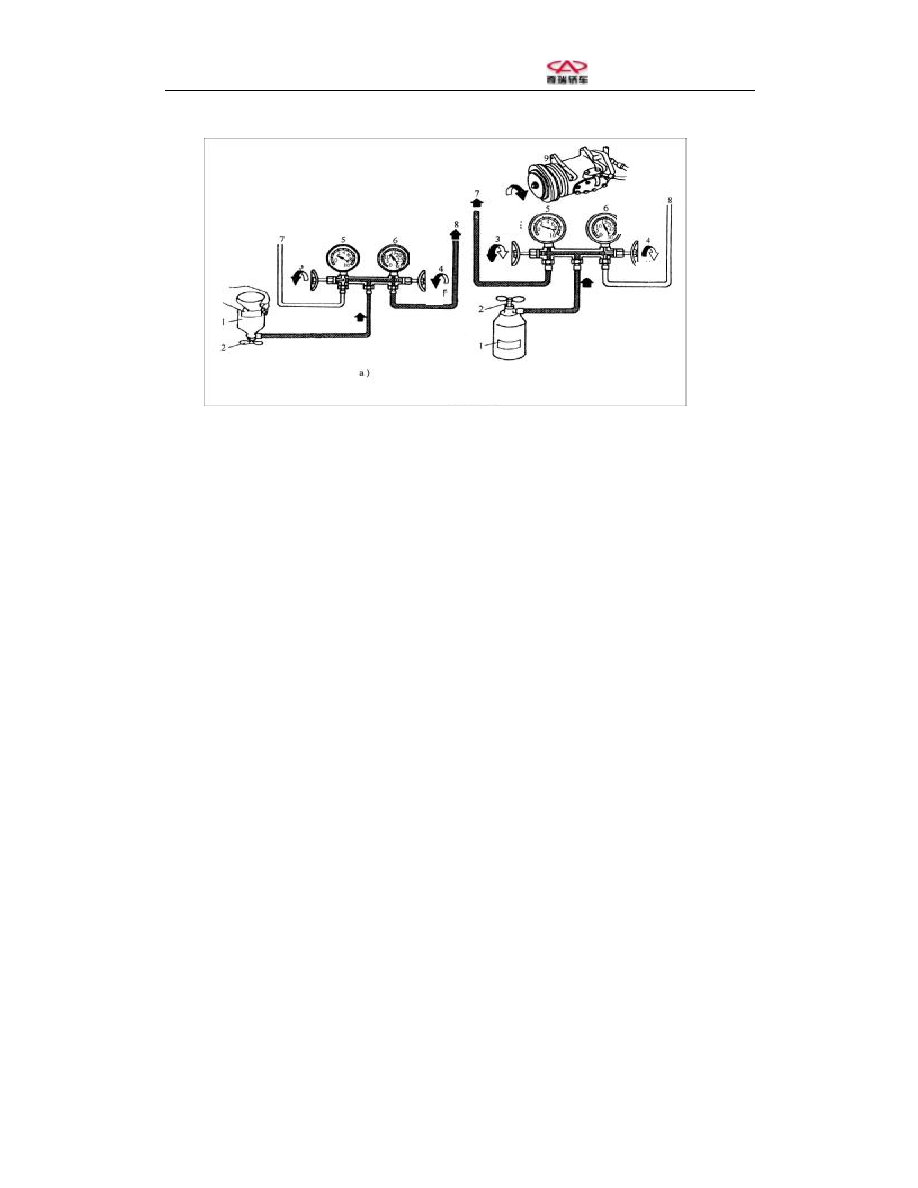
Charging the refrigerant 

Low 
pressur

ON 

High 
pressur

Low 
pressur

High 
pressur

OFF 

OFF 

OFF 

1-Refrigerant tank


2-Unlock valve


3-Low-pressure manual valve 

4-High-pressure manual valve


5-Low-pressure gauge


6-High-pressure gauge


7-Connect to low-pressure   

service valve hose


8-Connect to high-pressure   

service valve hose


.9-A/C compressor


Chery B11 Service Manual


Air Conditioner-20 

Section 12 Methods of Refrigerant Vacuumizing 

It  is  difficult  to  pump  out  the  water  from  the  refrigeration  system  when  vacuumizing.  But  the 

vacuumizing  can  reduce  the  fluidization  point  of  water  after  the  vacuum  is  generated  in  the 

refrigeration system, which enables the  water to boil at the lower temperature, and pump  out it in 

the form of steam from the system. 

Conduct  the  leak  check  firstly  before  vacuumizing.  If  vacuumizing  without  the  leak  check,  it  is 

difficult  to  find  out  the  leaking  position  after  vaccumizing  when  there  is  a  certain  leakage 

phenomenon.   

The purpose of vacuumizing is to further check the air tightness of the refrigeration system under 

the  vacuum  condition,  and  prepare  for  the  system’s  refrigerant  charging.  Its  procedures  are  as 

follows: 

(1)  Connect the  high-pressure  gauge hose to the  high-pressure service  valve joint  of  refrigerant 

tank,  shown  in  the  figure  below,  connect  the  low-pressure  gauge  hose  to  the  low-pressure 

service  valve joints on the pipe from the evaporator to the A/C compressor, and connect the 

intermediate hose to the interface of vacuum pump. 

(2)  Turn  on  the  high-  and  low-pressure  valves  of  manifold  pressure  gauge,  and  start  up  the 

vacuum gauge. 

(3)  The  vacuum  pump  works  for  at  least  15  min  to  make  the  vacuum  reading  of  low-pressure 

gauge 

below 0.07×10

5

Pa (708mmHg) . If the vacuum reading can’t be obtained, turn off the 

manual valves at the high-  and low-pressure sides, stop  vacuumizing, and check the leaking 

position. 

(4)  Turn  off  the  valves,  and  the  gauge  needle  doesn’t  return  back  within  10  min,  which  it  is 

called  the  vacuum  leakage  check  method.  If  the  vacuum  down,  it  shows  that  there  is  a 

leaking position which can be found out by using a leakage detector. 

(5)  If  the  gauge  needle  doesn’t  considerably  return  back  within  10  min,  it  indicates  that  the 

system is normal and the refrigerant can be charged into the system. 

(6)  Restart the vacuum pump, and turn on the low-pressure valve of the manifold pressure gauge 

to  continuously  vacuumize  15  min.  Then,  turn  off  the  low-pressure  valve  to  stop 

vacuumizing, and prepare for charging the refrigerant.


Chery B11 Service Manual


Air Conditioner-21 


High 
pressure

Low 
pressu
re 

On


On


On


Vacuumizing 


1-Connect to low-pressure service valve hose


2-Connect to high-pressure service valve hose


3-Low-pressure gauge


4-High-pressure gauge


5-Low-pressure manual valve


6-High-pressure manual valve


7-Vacuum pump


Chery B11 Service Manual


Air Conditioner-22 

Section 13 Methods of Refrigeration Oil Charging 

There  are  two  methods  for  refrigeration  oil  charging: 

direct charging method and vacuum inhaling method.   

I


Direct charging (shown in the right figure)


(1)


Remove  the  oil  charging  plug  1,  and  charge  the 

specified model of refrigeration oil.


(2)


Observe the level of oil through the plug hole, and 

turn  the  clutch  front  plate  to  enable  the  piston 

connecting  rod  just  at  the  central  position  of  the 

plug hole. 


(3)


Insert  the  dip  stick  3  into  the  right  side  of  piston 

connecting  rod  till  the  dip  stick  end  touches  the 

compressor casing.


(4)


Take  out  the  dip  stick,  and  check  the  reading 

(mark)  of  refrigeration  oil  which  shall  be  within 

the scale 4 to 6 of dip stick.


II


Vacuum inhaling (shown in the right figure)


Vacuumize the refrigeration system to 0.2X10⁵ Pa 

(737  mmHg),  and  then  start  to  charge  the 

refrigeration  oil,  the  procedures  of  which  are  as 

follows: 

(1)


Turn  off  the  high-pressure  manual  valve, 

and turn off the auxiliary valve.


(2)


Remove  the  high-pressure  side  hose  from 

the  manifold  pressure  gauge,  and  insert  the 

hose into the oil cup.


(3)


Turn  off  the  auxiliary  valve  to  inhale  the 

refrigeration  oil  into  the  refrigeration 

system from the oil cup.


(4)  When  the  refrigeration  oils  in  the  cup  are  nearly  evacuated,  immediately  turn  off  the 

auxiliary valve so as to prevent the air from being inhaled into the system. 

(5)  Connect  the  high-pressure  side  hose  joint  to  the  manifold  pressure  gauge,  turn  on  the 

high-pressure  manual  valve, and  start up the  vacuum  pump to  vacuumize  the  high-pressure 

side  hose.  And  turn  on  the  auxiliary  valve  to  vacuumize  for  the  system  to  0.02X10

Pa 

Direct Charging of Refrigeration Oil 

1-Oil charging plug. 2-Piston connecting 

Low-pressure gauge 

Low-pressure manual valve 

Vacuum pump 

High-pressure gauge 

High-pressure manual valve 

Vacuum pump 

Low-pressure gauge 

High-pressure gauge 

Low-pressure manual valve 

High-pressure manual valve 

Low-pressure side hose 

High-pressure pipe 

Air exhaust 

Air return 

Oil cup 

Vacuumizing and Charging the Refrigeration Oil 

High-pressure side hose 

auxiliary valve


Content   ..  122  123  124  125   ..