Chery A series. Manual - part 91
 

  Index      Chery     Chery A series - service repair manual


Search            copyright infringement  


Content   ..  89  90  91  92   ..


Chery A series. Manual - part 91


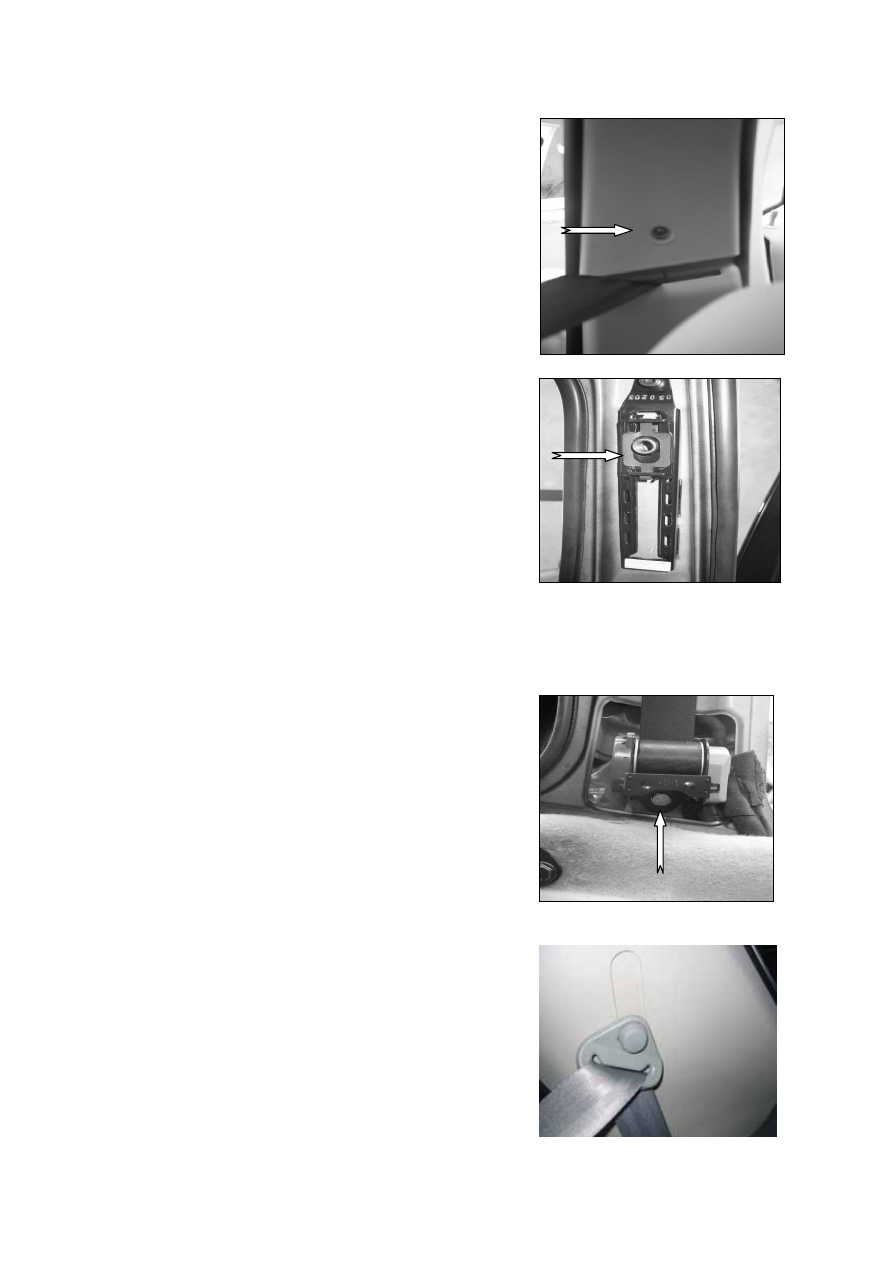
----Remove the nuts, loosen the bolt 

secured to the inner lining of B-pillar, 
and remove the B-pillar protective 
panel. 


----Loosen the two fixing screws of 

bottom-lining panel of B-pillar; remove 
the protective panel at the bottom of 
B-pillar. 

----Remove the decoration cap and loosen 

the fixing bolt between the safety seat 
belt and the floor as well as loosen the 
fixing bolt between the automatic lock 
device and B-pillar. 

----In case of seat belt with height adjuster as 

shown in the right figure, it is needed to 
loosen the two fixing bolts between the 
belt and B-pillar. 


INSTALLATION 
----Installation is in the reverse order of 

removal. Note the tightening torque for 
fixing bolt connecting seat belt with 
power steering device is 50±10N•m.


REMOVAL & INSTALLATION OF REAR 
SEAT BELT


----Remove the decoration of screw cap on 

the top, and loosen the two fixing bolt 
between seat belt and C-pillar and rear 
wheel house. 


S-15


----Loosen fixed bolt of automatic 

rewinding to remove seat belt. 

 
PRECAUTION: 

As the fixed position of belt has come 
away, wrap the belt in reverse on 
automatic device, and you should 
prevent the belt twisting up. 


REMOVAL & INSTALLATION OF FRONT

SEAT 

REMOVAL 

----Remove the limiting screw of the seat. 


----Remove the bolt stopper of regulating 

handle of the seat.  

 
----Press down the core of retainer pin of 

the seat track cover to take out the 
retainer pin and seat track cover. Pull out 
the seat backward. 

 
INSTALLATION: 
----Install in the reverse order of removal. 
 
PRECUATION 
Lubricative grease shall be applied in both sides
of tracks.   
 
REMOVAL & INSTALLATON OF REAR 
SEAT 


REMOVAL 
----Fold the rear seat forward until reaching 

the fixed bolt of lock. Loosen the bolt 
and the bolt connecting middle seat belt 
and the floor panel. 

 
INSTALLATION 
----Install in the reverse order of removal. 

Tightening torque for middle seat belt 
and the lock is 50±10N·m. 


S-16

REMOVAL & INSTALLATON OF 
INNER REARVIEW MIRROR 
----Turn inner rearview mirror, making a 1 

5℃ ~ 20

 angle between pole and 

beeline of vehicle. 

 
----Install in reverse order of removal. 


REMOVAL & INSTALLATON OF SUN 
VISOR & ITS BRACKET 


---- Remove sun visor after remove bracket 

and its fixed bolt. For the vehicle with 
door-controlled mirror, it is necessary 
to remove electrical system. 

---- Install in reverse order of removal. 


REMOVAL & INSTALLATON OF 

PASSENGER GRAB HANDLE 

---- Remove lid on bottom end of inner grab 

handle and fixed bolt with screwdriver. 

---- Take out fixed bolt between the handle 

and body to remove the grab handle. 

---- Install in the reverse order of removal. 


S-17

INTERIOR ACCESSORIES (A15 INTERIOR TRIM)


DISASSEMBLY AND ASSEMBLY OF 

INSTRUMENT PANEL 


Disassembly:


A. Begin from engine compartment 

1. Remove the negative grid of battery. 


2. Remove the right-hand-side wiper of 

windshield. Loosen the four fastening 
clamps at the bottom side of the windshield 
trim plate. 

Remove the cover of box. 

3. Remove two fastening screws from the 

instrument panel located in the cowl top 
grille.


S-18


Content   ..  89  90  91  92   ..