Alfa Romeo Stelvio (2022 year). Manual in english - page 13
 

  Index      Manuals     Alfa Romeo Stelvio (2022 year). Manual in english


Search            copyright infringement  


Content      ..     11      12      13      14     ..


Alfa Romeo Stelvio (2022 year). Manual in english - page 13


 IN AN EMERGENCY

206

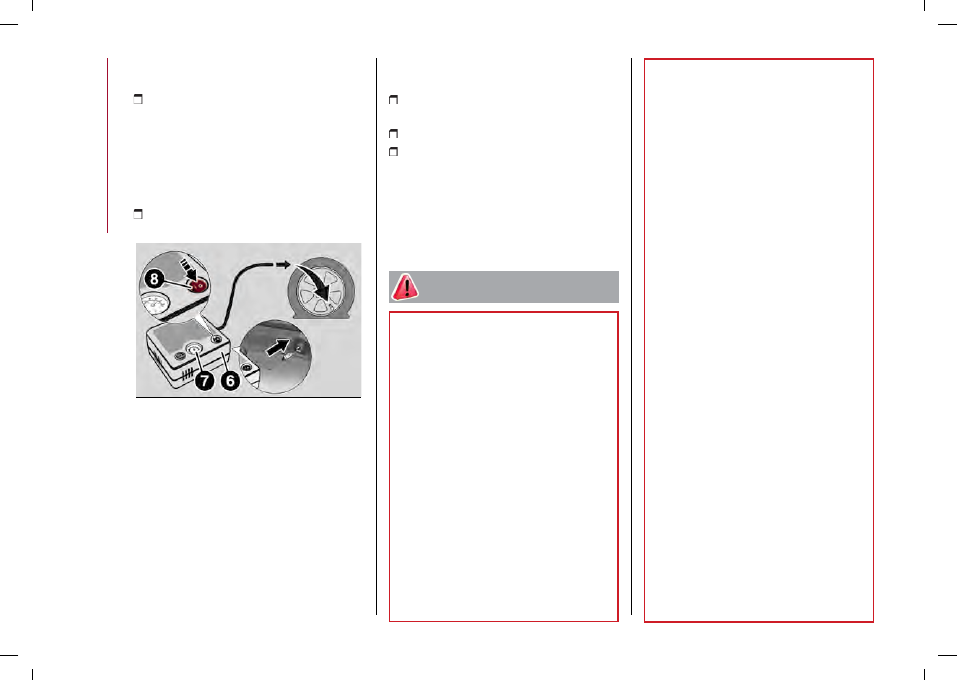
and screwing on the compressor inflation
hose fitting (6) fig. 244;

make sure that the switch (8) on the

compressor (6) is in the 0 (off) position,

open the rear hatch and insert the plug

into the power socket in the luggage

compartment or on the central tunnel

and start the engine. Put the switch (8) in

the I (on) position;

inflate the space-saver wheel to a

pressure of 43.5 psi (3 bar);

244

08066V0011EM

WARNING To conserve the battery

charge, you are advised to leave the

engine running throughout the inflation

process.
To obtain a more accurate reading, it is

advisable to check the inflation pressure

of the space-saver wheel on the pressure

gauge (7) with the compressor off.
The compressor was designed

exclusively for inflating the space-saver

wheel. Do not use it for inflating

mattresses, rafts, etc.

operate the extension lever (2) on the

jack (4) to lower the car;

then extract the jack (4);
use the wrench (3), to fully tighten the

bolts, passing alternately from one bolt

to the opposite one.
When replacing an alloy wheel, it is

advisable to place it upside down, with

the aesthetic part facing upwards.

WARNING

170)

Indicate the presence of the stationary

car in accordance with current regulations:

hazard warning lights, warning triangle,

etc. Those on board should get out of the

car, especially if it is heavily laden, and wait

for the wheel to be replaced away from the

threat posed by the traffic.

171)

The jack is a tool developed and

designed only for changing a wheel, if a tyre

gets punctured or damaged, on the vehicle

with which it is supplied or on other vehicles

of the same model. Any other use, e.g. to

jack up other vehicle models or different

things, is strictly prohibited. Never use for

maintenance or repair activities under the

car or to exchange the summer/winter

wheels and vice versa. Never go under the

raised vehicle. Should it be necessary to

work under the vehicle, contact an Alfa

Romeo Dealership. Incorrect positioning

of the jack may cause the raised vehicle

to fall: use only in the positions indicated.

Do not use the jack for loads higher than

the one shown on its label. Never start the

engine with vehicle raised. If the vehicle is

raised more than necessary, everything can

become more unstable, with the risk of the

vehicle dropping violently. Thus, lift the

vehicle only as needed in order to access the

spare wheel.

172)

Alert other drivers that the car

is stationary in compliance with local

regulations: hazard warning lights, warning

triangle, etc. Any passengers on board

should leave the car, especially if it is

heavily laden. Passengers should stay away

from on-coming traffic while the wheel is

being changed. On hills or uneven roads, use

chocks or appropriate objects to block the

wheels of the vehicle.

173)

If left in the passenger compartment,

the punctured wheel and jack constitute

a serious risk to the safety of occupants

in the event of accidents or sharp braking.

Therefore, always place both the jack and

punctured wheel in the dedicated housing in

the boot.

174)

It is extremely dangerous to attempt to

change a wheel on the side of the car next to

the driving lane: make sure that the car is at

a sufficient distance from the road, to avoid

being run over.

175)

Never tamper with the inflation

valve. Never introduce tools of any kind

between the rim and the tyre. Check tyre

and space-saver wheel pressures regularly,

complying with the values given in the

"Technical specifications" chapter.

176)

The space-saver spare wheel is

specific for your car. Do not use it on cars of

different models. Do not use space-saver

wheels of different models on your car.

-------------------------------------------------------------------------------------------------------------------------------------------------------------

207

The space-saver wheel must only be used

in the event of an emergency. Never use it

for more than strictly necessary and never

exceed 80 km/h. On the space-saver wheel

there is an orange sticker, summarising the

main warnings regarding space-saver

wheel usage restrictions. Never remove or

cover the label. Never apply any hubcap to

the space-saver wheel. The car's driving

characteristics will be modified with the

space-saver wheel fitted. Avoid violent

acceleration and braking, abrupt steering

and fast cornering. Have the wheel repaired

and refitted as soon as possible. Using two

or more space-saver spare wheel at the

same time is forbidden. Do not apply grease

to the bolt threads before fitting: they could

come unscrewed.

IMPORTANT

72)

When turning the jack handle make sure

that it can turn freely without scraping

your hand against the ground. The moving

components of the jack ("worm screw"

and joints) can also cause injuries: avoid

touching them. If you come into contact

with lubricating grease, clean yourself

thoroughly.

73)

Contact an Alfa Romeo Dealership

as soon as possible to have the correct

tightening of the wheel bolts checked.

TYRE REPAIR KIT

DESCRIPTION

177) 178) 179) 180) 181) 182) 183) 184) 185) 186)

74)

3)

The Tyre Repair Kit is located in the boot,

inside a dedicated container marked with

the Alfa Romeo logo.
To access the Tyre Repair Kit, open the

boot, lift the load platform.
The Tyre Repair Kit includes also:

a spray can (1) fig. 245 of sealant, with

filling : tube (2);

a compressor (4) complete with

pressure gauge, fittings and an adhesive

label (3) with the words Max. 80 km/h”, to

be attached in a position easily visible to

the driver (e.g. on the dashboard) after

repairing the tyre;

some adaptors, for inflating different

elements.

245

08066V0002EM

WARNING The sealing liquid is effective

for external temperatures between -

40°F and 122°F (-40°C and +50°C). The

sealant has an expiry date.

INFLATION PROCEDURE

177) 178) 179) 180) 181) 182) 183) 187) 185) 186)

Proceed as follows:

stop the car in a position that is not

dangerous for oncoming traffic where

you can repair the tyre safely, as far as

possible from the side of the road;

turn on the hazard warning lights;
engage the electric parking brake;
engage P (Park) mode;
stop the engine and put on the

reflective safety jacket (for your

own safety and to comply with the

regulations in force in the country where

you are) before getting out of the car.

when the situation requires it (for

your own safety and to comply with the

regulations in force in the country where

you are), take the warning triangle from

the boot and position it at a suitable

distance from the car.

put on the gloves, connect the tube

(5) fig. 246to the spray can (1) using the

connector (6). Unscrew the tyre valve cap

and screw the filler pipe ring nut (2) onto

the tyre valve;

-------------------------------------------------------------------------------------------------------------------------------------------------------------

 IN AN EMERGENCY

208

246

08066V0004EM

make sure that switch (7) fig. 247 of the

compressor (4) is in (0) (off) position;

247

08066V0005EM

insert the plug into the socket in the

passenger compartment or in the boot
fig. 248 and start the engine;

248

08066V0006EM

switch on the compressor by turning

the switch (7) fig. 247 to the (I) (on)

position;

inflate the tyre to a pressure of at

least 32 psi (2.2 bar). In order to obtain a

more precise reading, check the pressure

value on pressure gauge (8) with the

compressor off;

if a pressure of at least 26 psi (1.8 bar)

is not reached within 15 minutes, the

tyre is too damaged to be repaired. Do

not continue driving, but contact an Alfa

Romeo Dealership;

after having driven for about 5 miles

(8 km), stop, engage the electric parking

brake and recheck the tyre pressure;

if the measured pressure is unchanged

(32 psi / 2.2 bar), continue driving to an

Alfa Romeo Dealership;

if the measured pressure is between

19 psi and 30.5 psi (1.3 and 2.1 bar), restore

pressure to 32 psi (2.2 bar), continue

driving to an Alfa Romeo Dealership;

if the measured pressure is lower than

19 psi (1.3 bar), the tyre is too damaged to

be repaired. Do not continue driving, but

contact an Alfa Romeo Dealership.
WARNING Only use original tyre repair

cannisters, which can be purchased at an

Alfa Romeo Dealership.
WARNING To conserve the battery

charge, it is recommended to leave the

car running for the entire inflation

process.

WARNING

177)

Punctures on the sides of the tyre may

not be repaired. Do not use the Tyre Repair

kit if the tyre was damaged as a result of

being used when underinflated.

178)

Always put on protective gloves before

proceeding with the operation.

179)

Apply the adhesive label where it can

be easily seen by the driver as a reminder

that the tyre has been treated with the Tyre

Repair Kit. Drive carefully, particularly on

bends. Do not exceed 80 km/h. Avoid sudden

acceleration or braking.

180)

You must always indicate that the tyre

was repaired using the Tyre Repair Kit. Give

the booklet to the technicians who will be

handling the tyre that was treated using the

Tyre Repair Kit.

181)

Repairs are not possible in the case

of damage to the wheel rim (bad groove

distortion causing air loss). Do not remove

-------------------------------------------------------------------------------------------------------------------------------------------------------------

209

foreign bodies (screws or nails) from the

tyre.

182)

Never operate the compressor for

longer than 20 consecutive minutes.

Risk of overheating. The Tyre Repair

Kit is not suitable for definitive repairs,

so the repaired tyres may only be used

temporarily.

183)

As required by current regulations,

the information on chemical substances

for the protection of human health and the

environment and on the safe use of the

sealing fluid are on the packaging label.

Compliance with the indications on the

label is an essential condition to ensure the

safety and the effectiveness of the product.

Remember to carefully read the label before

use; the user of the product is responsible

for any damages caused by improper use.

The sealing fluid has an expiry date. Replace

the bottle if the sealant has expired.

184)

If the pressure falls below 1.3 bar, do

not drive any further: the Tyre Repair Kit

cannot guarantee proper seal because the

tyre is too damaged. Contact an Alfa Romeo

Dealership.

185)

The Tyre Repair Kit provide a

temporary repair, therefore the tyre must

be examined and repaired by a specialist as

soon as possible. The sealant is suitable

for use at temperatures in the range from

−40°C to +50°C.

186)

Indicate the presence of the stationary

car in accordance with current regulations:

hazard warning lights, warning triangle, etc.

Those on board should get out of the vehicle

and wait for the wheel to be repaired away

from the threat posed by the traffic. If

parked on a slope or rough surface, chock

the wheels with wedges or other suitable

devices (for the correct procedure for

parking the car safely, refer to the "Parking"

paragraph in the "Starting and driving"

chapter).

187)

If the pressure falls below 1.8 bar, do

not drive any further: the Tyre Repair Kit

cannot guarantee proper seal because the

tyre is too damaged. Contact an Alfa Romeo

Dealership.

IMPORTANT

74)

In the event of a puncture caused by

foreign bodies, the kit may be used to repair

tyres showing damage on the tyre tread up

to max. 6 mm diameter.

IMPORTANT

3)

Dispose of the bottle and the sealant

liquid properly. Have them disposed of

in compliance with national and local

regulations.

RUN FLAT TYRES

(where provided)

188) 189)

"Run Flat" tyres allow you to maintain

control of the car after a puncture and to

continue driving safely for about 50 mi

(80 km) at a maximum speed of 50 mph

(80 km/h).
The reinforced tyre wall retains its shape

and supports the weight of the car in the

event of pressure loss.
Cars equipped with Run Flat tyres are

NOT provided with Tyre Repair Kits. For

repair, contact an Alfa Romeo Dealership

as soon as possible.

WARNING

188)

A pressure loss alters the driving

behaviour of the car, for example, causing

less directional stability when braking,

longer braking distances and altered

steering geometry. Therefore, adjust your

driving style to avoid sudden turns or

obstacles such as pavements and potholes.

189)

Do not exceed 60 km/h when driving

with an especially heavy trailer.

-------------------------------------------------------------------------------------------------------------------------------------------------------------

 IN AN EMERGENCY

210

JUMP STARTING

If the battery is flat, a jump starting can

be performed using the battery and

the cables of another car, or using an

auxiliary battery. In all cases, the battery

used must have a capability equal to or a

little higher than the flat one.
Jump starting may be dangerous if

carried out incorrectly: carefully follow

the procedures described below.

75)

WARNINGS

Do not use an auxiliary battery or any

other source of external supply with

a voltage above 12V: the battery, the

starter, the alternator and the electrical

system of the car could be damaged.
Do not attempt jump starting if the

battery is frozen. The battery could

break and explode!

REMOTE BATTERY CONNECTION

POLES

To facilitate the operation, the remote

poles of the battery for the jump starting

can be found in the engine compartment:

the battery, on the other hand, is placed

in the boot.
The negative terminal (-) fig. 249 is

located next to the right bonnet catch.

249

08076V0006EM

You can access the positive terminal (+)
by lifting the protective flap fig. 250.

250

08076V0002EM

The pole is shown in fig. 251.

251

08076V0001EM

QV version

The negative terminal (-) fig. 252 is

located next to the right bonnet catch.
You can access the positive terminal (+)
by lifting the protective flap fig. 253.

252

08076V0003EM

-------------------------------------------------------------------------------------------------------------------------------------------------------------

211

253

08076V0007EM

To carry out the operation, you need to

have the correct cables to connect the

auxiliary battery to the remote poles of

the flat battery.
Usually, these cables have terminals at

the ends and are identified by different

sheath colours (red = positive, black =

negative).

STARTING WITH AUXILIARY BATTERY

190) 191) 192)

Proceed as follows:

switch off all electrical devices in the

car;

engage the parking brake, activate P

(Park) mode and put the ignition device in

the STOP position;

should you be using the battery of

another car, park the other car within

the range of the cables used for the

connection, operate the parking brake

and ensure that its ignition is off.

WARNING If the auxiliary battery is

installed on another car, check that there

is no accidental contact of metal parts

between the two cars, since an earth

connection may result, with the risk of

serious injury to any people who may be

nearby.
WARNING If the procedure below is

carried out incorrectly, it can cause

severe injury to people or damage the

recharging system of one or both cars.

Carefully follow the instructions given

below.

Cable connection

76)

Proceed as follows to carry out a jump

starting:

connect a terminal on the end of the

positive cable from the remote positive

pole (+) of the car with flat battery;

connect the terminal on the opposite

end of the positive (+) cable to the

positive (+) pole of the auxiliary battery;

connect a negative cable end terminal

to the negative (-) pole of the auxiliary

battery;

connect the terminal on the opposite

end of the negative (-) cable to the earth

point (-) on the car with the battery flat;

start the engine of the car with an

auxiliary battery, let it run for some

minutes at idle and then start the engine

of the car with flat battery.

In case a portable battery is used, before

starting the car, wait a few seconds after

completing the connection.

Cable disconnection

Once the engine is started, remove the

connection cables in reverse sequence,

as shown below:

disconnect the negative cable end

terminal (-) from the earth point (-) of the

car with flat battery;

disconnect the terminal on the

opposite end of the negative cable from

the negative (-) pole of the auxiliary

battery;

disconnect the terminal on the

opposite end of the positive (+) cable

from the positive (+) pole of the auxiliary

battery;

disconnect the terminal on the end

of the positive cable from the remote

positive pole (+) of the car with flat

battery.

WARNING

190)

Do not get too close to the radiator

cooling fan: the electric fan may start;

danger of injury. Scarves, ties and other

loose clothing might be pulled by moving

parts.

191)

Remove any metal objects (e.g. rings,

watches, bracelets), that might cause an

-------------------------------------------------------------------------------------------------------------------------------------------------------------

 IN AN EMERGENCY

212

accidental electrical contact and cause

serious injury.

192)

The batteries contain acid that can

burn skin or eyes. Batteries produce

hydrogen, which is easily flammable and

explosive. Thus keep away flames or

devices which may cause sparks.

IMPORTANT

75)

Never use a fast battery charger to

start the engine as this could damage the

electronic systems, particularly the engine

ignition and fuel supply control units.

76)

Do not connect the cable to the negative

terminal (–) of the flat battery. The following

spark could lead to battery explosion and

cause serious harm. Only use the specific

earth point; do not use any other exposed

metallic part.

FUEL CUT-OFF SYSTEM

DESCRIPTION

Depending on the type and violence

of the impact, the control unit of the

ORC occupant protection systems

determines whether to activate

the airbags and the front seat belt

pretensioners and whether to

immediately interrupt the current from

the batteries to the supply pumps and to

the devices that operate the engine. The

power from the battery is interrupted by

"skipping" the pyrotechnic fuse placed on

the fusebox next to the positive pole of

the battery.
When the fuse is "skipped", only some

services, necessary for the safety of the

vehicle (e.g.: door locks, anti-theft device,

etc.), remain powered.
WARNING After the impact, carefully

check the vehicle for fuel leaks, for

instance in the engine compartment,

under the vehicle or near the tank area.
WARNING Contact an Alfa Romeo

Dealership to have the system checked.

ENGINE OVERHEATING

WARNING An overheated cooling

system can damage the car. In the case

of overheating, pull over and stop the

car. Keep the engine at idling with air

conditioning off until the temperature

decreases. If temperature does not

decrease, contact an Alfa Romeo

Dealership as soon as possible.
WARNING Coolant (antifreeze) exiting

from the engine or vapour exiting from

the radiator can cause serious burns. If

vapour is seen or heard coming from the

engine compartment, do not open the

bonnet until the radiator has had enough

time to cool down. Never try to remove

the cap when the radiator is hot.

-------------------------------------------------------------------------------------------------------------------------------------------------------------

213

AUTOMATIC TRANSMISSION

GEAR LEVER RELEASE

(where provided)
To release the automatic transmission

lever, contact an Alfa Romeo Dealership.

TOWING A BROKEN-DOWN CAR

This paragraph describes the conditions

and methods to transport and tow a

broken-down car with a breakdown truck.
The assistance car operators must be

informed about the minimum ground

clearance of the car in order to avoid

contact between the ends of the bumper

with the tow truck equipment.
The front and rear attachment corners

of the car, to be taken into consideration

when loading the car on the roadside
assistance vehicle are shown in fig. 254.

254

08126V0001EM

AWD versions

A

: 21.7°

B

: 18.3°

RWD versions

A

: 20.6°

B:

18.8°

QV versions

A

: 20.8°

B

: 20°

REAR-WHEEL DRIVE (RWD) VERSIONS

It is recommended to tow the car with

all four wheels lifted from the ground on

the platform of a roadside assistance

vehicle.
If a tow truck with platform is not

available, the car must be towed with

the rear wheels LIFTED from the ground

(using a trailer or special equipment

allowing lifting of the rear wheels).

ALL-WHEEL DRIVE (AWD) VERSIONS

It is recommended to tow the car with

all four wheels lifted from the ground on

the platform of a roadside assistance

vehicle.
WARNING Avoid lifting the front (or

rear) wheels only, using a trailer or car

that allows lifting the wheels of one axle

only. Lifting the front (or rear) wheels

only while towing might damage the

transmission or the transfer unit.

WARNINGS

If a car is towed without complying

with the above requirements, the

transmission and/or the transfer unit

might be seriously damaged (on AWD

versions). Damage due to incorrect

towing is not covered by warranty.
The car should be transported with all

four wheels lifted from the ground on the

platform of a roadside assistance car.

Avoid towing with only the front (or rear)

wheels lifted. When towing with only the

front (or rear) wheels lifted, in addition to

damaging the body, it could damage the

gearbox.
To carry out the operation, the

assistance car must be equipped with

an appropriate movement/lifting

equipment to avoid damaging the car.

For loading on the towing car, attach the

tow equipment to the main structural

components of the car and not to the

bumpers or other related brackets.
Comply with the regulations regarding

assistance and car towing in force in each

country.
When securing the car to a row truck, do

not attach to front or rear suspension

components. Damage to your car may

result from improper towing.

-------------------------------------------------------------------------------------------------------------------------------------------------------------

 IN AN EMERGENCY

214

TOWING THE CAR

193) 194) 195)

In order to be able to tow the car, which

has been in an accident or has broken

down, on the road surface and only for

short distances, a tow ring is provided in

the tools container inside the boot.
Proceed as follows to use the tow ring:

release the cap fig. 255 on the front or

rear bumper (where provided) fig. 256,

pressing on the upper part;

take the tow hook from its housing in

the boot and carefully clean the threaded

housing on the car before using it;

tighten the car's tow ring in its place

for about 11 turns.

255

08136V0001EM

256

08136V0003EM

WARNING The largest work angle of

the cable to fix on the tow ring must not
exceed 15°, as shown in fig. 257.

257

08136V0002EM

WARNING

193)

Move the ignition device to ON and

then to STOP, without opening the door.

194)

The brake servo and the

electromechanical power steering will not

work while the vehicle is being towed. You

will therefore need to apply more force on

the brake pedal and steering wheel. Do not

use flexible ropes when towing, and avoid

jerky movements. While towing, make sure

that the trailer hitch does not damage any

components it is touching. When towing the

car, you must comply with all specific traffic

regulations and adopt an appropriate

driving behaviour. Do not start the engine

while towing the car. Before tightening the

ring, clean the threaded housing thoroughly.

Make sure that the ring is fully screwed into

the housing before towing the car.

195)

The front and rear tow hooks should

be used only for emergencies on the road.

You are allowed to tow the vehicle for short

distances using an appropriate device in

accordance with the highway code (a rigid

bar), to move the vehicle on the road in

readiness for towing or transport via a

breakdown vehicle. Tow hooks MUST NOT

be used to tow vehicles off the road or

where there are obstacles and/or for towing

operations using cables or other non-rigid

devices. In compliance with the above

conditions, towing must take place with the

two vehicles (one towing, the other towed)

aligned as much as possible along the same

centre line.

-------------------------------------------------------------------------------------------------------------------------------------------------------------

Proper maintenance allows car performance to be maintained

over time, operating costs to be contained, and safety system

performance to be safeguarded. This chapter explains how.

MAINTENANCE AND CARE

SCHEDULED SERVICING . . . . . . . . . . . . . . . . . . . . . . . . . . . . . . . . . . . . . . . . . . . . . . . 216
ENGINE COMPARTMENT . . . . . . . . . . . . . . . . . . . . . . . . . . . . . . . . . . . . . . . . . . . . . . .226
RECHARGING THE BATTERY . . . . . . . . . . . . . . . . . . . . . . . . . . . . . . . . . . . . . . . . . .233
SERVICING PROCEDURES . . . . . . . . . . . . . . . . . . . . . . . . . . . . . . . . . . . . . . . . . . . . .235
LIFTING THE VEHICLE . . . . . . . . . . . . . . . . . . . . . . . . . . . . . . . . . . . . . . . . . . . . . . . . . .239
WHEELS AND TYRES . . . . . . . . . . . . . . . . . . . . . . . . . . . . . . . . . . . . . . . . . . . . . . . . . . .239
PROLONGED CAR INACTIVITY . . . . . . . . . . . . . . . . . . . . . . . . . . . . . . . . . . . . . . . 240
BODYWORK . . . . . . . . . . . . . . . . . . . . . . . . . . . . . . . . . . . . . . . . . . . . . . . . . . . . . . . . . . . . . . 241
INTERIOR . . . . . . . . . . . . . . . . . . . . . . . . . . . . . . . . . . . . . . . . . . . . . . . . . . . . . . . . . . . . . . . . .243

-------------------------------------------------------------------------------------------------------------------------------------------------------------

 MAINTENANCE AND CARE

216

SCHEDULED SERVICING

Correct servicing is crucial for

guaranteeing a long life for the car under

the best conditions.
For this reason, Alfa Romeo has planned

a series of checks and maintenance

operations at fixed distance intervals

and, for versions/markets, where

provided, at fixed time intervals, as

described in the Service Schedule.
Before each service, it is always

necessary to carefully follow the

instructions in the Scheduled Servicing

Plan (e.g. periodically check level of

fluids, tyre pressure, etc.).
Scheduled Servicing is offered by an Alfa

Romeo Dealership according to a set

time schedule. If, during each operation,

in addition to the ones scheduled, the

need arises for further replacements or

repairs, these may be carried out with

the owner's explicit consent only.
WARNING Scheduled Servicing

interventions are set out by the

Manufacturer. Failure to have them

carried out may invalidate the warranty.
It is advisable to inform the Alfa Romeo

Dealership of any small operating

irregularities without waiting for the next

service.

REGULAR CHECKS

Every year or

620

miles (

1000

km) or

before long journeys, check and top up, if

necessary:

engine coolant level;
brake fluid level (if insufficient, see

an Alfa Romeo dealership as soon as

possible);

AdBlue® (UREA) diesel emissions

additive (2.2 JTD versions only);

windscreen washer fluid level;
tyre inflation pressure and condition;
operation of lighting system

(headlights, direction indicators, hazard

warning lights, etc.);

operation of windscreen wash/wipe

system and positioning/wear of wiper

blades.
Oil consumption of the engine depends

on conditions and driving style. For this

reason, the engine oil level must be

checked every

1860

miles (

3000

km),

and topped up, if necessary (see the

"Engine compartment - Checking the

levels" paragraph for information on the

quantity to be topped up).

DEMANDING USE OF THE CAR

If the vehicle is used in one of the

following conditions:

dusty roads;
short, repeated journeys (less than 7-8

Km) at sub-zero outdoor temperatures;

engine often idling or driving long

distances at low speeds or long periods

of inactivity;

in the event of a long period of

inactivity;
the following checks must be carried

out more often than indicated in the

Scheduled Servicing Plan:

check front and rear disc brake pad

condition and wear;

check cleanliness of bonnet and

tailgate locks, cleanliness and lubrication

of linkage;

visually inspect conditions of:

engine, gearbox, transmission,

pipes and hoses (exhaust/fuel

system/brakes) and rubber elements

(gaiters/sleeves/bushes, etc.);

check battery charge and battery fluid

level (electrolyte);

visually inspect conditions of the

accessory drive belts;

check and, if necessary, change engine

oil and replace oil filter;

check and, if necessary, replace pollen

filter;

check and, if necessary, replace air

cleaner;

check and, if necessary, replace the

Bad Fuel filter (where provided).

-------------------------------------------------------------------------------------------------------------------------------------------------------------

217

SCHEDULED SERVICING PROGRAMME (2.9 V6 engine)

WARNING Once you have carried out the last intervention in the table, continue with the scheduled servicing, maintaining the

frequency indicated in the plan by marking each operation with a dot or dedicated note. Warning: simply restarting the maintenance

from the start of the plan may cause the allowed interval to be exceeded for some operations!

Thousands of miles

9

18

27

36

45

54

63

72

81

90

Thousands of kilometres

15

30

45

60

75

90

105

120

135

150

Years

1

2

3

4

5

6

7

8

9

10

Check battery state of charge with the proper instrument

Check tyre condition/wear and adjust pressure. Check Tyre Kit

recharge (where provided) conditions/expiry date

Check operation of lighting system (headlights, direction indicators,

hazard warning lights, boot, passenger compartment, glove

compartment, instrument panel warning lights, etc.)

Check and, if necessary, top up fluid levels (1)

Check exhaust emissions/smokiness

Check the supply/engine control and emissions systems operation

using the diagnosis equipment

Visually inspect condition of: exterior bodywork, underbody

protection, pipes and hoses (exhaust, fuel system, brakes), rubber

elements (gaiters, sleeves, bushes, etc.)

Check windscreen and rear window wiper blade position/wear

Check operation of the windscreen wiper/washer system and adjust

nozzles, if necessary

-------------------------------------------------------------------------------------------------------------------------------------------------------------

 MAINTENANCE AND CARE

218

Thousands of miles

9

18

27

36

45

54

63

72

81

90

Thousands of kilometres

15

30

45

60

75

90

105

120

135

150

Years

1

2

3

4

5

6

7

8

9

10

Check cleanliness of bonnet and boot locks, cleanliness and lubrication

of linkage

Visually inspect conditions and wear of front/rear disc brake pads and

operation of pad wear indicators

Visually inspect the surface and edge of the carbon-ceramic brake

discs (where provided)

Visually inspect the condition and tensioning of the accessory drive

belt(s) (2)

Replace brake pads/carbon-ceramic brake discs (where provided)

(6)

Change engine oil and replace oil filter

Change Transfer Case oil (AWD versions)

Spark plug replacement(3)

Replace accessory drive belt/s

(2)

Replace air cleaner cartridge (4)

Change the brake fluid

(5)

Replace the Bad Fuel filter (where provided)

Replace passenger compartment filter (4)

-------------------------------------------------------------------------------------------------------------------------------------------------------------

219

Thousands of miles

9

18

27

36

45

54

63

72

81

90

Thousands of kilometres

15

30

45

60

75

90

105

120

135

150

Years

1

2

3

4

5

6

7

8

9

10

Alfa Connect Box system battery replacement (where provided) (7)

(1) Always only use the liquids shown in the handbook for topping up after having checked that the system is not damaged.
(2) The maximum mileage is 60,000 km. The belt must be replaced every 4 years, regardless of distance travelled. If the car is used in heavy

conditions (dusty areas, particularly harsh weather conditions, very low or very high temperatures for extended periods, urban driving, long periods

of idling), the maximum mileage is 30,000 km. The belt must be replaced every 2 years regardless of the mileage.
(3) The replacement must be performed according to mileage and regards of the elapsed time. The following are vital in order to ensure correct

operation and prevent serious damage to the engine: - only use spark plugs specifically certified for the engine itself of the same type and brand (see

the "Engine" paragraph in the "Technical specifications" chapter); - strictly comply with the spark plug replacement intervals in the Service Schedule.

It is advisable to contact a reference Dealership for plug replacement.
(4) If the car is used in dusty areas, this cleaner should be replaced every 15,000 km.
(5) The brake fluid must be changed every 2 years, regardless of the mileage.
(6) The actual interval for changing the brake pads and the carbon ceramic brake discs depends on the car usage conditions and is signalled by the

warning light or message on the instrument panel. Use the diagnosis equipment to reset the warning light every time the discs are replaced.
(7) The battery in the Alfa Connect Box system must be replaced every 5 years, regardless of mileage.
(o) Recommended operations
(●) Mandatory operations

-------------------------------------------------------------------------------------------------------------------------------------------------------------

 MAINTENANCE AND CARE

220


SERVICE SCHEDULE (2.0 T4 MAir engine)

WARNING Once you have carried out the last intervention in the table, continue with the scheduled servicing, maintaining the

frequency indicated in the plan by marking each operation with a dot or dedicated note. Warning: simply restarting the maintenance

from the start of the plan may cause the allowed interval to be exceeded for some operations!

Thousands of miles

9

18

27

36

45

54

63

72

81

90

Thousands of kilometres

15

30

45

60

75

90

105

120

135

150

Years

1

2

3

4

5

6

7

8

9

10

Check battery charge status with the proper instrument

Check tyre condition/wear and adjust pressure. Check Tyre Kit

recharge (where provided) conditions/expiry date

Check operation of lighting system (headlights, direction indicators,

hazard warning lights, boot, passenger compartment, glove

compartment, instrument panel warning lights, etc.)

Check and, if necessary, top up fluid levels (1)

Check exhaust emissions/smokiness

Check the supply/engine control and emissions systems operation

using the diagnosis equipment

Check engine oil deterioration using the diagnosis equipment (2)

Visually inspect condition of: exterior bodywork, underbody

protection, pipes and hoses (exhaust, fuel system, brakes), rubber

elements (gaiters, sleeves, bushes, etc.)

Check windscreen and rear window wiper blade position/wear

Check operation of windscreen washer system and adjust jets if

necessary

-------------------------------------------------------------------------------------------------------------------------------------------------------------

221

Thousands of miles

9

18

27

36

45

54

63

72

81

90

Thousands of kilometres

15

30

45

60

75

90

105

120

135

150

Years

1

2

3

4

5

6

7

8

9

10

Check cleanliness of bonnet and luggage compartment locks,

cleanliness and lubrication of linkage

Visually inspect conditions and wear of front disc brake pads and

operation of pad wear indicators

Visually inspect conditions and wear of rear disc brake pads and

operation of pad wear indicators

Visually inspect the condition and tensioning of the accessory drive

belt(s) (3)

Change engine oil and replace oil filter

(4)

Replace Transfer Case oil (for AWD versions)

Spark plug replacement(5)

Replace accessory drive belt/s

(3)

Replace air cleaner cartridge (6)

Change the brake fluid

(7)

Replace passenger compartment cleaner (6)

-------------------------------------------------------------------------------------------------------------------------------------------------------------


Content      ..     11      12      13      14     ..