Acura RL. Manual - part 437
 

  Index      Acura     Acura RL - service repair manual 2005-2008 year


Search            


Content   ..  435  436  437  438   ..


Acura RL. Manual - part 437


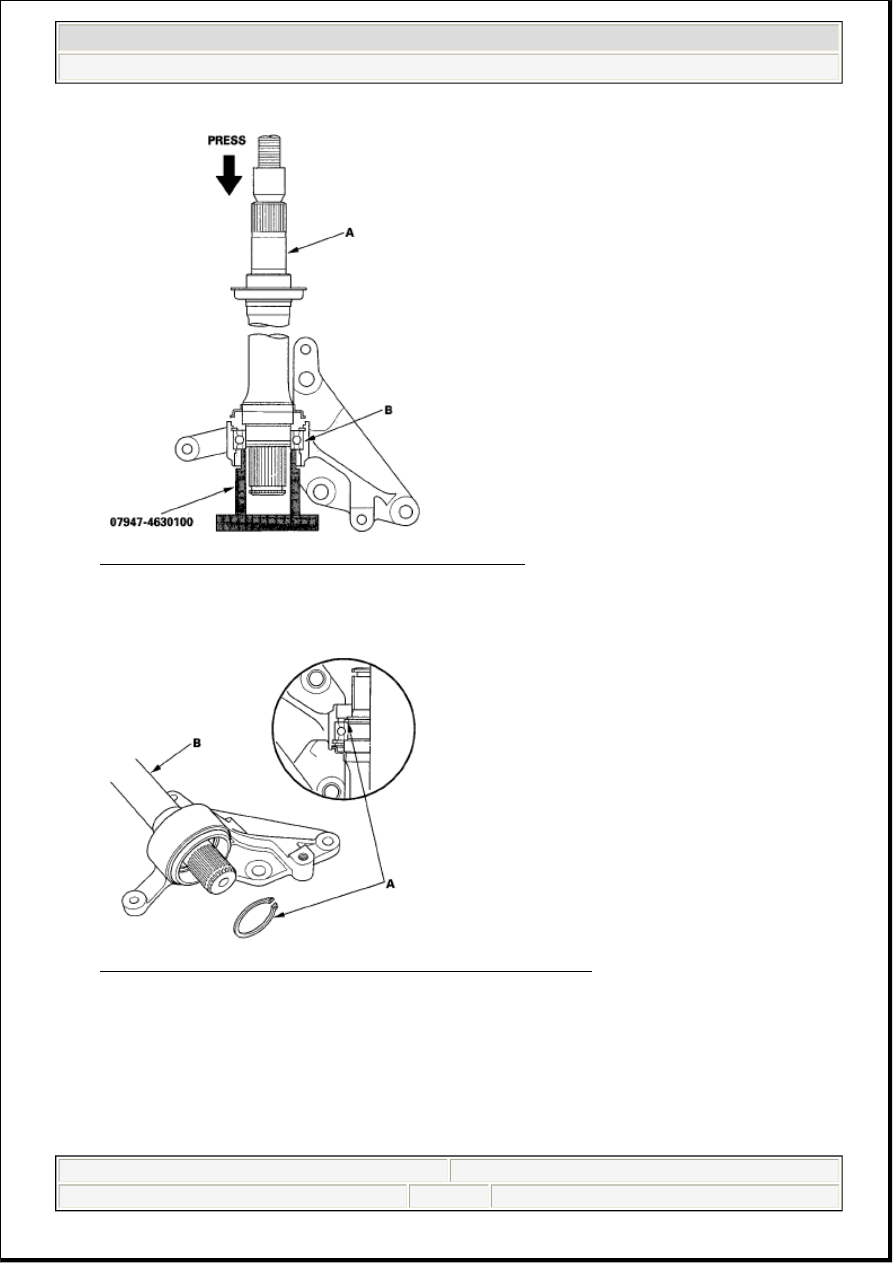
Fig. 73: Pressing Intermediate Shaft Into Shaft Bearing 
Courtesy of AMERICAN HONDA MOTOR CO., INC. 

5. Install, then seat the external snap ring (A) in the groove of the intermediate shaft (B). 

Fig. 74: Identifying External Snap Ring And Intermediate Shaft 
Courtesy of AMERICAN HONDA MOTOR CO., INC. 

6. Install the outer seal (A) into the bearing support (B) using the fork seal driver, 39.2x49.5 x 15 mm, 

support base attachment, support base and a press. 


2007 Acura RL 

2005-08 DRIVELINE/AXLES Driveline/Axle - RL


me 


Friday, June 05, 2009 3:01:08 PM

Page 34 

© 2005 Mitchell Repair Information Company, LLC. 

Fig. 75: Installing Outer Seal 
Courtesy of AMERICAN HONDA MOTOR CO., INC. 

7. Install the set ring. 

Fig. 76: Identifying Set Ring 
Courtesy of AMERICAN HONDA MOTOR CO., INC. 

8. Install the heat shield onto the bearing support. 

Fig. 77: Identifying Heat Shield Onto Bearing Support With Torque Specifications 
Courtesy of AMERICAN HONDA MOTOR CO., INC.


2007 Acura RL 

2005-08 DRIVELINE/AXLES Driveline/Axle - RL


me 


Friday, June 05, 2009 3:01:08 PM

Page 35 

© 2005 Mitchell Repair Information Company, LLC. 

INTERMEDIATE SHAFT INSTALLATION

1. Use brake cleaner to thoroughly clean the areas where the intermediate shaft (A) contacts the 

transmission (differential), and dry with compressed air. Do not wash the rubber parts in solvent. 
Insert the intermediate shaft assembly into the differential. Hold the intermediate shaft horizontally to 
prevent damage to the differential oil seal (B). 

Fig. 78: Identifying Intermediate Shaft And Differential Oil Seal 
Courtesy of AMERICAN HONDA MOTOR CO., INC. 

2. Install the flange bolt (A) and two dowel bolts (B). 

Fig. 79: Identifying Flange Bolt And Dowel BoltsWith Torque Specifications 
Courtesy of AMERICAN HONDA MOTOR CO., INC. 

3. Install the exhaust pipe bracket. 


2007 Acura RL 

2005-08 DRIVELINE/AXLES Driveline/Axle - RL


me 


Friday, June 05, 2009 3:01:08 PM

Page 36 

© 2005 Mitchell Repair Information Company, LLC. 

Fig. 80: Identifying Exhaust Pipe Bracket With Torque Specifications 
Courtesy of AMERICAN HONDA MOTOR CO., INC. 

4. Install the right driveshaft (see FRONT DRIVESHAFT INSTALLATION ).  

5. Refill the automatic transmission fluid (see ATF REPLACEMENT ).  

REAR DRIVESHAFT REMOVAL 

1. Raise the vehicle on a lift (see LIFT AND SUPPORT POINTS ).  

2. Remove the wheel nuts and rear wheels. 

Fig. 81: Identifying Wheel Nuts And Spindle Nut 
Courtesy of AMERICAN HONDA MOTOR CO., INC. 

3. Lift up the locking tab (A) on the spindle nut (B), then remove the nut.  

4. Remove the rear differential, and disconnect the inboard joint from the differential (see REAR 

DIFFERENTIAL REMOVAL ).  

5. Remove the rear driveshaft outboard joint from the trailing arm and rear hub using a plastic hammer 

or a puller if necessary. 


2007 Acura RL 

2005-08 DRIVELINE/AXLES Driveline/Axle - RL


me 


Friday, June 05, 2009 3:01:08 PM

Page 37 

© 2005 Mitchell Repair Information Company, LLC. 


Content   ..  435  436  437  438   ..