Kia Forte (2024 year). Manual in english - page 5
 

  Index      Kia     Kia Forte (2024 year). Manual in english


Search            copyright infringement  


Content      ..     3      4      5      6     ..


Kia Forte (2024 year). Manual in english - page 5


Features of your vehicle

60

4

LCD display

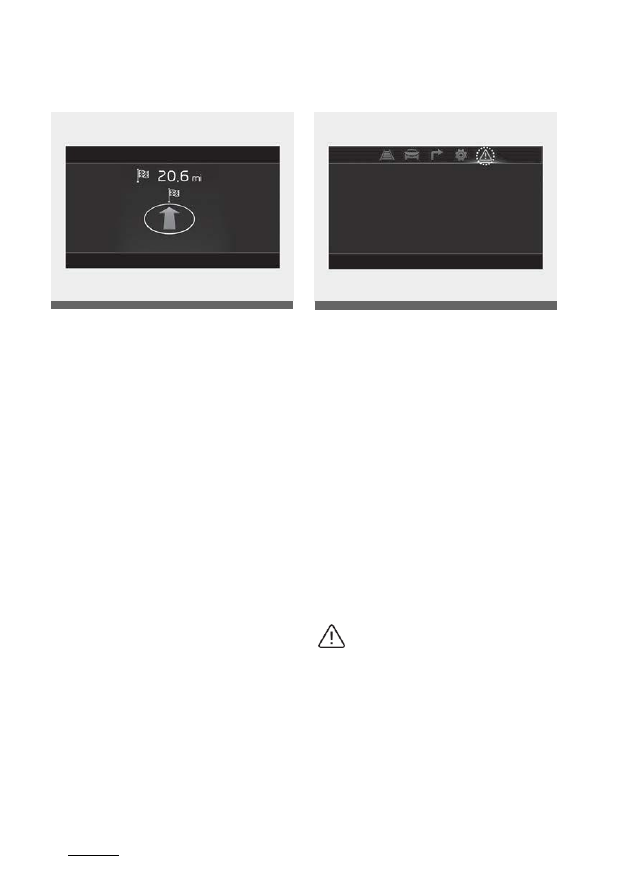
Turn By Turn mode (if equipped)

This mode displays the navigation state.

Master warning mode

This warning light informs the driver of 
the following situations.
• Forward Collision-Avoidance Assist 

malfunction (if equipped)

• Blind-Spot Collision Warning malfunc

-

tion (if equipped)

• Blind-Spot Collision Warning radar 

blocked (if equipped)

• High Beam Assist malfunction
• Smart Cruise Control malfunction (if 

equipped)

• Smart Cruise Control radar blocked (if 

equipped)

• LED headlamp malfunction
• TPMS failure, low pressure (if 

equipped), etc.

At this time, a Master Warning icon

(

) will appear on the LCD display. If

the warning situation resolves, the mas

-

ter warning light will turn off and the 
Master Warning icon will disappear.

OBDM041579

OBD041586

61

4

4

Features of your vehicle

LCD display

User settings mode (if equipped)

In this mode, you can change the set

-

tings of the instrument cluster, doors,
lamps, etc.

*The information provided may differ 

depending on which functions are 
applicable to your vehicle.

Shift to P (Park) to edit settings/ 
Engage parking brake to edit set

-

tings

This warning message appears if you try
to adjust the User Settings while driving.

Dual clutch transmission, IVT

Change the User Settings only after 
stopping the vehicle, applying the 
parking brake and moving the shift 
lever to P (Park).

• Manual Transmission

Change the User Settings only after 
stopping the vehicle and engaging the 
parking brake.

OBD041588L

Features of your vehicle

62

4

LCD display

Driver Assistance (if equipped)

*The information provided may differ depending on which systems are applicable to 

your vehicle.

Instrument Cluster (if equipped)

*The information provided may differ depending on which functions are applicable to

your vehicle.

Items

Explanation

SCC Reaction

Fast/Normal/Slow

To select the functions.

*For more details, refer to "Smart Cruise Control (SCC) (if equipped)" on page 6-64.

Warning Timing

Normal/Late

To select the Warning Time.

Warning Volume

High/Medium/Low

To select the Warning Volume.

Driver Attention Warning

Leading vehicle departure alert

Inattentive Drive Warning

To select the function.

*For more details, refer to "Driver Attention Warning (DAW) (if equipped)" on page 6-55

Forward Safety

Active Assist/Warning Only/Off

To select the functions.

*For more details, referto "Forward Collision

–Avoidance Assist (FCA) (Front view camera only)(if

equipped)" on page 6-4 or "Forward Collision-Avoidance Assist (FCA) (Sensor fusion) (if
equipped)" on page 6-15.

Lane Safety

Assist/Warning Only/Off

To select the functions.

*For more details, refer to "Lane Keeping Assist (LKA) (if equipped)" on page 6-27.

Blind-Spot Safety

Safe Exit Warning

To select the function.

*

For more details, refer to "Safe Exit Warning (SEW) (if equipped)" on page 4-23.

Active Assist/Warning Only/Off

To select the function.

*

For more details, refer to "Blind-Spot Collision Warning (BCW) (if equipped)" on page 6-32 or

"Blind-Spot Collision-Avoidance Assist (BCA) (if equipped)" on page 6-41

Parking Safety

Rear Cross-Traffic

Safety

To select the

function.

*For more details, refer to "Rear Cross-Traffic Collision Warning (RCCW) (if equipped)" on page

6-95 or "Rear Cross-Traffic Collision-Avoidance Assist (RCCA) (if equipped)" on page 6-101.

Items

Explanation

Wallpaper

Wallpaper A/Wallpaper B/Wallpaper C

To select the theme of instrument cluster LCD.

Wiper/Lights Display

If this item checked, the Wiper/Lights Display will be activated.

Traffic Signs

If this item checked, the Traffic Signs will be activated.

Icy Road Warning

If this item checked, the Icy Road Warning display will be activated.

Welcome Sound

If this item checked, the Welcome Sound will be activated.

63

4

4

Features of your vehicle

LCD display

Lights (if equipped)

*The information provided may differ depending on which functions are applicable to

your vehicle.

Door (if equipped)

*The information provided may differ depending on which systems are applicable to 

your vehicle.

Items

Explanation

One Touch Turn Signal

Off: The one touch turn signal function will be deactivated.

3, 5, 7 flashes: The turn signal indicator will blink 3, 5, or 7 times when the turn signal
lever is moved slightly.

*For more details, refer to "One-touch lane change function" on page 4-83.

Ambient Light Brightness

Off/Level 1,2,3,4

To adjust the brightness of the Ambient Light.

Ambient Light Color

Blue Flight/Peaceful Forest/Dreamy Purple/Aurora Violet/Orange Delight/Golden
Insight/Refreshing Sea

To select the color of the Ambient Light.

Headlight Delay

To activate or deactivate the headlight delay function.

High Beam Assist

To activate or deactivate High Beam Assist function.

*For more details, refer to "High Beam Assist (HBA)" on page 4-84.

Items

Explanation

Auto Lock

Enable on shift (if equipped with Dual clutch transmission, Intelligent Variable Transmission) : All doors will be
automatically locked if the vehicle is shifted from the P (Park) position to the R (Reverse), N (Neutral), or D
(Drive) position.(withthe engine ON, itis activated.)

Enable on speed: All doors will be automatically locked when the vehicle speed exceeds 9.3 mph (15 km/h).

Auto Unlock

On shift to P (if equipped Dual clutch transmission, Intelligent Variable Transmission): All doors will be auto

-

matically unlocked if the gear is shifted to the P (Park) position. (with the engine ON, it is activated.)

On key out/Vehicle off : All doors will be automaticallyunlocked when the ignition key is removed from the
ignitionswitch or the ENGINE START/STOP button is set to the OFF position.

Off : The auto door unlock operation will be canceled.

2 Press Unlock

If this item is checked, the two press unlock will be activated.Press the door unlock button once to unlock the
driver's door, and press the button once more within 4 seconds to unlock the rest of the doors.

Remote Window

To activate or deactivate the Remote Window.

*For more details, refer to "Remote window opening system (if equipped)" on page 4-36.

Smart Trunk

To activate or deactivate the Smart Trunk.

*For more details, refer to "Smart Trunk (if equipped)" on page 4-29.

Features of your vehicle

64

4

LCD display

Convenience (if equipped)

If the service interval is activated and the time and distance is adjusted, messages are 
displayed in the following situations each time the vehicle is turned on.
• Service in: Displayed to inform the driver the remaining mileage and days to ser

-

vice.

• Service required: Displayed when the mileage and days to service has been 

reached or passed.

If any of the following conditions occur, the mileage and number of days to service 
may be incorrect.
• The battery cable is disconnected.

The battery is discharged.

NOTICE

To use the service interval menu, consult an authorized Kia dealer.

Units

*The information provided may differ depending on which functions are applicable to

your vehicle.

Items

Explanation

Rear Occupant Alert

To activate or deactivate Rear Occupant Alert function.

*For more details,refer to "Rear Occupant Alert (ROA) system" on page 4-22.

Service Interval

Enable Service Interval : If this item is checked, the Service Interval function will be acti

-

vated.

Adjust Interval : If the Service Interval menu is activated, you may adjust the time and
distance.

Reset : To reset the Service Interval function.

Welcome Mirror/Light

To activate or deactivate the Welcome Mirror/Light function.

Wireless Charging System

To activate or deactivate the Wireless Charging System function.

*For more details,refer to "Wireless smart phone charging system (if equipped)" on page 4-

119.

Items

Explanation

Speed Unit

km/h, MPH

To select the Speedometer unit.

Temperature Unit

°C/°F

To select the Temperature unit.

Fuel Econ. Unit

L/100km, km/L or US gallon, UK gallon

To select the Fuel economy unit.

Tire Pressure Unit

psi, kPa, bar

To select the Tire Pressure Unit.

65

4

4

Features of your vehicle

LCD display

Language

Reset

Items

Explanation

Language

To select language.

Items

Explanation

Reset

You can resetthe menus in the User Settings mode.

Features of your vehicle

66

4

LCD display

Warning messages

Warning messages appear on the LCD 
to warn the driver. It is located in the 
center of the instrument cluster.

The warning message may appear dif

-

ferently depending on the type of instru

-

ment cluster and some may not show the
warning message at all.

The warning message is shown in either 
symbol, symbol and text only.

Door, hood, Trunk open

• This warning is displayed indicating 

which door, or the hood, or the trunk 
is open.

Sunroof open (if equipped)

• This warning is displayed if you turn 

off the engine when the sunroof is 
open.

Window open (if equipped)

• This warning is displayed if you turn 

off the engine when any window is 
open.

Lights mode

• This indicator displays which exterior 

light is selected using the lighting con

-

trol.

You can activate or deactivate Wiper/
Lights Display function from the User
Settings mode in the LCD display.

OBD041287

OBD041288

OBD041294L

OBD041590L

67

4

4

Features of your vehicle

LCD display

Wiper mode

• This indicator displays which wiper 

speed is selected using the wiper con

-

trol.

You can activate or deactivate Wiper/
Lights Display function from the User
Settings mode in the LCD display.

Engine Overheated

• This warning message illuminates 

when the engine coolant temperature 
exceeds the proper range. This mean 
that the engine is overheated and may
be damaged.

*If your vehicle is overheated, refer to "If 

the engine overheats" on page 7-7.

Shift to P (Park) (for smart key
system and Dual clutch transmis

-

sion, IVT (if equipped)

• This warning message illuminates if 

you try to turn off the engine without 
the gear in P (Park) position.

• The ENGINE START/STOP

button turns to the ACC position.

Low key battery (for smart key
system) (if equipped)

• This warning message illuminates if 

the battery of the smart key is dis

-

charged when the ENGINE START/ 
STOP button changes to the OFF 
position.

Press START button while turn

-

ing wheel (for smart key system) 
(if equipped)

• This warning message illuminates if 

the steering wheel does not unlock 
normally when the ENGINE START/ 
STOP button is pressed.

• It means that you should press the 

ENGINE START/STOP button
while turning the steering wheel right
and left.

Press clutch pedal to start engine
(for smart key system and manual
transmission) (if equipped)

• This warning message illuminates if 

the ENGINE START/STOP button 
changes to the ACC position twice by 
pressing the button repeatedly with

-

out depressing the clutch pedal.

• It means that you should depress the 

clutch pedal to start the engine.

Press brake pedal to start engine 
(for smart key system) (if
equipped)

• This warning message illuminates if 

the ENGINE START/STOP button 
changes to the ACC position twice by 
pressing the button repeatedly with

-

out depressing the brake pedal.

• It means that you should depress the 

brake pedal to start the engine.

OBD041591L

Features of your vehicle

68

4

LCD display

Key not in vehicle (for smart key
system) (if equipped)

• This warning message illuminates if 

the smart key is not in the vehicle 
when you press the ENGINE
START/ STOP button.

• It means that you should always have 

the smart key with you.

Key not detected (for smart key
system) (if equipped)

• This warning message illuminates if

the smart key is not detected when
you

press

the

ENGINE

START/STOP button.

Press START button again (for 
smart key system) (if equipped)

• This warning message illuminates if 

you cannot operate the ENGINE 
START/STOP button when there is
a problem with the ENGINE START/ 
STOP button system.

• It means that you could start the 

engine by pressing the ENGINE 
START/STOP button once
more.

• If the warning illuminates each time

you

press

the

ENGINE

START/STOP button, have your
vehicle inspected by an authorized
Kia dealer.

Press START button with key (for 
smart key system) (if equipped)

• This warning message illuminates if 

you press the ENGINE
START/STOP button while the
warning message 

“Key not detected”

is illuminating.

• At this time, the immobilizer indicator 

light blinks.

Shift to P or N to start engine (for 
smart key system) (if equipped)

• This warning message illuminates if 

you try to start the engine with the 
shift gear not in the P (Park) or N
(Neutral) position.

NOTICE

You can start the engine with the shift 
lever in the N (Neutral) position. But, You 
start the engine with the gear in the P
(Park) position.

Low fuel

• This warning message is displayed if 

the fuel tank is almost out of fuel.

• When this message is displayed, the 

low fuel level warning light in the clus

-

ter will come on.

• It is recommended to look for the 

nearest fueling station and refuel as 
soon as possible.

Low washer fluid

• This warning message is displayed if

the washer fluid level in the reservoir
is nearly empty.

• Have the washer fluid reservoir

refilled.

Check headlight LED (if
equipped)

• This message is displayed if there is a

problem with the LED headlamp. 
Have your vehicle inspected by an
authorized Kia dealer.

69

4

4

Features of your vehicle

Trip Computer

Device in wireless charger (if
equipped)

• This warning messages will illuminate 

when the vehicle ignition is OFF and 
the smart phone is on the wireless 
charging pad in these two situations:

1. When the driver or passenger door is 

opened.

2. When one minute passed after the 

ignition has been turned OFF (and the 
door has not been opened for more 
than one minute).

*For more details, refer to "Wireless 

smart phone charging system (if 
equipped)" on page 4-119.

Battery discharging due to exter

-

nal electrical devices

• The vehicle can detect self-discharge 

of the battery due to over-current that is
generated by unauthorized electri

-

cal

devices such as dashboard cam

-

era

(dash cam) mounting when parked.

• If the warning continues even after 

external electrical devices are 
removed, have your vehicle inspected 
by an authorized Kia dealer.

NOTICE

When there is a malfunction of the Elec

-

tronic Stability Control (ESC), the Elec

-

tronic Control Suspension (ECS) warning 
message may illuminate as well as the 
ESC indicator light.

Trip Computer

Trip information (trip computer)

The trip computer is a microcomputer-
controlled driver information system that
displays information related to driv

-

ing.

Trip Modes

To change the trip mode, scroll the tog

-

gle the switch (

/

) on the steering

wheel.

OBD041616L

Features of your vehicle

70

4

Trip Computer

Drive Info display

This display shows the trip distance (1), 
average fuel efficiency (2), and instant 
fuel economy (3) information once per 
one ignition cycle.

• Fuel efficiency is calculated after the 

vehicle has run for more than 0.2 
miles (300 meters).

• If opening the driver's door after turn

-

ing off the engine or 3 minutes passes 
after restarting the engine, Driving 
Information is reset.

• If you press "OK" button for more than 1

second after the Driving Information is
displayed, the information will be reset.

• If the engine is running, even when 

the vehicle is not in motion, the infor

-

mation will be accumulated.

Since Refueling

This display shows the accumulated trip 
distance (1), average fuel efficiency (2), 
and instant fuel economy (3) after refu

-

eling.
• Fuel efficiency is calculated after the 

vehicle has run for more than 0.2 
miles (300 meters).

• After refueling more than 1.6 gallons

(6 liters) and driving over 1 mph (1 km/ 
h), the Since Refueling will reset to 
default automatically.

• If you press "OK" button for more than 1

second after the Since Refueling is 
displayed, the information will be reset.

• If the engine is running, even when 

the vehicle is not in motion, the infor

-

mation will be accumulated.

OBDM042592N

OBDM042594N

71

4

4

Features of your vehicle

Warning and indicator lights

Accumulated driving information 
mode

This display shows the accumulated trip 
distance (1), average fuel efficiency (2), 
and instant fuel economy (3).

• Accumulated information is calculated 

after the vehicle has run for more than
0.2 miles (300 meters).

• If you press "OK" button for more than 1

second after the Accumulated Infor

-

mation is displayed, the information 
will be reset.

• If the engine is running, even when 

the vehicle is not in motion, the infor

-

mation will be accumulated.

Digital speedometer

This digital speedometer display shows 
the speed of the vehicle.

Warning and indicator lights

The warning light and indicator light 
indicate a situation where the driver 
should be careful and whether the vari

-

ous functions are activated.

Warning lights

The warning light indicates situations 
that require the driver to pay attention.

NOTICE

Warning lights
Make sure that all warning lights are
OFF after starting the engine. If any light 
is still ON, this indicates a situation that 
needs attention.

Air bag warning light

This warning light illuminates:

• Once you set the ignition switch or the 

ENGINE START/STOP button to the 
ON position.

- It illuminates for approximately 6

seconds and then goes off.

• When there is a malfunction with the 

SRS.

In this case, have your vehicle 
inspected by an authorized Kia dealer.

Seat belt warning light

This warning light informs the driver
that the seat belt is not fas

-

tened.

*For more details, refer to "Seat belts" on 

page 3-16.

OBDM042605N

OBDM042595N

Features of your vehicle

72

4

Warning and indicator lights

Parking brake & brake fluid 
warning light

This warning light illuminates:

• Once you set the ignition switch or 

ENGINE START/STOP button to
the ON position.

- It illuminates for approximately 3

seconds

- It remains on if the parking brake is 

applied.

• When the parking brake is applied.
• When the brake fluid level in the res

-

ervoir is low.

- If the warning light illuminates with 

the parking brake released, it indi

-

cates the brake fluid level in reser

-

voir is low.

If the brake fluid level in the res

-

ervoir is low:

1. Drive carefully to the nearest safe 

location and stop your vehicle.

2. With the engine stopped, check the 

brake fluid level immediately and add 
fluid as required (For more details, 
refer to "Brake/clutch fluid" on page 8-
23). Check all brake components for 
fluid leaks. If any leak in the brake 
system is found, the warning light 
remains on, or the brakes do not 
operate properly, do not drive the 
vehicle.

In this case, have your vehicle 
inspected by an authorized Kia dealer.

Dual-diagonal braking system 

Your

vehicle is equipped with dual-diag

-

onal

braking systems. This means you

still have braking on two wheels even if 
one of the dual systems should fail.

With only one of the dual systems work

-

ing, more than normal pedal travel and 
greater pedal pressure are required to 
stop the vehicle.

Also, the vehicle will not stop in as short 
a distance with only a portion of the 
brake system working.

If the brakes fail while you are driving, 
shift to a lower gear for additional 
engine braking and stop the vehicle as 
soon as it is safe to do so.

W ARNING

Parking Brake & Brake Fluid Warning
Light

Driving the vehicle with a warning light 
ON is dangerous. If the Parking Brake &
Brake Fluid Warning Light illuminates 
with the parking brake released, it indi

-

cates that the brake fluid level is low.

In this case, have your vehicle inspected 
by an authorized Kia dealer.

Anti-lock brake system (ABS) 

warning light

This warning light illuminates:

• Once you set the ignition switch or 

ENGINE START/STOP button to
the ON position.

- It illuminates for approximately 3

seconds and then goes off.

• When there is a malfunction with the

ABS (The normal braking system will
still be operational without the assis

-

tance of the ABS).

Have your vehicle inspected by an
authorized Kia dealer.

73

4

4

Features of your vehicle

Warning and indicator lights

Electronic Brake Force Distribu

-

tion (EBD) System Warning Light

These two warning lights illumi

-

nate at the same time while driv

-

ing:

• When the ABS and regular brake sys

-

tem do not work normally.

In this case, have your vehicle inspected 
by an authorized Kia dealer.

W ARNING

EBD System Warning Light
When both ABS and Parking Brake &
Brake Fluid Warning Lights are on, the 
brake system will not work normally, and 
you may experience an unexpected and 
dangerous situation during sudden 
braking.

In this case, avoid high speed driving 
and abrupt braking. Have your vehicle 
inspected by an authorized Kia dealer as 
soon as possible.

NOTICE

EBD System Warning Light
When the ABS Warning Light is on or 
both ABS and Parking Brake & Brake 
Fluid Warning Lights are on, the speed

-

ometer, odometer, or tripmeter may not 
work. The MDPS (Motor Driven Power 
Steering) Warning Light may illuminate 
and the steering effort may increase or 
decrease.

Have your vehicle inspected by an 
authorized Kia dealer as soon as possi

-

ble.

MDPS warning light

This warning light illuminates:

• Once you set the ignition switch or 

ENGINE START/STOP button to
the ON position.

- This indicator light comes on after 

the ignition key is turned to the ON 
position and then goes off after 
approximately 3 seconds.

• When there is a malfunction with the 

MDPS.

Have your vehicle inspected by an 
authorized Kia dealer.

Charging System Warning Light

This warning light illuminates:

When there is a malfunction with 

either the alternator or electrical

charging system.

If there is a malfunction with either
the alternator or electrical charging
system:

1. Drive carefully to the nearest safe 

location and stop your vehicle.

2. Turn the engine off and check the 

alternator drive belt for looseness or 
breakage.

Have your vehicle inspected by an 
authorized Kia dealer as soon as pos

-

sible.

Features of your vehicle

74

4

Warning and indicator lights

Malfunction Indicator Lamp (MIL)

This warning light illuminates:

• When you set the ignition switch or

the ENGINE START/STOP button
to the ON position.

- The MIL illuminates for about 3

seconds and then goes off.

• Whenever there is a malfunction with

either the emission control system or
the engine or the vehicle powertrain.

Have your vehicle inspected by an
authorized Kia dealer.

NOTICE

Driving with the MIL on may cause dam

-

age to the emission control system
which could affect drivability and/or fuel 
economy.

CAUTION

If the MIL illuminates, potential catalytic 
converter damage is possible which 
could result in loss of engine power.
Have your vehicle inspected by an 
authorized Kia dealer as soon as possi

-

ble.

Engine Oil Pressure Warning 
Light

This warning light illuminates:

• When the engine oil pressure is low.

Drive carefully to the nearest safe
location and stop your vehicle.

• Turn the engine off and check the 

engine oil level (For more details, refer 
to "Engine oil and filter" on page 8-18). 
If the level is low, add oil as required.

• If the warning light remains on after 

adding oil or if oil is not available, have
the vehicle inspected by an authorized
Kia dealer. Continued driv

-

ing with the

warning light on may cause engine
failure.

Low Fuel Level Warning Light

This warning light illuminates:

When the fuel tank is nearly empty.

If the fuel tank is nearly empty:

Add fuel as soon as possible.

CAUTION

Low Fuel Level
Driving with the Low Fuel Level warning 
light on or with the fuel level below

“E” 

can cause the engine to misfire.

Master warning light

This indicator light illuminates:

• This warning light in the following sit

-

uations

• Forward Collision-Avoidance Assist 

malfunction (if equipped)

• Blind-Spot Collision Warning malfunc

-

tion (if equipped)

• Blind-Spot Collision Warning radar 

blocked (if equipped)

• High Beam Assist malfunction
• Smart Cruise Control malfunction (if 

equipped)

• Smart Cruise Control radar blocked (if 

equipped)

• LED headlamp malfunction

75

4

4

Features of your vehicle

Warning and indicator lights

• TPMS failure, low pressure (if 

equipped), etc.

To identify the details of the warning 
look at the LCD display.

If the warning situation is resolved, the 
master warning light will turn off.

Low Tire Pressure Warning Light

This warning light illuminates:

• Once you set the ignition switch or 

ENGINE START/STOP button to
the ON position.

- It illuminates for approximately 3

seconds and then goes off.

• When one or more of your tires are 

significantly under inflated. (The loca

-

tion of any underinflated tires are dis

-

played on the LCD display).

This warning light remains on after
blinking for approximately 70
seconds or repeats blinking on and
off at the intervals of approximately
3 seconds:

• When there is a malfunction with the 

TPMS.

Have your vehicle inspected by an 
authorized Kia dealer as soon as pos

-

sible.

*For more details, refer to "Tire Pressure 

Monitoring System (TPMS) (if 
equipped)" on page 7-8.

W ARNING

Low tire pressure
• Significantly low tire pressure makes 

the vehicle unstable and can contrib

-

ute to loss of control and increased 
braking distances.

• Continued driving on low pressure 

tires will cause the tires to overheat 
and fail.

The TPMS cannot alert you to severe 
and sudden tire damage caused by 
external factors.If you notice any vehicle 
instability,immediately take your foot off 
the accelerator pedal, apply the brake s
gradually with light force, and slowly 
move to a safe position off the road.

W ARNING

Safe Stopping
• The TPMS cannot alert you to

severe and sudden tire damage
caused by external factors.

• If you notice any vehicle instability, 

immediately take your foot off the 
accelerator pedal, apply the brakes 
gradually with light force, and slowly 
move to a safe position off the road.

This warning light illuminates:

Once you set the ENGINE START/ 

STOP button to the ON position.

- It illuminates for approximately 3

seconds and then goes off.

• When there is a malfunction with the 

EPB.

Have the vehicle inspected by an 
authorized Kia dealer.

NOTICE

EPB Warning Light
The Electronic Parking Brake (EPB) 
Warning Light may illuminates when the 
Electronic Stability control (ESC) Indica

-

Electronic Parking Brake (EPB) 

Warning Light

EPB

(if equipped)

Features of your vehicle

76

4

Warning and indicator lights

tor Light comes on to indicates that the
ESC is not working properly. (This does
not indicate malfunction of the EPB).

LED Headlamp Warning Light 

(if equipped)

This warning light illuminates:

• When there is a malfunction with the 

LED headlamp.

Have your vehicle inspected by an 
authorized Kia dealer.

CAUTION

LED Headlamp Warning Light
Continuous driving with the LED Head

-

lamp Warning Light on can reduce LED
headlamp (low beam) life.

If the icy road warning light appears 
while driving, you should drive more 
attentively and safely, refrain from 
speeding, rapid acceleration, sudden 
braking or sharp turning, etc.

Indicator lights

Forward Safety Warning light 

(if equipped)

This indicator light illuminates:

When you set the ignition switch or the

ENGINE START/STOP button to

the ON position.
- The malfunction indicator light illu

-

minates for about 3 seconds and 
then goes off.

• When there is a malfunction with For

-

ward Collision-Avoidance Assist.

Have your vehicle inspected by an 
authorized Kia dealer.

Icy Road Warning Light

(if

equipped)

• This warning light is to warn the driver 

the road may be icy.

When the temperature of the outside 
temperature gauge is below 39

°F 

(4

°C), the Icy Road Warning Light and 

Outside Temperature Gauge blinks 
and then illuminates. The warning 
chime sounds 1 time.

NOTICE

ESC indicator light

This indicator light illuminates:

• Once you set the ignition switch or 

ENGINE START/STOP button to
the ON position.

- It illuminates for approximately 3

seconds and then goes off.

• When there is a malfunction with the 

ESC system.

Have your vehicle inspected by an 
authorized Kia dealer.

This indicator light blinks:

While the ESC is operating.
*For more details, refer to "Electronic 

Stability Control (ESC)" on page 5-40.

77

4

4

Features of your vehicle

Warning and indicator lights

Electronic stability control (ESC) 

OFF indicator light

This indicator light illuminates:

• Once you set the ignition switch or 

ENGINE START/STOP button to
the ON position.

- It illuminates for approximately 3

seconds and then goes off.

• When you deactivate the ESC

system by pressing the ESC OFF
button.

*For more details, refer to "Electronic 

Stability Control (ESC)" on page 5-40.

Immobilizer Indicator Light 
(Without Smart Key)

(if

equipped)

This indicator light illuminates:

• When the vehicle detects the immobi

-

lizer in your key while the ignition 
switch is ON.

- You can start the engine.
- The indicator light goes off after 

starting the engine.

This indicator light blinks:

• When there is a malfunction with the 

immobilizer system.

In this case, have your vehicle 
inspected by an authorized Kia dealer.

Immobilizer Indicator Light (With 
Smart Key)

This indicator light illuminates for up
to 30 seconds:

• When the vehicle detects the smart 

key in the vehicle properly while the

ENGINE START/STOP button is
ACC or ON.

- You can start the engine.
- The indicator light goes off after 

starting the engine.

This indicator light blinks for a
few seconds:

• When the smart key is not in the vehi

-

cle.

- You can not start the engine.

This indicator light illuminates for 2
seconds and goes off:

• When the vehicle can not detect the 

smart key which is in the vehicle while 
the ENGINE START/STOP button is 
ON.

Have your vehicle inspected by an 
authorized Kia dealer.

This indicator light blinks:

• When the battery of the smart key is 

weak.

- You can not start the engine. You 

press the ENGINE START/STOP 
button with the smart key. (For 
more details, refer to "Immobilizer 
System" on page 4-14).

• When there is a malfunction with the 

immobilizer system.

Have your vehicle inspected by an 
authorized Kia dealer.

AUTO HOLD Indicator Light

This indicator light illuminates:

• [White] When you activate the auto

hold system by pressing the AUTO
HOLD button.

Features of your vehicle

78

4

Warning and indicator lights

• [Green] When you stop the vehicle 

completely by depressing the brake 
pedal with the auto hold system acti

-

vated.

• [Yellow] When there is a malfunction 

with the auto hold system.

Have the vehicle inspected by an 
authorized Kia dealer.

*For more details, refer to "AUTO HOLD 

(if equipped)" on page 5-36.

Turn signal indicator light

This indicator light blinks:

• When you turn on the turn signal light.

- If any of the following occurs, there 

may a malfunction with the turn 
signal system and in this case, have 
your vehicle inspected by an autho

-

rized Kia dealer.

• The indicator light does not illumi

-

nates but blink.

• The indicator light blinks rapidly.
• The indicator light does not illuminate 

at all.

Low beam indicator light

(if

equipped)

This indicator light illuminates:

• When the headlights are on.

High beam indicator light

This indicator light illuminates:

• When the headlights are on and in the 

high beam position.

• When the turn signal lever is pulled to 

the Flash-to-Pass position.

High Beam Assist indicator

This warning light illuminates :

• When the high beam is on with the 

light switch in the AUTO light position.

• If your vehicle detects vehicles ahead 

or oncoming, High Beam Assist will 
switch the high beam to low beam 
automatically.

*For more details, refer to "High Beam 

Assist (HBA)" on page 4-84.

Lane Safety indicator light 
(if equipped)

This indicator light illuminates:
• [Green] When Lane Keeping Assist 

(LKA) operating conditions are satis

-

fied.

• [Gray] When LKA operating condi

-

tions are not satisfied.

• [Yellow] Whenever there is a malfunc

-

tion with LKA.

Have your vehicle inspected by an 
authorized Kia dealer.

*For more details, refer to "Lane Keeping 

Assist (LKA) (if equipped)" on page 6-
27.

Light ON indicator light

This indicator light illuminates:

• When the tail lights or headlights are 

on.

Front fog indicator light

(if

equipped)

This indicator light illuminates:

• When the front fog lights are on.

79

4

4

Features of your vehicle

Warning and indicator lights

KEY OUT Indicator Light

(if

equipped)

When the ENGINE START/STOP
button

is in the ACC or ON position, if any door
is open, the system checks for the smart 
key.

This indicator light blinks:

When the smart key is not in the vehicle 
and any door is open with the ignition 
switch or ENGINE START/STOP button 
in the ACC or ON position.
• If you close all doors, the chime will

also sound for approximately 5 sec

-

onds.

• The indicator light will go off while the

vehicle is moving.

Cruise indicator light

This indicator light illuminates:

• When the cruise control system is 

enabled.

*For more details, refer to "Cruise Con

-

trol (CC) (if equipped)" on page 6-61.

SPORT Mode Indicator Light

(if equipped)

This indicator light illuminates :

• When you select “SPORT” mode

as drive mode.

For more details, refer to "Drive mode 
integrated control system (if equipped)" 
on page 5-45.

SMART Mode Indicator Light

(if equipped)

This indicator light illuminates :

• When you select “SMART” mode

as drive mode.

For more details, refer to "Drive mode 
integrated control system (if equipped)" 
on page 5-45.

Features of your vehicle

80

4

Lighting

Lighting

This vehicle is equipped with a variety of
lights to illuminate the interior and exte

-

rior of the vehicle.

CAUTION

To prevent the battery from being dis

-

charged, do not leave the headlights and 
interior lights on for a prolonged time 
while the engine is not running.

Battery saver function

The purpose of this feature is to prevent
the battery from being discharged if the
lights are left in the ON position.

The system automatically shuts off the
parking light after the engine is off and
the

driver’s door is opened.

However, the position lamps stay ON 
even when the

driver’s side door is 

opened if the light switch is operated 
after the engine is turned off.

If necessary, to keep the lamps on turn 
the position lamps OFF and ON again 
using the headlamp switch on the steer

-

ing column after the engine is turned off.

Headlight delay function (if
equipped)

If you place the ENGINE START/STOP 
button in the ACC or OFF position with 
the headlamps ON, the headlamps (and/ 
or position lamps) remain on for about 5
minutes. However, with the engine off if 
the

driver’s door is opened and closed, 

the headlamps (and/or position lamps) 
are turned off after 15 seconds.

The headlamps (and/or position lamps) 
can be turned off by pressing the lock 
button on the remote key or smart key 
twice or turning the light switch to the 
OFF or AUTO position. However, if you 
turn the light switch to the AUTO posi

-

tion when it is dark outside, the head

-

lamps will not be turned off.

You can activate or deactivate the Head

-

lamp Delay function from the User Set

-

tings Mode in the LCD display. For more 
details, refer to "LCD display" on page 4-
58. If your vehicle is equipped with addi

-

tional navigation, refer to the infotain

-

ment system manual separately supplied.

NOTICE

If the driver exits the vehicle through a
door other than the

driver’s door, the 

battery saver function will not operate 
and the headlamp delay function will not 
turn OFF automatically.

This may cause the battery to discharge.
To avoid battery discharge, turn OFF the
headlamps manually from the headlamp
switch before exiting the vehicle.

Headlight welcome function (if
equipped)

When the headlight switch is in the ON or
AUTO position and all doors (and trunk)
are closed and locked, if you press the
door unlock button on the transmitter (or
smart key), the head

-

lights will come on

for about 15 sec

-

onds.If the headlight

switch is in the AUTO position, the
function can only operate at night.At this
time, if you press the door unlock button
again or door lock button on the
transmitter (or smart key), the headlights
will turn off immedi

-

ately.

Daytime Running Light (DRL) (if
equipped)

The Daytime Running Light (DRL) can 
make it easier for others to see the front 
of your vehicle during the day.

81

4

4

Features of your vehicle

Lighting

The DRL can be helpful in many differ

-

ent driving conditions, and it is especially 
helpful after dawn and before sunset.

The DRL will turn the dedicated lamp 
OFF when:
• The headlight switch is on.

The vehicle is off.

• The front fog light is on. (if equipped)

The Parking Brake is engaged.

Lighting control

The light switch has a headlight and a
position lamp position.

To operate the lights, turn the knob at 
the end of the control lever to one of the 
following positions:

1. OFF position

2. Auto light position

3. Position & Tail lamp

4. Headlight position

Position & Tail lamp

When the light switch is in the position 
lamp position, the front position lamp 
and, tail, license light will turn ON.

Headlight

When the light switch is in the head light
position, The head, tail, position, license
and instrument panel lights will turn ON.

NOTICE

The ignition switch or the ENGINE 
START/STOP button must be in the
ON position to turn on the headlights.

OSP2049032

OSP2049034

OSP2049035

Features of your vehicle

82

4

Lighting

Auto light

When the light switch is in the AUTO 
light position, the taillights and head

-

lights will turn ON or OFF automatically 
depending on the amount of light out

-

side the vehicle.

CAUTION

• Never place anything over the sensor

(1) located on the instrument panel to 
ensure better auto-light system con

-

trol.

• Don't clean the sensor using a window

cleaner. The cleaner may leave a light
film which could interfere with sensor
operation.

• If your vehicle has window tint or other 

types of metallic coating on the front
windshield, the Auto light system may
not work properly.

Operating high beam

To turn on the high beam headlamp:

Push the lever away from you.

The lever will return to its original 
position.

The high beam indicator will illumi

-

nate when the headlight high beams 
are switched on.

W ARNING

Do not use high beams when an other 
vehicle is nearby. Using high beam could 
obstruct the other driver's vision.

To flash the headlights:
• Pull the lever towards you.

It will return to the normal (low beam) 
position when released. The head

-

OBDM041651

OSP2049037

OSP2049036

83

4

4

Features of your vehicle

Lighting

light switch does not need to be on to 
use this flashing feature.

Operating turn signals and lane 
change signals

The ignition switch or the ENGINE 
START/STOP button must be on for
the turn signals to function.

To turn on the turn signals:
• Move the lever up or down (A).

The green arrow indicators on the 
instrument panel indicate which turn 
signal is operating.

They will self-cancel after a turn is 
completed. If the indicator continues 
to flash after a turn, manually return 
the lever to the OFF position.

To signal a lane change:
• Move the turn signal lever slightly and 

hold it in position (B).

The lever will return to the OFF posi

-

tion when released.

If an indicator stays on and does not 
flash or if it flashes abnormally, one of the
turn signal bulbs may be burned out and
will require replacement.

One-touch lane change function

To activate a one-touch lane change 
function, move the turn signal lever 
slightly and then release it. The lane 
change signals will blink 3, 5 or 7 times.

You can activate or deactivate the One 
Touch Turn Signal function or choose 
the number of blinking (3, 5, or 7) by 
selecting

‘User Settings (LCD display)

or Setup (Infotainment System screen)
→ Vehicle (Infotainment System screen)
→ Lights → One Touch Turn Signal’.

NOTICE

If an indicator flash is abnormally quick 
or slow, a bulb may be burned out or 
have a poor electrical connection in the 
circuit.

Operating front fog light

(if

equipped)

Fog lights are designed to provide 
improved visibility when visibility is poor 
due to fog, rain or snow, etc.

The fog lights will turn on when the fog
light switch (1) is turned to the on posi

-

tion after the headlights are turned on.

To turn off the fog lights:
• Turn the fog light switch (1) to the OFF

position.

OSP2049078

OSP2049079

Features of your vehicle

84

4

Lighting

CAUTION

When in operation, the fog lights con

-

sume a lot of electrical power. Only use 
the fog lights when visibility is poor.

High Beam Assist (HBA)

High Beam Assist is a function that auto

-

matically adjusts the headlamp range 
(switches between high beam and low 
beam) according to the brightness of 
other vehicles and road conditions.

High Beam Assist settings

The driver can activate HBA by placing 
the ignition switch orENGINE START/ 
STOP button in the ON position and by 
selecting:

‘User Settings (LCD display) 

or Setup (Infotainment System screen)
→ Vehicle (Infotainment System screen)
→ Lights → High Beam Assist’. If you
dis

-

able this setting, HBA will not work.

The setting of High Beam Assist will be 
maintained as selected when the engine 
is re-started.

Operating condition

1. Place the light switch in the AUTO 

position.

2. Turn on the high beam by pushing the 

Light switch away from you.

3. High Beam Assist (

) indicator will 

illuminate.

4. When the function is enabled, the high

beams will turn on when vehicle speed
is above 25 mph (40 km/h). The High
Beam (

) indicator light will appear on

the instrument cluster. When vehicle
speed is below 15 mph (25 km/h), high
beam will not turn on and the High
Beam Assist (

) indica

-

tor light will 

appear white on the instrument cluster.

1) If the light switch is pushed away 

from you when High Beam Assist is 
operating, High Beam Assist will 
turn off and the high beams will be 
on continuously.

2) If the light switch is pulled towards 

you when the high beams is off, the 
high beams will be on without can

-

cellation of High Beam Assist. When 
you let go of the light switch, the 
lever will move to the middle and 
the high beams will turn off.

3) If the light switch is pulled towards 

you when the high beams are on by 
High Beam Assist, the low beam will 
be on and High Beam Assist will 
turn off.

4) If the light switch is placed in the 

headlamp position (

), High Beam 

Assist will turn off and the low 
beams will be on continuously.

When High Beam Assist is operating, the 
high beams switches to low beams under
the following conditions.
• When the headlamps of an on-coming 

vehicle is detected.

• When the tail lamp of a vehicle in 

front is detected.

• When the headlamp or tail lamp of a

motorcycle or a bicycle is detected.

OSP2049080

85

4

4

Features of your vehicle

Lighting

• When the surrounding ambient light is

bright enough so that high beams are
not required.

• When streetlights or other lights are 

detected.

• When the light switch is not in the 

AUTO position.

• When High Beam Assist is off.
• When vehicle speed is below 19 mph

(30 km/h).

Warning light and message

When High Beam Assist is not working 
properly, the warning message will ilu

-

minate for a few seconds. After the mes

-

sage disappears, the master warning

light (

) will illuminate.

We recommend that you have your vehi

-

cle inspected by an authorized Kia 
dealer.

CAUTION

The function may not operate normally if
any of the following conditions should 
occur:

1. When the illumination from an on-

coming vehicle or a vehicle in front is 
dim. Such examples may include:
• When the headlamps of an oncom

-

ing vehicle or the tail lamps of a

vehicle in front is covered with dust, 
snow, or water

• When the headlamps of an on-

coming vehicle are OFF, but the fog 
lamps are ON

2. When High Beam Assist is adversely 

affected by an external condition. 
Such examples may include:
• When the vehicle's headlamps have 

been damaged or not repaired 
properly

• When the vehicle headlamps are 

not aimed properly

• When the vehicle is driven on a nar

-

row curved or rough road

• When the vehicle is driven uphill 

road or downhill

• When only part of the vehicle in

front is visible on a crossroad or
curved road

• When there is a traffic light, reflect

-

ing sign, flashing sign or mirror

• When road conditions are poor 

such as being wet or covered with 
snow

• When a vehicle suddenly appears 

from a curve

• When the vehicle is tilted from a flat 

tire or being towed

• When Lane Keeping Assist warning 

light illuminates

• When the lights from an oncoming 

or vehicle in front are not detected 
because of exhaust fume, smoke, 
fog, snow, etc.

• When the front window is covered 

with foreign matter such as ice, 
dust, fog, or is damaged

3. When forward visibility is poor. Such 

examples may include:
• When the headlamps of an oncom

-

ing vehicle or vehicle in front are

OBD041226L

Features of your vehicle

86

4

Wipers and washers

not detected due to poor outside
visibility (smog, smoke, dust, fog,
heavy rain, snow, etc.)

• When windshield visibility is poor

CAUTION

• The function may not work for around 

15 seconds after starting the vehicle or 
the initialization or reboot of the front
view camera.

• Do not disassemble the front view 

camera without the assistance of an 
authorized Kia dealer technician.

• If the front view camera is removed for

any reason, the function may need to
be re-calibrated. We recommend that
the function be inspected by an 
authorized Kia dealer.

• If the windshield of your vehicle is 

replaced, most likely the front view 
camera will need to be re-calibrated. If 
this occurs, have your vehicle 
inspected and have the function re-
calibrated by an authorized Kia
dealer.

• Be careful that water doesn't enter 

related parts of High Beam Assist and 
do not remove or damage related 
parts the function.

• Do not place objects on the crash pad

that reflect light such as mirrors, white
paper, etc. The function may malfunc

-

tion if sunlight is reflected.

• At times, High Beam Assist may not 

work properly. The function is for your 
convenience only. It is the responsibil

-

ity of the driver for safe driving prac

-

tices and always check the road 
conditions for your safety.

• When the function does not operate 

normally, change the lamp position 
manually between the high beams 
and low beams.

Wipers and washers

The wipers and washers remove foreign
substances from the windshield and rear
window, helping to maintain visibility.

Front

A: Wiper speed control (front)

1. MIST : Single wipe

2. OFF : Off

3. INT : Intermittent wipe

4. LO : Low wiper speed

5. HI : High wiper speed
B: Intermittent control wipe time
adjustment/Auto control wipe time
adjustment

C: Wash with brief wipes (front)

NOTICE

If there is heavy accumulation of snow or
ice on the windshield, defrost the 
windshield for about 10 minutes, or until 
the snow and/or ice is removed before 
using the windshield wipers to ensure 
proper operation. If you do not remove 
the snow and/or ice before using the 
wiper and washer, it may damage the 
wiper and washer system.

OBD041096L

87

4

4

Features of your vehicle

Wipers and washers

Operating windshield washers 
(front)

1. Move the wiper speed control switch 

to OFF position.

2. Pull the lever gently toward you to 

spray washer fluid on the windshield 
and to run the wipers 1-3 cycles. Use 
this function when the windshield is 
dirty. The spray and wiper operation 
will continue until you release the 
lever.

If the washer does not work, check the 
washer fluid level. If the fluid level is in 
sufficient, add appropriate non-abrasive 
windshield washer fluid to the washer 
reservoir.

The reservoir filler neck is in located in 
the front of the engine compartment on 
the passenger side.

CAUTION

To prevent possible damage to the 
washer pump, do not operate the 
washer when the fluid reservoir is 
empty.

W ARNING

Do not use the washer in freezing tem

-

peratures without first warming the 
windshield with the defrosters; the 
washer solution could freeze on the 
windshield and obscure your vision.

CAUTION

• To prevent possible damage to the 

wipers or windshield, do not operate 
the wipers when the windshield is dry.

• To prevent damage to the wiper 

blades, do not use gasoline, kerosene, 
paint thinner, or other solvents on or 
near them.

• To prevent damage to the wiper arms 

and other components, do not attempt
to move the wipers manually.

• To prevent possible damage to the 

wipers and washer system, use anti-
freezing washer fluids in the winter or 
cold weather.

INFORMATION

If you operate the wipers while driving on
snowy roads, the wipers may stop due to
snow buildup on your windshield. This is
normal and not a failure because it is one
of our safety features to prevent vehicle
accidents and wiper damage from
overloading the wiper motor. If the wipers
stop, remove snow accumulated on the
top or bottom of windshield before using
them.

OBD041653L

Features of your vehicle

88

4

Welcome system

Welcome system (if equipped)

The welcome system is a function that 
illuminates the surroundings or the inte

-

rior when the driver approaches or exits 
the vehicle.

Door handle lamp (if equipped)

When all the doors (and trunk) are closed
and locked, the door handle lamp will
illuminate for about 15 seconds if any of
the following is performed:
• When the door unlock button is 

pressed on the remote key or smart 
key.

• When the button of the outside door 

handle is pressed.

• When you approach the vehicle with 

the smart key in possession.

Headlight escort function

The headlights (and/or taillights) remain 
on for approximately 5 minutes after the 
vehicle is turned off. However, if the 
driver's door is opened and closed, the 
headlights will turn off after 15 seconds.

The headlights can be turned off by 
pressing the lock button on the smart key
twice or turning off the light switch from
the headlight or Auto light position.

Interior light

When the interior light switch is in the 
DOOR position and all doors (and trunk) 
are locked and closed, the room lamp will
come on for 30 seconds if any of the 
following occurs:
• With the smart key system

- When the door unlock button is 

pressed on the smart key.

- When the button of the outside 

door handle is pressed.

At this time, if you press the door lock
button, the lamps will turn off immedi

-

ately.

OBDM041013L

89

4

4

Features of your vehicle

Interior lights

Interior lights

This vehicle is equipped with lights 
throughout the vehicle to illuminate the 
interior.

CAUTION

Do not use the interior lights for extended 
periods when the engine is not running.

It may cause battery discharge.

W ARNING

Do not use the interior lights when driv

-

ing in the dark. Accidents could happen
because you view may be obscured by
interior lights.

Map lamp

Type A

Type B

• Press the lens (1) to turn ON the map 

lamp.

To turn the map lamp OFF press the 
lens (1) again.

(2): DOOR mode

- The map lamp and room lamp 

come on when a door is opened. 
The lamps go out after approxi

-

mately 30 seconds.

- The map lamp and room lamp 

come on for approximately 30 sec

-

onds when doors are unlocked with 
a smart key as long as the doors 
are not opened.

- The map lamp and room lamp will 

stay on for approximately 10 min

-

utes if a door is opened with the 
ignition switch or the ENGINE 
START/STOP button in the ACC
or OFF position.

- The map lamp and room lamp will 

stay on continuously if the door is 
opened with the ignition switch or 
the ENGINE START/STOP button
in the ON position.

- The map lamp and room lamp will 

go out immediately if the ignition 
switch or the ENGINE
START/STOP button is changed to
the ON posi

-

tion or all doors are

locked.

OBD041403L

OBD041058L

Features of your vehicle

90

4

Interior lights

- To turn off the DOOR mode, press 

the DOOR button (2) once again 
(not pressed).

(3)

: Press this switch to turn the 

front map lamps on.

(4)

: Press this switch to turn the 

front map lamps off.

NOTICE

The DOOR mode and ROOM mode
can not be selected at the same time.

Room lamp

Type A

Type B (if equipped)

: The light stays on at all times.

Trunk room lamp

The trunk room lamp comes on when 
the trunk is opened.

CAUTION

The trunk room lamp comes on if the 
trunk opens. To prevent unnecessary 
charging system drain, close the trunk 
securely after using the trunk room.

Vanity mirror lamp (if equipped)

: The lamp will turn on if this but

-

ton is pressed.

: The lamp will turn off if this but

-

ton is pressed.

OSKEV048007NR

OSK3048007NR

OBDM041060

ODEEV068157NR

91

4

4

Features of your vehicle

Climate control system

CAUTION

Vanity mirror lamp
Always have the switch in the off posi

-

tion when the vanity mirror lamp is not in
use. If the sun visor is closed with the
lamp on, it may discharge the battery or
damage the sun visor.

Glove box lamp (if equipped)

The glove box lamp comes on when the 
glove box is opened.

CAUTION

To prevent unnecessary charging sys

-

tem drain, close the glove box securely 
after using the glove box.

Climate control system

The climate control system uses cooling
and heating to help maintain a pleasant
environment inside the vehicle.

System operation

Ventilation

1. Set the mode to the

position.

2. Set the air intake control to the out

-

side (fresh) air position.

3. Set the temperature control to the 

desired position.

4. Set the fan speed control to the 

desired speed.

Heating

1. Set the mode to the

position.

2. Set the air intake control to the out

-

side (fresh) air position.

3. Set the temperature control to the 

desired position.

4. Set the fan speed control to the 

desired speed.

5. If dehumidified heating is desired, 

turn the air conditioning system on.

If the windshield fogs up, set the

mode to the

or

position.

Operation tips

• To keep dust or unpleasant fumes 

from entering the vehicle through the 
ventilation system, temporarily set the 
air intake control to the recirculated air
position. Be sure to return the con

-

trol

to the fresh air position when the 
irritation has passed to keep fresh air 
in the vehicle. This will help keep the 
driver alert and comfortable.

OBD041061L


Content      ..     3      4      5      6     ..