Network Management System Industrial HiVision 8.2. User Manual (2021) - page 12

References
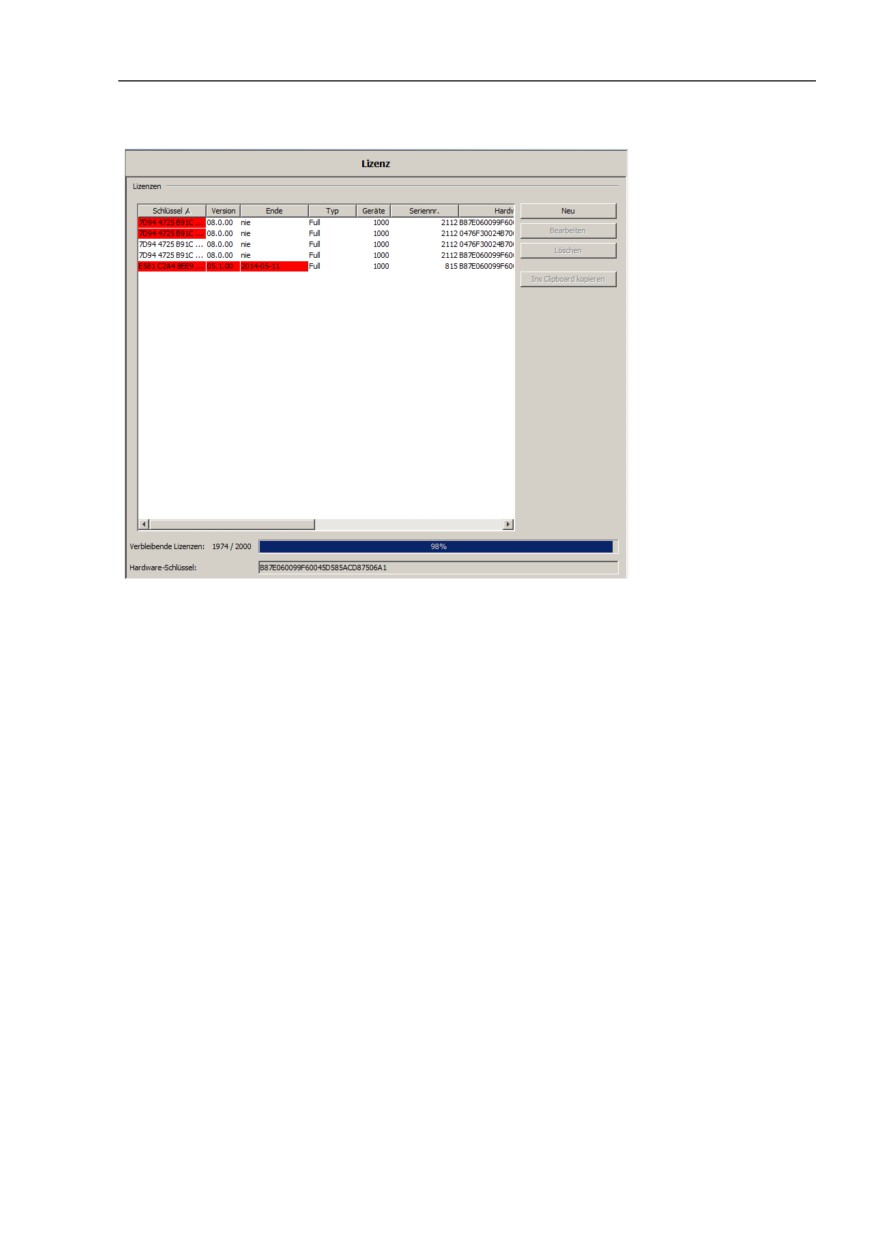
Preferences > Basics > License
Designation
Meaning
Hardware Key
Hardware key that you entered when requested to
enter the license key. If the hardware key of this
license key matches the hardware key under this
license table, then you can use this license key on
this network management station.
License Holder
Name that you entered when requested to enter the
license key.
Registration Code
Registration code you received upon purchase of a
full version, upgrade or maintenance schedule.
You used this registration code to request the
license key.
Table 41: Entries in the license table
A full license allows you to monitor a particular number of devices in
Industrial HiVision. A full license is linked to the version of Industrial
HiVision at the time of purchase.
Note: To determine the hardware key, Industrial HiVision uses a number
of hardware components of its network management station. These
hardware components include the network interface cards. For you to be
able to replace hardware components, Industrial HiVision compares
specific combinations of the hardware components in order to determine
the hardware key.
As long as at least one of the network interface cards in the network
management station that was installed when the license key was
requested is active, Industrial HiVision detects the correct key. In this
case, Industrial HiVision requires that other hardware components are
still installed.
When Industrial HiVision detects that the management station is without
an active interface card the “Hardware Key“ field displays this message.
“The Hardware Key is not valid. It contains no network interface.” To
display the hardware key, add a network interface. You can also activate
a network interface for this purpose.
348
References
Preferences > Basics > License
“Leased licenses“
When you have a hierarchical network structure and have leased licenses
to subdomains, the bottom part of the “Licenses“ dialog contains a table
for displaying the leased licenses.
This table contains the following columns:
-
“Subdomain name“
–
“IP Address“
–
“Leased licenses“
349
References
Preferences > Display > Language
Preferences > Display > Language
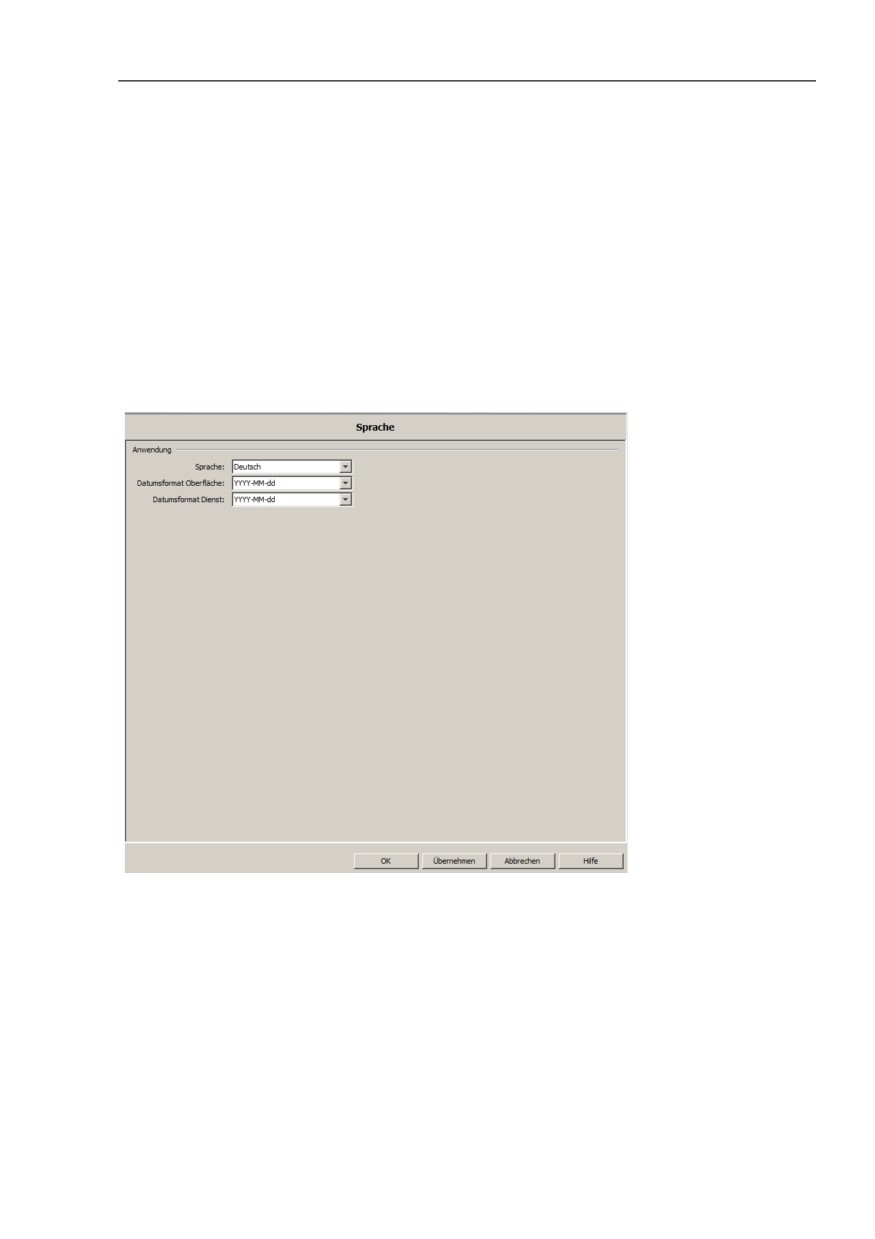
Language
This dialog gives you the option to select the language of the graphical
user interface and the date formats.
Default settings:
Language: system language of your computer.
Date format of the interface: year-month-day
Date format of the service: year-month-day
351
References
Preferences > Display > Event
Preferences > Display > Event
Event
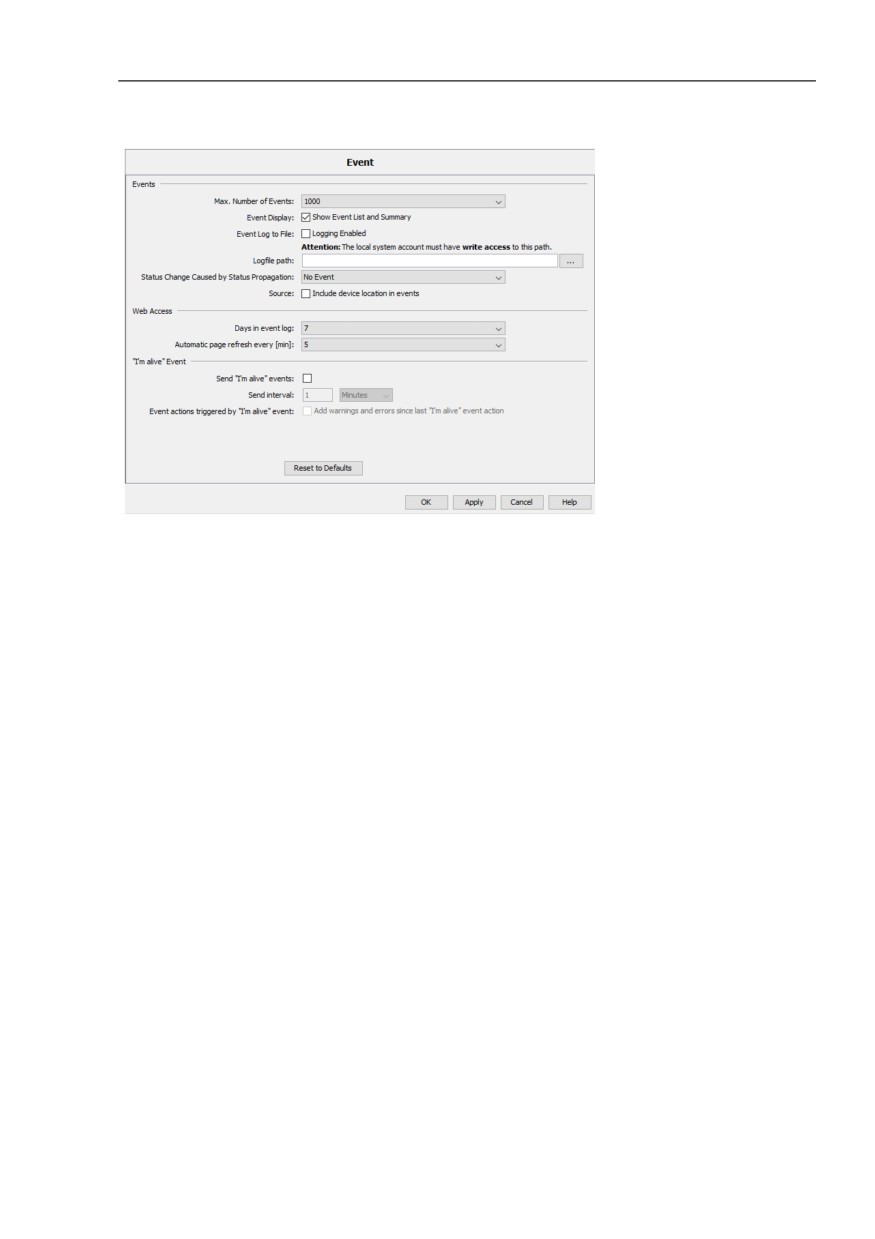
This dialog gives you the option of entering initial settings for the
displaying of events.
Events in the event list (see figure 7):
“Max. Number of Events“
Use the drop-down list to select the maximum number of events which
Industrial HiVision displays in the event list. If more events occur than
the number specified, then Industrial HiVision discards the older
events (first in, first out).
Default setting: 1000
Value range: ≤50000
“Event Display“
You use “Show Event List and Summary“ to display/hide the event list
and the event summary in the main window.
Default setting: display.
“Event Log to File“
With “Logging Enabled“ you can set Industrial HiVision to write every
event that occurs in the event log file. Industrial HiVision writes the
event log file in the language of the operating system.
You will find the HiVisionEvents0.csv event log file in the installation
directory of Industrial HiVision under \log\events.
If the HiVisionEvents0.csv file exceeds a size of 1 MB, then
Industrial HiVision renames the HiVisionEvents0.csv file as
HiVisionEvents1.csv. Industrial HiVision writes new events in the
new HiVisionEvents0.csv file.
If the size of the HiVisionEvents0.log file exceeds 1 MB again,
Industrial HiVision renames the files:
- the HiVisionEvents1.csv file as HiVisionEvents2.csv
- the HiVisionEvents0.csv file as HiVisionEvents1.csv
- etc.
Industrial HiVision can write up to 1000 log files. If other events occur,
Industrial HiVision overwrites the HiVisionEvents999.csv file in
accordance with the scheme described above.
352
References
Preferences > Display > Event
“Logfile path“
As an alternative to the installation directory, this line gives you the
option of selecting a path on which Industrial HiVision writes the event
log file.
Note: Delays or interruptions while writing to a network drive can block
the Industrial HiVision service.
Note: Delays and interruptions in the network can result in gaps in the
content of the event log file.
Note: As the service writes the log file, the local system account
requires write permission for this directory.
“Status Change Caused by Status Propagation“
A status change for a property of a component/folder is an event which
Industrial HiVision can display as an entry in the event list.
Use the drop-down list to select the events that Industrial HiVision
displays:
-
“No Event“, if you only want to display the status changes on the
lowest level as an entry. The status changes which are propagated
upwards from the lowest level are hidden by Industrial HiVision as
an event entry.
-
“Info Event“, if you want Industrial HiVision to display the status
changes as entries in the event list. The event entries caused by a
propagated status change are assigned the type “Info” (see on
page 90 “Number of events”).
-
“Similar Event“, if you want Industrial HiVision to display the status
changes as entries in the event list.
The event entries caused by a propagated status change are
assigned the type corresponding to the propagated status change
on this level.
Default setting: No event.
“Source“
For an event that relates to a device, Industrial HiVision adds to the
event list the device name with the location that you entered in the
“Location“ device property.
353
References
Preferences > Display > Event
Events on the Industrial HiVision website
(see on page 240 “Events on the website”)
“Days in event log“
On the event website, Industrial HiVision displays the events for the
number of previous days that you enter here.
Default setting: 7 days
“Automatic page refresh every“
Industrial HiVision refreshes the event website periodically. Here you
enter the length of the period in minutes.
Default setting: 5 min
“I'm alive Event“
“Send I'm alive events“
When you activate this function, Industrial HiVision periodically sends
the event defined as the “I'm alive Event“ action.
Default setting: unmarked
Note: If you previously defined an “I'm alive Event“ category alarm and
a related action, then Industrial HiVision also sends an associated
“Alarm“ event (see on page “Industrial HiVision “I'm alive” event” on
page 214).
“Send interval“
Default setting: 1 min
“Event actions triggered by I'm alive event“
When you activate this function, the associated “Alarm“ event also
contains additional events with the “Warning“ or “Error“ status. These
additional events are the ones that Industrial HiVision registered since
it sent the last “I'm alive Event“.
Default setting: unmarked
354
References
Preferences > Display > Event
Figure 83: Configuration > Preferences > Display > Event
355
References
Preferences > Display > Event Auto-Acknowledge
Preferences > Display > Event Auto-Acknowledge
Event Auto-Acknowledge
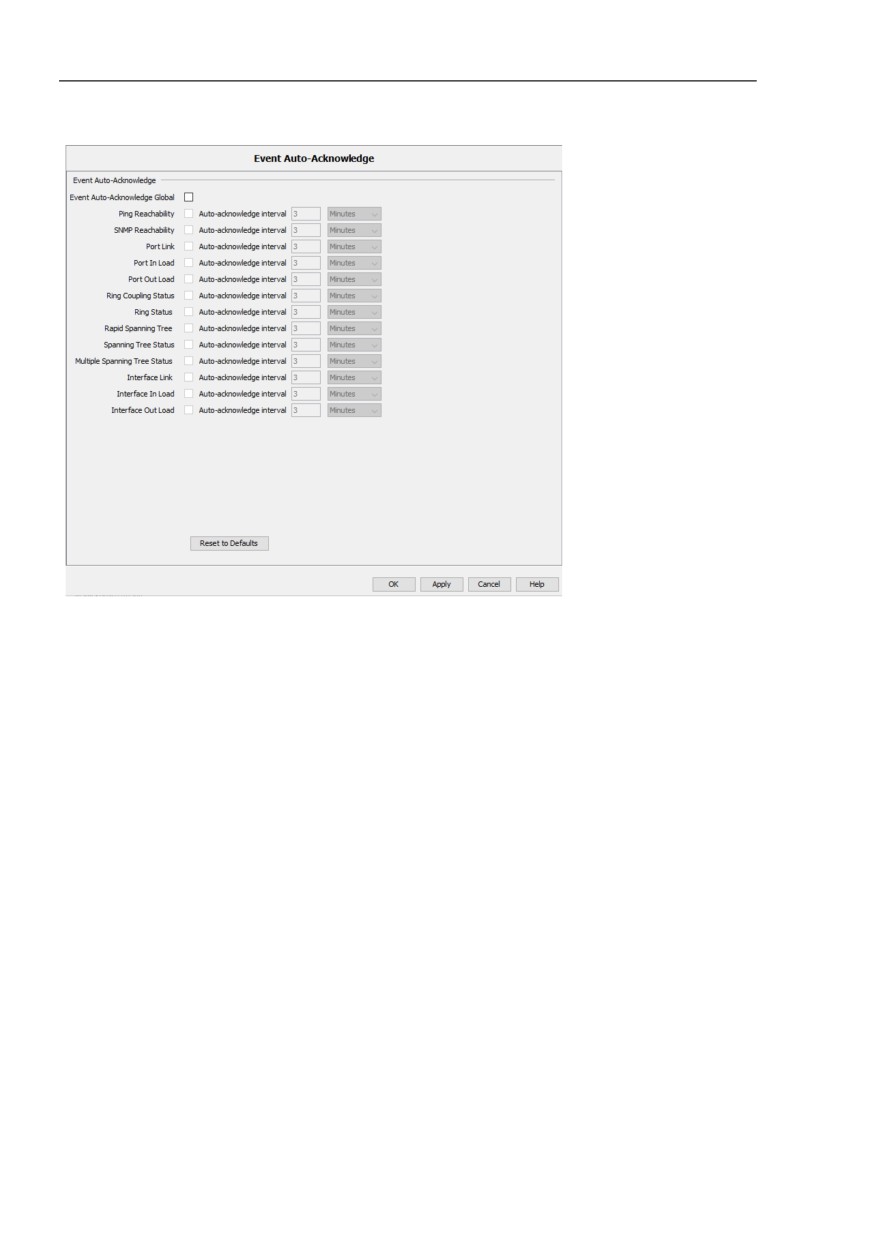
This dialog gives you the option to set the “Status Worse“ events, that
Industrial HiVision application can automatically acknowledge if a related
“Status Better“ event occurs in a specified time interval.
Events in the “Event Auto-Acknowledge“ list:
“Ping Reachability“
An event related to a change in the reachability status of a port.
“SNMP Reachability“
An event related to a change in the reachability status of the SNMP
protocol.
“Port Link“
An event related to a change in the link status of a port.
“Port In Load“
An event related to a change in the status of the inbound traffic load
on a port.
“Port Out Load“
An event related to a change in the status of the outbound traffic load
on a port.
“Ring Coupling Status“
An event related to a change in the status of the redundant ring
coupling.
“Ring Status“
An event related to a change in the status of the “Ring Status“
property.
“Rapid Spanning Tree“
An event related to a change in the status of the Rapid Spanning Tree
Protocol.
“Spanning Tree Status“
An event related to a change in the status of the Spanning Tree
Protocol.
“Multiple Spanning Tree Status“
An event related to a change in the status of the Multiple Spanning
Tree Protocol.
356
References
Preferences > Display > Event Auto-Acknowledge
“Interface Link“
An event related to a change in the link status of an interface.
“Interface In Load“
An event related to a change in the status of the inbound traffic load
on an interface.
“Interface Out Load“
An event related to a change in the status of the outbound traffic load
on an interface.
To configure the auto-acknowledge function for an event proceed as
follows:
The auto-acknowledge function is disabled by default. To enable the
auto-acknowledge function, mark the “Event Auto-Acknowledge
Global“ checkbox.
Select the event(s) for which it is necessary to enable the function.
Mark the appropriate checkbox in the “Event Auto-Acknowledge“ list.
To set the time interval, type the necessary value in the “Auto-
acknowledge interval“ field and select the units of time for this value
from the pull-down menu. You can select between seconds, minutes,
hours or days.
Default setting: 3 minutes.
Value range for the “Auto-acknowledge interval“ can be specified
between 1 second and 2 days.
When you configure an alarm for a “Status Worse“ event, you can also
choose not to display an alarm for the event. This is possible if the
event has been acknowledged beforehand.
You can create a new alarm for a “Status Worse“ event in the
Configuration > Preferences > Basics > Event Actions >
Alarms > New > New Entry dialog (see figure 80). In the “Type“ frame,
mark the “If event has not been acknowledged after“ checkbox and
select a time interval that exceeds the time interval specified in the
“Auto-acknowledge interval“ field.
To accept the changes, click the “Apply“ button.
If you want to reset the values to default parameters, click the “Reset
to Defaults“ button.
357
References
Preferences > Display > Event Auto-Acknowledge
Figure 84: Configuration > Preferences > Display > Event Auto-Acknowledge
358
References
Preferences > Display > Device
Preferences > Display > Device
Device
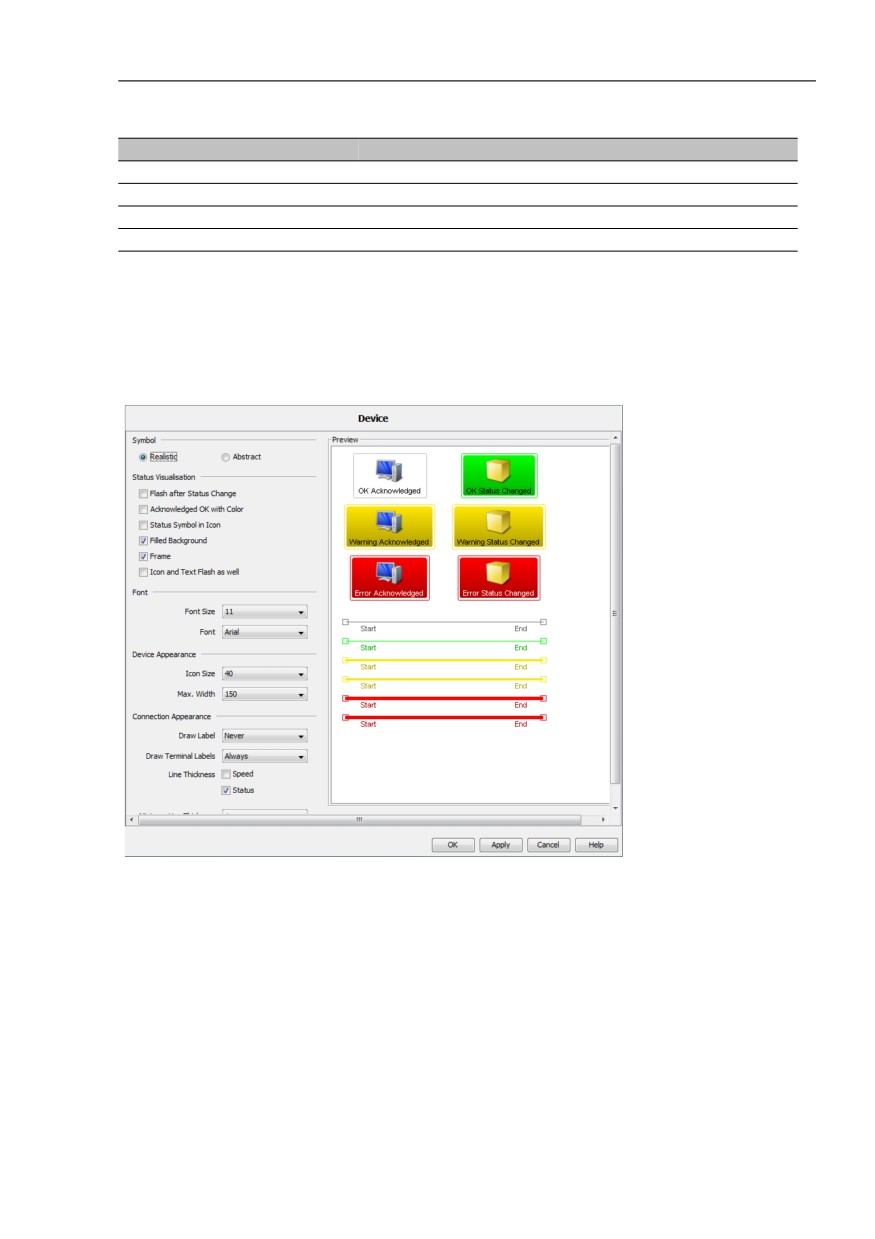
This dialog allows you to specify the displaying of the devices in the
network, the connections between the devices and the labeling.
“Symbol“
Click on the relevant white radio button to select the symbol that
Industrial HiVision uses to display the device:
-
“Realistic“: display the device as a product image
–
“Abstract“: display the function of the device using a symbol
Default setting: “Realistic“
“Status Visualisation“
Here you specify how Industrial HiVision optically displays the status
of the devices or a status change on the screen.
Industrial HiVision provides the following display options:
-
“Flash after Status Change“
–
“Acknowledged OK with Color“
–
“Status Symbol in Icon“
–
“Filled Background“
–
“Frame“
–
“Icon and Text Flash as well“
Default setting: “Filled Background“ and “Frame“ activated.
“Font“
Enter the font size (in points) and the font type for the labeling of the
devices and the connections between the devices.
Default setting: font size = 13, font type = Arial.
“Device Appearance“
Specify the icon size and the maximum width (in pixels) with which
Industrial HiVision displays the devices in the network on the screen.
Default setting: icon size = 48, max. width = 150.
359

References
Preferences > Display > Device
“Connection Appearance“
-
Specify whether and how Industrial HiVision labels connections
between the devices in the network on the screen.
You use the “Draw Label“ drop-down list to select when you want
Industrial HiVision to label a connection with the status of the
connection.
Options: “Always“, “Never“, “Under Mouse Pointer“
Default: “Never“
You use the “Draw Terminal Labels“ drop-down list to select when
you want Industrial HiVision to label the terminal points of the
connection.
Options: “Always“, “Never“, “Under Mouse Pointer“
Default: “Always“
-
The settings for “Line Thickness“ provide you with a better overview
of the connection speed and the connection status in the topology
view.
If you activate the “Speed“ display, when the speed is increasing
Industrial HiVision increases the line thickness in 2-point steps at
10, 100, 1000, 10000 MBit/s. If you activate the “Speed“ display,
Industrial HiVision displays the current connection setting in the
bubble help.
If you deactivated the “Speed“ display, Industrial HiVision displays
the current speed setting even if you have activated the “Speed“
display in the connection properties dialog (see on page 291
“Connection”).
If you activate the “Status“ display, when the status weighting
increases Industrial HiVision increases the line thickness in 2-point
steps.
Default setting: “Status“
-
The “Minimum Line Thickness“ is the minimum thickness applied
by Industrial HiVision when increasing the line thickness depending
on the speed.
Possible: 1, 3, 5
Default setting: 1
“Preview“
The “Preview“ frame displays how your settings affect the display.
Display
Meaning
OK Acknowledged
Status has not changed and is OK.
OK Status Changed
Status has changed and is OK.
Table 42: Preview for displaying devices and connection lines
360
References
Preferences > Display > Device
Display
Meaning
Warning Acknowledged
Status has not changed. There is a warning message.
Warning Status Changed
Status has changed. There is a warning message.
Error Acknowledged
Status has not changed. There is an error.
Error Status Changed
Status has changed. An error has occurred.
Table 42: Preview for displaying devices and connection lines
If you click on “Reset to Defaults“, the changes you made are reset to
the default settings.
Figure 85: Configuration > Preferences > Display > Device
361
References
Preferences > Display > Appearance
Preferences > Display > Appearance
Appearance
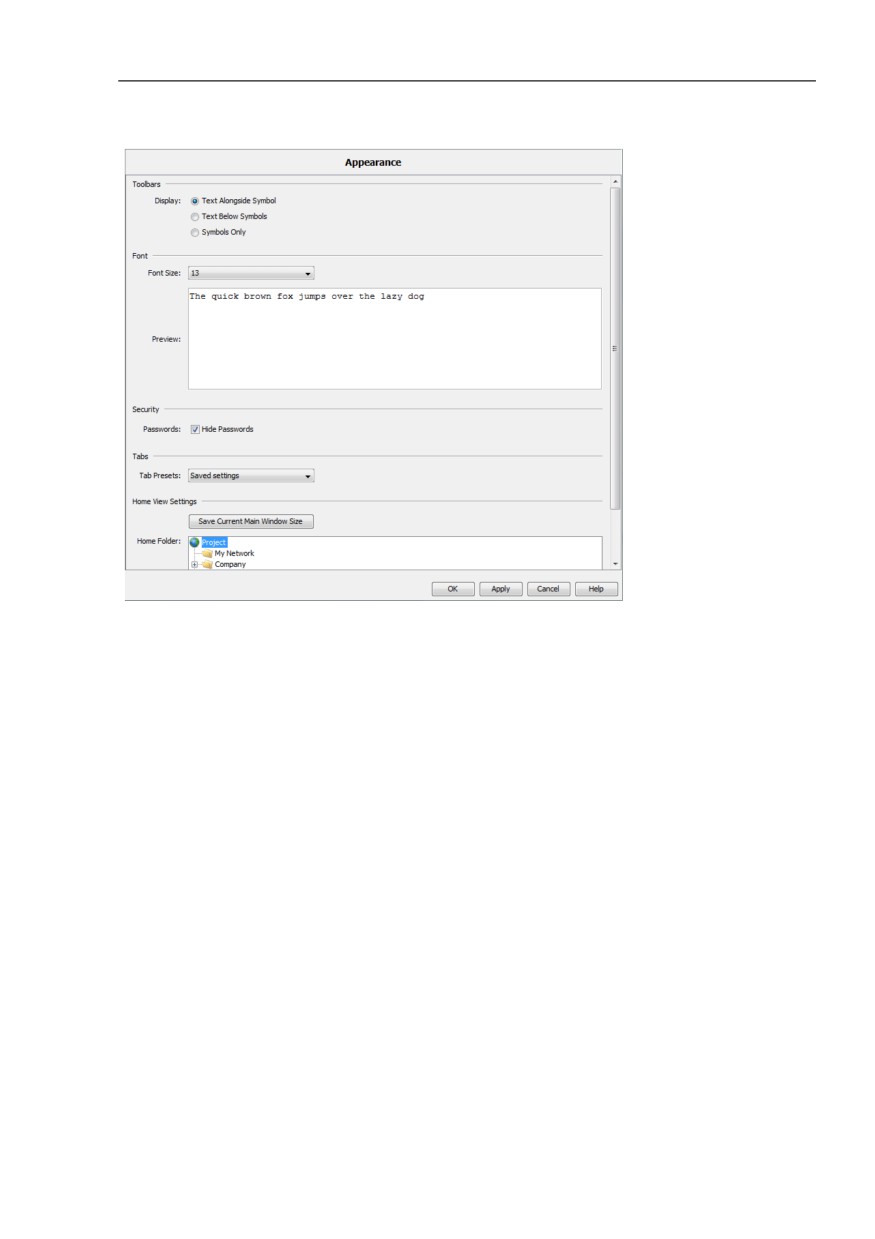
This dialog allows you to alter the text display and the tab page selection:
“Toolbars“
Text placement in the tool bar
Default setting: “Text Alongside Symbol“
“Font Size“
Default setting: depends on the screen resolution.
“Security“
Display password as stars (not readable) when dialogs are opened in
which you enter or can see passwords.
Default setting: “Hide Passwords“
“Tab Presets“
Depending on the context, Industrial HiVision provides you with
various tabs:
- Select “Saved settings“ to display the tab last opened in this view
when you open the view.
- Select “Default settings“ so that Industrial HiVision selects the tab
with the list display below the device level.
- Select “Don't apply“ so that when Industrial HiVision changes to
another device or component detail, it keeps the current display
type (list or topology display).
Default setting: “Saved settings“
“Home View Settings“
Specifies the display default settings for the “Home View“ button.
Industrial HiVision allows you to save the following settings:
Specify a different folder in the menu tree.
Specify a different screen size.
Specify either the maximize or normal view.
The following parameters are set as default in Industrial HiVision:
VLAN “All“
“Last 24 Hours Events“
“Map“ view
362
References
Preferences > Display > Appearance
Figure 86: Configuration > Preferences > Display > Appearance
363
References
Preferences > Display > Status Colors
Preferences > Display > Status Colors
Status Colors
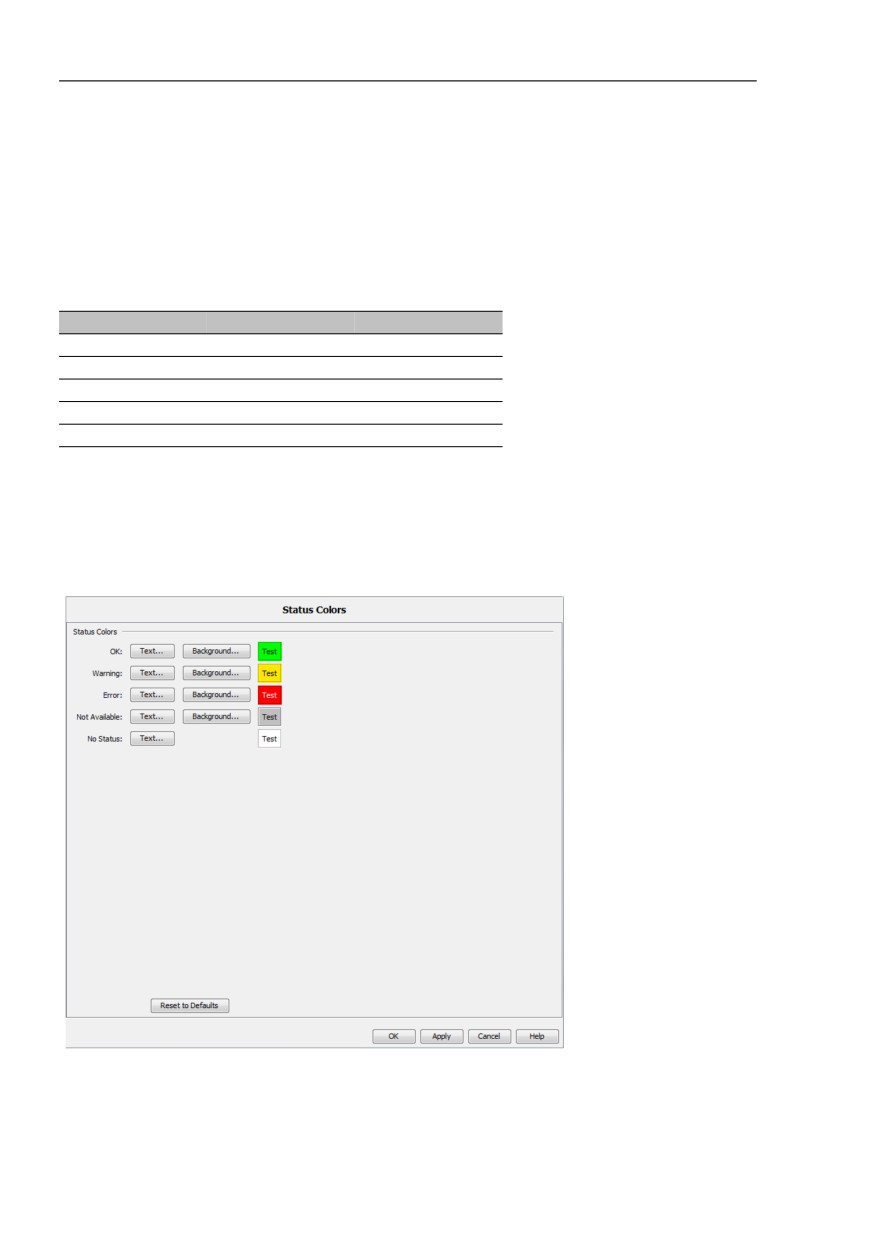
This dialog allows you to assign a color to every status. You can select
the colors for the foreground and the background.
Status
Foreground
Background
OK
Black
Green
Warning
Black
Yellow
Error
White
Red
Not Available
Black
gray
No Status
Black
White
Table 43: Default setting of the status colors
If you click on “Reset to Defaults“, the changes you made are reset to
the default settings.
Figure 87: Configuration > Preferences > Display > Status Colors
364

References
Preferences > Display > Device Icon
Preferences > Display > Device Icon
Device Icon
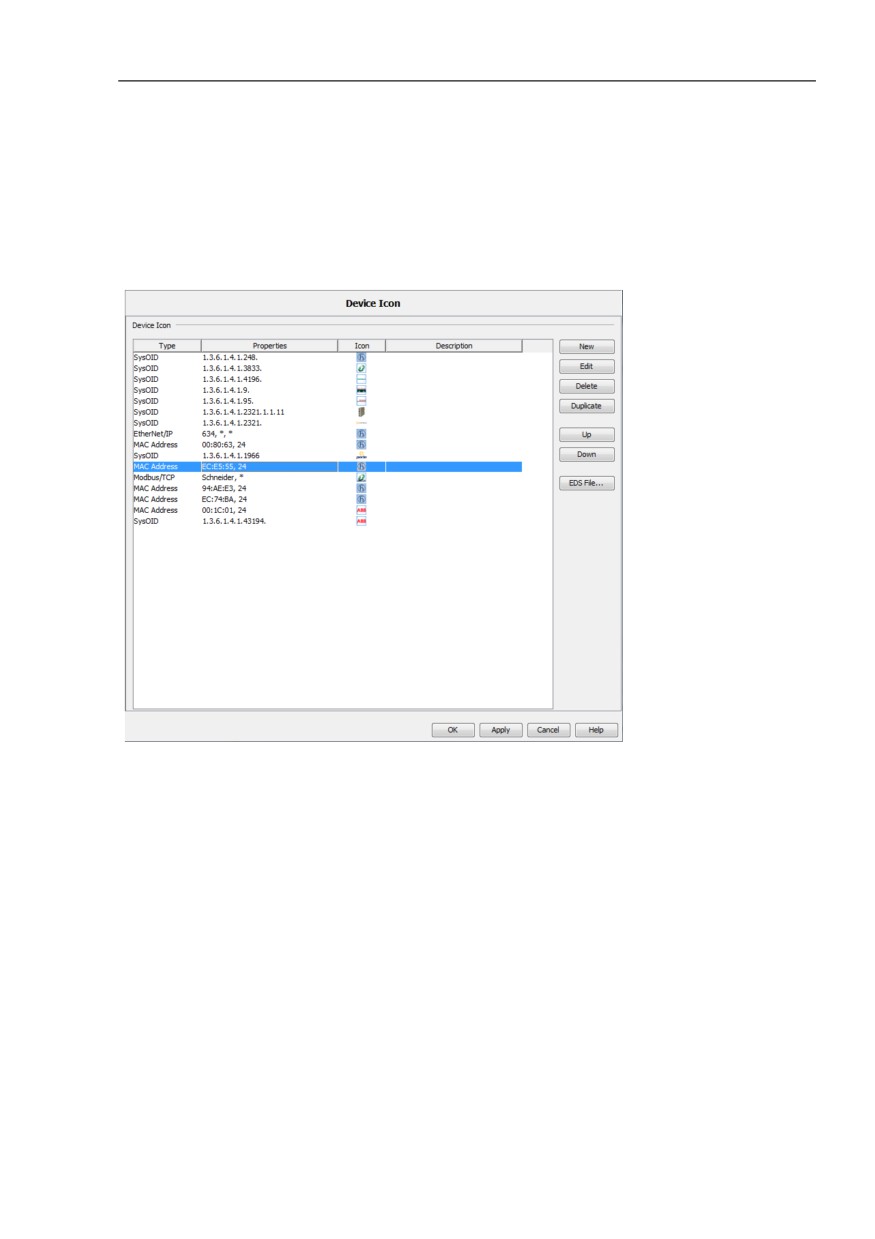
This dialog enables you to assign defined default icons to different device
types when devices are detected.
To define a new default icon assignment, click the “New“ button or to
edit an entry, select a row in the table and click the “Edit“ button.
Industrial HiVision provides the following methods for differentiating the
device types:
System Object Identifier (“SysOID“)
Type
SysOID
SysOID
Manufacturer ID
Icon
Click on “?” to search your file system for an image file for the icon.
“EtherNet/IP“
Along with entering the parameters in the dialog, Industrial HiVision
allows you to load the parameters from an EDS file (electronic data
sheet).
Type
EtherNet/IP
Vendor Code
Manufacturer ID in the device description based on EtherNet/IP.
Product Type
Product type in the device description based on EtherNet/IP. An “*” in this field
means “all product types”.
Product Code Product code in the device description based on EtherNet/IP. An “*” in this field
means “all products”.
Icon
Click on “?” to search your file system for an image file for the icon.
“Modbus/TCP“
Type
Modbus/TCP
Vendor Name
Manufacturer ID in the device description based on Modbus/TCP.
Product Code
Product code in the device description based on Modbus/TCP. An “*” in this
field means “all products”.
Icon
Click on “?” to search your file system for an image file for the icon.
365

References
Preferences > Display > Device Icon
“MAC Address“
Type
MAC Address
MAC Address
The part of the MAC addresses of devices to which you want to assign a device
icon using the MAC address. For example, the first 24 bits of the MAC address
of Hirschmann addresses are 00:80:63.
Number of Bits The number of bits of the MAC addresses that you want to use for the icon
assignment. The first 24 bits of a MAC address indicate the manufacturer of a
device.
Icon
Click on “?” to search your file system for an image file for the icon.
In the table, you can:
-
add new entries
–
edit existing entries
–
delete existing entries
–
duplicate existing entries
–
add new EtherNet/IP entries using the “EDS File“ button. Industrial
HiVision loads the EDS files selected together with the corresponding
icon files.
Industrial HiVision also finds icons in manufacturer-specific
subfolders.
The EDS Files are located on the device CD, or can be downloaded
from the web page of the manufacturer. The EDS files contain the
“Vendor Code“, “Product Type“, “Product Code“ and the name of the
icon. Industrial HiVision attempts to open the icon with the specified
name.
If Industrial HiVision does not open the icon for the new device, then
proceed as follows:
Open the EDS file of the device using a text editor e.g. Notepad++.
Verify that the icon is in the specified path, e.g. “Icon = "Icon/
xxxx.ico";”.
Save and close the EDS file.
Click the “EDS File“ button.
Select the EDS file for the device.
Click the “OK“ button.
In the device detection, and for selected devices with Edit > Set Default
Device Icon, Industrial HiVision checks the device type. Industrial
HiVision assigns the device the first icon that Industrial HiVision finds in
the table.
366
References
Preferences > Display > Device Icon
To change the sequence of the entries in the table, use the “Up“ and
“Down“ buttons.
The icons already defined in Industrial HiVision for Hirschmann devices
are hidden at the top of the table. Thus Industrial HiVision assigns the
correct icons to the Hirschmann devices.
Figure 88: Assignment table for device icons
367
References
Preferences > Advanced
Preferences > Advanced
[ Advanced]
368
References
Preferences > Advanced > Program Access
Preferences > Advanced > Program Access
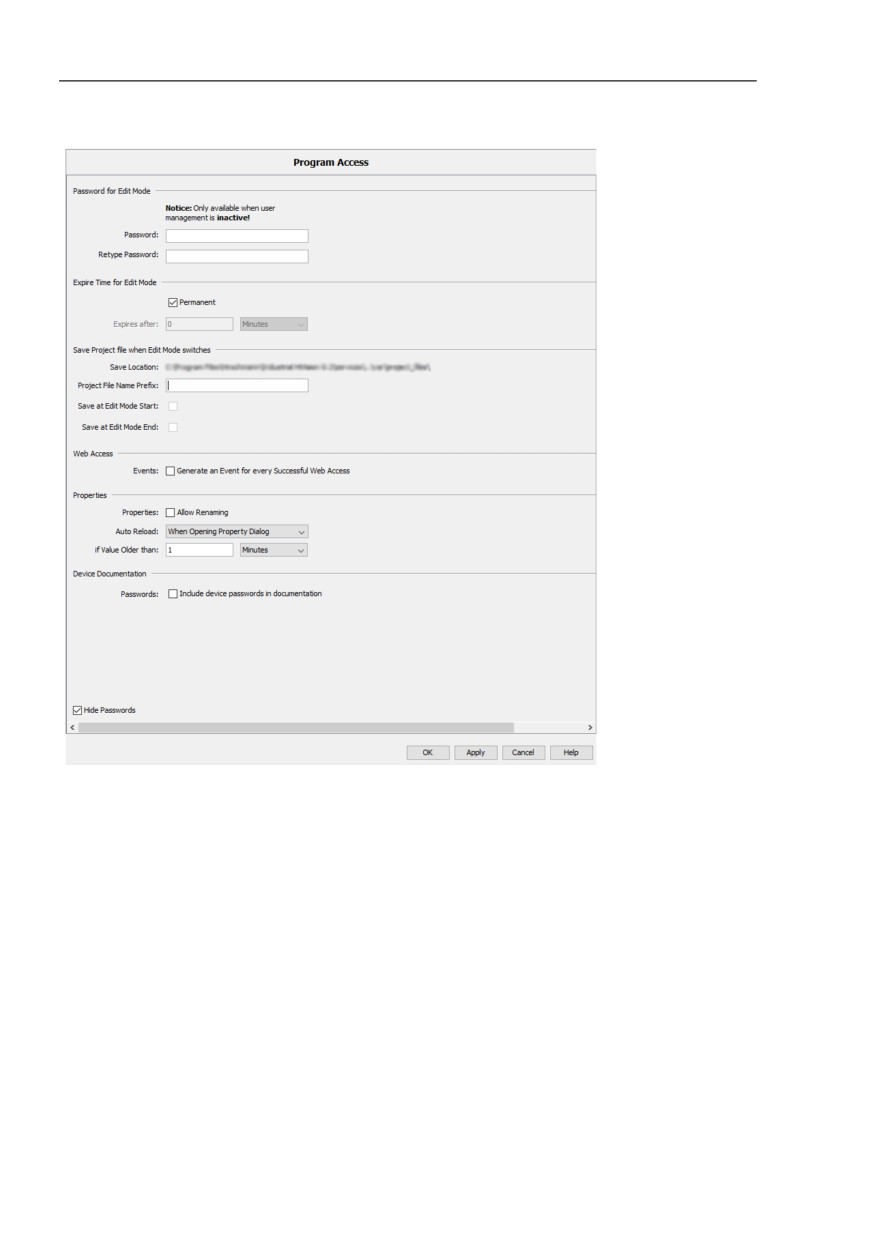
Program Access
“Password for Edit Mode“
This function helps protect the edit mode from unauthorized access.
You can enable the “Password for Edit Mode“ function only when the
“User Management“ function is disabled. To verify that the “User
Management“ function is disabled, perform the following steps:
Open the Preferences > Basics > User Management dialog.
Verify that the “Selected Order“ window is empty.
To enable and test the “Password for Edit Mode“ function, perform the
following steps:
Enter the same password in the “Password“ and the “Retype
Password“ fields.
To save the password in the database and close the dialog, click the
“OK“ button.
To verify that the “Password for Edit Mode“ function is enabled, click
the “Edit Mode“ button. Industrial HiVision opens the “Edit Mode
Password“ dialog.
Note: When you click the “Edit Mode“ button and the “User Account“
dialog opens, this is an indication that the “User Management“ function is
enabled. To access the edit mode, when the “User Management“ function
is enabled, enter the password of the user that is currently logged in.
“Expire Time for Edit Mode“
With the Expire Time you specify how long Industrial HiVision stays in the
Edit Mode after you have made an entry. When this time has expired,
Industrial HiVision switches to the Run Mode.
Possible settings: 5 to 60 minutes or “Permanent“.
“Save Project file when Edit Mode switches“
This function lets you save the Industrial HiVision project file. You can
select the moment Industrial HiVision automatically saves the project file,
as follows:
at the activation of the “Edit Mode“
at the deactivation of the “Edit Mode“
in both of the above cases
369
References
Preferences > Advanced > Program Access
In the “Save Location“ field you can find the location where Industrial
HiVision saves the project file.This location is on the hard drive of the PC
that runs the Industrial HiVision kernel. You cannot change this location.
To configure the “Save Project file when Edit Mode switches“ function,
perform the following steps:
In the “Project File Name Prefix“ field, specify the prefix of the project
file name.
Possible values: Alphanumeric ASCII character string with 1..30
characters
The following characters are allowed:
-
0..9
- a..z
- A..Z
-
_
The pattern of the project file name is as follows:
prefix-YYYY-MM-DD-HH-MM-SS.ihp
To save the project file when you activate the “Edit Mode“, mark the
“Save at Edit Mode Start“ checkbox.
Default setting: unmarked
To save the project file when you deactivate the “Edit Mode“, mark the
“Save at Edit Mode End“ checkbox.
Default setting: unmarked
Note: Industrial HiVision saves a maximum of 100 project files in the
location on the hard drive of the PC that runs the Industrial HiVision
kernel. If this number is exceeded, then Industrial HiVision deletes the
oldest saved files.
“Web Access“
“Generate an Event for every Successful Web Access“ lets you to also
generate an event for every successful Web access, in addition to
unauthorized access attempts.
“Properties“
“Allow Renaming“ lets you to rename a property of the component details.
For example, you can change the “In Load“ property of a connection to
“Volume of Incoming Data”.
370

References
Preferences > Advanced > Program Access
“Auto Reload“ lets you to get Industrial HiVision to perform the following
task:
- query the current values for a property dialog when it opens this dialog
- query the current values of the content of the detail frame when it
opens this frame.
The “if Value Older than“ function lets you to make an automatic querying
of the values to be displayed depending on the age of these values.
“Device Documentation“
“Include device passwords in documentation“ allows you create the
device documentation with a readable or a hidden password.
Default setting: password hidden.
SNMP V1
******,******
public, private
SNMP V3
admin, MD5: ******,
admin, MD5: private,
DES: ******
DES: private
Table 44: Example device documentation with a readable and a hidden password.
Note: If you have forgotten your password, then quit Industrial HiVision.
Logon to Windows as an administrator or to Linux as a root and start
Industrial HiVision again. Restarting Industrial HiVision as an
administrator or as a root enables you to make a new entry without the
password being queried first.
371
References
Preferences > Advanced > Program Access
Figure 89: Configuration > Preferences > Advanced > Program Access
372
References
Preferences > Advanced > Services Access
Preferences > Advanced > Services Access
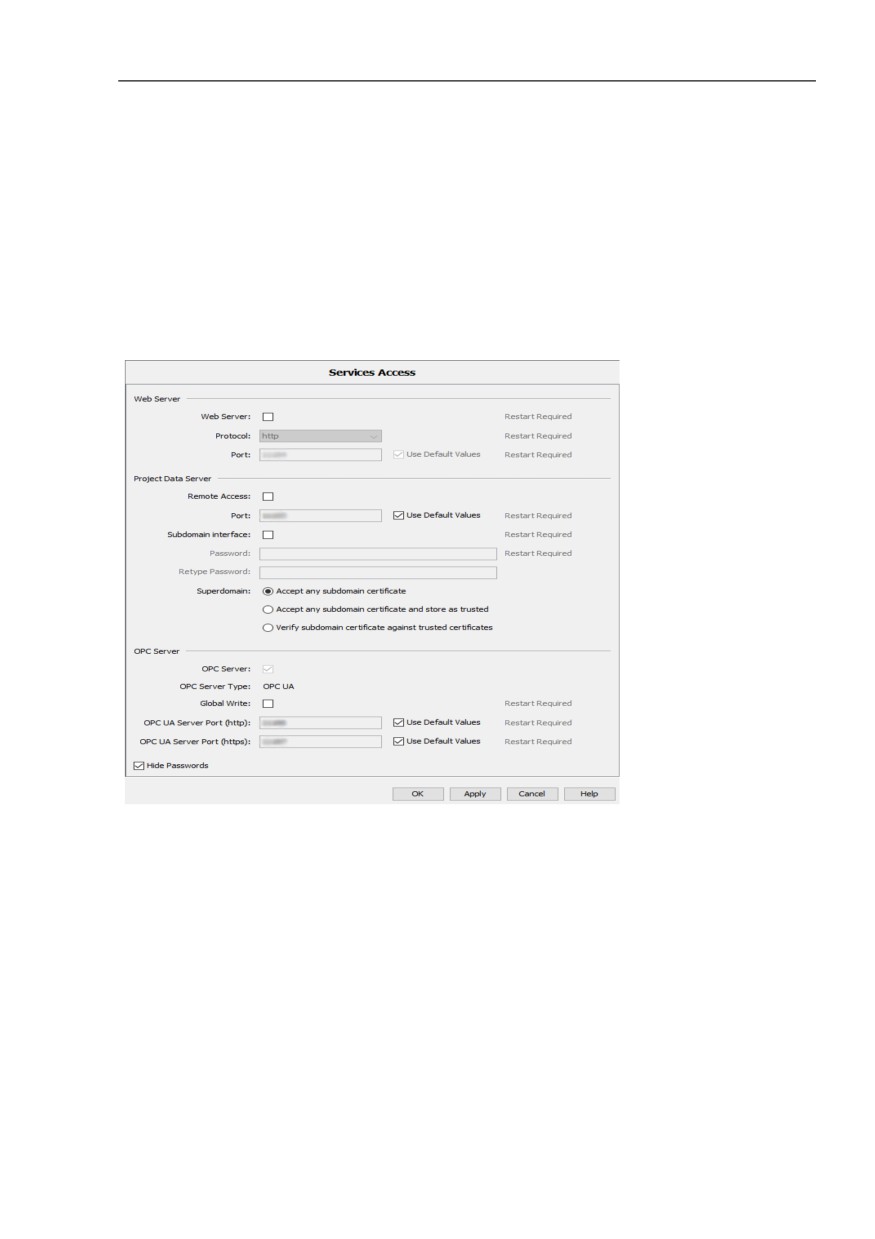
Services Access
The “Services Access“ dialog lets you to activate and deactivate various
methods of accessing network management from another computer.
When a firewall separates your Industrial HiVision services from a client,
add a rule to the firewall to forward data between the services and client.
See “Using Industrial HiVision with Firewalls” on page 62.
“Web Server“
This service allows you to access your network management server
using a Web browser using another computer. The address of the
Web server is:
protocol://IP address of the network management station:port number,
for example
When setting up a secure connection using HTTPS, Industrial HiVision
uses a Hirschmann certificate that classifies your browser as invalid. If
you want to use this service, then you trust this connection, add an
exception to your browser. Save the exception.
If you wish to specify a different value that Industrial HiVision uses to
connect to the “Web Server“, then unmark the “Use Default Values“
checkbox. Enter the desired value in the “Port“ field. If you mark the
“Use Default Values“ checkbox, then Industrial HiVision resets the
value in the “Port“ field to the default value 11194.
“Project Data Server“
With “Remote Access“ you let Industrial HiVision interfaces running on
other computers to have access to the local Industrial HiVision service.
If you permit “Services Access“, then the local interface connects
using the network connection, as an alternative to the internal IP
address 127.0.0.1. The local interface connects the same way as the
interface of the external computer. A result of this is that the internal
interface also loses the connection to the service if the network
connection is interrupted.
The “Port“ field displays the port on which Industrial HiVision
interfaces, running on other computers, can access the local Industrial
HiVision service.
Note: Starting with Industrial HiVision release 8.0, you can change the
value of the Project Data Server > Port field.
“Subdomain interface“
373
References
Preferences > Advanced > Services Access
If you activate the “Subdomain interface“ function, you let another
network management station access the local Industrial HiVision as a
superdomain.
“Password“
If you use this management station as a subdomain, then the dialog
gives you the option to type in the password for access to the
subdomain interface. See “Connect subdomains to superdomains” on
page 56.
“Superdomain“
When a secured connection is established, Industrial HiVision lets you
select the process that the superdomain uses to handle certificates
provided by the subdomain:
“Accept any subdomain certificate“
This method permits the superdomain to accept the certificate
provided by the subdomain without verification. The certificate is
not added to the trust store and an event is created with the
fingerprint of the subdomain in the message.
Default setting: marked
“Accept any subdomain certificate and store as trusted“
This method permits the superdomain to accept the certificate
provided by the subdomain without verification. The certificate is
added to the trust store and it is used for future connections. An
event is created which records the fact that the fingerprint of the
subdomain is added to the trust store.
Default setting: unmarked
“Verify subdomain certificate against trusted certificates“
This method is used to verify that the certificate provided by the
subdomain is added to the trust store.
If the certificate is not in the trust store, then the connection is
rejected. An error event is created with the fingerprint of the
subdomain in the message.
Default setting: unmarked
“OPC Server“
The “OPC Server“ lets you activate the Industrial HiVision OPC server
(see on page 229 “Structure of the transfer data for OPC”).
With “Global Write“ you permit Industrial HiVision to write object values
using an OPC write command (see on page 227 “Link to process
visualization system”).
To help secure communications between the OPC UA server and
Industrial HiVision, use a CA certificate (see on page 236 “OPC UA
Server Custom Certificates”).
When using HTTP to connect to the Industrial HiVision OPC UA
374
References
Preferences > Advanced > Services Access
server, configure the OPC UA client to access the server on the port
displayed in the “OPC UA Server Port (http)“ field.
When using HTTPS to connect to the Industrial HiVision OPC UA
server, configure the OPC UA client to access the server on the port
displayed in the “OPC UA Server Port (https)“ field.
Note: When you deactivate the “OPC Server“ function, restart the
Industrial HiVision kernel.
Figure 90: Configuration > Preferences > Advanced > Services Access
375
References
Preferences > Advanced > Device Credentials
Preferences > Advanced > Device Credentials
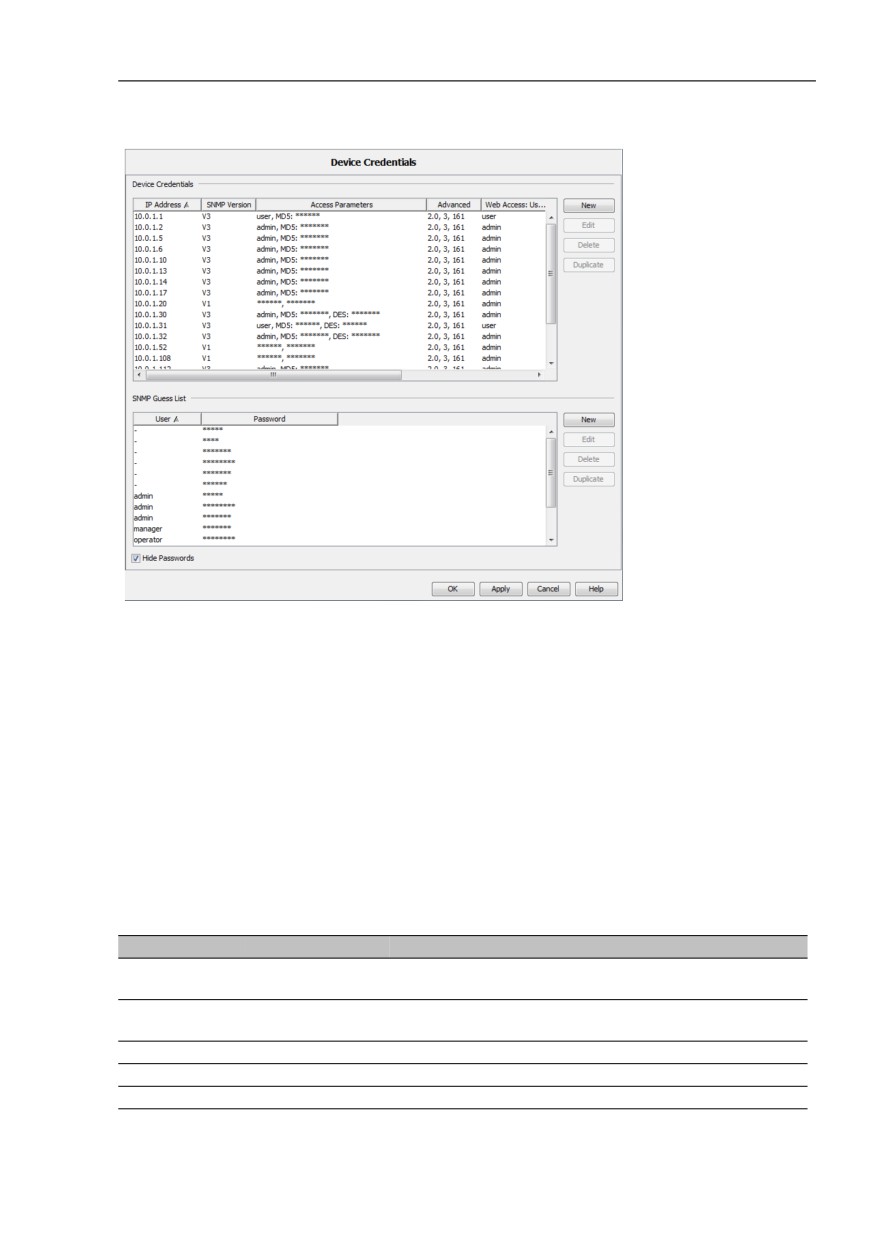
Device Credentials
Industrial HiVision supports you in communicating with SNMP devices by
means of automated password usage.
“Device Credentials“
When setting up the communication with an SNMP device, Industrial
HiVision tries to get access using known passwords and user names.
For an attempt with an incorrect password, Industrial HiVision gets an
authentication trap from the relevant device.
For an attempt with a correct password, Industrial HiVision gets a reply to
an SNMP query and enters the correct password and user name into the
upper table of this dialog.
“SNMP Guess List“
When setting up the communication with an unknown SNMP device,
Industrial HiVision attempts to authenticate itself with the login data from
the “SNMP Guess List“.
You use the “New“ button to create a new entry in the table.
Industrial HiVision allows you the following options for table entries:
- change the entry using the “Edit“ button
- delete the entry using the “Delete“ button
- duplicate the entry using the “Duplicate“ button
“Hide Passwords“
Industrial HiVision allows you to display passwords unreadable, as stars.
When you open this dialog, the setting for this field depends on the setting
in the Display > Appearance dialog.
376
References
Preferences > Advanced > Device Credentials
Figure 91: Configuration > Preferences > Advanced > Device Credentials
Along with the automatic password usage, Industrial HiVision also gives
you the option of manually entering the SNMP configuration for individual
SNMP devices.
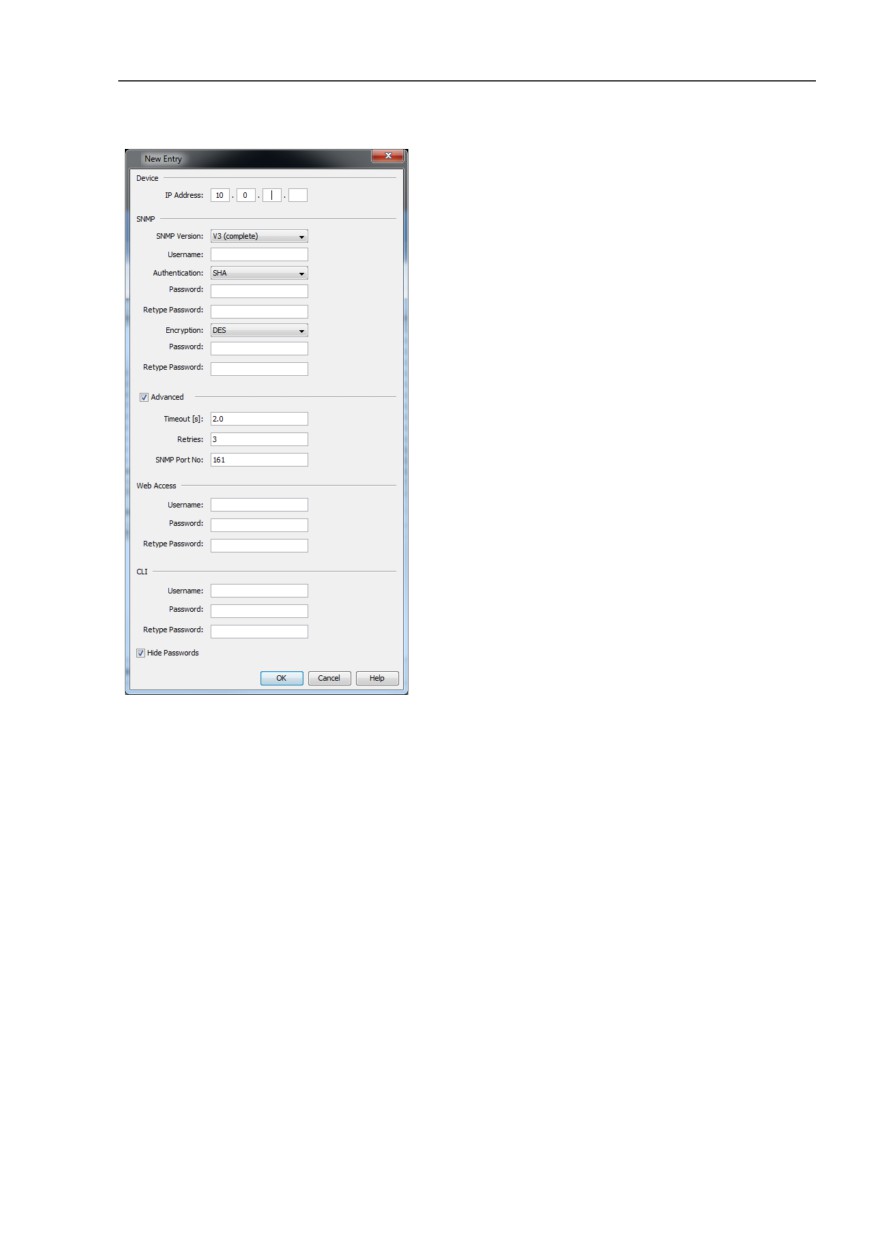
To open the “New Entry“ dialog for the SNMP configuration, in the
“Device Credentials“ frame click the “New“ button.
Enter the IP address of the device for which you want to enter the
SNMP access configuration.
Select the SNMP version that supports the device.
Depending on the SNMP version selected, you enter the required
access information:
SNMP version Designation
Meaning
V1
Read Password Password with which you can get read access to the
device
V1
Write Password Password with which you can get write/read access to
the device.
V3 (easy)
Username
User name with which you can access the device.
V3 (easy)
Password
Password belonging to the user name.
V3 (complete)
Username
User name with which you can access the device.
Table 45: SNMP configuration entries
377

References
Preferences > Advanced > Device Credentials
SNMP version Designation
Meaning
V3 (complete) Authentication
SHA, MD5 method for authentication of the message
V3 (complete) Password
Password for the authentication
V3 (complete) Encryption
DES, AES128, symmetrical encryption algorithm
V3 (complete) Password
Password for the encryption
Table 45: SNMP configuration entries
Under “Advanced“ you will find SNMP-specific exchange parameters.
The default settings are sufficient for many requirements.
With “Timeout [s]“ you specify how long Industrial HiVision waits for
the response to an SNMP query. If there is no response, then
Industrial HiVision repeats the SNMP query.
With “Retries“ you specify how often Industrial HiVision repeats the
SNMP query if there is no response.
For each repetition, Industrial HiVision doubles the timeout time,
Industrial HiVision sends a new query.
With “Port No“ you select the protocol port of the device to which
Industrial HiVision sends an SNMP query.
“Hide Passwords“ allows you to display passwords for this table entry
unreadable, as stars.
378
References
Preferences > Advanced > Device Credentials
Figure 92: Configuration > Preferences > Advanced > Device Credentials >
New
379