Network Management System Industrial HiVision 8.2. User Manual (2021) - page 11
References
8.4 Configuration
Industrial HiVision keeps a record of detected failed tasks. If you wish
to also keep a log entry for every successful task, then unmark the
checkbox “Suppress report creation for successfully completed task“.
Click the “OK“ button.
The following work steps pertain to the “Schedules“ tab:
To open the “New Entry“ dialog, click the “New“ button.
Open the “Name“ drop down list, in the “Task“ field.
Select the task created in the previous work steps.
To have Industrial HiVision save the device configuration multiple
times, in the “Execution“ field, select “Multiple execution“.
You can leave the current date and time in the “Start Date“ field
(default setting).
Change the “Interval“ setting to 1 and the units to “Days“.
To have Industrial HiVision save the device configuration every day
until you change this setting, in the “Repetition“ field, select the
“Repeat indefinitely“ option (default setting).
Click the “OK“ button.
Example of Scheduling an Event for Multiple Devices
You can also schedule an event to save the configuration of multiple
devices. If Industrial HiVision detects an error during the configuration
saving process, then the detected error is entered in a log.
The log file is in the following location:
\log\services\HiVisionKernelDb.0.stderr.log.
Note: If the “Save Device Configuration“ task fails during device
configuration retrieval, then proceed as follows:
Verify that Industrial HiVision can reach the selected device.
Verify that the protocols, SNMP and HTTP or HTTPS, are active on the
device.
Verify that Industrial HiVision has administration rights for SNMP,
HTTP, and HTTPS on the selected device.
Verify that the selected device supports the “Save configuration to
PC”, or “Export configuration” functions.
316
References
8.4 Configuration
To schedule an event in Industrial HiVision for saving the configuration file
for multiple devices, proceed as follows:
Open Industrial HiVision.
Verify that the “Edit Mode“ is active.
In the “Map“ tab, select the devices that you want to save the
configuration. You can also select devices from the “List“, “Devices“,
and “Security“ tabs.
Right-click a device.
In the drop down menu, select the “Schedule Saving Device
Configuration“ option. The “Schedule Saving Device Configuration“
dialog opens. In the “Device“ field, Industrial HiVision highlights the
devices that you selected in the “Map“ tab.
In the “Save Config“ field, enter the appropriate information in the
following fields:
- In the “Destination folder“, enter or browse to the location in which
you wish to save the configuration.
- Industrial HiVision enters IP_Address in the “File name“ field.
- The “On multiple task execution“ field allows you to select how
Industrial HiVision handles multiple files. To maintain a history of
the configuration changes, select “Add timestamp to target file
name“.
Industrial HiVision keeps a record of detected failed tasks. If you wish
to also keep a log entry for every successful task, then unmark the
checkbox “Suppress report creation for successfully completed task“.
The “Reporting“ field also contains the “Schedule Execution“ function.
The function allows you to schedule a save configuration file event.
When the function is active, Industrial HiVision saves the configuration
of the devices in a single file.
To have Industrial HiVision save the device configuration multiple
times, in the “Execution“ field, select “Multiple execution“.
You can leave the current date and time in the “Start Date“ field
(default setting).
Change the “Interval“ setting to 1 and the units to “Days“.
Verify that the “1 minute delay between start of tasks“ function is
active. The function allows Industrial HiVision to add a delay between
saving the configuration of the devices.
To have Industrial HiVision save the device configuration every day
until you change this setting, in the “Repetition“ field, select the
“Repeat indefinitely“ option (default setting).
Click the “OK“ button.
317
References
8.4 Configuration
Example of Scheduling an Event for Save Project
The “Save Project“ task gives you the opportunity to schedule a backup
of your project database.
Note: The backup files made with the “Save Project“ task are version
specific.
To schedule an event in Industrial HiVision to save a backup of your
project database, proceed as follows:
Verify that the “Edit Mode“ is active.
To open the “Scheduler“ dialog, click Configuration > Scheduler.
The following work steps pertain to the “Tasks“ tab:
To open the “New Entry“ dialog, click the “New“ button.
Enter a name that describes the event for example, “Save Project“.
In the “Task Type“ field, select the “Save Project“ option from the drop
down list.
In the “Save Project File“ field, enter the following information:
- Enter a path to the location where you wish to save the file in the
“Destination folder“ field.
- Enter a name that describes the file in the “File name“ field.
- The work steps that follow make multiple files in the same location.
Use the “On multiple task execution“ drop down list to select either
“Overwrite target file“, or “Add timestamp to target file name“.
Industrial HiVision keeps a log entry of detected failed tasks. If you
wish to also keep a log entry for every successful task, then unmark
the checkbox “Suppress report creation for successfully completed
task“.
Click the “OK“ button.
The following work steps pertain to the “Schedules“ tab:
To open the “New Entry“ dialog, click the “New“ button.
In the “Task“ field, open the “Name“ drop down list.
Select the task made in the previous work steps.
To have Industrial HiVision save the project database multiple times,
in the “Execution“ field, select “Multiple execution“.
You can leave the current date and time in the “Start Date“ field
(default setting).
Change the “Interval“ setting to 1 and the units to “Weeks“. The
minimum value for the “Save Project“ task is 1 hour.
318
References
8.4 Configuration
To have Industrial HiVision save the project every week until you
change this setting, in the “Repetition“ field, select the “Repeat
indefinitely“ option (default setting).
Click the “OK“ button.
8.4.6
Preferences
The “Preferences“ window enables you to enter basic program settings.
These settings relate to monitoring functions, management functions, display
options, access rights and others.
319
References
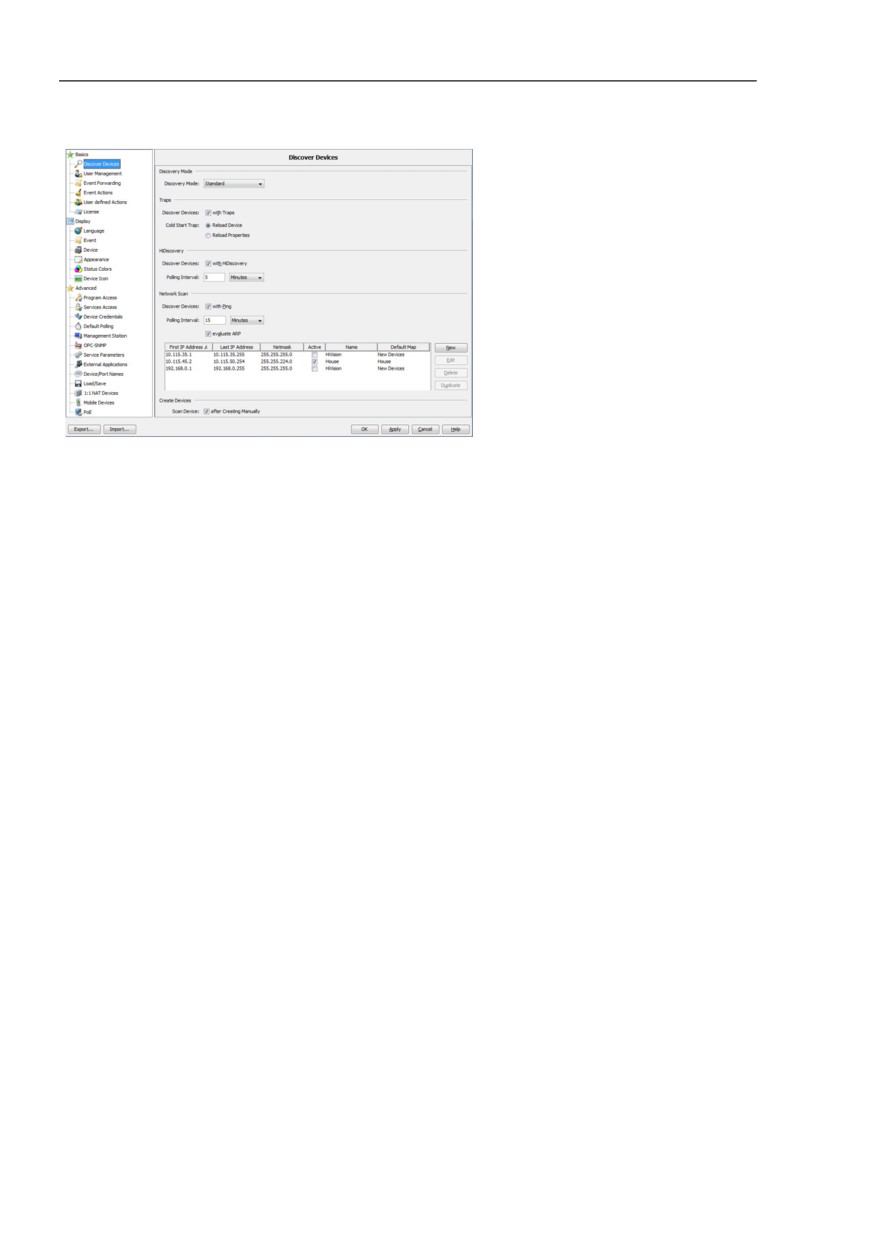
Figure 75: Configuration > Preferences
To accept changes in the dialogs and close the window, click the “OK“
button.
To accept changes in the dialogs before you switch to another dialog,
click the “Apply“ button.
To close the window, click the “Cancel“ button. Changes not written using
the “Apply“ button are lost.
Importing and Exporting the Preference Settings
Industrial HiVision allows you to import and export the preference
parameter settings. Industrial HiVision exports the preference file with a
.prefs extension. You can use the file for a backup or importing the
preference settings to a new management station. The application
restarts after importing preferences settings.
For security reasons, Industrial HiVision excludes the following
parameters from the export file:
Passwords
Password dependent preferences
User Management settings
Licenses
Device Credentials
Mobile Device Credentials
320
References
Note: Industrial HiVision displays an information message allowing you to
apply the settings before you export the preference file.
321
References
Preferences > Basics > Discovering devices
Preferences > Basics > Discovering devices
Discovering devices
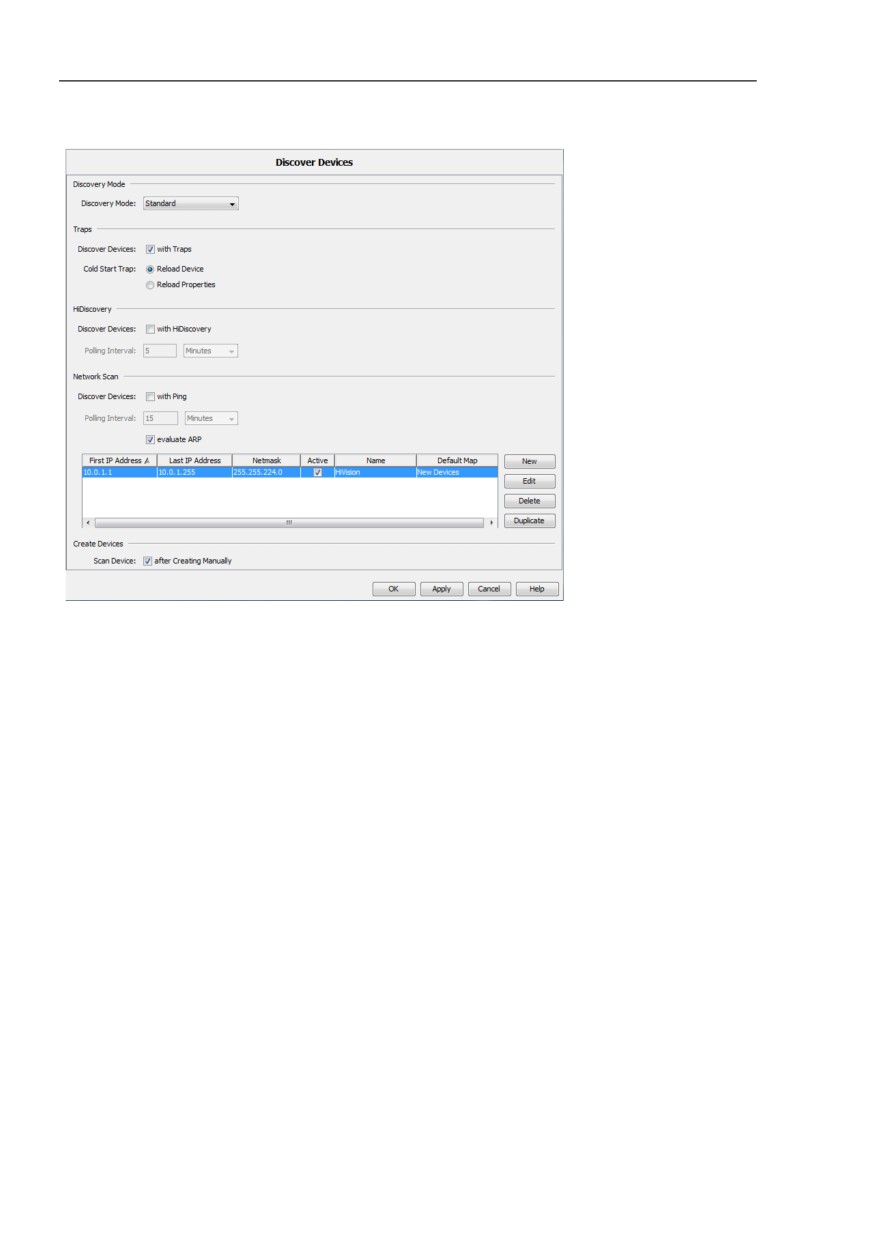
You use this dialog to specify which way Industrial HiVision should detect
the devices in your network structure. Industrial HiVision enters newly
detected devices in the default map. If you have not entered an activated
default map in the network scan table (see below), then Industrial HiVision
displays newly detected devices in the “New Devices“ folder
The search function in the tool bar helps you to find devices already
detected.
Industrial HiVision provides the following options for the “Discovery
Mode“:
“Standard“
Industrial HiVision uses the option you select to detect devices.
“Monitoring Mode“
Industrial HiVision exclusively evaluates cold start “Cold Start Trap“
and ARP answers to discover devices.
“Rogue Device Detection“
Industrial HiVision uses the option you select to detect devices and
places newly discovered devices in the “Rogue Devices“ folder.
Industrial HiVision provides the following options for discovering devices:
Detecting devices using traps
Detecting devices using the HiDiscovery V1 protocol
Detecting devices using a defined IP address range (“Network Scan“)
Detecting newly created devices
Detecting devices using a list
Detecting devices using traps.
After they are switched on, the devices send a switched-on message to
the network management station entered in the device.
Then Industrial HiVision reads the properties of the devices:
- Read device again: Industrial HiVision treats the device like a new
device and reads in the entire properties and the structure of the
device (new/removed model or power unit) again.
- Read properties again: Industrial HiVision reads the known properties
in again.
323
References
Preferences > Basics > Discovering devices
Example: You switch on a device with 2 power supplies for the duration
of some maintenance work. How does Industrial HiVision behave after the
device is switched on if a voltage supply is missing?
- With the “Reload Device“ setting, Industrial HiVision represents the
device with one power unit and the color green.
- With the “Reload Properties“ setting, Industrial HiVision represents the
device with two power units, with one power unit in red.
Industrial HiVision displays the newly detected devices in the
corresponding folder.
This method of detecting devices is suitable for use during ongoing
monitoring in networks where you need to manage the bandwidth.
Detecting devices using the HiDiscovery V1 protocol
The HiDiscovery V1 protocol uses the MAC address to communicate with
Hirschmann devices in the subnetwork on which the HiDiscovery V1
protocol is active.
You can find information as to which devices support HiDiscovery V1 in
the user manual of the device.
This method enables you to detect devices in your network to which you
have not yet assigned a valid IP address.
Industrial HiVision displays the devices in the corresponding folder.
This method is suitable for when you start up a newly installed network
and want to assign the IP address to the new devices. Select this method
for a limited time in order to spare your network an unnecessary network
load.
For the polling interval you enter the desired value in the “Polling
Interval“ field and select the units for this value - seconds, minutes,
hours or days - in the pull-down list.
Default setting: 5 minutes.
Keep in mind how this affects your system resources (see on
page 222 “Effect on system resources”).
Detecting devices using a defined IP address range
Using the “Network Scan“ function, Industrial HiVision periodically sends
ping requests to the devices with an IP address in the defined IP address
ranges and displays the new devices that respond in the destination folder
entered.
A firewall blocks the ping requests.
324
References
Preferences > Basics > Discovering devices
In order for Industrial HiVision to be able to discover devices behind a
transparent firewall, mark the “evaluate ARP“ checkbox. A transparent
firewall forwards an ARP response. If the ping response does not come
within a predetermined time, Industrial HiVision evaluates the ARP
response.
The “Network Scan“ method is suitable for monitoring a running network.
Adapt the frequency of the requests to the bandwidth of your network.
For the request interval you enter the desired value in the “Polling
Interval“ field and select the units for this value - seconds, minutes,
hours or days - in the pull-down list.
Default setting: 15 minutes.
Keep in mind how this affects your system resources (see on
page 222 “Effect on system resources”).
To enter an IP address range, click the “New“ button. Entering the IP
address range includes:
- the first IP address of the query range
- the last IP address of the query range
- the related network mask
- the activation/deactivation of this range for the query
- the name you want to give the range
- the default map in which you want Industrial HiVision to display a
newly detected device.
You can enter overlapping IP address ranges, then Industrial
HiVision enters a copy of a device in each of the relevant folders.
The table displays the IP address ranges already created.
To edit an IP address range, select a row in the table and click on the
“Edit“ button.
To delete a row from the table, select the row in the table and click the
“Delete“ button.
To duplicate an IP address range so that you can then modify the
copy, select a row in the table and click the “Duplicate“ button.
Detecting newly created devices
Here you enter the initial setting for the dialog for entering the IP address
which appears when you create a new device (see on page 132 “Creating
new devices”).
Discover device from a list of IP addresses
Industrial HiVision allows you to scan IP addresses using a text or an
Microsoft Excel csv file. The “Create Devices from List“ dialog allows you
to search for and upload the file to Industrial HiVision. If a device in the list
is unreachable, then Industrial HiVision displays the device in the
topology map as a generic device. (see on page 255 “Devices from List”)
325
References
Preferences > Basics > Discovering devices
Figure 76: Configuration > Preferences > Basics > Discover Devices
326
References
Preferences > Basics > User Management
Preferences > Basics > User Management
User Management
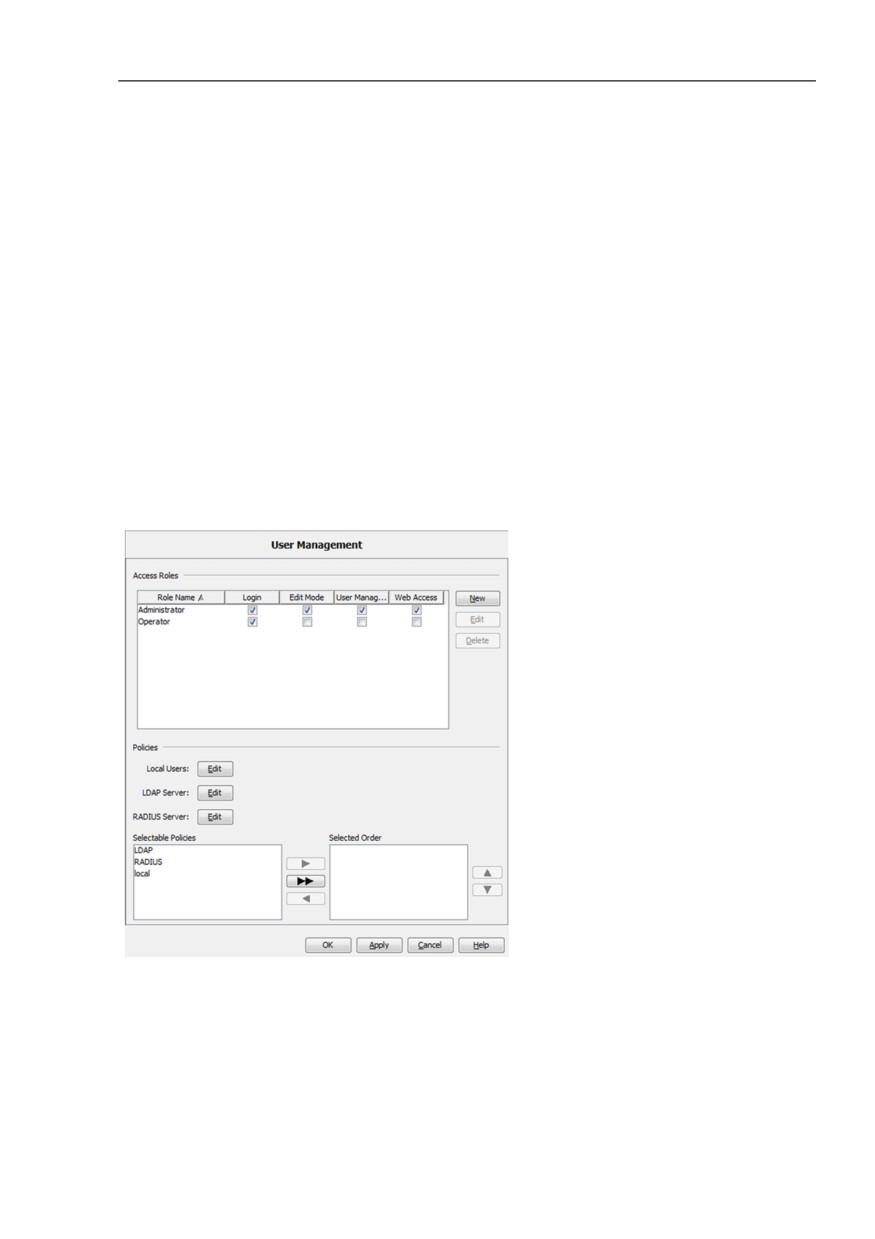
User management is based on a role model.
You specify role names in the “Access Roles“ frame. You assign these
roles the permissions of this role using the assignment of the access
authorizations. You can naturally assign the available rights to an
administrator, whereas an observer can only login, they cannot receive
rights with which they are able to change anything.
Industrial HiVision provides the following permissions:
“Login“
“Edit Mode“
“User Management“
“Web Access“
Once you have made the access roles, create the users and allocate
them one or more of the roles made above. This assignment depends on
the method Industrial HiVision is supposed to use to verify a user's
authorization.
327
References
Preferences > Basics > User Management
Industrial HiVision uses three “Policies“ to verify the authorization of a
user:
-
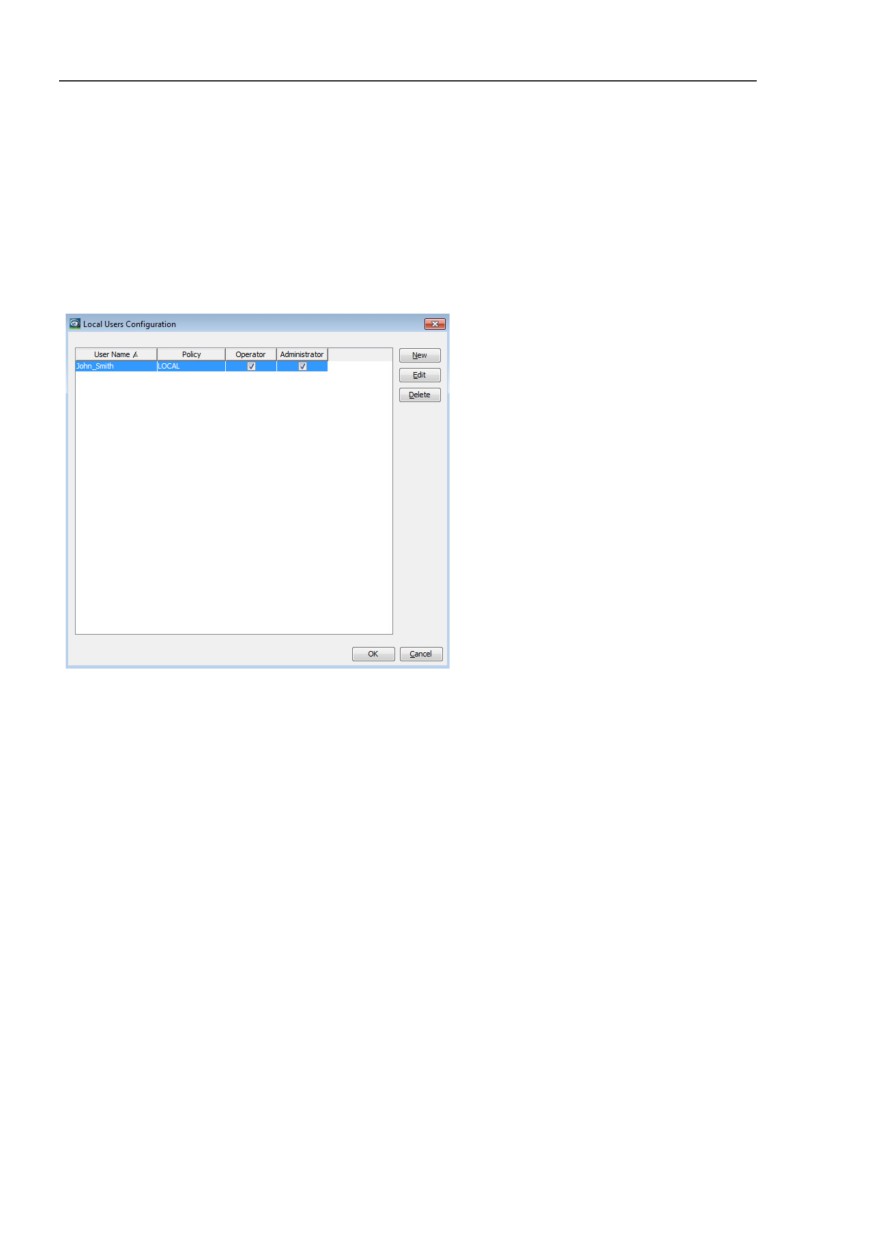
“Local Users“, local user name with role assignment.
Industrial HiVision transfers the role names created above into the
user table header. Thus allowing you to easily assign roles to a user
name.
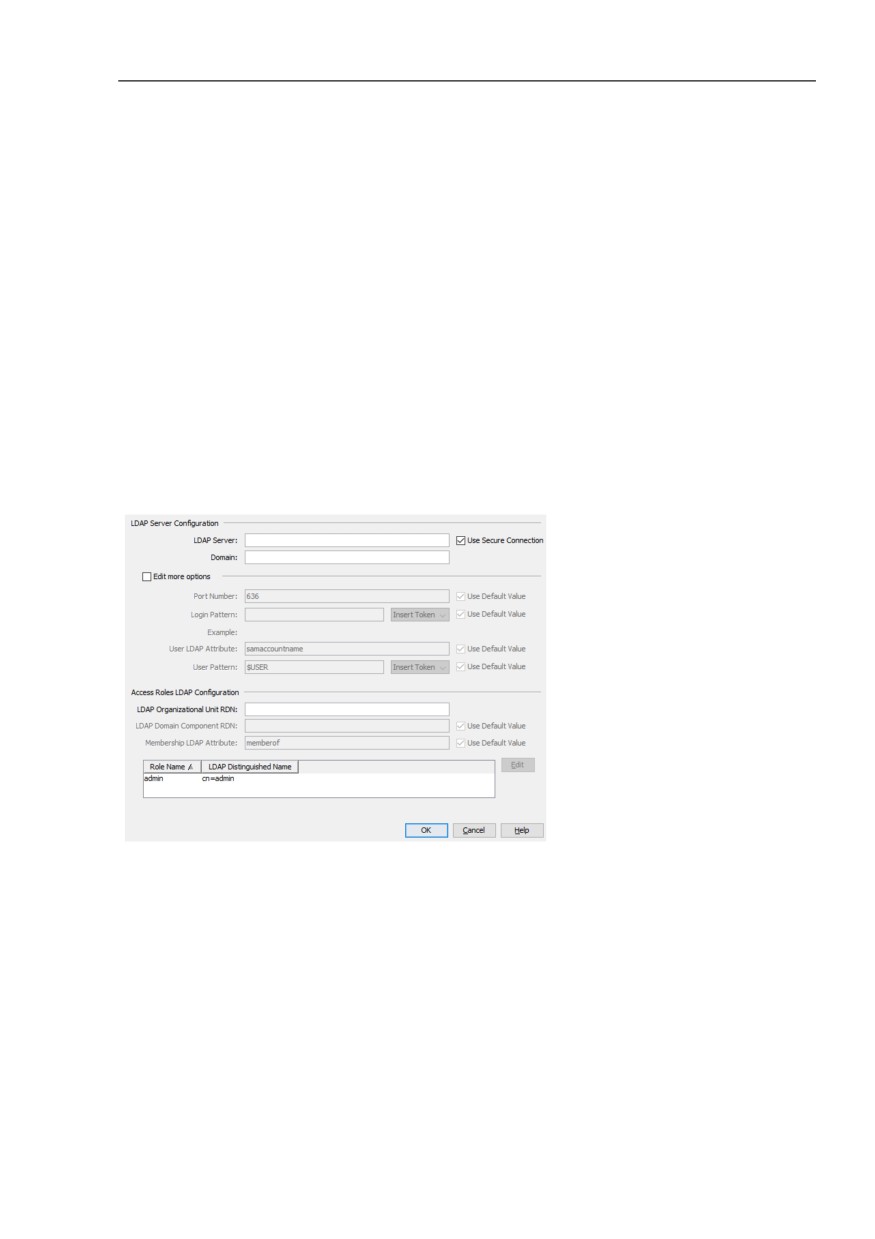
- The Lightweight Directory Access Protocol (LDAP) lets you
authenticate and authorize the users at a central point in the network.
Give the administrator of your LDAP server information about the
Industrial HiVision users and their access roles. The necessary
information includes the following user data:
-
“User Name“
–
“Password“
–
“Access Roles“
The Preferences > Basics > User Management > LDAP Server
Configuration dialog contains an “LDAP Server“ field. Specify the IP
address or DNS name in the “LDAP Server“ field. The field lets you
specify more than one “LDAP Server“. Industrial HiVision sends the
log on data to the first authentication server. If the first server does not
328
References
Preferences > Basics > User Management
respond, then Industrial HiVision attempts to contact the other servers,
one after the other, until it receives an answer. To specify more than
one server, separate the IP addresses or host names with either a
comma or a space. For example, 192.168.10.10 LDAP_Server_1 or
192.168.10.10,LDAP_Server_1.
The “LDAP Server Configuration“ dialog also contains the “Use
Secure Connection“ checkbox. When using an LDAP server to
authorize an Industrial HiVision user, the checkbox lets you choose
between a secure or an unsecure connection.
When you mark the checkbox, the user authenticates using an SSL
connection to the server. The data exchanged between Industrial
HiVision and the LDAP sever is encrypted.
When the checkbox is unmarked, the connection is unsecure and
data such as passwords are sent as plain text.
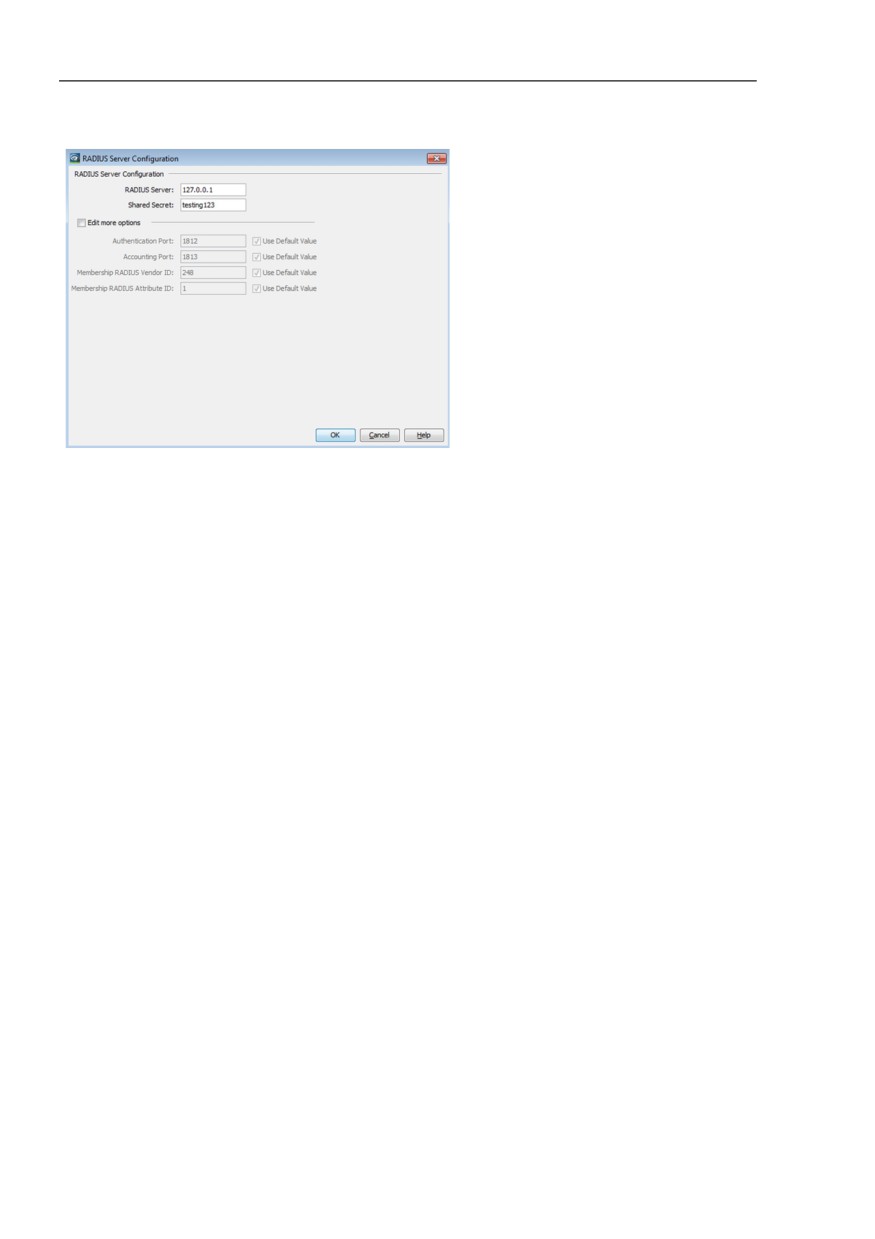
-
“RADIUS Server“, central user control using the Remote
Authentication Dial-In User Services.
Give your RADIUS server administrator the following user data to
enter into the RADIUS server:
-
“User Name“
–
“Password“
–
“Access Roles“
329
References
Preferences > Basics > User Management
In the “Selected Order“ field you can specify, which methods Industrial
HiVision uses to verify the authorization of a user. As long as the
“Selected Order“ field is blank, the “User Management“ function is
disabled and Industrial HiVision is freely accessible.
Industrial HiVision uses the first entry in this field for an authorization
check. If the test for the 1st method is unsuccessful, Industrial HiVision
verifies the authorization according to the 2nd method. If Industrial
HiVision cannot verify any of the authorization checks successfully,
Industrial HiVision denies access.
To allow HiMobile users access to the Industrial HiVision application,
proceed as follows:
Open Industrial HiVision.
Verify that the “Edit Mode“ is active.
Open the Configuration > Preferences > Basics > User
Management dialog.
To create an access role for the HiMobile users, click the “New“ button.
In the “Role Name“ field, enter HiMobile.
In the “Permissions“ frame, mark the “Login“ and “Web Access“
checkboxes.
Note: Hirschmann recommends that you deactivate the “Edit Mode“
and “User Management“ options for the HiMobile users.
Click the “OK“ button.
Open the Configuration > Preferences > Advanced > Services
Access dialog.
330
References
Preferences > Basics > User Management
Verify that the “Web Server“ option is active.
Create a certificate and import it into your mobile device (see on
page 245 “Certificate for the HTTPS connection”)
331
References
Preferences > Basics > Event Forwarding
Preferences > Basics > Event Forwarding
Event Forwarding
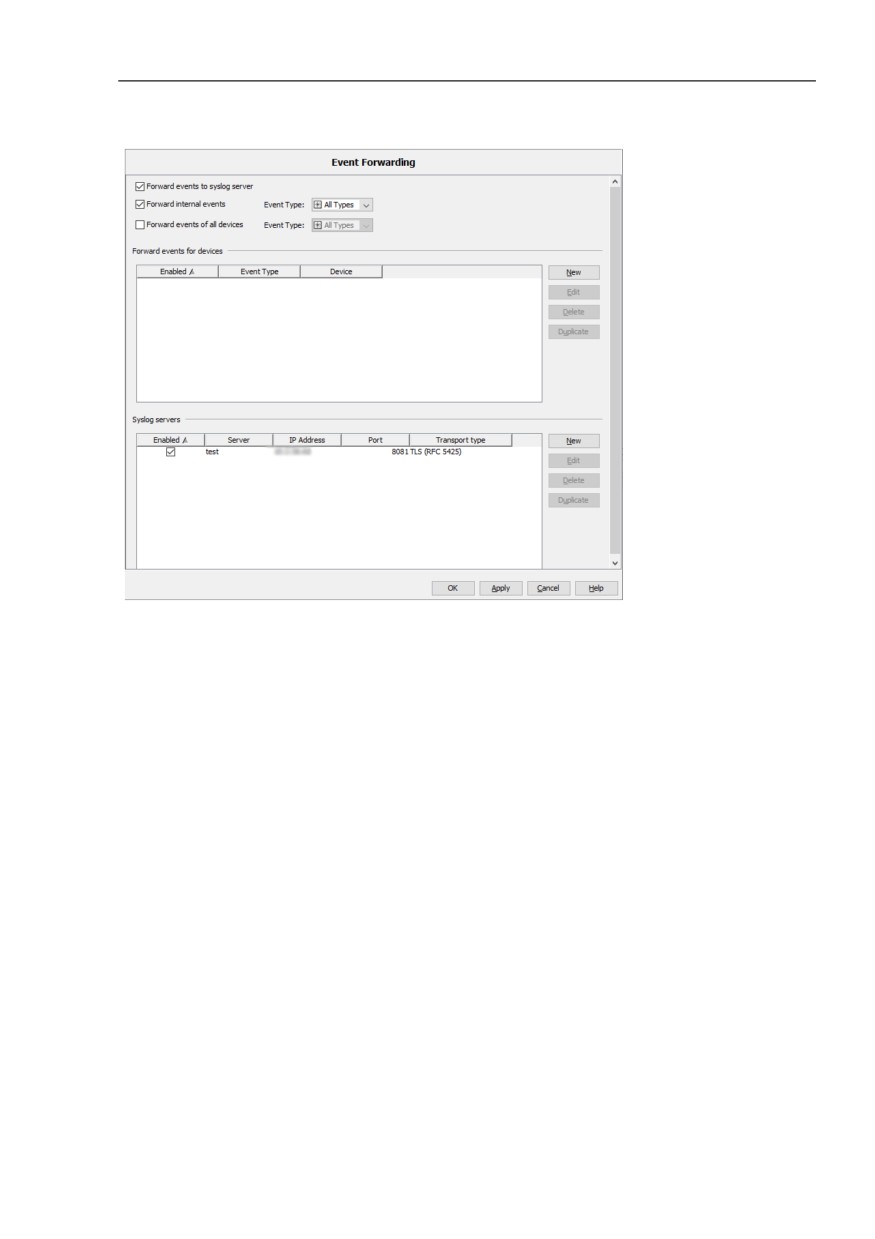
This dialog gives you the option of making settings for forwarding events
to a syslog server.
With “Forward events to syslog server“ you enable/disable the event
forwarding function globally. When event forwarding is enabled, Industrial
HiVision sends a syslog message to the syslog server entered in this
dialog as soon as an event occurs.
With “Forward internal events“ for example, “Industrial HiVision Started“,
Industrial HiVision also sends syslog messages for Industrial HiVision
internal events.
With “Forward events of all devices“, Industrial HiVision sends syslog
messages to the syslog server for every available device. When you mark
the “Forward events of all devices“ checkbox, the “Forward events for
devices“ table is hidden.
With “Event Type“, you specify at what evaluation level of an event
Industrial HiVision sends a syslog message.
In the “Forward events for devices“ table, you enter the device whose
events should lead to a syslog message.
In the “Syslog servers“ table, you enter the data of the syslog server to
which Industrial HiVision sends syslog messages.
Industrial HiVision sets the communication with the syslog server through
the following transport protocols:
User Datagram Protocol (UDP)
Transport Layer Security (TLS)
When the TLS protocol is used, Industrial HiVision accepts the certificate
of the syslog server without additional validation.
In some cases, a syslog server can require a two-step validation process
which includes the validation of the client certificate. If a syslog server
requires a two-step validation process, then the communication with the
syslog server is not possible.
332
References
Preferences > Basics > Event Forwarding
Figure 77: Configuration > Preferences > Basics > Event Forwarding
333
References
Preferences > Basics > Event Forwarding
Preferences > Basics > Event Forwarding
Event Actions
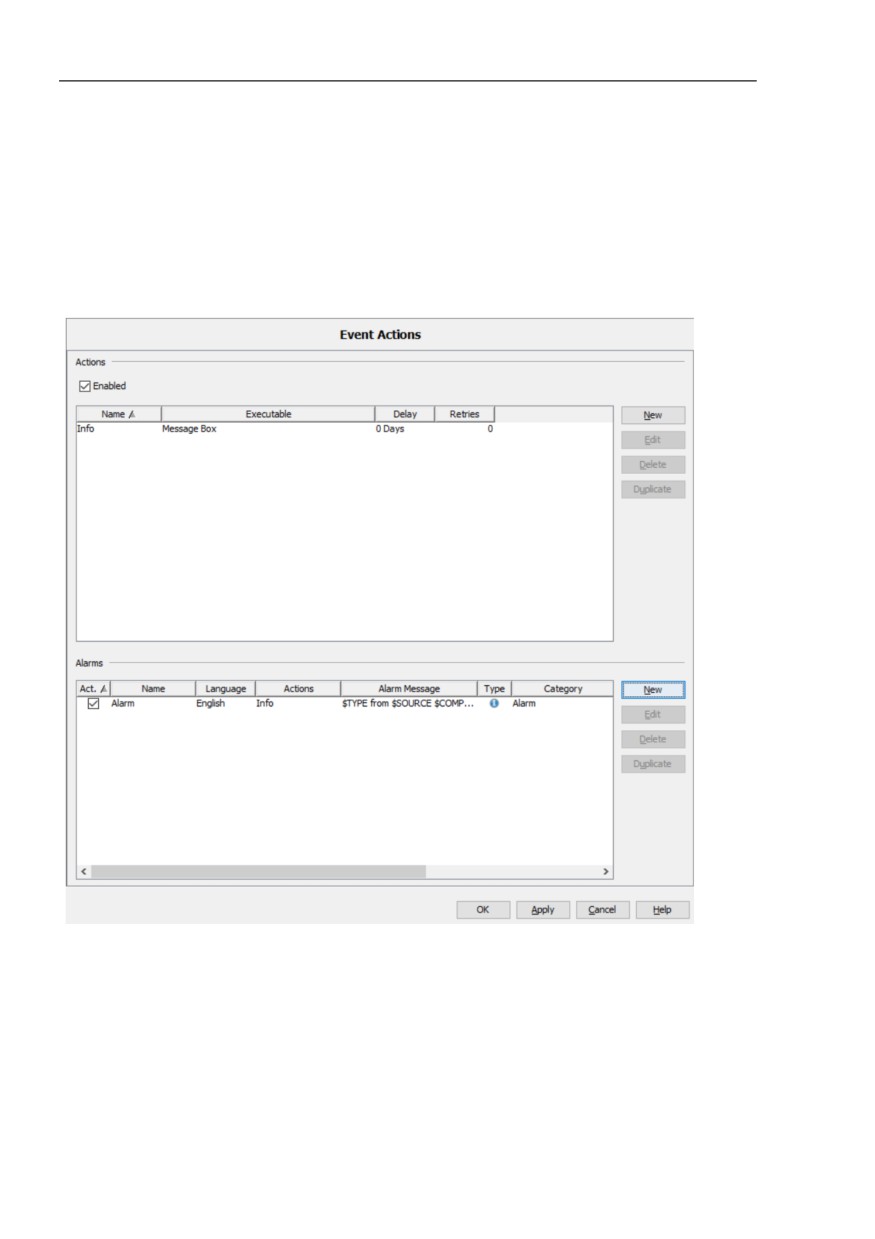
In this dialog you define the actions you want Industrial HiVision to
perform when particular events occur.
Figure 78: Configuration > Preferences > Basics > Event Actions
The “Actions“ frame describes what Industrial HiVision can carry out:
Open the message window on the screen
Send an SMS
Play Sound
Play Notification
334
References
Preferences > Basics > Event Forwarding
Send an e-mail
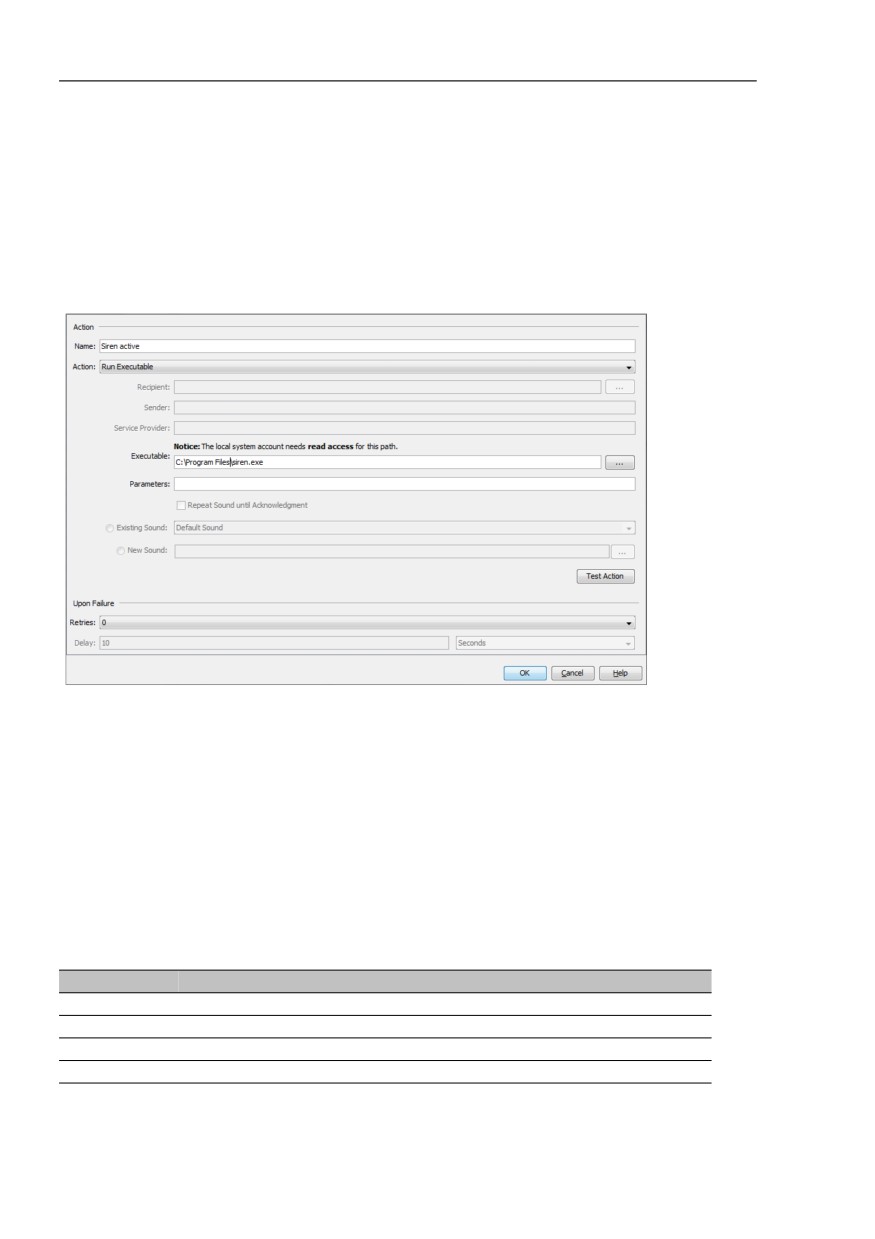
Execute a program (see note in “Installation under Windows”). In the
figure below (see figure 79), you will find the user program “siren.exe”
as an example.
To enable the “Event Actions“ function, mark the “Enabled“ checkbox.
When enabled, Industrial HiVision completes the actions defined in the
“Actions“ table.
The checkbox is enabled in the following situations:
You open a new project.
You open an existing project that has no event actions defined.
You load the backup of an existing project that has no event actions
defined.
The checkbox is disabled in the following situations:
You open an existing project that has minimum 1 event action
defined.
You load the backup of an existing project that has minimum 1
event action defined.
To specify the action you want to assign to the events, click the “New“
button.
For actions that might not execute on the first try, such as a busy line
when sending an SMS, Industrial HiVision gives you the option of
repeating the action.
The “New Entry“ dialog contains the “Test Action“ button. The “Test
Action“ button gives you the possibility to test your configuration.
The “Send SMS“ action requires
- that your network management station is connected to the
telephone network for example, using a modem and
- that the SMS program is configured correctly.
Enter the telephone number of the recipient under “Recipient“.
If you enter the telephone number of your modem as the “Sender“,
then Industrial HiVision sends it with the message. You can thus
recognize Industrial HiVision as the sender in the display of your
mobile phone.
As the “Service Provider“ you enter the available service which you
configured in your SMS program (if available).
Under Preferences > Advanced > External Applications, check
that the entries for the required external applications are present and
that they meet your requirements.
335
References
Preferences > Basics > Event Forwarding
The table displays the actions already created.
To edit an action, select a row in the table and click the “Edit“ button.
To delete a row from the table, select the row in the table and click the
“Delete“ button.
To duplicate an action so that you can then modify the copy, select a
row in the table and click the“Duplicate“ button.
Figure 79: Configuration > Preferences > Basics > Event Actions > Actions,
Example for using the action “Execute program” for the user program
“siren.exe”
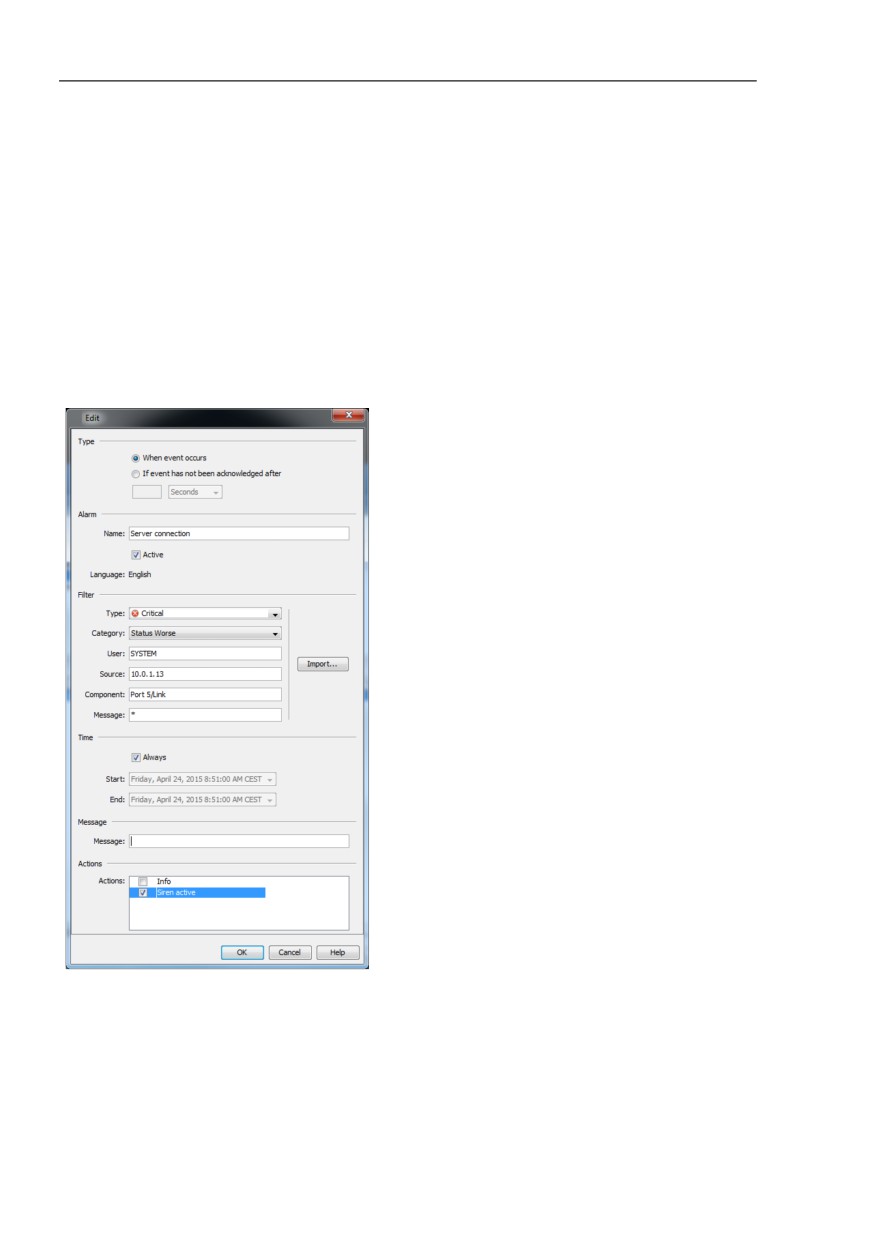
The “Alarms“ frame offers the possibility to perform an action when certain
events occur or in the absence of confirmation of certain events.
Under “Type“, you specify when Industrial HiVision performs the action.
Under “Alarm“, enter any name for the event that is to trigger an action.
Under “Filter“, you define the event that is to trigger the actions selected
below. Industrial HiVision allows wildcards for defining the filters.
Designation Meaning
Type
Selection of the status type (error, warning, ...)
Category
Event of a particular category (status better, new device, ...)
User
Logon name from the network management station
Source
Cause of the event
Table 39: Filter criteria
336

References
Preferences > Basics > Event Forwarding
Designation Meaning
Component Component of the cause of the event
Message
Text describing the event
Table 39: Filter criteria
To simplify things, “Import...“ provides you with the events that have
already occurred from the list in the event frame.
Select a row and click the “OK“ button.
Industrial HiVision copies the properties of the selected event into the
filter frame.
The “Message“ row enables you to enter the message text for actions.
You can use the filter keywords with a “$” sign as a prefix to a variable
entry. Enter the keywords in upper-case characters. For example, if you
enter “$TIME” in the message, Industrial HiVision enters the time the
event occurred in the message. The keywords that Industrial HiVision
provides you with are listed in the “Message“ row of the bubble help.
The following list contains words that are reserved for Industrial HiVision
internal usage. If you type any of the words in the “Message“ field, then
Industrial HiVision opens an error message. The words by themselves or
as part of a longer word are prohibited. The reserved words apply only to
the English and German graphical user interfaces (GUI).
List of reserved English words:
Alarm
alarm
Alarms
alarms
Actions
actions
Message
message
Critical
critical
List of reserved German words:
Alarm
Alarme
Alarms
337
References
Preferences > Basics > Event Forwarding
Nachricht
Kritisch
The “Time“ frame offers you the opportunity to set a time period during
which Industrial HiVision responds to an event with an action.
In the “Actions“ frame, you have the option of selecting one or more of the
actions already created. Industrial HiVision executes these actions when
the event defined above occurs or when confirmation of the event is
absent within the time specified in “Type“.
Figure 80: Configuration > Preferences > Basics > Event Actions > Alarms >
Message
338
References
Preferences > Basics > Event Forwarding
The following example configuration describes how you configure
Industrial HiVision to send an email for an event. In this example you
configure the following Configuration > Preferences dialogs:
The Advanced > External Applications dialog
The Basics > Event Actions > Actions > New > New Entry dialog
The Basics > Event Actions > Alarms > New > New Entry dialog
In order for Industrial HiVision to send emails, it connects to an email
server host. Get the following server information from your email server
administrator:
Host name
The name of the email account which Industrial HiVision uses to send
the email. Make the name of the email sender easily identifiable as
Industrial HiVision.
Is it necessary for Industrial HiVision to log on to the server? If so, then
the following information is necessary:
- What type of connection does the server use. Industrial HiVision
connects using the following protocols:
Normal, unsecure communication
STARTTLS, begins a TLS session
SSL, uses the Secure Socket Layer protocol
- What TCP port does the server use.
- The user name and password used for authentication.
The following items can prevent Industrial HiVision from sending an email:
Firewall settings
Virus protection settings
To configure Industrial HiVision to connect to an email server, proceed as
follows:
Open the Advanced > External Applications dialog.
In the Mail Server > SMTP Mail Host field, type in the name of the
email server for example, smtp2.xxxx.com.
In the “Sender Address“ field, type in the email account from which
Industrial HiVision sends the email, for example,Industrial
HiVision@xxxx.com.
Click the “OK“ button.
To send an email to the person responsible for the task, proceed as
follows:
Open the Basics > Event Actions dialog.
To make an entry in the “Actions“ table, click the Actions > New
button.
339
References
Preferences > Basics > Event Forwarding
In the Edit > Action > Name field, type in the value
Send_email_to_admin.
In the “Action“ drop-down list, select the “Send E-Mail“option.
Type in the email address of the person responsible for the task in the
“Recipient“ field.
Click the “OK“ button.
To configure an event for which Industrial HiVision sends an email,
proceed as follows:
Open the Basics > Event Actions dialog.
To make an entry in the “Alarms“ table, click the Alarms > New button.
In the “Edit“dialog, type in the text that you wish to be displayed on the
subject line in the “Name“ field.
Type in the event that you wish to send as an email in the “Filter“
frame.
When Industrial HiVision has an event in the “Event History“ that you
wish to send as an email, you can have Industrial HiVision
automatically enter values in the “Filter“ frame using the “Import...“
button.
- Click the “Import...“ button.
- Select the event from the “Application Events“ tab.
- Click the “OK“ button.
You can also generate test events that you can send as an email.
See “Generate test events” on page 289.
Type in the message that you wish to be displayed in the body of the
email in the “Message“ field.
You can type in free text or use tokens. When you hover over the text
field Industrial HiVision displays a bubble help containing the tokens
that you can use. The tokens represent the columns displayed in the
event log. For example, $TYPE = the “Type“column, $MESSAGE =
the “Message“ column.
Mark the Send_email_to_admin checkbox in the “Actions“ table.
Click the “OK“ button.
340

References
Preferences > Basics > User defined Action
Preferences > Basics > User defined Action
User defined Action
User-configurable actions give you the opportunity of starting actions on
other devices from your network management station.
Location
Meaning
Desktop
Industrial HiVision starts the application on the computer on which the
Industrial HiVision interface is running. The service can run on another
computer.
You select “Desktop“ when the application that Industrial HiVision starts
expects an interaction.
Application example: Starting a Telnet client
Service
Industrial HiVision starts the application on the computer on which the service
is running.
This selection gives you the option of configuring devices that only permit
configuration from the IP address of the network management station.
Application example: Configuration scripts which you want to call up from
multiple interfaces (and also from applets) or use to run batch files (see
“Example of interface”).
Browser
Industrial HiVision starts the application with the URL.
Example: To open the graphical user interface of a device in the browser, enter
the following value in the “Parameters“ field: http://10.0.1.13.
Table 40: Location of execution of a user-defined action
Example of interface: “Call up Telnet client”
You want to use a Telnet client for example, “Putty”, to access a known
device such as an EtherNet switch.
In the Industrial HiVision menu bar, select Configuration >
Preferences.
In the “Preferences“ dialog, select Basics > User defined Actions.
To define a new user-configurable action, click the “New“ button.
In the “Name“ field enter a name to identify calling up the Telnet client
for example, “Manage Switch using Telnet”.
In the “Available for“ row, you select the symbol with which you wish to
start the action. Industrial HiVision places the action in the drop-down
list according to the definition. You can find the action under “Actions“
by right-clicking this symbol.
- As you want to call the action later at the device level, from the
“Available for“ drop-down list, select “Device“.
In the “Device Type“ drop-down list, select “All“.
341
References
Preferences > Basics > User defined Action
You want to start the Telnet client on a computer on which the
Industrial HiVision graphical user interface is running. The Telnet client
expects an interaction with the administrator of the switch. Therefore
you select “Desktop“ as the “Location of Execution“ (see table 40).
Enter the path to the application and the name of the application, in the
“Application“ text filed. You can also select the application by clicking
the “...“ button.
To select the Telnet client “Putty” application, enter the following for
example:
C:/Data/Software/putty.exe.
The “Parameters“ text field gives you the option of transferring
parameters to the application with tokens. Enter the following in the
example:
- Call up Telnet
- The token for the IP address of the device
$“-telnet $IP_ADDR“
Example for service: “Enable/disable port”
In a room for visitors you have Ethernet connections. The room can be
accessed by anybody. Therefore you would like to enable a port that is
connected to this Ethernet connection only when you actually have
visitors.
To do this, write the following small batch files with the SNMP
commands for enabling/disabling the port:
Windows users:
1st batch file: Port-on.bat
set IP_ADDR=%1%
set IF_INDEX=%2%
"<installation folder>\bin\SnmpSet.cmd.exe" -c private %IP_ADDR%
1.3.6.1.2.1.2.2.1.7.%IF_INDEX% integer 1
2nd batch file: Port-off.bat
set IP_ADDR=%1%
set IF_INDEX=%2%
"<installation folder>\bin\SnmpSet.cmd.exe" -c private %IP_ADDR%
1.3.6.1.2.1.2.2.1.7.%IF_INDEX% integer 2
Linux users:
1st batch file: Port-on.sh
#!/bin/bash
IP_ADDR=$1
IF_INDEX=$2
"<installation folder>/bin/SnmpSet" -c private $IP_ADDR
1.3.6.1.2.1.2.2.1.7.$IF_INDEX integer 1
2nd batch file: Port-off.sh
#!/bin/bash
342
References
Preferences > Basics > User defined Action
set IP_ADDR=%1%
set IF_INDEX=%2%
"<installation folder>/bin/SnmpSet" -c private $IP_ADDR
1.3.6.1.2.1.2.2.1.7.$IF_INDEX integer 2
Mark the file as executable, Exec-Bit, with the command: chmod 700
Port-On.sh.
Save the batch files on your network management station for example,
under C:\Data\PortOnOffBatch
In the Industrial HiVision menu bar, select Configuration >
Preferences.
In the “Preferences“ dialog, select Basics > User defined Actions.
To define a new user-configurable action, click the “New“ button.
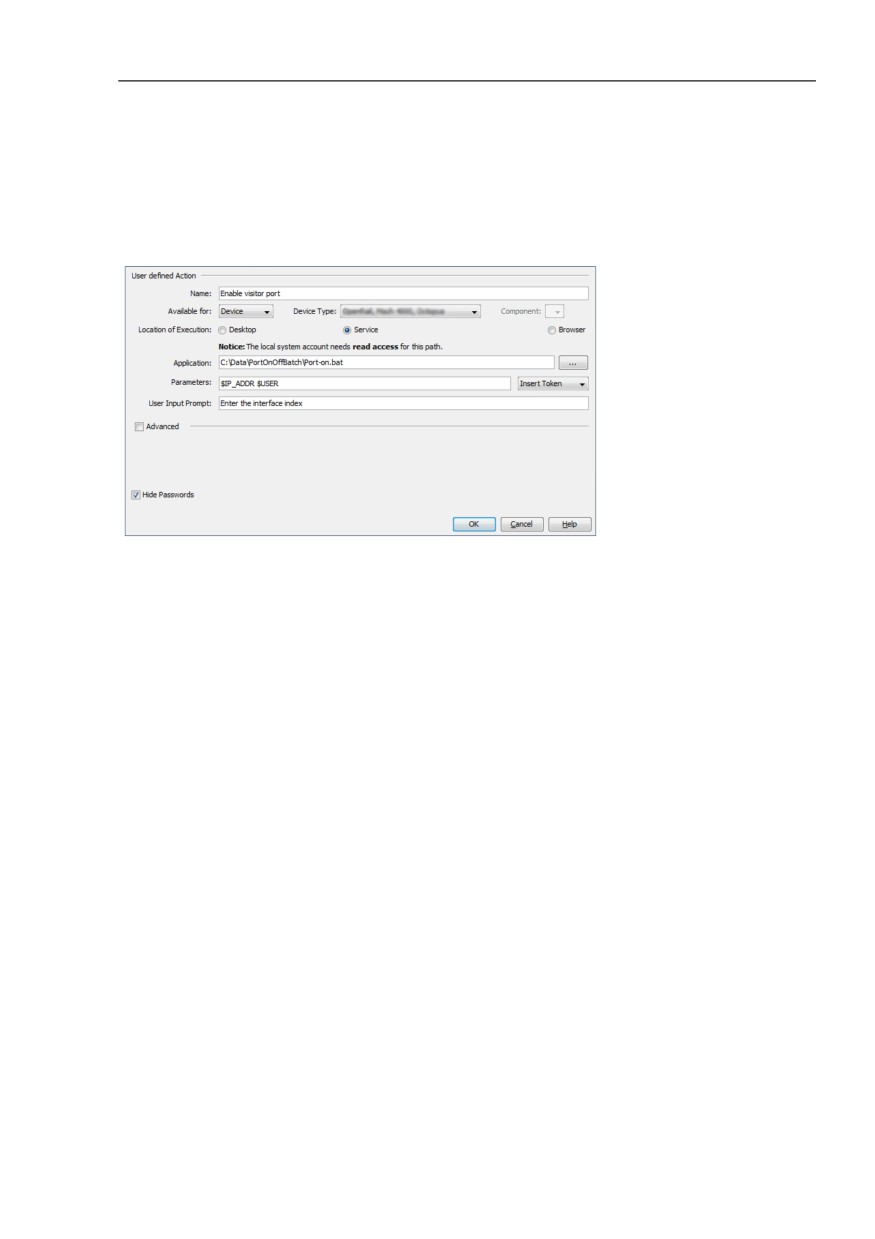
Enter any name for the 1st batch file for example, “Enable visitor port”.
343
References
Preferences > Basics > User defined Action
In the “Available for“ row, you select the symbol with which you wish to
start the action. Industrial HiVision places the action in the drop-down
list according to the definition. You can find the action under “Actions“
by right-clicking this symbol.
- As you want to call the action later at the device level, from the
“Available for“ drop-down list, select “Device“.
In this example the port for the connection in the visitors room is
connected to a RS30 rail switch. Therefore, in the “Device Type“ drop-
down list, select “OpenRail, Mach 4000, Octopus“.
You would like to execute the batch files on a computer on which the
service of Industrial HiVision is running. Industrial HiVision passes the
interface number of the port as a command parameter when calling up
the batch file. Then the batch files run automatically. Therefore you
select “Service“ as the “Location of Execution“ (see table 40).
Enter the path to the application and the name of the application, in the
“Application“ text filed. You can also select the application by clicking
the “...“ button.
For our example enter the following,
“C:\Data\PortOnOffBatch\Port-on.bat”
The “Parameters“ text field gives you the option of transferring
parameters to the application with tokens. For our example enter the
following,
- The token for the IP address of the device
- The token for the port
$IP_ADDR $USER
When you enter the value $USER in the “Parameters“ text field,
Industrial HiVision opens the “User Input Prompt“ text field.
The “User Input Prompt“ text field gives you the option to enter
instructions in the “User Input“ dialog.
For our example enter the following, “Enter the Interface Index”.
You can find further function details under “Advanced“:
“Token Language“
Industrial HiVision transfers the token content to the application in this
language. This applies to the tokens: “Status (textual)”, “Value” and
“Name”.
Query password when calling action
If more than 30 minutes elapse between password entry and the next
call of the action, then Industrial HiVision queries the password again.
344
References
Preferences > Basics > User defined Action
Display settings for the content of the application event
Display settings for the display type of the application event.
“Only In Case Of Failure“: There has been a failure if the return value
of the application has a value other than 0.
Figure 81: Example for a user-configurable action
Example for browser: “Call up web browser”
You want to access the Web server of your Industrial HiVision service to
read the event list.
In the Industrial HiVision menu bar, select Configuration >
Preferences.
In the settings dialog, select Basics > User defined Actions.
To define a new user-configurable action, click the “New“ button.
To call up the Telnet client, enter any name for example, “Event list”.
In the “Available for“ row, you select the symbol with which you wish to
start the action. Industrial HiVision places the action in the drop-down
list according to the definition. You can find the action under “Actions“
by right-clicking this symbol.
- As you want to call the action later at the device level, from the
“Available for“ drop-down list, select “Device“.
As the “Device Type“, select “Windows PC“.
You want to view the event list in your web browser. Therefore you
select “Browser“ as the “Location of Execution“ (see table 40).
The “Parameters“ line gives you the option of transferring parameters
to the application with tokens. Enter the following in the example:
- Call up the Web browser
- The token for the IP address of the computer on which the service
of Industrial HiVision is running.
345
References
Preferences > Basics > User defined Action
- The port for the Web server of Industrial HiVision
- The Web page you want to view
346

References
Preferences > Basics > License
Preferences > Basics > License
License
You require a license key to operate Industrial HiVision. The number of
devices you can display depends on the license key. You thus have the
option of adapting the amount you invest in Industrial HiVision to the
growth of your network.
After a new installation or an update, you require new license keys.
Industrial HiVision puts devices for which no license exists into the
“Unmanaged” state. When you have entered a license key for these
devices, you can put these devices into the “Managed” state again (see
on page 267 “Manage”).
Industrial HiVision uses a seal to represent devices without a valid
license.
Figure 82: Device without Industrial HiVision license key.
Click the “New“ button and enter the license key in the entry window.
If you have the license key in electronic form, then you can use copy
and paste to save having to type it in.
To complete the entry, click the “OK“ button.
You add new license keys and update licenses in the same way.
After you enter a license key, Industrial HiVision displays this license key
in a row of the table.
Designation
Meaning
Key
Key number
Version
Software version number of Industrial HiVision
Expires
Date upon which the validity of the license ends
Type
Full version or update version
Devices
Number of devices covered by the license
Table 41: Entries in the license table
347