IDEXX Cornerstone. Administrator’s Manual (8.3 NEXT version 8.3.6) - page 15
Chapter 25: Using General Ledger
Overview
The General Ledger (GL) Interface allows you to transfer daily or monthly financial information from your
IDEXX Cornerstone* Practice Management System to a file. This file can be imported into QuickBooks®
or MYOB®, two commercial accounting software packages.
Information that can be imported from Cornerstone into QuickBooks or MYOB includes the following:
• Sales by class
• Tax
• Payments received
• Credit card service charges for the different credit cards accepted by your practice
• Changes to the accounts receivable account
• Discounts
• Refunds
• Adjustments
• Write-offs and reinstatements
• Billing, finance and service charges
• Returned checks
• Change given
Note: If you are using QuickBooks, you must have QuickBooks 2000 (or a later release) to use the
General Ledger Interface.
Extract Data Using the General Ledger Interface
The General Ledger Interface allows you to extract data that can be imported into one of the commercial
accounting packages. Data can be extracted automatically or manually. We recommend that you set up
your system to automatically extract data at End of Day or End of Month for consistency.
To set up your software to automatically extract data:
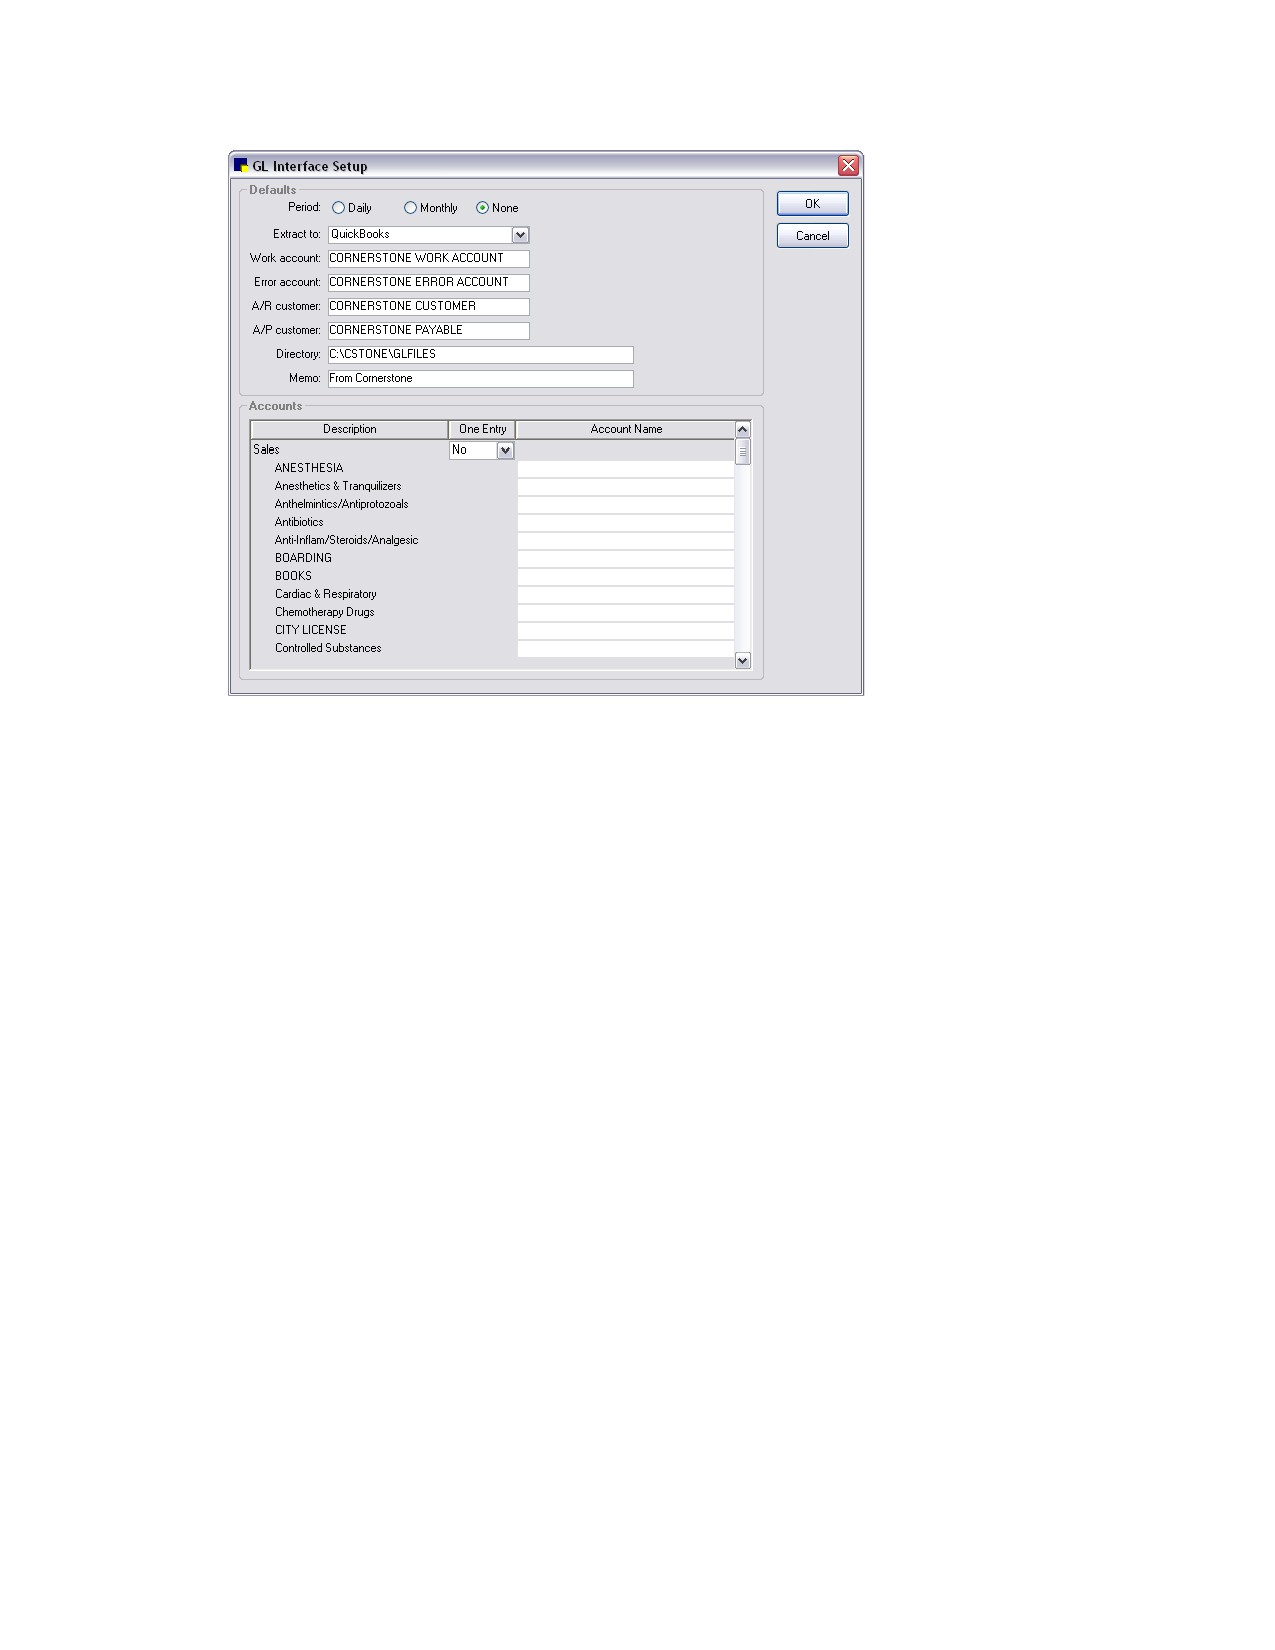
1. On the Controls menu, select General Ledger > Setup. The GL Interface Setup window appears.
422
Chapter 25: Using General Ledger
GL Interface Setup window
2.
Select a Period option to specify how frequently you want to automatically extract data (on a daily or
monthly basis). If you don’t want to automatically extract data, select None.
3.
Select the commercial accounting package from the Extract to drop-down list.
4.
The Work account and Error account fields are used by QuickBooks to balance transactions. Do
not change the default entries in these fields.
5.
In the A/R customer field, assign a customer name (required by QuickBooks) to your accounts
receivable. In the A/P customer field, assign a customer name (required by QuickBooks) to your
accounts payable.
6.
The Directory field contains the path where the extracted file will be saved. This may be changed if
desired.
7.
The Memo field contains a description that displays in the commercial accounting software, for
example, “From Cornerstone,” which allows the user to know the origin of the data.
8.
In the Accounts area, select the data to extract.
Note: Cornerstone allows you to choose how detailed you want the data extraction to be. For
example, you can extract all payment information added together in one sum or you can break
down the information by payment type.
• Under the Sales category, to extract all sales information as one amount, select Yes from the
One Entry drop-down list. To break out your sales by class, select No. If you select Yes, the
menu will condense.
• The Account Name column (displays for an extraction to QuickBooks) allows you to give your
data a meaningful name or number that will also be used in QuickBooks. The Account Number
column (displays for an extraction to MYOB) allows you to give your data a meaningful number
that will also be used in MYOB. You can enter this name on the setup windows also. For
423
Chapter 25: Using General Ledger
example, when you are setting up your tax information and you want to break out the
information by tax type on your GL Batch Report, you will want to enter an account name.
Note: The GL Batch Report is sorted alphabetically. If you choose to separate lines in GL Setup, you
may not have like information sorted together. For example, if you have the account names “city tax”
and “sales tax,” city tax will print near the top of the report, and sales tax will print near the bottom of
the report. If you want all your tax information grouped together on the GL Batch Report, we
recommend an account name like “Taxes-City Tax” and “Taxes-State Tax.” This method allows you
to have all your tax information in the same section of the report.
Note: Using colons between your account names allows you to set up subaccounts in QuickBooks.
For example, using the account names “Taxes:City Tax” and “Taxes:State Tax” will cause State Tax
and City Tax to be subaccounts of Taxes when you import your file into QuickBooks.
9. Click OK to save your changes.
To manually extract data:
You can also manually extract data for prior time periods.
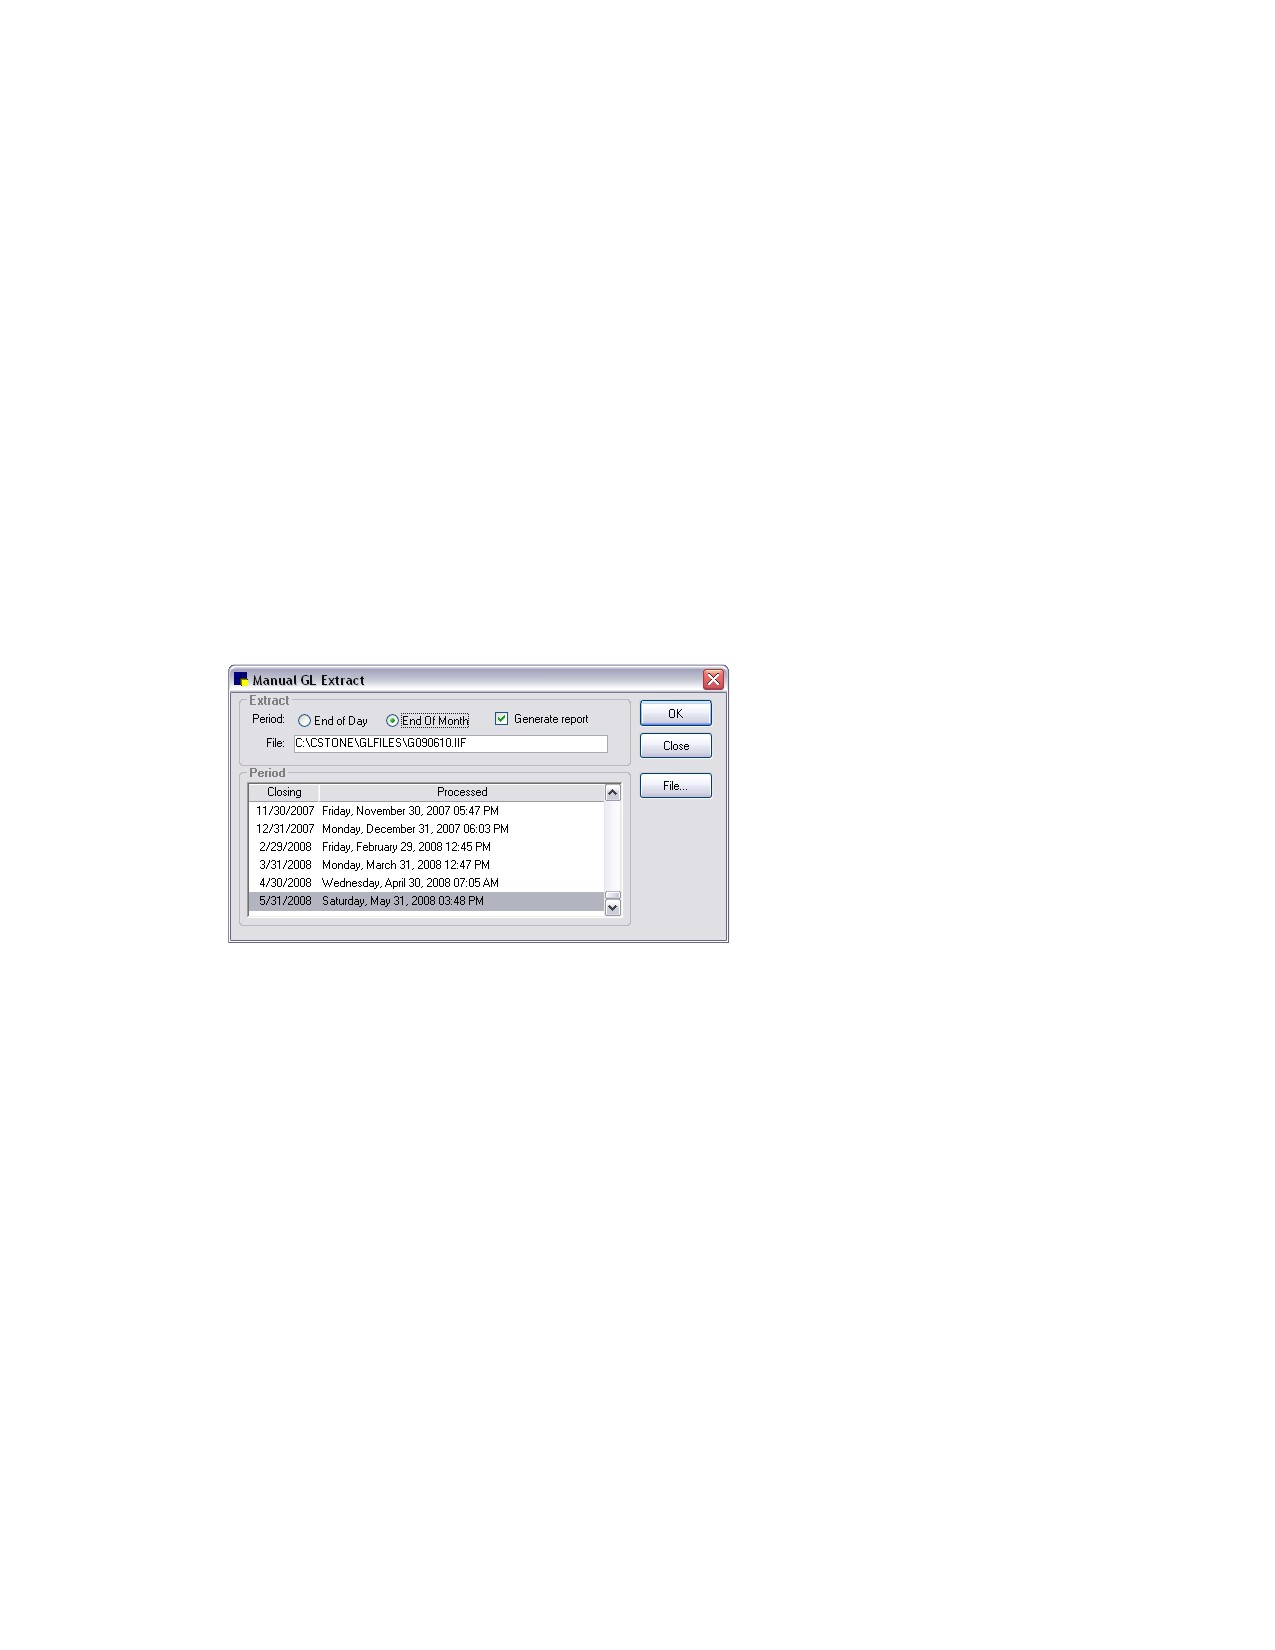
1. On the Controls menu, select General Ledger > Manual Extract. The Manual GL Extract dialog
box appears.
Manual GL Extract dialog box
2. Select whether you want to extract data from End of Day or End of Month.
3. Select the Generate report check box if you want to print a summary of the information saved in the
extract file. (This is the GL Batch Report.)
4. If necessary, click the File button and modify the file name.
5. Click OK to generate the extract file (and print the report, if the Generate report option is selected).
6. Click Close to exit.
To enter an account name from the setup windows:
You can enter GL account information when you set up taxes, discounts, invoice item classifications and
payment types.
1. On the Controls menu or Lists menu, select the desired control/list to set up in Cornerstone (for
example, Taxes).
2. Highlight the control/list setting to modify and click Update.
3. Enter the account name in the GL Account field.
4. Click OK when finished.
424
Chapter 25: Using General Ledger
GL Batch Report
The GL Batch Report provides a summary of the data extracted to the file. If your practice is set up to
automatically extract data, you can set up your system to automatically generate this report.
See “GL Batch Report” on page 375 (End of Day) and on page 388 (End of Month) for an example of
the report.
To set up your system to automatically print the GL Batch Report:
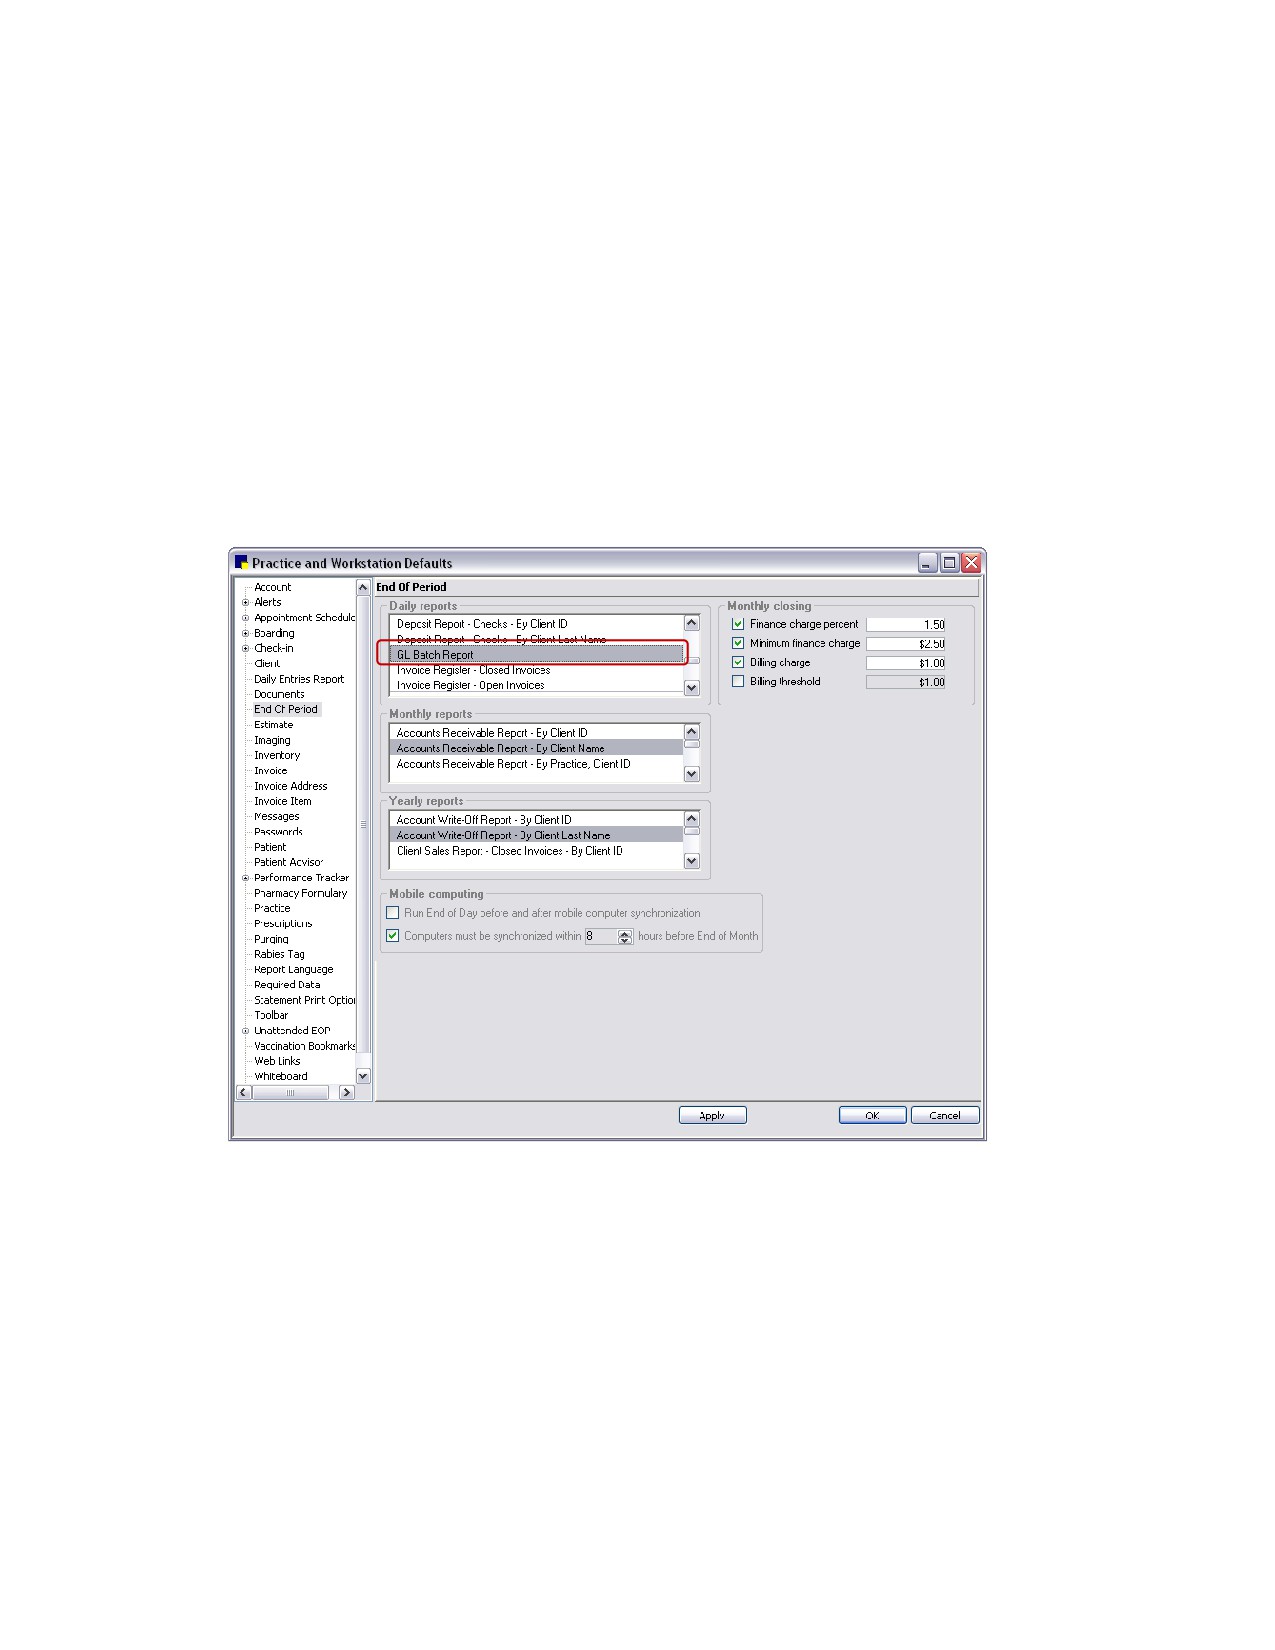
1. On the Controls menu, select Defaults > Practice and Workstation. The Practice and Workstation
Defaults window appears.
2. In the navigation pane, click End Of Period. The End Of Period configuration pane appears on the
right side of the window.
3. Depending on whether you are extracting data daily or monthly, select the GL Batch Report from
the Daily reports or Monthly reports box.
End of Period defaults
4. Click OK.
To print the report manually:
1. On the Reports menu, select Find a Report. The Report Search window appears.
2. In the Reports list, click the plus sign to the left of End of Day or End of Month, depending on if you
are extracting data daily or monthly.
3. Select the GL Batch Report and click Create Report.
4. Select the applicable daily or monthly periods.
5. Click Print or Preview.
425
Chapter 25: Using General Ledger
Using the Batch File in QuickBooks
Note: Depending on the version of QuickBooks you are using, the steps provided below may vary
slightly from your version. Refer to your QuickBooks documentation for instructions specific to your
version.
To use the batch file in QuickBooks:
1. Select File from the menu bar.
2. Select Import.
3. Specify the path and file name for the batch file (e.g., C:\Cstone\glfiles).
4. Click OK when finished.
To set up a payment type to calculate charges:
1. On the Controls menu, select Payment Types.
2. Highlight the payment type to modify and click Update.
3. If you want to calculate a percentage, click the Percentage option and enter the percentage amount
in the Amount field. If you want to calculate a flat amount, click the Amount option and enter the
total in the Amount field. If you don’t want to calculate a service charge on this payment, click the
None option.
4. Click OK when finished.
Note: This information is only available through the GL Batch Report. It does not appear on any other
Cornerstone reports.
426
Chapter 26: Using the Compliance Assessment Tool*
Overview
The Compliance Assessment Tool* allows practices to identify missed opportunities for revenue. You
can use the Compliance Assessment Tool to search for patients who visited the practice during a
specified date range and check to see if they received recommended services based on species, age,
weight or diagnosis.
Using Check-In Dates vs. Invoice Dates
The Compliance Assessment Tool will use either the check-in dates or invoice dates to determine when
the patient was last seen in the practice.
• If your practice uses Check-in (Controls > Defaults > Practice and Workstation > Check-in
> Use Check-in Date for Compliance check box selected), this is the preferred method for
tracking compliance. This method of tracking compliance based on when patients were
checked into the practice through the IDEXX Cornerstone* Practice Management System
covers all patient visits, regardless of whether an invoice was generated during the visit.
• If your practice does NOT use Check-in, you can track compliance based on invoice dates.
Note, however, that all patients who visit the practice in a specified date range are counted for
compliance purposes. For example, if a client receives services in the practice but is not
invoiced (e.g., suture removal), or if a client visits the practice but is not seen for an appointment
(e.g., the owner stopped by to purchase pet food). These types of situations will adversely affect
compliance results.
Compliance Comparison Types
The Compliance Assessment Tool allows you to run two types of compliance comparisons: a regular
compliance search or an alternative compliance search.
Regular compliance search: Search for patients to see if they received recommended services based
on species, age, weight or diagnosis. For example, you may want to search for all senior patients seen
in the last six months to see which recommended services from your senior care protocol were not
provided.
Alternative compliance search: Search for missing services based on other services provided. For
example, you may want to search for all patients who received heartworm preventatives to see if they
also received a heartworm test.
427
Chapter 26: Using the Compliance Assessment Tool*
Setting Up Protocols
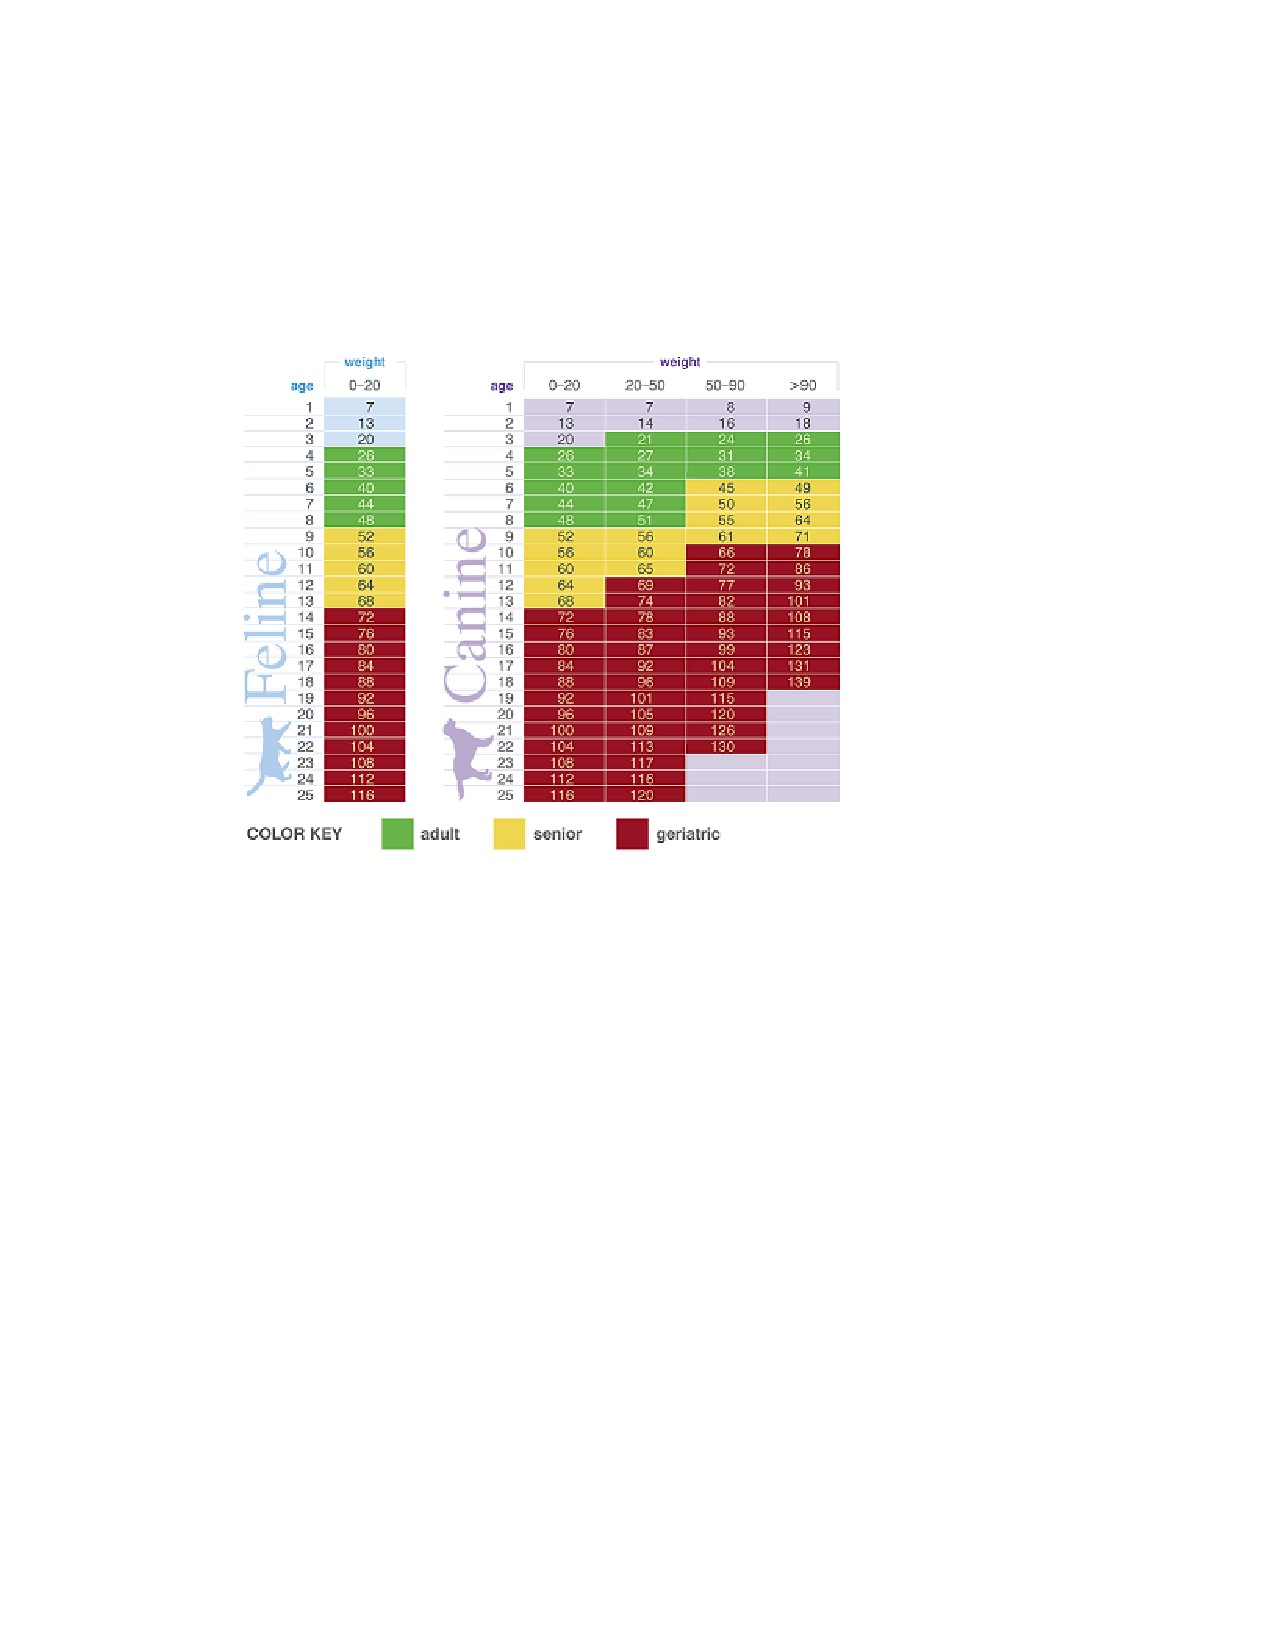
Cornerstone provides predefined protocols (based on the chart shown below) set up by species, age
and weight. A list of these predefined protocols can be viewed by selecting the Display predefined
IDEXX protocols check box in the Protocol Setup Wizard and on the Compliance Results window.
Using the predefined protocols can save your practice time; however, note that you must assign your
practice’s invoice items to the tests in the predefined protocols in order to receive valid results.
Chart on which predefined protocols are based
Before You Begin
• If you want only to count compliance for patients that you check in using Cornerstone’s check-in
feature, you must select the Use check-in date for compliance check box in Check-in defaults.
(See “Check-in Defaults” on page 94.)
If this check box is not checked, all patients who visit the practice in a specified date range are
counted for compliance purposes, even if they were not in the practice for an appointment (e.g., the
owner stopped by to purchase pet food).
• If you want to set up your system to display an alert when a patient who needs a recommended
service is seen, you must set up the alert in Compliance Alerts defaults. (See “Compliance
Alerts Defaults” on page 87.)
To set up a compliance search protocol:
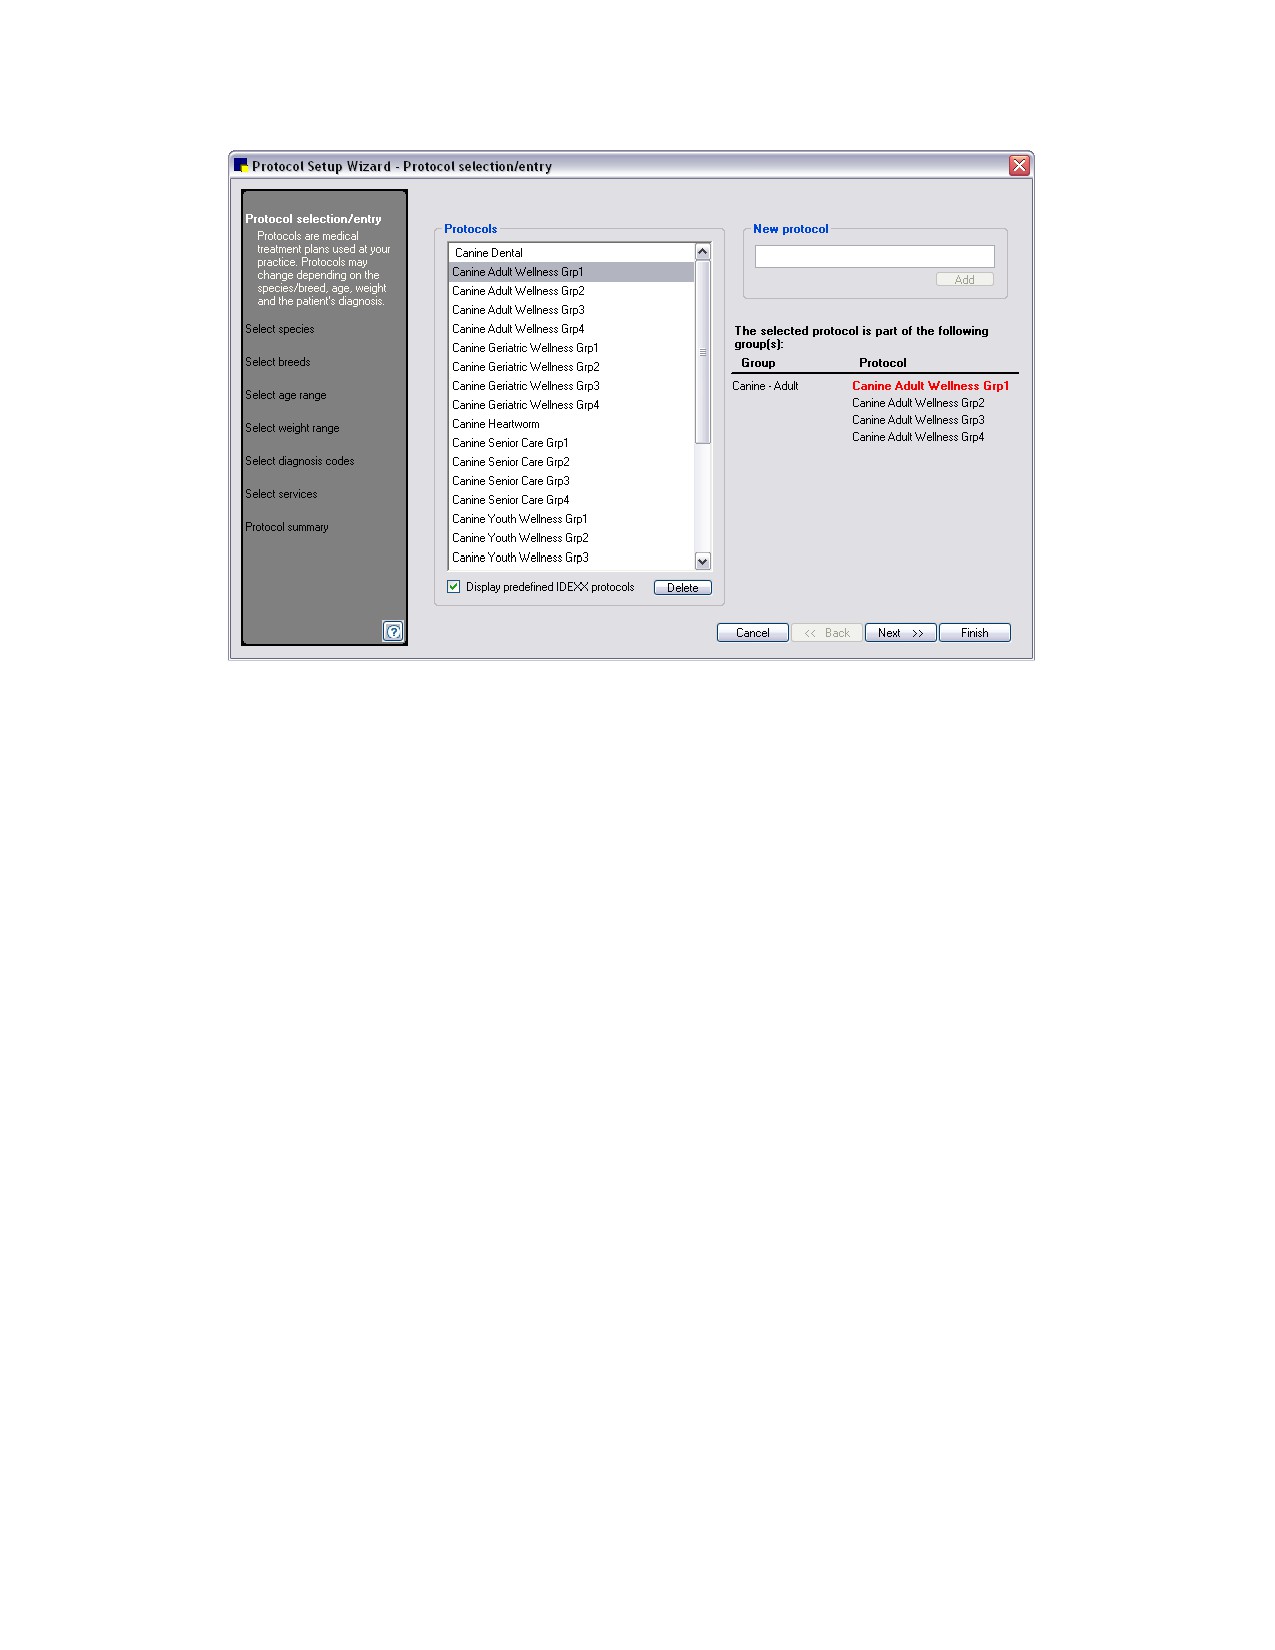
1. On the Reports menu, select Compliance Assessment Tool > Protocol Setup Wizard. The
Protocol selection/entry window appears.
428
Chapter 26: Using the Compliance Assessment Tool*
Protocol Setup Wizard - Protocol selection/entry window
2. Click the Display predefined IDEXX protocols check box if you want to view the protocols set up
by IDEXX. (If the single protocol is part of a protocol group, the group will display on the right.)
3. Do one of the following:
• To customize a predefined IDEXX protocol or modify an existing protocol, in the Protocols list,
select the protocol you want to modify and click Next.
• To add a new protocol, enter a name for the protocol in the New protocol box and click Add.
With the new protocol name selected in the Protocols list, click Next.
4. On the Select species window, select the species to assign to the protocol and click Next. <All> is
selected by default.
5. On the Select breeds window, select the breed(s) to assign to the protocol and click Next. <All> is
selected by default. (If breeds do not apply, click Next to continue to the next step.)
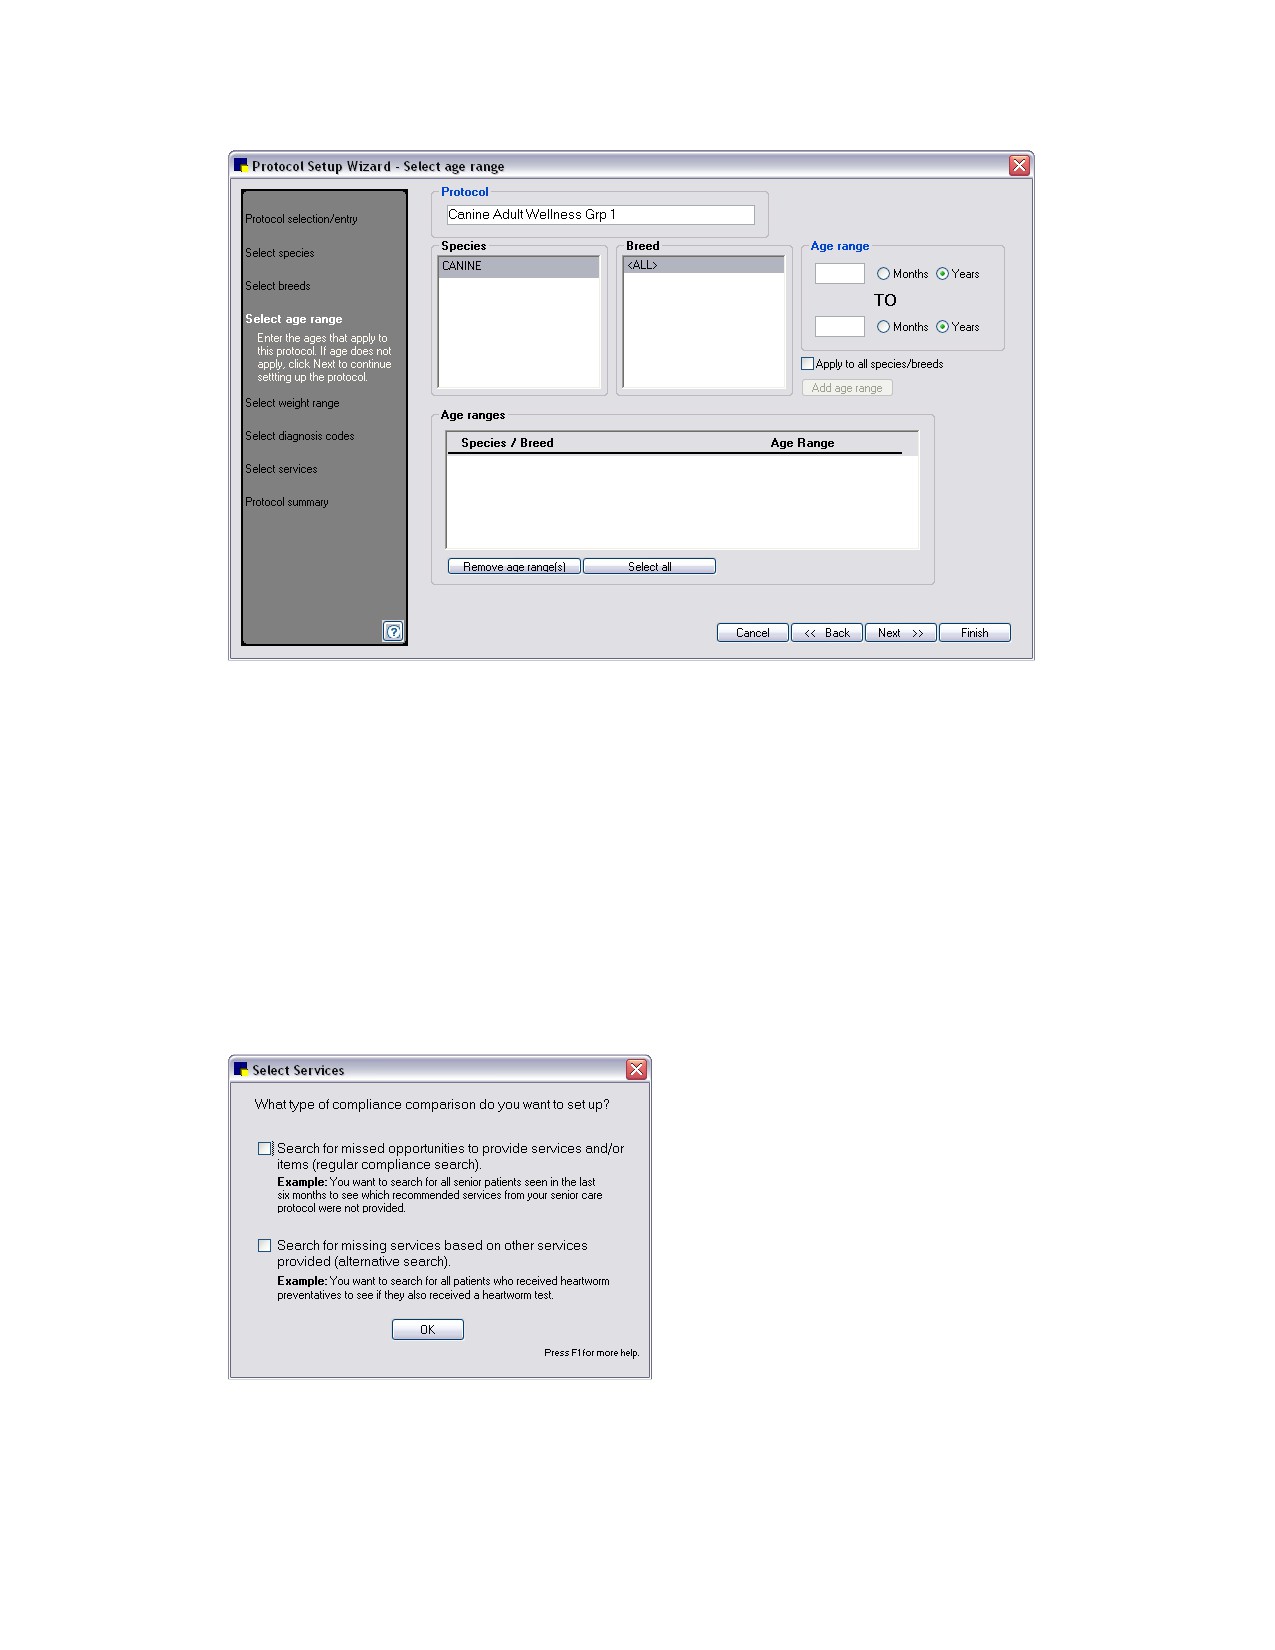
6. On the Select age range window, enter the ages that apply to this protocol. (If age does not apply,
click Next to continue to the next step.) All ages are selected by default. To enter a specific range,
enter the Age range in months or years and click the Add age range button. To apply this range to
all selected species/breeds, select the Apply to all species/breeds check box. Click Next to
continue.
429
Chapter 26: Using the Compliance Assessment Tool*
Protocol Setup Wizard - Select age range
7. On the Select weight range window, enter the weight ranges that apply to this protocol. (If a weight
does not apply, click Next to continue to the next step.) All weights are selected by default. To enter
a specific range, enter the Weight range, select the unit of measure (pounds, ounces, kilograms or
grams) and click the Add weight range button. To apply a diagnosis to all species/breeds, click the
Apply to all species/breeds check box. Click Next to continue.
8. On the Select diagnosis codes window, select the diagnoses that apply to this protocol and click the
Add diagnosis button. (If a diagnosis does not apply, click Next to continue to the next step.) To
apply a diagnosis to all species/breeds, click the Apply to all species/breeds check box. Click
Next to continue.
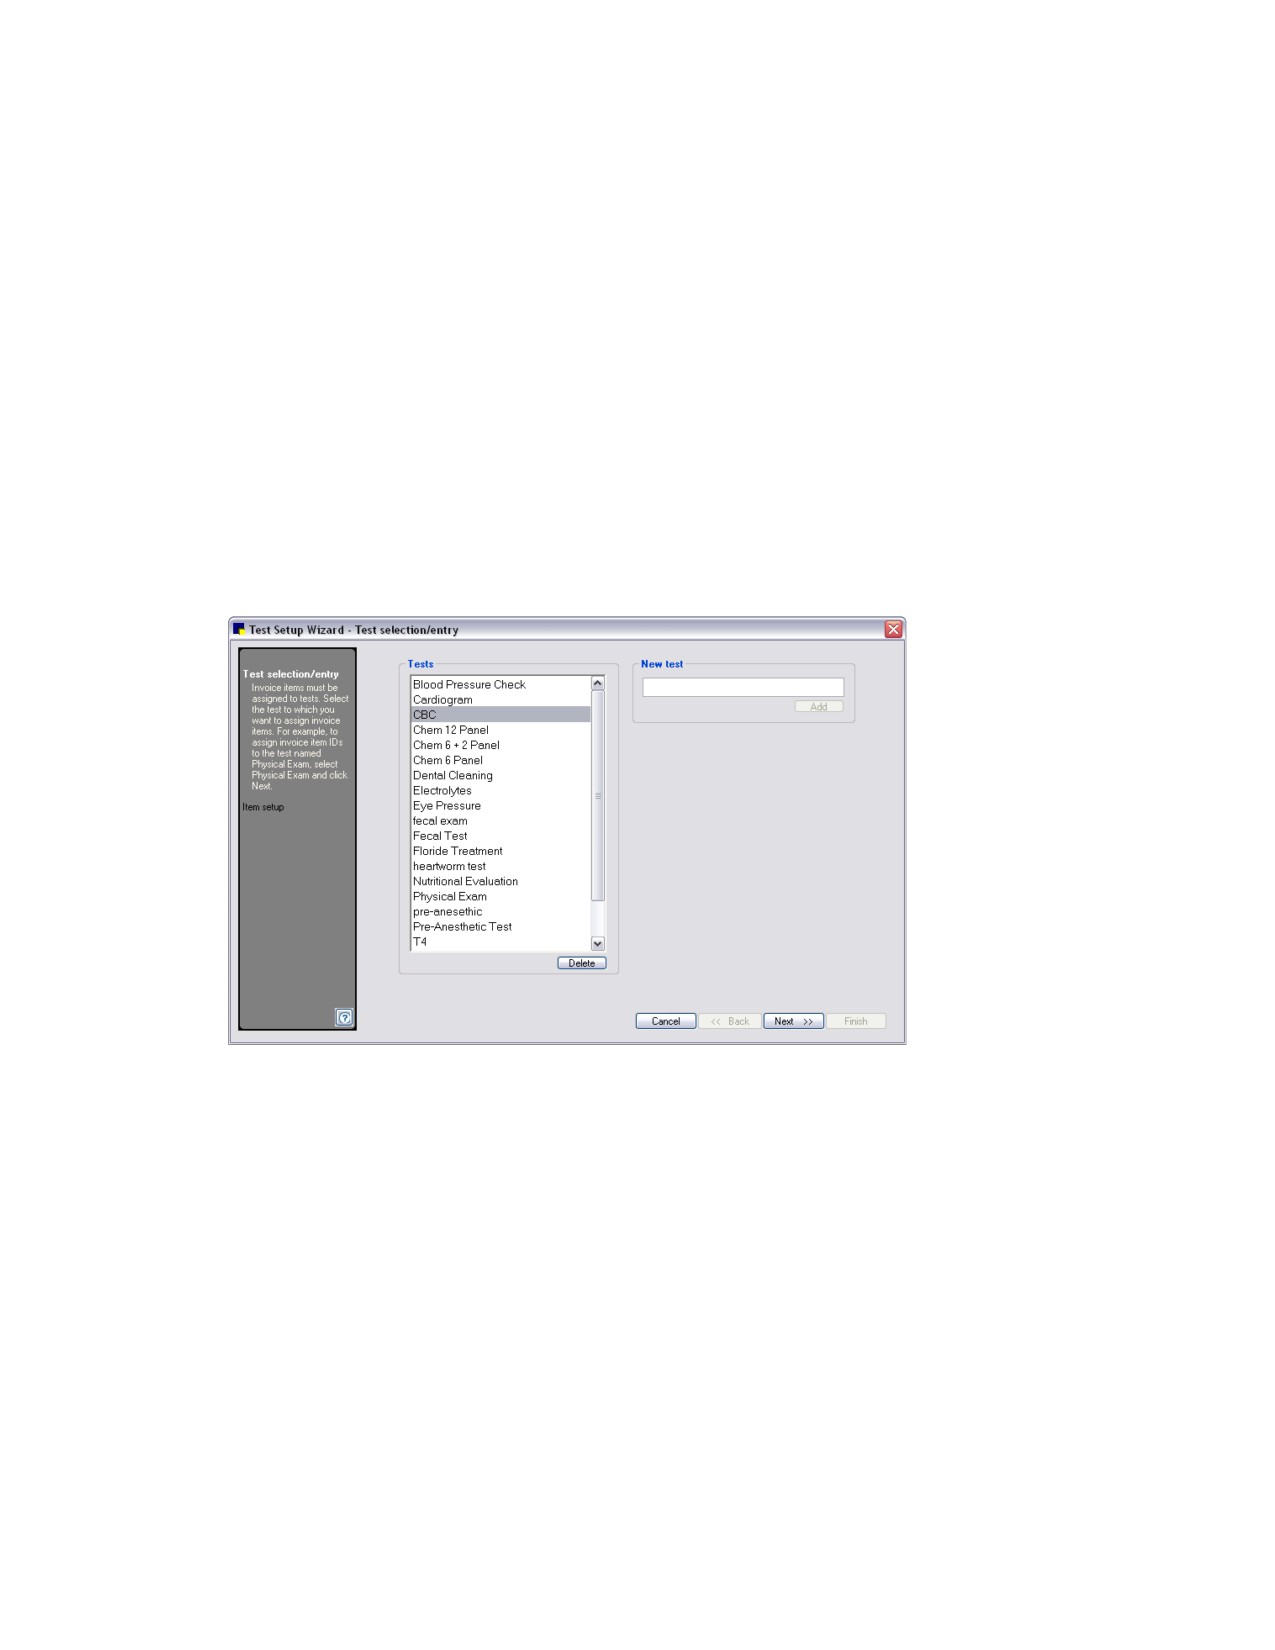
9. The Select Services pop-up window appears. Select the type of compliance comparison (regular or
alternative) that you want to set up, and click OK.
Select Services pop-up window
430
Chapter 26: Using the Compliance Assessment Tool*
10. Do one of the following:
• If you chose the regular compliance search, go to the “To complete the setup for a regular
compliance search” section that follows.
• If you chose the alternative search, go to the “To complete the setup for an alternative search”
section on page 433.
To complete the setup for a regular compliance search:
1. Complete the steps in the “Setting Up Protocols” section.
2. On the Select services window, select the tests that apply to this protocol.
3. Click the Add/update tests and services button to add your invoice items to the test. (If the test you
need is not in the list, you can also add a new test by clicking the Add/update tests button.) The
wizard will display a smaller built-in wizard with two steps (See example below.)
Note: To check patient compliance, Cornerstone searches your patient records for specified invoice
items. You must assign invoice items to tests. If you have already added invoice items to the tests,
click Next and skip to step 8.
Step one of the two-step process of adding invoice items to tests
4. Select the test to which you want to assign invoice items and click Next. The Item setup window
appears.
431
Chapter 26: Using the Compliance Assessment Tool*
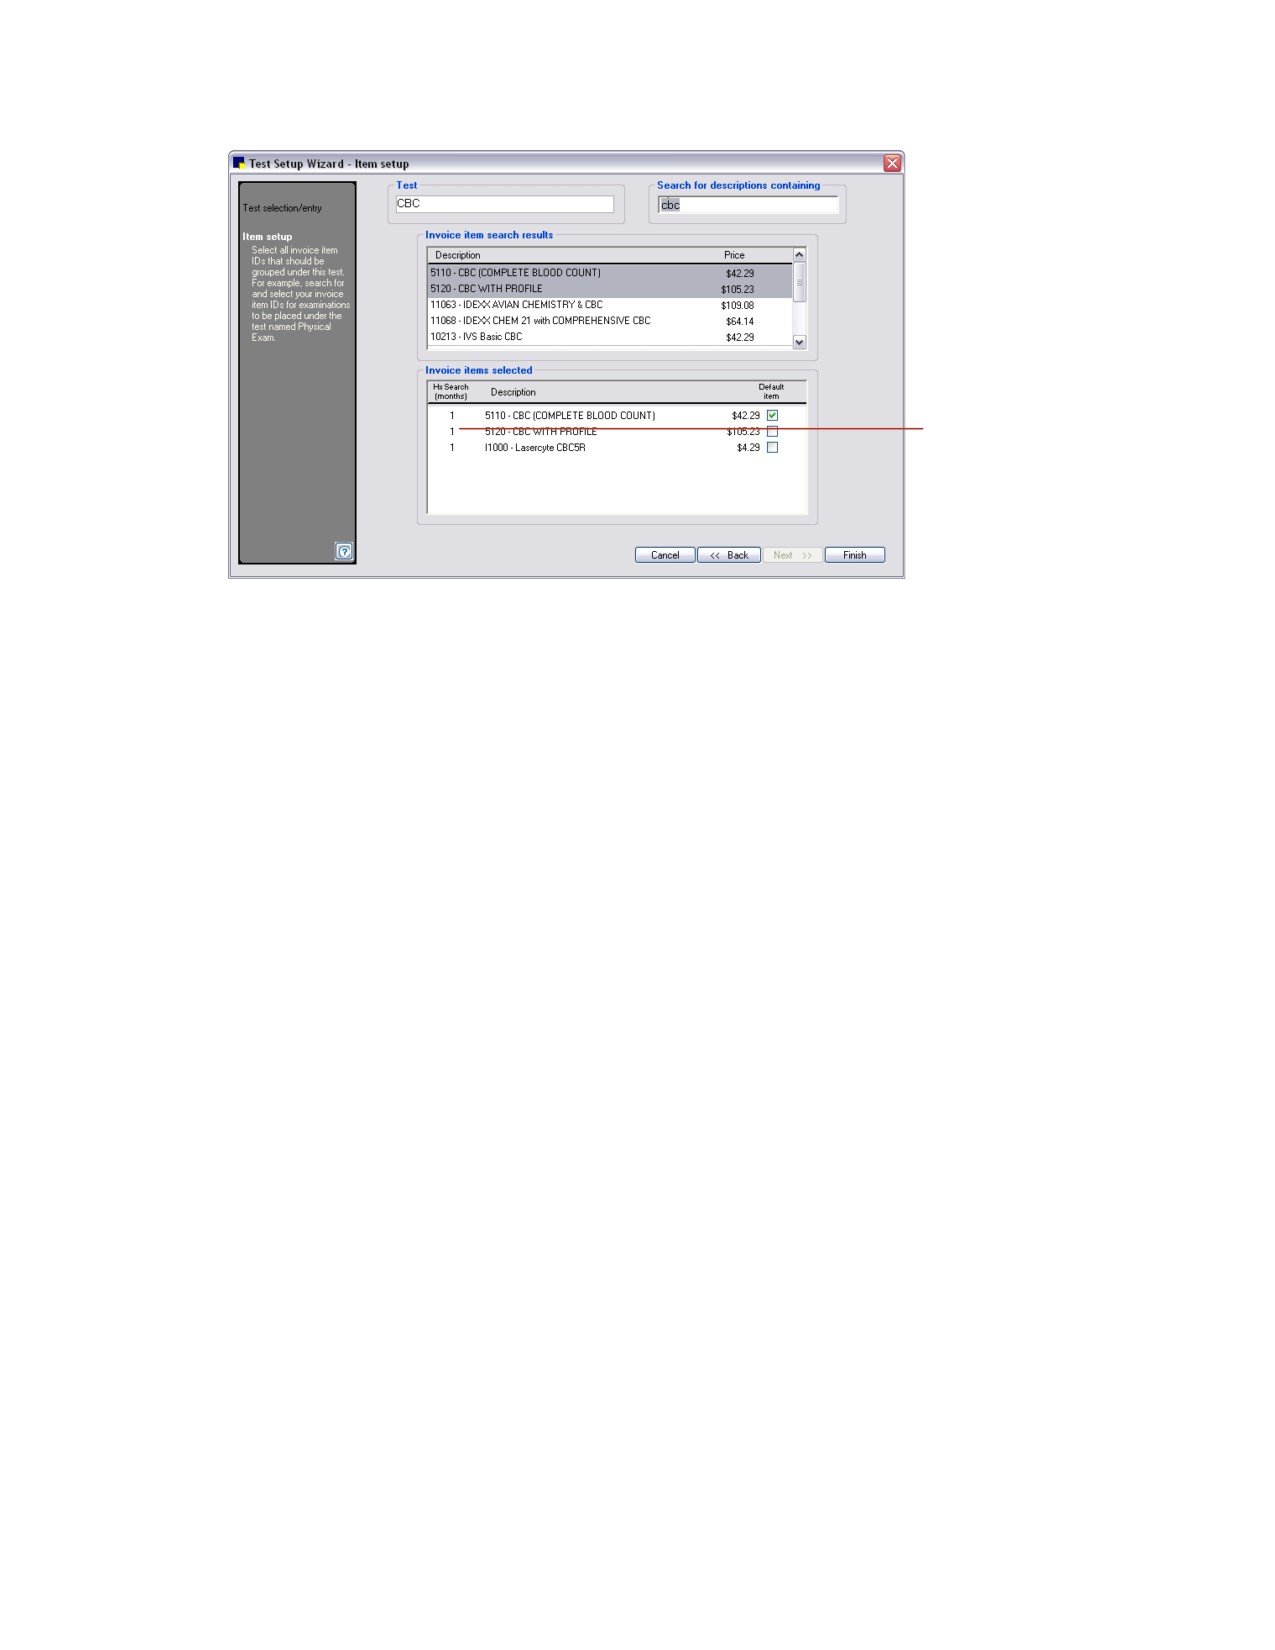
To change the
number of
months to
search history,
click existing
number and type
new number.
Step two of the two-step process of adding invoice items to tests
5.
Select the invoice items used at your practice that correspond to this test. Any of these invoice items
will be considered as compliant for this test. Enter all or part of the description in the Search for
descriptions containing field. If you know your practice’s invoice item ID, press F2 in this field to
select by ID. Your search results display. Click to select the items to assign to this test. To select
more than one invoice item, press the CTRL key as you click the items to be selected.
6.
The default number of months to search history is six. If you want to change the number of months
to search history, in the Hx Search column, click the existing number of months and type the new
number of months to search history. The Compliance Assessment Tool checks a patient’s history to
determine if invoice items in the selected protocol are found in the patient’s history during the
specified number of months prior to the specified date range.
7.
Before you can see a potential dollar value for missed revenue, you must select a default invoice
item for a test. The price of this default invoice item will be used to calculate the potential dollar
amount. To select a default item, select the Default item check box next to the item. Only one
default item can be selected per test.
8.
Click Finish when you are done adding invoice items to the test. The Protocol Setup Wizard displays
again. If needed, select additional tests to add to the protocol. Click Next when all tests are added.
9.
The Protocol Summary appears. Review the details of the protocol and choose one of the following
options:
• To make changes, click the Back button to return to the previous window.
• To set up another protocol, click Protocol selection/entry at the top of the navigation pane on
the left side of the wizard.
• If you are done setting up protocols, click Finish to save your changes.
10. After you click Finish on the Protocol Setup Wizard, Cornerstone asks if you want to generate
compliance results. Click Yes to go to the Compliance Results window or click No to exit.
432
Chapter 26: Using the Compliance Assessment Tool*
To complete the setup for an alternative search:
For this alternate type of compliance check, Cornerstone searches your patient records for missing
services based on other services that were provided. So that Cornerstone can determine if a patient has
complied with a service or is missing it, you must assign invoice items to the service.
1. Complete the steps in the “Setting Up Protocols” section.
2. On the Select services pop-up window (see step 9 in "To set up a compliance search protocol"),
click the second check box for alternative searches and click OK.
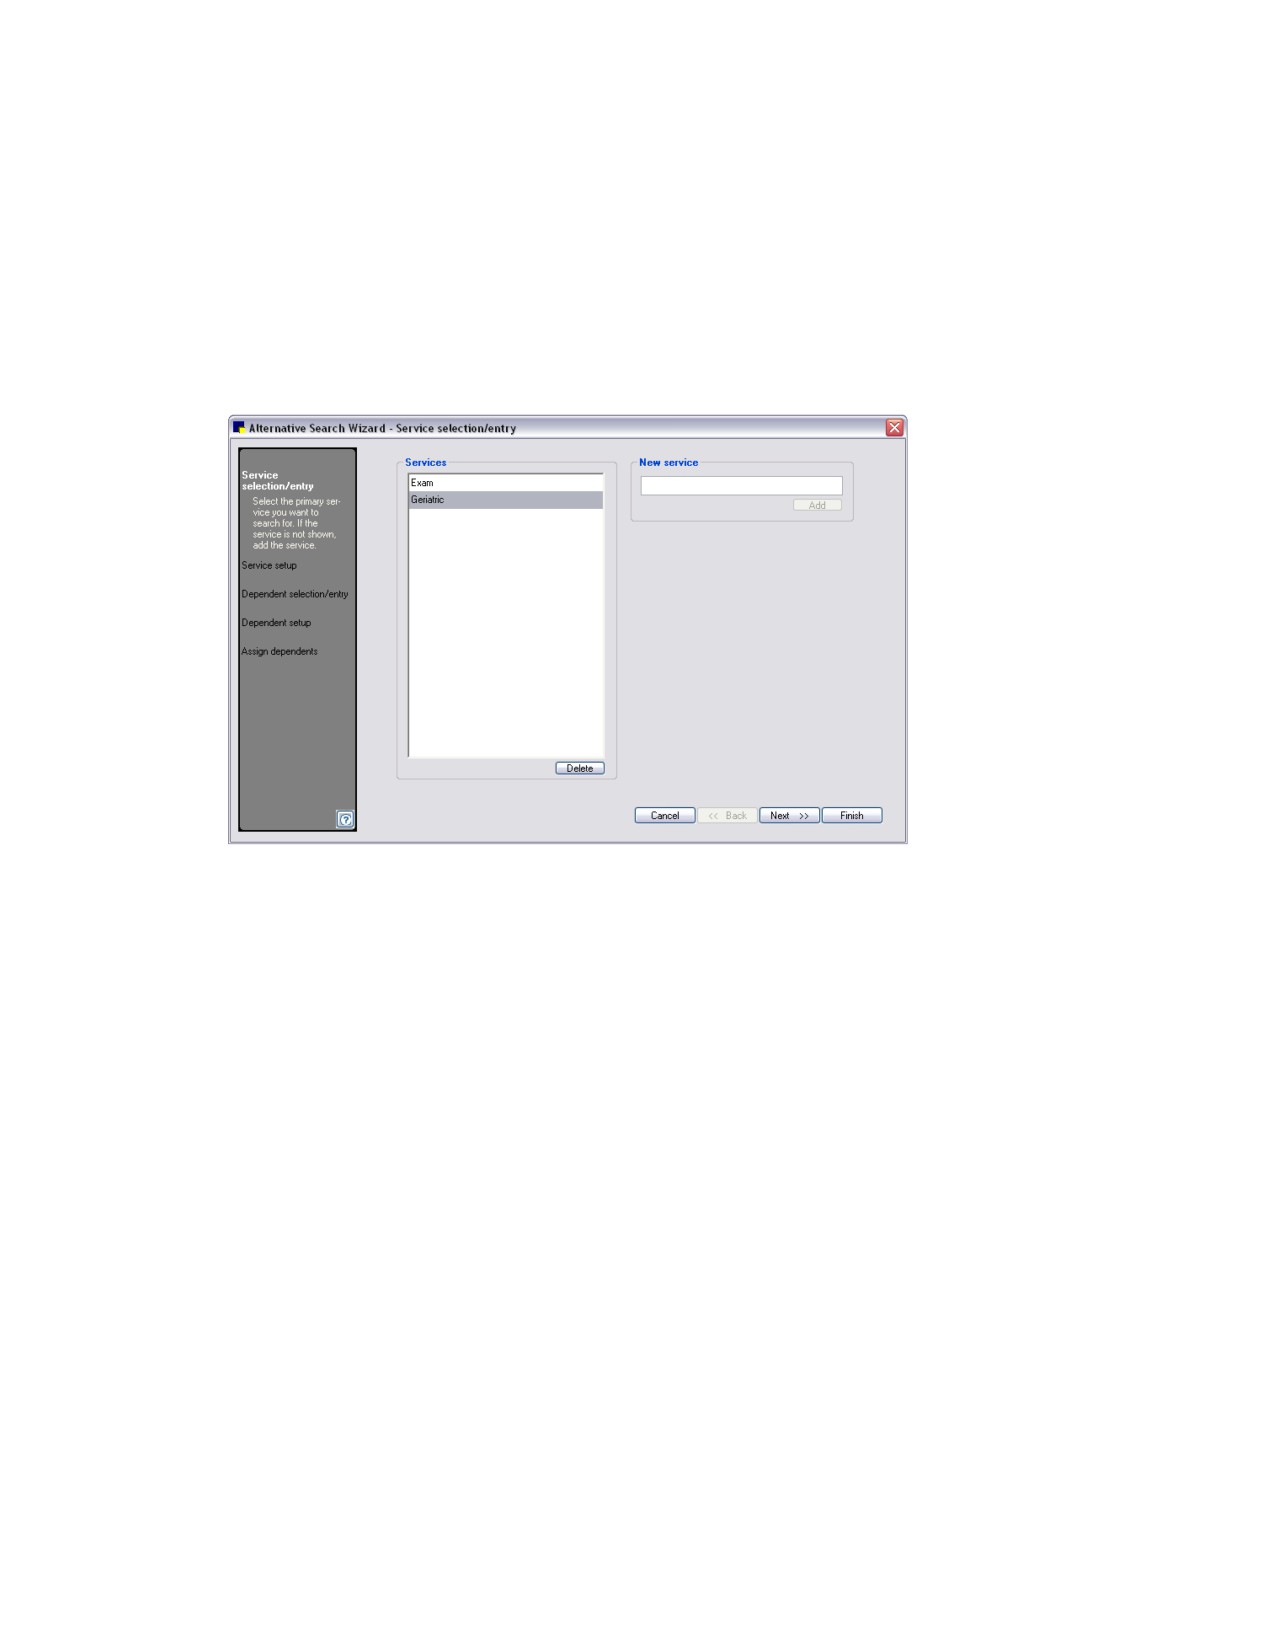
3. Click the Maintain services/dependents button. An Alternative Search Wizard appears.
The first step of the five-step process of selecting services for the search
4. On the Service selection/entry window, do one of the following:
• In the Services column, select the primary service to search for and click Next to go to the
service setup step.
• If the service you want is not shown in the services column, in the New service text box, enter a
new service, click the Add button and click Next to go to the service setup step.
Note: When entering a new service, enter any name you want for the service, preferably short and
descriptive. It does not have to match the name of an invoice item in Cornerstone.
433
Chapter 26: Using the Compliance Assessment Tool*
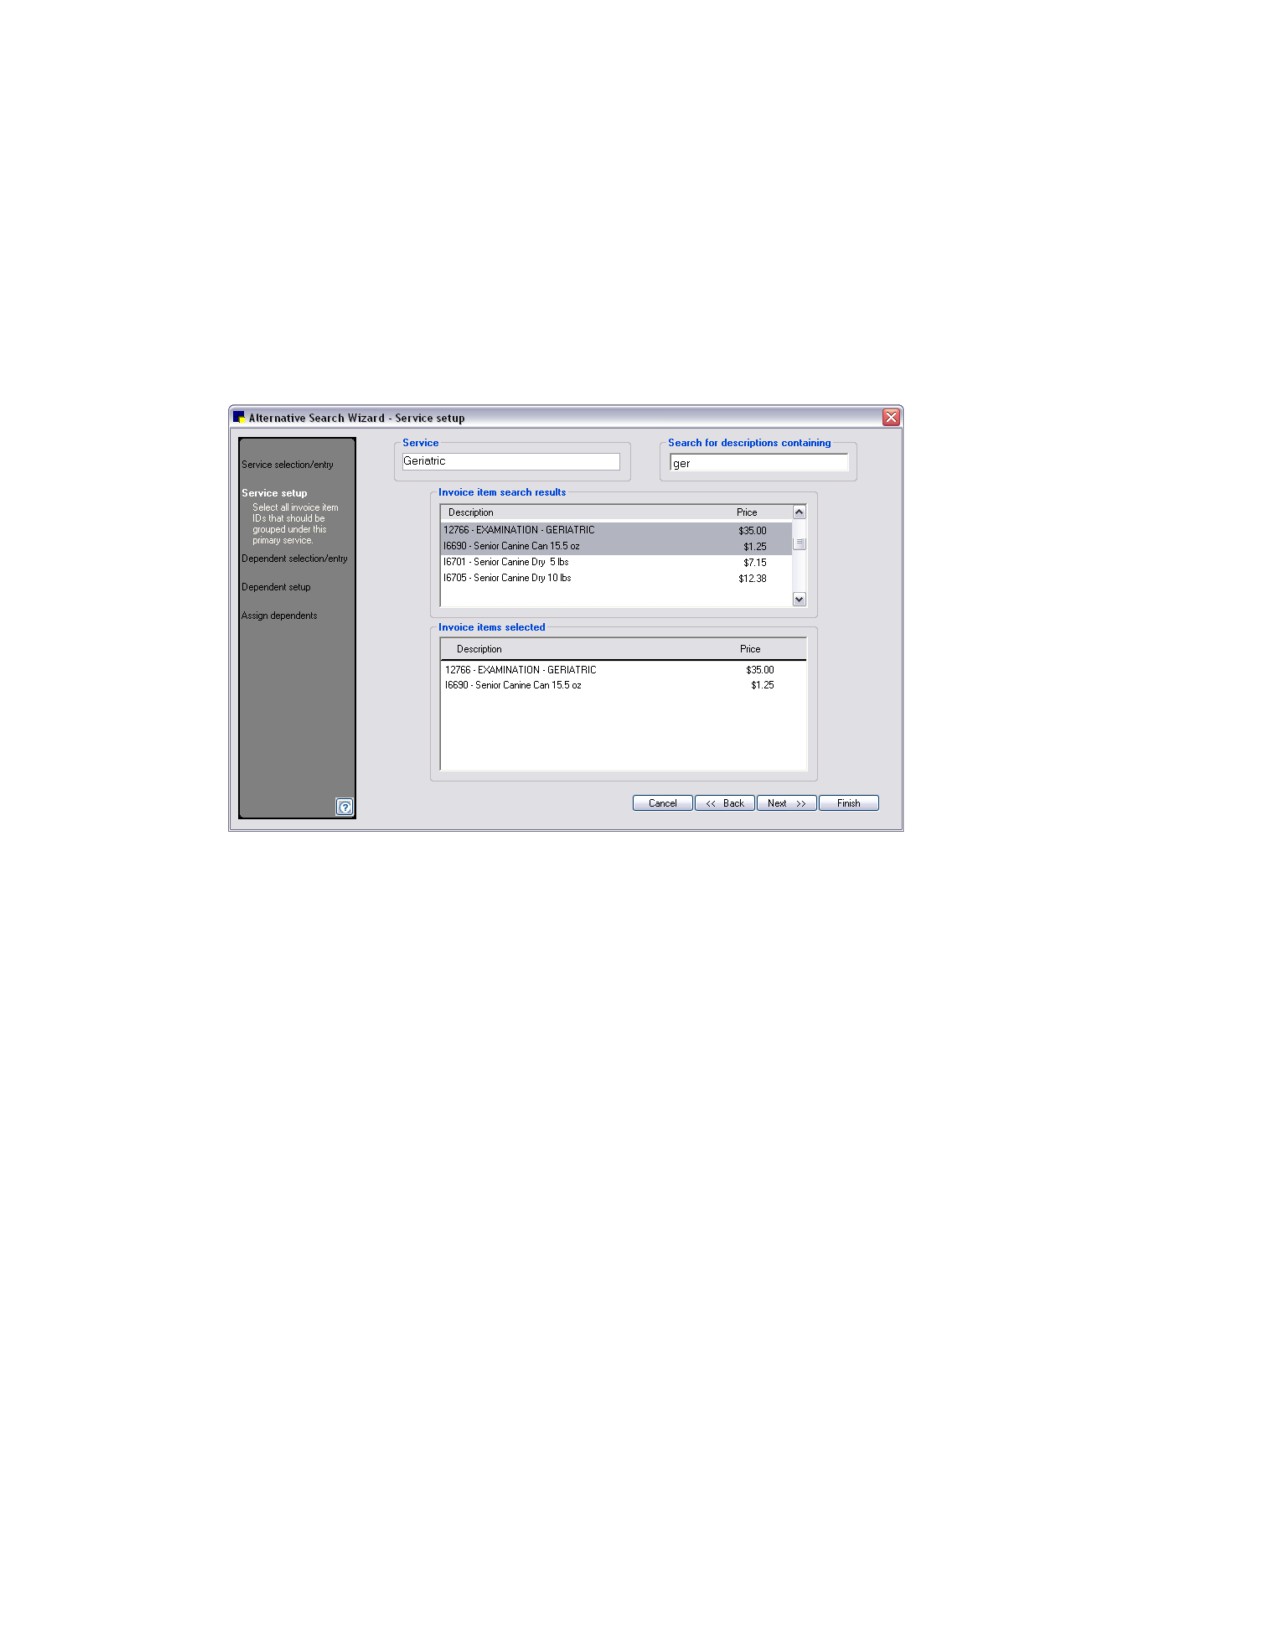
5. On the Service setup window, choose one of the following options:
• If invoice items have been previously assigned to the service, review the items, change them if
necessary, and click Next to move to the next step.
• If this is a new service, select the invoice items in Cornerstone that corresponds to this service.
Enter all or part of the description in the Search for descriptions containing field. If you know
your practice’s invoice item ID, press F2 in this field to select by ID. Your search results display.
Click to select the items to assign to this service. To select more than one invoice item, press
the CTRL key as you click the items. Click Next to move to the next step.
Services set up window
6. On the Dependent selection/entry window, select the dependent service that the Compliance
Assessment Tool will search for if the primary service is found on the patient record. If the service is
not shown, enter the service and click the Add button. Click Next to move to the next step.
7. Select the invoice items that correspond to the dependent (second) service. Before you can see a
potential dollar value for missed revenue, you must select a default invoice item for the service. The
price of this default invoice item will be used to calculate the potential dollar amount. To select a
default item, click the Default item check box next to the item. Only one default item can be
selected. Click Next to move to the next step.
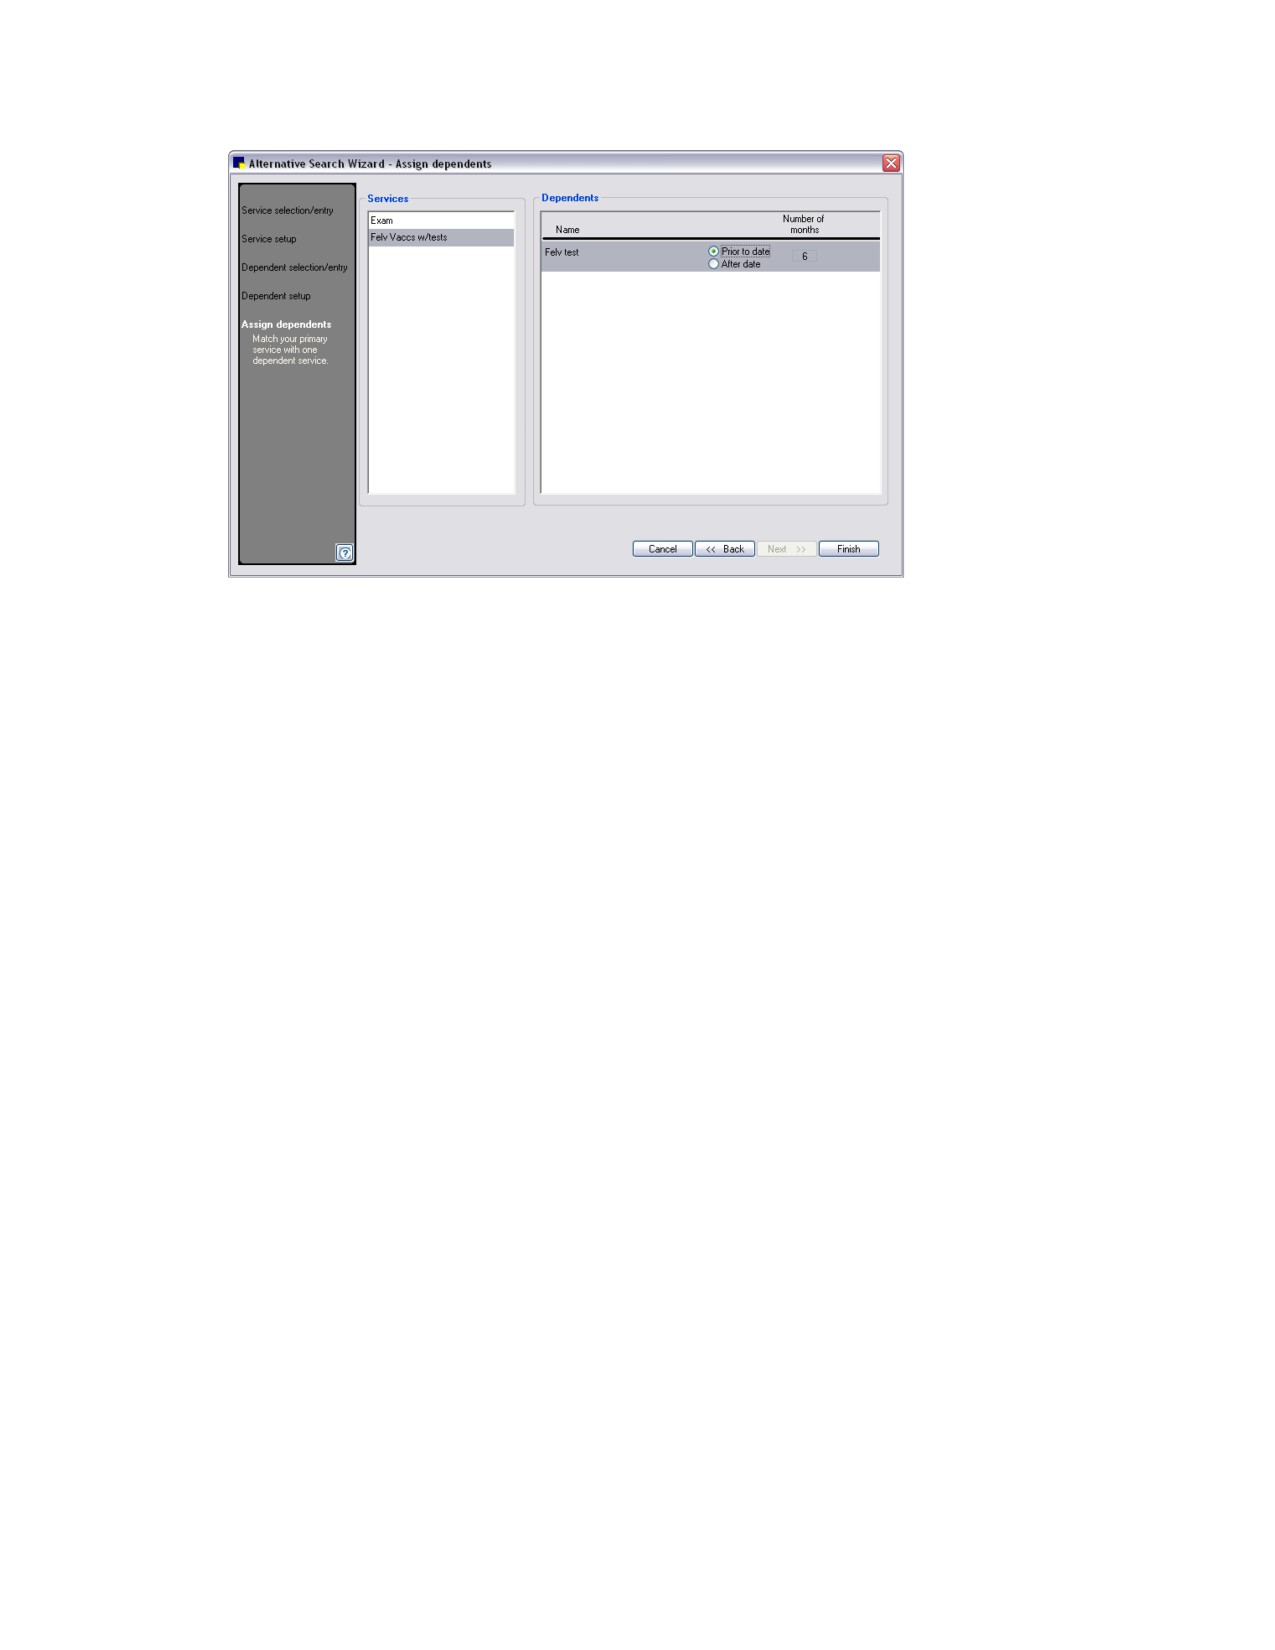
8. On the Assign dependents window, select the primary service to which you want to assign a
dependent and then click to highlight the dependent to be assigned to the service.
434
Chapter 26: Using the Compliance Assessment Tool*
The fifth step of the five-step process of selecting services for the alternative search
9. Choose whether you want to search for the dependent service prior to or after the date you will
select when you run compliance results.
10. If you want to change the number of months to search history, click the Number of months box and
enter the number of months you want to use. The Compliance Assessment Tool checks a patient’s
history to determine if invoice items in a selected protocol are found in the patient’s history during
the specified number of months prior to or after the specified date range, depending on your
selection. The default number of months is six.
11. Click Finish to close the mini-wizard and return to the Protocol Setup Wizard.
12. The Protocol Setup Wizard returns to the Select services window. Select the primary service for
which you want to run an alternative search. Click Next.
13. The Protocol Summary appears. Review the details of the protocol and choose one of the following
options:
• To make changes, click the Back button to return to the previous window.
• To set up another protocol, click Protocol selection/entry at the top of the navigation pane on
the left side of the wizard.
• If you are done setting up protocols, click Finish to save your changes.
14. After you click Finish on the Protocol Setup Wizard, Cornerstone asks if you want to generate
compliance results. Click Yes to go to the Compliance Results window or click No to exit.
Placing Protocols into Groups
You can place related protocols into groups. Compliance results can be compiled by group or by
individual protocol.
Why group protocols? Individual protocols can have only one weight and/or age range specified per
species. If you want to develop a broader protocol (for example, a protocol for canine senior care),
individual protocols based on weight and age can be placed in a group protocol.
435
Chapter 26: Using the Compliance Assessment Tool*
All protocols in a group must have the same tests; however, the age and/or weight among the protocols
are different. After the initial protocol is added to a group, only protocols with the same tests can be
added.
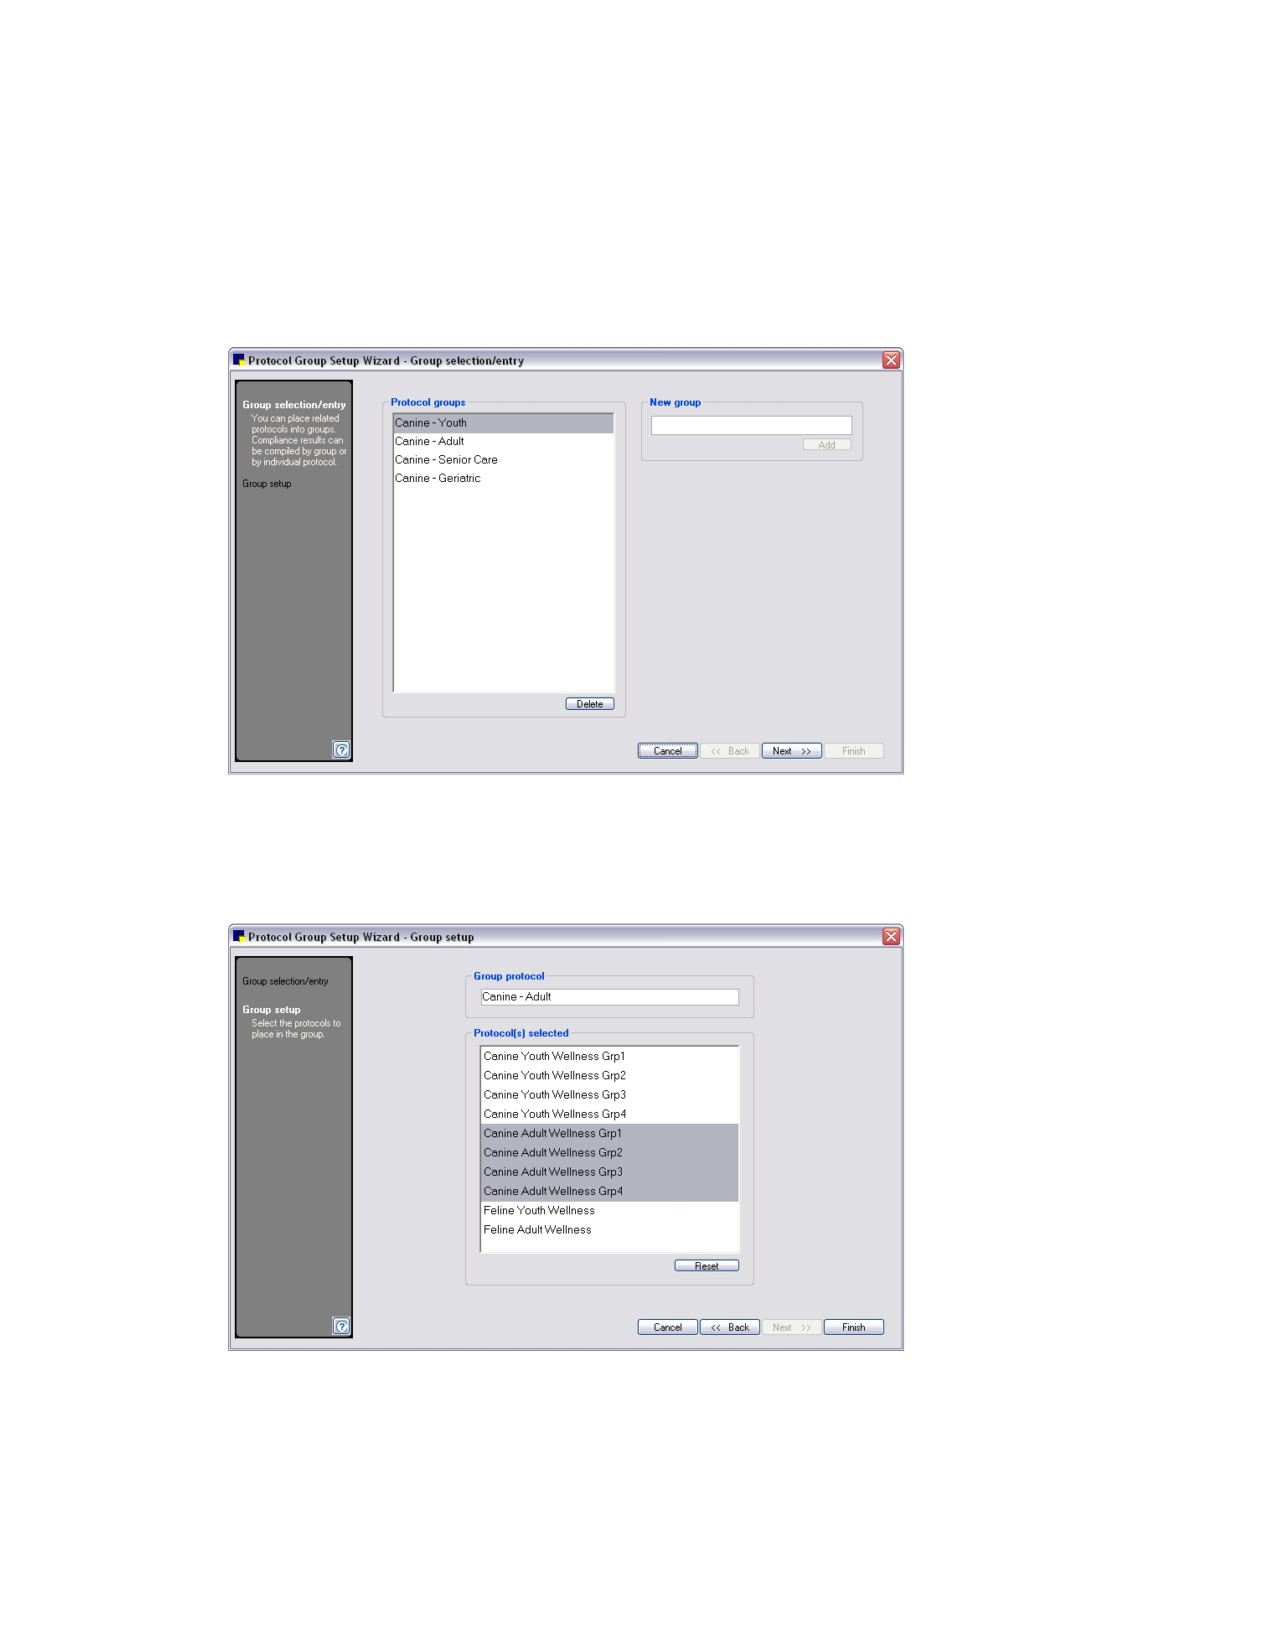
To put protocols into groups:
1. On the Reports menu, select Compliance Assessment Tool > Protocol Group Setup. The Group
selection/entry window appears.
Protocol Group Setup Wizard - Group selection/entry
2. Select the protocol group to which you want to add or remove protocols. If you want to create a new
group, enter the name of the new group and click the Add button. The Group setup window
appears. Click Next.
Protocol Group Setup Wizard - Group setup
3. Select the protocols to add to the group. To clear the protocols from the group, click the Reset
button.
4. Click Finish when you are done adding protocols to the group.
436
Chapter 26: Using the Compliance Assessment Tool*
Extracting Compliance Results
After the setup process is complete, you can use the Compliance Assessment Tool to generate
compliance results.
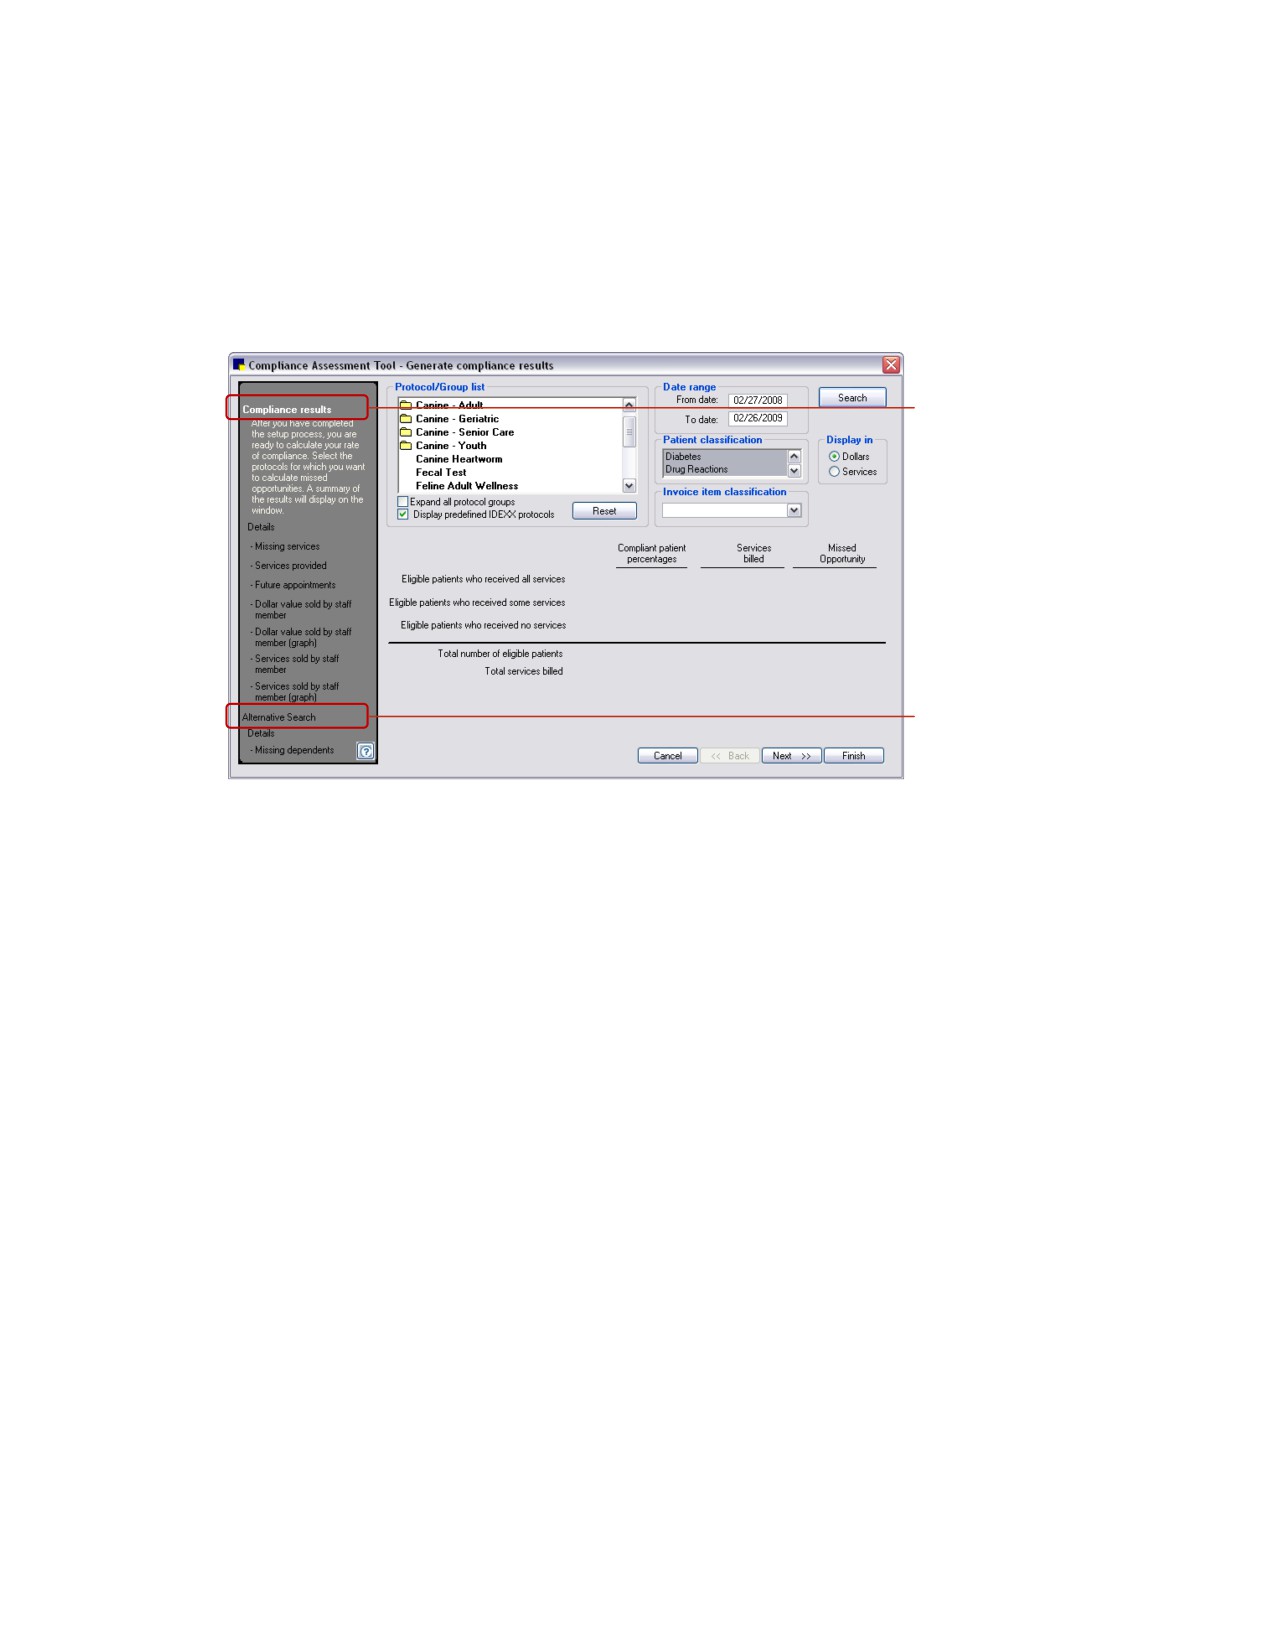
To generate compliance results:
1. On the Reports menu, select Compliance Assessment Tool > Generate Compliance Results.
The Generate compliance results window appears.
To perform and
view a regular
compliance
search, click
here.
To perform and
view an
alternative
compliance
search, click
here.
Compliance Assessment Tool - Generate compliance results
2.
On the navigation pane, click Compliance results to perform a regular compliance check or click
Alternative Search to perform an alternative compliance check.
3.
In the Protocol/Group list, select the protocol(s) to be included in the compliance check. If your
practice has set up protocol groups, click on the group name to select all protocols in the group.
4.
Enter the Date range for which you want to find compliance results.
5.
In the Patient classification list, select the classes (referral only, family pet, etc.) that you want to
include in the compliance assessment. Selected classes are highlighted/shaded. Initially, all classes
are selected. Click the classes you do not want to include to deselect them.
6.
In the Invoice item classification drop-down list, select a specific invoice item classification to
narrow the search.
7.
Under Display in, select one of the following:
• Select Dollars to display results showing the potential dollar values for missed revenue,
calculated based on the price of the invoice items. Results include Compliant patient
percentages, Services billed and Missed Opportunity in terms of dollars.
• Select Services to display results showing which services have been missed. Results include
Percent of missed opportunity, Total services provided, and Total Services missed.
8.
Click the Search button. The results display.
Note: Depending on the type of search that you are performing, it may take several minutes for the
search to finish. Do not attempt to close the window or cancel the search during this time.
437
Chapter 26: Using the Compliance Assessment Tool*
Compliance Reports
After compliance results are generated, a number of reports and graphs can be viewed or printed from
the Compliance Assessment Tool.
• Missing services: This report lists eligible patients, patients’ owners, addresses and selected
tests from which the patient did not receive at least one invoice item.
• Services provided: This report shows clients with patients who received invoice items from one
or more of the selected protocol’s tests and lists the invoice items each patient received.
• Future appointments: This report lists pets who are scheduled for future appointments and are
eligible for services in the selected protocol. It includes the pet owner’s name and address. The
report prints the appointments for staff members in date order.
• Dollars Sold by Staff: This report shows the dollar value of the selected protocol’s services that
were provided to eligible patients. The report prints in staff member order. To list the dollar value
for an individual staff classification, under Classification, click the classification (doctor, groomer,
receptionist, etc.) and click the Retrieve button.
• Dollar Sold by Staff (graph): View the dollar value of the selected protocol’s services that were
provided to eligible patients as a graph.
• Services Sold by Staff: This report shows services sold to eligible patients by staff members.
• Service Sold by Staff (graph): View the services sold by staff member as a graph.
• Missing Dependents (Alternative Search): This report lists eligible patients who received the
primary service, but did not receive the dependent service. This report also list the dollar value
of missing tests by doctor.
Tip: Print the Client List (Missing Services) Report and the Client List (Services Provided) Report for
a complete comparison.
To print or save the reports or graphs:
1. In the navigation pane, under Details, click the type of compliance results detail (Missing services,
Services provided, Missing dependents, etc.) to view in a report. Use the Next and Back buttons to
go back and forth, selecting and viewing the applicable reports.
2. With the results report displayed in the pane on the right, click Print to print the report or Save to
save the report data to a file.
Understanding Compliance Results
The type of compliance results that are generated by the Compliance Assessment Tool depends on the
type of search (regular or alternative) that is performed.
Regular Compliance Results Search-Dollars Display Option
Total number of eligible patients
Eligible patients are patients who satisfy the species, age, and weight requirements of the chosen
species/age group and who have been invoiced for services during the chosen date range.
Eligible patients who received all services (Compliant)
The number of eligible patients who were invoiced for at least one item in each of the protocol’s
selected tests during the specified date range or in the patient’s history (if using the Hx-search
feature). At least one of these items must be invoiced during the specified date range. The rest can
be in the date range or in the patient’s history.
438
Chapter 26: Using the Compliance Assessment Tool*
Eligible patients who received some services (partially compliant)
The number of eligible patients who were invoiced for items in at least one, but not all, of the
protocol's selected tests during the specified date range or in the patient’s history (if using the Hx
search feature).
Eligible patients who received no services (non-compliant)
The number of eligible patients who were invoiced, but were not invoiced for any invoice items in the
protocol's selected tests during the specified date range or in the patient history.
Total services billed
The total services billed amount only includes charges for items in the selected tests that were
invoiced during the specified date range. Charges for other service and inventory items not in the
selected tests that were invoiced during the date range are not included. In addition, because items
in history are outside the specified date range, charges for history items are not included.
Missed opportunity
If no invoice item in a selected test is found in an eligible patient’s record during the specified date
range or in history (if using the Hx search feature), the price of the selected test’s default item is
added to the Missed Opportunity column.
Total opportunity
This is the sum of all missed opportunities.
Regular Compliance Results Search-Services Display Option
Percent of missed opportunity
Calculates the percentage of missed opportunities using the Total services provided and the Total
services missed values.
Total services provided
Shows the number of times each service was provided.
Total services missed
Shows the number of times the service could have been provided but was missed.
Alternative Search
Eligible patients who received the service (primary)
This is the number of patients who received the primary service during the specified date range.
Eligible patients who received the dependent
This is the number of patients who received the primary service and the dependent service during
the specified date range.
Note: If the eligible patient received the dependent service, but did not receive the primary service,
they are not counted.
Eligible patients who received the service (primary) but not the dependent
This is the number of patients who received the primary service, but not the dependent service
during the specified date range.
439
Chapter 26: Using the Compliance Assessment Tool*
Missed opportunity
If no invoice item in the selected dependent service is found in an eligible patient’s record during the
specified date range, the price of the dependent service’s default item is added to the Missed
Opportunities column.
Total opportunity
This is the sum of all missed opportunities.
Tip: You can set up your system to display an alert when a patient who needs a recommended service
is seen. When the alert displays, you can process the alert to see which services or tests are missing
from the patient record. To specify the desired alert types to display, select them in Compliance Alerts
defaults. For more information, see “Compliance Alerts Defaults” on page 87.
440
Chapter 27: Using Cornerstone Performance Tracker
Overview
The performance tracker feature in the IDEXX Cornerstone* Practice Management System allows you to
compare month-to-month data within your practice. For example, compare your practice’s revenue from
the second quarter of 2010 with the revenue from the second quarter of 2011. Cornerstone performance
tracker displays your data in dynamic graphs and includes interactive features.
Tip: You can view samples of Cornerstone performance tracker reports on the Report Search window
(Reports > Find a Report) by clicking on a report in the Performance Tracker report group. The report
details and a sample display in the right-side pane.
Tracking Performance
Before You Begin
¾ Set up the Cornerstone Performance Tracker defaults. See “Performance Tracker Defaults” on page
123.
To use Cornerstone performance tracker:
1. On the Reports menu, select Performance Tracker.
2. Select which time periods you want to compare from the Tracking Period box and the Comparison
Period box. To select a quarter, press the CTRL key and click each month in the three-month period.
Click Retrieve. The retrieved information displays.
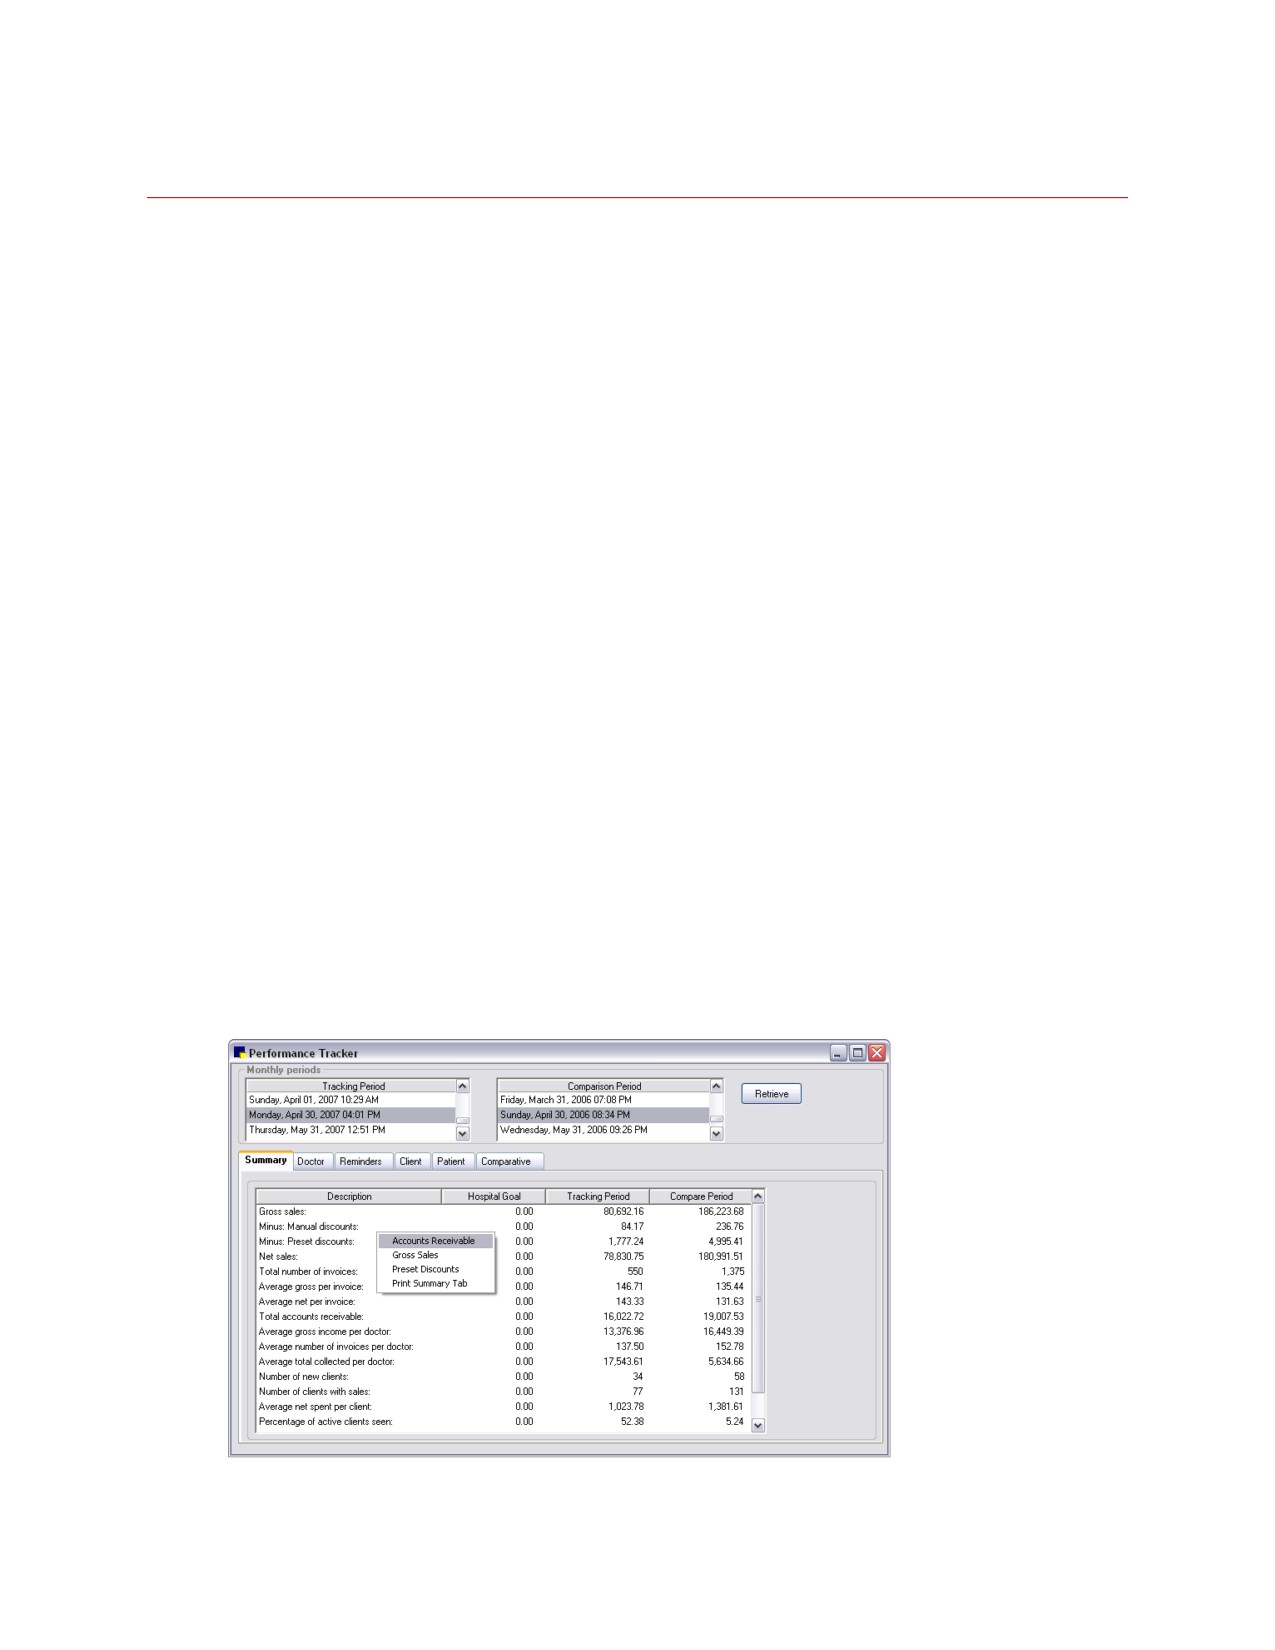
3. Click the Summary tab to see the financial information compared between your selected time
periods.
• To display graphs comparing your accounts receivable information, gross sales or preset
discounts, right-click within the results display area and select the applicable option.
• To print a report showing the information on the Summary tab, right-click within the data display
area and select Print Summary Tab.
Cornerstone Performance Tracker-Summary tab
441
Chapter 27: Using Cornerstone Performance Tracker
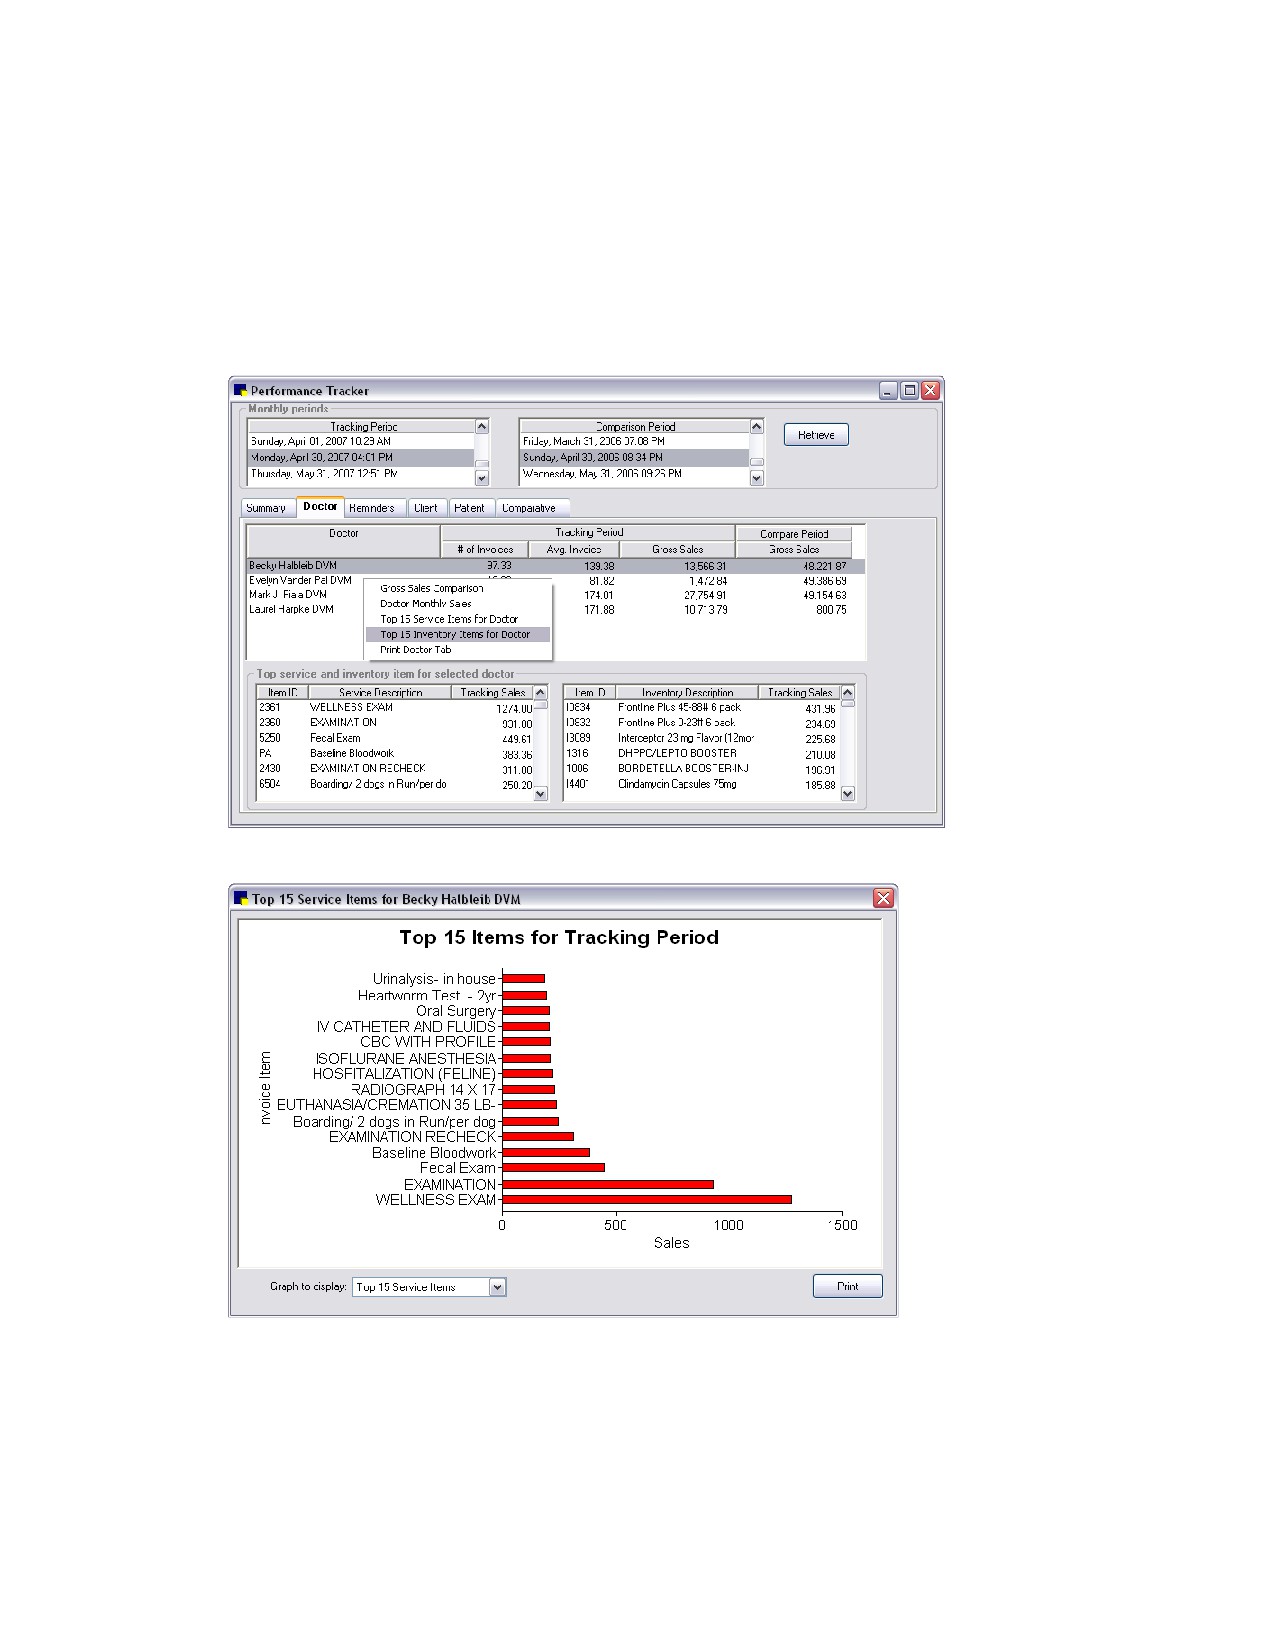
4. Click the Doctor tab to see the amount of gross sales for each doctor compared between your
selected time periods.
• To display graphs comparing gross sales by doctor, showing a doctor’s monthly sales, or
showing the top 15 services or inventory items for a doctor, select a doctor’s name to highlight it
and then right-click within the results display area and select the applicable option.
• To print a report showing the information on the Doctor tab, select a doctor’s name to highlight
it and then right-click within the results display area and select Print Doctor Tab.
Cornerstone Performance Tracker-Doctor tab
Sample of a graph that can be displayed from the Doctor tab
442
Chapter 27: Using Cornerstone Performance Tracker
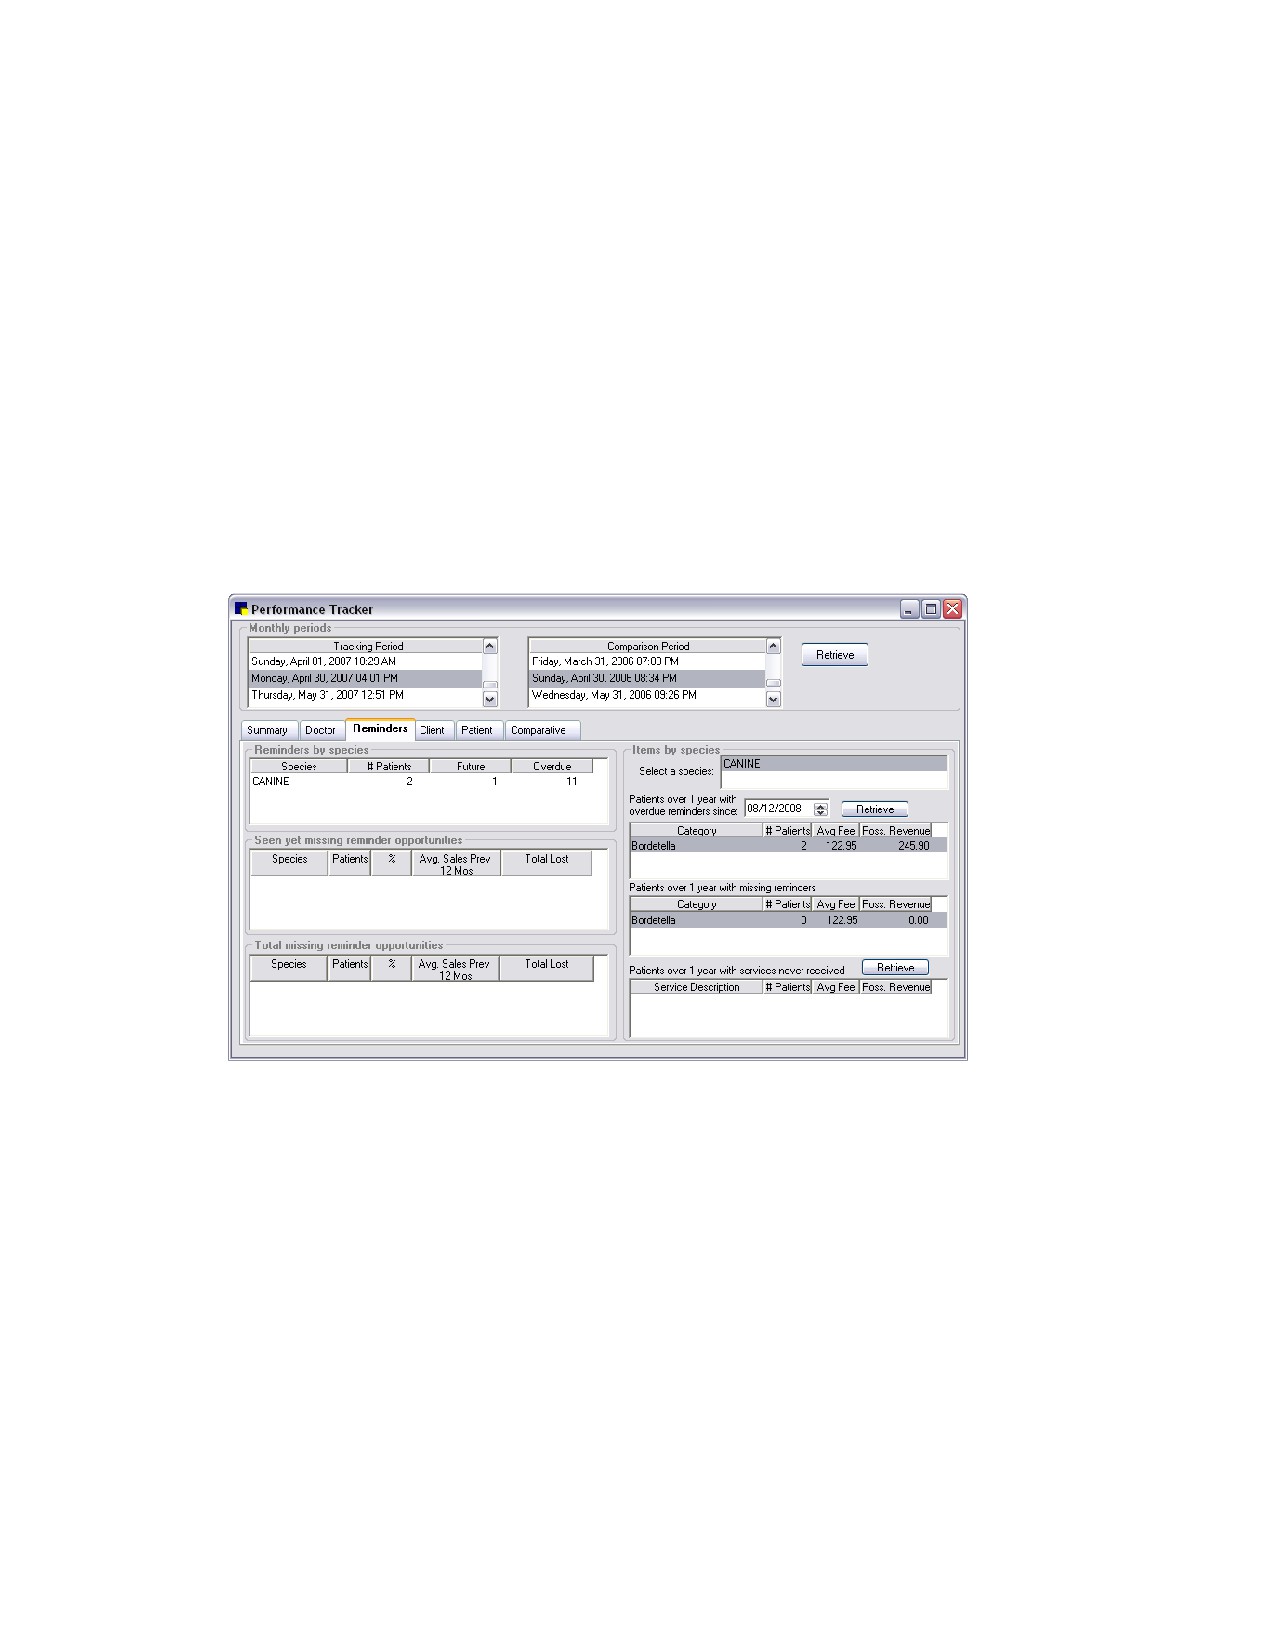
5. Click the Reminders tab to see your clients’ reminders compliance rate, based on what you
selected on the Cornerstone performance tracker Default Reminder tab. This information is always
current, even if a different time period is selected.
• To see a detailed report of missing reminders, right-click in the Seen yet missing reminder
opportunities box or the Total missing reminder opportunities box and select Patient report for
species.
• To generate a file that can be merged with a reminder card or letter, right-click on a reminder
and select Generate reminder file for selected items or Generate reminder file for patients
without all selected items.
• To generate a report of patients without all selected items, a patient report for all items, or a
patient report for all selected items, right-click on a reminder and select the applicable option.
• To see patients over one year old who have never received services, click the Retrieve button
next to this option in the bottom right corner of the Reminders tab. Because the software must
sort through your entire practice database, retrieving this information could take some time.
Cornerstone Performance Tracker-Reminders tab
443
Chapter 27: Using Cornerstone Performance Tracker
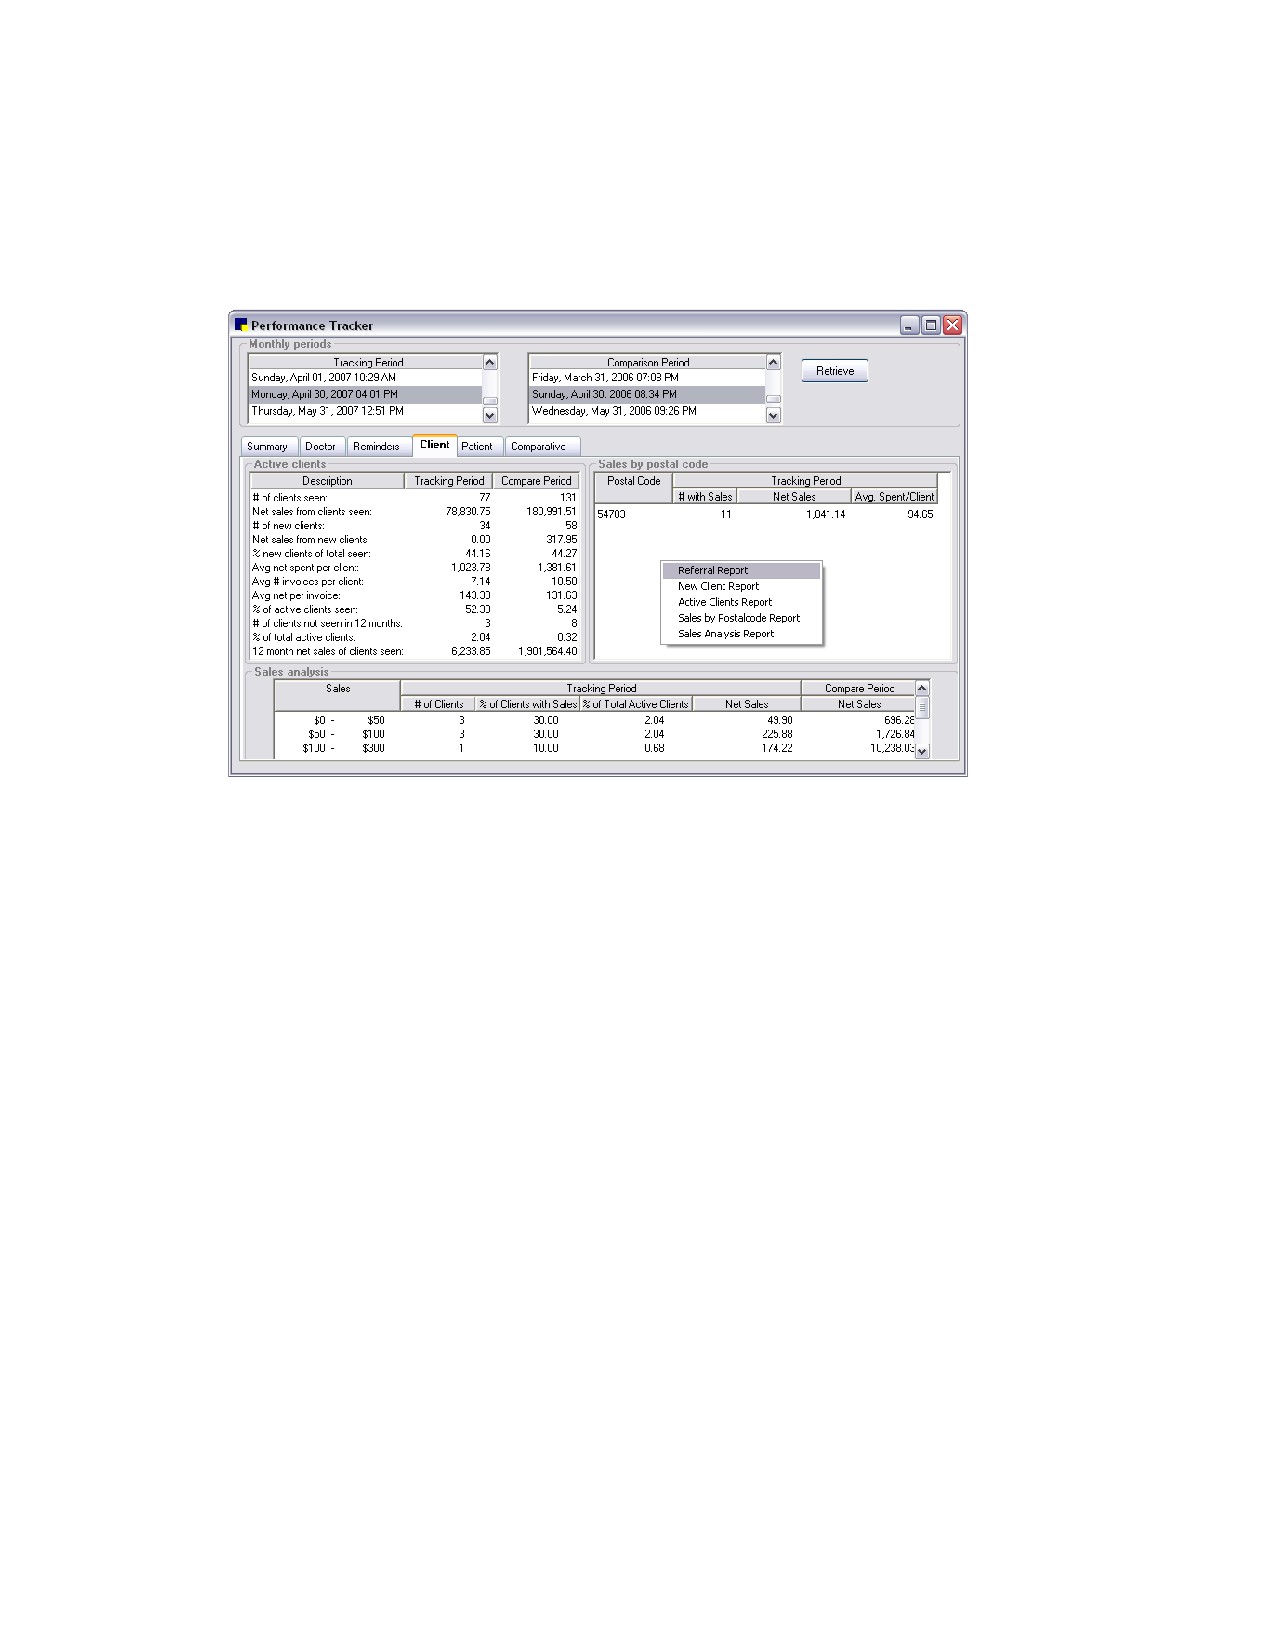
6. Click the Client tab to see a summary of how many clients your practice has seen compared
between your selected time periods. You can also view sales by postal code and see the
geographical location of your clients.
• To print a Client Referral Report, New Clients Report, Sales by Postal Code Report or Sales
Analysis Report, right-click in any results display area and select the applicable report.
Cornerstone Performance Tracker-Client tab
7. Click the Patient tab to view sales comparisons by species, breed and age. You can also view a
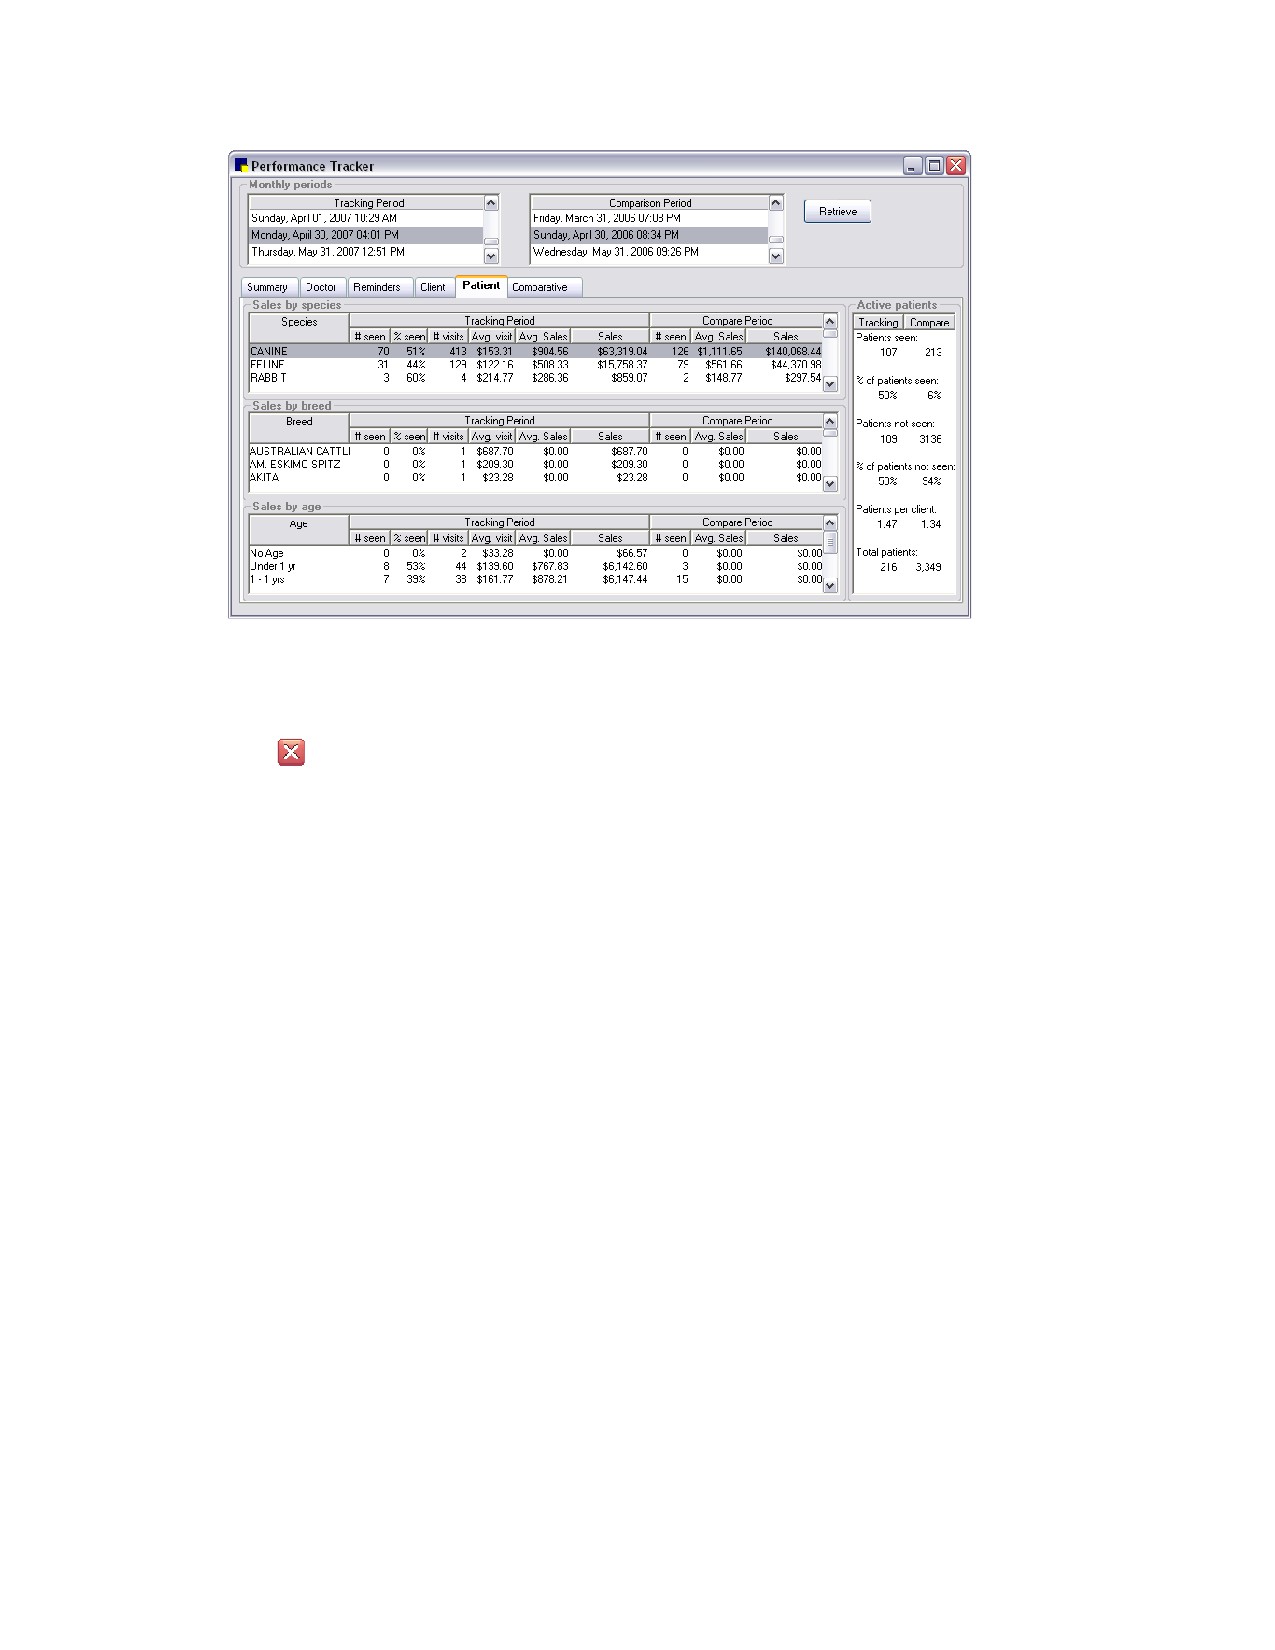
comparison of the number of patients seen. You can print reports showing the sales comparisons.
• To print a Species Report, right-click in the Sales by species results display area.
• To print a Breed Report, right-click in the Sales by breed results display area.
• To print an Age Report, right-click in the Sales by age results display area.
444
Chapter 27: Using Cornerstone Performance Tracker
Cornerstone Performance Tracker-Patient tab
8. Click the Comparative tab to learn about the benefits that IDEXX Practice Profile* provides your
practice.
9. Click
to exit Cornerstone* performance tracker.
445
Chapter 28: Using the Backup Verification Assistant
Overview
The Backup Verification Assistant provides an extra precautionary measure to protect your data by
scanning the backup log and reporting possible problems when a staff member logs into the IDEXX
Cornerstone* Practice Management System.
If your practice uses compatible backup software, you can set up Cornerstone to automatically verify
your backup. The following backup software is compatible: Backup4all™, Backup Exec™, BackUp
MyPC™, PC Backup, TapeWare®, and IDEXX VetVault* Backup Solution.
How the Backup Verification Assistant Works
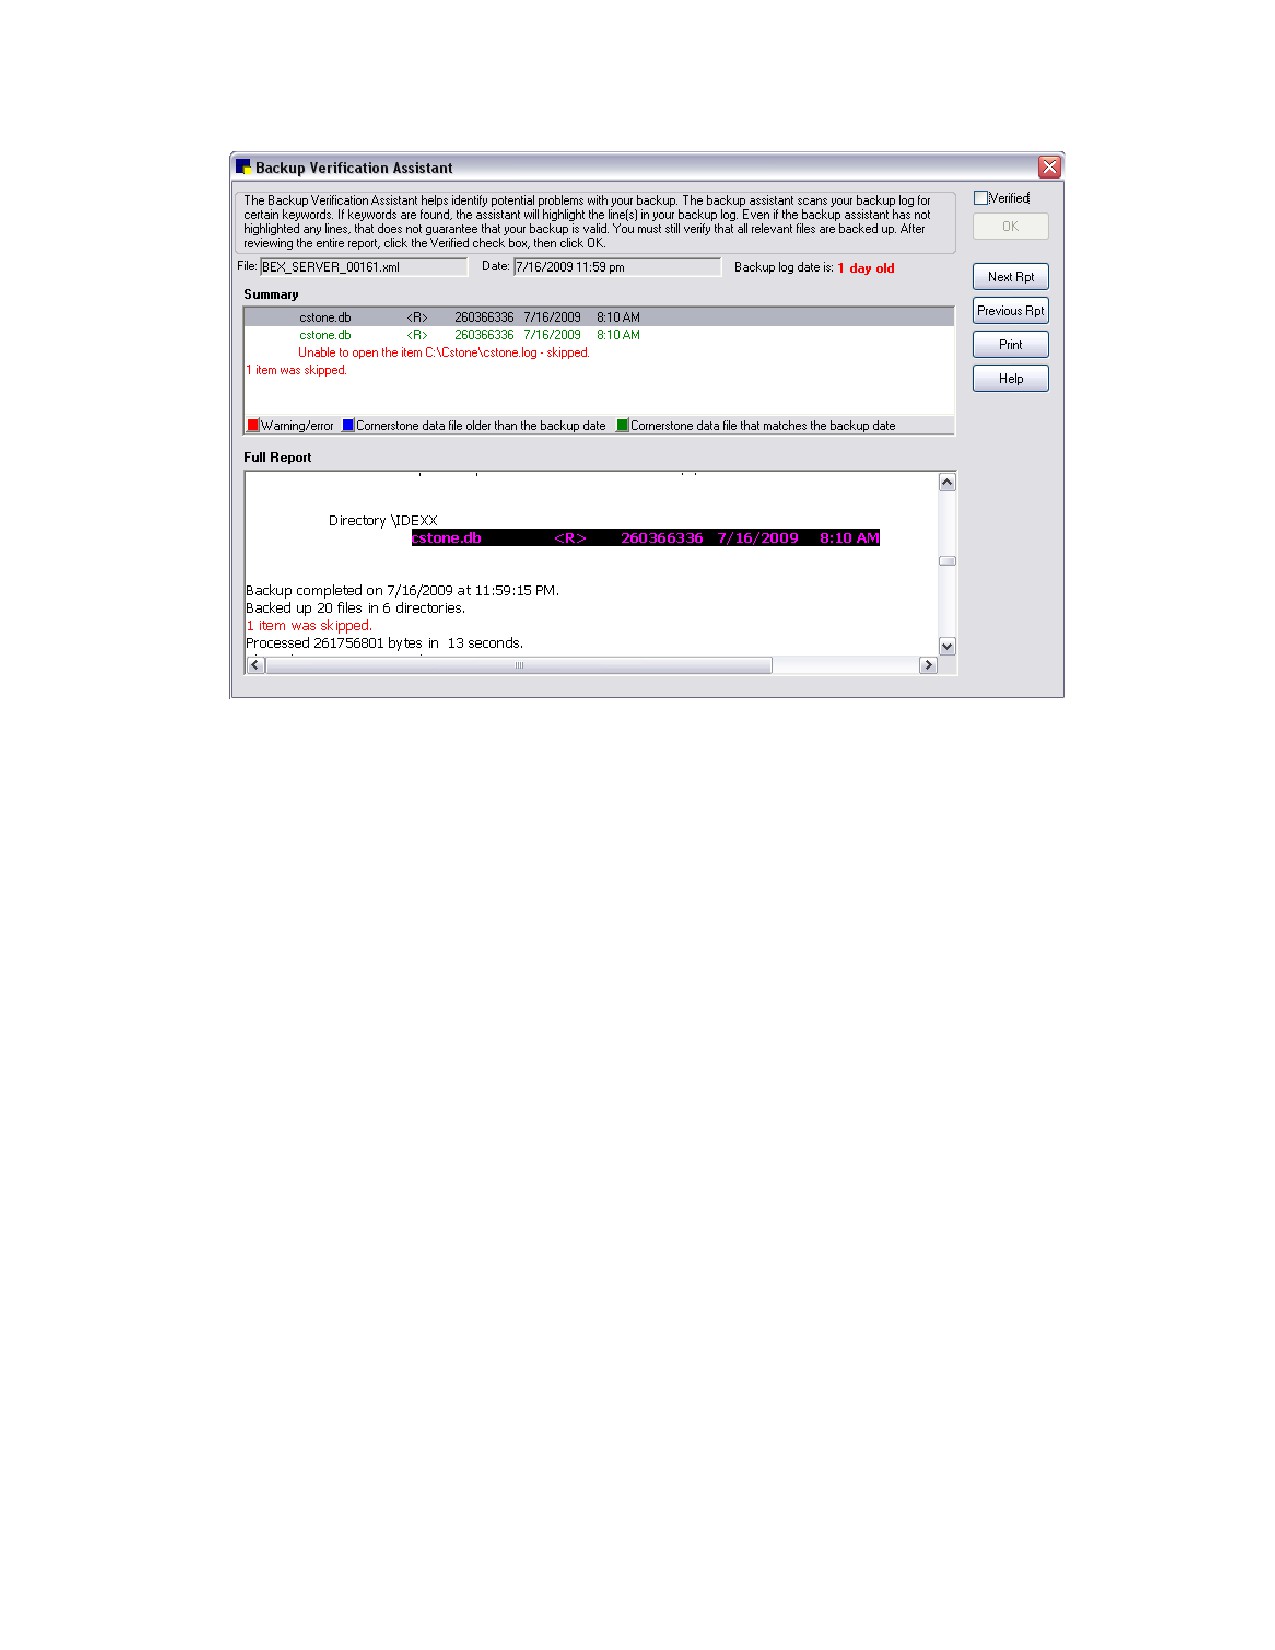
The Backup Verification Assistant scans your backup log for certain keywords. If keywords are found,
the Backup Verification Assistant highlights the line(s) in your backup log and displays them, color-
coded, in the Summary area.
Backup Exec, TapeWare and BackUp My PC
• Red-indicates there was a warning or error during the backup process.
• Blue-indicates a Cornerstone data file with a file date older than the backup date. It is normal for
the cstone.db file to display in blue if an automatic backup is scheduled to run nightly.
• Green-indicates a Cornerstone data file with the current file date was backed up.
Backup4all and PC Backup
• Red-indicates there was a warning or error during the backup process.
• Green-indicates a Cornerstone data file was backed up.
IDEXX VetVault Backup Solution
• Red-indicates there was a warning or error during the backup process.
• Blue-indicates a Cornerstone data file was NOT backed up.
• Green-indicates a Cornerstone data file was backed up.
446
Chapter 28: Using the Backup Verification Assistant
Backup Verification Assistant window
Enabling the Backup Verification Assistant in Cornerstone
1. On the Tools menu, select Backup Verification Assistant.
2. Select the backup software that is used by your practice.
3. Select the Use Backup Verification Assistant check box.
4. Click OK.
Viewing the Backup Verification Assistant
Cornerstone Administrators and staff with proper security permissions will see the Backup Verification
Assistant the first time they log in each day. It can also be viewed manually through the Reports menu.
To manually view the Backup Verification Assistant:
1. On the Reports menu, select Backup Logs.
2. After viewing the Backup Verification Assistant, select the Verified check box.
3. Click OK.
447
Chapter 29: Purging Data from Cornerstone*
Overview
After you have entered many years of data into the IDEXX Cornerstone* Practice Management System,
you may want to go back and clean up old files by deleting data you no longer need. There are several
reasons why you would want to periodically purge (delete) data from the Cornerstone database:
• It makes Cornerstone work faster.
• It decreases the amount of history displayed in client account history and patient medical history
records, as well as decreases the size of reports that include client and patient history.
• It allows you to delete old client and patient records that clutter your system.
Think of your Cornerstone database as a parking lot. When you purge data, you remove cars from the
lot. The lot is still the same size, but it’s easier to find your car (with fewer cars to look at) and you can fit
new cars into the empty spaces.
Options for Purging Data from Cornerstone
You can perform three different types of data purges in Cornerstone:
• Delete clients, their patients, and all associated information
• Delete patients and their associated information
• Delete specific types of client or patient information from the client and patient records (but do
not delete the client or patient)
IMPORTANT: We strongly advise backing up your Cornerstone database before purging any data.
If you purge clients and patients:
Cornerstone will:
• Delete all records of the selected client(s) and any patients owned 100% by the client(s) before
the selected date. (The client must have 100% ownership or the client and patient records will
not be deleted.)
• Delete the selected client(s) and associated patient(s) from the Client List and Patient List.
Cornerstone will purge a client only if:
• All of the patients owned by the client can be purged.
• The client does not have a balance.
• The client does not have an open invoice.
• The client does not have any account transactions after the purge date.
• The client has 100% ownership of all of their patients.
Note: If the client has been written off, Cornerstone prompts you to keep the client.
448
Chapter 29: Purging Data from Cornerstone*
Cornerstone will purge a patient only if:
• The patient does not have a future appointment.
• The patient does not have an open (saved) exam.
• The patient is not checked in.
• The patient does not have transactions on an open invoice.
• The patient does not have any account transactions after the purge date.
• The patient does not have a controlled substance in its history for at least two years.
• The patient’s record was not created after the purge date specified.
• The patient does not have reminders in the future nor in the past month.
If a patient is deceased, Cornerstone will only check to verify that the patient does not meet any of the
conditions indicated by the symbol.
Note: If you do not want to delete the client or patient, purge specific information from the records
instead. See “Purging Specific Types of Client or Patient Information” on page 452.
Purging Clients and Patients
If you purge clients and patients, Cornerstone will:
• Delete all records of the selected client(s) and any patients owned 100% by the client(s) before
the selected date. (The client must have 100% ownership or the client and patient records will
not be deleted.)
• Delete the selected client(s) and associated patient(s) from the Client List and Patient List.
Note: If you do not want to delete the client or patient, purge specific information from the records
instead. See “Purging Specific Types of Client or Patient Information” on page 452.
Before You Begin
• Process End of Year, if necessary. End of Year must be run before the database can be purged.
You must have entered one full year of data and processed at least two End of Year periods
before you can purge data.
• Check with your accountant to make sure your practice is complying with state and local
regulations regarding the length of time data should be kept.
• Review your Purging defaults to prevent you from purging recent client or patient information.
See “Purging Defaults” on page 130.
IMPORTANT: Back up your Cornerstone database.
To purge clients and patients and their records:
1. On the Tools menu, select Purge Data. A message appears to remind you to back up your
database before continuing. If you have backed up your database, click OK. The Select Type of
Purge dialog box appears.
2. Specify Purge both clients and patients and click OK. The Purge Information dialog box appears.
449
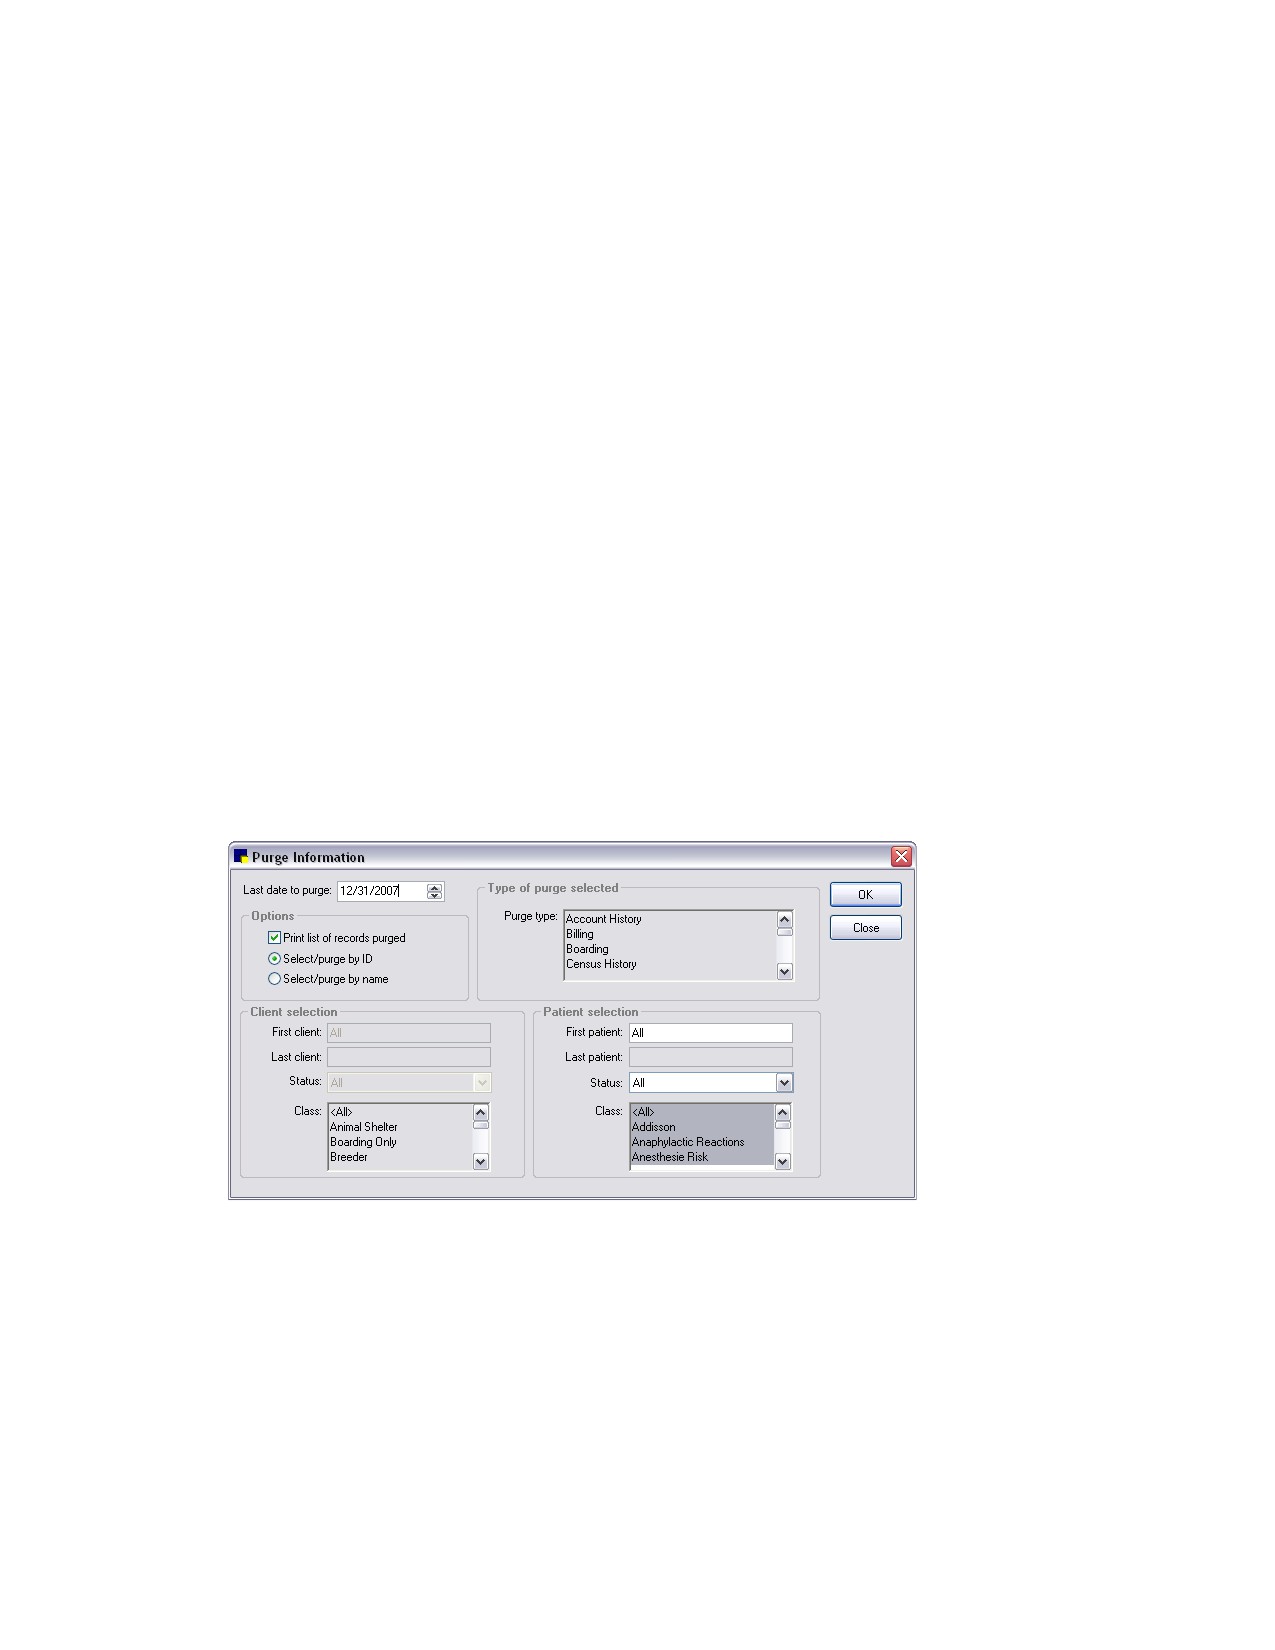
Chapter 29: Purging Data from Cornerstone*
Purge Information dialog box
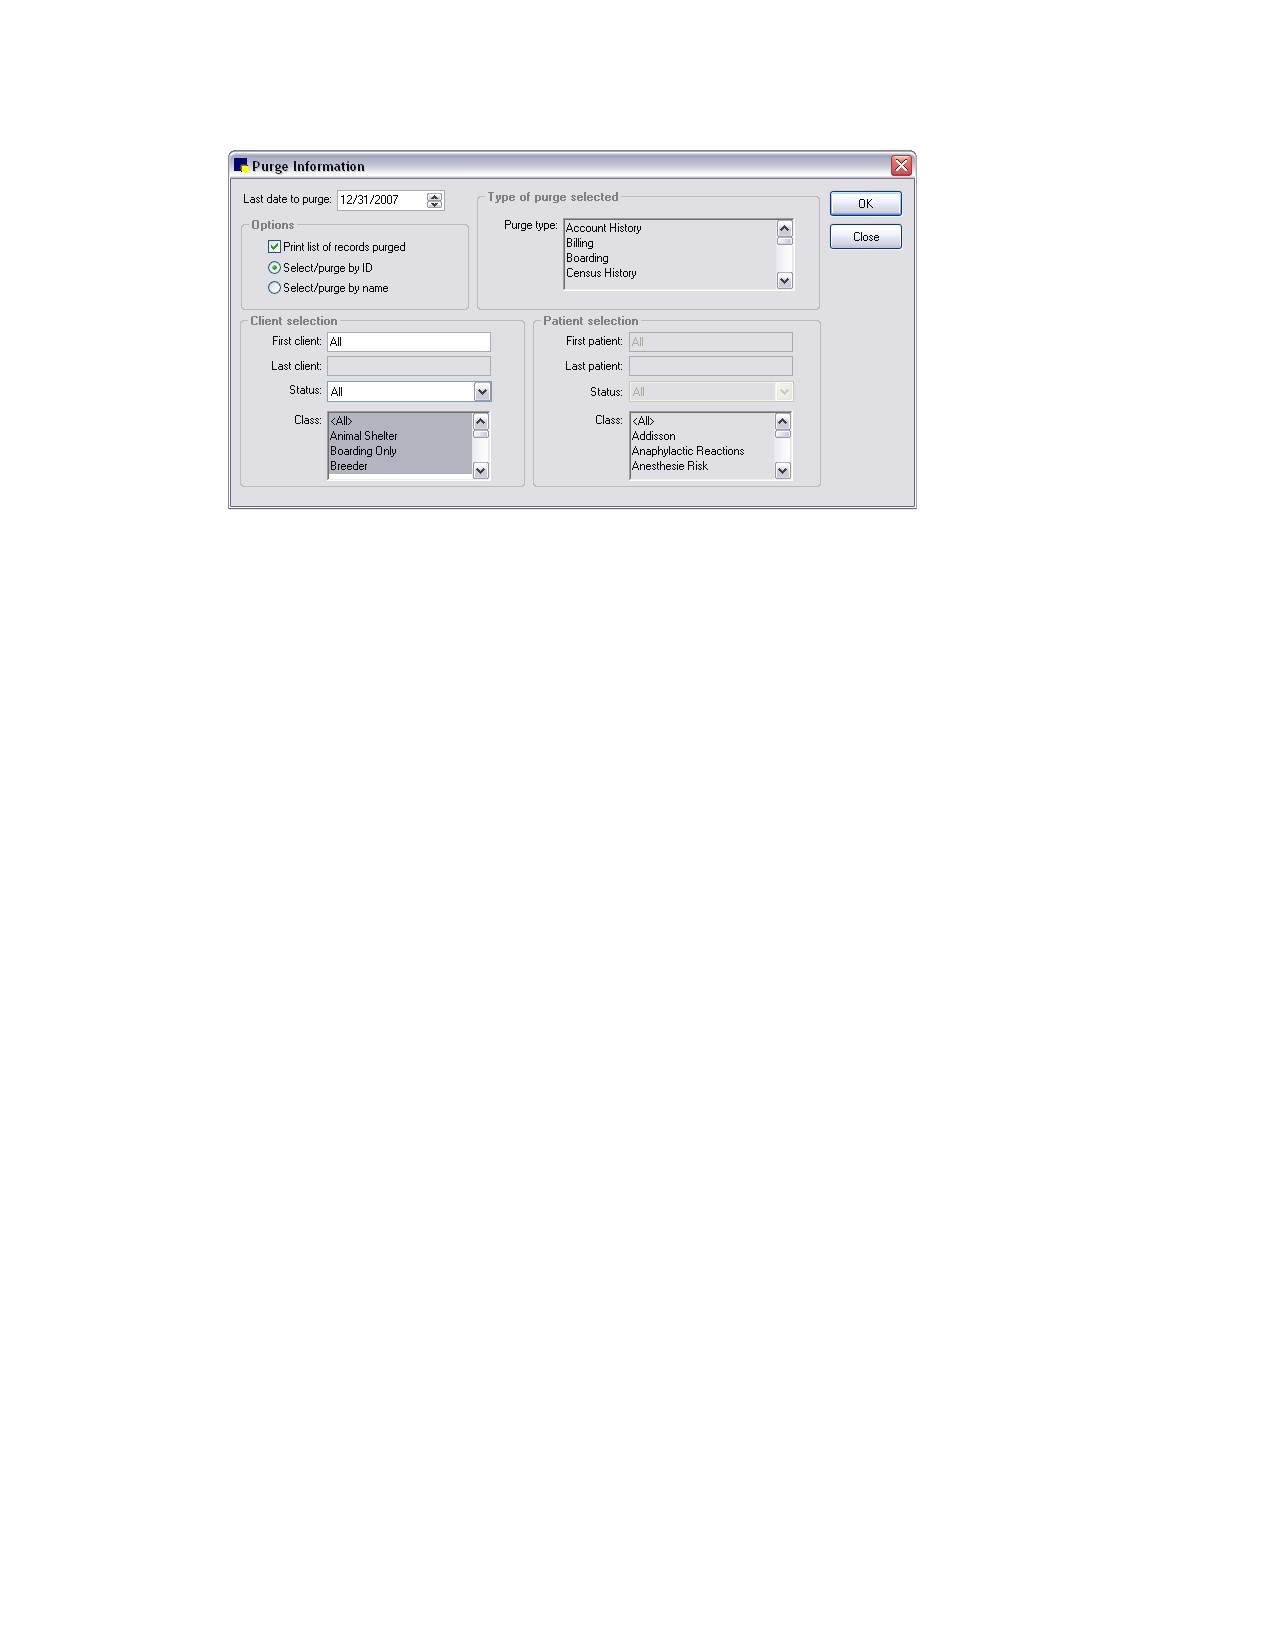
3. If necessary, change the Last date to purge. The date that appears by default is based on the
periods entered in purging defaults. You cannot purge data from a more current date than the
default period allows.
Note: If the records to purge contain both client and patient account information and reminders,
Cornerstone retains data using the oldest possible date from the defaults.
4. In the Options area, do the following:
• Select the Print list of records purged check box if you want to print a list of the records
purged.
• Specify whether to select the range of clients to purge by ID or by last name.
5. In the Client selection area, type the ID or last name (or part of the ID or name) of the first and last
client to delete.
Note: You can press F2 to use the Client List to choose a client.
6. Select the Status of clients to delete: Active, All or Inactive.
7. Select the Classifications of clients to delete. Select <All> to include all classifications.
8. Click OK.
9. If prescriptions for the patient exist, Cornerstone prompts you to save the refill information.
10. If the patient’s weight has not been updated after the selected date, Cornerstone prompts you to
retain the patient’s most recent weight.
11. If you decided to print a list of purged records, a message appears to inform you that Cornerstone
will print the purged history next. Click OK.
Note: Cornerstone does not print records purged for all types of information.
12. A message appears to inform you that the purge is now completed. Click OK.
13. If there is a reason a client or patient was not deleted, the reason is displayed in the Purge
Summary. Click Print to print the summary.
450
Chapter 29: Purging Data from Cornerstone*
Purging Patients
If you purge patients, Cornerstone will:
• Delete all records of the selected patient before the selected date.
• Delete the selected patient(s) from the Patient List.
Note: If you do not want to delete the patient, purge specific information from the patient records
instead. See “Purging Specific Types of Client or Patient Information” on page 452.
Before You Begin
• Process End of Year, if necessary. End of Year must be run before the database can be purged.
You must have entered one full year of data and processed at least two End of Year periods
before you can purge data.
• Check with your accountant to make sure your practice is complying with state and local
regulations regarding the length of time data should be kept.
• Review your purging defaults to prevent you from purging recent client or patient information.
See “Purging Defaults” on page 130.
IMPORTANT: Back up your Cornerstone database.
To purge patient records and patients:
1. On the Tools menu, select Purge Data. A message appears to remind you to back up your
database before continuing. If you have backed up your database, click OK. The Select Type of
Purge dialog box appears.
2. Specify Purge only patients and click OK. The Purge Information dialog box appears.
Purge Information dialog box
3. If necessary, change the Last date to purge. The date that appears by default is based on the
periods entered in the Purging Defaults. You cannot purge data from a more current date than the
default period allows.
Note: If the records to purge contain both patient account information and reminders, Cornerstone
retains data using the oldest possible date from the defaults.
451