IDEXX Cornerstone. Administrator’s Manual (8.3 NEXT version 8.3.6) - page 14
Chapter 21: End of Month Processing
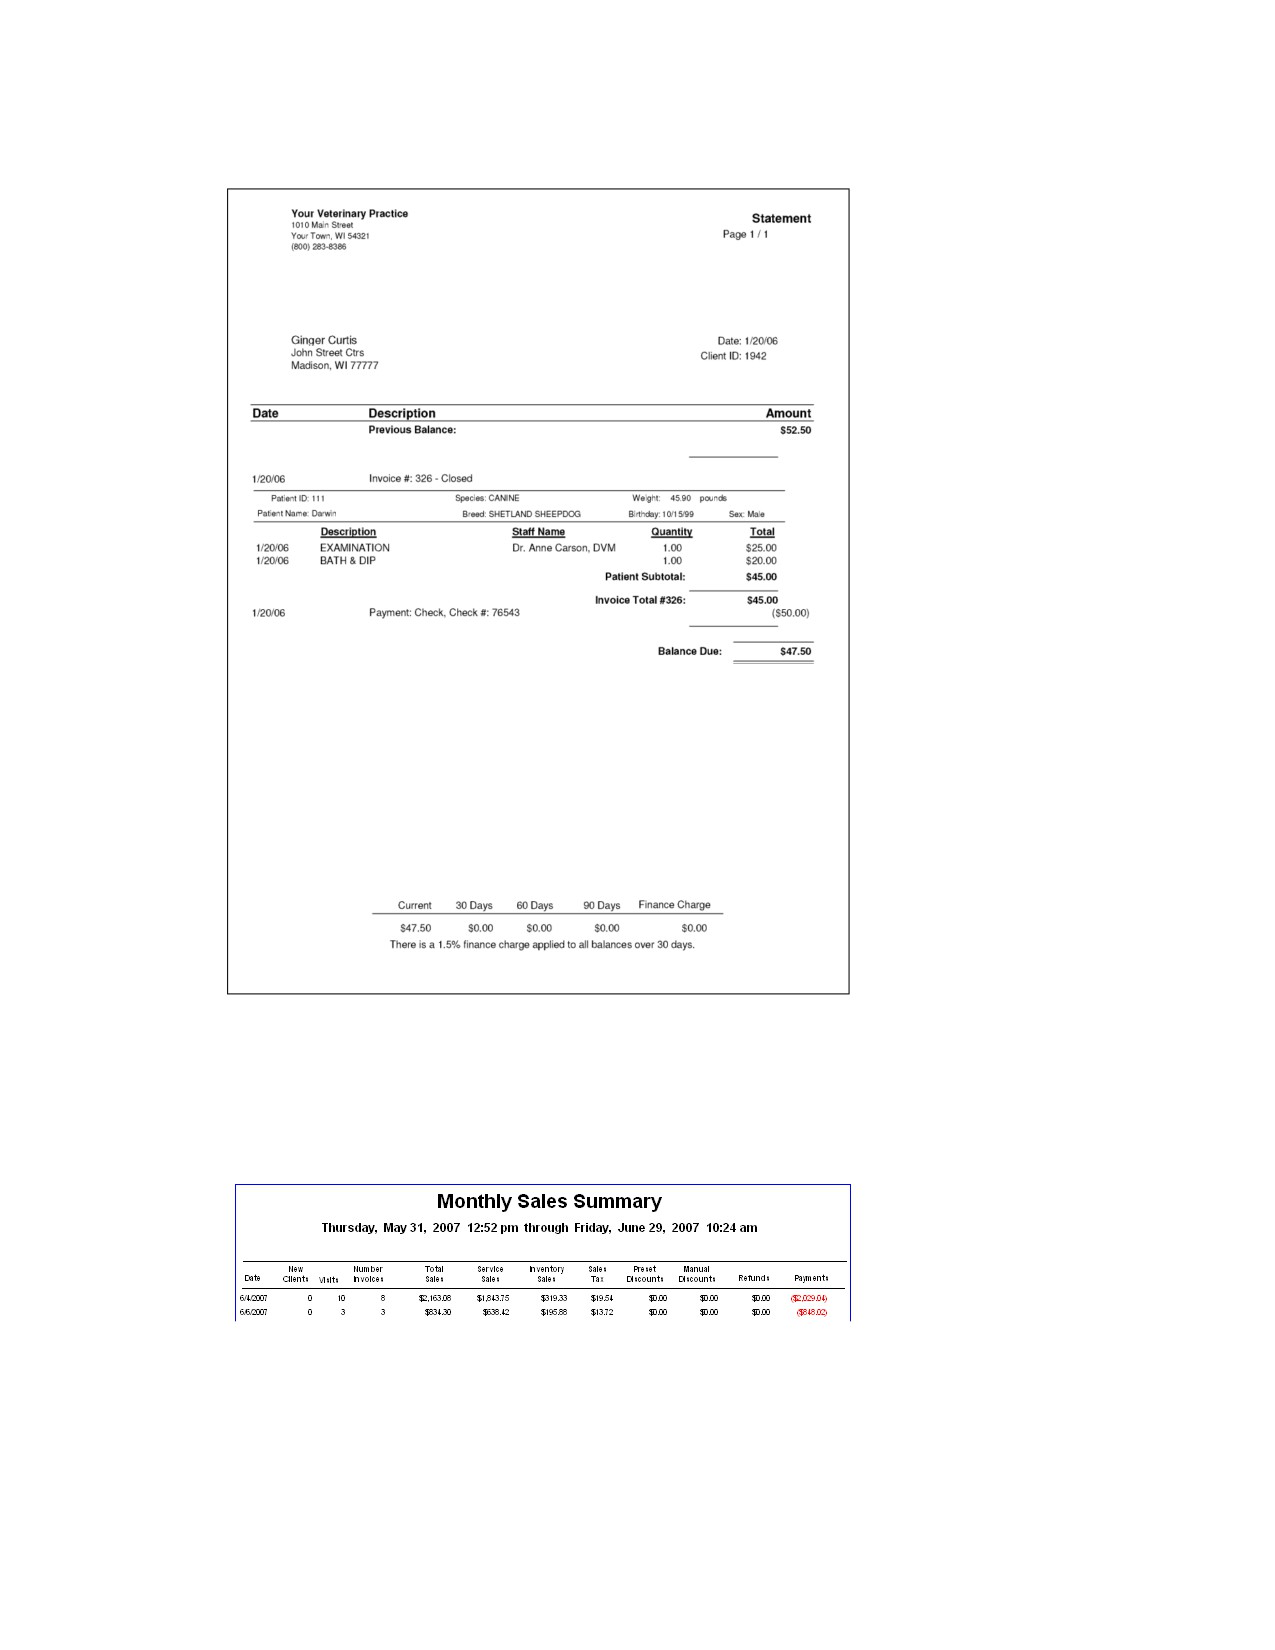
Sample Detailed Statement
Monthly Sales Summary
The Monthly Sales Summary displays sales information for each daily closing period. You can see total
sales as well as inventory and service item sales. The report also shows the sales tax collected in each
daily closing period.
392
Chapter 21: End of Month Processing
Monthly Sales Summary-By Practice
The Monthly Sales Summary-By Practice is available for those practices with the Multi-Location/Single
Database option enabled. This report is split out by practice and displays sales information for each
daily closing period. You can see total sales as well as inventory and service item sales. The report also
shows the sales tax collected in each daily closing period.
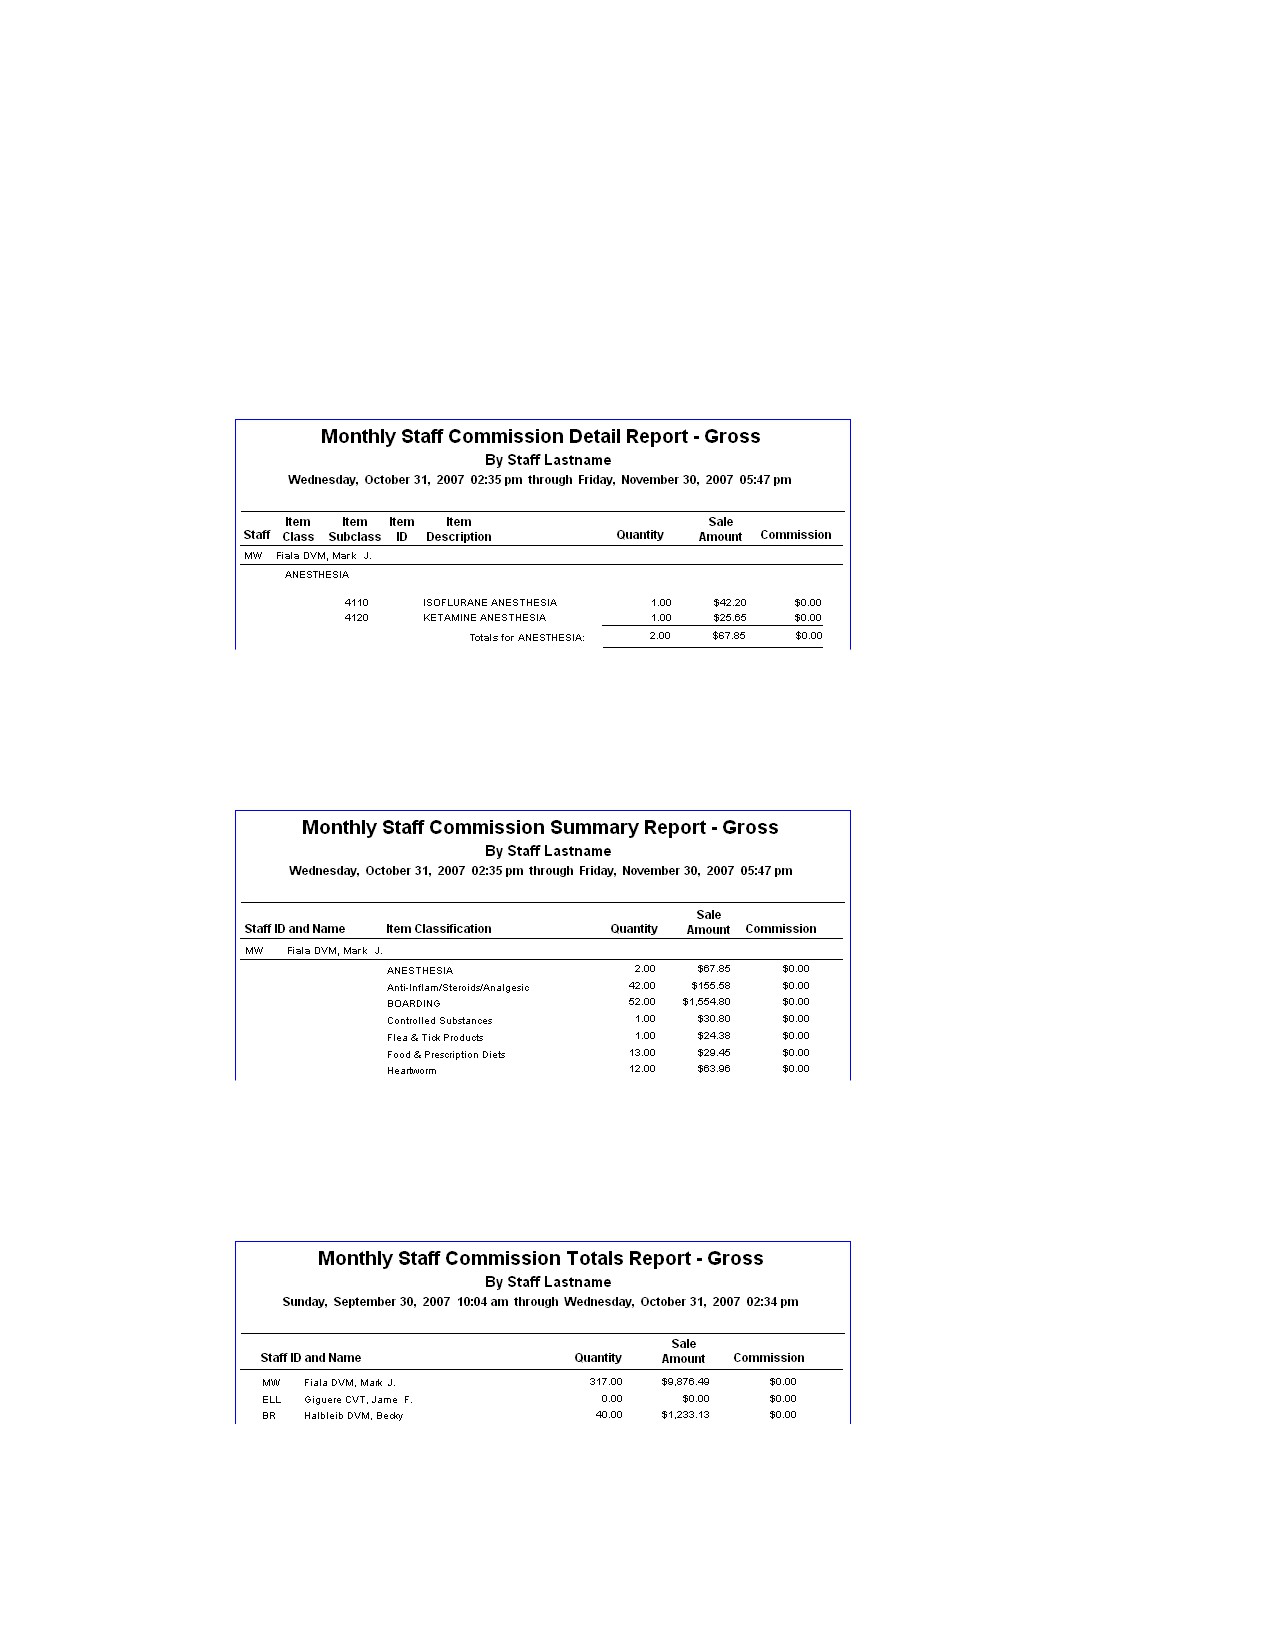
Monthly Staff Commission Detail Report-Gross or Net
The Monthly Staff Commission Detail Report shows the commission for staff members in detail by item
classification.
Monthly Staff Commission Summary Report-Gross or Net
The Monthly Staff Commission Summary Report shows the commission for staff members summarized
according to item classification.
Monthly Staff Commission Totals Report-Gross or Net
The Monthly Staff Commission Totals Report shows the total amount of sales and total amount of
commission credited to each provider.
393
Chapter 21: End of Month Processing
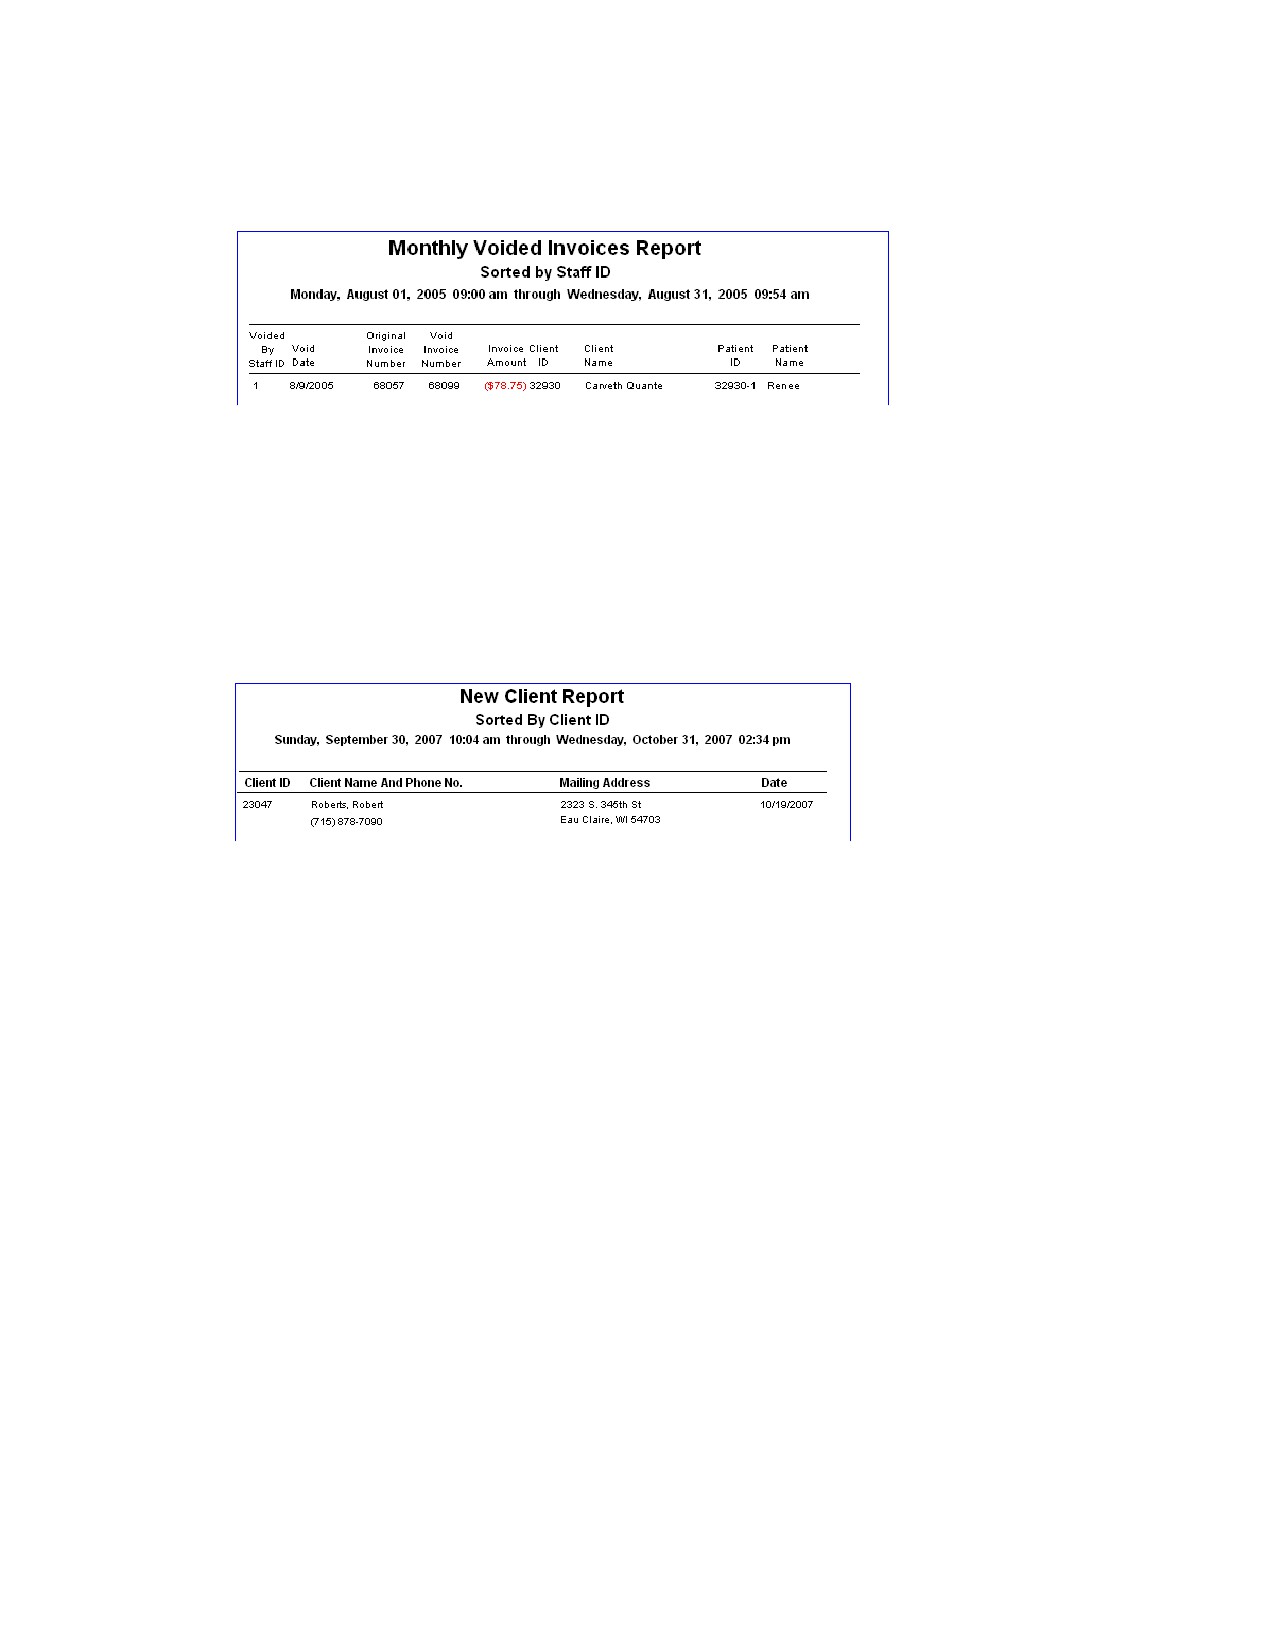
Monthly Voided Invoice Report-By Client ID, By Date or By Staff
This report lists invoices voided in a specific monthly period.
New Client Report-By Client ID or By Client Last Name
The New Client Report shows all of the new clients entered into Cornerstone during the selected monthly
period(s). This report can be sorted by client ID or last name.
You can save data from this report (using the Save As feature) to create mailing labels to send client
satisfaction surveys or other marketing materials.
Note: This report is also available as an End of Day report and End of Year report.
Along with the information on the EOD New Client Report, the EOM New Client Report shows the date the client was entered
into Cornerstone.
New Client Report-By Practice, Client ID or By Practice, Client Last Name
For those practices with the Multi-Location/Single Database option enabled, the New Client Report-By
Practice shows all of the new clients entered into Cornerstone by practice during the selected period(s)
based on the client home practice. This report can be sorted by client ID or last name.
You can save data from this report (using the Save As feature) to create mailing labels to send client
satisfaction surveys or other marketing materials.
Note: This report is also available as an End of Day report and End of Year report.
394
Chapter 21: End of Month Processing
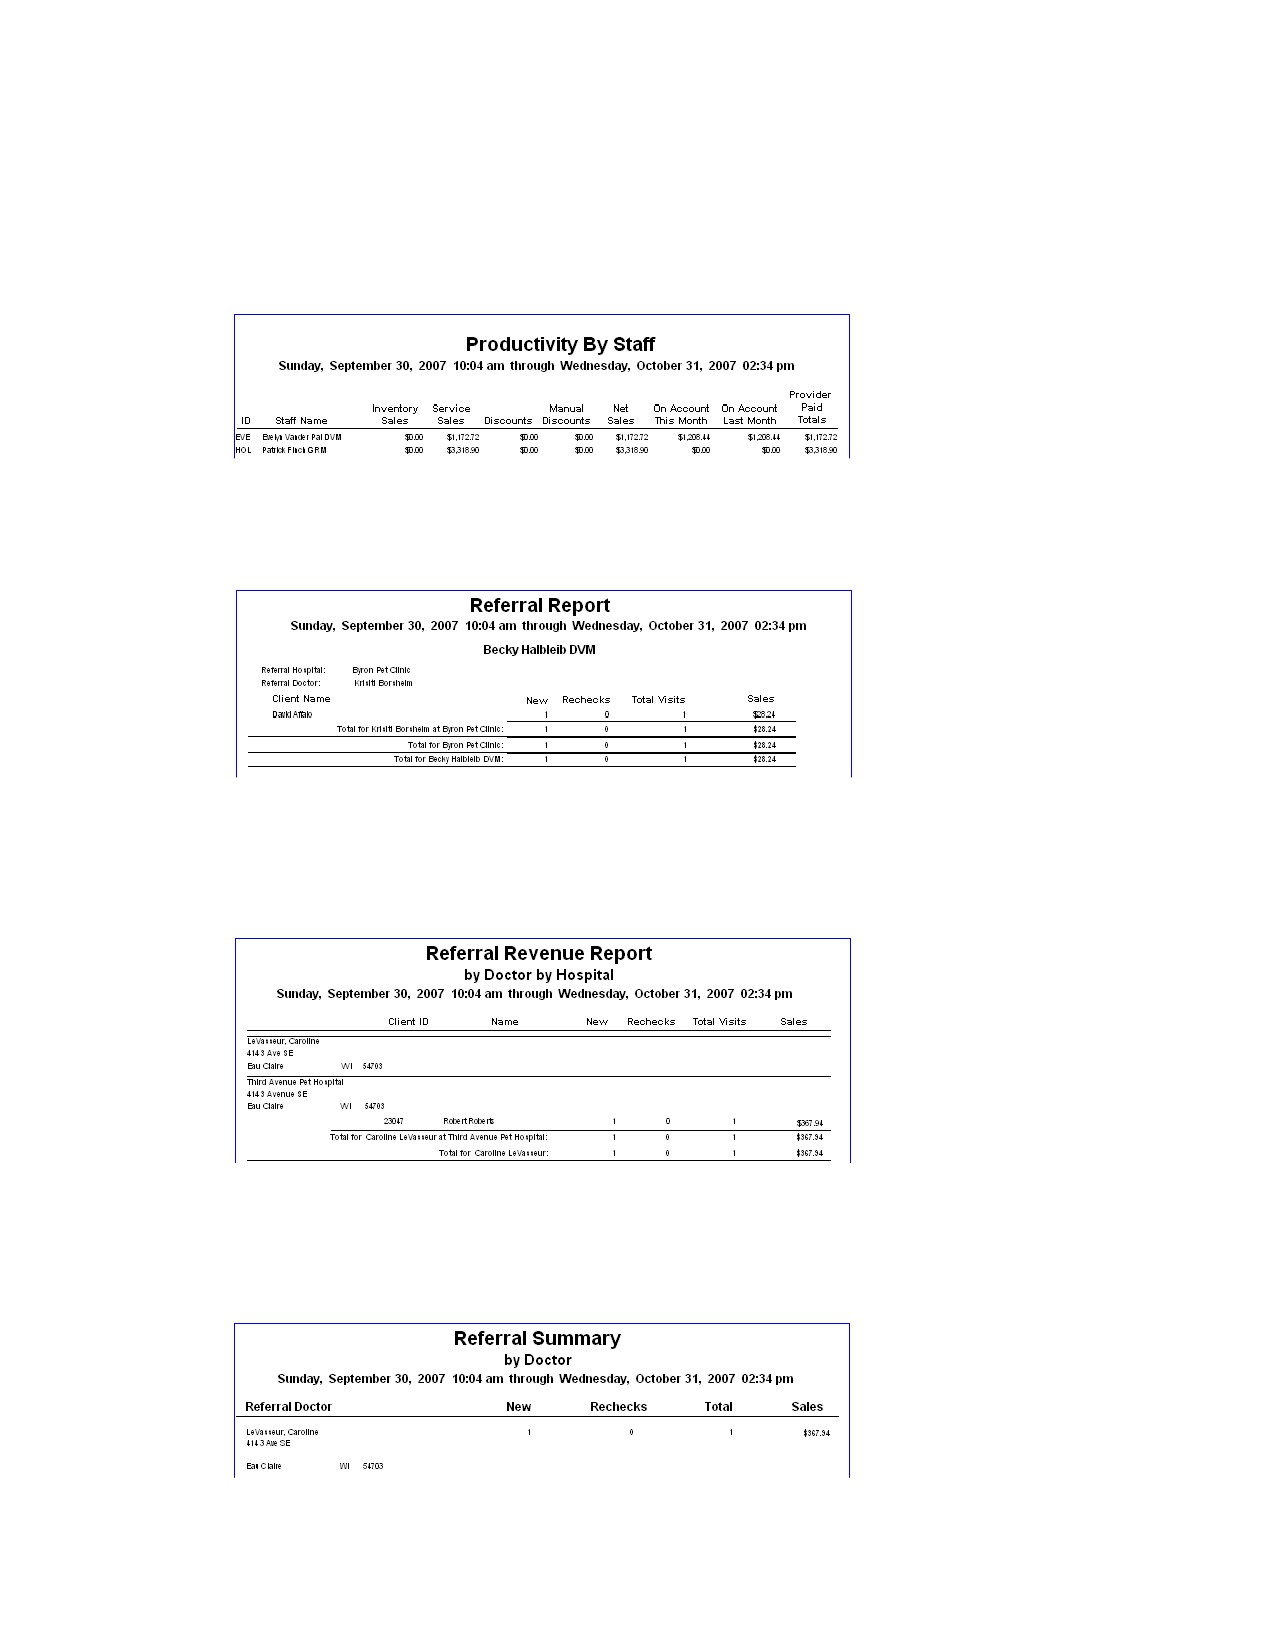
Productivity by Staff Report
The Productivity by Staff report contains the sales totals for the month and each provider’s paid sales
total. In order for this report to print with accurate information, you must run your End of Month
processing before printing. You must set the A/R by provider settings in Invoice defaults in order to
see/run this report. For more information, see “Invoice Defaults” on page 112.
Referral Report-by Staff
The Referral Report shows the work done by a staff member of your practice for another hospital.
Referral Report-Doctor by Hospital or Hospital by Doctor
The Referral (Revenue) Report shows the work done by your practice for another hospital, separated by
client.
Referral Summary-by Doctor
The Referral Summary-by Doctor report lists referral doctors and shows the amount of work and sales
each referral doctor generated for your practice.
395
Chapter 21: End of Month Processing
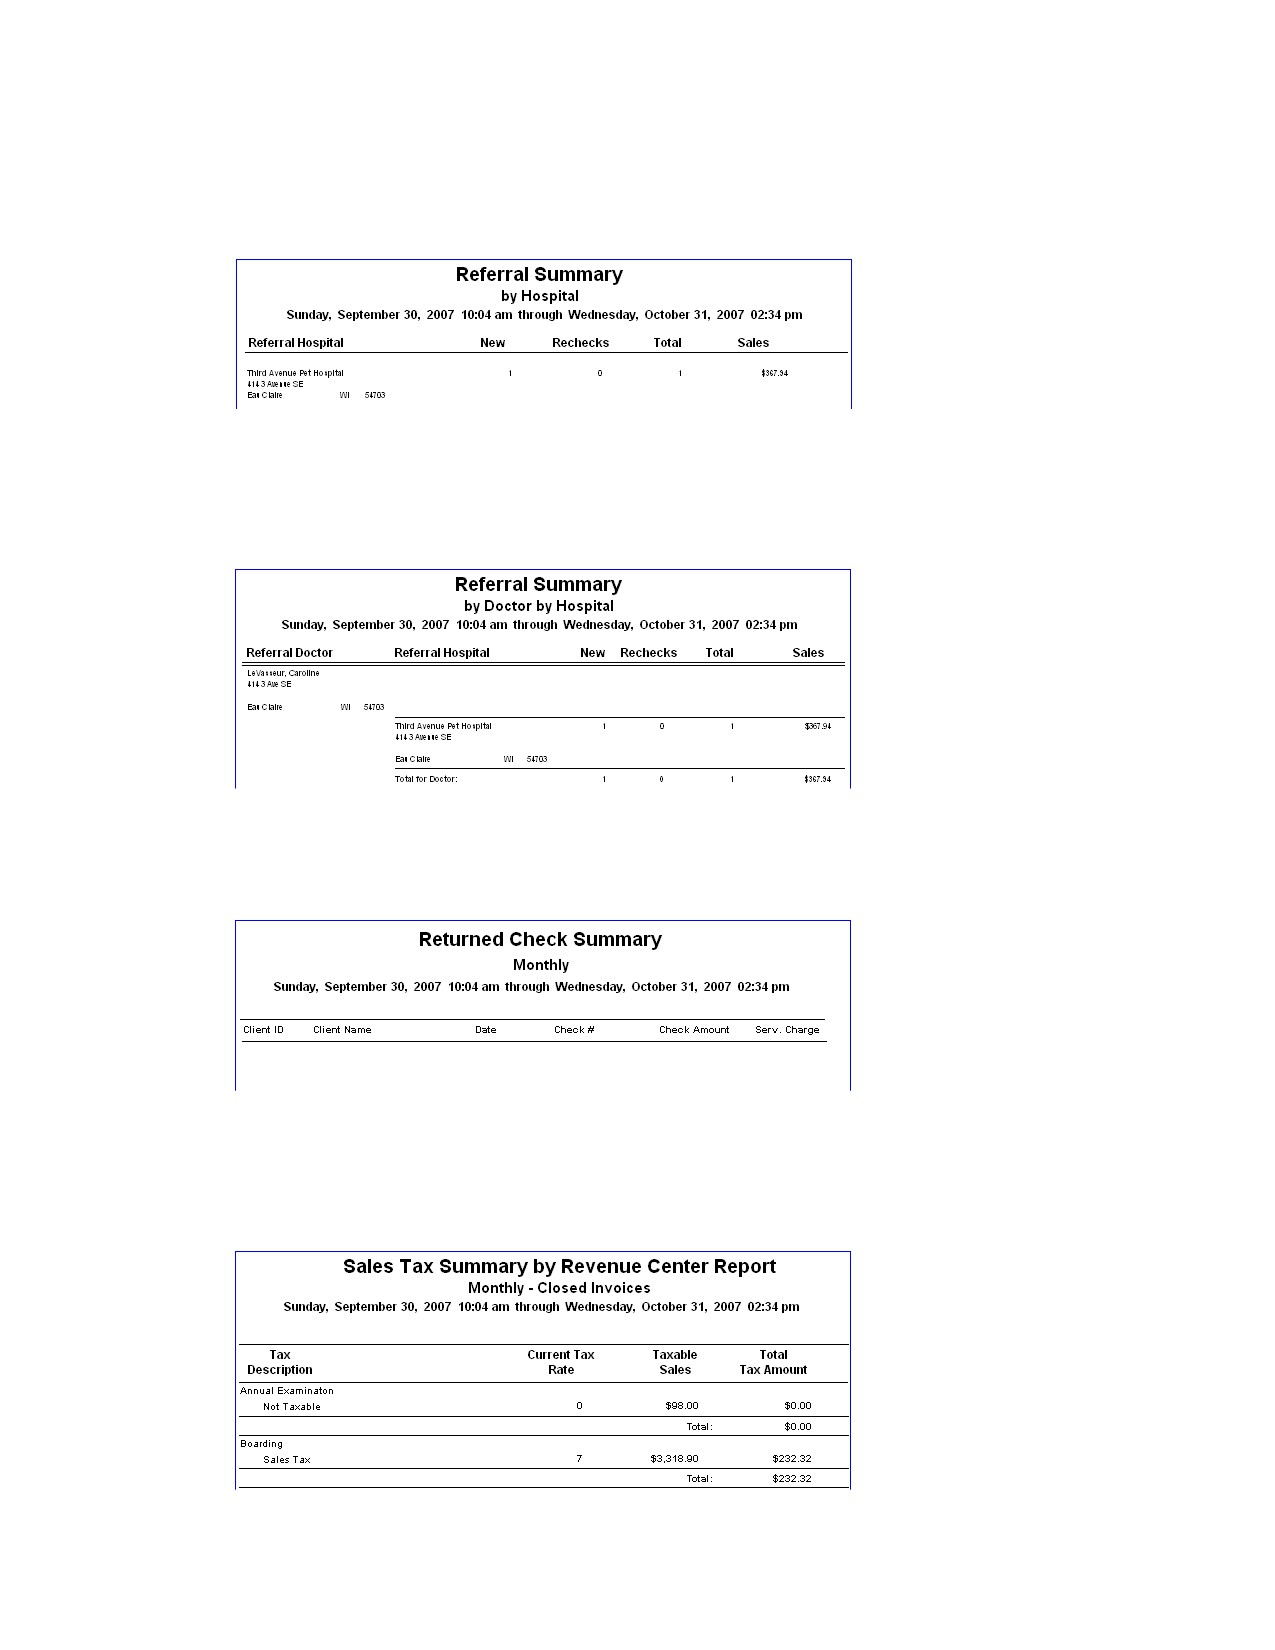
Referral Summary-by Hospital
The Referral Summary-by Hospital report lists referral hospitals and shows the amount of work and
sales each referral hospital generated for your practice.
Referral Summary-Doctor by Hospital or Hospital by Doctor
The Referral Summary report shows the total amount of work done for another hospital by your practice.
This report can be sorted by staff class or staff ID.
Returned Check Summary
Use the Returned Check Summary to follow up on amounts that need to be recovered.
Sales Tax Summary by Revenue Center
This report shows how much sales tax was collected during the month by revenue centers. Sale tax
amounts display for each revenue center at your practice.
396
Chapter 21: End of Month Processing
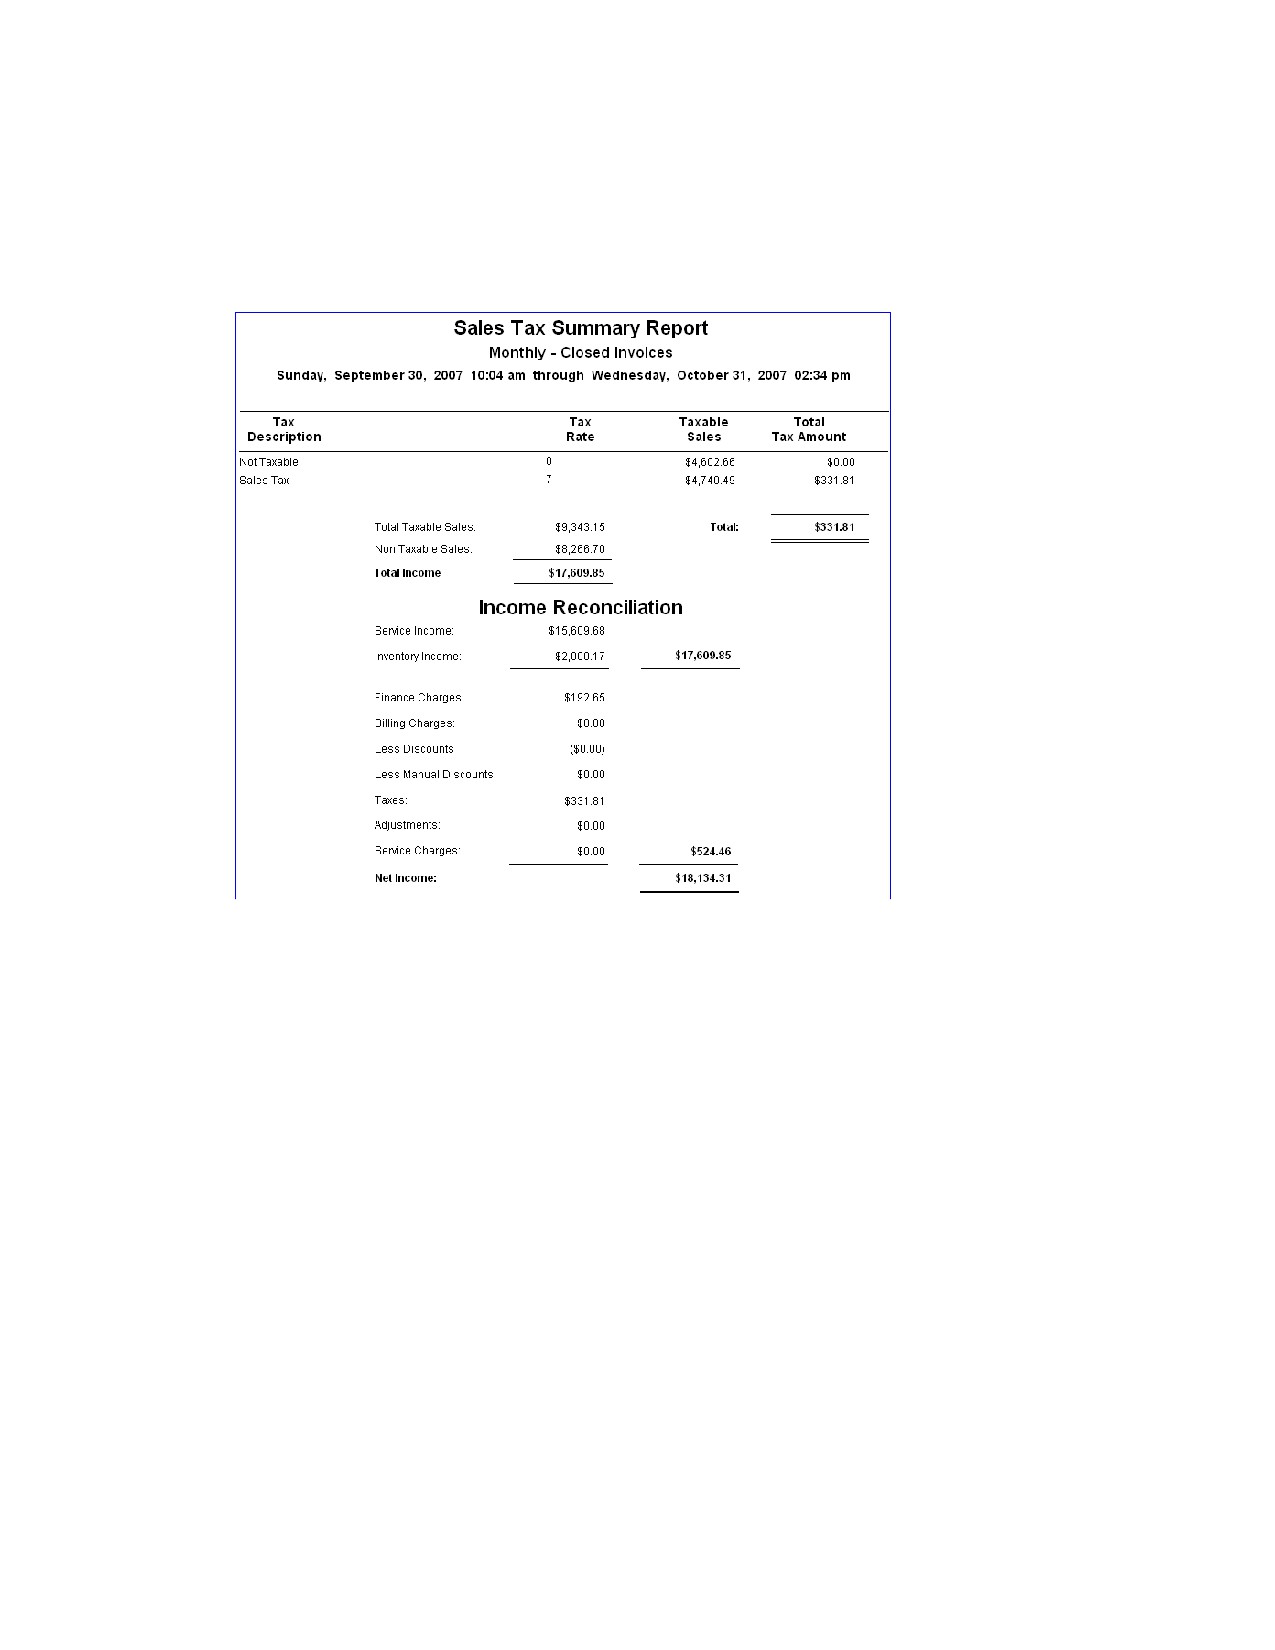
Sales Tax Summary/Income Reconciliation-Closed Invoices
The Sales Tax/Income Reconciliation report gives you a quick summary of your income for the selected
monthly period(s). Sales are broken out into taxable sales and nontaxable sales.
Note: This report is also available as an End of Year report.
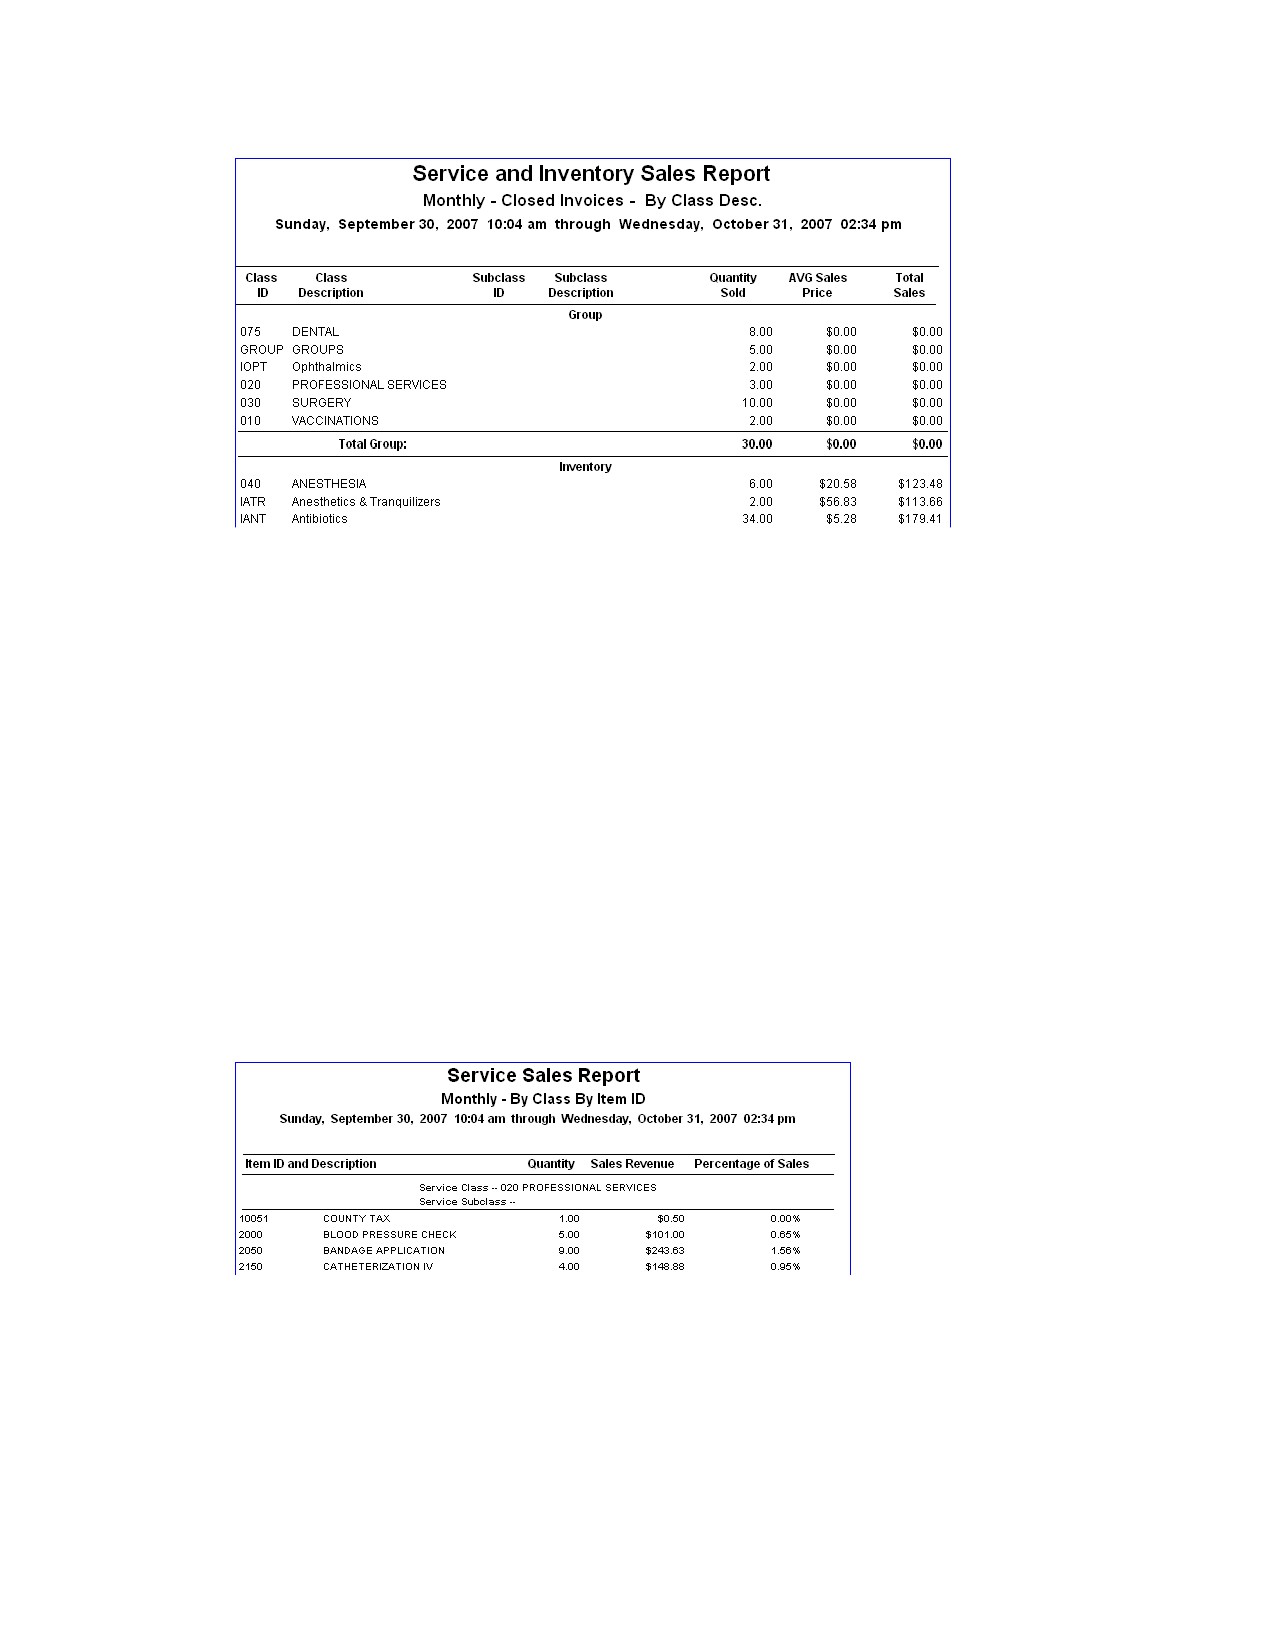
Serv. and Inv. Sales - Closed Inv.-By Class Desc. or By Class ID or By Staff ID or By Staff
Last Name
The Service and Inventory Sales report quickly shows you the most common procedures performed, the
top medications sold and the supplies used in your practice during the selected monthly period(s).
Because the Service and Inventory Sales report can be a very large report, Cornerstone displays the End
of Period Filters dialog box so you can enter a range of information to print. You can print a range by
class ID and subclass ID. If you are sorting by staff ID or staff last name, you can also use the range
staff ID. For more information on filtering information in reports, see “Chapter 5: Reports” in the
Cornerstone User’s Manual.
Note: This report is also available as an End of Day report.
397
Chapter 21: End of Month Processing
Serv. And Inv. Sales by Revenue Center-By Class Desc. or By Class ID or By Staff ID or
By Staff Last Name
The Service and Inventory Sales by Revenue Center report shows the monthly sales broken down by
revenue center.
Serv. Sales Report-Closed Invoices-By Class By Desc. or By Class By ID
The Service Sales Report shows the sales revenue from service items. Use this report to see which
service items are generating the most sales.
Like the Service and Inventory Sales report, the Service Sales Report can also be a very large report;
Cornerstone displays the End of Period Filters dialog box so you can enter a range of information to
print. You can print a range by class ID, invoice item description, invoice item ID and subclass ID. For
more information on filtering information in reports, see “Chapter 5: Reports” in the Cornerstone User’s
Manual.
Note: This report is also available as an End of Year report.
398
Chapter 21: End of Month Processing
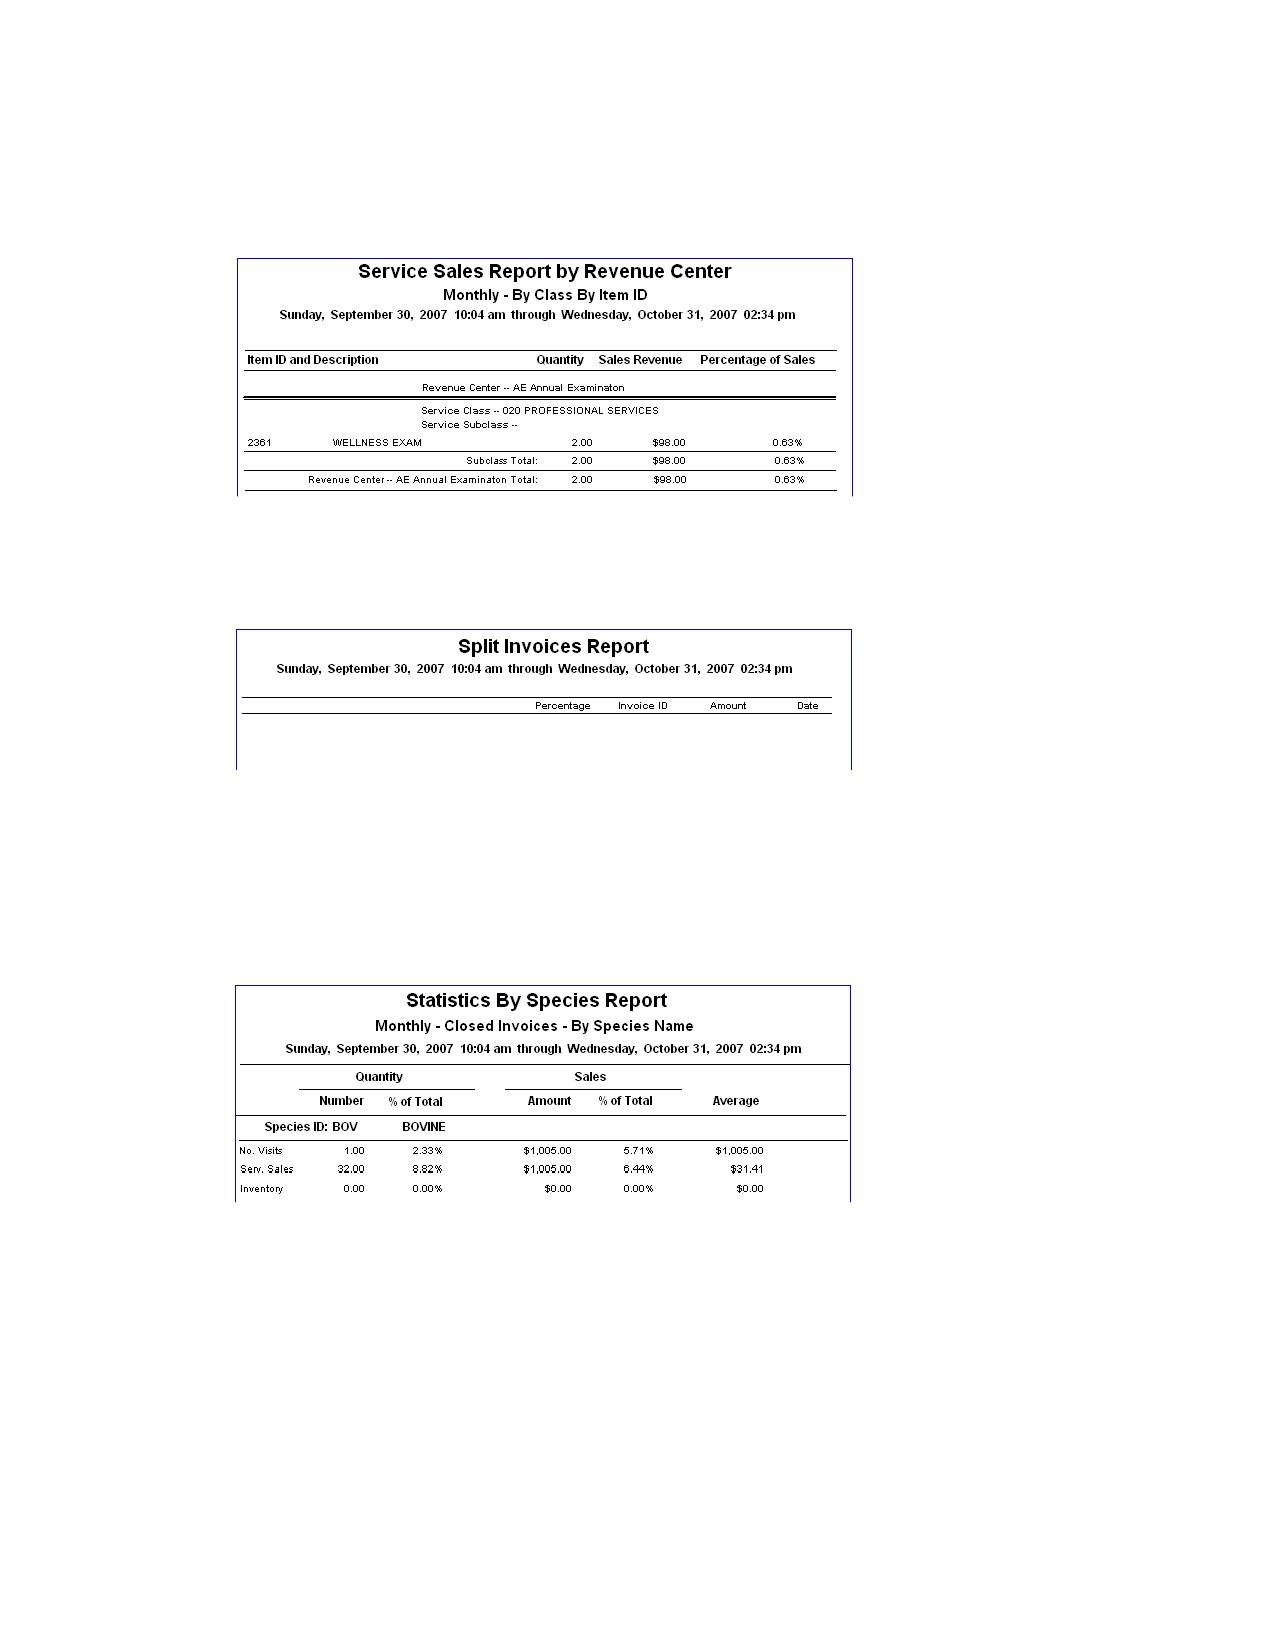
Serv. Sales Report by Revenue Center-By Class by Desc. or By Class by ID
The Service Sales Report by Revenue Center shows the services performed during a monthly period
broken down into your practice’s revenue centers.
Split Invoices Report
The Split Invoices Report shows a list of all invoices divided for split billing purposes during the month.
Statistics By Species Report-Closed Invoices
The Statistics By Species Report shows sales activity for each species invoiced during the selected
monthly period(s).
Note: This report is also available as an End of Day report and End of Year report.
399
Chapter 21: End of Month Processing
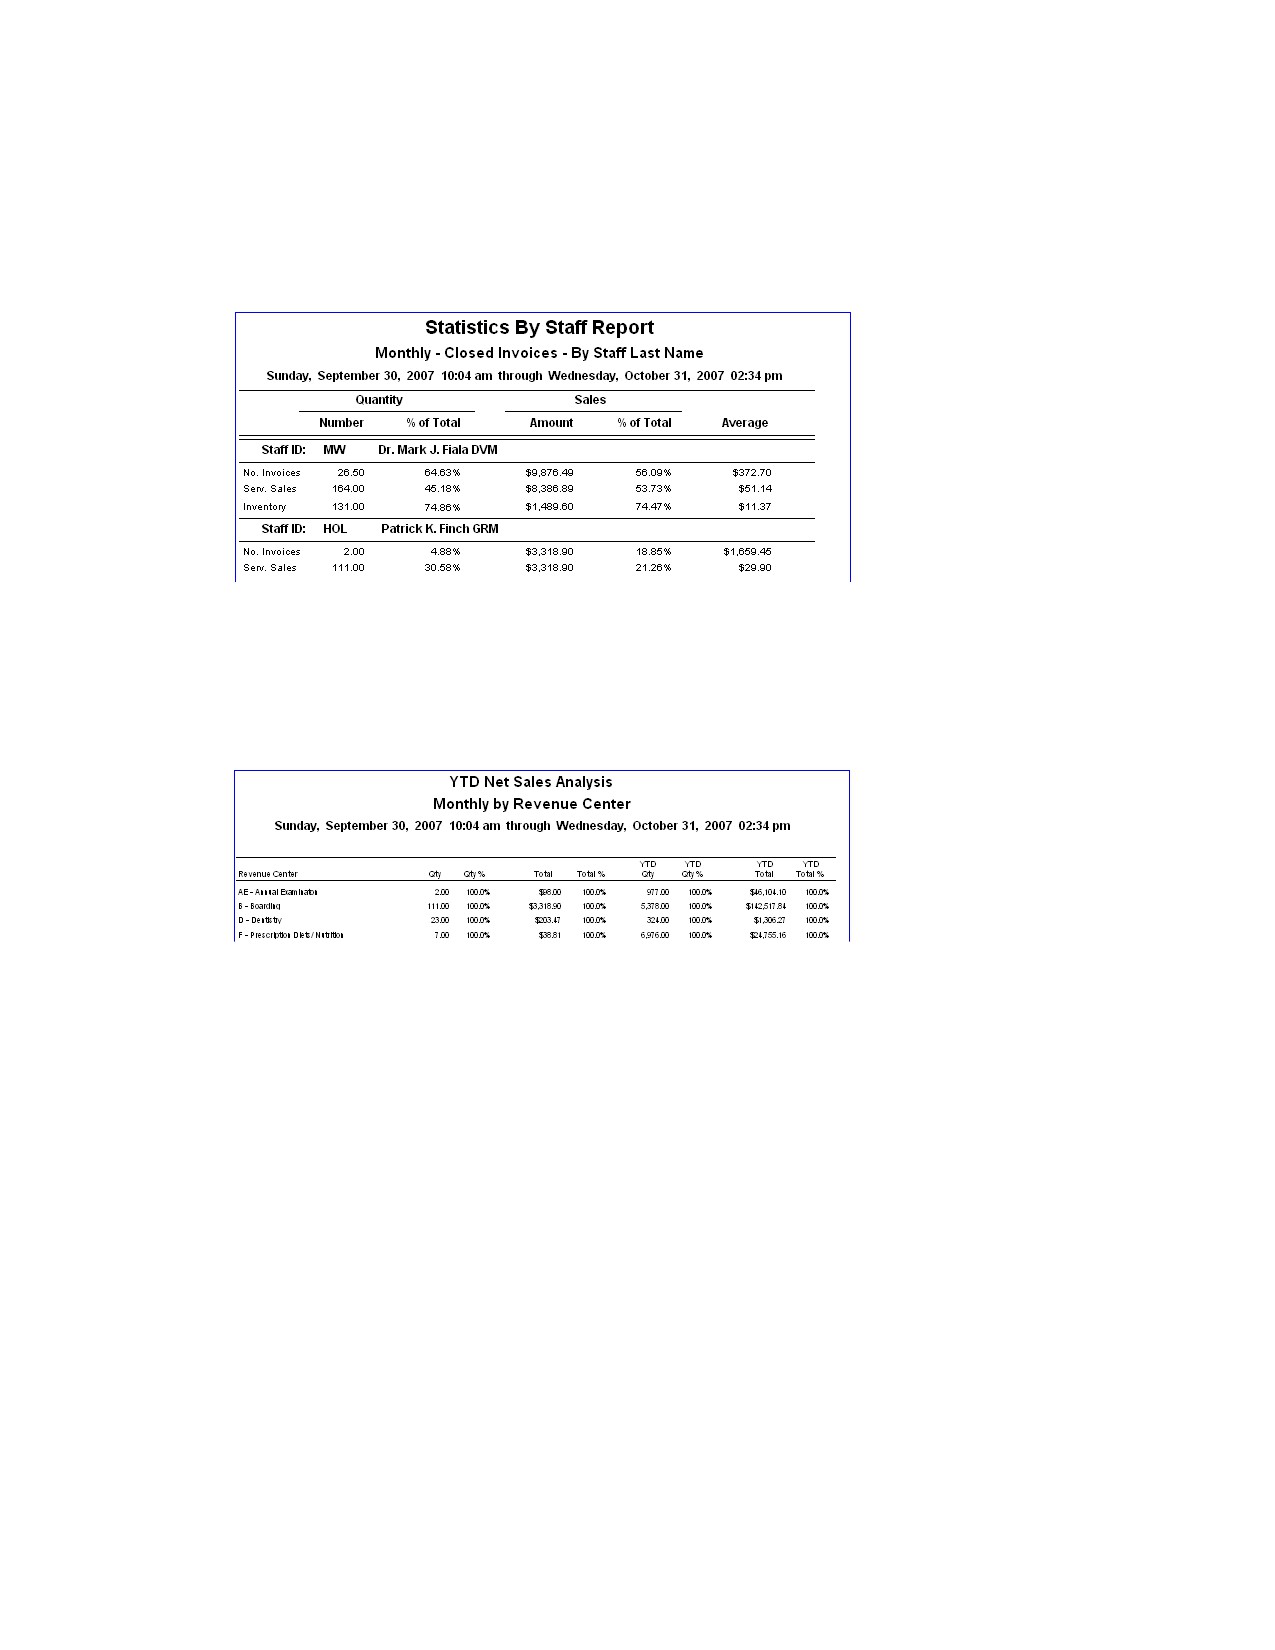
Statistics by Staff Report-Closed Invoices
The Statistics By Staff Report shows the sales activity for each staff member. This report is also available
as an End of Day and End of Year report.
Note: This report is also available as an End of Day report and End of Year report.
YTD Net Sales Analysis Report-By Revenue Center, Class, Staff, and Type
This report prints your net sales by revenue center, class, staff (provider) and type with an option to print
detail by invoice item. The report can be sorted by subclass and item ID. You can print the report by
providers with each provider’s net sales printed on a separate page.
Printing Monthly Invoices and Statements
You can print monthly statements and copies of the invoices closed during the monthly period closing.
Printing invoices is useful if you want to include newly closed invoices with the clients’ statements.
IMPORTANT: Selecting the option to apply a billing charge when printing a statement in the current
monthly period will apply a billing charge each time you choose to print. Once you have chosen to print
the monthly statements, even if you cancel the print job, any billing charges are still applied.
Note: Cornerstone does not automatically print statements for clients with credit balances. See “Printing
Statements for Clients with Credit Balances” on page 402 for instructions on printing these statements.
Before You Begin
• Set End of Period defaults (see “End of Period Defaults” on page 102).
• Set Statement Print Options defaults (see “Statement Print Options Defaults” on page 132).
• Assign the printer to print the monthly invoices and statements (File > Printer Assignment >
End of Month, and make sure Monthly Invoices and Statements is highlighted for the
applicable printer).
400
Chapter 21: End of Month Processing
• Make sure the appropriate clients are set up to receive finance charges and billing charges
(Lists > Clients > Update > A/R Information tab).
Tip: Cornerstone allows you to change where the practice and client addresses print on the statement,
which is helpful if you use window envelopes to mail statements. See “Statement Print Options Defaults”
on page 132 for information on positioning the statement addresses.
To print monthly invoices and/or statements for all applicable clients:
1. On the Reports menu, select Find a Report. The Report Search window appears.
2. In the Reports list, click the plus sign to the left of End of Month, and then select Monthly Invoices
and Statements.
3. Click Create report. The Daily Reports dialog box appears.
4. Under Monthly periods, select the most recent month that was processed, or if you are processing
mid-month statements, select Current. Cornerstone will create a statement for all accounts with
balances greater than or equal to the billing threshold within this period.
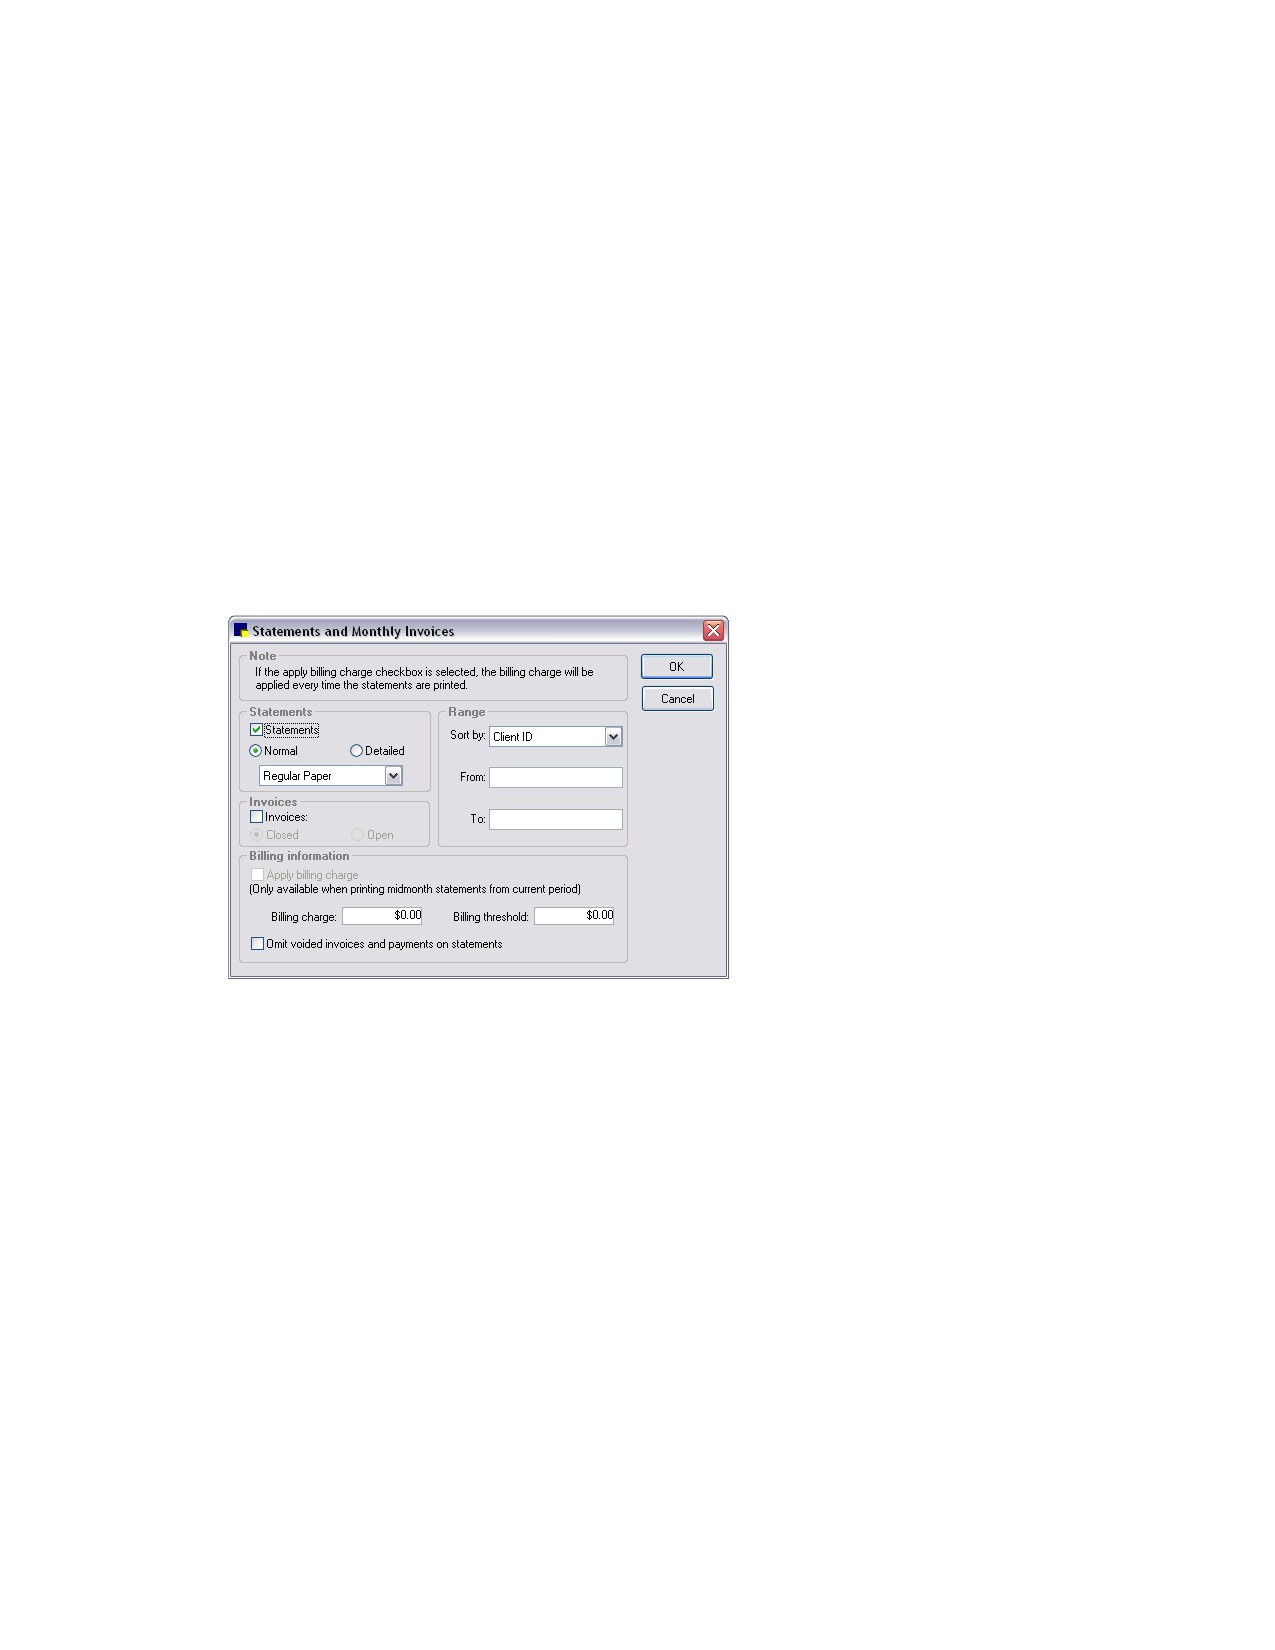
5. Click Print. The Statements and Monthly Invoices dialog box appears.
Statements and Monthly Invoices dialog box
6. If you plan to print monthly statements, select the Statements check box and specify the type of
statement to print:
• Normal prints a standard statement. Paper options include Regular Paper if you plan to print
on blank paper, or Preprinted Statement Paper if you purchase special paper for statements
(especially designed for open window envelopes).
• Detailed prints the invoice details (provided services, prescribed drugs, etc.) and breaks out
taxes by tax type. (Large animal practices may find this especially useful.) Printing options
include By Invoice Number or By Invoice Date (prints the invoice details by the date the
invoice was saved).
Note: See “Monthly Invoices and Statements” on page 391 to view samples of Normal and Detailed
statements.
Tip: To change the placement of the client address or practice address on monthly statements, see
“Statement Print Options Defaults” on page 132. To change the placement of the client address or
practice address on invoices, see “Invoice Address Defaults” on page 114.
401
Chapter 21: End of Month Processing
7. If you selected Normal statements, select the Invoices check box if you want to print the invoices
that were closed by End of Month processing (the Invoices check box is available only if you are
printing Normal statements).
8. If you selected the Invoices check box, specify whether you want to print Closed or Open invoices.
Note: Open invoices can be printed only for the current period.
9. Multi-Location/Single Database configuration only: In the Range area, select the applicable practice
from the Practice drop-down list.
10. In the Range area, specify how you want to sort your statements. You can sort by Client ID or Client
Name. You can also type a range of statements and invoices to print. Enter the range in the From
and To text boxes.
11. In the Billing information area, set your practice’s billing preferences:
a. If you want to add a billing charge for the current period (or when you close End of Month),
select the Apply Billing Charge check box.
b. If applicable, enter the applicable Billing charge and Billing threshold. (The Billing Threshold is
the minimum balance an account must have before Cornerstone will print the statement.)
c. If you want to omit voided invoices when printing monthly statements and invoices, select the
Omit voided invoices and payments on statements check box. If this option is selected, note
that a voided invoice will be omitted only if the original invoice is also part of the current
statement. If the original invoice was included in a prior Month-End period that is not selected,
the voided invoice will be included in the current statement (regardless of the Omit voided
invoices setting).
12. Click OK to print your statements.
To print monthly invoices and/or statements for a specific client:
1. On the Reports menu, select Find a Report. The Report Search window appears.
2. In the Reports list, click the plus sign to the left of End of Month, and then select Monthly Invoices
and Statements.
3. Click Create report. The Daily Reports dialog box appears.
4. Under Monthly periods, select the most recent month that was processed, or if you are processing
mid-month statements, select the Current period.
5. Click Preview. The Statements and Monthly Invoices dialog box appears.
6. Follow steps 6-11 in the previous section to set your practice’s preferences for printing monthly
statements and invoices.
7. When you have completed all settings on the Statements and Monthly Invoices dialog box, click OK.
The EOM Invoices and Statements dialog box appears.
8. Select a client from the list and click OK. The Reports Preview window displays the statement for the
selected client.
9. Click Print to print the statement, click Save to save the statement data to a file or click Cancel to
return to the EOM Invoices and Statements dialog box.
Printing Statements for Clients with Credit Balances
Cornerstone does not automatically print statements for clients with credit balances. However, you can
create a statement for a client with a credit balance using the following instructions.
402
Chapter 21: End of Month Processing
Before You Begin
¾ Run your statements as usual, printing statements for clients who have a balance greater than $0.
(Enter $0.00 as the Billing Threshold).
To create statements for clients with credit balances:
1. On the Reports menu, select Find a Report. The Report Search window appears.
2. In the Reports list, click the plus sign to the left of End of Month, and then select Accounts
Receivable Report (either By Client ID or By Client Name). The Accounts Receivable Report lists
clients with credit balances.
3. Click Create report. The Daily Reports dialog box appears.
4. Under Monthly periods, select the applicable monthly period and click Print.
5. On the Accounts Receivable Report, note the client IDs of the clients with credit balances. The client
IDs will be needed in order to print statements with credit balances.
6. On the Monthly Reports dialog box, under Monthly periods, again ensure that the appropriate
monthly closing period is selected.
7. Select Monthly Invoices and Statements. Make sure this is the only highlighted report.
8. Click Print. The Statements and Monthly Invoices dialog box appears.
9. In the Range area, select Client ID from the Sort by drop-down list.
10. Enter the Client ID in the From and To text boxes.
11. Press the TAB key until the cursor is in the Billing Threshold text box and then type -999.
12. Press TAB.
13. Click OK to print a statement.
14. Repeat steps 9-13 for each statement you want to print.
403
Chapter 22: End of Year Processing
Overview
When End of Year (EOY) is processed, the IDEXX Cornerstone* Practice Management System:
• Processes the records for the yearly period.
• Totals the monthly records to create the yearly totals.
• Resets the current yearly period to zero.
It is easy to track EOY periods because the Cornerstone software records the date and time with each
closing.
IMPORTANT: It is imperative for your practice to have a good backup procedure in place. Backups
provide security against the unlikely chance that files are lost or destroyed. As an added safety
precaution, you should remove the most recent backup from the practice or place it in a DATA-
Rated fireproof safe.
We recommend performing a database backup before performing End of Year processing. For
backup instructions, see the original documentation that came with your backup software.
If you have questions about your backup procedure or how to verify that your backup was
successful, contact Cornerstone Support at 1-800-695-2877. Do not take chances with your practice
data.
Note: If your practice uses compatible backup software, you can set up Cornerstone to
automatically verify your backup using the Cornerstone Backup Verification Assistant. (See “Chapter
28: Using the Backup Verification Assistant” beginning on page 446 for more information.)
Notes on End of Year processing:
• You do not have to process End of Year on December 31. The important thing is to maintain a
consistent pattern of closing periods.
• When End of Year is processed, all transactions since the previous End of Year up through the
current date are included.
• Before processing End of Year, we suggest that you print the Inventory Cost Report. This
report lists current quantity on hand and the current total cost (value) of your inventory. If your
practice is not taking a physical inventory at the end of the year, we recommend that you print
this report to obtain the value of your ending inventory.
Note: Because the Inventory Cost Report is a snapshot of the data at the time you print the report,
you should print it before you start invoicing for the next yearly period. After that point, you will not be
able to reprint the report showing the End of Year data (as the current year figures will be calculated
with the previous year figures to give you the current cost of your inventory).
• You do not need exclusive use to process End of Year. However, staff will not be able to post
invoices or save changes to any window that modifies a client’s account. If a user tries to modify
a client’s account, a message warns the user to wait until the End of Year processing is finished.
Once the End of Year processing is complete, the user can continue.
404
Chapter 22: End of Year Processing
Performing End of Year Processes
Before You Begin
• Perform all invoicing for the year and process End of Day and End of Month as usual. Be sure to
perform End of Month processing immediately before processing End of Year.
• Perform a yearly backup and store your backup in an off-site location for an extended period of
time (for accounting purposes).
• Ensure that EOY defaults have been set up (see “End of Period Defaults” on page 102).
• Verify that the EOY reports are accurate, and fix any discrepancies prior to processing End of
Year.
To process End of Year:
1. On the Activities menu, select End of Period > End of Year.
2. An End of Period warning message appears. Read the message and click OK. (To prevent this
message from appearing in the future, clear the Show Message check box.)
The Yearly Period Closing dialog box appears.
3. In the Notes text box, enter any details for this EOY closing and include your name or initials.
4. Click OK.
5. In the confirmation window, click Yes to process End of Year.
6. Depending on the version of Cornerstone installed, a Database Copy window may appear. If it does,
click Yes.
7. When EOY processing is complete, click OK in the notification window.
Note: EOY processing is normally very quick.
Printing End of Year Reports
Cornerstone includes many yearly reports that help you keep records of your valuable information. We
recommend that you print all of the Cornerstone yearly reports.
Before You Begin
• Set your End of Period defaults to select the reports you want Cornerstone to automatically
select for you in the Yearly Reports dialog box (see “End of Period Defaults” on page 102).
• Assign the printer to print the reports (File > Printer Assignment > End of Month, and select
the reports you want to print on each printer).
• Finish your End of Year processing.
To print all selected EOY reports:
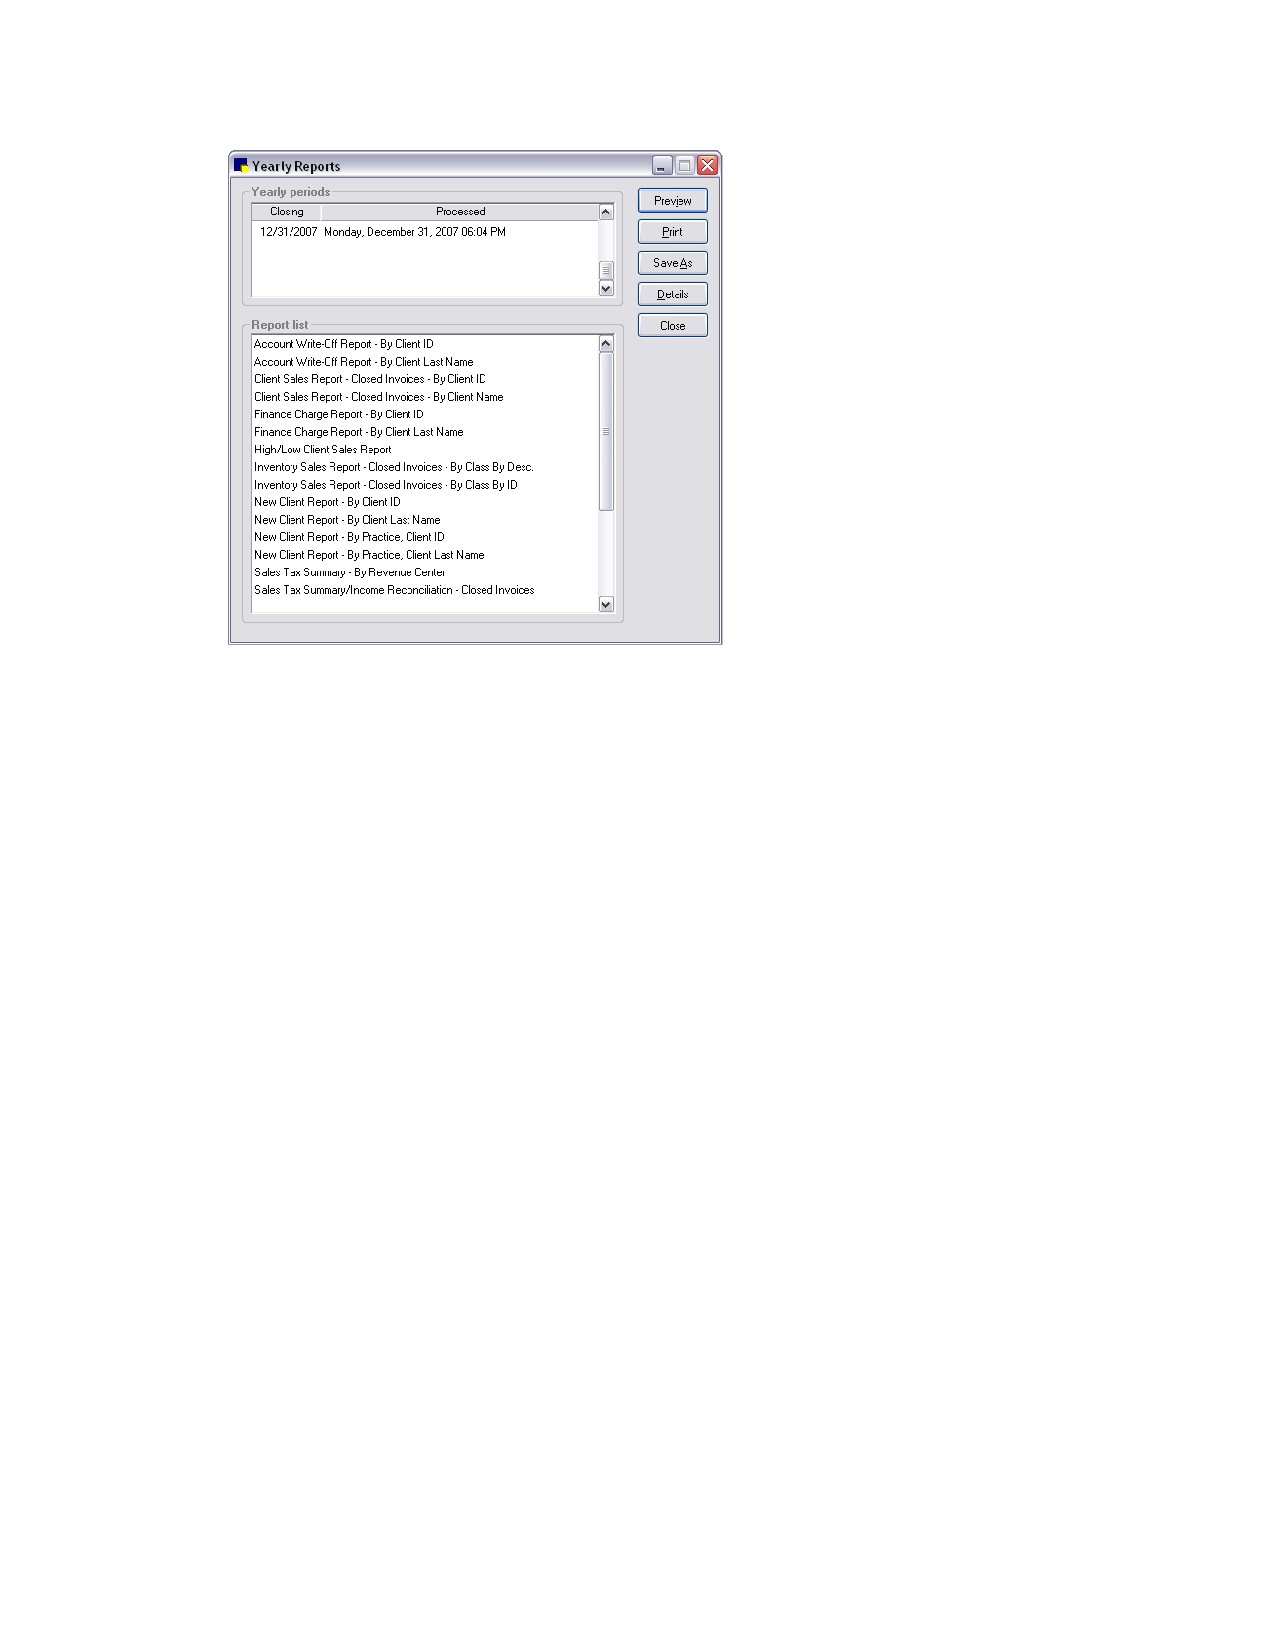
1. On the Reports menu, select End of Period > End of Year. The Yearly Reports dialog box
appears.
405
Chapter 22: End of Year Processing
Yearly Reports dialog box
2. Under Yearly periods, select the period you want the reports to reflect. For most reports, you can
print information for more than one continuous period; click the earliest period and then press and
hold the SHIFT key, click the down arrow until you see the last period and then click the last period.
All of the periods in between are highlighted.
Note: When you select a beginning date range, your End of Period reports include all data in the
date range from one minute prior to the beginning date selected through the ending date selected.
3. In the Report list, reports you have selected in End of Period defaults are highlighted. If needed, do
the following to select additional reports:
• To select a consecutive group of reports, click the first report, hold down the SHIFT key, and
then click the last report.
• To select nonconsecutive reports, hold down CTRL, and then click each report you want to
select.
4. Click Print. The reports print on the printer assigned for each report (or the default printer if no
printer has been assigned).
To preview, print and/or save a specific EOY report:
1. On the Reports menu, select Find a Report. The Report Search window appears.
2. In the Reports list, click the plus sign to the left of End of Year, and then select the desired report.
3. With the desired report highlighted in the End of Year report group, click Create report. The Yearly
Reports dialog box appears.
4. Under Yearly periods, select the period you want the report to reflect. For most reports, you can print
information for more than one continuous period; click the earliest period and then press and hold
the SHIFT key while you click the last period. All of the periods in between are highlighted.
Note: When you select a beginning date range, your End of Period reports include all data in the
date range from one minute prior to the beginning date selected through the ending date selected.
406
Chapter 22: End of Year Processing
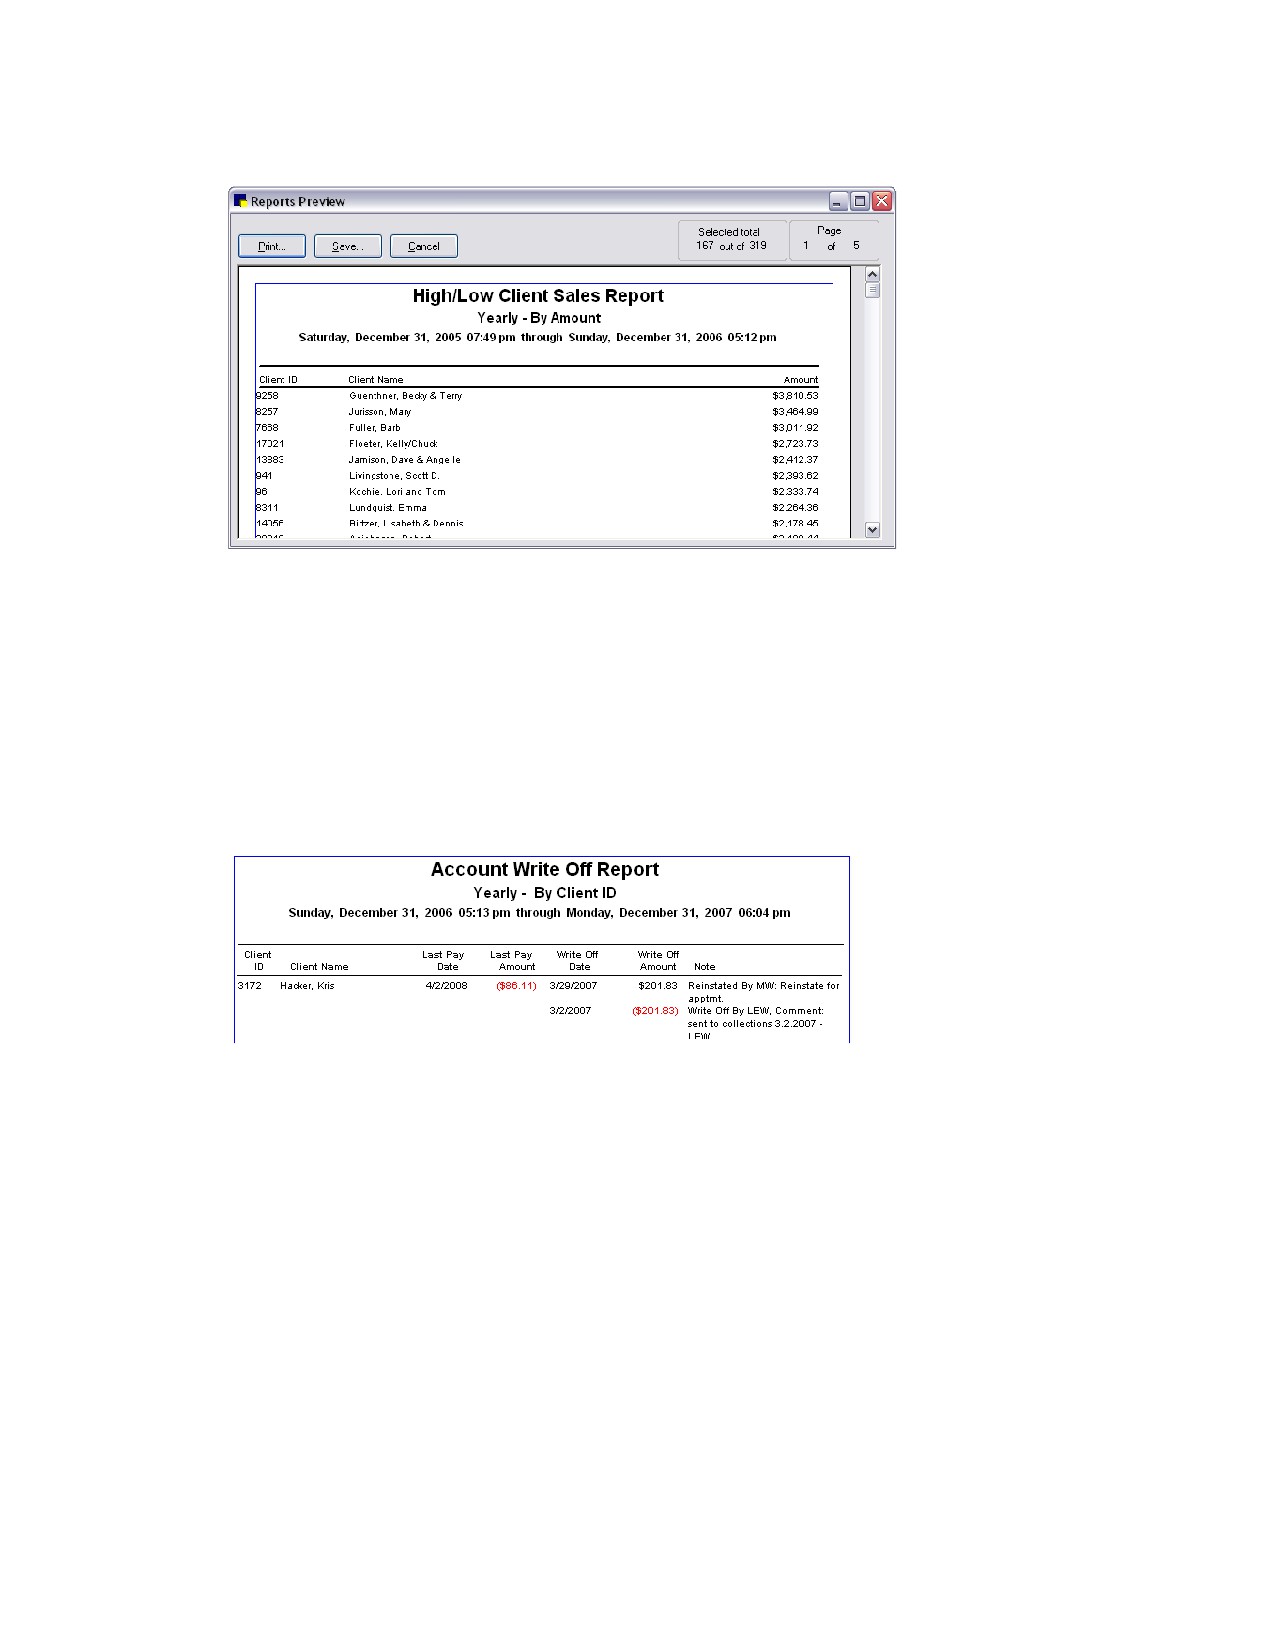
5. Click Preview. The Reports Preview window appears.
Reports Preview window
6. Click Print to print the report, click Save to save the report data to a file or click Cancel to return to
the Yearly Reports dialog box.
End of Year Reports
Account Write Off Report - By Client ID or By Client Last Name
The Account Write Off Report shows all of the clients that have been written off during the yearly period,
the amount written off and the reason why (in the note). This report can be sorted by client ID or last
name.
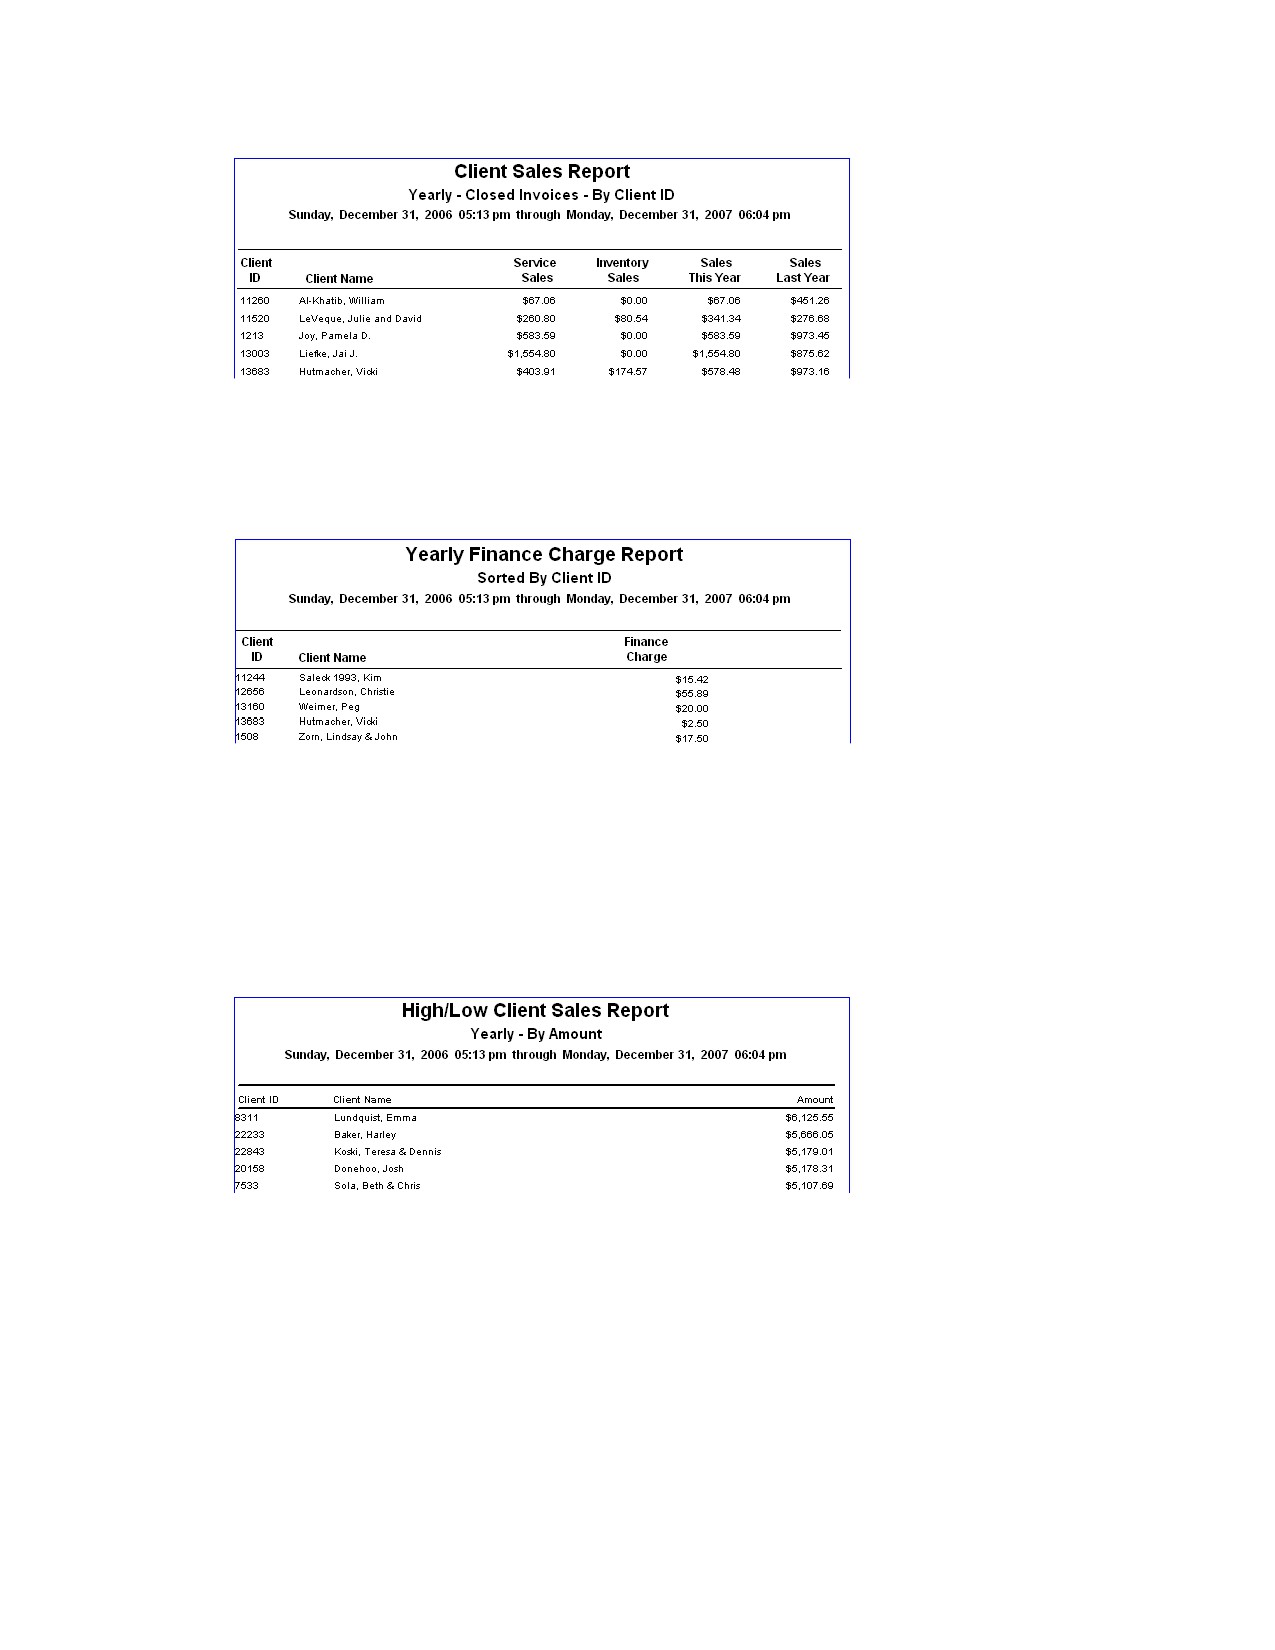
Client Sales Report - Closed Invoices - By Client ID or By Client Name
The Client Sales Report shows your best clients during the yearly period, and the sales compared with
the previous yearly period’s sales. This report can be sorted by client ID or last name.
Because the Client Sales Report can be a very large report, Cornerstone displays the End of Period
Filters dialog box so you can enter a range of information to print. For more information on filtering
information in reports, see “Chapter 5: Reports” in the Cornerstone User’s Manual.
407
Chapter 22: End of Year Processing
Finance Charge Report - By Client ID or By Client Last Name
The Finance Charge Report is a quick way to determine how much your practice has generated through
finance charges. This report can be sorted by client ID or last name.
High/Low Client Sales Report
This report lists the practice’s top clients by total sales, which can be useful for sending direct mailings
to your best clients. This report can be sorted by dollar amount, 90-day balance, status or top clients.
Because the High/Low Client Sales Report can be a very large report, Cornerstone displays the End of
Period Filters dialog box so you can enter a range of information to print. For more information on
filtering information in reports, see “Chapter 5: Reports” in the Cornerstone User’s Manual.
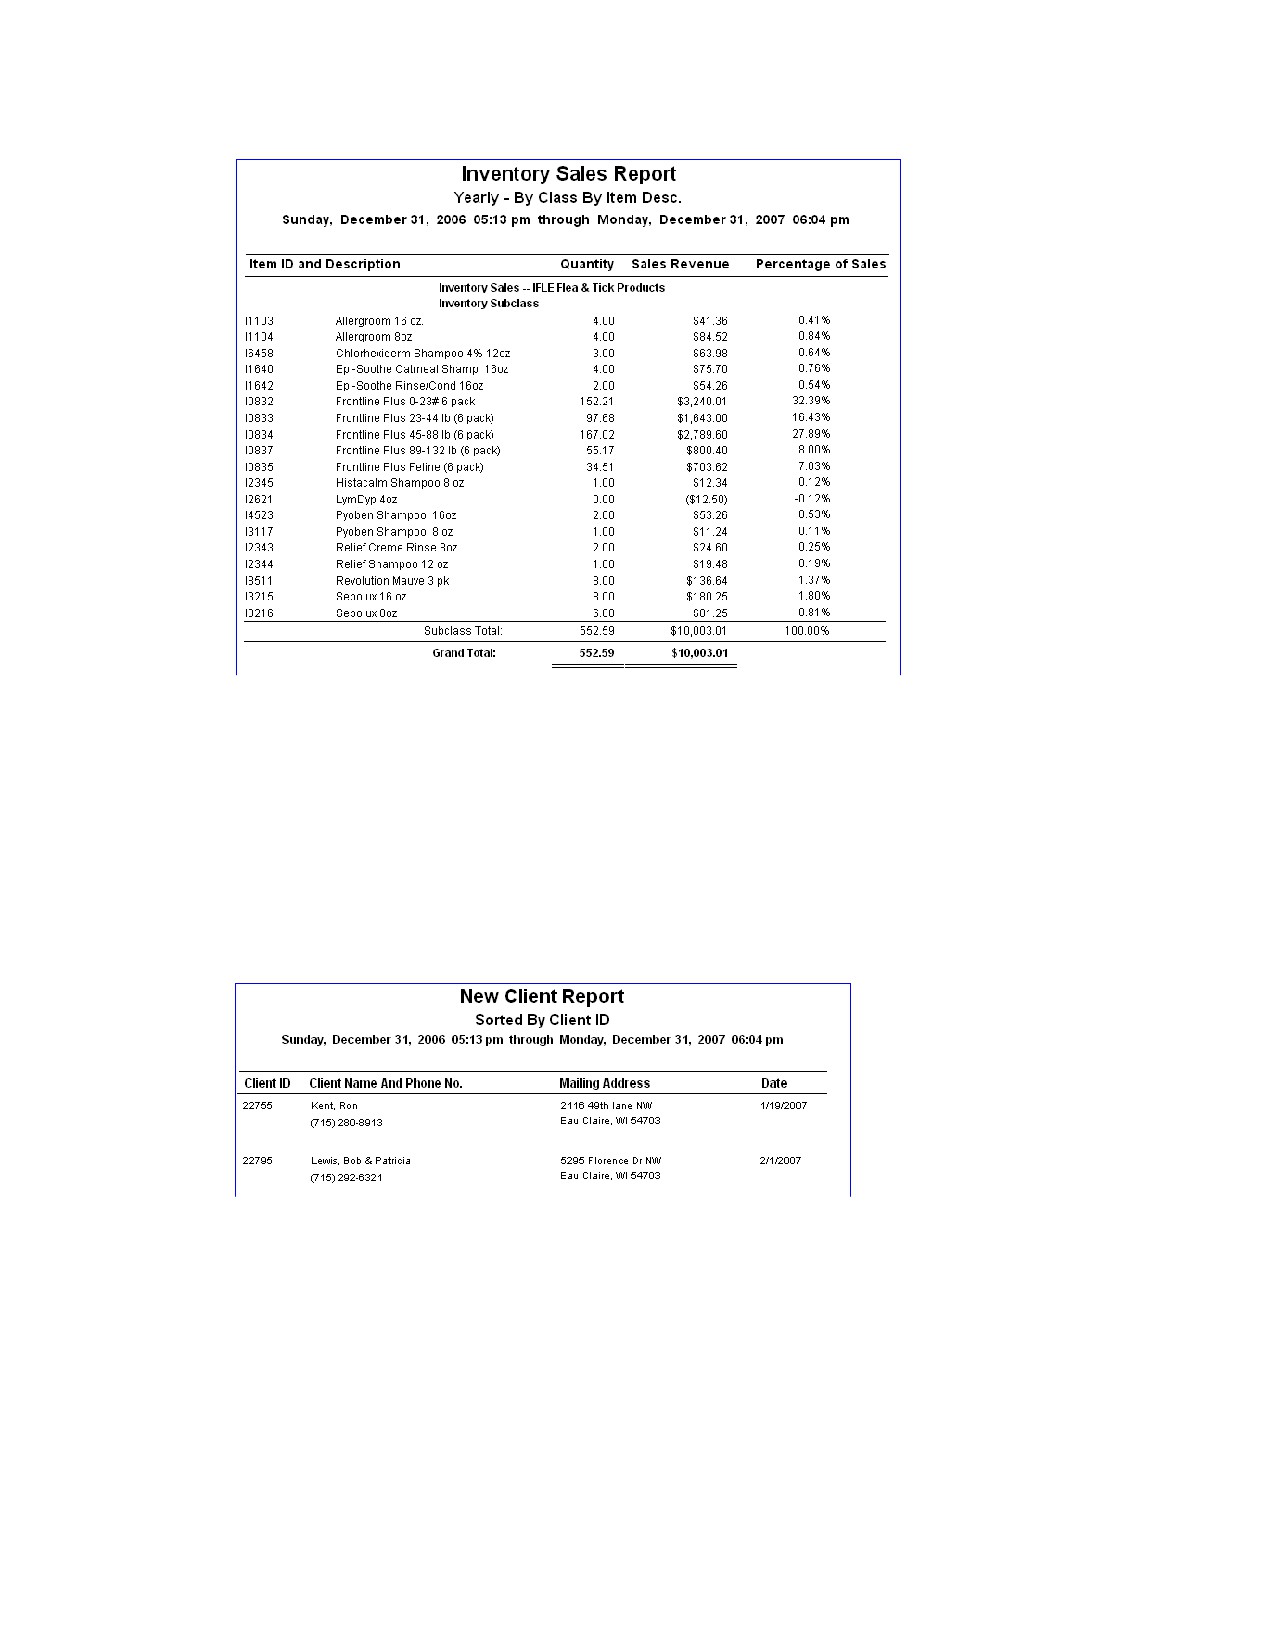
Inventory Sales Report - Closed Invoices - By Class By Description or By Class By ID
The Inventory Sales Report shows which products are your best sellers. This report can be sorted by
class by description or by class by ID.
Because the Inventory Sales Report can be a very large report, the End of Period Filters dialog box
appears so you can enter a range of information to print (class ID, invoice item description, invoice item
ID, subclass ID or combination). For more information on filtering information in reports, see “Chapter 5:
Reports” in the Cornerstone User’s Manual.
Note: This report is also available as an End of Month report.
408
Chapter 22: End of Year Processing
New Client Report - By Client ID or By Client Last Name
The New Client Report shows you all of the new clients entered into Cornerstone during the selected
period(s). This report can be sorted by client ID or last name.
You can save data from this report (using the Save As feature) to create mailing labels to send client
satisfaction surveys or other marketing materials.
Note: This report is also available as an End of Day report and End of Month report (without the date
information).
New Client Report - By Practice, Client ID or By Practice, Client Last Name
For those practices with the Multi-Location/Single Database option enabled, the New Client Report - By
Practice shows all of the new clients entered into Cornerstone by practice during the selected period(s)
based on the client home practice. This report can be sorted by client ID or last name.
You can save data from this report (using the Save As feature) to create mailing labels to send client
satisfaction surveys or other marketing materials.
Note: This report is also available as an End of Day report and End of Month report (without the date
information).
409
Chapter 22: End of Year Processing
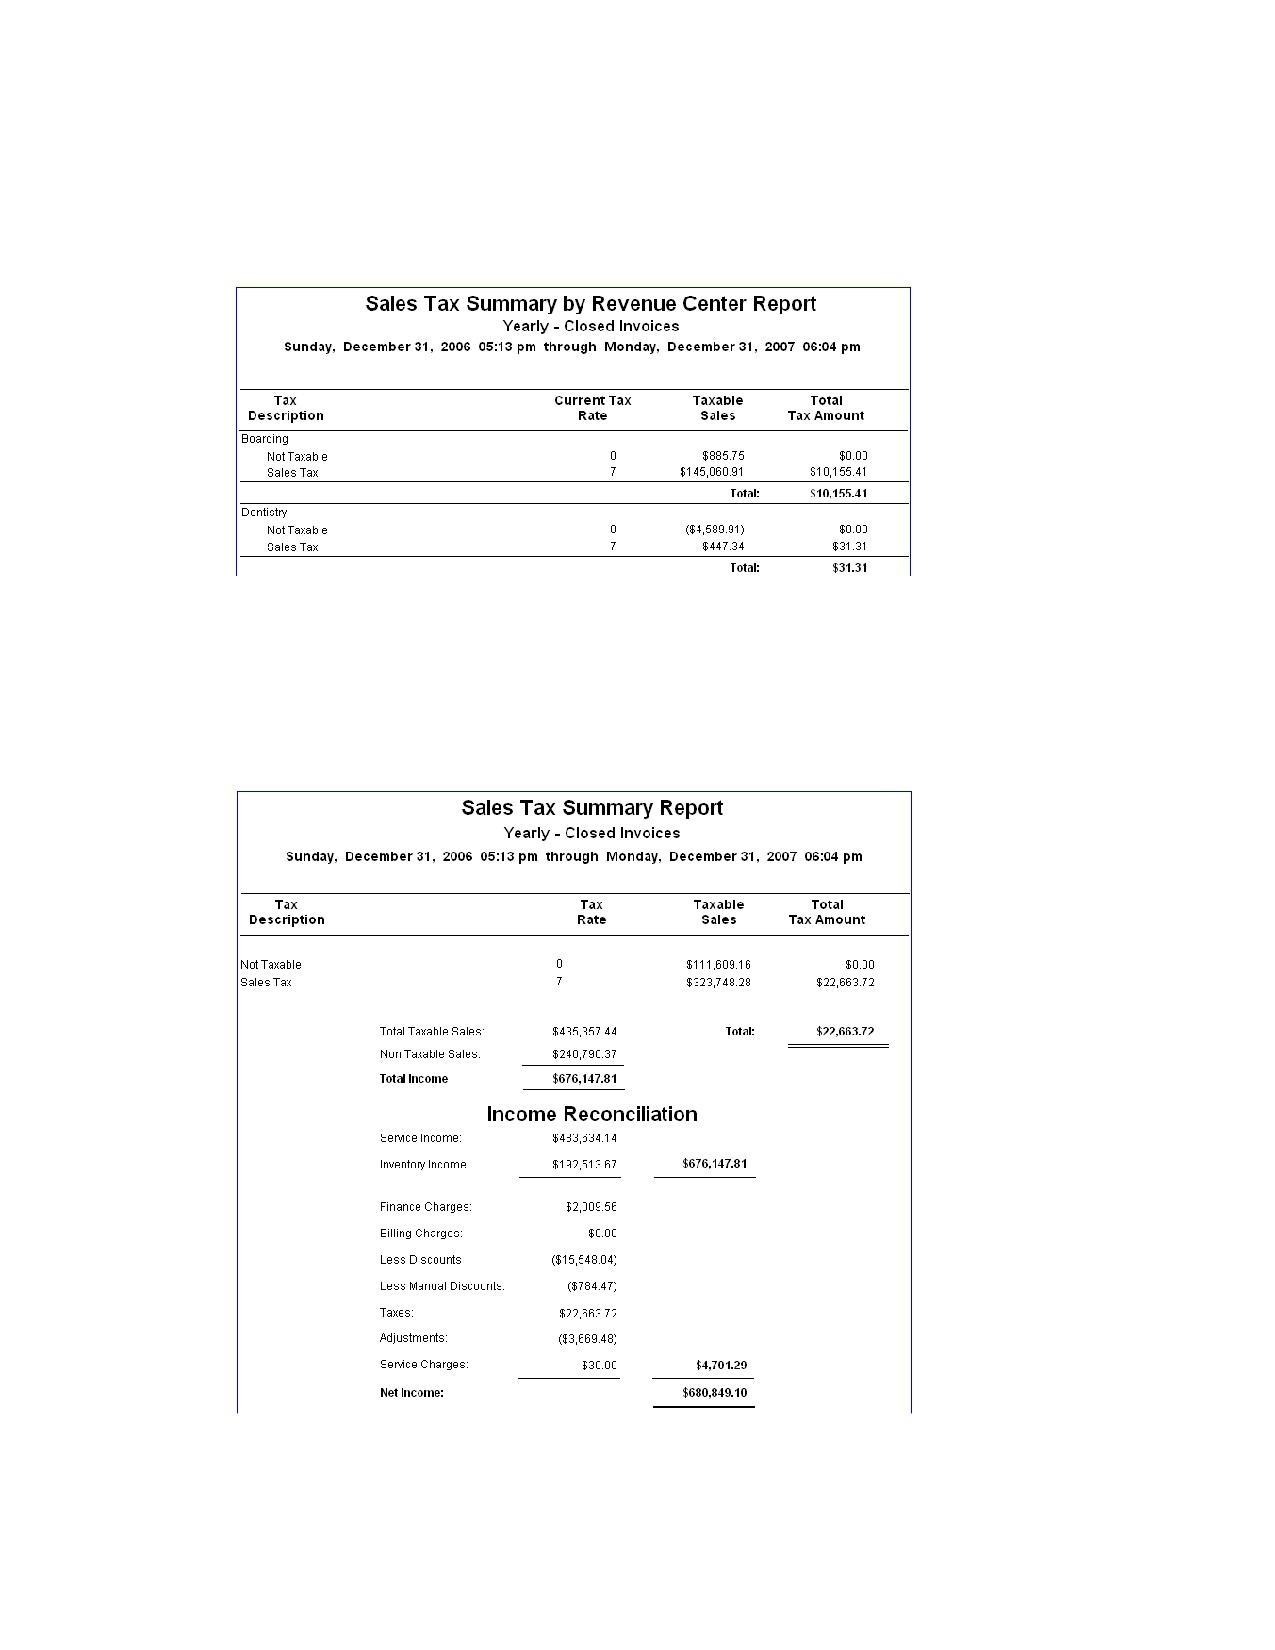
Sales Tax Summary by Revenue Center (Yearly)
The Sales Tax Summary by Revenue Center report shows how much sales tax was collected during the
year by revenue centers. The tax description, current tax rate, taxable sales and total tax amounts are
shown for each revenue center at your practice.
Sales Tax Summary/Income Reconciliation - Closed Invoices
The Sales Tax/Income Reconciliation report gives you a quick summary of your income for the selected
yearly period(s). Sales are broken out into taxable sales and nontaxable sales.
Note: This report is also available as an End of Month report.
410
Chapter 22: End of Year Processing
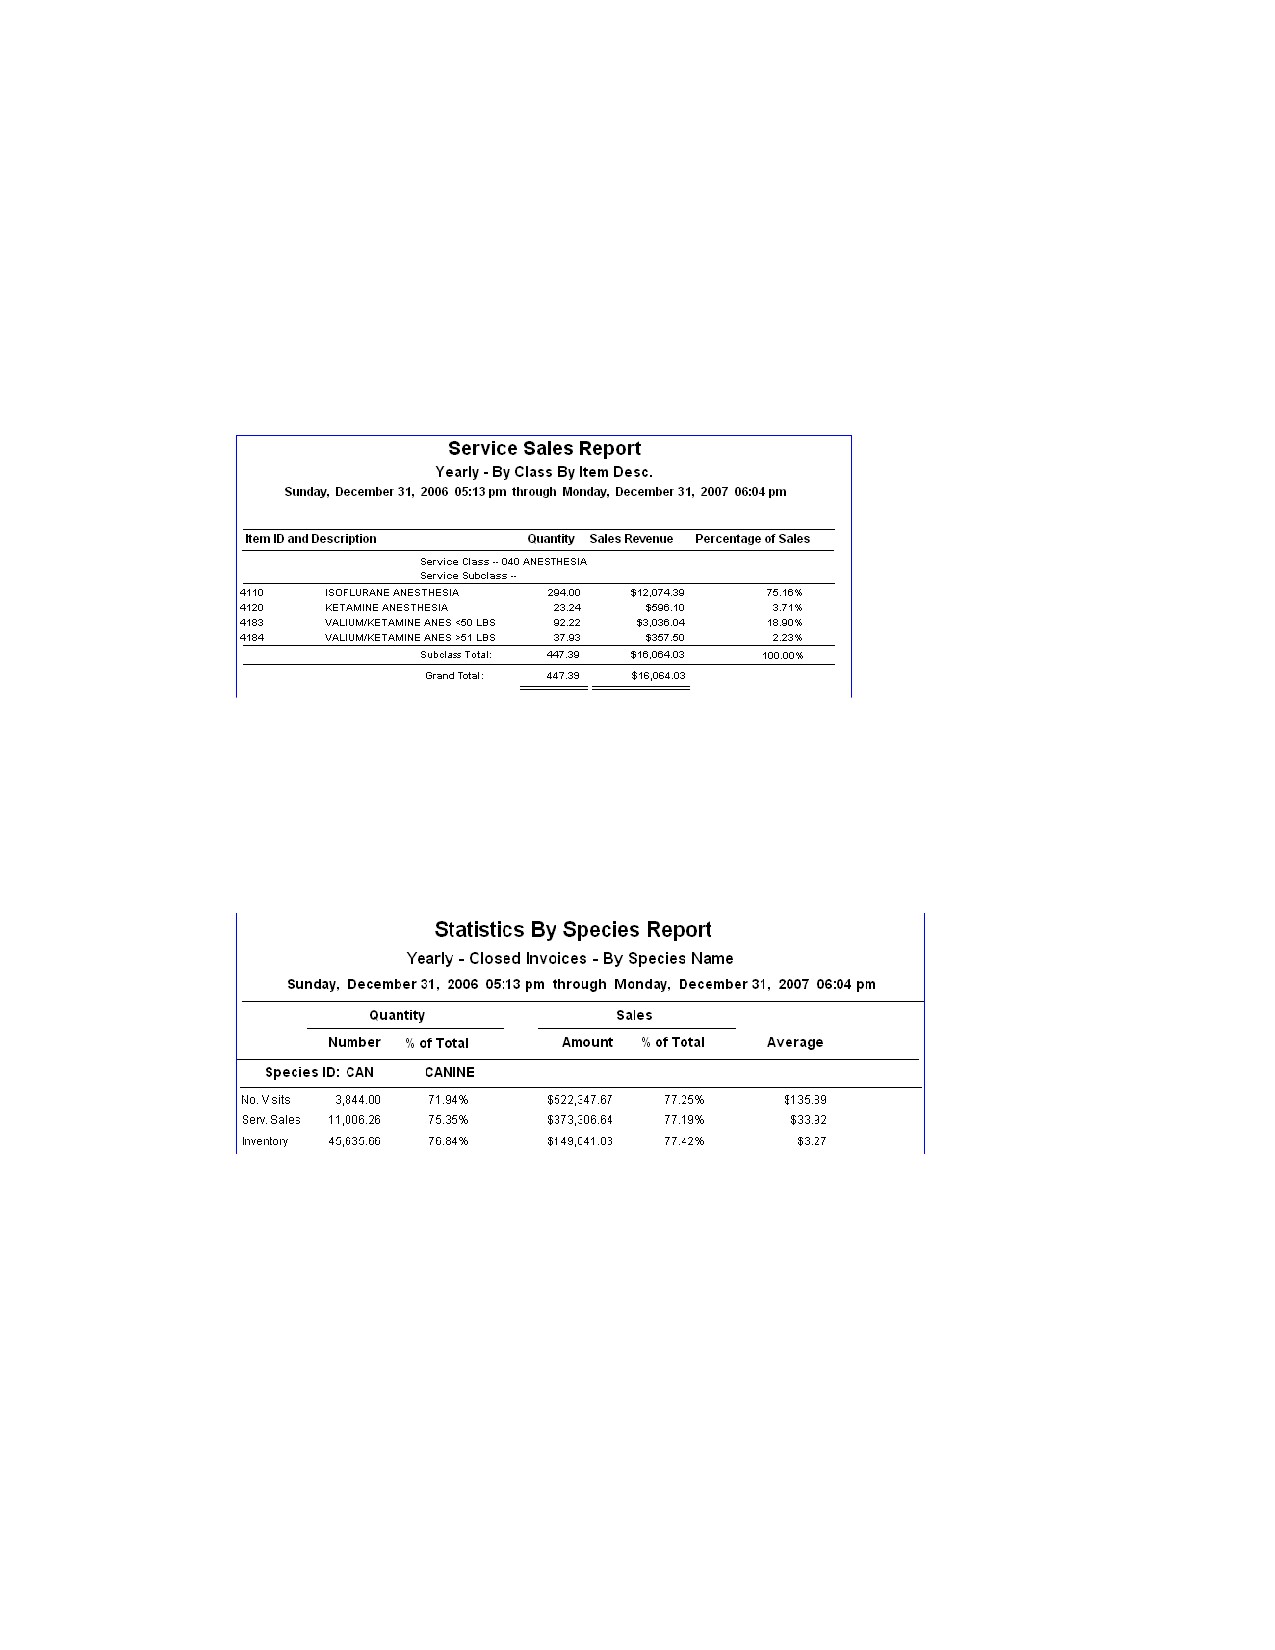
Service Sales Report - Closed Invoices - By Class By Description or By Class By ID
The Service Sales Report shows the sales revenue from service items. Use this report to see which
service items are generating the most sales.
Because the Inventory Sales Report can be a very large report, the End of Period Filters dialog box
appears so you can enter a range of information to print (class ID, invoice item description, invoice item
ID, subclass ID or combination thereof). For more information on filtering information in reports, see
“Chapter 5: Reports” in the Cornerstone User’s Manual.
Note: This report is also available as an End of Month report.
Statistics By Species Report - Closed Invoices
The Statistics By Species Report shows sales activity for each species invoiced during the selected
yearly period(s).
Note: This report is also available as an End of Day and End of Month report.
411
Chapter 22: End of Year Processing
Statistics By Staff Report - Closed Invoices
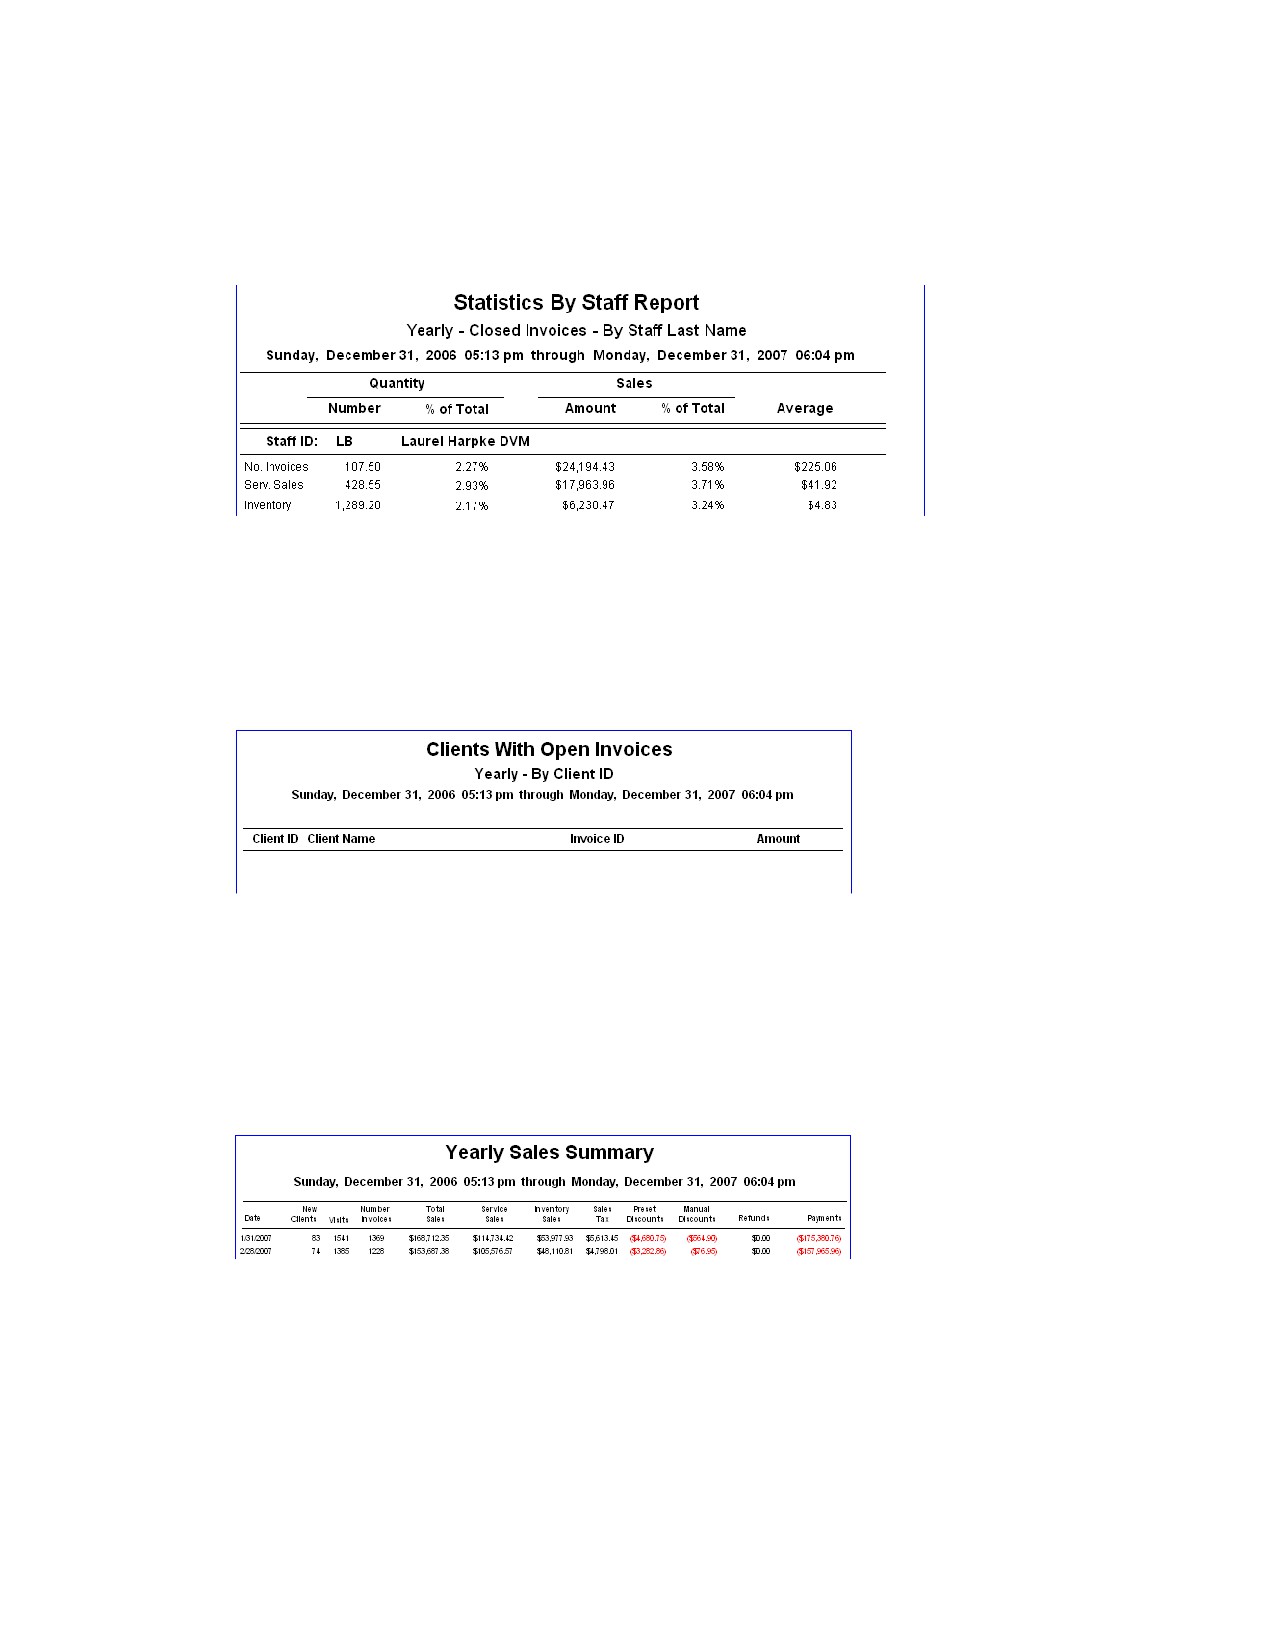
The Statistics By Staff Report shows the sales activity for each staff member.
Note: This report is also available as an End of Day and End of Month report.
Yearly Clients With Open Invoices Report - By Client ID or By Invoice No.
You can print the Yearly Clients With Open Invoices report for the current period to see income you can
expect in the next yearly period. This report can be sorted by client ID or invoice number.
Note: This report is also available as an End of Month report.
Yearly Sales Summary Report
The Yearly Sales Summary report displays sales information for each monthly closing period, as well as
the total for the yearly period. You can see total sales as well as inventory and service item sales. The
report also shows you the sales tax collected in each monthly closing period.
Note: This report is also available as an End of Month report (for each daily closing period).
Yearly Sales Summary - By Practice Report
The Yearly Sales Summary - By Practice report is available for those practices with the Multi-
Location/Single Database option enabled. This report is split out by practice and displays sales
information for each monthly closing period, as well as the total for the yearly period. You can see total
sales as well as inventory and service item sales. The report also shows you the sales tax collected in
each monthly closing period.
412
Section 7-Other Management Tools and
Tasks
Chapter 23: Setting Up Referral Relationship Management
Chapter 24: Setting Up Hill’s® Feeding Guide Software
Chapter 25: Using General Ledger
Chapter 26: Using the Compliance Assessment Tool*
Chapter 27: Using Cornerstone Performance Tracker
Chapter 28: Using the Backup Verification Assistant
Chapter 29: Purging Data from Cornerstone
Chapter 30: Using the Time Clock
Chapter 31: Setting Up the Mobile Computing Module
413
Chapter 23: Setting Up Referral Relationship Management
Overview
The Referral Relationship Management features in the IDEXX Cornerstone* Practice Management
System allow you to track patients referred to your hospital and print reports showing sales received
from those referrals. You can also generate a letter to the referring hospital and doctor (RDVM), thanking
them for the referral and updating them on the patient’s care.
For information about using the Referral Relationship Management features, see “Chapter 29: Referral
Relationship Management” in the Cornerstone User’s Manual or the help within Cornerstone.
Overview of the Referral Process
1. Set up Referral Relationship Management:
• Add your referring hospitals.
• Add your referring doctor classifications.
• Add your referring doctors.
2. Set up the referral letter template.
3. Create a record for the client and patient, and assign a referring doctor and hospital to the patient.
4. After providing the needed care to the patient, use the referral letter template to record medical
history. This letter can be retrieved and changed until it is marked as final.
5. Send the letter to the referring hospital and/or doctor using the method you set up in the
hospital/doctor record.
6. Save the referral letter in the patient’s history; all referrals for this patient appear in the record as
historical data.
7. Print Referral reports.
Setting Up Referring Hospitals
You must set up records in your software for those hospitals with which your practice has a referral
relationship.
To add or edit a referring hospital:
1. On the Lists menu, select Referrals > Hospitals.
2. Click New to add a new hospital or double-click an existing hospital to update it. The Referring
Hospital Information dialog box appears.
414
Chapter 23: Setting Up Referral Relationship Management
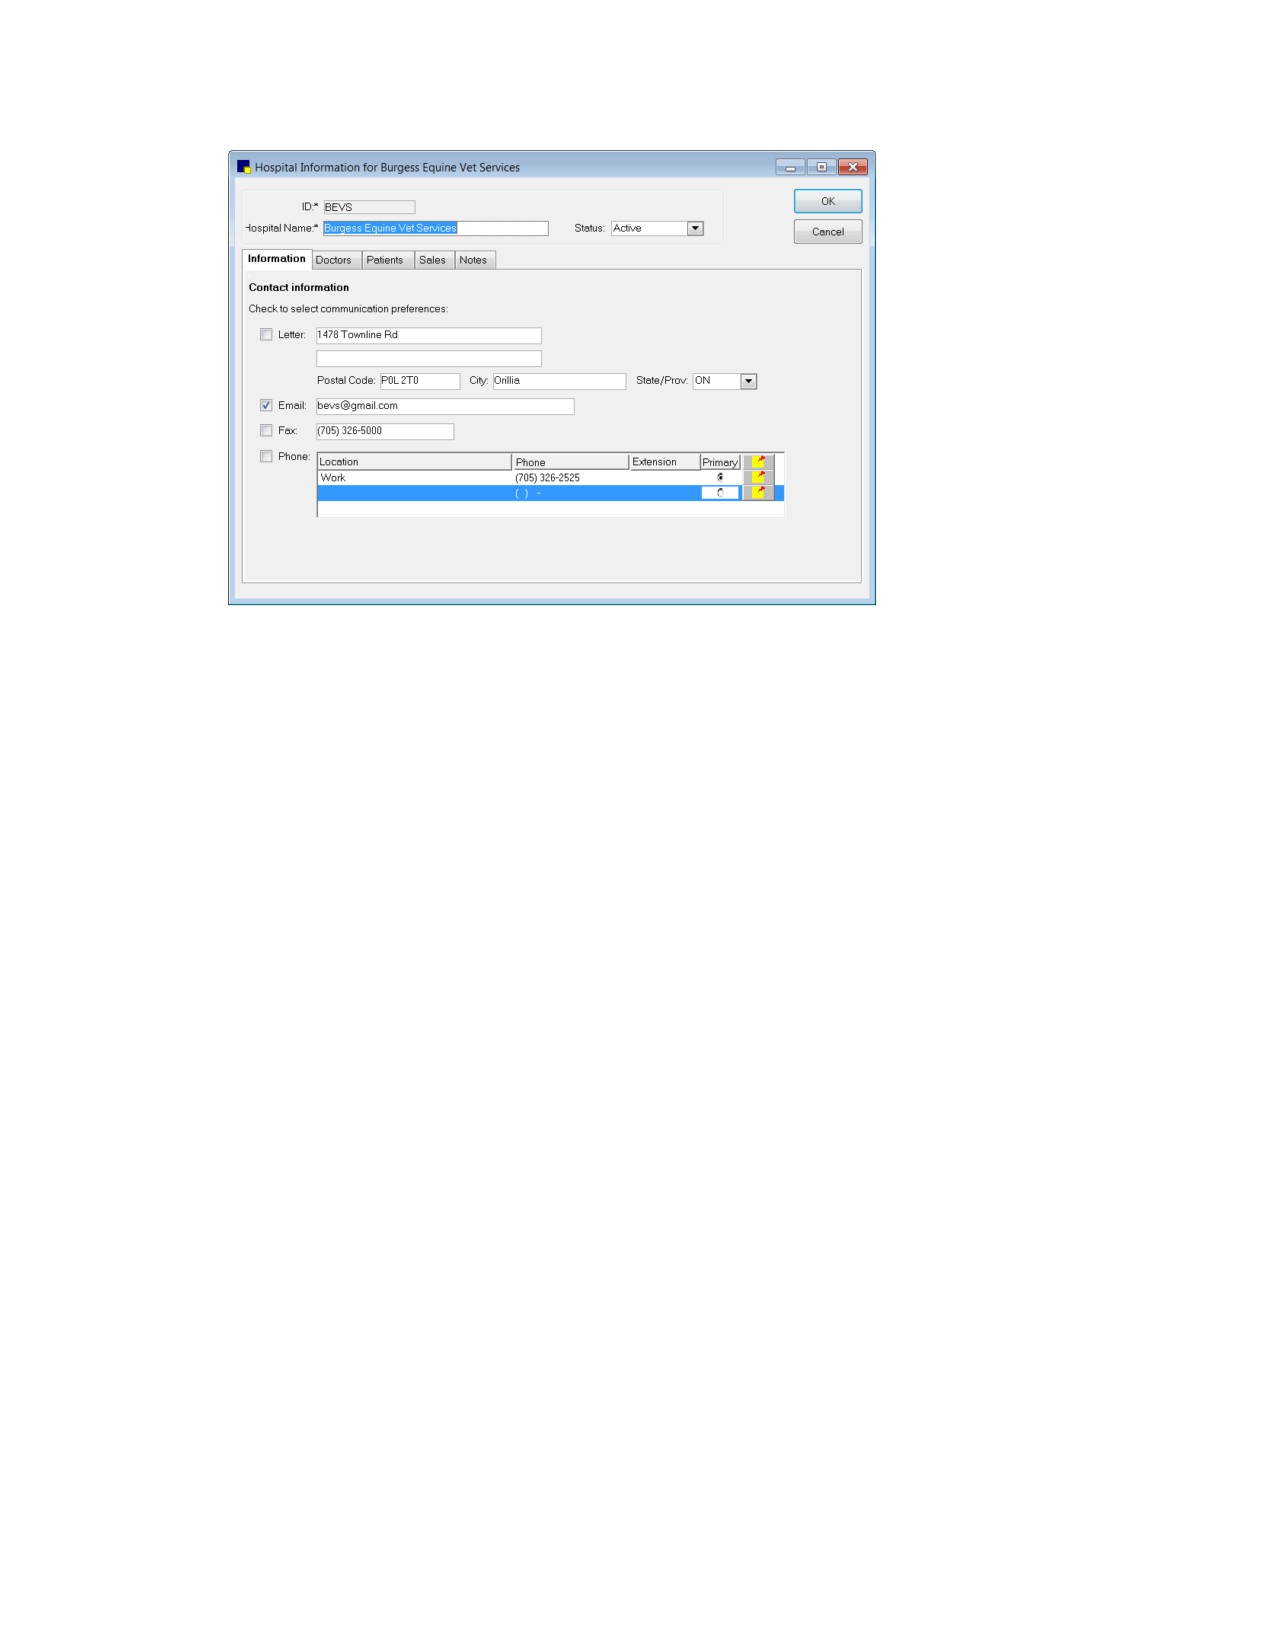
Referring Hospital Information dialog box
3. If adding a new hospital, in the ID text box, type the ID to be used by your practice to identify this
hospital.
4. Type the hospital’s name in the Name text box.
5. The Status field defaults to Active for a new hospital. Do not change the status to Inactive unless
you have ended your referral relationship with this hospital.
6. Click the Information tab.
7. Enter the Name, Address, Postal Code, City and State/prov information.
8. Enter the Fax # and E-mail address of the hospital.
9. Select the check boxes for each of the hospital’s communication preferences. Add or update
information as necessary. To update or add a phone number, double-click a line in the Phone area.
Click Primary to indicate the primary phone number.
10. Click the Notes tab and enter any notes about this hospital.
11. Click OK and then click Close.
To view a list of all referral hospitals set up in Cornerstone*, print the Referral Hospital Master
Report.
To view a list of referring hospitals, the number of referrals, rechecks and sales each referring hospital
generated, print the End of Month Referral Summary - by Hospital Report.
415
Chapter 23: Setting Up Referral Relationship Management
Setting Up Doctor Classifications
The classification field is defined by the user, allowing you to choose the best way to use this field for
your practice. One possible use for this field is to enter the referring doctor’s specialty, for example,
exotics or small animal.
To add or edit a doctor classification:
1. On the Lists menu, select Referrals > Classifications. The Doctor Classifications dialog box
appears.
2. Click New to add a new classification or double-click an existing classification to update it. The
Classification Setup for Doctor dialog box appears.
3. Enter the Description of the classification.
4. Click OK and then click Close.
Setting Up Referring Doctors
You must set up a record in your system for each referral doctor your practice works with. A doctor must
be associated with a hospital. If you have a provider that is not associated with a hospital, you can set
up a hospital in Cornerstone called “no affiliation.” Doctors can also be associated with more than one
hospital.
To add or edit a referring doctor:
1. On the Lists menu, select Referrals > Doctors. The Doctor List dialog box appears.
2. Click New to add a new doctor or double-click an existing doctor to update the information. The
Doctor Referral Information dialog box appears.
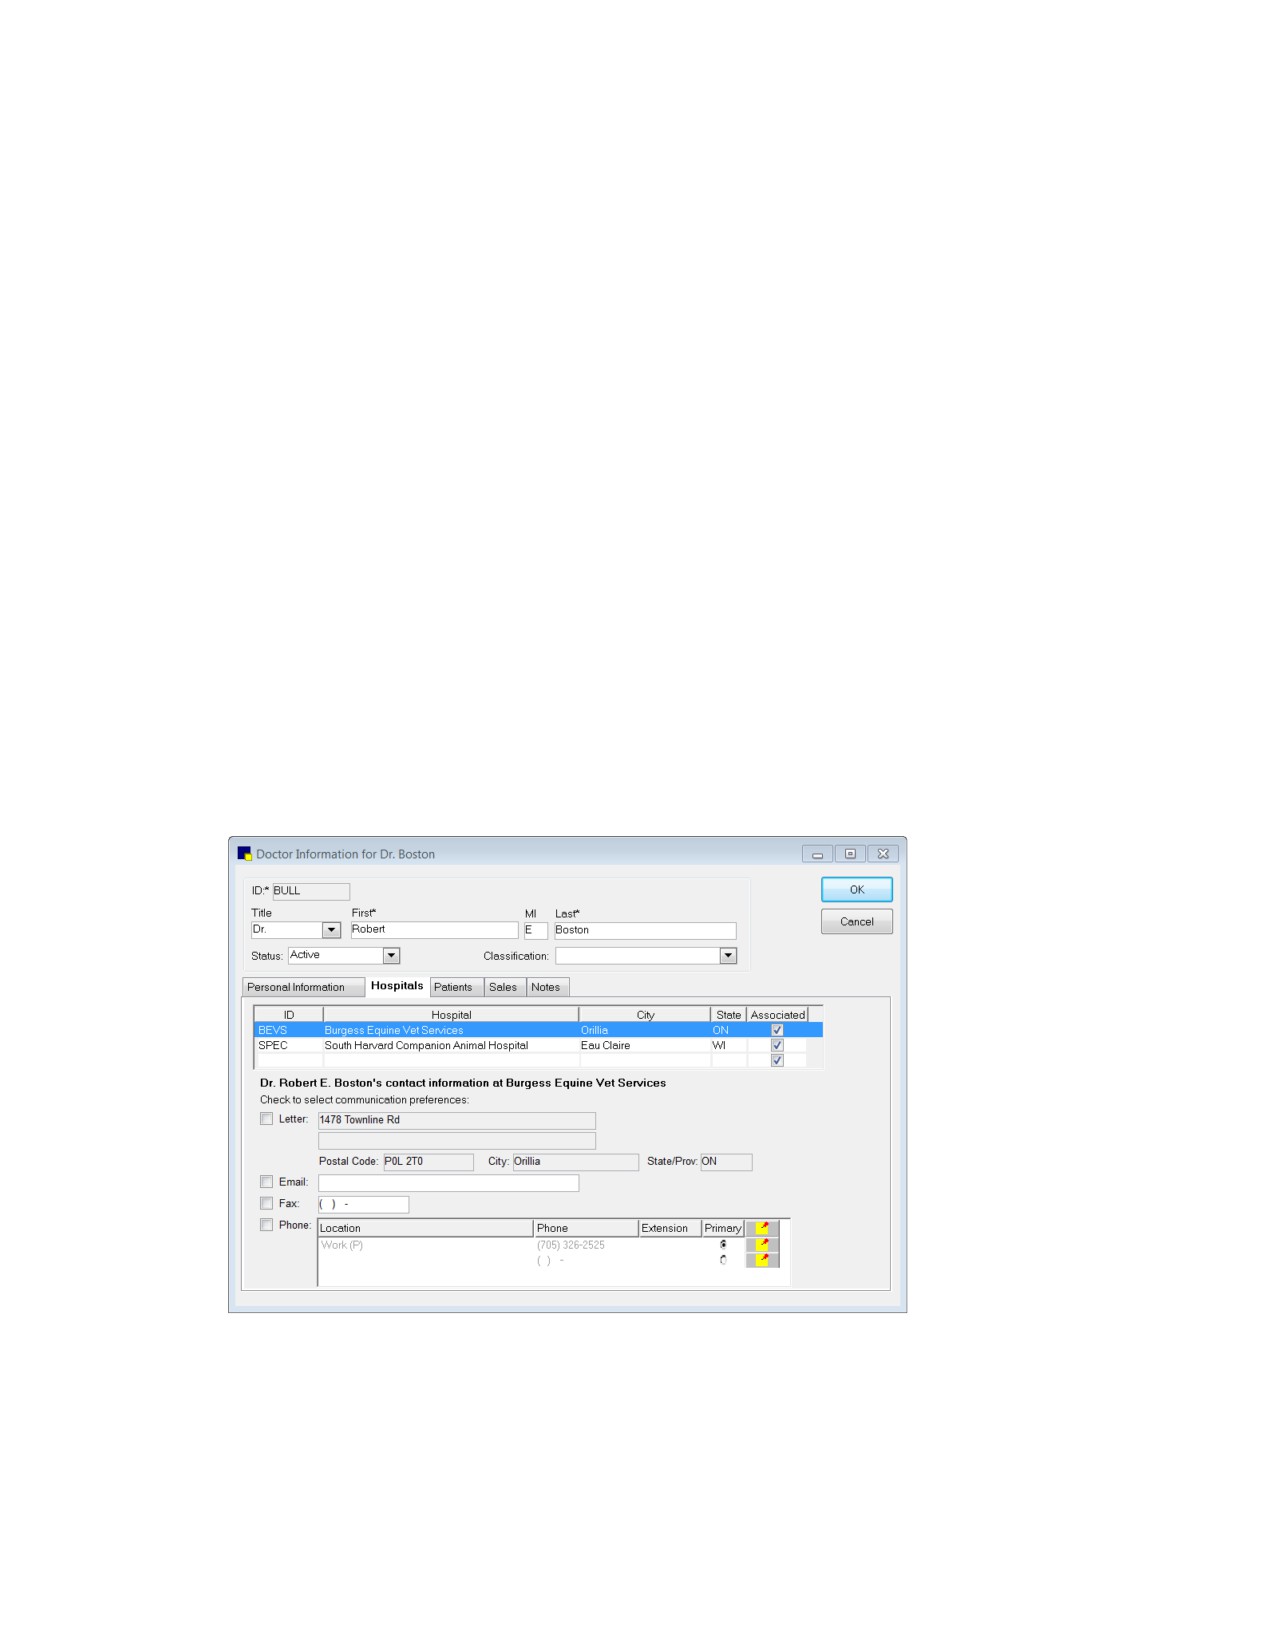
Doctor Referral Information dialog box
3. If adding a new referring doctor, in the ID text box, type the ID to be used by your practice to identify
this doctor.
4. Enter the doctor’s information in the Title and name fields.
416
Chapter 23: Setting Up Referral Relationship Management
5. The Status field defaults to Active for a new doctor. Do not change the status to Inactive unless you
are not receiving referrals from this doctor.
6. Select the doctor’s classification from the Classification drop-down list.
7. If the doctor is associated with one of the referring hospitals you have set up in your system, on the
Hospitals tab, enter that hospital’s ID number or press F2 to use the Hospital List to choose a
hospital.
Note: If there is not an address on the doctor’s record, Cornerstone will use the address on the
associated hospital’s record. A doctor must be associated with a hospital.
8. Select the check boxes for each of the doctor’s communication preferences at this hospital. You can
update the email, fax, and phone number. To update or add a phone number, double-click a line in
the Phone area. Click Primary to indicate the primary phone number.
9. Click the Personal Information tab.
10. Under Display the following information on the Patient Clipboard, select Personal preferences,
Hospital related preferences, or both.
11. Select the check boxes for each of the doctor’s personal communication preferences. You can
update the email, fax, and phone number. To update or add a phone number, double-click a line in
the Phone area. Click Primary to indicate the primary phone number.
12. Click the Notes tab and enter any notes about this doctor.
13. Click OK and then click Close.
To view a list of all referral doctors set up in Cornerstone, print the Referral Doctor Master Report.
To view a list of referring doctors, the number of referrals, rechecks and sales each referring doctor
generated, print the End of Month Referral Summary-by Doctor Report.
To delete a referring doctor:
1. On the Lists menu, select Referrals > Doctors. The Doctor List dialog box appears.
2. Select the doctor to remove and click Delete.
3. On the confirmation message, click OK.
Creating a Referral Letter Template
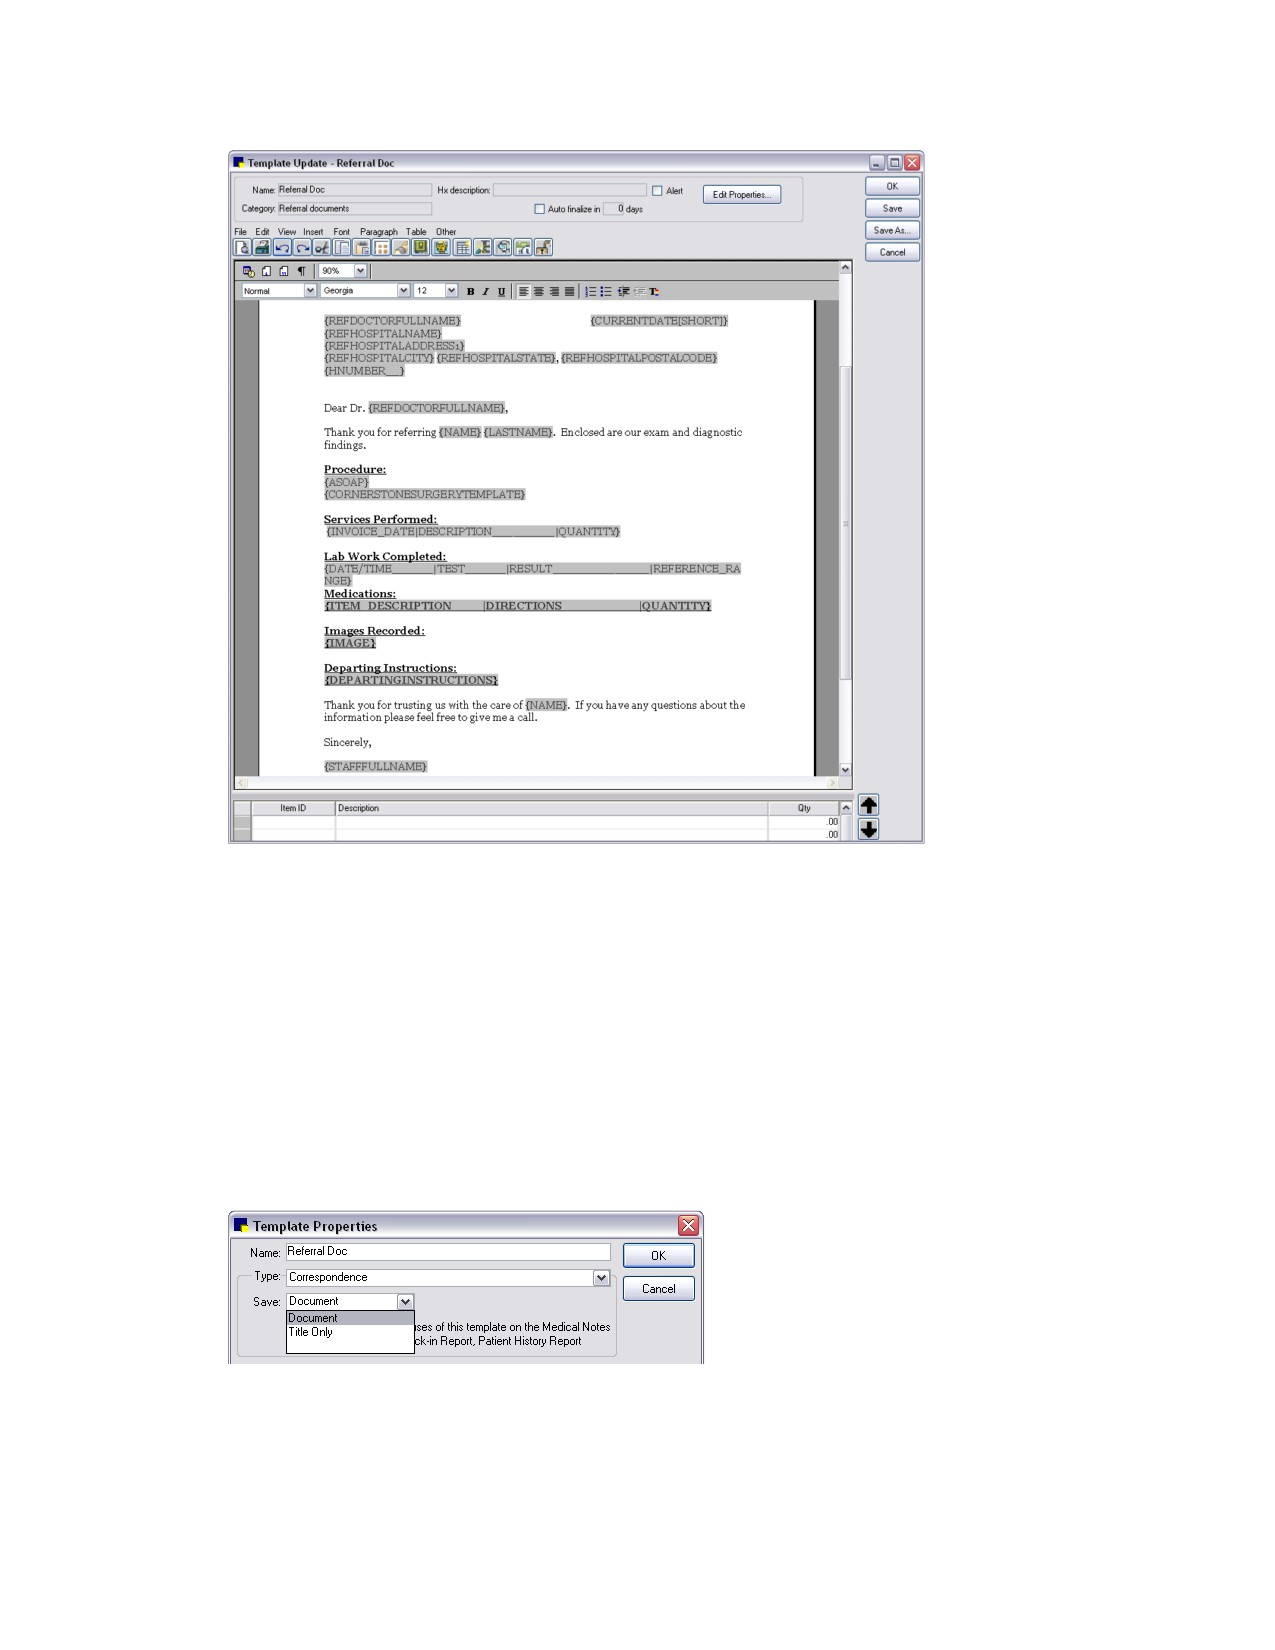
Referral letters establish good communication with your referral providers. By using bookmarks to create
your letter in the Cornerstone Editor, you can set up fields on the letter to automatically populate with the
correct information from your Cornerstone database, as shown in the following sample referral letter
template.
417
Chapter 23: Setting Up Referral Relationship Management
Sample document template for a referral letter
When setting up the properties for a referral letter, set the type to Correspondence so that a record of
the document is saved in the patient’s history. Once the Correspondence type is selected, you must
then specify how the document will be saved:
• Title Only saves only the title in patient history. Use this option when no patient findings, results,
or other information is included in the letter. In this case, it is preferable to save just the title to
record that you sent a referral letter. Saving as Title Only can help to conserve hard drive space
on your system.
• Document saves the entire document in patient history. Use this option when patient findings,
results, or other information is included in the letter. In this case, it is preferable to save the entire
document so it can be referred to later if needed.
See “Chapter 17: Setting Up Medical Notes and Correspondence” on page 312 for information on
creating document templates in the Cornerstone Editor.
418
Chapter 23: Setting Up Referral Relationship Management
Tracking Referral Sales
You can track the monthly sales history for a referral doctor or hospital. To do this:
1. On the Lists menu, select Referrals, and then select Doctors or Hospitals, depending on the type
of data you want.
2. Click Update, and then click the Sales tab. The monthly sales history will display.
Referral Reports
In the Report Search window (Reports > Find a Report), a variety of referral reports are available in the
Reports list under the Referral group and under the End of Month > Referral Reports group.
Referral reports:
• The Referral Doctor Master Report prints a list of all the referral doctors (by Doctor ID) you
have set up in Cornerstone
• The Referral Hospital Master Report prints a list of all the referral hospitals (by Hospital ID) you
have set up
End of Month > Referral reports:
• Referral Report-by Staff
• Referral Report-Doctor by Hospital
• Referral Report-Hospital by Doctor
• Referral Revenue Report-By Hospital
• Referral Revenue Report-By Doctor
• Referral Summary-by Doctor
• Referral Summary-by Hospital
• Referral Summary-Doctor by Hospital
• Referral Summary-Hospital by Doctor
See “End of Month Reports” on page 385 for more information.
419
Chapter 24: Setting Up Hill’s® Feeding Guide Software
This chapter covers the steps required to set up the Hill’s® Feeding Guide software in the IDEXX
Cornerstone* Practice Management System. For information on daily usage tasks in the Hill’s Feeding
Guide software, see “Chapter 26: Using Hill’s Feeding Guide Software” in the Cornerstone User’s
Manual.
The Hill’s Feeding Guide Software is a tool designed to help you recommend the appropriate Hill’s pet
food for each patient’s specific health condition.
Setting Up the Feeding Guide Software
Before You Begin
1. Enter Hill’s pet foods products as inventory invoice items.
2. Link the special action Feeding Guide Software to each invoice item. See “Setting Up Invoice Items
to Initiate a Special Action” on page 202.
To set up the Hill’s Feeding Guide Software:
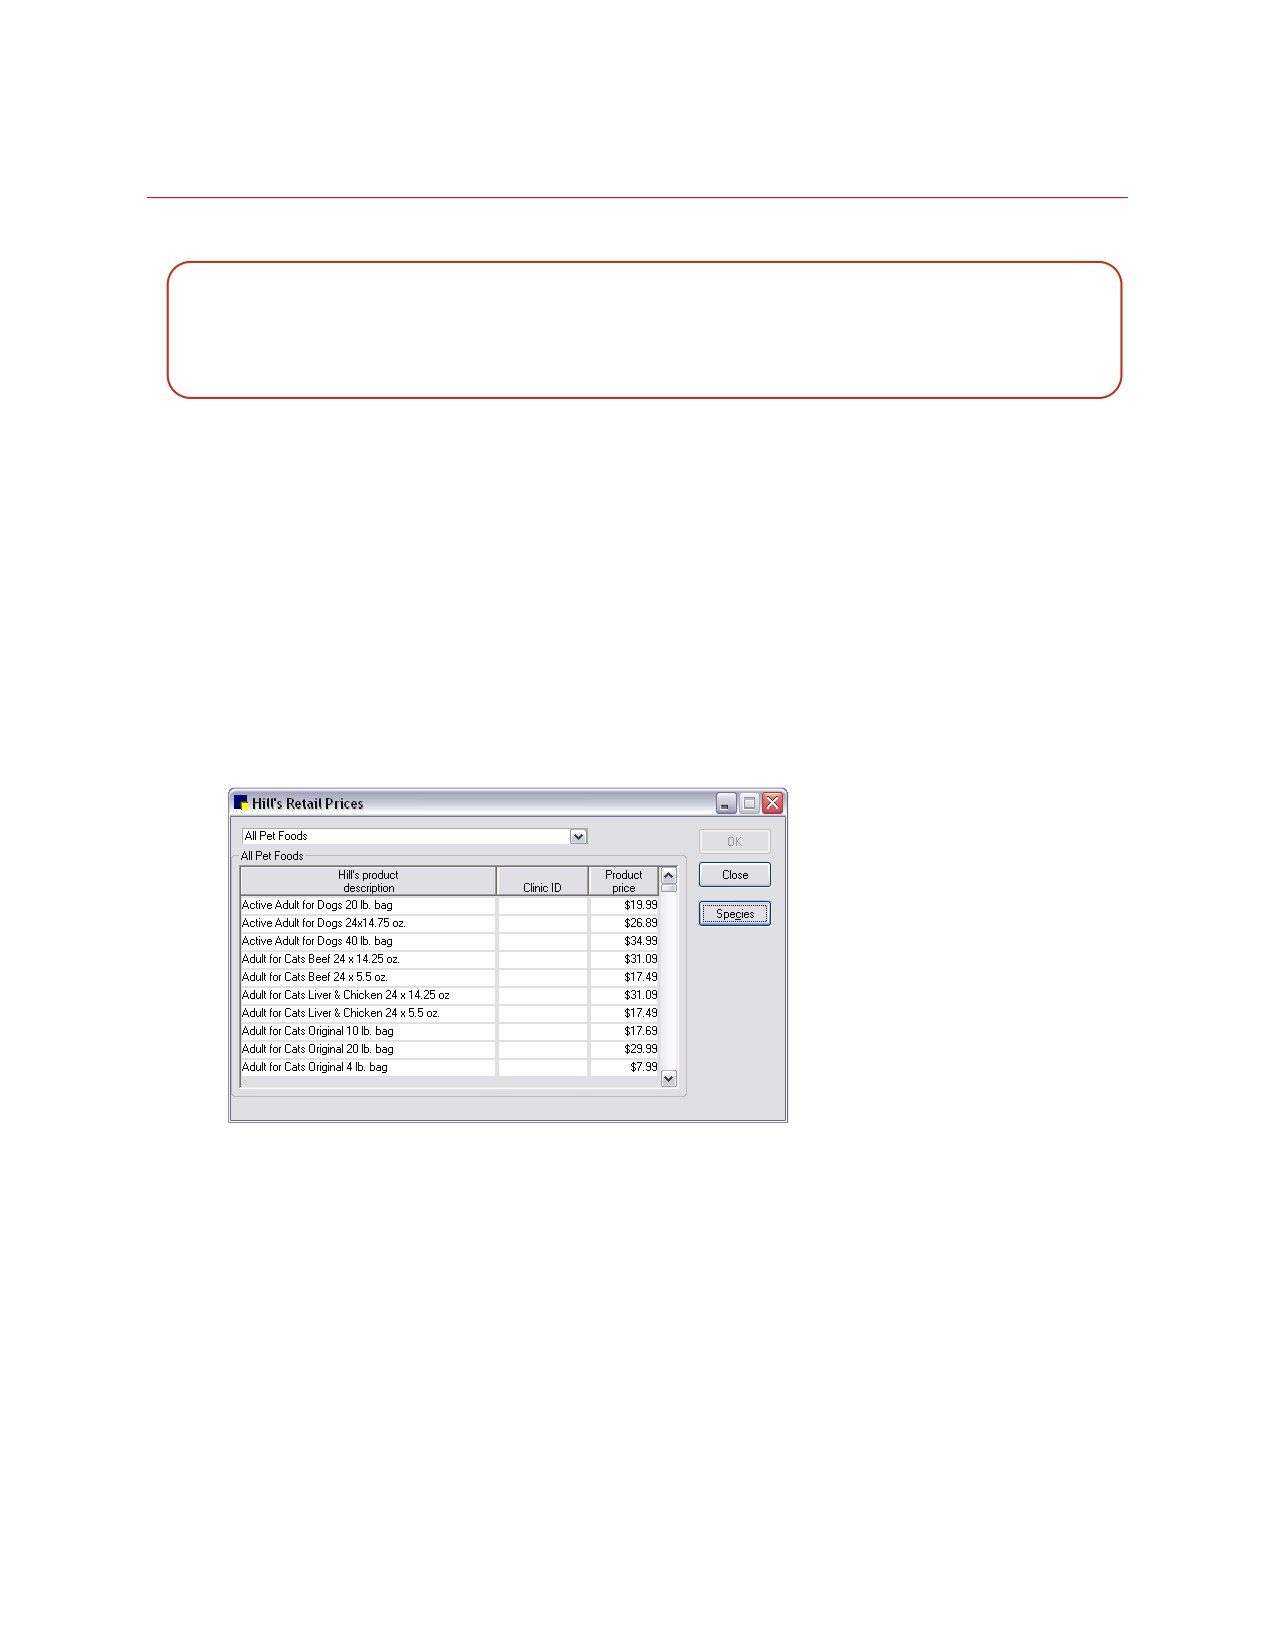
1. On the Activities menu, select Feeding Guide > Feeding Guide Setup. The Hill’s Retail Prices
window appears.
Hill’s Retail Prices window
2. Click Species. The Link Species dialog box appears.
3. Type the ID you use for each species and click OK.
4. Using the drop-down list at the top of the Hill’s Retail Prices dialog box, select the type of Hill’s
products to display.
5. In the price table Clinic ID column, type the invoice item ID you use for each product. (You can also
press F2 to use the Invoice Item List to choose an item.) Repeat this process for each of the Hill’s
dietary products your practice carries.
6. Click OK.
420
Chapter 24: Setting Up Hill’s® Feeding Guide Software
Learning about Hill’s Feeding Guide Software
1. On the Activities menu, select Feeding Guide > Feeding Guide Profile. The Hill’s Feeding Guide
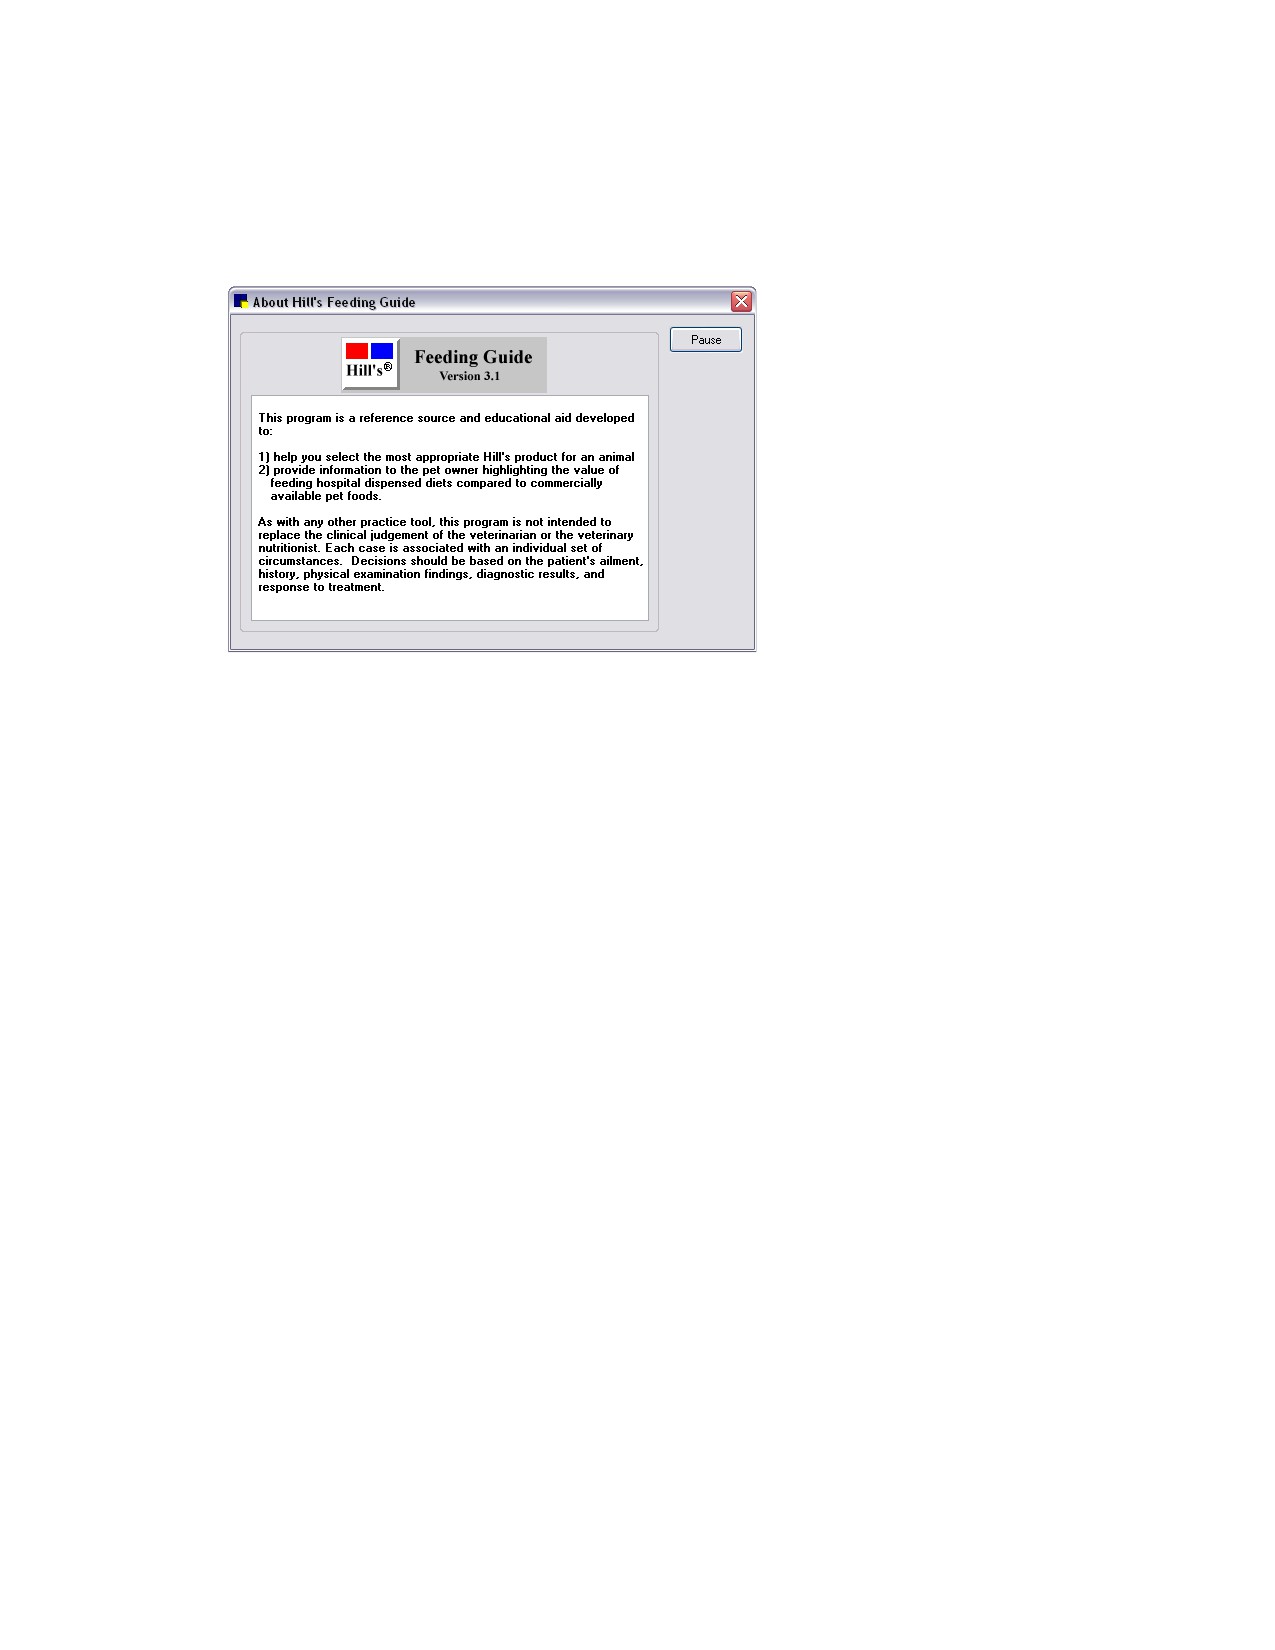
dialog box appears.
2. Click About. The About Hill’s Feeding Guide dialog box appears with the text scrolling automatically.
About Hill’s Feeding Guide dialog box
3. Click Pause to stop the text movement. Click Resume to continue scrolling the text. The Close
button appears when the text is finished scrolling.
Viewing Storage and Handling Instructions for Hill’s Pet Food Products
1. On the Activities menu, select Feeding Guide > Storage & Handling Instructions. The Shelf Life
Information dialog box appears.
2. To view Proper Storage and Handling Procedures, click Storage.
3. Click Close when you have finished viewing the information.
4. Click Close to close the Shelf Life Information dialog box.
421