IDEXX Cornerstone. Administrator’s Manual (8.3 NEXT version 8.3.6) - page 13
Chapter 20: End of Day Processing
Overview
When you process End of Day (EOD), the IDEXX Cornerstone* Practice Management System:
• Processes your records for the day.
• Totals the records for the daily period.
• Transfers the daily totals to the current monthly totals.
• Resets the current daily period to zero.
It is easy to track EOD periods because Cornerstone* records the date and time with each closing.
Tip: You can set up your Cornerstone system to automatically process End of Day or End of Month. See
“Unattended End of Period (EOP) Defaults” on page 135 for more information.
IMPORTANT: It is imperative for your practice to have a good backup procedure in place. Backups
provide security against the unlikely chance that files are lost or destroyed. As an added safety
precaution, you should remove the most recent backup from the practice or place it in a DATA-
Rated fireproof safe.
Depending on the backup procedure at your practice, you can manually back up before completing
End of Day processing or automatically as set up by IDEXX Computer Systems. For backup
instructions, see the original documentation that came with your backup software.
If you have questions about your backup procedure or how to verify that your backup was
successful, contact Cornerstone Support at 1-800-695-2877. Do not take chances with your practice
data.
Note: If your practice uses compatible backup software, you can set up Cornerstone to
automatically verify your backup using the Cornerstone Backup Verification Assistant. (See “Chapter
28: Using the Backup Verification Assistant” beginning on page 446 for more information.)
Notes on End of Day processing:
• You can perform End of Day processing after every shift, if necessary, not only at the actual end
of the day. The important thing is to maintain a consistent pattern of daily closing periods.
• Printing reports does not close or process the totals for the day.
• When you close a daily period, all transactions from the previous daily closing up through the
current daily closing are included.
• You do not need exclusive use to process End of Day. However, staff will not be able to post
invoices or save changes to any window that modifies a client’s account. If a user tries to modify
a client’s account, a message warns the user to wait until the EOD processing is finished. Once
the EOD processing is complete, the user can continue.
362
Chapter 20: End of Day Processing
Performing End of Day Processes
Before You Begin
• Follow your normal backup procedures to perform your daily Cornerstone backup. For backup
instructions, see the original documentation that came with your backup software, or contact
Cornerstone Support at 1-800-695-2877. If a backup is performed before processing End of
Day, information can be restored, if necessary.
• Ensure that EOD defaults have been set up (see “End of Period Defaults” on page 102).
To balance your cash drawer (recommended):
1. On the Reports menu, select Find a Report. The Report Search window appears.
2. In the Reports list, click the plus sign to the left of End of Day, and then select the Daily Deposit
Report. (See "Daily Deposit Report” on page 367 for more information on this report.)
3. Click Create report. The Daily Reports dialog box appears.
4. Under Daily periods, select the Current period.
5. Click Preview or Print.
6. Make any corrections necessary to balance your cash drawer before proceeding.
Tip: The Daily Payment Register by Payment Type Report is helpful for locating balancing errors.
To process End of Day:
1. On the Activities menu, select End of Period > End of Day.
2. A message box may appear to remind you to back up your data. Click Cancel to stop performing
End of Day and backup the Cornerstone database, or click OK to continue processing End of Day.
Note: To prevent the message from displaying, clear the Show message check box.
The Daily Period Closing dialog box appears.
3. In the Note box, type any notes concerning this daily period closing or type your initials, and click
OK. (If notes exist for a daily closing period, you can click the Details button in the Daily Reports
dialog box to view the notes.)
4. Click OK. You are prompted to confirm the decision.
5. Click Yes.
6. When End of Day has finished processing, click OK on the Daily Period Closing dialog box.
Note: If you are processing End of Month, immediately start your End of Month procedures. See
“Performing End of Month Processes” on page 381.
Printing End of Day Reports
Cornerstone includes many daily reports that help you keep records of your valuable information. At a
minimum, you should print the Daily Deposit Report and Itemized Audit Trail Report each day. In
addition to helping you balance the cash drawer, these reports contain valuable information that you
would need if your computer fails and you don’t have a good backup. You should also print a Daily
Summary Report and the Daily Payment Register by Payment Type.
Tips for End of Day reports:
• Set up a binder for the current month’s daily reports. Keep End of Day reports until End of
Month has been processed and balanced.
363
Chapter 20: End of Day Processing
• Always run the daily Itemized Audit Trail Report. Among other uses, you can reenter
information from this report if the system fails and you do not have a timely backup.
• Use the Daily Deposit Report to balance your drawer. Other common reports printed daily
include: the Deposit Report - Checks, the Daily Payment Register, and the Daily Summary
Report. You may wish to spot-check the Standard Fee Exception Report. Analyze the reports
to verify that they match your drawer and daily totals.
When to Print End of Day Reports
EOD reports can be printed at any time. However, for totals that reflect the EOD amounts, they should
be printed after you have processed End of Day.
Note: Some daily reports are not available until after EOD processing is complete.
Performing monthly activities creates a second EOD closing. These totals include added finance
charges, billing charges and open invoices that were closed as part of End of Month (EOM) processing.
For the last EOD of the month, print the EOD reports again after processing End of Month so the reports
will include the information for the second EOD closing.
Before You Begin
• Set your End of Period defaults to select the reports you want Cornerstone to automatically
select for you in the Daily Reports dialog box (see “End of Period Defaults” on page 102).
• Assign the printer to print the reports (File > Printer Assignment > End of Day, and then
select the reports you want to print on each printer).
• Finish your End of Day processing.
To print all selected EOD reports at once:
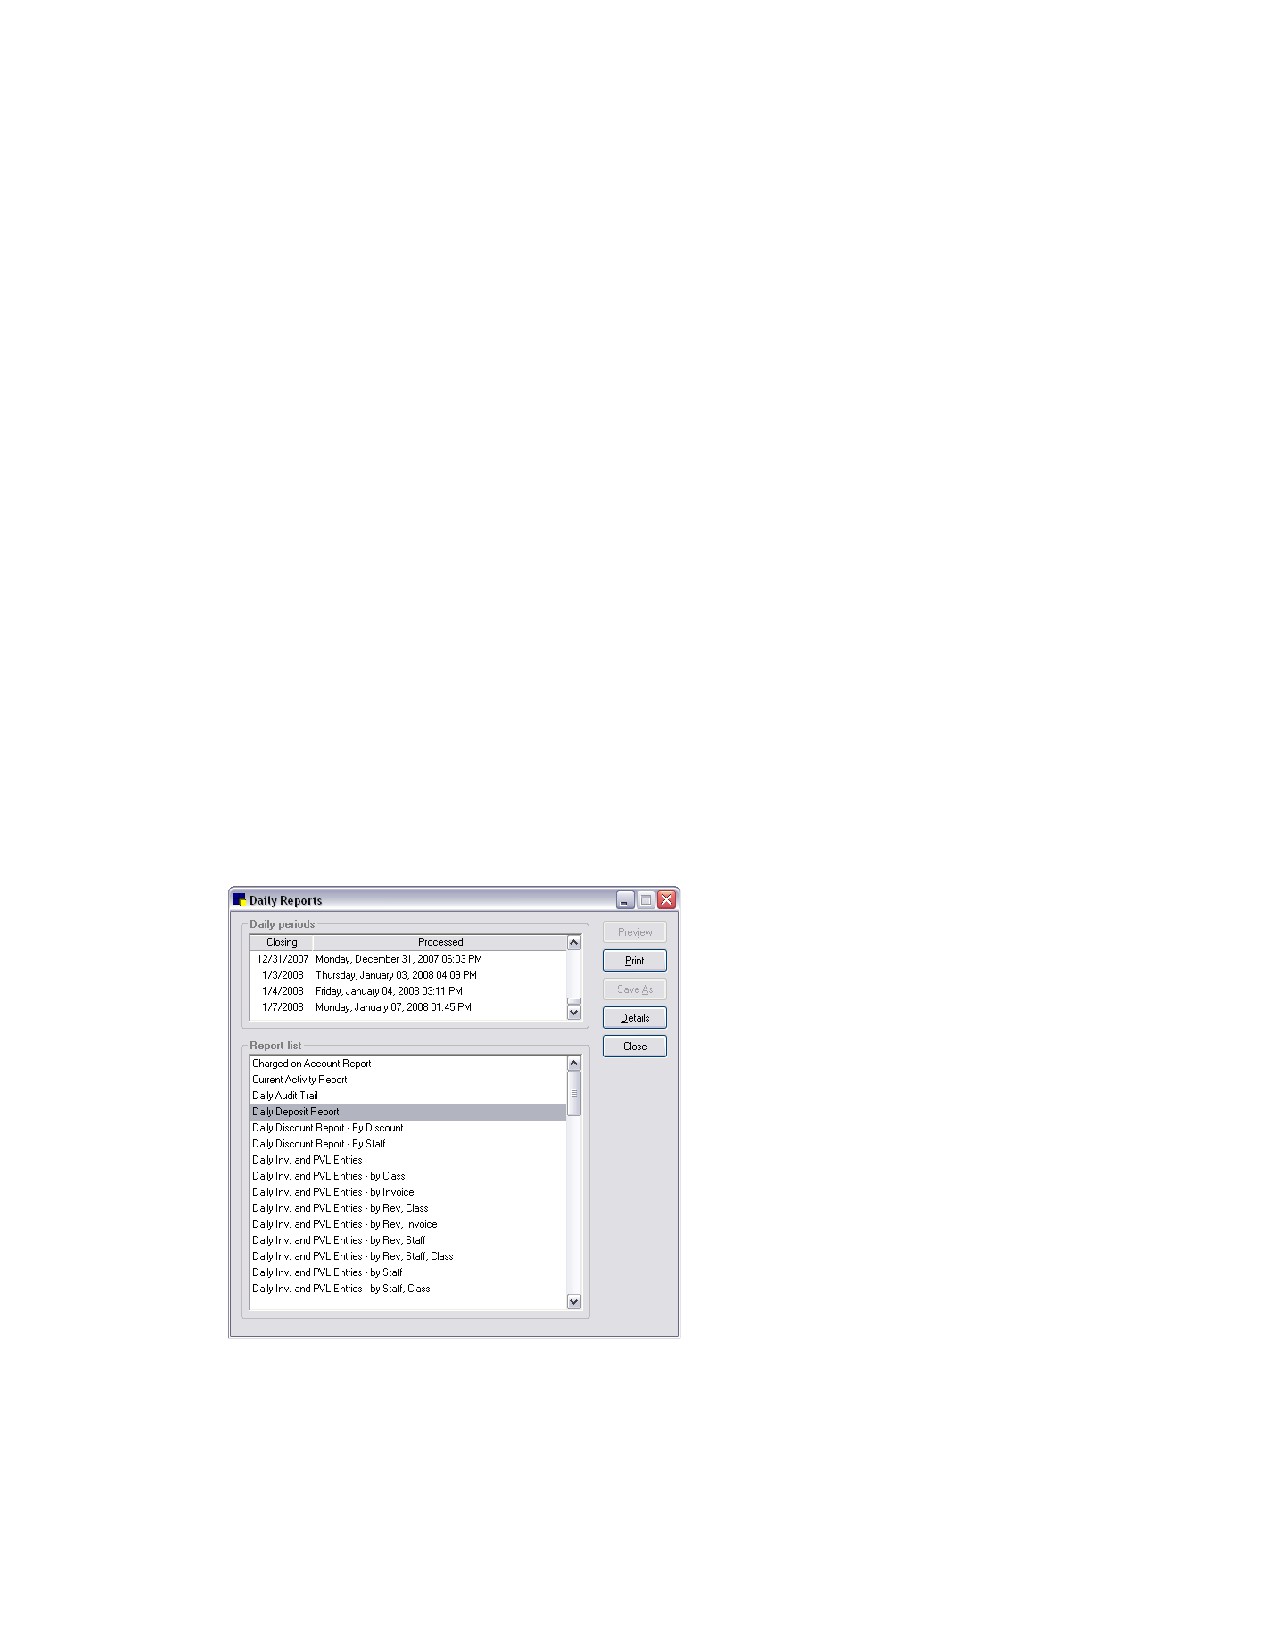
1. On the Reports menu, select End of Period > End of Day. The Daily Reports dialog box appears.
Daily Reports dialog box
2. Under Daily Periods, select the period you want the reports to reflect. For most reports, you can print
information for more than one continuous period. To do this, click the earliest period and then press
364
Chapter 20: End of Day Processing
and hold the SHIFT key, click the down arrow until you see the last period and then click the last
period. All of the periods in between are highlighted.
Note: When you select a beginning date range, your End of Period reports include all data in the
date range from one minute prior to the beginning date selected through the ending date selected.
3. In the Report list, reports you have selected in End of Period defaults are highlighted. If needed, do
the following to select additional reports:
• To select a consecutive group of reports, click the first report, hold down the SHIFT key, and
then click the last report.
• To select nonconsecutive reports, hold down CTRL, and then click each report you want to
select.
4. Click Print. The reports print on the printer assigned to each report (or the default printer if no printer
has been assigned).
To preview, print and/or save a specific EOD report:
1. On the Reports menu, select Find a Report. The Report Search window appears.
2. In the Reports list, click the plus sign to the left of End of Day, and then select the desired report.
3. With the desired report highlighted in the End of Day report group, click Create report. The Daily
Reports dialog box appears.
4. Under Daily periods, select the period you want the report to reflect. For most reports, you can print
information for more than one continuous period. To do this, click the earliest period and then press
and hold the SHIFT key while you click the last period. All of the periods in between are highlighted.
Note: When you select a beginning date range, your End of Period reports include all data in the
date range from one minute prior to the beginning date selected through the ending date selected.
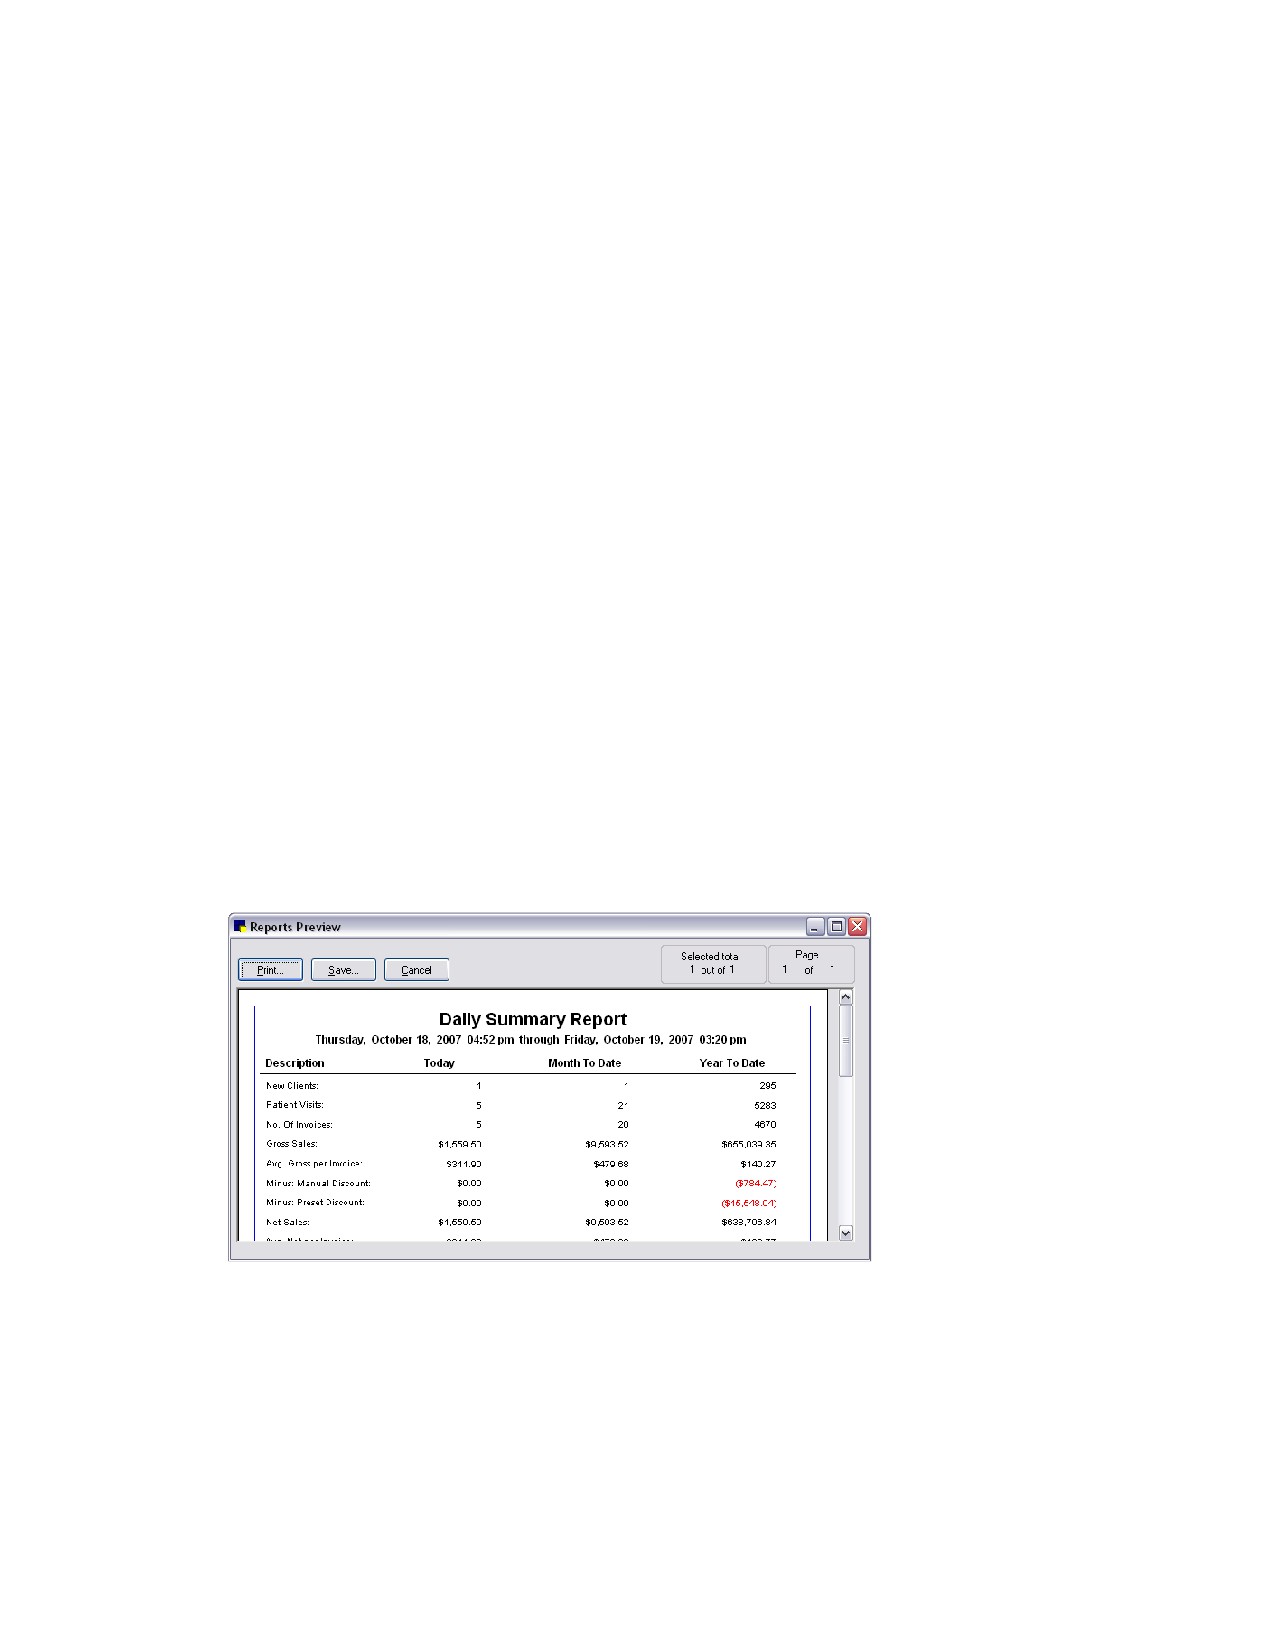
5. Click Preview. The Reports Preview window appears.
Reports Preview window
6. On the Reports Preview window, click Print to print the report, click Save to save the report data to a
file, or click Cancel to close the window.
365
Chapter 20: End of Day Processing
End of Day Reports
Charged on Account Report
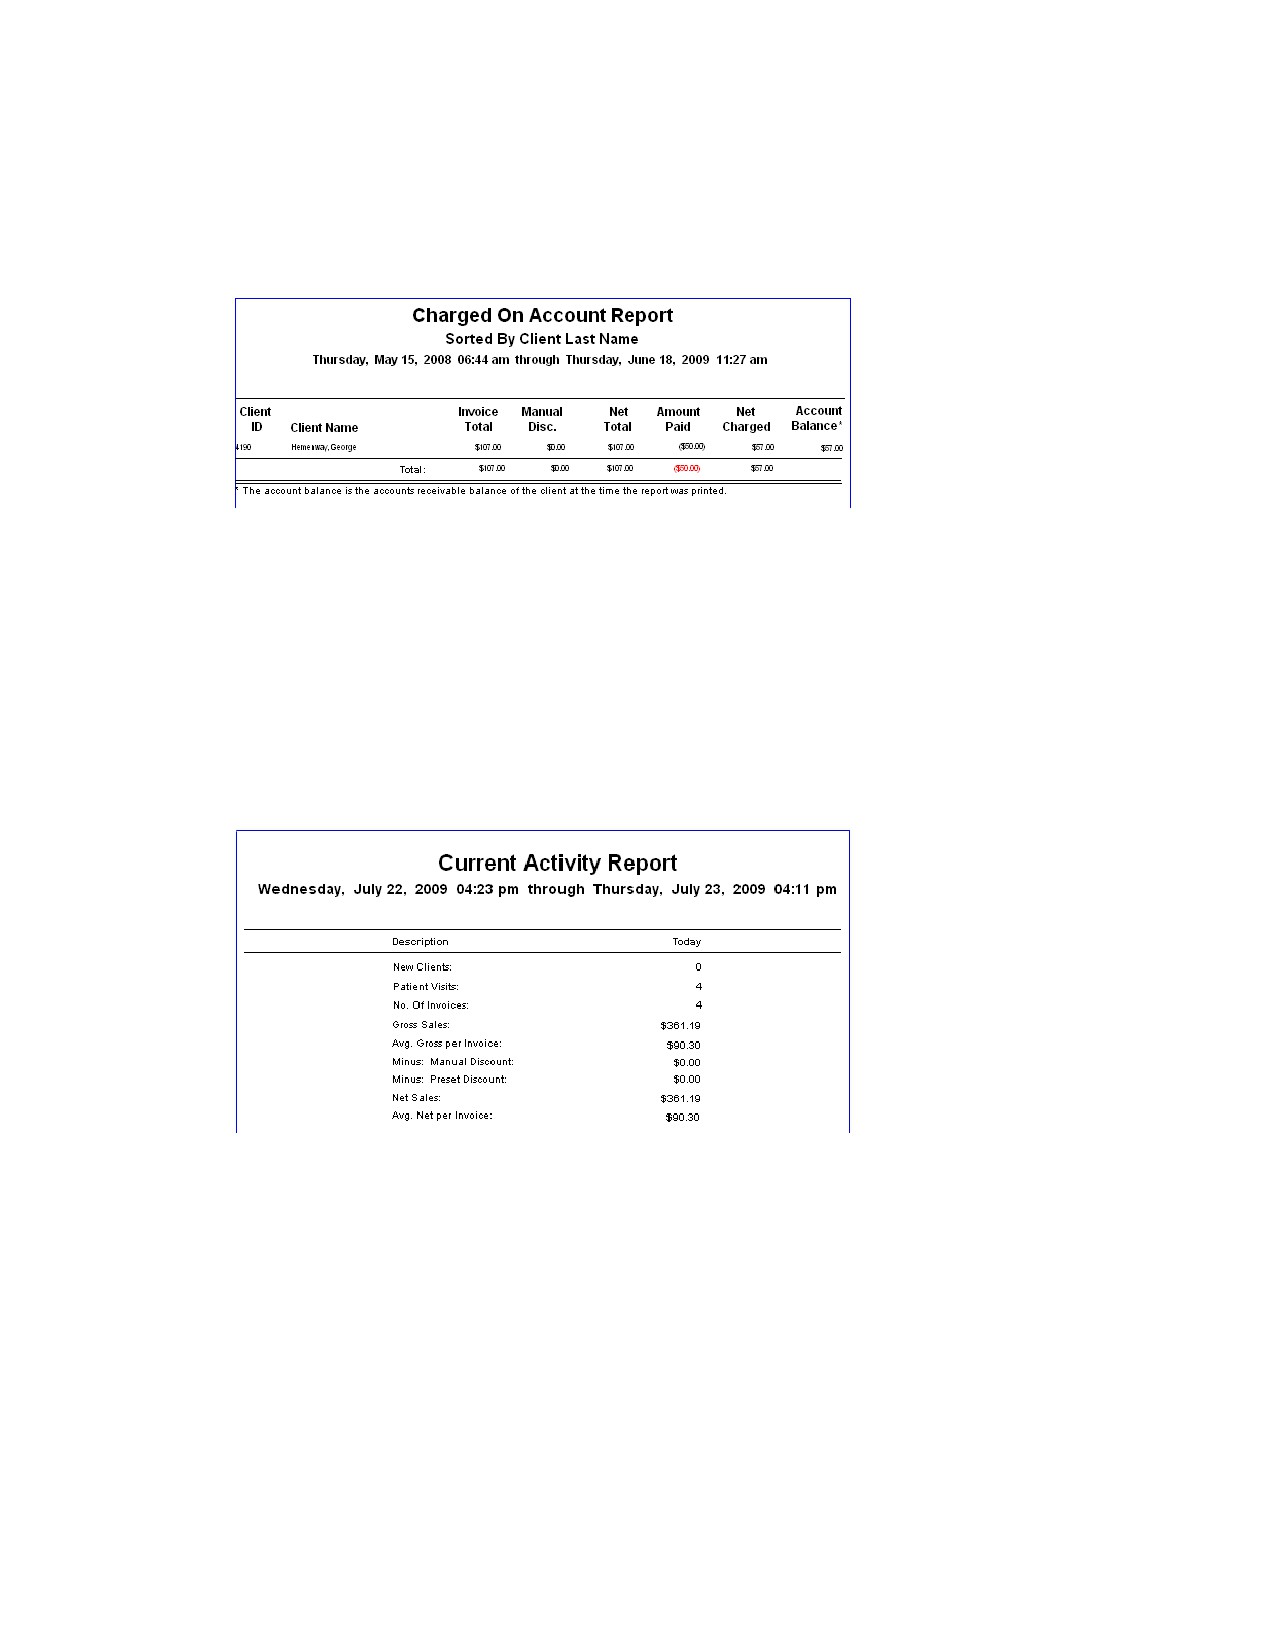
Use the Charged on Account Report to view clients who charged amounts on their accounts. The
account balance on the report is the current balance at the time the report was printed.
Net Total = Invoice total - manual discounts
Net Charged = Net total - amount paid
Current Activity Report
The Current Activity Report shows the totals of sales and revenue collected since the last EOD
processing. This report includes the number of new clients, number of patient visits, number of invoices,
gross sales, net sales, taxes, net service and inventory revenue, total payments, refunds, total deposits
and other adjustments to income.
Note: The Current Activity Report can be run only for the Current daily period.
Daily Audit Trail Report
The Daily Audit Trail Report shows every invoicing and payment transaction within the selected daily
period. We recommend that you print the Daily Audit Trail Report every time you process End of Day.
In the report’s Transaction Type column, you will find a listing of each invoice (and whether the invoice is
open or closed), each payment received (and the type of payment), each adjustment to a client’s
account, and each instance of change given or cash refund.
366
Chapter 20: End of Day Processing
Daily Deposit Report
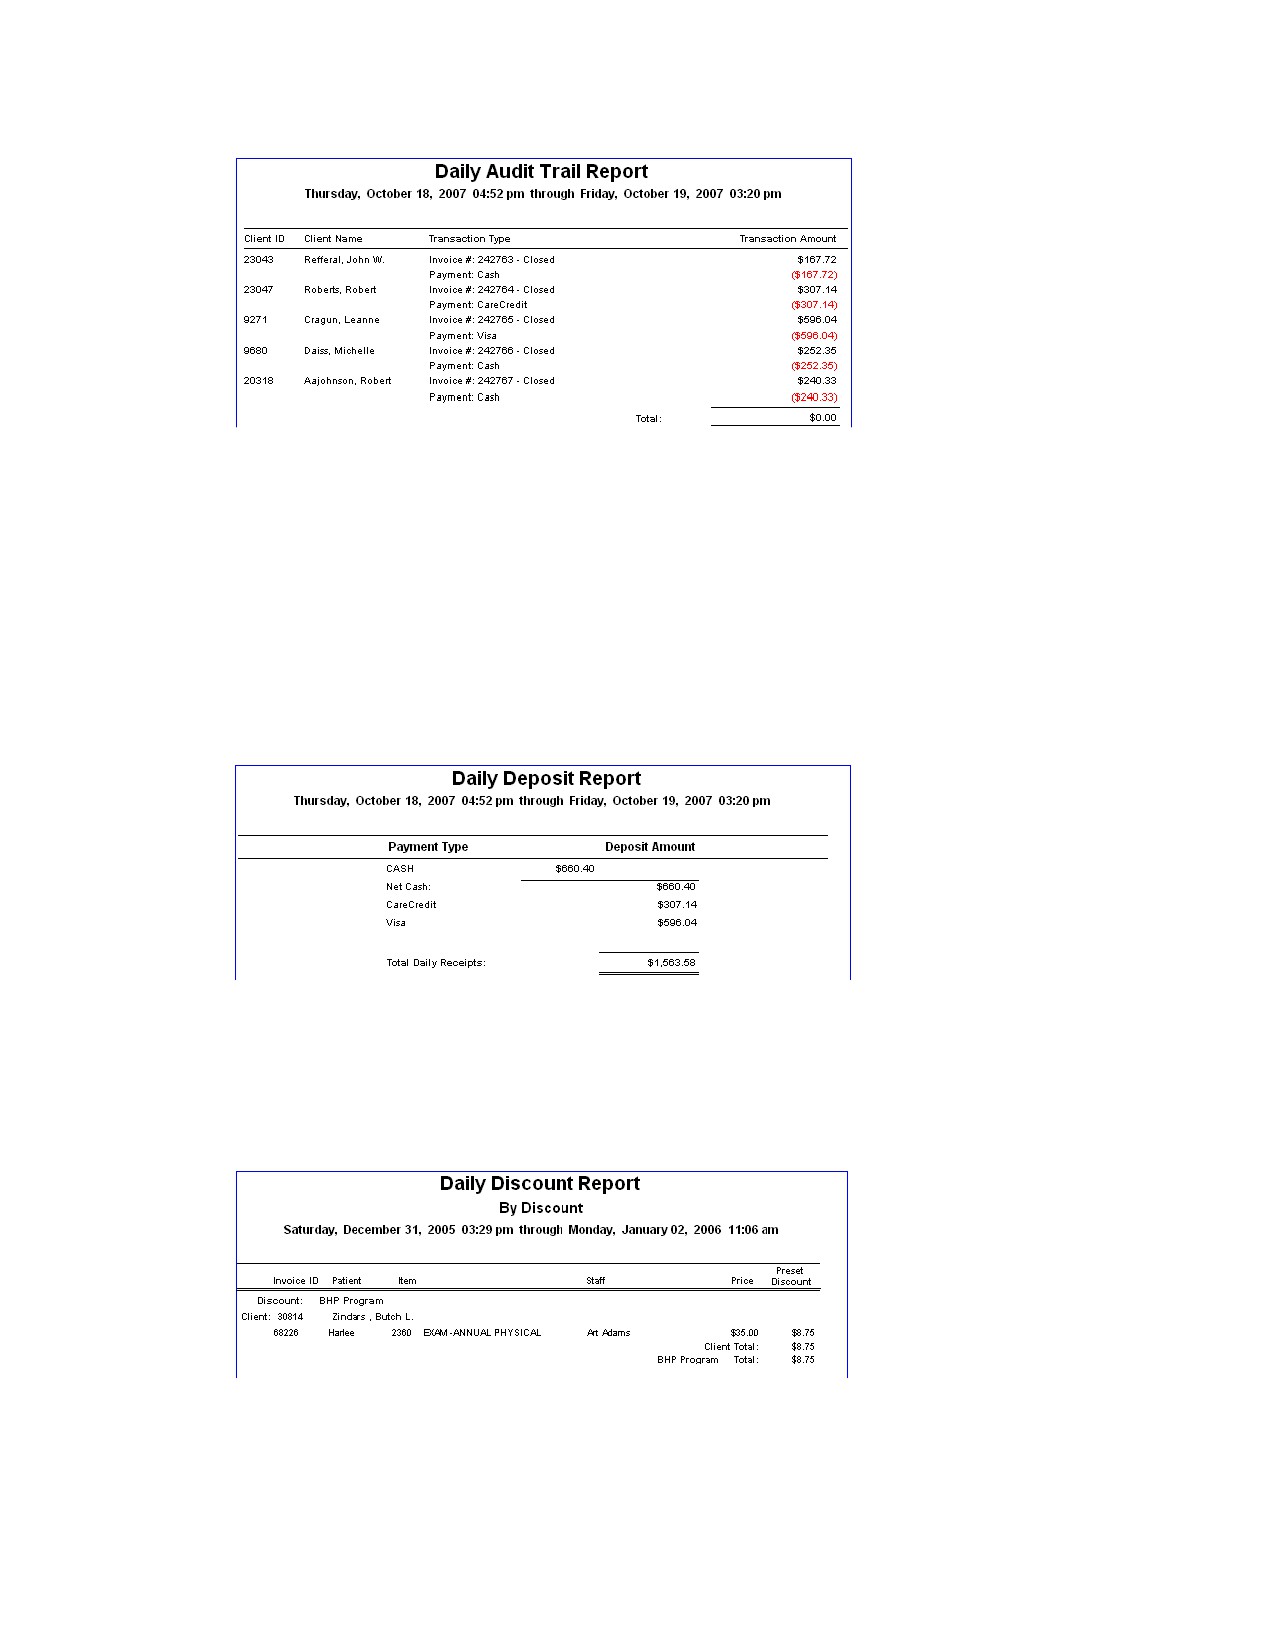
The Daily Deposit Report provides separate totals of each payment type received and totals these
payments. This report displays the amount of cash you should have accepted and the amount of each
payment type received.
Use this report in combination with the Deposit Report - Checks to help balance your cash drawer. We
recommend that you print the Daily Deposit Report every time you process End of Day. Preview this
report before processing End of Day so that you can correct any errors before closing.
Note: This report is also available as an End of Month report.
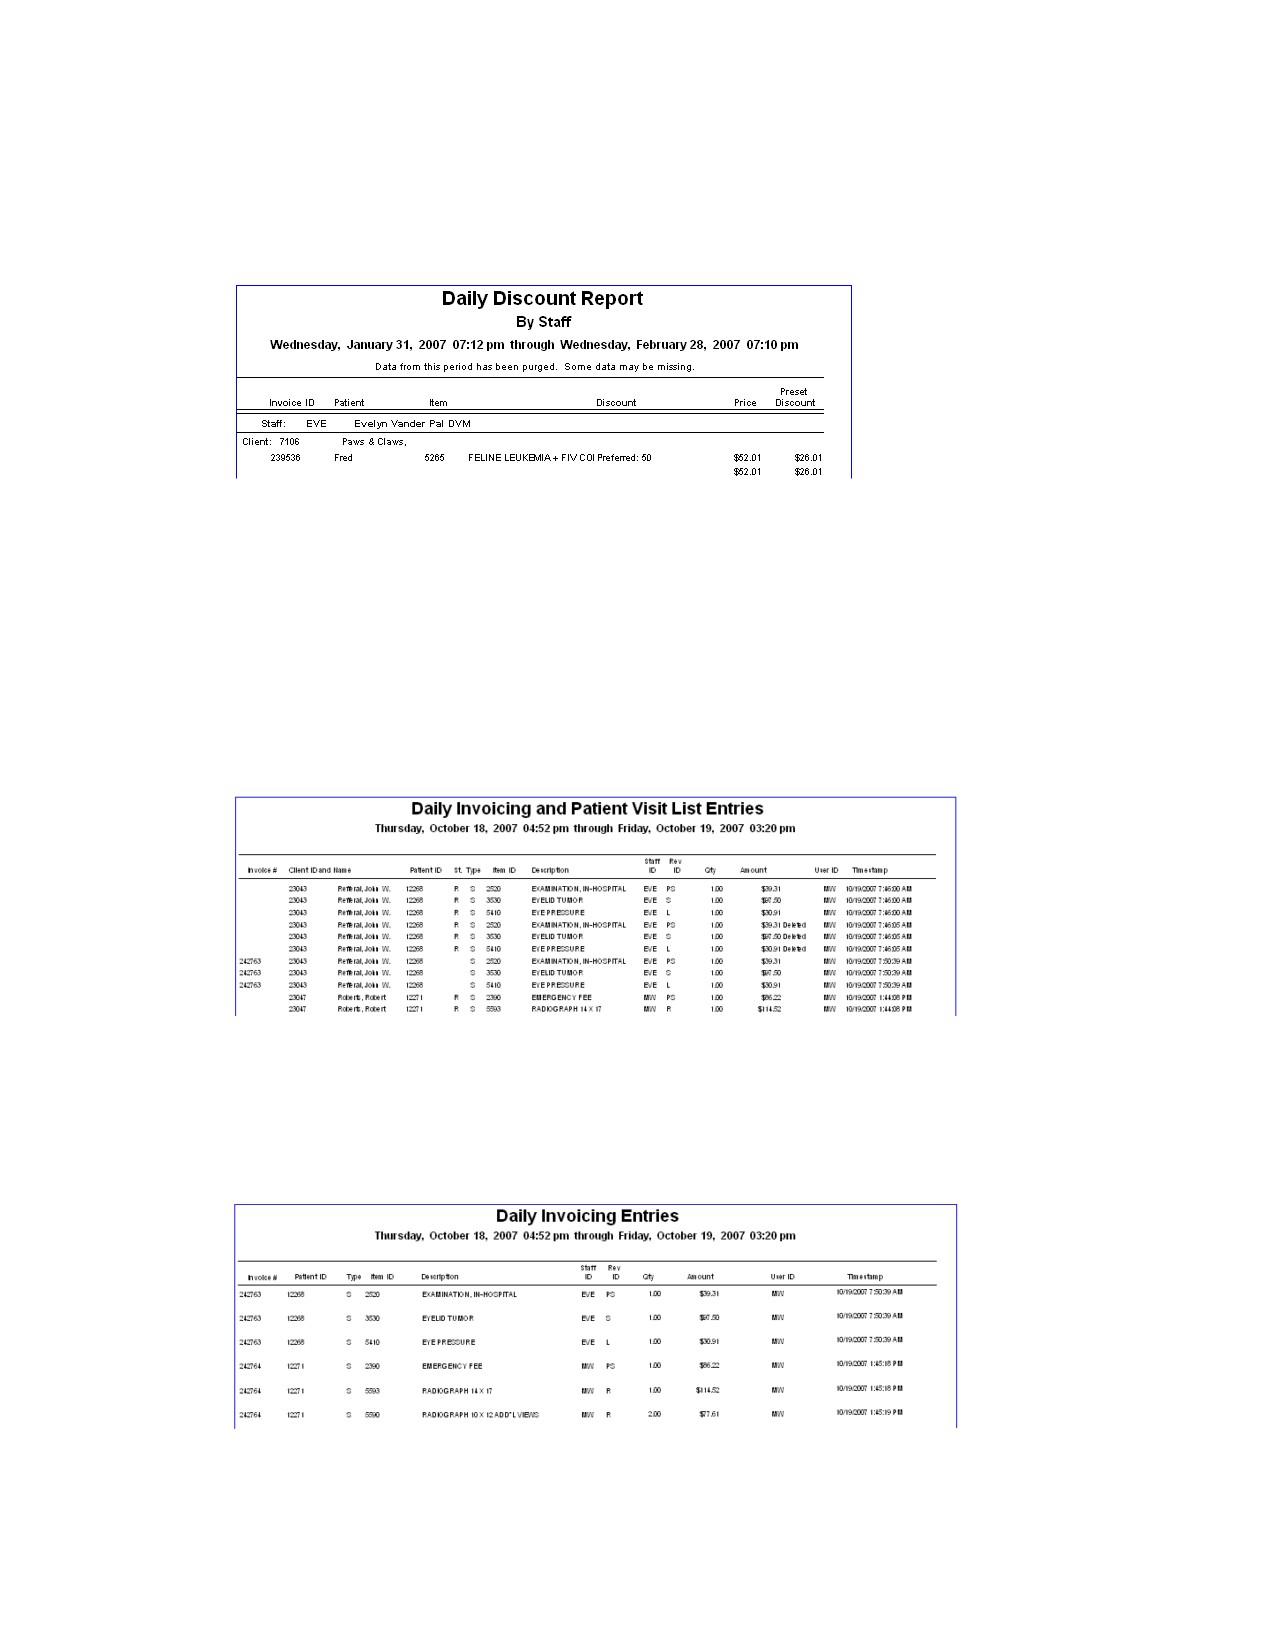
Daily Discount Report - By Discount
The Daily Discount Report - By Discount includes all predefined discounts given during the daily period.
When this report is run, the Daily Manual Discount Report - By Client is also automatically run (includes
all manual discounts given during the daily period).
367
Chapter 20: End of Day Processing
Daily Discount Report - By Staff
This report includes all predefined discounts given by staff during the daily period. When you run this
report, the Daily Manual Discount Report - By Staff is also automatically run (includes all manual
discounts given by staff during the daily period).
Daily Inv. and PVL Entries Report and Daily Inv. And PVL Totals Report
These reports enable your practice to track all changes, additions and deletions of billed lines on
invoices or the Patient Visit List, including all lines on open or closed invoices and the user ID of the
person who is logged in.
To select what you want to track on the reports, see “Daily Entries Report Defaults” on page 98.
Note: For practices using the Mobile Computing module, changes and deletions performed on a mobile
computer will not display on these reports. When synchronization is run, the entries will display as
additions to the reports.
Daily Invoicing Entries
The Daily Invoicing Entries Report enables your practice to track all changes, additions and deletions of
billed lines on invoices. To select what you want to track on the reports, see “Daily Entries Report
Defaults” on page 98.
368
Chapter 20: End of Day Processing
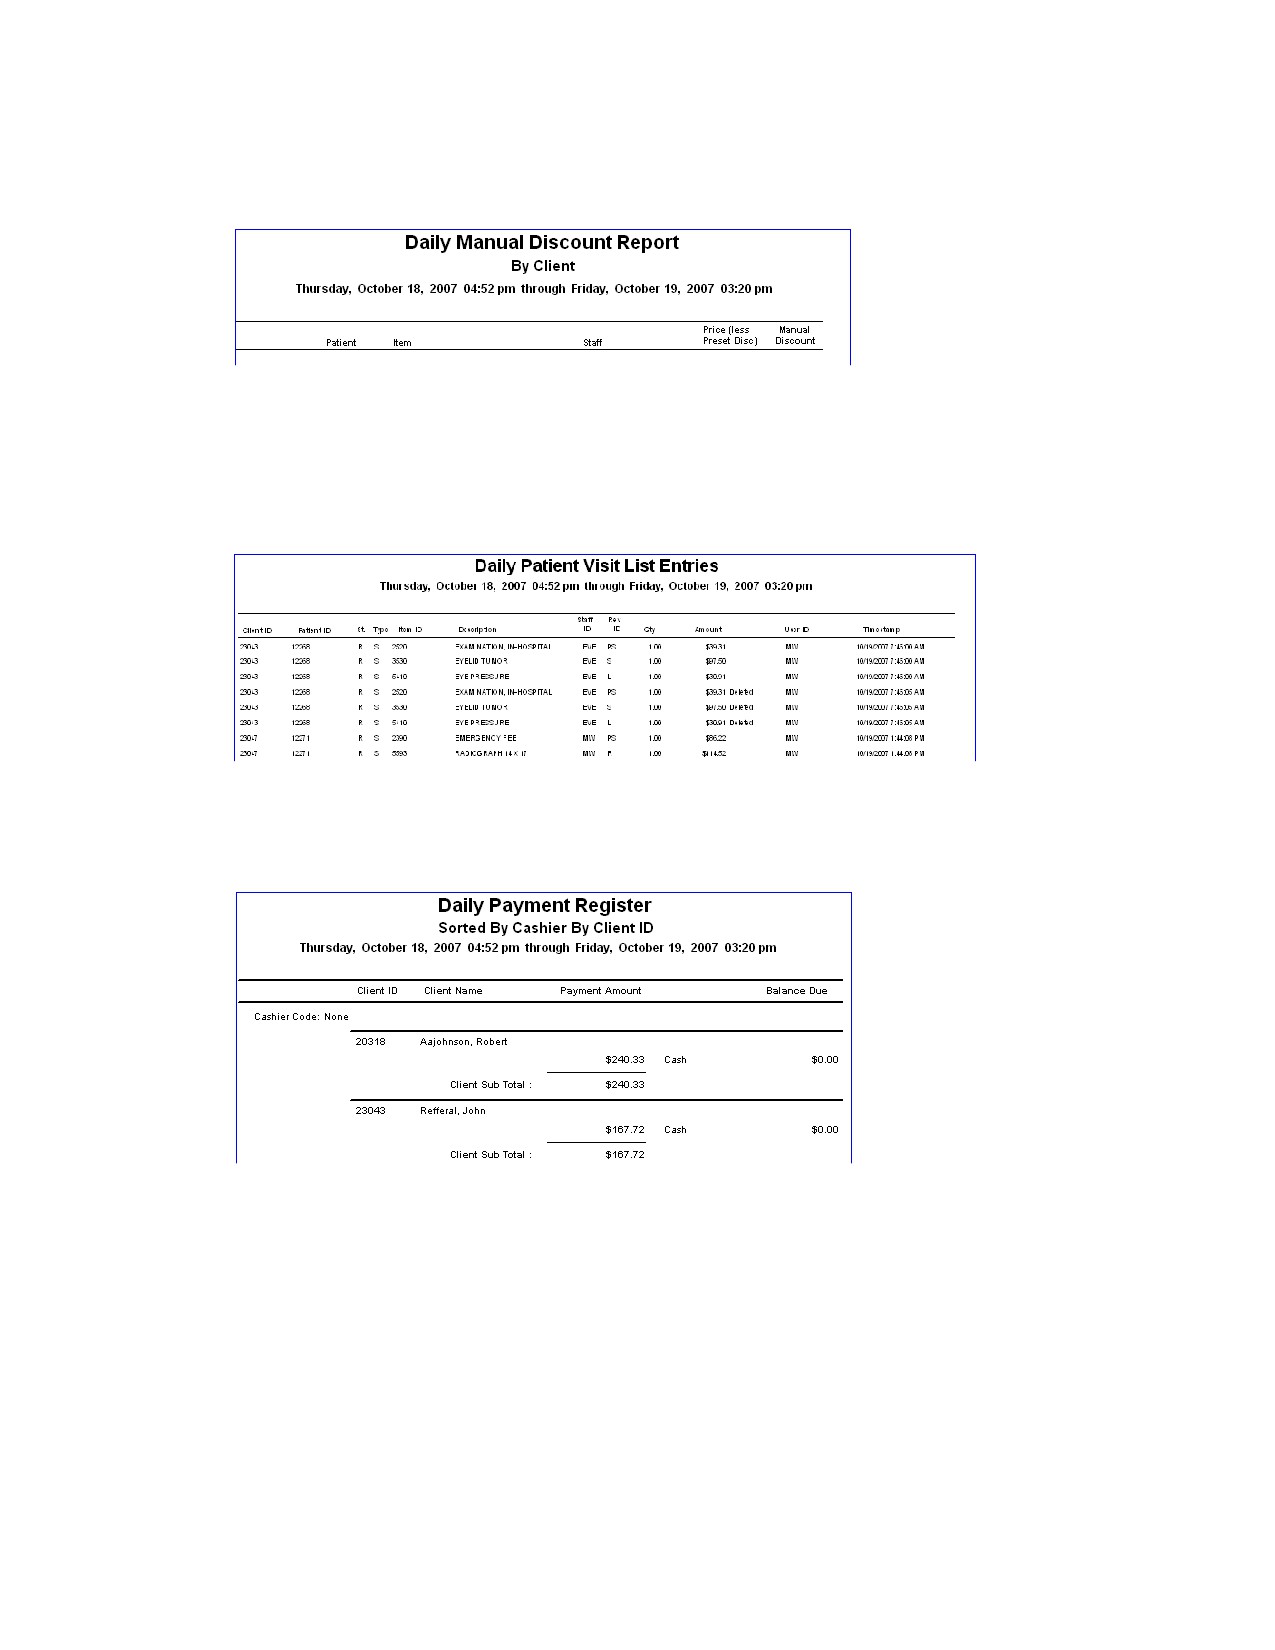
Daily Manual Discount Report - By Client or By Staff
The Daily Manual Discount Report includes all manual discounts given during the daily period.
Daily Patient Visit List Entries Report
The Daily Patient Visit List Entries Report enables your practice to track all changes, additions and
deletions of billed lines on the Patient Visit List. To select what you want to track on the reports, see
“Daily Entries Report Defaults” on page 98.
Daily Payment Register - By Cashier ID by Client ID or By Cashier by Payment Type
The Daily Payment Register provides a list of the payments received in the daily period.
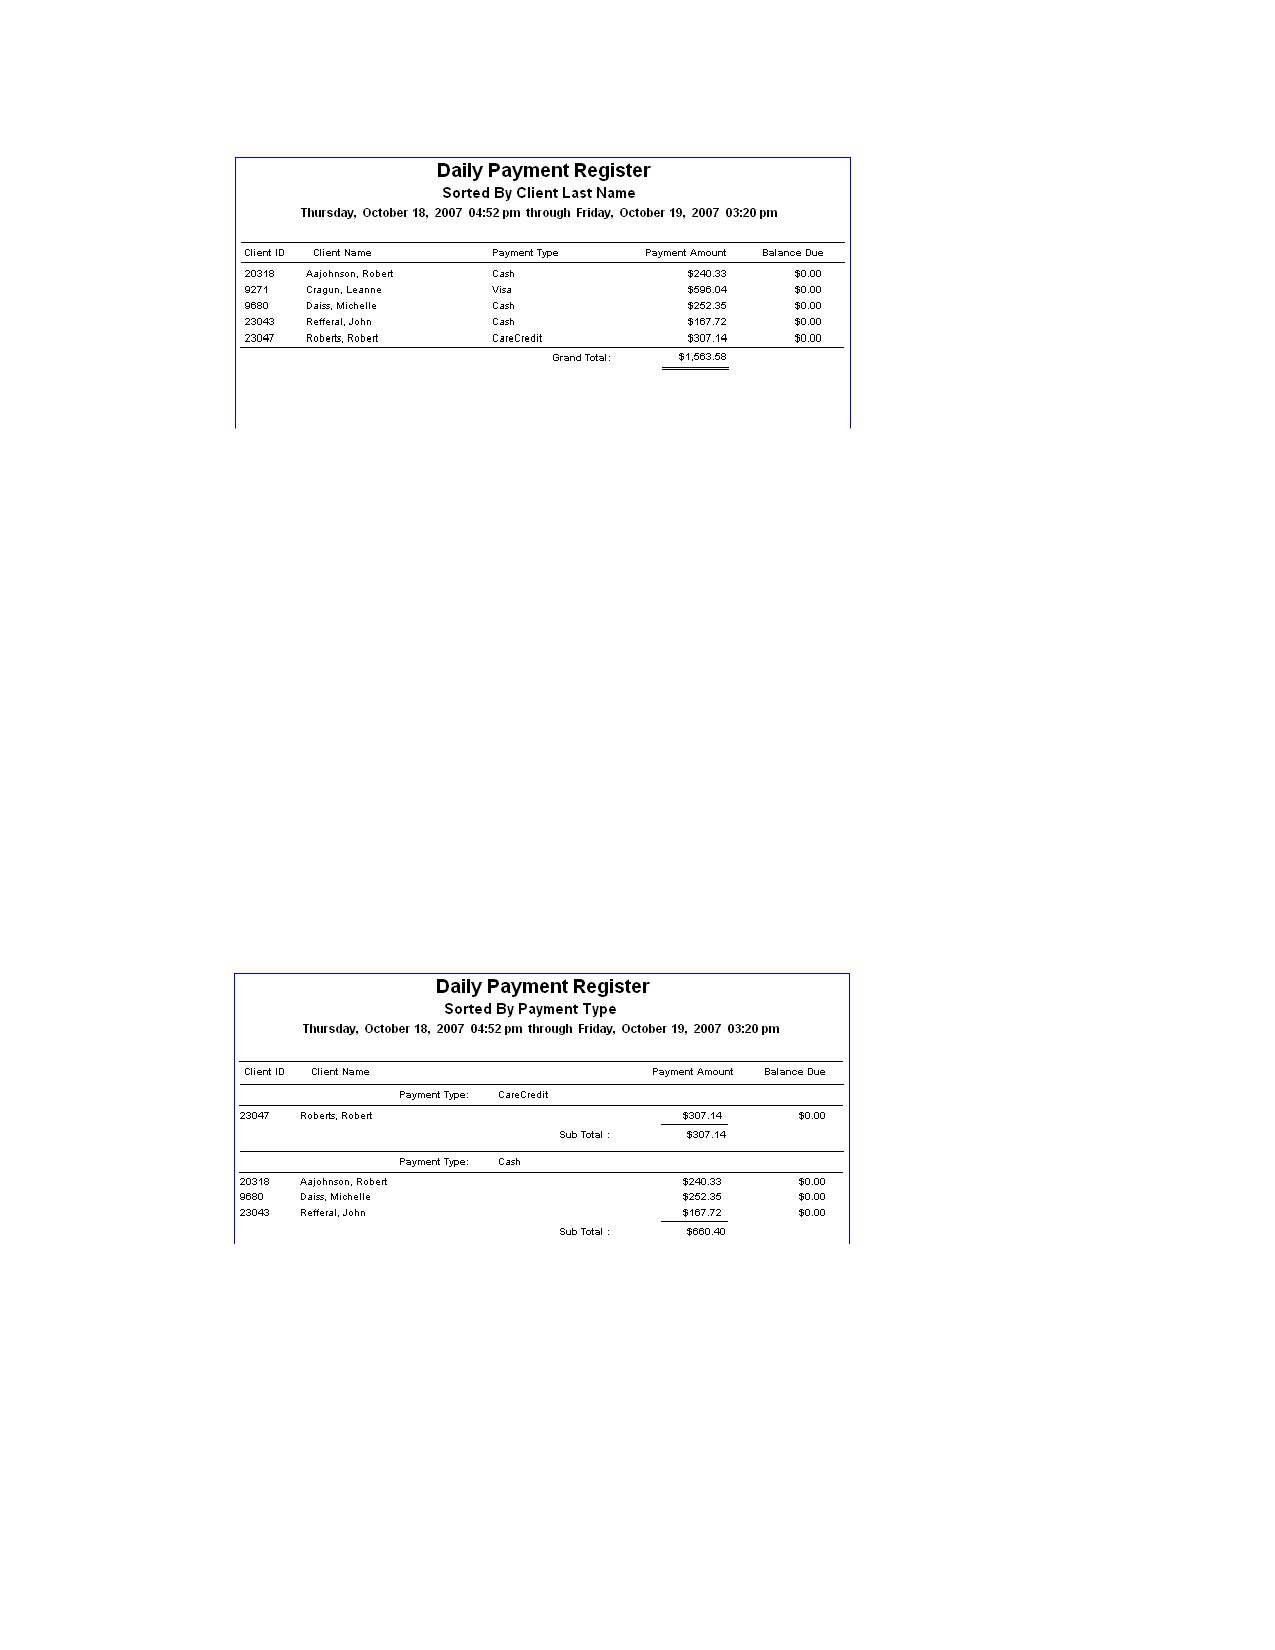
Daily Payment Register - By Client Last Name
The Daily Payment Register - By Client Last Name Report lists each client who made a payment during
the day. For each client who made a payment during this period, the report shows the payment type,
payment amount and the client’s balance due. If your practice uses cashier codes, the cashier code will
also display.
Use this report to review your daily business and see a recap of client visits, payments and balances
due.
369
Chapter 20: End of Day Processing
Daily Payment Register-Credit/Debit Payment Transactions
The Daily Payment Register-Credit/Debit Payment Transactions report allows you to review your daily
credit/debit card transactions (payments, voids and refunds). The report groups transactions according
to payment card type and sorts them in ascending date/time order.
Note: This report lists only those transactions performed using the Credit Card Payment and/or Debit
Card Payment payment types, as these are the only payment types that allow card processing initiated
from Cornerstone.
Daily Payment Register - By Payment Type
The Daily Payment Register - By Payment Type report lists each client who made a payment during the
daily period, categorized and subtotaled by Payment Type. Like the Daily Payment Register - By Client
Last Name report, you can use the Daily Payment Report - By Payment Type report to review your daily
business and see a recap of client visits, payments and balances due, with each payment categorized
under a Payment Type heading.
This report is a useful tool when you are filling out your bank deposit slip.
370
Chapter 20: End of Day Processing
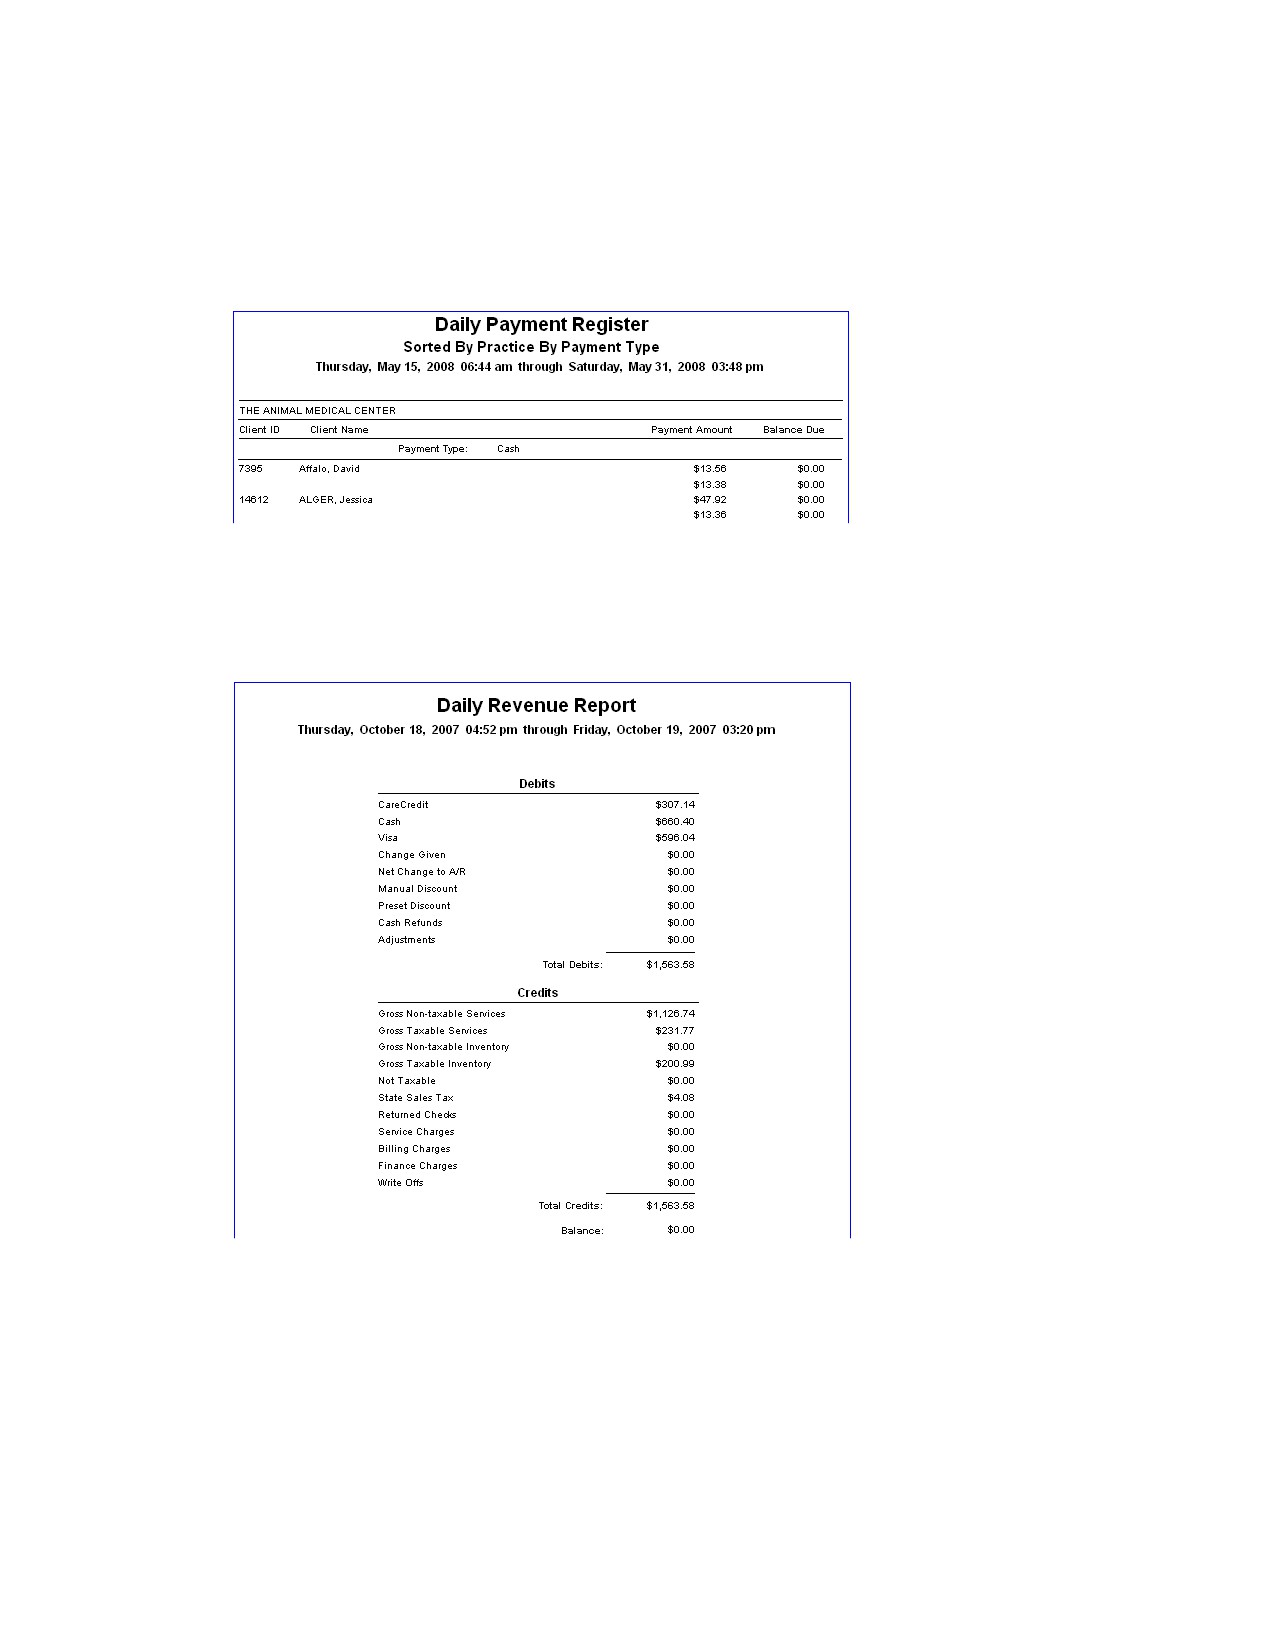
Daily Payment Register - By Practice
The Daily Payment Register - By Practice report is available for those practices with the Multi-
Location/Single Database option enabled. This report is split out by practice based on the logged in
practice when the payment was made. It lists each client who made a payment during the daily period,
sorted by Practice by Payment Type.
Daily Revenue Report
The Daily Revenue Report summarizes credits and debits in balance sheet form. This report should
always balance.
371
Chapter 20: End of Day Processing
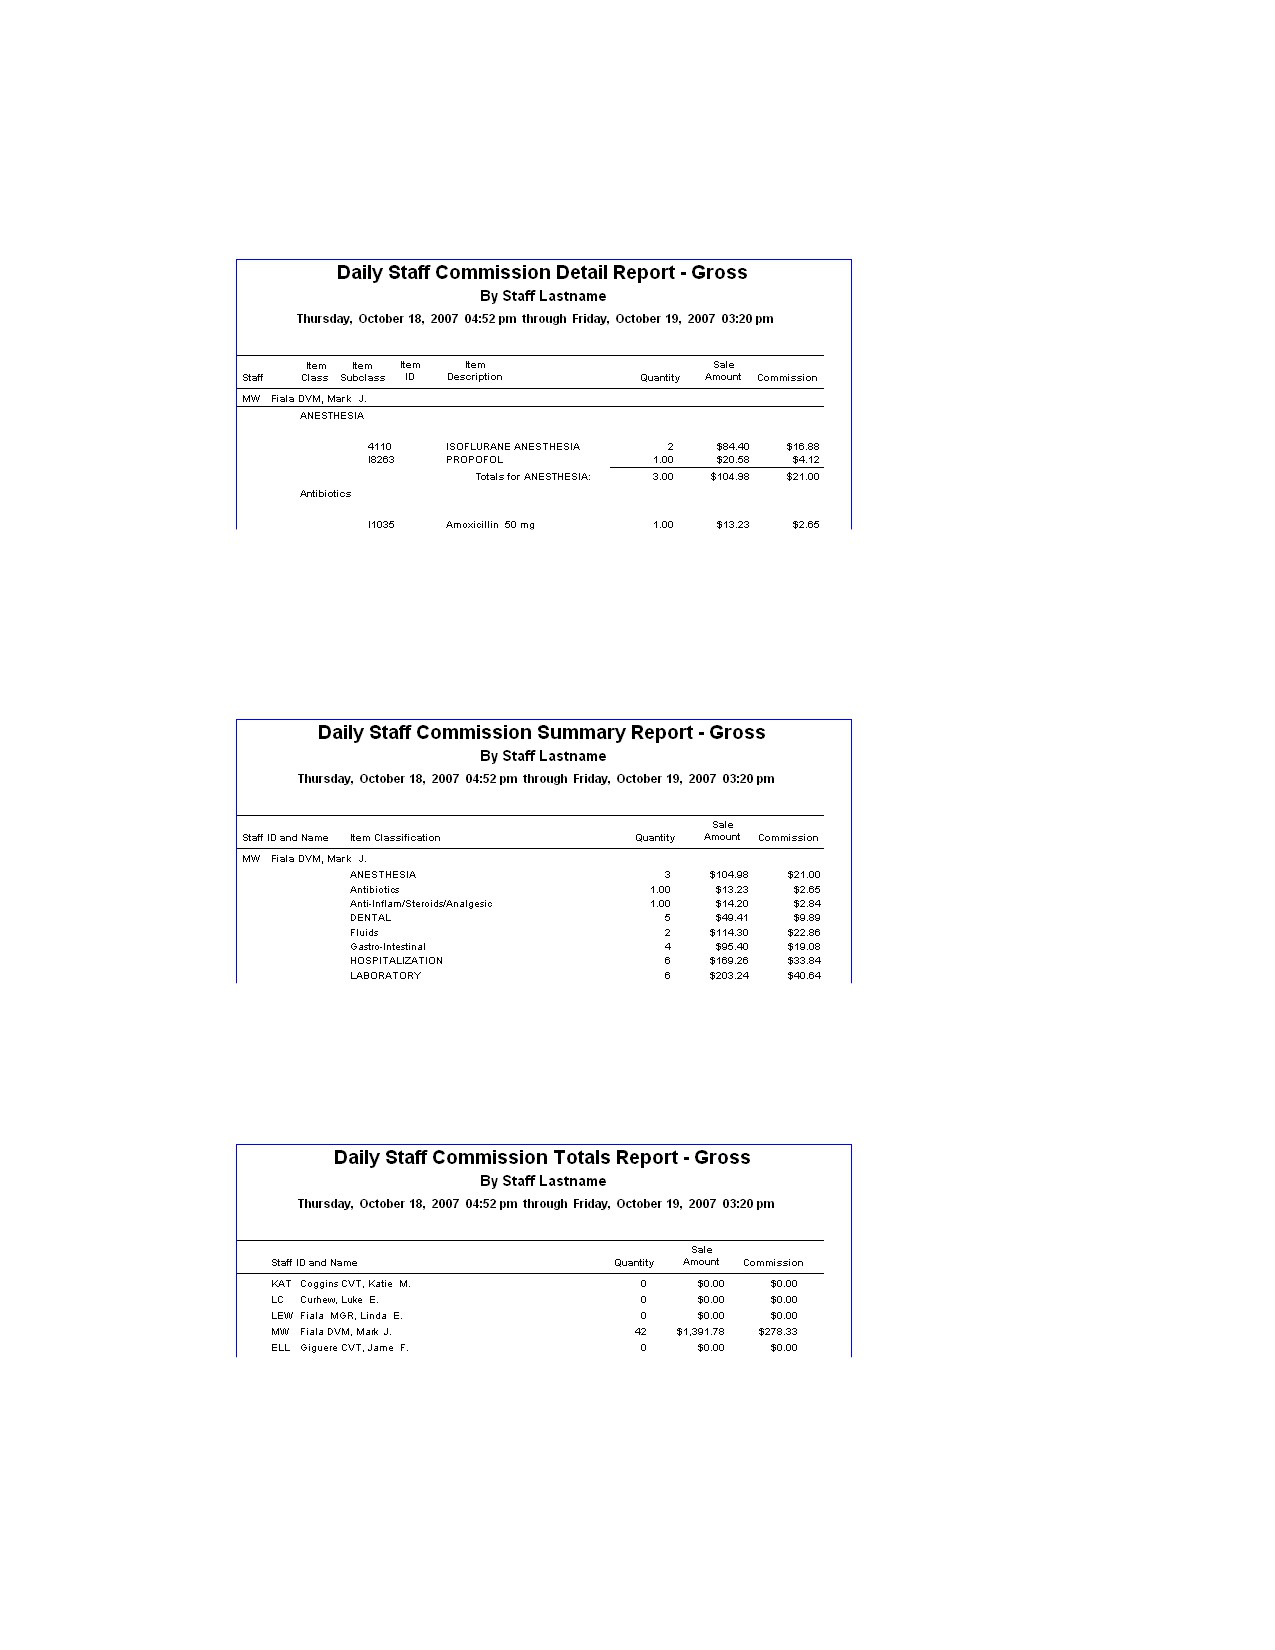
Daily Staff Commission Detail Report - Gross or Net
The Daily Staff Commission Detail Report shows the commission for staff members by invoice item by
item classification.
Daily Staff Commission Summary Report - Gross or Net
The Daily Staff Commission Summary Report shows the commission for staff members summarized
according to invoice item classification. These totals are not paid totals; they are the totals for today’s
sales.
Daily Staff Commission Totals Report - Gross or Net
The Daily Staff Commission Totals Report shows the total amount of sales and total amount of
commission credited to each provider.
372
Chapter 20: End of Day Processing
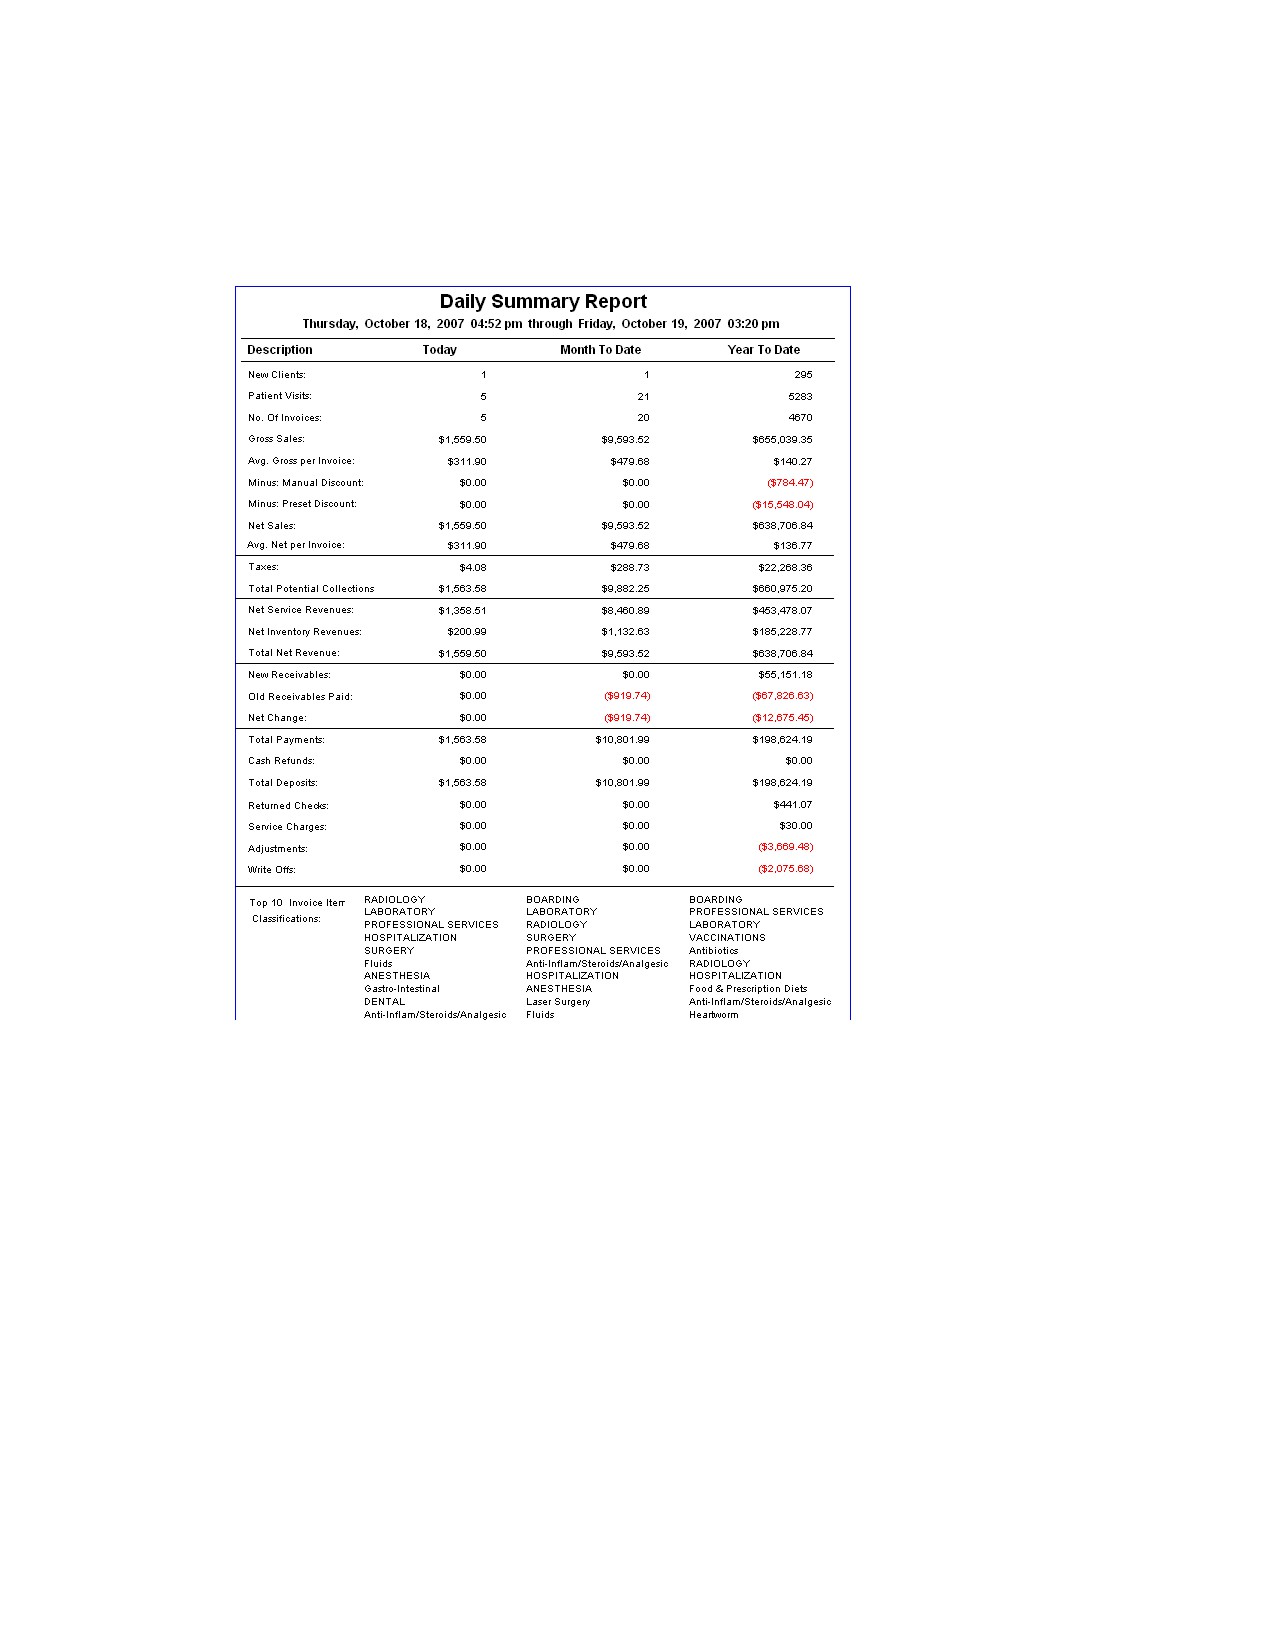
Daily Summary Report
Use the Daily Summary Report to track the health of your practice by looking at a summary that includes
daily, month-to-date, and year-to-date statistics. We recommend that you print the Daily Summary
Report after every End of Day processing.
Daily Summary Report - By Practice
The Daily Summary Report - By Practice is available for those practices with the Multi-Location/Single
Database option enabled. This report lets you track financial health by breaking out the daily, month-to-
date, and year-to-date statistics for each practice.
373
Chapter 20: End of Day Processing
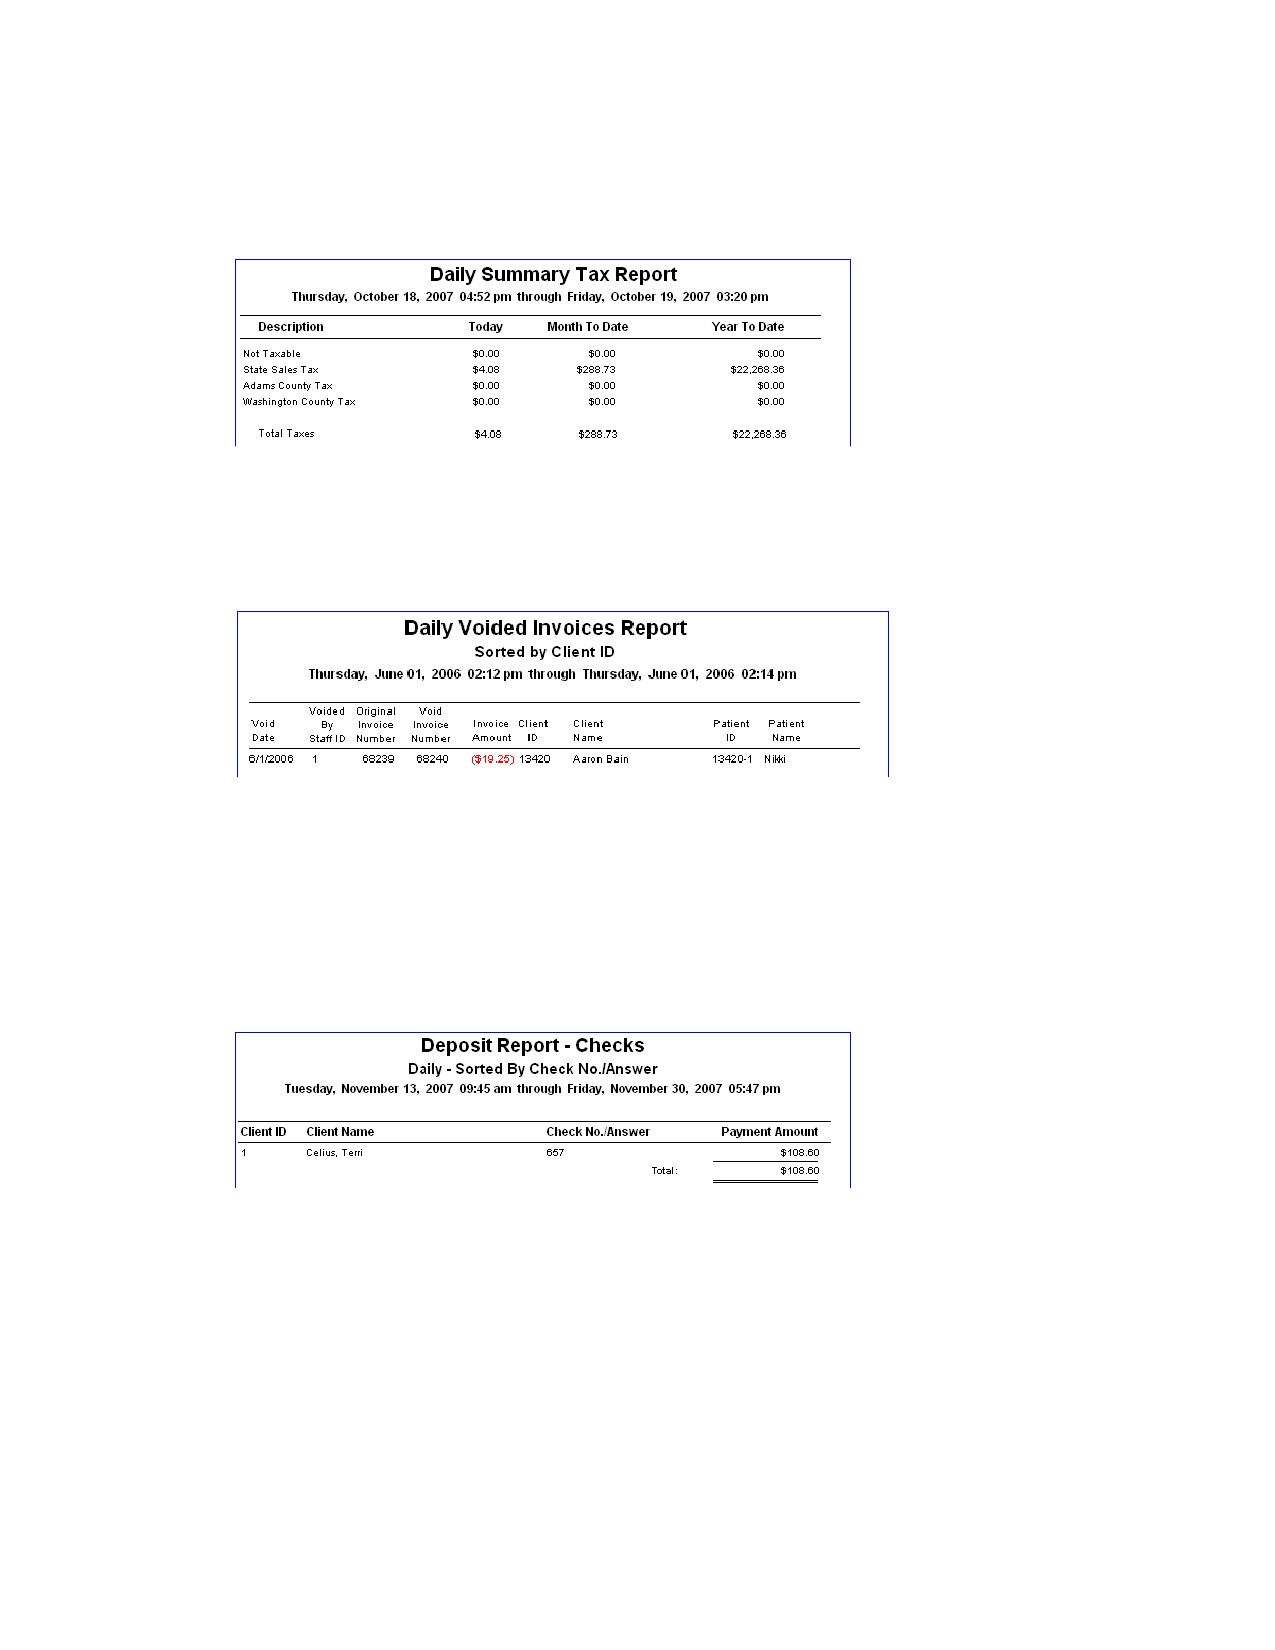
Daily Summary Tax Report
Use the Daily Summary Tax Report to list sales tax by tax type. This is useful to see how much tax is
owed on a daily basis.
Daily Voided Invoices Report - By Client ID, Date or Staff
The Daily Voided Invoices Report provides a list of invoices voided during a specified period. The report
can be printed by client ID, by date or by staff.
Deposit Report - Checks - By Check No./Answer, By Client ID or By Client Last Name
The Deposit Report - Checks lists all of the checks entered as payments. You can use this report as part
of the deposit record at your practice’s bank.
For each check payment you received, the Deposit Report - Checks lists each check, check number
and check amount. Depending on which deposit report you selected, the report is sorted by check
number (or prompt answer), client ID or client last name.
374
Chapter 20: End of Day Processing
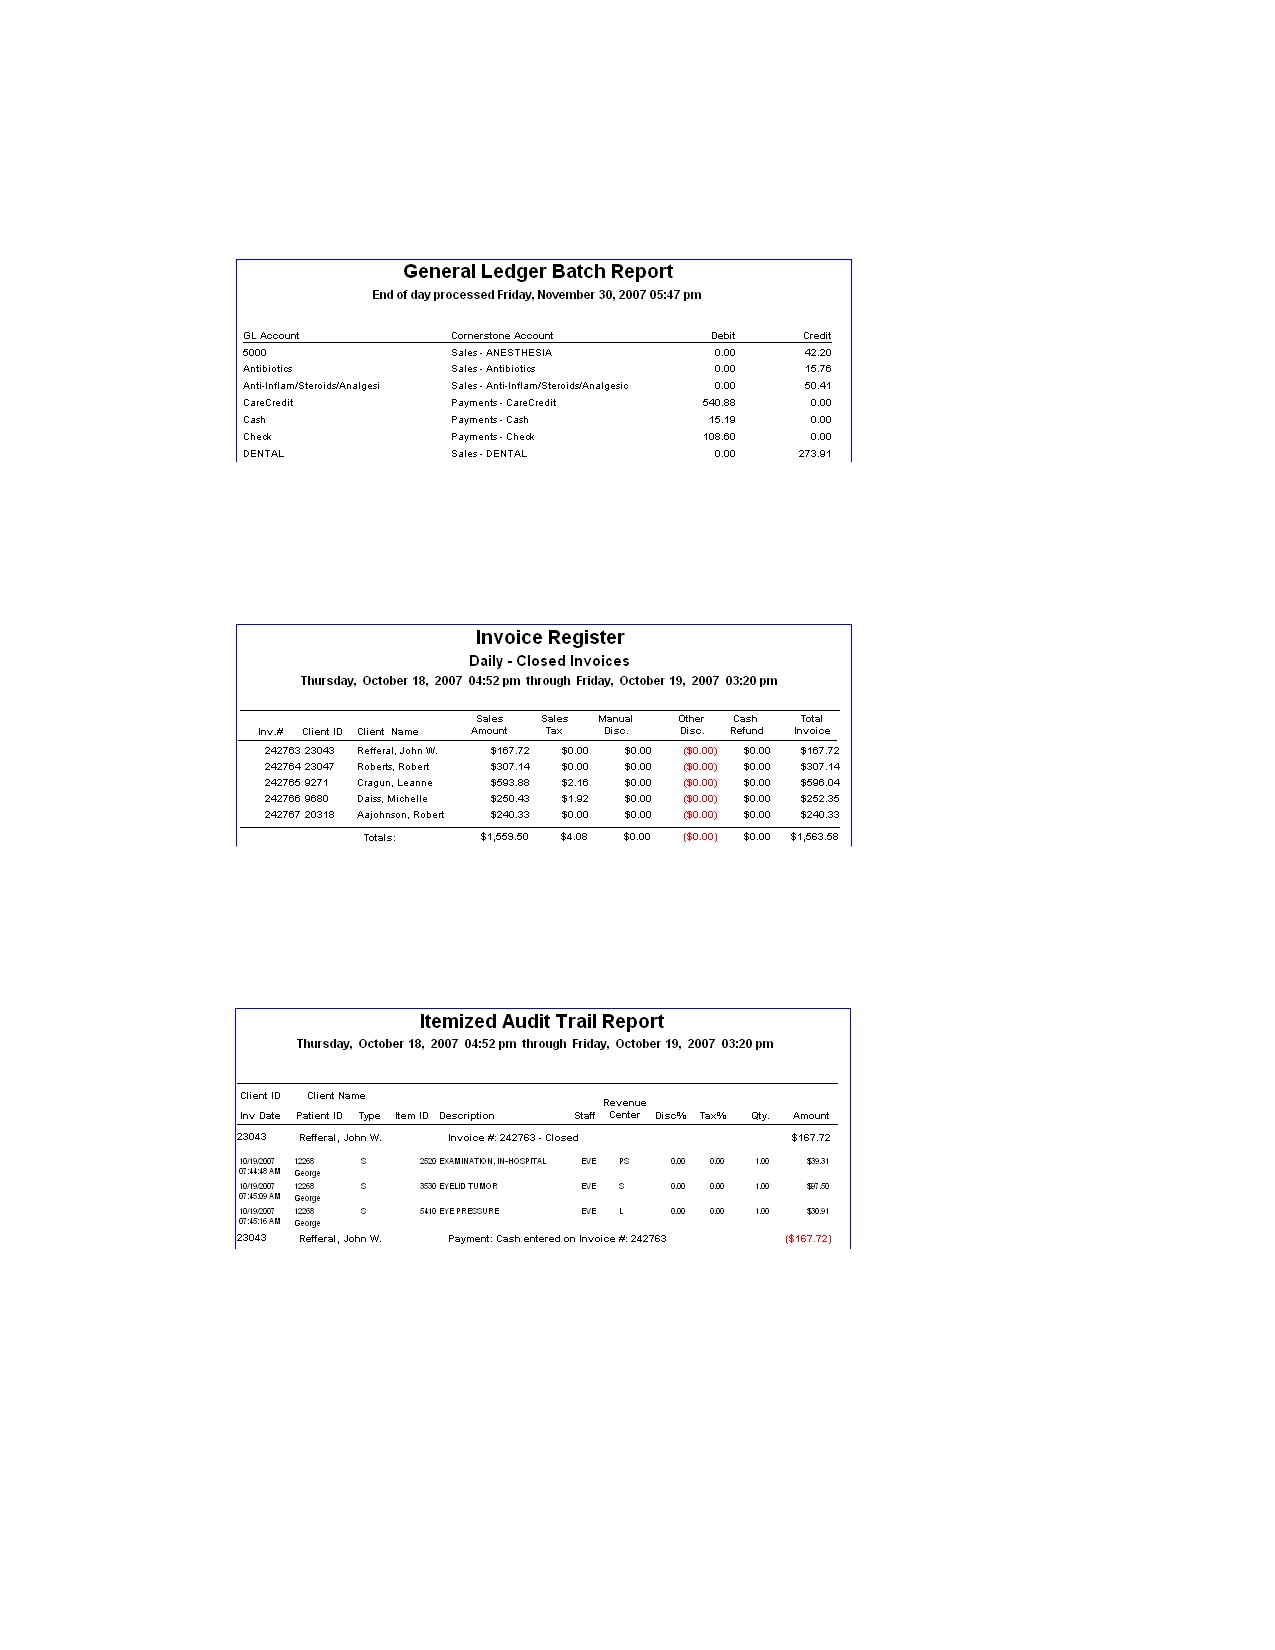
GL Batch Report
Used only if your practice utilizes the General Ledger (GL) Interface, the GL Batch Report provides a
summary of the data extracted to the file.
Invoice Register - Closed Invoices or Invoice Register - Open Invoices
The Invoice Register Report lists basic information for each invoice closed (or still open) during the
selected daily period(s). The report is sorted by invoice number.
Itemized Audit Trail
The Itemized Audit Trail Report details each transaction entered during the daily period. Transactions are
displayed in the order they were entered. This report is useful if you have to reenter any data.
Other types of transactions which appear on this report include: cash refunds, manual discounts,
adjustments, write offs and reinstatements, returned checks and returned check service charges.
Itemized Audit Trail for Revenue Center
The Itemized Audit Trail by Revenue Center Report allows you to print a trail of all invoices for a specified
revenue center. Only one revenue center may be selected each time you print the report. For example,
you can print a report of all invoices with at least one item attributed to the selected revenue center. You
375
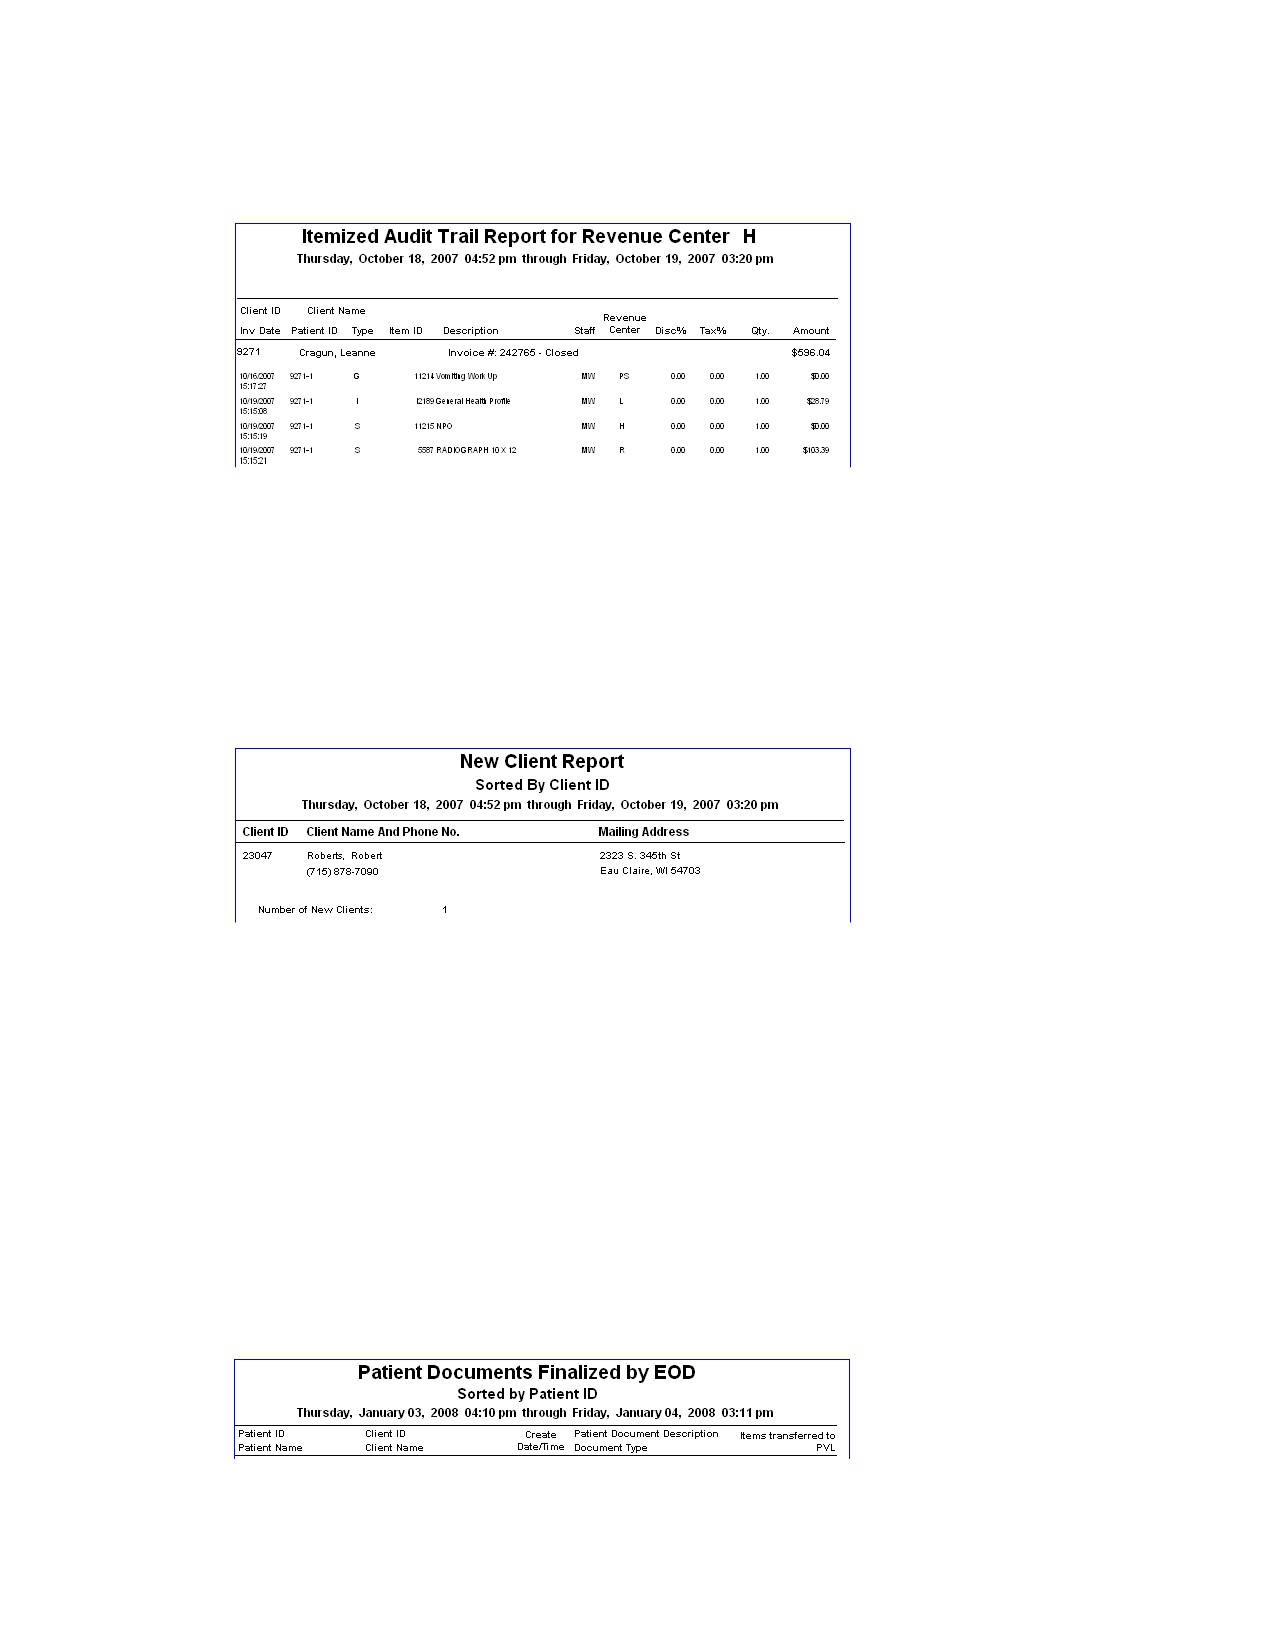
Chapter 20: End of Day Processing
can also choose to print this report by revenue center for an individual cashier ID or for a range of
cashier IDs.
New Client Report - By Client ID or By Client Last Name
The New Client Report shows all of the new clients entered into Cornerstone during the selected daily
period(s). This report can be sorted by client ID or last name.
You can save data from this report (using the Save As feature) to create mailing labels to send client
satisfaction surveys or other marketing materials.
Note: This report is also available as an End of Month report and End of Year report.
New Client Report - By Practice, Client ID or By Practice, Client Last Name
For those practices with the Multi-Location/Single Database option enabled, the New Client Report - By
Practice shows all of the new clients entered into Cornerstone by practice during the selected daily
period(s) based on the client home practice. This report can be sorted by client ID or last name.
You can save data from this report (using the Save As feature) to create mailing labels to send client
satisfaction surveys or other marketing materials.
Note: This report is also available as an End of Month report and End of Year report.
Patient Documents Finalized by EOD
The Patient Documents Finalized by EOD Report lists all medical notes, correspondence and Classic
medical notes that were automatically finalized during End of Day processing. If items were moved to the
Patient Visit List, asterisks (**) are included on the report line.
376
Chapter 20: End of Day Processing
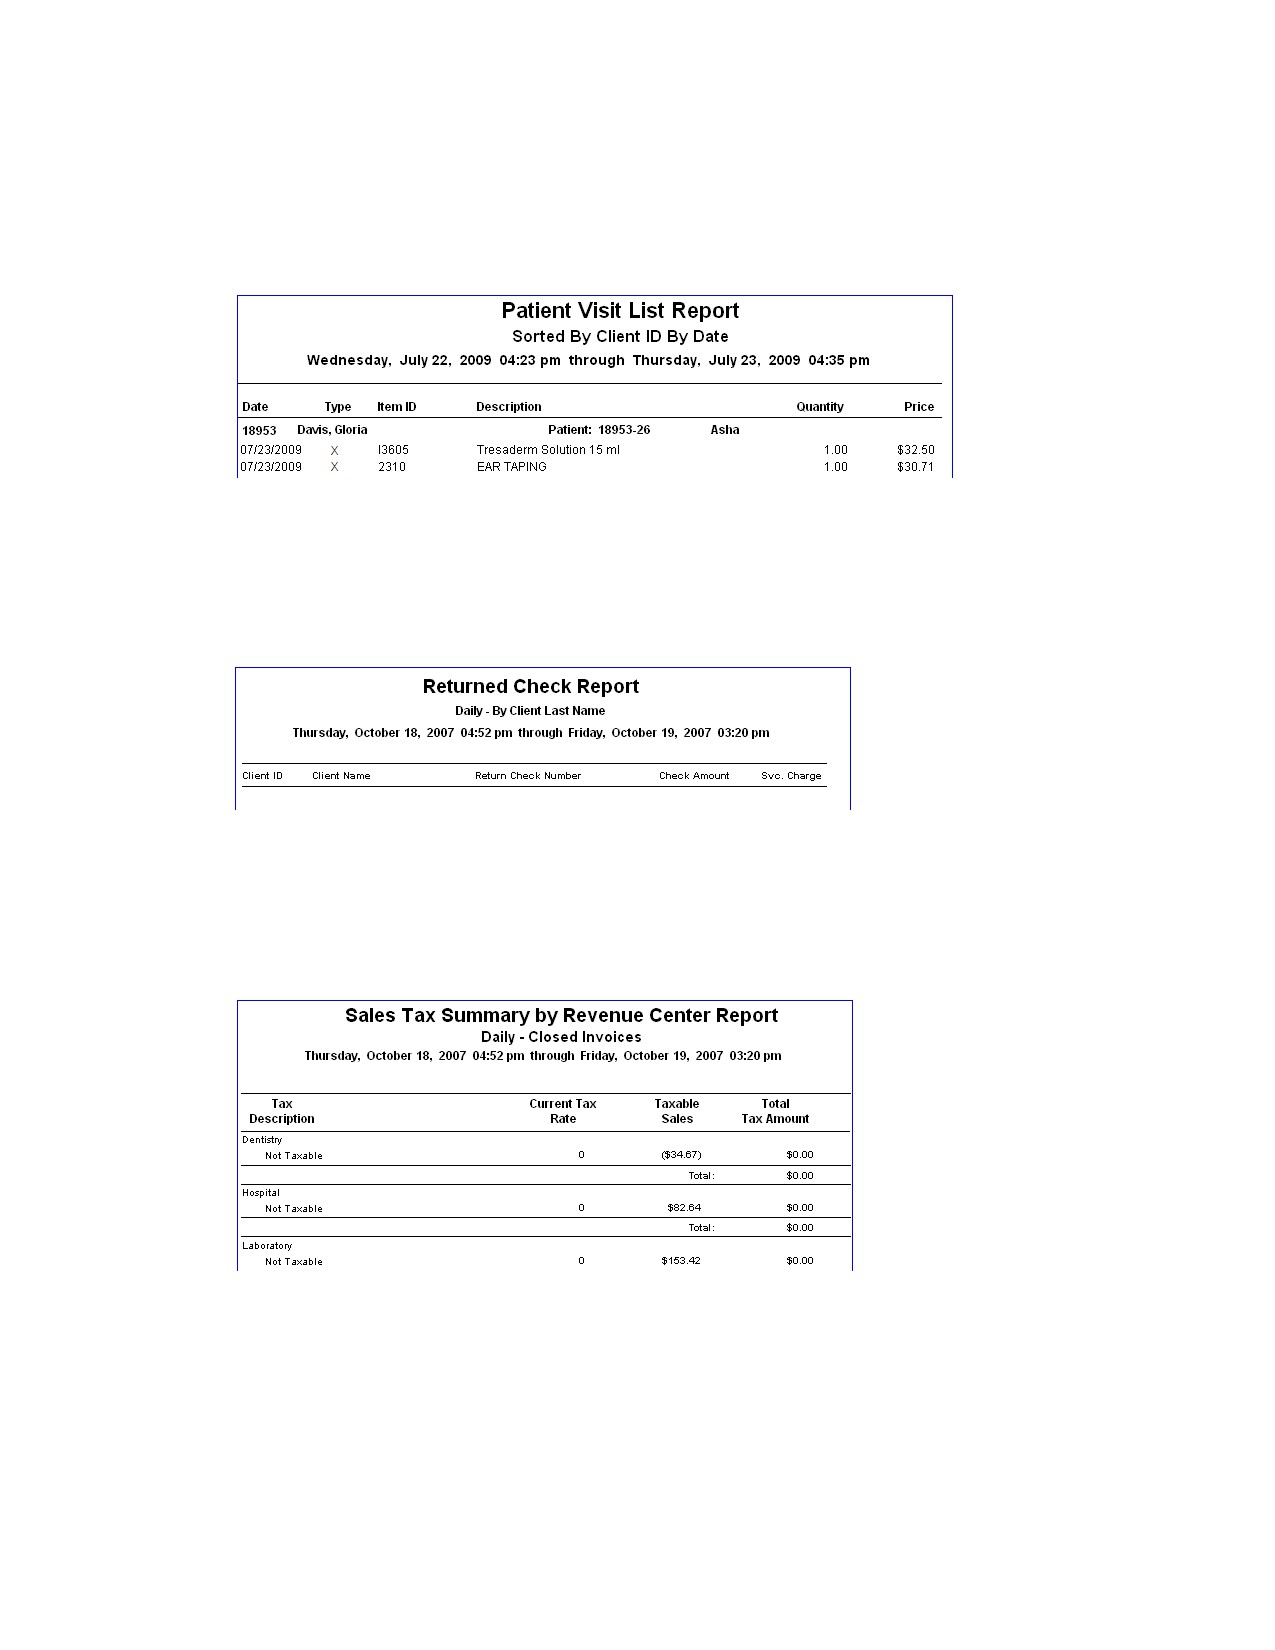
Patient Visit List By Date or Patient Visit List By Type
The Patient Visit List Report shows all of the items that currently exist in the Patient Visit List for all
patients.
Note: The Patient Visit List Report can be run only for the Current daily period.
Returned Check Report - By Client ID or By Client Last Name
The Returned Check Report shows the returned checks recorded in Cornerstone during the daily period.
Note: This report is also available as an End of Month report.
Sales Tax Summary - By Revenue Center (Daily)
The Sales Tax Summary by Revenue Center Report shows how much sales tax was collected during the
day by revenue centers. The tax description, current tax rate, taxable sales and total tax amounts are
shown for each revenue center at your practice.
377
Chapter 20: End of Day Processing
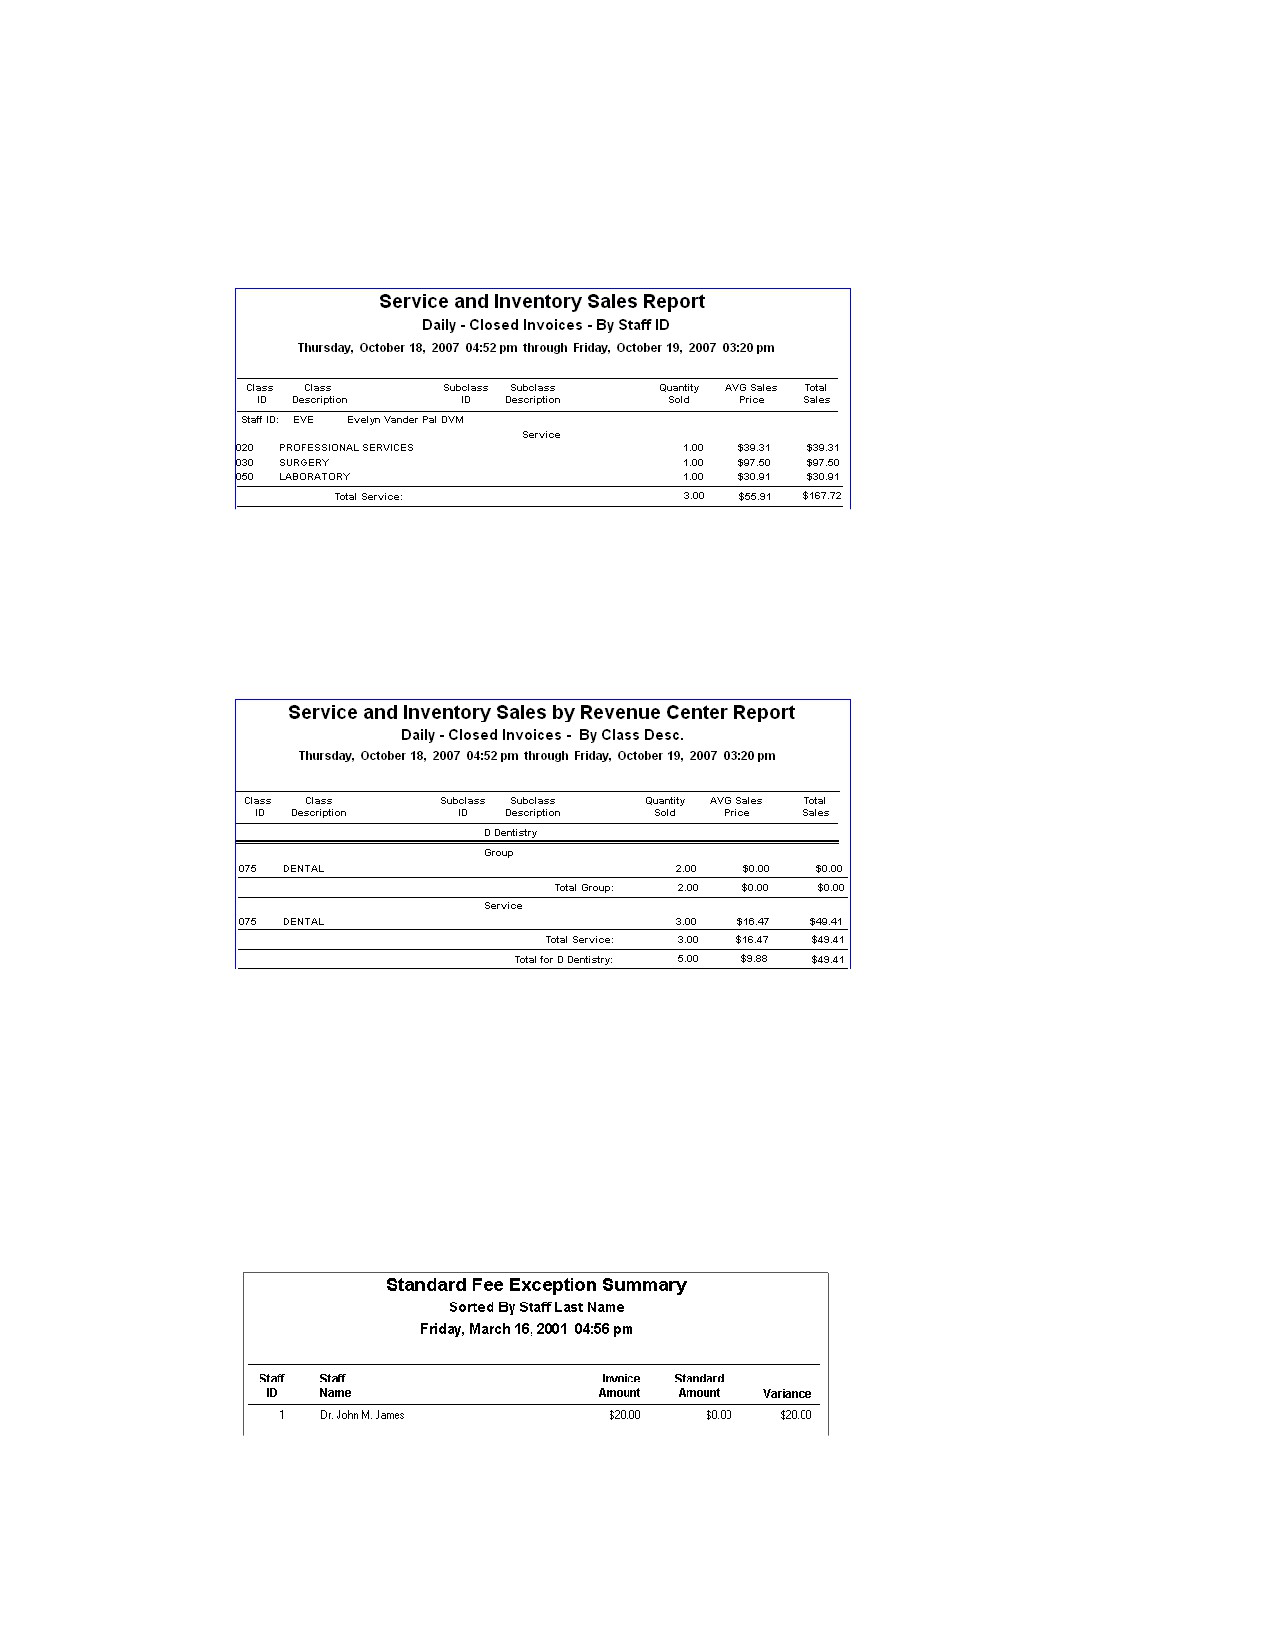
Serv. and Inv. Sales - Closed Invoices - By Class Desc., By Class ID, By Staff ID, or By
Staff Name
The Service and Inventory Sales Report shows daily period gross sales categorized by classifications of
products and services.
Serv. And Inv. Sales by Revenue Center - By Class Desc., By Class ID, By Staff ID or By
Staff Last Name
The Service and Inventory Sales by Revenue Center Report shows daily gross sales broken down by
revenue center.
Standard Fee Exception Report - By Item Description or By Item ID
The Standard Fee Exception Report lists the clients and patients invoiced for an item at a price other
than the standard price and shows the staff member who gave the deviated price. This report calls
attention to how much money is lost each day by changing prices.
Standard Fee Exception Summary
The Standard Fee Exception Summary Report shows how much each staff member has invoiced at a
price variance within the selected daily period(s).
378
Chapter 20: End of Day Processing
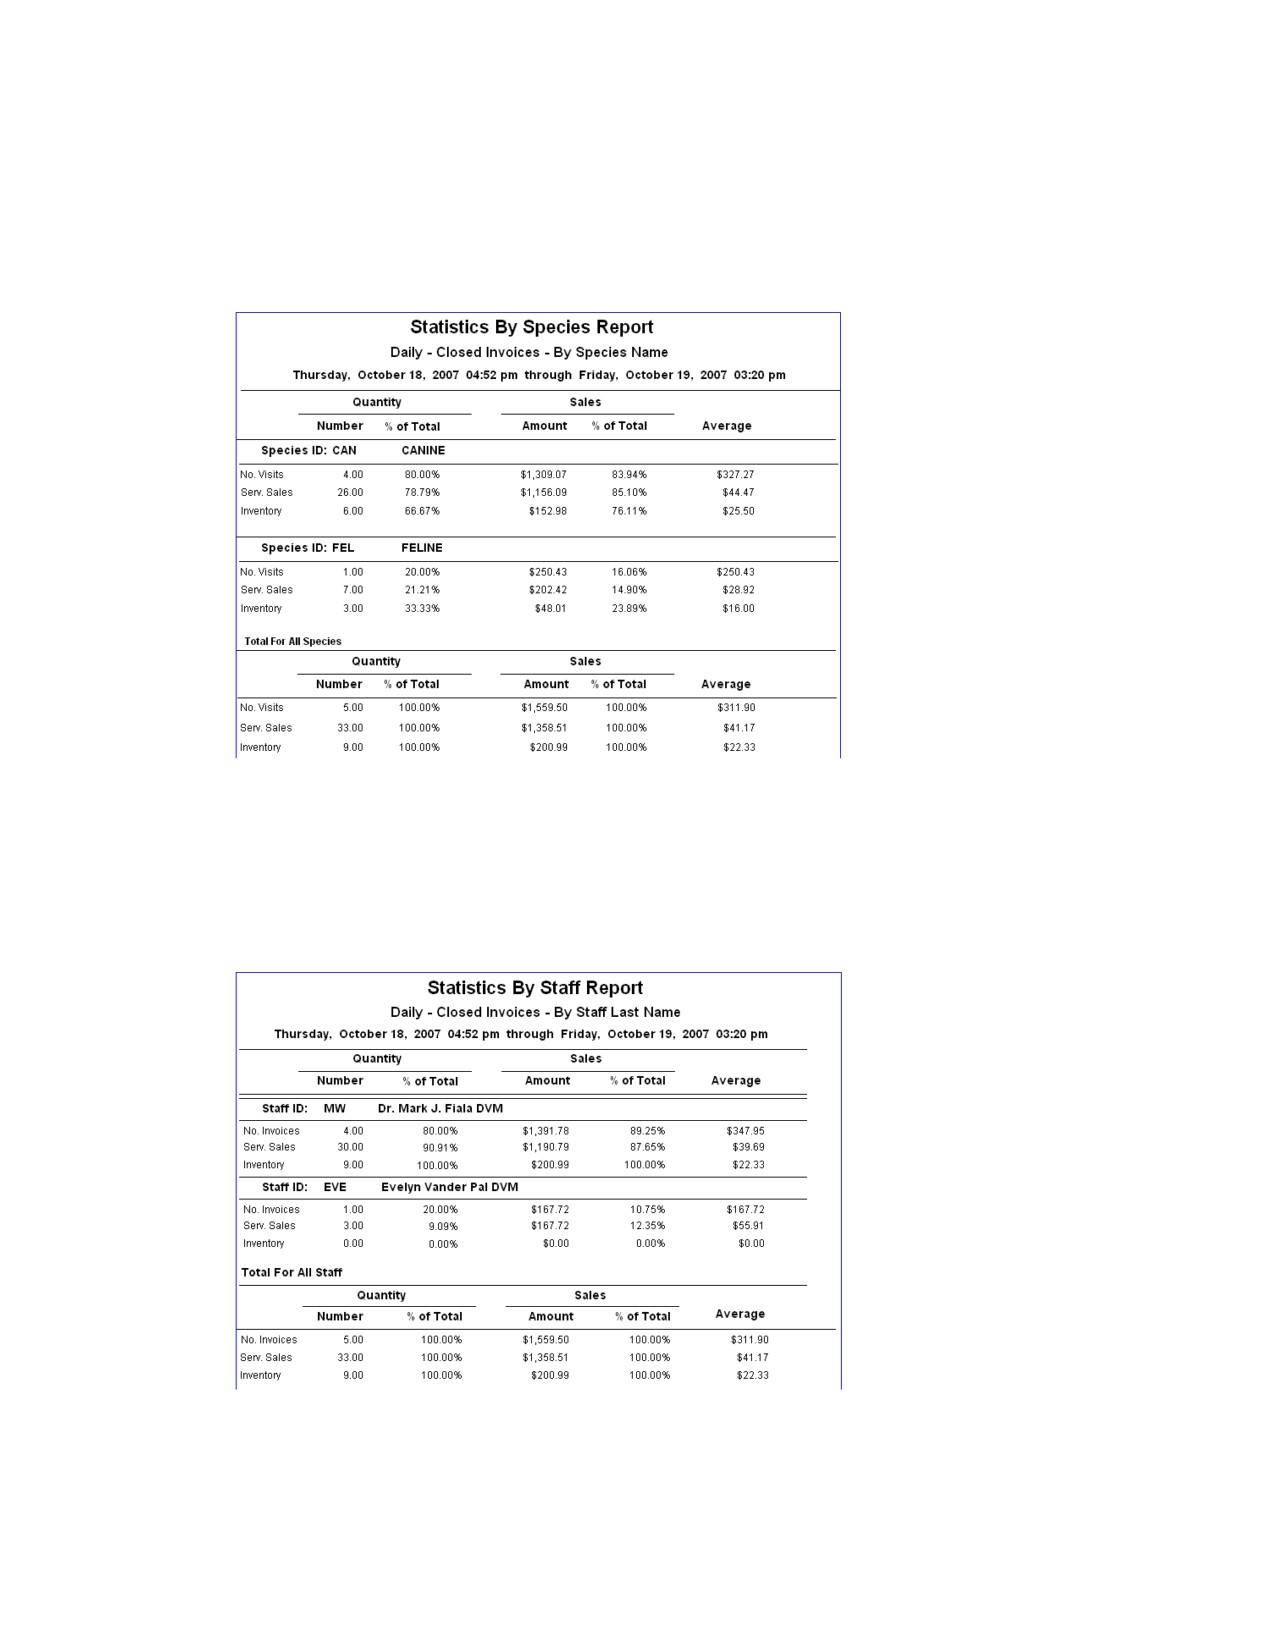
Statistics By Species - Closed Invoices
The Statistics By Species Report shows the number of invoices and the total gross sales taken in for the
day to show the financial return from different species.
Note: This report is also available as an End of Month report and End of Year report.
Statistics By Staff - Closed Invoices
The Statistics By Staff Report shows each staff member’s productivity by providing the number of
invoices and the total gross sales taken in for the day.
Note: This report is also available as an End of Month report and End of Year report.
379
Chapter 21: End of Month Processing
Overview
When you process End of Month (EOM), the IDEXX Cornerstone* Practice Management System:
• Processes your records for the monthly period.
• Totals the daily records to create the monthly totals.
• Transfers the monthly totals to the current yearly totals.
• Resets the current monthly period to zero.
It is easy to track EOM periods because Cornerstone* records the date and time with each closing.
Tip: You can set up your Cornerstone system to automatically process End of Day or End of Month. See
“Unattended End of Period (EOP) Defaults” on page 135 for more information.
IMPORTANT: It is imperative for your practice to have a good backup procedure in place. Backups
provide security against the unlikely chance that files are lost or destroyed. As an added safety
precaution, you should remove the most recent backup from the practice or place it in a DATA-
Rated fireproof safe.
Depending on the backup procedure at your practice, you can do a manual backup before
completing End of Month processing or automatically as set up by IDEXX Computer Systems. For
backup instructions, see the original documentation that came with your backup software.
If you have questions about your backup procedure or how to verify that your backup was
successful, contact Cornerstone Support at 1-800-695-2877. Do not take chances with your practice
data.
Note: If your practice uses compatible backup software, you can set up Cornerstone to
automatically verify your backup using the Cornerstone Backup Verification Assistant. (See “Chapter
28: Using the Backup Verification Assistant” beginning on page 446 for more information.)
Notes on End of Month processing:
• You can perform End of Month processing on any day of the month, if necessary, not only on
the last calendar day of the month. The important thing is to maintain a consistent pattern of
closing periods.
• When you close a monthly period, all transactions from the previous monthly closing up through
the current monthly closing are included.
• End of Month ages accounts. This adds finance charges if they have been set up.
• Performing monthly activities creates a second EOD closing. These totals include added
finance charges, billing charges and open invoices that were closed as part of EOM processing.
For the last EOD of the month, print the EOD reports after processing EOM so the reports will
include the accurate information.
• Once End of Month has been processed, billing charges cannot be added to accounts for the
closed month. (Billing charges can be applied to accounts by printing the Monthly Invoices and
Statements Report and selecting Current for the monthly period. However, this billing charge
will be applied toward the next monthly period.)
380
Chapter 21: End of Month Processing
• You do not need exclusive use to process End of Month. However, staff will not be able to post
invoices or save changes to any window that modifies a client’s account. If a user tries to modify
a client’s account, a message warns the user to wait until the End of Month processing is
finished. Once the End of Month processing is complete, the user can continue.
Performing End of Month Processes
Before You Begin
• Process End of Day immediately before processing End of Month.
• Follow your normal backup procedures to perform a monthly backup. For backup instructions,
see the original documentation that came with your backup software, or contact Cornerstone
Support at 1-800-695-2877. If a backup is performed before processing End of Month,
information can be restored, if necessary.
• Ensure that EOM defaults have been set up (see “End of Period Defaults” on page 102).
• Make sure the appropriate clients are set up to receive finance charges and billing charges
(Lists > Clients > Update > A/R Information tab).
• If a large number of open invoices is anticipated, preview and/or print the Monthly Client Open
Invoices-By Client ID Report. If only a small number is anticipated, preview the Daily Planner’s
Invoices tab.
IMPORTANT: Because End of Month involves totals from the daily records, you must run End of Day
immediately before processing End of Month.
To check for open invoices (recommended):
1. On the Reports menu, select Find a Report. The Report Search window appears.
2. In the Reports list, click the plus sign to the left of End of Month, and then select the Monthly
Clients with Open Invoices-By Client ID report.
3. Click Create report. The Daily Reports dialog box appears.
4. Under Monthly periods, select the Current period
5. Preview the report to determine which invoices to close.
6. Close the report.
To preview and close open invoices (recommended)
1. Click the Daily Planner
toolbar button.
2. Enter your staff information and select the Invoices tab.
3. Double click the invoices to be closed.
Note: If all consumption information has not been filled in, you will need to enter the information
before the invoice will close.
4. Click Post.
5. In the Post Invoice window, you can clear the check boxes for Apply payment and Print invoice, as
this balance will be applied to the client’s account.
Note: Cornerstone has the ability to automatically close invoices based on the invoice type.
When an invoice is closed, the invoice becomes part of the client’s accounts receivable balance and
the client will receive a statement inclusive of all charges.
381
Chapter 21: End of Month Processing
To process End of Month:
IMPORTANT: Processing End of Month (EOM) ages the accounts receivable and applies finance
charges and/or billing charges. Even if you cancel out of processing End of Month, the finance and
billing charges will still be applied. If you make a backup prior to performing this function, you can
restore the information, should the need arise.
1. On the Activities menu, select End of Period > End of Month.
2. An End of Period warning message appears. Read the message and click OK. (To prevent this
message from appearing in the future, clear the Show Message check box.)
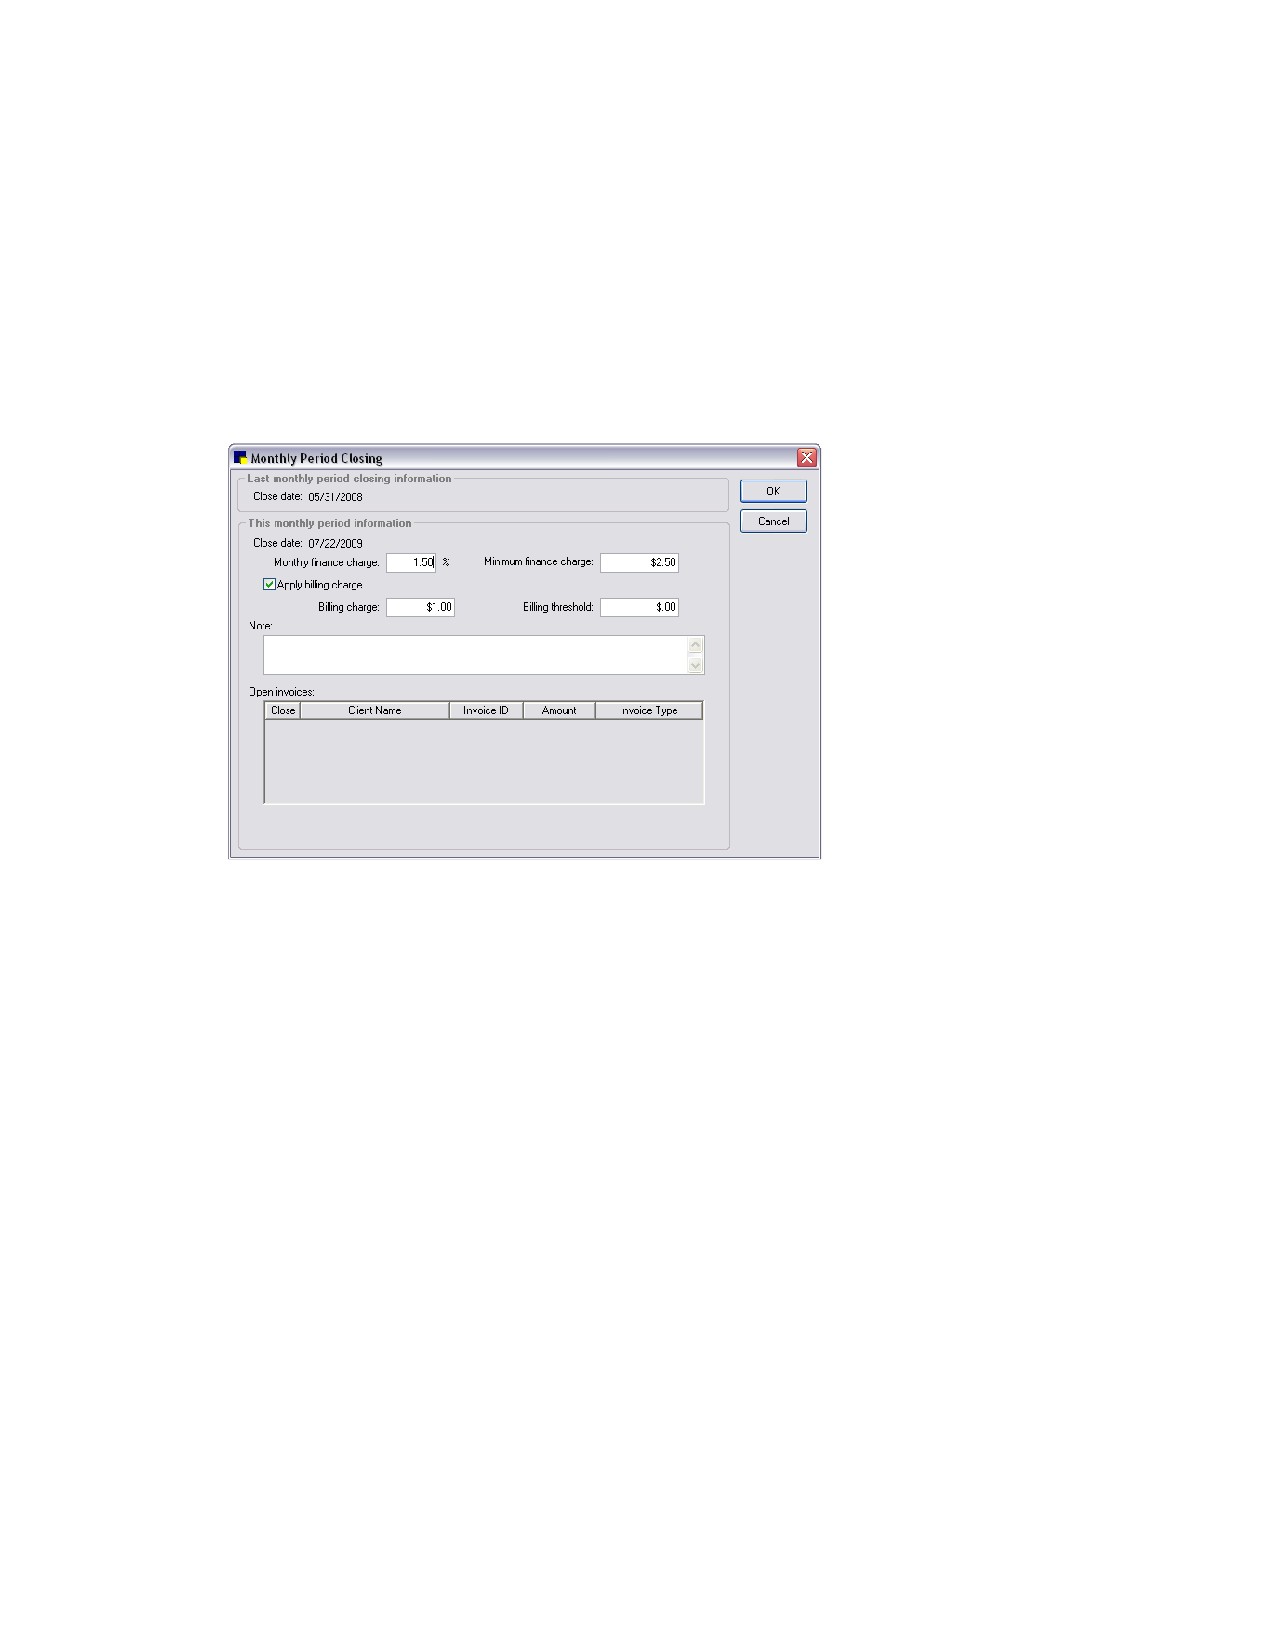
The Monthly Period Closing dialog box appears.
Monthly Period Closing dialog box
3.
Verify that the Monthly finance charge, Minimum finance change, Billing charge and Billing
threshold are all set to the appropriate amounts. (These amounts may have already been defined in
the End of Period defaults Monthly Closing settings. See “End of Period Defaults” on page 102 for
more information on these settings.)
Note: Cornerstone adds a finance charge only to clients who are set up to receive a finance charge
with a balance over 30 days.
4.
Select the Apply billing charge check box if you want a billing charge to be applied to all accounts
that will receive a bill at EOM closing.
Tip: If you would like a billing charge to be applied only to accounts 30 days and over, we suggest
you put the charge amount in the Minimum finance charge field instead.
5.
In the Notes text box, enter any details for this EOM closing and include your name or initials. (You
can view the notes later by clicking Details in the Monthly Reports dialog box.)
6.
In the Open invoices area, verify that any open invoices you want to close are marked as Yes. If you
do not want an invoice closed, click on Yes to change it to No.
Note: Open invoices are not included on monthly statements.
7.
Click OK.
8.
In the confirmation window, click Yes to process End of Month.
9.
When processing is complete, click OK in the notification window.
382
Chapter 21: End of Month Processing
Note: If you are processing End of Year, immediately start your End of Year procedures. See
“Performing End of Year Processes” on page 405.
Printing End of Month Reports
Cornerstone includes many monthly reports that help you keep records of your valuable information.
These reports are an important part of standard bookkeeping and are useful for tracking business
trends.
Some commonly printed monthly reports include:
• Sales Tax Summary/Income Reconciliation Report-Breaks down all of your practice’s sales,
taxes, discounts and other items that impact revenue and displays the total income for the
monthly period(s).
• Accounts Receivable Report-Displays all of the clients that owe you money.
Tips for End of Month reports:
• The first time you process End of Month, print every report. From these, decide which
information you want each month and make a list of reports to run monthly. (You may want to
show the reports to people like your accountant and office manager before deciding which to
run monthly.) Include these reports in your reports binder and select them as your default
reports.
• After End of Month has been processed and balanced, discard (or file) the End of Day reports
that were in your binder.
• Statements are found on the End of Month Report List. Each time statements are printed, billing
charges are added (if applicable). Finance charges are added to account balances over 30
days when the monthly period is closed (when Cornerstone ages accounts).
IMPORTANT: Selecting the option to apply a billing charge when printing a statement in the current
monthly period will apply a billing charge each time you choose to print. Once you have chosen to print
the monthly statements, even if you cancel the print job, any billing charges are still applied.
Before You Begin
• Set your End of Period defaults to select the reports you want Cornerstone to automatically
select for you in the Monthly Reports dialog box (see “End of Period Defaults” on page 102).
• Assign the printer to print the reports (File > Printer Assignment > End of Month, and select
the reports you want to print on each printer).
• Finish your End of Month processing.
To print all selected EOM reports:
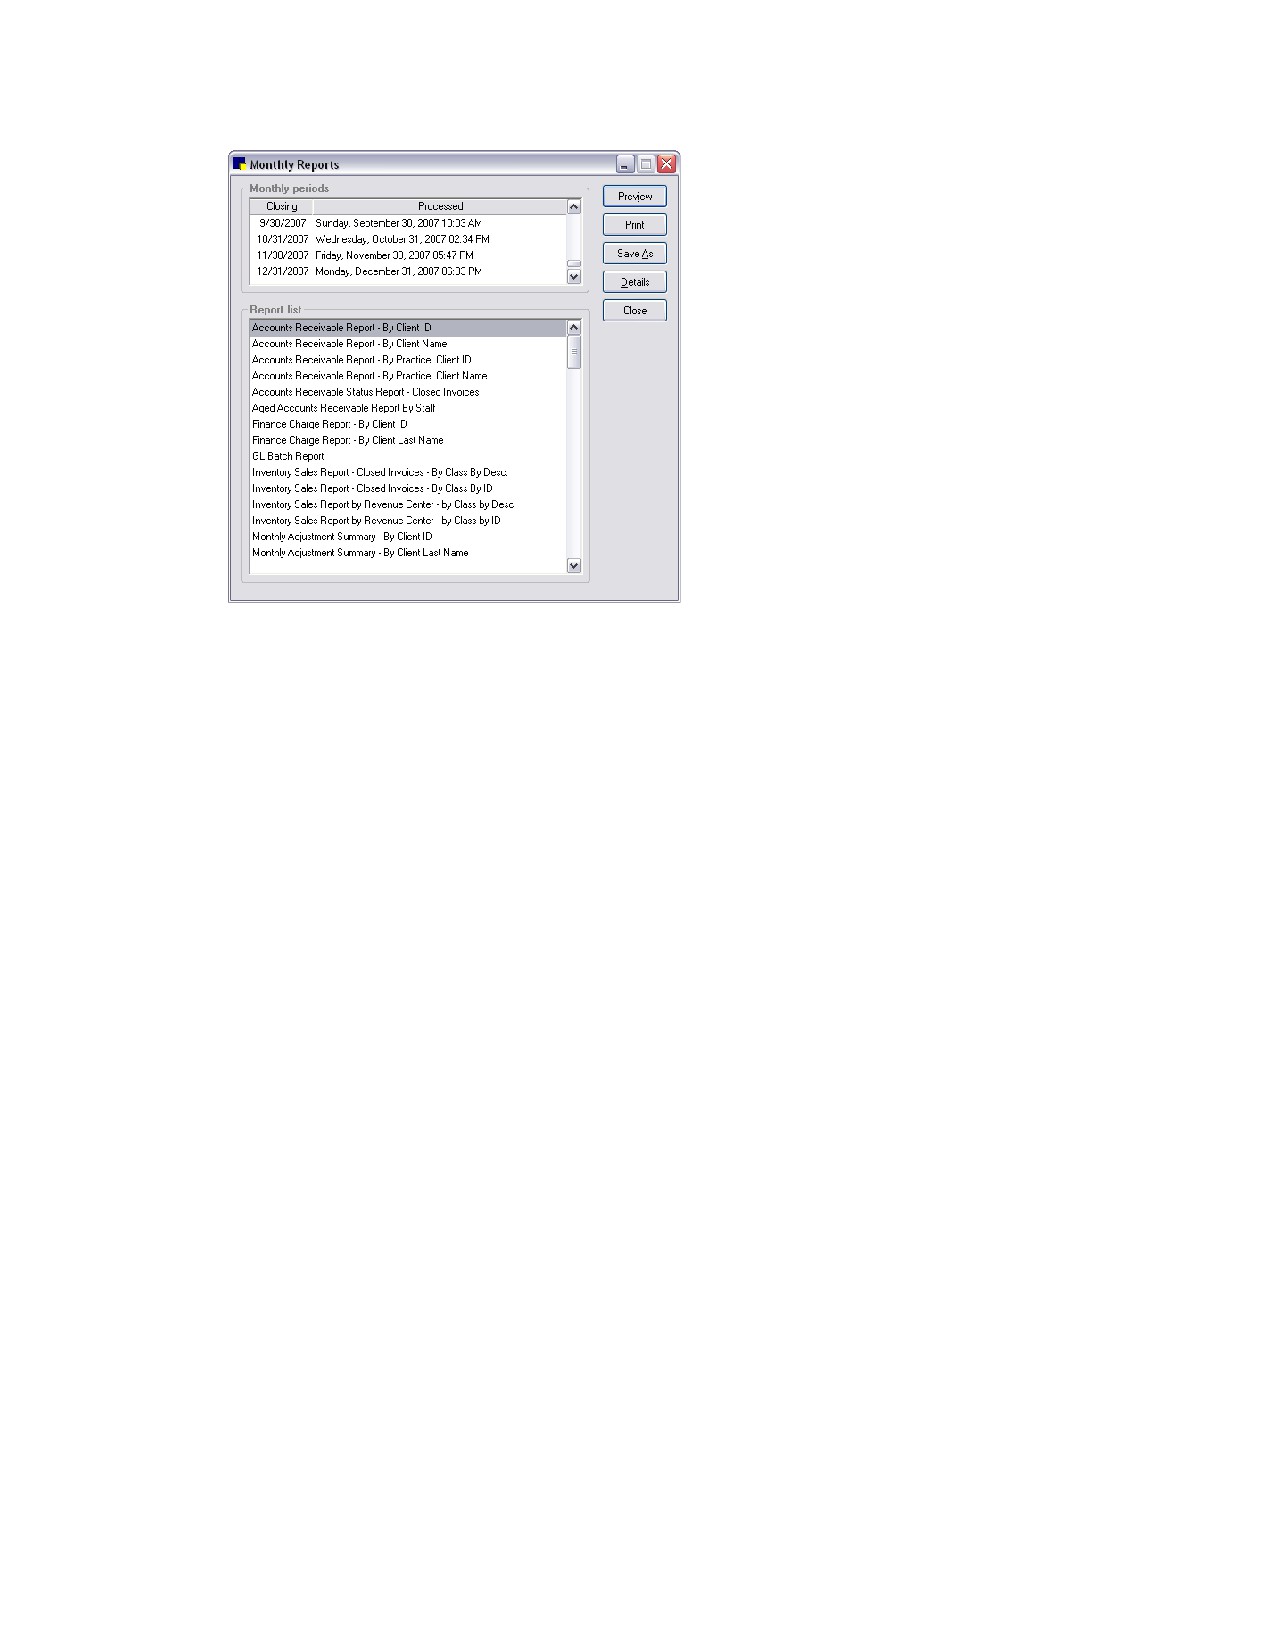
1. On the Reports menu, select End of Period > End of Month. The Monthly Reports dialog box
appears.
383
Chapter 21: End of Month Processing
Monthly Reports dialog box
2. Under Monthly periods, select the period you want the reports to reflect. For most reports, you can
print information for more than one continuous period; click the earliest period and then press and
hold the SHIFT key, click the down arrow until you see the last period and then click the last period.
All of the periods in between are highlighted.
Note: When you select a beginning date range, your End of Period reports include all data in the
date range from one minute prior to the beginning date selected through the ending date selected.
3. In the Report list, reports you have selected in End of Period defaults are highlighted. If needed, do
the following to select additional reports:
• To select a consecutive group of reports, click the first report, hold down the SHIFT key, and
then click the last report.
• To select nonconsecutive reports, hold down CTRL, and then click each report you want to
select.
4. Click Print. The reports print on the printer assigned for each report (or the default printer if no
printer has been assigned).
To preview, print and/or save a specific EOM report:
1. On the Reports menu, select Find a Report. The Report Search window appears.
2. In the Reports list, click the plus sign to the left of End of Month, and then select the desired report.
3. With the desired report highlighted in the End of Month report group, click Create report. The
Monthly Reports dialog box appears.
4. Under Monthly periods, select the period you want the report to reflect. For most reports, you can
print information for more than one continuous period; click the earliest period and then press and
hold the SHIFT key while you click the last period. All of the periods in between are highlighted.
Note: When you select a beginning date range, your End of Period reports include all data in the
date range from one minute prior to the beginning date selected through the ending date selected.
5. In the Report list, select the report to preview. (You can only preview one report at a time.)
384
Chapter 21: End of Month Processing
Note: You may have to deselect any reports that Cornerstone has automatically selected (based on
End of Period defaults).
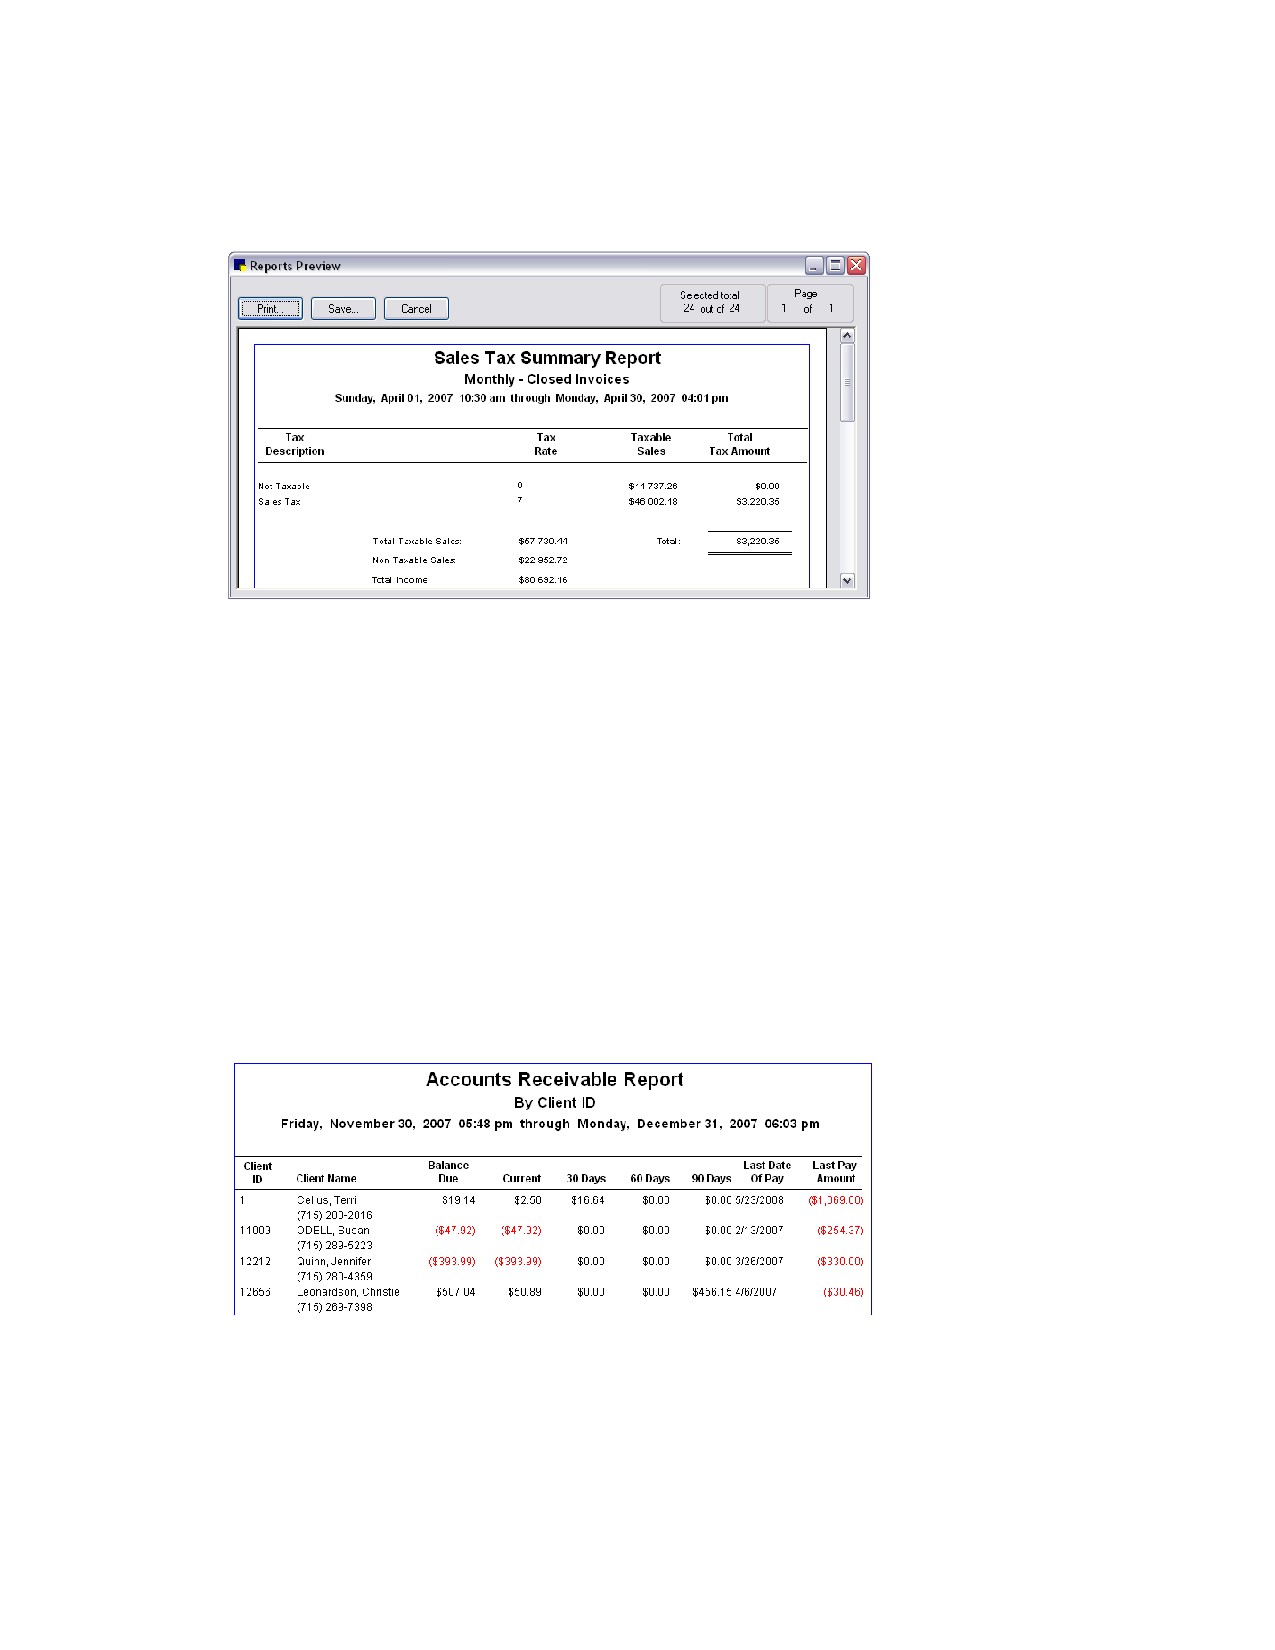
6. Click Preview. The Reports Preview window appears.
Reports Preview window
7. Click Print to print the report, click Save to save the report data to a file or click Cancel to return to
the Monthly Reports dialog box.
End of Month Reports
Accounts Receivable Report - By Client ID or By Client Name
The Accounts Receivable Report displays all clients who owe your practice money and how much is
owed. You can choose what type of accounts receivable balance you want to include the following:
• All clients with an accounts receivable balance
• Clients with account receivable balances that are 30 days or more overdue
• Clients with account receivable balances that are 60 days or more overdue
• Clients with account receivable balances that are 90 days or more overdue
• Only clients who have a credit balance
The date reflects the monthly period closing covered by the report. Do not run this report for
multiple monthly period closings.
385
Chapter 21: End of Month Processing
Accounts Receivable Report - By Practice, Client ID or By Practice, Client Name
For those practices with the Multi-Location/Single Database option enabled, the Accounts Receivable
Report-By Practice shows all clients who owe money and how much is owed, broken down by practice
based on the client home practice.
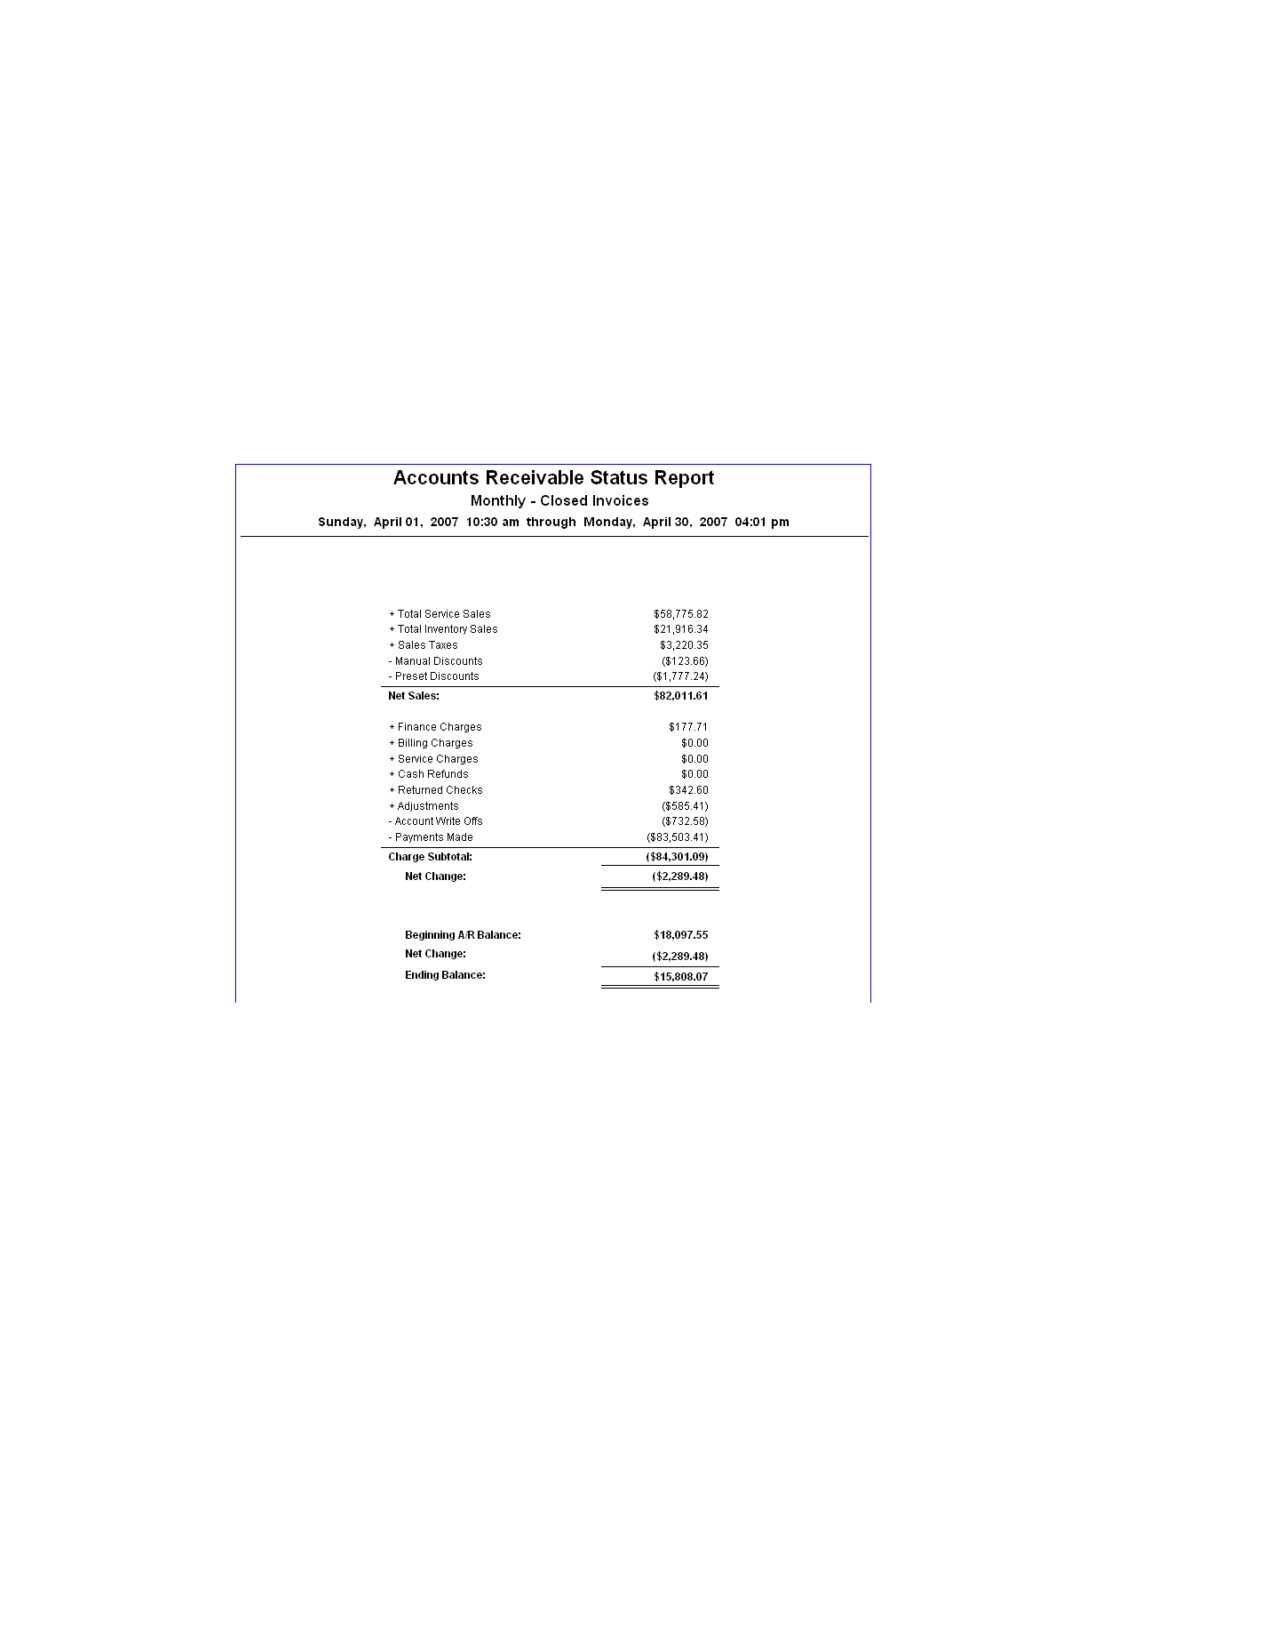
Accounts Receivable Status Report - Closed Invoices
The Accounts Receivable Status Report gives you a quick summary of account activity during the
selected monthly period(s).
Note: This report is not available for the Current monthly period.
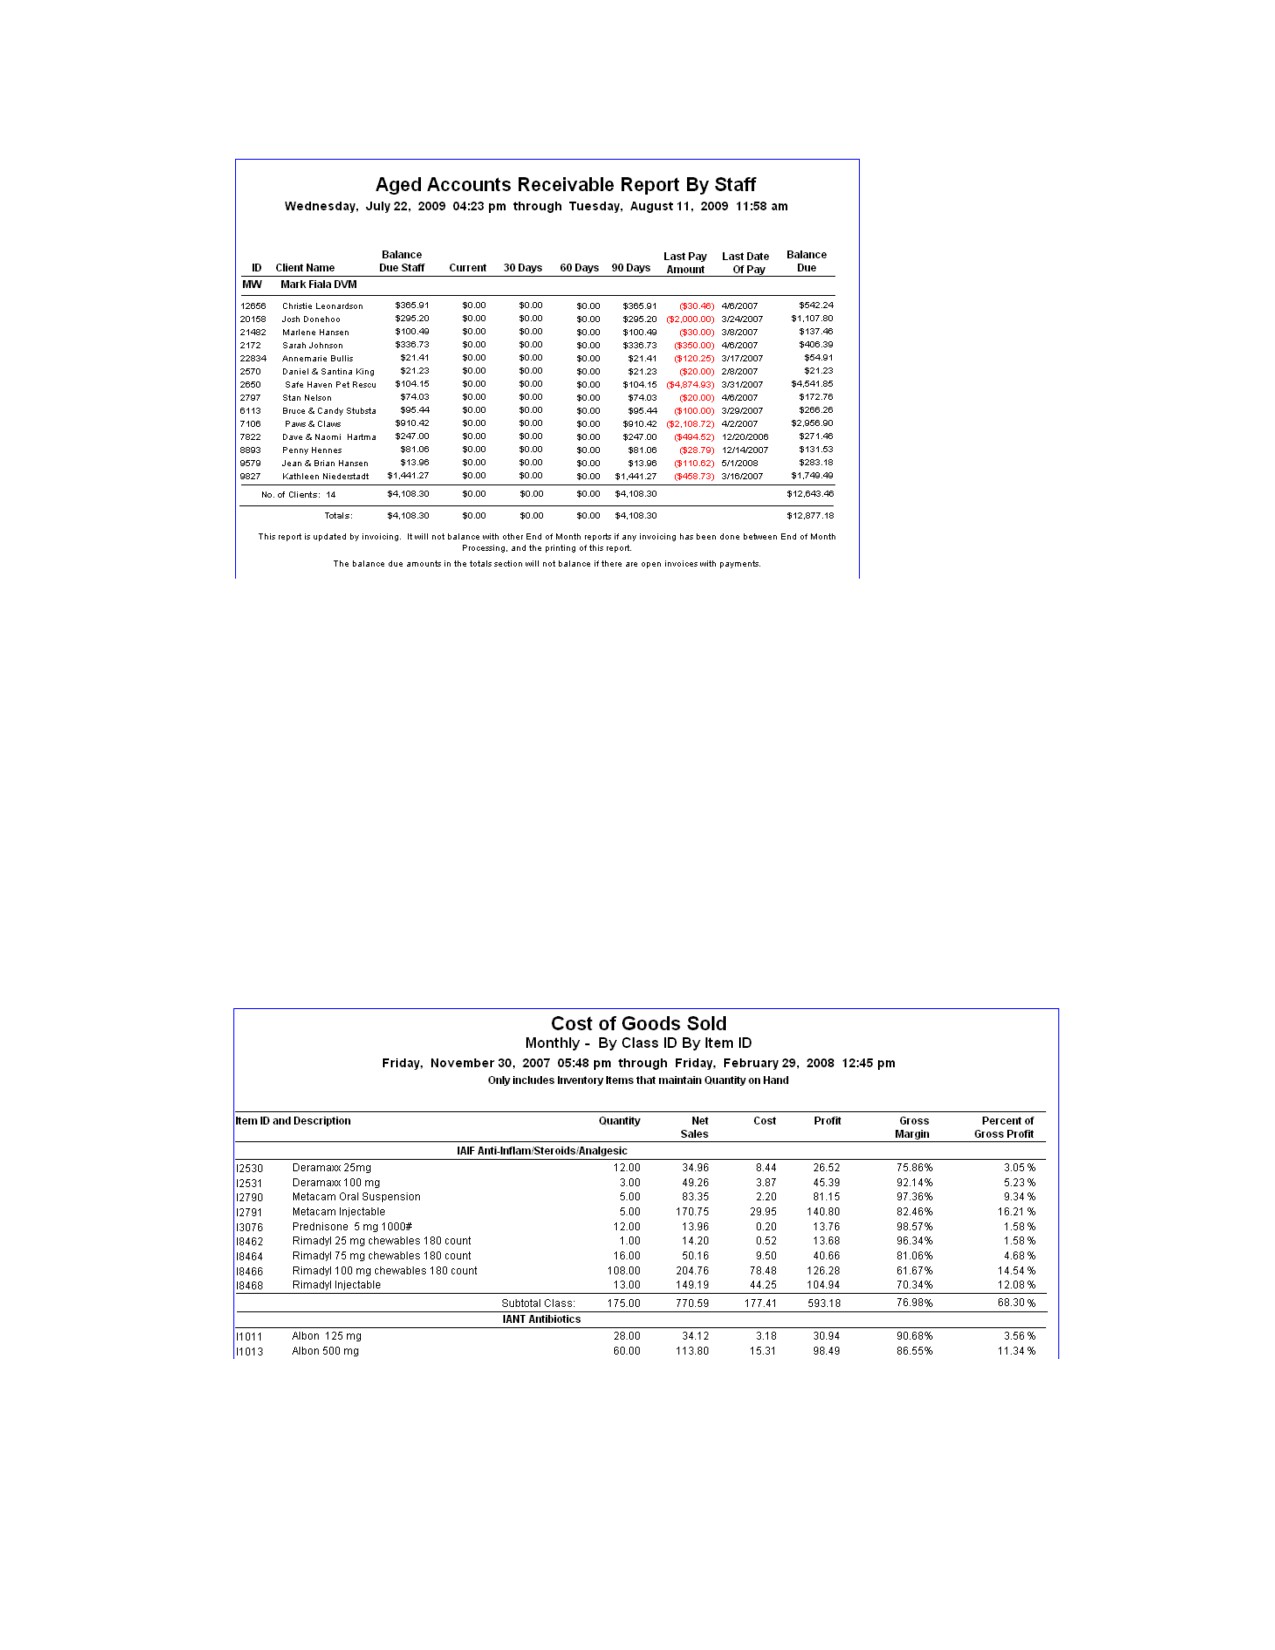
Aged Accounts Receivable Report by Staff
The Aged Accounts Receivable Report by Staff should be used only by practices that pay providers
based on collected accounts receivable. It tracks the uncollected portion of each provider’s production
(what’s owed a provider) and may be used to help calculate providers’ commissions.
This report is updated by invoicing. It will not balance with other EOM reports if any invoicing has been
done between EOM processing and the printing of this report. The Balance Due amounts in the Totals
section will not balance if there are open invoices with payments.
You must set up your system to run this report. See “Invoice Defaults” on page 112 for more information
on setting your system to run this report.
Note: The Aged Accounts Receivable Report by Staff can be run only for the Current monthly period.
386
Chapter 21: End of Month Processing
Cost of Goods Sold Report
The Cost of Goods Sold report shows cost and profit based on sales for items that are set up to track
Quantity on Hand. It includes only those inventory items that are sold in the selected time frame (you can
select multiple periods and/or the current period). The report provides subtotals by class and revenue
center, with grand totals of net sales (after discounts and before taxes), cost and profit. (Included
subtotals and grand totals will vary depending on how the report is sorted.)
You can select from four different variations of the report, depending on your sorting preference:
• Sorted by Revenue Center, Class ID, Item ID
• Sorted by Revenue Center, Inv. Location, Class ID, Item ID
• Sorted by Class ID, Item ID
• Sorted by Inv. Location, Class ID, Item ID
387
Chapter 21: End of Month Processing
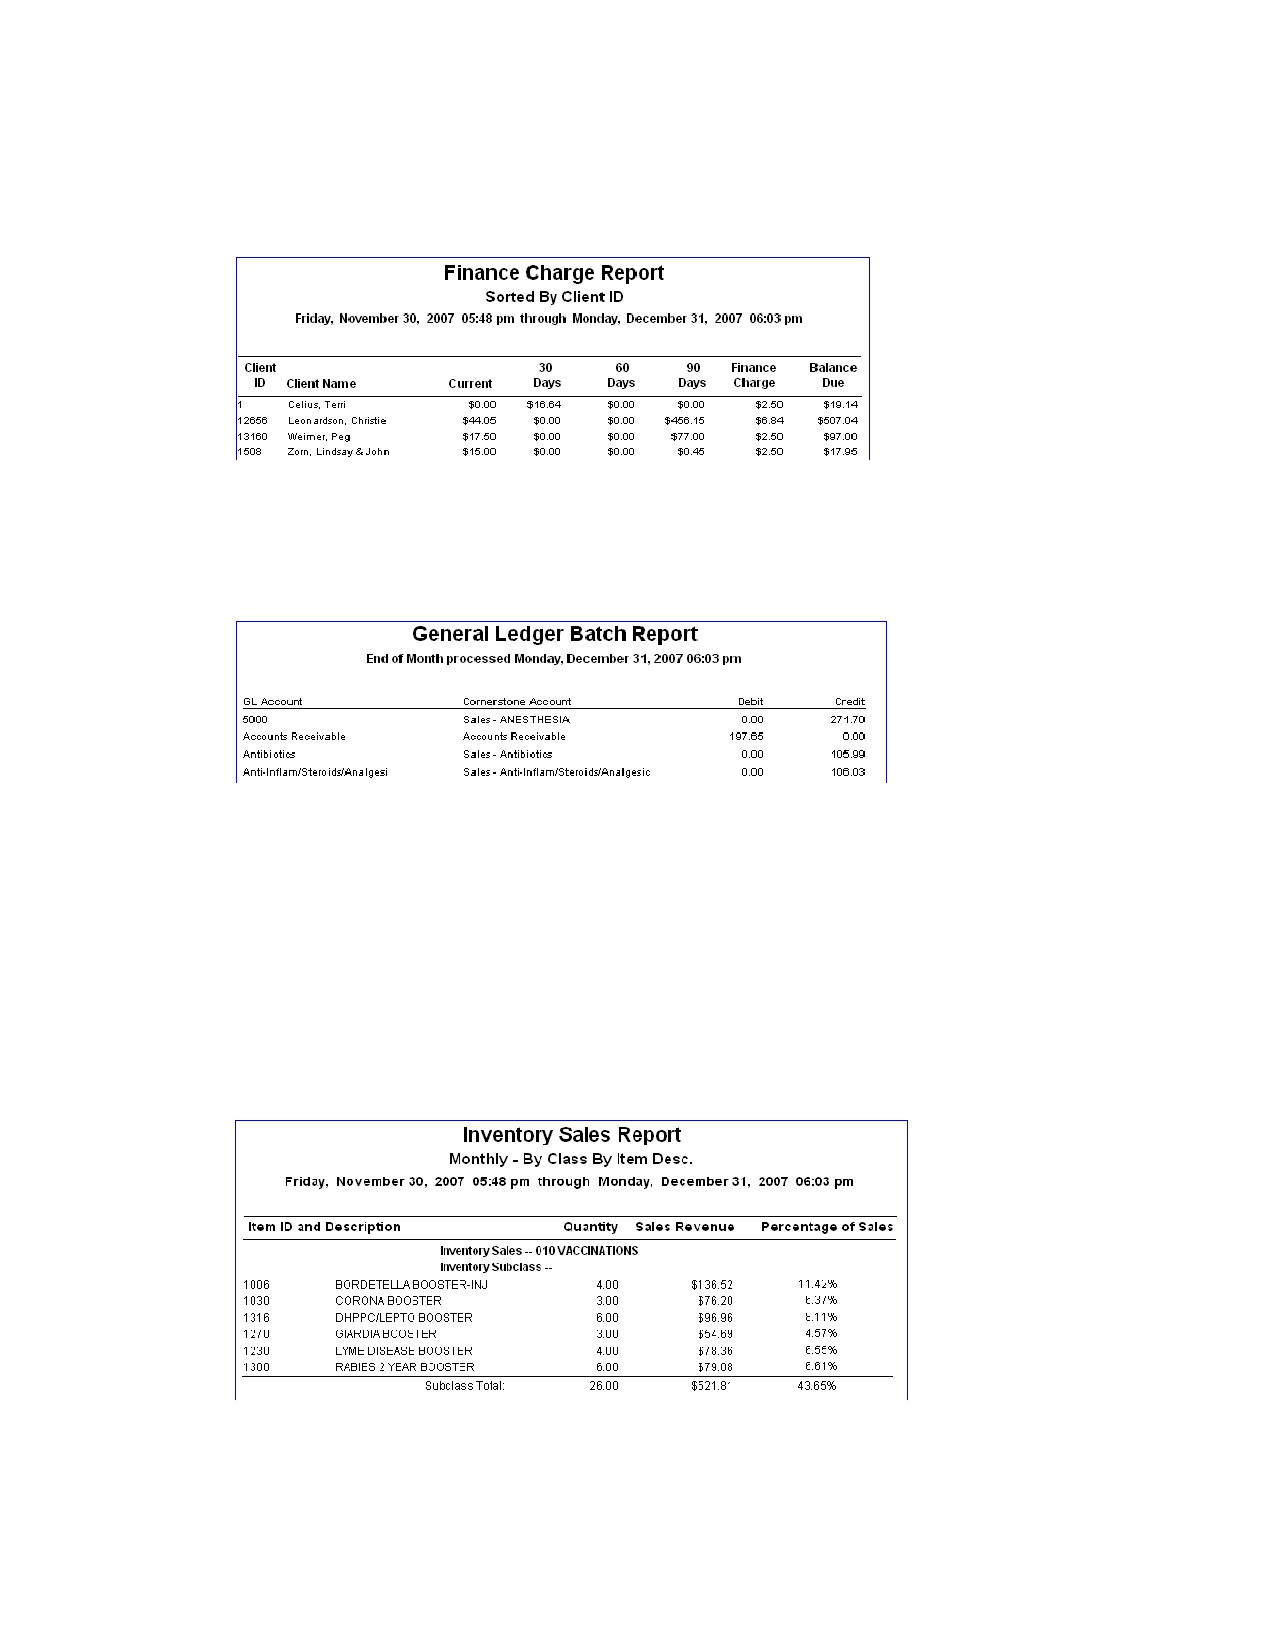
Finance Charge Report - By Client ID or By Client Last Name
The Finance Charge Report shows you the finance charges added to each client’s account during the
selected monthly period(s).
GL Batch Report
Used only if your practice utilizes the General Ledger (GL) Interface, the GL Batch Report provides a
summary of the data extracted to the file.
Inventory Sales Report - Closed Invoices - By Class By Desc. or By Class By ID
The Inventory Sales Report displays both the percent and dollar amounts of revenue for each inventory
subclass. Use this report for a quick summary of the items with the highest sales in the selected monthly
period(s). You can track seasonal and promotional items easily.
Because the Inventory Sales Report can be a very large report, Cornerstone displays the End of Period
Filters dialog box so you can enter a range of information to print. For more information on filtering
information in reports, see “Chapter 5: Reports” in the Cornerstone User’s Manual.
Note: This report is also available as an End of Year report.
The last page of the report displays the grand total for the quantity and sales revenue.
388
Chapter 21: End of Month Processing
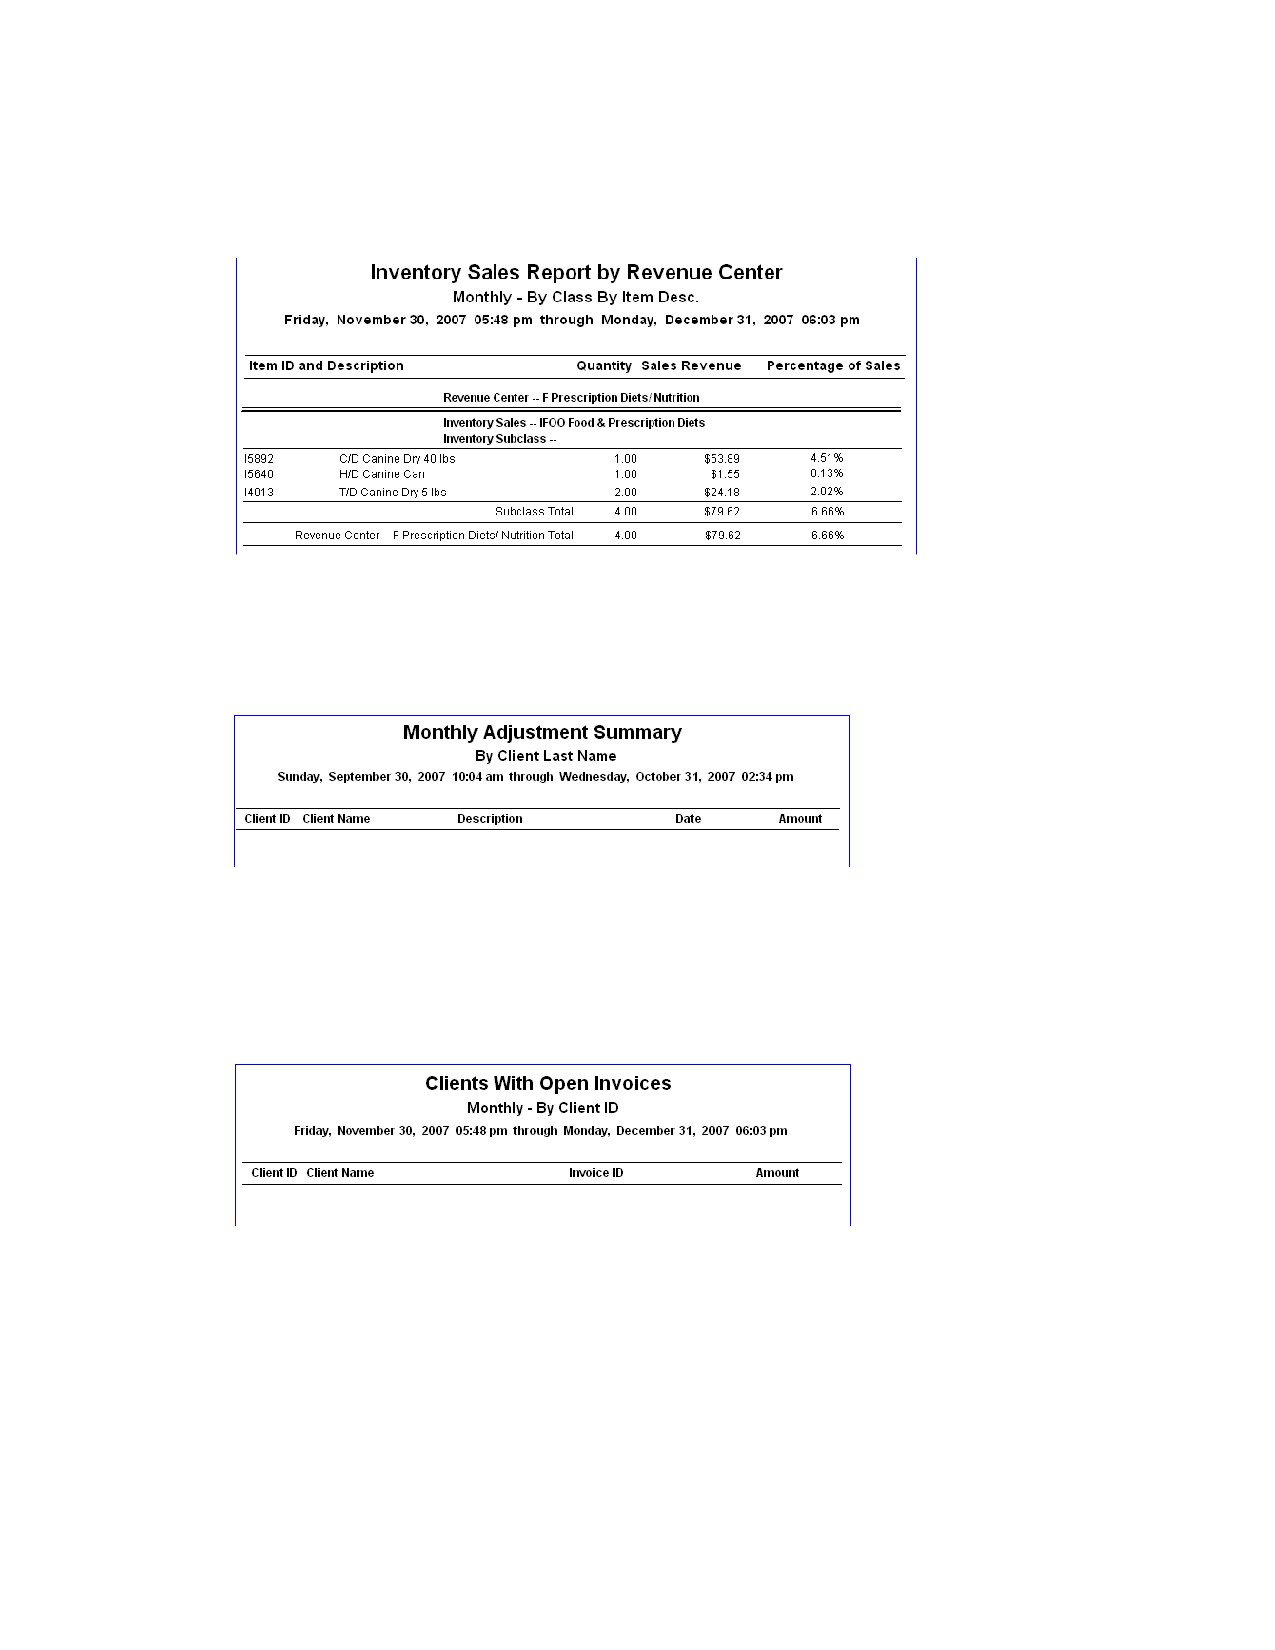
Inventory Sales Report by Revenue Center - By Class by Desc or By Class by ID
The Inventory Sales Report by Revenue Center shows the sales of inventory divided into revenue
centers.
Monthly Adjustment Summary - By Client ID or By Client Last Name
The Monthly Adjustment Summary report displays all adjustments made in the selected periods, with the
comment and staff ID of the person making the adjustment.
Monthly Clients With Open Invoices - By Client ID or By Invoice No.
You can use the Monthly Clients With Open Invoices report to help you decide which invoices to close
before you start the End of Month process.
Note: The Monthly Clients With Open Invoices report can be run only for the Current monthly period.
389
Chapter 21: End of Month Processing
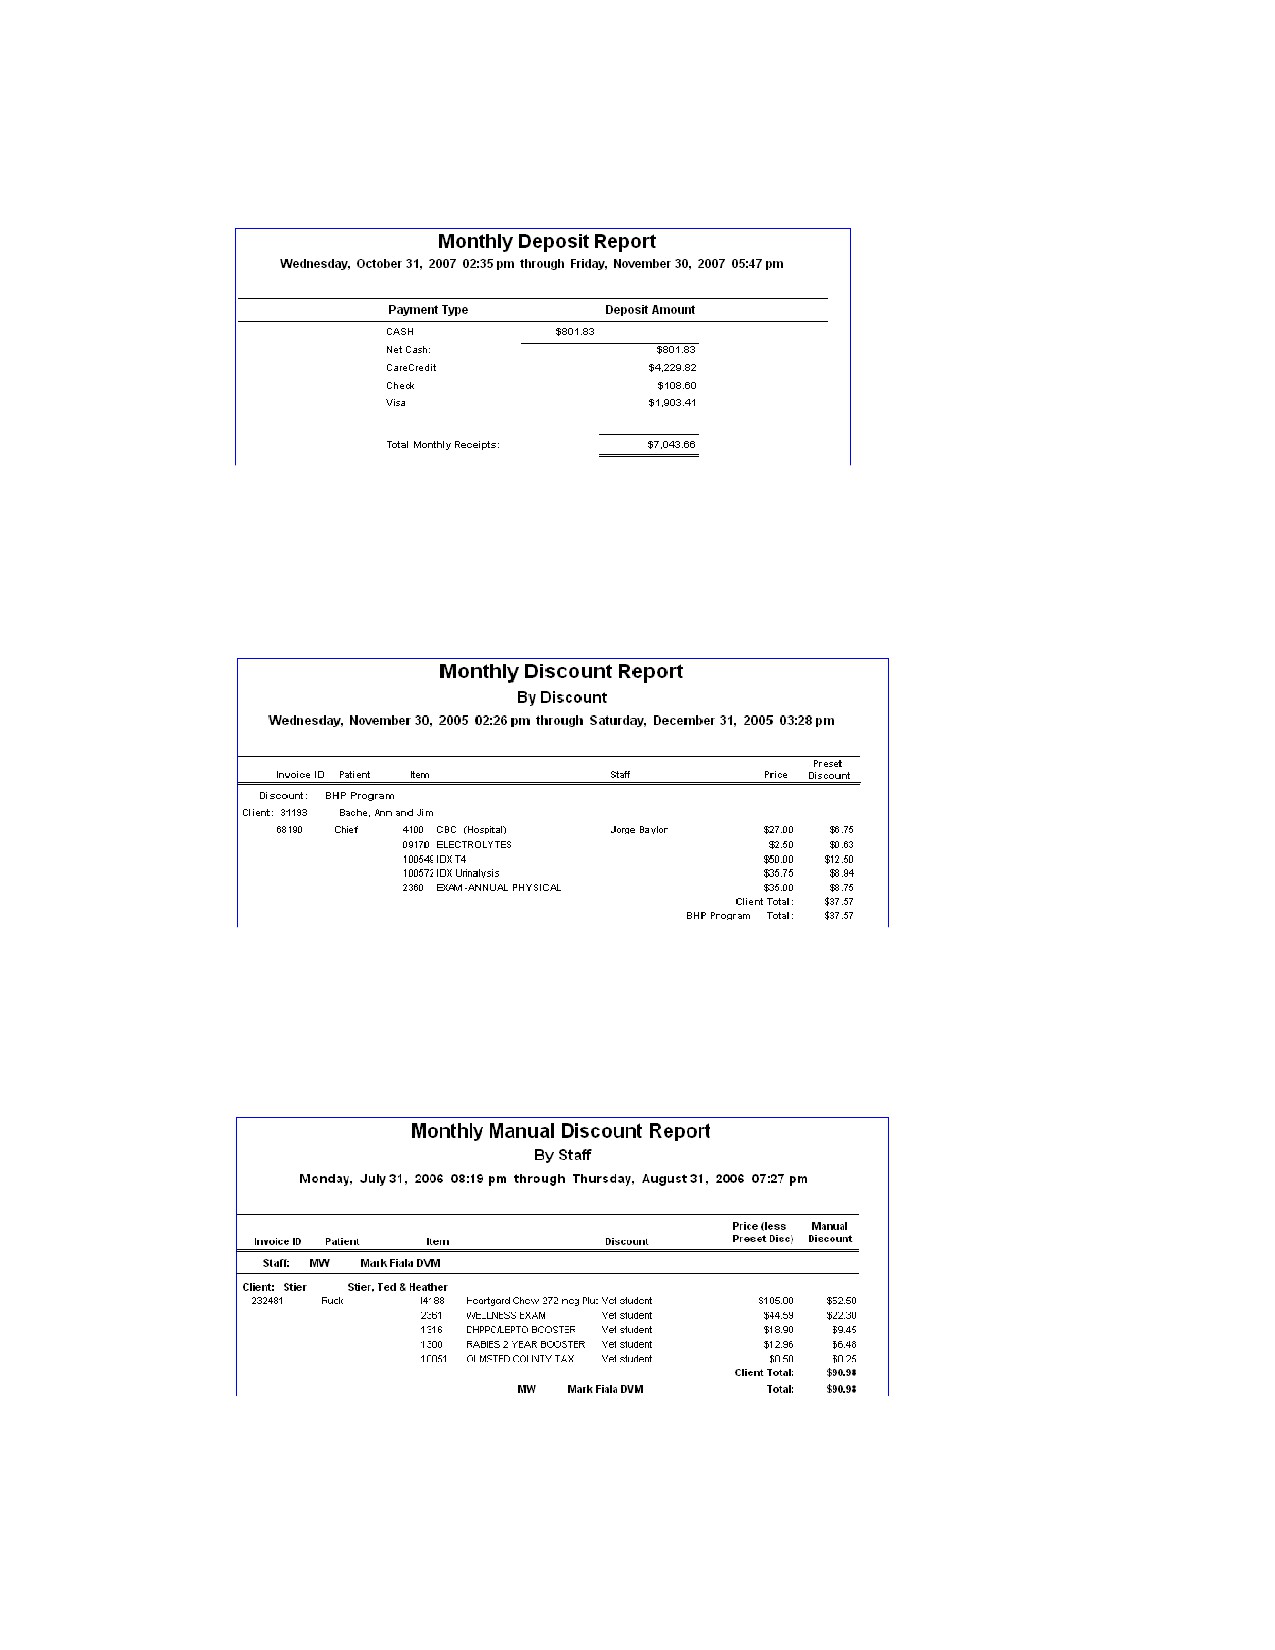
Monthly Deposit Report
The Monthly Deposit Report helps you see your client cash flow for the month.
Monthly Discount Report-By Discount
The Monthly Discount Report - By Discount includes all predefined discounts given during the month.
When this report is run, the Monthly Manual Discount Report - By Client is also automatically run. It
includes all the manual discounts given during the month.
Monthly Discount Report - By Staff
The Monthly Discount Report - By Staff displays all uses of predefined discounts given by staff during
the month. When you run this report, the Monthly Manual Discount Report - By Staff is also automatically
run. It includes all manual discounts given by staff during the month.
390
Chapter 21: End of Month Processing
Monthly Invoices and Statements
For information on the Monthly Invoices and Statements report option, see “Printing Monthly Invoices
and Statements” on page 400 for more information.
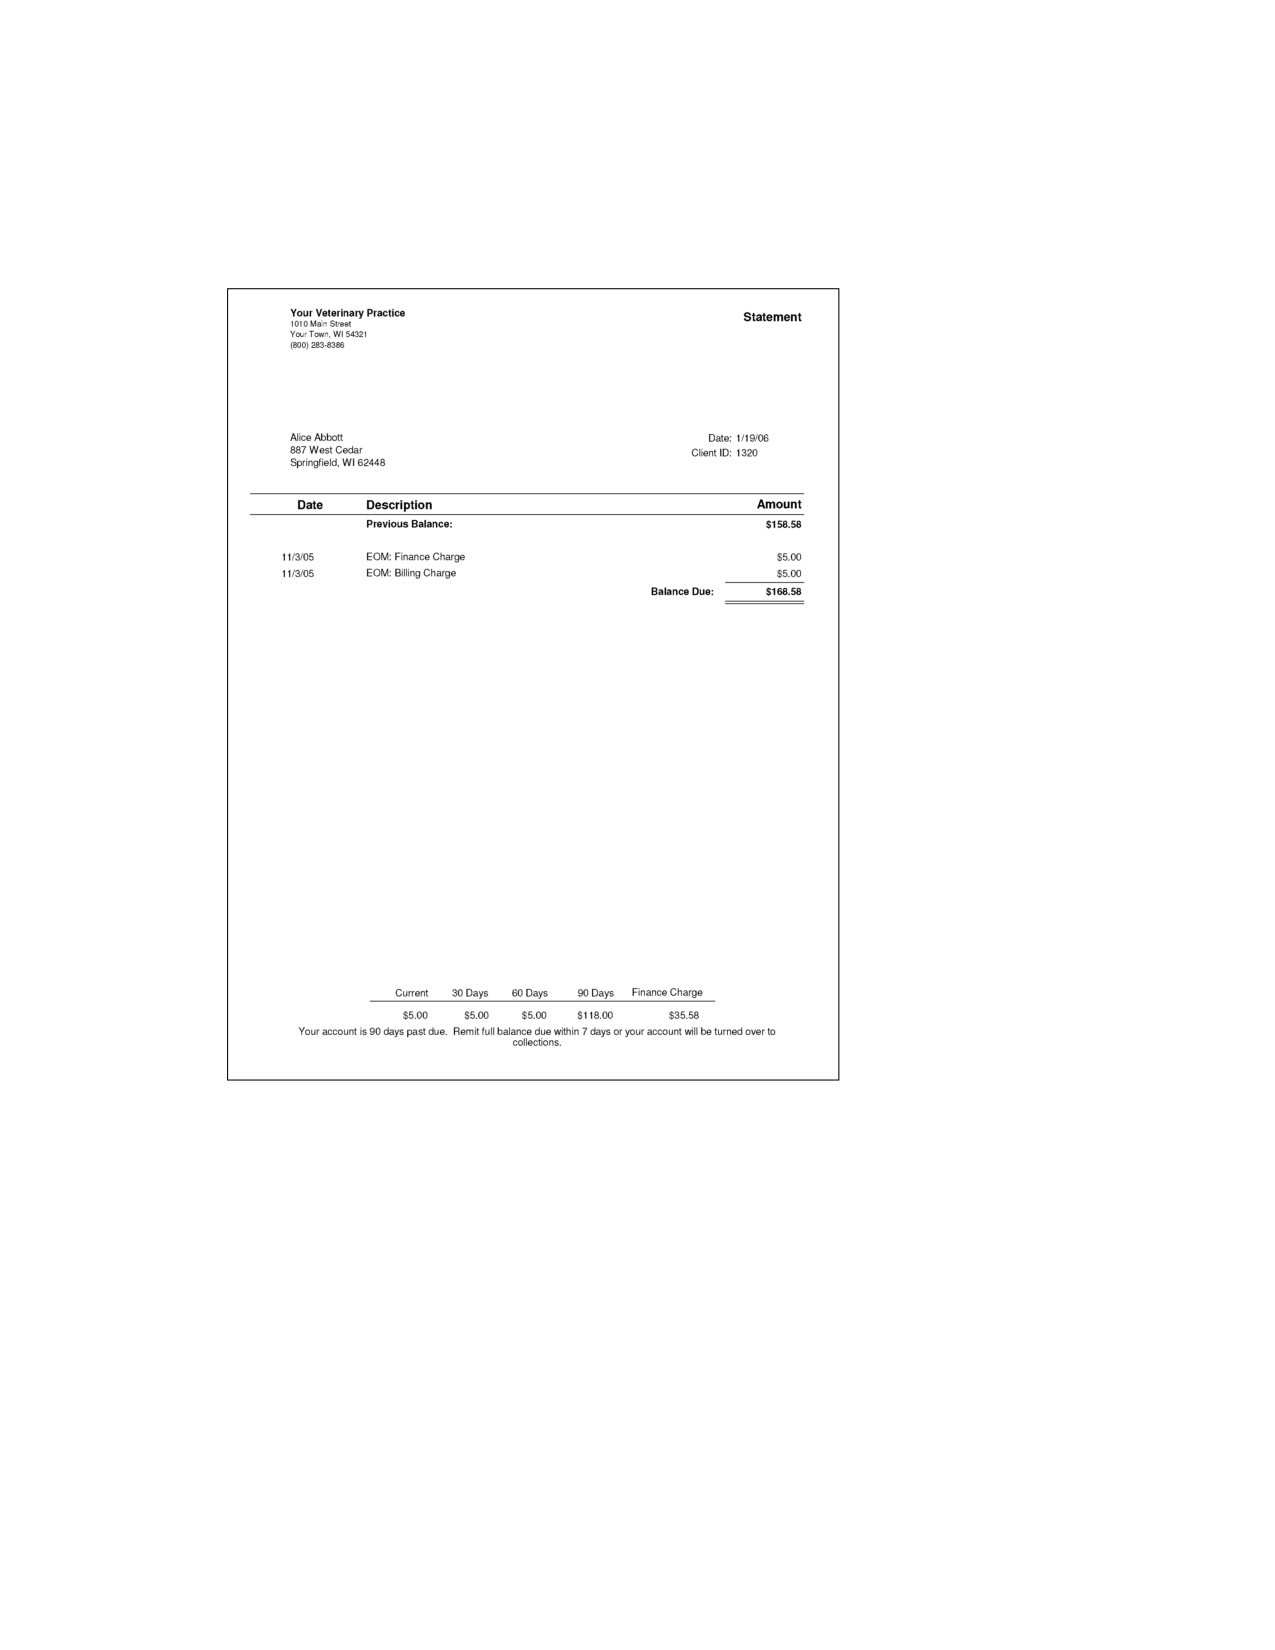
Sample Normal Statement
The standard statement for preprinted paper is formatted so that you can fit the
statement in an open window envelope.
Tip: To change the placement of the client address or practice address on monthly statements, see
”Statement Print Options Defaults” on page 132. To change the placement of the client address or
practice address on invoices, see “Invoice Address Defaults” on page 114.
391