IDEXX Cornerstone. Administrator’s Manual (8.3 NEXT version 8.3.6) - page 12
Chapter 17: Setting Up Medical Notes and Correspondence
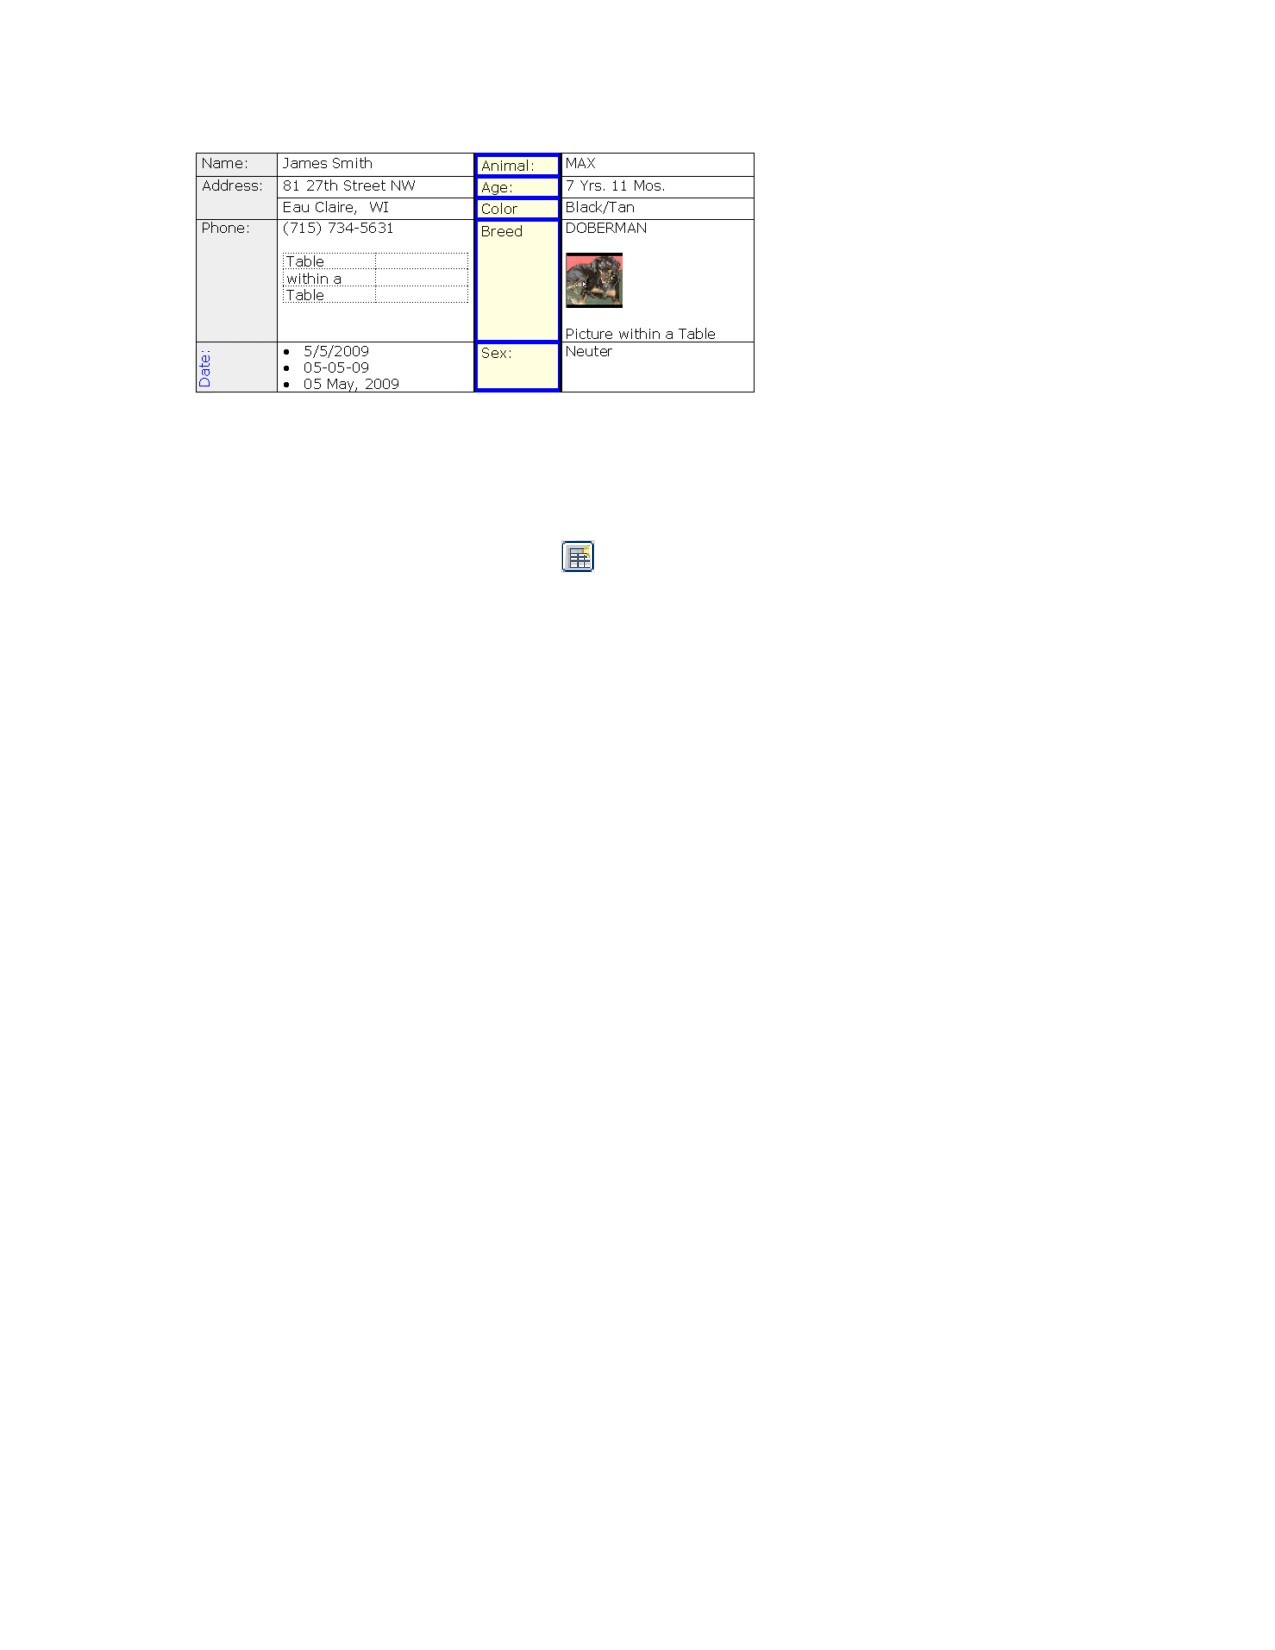
Note: When working within a table, the right-click options available are specific to table-related tasks. To
insert elements within a table cell you must use the menus or toolbar buttons.
To insert a table:
1. Right-click in the document template where you want to insert a table and select Insert > Table.
Alternatively, you can click the Table
button on the editor toolbar or select Insert Table from
the Table menu. The New Table Parameters dialog box appears.
2. Specify the number of rows and columns, and then click OK. The table is inserted at the current
cursor location.
3. To move from one cell to another within the table, press TAB.
4. To insert a new line within a cell, press SHIFT+ENTER.
5. To apply formatting or adjust positioning within the table, right-click within the table to access a
shortcut menu of frequently used table editing commands. Alternatively, you can choose from an
extensive list of table editing commands in the Table menu.
Inserting a Problem Description Prompt or Problem Details Prompt
(Enhanced templates only)
In the Cornerstone Editor, problem prompts can be added during template setup, and then at use time
the staff member can simply click on the prompt link to select the problems. (Or, if needed, a problem
can be added at use time even if a problem prompt is not added during setup.)
Problems can be documented in two different formats (both display as underlined links during setup):
• Problem description inserts the problem description text into the body of your text or
paragraph. If multiple problem descriptions are selected, they display separated by commas
(example shown below). In most cases, this is the format you would want to use within a
document, inserting the problem text within the text of a predefined paragraph.
Example:
Abdominal Enlargement, Abdominal Pain
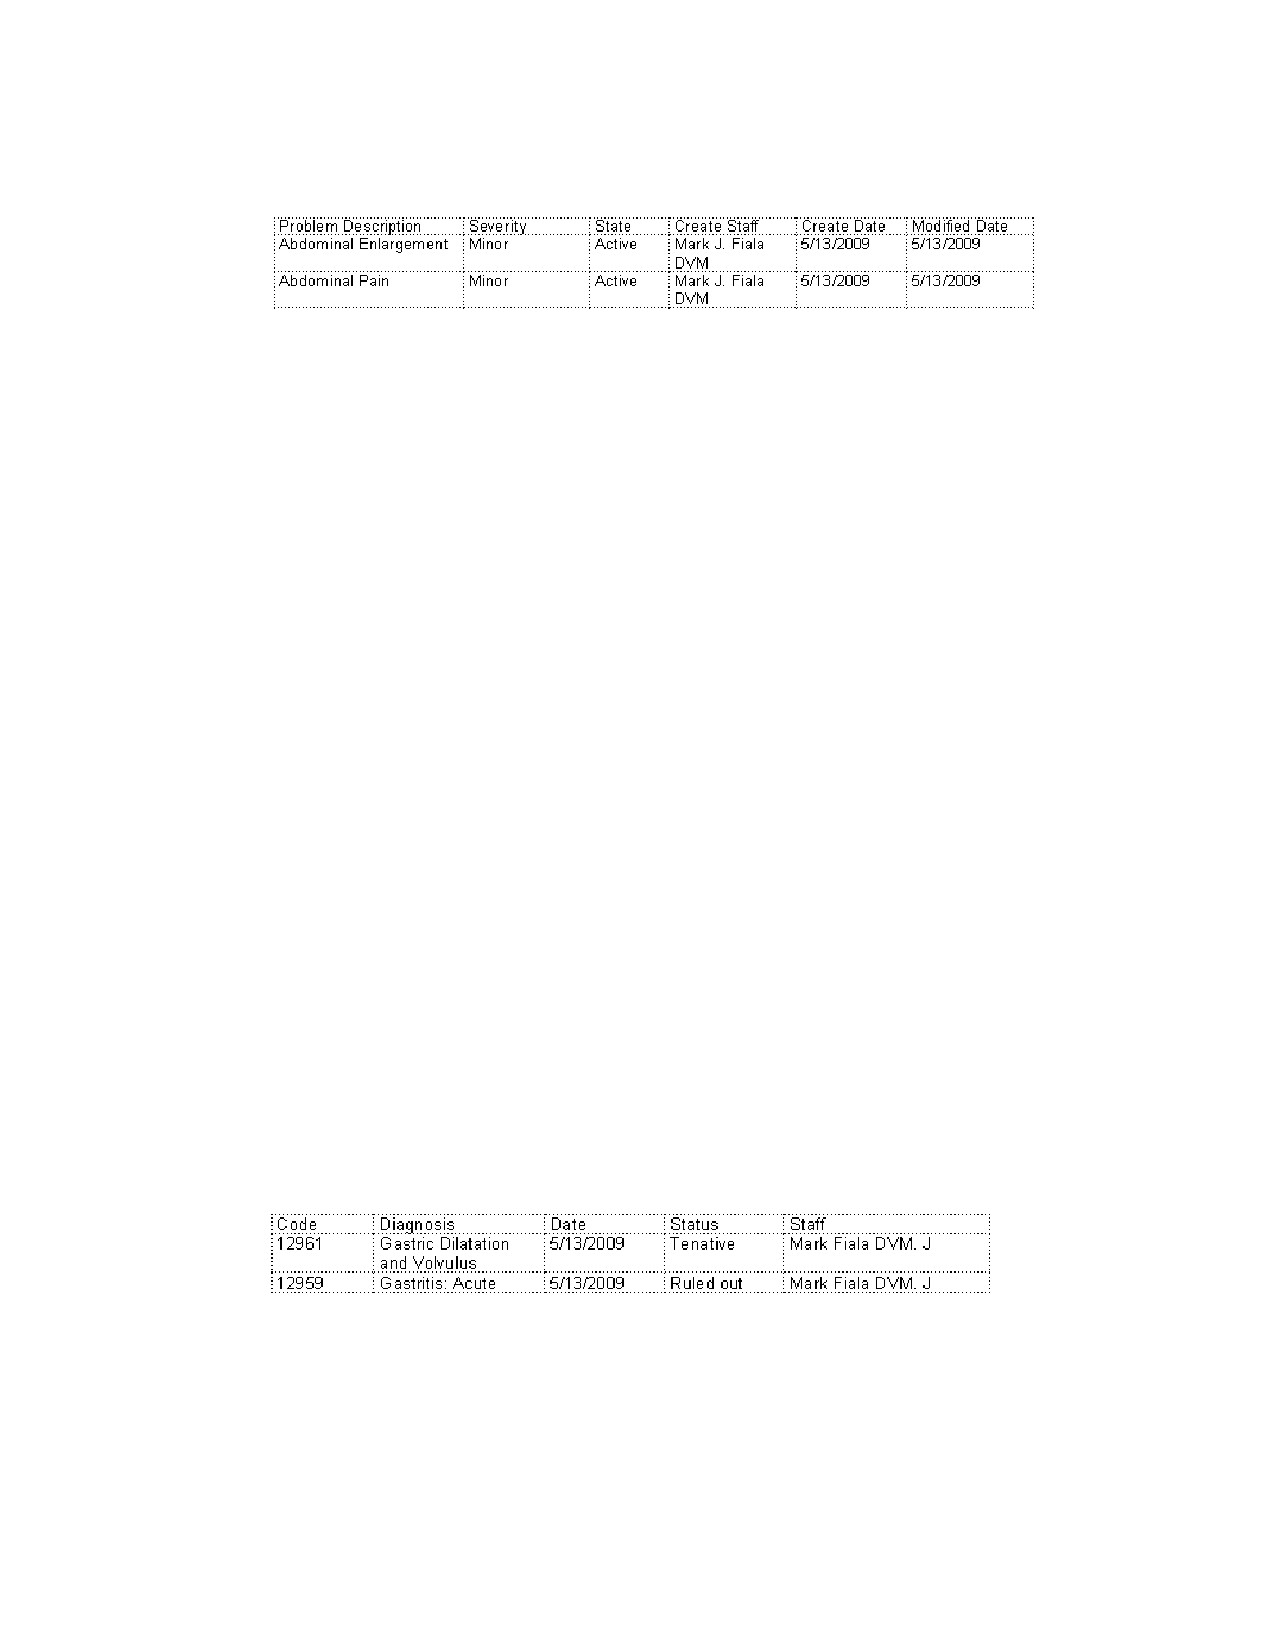
• Problem details inserts a “detail block” table that includes all information associated with the
problem (Description, Severity, State, Staff, Date, Modified Date). If multiple problem details are
selected, they display as separate rows in the detail block (example shown below). This format
is typically used for inserting at the end of a medical note, or for a document being sent to a
referring doctor.
332
Chapter 17: Setting Up Medical Notes and Correspondence
Example:
To insert a problem description prompt/problem details prompt in a template:
¾ Place your cursor in the desired location, right-click and select Insert > Add problem description
prompt (or Add problem details prompt).
The prompt displays in the template as an underlined link. At use time the staff member can simply
click on the link to access the Problems dialog box and specify the problems to add to the
document.
Inserting a Diagnosis Description Prompt or a Diagnosis Details Prompt
(Enhanced templates only)
In the Cornerstone Editor, diagnosis prompts can be added during template setup, and then at use time
the staff member can simply click on the prompt link to select the diagnoses. (Or, if needed, a diagnosis
can be added at use time even if a diagnosis prompt is not added during setup.)
Note: Diagnoses added to a document (medical note or correspondence document), do not finalize
automatically.
Diagnoses can be documented in two different formats (both display as underlined links during setup):
• Diagnosis description inserts the diagnosis description text as it is defined in Cornerstone. If
multiple diagnosis descriptions are selected, they display separated by commas (example
shown below). In most cases, this is the format you would want to add to a document.
Example:
Gastric Dilatation and Volvulus, Gastritis: Acute
• Diagnosis details inserts a “detail block” table that includes all information associated with the
diagnosis (Code, Diagnosis, Date, Status, Staff). If multiple diagnosis details are selected, they
display as separate rows in a diagnosis details table (example shown below). This format is
typically used for sending documents to a referring doctor.
Example:
To insert a diagnosis description prompt/diagnosis details prompt in a template:
¾ Place your cursor in the desired location, right-click and select Insert > Add diagnosis description
prompt (or Add diagnosis details prompt).
333
Chapter 17: Setting Up Medical Notes and Correspondence
The prompt displays in the template as an underlined link. At use time the staff member can click on
the link to access the Patient Diagnosis dialog box and specify the diagnoses to add to the
document.
Inserting a Vital Signs Prompt
(Enhanced templates only)
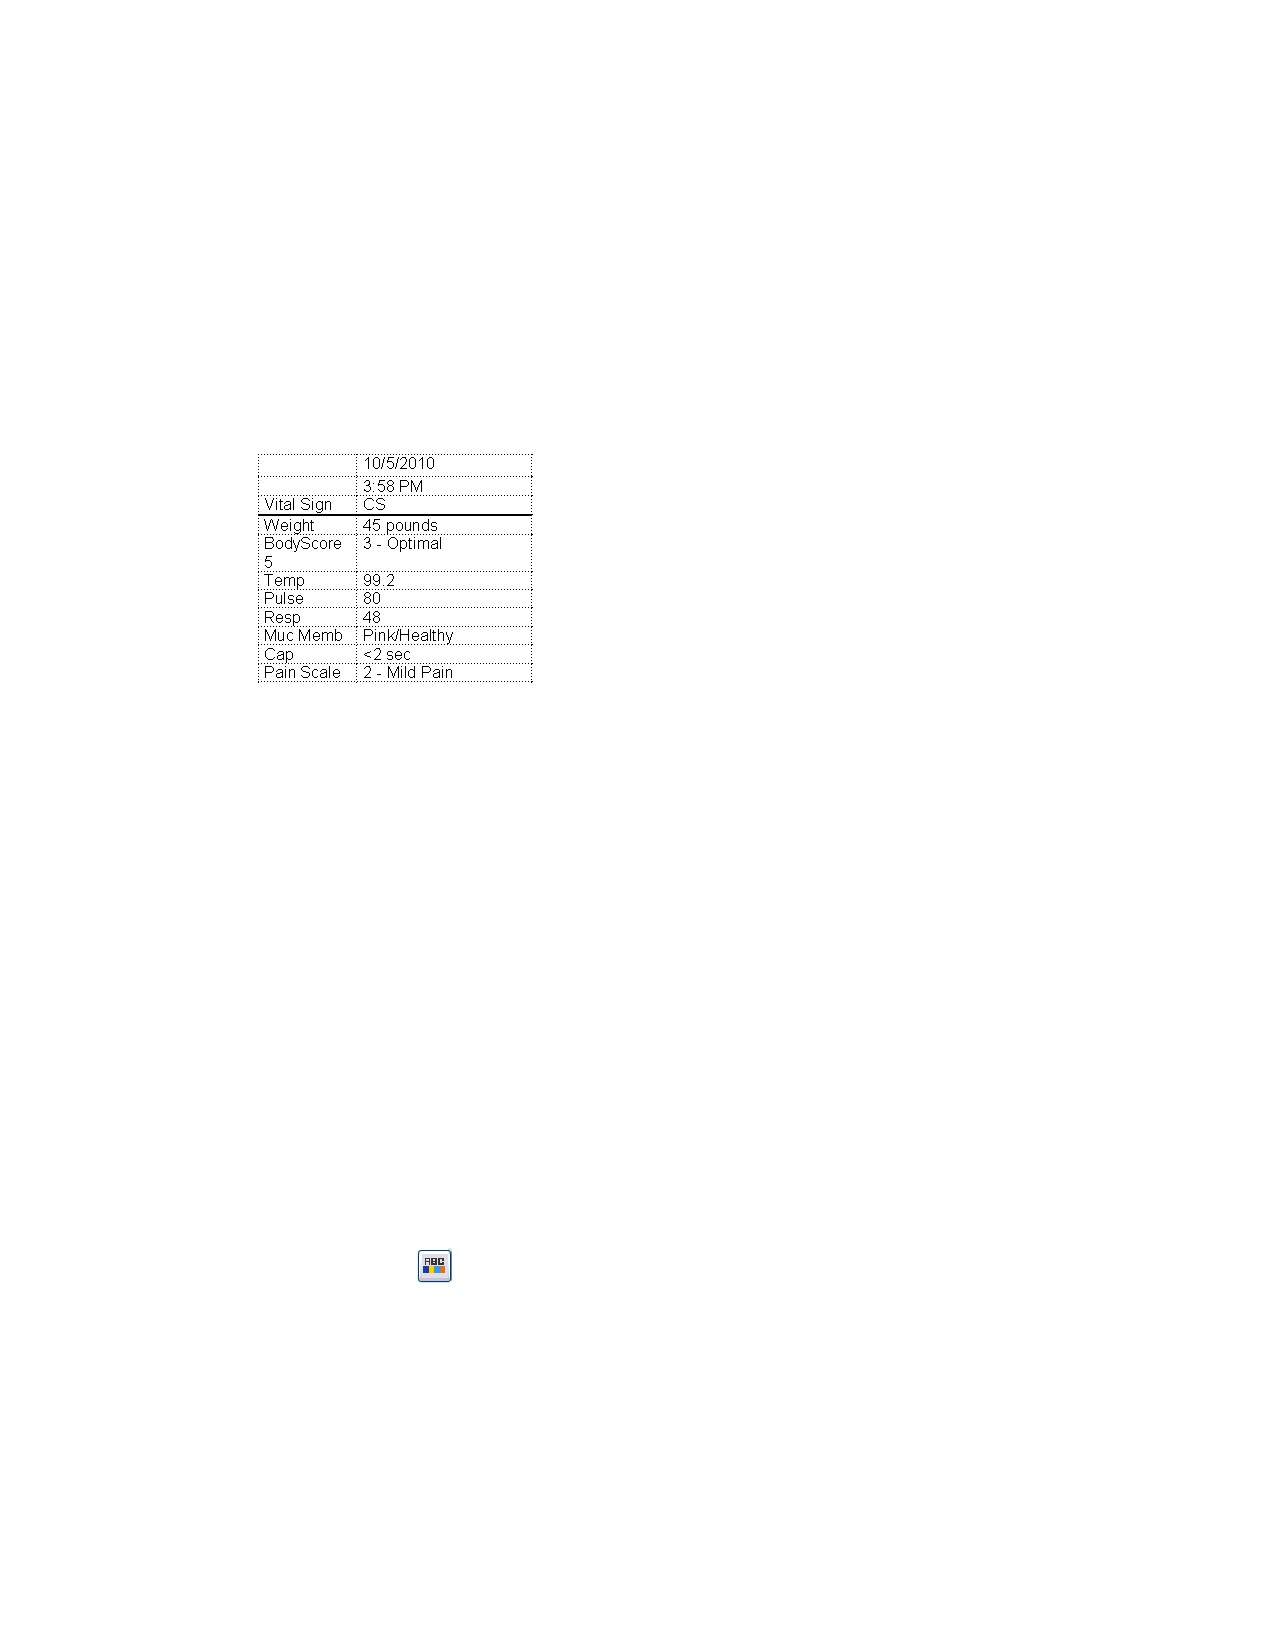
In the Cornerstone Editor, a vital signs prompt can be added during template setup. With the prompt in
place, at the time of use the staff member can simply click on the prompt link and select the patient’s
vital signs information to insert in the document.
Example:
To insert a vital signs prompt in a template:
¾ Place your cursor in the desired location, right-click and select Insert > Vital Signs Prompt.
The prompt displays in the template as an underlined link. At use time the staff member can click on
the link to access the Vital Signs selection window and select the patient’s vital signs information to
insert in the document.
Additional Cornerstone Editor Tools
Several additional tools are available for enhanced templates/documents both at the time of setup and
at the time of use:
• Text and paragraph formatting options
• Pictures and graphics
These tools are most often used at the time of use when adding a document to a patient record. For
information on these tools, see “Chapter 17: Using Medical Notes and Correspondence” in the
Cornerstone User’s Manual.
Cornerstone Editor Features and Limitations in Text-Only Mode
When setting up a text-only template or adding a text-only medical note, the Cornerstone Editor displays
in “text-only mode,” which has the following differences from the standard editor:
• A Color All Text
button is available. This text-only option allows you to apply a single color
to all text in the template or document. (Note: If the Color All Text option is used, the history
description and document text will display in the selected color in patient history.)
• The menus, toolbar buttons and right-click menus available are limited to those options that
pertain to text-based data entry.
• Only text-based bookmarks can be used (image- or table-based bookmarks are not available
for selection).
334
Chapter 17: Setting Up Medical Notes and Correspondence
• In the event that a text-only document is saved for the first time with its Hx description field left
blank, if there is text in the first line of the document, that text will be used as the history
description.
Note: If you copy and paste content into a text-only template or document, only plain text is pasted. Any
font properties, formatting, tables, graphics, check boxes, etc. copied from an enhanced document will
not be included when pasted in a text-only document.
Customizing the Default Setup Document Template
(Enhanced templates only)
The template designated as the default setup document template (set in Documents defaults) is used
for creating a new enhanced document template and for converting to an enhanced template. The
“Header and Footer (w/ fonts)” template is automatically set up as the default setup document template
in Cornerstone. The “Header and Footer (w/ fonts)” template includes a header and footer containing
bookmarks for clinic information, client information, patient information, date, etc. Unless you opt to
designate a different default template in Documents defaults, the “Header and Footer (w/fonts)”
template will be used every time you create a new document template or convert to an enhanced
template.
Note: Although you do have the option to remove the predesigned header and footer bookmarks from
the default template, we do not recommend removing this information. The predesigned header and
footer contain key identifying information that should be included when printing most types of medical
notes and correspondence. If you remove the bookmarks, then documents printed from your templates
will not have any identifying information unless you include it separately in the body text.
Tip: The header and/or footer can be turned off for printing at the time of use from the Print Options
dialog box, if desired.
To set up your own default setup document template:
1. On the Lists menu, select Documents > Templates. The Document Template List window
appears.
2. With all templates displayed in the list (no category or favorites selected), in the Title or ID text box,
type the word header.
335
Chapter 17: Setting Up Medical Notes and Correspondence
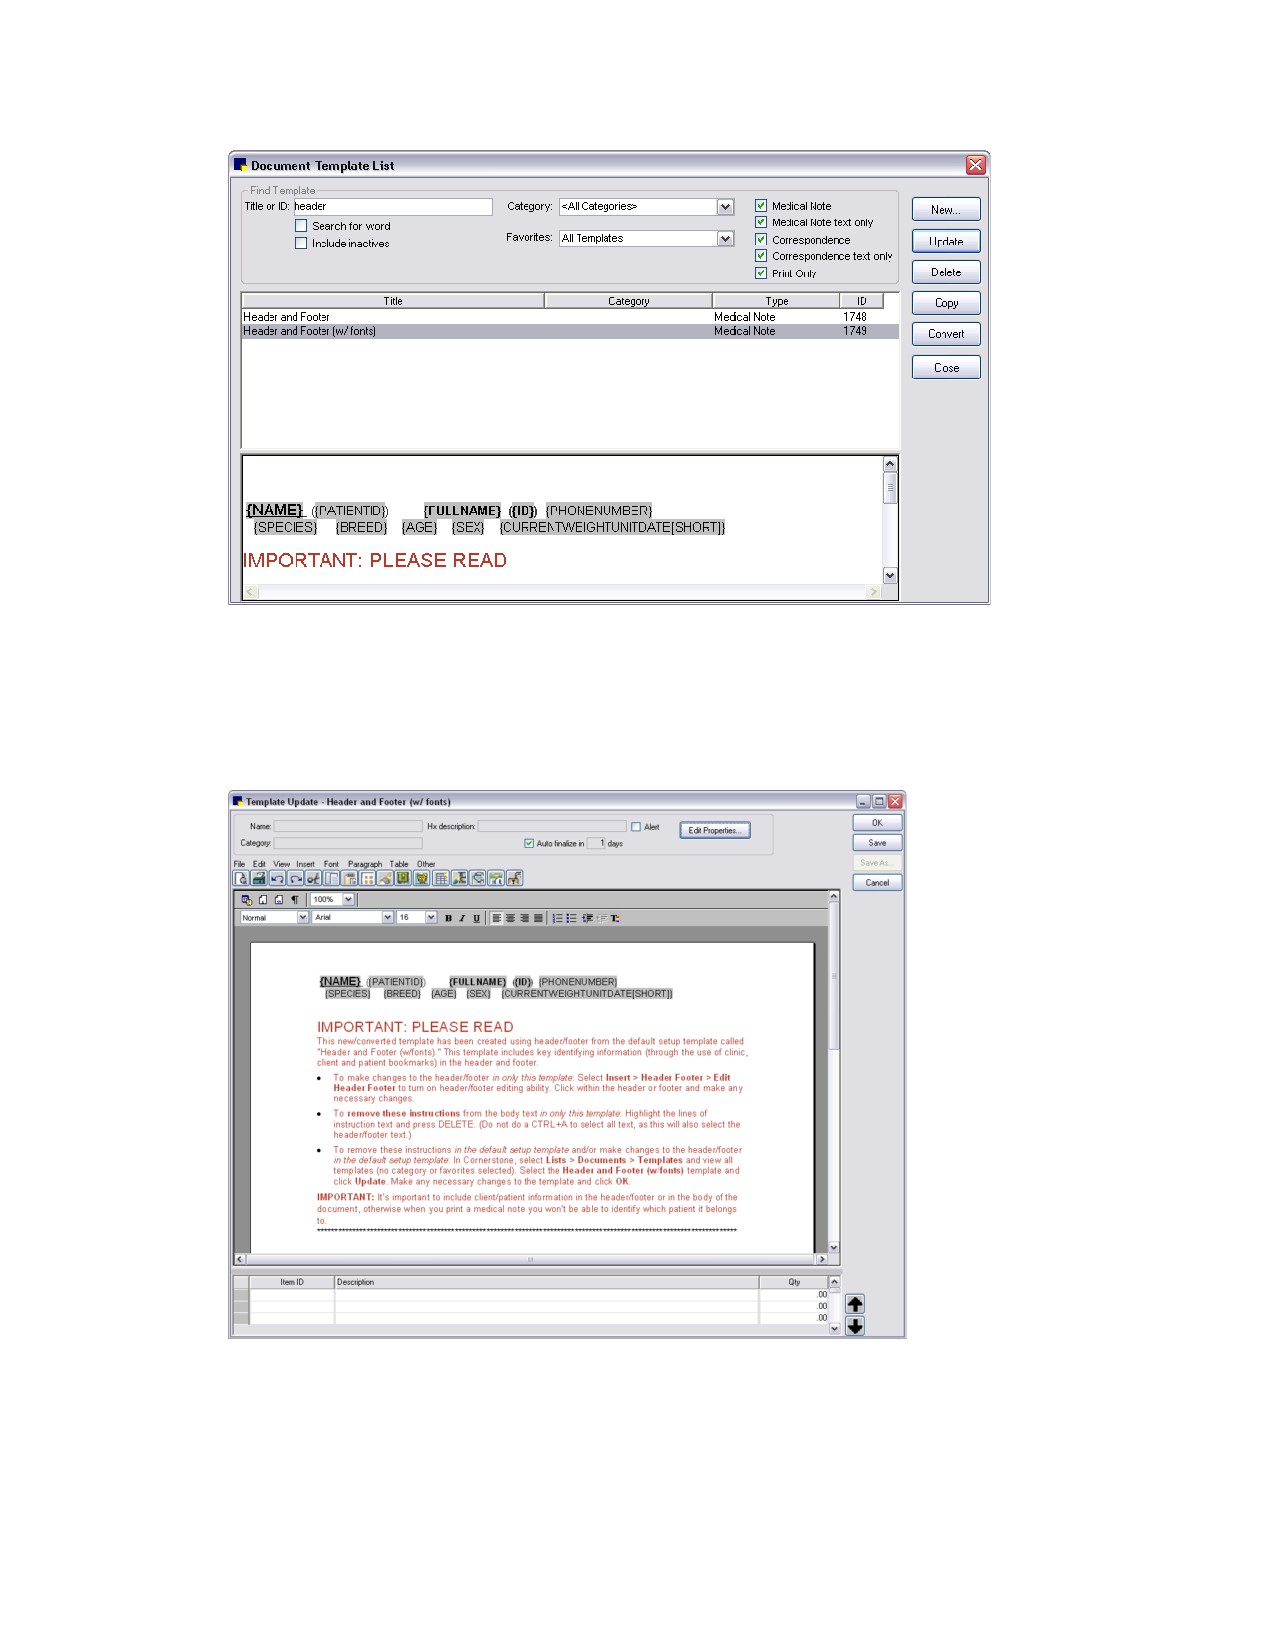
Header and Footer (w/fonts) template selected in the Document Template List
3. Select the Header and Footer (w/fonts) template and click Update.
The template opens in the Cornerstone Editor. It includes the header and footer bookmarks (text
with gray background), along with temporary “IMPORTANT: PLEASE READ” instruction text in the
body of the template.
Header and Footer (w/fonts) template in the Cornerstone Editor
4. Click Save As. The Template Properties dialog box appears.
336
Chapter 17: Setting Up Medical Notes and Correspondence
5. Type a template name and select other desired settings in the Template Properties dialog box and
click OK when finished. (See “Properties Banner” on page 317 for information on template
properties.)
6. To remove the temporary instruction text from the body of the template, highlight the lines of text and
press DELETE. (Do not do a CTRL+A to select all text, as this will also select the header/footer text.)
7. To make changes to the header or footer, select Insert > Header Footer > Edit Header Footer to
turn on header/footer editing ability. Click within the header or footer and make any necessary
changes.
8. Insert any other elements that you want to be included in every new document template (and
converted Classic medical note) that you create.
9. Click OK to save your changes and close the Cornerstone Editor.
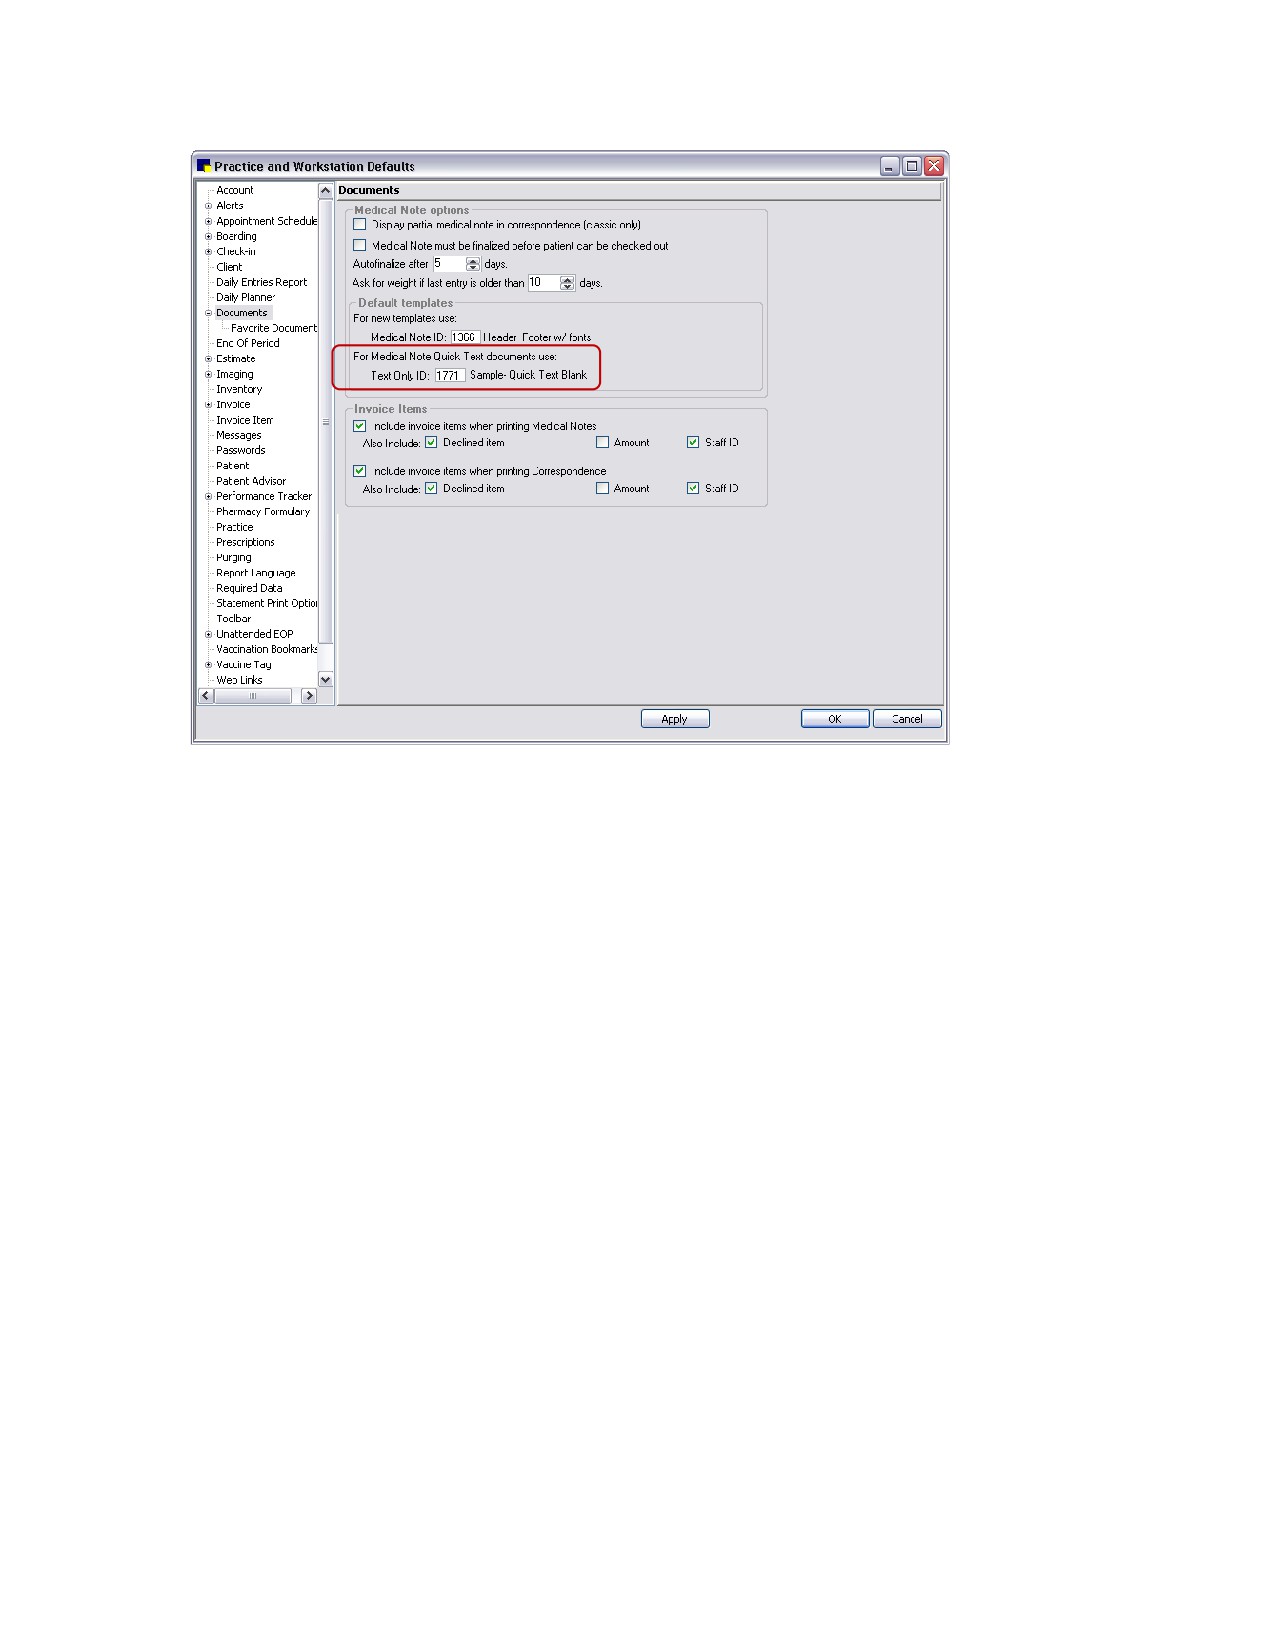
10. On the Controls menu, select Defaults > Practice and Workstation, and then select Documents
in the navigation pane on the left. In the For new templates use: Medical Note ID field, press F2
(or double-click) and use the Document Template List to select the template you want to use as the
default setup document template.
11. Click OK on the Practice and Workstation Defaults window to save your changes.
When you create a new document template (or convert to an enhanced template), the newly
designated default setup document template will be used.
Designating the Text-Only Template to Use for Adding Quick Text Medical Notes
The Medical Note Quick Text feature offers a simpler, faster option for adding information to a patient’s
medical record. Similar to the “None” Classic medical note template available in Cornerstone 7.6 and
earlier versions, the Medical Note Quick Text feature allows you to simply right-click on the Patient
Clipboard and select Medical Note Quick Text, enter your staff ID, and immediately start typing your
notes in the Cornerstone Editor.
You can get started immediately with no setup required by using the default Medical Note Quick Text
template (the “Sample- Quick Text Blank” template). If you don’t want to use the blank default template,
you can create your own text-only template (in Lists > Documents > Templates) and then assign your
template as the “Medical Note Quick Text document” in Documents defaults.
337
Chapter 17: Setting Up Medical Notes and Correspondence
See “Documents Defaults” on page 100 for more information on Documents defaults.
Creating a New Document Template for Medical Notes or Correspondence
Tip: Sample templates are available in the “Samples” category. You can easily create a copy of one of
these templates and modify it to meet the needs of your practice. See “Creating a Copy of an Existing
Document Template” on page 340 for more information. You can also download new sample templates
and import them into Cornerstone. See “Importing a Document Template” on page 340 for more
information.
To create a new document template (enhanced or text only):
1. On the Lists menu, select Documents > Templates. The Document Template List window
appears.
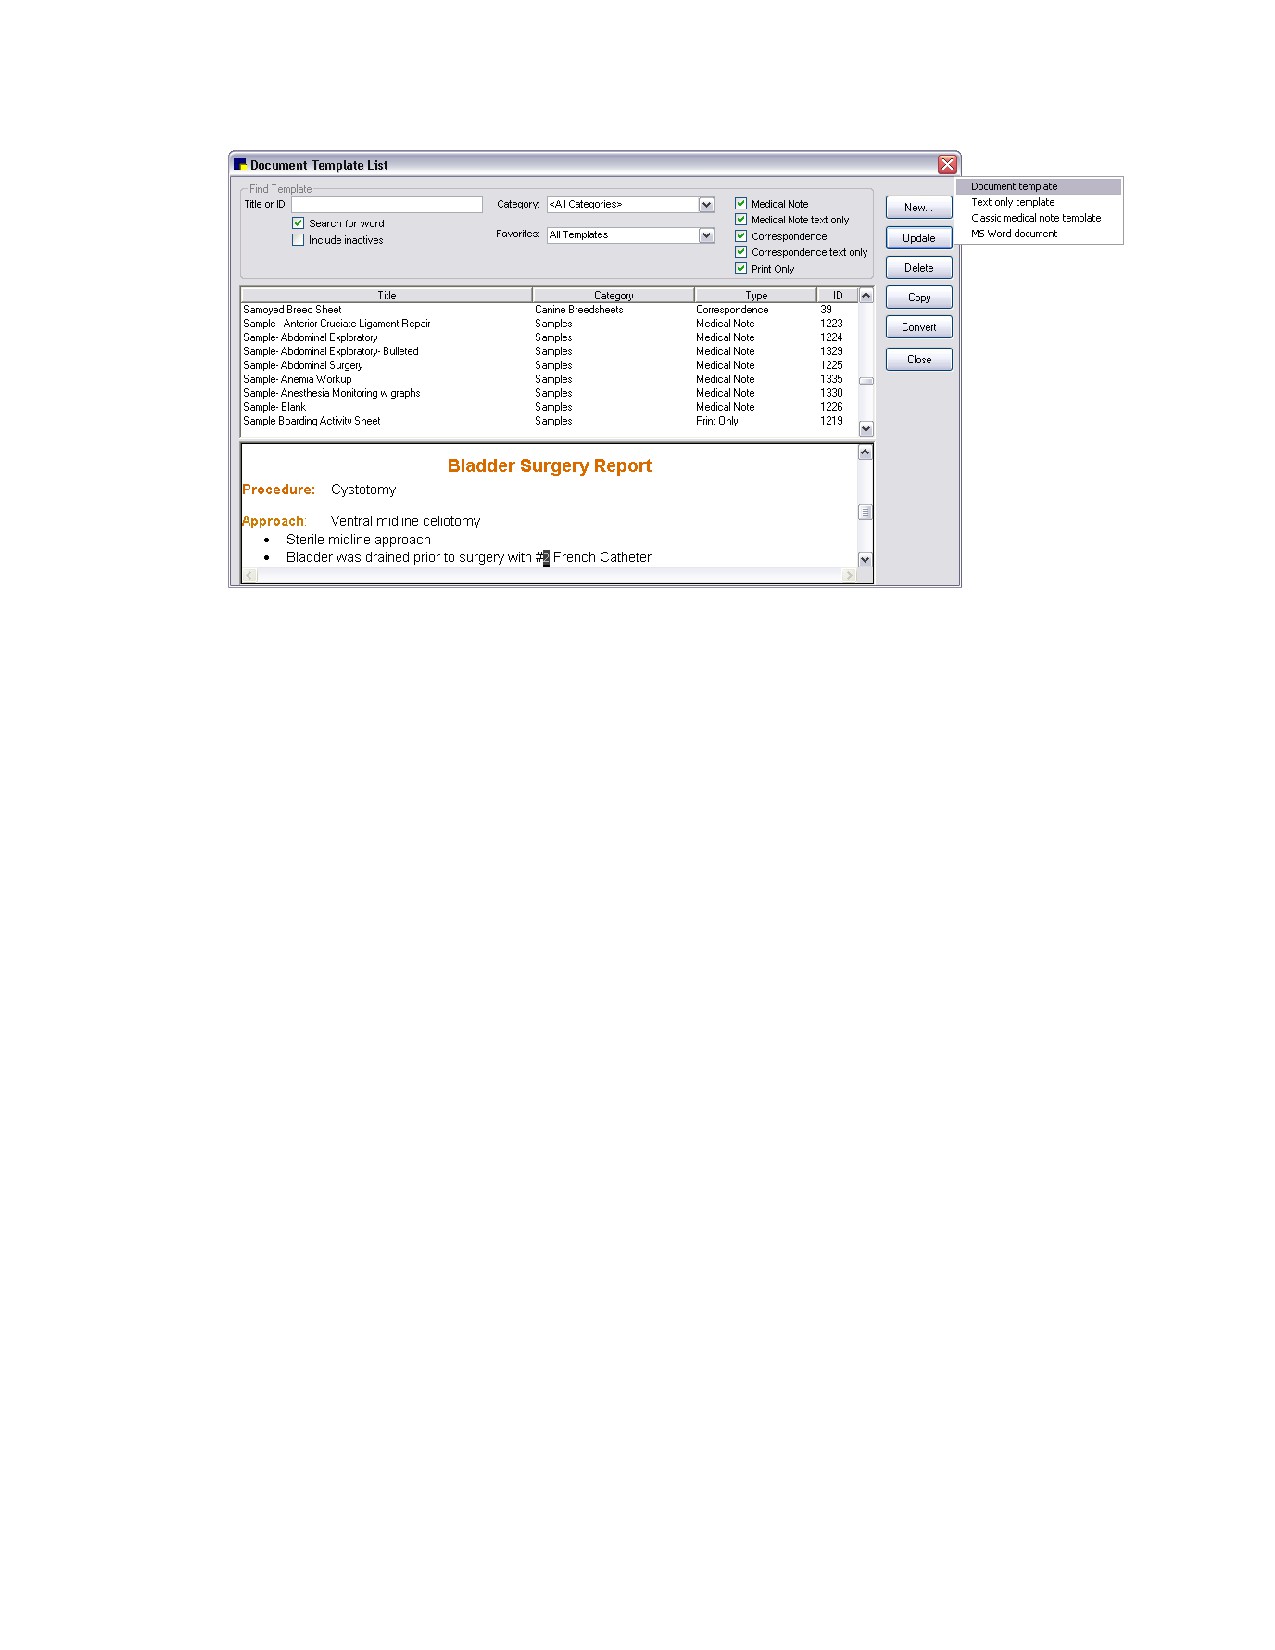
2. Click the New button to display a pop-up menu of template creation options.
338
Chapter 17: Setting Up Medical Notes and Correspondence
Create a new document template from the Document Template List
3.
From the New button’s pop-up menu, select Document template or Text only template. The
Cornerstone Editor opens.
Note: If you select Text only template, the Cornerstone Editor will display in text-only mode, which
means that the menus, toolbar buttons and right-click menus available are limited to those options
that pertain to text-based data entry.
Tip: Use the Zoom (100%) drop-down list to select or enter a lower magnification level (like 75%)
that allows you to increase the amount of the page you can see on screen.
4.
Click Edit Properties. The Template Properties dialog box appears.
5.
Specify the desired template settings in the Template Properties dialog box and click OK when
finished. (See “Properties Banner” on page 317 for more information on template properties.)
6.
Create the template as desired using the tools available in the Cornerstone Editor-Template Setup
window. (See “Document Template Setup Tools” on page 323 for more information.)
7.
To add invoice items to the template, in the Invoice Items pane, double-click or press F2 in any
blank Item ID row to open the Invoice Item list, allowing you to search for and select the desired
item. (See “Invoice Items Pane” on page 320 for more information on adding invoice items to a
template.)
Note: Items can be deleted later by staff when creating a document based on the template.
8.
When you are finished setting up the template, do one of the following:
• If you want to save the template and close the Cornerstone Editor, click OK. If any changes
have been made to the template since it was last saved, the Template Properties dialog
appears. Click OK on the Template Properties dialog box to save changes and close the
Cornerstone Editor.
• If you want to save the template and remain in the Cornerstone Editor so that you can continue
working on the template, click Save. (If this is the first time the template has been saved, the
Template Properties dialog box appears.)
• If you want to save the template with a new name (and optionally change the template type),
click Save As. The Template Properties dialog box appears. Type a new name for the template
339
Chapter 17: Setting Up Medical Notes and Correspondence
and click OK to save changes and continue working on the newly saved template in the
Cornerstone Editor.
• If you want to close the Cornerstone Editor without saving the template, click Cancel.
Importing a Document Template
Many sample document templates for medical notes and correspondence are available in the
“Samples” category in Cornerstone. You can also download sample templates and import them into
Cornerstone.
To download and import a document template:
1. On the Tools menu, select Import Document Templates. The Import Document Template dialog
box appears.
2. If you have not already downloaded the document template to import, click the download link and
download the desired template file to the Downloads folder in your Cornerstone directory (e.g.,
C:\Cstone\Downloads).
3. On the Import Document Template dialog box, click Browse and select the desired document
template (.csz file) to import.
Note: If a template with the same name already exists on your system, a message asks if you want
to continue with the import. If you click Yes, a number is appended to the new template name (e.g.,
“Eye Exam” will be changed to “Eye Exam (1)”). If you click No, the currently selected template will
not be imported. Click Browse to select a different template or click Cancel to close the Import
Document Template dialog box without importing a template.
4. Click Import Template. A message displays to inform you that the import was successful.
The next time you access the Document Template List window, the imported template will be
available for selection in the Samples category.
Note: If the Document Template List window is open while you import the template, you will need to
close the Document Template List window and reopen it in order to see the new template in the list.
Creating a Copy of an Existing Document Template
You can create a copy of an existing template and assign a new name to the copied (new) template. The
new template will contain all elements from the original (copied) template and any bookmarks will retain
their functionality.
Note: You can use copy (CTRL+C) and paste (CTRL+V) to copy portions of text, graphics, tables and
other elements from one template to another. It is important to note, however, that bookmarks will not
retain their functionality when copied in this way. New bookmarks must be inserted in the document or
you must create a copy of the entire template using the Document Template List Copy button method
described below.
Tip: Sample templates for enhanced medical notes are available in the “Samples” category. You can
easily create a copy of one of these templates and modify it to meet the needs of your practice.
To create a copy of an existing template:
1. On the Lists menu, select Documents > Templates.
2. Select the template to copy and click Copy.
3. Enter a new description (name) for the template and click OK.
340
Chapter 17: Setting Up Medical Notes and Correspondence
Using “Save As” to Save an Existing Template as a Different Template Type
You can use Save As to save a correspondence template as a medical note template, or vice versa.
To save an existing document template as a different template type:
1. On the Lists menu, select Documents > Templates.
2. Select the applicable enhanced medical note or correspondence template and click Update.
3. On the Template Update window, click Save As. The Template Properties dialog box appears.
4. In the Name text box, type a unique name to use for this template (must be different from the name
of the existing template).
5. In the Type drop-down list, select a different template type (Print Only, Correspondence or Medical
Note).
6. Click OK to close the Template Properties dialog box.
7. Click OK to close the Cornerstone Editor.
Showing Correspondence with Medical Notes in History
The Show past and future uses of this template on the Medical Notes tab, Daily Planner, Check-in
Report, Patient History Report option is available when setting up the properties of a new document
template. You may want to use this option if:
• You are a referral practice and you would like referral documents to serve a dual purpose as
medical notes and referral documents.
• In previous versions of Cornerstone you used correspondence to add medical notes to a patient
record and you wish to continue this practice. Using this option you can set the correspondence
template to appear in history with medical notes.
• In previous versions of Cornerstone you used correspondence to add medical notes because of
their flexibility/formatting options but now want to change them to medical notes for future use.
In this case, select the Show past and future uses… check box in the correspondence
document’s properties so that old uses of the template show with medical notes, and then use
Save As to save as an enhanced medical note template.
To set a correspondence template to appear in history with medical notes:
1. On the Lists menu, select Documents > Templates.
2. Select the applicable correspondence template and click Update.
3. On the Cornerstone Editor’s Template Update window, click Edit Properties.
4. Select the Show past and future uses of this template on the Medical Notes tab, Daily Planner,
Check-in Report, Patient History Report check box.
5. Click OK.
6. Click Save.
341
Chapter 17: Setting Up Medical Notes and Correspondence
Converting Medical Note Templates
On the Document Template List window, select a template in the list and then click Convert. The
conversion options available depend on the type of template you selected to convert.
Conversion options include:
• Enhanced converted to Text Only-Converts the template and opens it for editing in the
Cornerstone Editor (in text-only mode). The template retains only text from the enhanced
template; tables, images, check boxes, etc. will be removed.
• Text Only converted to Enhanced-Converts the template and opens it for editing in the
Cornerstone Editor.
• Classic converted to Enhanced-Converts the template and opens it for editing in the
Cornerstone Editor.
• Classic converted to Text Only-Converts the template and opens it for editing in the
Cornerstone Editor (in text-only mode).
Conversion notes:
• When you convert a template, the original template is saved but inactivated. Even if you cancel
before saving the converted template, the conversion will still occur.
• Once a template is converted and automatically inactivated, you can activate it again if
necessary. Note, however, that you cannot convert that same template a second time.
• Bookmarks and invoice items are retained in the conversion, but note that when converting to a
text-only template, any non-text bookmarks will be removed.
• When you convert a Classic template to an enhanced template, any standard data field prompts
(Patient ID, Patient Name, Birthdate, Breed, etc.) in the Classic template will automatically be
changed to the matching bookmark type in the converted medical note. See “Conversion of
Existing Data Fields in Classic Templates” on page 344 for information.
• When you convert a Classic template, all invoice items are moved to the Invoice Items pane in
the enhanced medical note template and are marked as Accepted.
• When you convert a Classic template, if you have invoice items included in the body of the
template, these items will not remain in the body text but will be moved to the Invoice Items
pane in the converted template.
To convert a template:
1. On the Lists menu, select Documents > Templates. The Document Templates List dialog box
appears.
2. Select the template you want to convert and click the Convert button. A Convert message displays
information on the type of conversion you are about to perform.
3. To continue with the conversion, click OK. The template is converted and opens in the Cornerstone
Editor’s Template Update window.
4. Click Edit Properties. The Template Properties dialog box appears.
Note: The Template Properties dialog box also appears automatically if you click Save for the first
time, if you click OK without first setting the properties, or if you click Save As.
342
Chapter 17: Setting Up Medical Notes and Correspondence
5.
Specify the desired template settings in the Template Properties dialog box and click OK when
finished. Note that the Name must be different from the name of the template you are converting.
(See “Properties Banner” on page 317 for information on template properties.)
6.
Edit the converted template as desired using the object creation and formatting tools available in the
Cornerstone Editor-Template Update window. (See “Document Template Setup Tools” on page 323
for more information.)
Tip: When creating or updating a template, both bookmarks and Text Input Fields appear with a
gray background, but bookmarks are easily distinguishable by the brackets { } that appear around
them.
7.
To add invoice items to the template, in the Invoice Items pane, double-click or press F2 in any
blank Item ID row to open the Invoice Item list, allowing you to search for and select the desired
item. (See “Invoice Items Pane” on page 320 for more information on adding invoice items to a
template.)
Note: Items can be deleted later by staff at the time of use when creating a document based on the
template.
8.
When you are finished setting up the template, do one of the following:
• If you want to save the template and close the Cornerstone Editor, click OK. If any changes
have been made to the template since it was last saved, the Template Properties dialog
appears. Click OK on the Template Properties dialog box to save changes and close the
Cornerstone Editor.
• If you want to save the template and remain in the Cornerstone Editor so that you can continue
working on the template, click Save. (If this is the first time the template has been saved, the
Template Properties dialog box appears.)
• If you want to save the template with a new name (and optionally change the template type),
click Save As. The Template Properties dialog box appears. Type a new name for the template
and click OK to save changes and continue working on the newly saved template in the
Cornerstone Editor.
• If you want to close the Cornerstone Editor without saving the template, click Cancel.
(Remember, even if you cancel before saving the converted template, the conversion will still
occur.)
343
Chapter 17: Setting Up Medical Notes and Correspondence
Conversion of Existing Data Fields in Classic Templates
When you convert a Classic medical note template, any standard data field prompts (Patient ID, Patient
Name, Birthdate, Breed, etc.) in the Classic template will automatically be changed to the matching
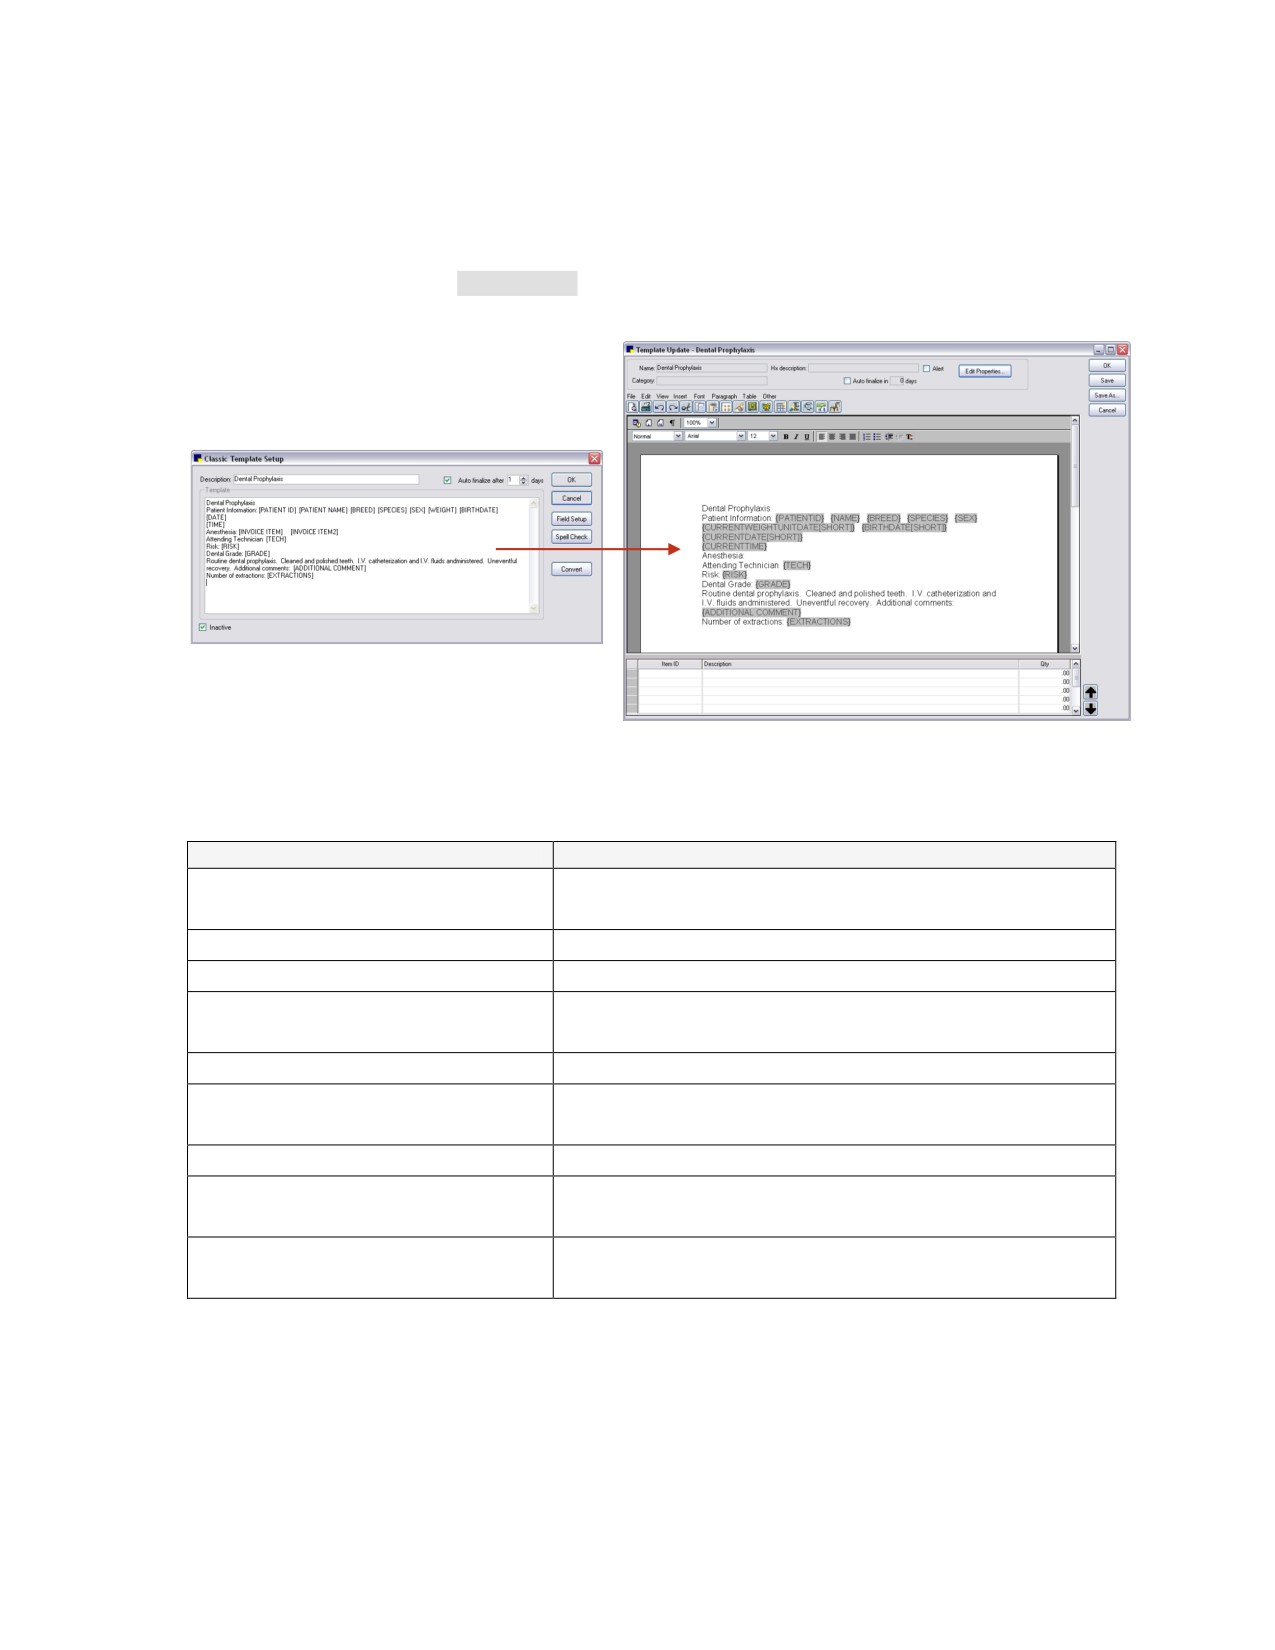
bookmark type in the converted medical note. For example, a [PATIENT ID] data field in the Classic
template will be changed to a {PATIENTID} bookmark in the converted template. For more information
on bookmarks in the Cornerstone Editor, see “Inserting Bookmarks” on page 324.
Conversion of data fields from a Classic template to an Enhanced template
For any custom data fields in the Classic template that do not have a matching bookmark in the
enhanced template, Cornerstone will convert them as shown in the following table.
Classic Template-Custom Data Field
Converts to…
Text Input Field if it contains any default data
[CHAR]
Question bookmark if it does not contain any default data
[CONSULT ITEM]
Item will be added to the Invoice Items tab with Accepted status
[DIAGNOSIS]
“Add_Diagnosis_Description” link
Text Input Field if it contains any default data
[IMAGE #]
Question bookmark if it does not contain any default data
[INVOICE ITEM]
Item will be added to the Invoice Items tab with Accepted status
Text Input Field if it contains any default data
[NUMERIC]
Question bookmark if it does not contain any default data
[PROBLEMS]
“Add_Problems_Description” link
Text Input Field if it contains any default data
[REMARKS]
Question bookmark if it does not contain any default data
Text Input Field if it contains any default data
All other custom predefined fields
Question bookmark if it does not contain any default data
Tip: If you end up with Question bookmarks for data that is not known upon starting a medical note for a
patient (which is when the pop-up question appears), this may pose a problem because although the
bookmarks are still there, you cannot easily determine where they are located within a document. To
avoid this issue, you may want to redo these Question bookmarks as Text Input Fields. Text Input Fields
344
Chapter 17: Setting Up Medical Notes and Correspondence
are easily visible with a gray background and these fields can be filled in at any time when creating the
document. See “Inserting Text Input Fields” on page 330 for more information.
Inactivating a Document Template
You can flag a medical note or correspondence template as inactive so it will not appear by default
when searching the template list.
To inactivate a template:
1. On the Lists menu, select Documents > Templates.
2. Select the applicable template and click Update.
3. On the Template Update window, click Edit Properties. The Template Properties dialog box
appears.
4. Select the Inactive check box.
5. Click OK to close the Template Properties dialog box.
6. Click OK to close the Cornerstone Editor.
Setting Up a Special Action to Associate a Document Template with an Invoice Item
Using the Print Document special action, you can associate a particular document template with an
invoice item so that the document automatically opens in the Cornerstone Editor when the designated
“When to apply” action takes place. At that point, staff can add information to the document and save it
in patient history (and optionally print the document, if desired).
To set up a Print Document special action for an invoice item:
1. On the Lists menu, select Invoice Item. The Invoice Item List appears.
2. Select the item that you want to link a document to and click Update. The item information displays
in the Invoice Item Information window.
3. Click the Spec. Actions tab.
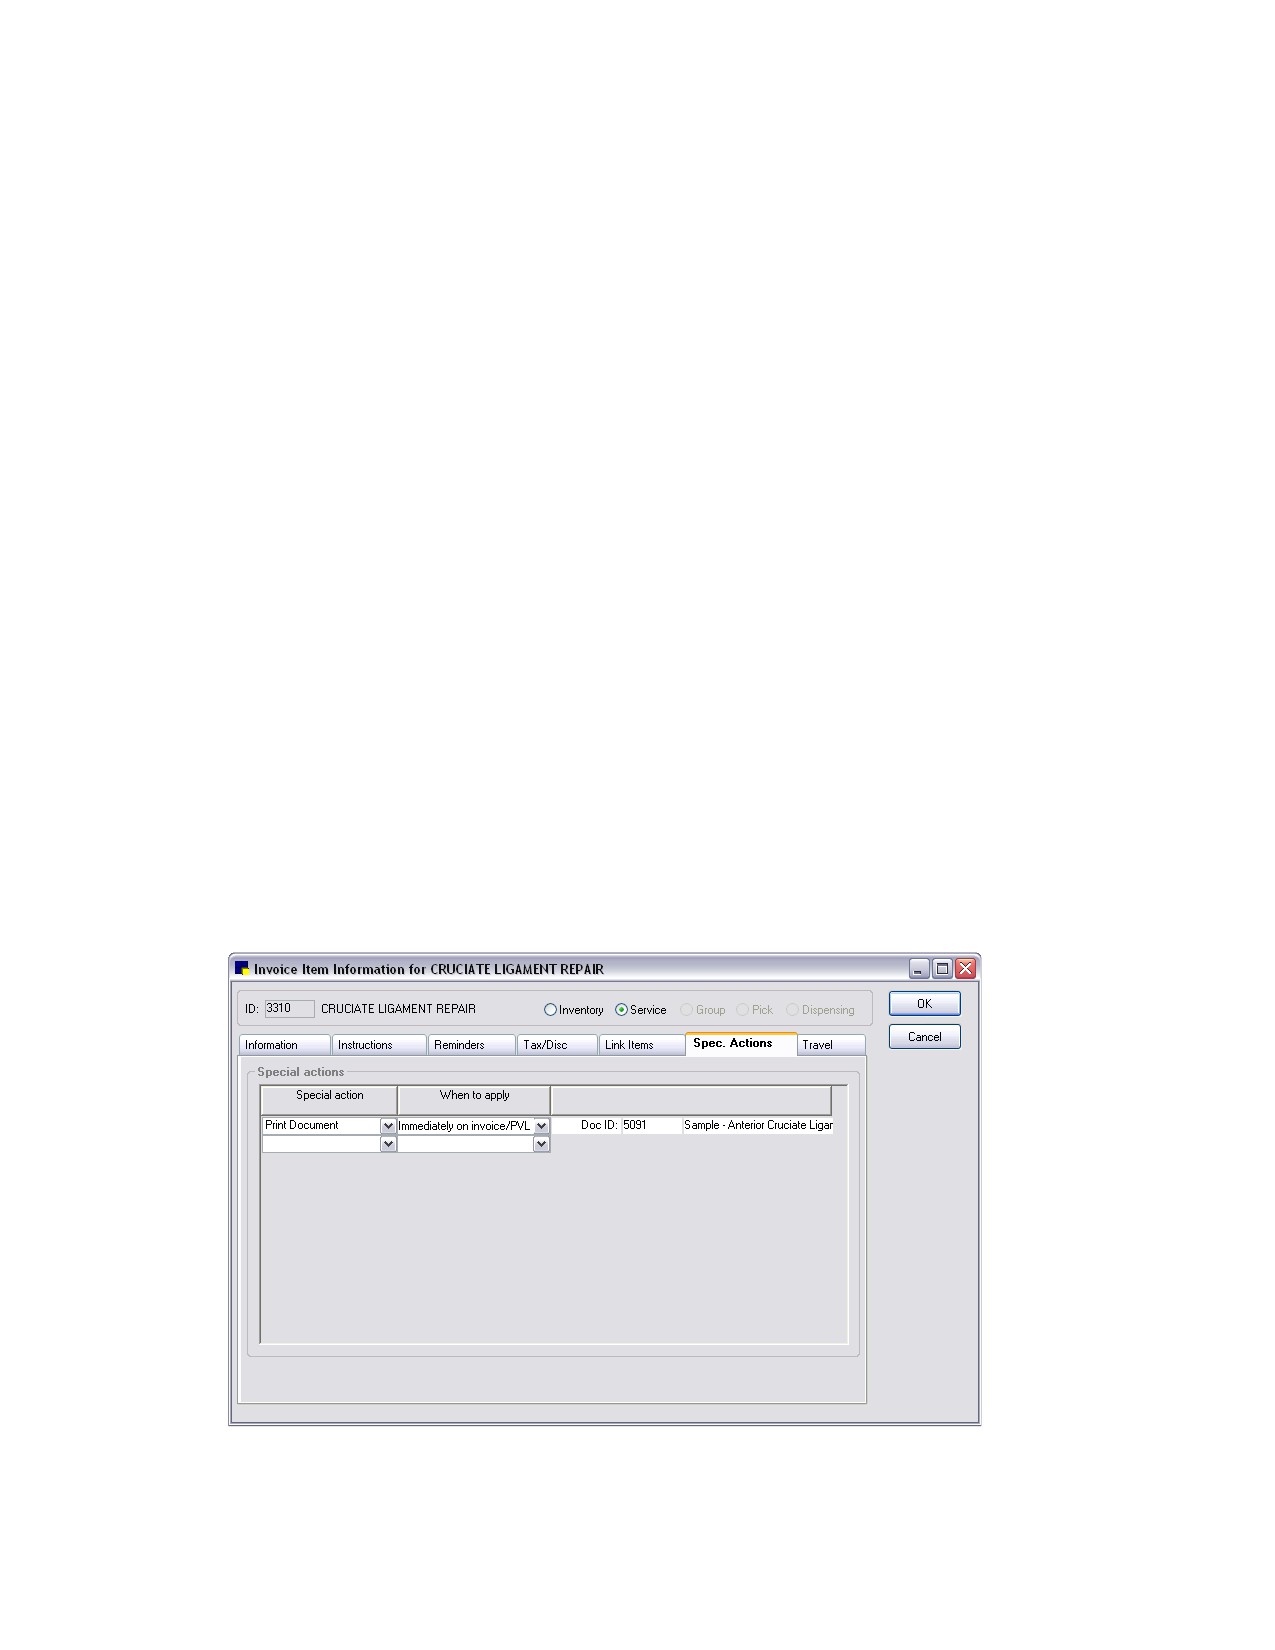
Print Document special action setup
345
Chapter 17: Setting Up Medical Notes and Correspondence
4. In the Special action field, select Print Document. (Note: Select this option even if you do not plan
to actually print the document. This option also applies for viewing a document and updating/saving
a document in patient history.)
5. In the When to apply field, select one of the following options to specify when to open the
document in the Cornerstone Editor:
• Optional on invoice (you can click the Special button and process the special action at any time
during invoicing, or you can wait until the invoice is saved or posted, at which time the Special
Action box automatically appears)
• Before invoice is posted
• Immediately on invoice/PVL (the Special Action dialog box appears when the item is added or
moved to the invoice or Patient Visit List)
• Print after invoice posted
Note: If the document template you are linking to contains default invoice items, it cannot be set up
to print after the invoice is posted.
6. In the Doc ID field, type a document ID or press F2 to use the Document Template List to choose a
document template.
IMPORTANT: Make sure the selected document template does not contain this item (the item you
are linking the special action to) as a default invoice item, as this would create a perpetual loop.
7. Click OK to save your changes.
Example:
A practice has set up a CRUCIATE SURGERY service item with a Print Document special action set to
display the “Anterior Cruciate Ligament Surgery Report” document when the item is sent to an invoice or
to the Patient Visit List (PVL). With this type of special action setup in place, when a CRUCIATE
SURGERY service is completed on the invoice or PVL (or on the Whiteboard Patient Treatments
window), the surgery report immediately displays in the Cornerstone Editor. At that time, staff can add
information to the document and save it in patient history (and optionally print the document, if desired).
Customizing Document Templates for PetDetect* Collars
Cornerstone includes a variety of size options for PetDetect Collars that you can print from the
Cornerstone Editor. These animal identification and tracking collars can be easily printed upon check-in
and used to help hospital staff with immediate and positive identification of pets and their belongings.
Note: The collars work best for dogs; they are too wide for most cats.
All fields and information included on the collars can be modified and customized using bookmarks in
the Cornerstone Editor.
Note: This feature requires the PetDetect PD-700 label printer. To order a PetDetect printer, call
1-800-283-8386.
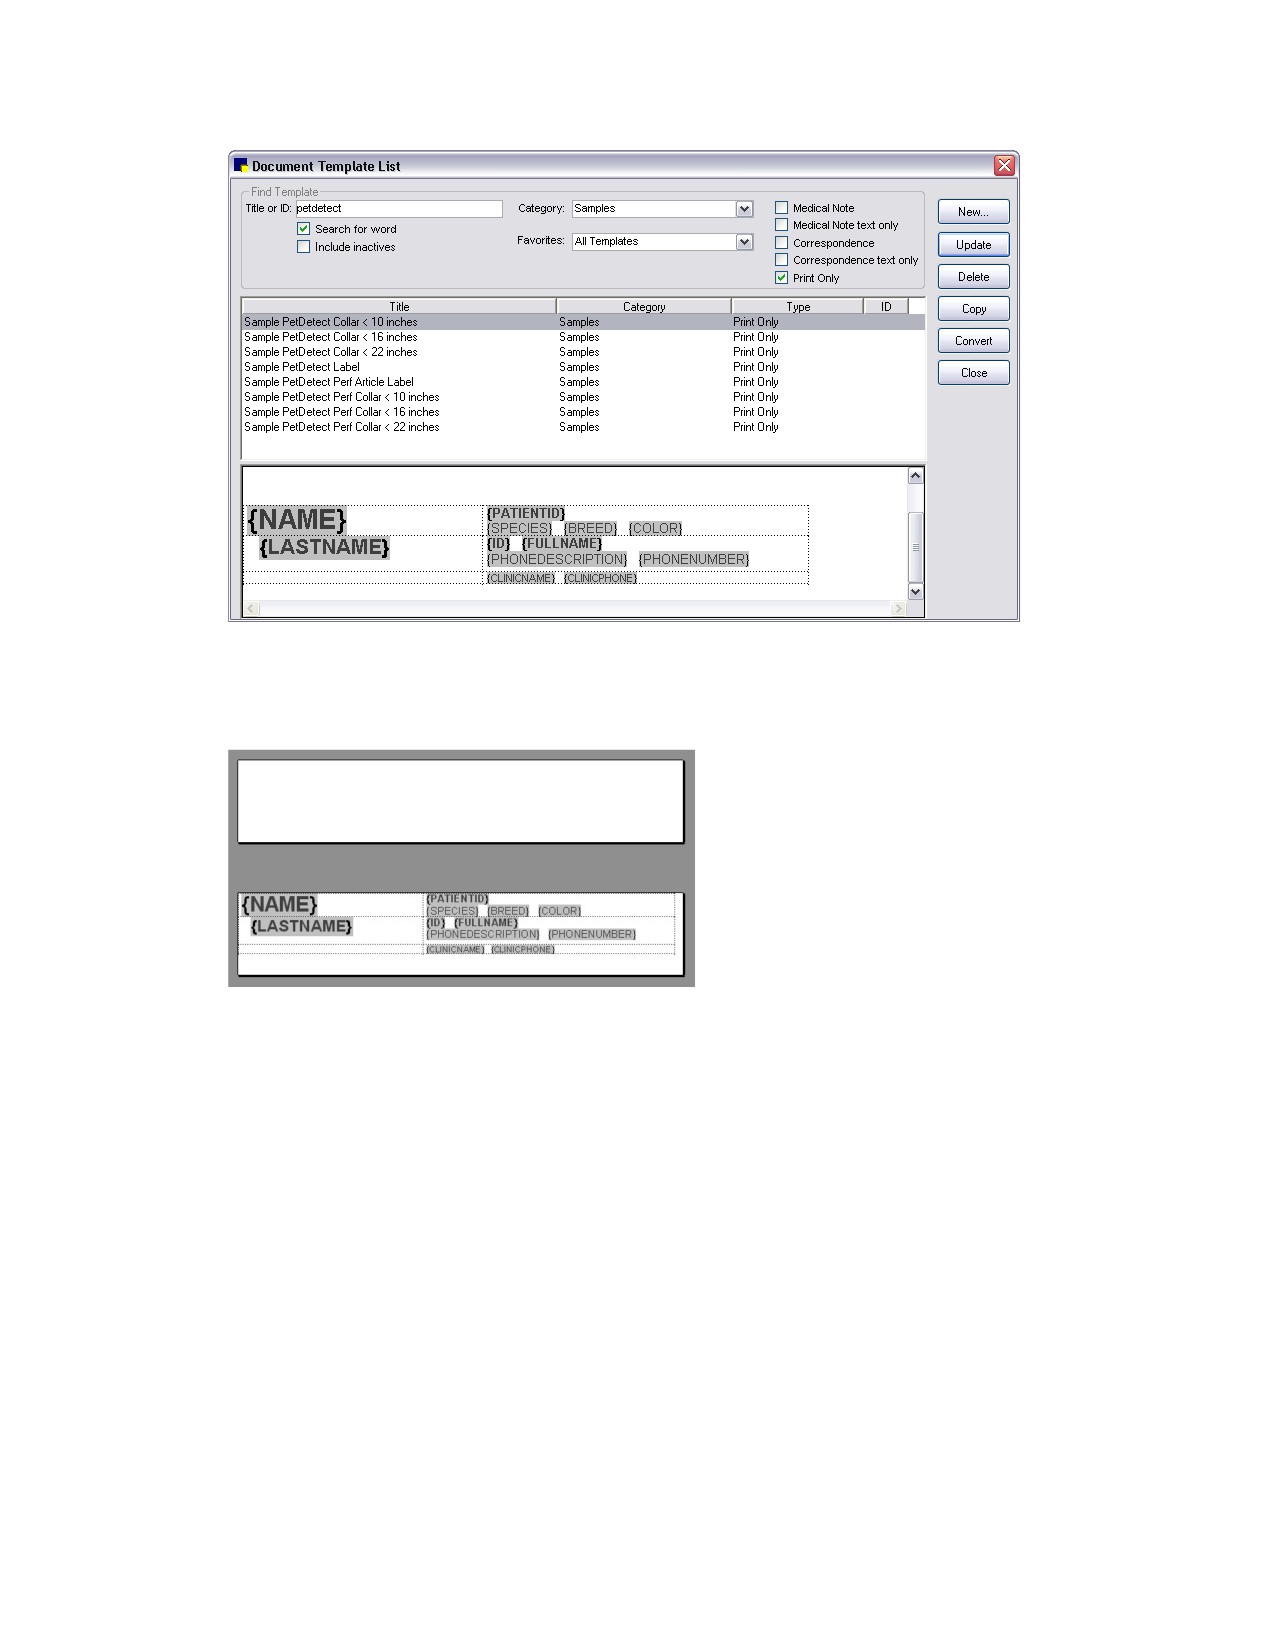
To customize a Sample PetDetect Collar template:
1. On the Lists menu, select Documents > Templates.
2. On the Document Template List window, in the Category drop-down list, select Samples.
3. Check to make sure the Print Only check box is selected for the template type.
4. With the Search for word option selected, in the Title or ID box, type petdetect.
346
Chapter 17: Setting Up Medical Notes and Correspondence
PetDetect Collars in the Document Template List
5. Select the Sample PetDetect Collar to be modified.
6. Click Update. The selected collar label opens in the Cornerstone Editor.
PetDetect collar (with bookmarks) in the Cornerstone Editor
7. Use the Cornerstone Editor tools to modify the bookmarks and other information on the collar.
8. When finished, click Save As. The Template Properties dialog box appears.
9. Use the Template Properties settings to specify a Name and Category.
10. In the Default Settings area, click the Printer drop-down list and select the PetDetect
PD-700 label printer as the default printer.
11. Click OK.
12. Click OK to close the Cornerstone Editor.
Customizing Document Templates for ID Cards
Three Sample ID Cards are available for printing from the Cornerstone Editor. These wallet-sized cards
can be easily printed and provided to clients when they bring in a new patient. Then at the next visit, the
staff member would simply need to scan the barcode on the card and Cornerstone will automatically
display the client/patient information (the information displayed depends on the type of information you
chose to encode in the barcode when the card was created).
347
Chapter 17: Setting Up Medical Notes and Correspondence
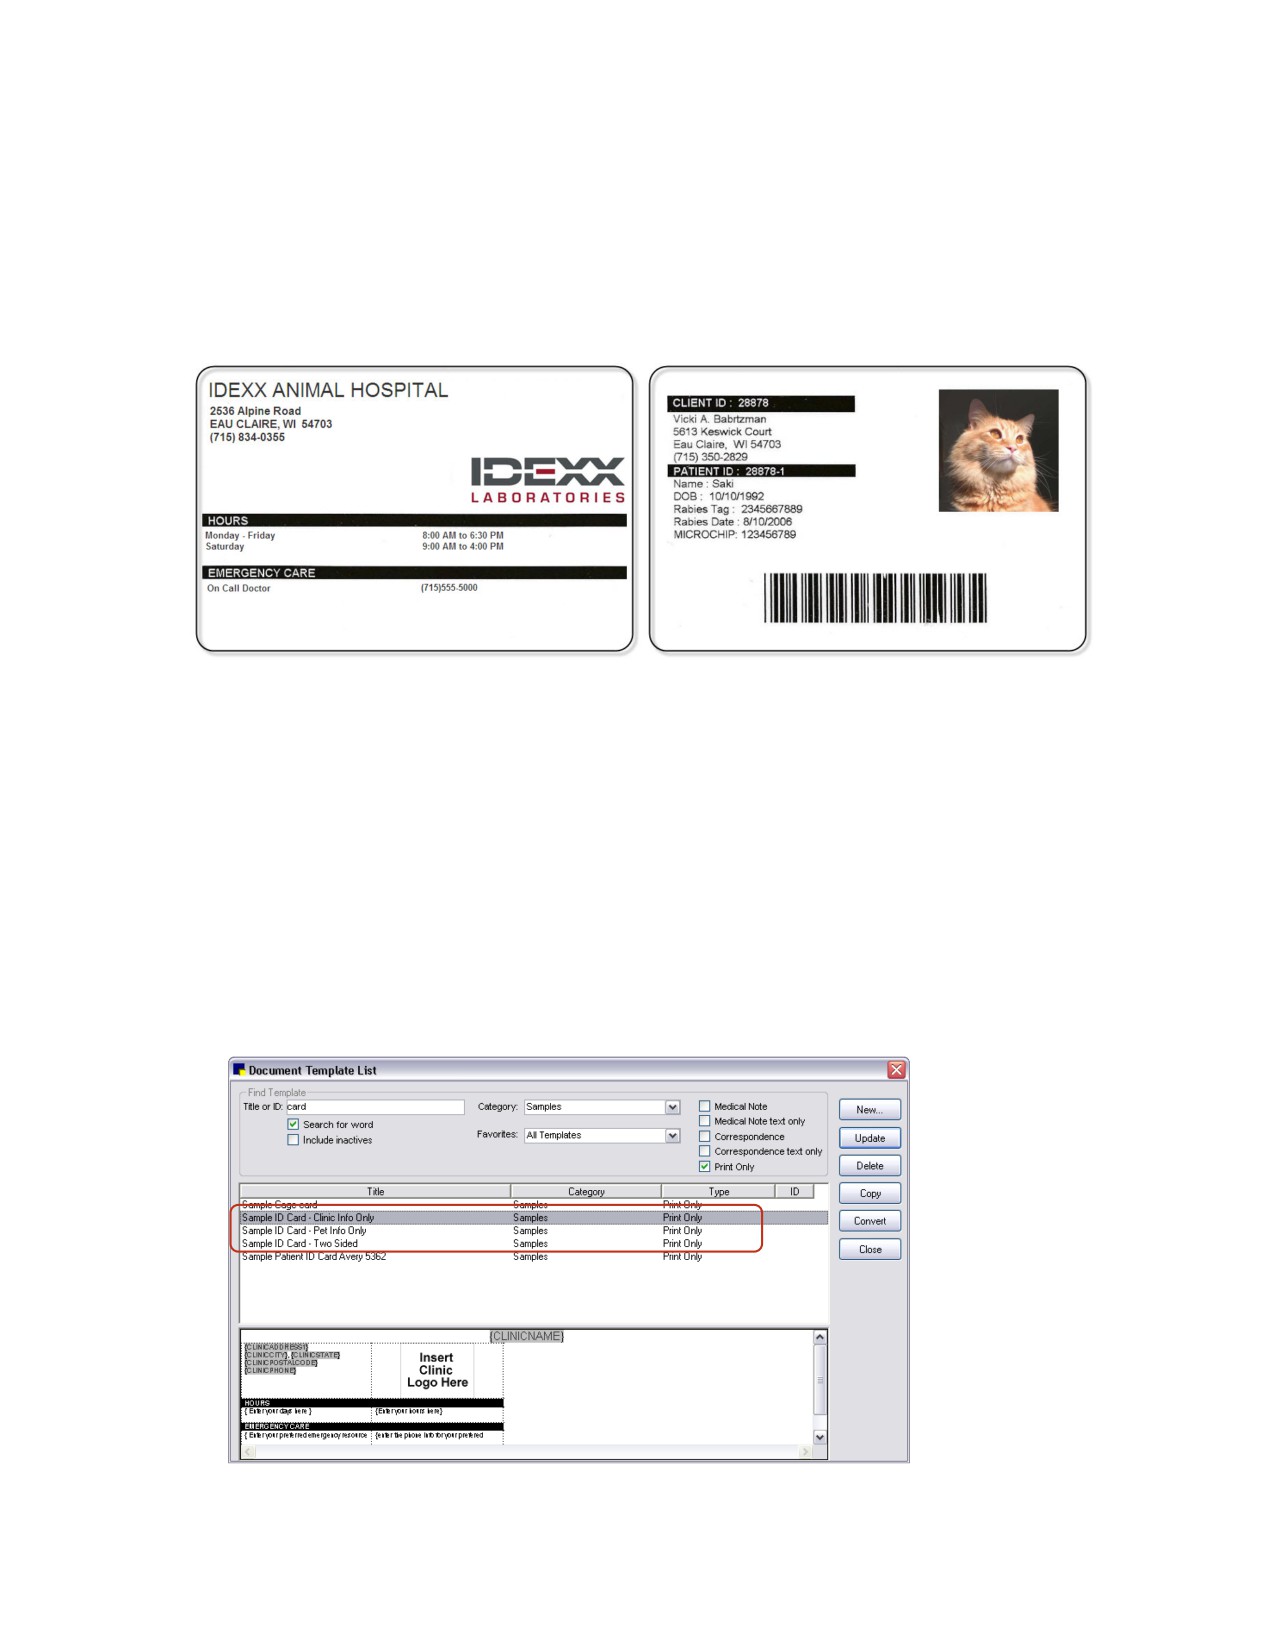
Choose from three ID card samples:
• Sample ID Card-Two Sided: Print both front and back sides
• Sample ID Card-Pet Info Only: Print only the back side with clinic name/address on top
• Sample ID Card-Clinic Info Only: Print only the front side with clinic information
Note: This feature requires the Zebra P110i ID printer.
(Front of two-sided card)
(Back of two-sided card)
Note: To print the two-sided ID card, load a single card into the feeder and print side 1. Then reinsert the
card with the printed side down so that page 2 prints on the opposite side.
All fields and information included on both sides of the card can be modified and customized using
bookmarks in the Cornerstone Editor. For example, the Client ID or Patient ID (or both) could be
encoded in a barcode.
To customize a Sample ID Card template:
1. On the Lists menu, select Documents > Templates.
2. On the Document Template List window, in the Category drop-down list, select Samples.
3. Check to make sure the Print Only check box is selected for the template type.
4. With the Search for word option selected, in the Title or ID box, type card.
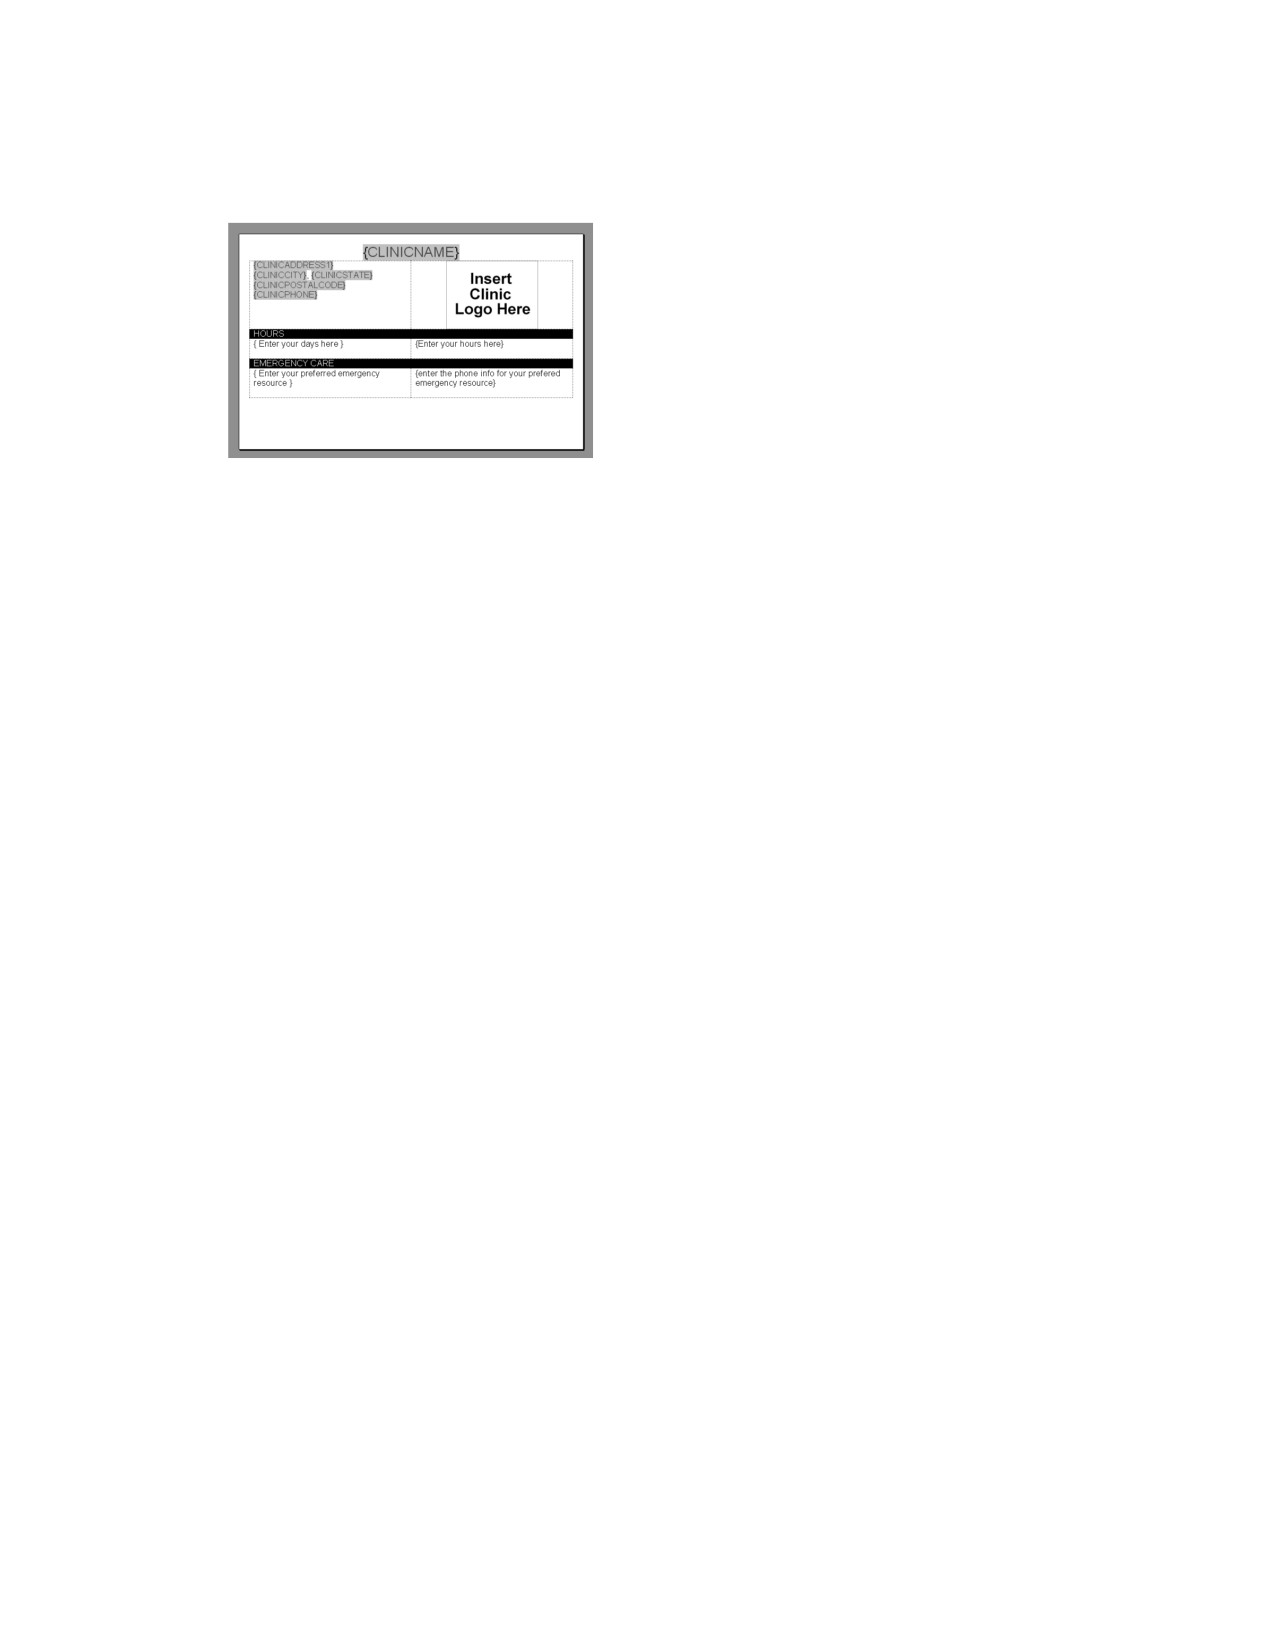
ID Cards in the Document Template List
348
Chapter 17: Setting Up Medical Notes and Correspondence
5. Select the Sample ID Card to be modified.
6. Click Update. The selected card template opens in the Cornerstone Editor.
Sample ID card (with bookmarks) in the Cornerstone Editor
7. Use the Cornerstone Editor tools to modify the bookmarks and other information on the card.
Note: If you have a long practice name, you may need to decrease the font size used for the
{CLINICNAME} bookmark to ensure that it does not wrap to a second line when the ID card prints.
8. When finished, click Save As.
9. Use the Template Properties settings to specify a Name and Category.
10. In the Default Settings area, click the Printer drop-down list and select the Zebra P110i ID printer as
the default printer.
11. Click OK.
12. Click OK to close the Cornerstone Editor.
LifeLearn® ClientEd Online™ Integration with Cornerstone
See “Chapter 32: Using LifeLearn ClientEd Online” in the Cornerstone User’s Manual.
Loading LifeLearn® CD Documents in Cornerstone
LifeLearn® client education documents on CD can be used in Cornerstone software. After an initial setup
procedure in Cornerstone, LifeLearn documents appear in the Start New Document window documents
list and can be selected for printing. LifeLearn documents can also be linked to invoice items as special
action documents.
LifeLearn documents printed from Cornerstone include your practice information (name, address, phone
number) and patient information.
Note: Microsoft® Word is needed to print LifeLearn documents.
To load LifeLearn documents in Cornerstone:
1. If you have not previously loaded the LifeLearn files, insert the LifeLearn CD into the CD drive and
install them.
2. In Cornerstone, from the Tools menu, select Load LifeLearn Documents and then select the type
of documents (Behavior, Canine, Feline, etc.) that you purchased.
Note: The first time you add a set of LifeLearn documents to Cornerstone, if the New Letterhead Not
Assigned dialog box appears, click OK. When the Locating LifeLearn letterhead file message
appears, click C:\LifeLearn and click OK.
349
Chapter 17: Setting Up Medical Notes and Correspondence
3. If the Duplicate Documents message appears, click Yes to replace existing Cornerstone documents
with any LifeLearn documents that have the same name, or click No and the LifeLearn document
with the same name will not replace the Cornerstone document.
4. When the LifeLearn bookmarks added message appears, click OK. The documents in the selected
document type have been added successfully to Cornerstone.
5. Repeat steps 2-4 to add documents for another LifeLearn document type (Behavior, Canine, Feline,
etc.).
Once the LifeLearn documents have been loaded successfully, they will be available for selection in
the Start New Document window.
Note: LifeLearn documents do not display in the Preview pane like other document templates because
LifeLearn documents are Microsoft Word documents.
350
Chapter 18: Setting Up Classic Medical Notes
This chapter covers the steps required to set up a Classic medical note template in the IDEXX
Cornerstone* Practice Management System. For information on adding a Classic medical note to a
patient record, see “Chapter 18: Using Classic Medical Notes” in the Cornerstone User’s Manual.
Overview
Classic medical notes are the “old style” of medical notes used in IDEXX Cornerstone* Practice
Management System 7.6 and earlier versions. If you are new to Cornerstone (or new to using medical
notes in Cornerstone), you should use the newer style of enhanced medical notes introduced in
Cornerstone 8.0.
If you are an existing user of Classic medical notes in Cornerstone, you can continue to use Classic
medical notes or you can convert your Classic medical note templates to enhanced medical note
templates.
See “Chapter 17: Setting Up Medical Notes and Correspondence” beginning on page 312 for
information on creating enhanced medical notes and converting Classic medical notes.
IMPORTANT: You will need to use Classic medical note templates for surgery/anesthesia logs.
Enhanced medical notes do not support this feature at this time.
About Classic Medical Note Templates
Cornerstone comes with predefined Classic medical note templates. These templates can be changed
or new templates can be created.
You can create Classic medical note templates that can help you enter information in the patient’s
medical record. Types of information you might enter in the templates include the following:
• Routine "form" information (such as temperature, results of lab tests, a SOAP outline, etc.)
• Statements or recommendations that you frequently enter for specific types of visits (such as an
annual visit)
Medical note templates help the medical staff enter information in the Classic Medical Notes window
and give the notes a unified and consistent look. They guide you to include all the information and to
enter it in the same order, so the opportunities for missed information are greatly reduced. Information in
a medical note can be edited until it is finalized. After the information is finalized it cannot be changed,
but an addendum can be added to a finalized Classic medical note.
Types of Information that Can Be Added to a Classic Medical Note Template
There are several different types of information that can be added to a Classic medical note template:
• Static text-This is body text and text labels that you manually type in the Template text box. This
static text appears and prints in the Classic medical note as it’s typed here. For example, you
might add a static text line at the top of the template to further identify the template (such as
“Canine Neuter”), or you might add text labels at the beginning of each line to identify the
information that follows (such as “Patient Information:” or “Attending Technician:”).
351
Chapter 18: Setting Up Classic Medical Notes
• Fields in which you must manually enter data-These fields are typically set up as prompts in
which the staff member will be required to enter the specified type of data (character, date,
numeric or time). For example, you might set up a TEMP field entry name, set its field type to
Numeric and use an entry description (user prompt) of “Enter temp.” Fields added using Field
Setup appear in all caps within brackets (e.g., [RESPIRATION]) to easily distinguish them from
static text in the template.
• Fields that are automatically populated with data from Cornerstone-These fields will be
automatically populated when the template is used to add a medical note to a patient’s record.
These fields include: date, time, problems, invoice item, staff, tech, patient ID, patient name,
birth date, breed, class, color, consult item, deceased date, diagnosis, image number,
markings, microchip ID, patient notes, rabies tag, registration number, remarks, sex, species,
status and weight. Fields added using Field Setup appear in all caps within brackets (e.g.,
[WEIGHT]) to easily distinguish them from static text in the template.
Note: Invoice items that are added in medical notes will transfer to the Patient Visit List. Items
entered in an Invoice Item data entry field will appear in the note text. If you want to add items to the
invoice while in a comment template and you do not want them to appear in the text of the template,
set the invoice item as a consult item. Items entered in a Consult Item data entry field will not appear
in the text, but will display in the lower left area of the Classic Medical Note window.
Tip: When setting up your template, place the fields in which you must manually enter data at the top of
the template. Place the fields that have defaulted values at the bottom of the template. With this type of
setup, when you use the template to create a medical note, you will not have to tab through all the
defaulted fields to get to the manual data entry section of the medical note.
Creating a New Classic Medical Note Template
To create a new Classic medical note template:
1. On the Lists menu, select Documents > Templates. The Document Templates List dialog box
appears.
2. Click New, and then from the pop-up menu, select Classic medical note template. The Classic
Template Setup dialog box appears.
Tip: If the template you want to add is similar to an existing one, select the similar template, click the
Copy button and make changes as needed. See the “Creating a New Classic Medical Note
Template Based on an Existing Template” section that follows for more information.
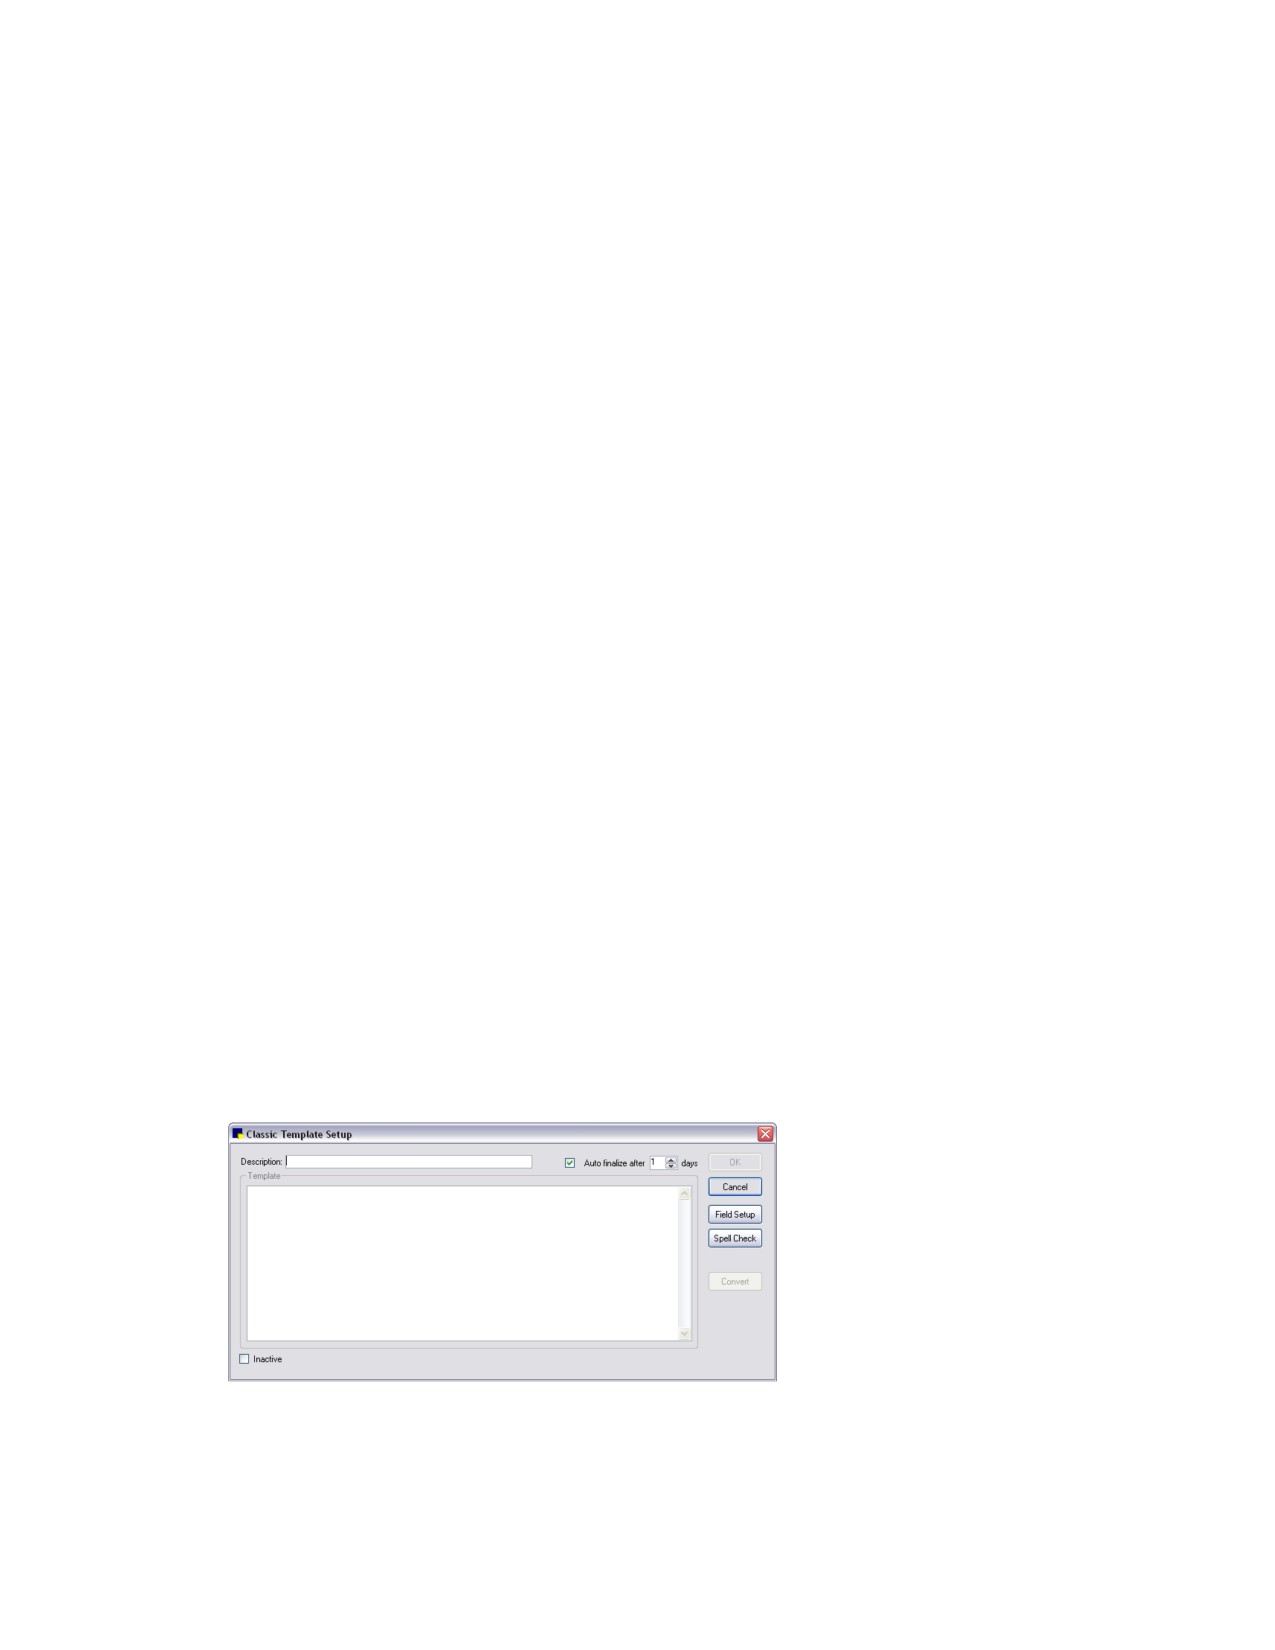
Classic Template Setup dialog box
3. In the Description text box, type a brief identifying name for the template. (This description appears
in the Template drop-down list when selecting a template in the medical notes.)
352
Chapter 18: Setting Up Classic Medical Notes
4. If you want this template to be automatically finalized, click the Auto finalize after check box and
enter the number of days after which this template will be marked as final.
Note: The medical note can be manually finalized from within the Classic Medical Notes dialog box
at any time prior to when it is auto-finalized by selecting the Final check box.
5. Click within the Template area and type the body text and text labels for the template.
Note: To insert a TAB (to “tab over”) within the Template area, press CTRL+TAB.
6. To add a field within the Template area:
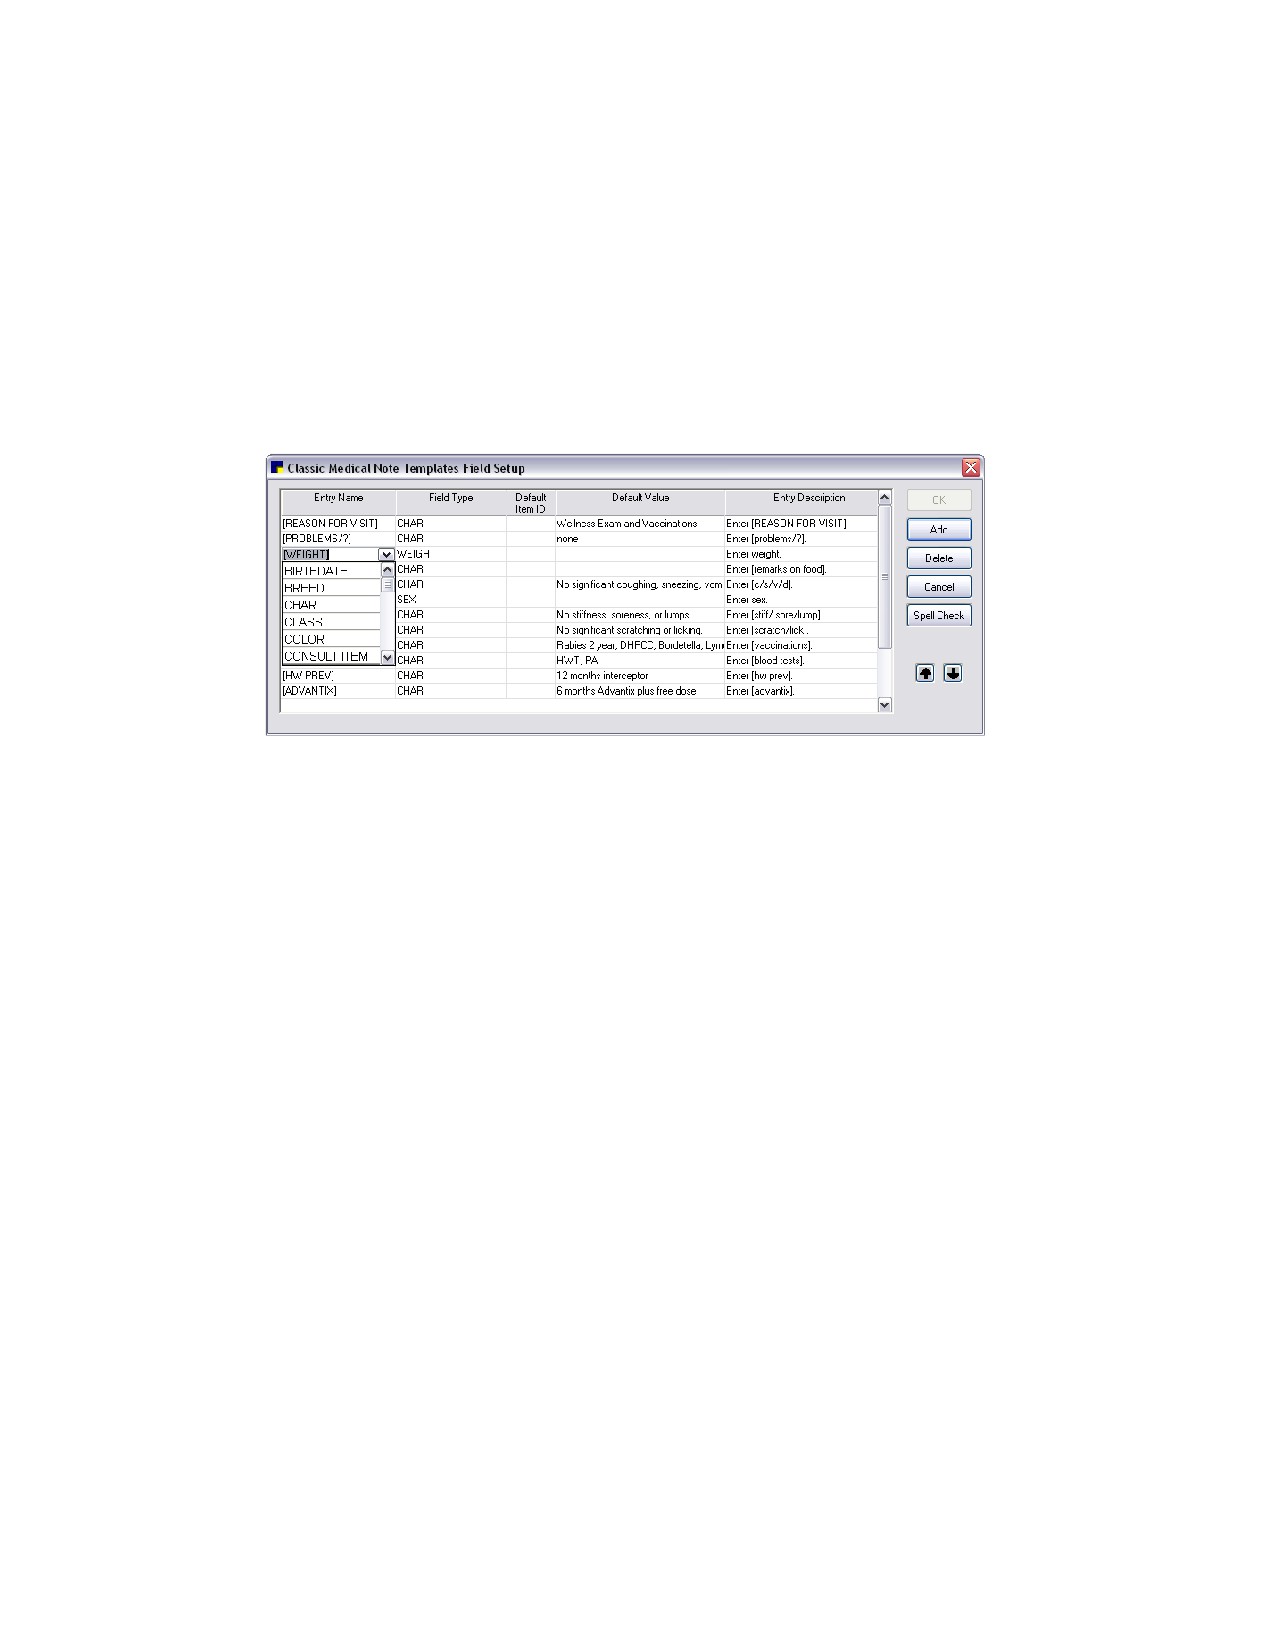
a. Place the cursor in the desired position and click the Field Setup button (or press F6). The
Classic Medical Note Templates Field Setup dialog box appears.
Classic Medical Note Templates Field Setup dialog box
b.
In the Entry Name drop-down list, select a data entry field name to specify the type of
information to use on the template line. The corresponding Field Type is automatically selected
based on the Entry Name.
Note: The entry names (or field types) selected during field setup do not show or print on the
medical note.
c.
In the Default Item ID field, if this is an invoice item or diagnosis type, you can select a default
ID.
d.
In the Default Value field, enter a value that is most often used, if applicable, and then press
TAB. Using default values saves you from entering information repetitiously.
e.
In the Entry Description field, enter a description of the information you require. This field
displays when the template is used to prompt the user for an answer.
f.
If you want to include only certain fields from a Classic medical note in correspondence (instead
of the complete contents of the note), select the Display partial medical note in
correspondence (classic only) check box in Documents defaults. With this option selected,
the Include in corres field appears on the right side in the Classic Medical Note Templates
Field Setup dialog box. Select the Include in corres check box for each field you want to
include in correspondence.
g.
To add another field, click Add.
h.
To delete a field, click within the line and then click Delete.
Note: If you are updating a template that is already in use, you cannot delete a template field if it
is already used in patient history.
i.
To review your fields for spelling errors, click Spell Check.
353
Chapter 18: Setting Up Classic Medical Notes
j.
To move a field up or down in the template, click the field’s entry name and then click the up
or down arrow button.
k. When finished, click OK to close the Field Setup dialog box.
7. Continue with your template layout and content entry in the Template area, and click the Field Setup
button as needed to insert fields throughout the template.
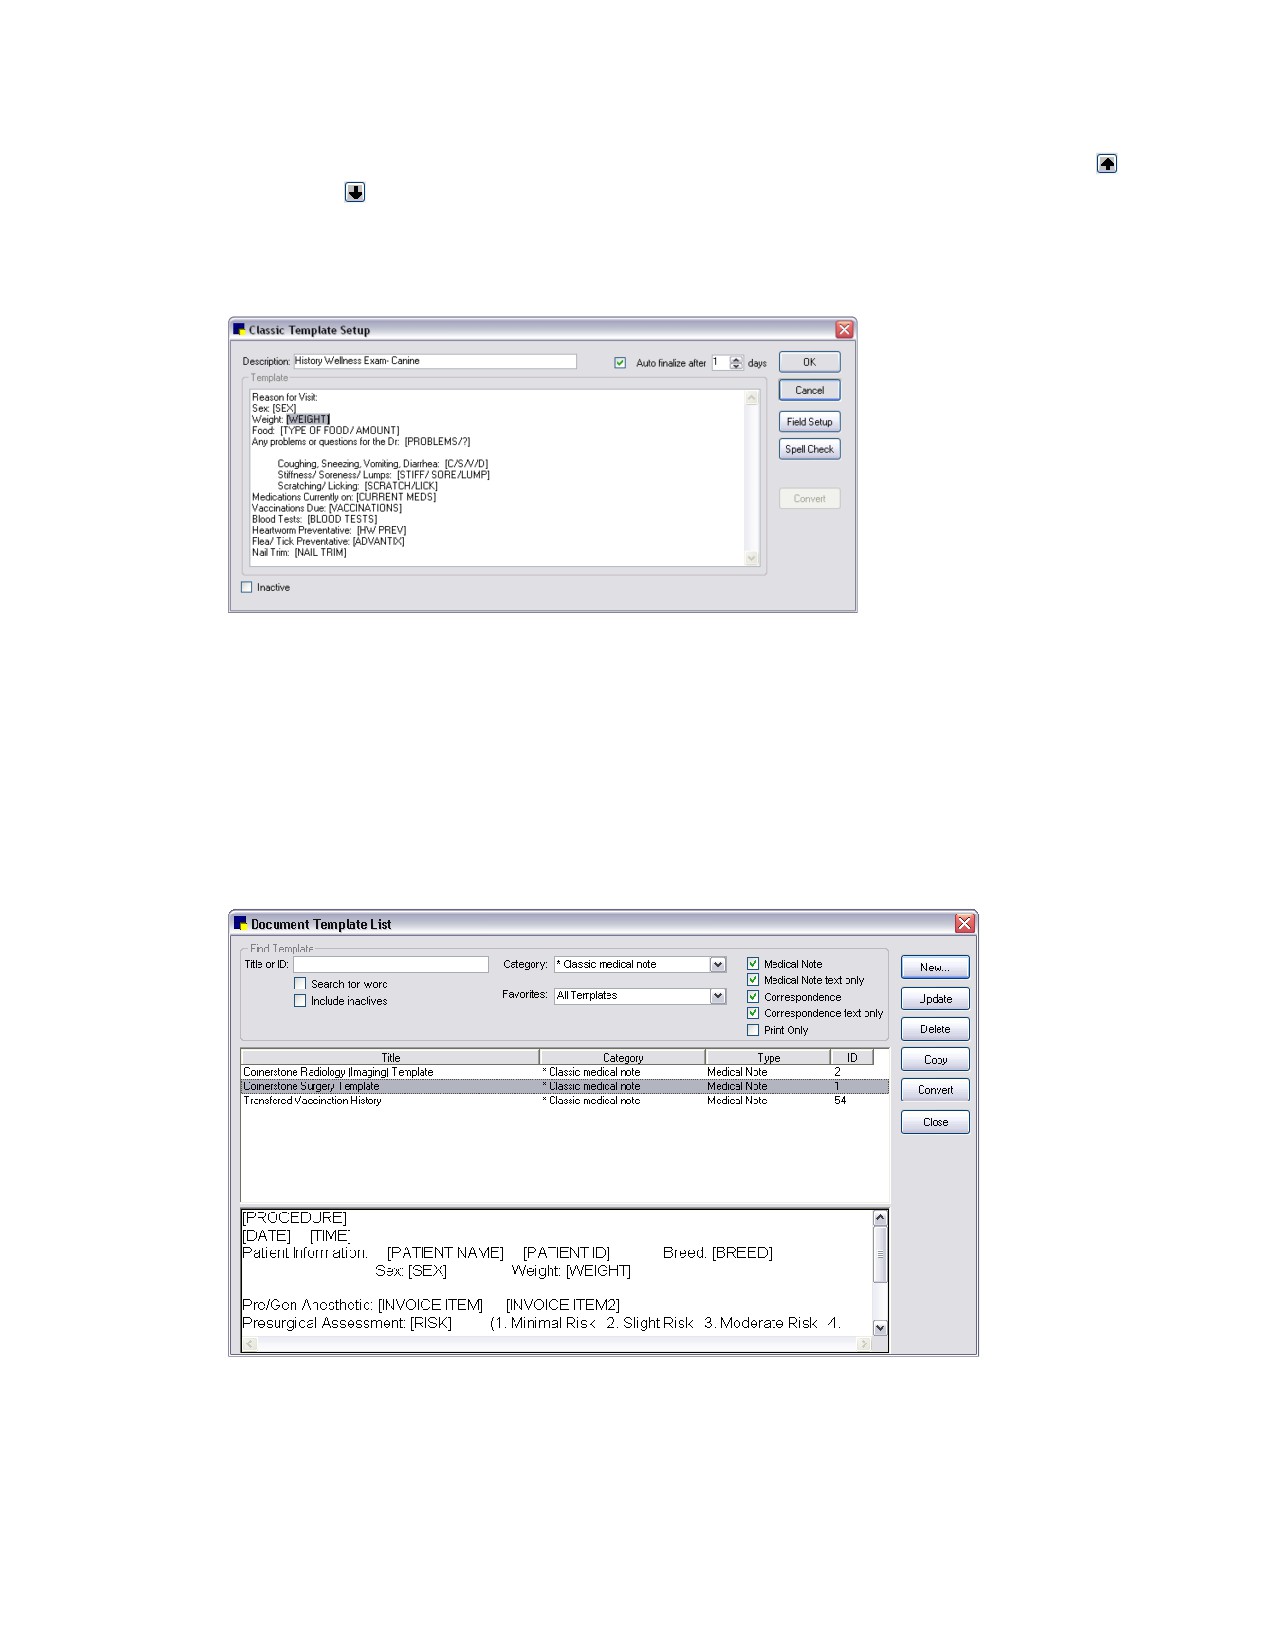
Classic Template Setup example
Tip: If necessary you can cut (CTRL+X) and paste (CTRL+V) a selected field from one place to
another within the Template area.
8. To review your template for spelling errors, click Spell Check.
9. Click OK to save your changes.
To find and preview a Classic medical note template in the Document Templates List:
1. On the Lists menu, select Documents > Templates. The Document Templates List dialog box
appears.
Document Templates List dialog box
354
Chapter 18: Setting Up Classic Medical Notes
2. To locate a Classic medical note template by title:
• If you know any of the words included in the template title, with the Search for word check box
selected, type the word or words in the Title or ID field.
• If you know the first word in the template title, clear the Search for word check box and then
type the word in the Title or ID field.
3. To locate a template by category, in the Category drop-down list, select *Classic medical note.
(To keep them separate from Enhanced medical notes, all Classic medical note templates are in the
*Classic medical note category. This category cannot be changed.)
4. To locate a template by type, in the Type area, select the Medical note check box and clear the
Correspondence and Print Only check boxes.
5. To include inactives in your search, select the Include inactives check box.
6. To sort the template list by the column, click on a column heading.
7. To see a preview of a template, click on the template in the list. A preview of the template will display
in the preview area below the list.
Creating a New Classic Medical Note Template Based on an Existing Template
To create a new Classic medical note template based on an existing template:
1. On the Lists menu, select Documents > Templates. The Document Templates List dialog box
appears.
2. In the template list, click the medical note template on which you want to base the new template.
3. Click the Copy button. The Copy template dialog box appears.
4. Enter a description for the new template and click OK.
5. Click the Update button to customize the new template and make necessary changes. See
“Creating a New Classic Medical Note Template” on page 352 for information on creating a Classic
medical note template.
6. When finished, click OK.
Note: Custom Classic medical note templates based on existing templates are included on template
logs. For example, a custom Classic template based on the Cornerstone Surgery Template prints on the
Surgery/Anesthesia Log.
Inactivating a Classic Medical Note Template
To mark a Classic medical note template as inactive:
1. On the Lists menu, select Documents > Templates. The Document Templates List dialog box
appears.
2. In the template list, click the medical note template to mark inactive and click Update. The template
appears in the Template Setup dialog box.
3. Click the Inactive check box.
4. Click OK to save your changes.
355
Chapter 19: Setting Up Correspondence in Microsoft® Word
Overview
In the IDEXX Cornerstone* Practice Management System version 7.6 or earlier, many practices used
Microsoft® Word for creating correspondence documents because of the advanced editing and
formatting options it offers. With the enhanced Cornerstone Editor that was introduced in Cornerstone
8.0, many of these same advanced features (check boxes, text input fields, etc.) are now available in
Cornerstone, and it is no longer necessary to create these types of documents in Word. However, if your
practice already has many correspondence documents set up in Word, you can continue to use your
existing files by following the steps included in this chapter.
When using Microsoft Word to create correspondence, the Cornerstone data available for use in Word
bookmarks is rather limited (as compared to the data available when using the Cornerstone Editor to
create the correspondence). Also, if you want to use bookmarks with Word documents, you must first go
through the added step of linking them with the applicable Cornerstone merge fields.
Note: For information on merging Cornerstone data with a Word document at the time of use, see
“Chapter 17: Using Medical Notes and Correspondence” in the Cornerstone User’s Manual.
Note: Depending on the version of Microsoft Word you are using, the Word functions and dialog boxes
referenced in this chapter may vary slightly from your version of Word. Refer to the Microsoft Word online
Help for instructions specific to your version.
Adding Bookmarks to a Microsoft Word Document
You can create Word documents that can be used in Cornerstone to create a personalized document for
a single selected client and/or patient. Bookmarks created in Microsoft Word must be linked to
Cornerstone data items.
When a document with bookmarks is printed, the bookmarks are replaced with the applicable data. For
example, if the client name bookmark is included in the document, the client’s name replaces the
bookmark.
Note: If you want to merge a Cornerstone data file with a Word document to do mass mailings from
Word, use Word merge codes instead of bookmarks.
356
Chapter 19: Setting Up Correspondence in Microsoft® Word
Cornerstone Bookmarks Available for Use with Microsoft Word
Client
Address 1
Full Name
Note
Referred Postal Code
Address 2
ID
Outstanding Balance
Referred State
All Phones
Last Month A/R
Overdue Balance
Secondary Name
City
Last Name
Phone Description
Sixty Days A/R
Classification
Last Payment Amount
Phone Extension
State
Client Signature
Last Payment Date
Phone Number
Status
Credit Code
LY Sales - Inventory
Postal Code
Thirty Days A/R
Current A/R
LY Sales - Services
Referred Address 1
Title
Date Client Entered
LY Visits
Referred Address 2
YTD Sales - Inventory
Email Address
Middle Initial
Referred By Name
YTD Sales - Services
Finance Charges A/R
Ninety Days A/R
Referred City
YTD Visits
First Name
Note: A/R totals do not include current invoices. Use Current A/R or Outstanding Balance fields to
include amounts not yet included in an end-of-day processing.
Miscellaneous
Current Date
Patient (includes Rabies Tag)
Age
Current Weight Unit
Patient Classification
Sex
Birth Date
Date Current Weight
Patient ID
Species
Breed
Date Patient Entered
Patient Note
Vaccine Amount
Check In Date (last)
Deceased Date
Patient Status
Vaccine Expiration
Check In Time (last)
Manner of Injection
Rabies Expiration Date
Vaccine Lot Number
Check Out Date (last)
Markings
Rabies Tag Date
Vaccine Name
Check Out Time (last)
Microchip ID
Rabies Tag Number
Vaccine Producer
Color
Name
Registration Number
Vaccine Type
Current Weight
Number of Years
Practice
All Phones
Clinic City
Clinic Name 2
Clinic Postal Code
Clinic Address 1
Clinic Name
Clinic Phone
Clinic State
Clinic Address 2
Staff
All Phones
Staff Extension
Staff License Number
Staff Postal Code
Staff Address 1
Staff First Name
Staff Middle Initial
Staff State
Staff Address 2
Staff Full Name
Staff Note
Staff Status
Staff City
Staff ID
Staff Phone Description
Staff Title
Staff Classification
Staff Last Name
Staff Phone Number
Signature
Signature w/Pwd
357
Chapter 19: Setting Up Correspondence in Microsoft® Word
Tips for adding bookmarks in Microsoft Word:
• To see a list of the bookmarks currently set up in a Word document, select Insert > Bookmark
and scroll through the list. Note that if you use a bookmark that is already in the document, it
replaces the old bookmark without a warning.
• To set your view options to display bookmarks within your Word document, select Tools >
Options > View tab, and select the Bookmarks check box.
• To make sure that your information lines up correctly, insert a two-column table in your Word
document. Type text in the first column and insert bookmarks in the adjacent cells in the second
column.
• Keep accurate records of the bookmark names you use so that you can easily set up the
Cornerstone correspondence.
Before You Begin
¾ Open Cornerstone and Microsoft Word so you can refer to both programs. Use the ALT+TAB
function to toggle back and forth between programs as needed.
To add the bookmarks in Microsoft Word:
1. Open an existing Microsoft Word document or create a new document.
2. Type the text for the correspondence or modify existing text as needed.
3. When you reach a location where you want to insert Cornerstone data, select Insert > Bookmark.
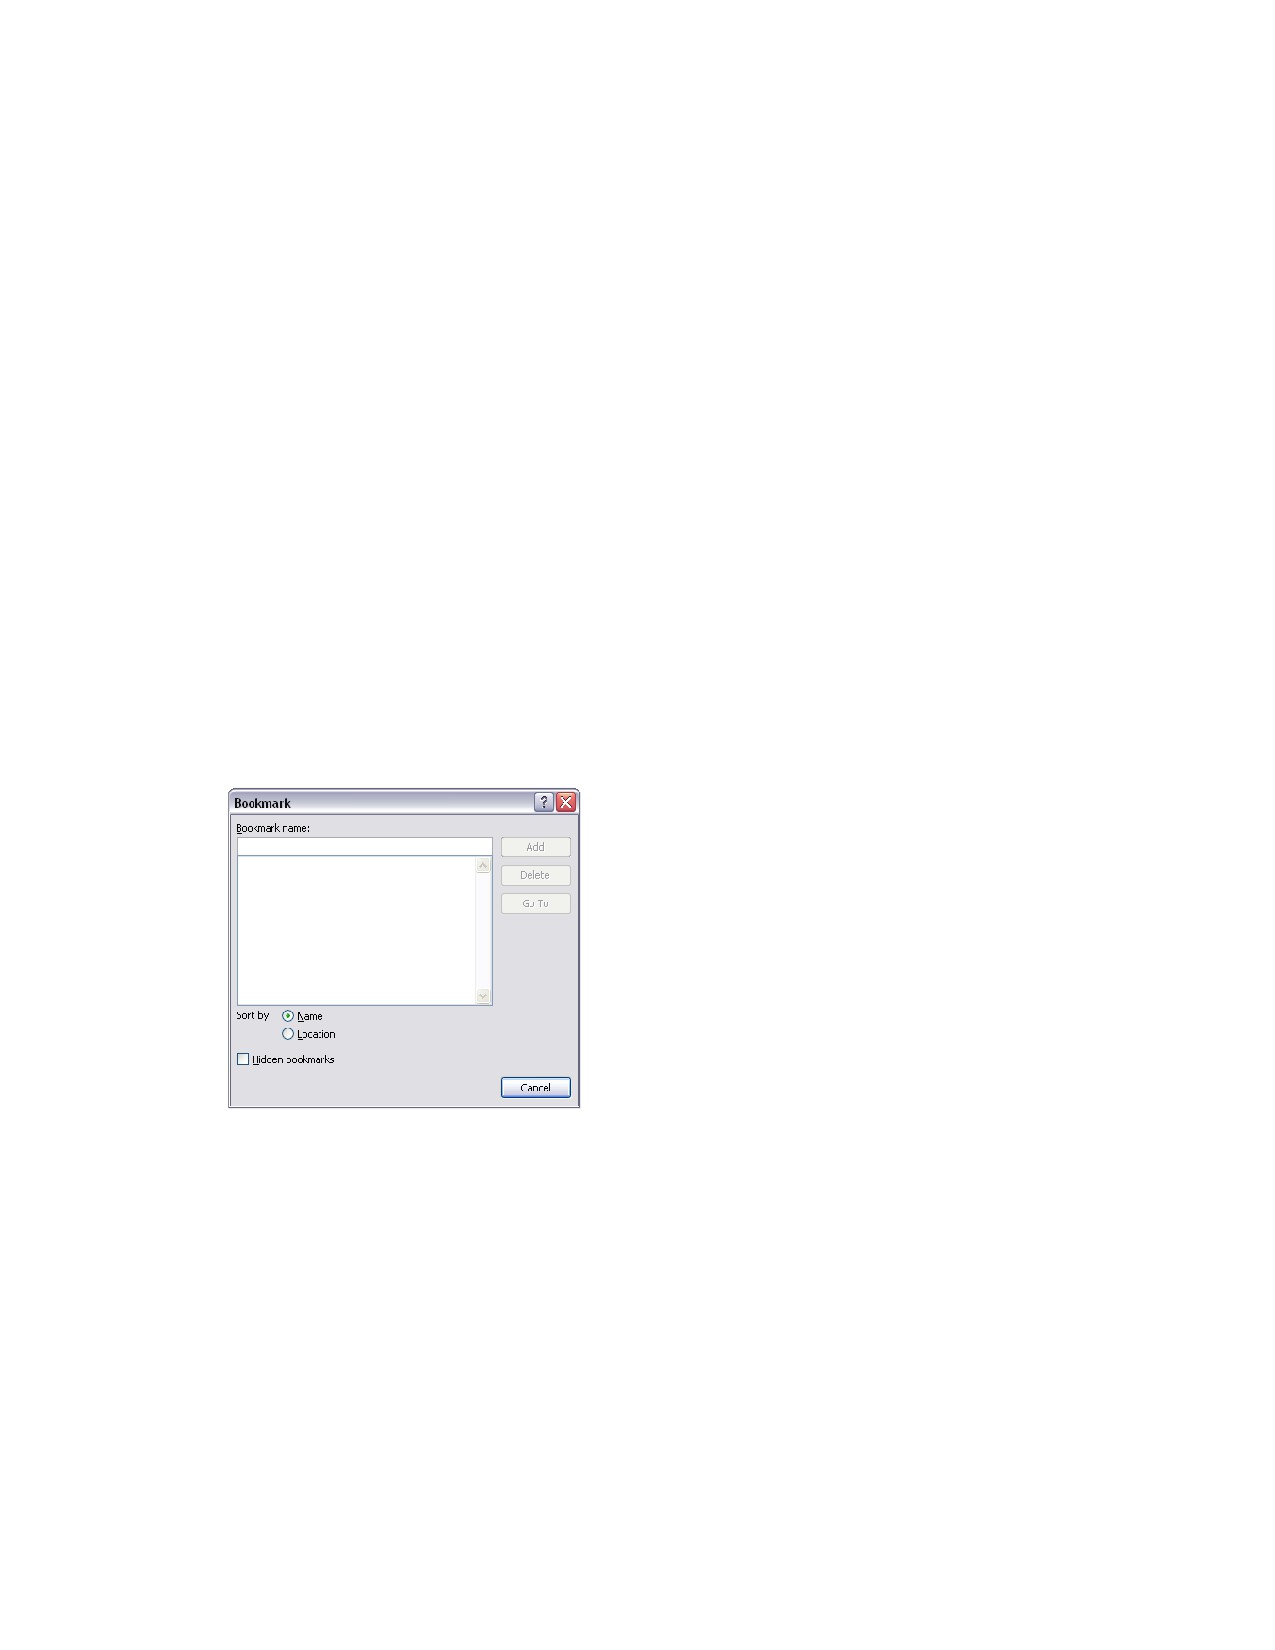
(In some versions of Word, Bookmark is on the Edit menu.) The Bookmark dialog box appears.
Bookmark dialog box
4. Enter a Bookmark name. Because the Word bookmark and the Cornerstone bookmark must be
identical, it is easiest if you name the Word bookmark the same name that Cornerstone
automatically generates for that field. The names are case sensitive. See “Cornerstone Bookmarks
Available for Use with Microsoft Word” on page 357.
IMPORTANT: Each bookmark must have a unique name. For example, if you have already used the
bookmark Title in the document, use Title1 for the next occurrence of the title field, Title2 for the next
one, and so on.
5. Click Add to place the bookmark into the Word document.
Tip: To see where a specific bookmark is located in the document, highlight the bookmark in the list
and click Go To.
358
Chapter 19: Setting Up Correspondence in Microsoft® Word
6. Repeat steps 3-5 until you have finished adding bookmarks to your document.
7. Save the Word document.
Linking Microsoft Word Documents to Cornerstone Data
When you have finished setting up the Microsoft® Word document, you are ready to set up the
Cornerstone* fields that correspond to the Word bookmarks. Cornerstone uses meaningful bookmarks
to describe the fields the bookmarks represent. The client’s last name becomes LastName (and
subsequently LastName1, LastName2, and so on, as it is used in the document), although you can
change the bookmark names in Cornerstone to match the bookmark names in the Word document.
IMPORTANT: Each Word bookmark name must match the corresponding Cornerstone bookmark
name. You do not have to use the Cornerstone default bookmark names, although this may be easiest.
Note: Unless you access Word documents over a network, they can only be accessed on the computer
where they are stored. However, you can copy the Word documents to your other computers.
Before You Begin
• Review the Cornerstone data field tables to become familiar with the bookmark names that
Cornerstone will automatically generate.
• Open Cornerstone and Microsoft Word so you can refer to both programs. Use the ALT+TAB
function to toggle back and forth between programs as needed.
To set up a new document link:
1. In Cornerstone, on the Lists menu, select Documents > Templates. The Document Template List
window appears.
2. Click New, and then from the pop-up menu, select MS Word document. The Document Setup
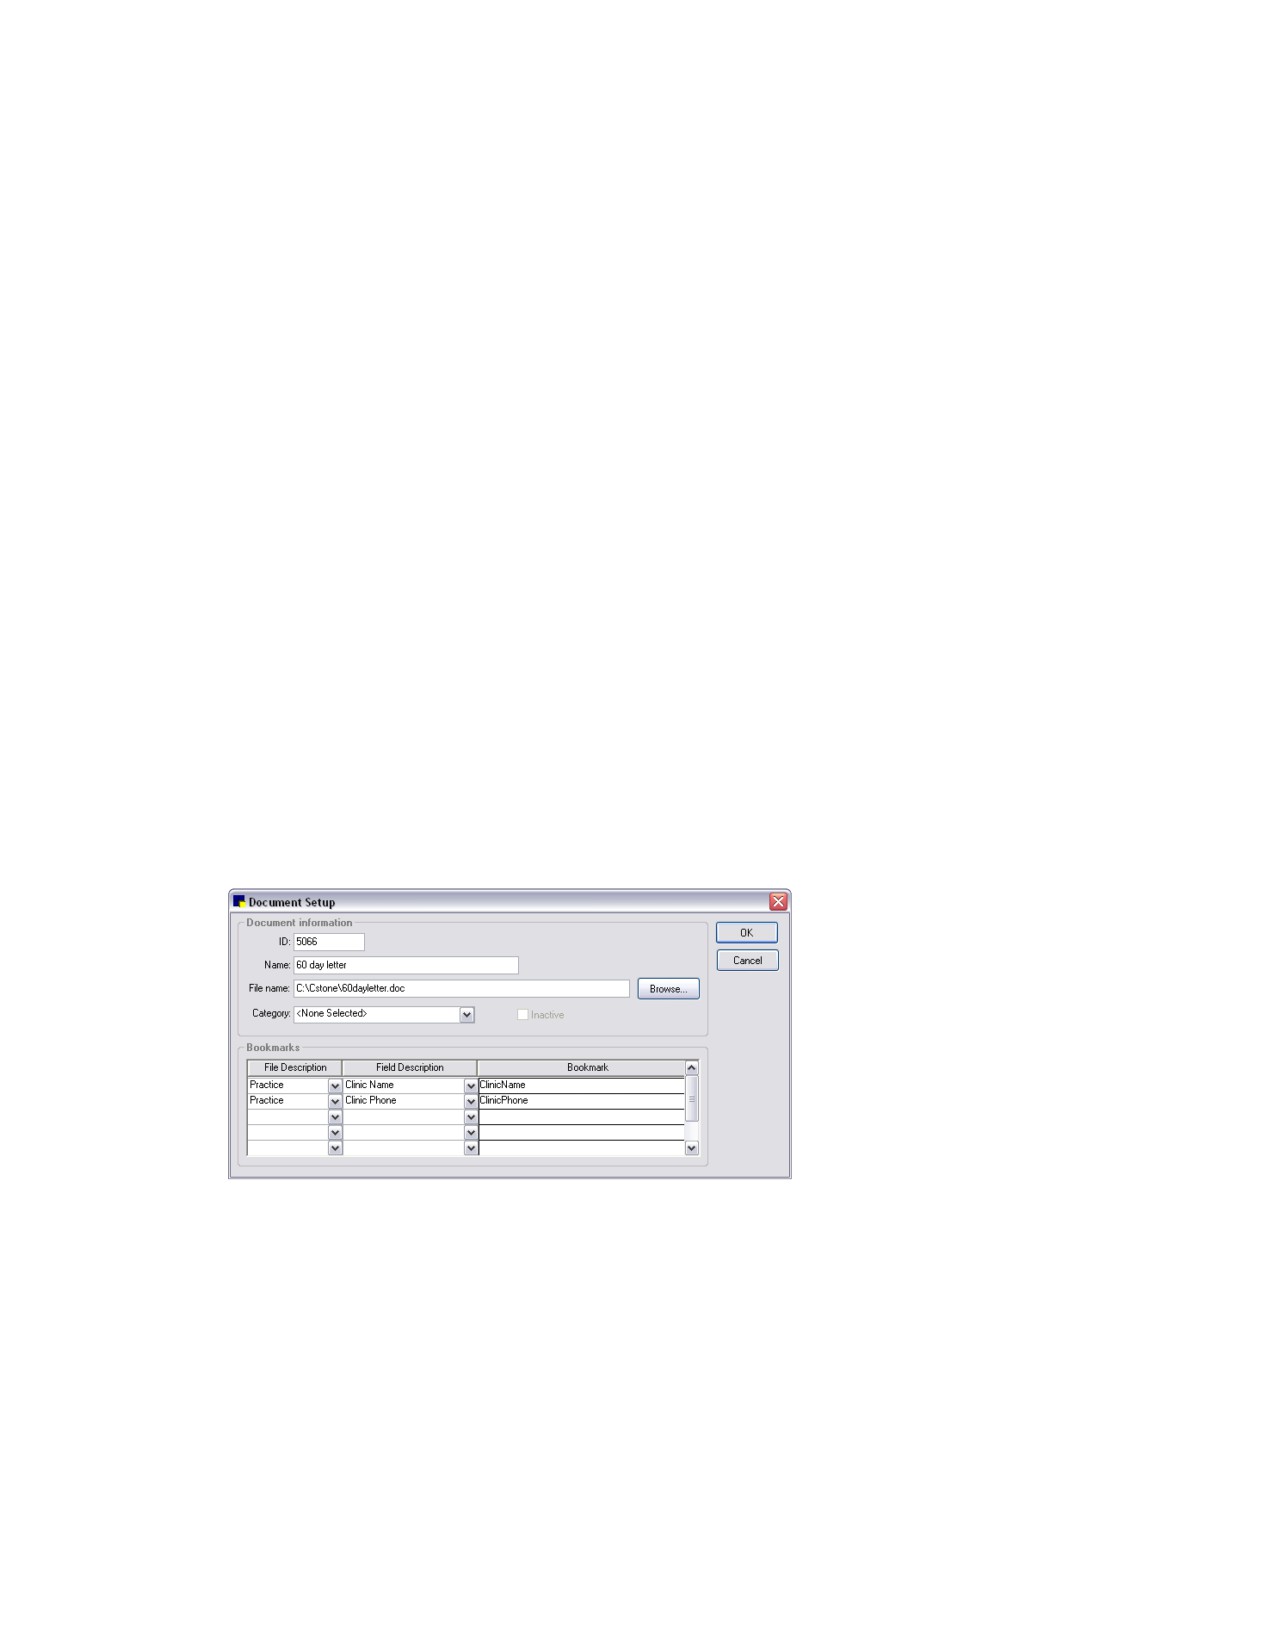
dialog box appears.
Document Setup dialog box
3. In the ID field, enter an ID for the document or press TAB to accept the document ID that
Cornerstone assigns.
4. In the Name field, enter a meaningful name for the document.
5. Click Browse to find and select the Word document that you want to link. Click OK to return to the
Document Setup dialog box.
6. In the Bookmarks table, from the File Description drop-down list, select the Cornerstone database
category (client, miscellaneous, patient, practice or staff).
359
Chapter 19: Setting Up Correspondence in Microsoft® Word
7. From the Field Description drop-down list, select the Cornerstone bookmark field name. The
corresponding Cornerstone bookmark appears in the Bookmark field.
8. In the Bookmark field, if the Cornerstone bookmark name displayed is not the same name as the
bookmark name in your Word document, type the name of Word bookmark so that the Word
bookmark is linked to the Cornerstone bookmark.
Note: When a field is used more than once, subsequent bookmarks are consecutively numbered.
You cannot have duplicate bookmark names.
9. Repeat steps 7-9 as needed to continue linking Cornerstone fields and the Word bookmarks.
10. When finished, click OK to save and return to the Document Template List window.
To modify a document link:
1. On the Lists menu, select Documents > Templates. The Document Template List window
appears.
Tip: All Microsoft Word documents have “ - MS Word” after the title.
2. Select the document to change and click Update. The Document Setup dialog box appears.
3. Make changes to the document information and bookmarks, as desired.
4. To delete a row, place the cursor in the row to delete and press CTRL + D.
5. When finished, click OK to save and return to the Document Template List window.
To delete a document link:
1. On the Lists menu, select Documents > Templates. The Document Template List window
appears.
Tip: All Microsoft Word documents have “ - MS Word” after the title.
2. Select the document to delete and click Delete. You are prompted to confirm the deletion. Click
Yes.
Note: For information on merging Cornerstone data with a Word document at the time of use, see
“Chapter 17: Using Medical Notes and Correspondence” in the Cornerstone User’s Manual.
360
Section 6-End of Period Processing
Chapter 20: End of Day Processing
Chapter 21: End of Month Processing
Chapter 22: End of Year Processing
361