IDEXX Cornerstone. Administrator’s Manual (8.3 NEXT version 8.3.6) - page 10
Chapter 12: Setting Up the Appointment Scheduler
Setting Up Appointment Suites
The Suite Setup feature is used to display selected columns for individual staff members. Using
appointment suites, you can group rooms together and arrange the order in which the rooms appear on
the daily and weekly schedules. (For example, you may want to group all your boarding rooms together
and all your examination rooms together.) If new appointment rooms are added after you set up the
suite feature, the room(s) will be added to the bottom of each suite. A default suite will automatically be
set up that contains all the rooms in your system. This suite cannot be changed or deleted.
To set up your appointment suites:
1. On the Controls menu, select Appointment Scheduler > Suite Setup.
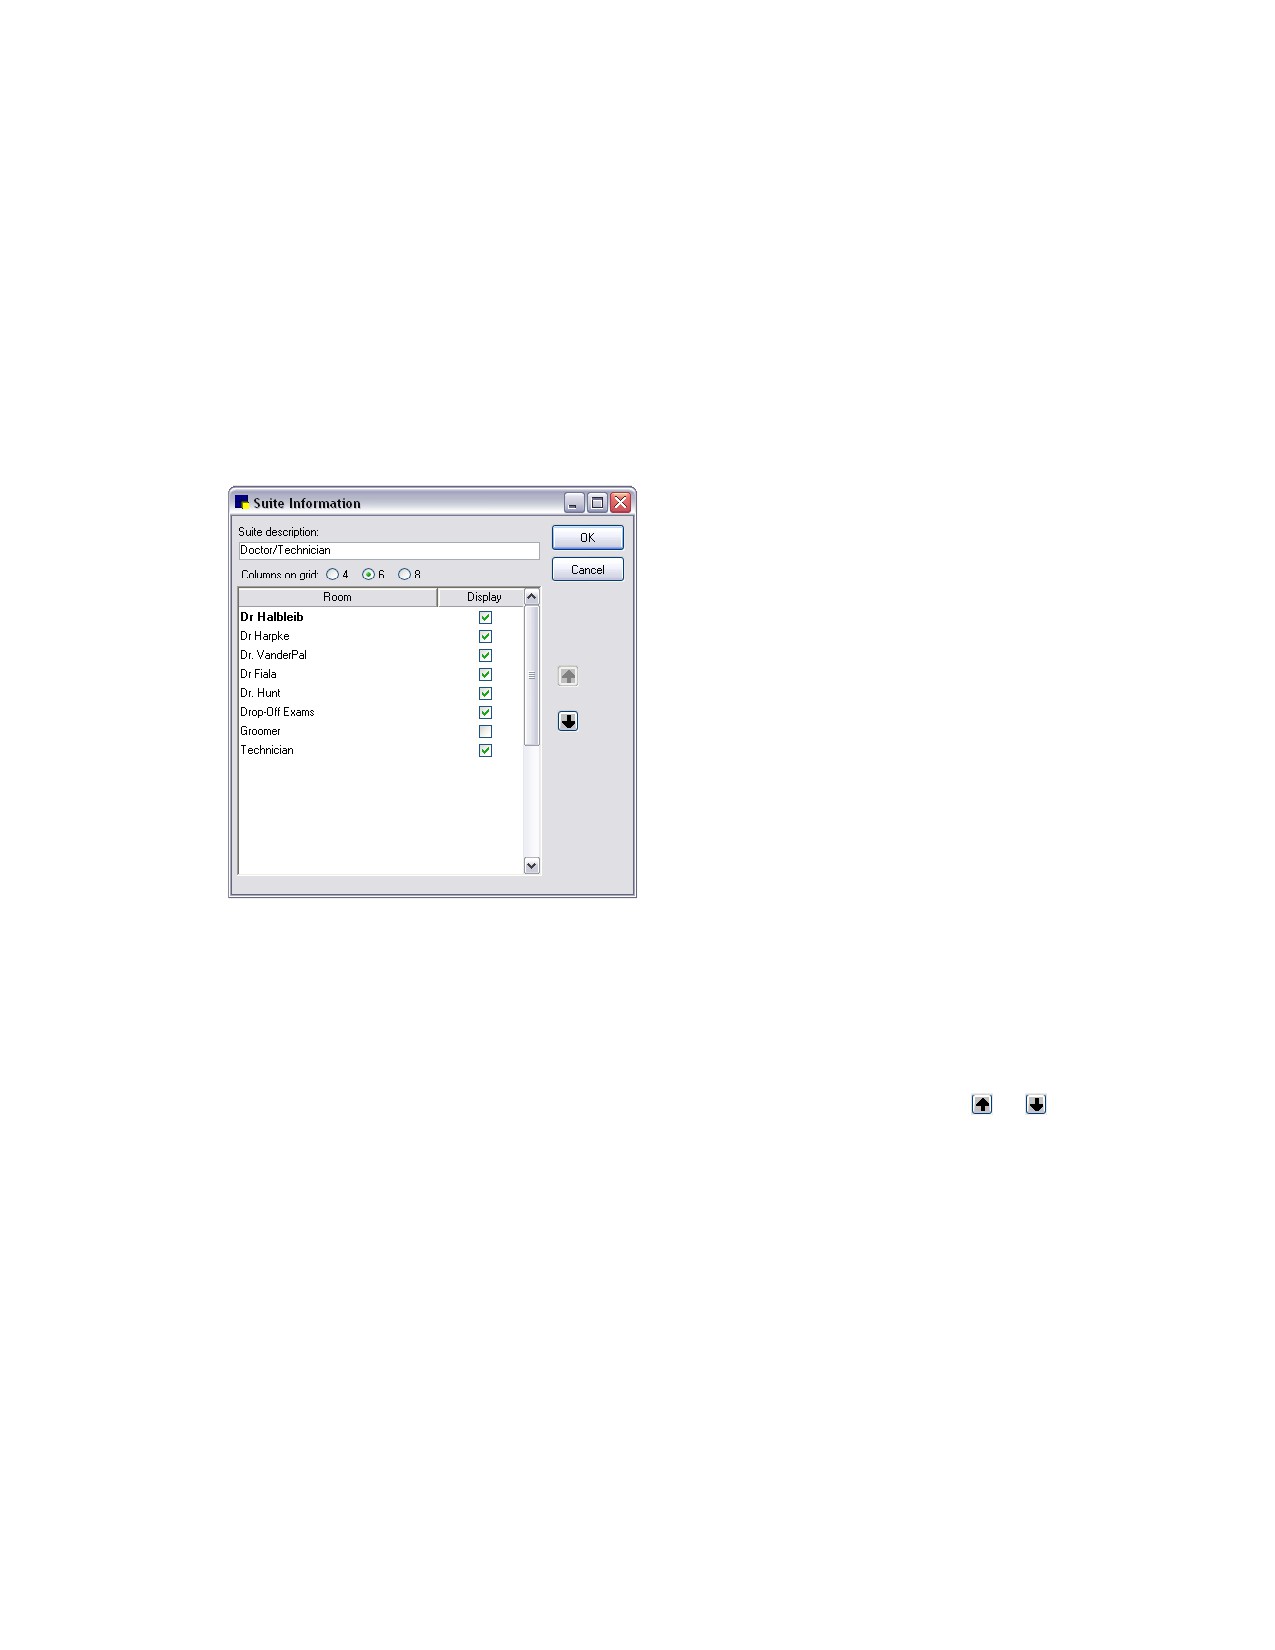
2. Click New to add a new suite. The Suite Information dialog box appears.
Suite Information dialog box
3. In the Suite description text box, type the name of the suite.
4. For the Columns on grid setting, click the number of columns (4, 6 or 8) you want to display when
this suite is viewed on the Schedule for Today window.
5. In the Display column, select the check box next to each room that you want to include in the suite.
6. To arrange the order in which the rooms will display, highlight a room and click the
or
arrow
button to change its position as needed.
7. Click OK.
272
Chapter 13: Setting Up the Electronic Whiteboard
This chapter covers the steps required to set up the Electronic Whiteboard the IDEXX Cornerstone
Practice Management System. For information on entering treatment orders and other daily usage tasks
in the Whiteboard, see “Chapter 10: Using the Electronic Whiteboard” in the Cornerstone User’s Manual.
Overview
The IDEXX Cornerstone* Practice Management System features an Electronic Whiteboard where all
treatments for patients can be ordered and tracked by staff. Upon completion of patients’ treatments,
treatment items are automatically placed on the Patient Visit List and completed treatments are placed in
patient history.
The Electronic Whiteboard comes ready to use. Standard categories (vital signs, treatments, etc.),
frequencies (SID, BID, etc.) and patient hospital statuses (Inpatient, Ready to go home, etc.) have been
provided so that no setup is required. However, if desired you can customize the Electronic Whiteboard
setup to better meet the needs of your practice using the following setup tasks.
Note: Information on setting up Whiteboard defaults, patient hospital statuses and wards/locations is
provided in other chapters (as indicated below, following each of
these tasks). The remaining setup tasks are covered in this chapter in the following pages.
• Set up Whiteboard defaults (see “Whiteboard Defaults” on page 144)
• Set up treatment categories
• Set up patient hospital statuses (see “Patient Hospital Status” on page 70)
• Set up wards/locations (see “Wards/Locations” on page 71)
• Set up treatment areas
• Set up treatment frequencies
• Set up Whiteboard alerts
Note: Remember to have a Cornerstone Administrator adjust Whiteboard security settings as needed for
each staff member.
Setting Up Treatment Categories
Treatment Categories manage the way tasks are grouped on the Electronic Whiteboard’s Patient
Treatments window. The categories are selected on the Patient Orders window and then organized and
displayed on the Patient Treatments window’s Treatments column.
There are several categories set up within Cornerstone already, including Vital Signs, Diagnostics,
Treatments, Medications, Daily Care, and Communication/Discharge.
To add or edit a treatment category:
1. On the menu bar, select Lists > Electronic Whiteboard > Categories. The Treatment Category
List dialog box appears.
2. Click New to add a new category or double-click an existing category to update it. The Treatment
Category Information dialog box appears.
273
Chapter 13: Setting Up the Electronic Whiteboard
3. In the Description text box, type or edit the name used to describe the category.
4. Click OK and then click Close.
To set the order of the Category drop-down list (available in Patient Orders):
1. On the menu bar, select Lists > Electronic Whiteboard > Categories. The Treatment Category
List dialog box appears.
2. Click Order. The Treatment Category Display Order dialog box appears.
3. For each category you want to move, highlight the category and use the
and arrow buttons to
move the category to a different position on the list.
4. When you have finished setting the order of the list, click OK and then click Close.
Setting Up Treatment Areas
Treatment areas are locations within the practice where inpatient orders are scheduled to be performed.
With treatment areas set up in Cornerstone, it is possible to assign an area to a specific treatment order
on the Patient Orders window. This allows staff to narrow the list of patients/treatments that display on
the Whiteboard and Patient Treatments window to a specific area.
For example, with the Lab and Radiology/X-ray treatment areas set up, you can easily edit the filters on
the Whiteboard to select one of these areas and narrow the list of patients to show only those needing
an x-ray or needing lab work.
To add or edit a treatment area:
1. On the menu bar, select Lists > Electronic Whiteboard > Areas. The Treatment Area List dialog
box appears.
2. Click New to add a new area or double-click an existing area to update it. The Treatment Area
Information dialog box appears.
3. In the Description text box, type or edit the name used to describe the treatment area.
4. Click OK and then click Close.
Setting Up Treatment Frequencies
Treatment frequencies are used to determine how often and when a treatment is scheduled for an
inpatient on the Whiteboard. The Treatment Frequency List allows you to set up treatment frequencies to
occur Every day or Every x days. The frequencies set up here display as options in the Frequency field
on the Patient Orders window when adding treatment orders for a patient.
Some common frequencies are included with Cornerstone, including Continuous, One time, Until
Completed, SID (once a day), BID (twice a day), TID (three times a day), QID (four times a day), and
frequencies performed "Every x number of hours" (e.g., Every 4 hours-q4h).
Some frequencies cannot be updated or deleted, including Continuous, One time, Until Completed and
frequencies performed "Every x number of hours."
To add or edit a treatment frequency:
1. On the menu bar, select Lists > Electronic Whiteboard > Frequencies. The Treatment Frequency
List dialog box appears.
2. Click New to add a new treatment frequency or double-click an existing frequency to update it. The
Treatment Frequency Information dialog box appears.
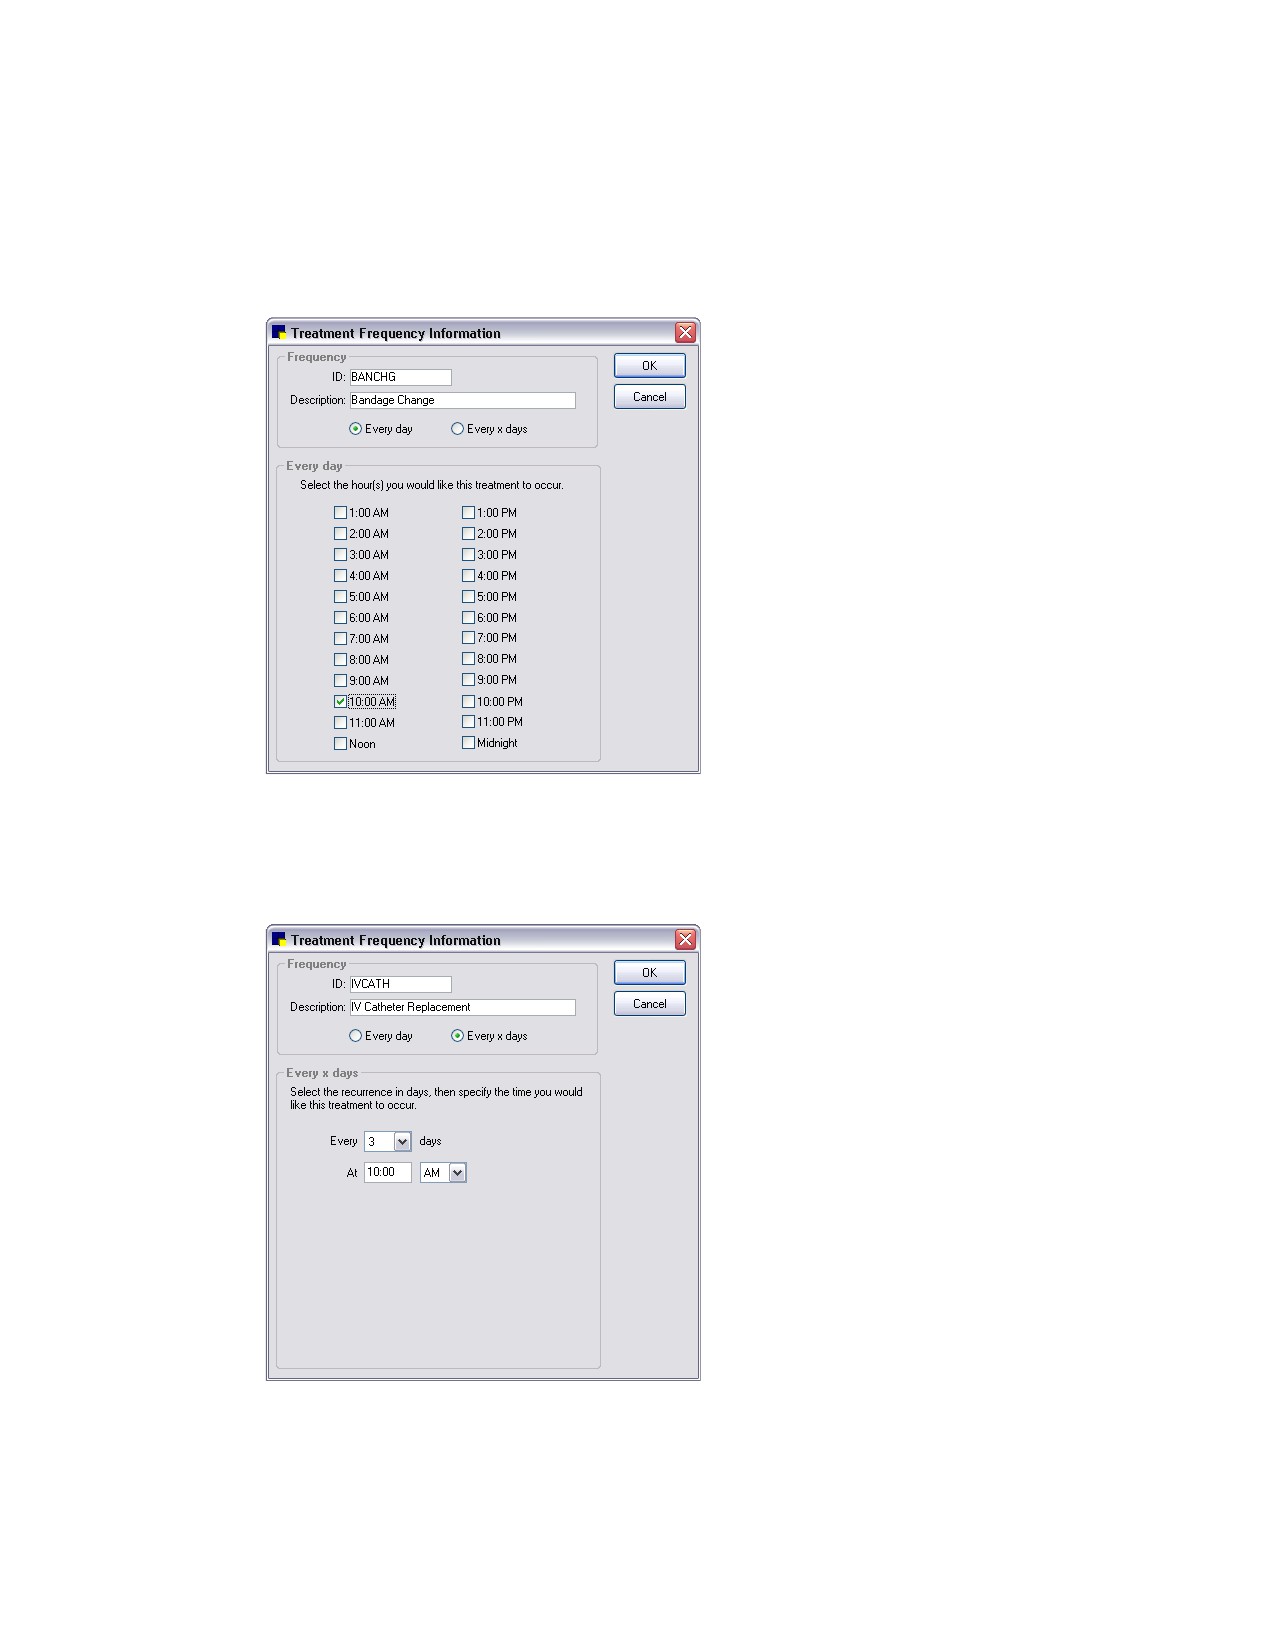
3. In the ID text box, type a unique identification code to use for this frequency (e.g., BANCHG).
274
Chapter 13: Setting Up the Electronic Whiteboard
4. In the Description text box, type a name used to describe the frequency (e.g., Bandage Change).
5. Do one of the following:
• If this frequency applies to treatments that will be performed every day, click the Every day
option and then click to place a check mark next to each default time a treatment should be
performed for this frequency.
Every day frequency
• If this frequency applies to treatments that will be performed every 2 to 7 days, click the Every x
days option, select a recurrence of every 2 to 7 days, and then specify the time you would like
the treatment to occur on those days.
Every x days frequency
6. Click OK and then click Close.
275
Chapter 13: Setting Up the Electronic Whiteboard
To set the order of the Frequency drop-down list (available in Patient Orders):
1. On the menu bar, select Lists > Electronic Whiteboard > Frequencies. The Treatment Frequency
List dialog box appears.
2. Click Order. The Treatment Frequency Display Order dialog box appears.
3. For each frequency you want to move, highlight the frequency and use the
and arrow buttons
to move the frequency to a different position on the list.
4. When you have finished setting the order of the list, click OK and then click Close.
Setting Up Whiteboard Alerts
The Whiteboard Alerts List allows your practice to create a list of commonly used hospitalized patient
alerts to be displayed on the Electronic Whiteboard windows for the current visit.
Note: Whiteboard alerts can also be free-form typed for each patient at the time of use as needed.
(Alerts entered manually at the time of use are not saved in your Whiteboard Alerts List.)
To add or edit a Whiteboard alert:
1. On the menu bar, select Lists > Electronic Whiteboard > Alerts. The Whiteboard Alerts List dialog
box appears.
2. Click New to add a new alert or double-click an existing alert to update it. The Add/Edit Whiteboard
Alert dialog box appears.
3. In the Description text box, type the alert text as you want it to display at the time of use on the
Whiteboard.
4. Click OK and then click Close.
276
Chapter 14: Setting Up a Reminder System
Overview
A reminder is a means of following up with a client about a patient’s specific needs; for example, a
reminder to make a phone call or a reminder to send a letter, postcard, or email.
Reminders are a vital component of the IDEXX Cornerstone* Practice Management System. Using
reminders, you can:
• Easily contact your clients regularly
• Remind clients of appointments
• Inform clients of medical updates or new products
• Analyze the productivity of your practice
Reminders are also a means of contacting clients who meet specific criteria. Cornerstone software
places reminders in a patient’s record when:
• An invoice item linked to a reminder is added to an invoice for the patient.
• A reminder is entered manually in the patient’s reminder information.
For information on linking reminders to invoice items, see “Adding Reminder Information to Invoice
Items” on page 192.
Reminder Printing Options-Cornerstone or Microsoft® Word®
The process of generating reminders is done entirely within Cornerstone. As part of this process, the
Cornerstone software searches all of the patient reminder files (that meet the criteria you specify) and
pulls the reminder information data into a text (.txt) file. This file can then be used to merge the data into
reminders that can be printed using Cornerstone software or printed/emailed using Microsoft Word.
The process is summarized as follows:
1. Use Cornerstone software to produce the list of clients/patients to whom reminders will be sent.
2. Do one of the following:
• Use Cornerstone software to print reminder cards with options to include a Postal Bulk Rate
(PRESORTED STANDARD) stamp, a pet picture, and/or a four-line reminder message.
• Use predefined Microsoft Word templates (or other applicable word processing programs) to
merge the list of clients and patients into documents that can be printed or emailed.
277
Chapter 14: Setting Up a Reminder System
What Information Prints on a Reminder?
Each reminder template contains the following information:
• Practice name and address (the templates must be customized with your practice’s name and
address)
• Patient name
• Client ID, name and address
• Postage information (when applicable)
In most cases, you will need to update the practice name, address and phone, reminder text and
postage information to meet your practice’s needs. You can later change these settings by editing the
reminder template.
Sample reminder card:
Countryside Animal Medical Clinic
PRESORTED
Drs. Papp, Williams, Orosz & Hogue
STANDARD
8338 Main Street
U.S. POSTAGE
Eau Claire, WI 54701
PAID
Phone: 715-555-5432
PERMIT #12345
CITY, STATE
A reminder that Ghost is due for:
4/6/09 Feline 3 + IMRAB
Ms. Karla Kracker
1001 Mockingbird Lane
Eau Claire, WI 54703
Your pet's health is very important to us.
Please call our office for an appointment.
To view reminders, print a Reminder Letter Report.
Reminder Strategies
The Cornerstone reminder system is an important means of contacting clients. With a solid reminder
strategy, you can do the following:
• Protect your client base
• Enhance client loyalty
• Improve preventative care
• Increase revenue
• Improve compliance
To use reminders effectively, predetermine and follow a strategy for generating and sending reminders.
Invoice Items and Reminders
When an invoice item that has reminders linked is included on an invoice, Cornerstone automatically
places a reminder (or several reminders) in the patient’s file. When the due date is reached, you can
print postcards or letters that list these invoice items. See “Adding Reminder Information to Invoice
Items” on page 192 for information.
278
Chapter 14: Setting Up a Reminder System
Generally, there are two ways to set up reminders on invoice items and you are encouraged to use both
simultaneously.
• Method 1—Set up items that are purchased sequentially
• Method 2—Set up items that are interchangeable
Method 1—Set up items that are purchased sequentially
Items set up sequentially should satisfy all earlier items in the sequence. If a client skips one part of the
series, the existing reminders should still be satisfied.
Example:
When Molly was one month old, Ms. Carlyle brought her in for her DHLPP 1st vaccination. This invoice
item DHLPP1 generated a reminder for another invoice item DHLPP2. When Molly was two months old,
however, Ms. Carlyle forgot to bring her in for the DHLPP 2nd vaccination. The practice used
Cornerstone to generate a second (unsatisfied) reminder for the DHLPP 2nd vaccination.
Ms. Carlyle brought Molly back in when she was three months old. At this time, Dr. Morris decided to
administer the DHLPP 3rd vaccination instead of the DHLPP 2nd. Because Dr. Morris’ reminder system
was set up correctly, Ms. Carlyle will not receive another reminder for the DHLPP 2nd even though Molly
never received the vaccination. The DHLPP 3rd vaccination satisfied the DHLPP 2nd vaccination and
also generated a reminder for a yearly DHLPP Booster.
Method 2—Set up items that are interchangeable
Interchangeable services should satisfy each other.
Example:
A practice interchanges two different types of heartworm tests, Heartworm Antigen and Heartworm
Occult. Each of these items generates a reminder in 12 months for the same service. In 2004, Ranger
gets the Heartworm Antigen. A reminder is created in 2005 for the Antigen test. When Ranger returns to
the practice in 2005, Dr. Randolph decides to use the Occult test instead. In order for Cornerstone to
delete the existing reminder for the Antigen test, the reminder for the Occult test must also satisfy the
reminder for the Antigen test and vice versa.
Call vs. Letter Reminders
Patient reminders provide two options for contacting clients—calls and letters.
• Call refers to “call backs” or “recalls” that you can view on the Reminder Recall Report or on the
Daily Planner. Calls are used to contact clients in more immediate situations, such as follow-up
calls after a surgery and reports on hospitalized animals.
• Letter refers to a printed reminder. Reminder letter formats include postcards, letters and email
reminders.
279
Chapter 14: Setting Up a Reminder System
Classifications and Flagged Owners
By classifying clients and flagging owners, you can narrow the focus of your reminders. Some common
strategies include:
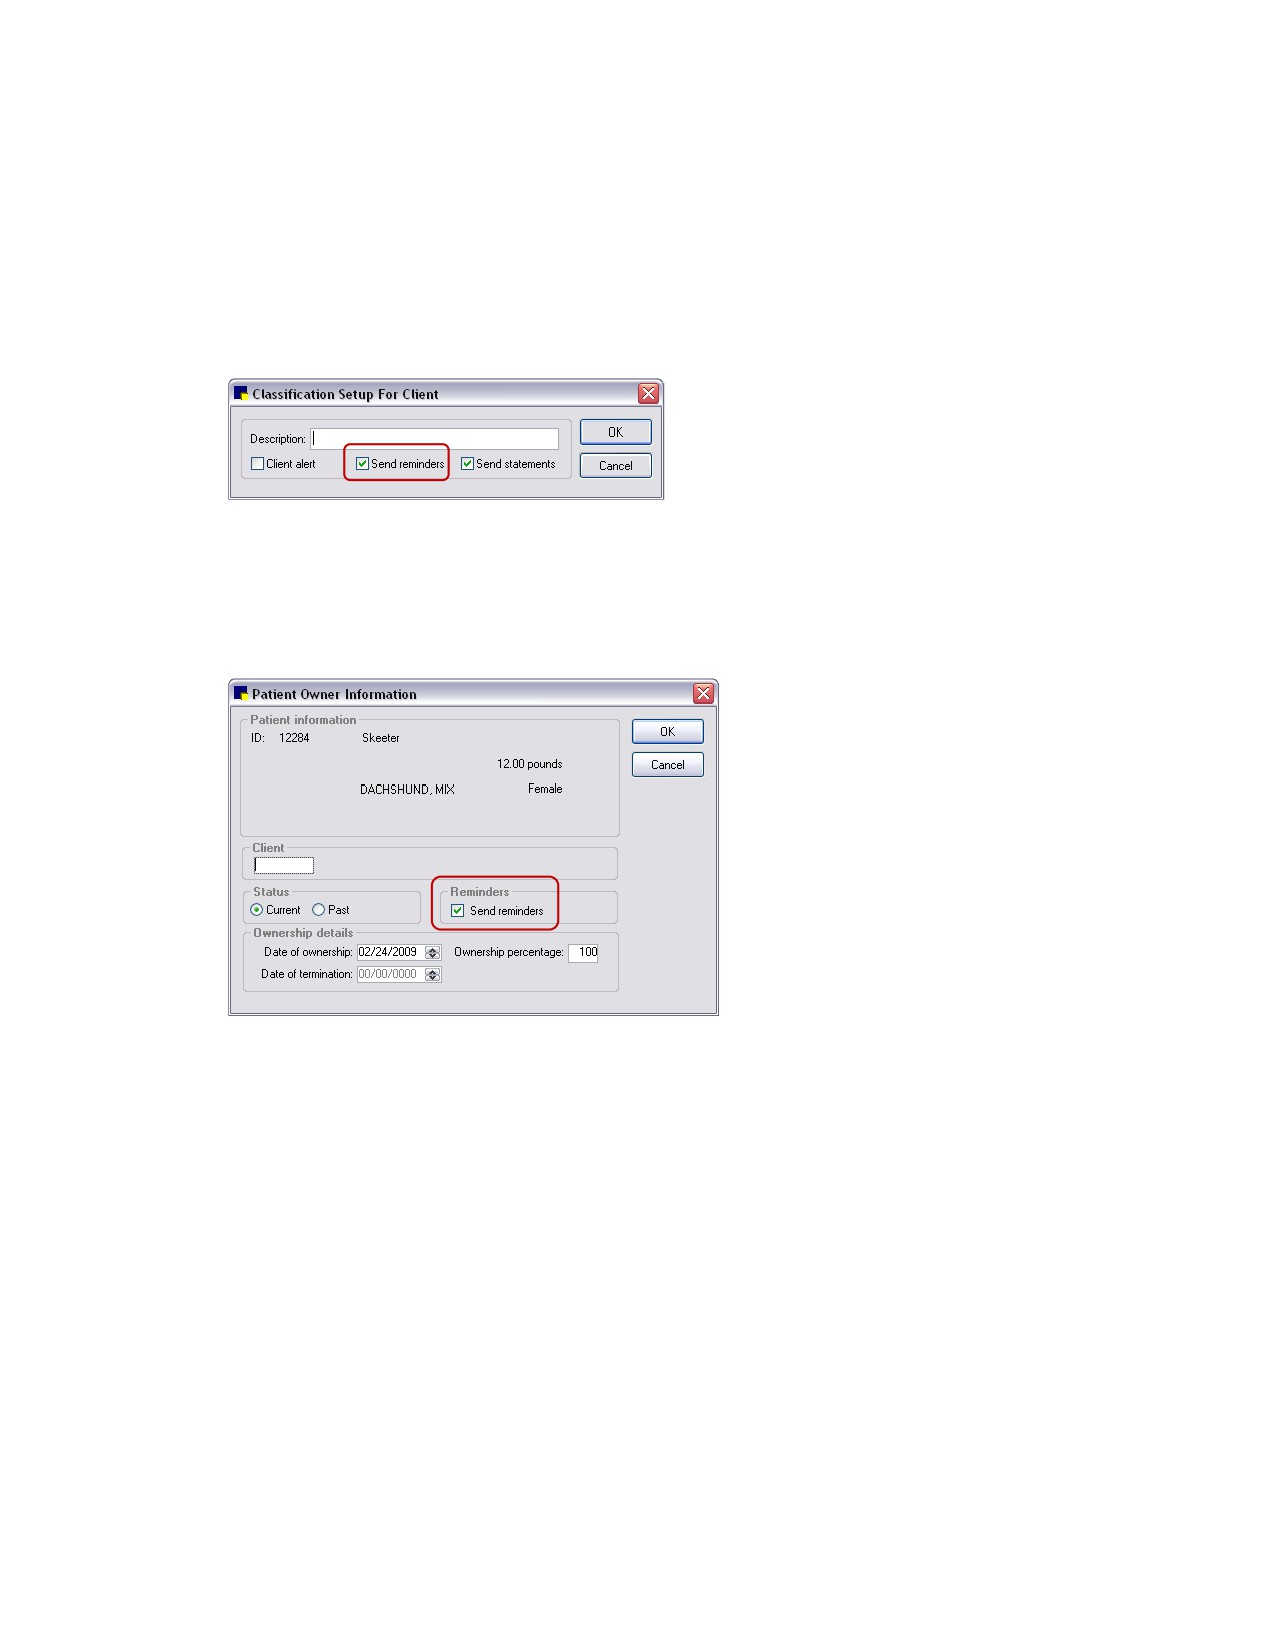
• Using classifications for various types of clients (preferred, seasonal, etc.). For example, use a
classification of Seasonal-W for winter clients. Clear the Send reminders check box (Controls
> Classifications, select the Client tab) for that classification during the summer months when
you do not want to send reminders to winter clients.
Classification Setup for Client dialog box
• Using flagged owners to narrow your reminder list. Clients who have the Send reminders check
box selected in the Patient Owner Information dialog box are considered “Flagged Owners” and
will receive mailings sent to flagged owners if their classification is selected. Flagged Owners
may be your best clients who receive more frequent reminders.
Patient Owner Information dialog box
Note: See “Generating Your Reminders” beginning on page 288 for information on selecting
classifications and flagged owners when generating reminders.
280
Chapter 14: Setting Up a Reminder System
Setting Up a Reminder System
The following example is of a three-tiered reminder system. This means that reminders are generated
twice each month (such as at the beginning of the month and at mid-month). Note that this is an
ongoing activity; this example only follows reminders that were due between 2/1 and 2/29.
Note: This is just one example of a reminder system. Your practice should form its own reminder
strategy.
Date Reminders
Reminder
Future
#
Were Generated
Due Dates
or
Time Sent
(Mailed)
(Date Range)
Overdue
The first time this
Ö 1/15
Ö 2/1 - 2/29
Ö Future
Ö 1st
group of reminders
11/1 - 11/30
Overdue
3rd
was sent was two
weeks before the
first reminder was
due.
1/31
12/1 - 12/31
Overdue
2nd
2/15
3/1 - 3/31
Future
1st
12/1 - 12/31
Overdue
3rd
2/29
1/1 - 1/31
Overdue
2nd
3/15
4/1 - 4/30
Future
1st
1/1 - 1/31
Overdue
3rd
The second time this
Ö 3/31
Ö 2/1 - 2/29
Ö Overdue
Ö 2nd
group of reminders
was sent was when
the reminder was
two months overdue.
The third (and last)
Ö 4/15
5/1 - 5/31
Future
1st
time this group of
Ö 2/1 - 2/29
Ö Overdue
Ö 3rd
reminders was sent
was two weeks after
the second set.
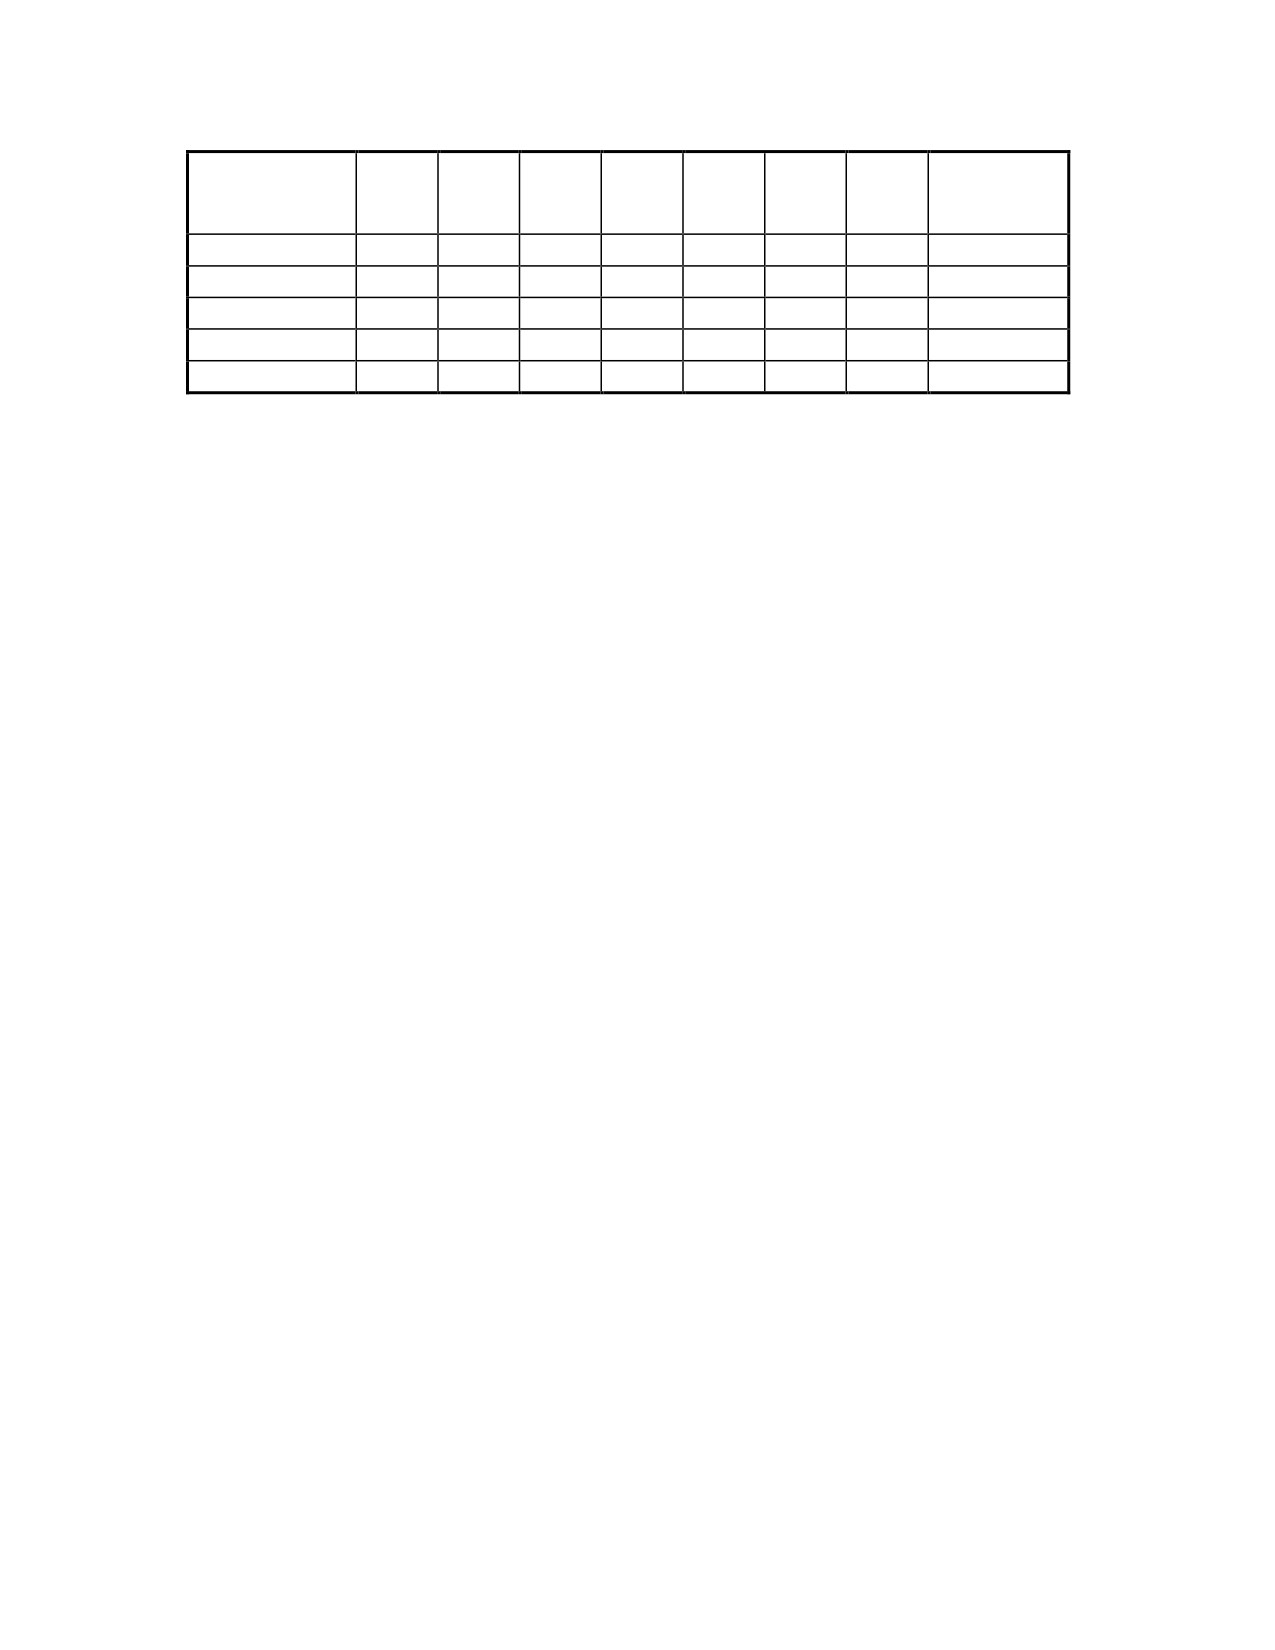
To calculate your return on reminders
You can calculate the financial return you’ve gained by using reminders. The compliance rate (satisfied
reminders) shows the effectiveness of your reminder system. Use the following table to calculate your
response rate of satisfied reminders. When you generate your reminders, make a note of the number
generated so you can accurately calculate the return.
Note: You can use this same method for calculating a response rate on cards generated.
281
Chapter 14: Setting Up a Reminder System
1st
2nd
3rd
4th
1st
2nd
3rd
Month
A
B
C
D
A - B
B - C
C - D
Total
A
B
C
January
492
336
239
220
32%
29%
8%
69%
February
526
347
271
255
34%
22%
6%
62%
March
427
303
225
29%
26%
April
359
215
36%
May
395
A = # 1st reminders sent, B = # 2nd reminders sent, C = # 3rd reminders sent, D = # 4th reminders
(not printed)
Tips for Using Reminders Effectively
•
Confirm that interchangeable items satisfy each other.
•
Decide on a strategy that works realistically for your practice.
•
Track the response rate by keeping track of the number of cards generated for each group each
time they are generated. Do not generate two time frame groups together (such as 5/1 - 5/31
and 2/1 - 2/29).
•
Set up a method to track when you send reminders. One method of tracking is to use a
calendar and three (or the number of times each group of reminders is sent) colored
highlighters to track the number of times you have mailed that group of reminders. Circle the
date that the first round was generated, and continue to circle that date with a different color as
each consecutive round is generated.
•
Verify that your reminders are set up in the system correctly. Run an Invoice Item Reminder
Information Report to check.
•
Be attentive to overdue reminders. Choose a certain period of time (such as monthly or yearly)
and pull out the clients that haven’t visited within a specific time period. Send these clients a
letter or call them to let them know that you are concerned for their pet and that you would like
an update of their pet for your files.
•
Talk to one client at a time. As clients come in to your practice, check the reminders on all of
their pets. If any reminders are overdue, ask them for an update of that pet. (You can preview a
Check-In Report for each animal who enters your practice and look for any overdue reminders.)
•
Use Cornerstone performance tracker to gather information about client’s compliance with your
recommendations. See “Chapter 27: Using Cornerstone Performance Tracker” beginning on
page 441 for more information.
To view a list of reminders that each item generates and satisfies, print the Invoice Item Reminder
Information Report.
282
Chapter 14: Setting Up a Reminder System
Cornerstone Reminder Card Setup
If you use Cornerstone software to print reminders, the following items can be printed on reminder
cards:
• Postal Bulk Rate (PRESORTED STANDARD) stamp
• Pet pictures
• Four-line reminder message
You can also easily change the alignment and placement of reminder information on reminder cards.
Setting Up a Bulk Rate (PRESORTED STANDARD) Stamp
The U.S. Postal Service provides special postage rates for large mailings. If your practice sends a large
number of reminders (200 or more), the special rate most likely applies. (There are some restrictions
based on the size of the reminder card. Consult your local post office for details.)
To take advantage of the special rate:
• A permit number issued by the post office is required.
• A bulk rate (PRESORTED STANDARD) stamp must be printed on reminder cards.
Note: This feature applies only to reminder cards that are printed in Cornerstone, not Microsoft Word. To
include a bulk rate stamp on a Microsoft Word reminder, type the bulk rate information and permit # for
the stamp on the applicable reminder template.
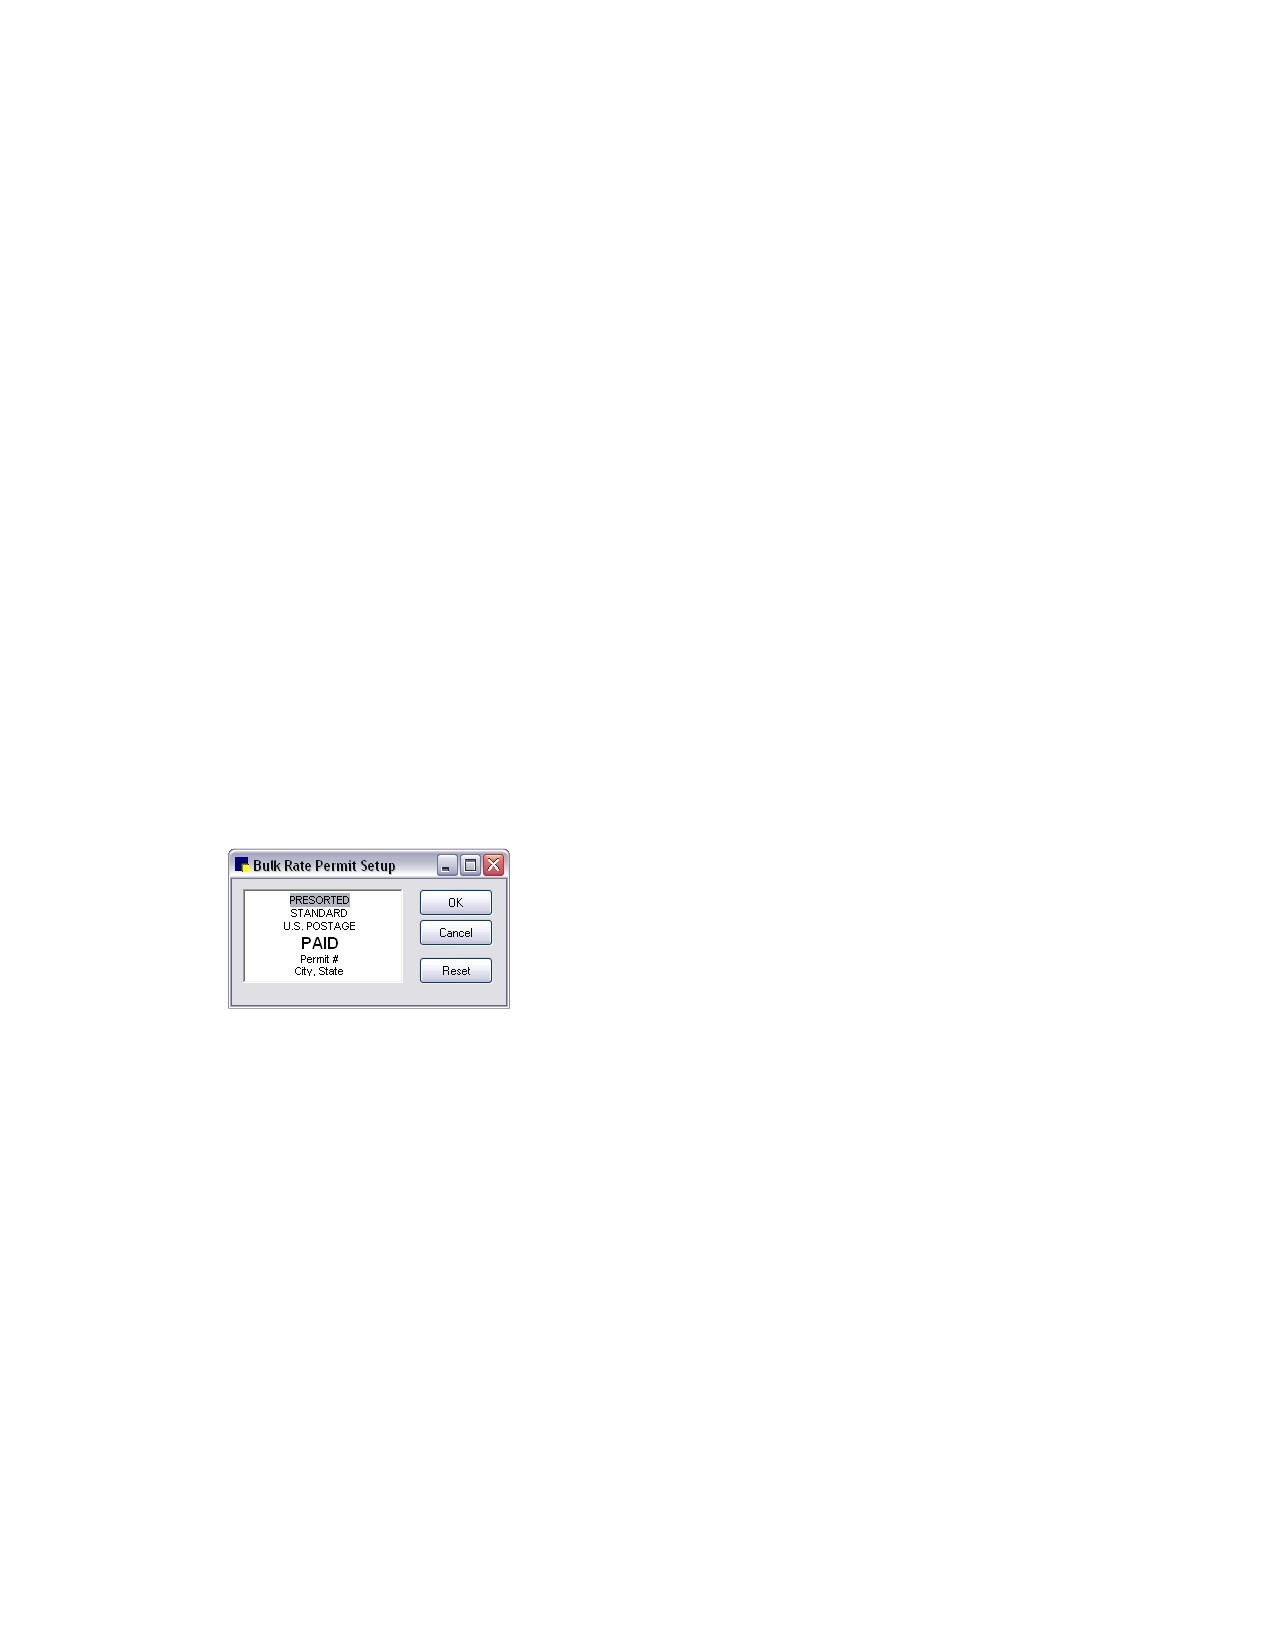
To set up a bulk rate stamp:
1. On the Activities menu, select Reminder Selection > Reminder Print Options > Reminder Bulk
Rate Permit Setup. The Bulk Rate Permit Setup dialog box appears.
Bulk Rate Permit Setup dialog box
2. Click on the Permit # line and type your permit number. Use care to not delete other bulk rate
information. This information complies with U.S. Postal Service regulations and should be left as is.
3. Click on the City, State line and enter your city and state.
4. If necessary, click Reset to reset the bulk rate permit wording to the default standard bulk rate
wording.
5. Click OK.
Including Pet Pictures on Reminder Cards
If you print reminder cards directly from Cornerstone (not Microsoft Word), you can include pet pictures
on them. Up to four pictures can print on two and four card reminders and up to three pictures can print
on three card reminders.
Note: This feature only applies to reminder cards that are printed in Cornerstone, not Microsoft Word.
283
Chapter 14: Setting Up a Reminder System
To include pet pictures on reminder cards:
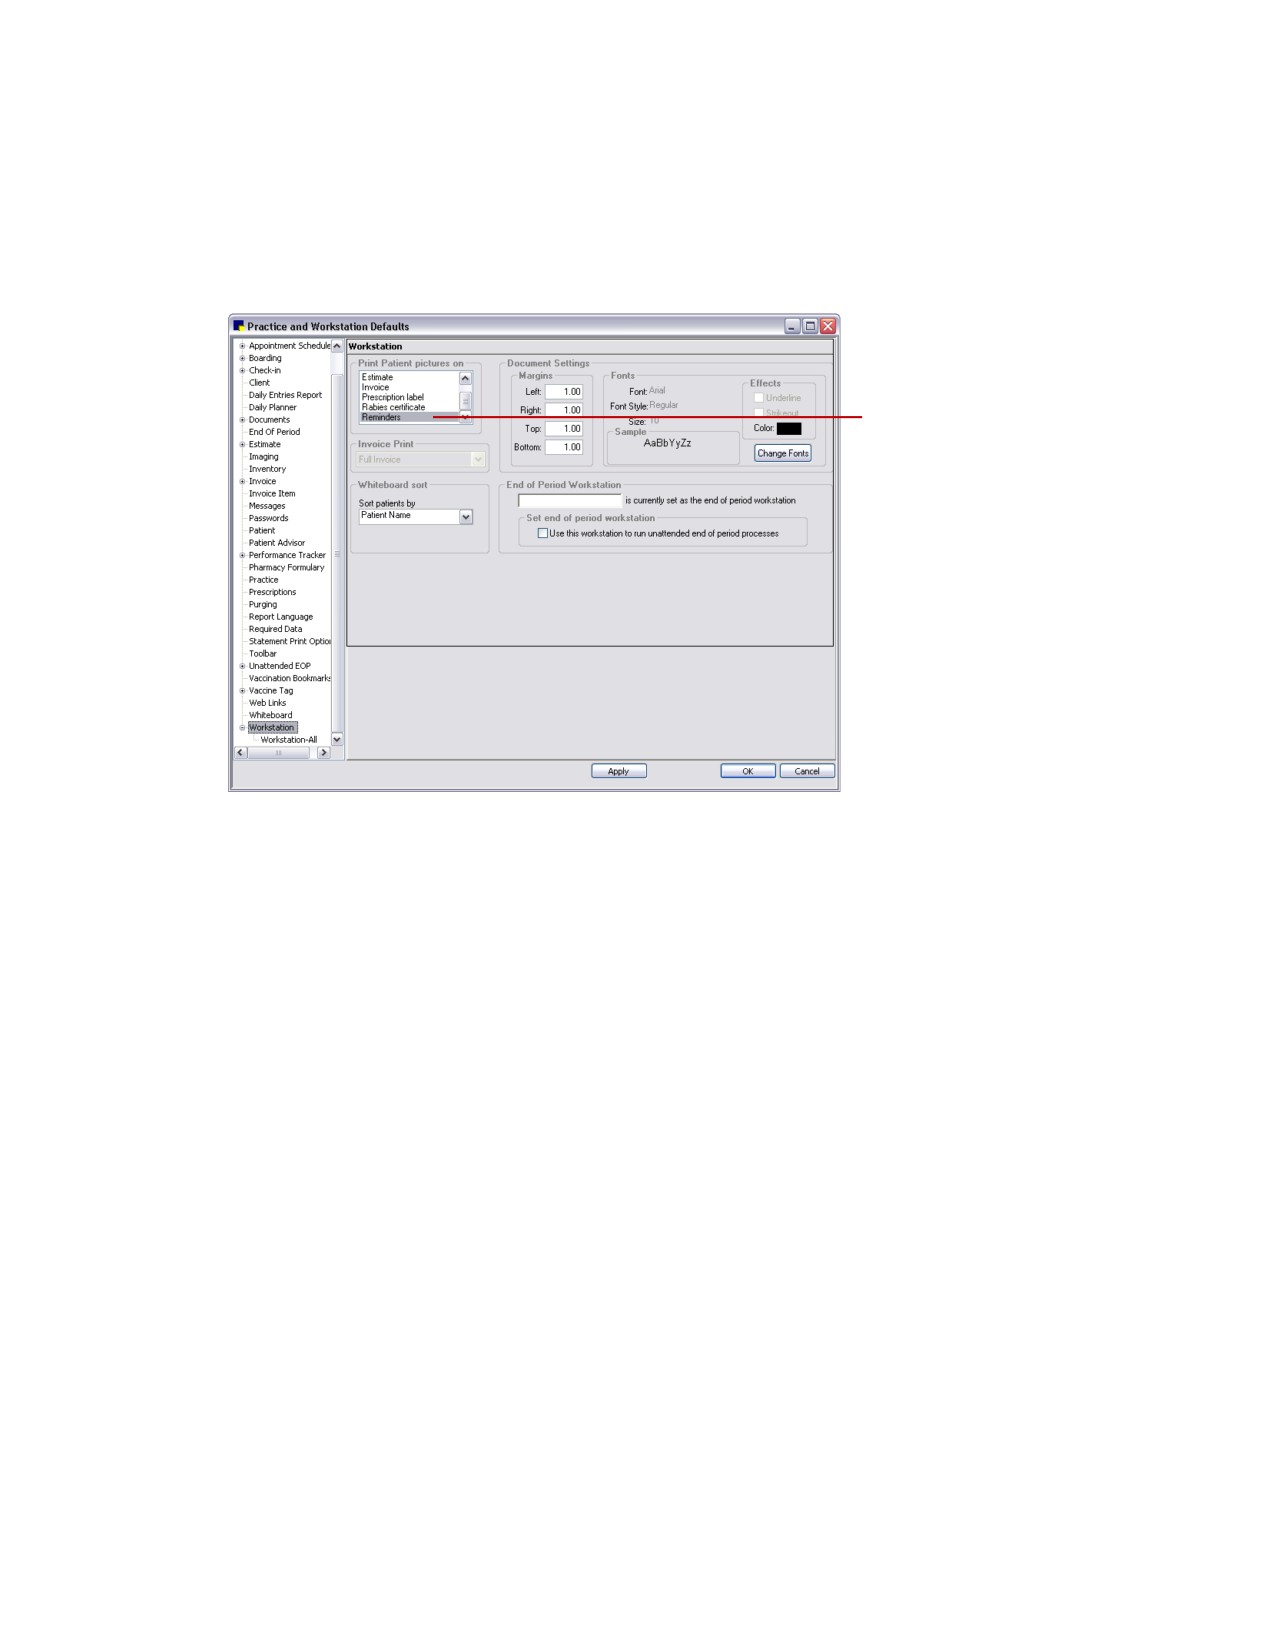
1. On the Controls menu, select Defaults > Practice and Workstation. The Practice and Workstation
Defaults window appears.
2. In the navigation pane, click Workstation. The Workstation configuration pane appears on the right
side of the window.
Select Reminders to
print pet pictures on
reminders
Workstation defaults
3. In the Print patient pictures on area, select Reminder to print pet pictures on reminders.
Note: This setting must be set on each workstation.
4. Click OK.
Modifying Reminder Card Alignment and Placement
You can easily change the alignment and placement of Cornerstone reminder card information by
modifying the reminder print options.
Note: This feature only applies to reminder cards that are printed in Cornerstone, not Microsoft Word.
To change alignment and placement of reminder card information:
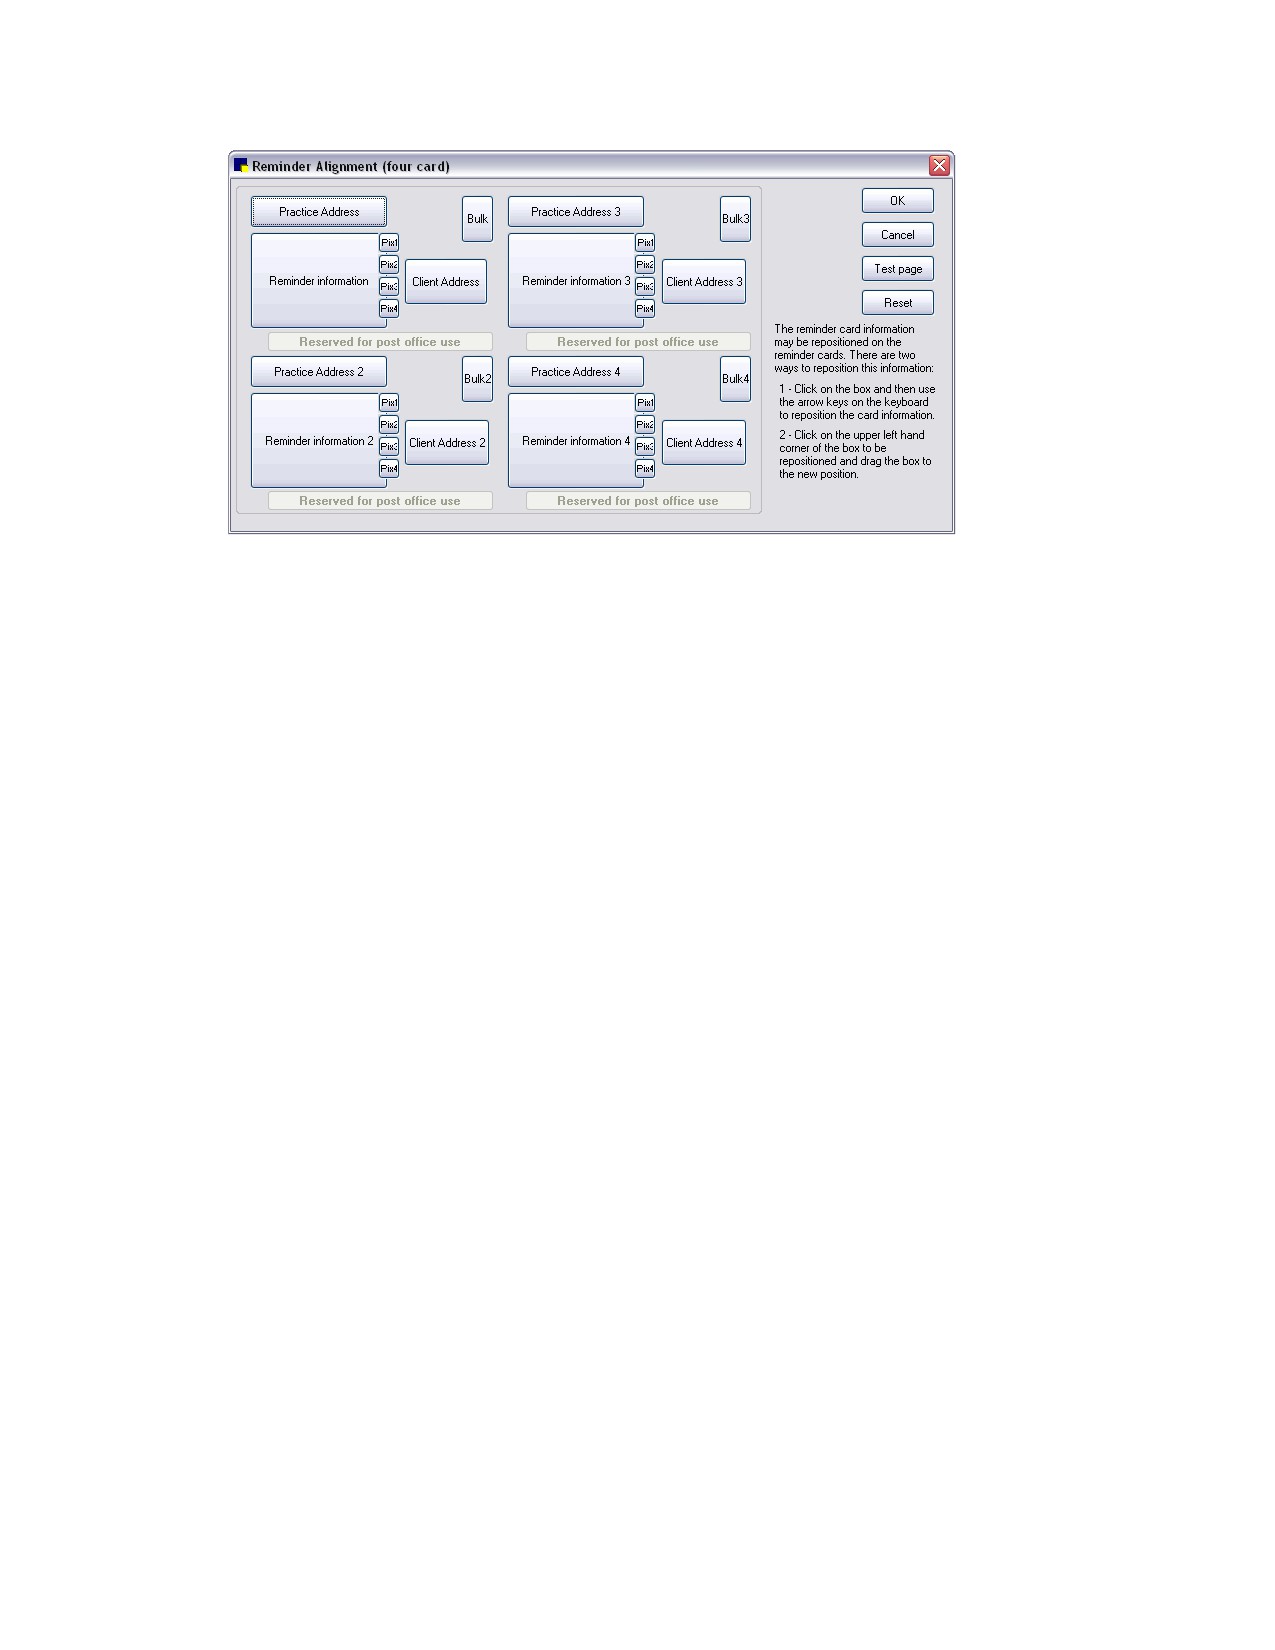
1. On the Activities menu, select Reminder Selection > Reminder Print Options > Two/Three/Four
Card Reminder Alignment. The Reminder Alignment dialog box appears.
284
Chapter 14: Setting Up a Reminder System
Reminder Alignment dialog box
2. To change the position of the information on the reminder cards, click a box and use your keyboard
arrow keys to move it.
Note: If you choose to include pet pictures on reminders, you need to set Workstation defaults to
include reminders. See “Including Pet Pictures on Reminder Cards” on page 283 for more
information.
3. To change the alignment back to the original reminder alignment, click Reset.
4. To print a test page to check the alignment, click Test page.
Note: If you change the alignment of pet picture boxes (the small boxes marked Pix1, Pix2, etc.),
we recommend that you test the alignment before printing all of your reminders.
5. Click OK.
Creating a Reminder Message
You can create reminder messages that print on the bottom of reminder cards. To match the reminder
reason, a message can easily be changed each time reminders are generated. You can also create a
number of different reminder messages. When you generate reminders, you can select the applicable
message from a drop-down list. You can print one four-line message per card.
Other reminder message options allow you to do the following:
• Change the standard Patient message (A reminder that [name] is due for:) to wording of your
choice.
• Add a reminder message line for overdue reminders. If you include overdue reminders on
reminder cards, this message precedes the overdue reminders.
• Select one set of reminder messages as the default set.
Note: This feature applies only to reminder cards that are printed in Cornerstone, not Microsoft Word.
285
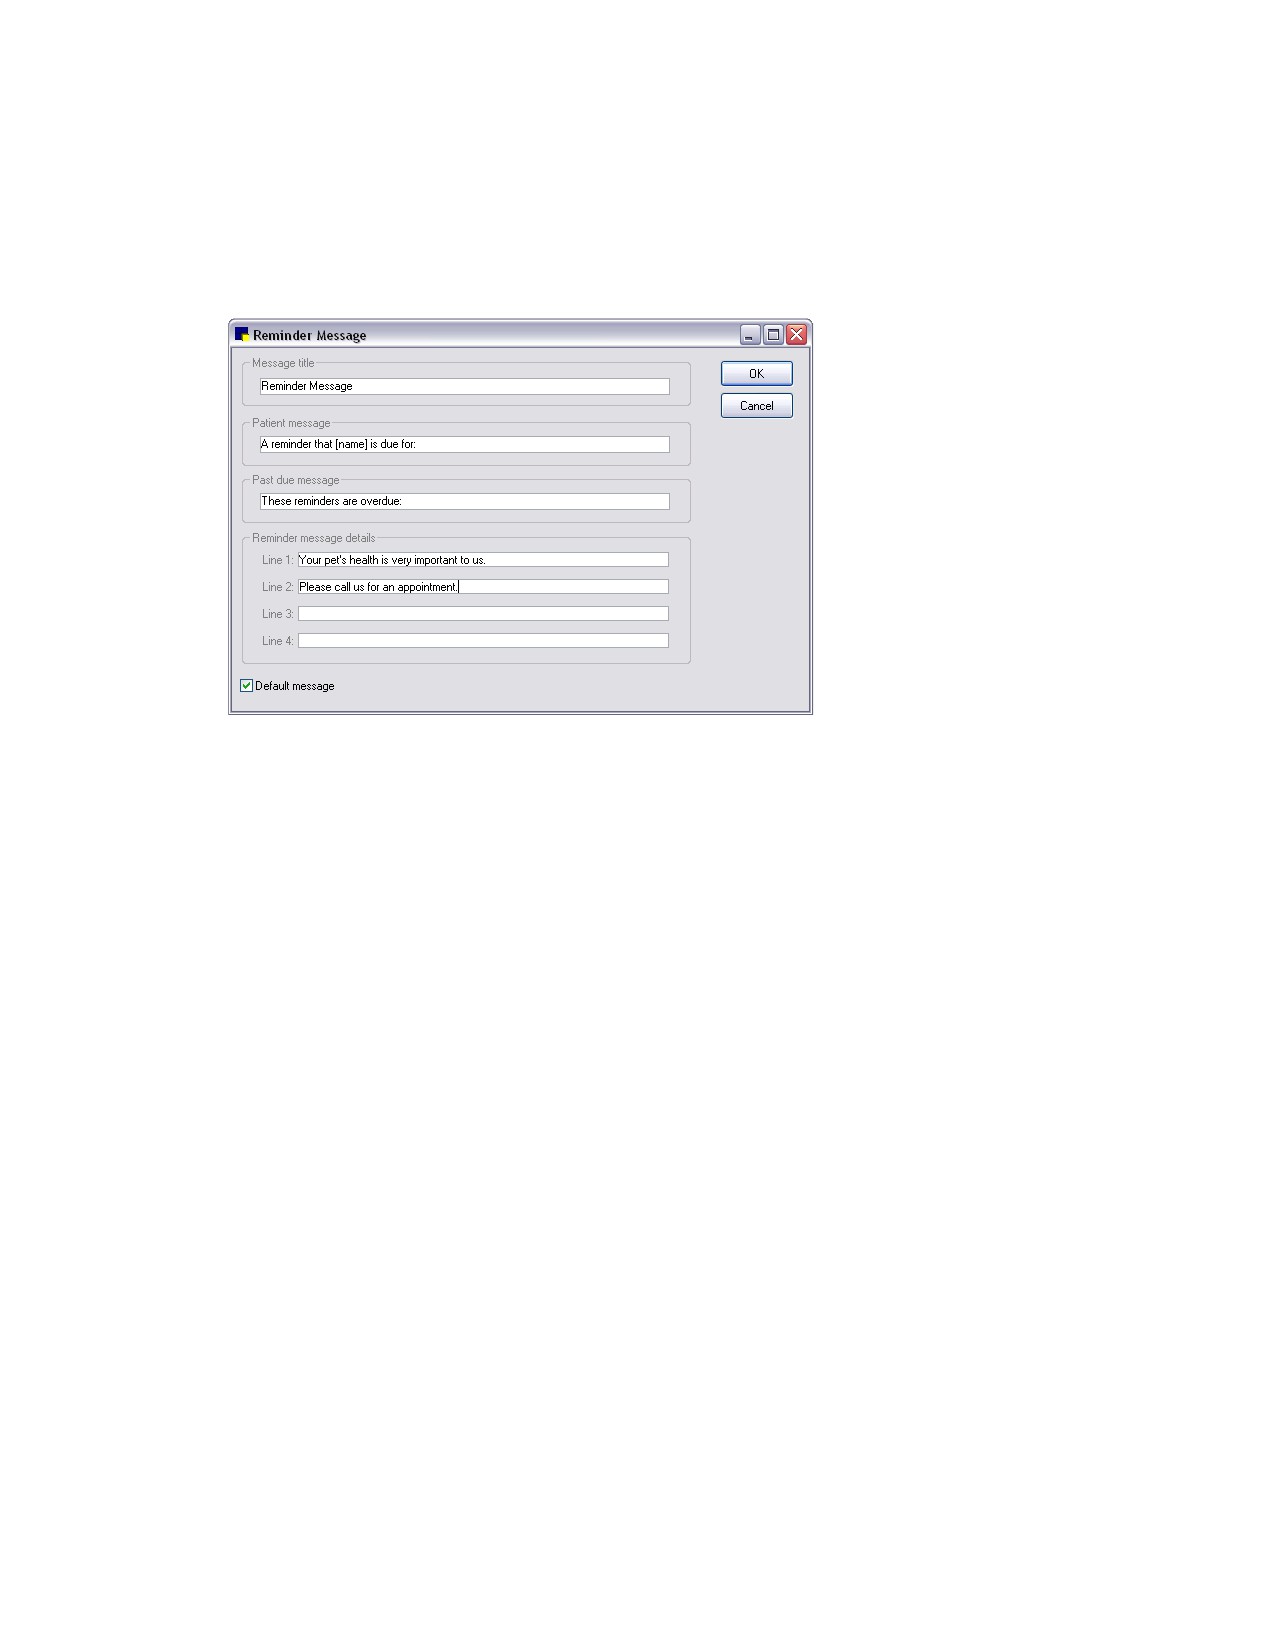
Chapter 14: Setting Up a Reminder System
To set up a reminder message:
1. On the Activities menu, select Reminder Selection > Reminder Print Options > Reminder
Message Setup.
2. Click New to add a new message or double-click an existing message to update it. The Reminder
Message window appears.
Reminder Message window
3. In the Message title text box, type the name you want to use for this message. This title will not
appear on the reminders, but will appear in the Reminder Message dialog box.
4. In the Patient message text box, type the text that you want to print for the patient message line on
the reminder card and press TAB. To include a patient name bookmark in the text, enclose name in
brackets (e.g., [name]).
5. In the Past due message text box, type a message line to precede past due reminders. This line
prints only if past due reminders are found and included on a patient’s reminder card. If this
message is not entered, past due reminders are included with reminders that are currently due for
the selected date range.
6. In the Reminder message details area, type the text of your message. Your message is limited to
four lines of 60 characters each.
7. If you want this message to be the current message used on your reminder, select the Default
message check box. Only one message can be selected as the default.
Note: A default message is not required. You can select a message when generating reminders.
8. Click OK and then click Close.
286
Chapter 14: Setting Up a Reminder System
Microsoft Word Reminder Card Setup
Reminder templates that can be used when you print reminders using Microsoft Word are included with
the software. Before using the templates for reminders, edit the templates to include your practice name,
address and telephone number.
Reminder templates included with your software include:
• reminder2.dot-Use to print two postcard reminders on a laser printer.
• lasrem3s.dot-Use to print three postcard reminders on a laser printer.
• reminder4.dot-Use to print four postcard reminders on a laser printer.
• postcrds.dot-Use to print postcard reminders on a dot-matrix printer.
• trifolds.dot-Use to print letter size reminders which can be folded in thirds and mailed.
Before You Begin
1. Save a copy of the .dot (Word template) file that you want to change. You will find the reminder files
in your Cornerstone directory (e.g., C:\Cstone). Save a copy in another folder or on CD.
2. Open Microsoft Word.
3. Generate reminders in Cornerstone. See “Generating Your Reminders” on page 288.
Note: Depending on the version of Microsoft Word you are using, the Word functions and dialog boxes
referenced in this section may vary slightly from your version of Word. Refer to the Microsoft Word online
Help for instructions specific to your version.
To edit a reminder template in Word:
1. In Microsoft Word, open the reminder template you want to use to print reminders:
a. On the File menu, select Open.
b. In the Files of type box, select Document Templates (*.dot) to view Word template files.
c. Look in your Cornerstone directory (e.g., C:\Cstone) and select the file.
d. Note the following:
• If the Macro Virus Protection Warning box appears, click No.
• If the Print dialog box appears, click Cancel.
• If the Command Failed message appears, click OK.
2. Edit your practice information, messages and postage information. Remember to edit all postcards
included in the template.
3. On the File menu, click Save to save your changes in the template.
4. If a message appears asking if you want to overwrite the older Word version with a newer Word
version format, click Yes.
5. If the message appears to inform you that Word converted the macros in the template and asking if
you would like to save a backup copy of the original template, click Yes.
For more information on working with document template (.dot) files, refer to your Microsoft Word online
Help.
287
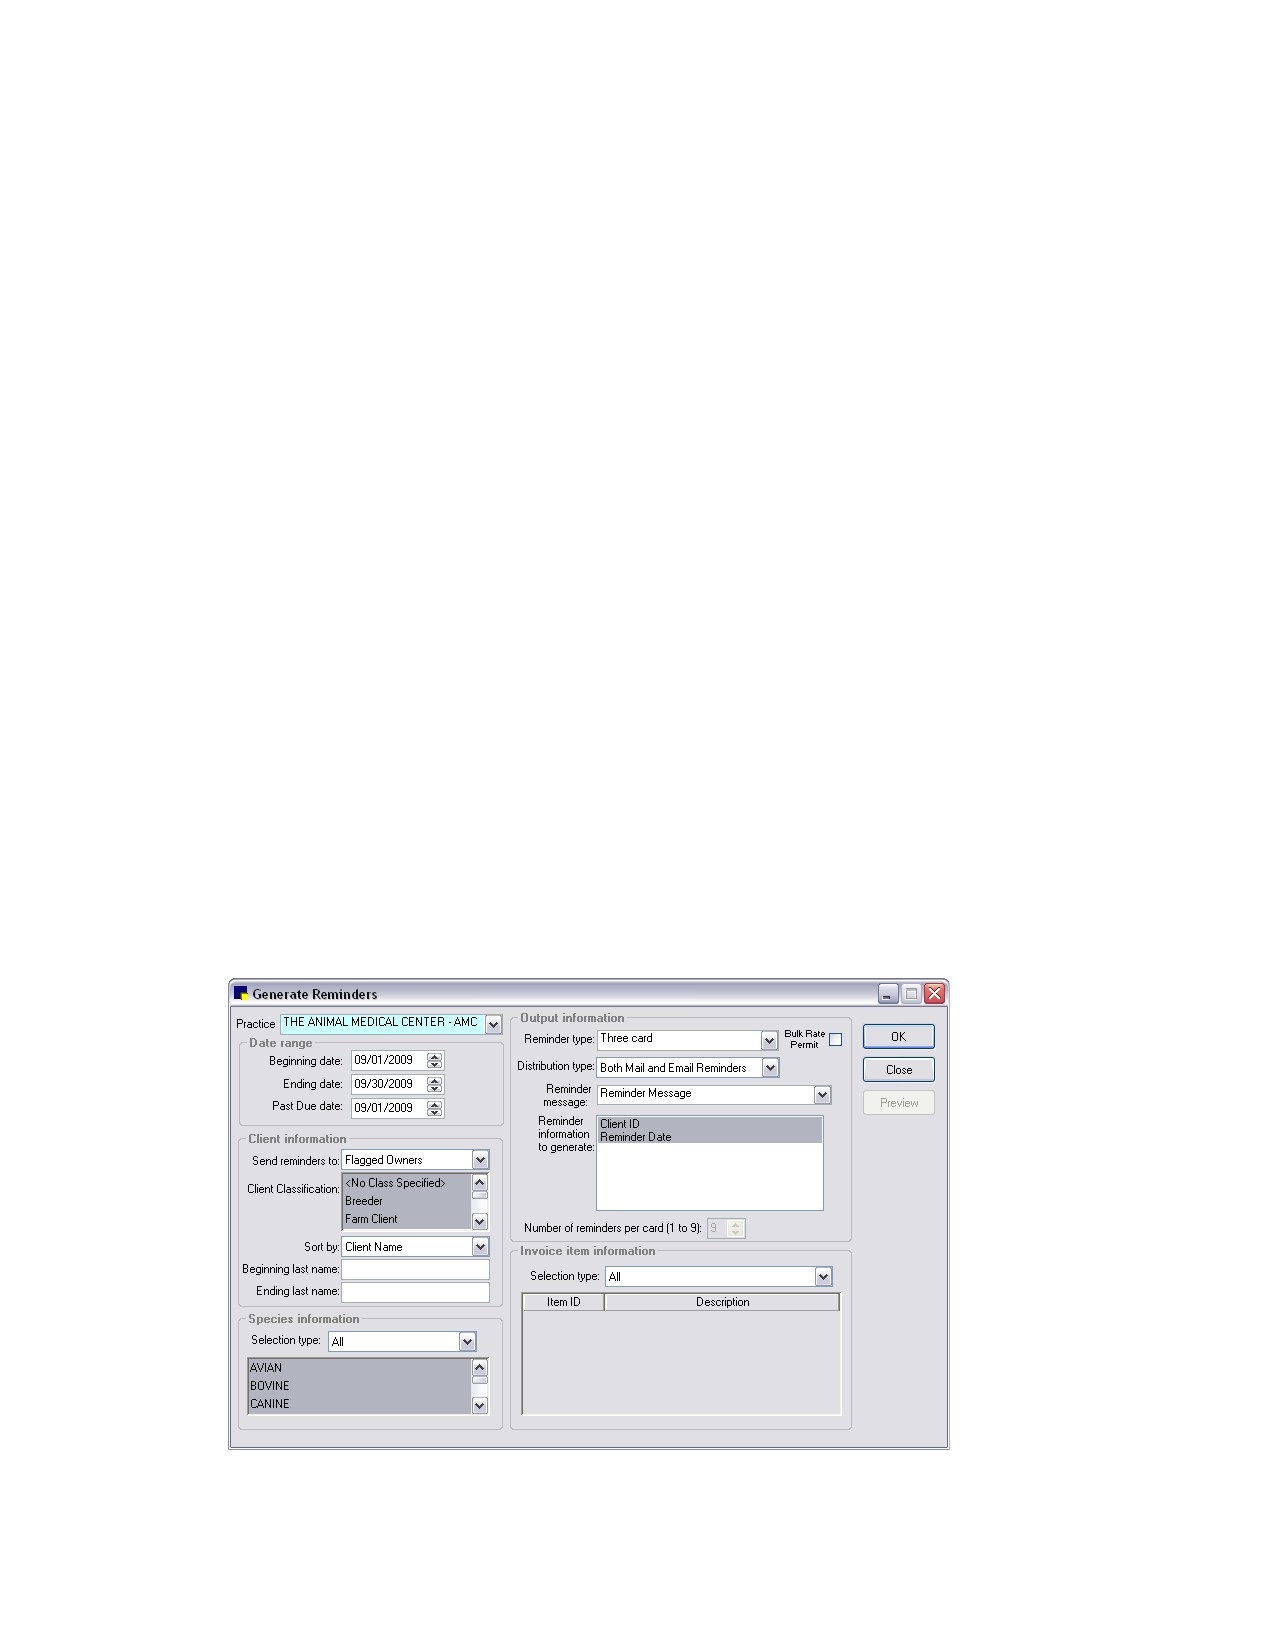
Chapter 14: Setting Up a Reminder System
Generating Your Reminders
When you are ready to send a batch of reminders, you must tell Cornerstone which reminders you want
to generate. The Cornerstone Generate Reminders window allows you to identify specifically what types
of reminders to send and to whom.
In addition, you can set the Reminder type field to specify your reminder output and printing
preferences. Reminder type options include:
• Two card/Three card/Four card-If you select one of these Cornerstone reminder card options,
at the end of the Generate Reminders process, the Report Preview window appears and allows
you to print your reminders immediately.
• Create Word file-Select this reminder type if you plan to generate reminders using Microsoft
Word. At the end of the Generate Reminders process, Cornerstone will create a text (.txt) file that
can be used to merge the data into reminders that can be printed or emailed from Word.
• Create Reminder Service file-Select this reminder type if you plan to generate reminders for
the IDEXX Reminder Service. See “Using the IDEXX Reminder Service” on page 291 for more
information on using this service.
Before You Begin
• Print the Invoice Item Reminder Information Report to review a list of reminders that each item
generates and satisfies, and verify that your reminder setup is correct.
• Print and review the Reminder Letter Report and make any necessary changes.
• If you plan to print reminders in Cornerstone as part of the Generate Reminders process, make
sure the applicable reminder cards are loaded in the printer. Reminders print to the printer set
up as the default printer.
To generate reminders:
1. On the Activities menu, select Reminder Selection > Generate Reminders. The Generate
Reminders window appears.
Generate Reminders window
288
Chapter 14: Setting Up a Reminder System
2.
Multi-Location/Single Database configuration only: If desired, select a practice from the Practice
drop-down list to filter specific clients based on their assigned home practice. (An All Practices
option is also available.)
3.
In the Date range area, do the following:
a. Specify the Beginning date and Ending date of the reminders you want to print. (These dates
are the reminder due dates.)
b. In the Past Due date text box, specify a past due date or press TAB and continue to the next
field if you do not want to include past due reminders. Any reminders with due dates that fall
between the past due date and the beginning date for reminders will be included on the
reminder cards. This applies only if the patient also has reminders due that fall in the beginning
and ending date range.
4.
In the Client information area, do the following:
a. In the Send reminders to drop-down list, do one of the following:
• Select All owners to send reminders to all owners who have the Send reminders check
box selected and/or who have a classification with the send reminder option set. Continue
to the Sort by field.
• Select Flagged owners to send reminders to owners based on classification. In the Client
Classification selection list, select the classification(s) for which you want to send
reminders. Reminders will be generated for all flagged owners (those with the Send
Reminders check box selected) who have the selected classification.
Tip: In the Client Classification selection list, all classifications are highlighted and selected by
default. Click the classifications you do not want to include to deselect them.
b. In the Sort by drop-down list, do one of the following:
• Select Client Name. In the Beginning last name and Ending last name fields, enter the
range of client names you want to select for reminders, or press TAB for both fields to
include all client names.
• Select Client ID. In the Beginning client ID and Ending client ID fields, enter the range of
client IDs you want to select for reminders, or press TAB for both fields to include all client
IDs.
• Select Postal Code. In the Beginning postal and Ending postal fields, enter the range of
postal ZIP Codes for reminders, or press TAB for both fields to include all postal codes.
5.
In the Species information area Selection type drop-down list, do one of the following:
• Select All to generate reminders for all species.
• Select Small to generate reminders for all small animal species only.
• Select Large to generate reminders for all large animal species only.
• Select Individual and then in the scroll list, click the species for which you want to generate
reminders.
6.
In the Output information area Reminder type drop-down list, select the type of reminder cards to
generate:
• To generate standard Cornerstone reminder cards, select Two card, Three card or Four card.
• To generate reminders using Microsoft Word, select Create Word file.
289
Chapter 14: Setting Up a Reminder System
• To generate reminders for the IDEXX Reminder Service, select Create Reminder Service file.
7.
Set the following Output information fields as applicable for the reminder type selected in the
previous step (the fields available will vary depending on the selected reminder type):
•
To include the bulk rate permit stamp on the reminders, select the Bulk Rate Permit check box.
This applies only to reminders printed in Cornerstone, not Microsoft Word. To set up a bulk rate
permit stamp, see “Setting Up a Bulk Rate (PRESORTED STANDARD) Stamp” on page 283.
•
In the Distribution type drop-down list, select the method or methods to use for distributing the
reminders.
•
If applicable, in the Reminder message drop-down list, select a message to print on reminders.
This applies only to reminders printed in Cornerstone, not Microsoft Word. To set up reminder
messages, see “Creating a Reminder Message” on page 285.
•
In the Name text box, type the path to use for generating a your name list (typically saved in
your Cornerstone directory as C:\Cstone\namelist.txt). If necessary, click Browse to search for
and select an existing file to replace with the newly generated name list.
•
Select the Include Pet Pictures check box to include pet pictures on cards printed using the
IDEXX Reminder Service (available only for the Create Reminder Service file option). See
“Using the IDEXX Reminder Service” on page 291 for more information on the IDEXX Reminder
Service.
•
In the Reminder information to generate box, address information appears. To deselect a
highlighted address item (e.g., Client ID), click the item. Deselected items do not print on
reminders.
•
In the Number of reminders per card (1 to 9) text box, type the maximum number of
reminders to print on a card. If you type 3, up to three reminders appear on a card. If a patient
has more than three reminders, a second card is printed. (The default of 9 reminders per card is
recommended.)
8.
In the Invoice item information area Selection type drop-down list, do one of the following:
• Select All to include all invoice items.
• Select Individual to include certain invoice items and specify the items to include.
• Select Service to include only Service type items.
• Select Inventory to include only Inventory type items.
• Select All Except to exclude certain invoice items and specify the items to exclude.
9.
Click OK. The Generating Reminders status box displays.
Cornerstone searches all of the patient reminder files (that meet the criteria you specified) and will
either create a namelist.txt file for mail merge with Word or generate the reminders for printing within
Cornerstone.
10. When Cornerstone has finished generating the reminders, make a note of the number of reminders
that were generated for your records.
11. If applicable, choose one of the following options:
• If you generated two-card, three-card or four-card reminders, click OK again and the Report
Preview window displays, showing the generated reminders. To print the reminders, click Print.
290
Chapter 14: Setting Up a Reminder System
• If you selected Create Word file to generate reminders, the Report Preview window does not
display. Click OK to exit. Open Microsoft Word and print reminders. See “Printing Reminders
from Microsoft Word” on page 293.
• If you selected Create Reminder Service file, select the Open IDEXX Reminder Service
check box and click OK. The reminder service website displays. Click Place your order now,
and the reminder service will print and mail reminders directly to your clients. See “Using the
IDEXX Reminder Service” in the following section for more information.
Using the IDEXX Reminder Service
The IDEXX Reminder Service allows you to delegate the printing and mailing of your practice’s
reminders to someone else. You can choose from a variety of card designs that will grab your clients’
attention and boost response rates.
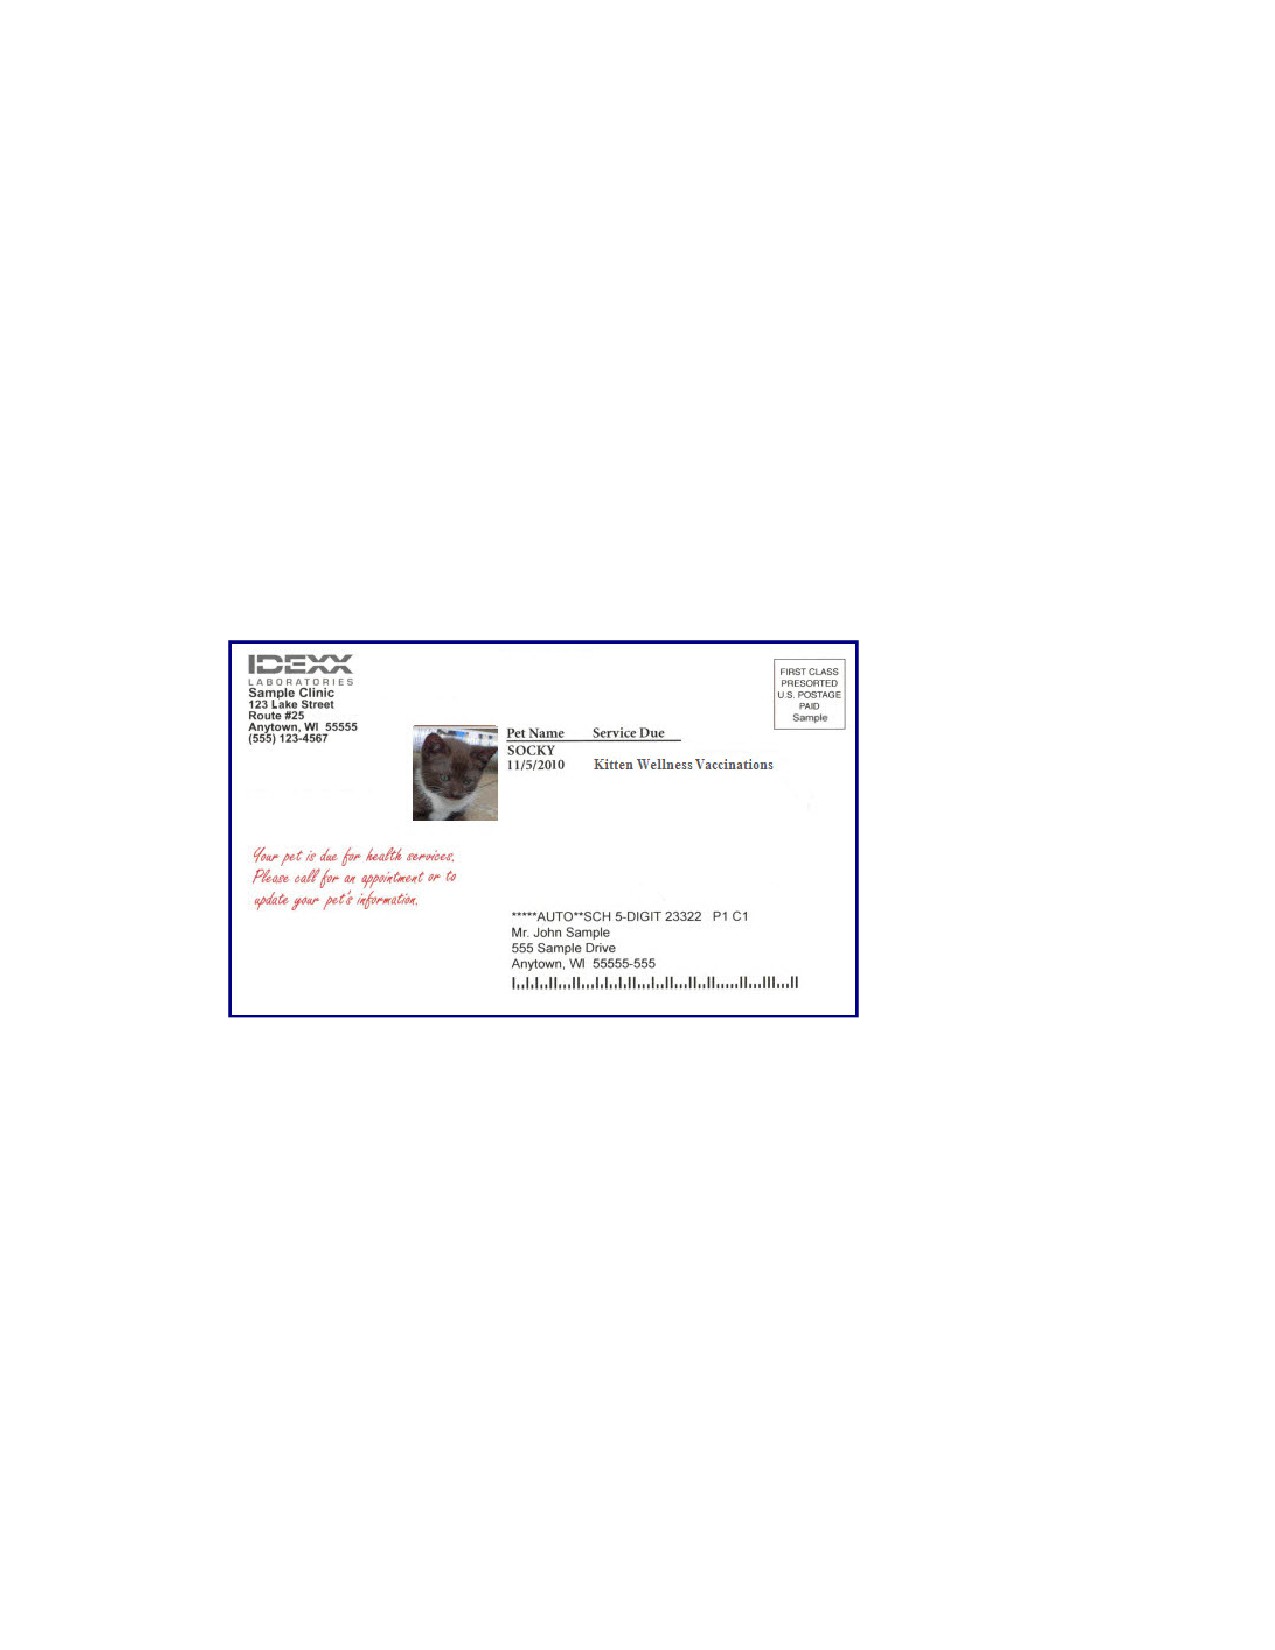
Option to Include Pet Pictures
You can provide a more personal touch to your clients with the addition of custom-printed pet pictures
on their reminder cards. With this IDEXX Reminder Service feature, you can include a small picture of the
Cornerstone patient on the client address side of the reminder postcard.
IDEXX Reminder Service postcard with Pet Picture included
For more information regarding the IDEXX Reminder Card Service, contact IDEXX Practice Solutions at
1-888-224-4408.
To send reminders using the IDEXX Reminder Service:
1. On the Activities menu, select Reminder Selection > Generate Reminders. The Generate
Reminders window appears.
2. Set up your reminders as you would normally, and in the Reminder type drop-down list, select
Create Reminder Service file. (See “Generating Your Reminders” on page 288 for information on
setting up reminders in the Generate Reminders window.)
291
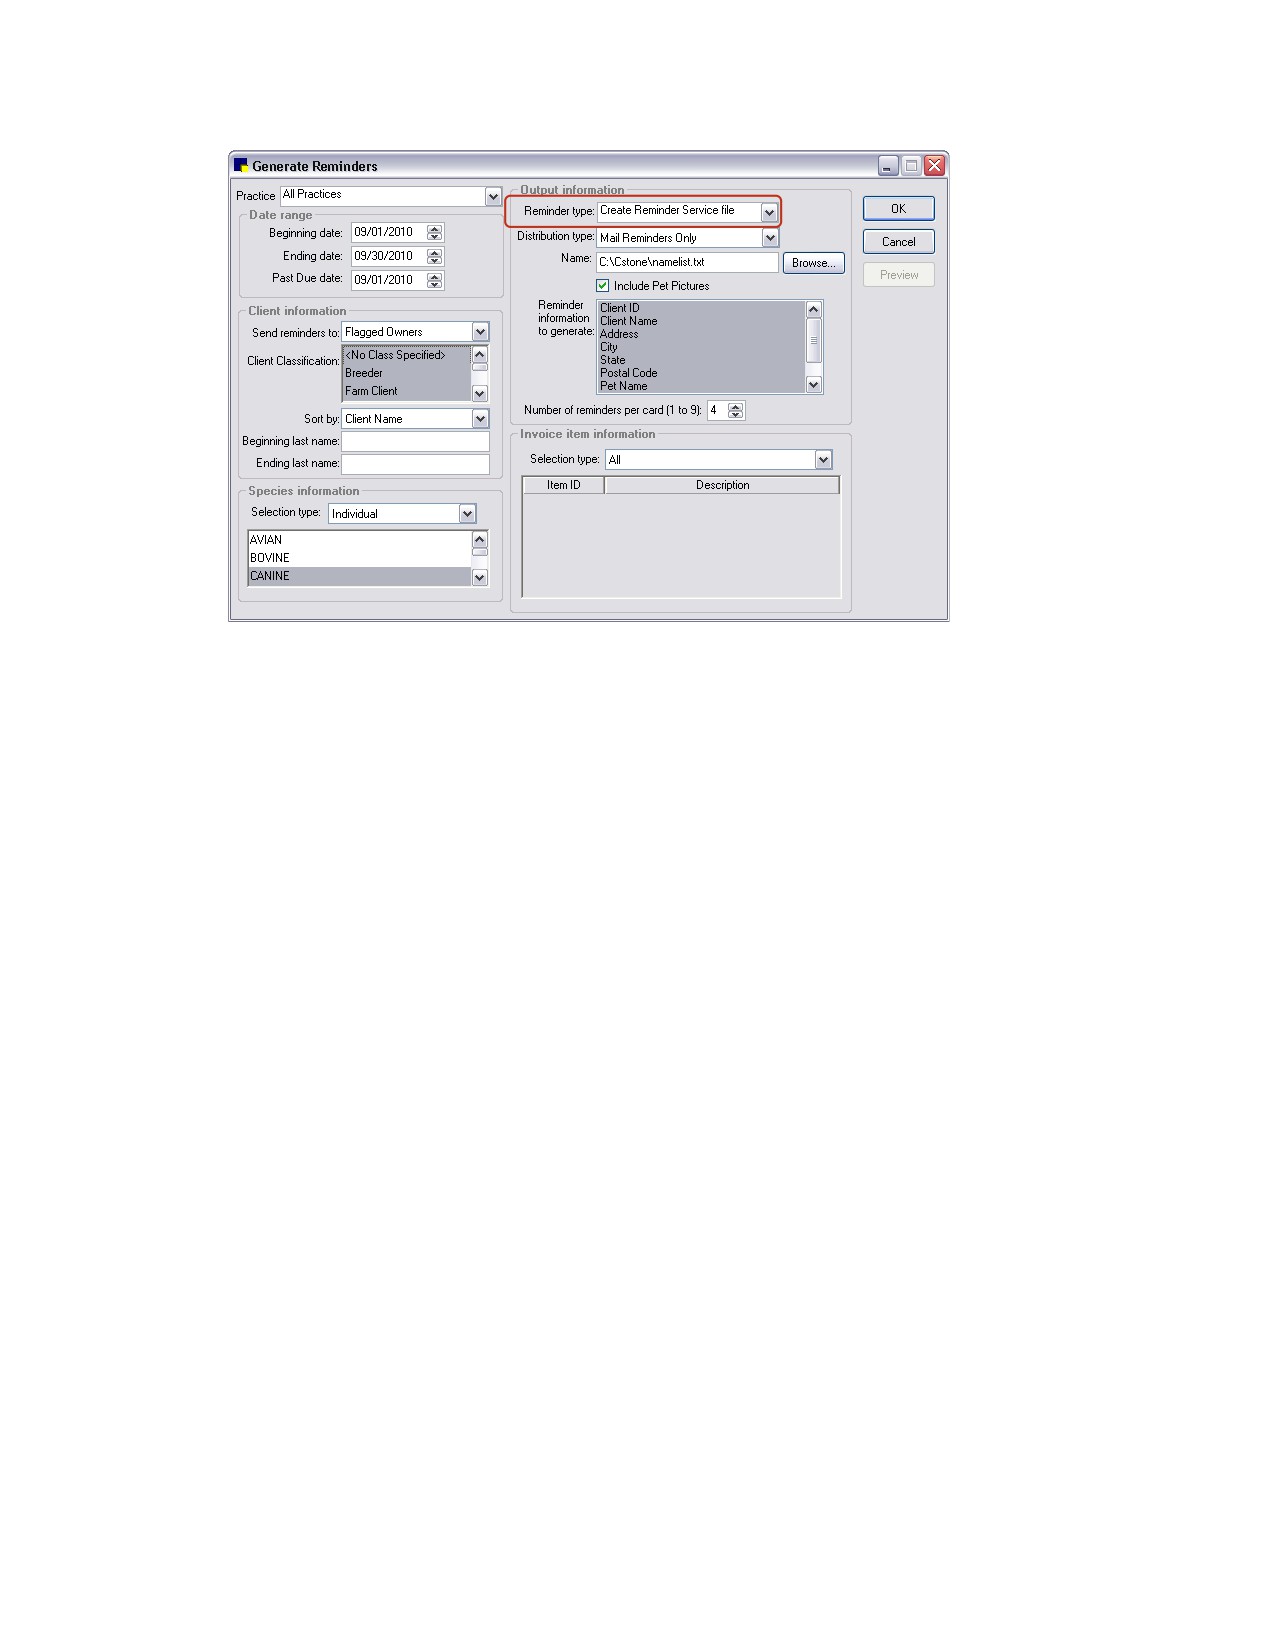
Chapter 14: Setting Up a Reminder System
Generate Reminders window-Create Reminder Service file
3.
If you want to include pet pictures on reminders (for those patients having an existing pet picture in
Cornerstone), select the Include Pet Pictures check box. If this option is selected, Cornerstone will
copy the applicable pet pictures and save them to a compressed ZIP file.
4.
When you have finished setting up your reminders, click OK. The Generating Reminders dialog
displays the number of reminders generated and the number of associated reminder cards.
5.
On the Generating Reminders dialog box, select the Open IDEXX Reminder Card Service check
box and then click OK. Your web browser will open to the IDEXX Reminder Card Service Web page.
Tip: You can also access the IDEXX Reminder Card Service Web page by selecting Reminder
Service from the Web Links menu in Cornerstone.
6.
On the IDEXX Reminder Card Service Web page, click Place your order now and enter your login
information to create a new order.
7.
If you previously selected the Include Pet Pictures option on the Generate Reminders window, do
the following to upload the pet pictures file:
a. When specifying the type of cards to create, select the All Cards option.
b. Under the Select Items area, click the Reminder Cards w/Pet Photo tab.
c. Complete all required practice information fields, then click the Upload File button and browse
to select and upload the Cornerstone-generated namelist.zip file containing your pet images.
Note: Only one pet picture may be used per reminder card.
8.
Follow the on-screen prompts to enter your information, attach your reminder mailing list file and
review your order. If you uploaded a pet pictures ZIP file, the reminder service will match up the pet
pictures with the corresponding practice ID, patient ID, and client ID information to print the pictures
on the reminder cards.
9.
When you have reviewed all information and you are ready to submit your order, click Send Order.
The reminder card will be printed and sent to the recipients on your list.
292
Chapter 14: Setting Up a Reminder System
Printing Reminders from Microsoft Word
After reminders are generated in Cornerstone, you can use Microsoft® Word software to print the
reminders using a reminder template.
If you use Microsoft Word to print your reminders, initially, you will need to enter your practice name,
address and phone number and postage information. You may also want to change or add reminder
text. You can change these settings by editing the reminder template.
Microsoft Word uses templates (postcrds.dot, trifolds.dot, lasrem3s.dot, reminder2.dot, and
reminder4.dot) to merge the client/patient data into a document file and then prints the reminders (in
Word). See “Microsoft Word Reminder Card Setup” on page 287.
Before You Begin
• Create the Cornerstone reminder .txt file (Activities > Reminder Selection > Generate
Reminders). See “Generating Your Reminders” on page 288.
• Make sure your reminder templates have been customized. See “Microsoft Word Reminder
Card Setup” on page 287.
• Make sure the correct paper is in the printer. Reminders print to the printer set up as the default
printer.
Tip: You can print mailing labels from the Cornerstone Editor using the sample document template for
the Avery® 5160 label.
Note: Depending on the version of Microsoft Word you are using, the Word functions and dialog boxes
referenced in this section may vary slightly from your version of Word. Refer to the Microsoft Word online
Help for instructions specific to your version.
To print reminders in Microsoft Word:
1. Open a reminder template by browsing to the Cornerstone > Reminder Documents folder in
Windows® and then selecting the applicable reminder template.
2. If a SQL command message appears, click Yes to continue.
The selected reminder opens in Microsoft® Word.
3. Open the Mail Merge window in Word (this varies depending on your version of Word).
4. For the document type, select Letters.
5. For the recipients, select Use an existing list, and then browse to select the namelist.txt file from
your Cornerstone directory (usually C:\Cstone). To find this file, search for only text files by selecting
Text Files (*.txt) from the Files of type drop-down list. After selecting the namelist.txt file, click
Open. The Mail Merge Recipients dialog box opens.
6. To include only some of the people on the list, edit the recipient list.
Tip: If you do not want to send printed reminders to clients selected to receive email reminders, you
can filter out those records using options in the Mail Merge Recipients dialog box: Scroll over to
locate the EmailAddr field and select (Blanks) from its associated drop-down list of options. This
will change the recipient list to include only those clients with a blank email field.
7. Write and preview your letter, and then complete the merge.
8. Verify that the correct printer and printing options are selected, and then print your reminders.
293
Chapter 14: Setting Up a Reminder System
Troubleshooting: Letter Reminders
If the reminders you printed are not the same as the reminders you thought you printed, check the
following in Cornerstone:
• Who did you select to send reminders to? (Flagged Owners or All Owners)
• Is the Send reminders check box selected for the classification assigned to the client?
To do this, on the Controls menu, select Classifications. Click the Client tab. Select the
classification and click Update. Click the Send reminders check box.
• Is the client a current owner marked as active? (Cornerstone does not generate reminders for
inactive clients). To do this, open the client record and check to see that the client’s status is
active.
• Is the patient active? (Cornerstone does not generate reminders for deceased and inactive
patients, but deceased and inactive patients print on the report unless you filter them out of the
report.) To check to see that the patient is active, at the bottom of the Client Information window,
double-click to select the patient (or right-click and select Update). In the Patient Information
window, select Active as the patient’s status. (You can also check the patient’s reminders while
you are here; click the Reminders tab.)
• If you chose Flagged Owners, did you make sure that, in the Patient Owner Information dialog
box, the Send reminders check box is selected for clients you want included? (Double-click the
owner in the Patient Information dialog box or select the owner, right-click and select Update.)
Tip: Owners who have the Send reminders check box selected but do not have a classification
assigned to them are included when All Owners is selected. If a patient has multiple owners, each owner
who has the Send reminders check box selected and/or has a classification with the reminder option
set receives a reminder.
Emailing Reminders from Microsoft Word
Save postage by sending email reminders instead of regular postal mailings. You can send both
electronic and regular mailings to give your clients the extra reminder.
You can send email reminders to clients who have an email address and have the E-mail reminders
check box selected in their client record.
Before You Begin
• Enter email addresses on the client record and select the E-mail reminders check box.
• Generate reminders as usual (to generate the namelist.txt file).
• Verify that you have all necessary hardware and software in place:
o Appropriate hardware and Internet service provider (ISP) for accessing the Internet
o An email account
o Microsoft Word and Microsoft Outlook®
• If you have not generated email reminders before, you must edit your email.dot template to
include your practice’s location information. If you do not edit this template, you will have
incorrect location information on your email reminders. Open Microsoft Word and locate the
email.dot template. It should be saved in your Cornerstone directory (usually C:\Cstone).
Change the information as needed. Be sure to save the file as a document template (*.dot).
294
Chapter 14: Setting Up a Reminder System
Note: Depending on the version of Microsoft Word you are using, the Word functions and dialog boxes
referenced in this section may vary slightly from your version of Word. Refer to the Microsoft Word online
Help for instructions specific to your version.
To email reminders in Microsoft Word:
1. Open the email reminder template by browsing to the Cornerstone > Reminder Documents folder
in Windows® and then selecting the applicable reminder template.
2. If a SQL command message appears, click Yes to continue.
The selected reminder opens in Microsoft® Word.
3. Open the Mail Merge window in Word (this varies depending on your version of Word).
4. For the document type, select Email messages.
5. For the recipients, select Use an existing list, and then browse to select the namelist.txt file from
your Cornerstone directory (usually C:\Cstone). To find this file, search for only text files by selecting
Text Files (*.txt) from the Files of type drop-down list. After selecting the namelist.txt file, click
Open. The Mail Merge Recipients dialog box opens.
6. To include only some of the people on the list, edit the recipient list.
7. Write and preview your email message, complete the merge, and then send your message.
295
Section 5-Pet Health Management Setup
Chapter 15: Setting Up Physical Exam and Pet Health Report Card
Chapter 16: Setting Up Vital Signs/Weight
Chapter 17: Setting Up Medical Notes and Correspondence
Chapter 18: Setting Up Classic Medical Notes
Chapter 19: Setting Up Correspondence in Microsoft® Word
296
Chapter 15: Setting Up Physical Exam and Pet Health Report Card
This chapter covers the steps required to set up the Physical Exam and Pet Health Report Card features
in the IDEXX Cornerstone* Practice Management system. For information on daily usage tasks for
Physical Exam and printing a Pet Health Report Card, see “Chapter 15: Using Physical Exam and Pet
Health Report Card” in the Cornerstone User’s Manual.
Overview
The Physical Exam feature is included with all Cornerstone systems. It allows practices to record
physical exam observations and comments using standard body system templates and print a Pet
Health Report Card.
Cornerstone’s Physical Exam feature provides the following:
• A quick, easy way to record body system observations and comments while the patient is being
examined
• A number of standard body system templates to use to record your observations
• A Pet Health Report Card that can be printed when the exam is complete
• A record of the physical exam that is stored in the patient’s history
Note: If you have installed the Patient Advisor* module, “Patient Advisor Exam” will display in place of
“Physical Exam” in several areas within Cornerstone (Practice and Workstation defaults, right-click menu
on the Patient Clipboard*, Activities menu, window title bars, etc.).
Ready to Use
The Physical Exam feature is set up so that you can create physical exam records without any additional
setup. For your convenience, a number of standard body systems templates are included.
In addition to the standard body system templates provided by Cornerstone, you can add your own
system templates or change the templates that came with your software. See the “Creating Your Own
System Templates” section that follows for more information. Pet Health Report Card defaults can also
be changed. See “Physical Exam/Patient Advisor* Defaults” on page 121.
Creating Your Own System Templates
System templates include the body systems that are applicable to the type of physical exam being
performed. System templates can be set up for specific species, and more than one system template
can be set up for each species. Only one system template can be designated as the default.
Before You Begin
¾ Set Physical Exam/Patient Advisor defaults (see “Physical Exam/Patient Advisor* Defaults” on page
121).
297
Chapter 15: Setting Up Physical Exam and Pet Health Report Card
To add or edit a system template:
1. On the Lists menu, select Physical Exam > System Templates (or Patient Advisor > System
Templates). The System Template List dialog box appears.
2. Click New to add a new template or double-click an existing template to update it. The System
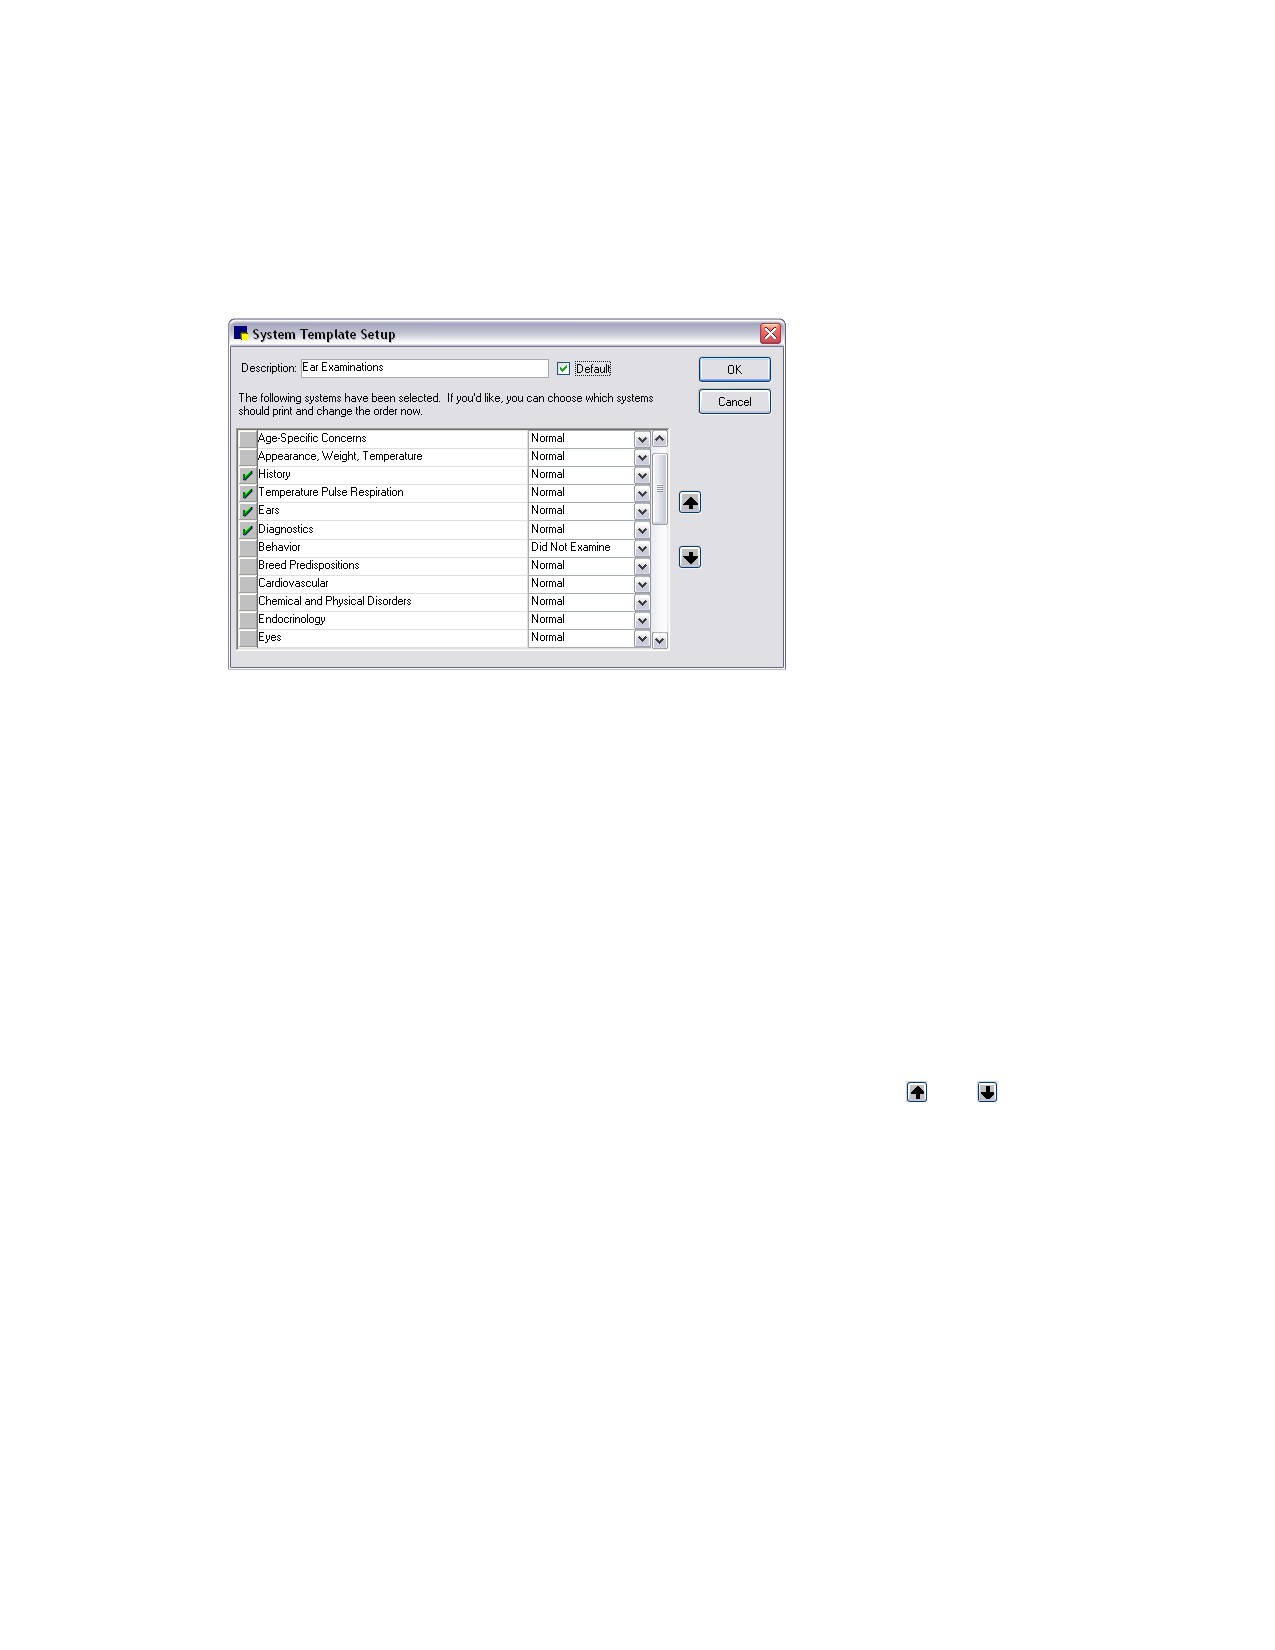
Template Setup dialog box appears.
System Template Setup dialog box
3. In the Description text box, type a descriptive name for the system template.
4. If you use this template for the majority of your physical exams, click the Default check box. The
default system template automatically appears when a physical exam is started for a patient;
however, you have the option of selecting a different template.
Note: You can have only one default template. (If another template is marked as the default, clicking
the Default check box here deselects the other template as the default.)
5. To include a body system on a template, click the gray box to the left of the system to make the
green check mark appear. To remove a body system, click the check mark to clear it.
6. Click the down arrow to the right of Normal and from the drop-down list, select a default observation
status for the system (Normal, Abnormal or Did Not Examine).
7. To arrange the systems in the order in which you want them to appear on the physical exam and on
the Pet Health Report Card, click the system you want to move and use the
and arrow
buttons to move the system up or down in the sequence.
8. Click OK and then click Close.
Creating and Updating Observation Text
Observation text for each body system can be set up in advance for Normal, Abnormal or Did Not
Examine statuses. More than one set of observation text can be set up for each body system status.
Only one set per body system status can be designated as the default observation.
Some standard body system observations are included with Cornerstone software. You can modify the
text of these observations and create additional sets of observation text.
To add observation text to body systems:
1. On the Lists menu, select Physical Exam > Physical Exam Setup (or Patient Advisor > Patient
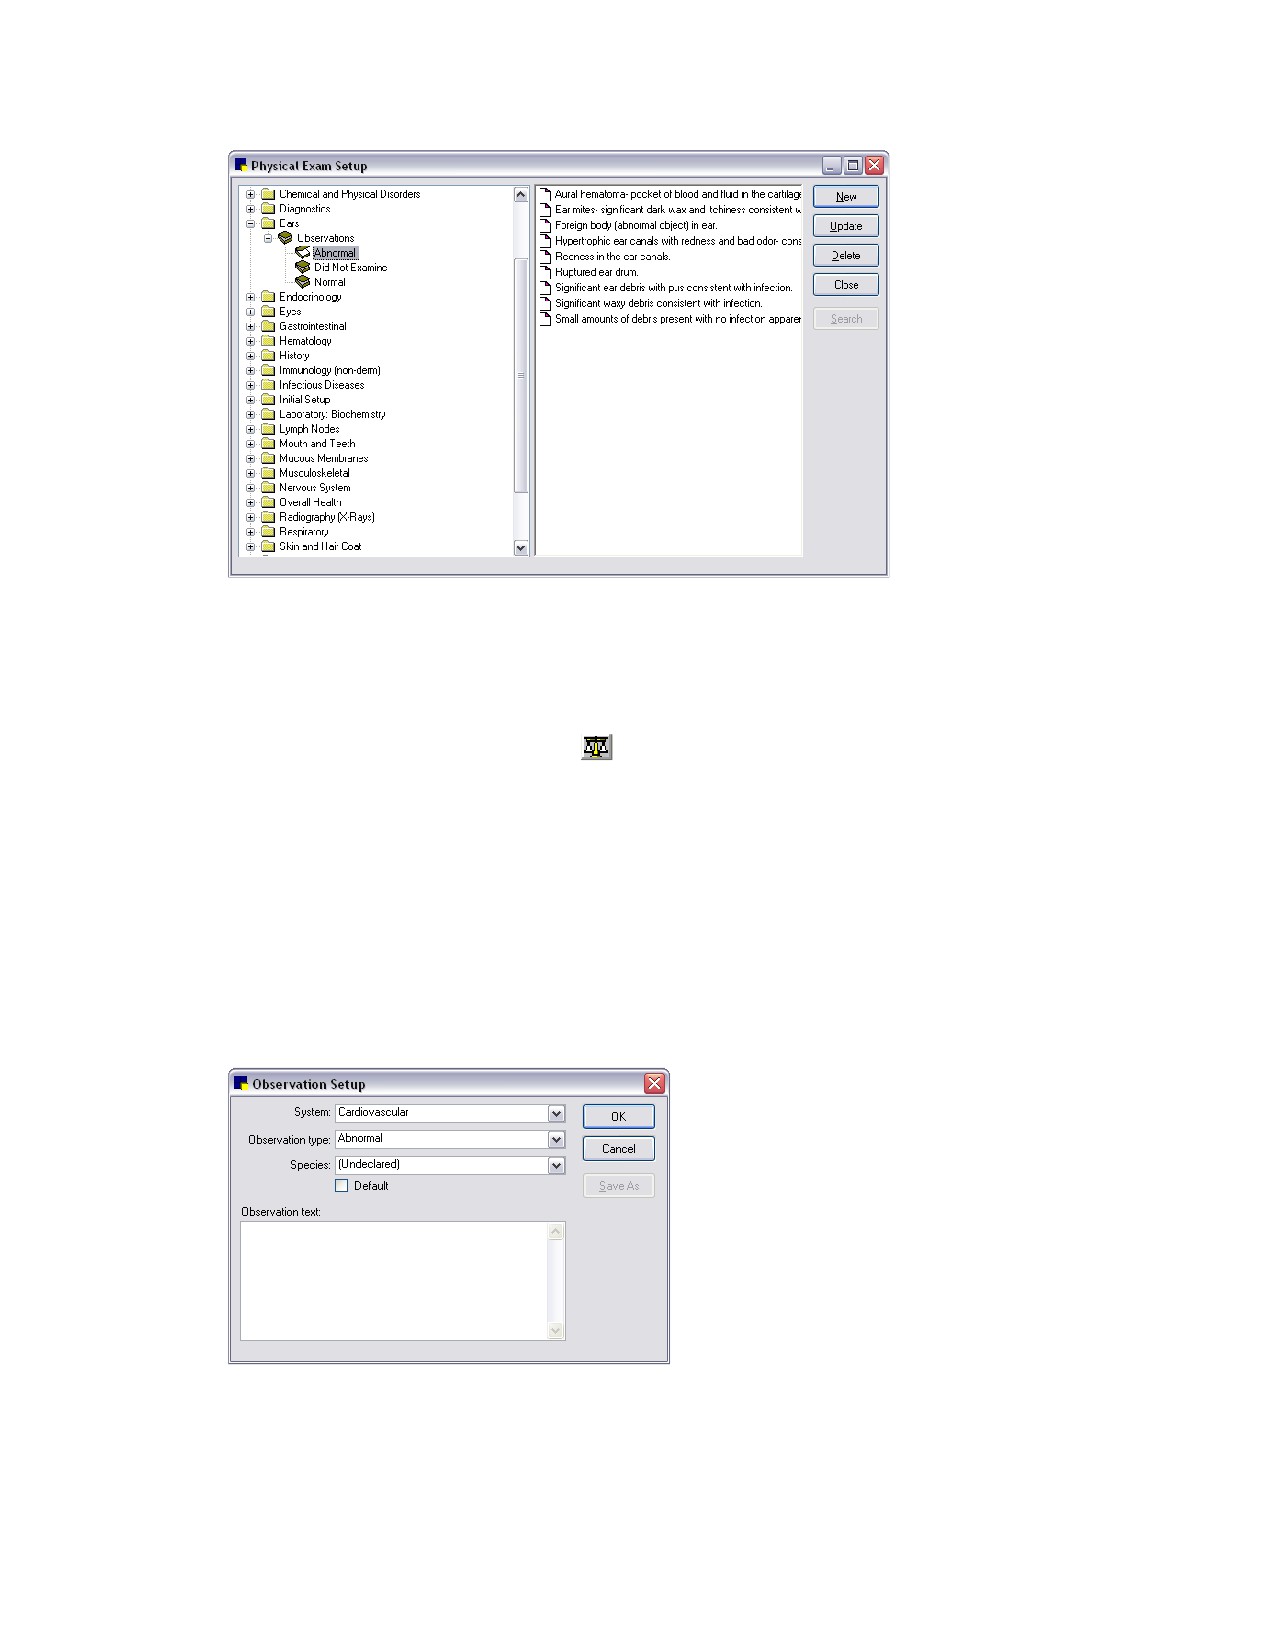
Advisor Setup). The Physical Exam Setup dialog box appears.
298
Chapter 15: Setting Up Physical Exam and Pet Health Report Card
Physical Exam Setup dialog box
2. Click New if you want to create a new body system, or select an existing body system and click
Update. The System Setup dialog box appears.
a. In the Description text box, type a descriptive name for the body system.
b. If you want the Vital Signs/Weight
icon to appear with this system in the Physical
Exam/Patient Advisor Exam Observations tab, select the Vital Sign System check box.
c. Click OK.
3. In the left pane of the Physical Exam Setup dialog box, find the body system to which the
observation will apply; click the + sign to the left of the system. The body system folder expands
with more options.
4. Under the expanded body system folder, click the + sign to the left of Observations.
5. Select the status (Normal, Abnormal or Did Not Examine) to which the observation text applies.
6. Click New to create a new line of observation text or click Update to modify existing observation
text. The Observation Setup dialog box appears.
Observation Setup dialog box
7. If the observation text applies only to a specific species, in the Species field, from the drop-down
list, select the species to which the observation text applies.
299
Chapter 15: Setting Up Physical Exam and Pet Health Report Card
8. Click in the Observation text box and type the observation text that you want to add or to change
text, position cursor at the applicable spot and change or delete text.
9. To designate the observation as the default, select the Default check box.
10. When finished, click OK.
300
Chapter 16: Setting Up Vital Signs/Weight
This chapter covers the steps required to set up the Vital Signs List for your practice. For information on
daily usage tasks for Vital Signs/Weight, see “Chapter 16: Recording Vital Signs/Weight Information” in
the Cornerstone User’s Manual.
Using the Vital Signs/Weight features in the IDEXX Cornerstone* Practice Management System, you can
view, add, edit and graph vital signs for a patient. You can also include vital signs information in medical
notes and on Pet Health Report Cards created using Physical Exam/Patient Advisor* Exam.
Before you can start entering vital signs for patients, you must first activate the vital signs you want to
track and assign species to applicable lists for List-type vital signs. Optionally, you can also edit the
default vital signs, add new vital signs, edit the Weight vital sign, and set the vital signs display order.
The Default Vital Sign List
Cornerstone provides a default Vital Sign List—you can use this list as is (see “Quick-Start Setup—
Activating Vital Signs and Assigning Species to Lists” on page 305) or you can customize the list and
add vital signs to meet the needs of your practice (see “Editing Default Vital Signs or Adding New Vital
Signs” on page 306).
Vital Sign
Abbreviation
Type
Start
Decimal
List
Range
Value
Places
Values
Weight (always active)
Weight
Weight
Canine 0.1-99.9
2
Feline 0.01-99.9
Body Score (1-5)
BodyScore5
Numeric List
1
1-5**
Body Score (1-9)
BodyScore9
Numeric List
1
1-9**
Temperature
Temp
Numeric
1
95-102.5
Pulse
Pulse
Numeric
0
40-180
Respiration
Resp
Alphanumeric
Mucous Membranes
Muc Memb
Alphanumeric List
**
Capillary Refill
CRT
Alphanumeric List
**
Blood Pressure
BP
Alphanumeric
Dental Score
Dental
Numeric List
1
1-5**
Pain Scale
Pain Scale
Numeric List
0
0-4**
Alert/Attitude
Alert
Alphanumeric List
**
Appetite
Appetite
Numeric List
1
1-6**
Urine Output
Urine Outp
Numeric List
1
1-8**
Fecal Output
Feces
Alphanumeric List
**
Gut Sounds
Gut Sounds
Numeric List
0
0-6**
301