IDEXX Cornerstone. Administrator’s Manual (8.3 NEXT version 8.3.6) - page 9
Chapter 10: Setting Up Your Invoice Items
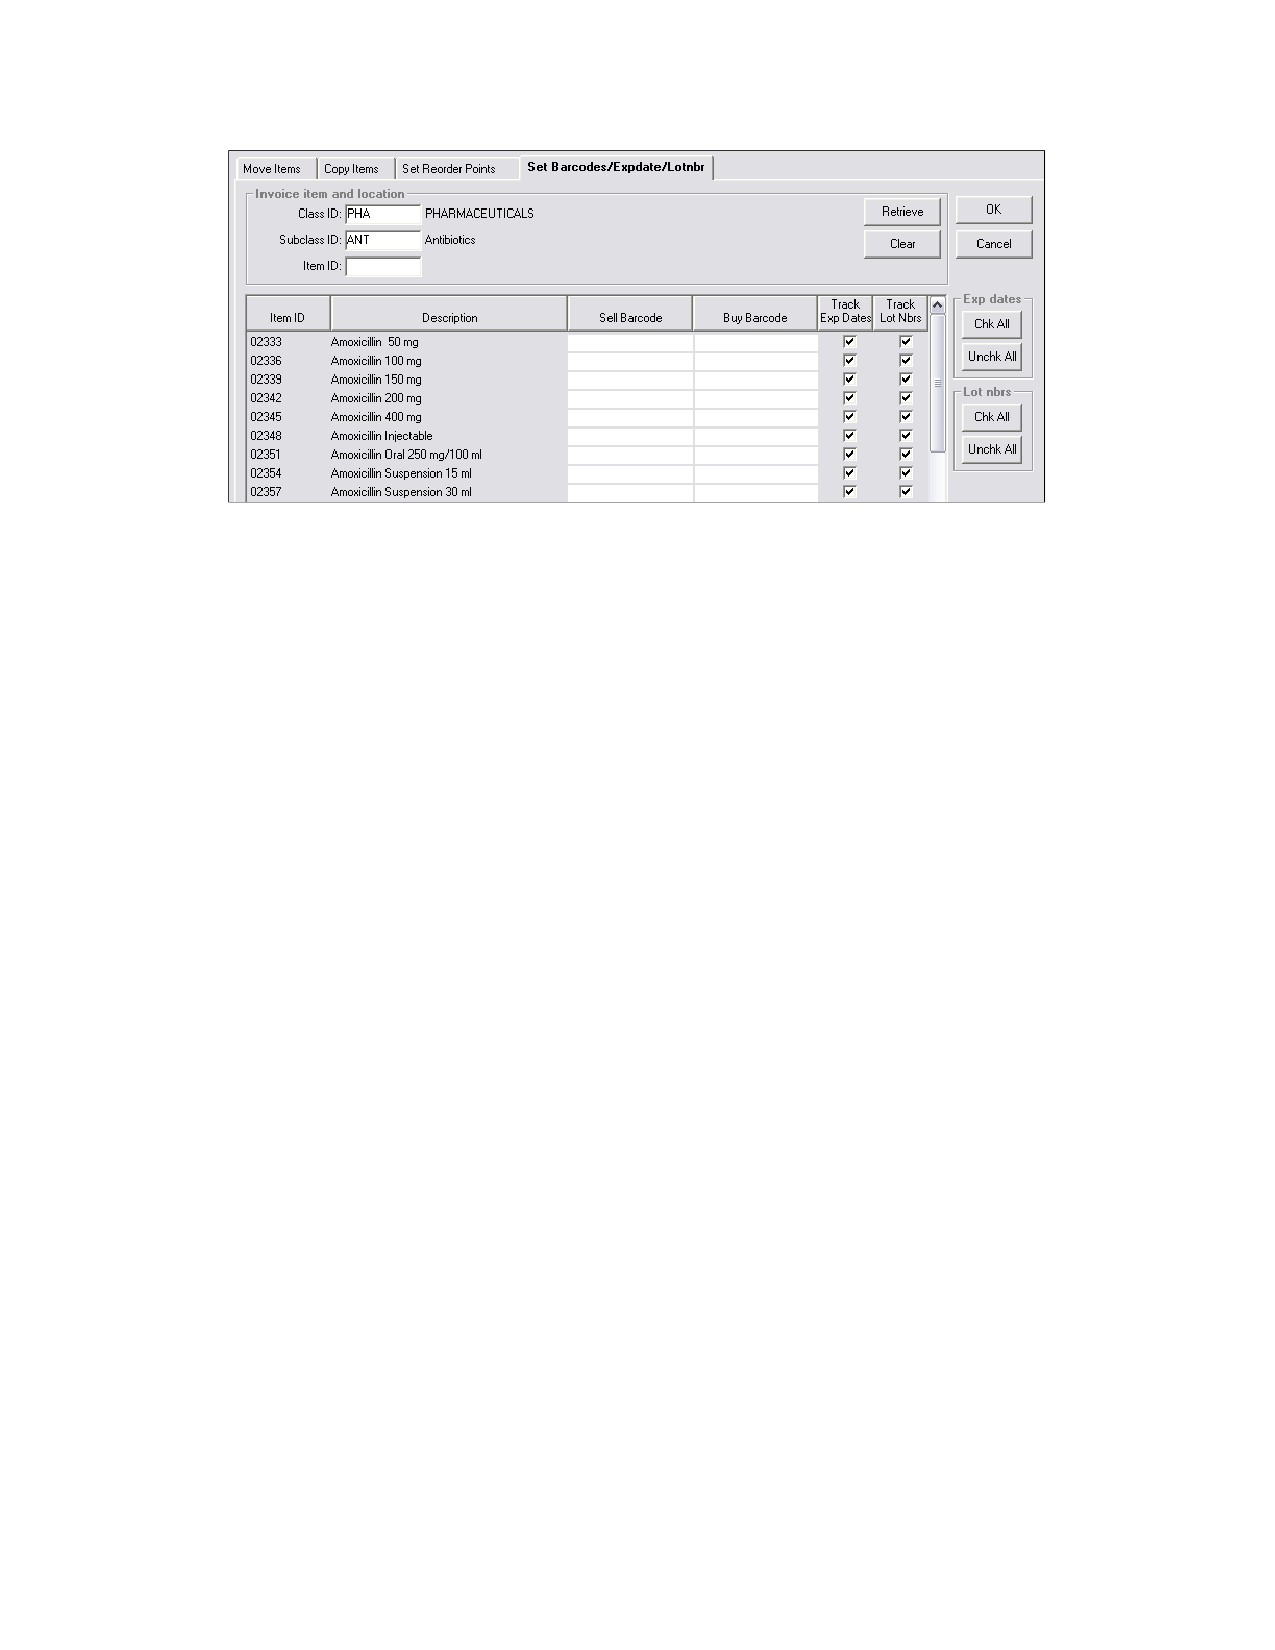
Set Barcodes/Expdate/Lotnbr tab on Invoice Item Setup window
4.
In the Invoice item and location area, to narrow the list of items displayed on the Set
Barcodes/Expdate/Lotnbr tab, do the following:
• To find items in a particular classification, in the Class ID text box, type the ID of the class or
press F2 to use the Invoice Item Classification List to choose an item classification.
• To find items in a particular subclassification, in the Subclass ID text box, type the ID of the
subclass or press F2 to use the Invoice Item Subclassification List to choose an item
subclassification.
• To find an individual item, in the Item ID text box, type the item’s ID or press F2 to use the
Invoice Item List to choose the item.
5.
Click Retrieve. A list of inventory items appears. To remove the list and enter different criteria, click
Clear.
6.
If applicable, scan the item’s Sell Barcode (used to sell the item to your clients) and/or the Buy
Barcode (used to buy the item from the vendor). Note: If the item is purchased by the case, scan or
enter the bar code on the case.
WARNING: In the next step, if you clear the Track Exp Dates check box for an item, all the
expiration dates for the item will be lost. We recommend you make an appropriate backup before
proceeding, as you will lose all expiration dates currently in the system for those items.
7.
Under Track Exp Dates, select the applicable option:
• If you want to track expiration dates for an item, select the item’s Track Exp Dates check box.
To track expiration dates for all items on the list, click the Chk All button.
• If you do not want to track expiration dates for an item, clear the item’s Track Exp Dates check
box. If you want to turn off expiration date tracking for all items on the list, click the Unchk All
button.
WARNING: In the next step, if you clear the Track Lot Nbrs check box for an item, all the lot
numbers for the item will be lost. We recommend you make an appropriate backup before
proceeding, as you will lose all lot numbers currently in the system for those items.
242
Chapter 10: Setting Up Your Invoice Items
8. Under Track Lot Nbrs, select the applicable option:
• If you want to track lot numbers for an item, select the item’s Track Lot Nbrs check box. To
track lot numbers for all items on the list, click the Chk All button.
• If you do not want to track lot numbers for an item, clear the item’s Track Lot Nbrs check box. If
you want to turn off lot number tracking for all items on the list, click the Unchk All button.
9. When finished selecting items, click OK.
10. If you selected the Track Exp Date check box for items, a message appears, asking if you want to
copy expiration dates from your previous version into your new inventory system.
• If you are confident that your existing item expiration dates are valid and you want to use them in
your newly set up inventory system, click Yes; otherwise, click No. (This option is no longer
available after an item is included on a received order or after the item’s Track Lot Nbr check
box is selected.)
• If you click Yes, the “If you unchecked the Track Exp Dates box…” message appears. Read the
warning message and click OK.
Setting Whiteboard Patient Order Defaults for Multiple Items at Once
The Invoice Item Setup tool’s Whiteboard tab allows you to perform a mass setup of default values and
field-level rules for invoice items that staff may enter on the Patient Orders window.
IMPORTANT: Make sure you have a current backup of your database before using the Invoice Item
Setup tool.
To set patient order defaults for multiple items:
1. On the Tools menu, select Invoice Item Setup.
2. A message appears to remind you that a backup of the database should be made and asks if you
wish to continue. Ensure that a backup has been made, and click Yes.
The Invoice Item Setup dialog box appears.
3. Click the Whiteboard tab.
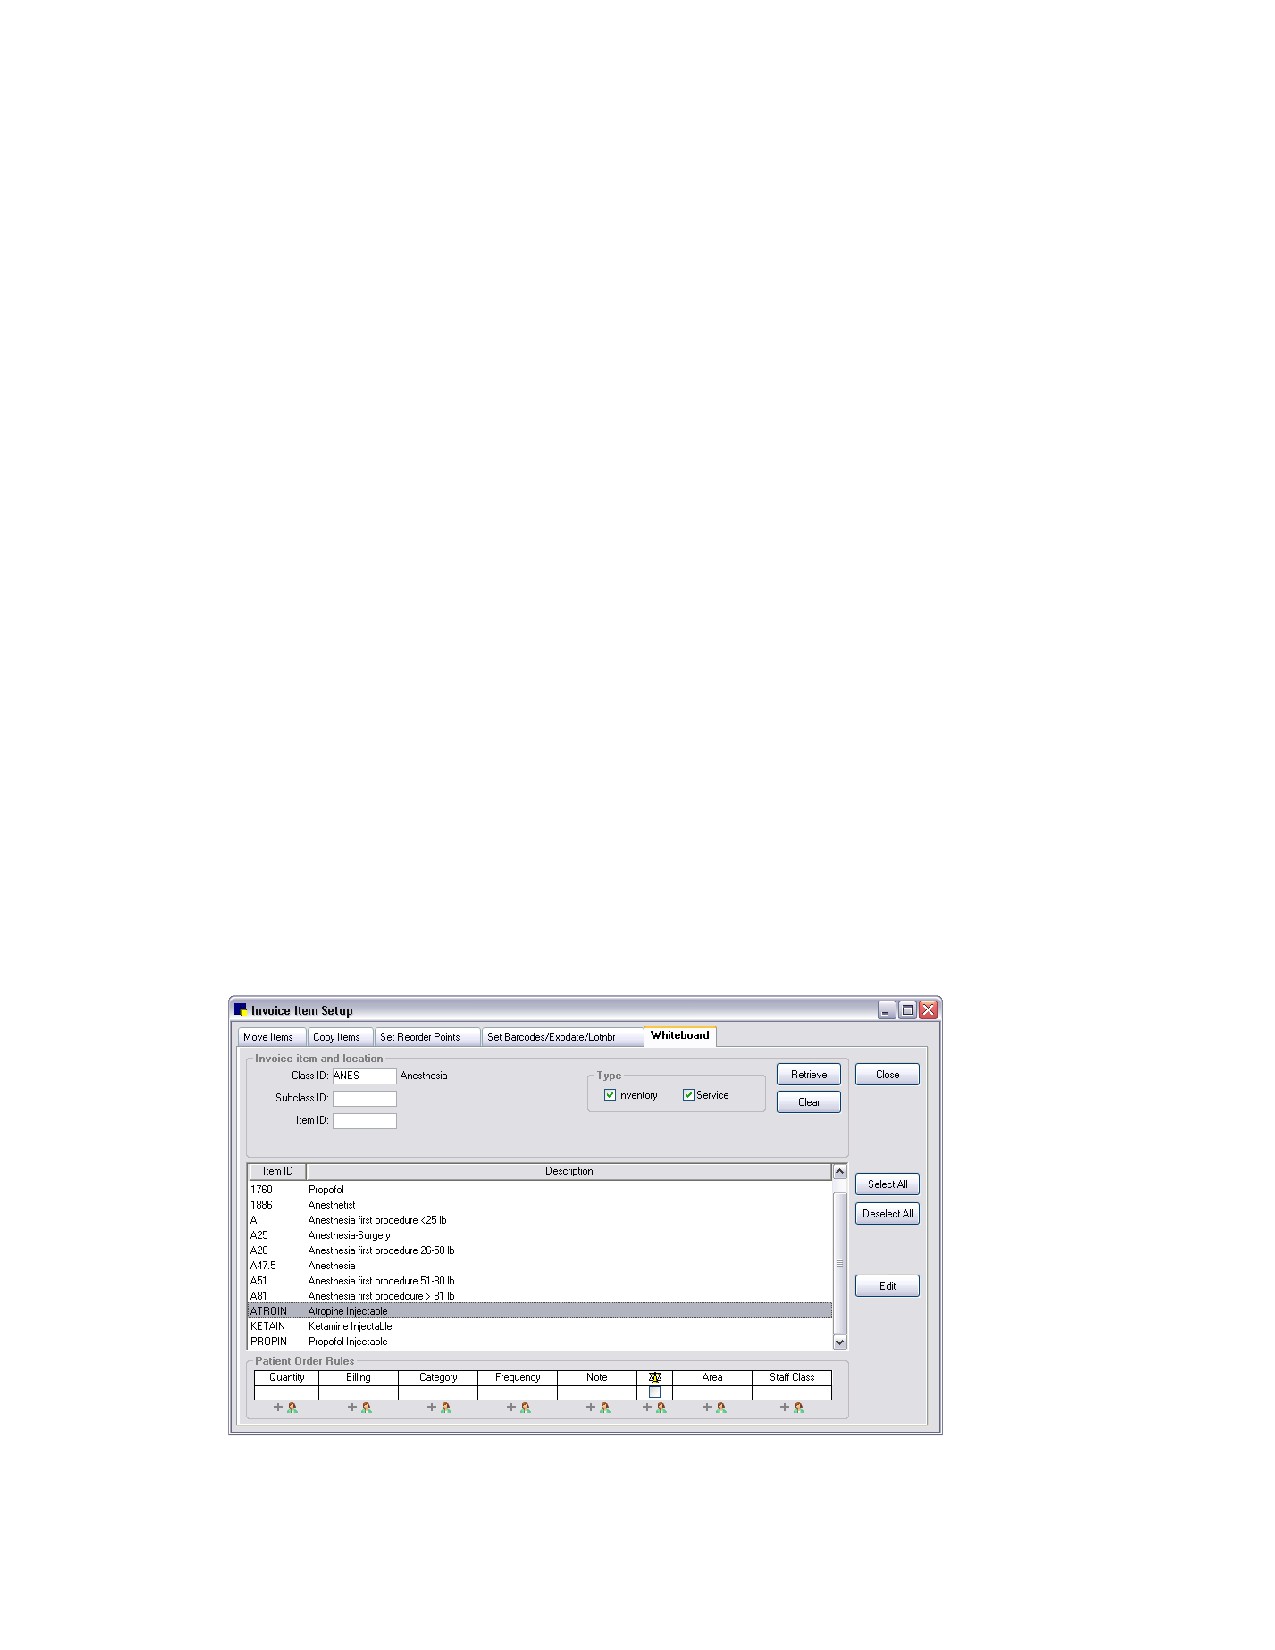
Whiteboard tab on Invoice Item Setup window
243
Chapter 10: Setting Up Your Invoice Items
4.
In the Invoice item and location area, to narrow the list of items displayed on the Whiteboard tab, do
the following:
• To find items in a particular classification, in the Class ID text box, type the ID of the
classification or press F2 to search for and select the classification from the Invoice Item
Classification List.
• To find items in a particular subclassification, in the Subclass ID text box, type the ID of the
subclassification or press F2 to search for and select the subclassification from the Invoice Item
Subclassification List.
• To find an individual item, in the Item ID text box, type the item’s ID or press F2 to search for
and select the item from the Invoice Item List.
5.
Click Retrieve. A list of inventory items appears. To remove the list and enter different criteria, click
Clear.
6.
If you want to view the currently assigned rules for an invoice item, select the single invoice item in
the list. Its associated rules display in the Patient Order Rules area at the bottom of the tab.
Note: The fields in the Patient Order Rules area will be empty if rules have not been specified for the
selected item or if multiple items are selected and those items have differing rules.
7.
In the list of retrieved invoice items, do any of the following to select the patient order items you want
to update:
• If you want to select more than one item, hold down the CTRL key while you select the items you
want.
• If you want to select a group of consecutive items, click the first item in the group and then hold
down the SHIFT key while you click the last item in the group. The first and last items and all the
items between them are selected.
• If you want to select all items in the list, click Select All.
• If you want to deselect all items in the list, click Deselect All.
8.
With the desired invoice items selected in the list, click Edit. The Update Whiteboard Invoice Item
dialog box appears.
244
Chapter 10: Setting Up Your Invoice Items
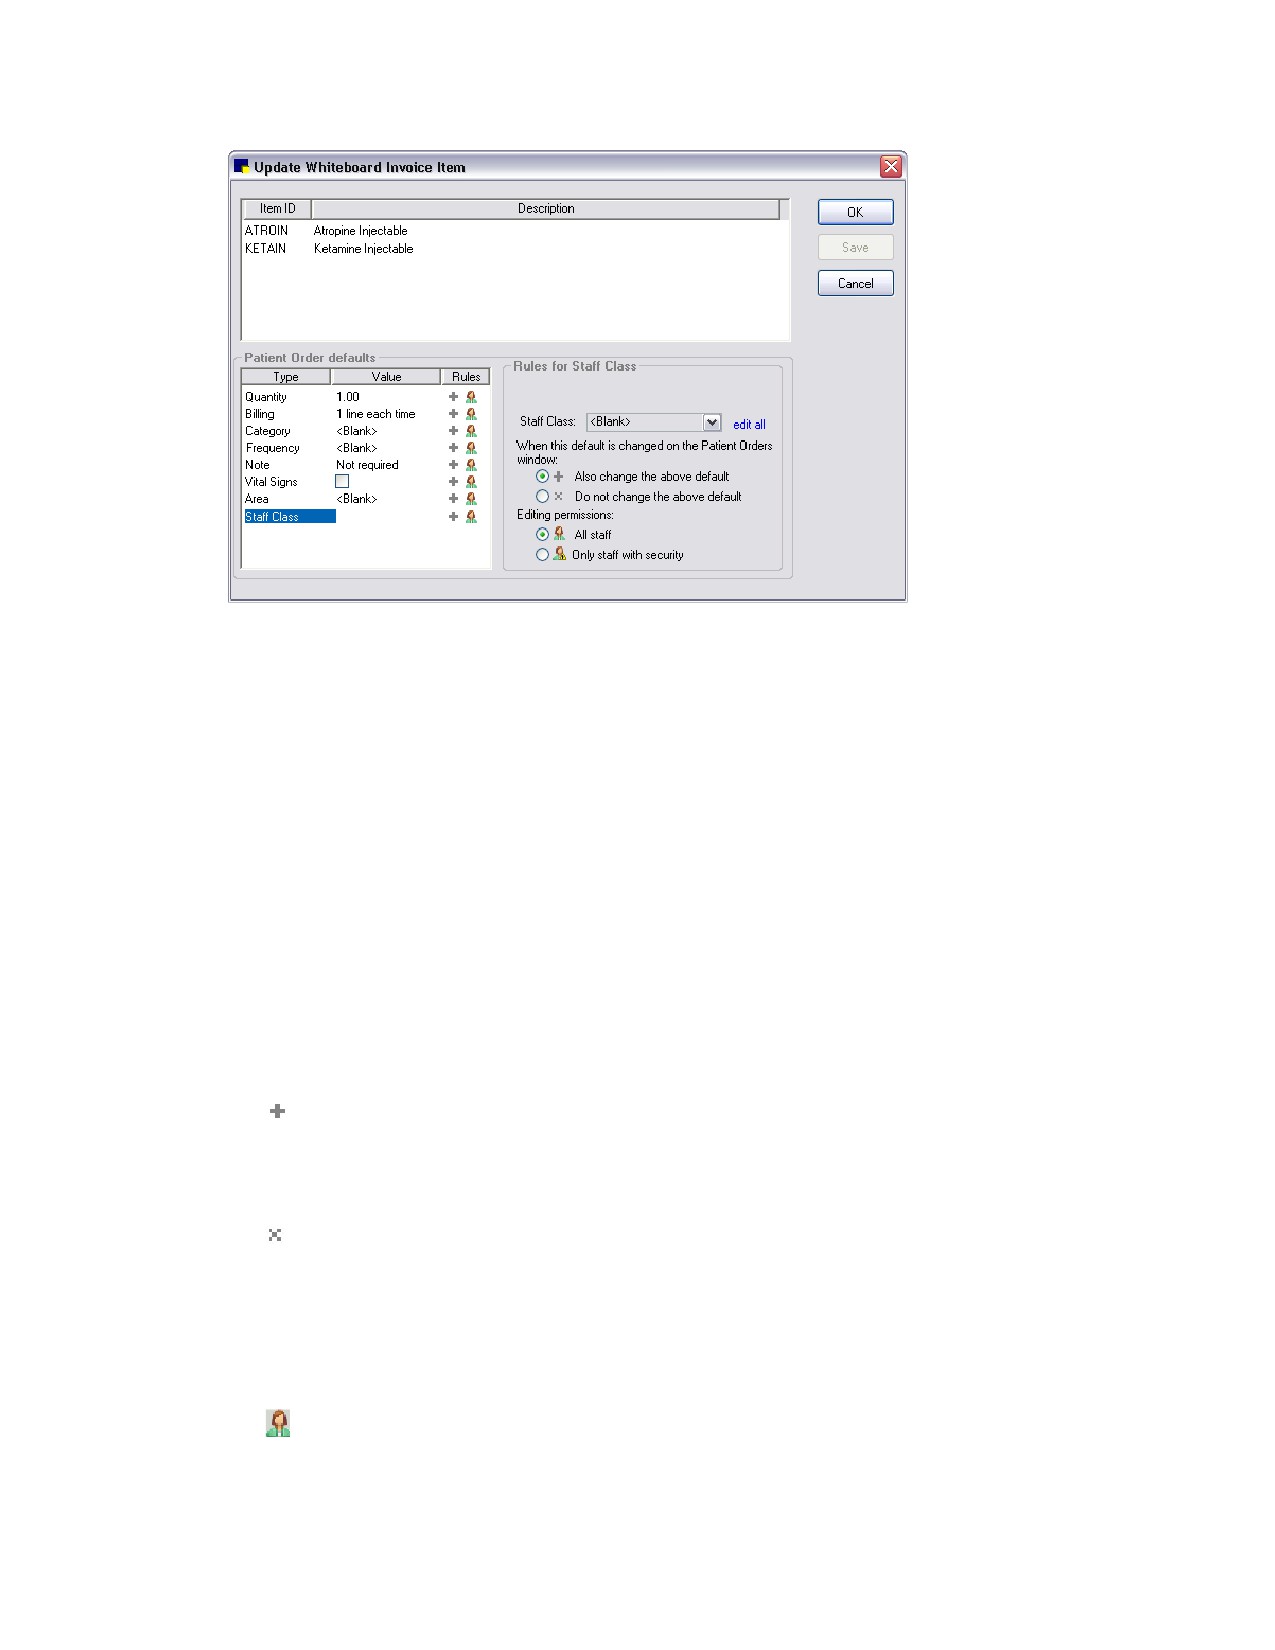
Update Whiteboard Invoice Item dialog box
9. Select a Patient Order defaults field in the list on the left to display its associated rules on the right.
Note: In the Patient Order defaults list on the left, if the Value column is empty, this means that there
are differing settings for the selected invoice items. (Note that if <Blank> shows in the Value
column for the field, this means that the value is set up to appear blank by default on the Patient
Orders window; a <Blank> field is not the same as an empty field.)
10. If the selected invoice items have differing settings for this field (indicated by an empty Value
column), click edit all to confirm that you want to edit the field and set it to the same value for all
selected invoice items at once.
11. Depending on the field type selected on the left, a drop-down list, text box or check box may display
on the right. Specify the desired default value to use for this field in its associated column on the
Patient Orders window. If you want to require staff to enter or select the value at the time the item is
added to the Patient Orders, set the value to <Blank>.
12. For the When this default is changed on the Patient Orders window setting, select one of the
following “change rules” to be followed when this value is changed on the Patient Orders window:
•
Also change the above default-When this field’s value is changed on the Patient Orders
window, Cornerstone will make the changed value the new default value for this field (and
automatically update the default value listed on the Whiteboard setup tab). For all fields except
Quantity, this is the option that will be selected by default.
•
Do not change the above default-When this field’s value is changed on the Patient Orders
window, Cornerstone will not make the changed value the new default value (it will leave the
default value as it is listed on the Whiteboard setup tab). For the Quantity field, this is the
option that will be selected by default.
13. For the Editing permissions setting, select one of the following rules to determine which staff are
allowed to edit/overwrite the default value for this field on the Patient Orders window:
•
All staff may edit-All staff with Patient Orders permissions are allowed to edit/overwrite the
default value for this field on the Patient Orders window, regardless of whether they have been
245
Chapter 10: Setting Up Your Invoice Items
granted Whiteboard Orders Override security permissions. This is the option that will be
selected by default.
•
Only staff with security permissions may edit-Only those staff members with Whiteboard
Orders Override security permissions in Cornerstone are allowed to edit/overwrite the default
value for this field on the Patient Orders window.
Note: If a field’s default value is set to <Blank> and therefore appears blank on the Patient Orders
window, all staff with Patient Orders permissions are allowed to enter or select a value for this field,
regardless of whether they have been granted Whiteboard Orders Override security permissions in
Cornerstone.
14. Do one of the following:
• If you want to save your updates and continue setting defaults for additional Patient Order fields
for the selected items, click Save and repeat steps 9-13.
• If you are finished setting Patient Order field defaults for the selected items, click OK to save any
unsaved changes and return to the Invoice Item Setup tool’s Whiteboard tab.
Invoice Item Reports
Cornerstone includes several reports related to invoice item information.
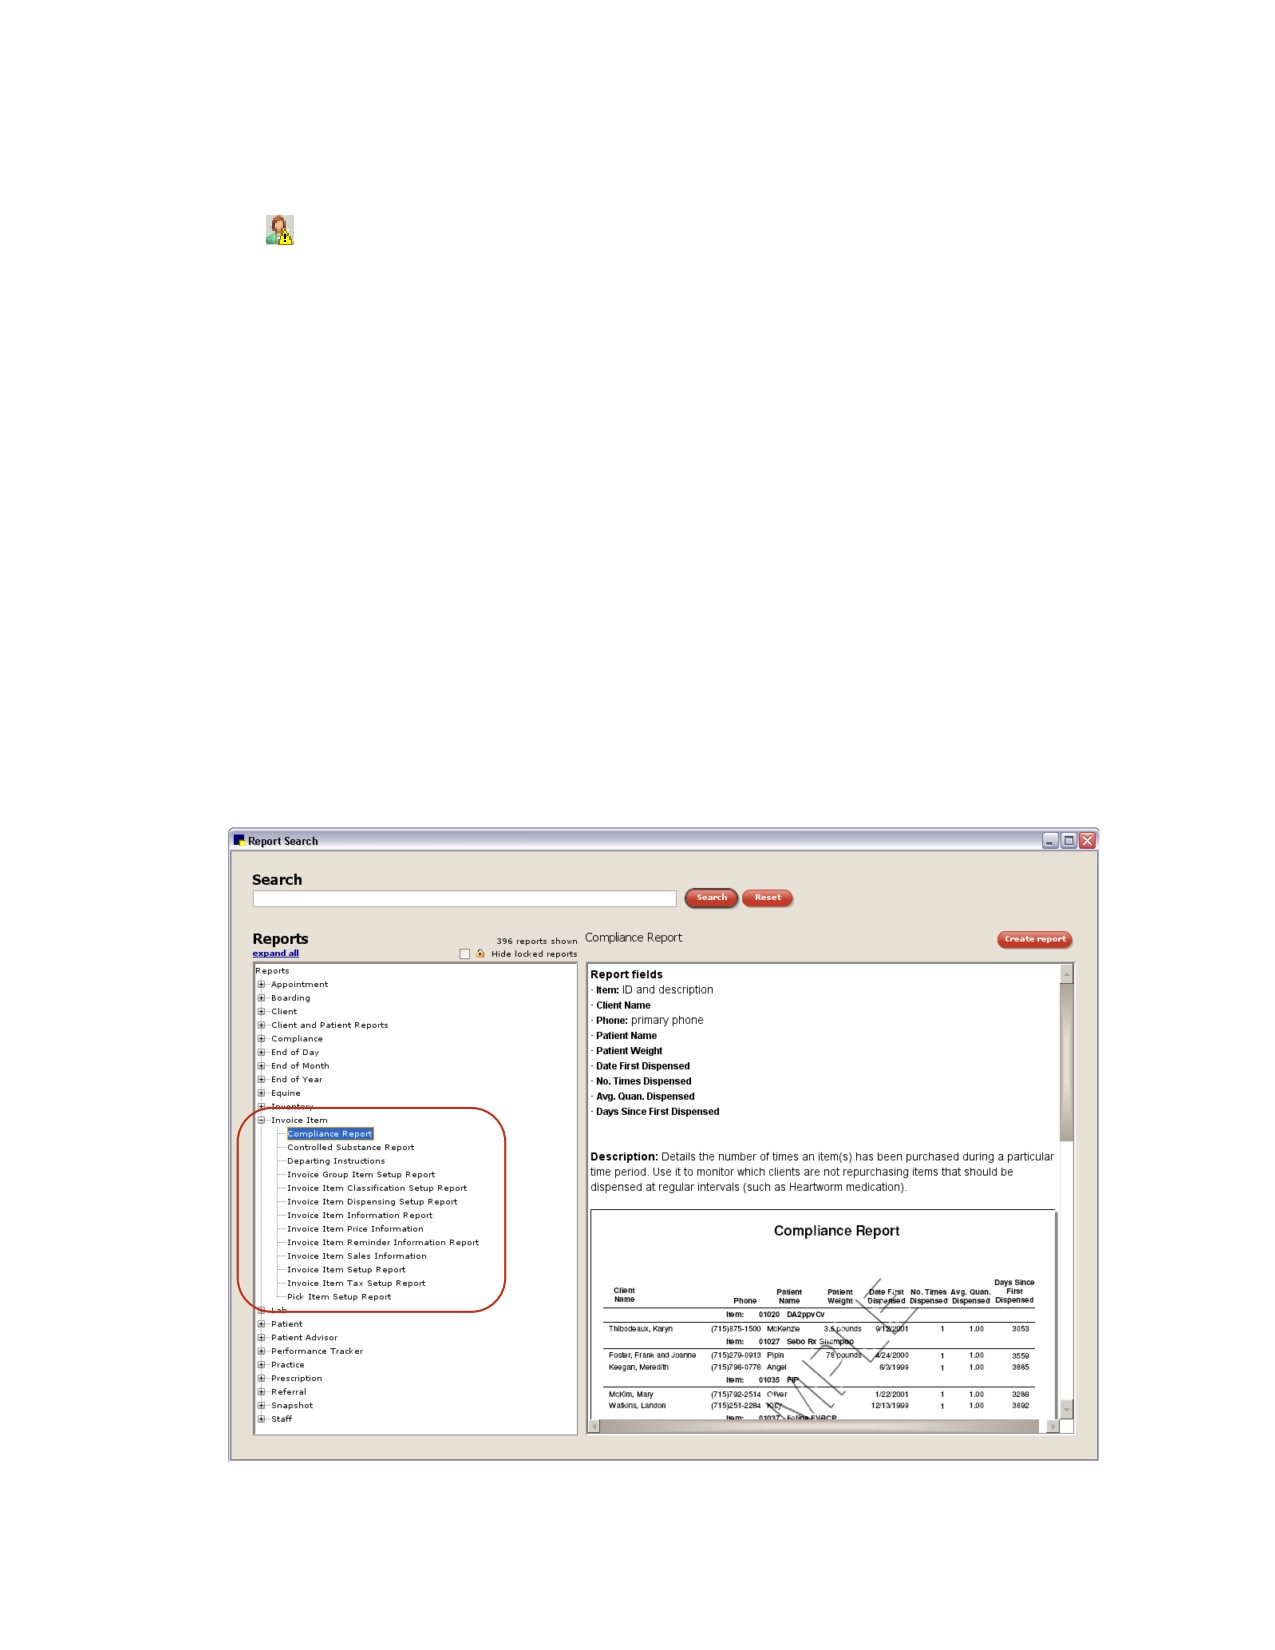
To access Invoice Item reports:
1. On the Reports menu, select Find a Report. The Report Search window appears.
2. In the Reports list, click the plus sign to the left of Invoice Item to expand the list of invoice item
reports.
Invoice Item Reports
246
Chapter 10: Setting Up Your Invoice Items
Note: Invoice item reports may be very large. Be sure to enter a Range to narrow the report results.
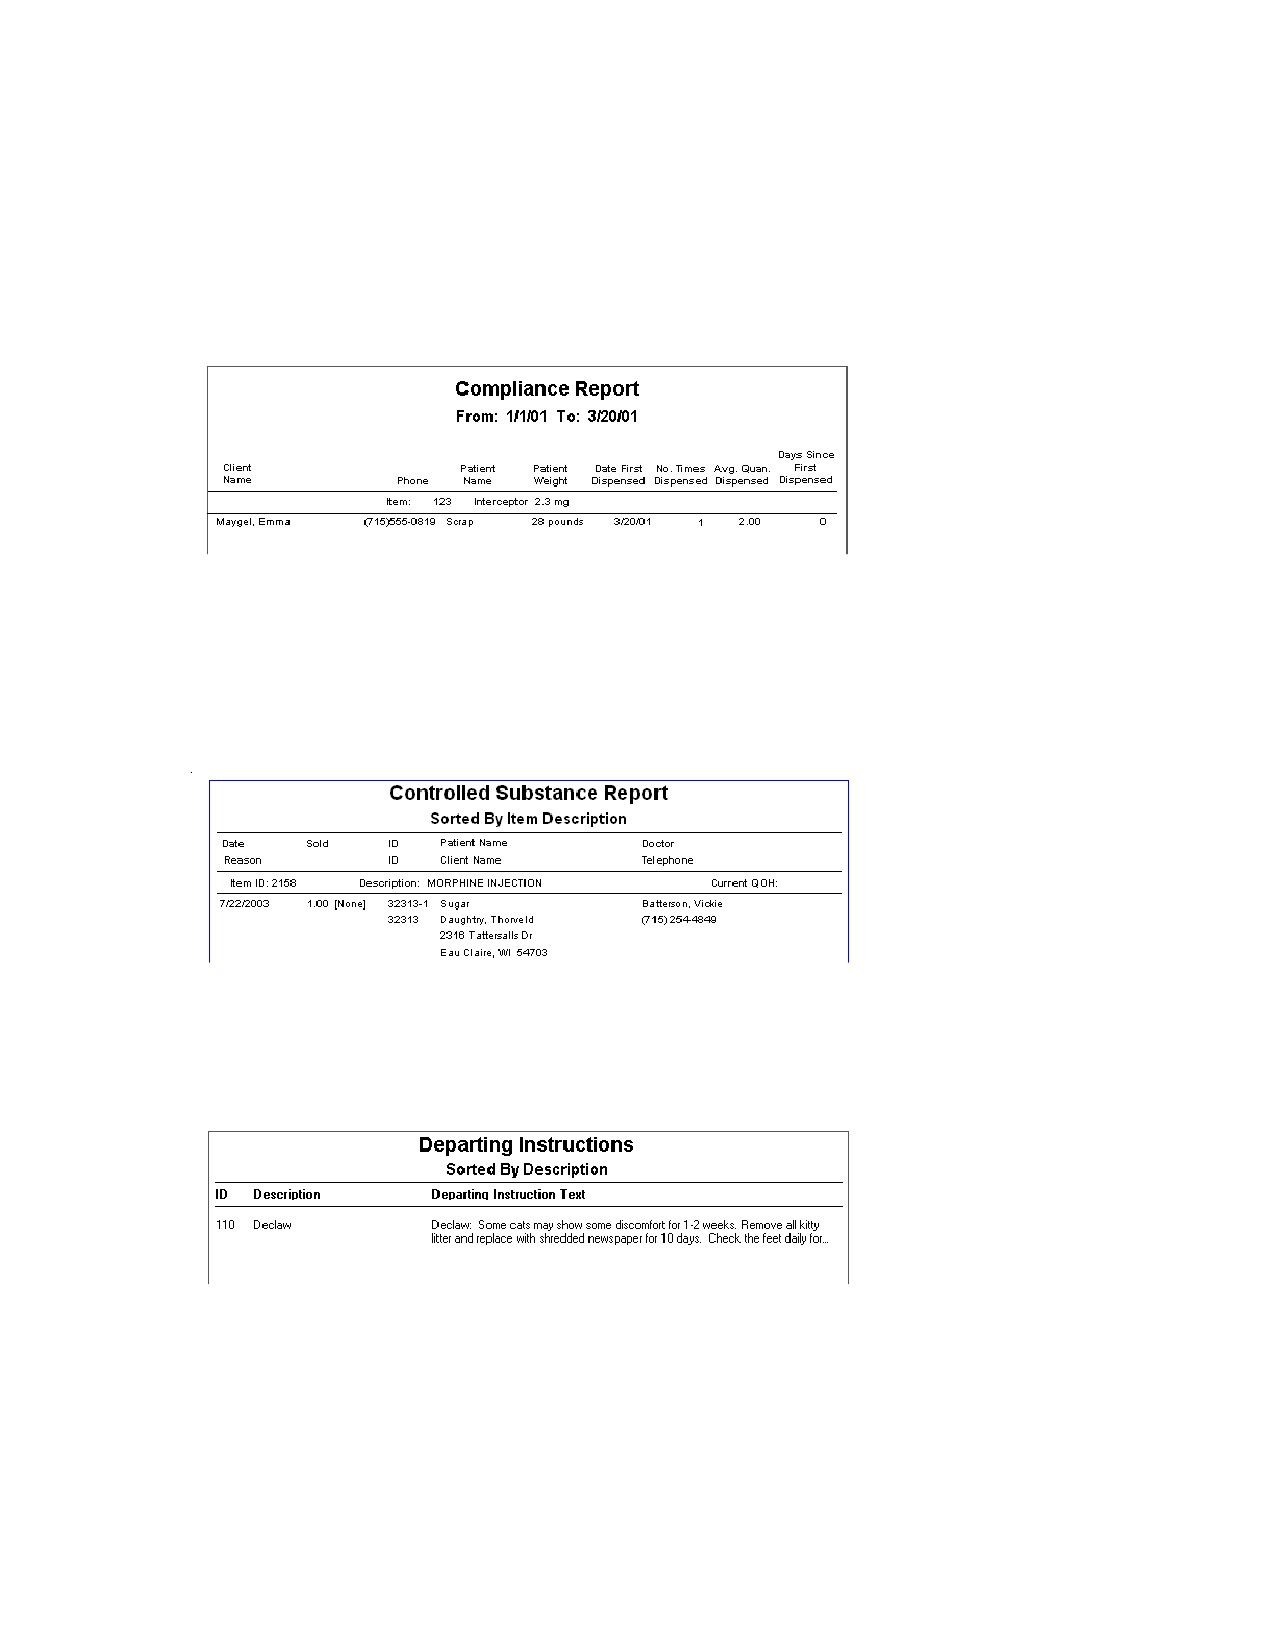
Compliance Report
This report details the number of times an item (or items) has been purchased during a particular time
period. Use it to monitor which clients are not repurchasing items that should be dispensed at regular
intervals (such as Heartworm medication). This report is available only if you have selected a compliance
group in Compliance Alerts defaults. See “Compliance Alerts Defaults” on page 87 for more information.
Controlled Substance Report
Use the Controlled Substance Report to help account for controlled drugs in your practice. The
Controlled Substance Report records the amount of the drug that is invoiced; it does not reflect the
difference between the invoiced amount and the administered amount.
In accordance with the requirements of some states, the client’s address is included on the report.
Departing Instructions Report
Use the Departing Instructions Report to see which departing instructions are currently set up in the
Departing Instruction List (Lists > Departing Instructions).
247
Chapter 10: Setting Up Your Invoice Items
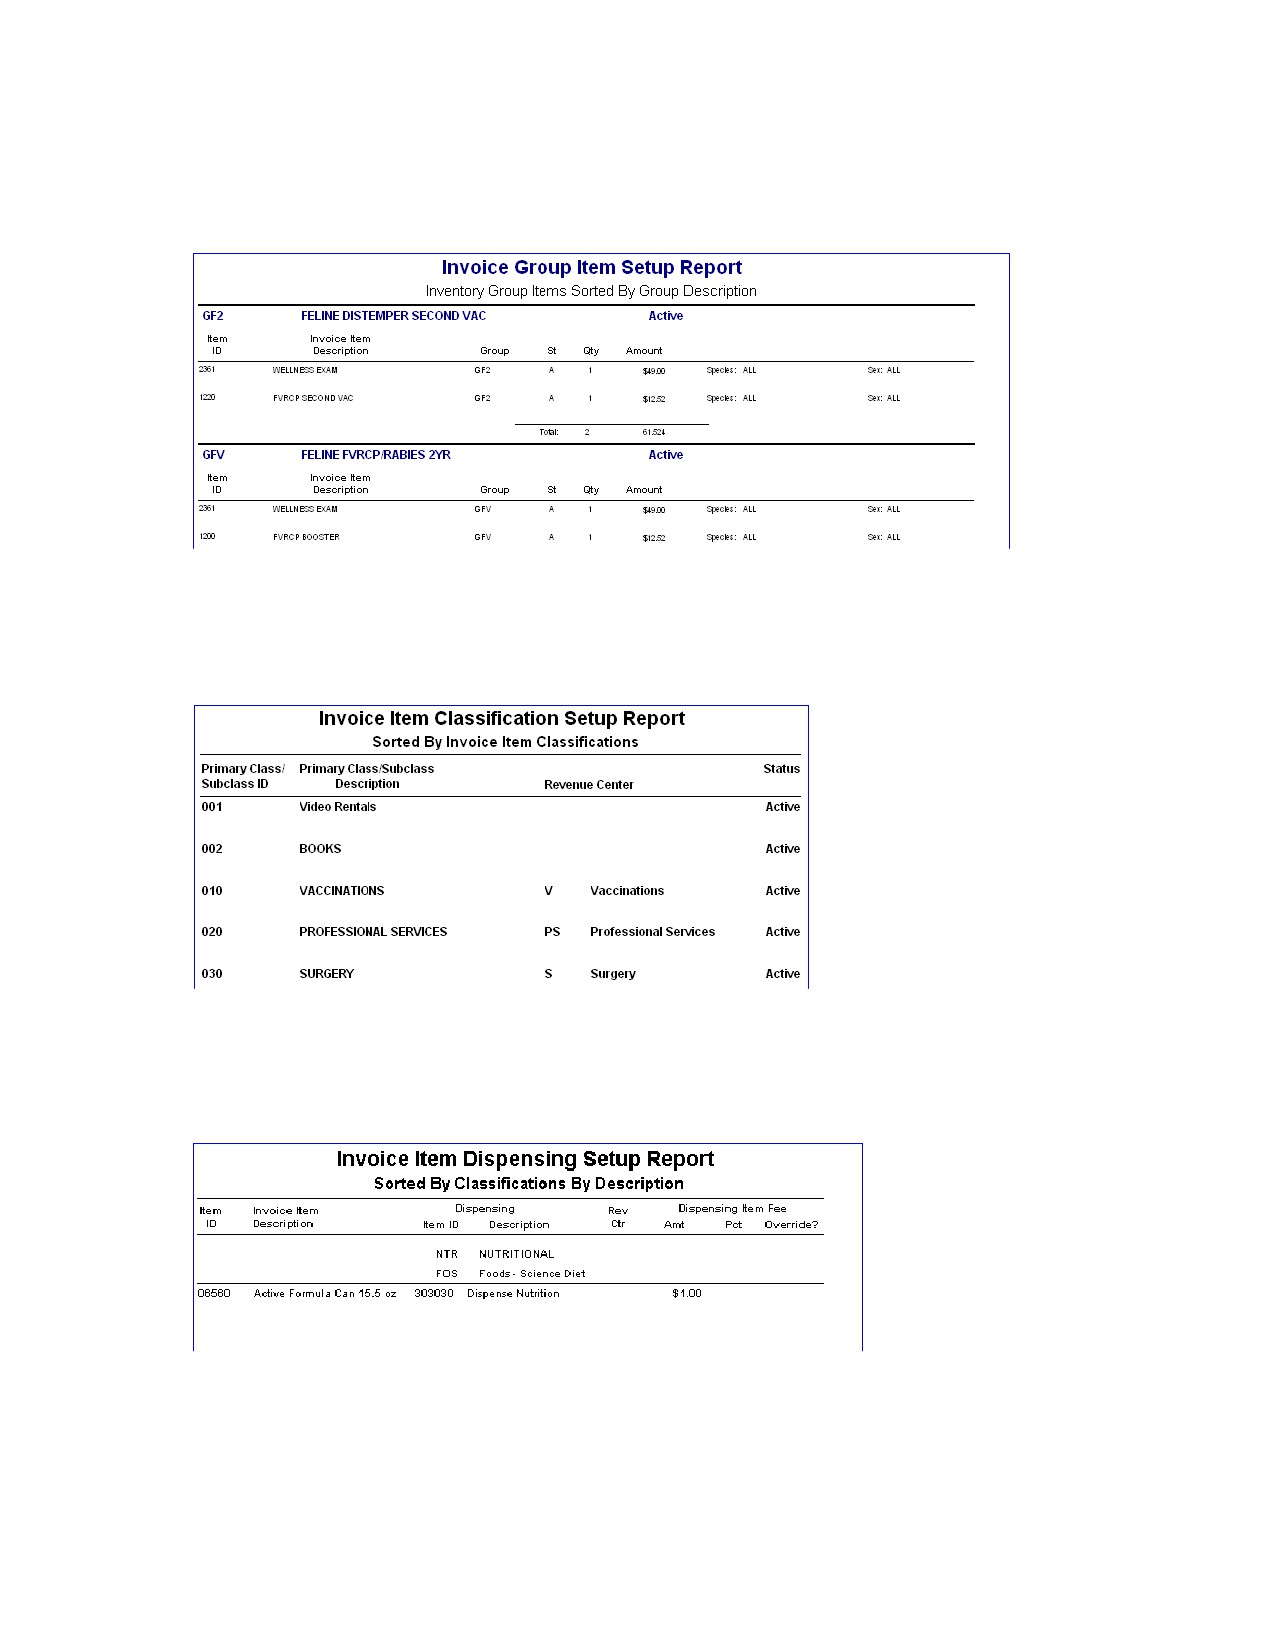
Invoice Group Item Setup Report
Use the Invoice Group Item Setup Report to see invoice items that are included in a group item. You can
also use this report to see the price of each group item.
Invoice Item Classification Setup Report
Use the Invoice Item Classification Setup Report to view the invoice item classifications and subclasses
you have set up in Cornerstone.
Invoice Item Dispensing Setup Report
Use the Invoice Item Dispensing Setup Report to get a list of invoice items that have been set up as
dispensing items.
248
Chapter 10: Setting Up Your Invoice Items
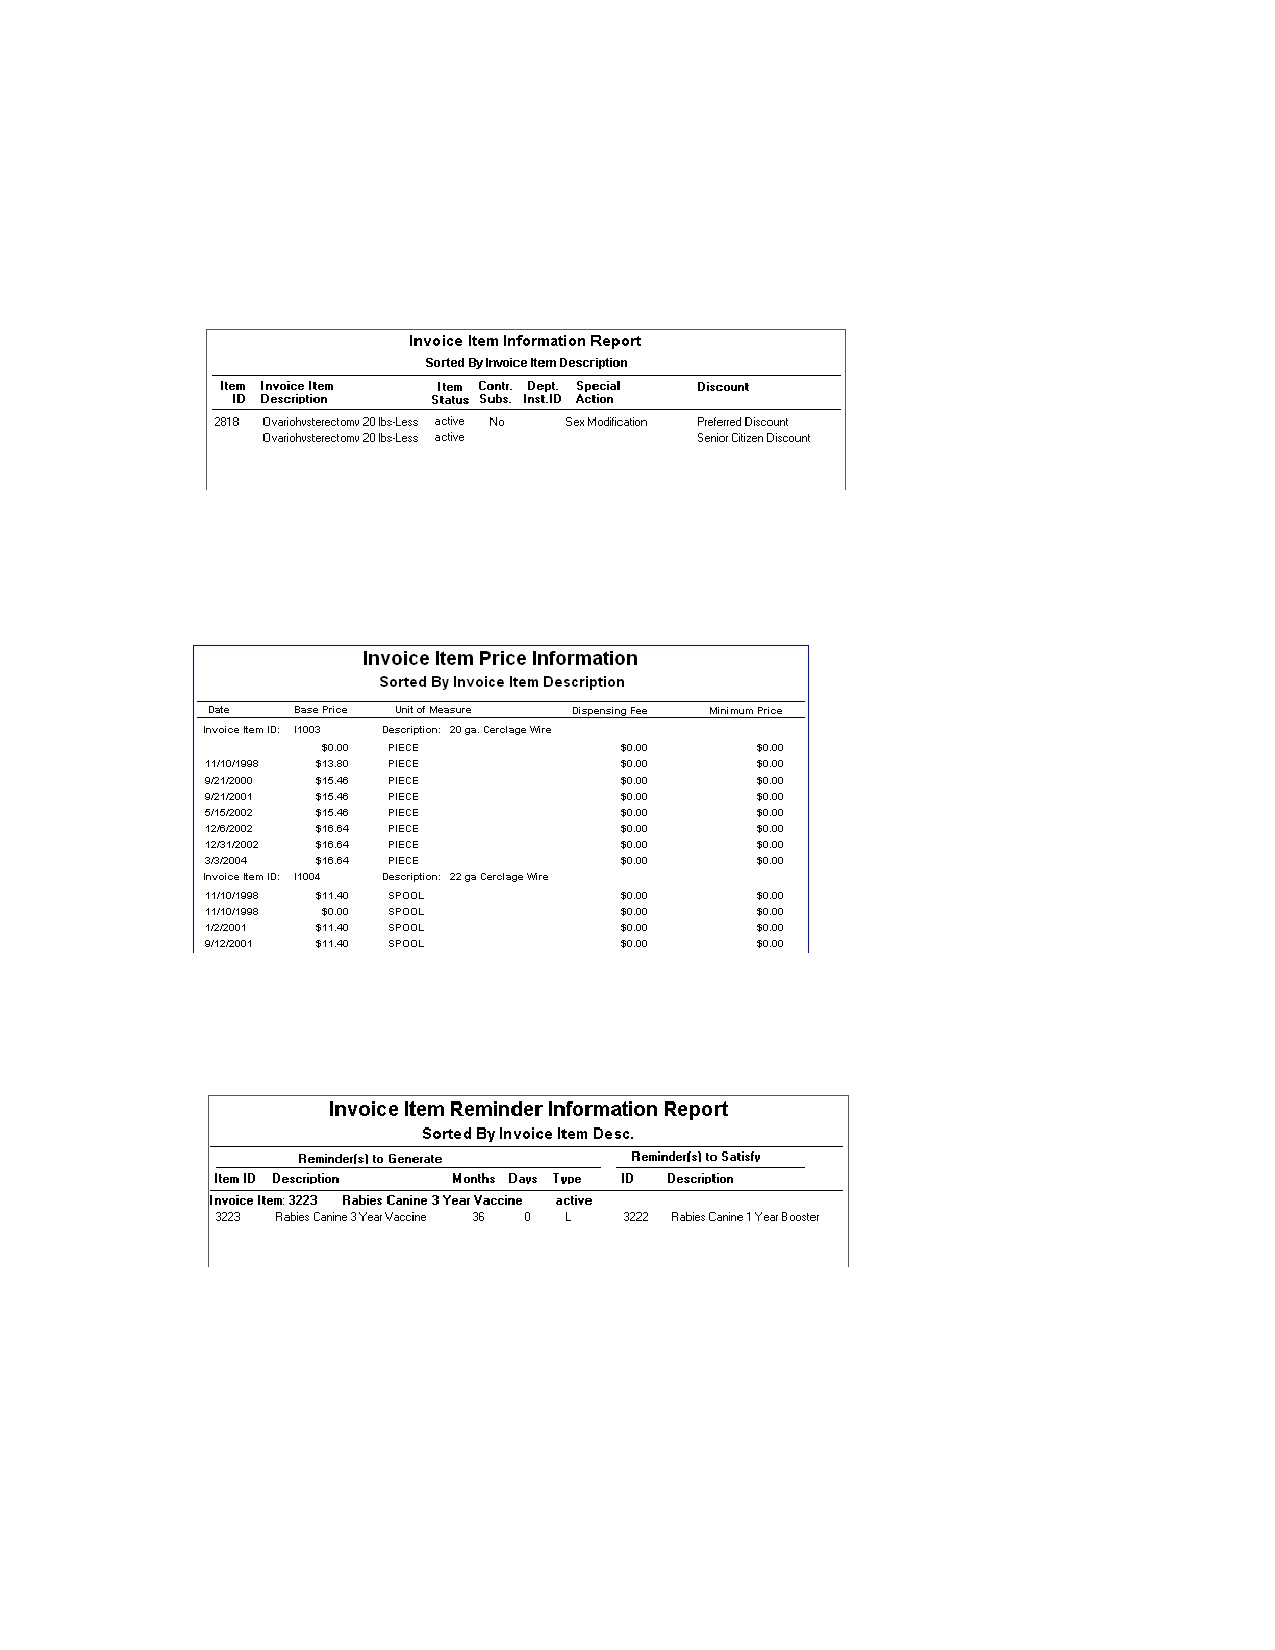
Invoice Item Information Report
Use the Invoice Item Information Report to see what has been set up in the Instructions/Actions tab (in
the Invoice Item Information window) for each item. You can view discounts linked to invoice items and
whether items are being tracked as controlled substances.
Note: This report does not show linked prescription instructions.
Invoice Item Price Information Report
Use the Invoice Item Price Information Report to find out the price of an invoice item on a particular date.
To view a list of current pricing only, run an Invoice Item Setup Report.
Invoice Item Reminder Information Report
Use the Invoice Item Reminder Information Report to check your reminder strategy.
249
Chapter 10: Setting Up Your Invoice Items
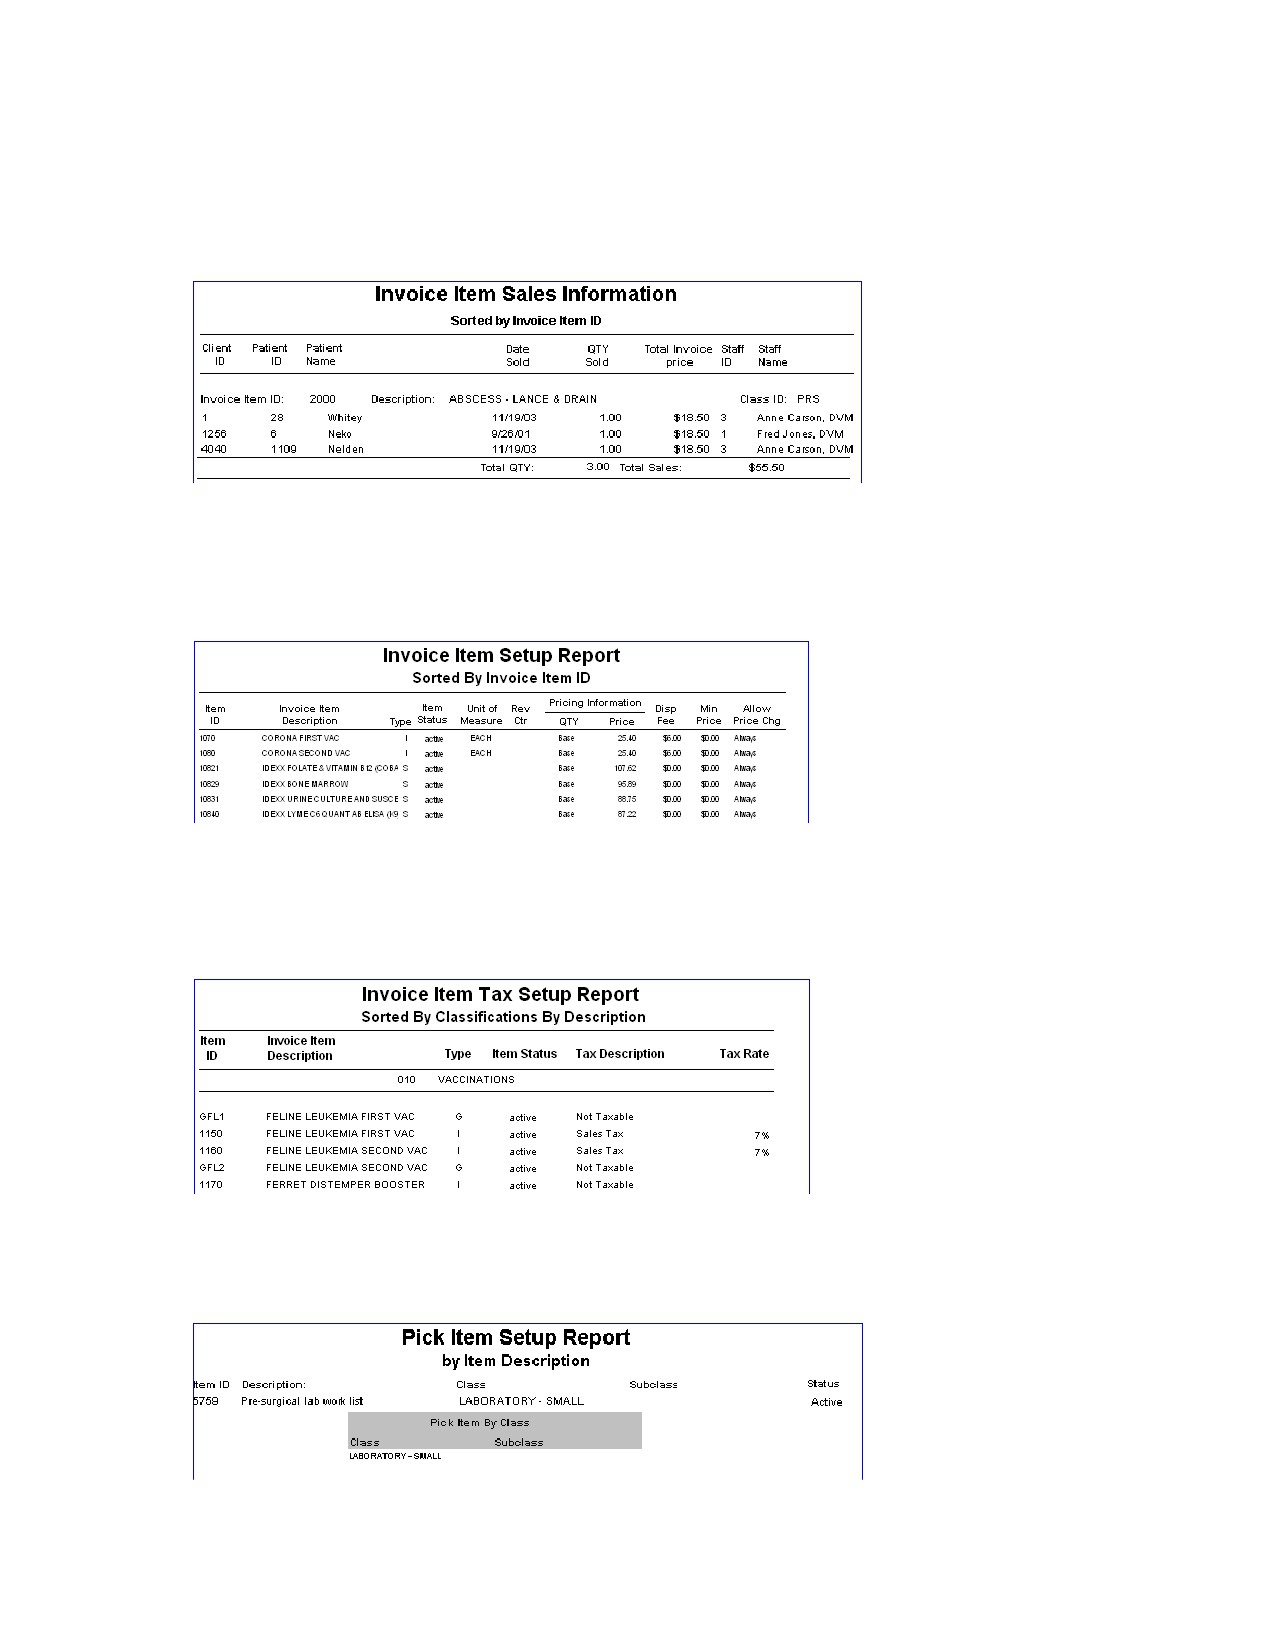
Invoice Item Sales Information Report
Use the Invoice Item Sales Information Report to see how invoice items are selling and which staff
members are producing sales. You can also use this report to see which patients have been invoiced for
particular items.
Invoice Item Setup Report
Use the Invoice Item Setup Report to see how invoice items are currently set up. This report can be
sorted by classification by description, classification by ID, invoice item description or invoice item ID.
Invoice Item Tax Setup Report
Use the Invoice Item Tax Setup Report to see which taxes are linked to invoice items. This report can be
sorted by classification by description or classification by ID.
Pick Item Setup Report
Use the Pick Item Setup Report to print a list of invoice items set up as pick items.
250
Chapter 11: Other Inventory Setup Tasks
Overview
Once your invoice items have been set up in the IDEXX Cornerstone* Practice Management System,
several additional setup tasks must be completed before you can start to use Cornerstone Inventory.
These tasks include:
• Receiving past invoices.
• Transferring items to the appropriate locations (Multiple Location Inventory only).
• Viewing and confirming a stock transfer (Multiple Location Inventory only).
• Performing a cycle count.
• Viewing and adjusting quantity on hand (from View Quantity on Hand window).
• Adjusting quantity on hand and cost (from Adjustment List window).
Receiving Past Invoices
If you have any past invoices that need to be entered, enter these orders to allow your facility to see
receipt and cost history for the items.
Note: Do not input past invoices after a physical count has been adjusted within Cornerstone, as
receiving orders will add to the current quantity on hand.
To receive an order:
1. On the Inventory menu, select Receipt List.
2. Click Receive an Order. The Receive Order window appears.
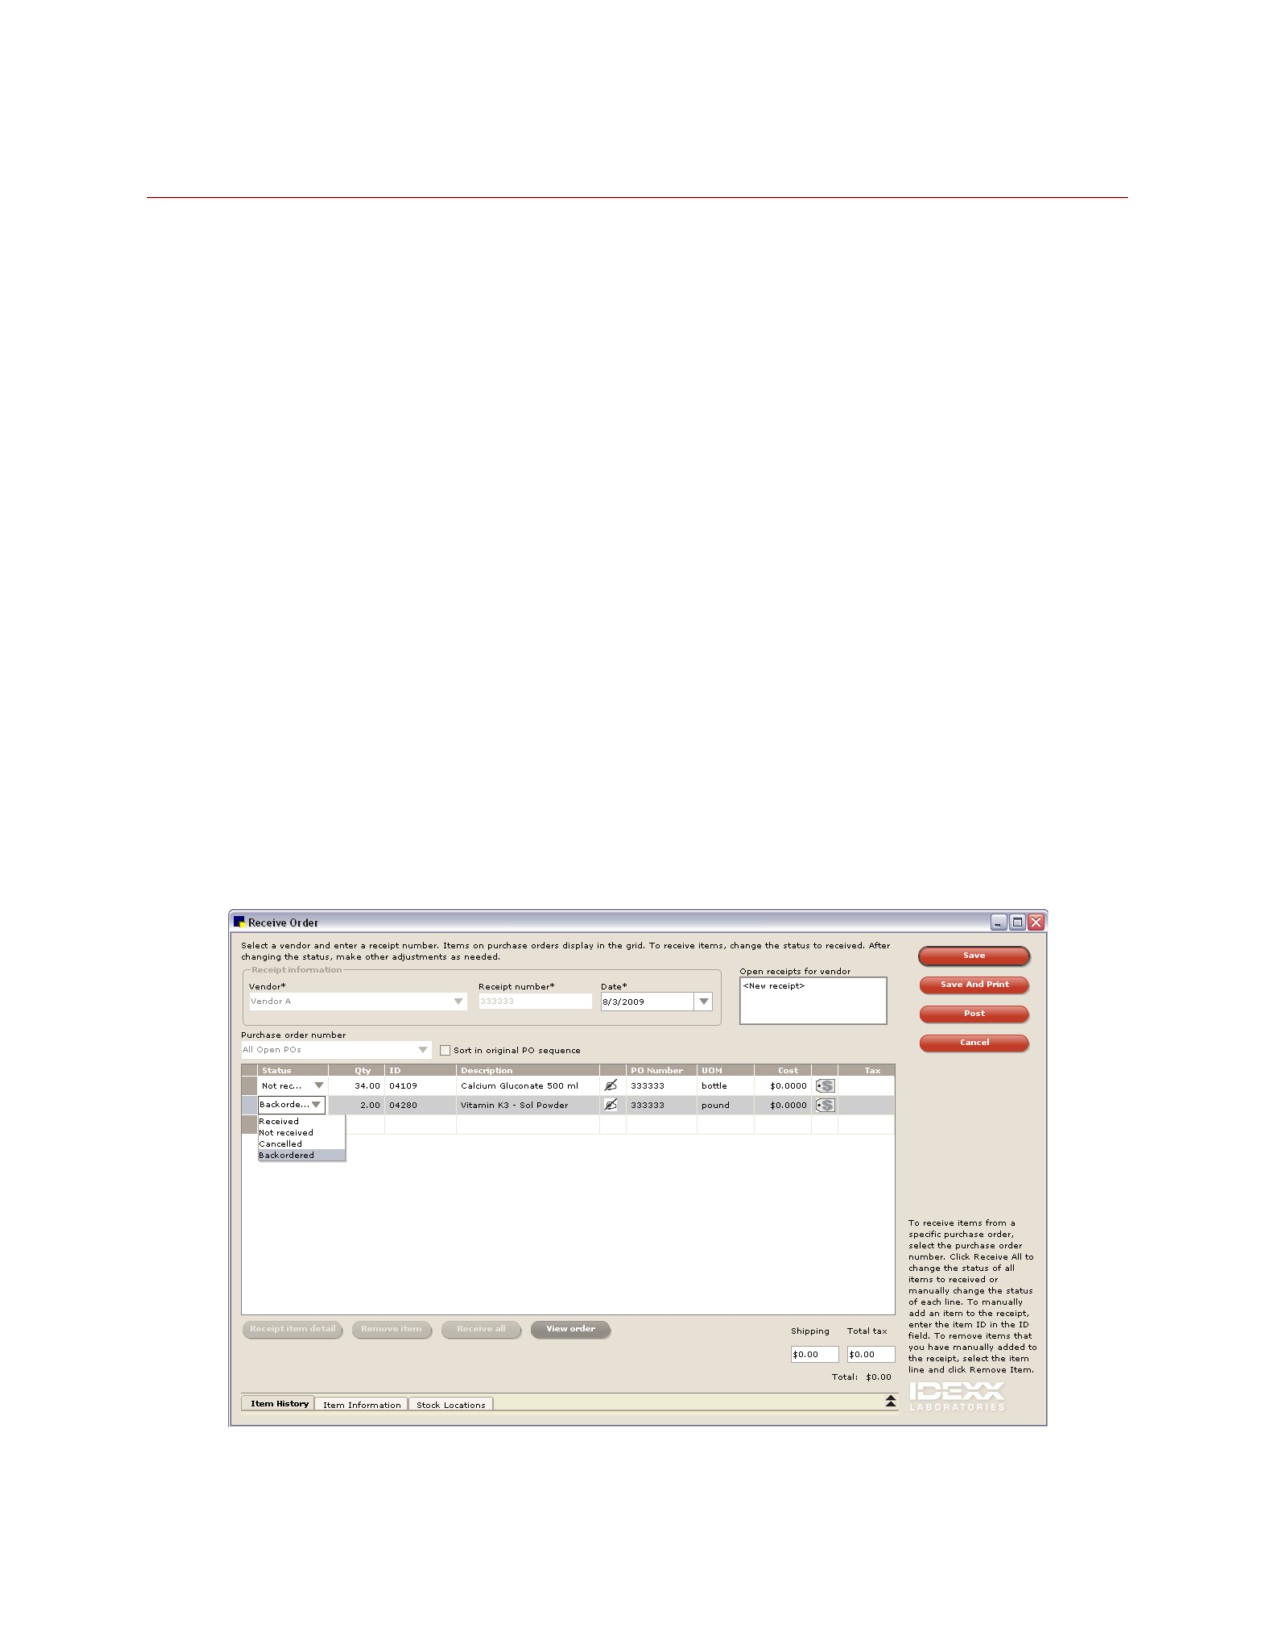
Receive Order window
251
Chapter 11: Other Inventory Setup Tasks
3.
From the Vendor drop-down list, select the vendor to receive stock from. If there are open,
unfinished receipts for this vendor, these receipts appear in the Open receipts for vendor box. To
complete one of the open receipts, select the receipt from the box.
4.
In the Receipt number text box, type the receipt number and press TAB.
5.
In the Date text box, enter the date the order was received. The default is today's date.
6.
A list of invoice items on open purchase orders appear for the vendor. To limit the list to one
purchase order, from the Purchase order number drop-down list, select the applicable purchase
order.
7.
All the items on the selected purchase order(s) appear on the receipt. To receive order items,
choose the option that applies:
•
To receive items individually, click the item in the Status list and select Received.
•
To receive all items on the order, click the Receive all button. The status of all items on the
order changes to Received. The Receive all button is active only when all listed items have a
Status of Not received.
Tip: If you received a majority of the items from the vendor, select Receive all and then go back
and enter any back ordered or cancelled items.
•
When an item’s entire order quantity is back ordered, click the item in the Status list and select
Backordered.
•
When only part of the order item is back ordered, click the item in the Status list, select
Received, and in the Qty text box, type the quantity received. This creates a second line
showing the back order quantity with a status of Not Received. Click the second line Status item
and change the Status to Backordered.
•
When an item’s entire order quantity is cancelled, click the item in the Status list and select
Cancelled.
•
When only part of the order item is cancelled, click the item in the Status list, select Received,
and in the Qty text box, type the quantity received. This creates a second line showing the
cancel quantity with a status of Not Received. Click in the second line Status item and change
the Status to Cancelled.
•
To add a received item that is not listed on a purchase order, on the empty line at the end of the
list of ordered items, in the ID text box, enter the item’s ID and fill in remaining fields, such as
quantity.
8.
Click the Receipt item detail button to receive items into a specific location, to add lot numbers,
and/or add expiration dates.
252
Chapter 11: Other Inventory Setup Tasks
9. When finished receiving items, choose one of the following:
• Click Save to save the receipt. Saved receipts can be edited.
• Click Save and Print to save the receipt and print a copy of the receipt.
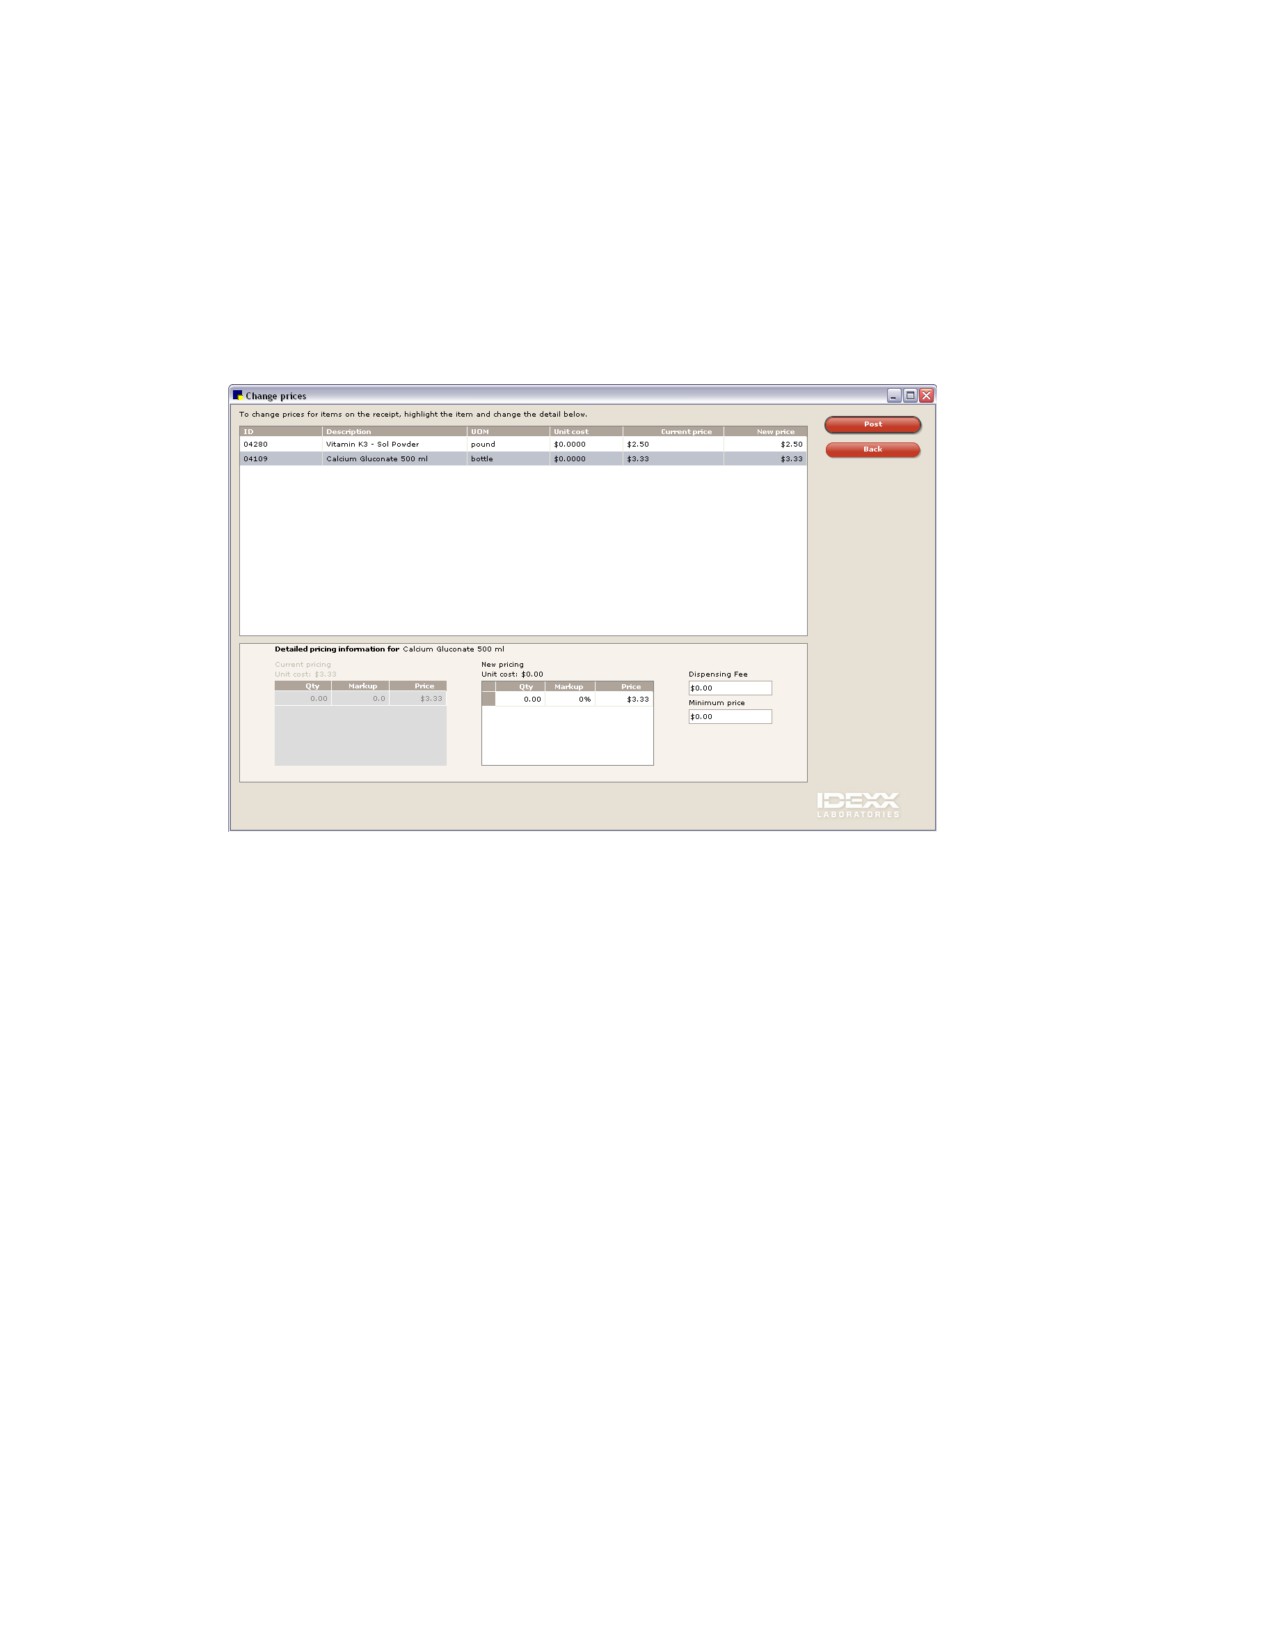
• Click Post to post the receipt. The Change Prices window appears. If necessary, click a
received item and change its markup or margin percentage, price, dispensing fee and/or
minimum price. When finished, click Post to return to Receipt List window. Posted receipts
cannot be edited.
Change Prices window
Transferring Items to the Appropriate Locations (Multiple Location Inventory Only)
The Find and Transfer feature can be used by practices that have inventory items in multiple locations.
Inventory is often physically moved from one location into another to replenish the inventory. This feature
is used to track this type of stock movement within Cornerstone.
To find and transfer items:
1. On the Inventory menu, select Find and Transfer Items. The Find and Transfer Items window
appears.
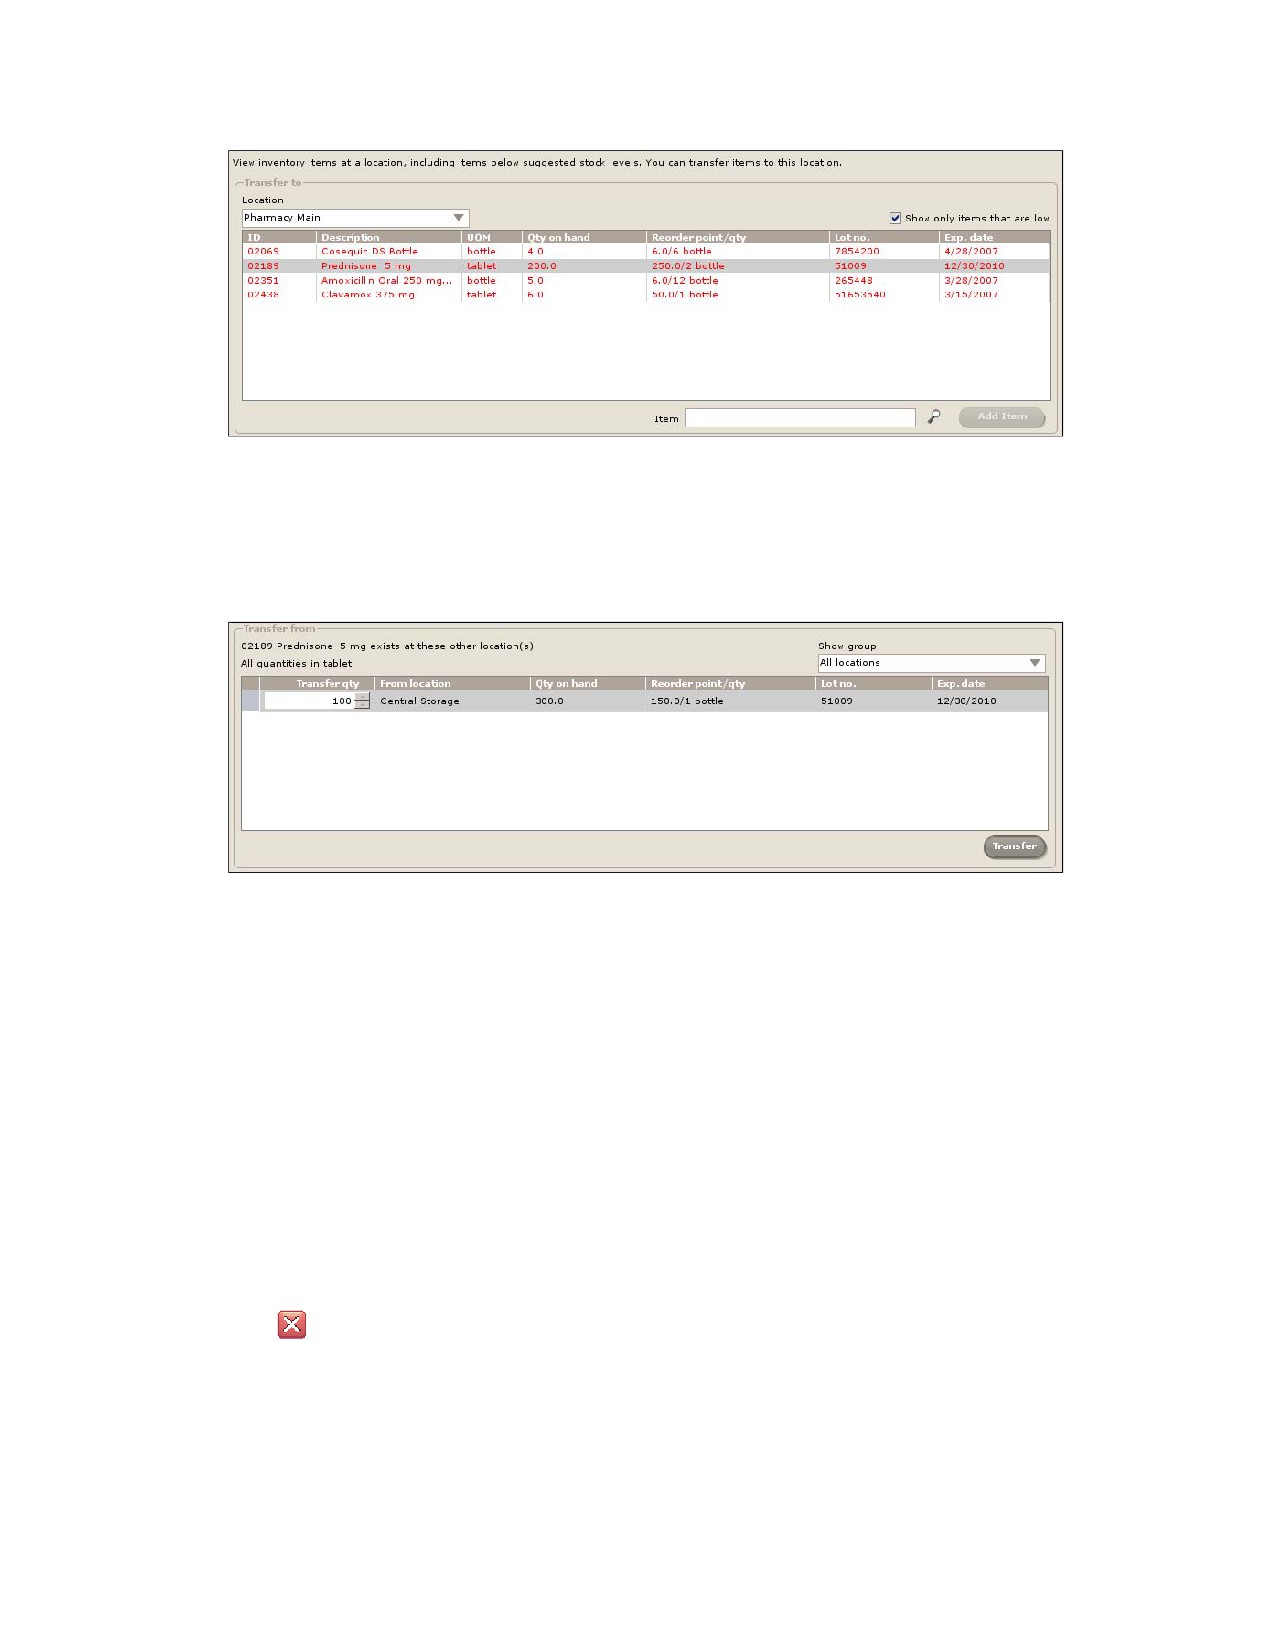
2. In the Transfer to area Location drop-down list, select a location to be stocked.
Note: A red line item in the Transfer to area indicates the product is at or below the recommended
reorder point that the practice has set.
3. To narrow the list of inventory items to those at or below the reorder point set by the practice for the
selected location, select the Show only items that are low check box.
4. Search for and select an item to add to the Transfer to list in the Item field; click Add Item to include
this item on the transfer list.
253
Chapter 11: Other Inventory Setup Tasks
Find and Transfer Items window-Transfer to list
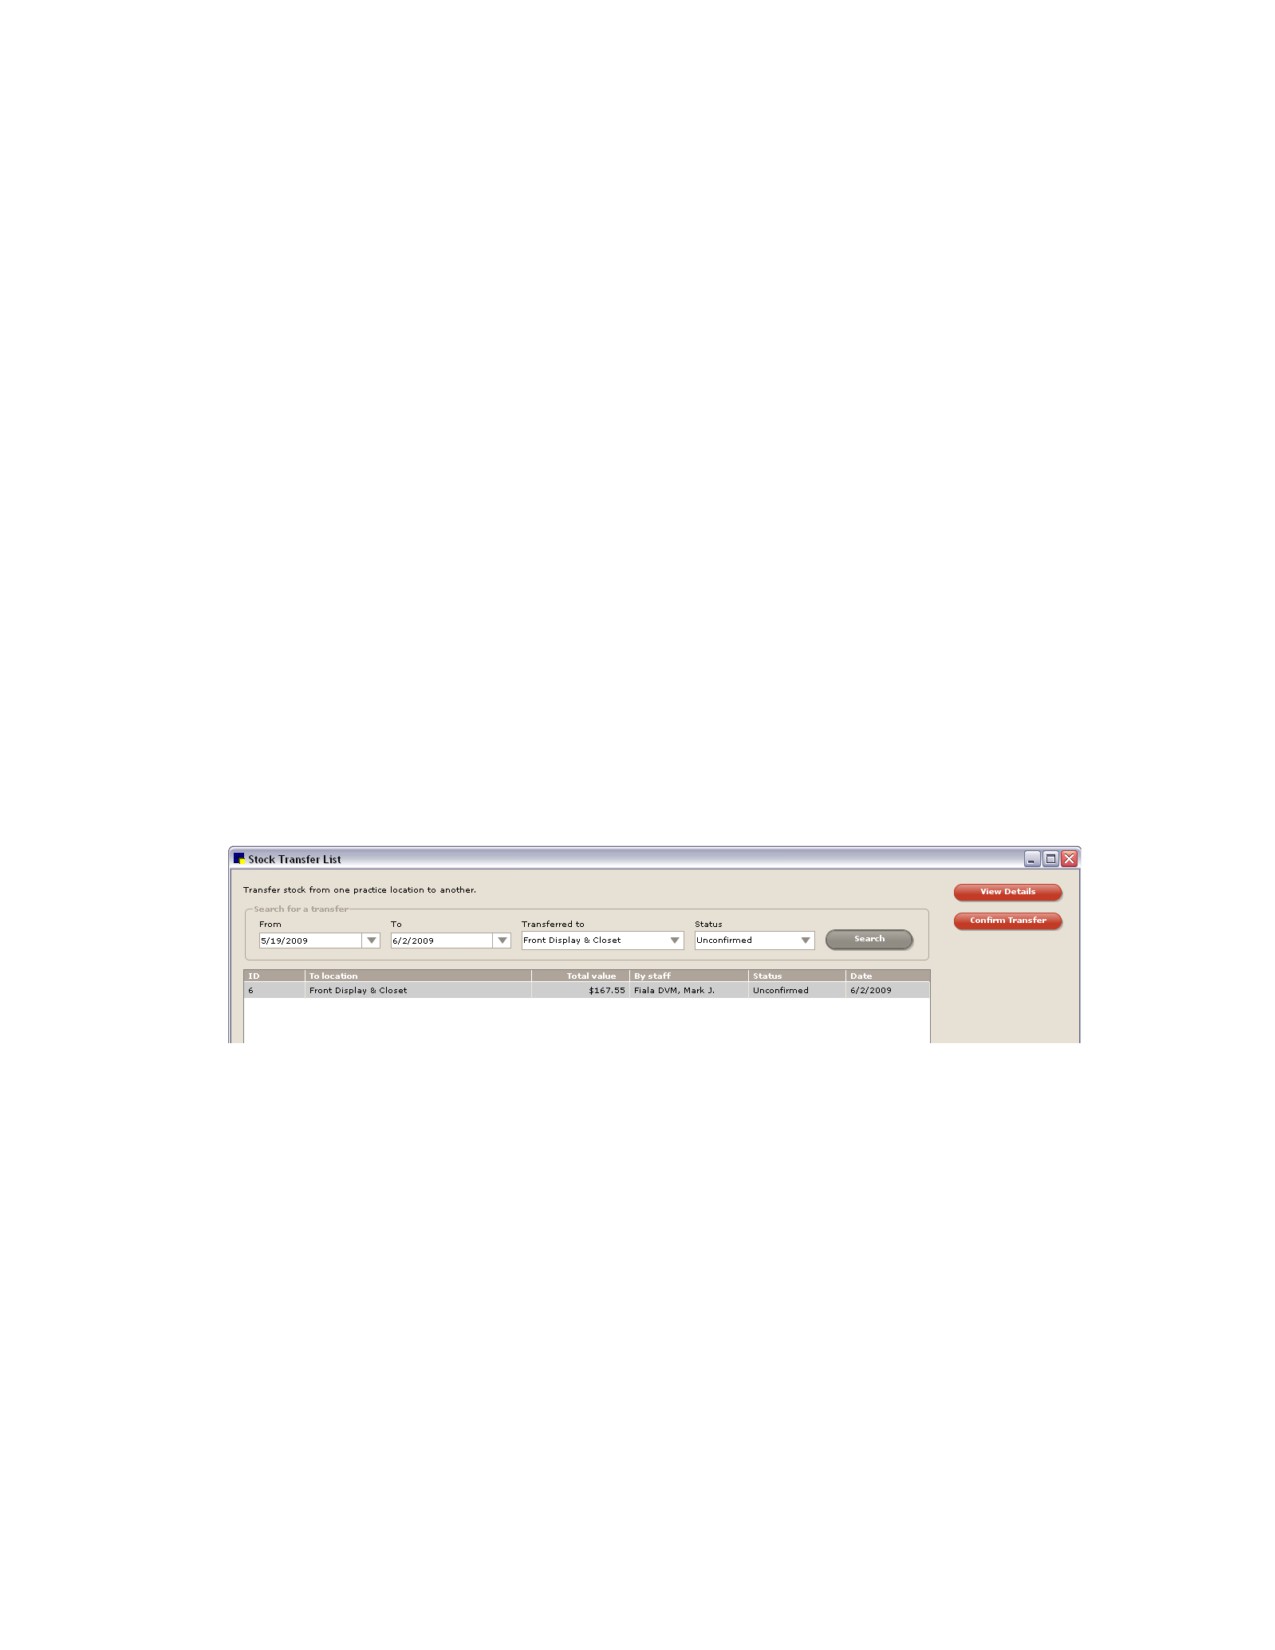
5. In the Transfer from area, to display quantities available for transfer from the specified group of
supply locations only, select a location group from the Show group drop-down list.
6. Enter the amount to be transferred from the locations listed in the Transfer from area’s Transfer qty
text box located in the lower left area of the window.
Find and Transfer Items window-Transfer from list
7. Click Transfer to move the quantities from the location(s) selected to the location above. The
quantities transferred from a location appear in parenthesis with a negative sign (- ###) in the
Transfer from bottom grid and the quantities transferred to a location appear in parenthesis with a
positive sign
(+ ###) in the Transfer to top grid.
Note: It may be necessary to use the scroll bar to the right to view this information on the list.
8. Click View details to look at specific transfer information for a highlighted item. The Items being
transferred to [Name of Location] window displays the amount to be transferred from other
locations. If the amount is not going to be transferred from a location, highlight the line item and
click Delete. Click Back to return to the Find and Transfer Items window.
9. Click Save to process the transfer. The Transfer Details report appears. Use this report to view the
details of the transfer.
10. Click Back to return to the Find and Transfer Items window.
11. Click
to close the Find and Transfer Items window.
Note: Once a stock transfer has been saved, it cannot be altered. To correct an error, issue another
transfer. If confirmation is required by the practice, another staff member or management must confirm
the transfer in the Stock Transfer List.
254
Chapter 11: Other Inventory Setup Tasks
Viewing and Confirming a Stock Transfer (Multiple Location Inventory Only)
Staff can verify and approve details to confirm the physical transfer of items from one location into
another performed in the Find and Transfer Items window by other staff personnel. This is only
necessary if the Auto confirm stock transfer check box is not checked in Inventory defaults (see
“Inventory Defaults” on page 109).
To search for a stock transfer:
1. On the Inventory menu, select Stock Transfer List.
2. Enter dates in the From and To text boxes to narrow the list of transfers to those performed within a
specific date range.
Note: The From text box is automatically completed with a date two weeks prior to the system date;
the To text box is automatically completed with the current system date. This information can be
modified.
3. To narrow the list of transfers to the specified transfer location, select the location into which the
inventory items were transferred from the Transferred to drop-down list.
4. To narrow the list of transfers to a specific category, select the status of the inventory transfer from
the Status drop-down list. Status options include:
• All-Includes all transfers.
• Unconfirmed-Transfers waiting to be confirmed.
• Confirmed-Transfers validated by another person or automatically confirmed by Cornerstone if
the default is set.
5. Click Search to find transfers that match the criteria entered in the Search for a transfer area.
Stock Transfer List window-Search for a transfer
6. Select a transfer and click View Details to display the Transfer Details report for the selected
transfer.
7. Click Back to return to the Stock Transfer List window.
To confirm a stock transfer:
Note: Confirming transfers is only necessary if the Auto confirm stock transfer check box is not
selected in Inventory defaults (see “Inventory Defaults” on page 109).
1. From the Stock Transfer List, highlight a transfer with the status of Unconfirmed.
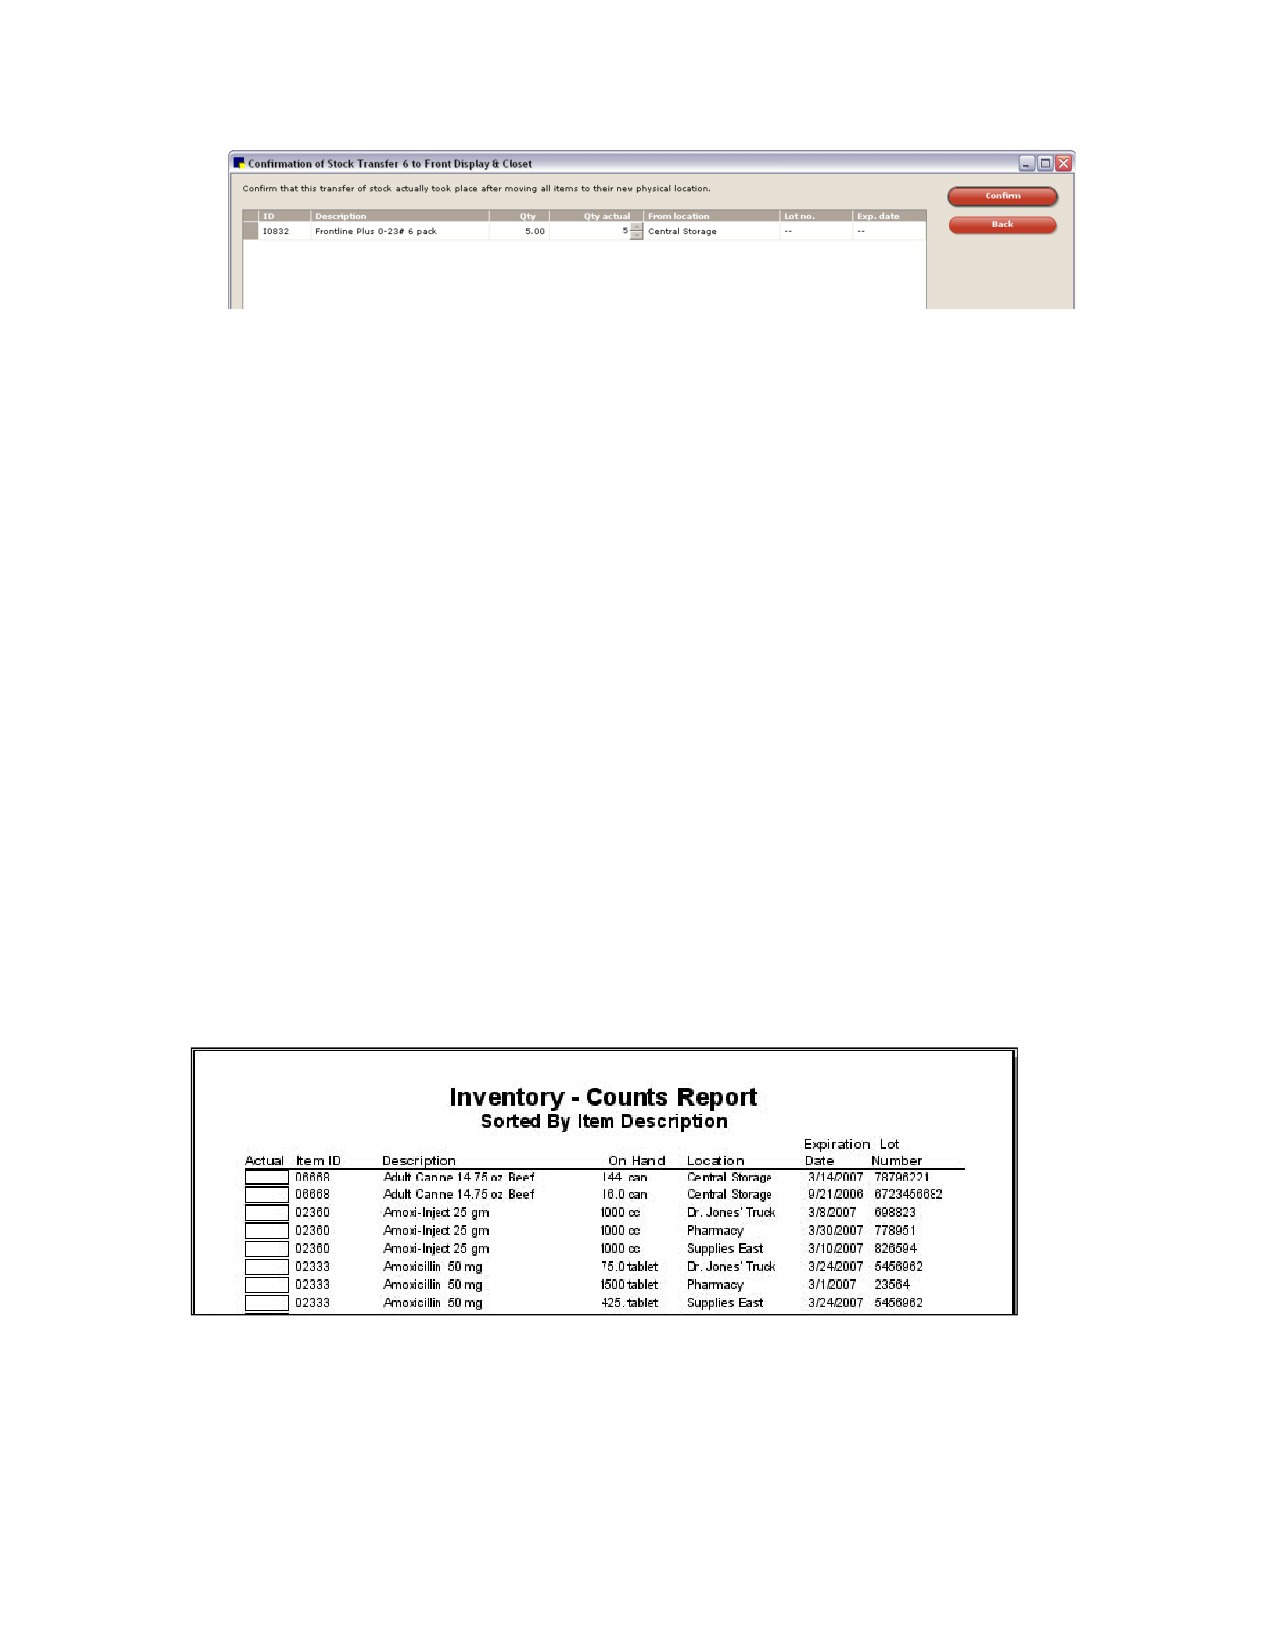
2. Click Confirm Transfer to verify the transfer performed by another staff member in the Find and
Transfer Items window is accurate and complete. The Confirmation of Transfer window appears.
255
Chapter 11: Other Inventory Setup Tasks
Confirmation of Stock Transfer window
3. If necessary, modify the quantity to transfer in the Qty actual text box.
4. Click Confirm.
Cornerstone returns to the Stock Transfer List window; the status of the transfer is now marked as
confirmed.
Performing a Cycle Count
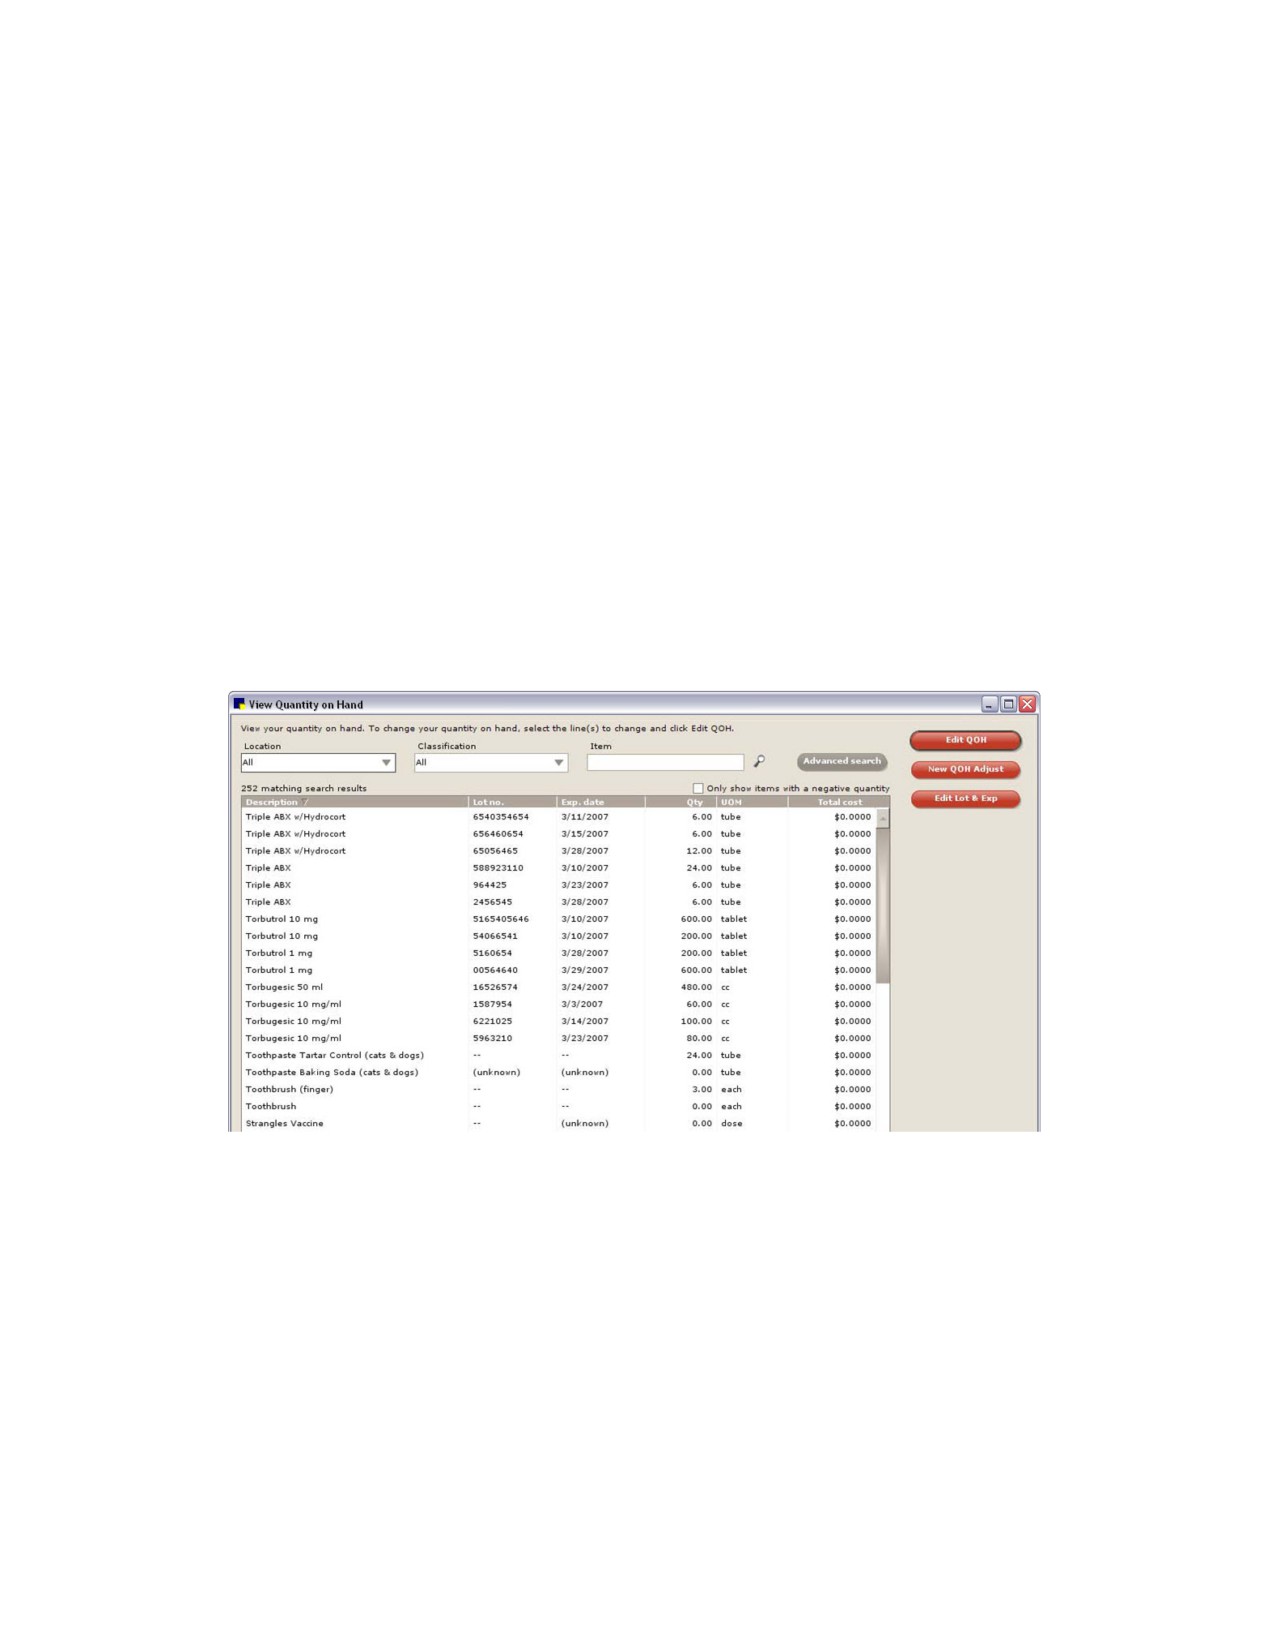
Use the Inventory-Counts Report to perform a cycle count of inventory items marked to maintain
quantity on hand. The report lists the current quantity on hand for each item and provides a space to
write the actual number of items physically available for each item.
To perform a cycle count using the Inventory-Counts Report:
1. On the Reports menu, select Find a Report. The Report Search window appears.
2. In the Reports list, click the plus sign to the left of Inventory, and then select the Counts Report.
3. Click Create report, and then click Run.
4. In the Sort by drop-down list, specify the desired sort order for the report (sort by Item Description,
Location or Class ID).
5. In the Set report range area, specify a range if you want to filter the information to be included in the
report.
6. Click Print Now to print the report immediately to the default printer, or click Print if you want to
specify the printer and print range options before printing.
7. Perform a physical count of inventory items and enter the number of items in the Actual column on
the printed report.
256
Chapter 11: Other Inventory Setup Tasks
Viewing and Adjusting Quantity on Hand (View Quantity on Hand window)
Once a physical count of inventory is complete, the next step is to adjust the quantity on hand (QOH)
within Cornerstone. Use the Adjustment feature to correct quantities and, if tracking, correct expiration
dates and lot numbers for items marked to maintain QOH within Cornerstone. Adjustments are generally
made because of a physical count of inventory, damaged or expired products, and entry errors.
Note: Only items marked to maintain QOH display on this list. (Items are marked to maintain QOH by
selecting the Maintain QOH check box in the Invoice Item Information Inventory tab.) If an item is
marked to maintain QOH and does not appear, it is possible it has zero quantity within Cornerstone or it
is an adjustment that has not been confirmed. In this instance, use the New QOH Adjust option to
perform the adjustment.
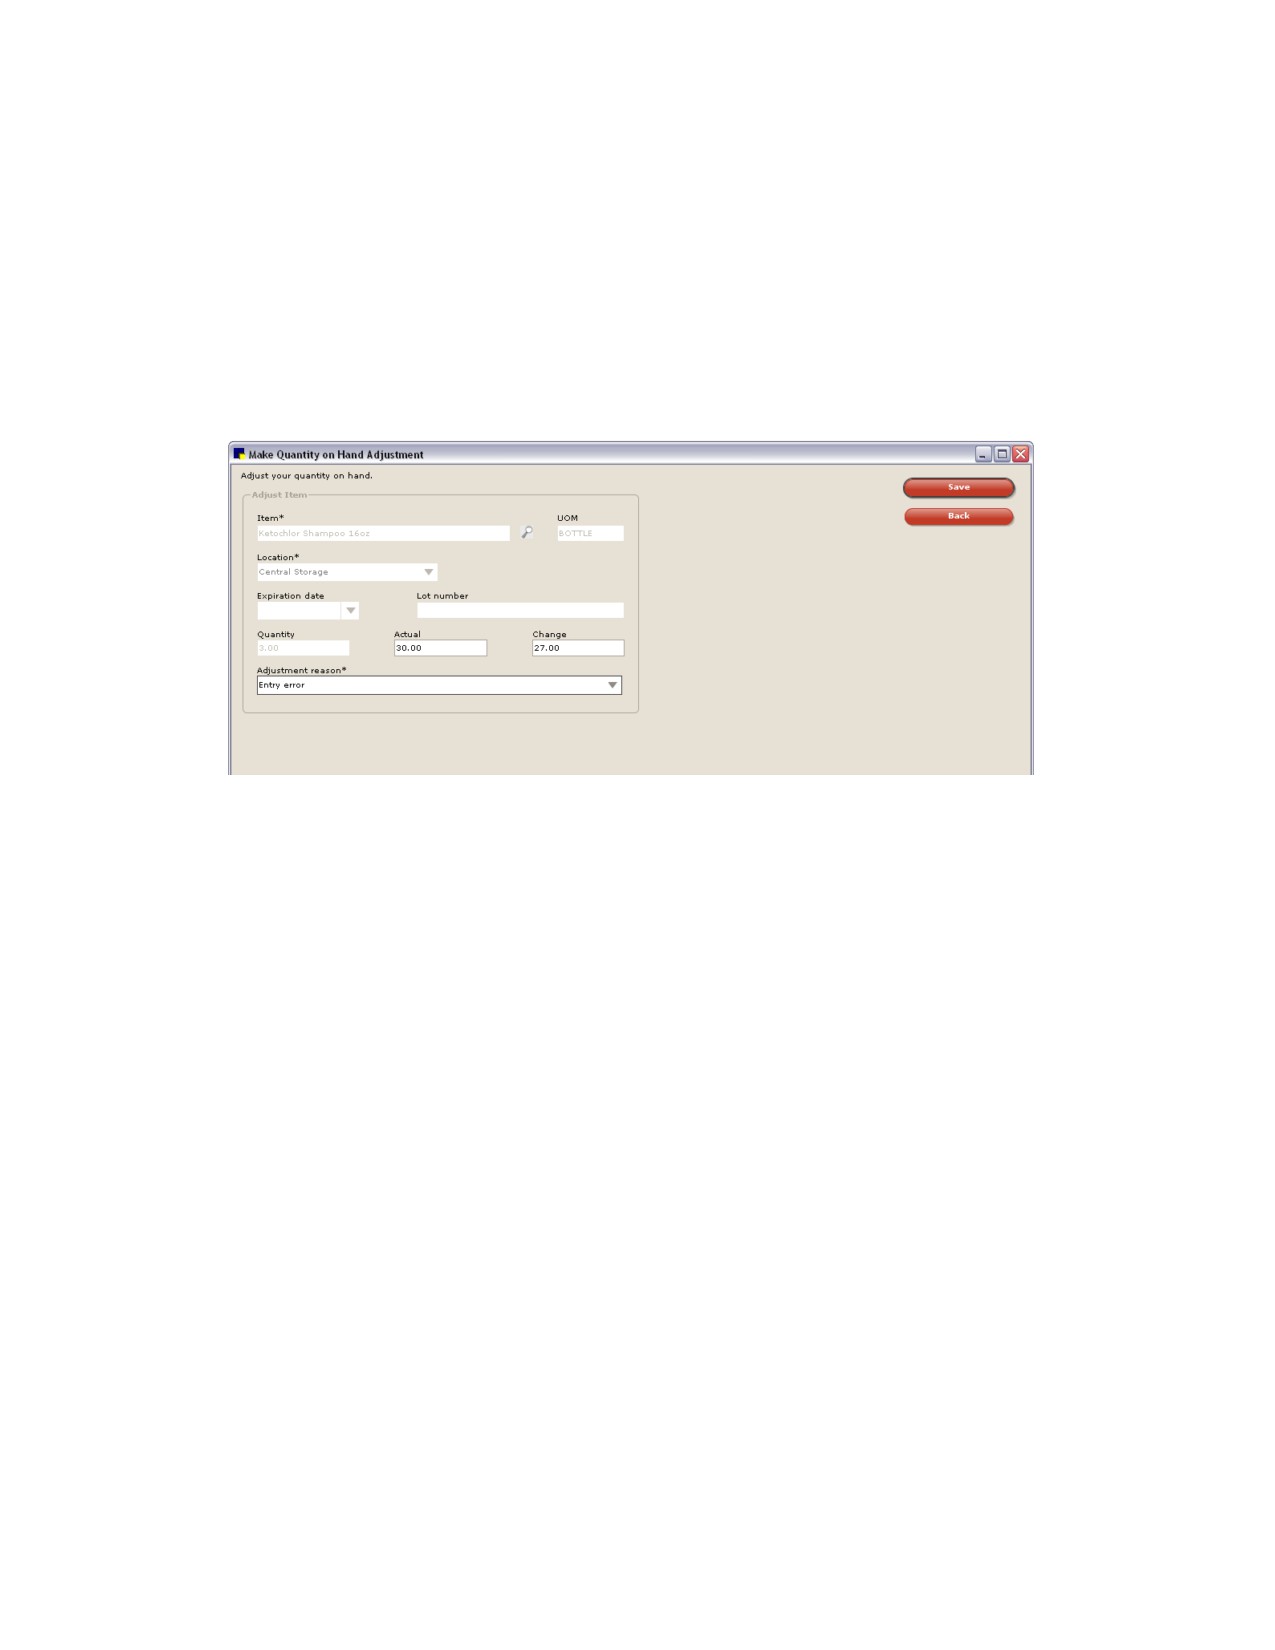
Several buttons are available on the View Quantity on Hand window:
• Click New QOH Adjust to adjust QOH and location.
• Click Edit QOH to adjust QOH only.
• Click Edit Lot + Exp to edit lot number and/or expiration date.
To access the View Quantity on Hand window:
¾ On the Inventory menu, select View Quantity on Hand.
View Quantity on Hand window
Note: Adjustments can also be made from the Adjustment List (by staff with required security
permissions). See “Adjusting Quantity on Hand and Cost (Adjustment List window)” on page 259.
To search for an inventory item:
1. On the View Quantity on Hand window, select an area from the Location drop-down list to narrow
the list of tracked inventory items to those assigned to the location.
2. Select a classification from the Classification drop-down list to narrow the list of inventory items to
those assigned to a specific category.
3. Search for and select an inventory item in the Item text box to view information for the specific item.
257
Chapter 11: Other Inventory Setup Tasks
4. Select the Only show items with a negative quantity check box to view only inventory items with a
negative quantity in Cornerstone.
5. Click the Advanced Search button to narrow the list of items to a specific location group (multiple
location inventory only), location type (multiple location inventory only), lot number, expiration date
range and/or total cost range.
To adjust a single item:
1. On the View Quantity on Hand window, highlight an item to adjust and click Edit QOH or click New
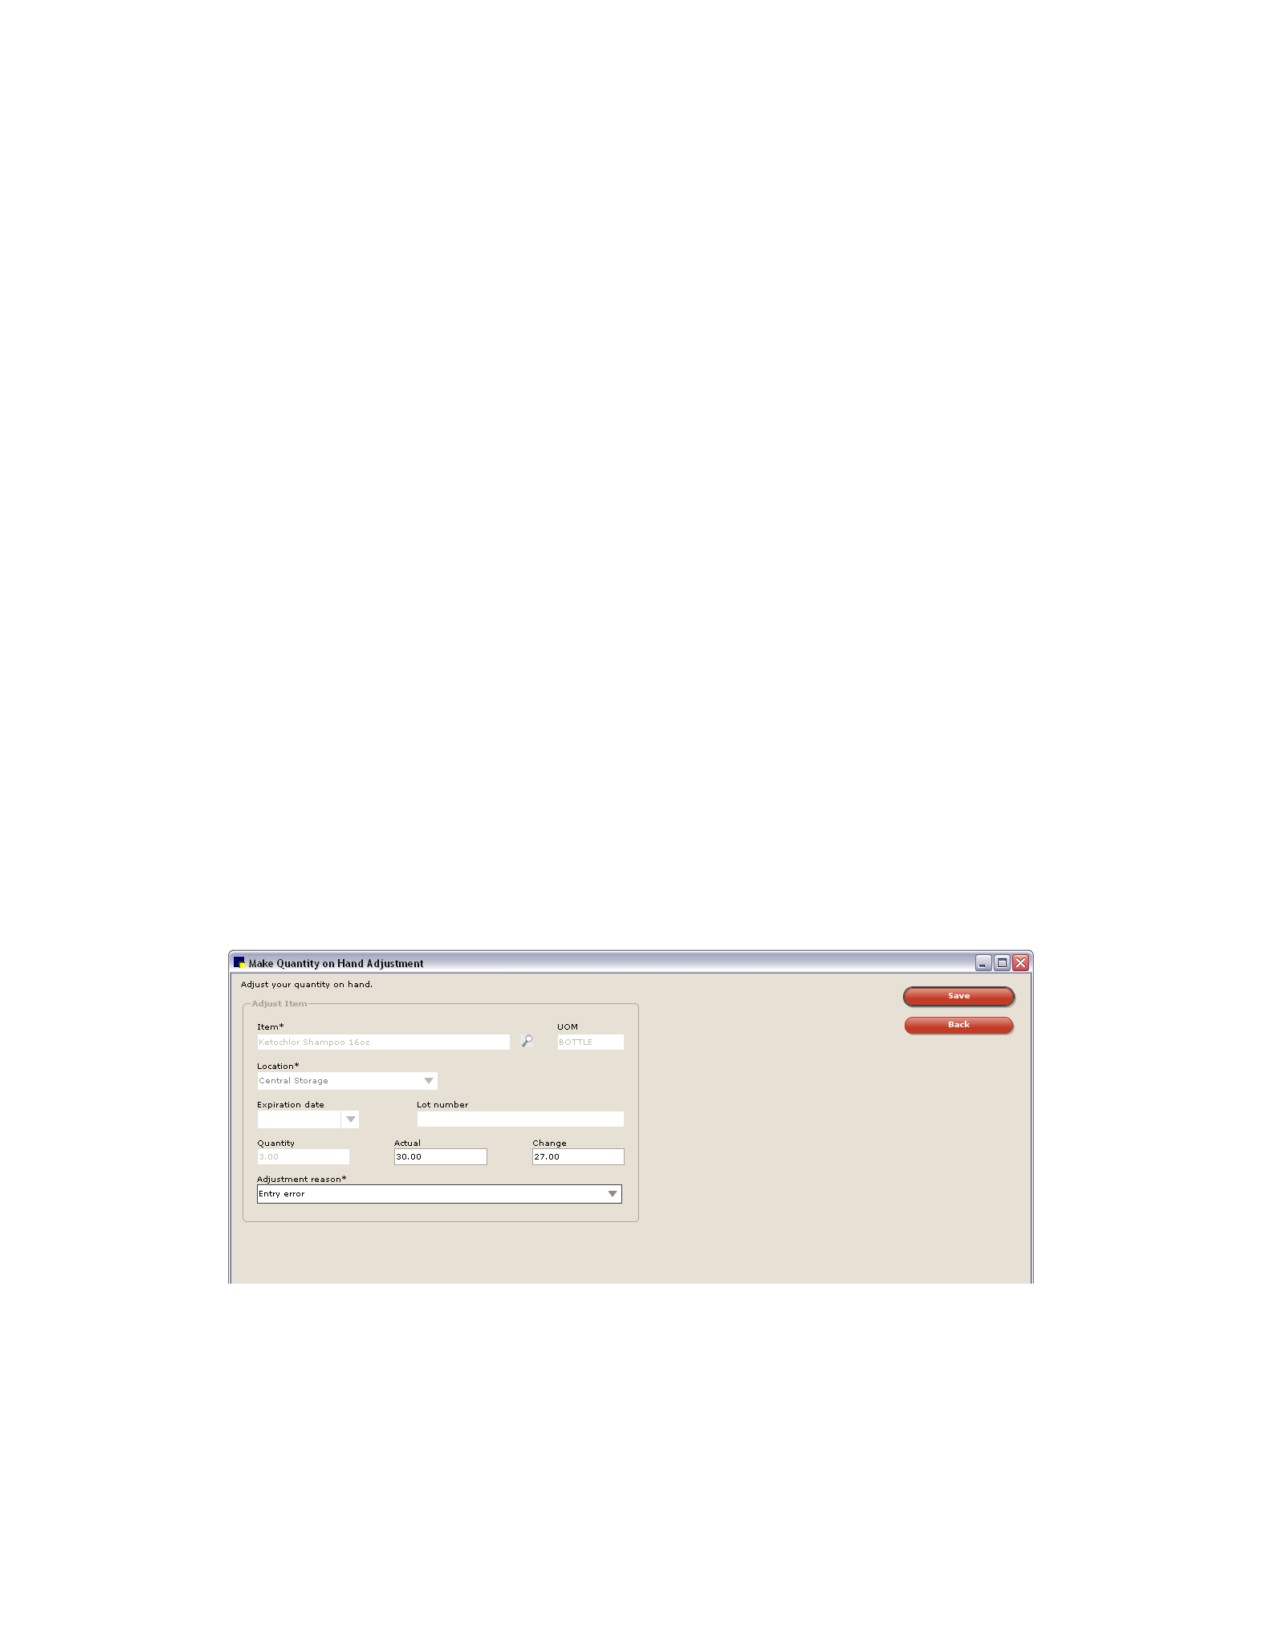
QOH Adjust to search for and select an item to adjust. The Make Quantity on Hand Adjustment
window appears.
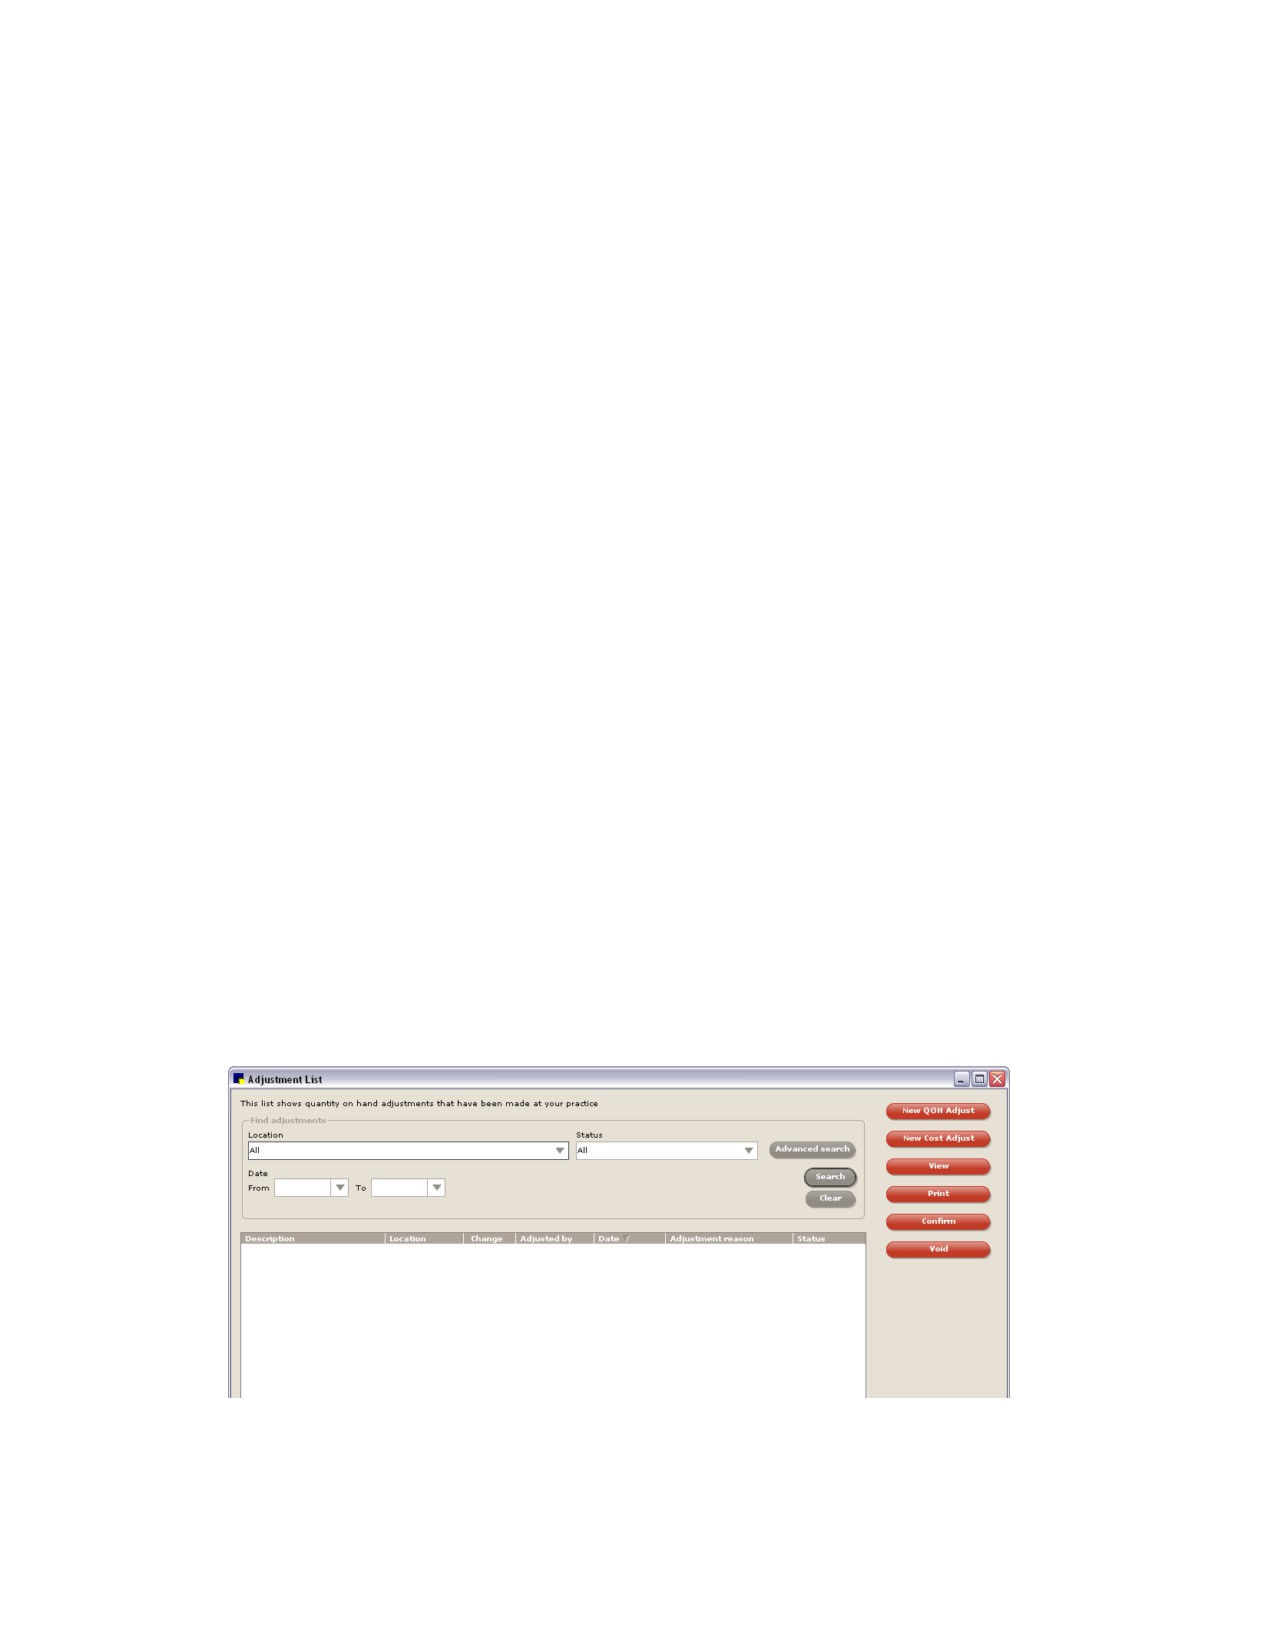
Make Quantity on Hand Adjustment window
Note: If an item is selected for editing, the following fields will be filled in for the inventory item:
UOM, Location, Expiration date, Lot number, and Quantity.
2. If the New QOH Adjust was selected, do the following:
a. Search for and select the inventory item to adjust in the Item text box. The selling unit of
measure displays in the UOM text box and the amount in stock according to Cornerstone is
listed in the Quantity text box.
b. Select the location of the item being adjusted from the Location drop-down list.
c. If applicable, enter the expiration date of the inventory item being adjusted in the Expiration
date text box.
d. If applicable, type the lot number of the inventory item being adjusted in the Lot number text
box.
3. Type the actual quantity available of the item in the selected location in the Actual text box. The
Change text box will display the adjusted quantity (Actual-Quantity = Change).
4. Select an explanation for the adjustment from the Adjustment reason drop-down list.
5. Click Save to process the adjustment. The View Quantity on Hand window will display the updated
information.
258
Chapter 11: Other Inventory Setup Tasks
To adjust multiple items:
1. On the View Quantity on Hand window, select the items that need to be adjusted.
• To select nonconsecutive items, hold down CTRL, and then click each item you want to select.
• To select a consecutive group of items, click the first item, hold down the SHIFT key, and then
click the last item.
2. Click Edit QOH to adjust the existing quantity on hand for each item.
3. Enter necessary information for the first item on the Adjusting records list.
4. Click Next Record to advance to the next available item or click Previous Record to return to the
last available item.
5. Enter necessary information for each item.
6. Once all items have been updated, click Save to process the adjustments.
To edit the expiration date and/or lot number for an item:
1. On the View Quantity on Hand window, select the applicable item.
2. Click Edit Lot & Exp. The Make Quantity on Hand Adjustment window appears.
3. If applicable, change the expiration date of the item in the Expiration date text box.
4. If applicable, change the lot number of the item in the Lot number text box.
5. Select the reason for the adjustment from the Adjustment reason drop-down list.
6. Click Save to process the change.
Adjusting Quantity on Hand and Cost (Adjustment List window)
Staff/management can use the Adjustment List to verify and approve the adjustment of tracked inventory
items performed in the View Quantity on Hand window by other staff personnel. This window can also be
used to adjust the vendor’s cost of an item within Cornerstone.
Note: The staff member who will use the Adjustment List to make inventory changes must have
appropriate security permissions in Cornerstone.
To search for adjustments:
1. On the Inventory menu, select Adjustment List. The Adjustment List window appears.
Adjustment List window
259
Chapter 11: Other Inventory Setup Tasks
2.
Select an area from the Location drop-down list to narrow the list of adjustments to those assigned
to the location.
3.
Select a status from the Status drop-down list to narrow the list of adjustments to a specific status.
Status options include:
• Unconfirmed-QOH adjustments waiting to be confirmed or voided
• Confirmed-QOH adjustments validated by another person or automatically confirmed by
Cornerstone if the default is set.
• Voided-Cancelled QOH adjustments (only available if confirming adjustments)
4.
Enter dates in the Date From/To text boxes to narrow the list of adjustments to those within a
specific date range.
5.
To narrow the list of items to a specific location group (only for multiple location inventory), item,
classification, and which staff member made the adjustment, click Advanced search.
6.
Select an adjustment and click View to display the adjustment information. When you are finished
viewing the information, click Back to return to the Adjustment List.
7.
Click Print to preview, print or save the Inventory-Adjustment Report.
8.
If confirming adjustments before applying changes, highlight an adjustment with a status of
Unconfirmed and click Confirm. If a confirmation message appears, click Yes.
Note: Confirming adjustments is only necessary if the Auto confirm adjustments check box is not
selected in Inventory defaults (see “Inventory Defaults” on page 109).
9.
If an adjustment is incorrect, highlight the Unconfirmed adjustment and click Void. If a confirmation
message appears, click Yes.
To make a Quantity on Hand adjustment:
1. On the Adjustment List window, click New QOH Adjust. The Make Quantity on Hand Adjustment
window appears.
Make Quantity on Hand Adjustment window
2. In the Item text box, search for and select the tracked inventory item that needs a quantity on hand
adjustment. The selling unit of measure displays in the UOM text box.
3. Select the location the item belongs to in the Location drop-down list.
4. If applicable, select or enter the expiration date for the item in the Expiration date text box.
260
Chapter 11: Other Inventory Setup Tasks
5. If applicable, select or enter the lot number for the item in the Lot number text box.
6. Type the actual quantity available of the item in the selected location in the Actual text box. The
Change text box will display the adjusted quantity (Actual-Quantity = Change).
7. Select an explanation for the adjustment from the Adjustment reason drop-down list.
8. Click Save.
261
Section 4-Scheduling and Patient Visit
Setup
Chapter 12: Setting Up the Appointment Scheduler
Chapter 13: Setting Up the Electronic Whiteboard
Chapter 14: Setting Up a Reminder System
262
Chapter 12: Setting Up the Appointment Scheduler
This chapter covers the steps required to set up the Appointment Scheduler in the IDEXX Cornerstone*
Practice Management System. For information on scheduling appointments and other daily usage tasks
in the Appointment Scheduler, see “Chapter 6: Using the Appointment Scheduler” in the Cornerstone
User’s Manual.
Overview
The Appointment Scheduler is used by a practice to schedule appointments for patients.
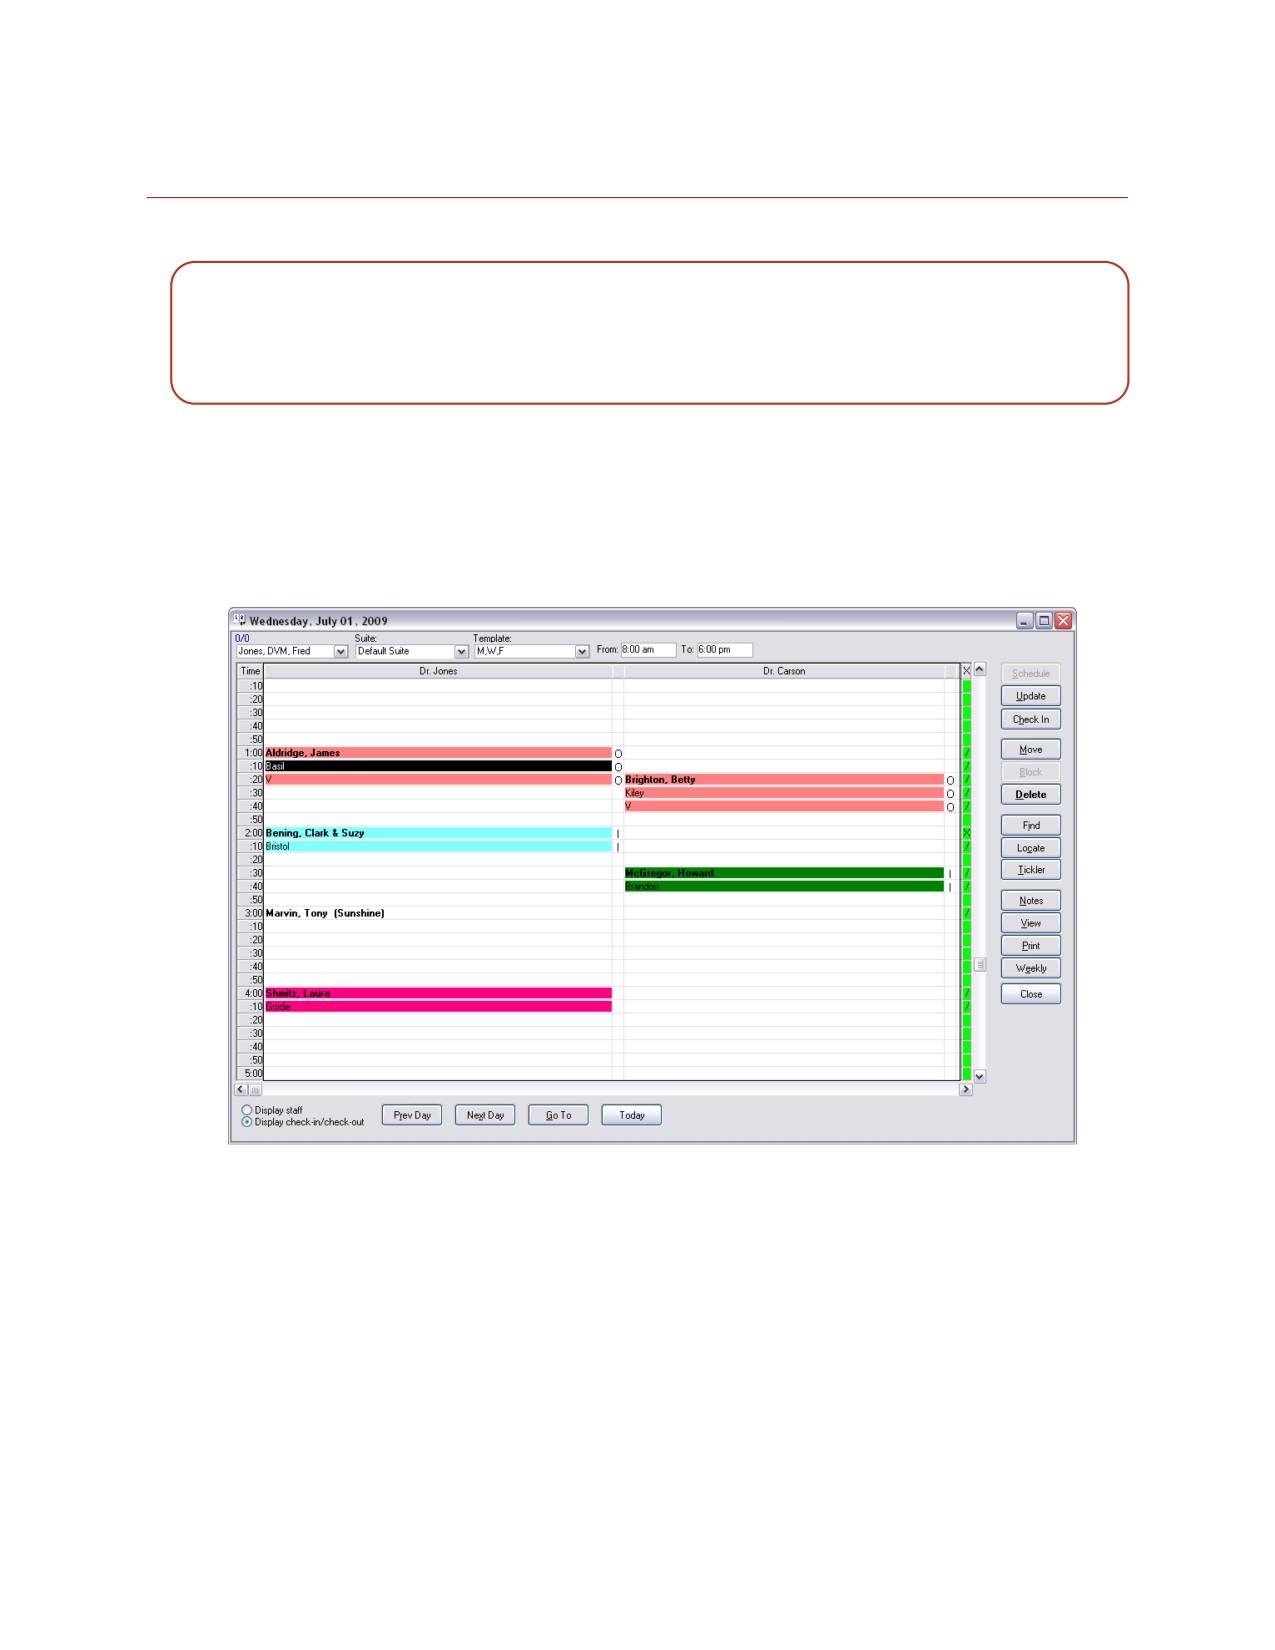
The settings you specify when setting up the Appointment Scheduler affect how you will view and use
the Schedule for Today window, the main window used for scheduling and tracking patient
appointments.
Schedule for Today window used in Appointment Scheduler
Before using the Appointment Scheduler, you will need to complete the setup tasks listed below to
ensure that your system is configured properly.
Note: Information on setting up rooms, hours and holidays is provided in other Cornerstone
Administrator’s Manual chapters (as indicated below, following each of these tasks). The remaining
checklist tasks are covered in this chapter in the following pages.
• Create an appointment scheduling plan
• Set up rooms to appear as column headers on the Schedule for Today window (see “Rooms”
on page 69)
• Set up practice hours (see “Appointment Scheduler-Practice Hours Defaults” on page 90)
263
Chapter 12: Setting Up the Appointment Scheduler
• Set up practice holidays (see “Appointment Scheduler-Holiday Defaults” on page 89)
• Set up staff schedules
• Set up daily staff revenue goals for each room
• Set up links to reasons for visit
• Set up schedule templates to define the appearance of the Schedule for Today window
• Assign practice templates to days of the week
• Set up appointment suite templates
Note: Remember to have a Cornerstone Administrator adjust Appointment security settings as needed
for each staff member.
Creating an Appointment Scheduling Plan
You should define an appointment scheduling plan for your practice before setting up rooms. When
creating your plan, consider the following key questions:
• Will you schedule appointments by staff member or by room/location?
• What room name (staff name, staff title, location, etc.) do you want to assign to each column
displayed in the Schedule for Today window?
• Should there be a separate Surgery column, or are surgeries scheduled in a doctor’s column?
• Will appointments be scheduled for Drop-offs, Groomers, or Technicians?
• Will overbooking be allowed?
Setting Up Staff Schedules
Each staff member who sees patients by appointment needs to have a staff schedule set up. Each staff
member’s hours must be defined in staff setup before appointments can be scheduled for that staff
member (even if their hours are the same as the practice hours). This also ensures that scheduled hours
appear correctly in the daily schedule.
To set up staff hours:
1. On the Controls menu, select Appointment Scheduler > Staff Setup.
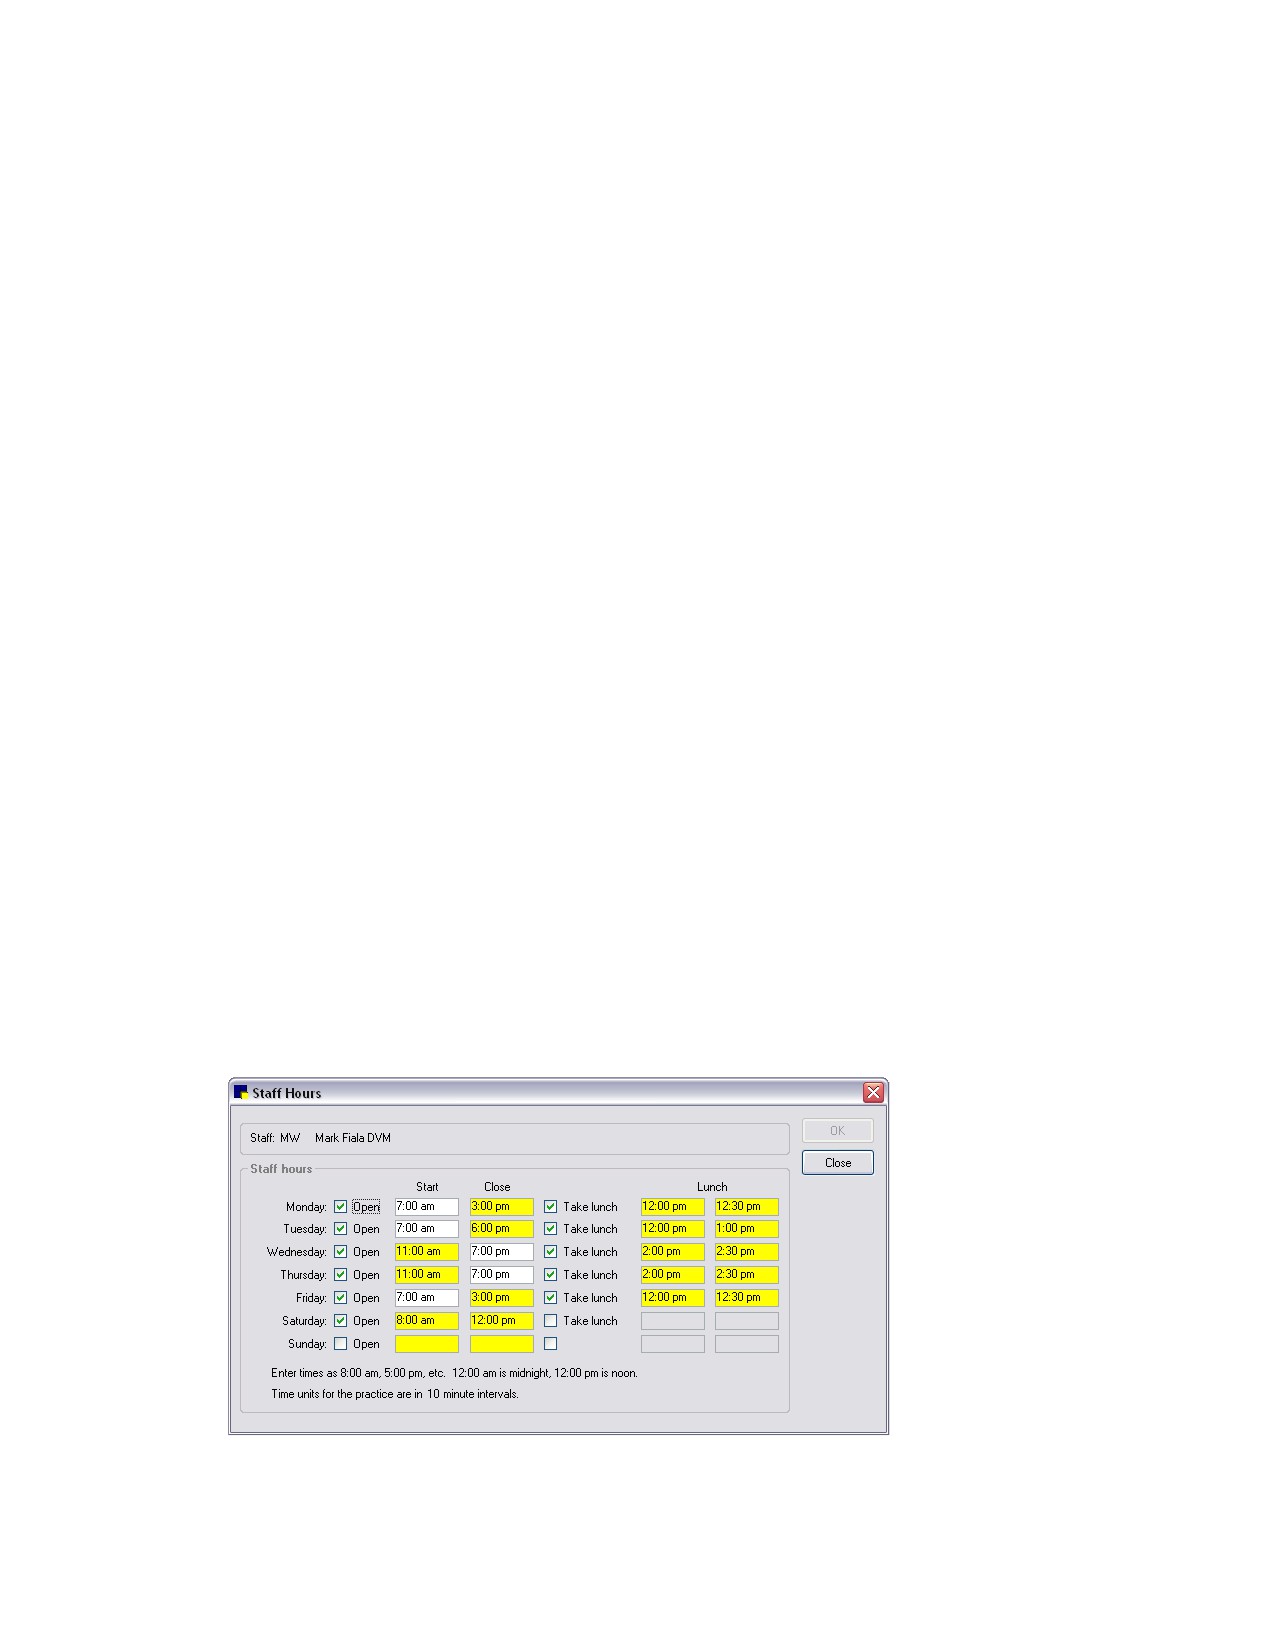
2. Select the staff member and click Hours. The Staff Hours dialog box appears.
Staff Hours dialog box
264
Chapter 12: Setting Up the Appointment Scheduler
Note: By default, the staff member is scheduled to work all hours the practice is open.
3. To modify the hours the staff member may be available for appointments, click a time text box and
enter the correct time. Clear the Open check box for any days the staff member is not scheduled to
work.
Note: Individual staff times that differ from the practice hours display with a yellow background.
4. Make sure the Take lunch check box is selected and the correct times are entered if the staff
member is unavailable during lunch.
5. Click OK.
Note: If you want to set up revenue goals for this staff member now, leave the Staff Setup window open
and refer to the following section to set daily revenue goals for staff.
Example:
You would like to schedule appointments for Dr. Anne Carson at any time the practice is open. You must
select her name in staff setup, click Hours, then click OK in the Staff Hours dialog box. Now her name
will appear in the daily schedule in the drop-down list of staff names under the date.
Setting Daily Revenue Goals for Staff
Setting up staff schedules and setting staff goals will let you track the revenue generated daily by staff
members for each room in your practice. Staff members are linked to revenue goals through rooms.
If you schedule appointments for a staff member in a room not normally assigned to that staff member
(i.e., they are not linked to the room through staff goals), a warning message will display.
The Scheduled vs. Goal Ratio
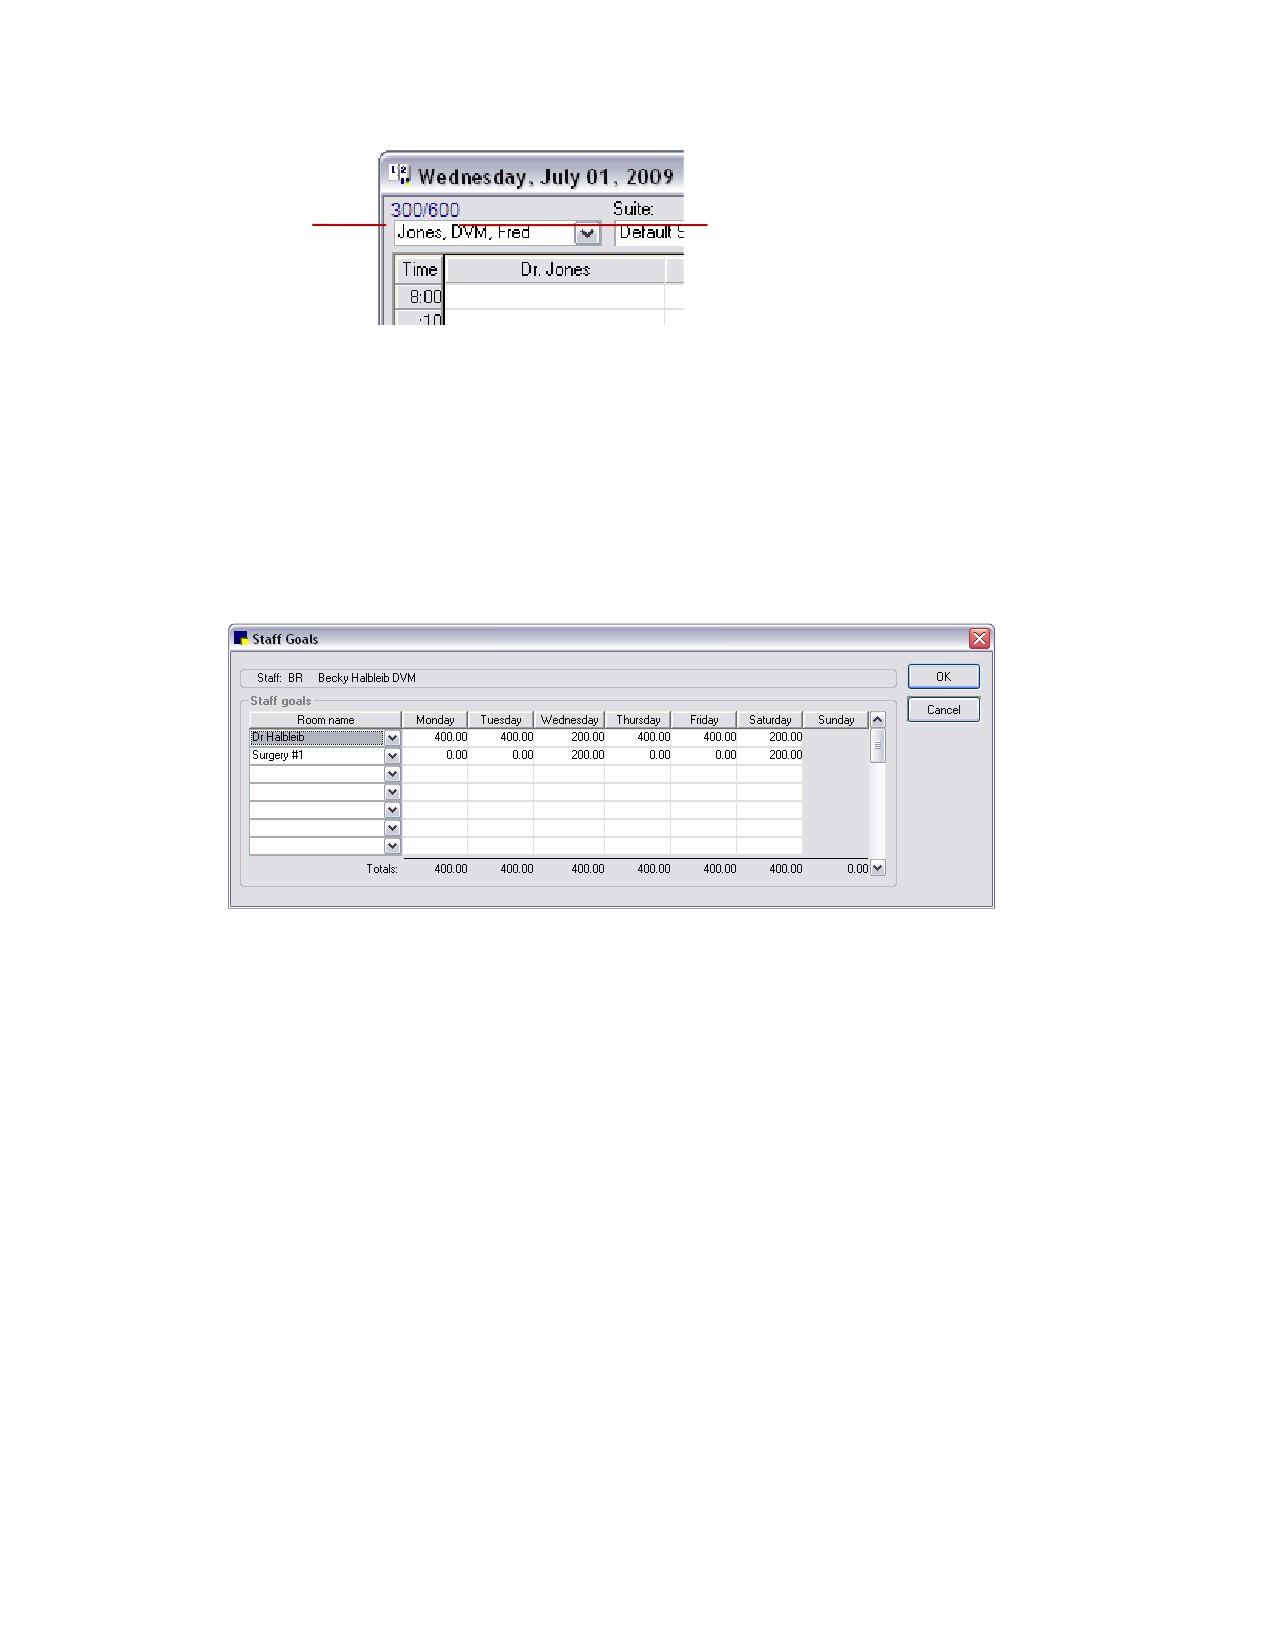
When you open the Schedule for Today window, your revenue goals are displayed in the upper-left
corner near the staff listing. The first number is the scheduled revenue for the day (the sum of reason for
visit usual amount or the appointment items added when the appointment is scheduled); the second
number is the staff member’s revenue goal for the day.
For the Scheduled/Goal ratio to reflect useful information, staff members with appointments scheduled
must have defined goals linked to rooms. As you schedule appointments, the ratio will automatically
update. Using staff goals, you can see how close your practice is to achieving the revenue goals you
set.
Example:
Dr. Jones’ practice schedules appointments in four rooms: Surgery Room 1, Surgery Room 2, Treatment
and Grooming. Dr. Jones tries to schedule six hours of surgery time at $50 per hour every Wednesday
and Friday in Surgery Room 1. The following must be set up for the Scheduled/Goals ratio to accurately
reflect Dr. Jones’ goals:
1) The room Surgery Room 1 must be in the Room List.
2) Dr. Jones’ Wednesday and Friday schedule must have six hours of available time.
3) Dr. Jones’ goals must include $300 (6 hours * $50) in Surgery Room 1 on Wednesday and Friday.
265
Chapter 12: Setting Up the Appointment Scheduler
Scheduled goal
Revenue goal
How it Works
The $300 of surgery revenue is included in the revenue goal (second number of the Scheduled/Goals
ratio) every Wednesday and Friday. As patients are scheduled with Dr. Jones in Surgery Room 1, the
usual amount set up in the reason for visit for the appointments is added to the scheduled revenue (first
number of the ratio).
To set up staff revenue goals:
1. On the Controls menu, select Appointment Scheduler > Staff Setup.
2. Select the staff member and click Goals. The Staff Goals dialog box appears.
Staff Goals dialog box
3. In the Room name column, use the drop-down lists to select the name of each room where the staff
member may have an appointment scheduled.
4. If the practice tracks daily sales goals for a staff member, type the staff member’s revenue goal
(dollar amount) for each day in each applicable room.
Note: In order to generate an accurate Scheduled vs. Goals Report, dollar amounts must be
entered in the Amount text box when scheduling.
5. Click OK.
The staff member’s scheduled vs. revenue goals will appear in the upper left corner of the Schedule
for Today window.
To review the status of staff revenue achievement vs. goals, print the Scheduled vs. Goal Report.
To delete a staff member’s daily revenue goals:
1. On the Controls menu, select Appointment Scheduler > Staff Setup.
2. Select the staff member and click Goals. The Staff Goals dialog box appears.
3. Select the goal to delete and press CTRL+D. You are prompted to confirm the deletion. Click Yes.
266
Chapter 12: Setting Up the Appointment Scheduler
Link to Reasons for Visit
You can link information to the appointment types set up in the Reason for Visit list to make it easy to
quickly enter appointment information in the schedule.
The following information can be linked to reasons for visit:
• The amount usually charged for the service
• The appointment color and text color (black or white) to be displayed on the schedule
• The staff member who normally provides the service
• The total amount of time required for the service
• The amount of time needed for the staff member to perform the service (of the total appointment
time scheduled)
Note: Primary and secondary reasons for visit are set up in Controls > Reasons for Visit. See
“Reasons for Visit” on page 22.
To set up Reason for Visit information:
1. On the Controls menu, select Appointment Scheduler > Reason for Visit. The Reasons for Visit
list opens.
2. Select the reason for visit to which you want to link the information and click Update. The Reason for
Visit dialog box appears.
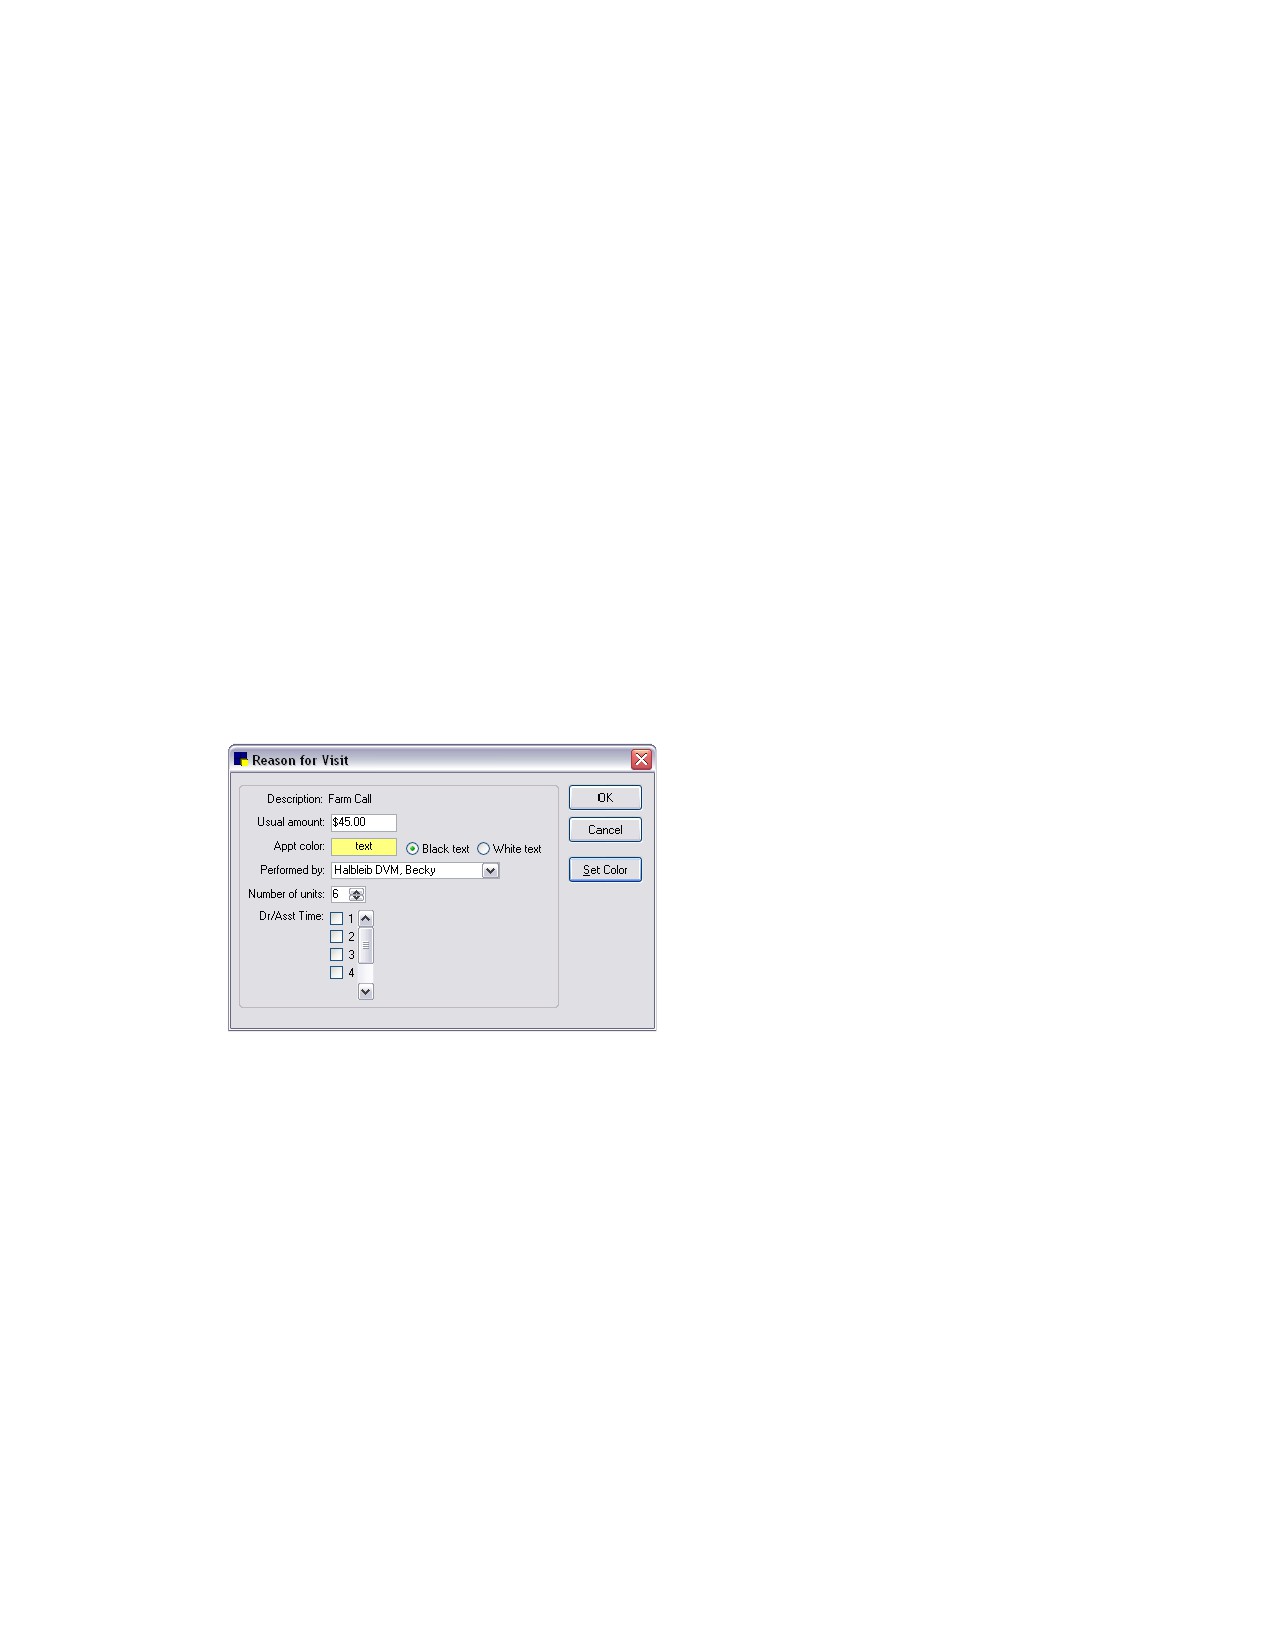
Reason for Visit dialog box
3. If the practice uses revenue goals for staff members, enter the Usual amount charged for this
service.
4. Click Set Color or double-click in the Appt. color text box. The Color dialog box appears.
267
Chapter 12: Setting Up the Appointment Scheduler
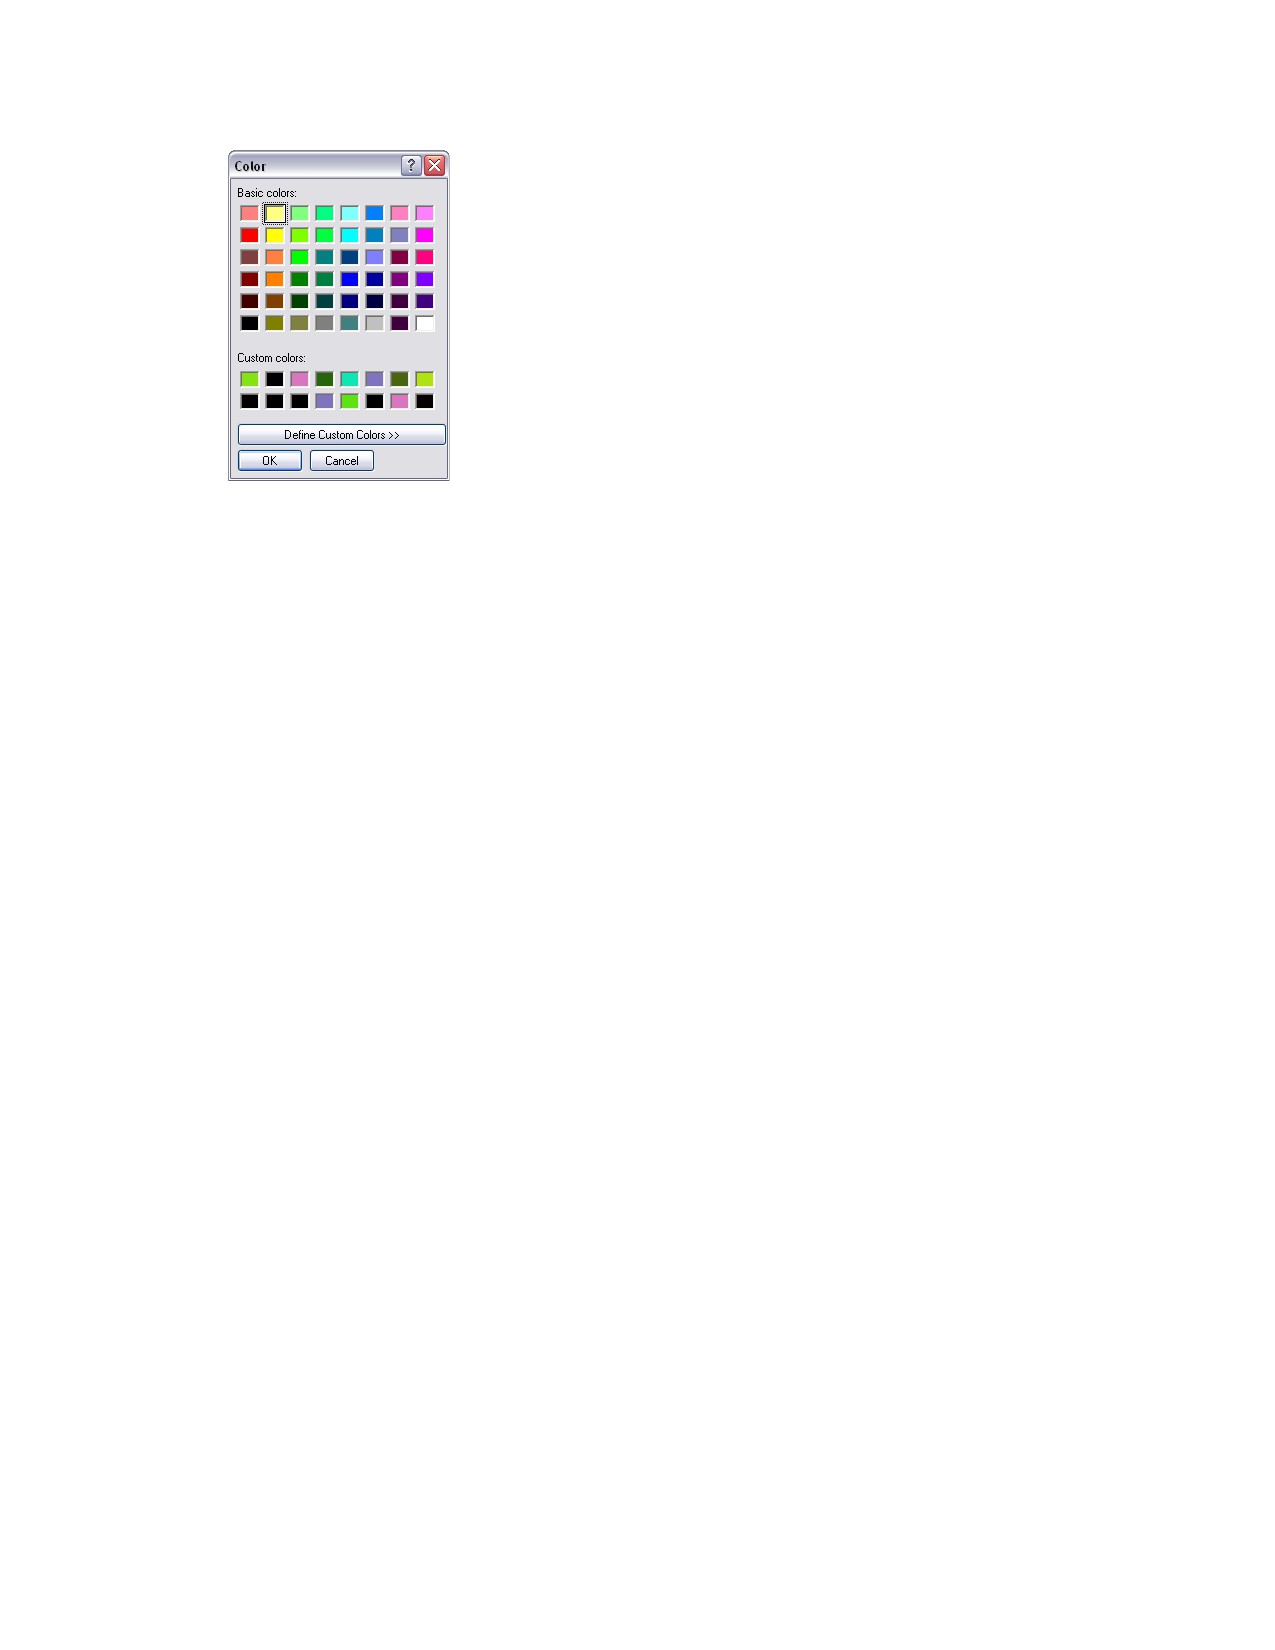
Color dialog box
Note: The color is used to color code the reason for visit on the side bar on the schedule template
and to color an appointment scheduled with this reason for visit on the Schedule for Today window.
5. Click on the color to assign to this reason for visit and click OK. Do not use black (color of cursor) or
white (color of Schedule for Today window background).
6. To define a custom color, click Define Custom Colors and click the area in the color spectrum with
the color you want. When you are satisfied with your color selection, click Add to Custom Colors.
Your color will appear under custom colors.
Tip: Use pastel colors instead of bright colors and use similar colors within the same palette to
group similar reasons for visit.
7. Select the text color (Black text or White text) so it can be seen on the background color in the
schedule.
8. From the Performed by drop-down list, select the staff member who normally provides this service.
9. Enter the default Number of units of time (up to 25) the appointment type normally requires, or use
the arrows to increase or decrease the number. The unit of time is a 10 or 15 minute interval, based
on how the practice hours are set up.
10. From the Dr/Asst Timedrop-down list, select the number of time units needed for the scheduled
staff member to perform the service. For example, a recheck appointment may be scheduled to take
20 minutes, but the doctor will only be with the patient for 10 minutes. These time units appear on
the schedule with an X next to the selected time slots (indicating that a staff member is scheduled to
attend to the patient during that time period). You can check boxes without preassigning a staff
member to the reason for visit.
11. Click OK.
268
Chapter 12: Setting Up the Appointment Scheduler
Example:
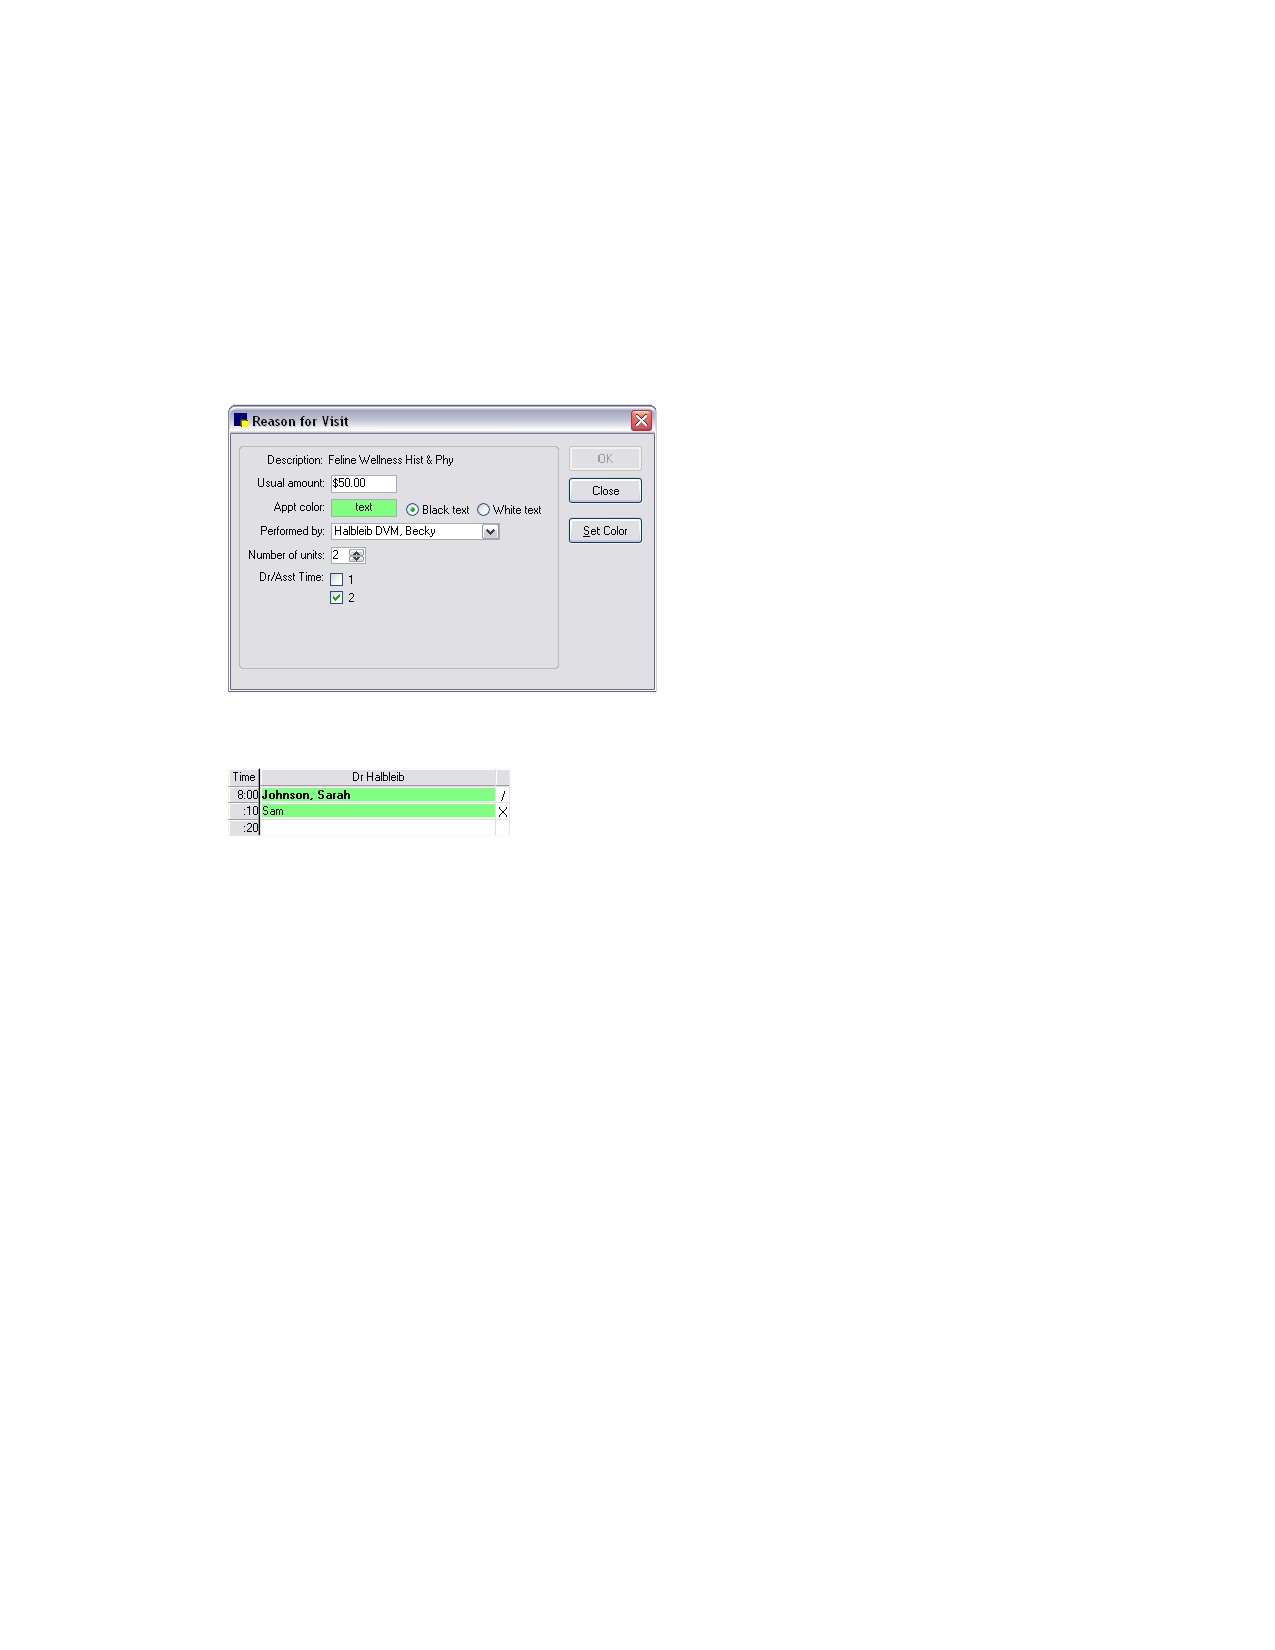
A practice uses Feline Wellness Hist & Phy as a reason for visit. To use Feline Wellness Hist & Phy with
the Appointment Scheduler, the following settings were defined:
Usual amount: $50,
Color: light green with black text
Performed by: (the doctor who normally performs feline checkups)
Number of units: 2
Dr/Asst Time: time unit 2 (the time that the doctor will actually attend the patient)
When a patient is scheduled for a Feline Wellness Hist & Phy, the appointment appears on the schedule
like this (with the applicable background color):
The Usual amount of $50 is added to the scheduled revenue in the upper left corner of the Schedule for
Today window. See “Setting Daily Revenue Goals for Staff” on page 265.
Designing a Schedule Template
Template designs define the appearance of the Schedule for Today window for each day of the week a
template is assigned. It is used as a general guide for staff when scheduling appointments and should
only be set up when your practice has a standard weekly schedule.
Note: Rotating schedules for surgery days or days off cannot be set up through templates. Instead,
block times for staff members on the Schedule for Today window, keep a rotation sheet available and
make appointments accordingly.
You can assign a schedule template as a default template to each day of the week. This is useful for
days when a room is not used or when rooms are used for specific types of appointments. For example,
on days when surgeries are performed, use a schedule template (named "Surgery Day") that reflects
how practice rooms are used on surgery days.
The templates you assign to specific days are also used for the Appointment Search. You can search for
an available appointment for a specific reason for visit if you set up schedule templates accordingly and
then use them as default templates.
To set up a schedule template:
1. On the Controls menu, select Appointment Scheduler > Template Designs.
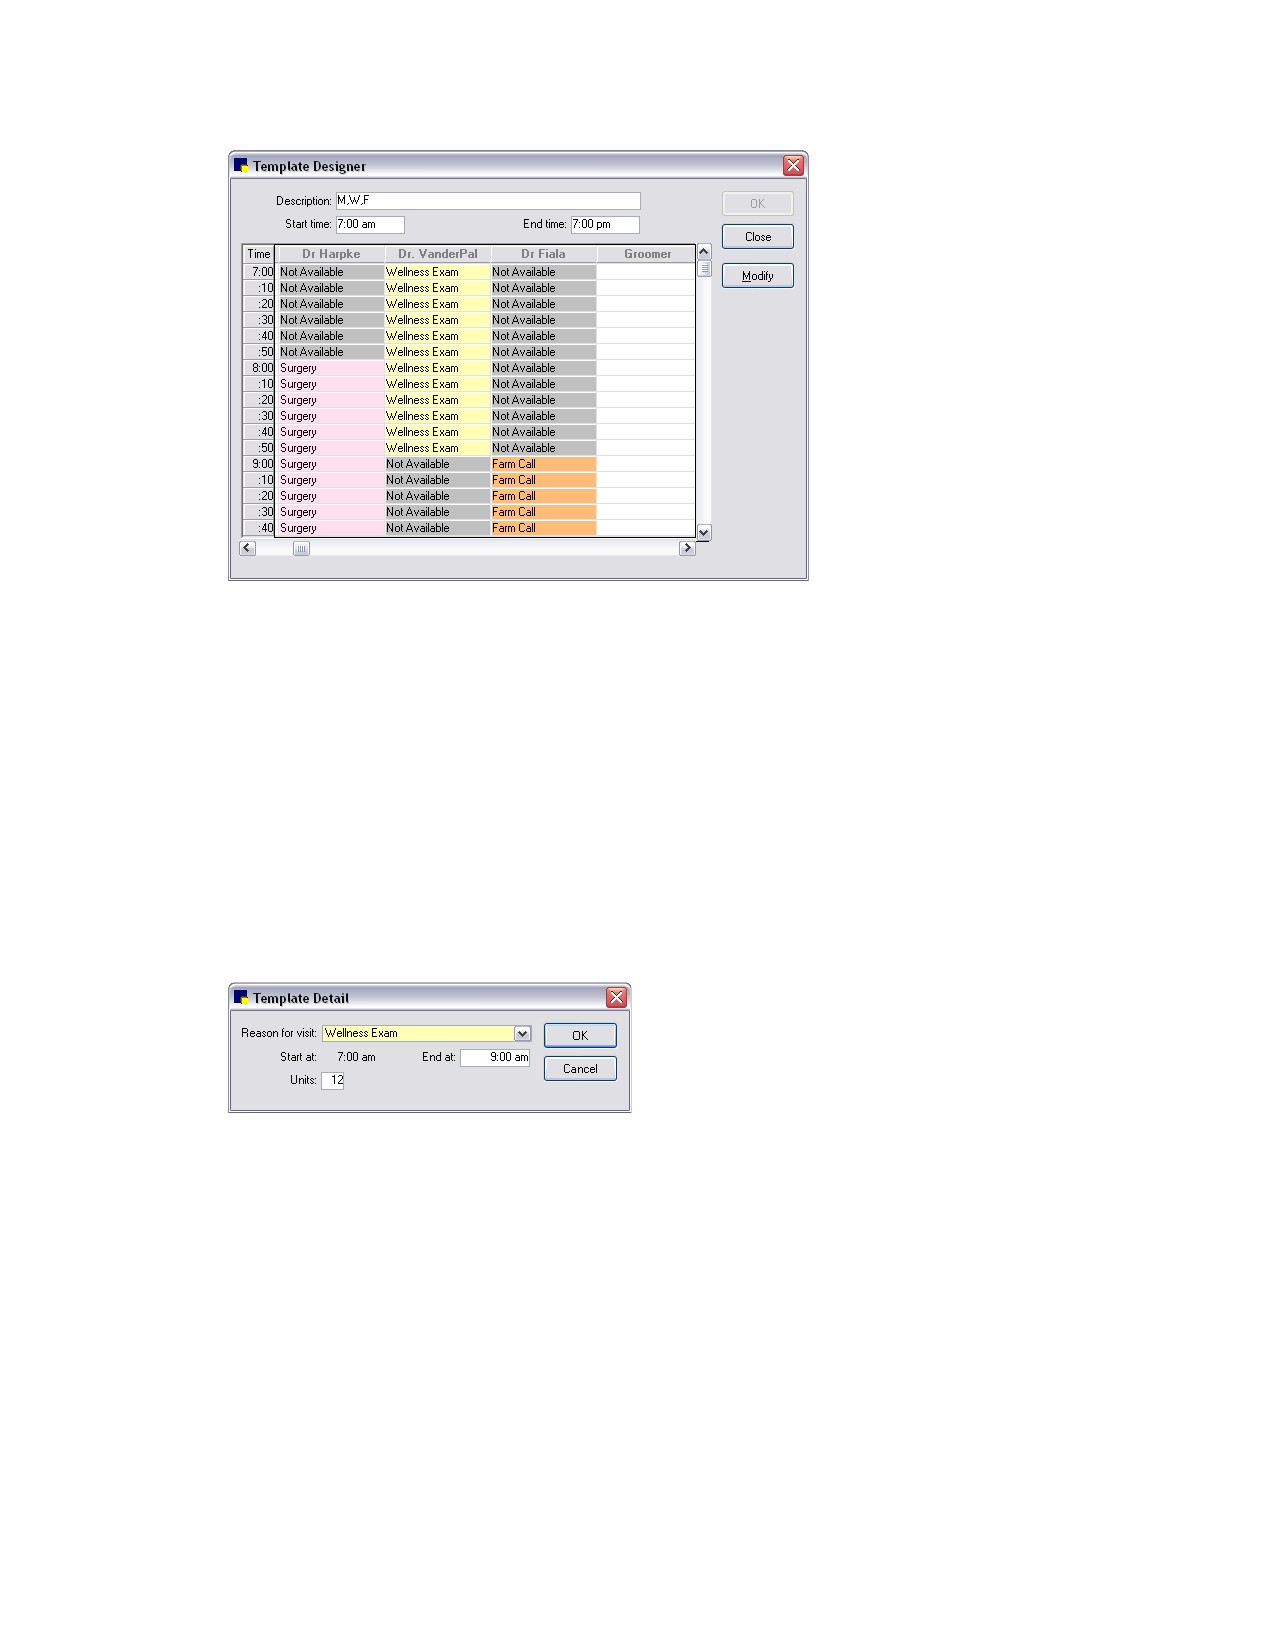
2. Click New. The Template Designer will open with a column for each room divided into rows with
your practice’s scheduled time units. (You can also press CTRL+N to add an item to a list.)
269
Chapter 12: Setting Up the Appointment Scheduler
Template Designer dialog box
3. In the Description text box, enter a description for this template. The description may be a day of
the week, staff name, general description or combination. For example, Surgery Day (on days when
surgeries are performed), M,W,F (if Monday, Wednesday and Friday schedules are the same) or
Monday-Friday (if the facility has the same schedule each day of the week).
4. The Start time and End time text boxes will display the earliest start time and latest end time you
selected for your practice hours. Change the start and end times, if necessary. The schedule will
automatically adjust to these times.
5. Select a beginning time slot for a room and click Modify, or double-click the time slot. The Template
Detail dialog box appears.
Note: Time units are increments of 10 or 15 minutes, depending on the time unit selected in the
Appointment Scheduler - Hours defaults.
Template Detail dialog box
6. In the Reason for visit drop-down list, select a general reason for seeing patients during this
specific time slot.
7. Type the time when this particular scheduling block should end in the End at text box, and then
press TAB. The total number of time units for the block will display in the Units text box. (Conversely,
you can enter the Units of time and the End at time will adjust accordingly.)
Note: The Template Designer window will automatically adjust to the times listed here. This does not
affect the Schedule for Today times, which are based on practice hours set in the Appointment
Scheduler - Hours defaults.
8. Click OK to return to the Template Designer.
9. Continue to set up the remaining blocks of time as needed.
270
Chapter 12: Setting Up the Appointment Scheduler
10. When finished, click OK to save the template.
Note: If you change the Template for a particular date in the Schedule for Today window, the default
template assigned to that day of the week will still appear whenever you access that date. (The template
used to schedule an appointment is not saved with the date.) If you plan to use a template other than
the day’s default template for appointments on a specific date (for example, when a doctor is not in the
office), save a note to use a different template for that date.
To delete a template:
A template cannot be deleted if it is currently being used as a default template, or if it is currently
displayed in the Schedule for Today window or Schedule for Week window.
1. On the Controls menu, select Appointment Scheduler > Template Designs.
2. Select a template description and click Delete. (You can also press CTRL+D to delete a selected
item from a list.) You are prompted to confirm the deletion. Click Yes.
Assigning Practice Templates to Days of Week
Once a template is created, it must be linked to the day(s) of the week it represents. Then, when viewing
a specific day on the Schedule for Today window, the template appears automatically.
Note: If you define a default template for your daily schedules, the default template is also used when
searching for available appointment times. First, the Appointment Search looks at the template for the
day selected (for example, Friday), and then it searches for available times set up with the reason for
visit.
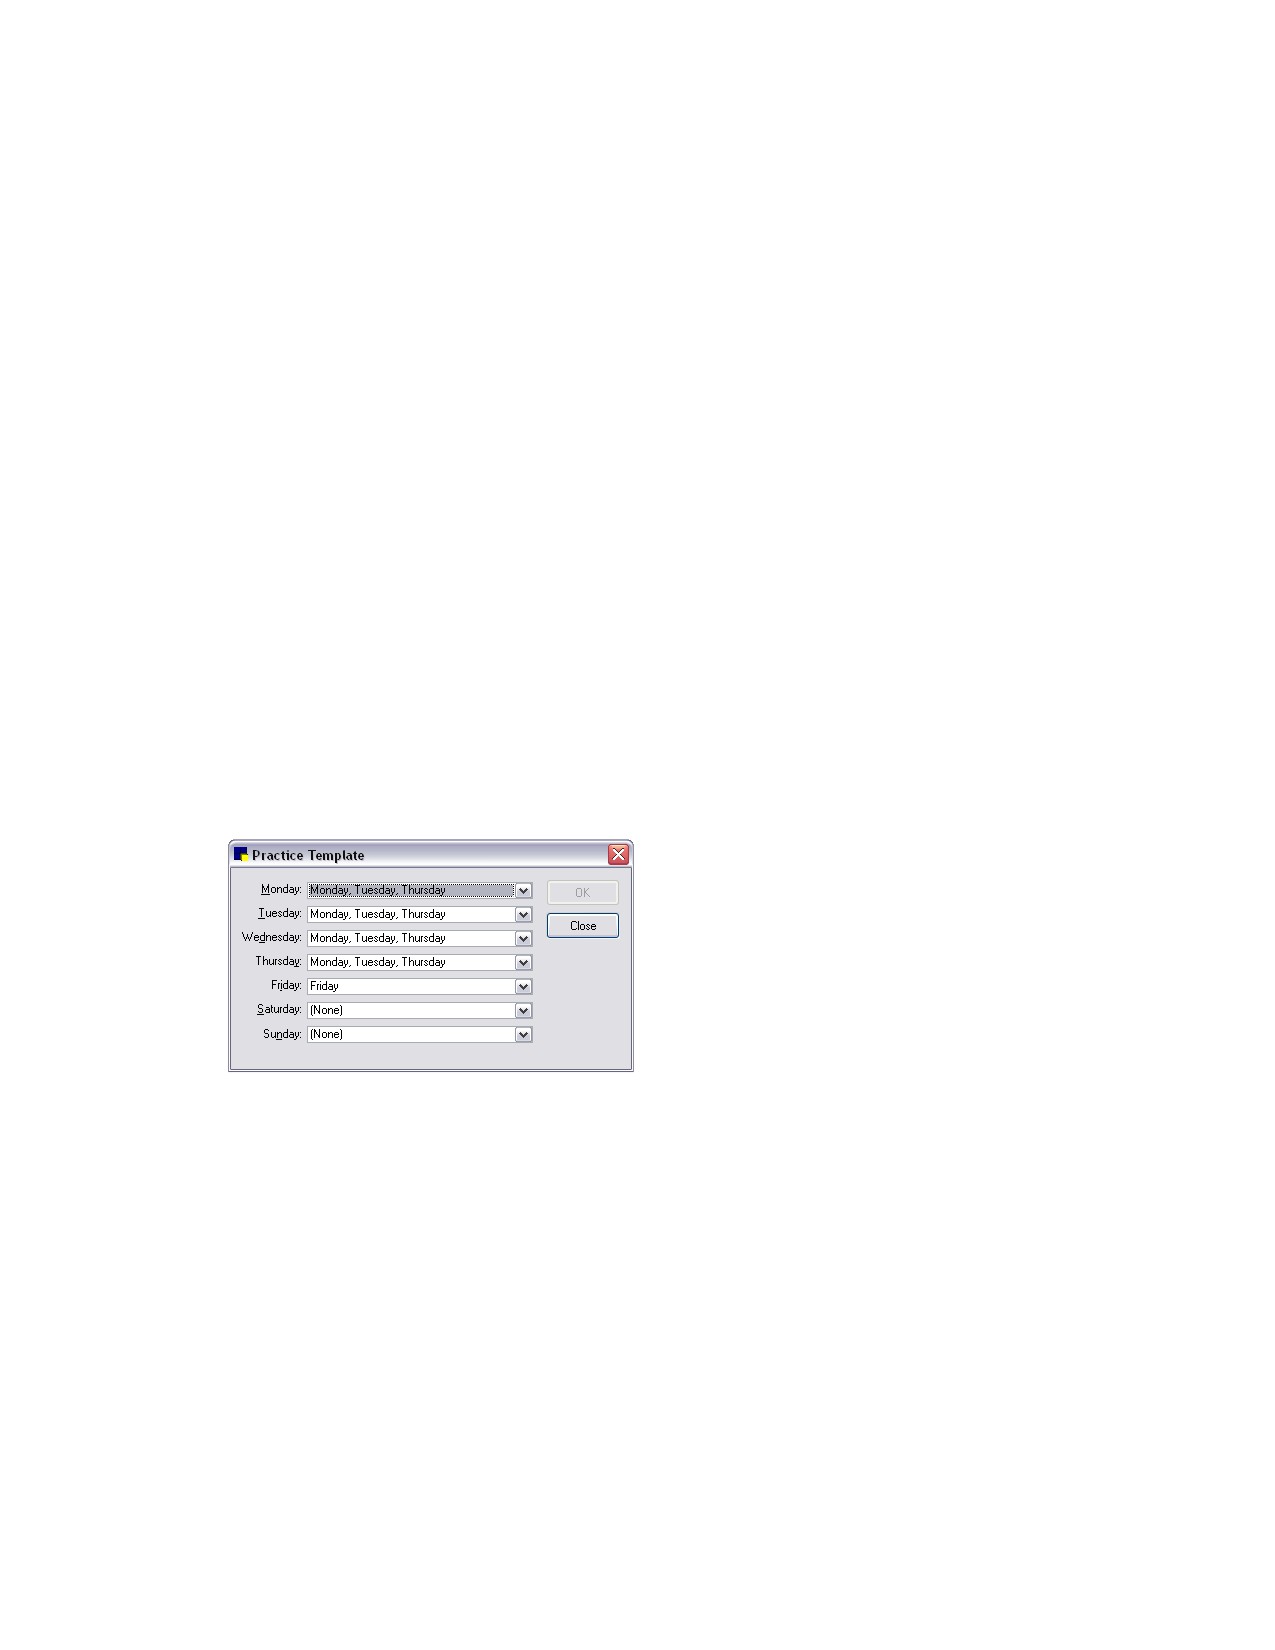
1. On the Controls menu, select Appointment Scheduler > Practice Setup > Templates. The
Practice Template dialog box appears.
Practice Template dialog box
2. From the Monday drop-down list, select the template you want to use to schedule appointments for
Monday. If you do not want to use a template for that day, select (None).
3. Repeat this process for Tuesday through Sunday, depending on the days your practice is open.
4. Click OK.
271