IDEXX Cornerstone. Administrator’s Manual (8.3 NEXT version 8.3.6) - page 8
Chapter 10: Setting Up Your Invoice Items
7. Select a classification for the pick list from the Primary drop-down list.
8. If applicable, select a subclassification for the item from the Subclass drop-down list.
9. Click the Pick tab.
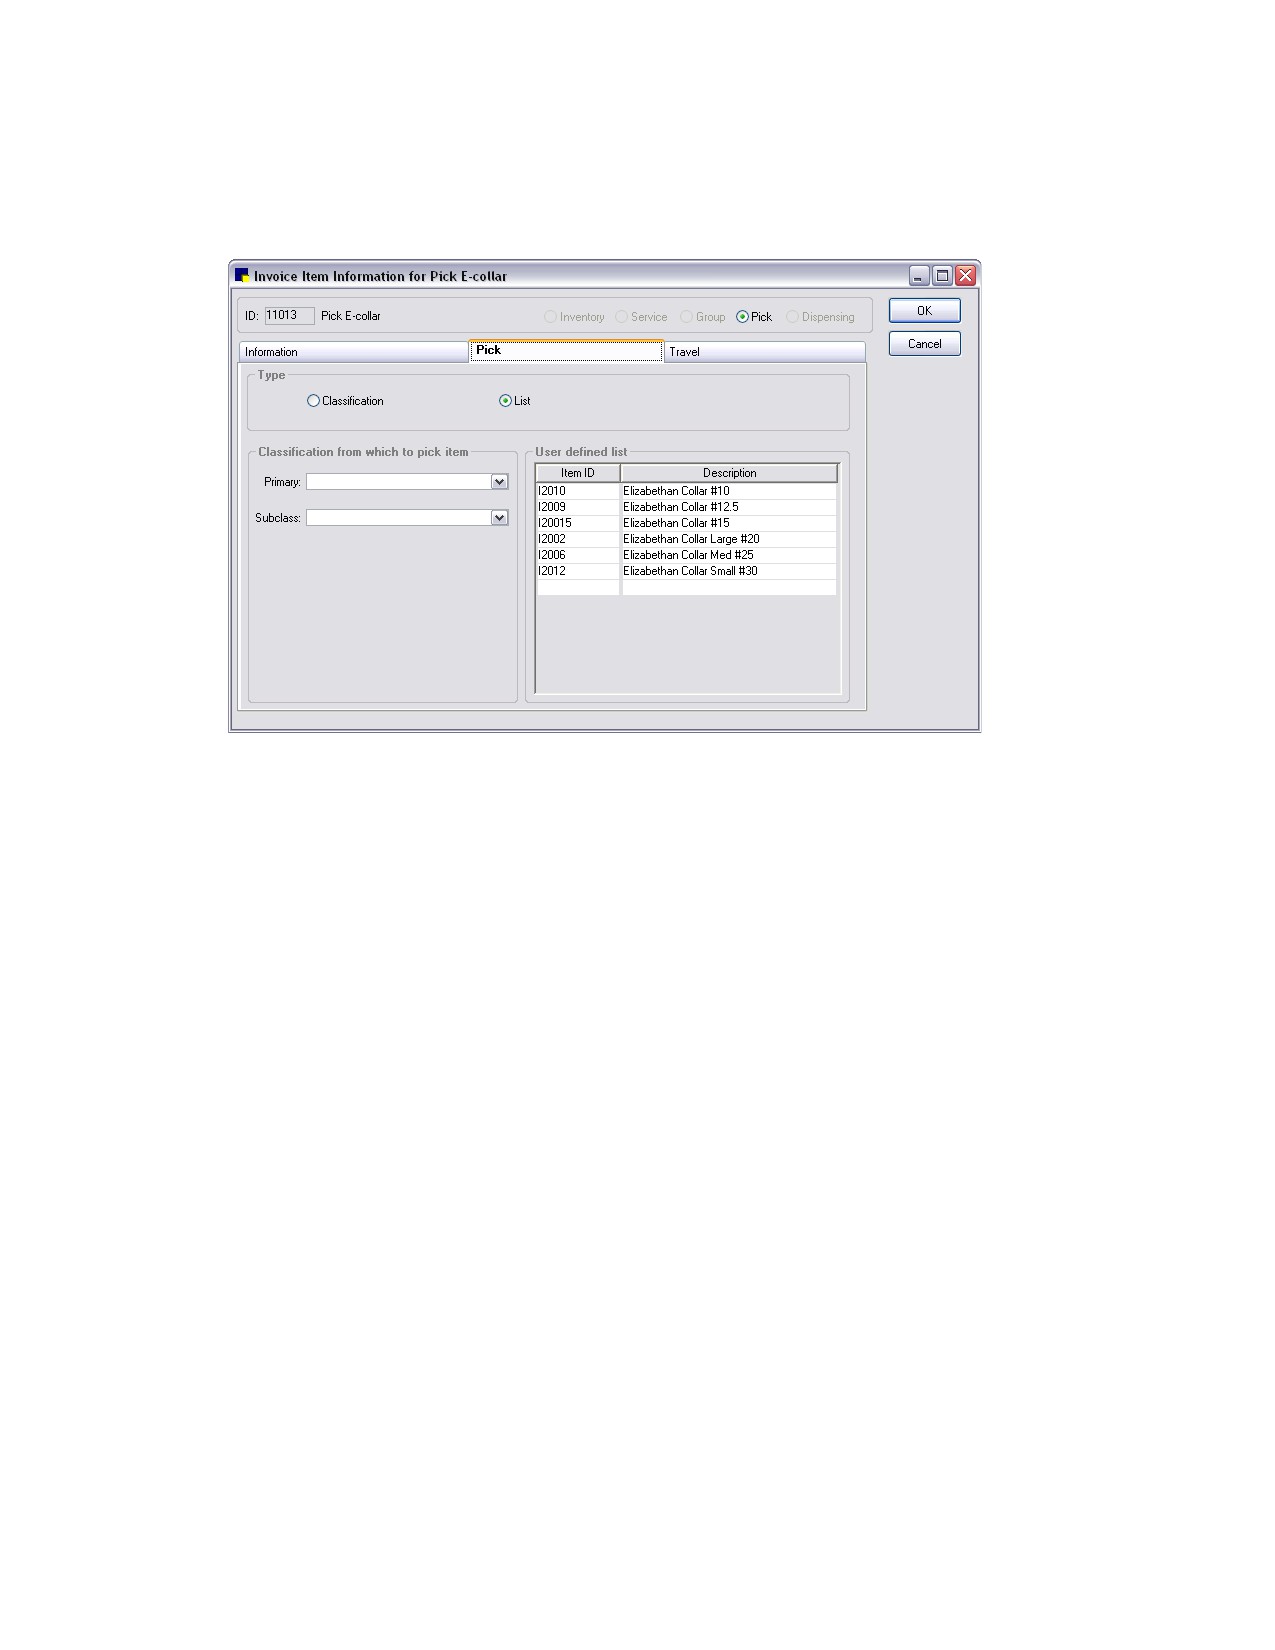
Pick tab on Invoice Item Information window
10. To set up the pick list type, do one of the following:
• Select the Classification option to set up a basic pick list with items from the same
class/subclass. From the Primary drop-down list, select the primary invoice item classification.
If applicable, select a subclass from the Subclass drop-down list.
• Select the List option to create a custom list by choosing specific invoice items to appear on the
list. In the User defined list area Item ID column, type an item ID to be added to the pick list or
press F2 to use the Invoice Item List to choose an item. Repeat as necessary to add the
applicable invoice items to the pick list.
11. Click OK to save your changes, or click another tab to add more information for the item.
Example:
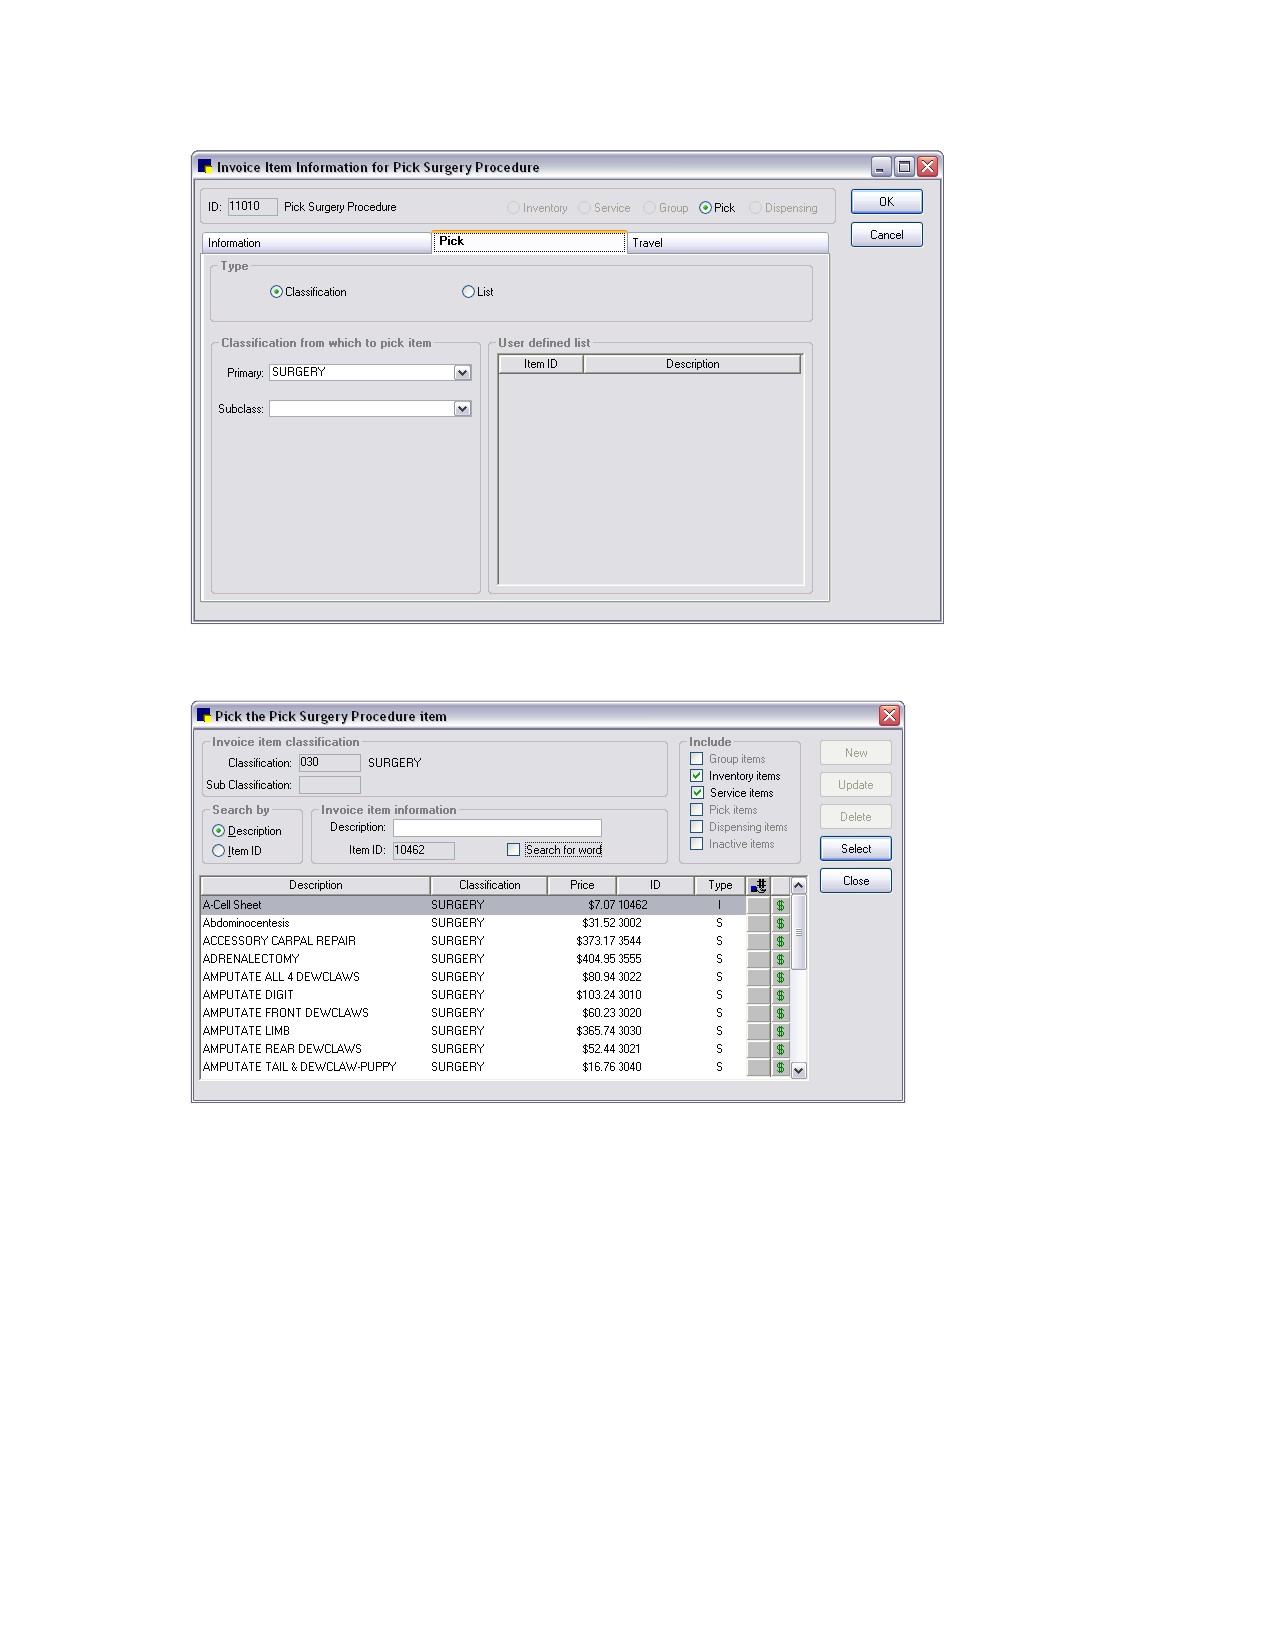
In this example, the practice has set up a Classification pick list that includes all items in the Surgery
classification.
212
Chapter 10: Setting Up Your Invoice Items
When selecting items to put on the invoice, the staff member enters the pick list ID. A list of all items
from the Surgery classification will display.
The staff member highlights the item to add to the invoice and clicks Select. The selected item will be
added to the invoice in place of the pick list ID.
Setting Up Invoice Item Groups
For items that you often invoice at the same time, you can combine these items as group items. When
you invoice, simply enter the Group ID to have all of the items in the group automatically added to the
invoice at once. When you invoice a group item, each item within the group appears in the invoice. At
that point, if necessary you can modify/remove items, change the quantity, pricing, taxes or discounts
associated with each item.
Common examples of group items are annual exams, dental exams and geriatric exams.
Note: Pricing and dispensing fees are calculated from each individual item’s information.
213
Chapter 10: Setting Up Your Invoice Items
To create a Group Item:
1. On the Lists menu, select Invoice Item. The Invoice Item List appears.
2. Click New. The Invoice Item Information window appears.
3. If your practice enters new invoice item IDs manually, type the invoice item ID in the ID text box (top
left). If your system is set up to generate invoice item IDs automatically, an ID appears.
4. Press TAB.
5. At the top of the Invoice Item Information window, select the Group item type to designate this item
as a group item. The number of available tabs is reduced to three.
6. On the Information tab, in the Hospital description text box, type an internal description of the
group item to appear in the Invoice Item List, in your reports and in the patient’s medical file.
7. If you would like an alternate description to display on client documents, in the Client description
text box, type a description of the group item to print on the invoice and estimate, and also on
reminders.
8. In the Classification area, do the following:
a. Select a classification for the group item from the Primary drop-down list. The classification is
used to generate more specific information in reports, to mark up or mark down entire groups of
similar invoice items, and narrow invoice item searches.
b. If applicable, select a subclassification for the item from the Subclass drop-down list.
9. Click the Group Items tab.
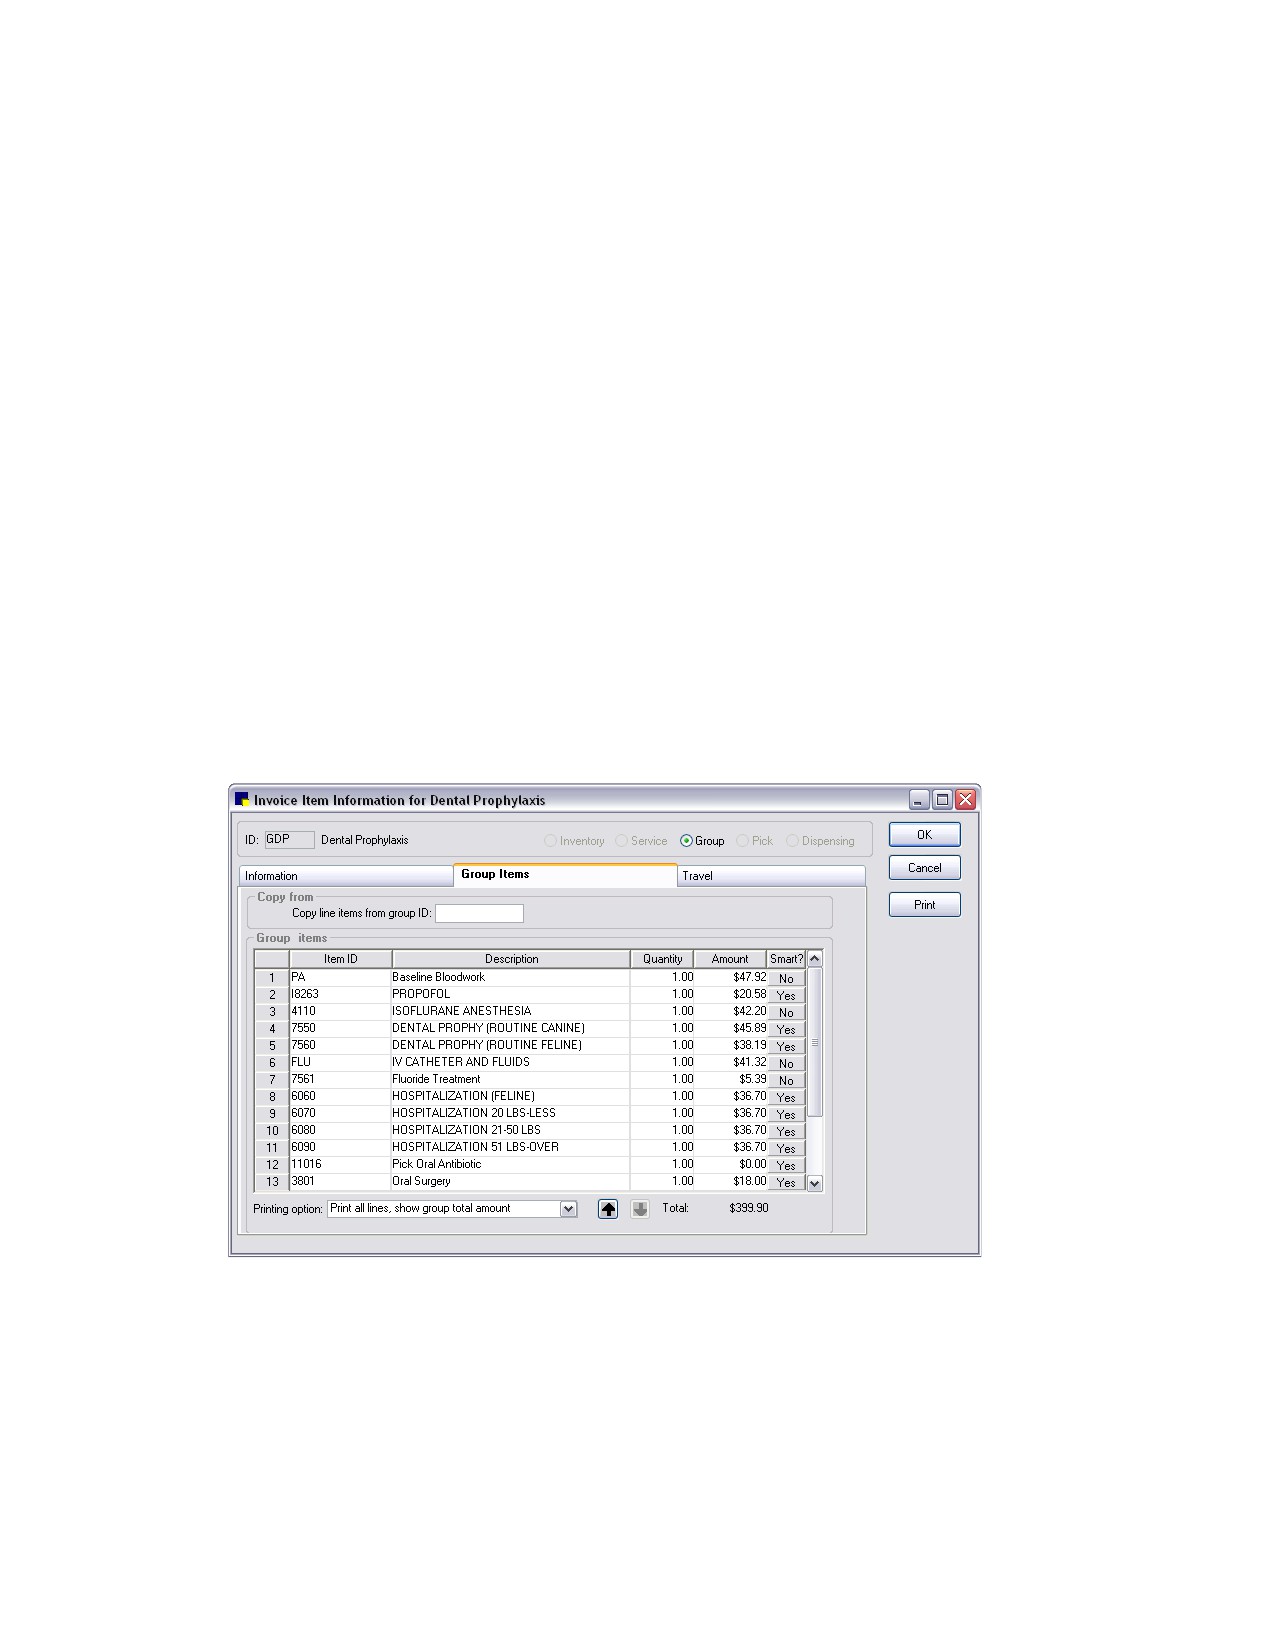
Group Items tab on Invoice Item Information window
10. If you want to copy items from another group, in the Copy line items from group ID text box, type
the ID of the group or press F2 to select from a list of groups. You can then add and edit items in
your new Group items list as necessary.
11. To add items to your Group items list (without copying from another group), in the Item ID column,
type an item ID or press F2 to use the Invoice Item List to choose an item.
214
Chapter 10: Setting Up Your Invoice Items
12. For each item you want to include in the group, if you want to include more than one of the item in
the group, type the quantity in the Quantity column.
13. To move an item up or down in the Group items list, highlight the item you want to move and then
click the
or
arrow button.
14. To delete an item from the list, highlight the item and press CTRL+D. You are prompted to confirm
the deletion. Click Yes.
15. To specify how you want your group to print on an invoice, select one of the following options from
the Printing option drop-down list:
• Print all lines, show line amounts-Prints the name of the group and individual lines for each
item in the group and amounts for each item.
• Print all lines, show group total amount-Prints the name of the group and individual lines for
each item in the group, but only shows the total amount on the group line at the top. The
individual lines will have an amount of zero.
• Print detail lines only-Prints only the individual lines for each item in the group and the amount
for each item.
• Print group line only-Prints only the name of the group and the total amount.
16. If desired, click the Print button on the Group Items tab preview or print a report with the details of
your group.
17. Click OK to save your changes, or click another tab to add more information for the item.
For a complete list of group invoice items, print an Invoice Group Item Setup Report.
Example:
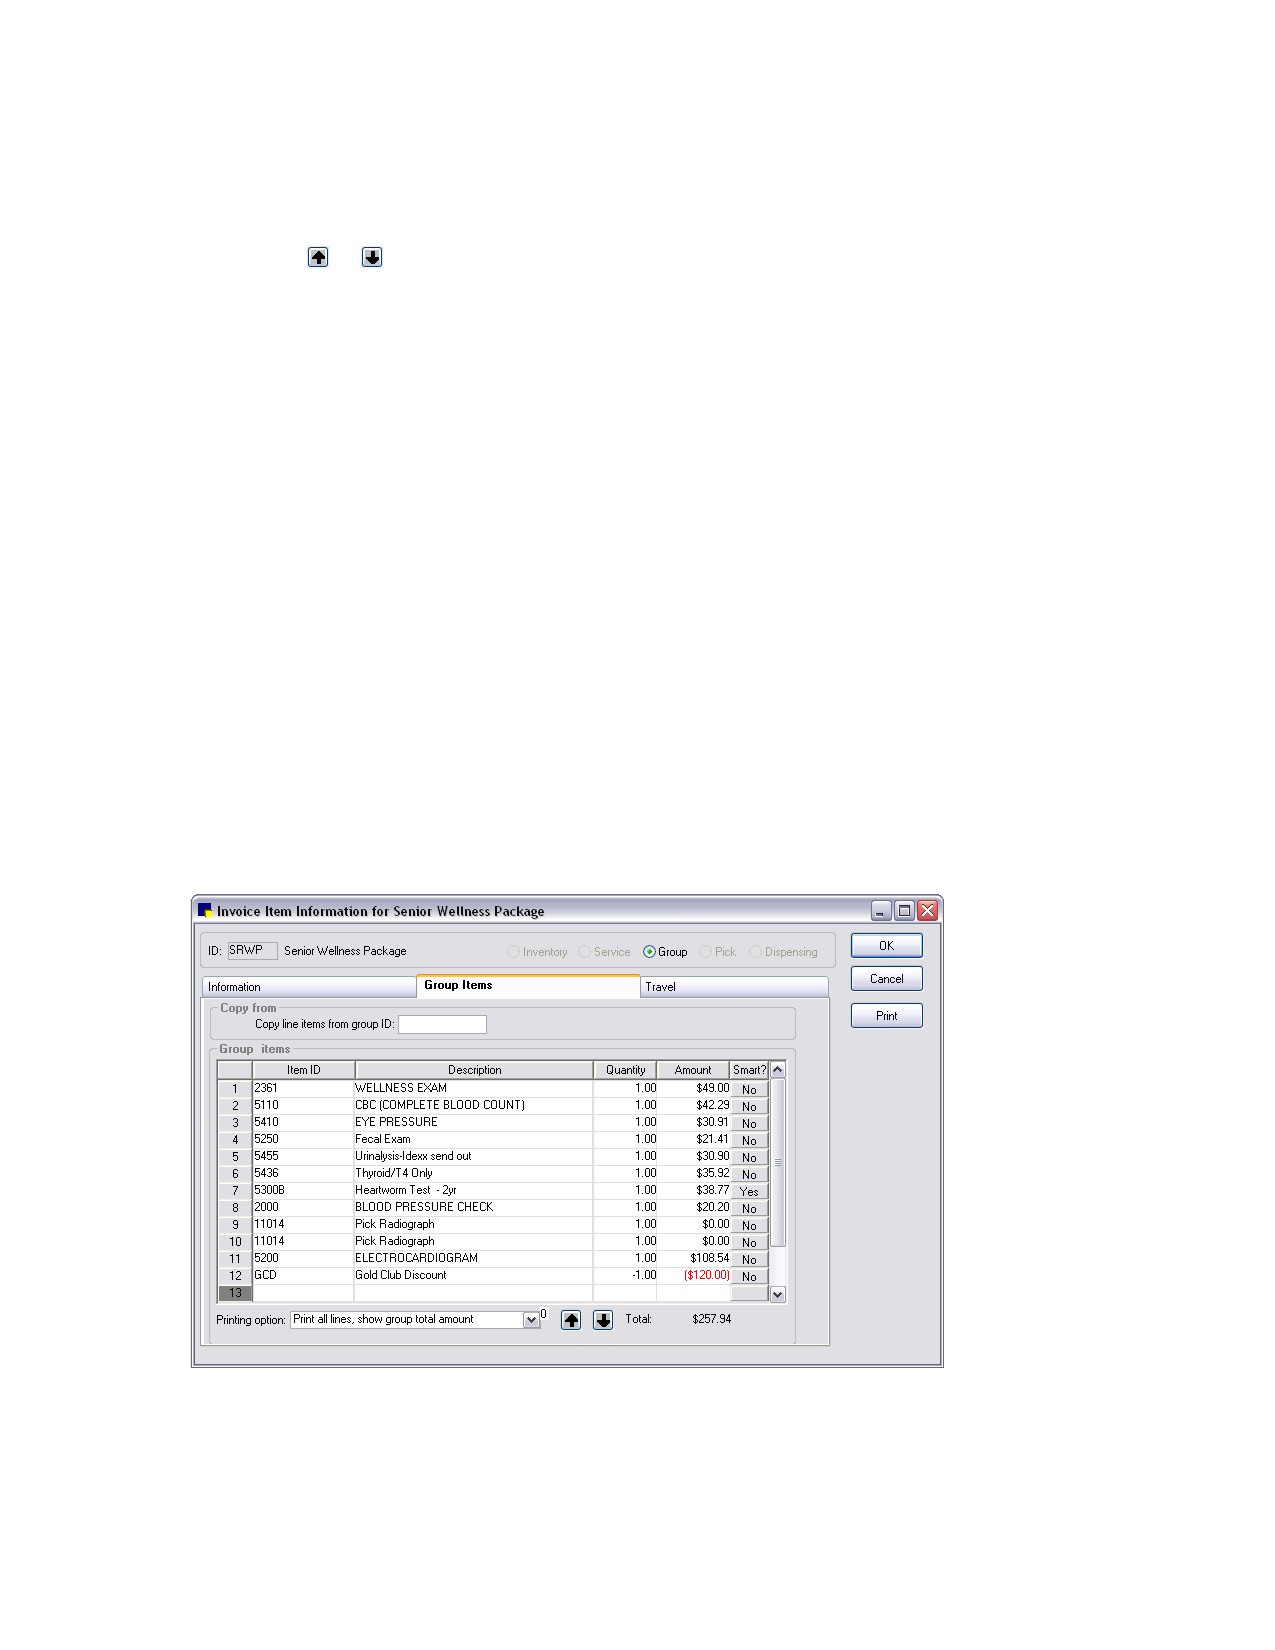
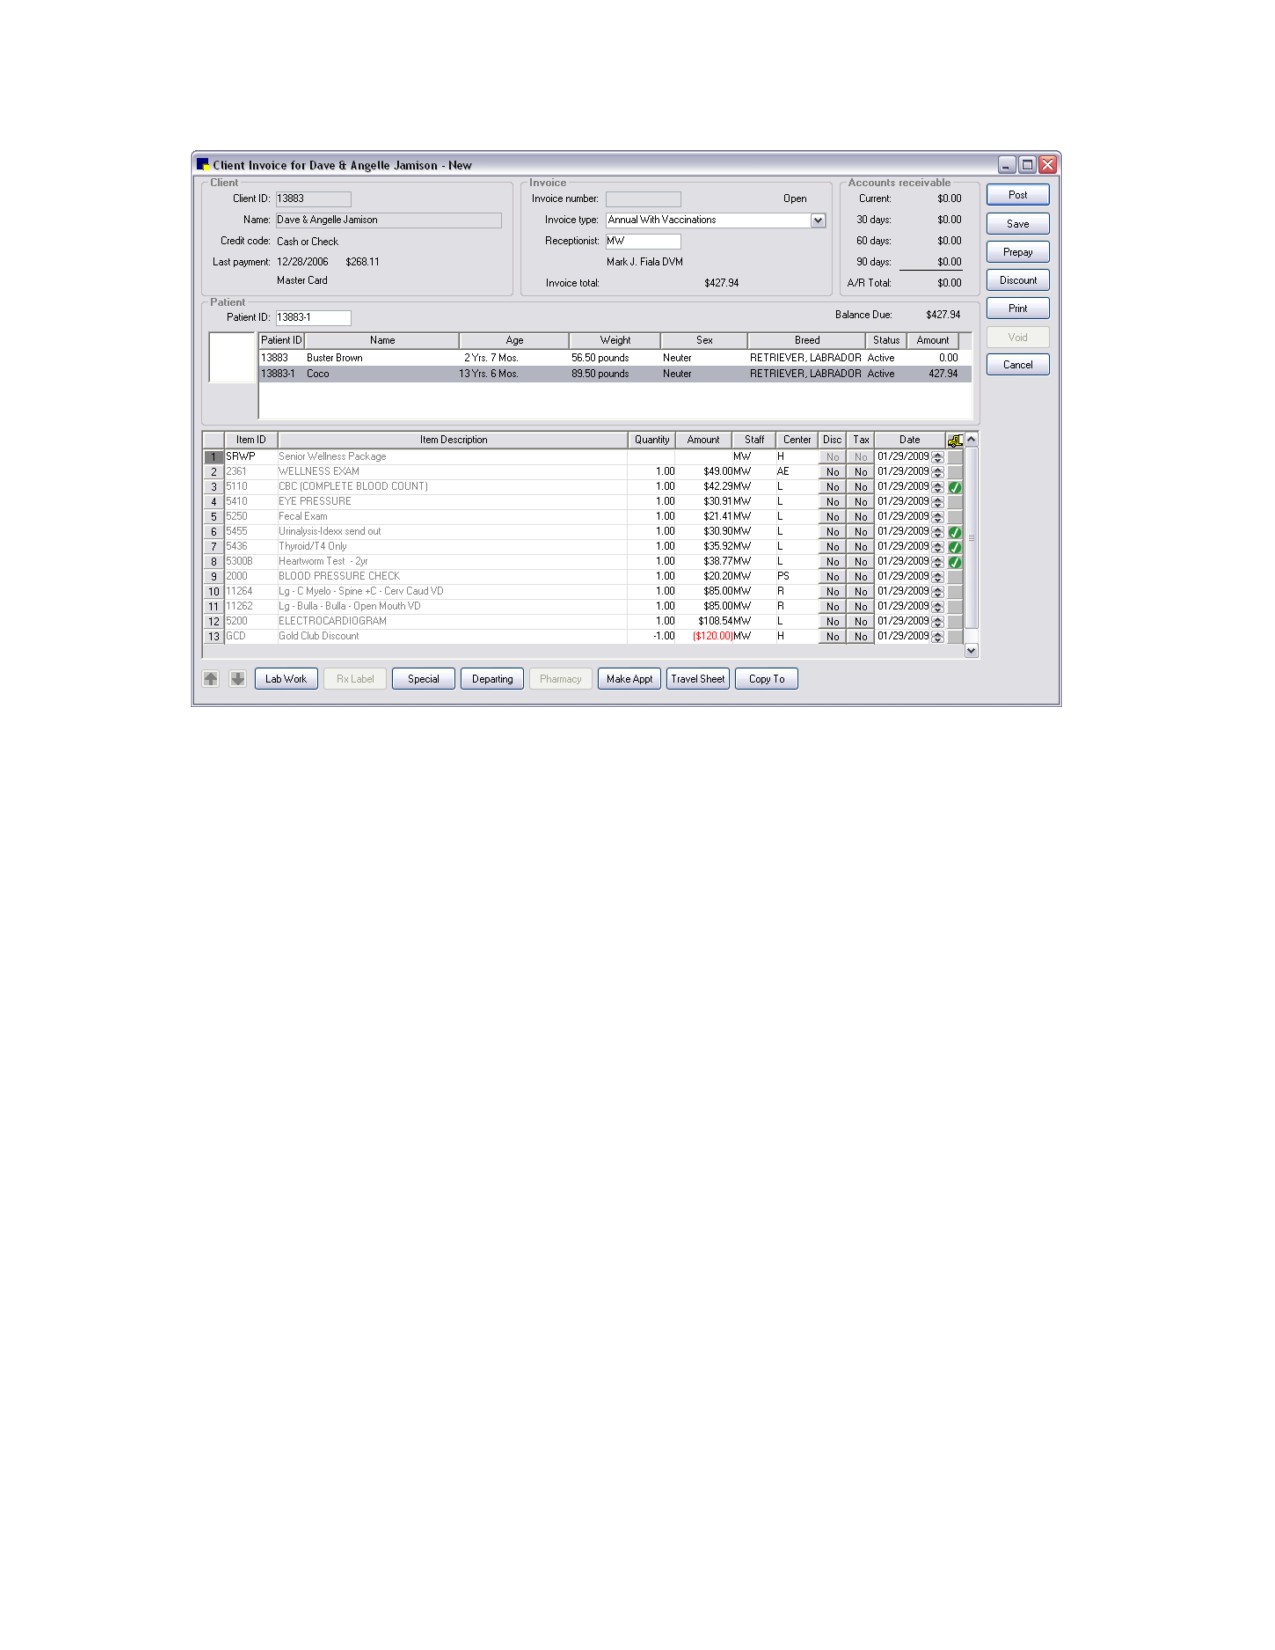
In this example, the practice has set up a Group for the Senior Wellness Exam.
When selecting items to put on the invoice, the staff member enters the group item ID. A list of all items
in the group will display.
215
Chapter 10: Setting Up Your Invoice Items
The staff member can then remove items or modify item quantities as needed.
Setting Up Smart Codes
Smart codes provide flexibility to choose the proper treatment for a patient based on species, sex, age
or weight. Only items matching the patient or invoice criteria are added to the invoice. Individual invoice
items, invoice item groups and pick lists can be included in a smart code.
For example, you could create a simple smart code for an office examination and include your invoice
item IDs for feline and canine examinations on the smart code. When the smart code is added to the
invoice, Cornerstone chooses the correct examination based on the patient’s species.
To set up smart codes:
1. On the Lists menu, select Invoice Item. The Invoice Item List appears.
2. Click New. The Invoice Item Information window appears.
3. If your practice enters new invoice item IDs manually, type the invoice item ID in the ID text box (top
left). If your system is set up to generate invoice item IDs automatically, an ID appears.
4. Press TAB.
5. At the top of the Invoice Item Information window, select the Group item type to designate this item
as a group item. The number of available tabs is reduced to three.
6. On the Information tab, in the Hospital description text box, type an internal description of the item
to appear in the Invoice Item List, in your reports and in the patient’s medical file.
7. If you would like an alternate description to display on client documents, in the Client description
text box, type a description of the item to print on the invoice and estimate, and also on reminders.
216
Chapter 10: Setting Up Your Invoice Items
8. In the Classification area, do the following:
a. Select a classification for the item from the Primary drop-down list. The classification is used to
generate more specific information in reports, to mark up or mark down entire groups of similar
invoice items, and narrow invoice item searches.
b. If applicable, select a subclassification for the item from the Subclass drop-down list.
9. Click the Group Items tab.
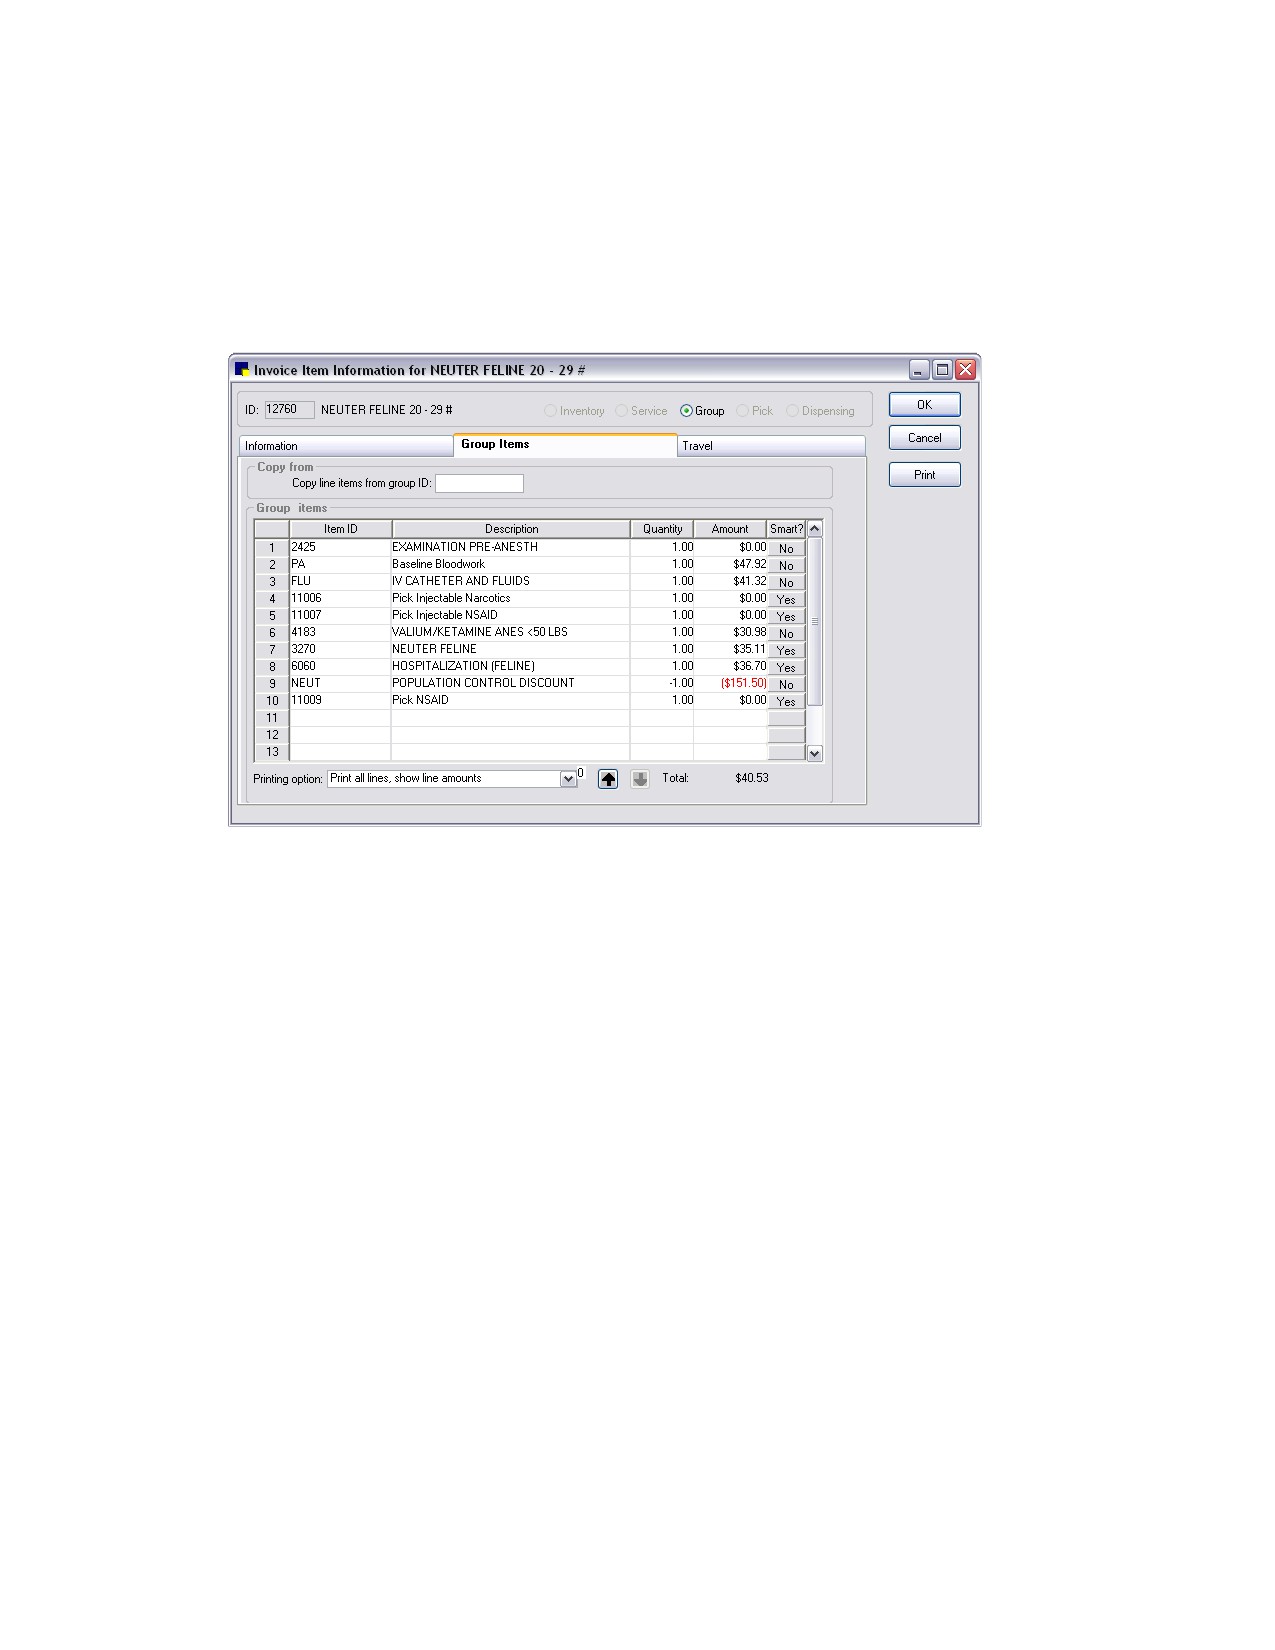
Click the Yes/No button in the Smart? column to change the characteristics for an item
10. The invoice items in your group appear. In the Smart? column, click the Yes/No button if needed to
change the characteristics of the item. If you clicked the No button, after changes are made to the
item, the No button changes to Yes. The Smart Code Item dialog box appears.
217
Chapter 10: Setting Up Your Invoice Items
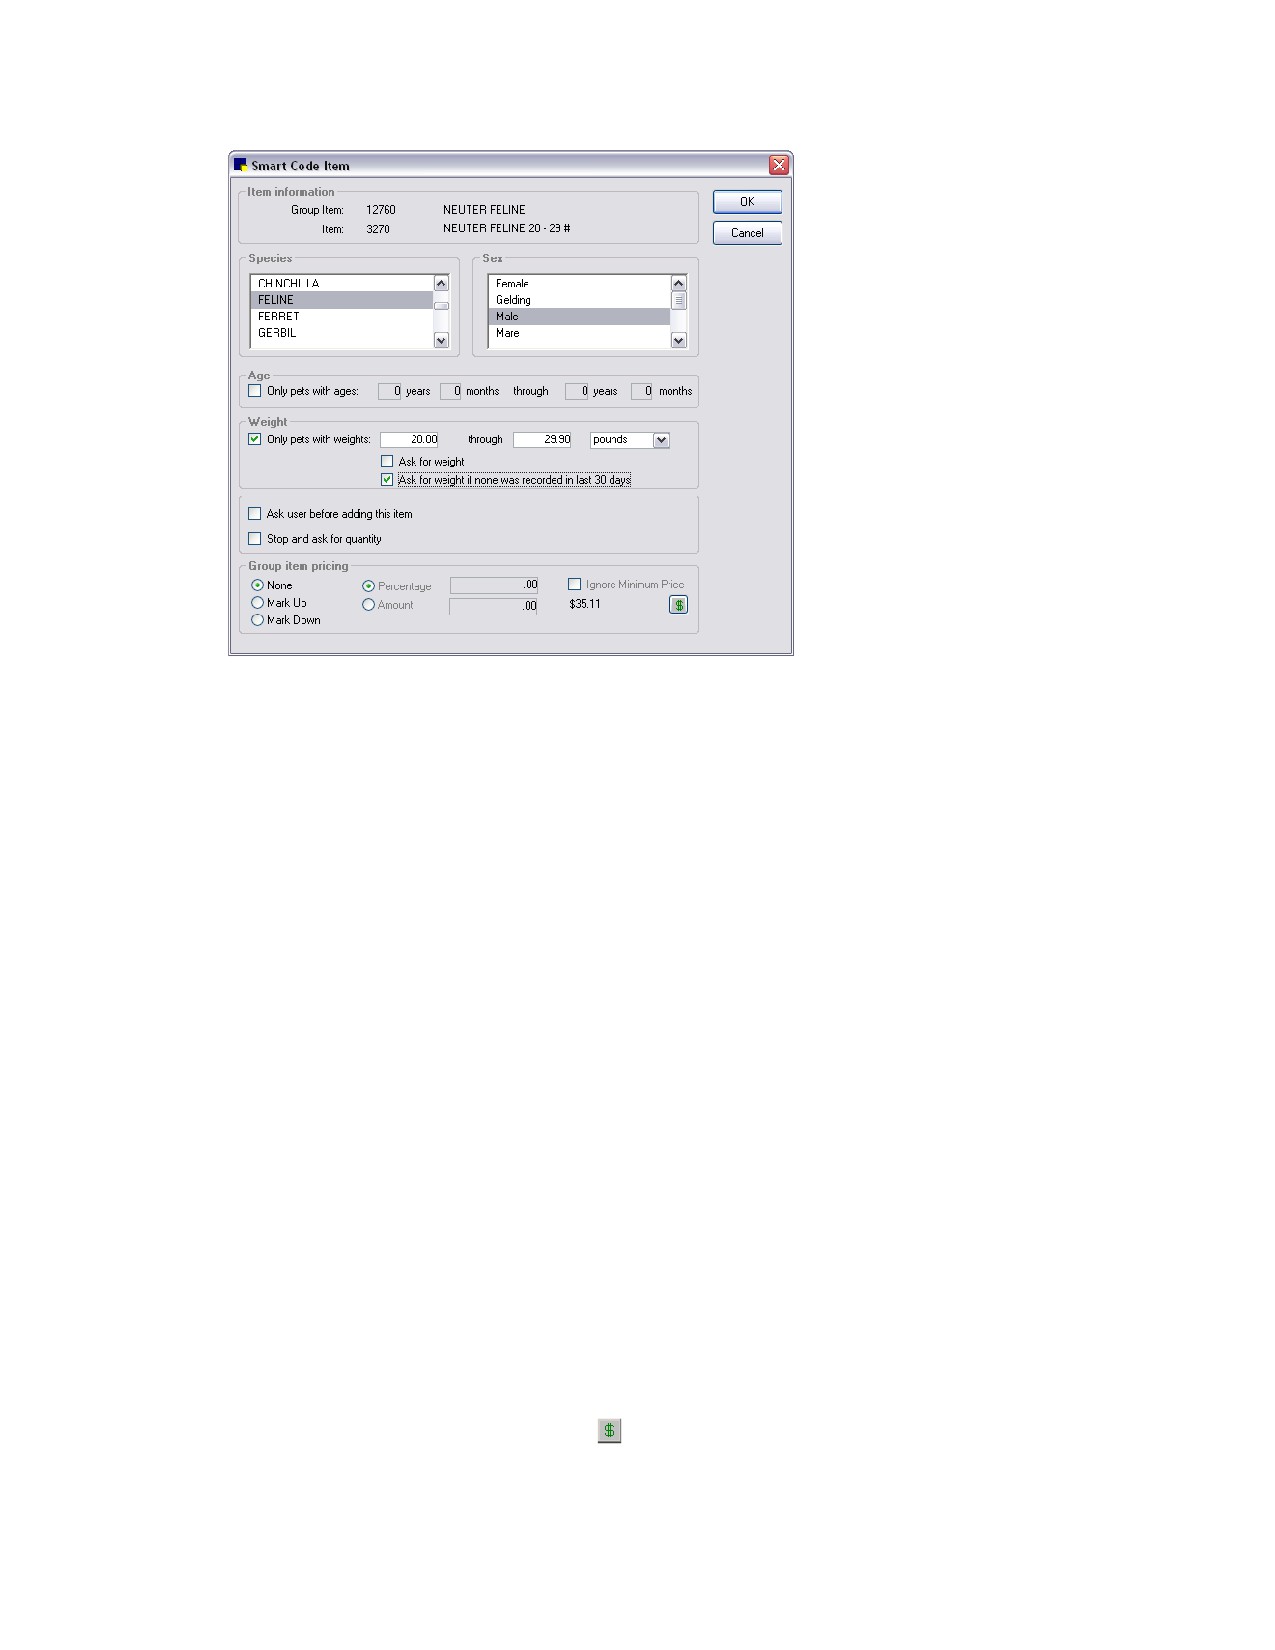
Smart Code Item dialog box
11. To limit the item based on the species, select a species (or multiple species) from the Species scroll
list.
12. To limit the item based on the patient sex, select a sex (or multiple sexes) from the Sex scroll list.
13. To limit the item based on the patient’s age, select the Only pets with ages check box. Enter the
age ranges. If the patient’s birthday is missing on a record, you will be prompted to enter a birth
date when the smart code is used.
14. To limit the item based on the weight of the patient, select the Only pets with weights check box.
Enter the weight ranges (e.g., 20.00-29.99). To have the system prompt for the patient’s weight,
select the Ask for weight check box. To have the system prompt for the patient’s weight if it has not
been updated in the last month, select the Ask for weight if none was recorded in the last 30
days check box. You only need to prompt for weight on the first item in the smart code.
15. To always prompt the user whether or not this item should be added to the invoice, click the Ask
user before adding this item check box.
16. To always prompt the user to enter a quantity when the item is used, click the Stop and ask for
quantity check box.
17. If applicable, set the Group item pricing area options to allow pricing to be different than if the
invoice item was billed outside the group:
a. If applicable, click the Mark up or Mark down option.
b. Select Percentage and enter a percent to mark up or down or select Amount and enter an
amount to mark up or down.
c. Click the Ignore Minimum Price check box if you do not want the software to take the minimum
price into account when the mark up or mark down is calculated.
d. Click the Group Item Pricing button
to see the details of the pricing.
e. Click OK to return to the Invoice Item Information window.
218
Chapter 10: Setting Up Your Invoice Items
18. Click OK to save your changes, or click another tab to add more information for the item.
Example:
A practice sets up a smart code for alter (neuter) surgeries. This code includes ovariohysterectomy
(spay) procedures for both dogs and cats. Based on a patient’s species, sex and weight, the correct
procedure is added to the invoice. A pick list for presurgical lab work is also included in the smart code.
When the smart code is used, the pick list displays, allowing staff to select any lab work that was
performed.
Another smart code for postsurgery antibiotic is also included in the alter surgery code. This code is set
up to ask staff at invoicing time if the code should be added to the invoice. If a postsurgery antibiotic
was used, the correct dosage (based on the patient’s species and weight) is added to the invoice.
Example of How the Smart Code is Put Together
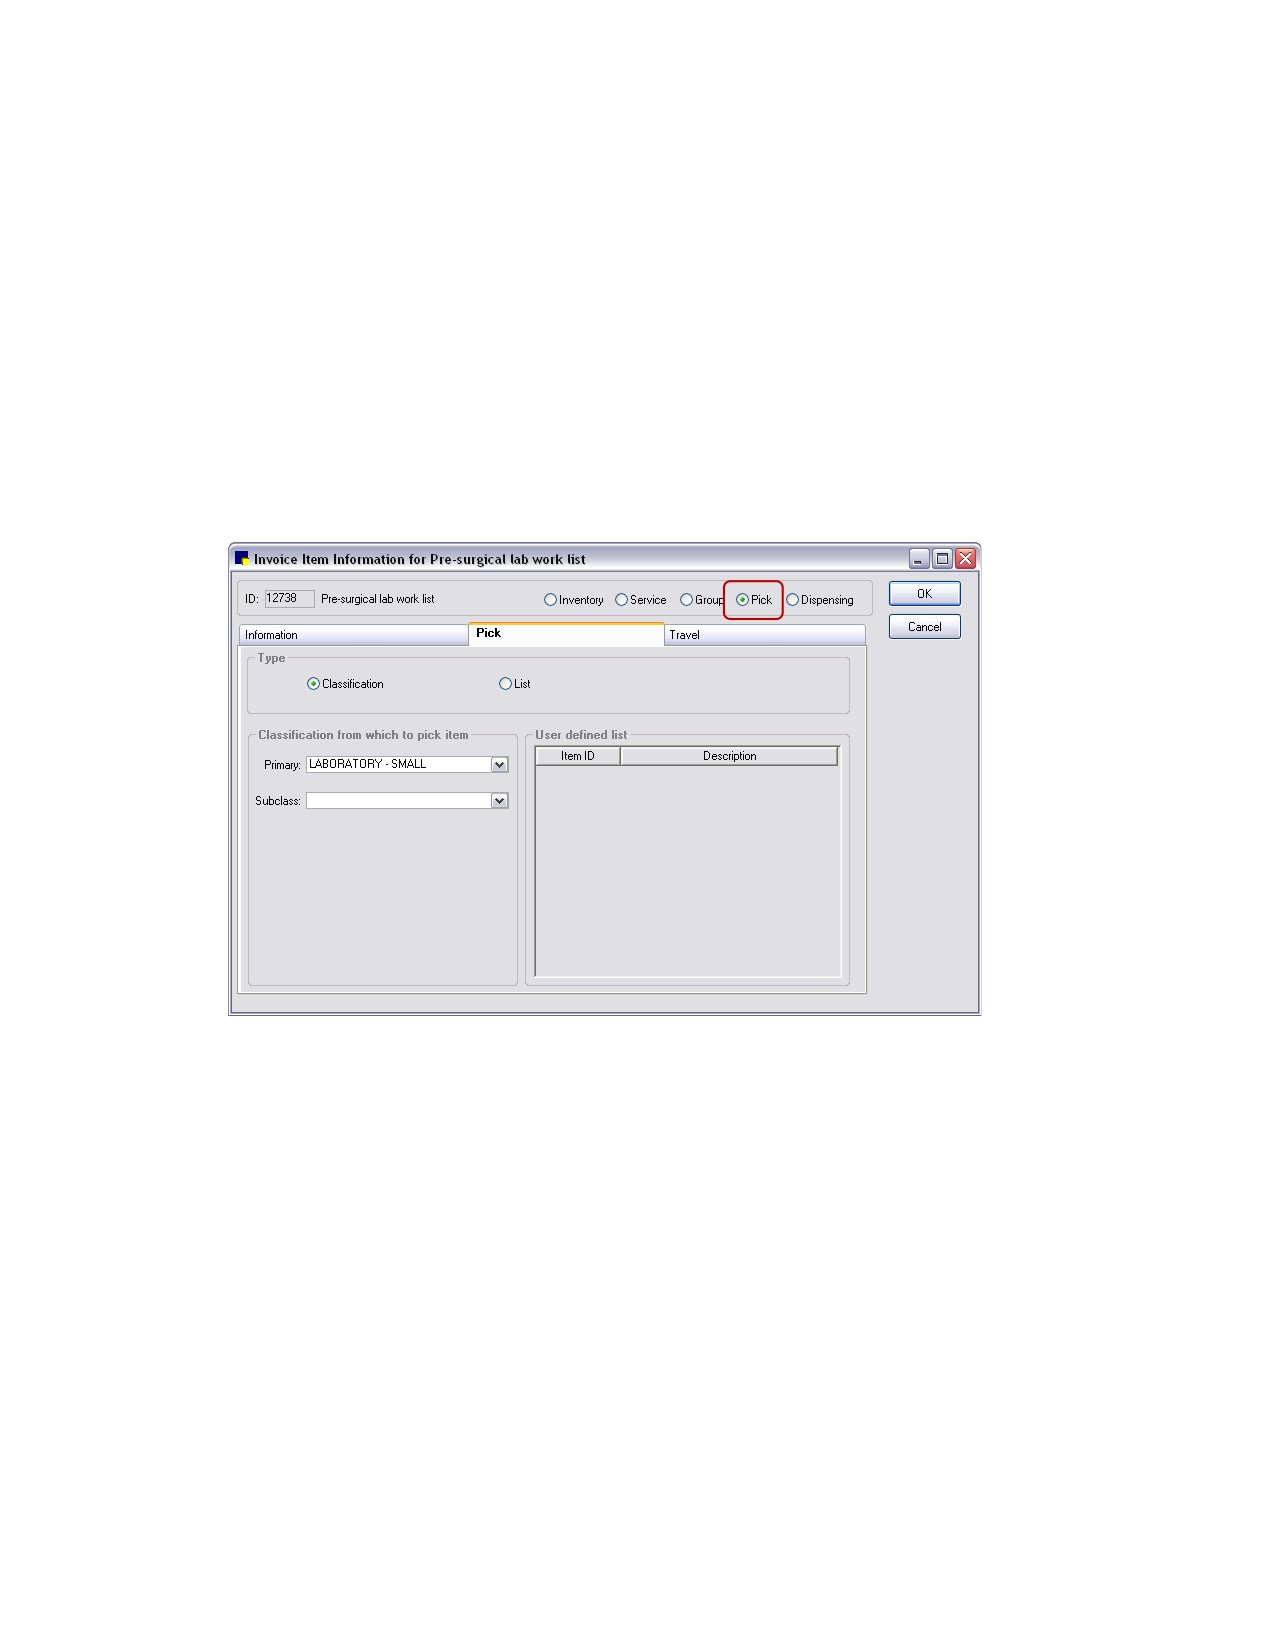
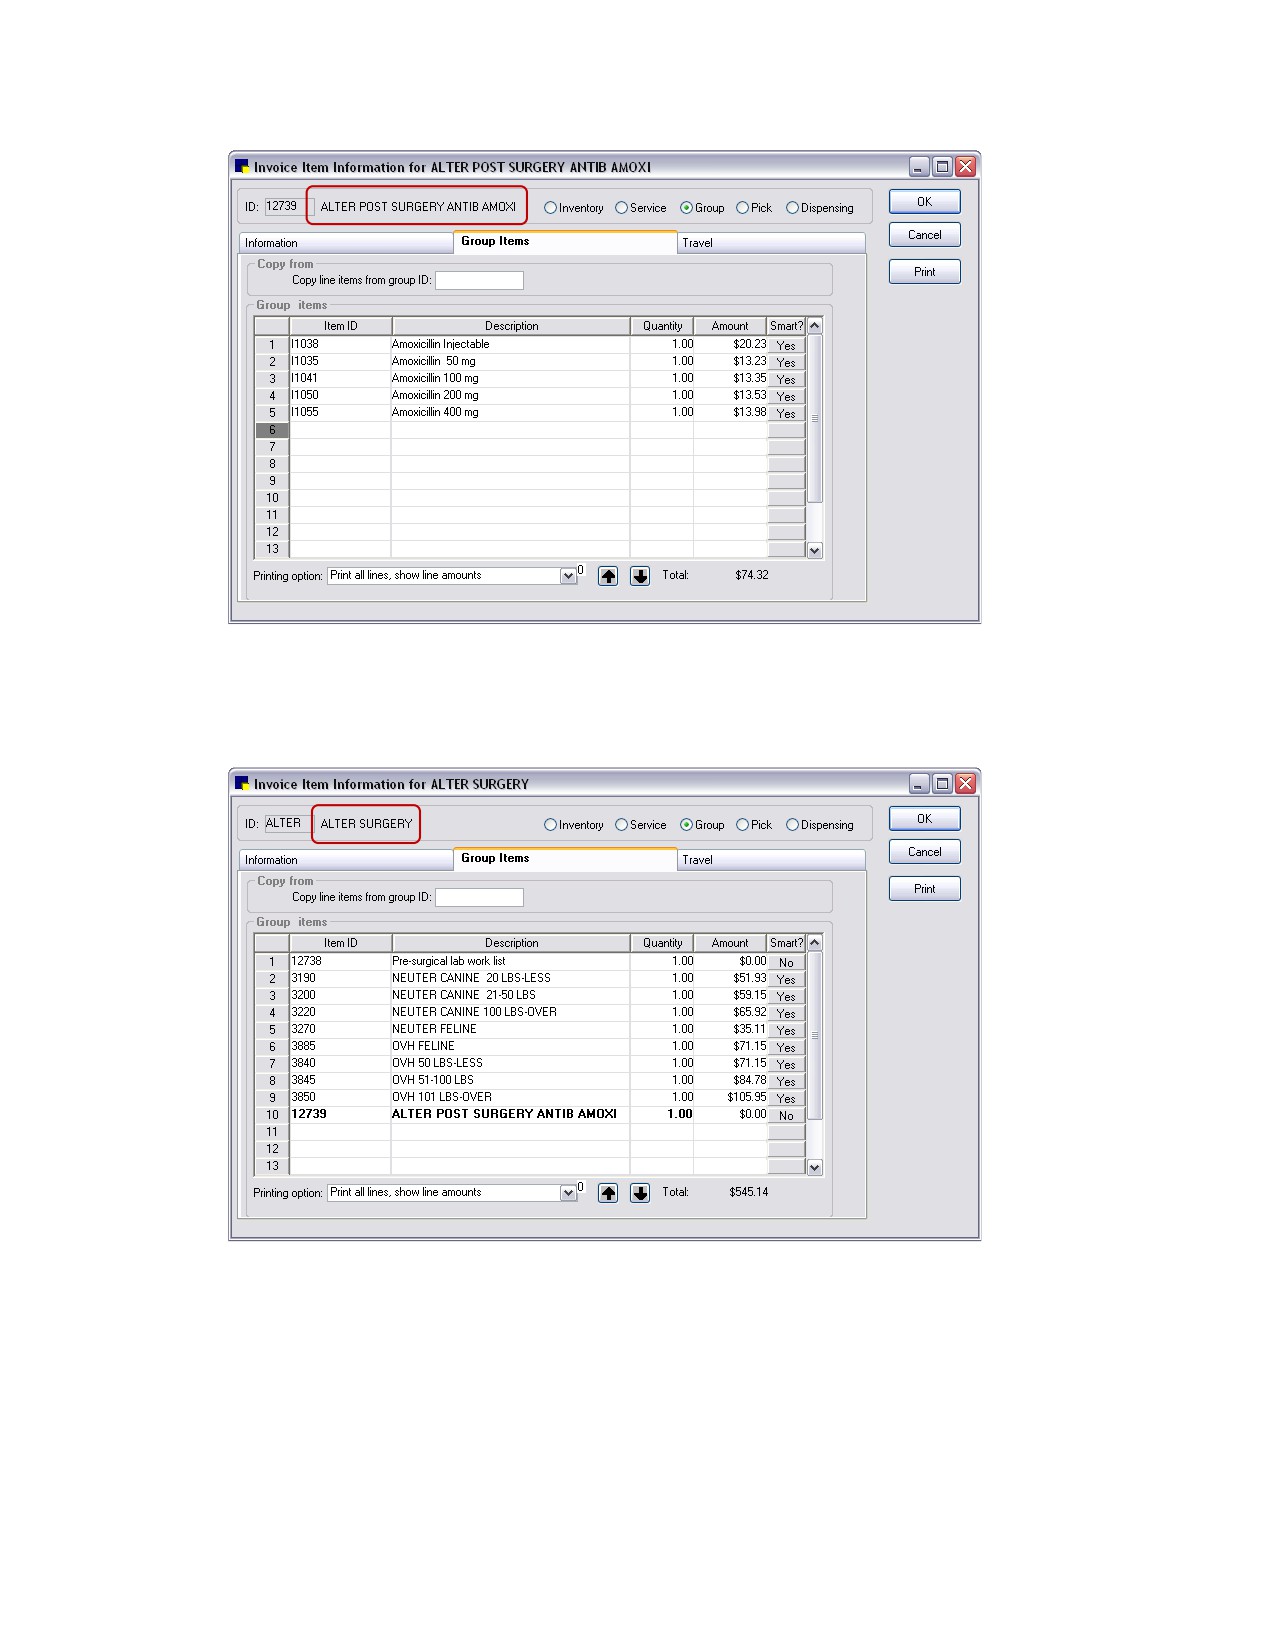
1. Create a pick list for lab work as shown below.
All invoice items that are in the LABORATORY-SMALL classification will display when the ID for the pick list is used.
2. Create a smart code for postsurgery antibiotics.
219
Chapter 10: Setting Up Your Invoice Items
Because the item IDs for amoxicillin are “smart,” the correct dosage will be added to the invoice based on the patient’s
weight and species.
3. Add the lab work pick list, smart code for postsurgery antibiotics and canine and feline castration
and ovariohysterectomy (OVH) invoice item IDs to the ALTER SURGERY smart code.
The ALTER SURGERY smart code includes the pre-surgical lab work list created in step 1. It also contains the postsurgery
smart code created in step 2. (A group code that is nested within another group code appears in bold.)
Viewing Your Invoice Group or Smart Code
To view a report with the details of your group, click the Print button on the Group Items tab.
220
Chapter 10: Setting Up Your Invoice Items
How it Works
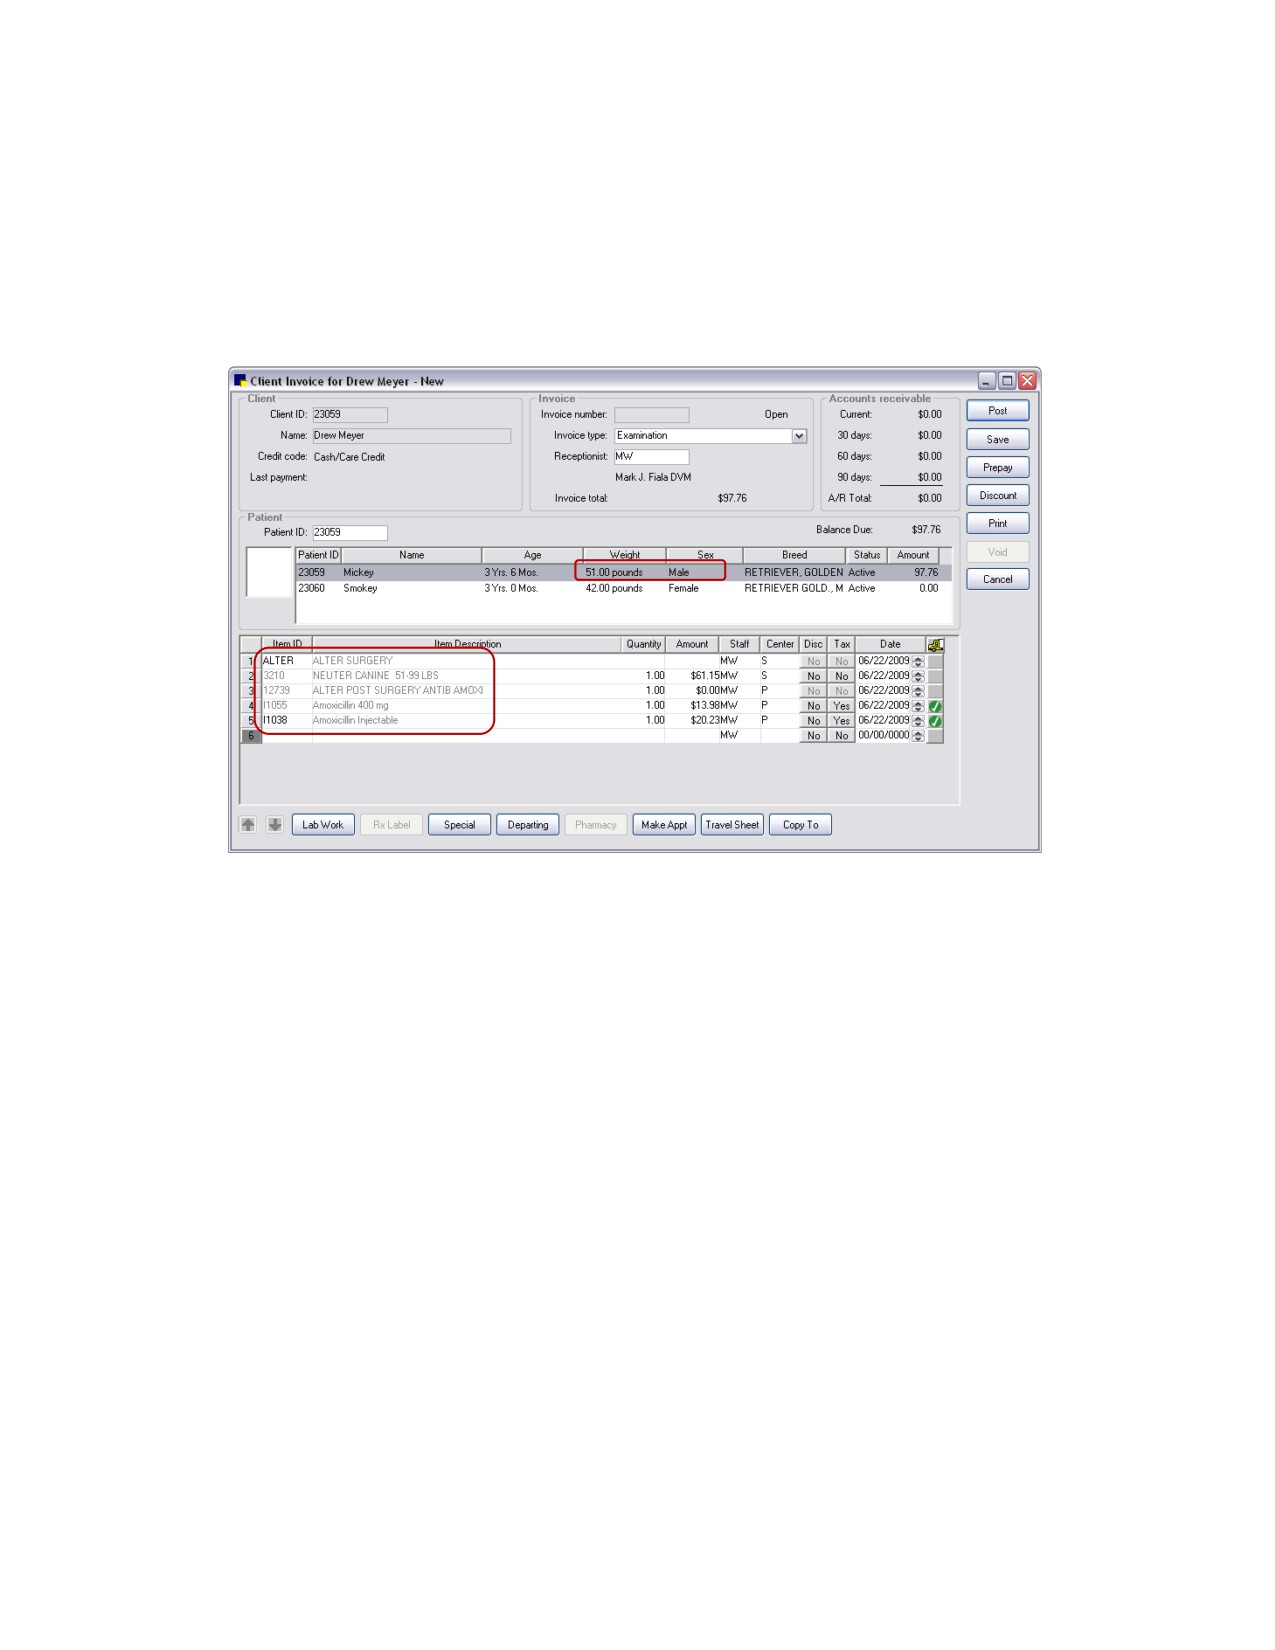
When the ALTER smart code is added to an invoice, the software detects that the patient is a male dog.
The software asks the user to select the appropriate pre-surgical lab work from a list. The appropriate
neuter code is selected based on species, sex, age, and weight. The software asks the user if a
postsurgery antibiotic should be added to the invoice. In this example, the user wanted the antibiotic
added and the software automatically selects the correct dosage and amount, based on species and
weight.
Smart code used on an invoice
Setting Up Dispensing Items
Dispensing items are a type of invoice item. They cannot be used by themselves, but instead are linked
to an inventory invoice item record.
This feature is useful if your practice dispenses an item in different ways. For example, if you have a drug
that is used in the practice and is also dispensed as a prescription. When the drug is used in the
practice, you may want to charge an additional dispensing fee. When the drug is prescribed for a
patient’s use at home, you may not want to charge the additional dispensing fee.
If your practice has a satellite clinic and your prices, sales tax or revenue centers at the satellite clinic are
different from those at the main practice, you may want to use dispensing items.
To set up dispensing items:
1. On the Lists menu, select Invoice Item. The Invoice Item List appears.
2. Click New. The Invoice Item Information window appears.
3. If your practice enters new invoice item IDs manually, type the invoice item ID in the ID text box (top
left). If your system is set up to generate invoice item IDs automatically, an ID appears.
4. Press TAB.
5. At the top of the Invoice Item Information window, select the Dispensing item type to designate this
item as a dispensing item. The number of available tabs is reduced to three.
221
Chapter 10: Setting Up Your Invoice Items
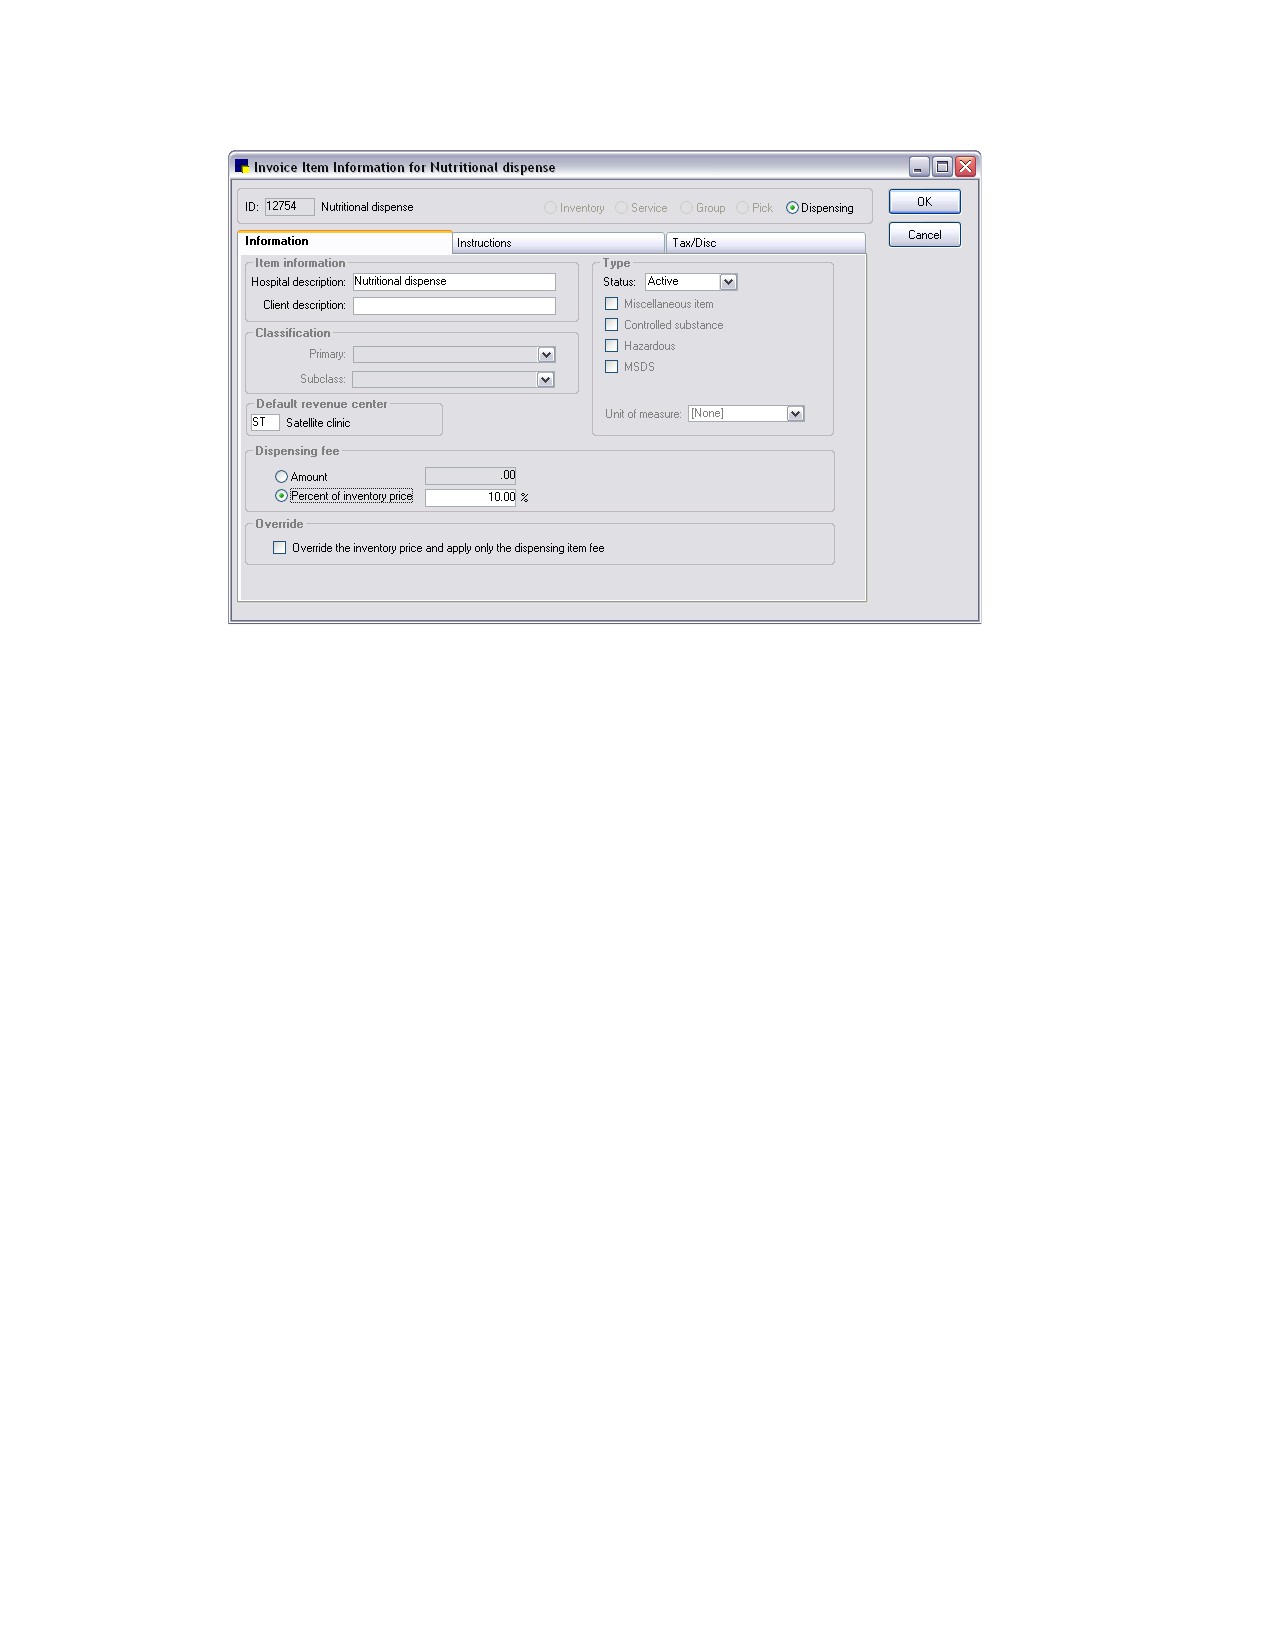
Information tab options for a dispensing item
6. On the Information tab, in the Hospital description text box, type a description of the dispensing
item for internal use. This is the description used by staff to find the dispensing item in the Invoice
Item List.
7. Select the dispensing item status from the Status drop-down list. For a new item, do not change the
default status of Active. Mark a dispensing item as Inactive only when you have discontinued use of
the item and do not want to use it any longer.
8. In the Default revenue center text box, specify a default revenue center for the dispensing item by
typing a revenue ID or pressing F2 to use the Revenue Center List to choose a revenue center. This
is used to track revenue separately by different areas for the business. See “Revenue Centers” on
page 71 for information about revenue centers.
9. In the Dispensing fee area, do one of the following:
• Select Amount and enter the dispensing fee amount that you want added to the cost of the
item.
• Select Percent of inventory price and enter the percentage.
Note: Any dispensing fee that is added here will be added to the dispensing fee on the invoice item
record.
10. Select the Override the inventory price and apply only the dispensing fee check box if you want
to use only the amount specified here instead of any amount or dispensing fee found on the item’s
record.
11. Click OK to save your changes, or click another tab to add more information for the item.
After the dispensing item is set up, it must be linked to an inventory invoice item before it can be used.
To link the dispensing item, see “Linking a Dispensing Item to an Inventory Item” on page 224.
222
Chapter 10: Setting Up Your Invoice Items
Setting Up Taxes and Discounts on Dispensing Items
If you are using dispensing items to charge tax or discounts, use care when setting up dispensing items
and linking them to existing invoice items. The taxes or discounts on dispensing items are applied in
addition to the taxes and discounts on the invoice items. If the tax or discount applies to all invoice items
at your practice, the tax or discount can be placed on either the invoice item or the dispensing item.
These taxes or discounts can be changed at invoice time, if needed.
To set up dispensing item taxes and discounts:
1. On the Lists menu, select Invoice Item. The Invoice Item List appears.
2. Click New. The Invoice Item Information window appears.
3. If your practice enters new invoice item IDs manually, type the invoice item ID in the ID text box (top
left). If your system is set up to generate invoice item IDs automatically, an ID appears.
4. Press TAB.
5. At the top of the Invoice Item Information window, select the Dispensing item type to designate this
item as a dispensing item. The number of available tabs is reduced to three.
6. On the Information tab, in the Hospital description text box, type an internal description of the
item. This is the description used by staff to find the dispensing item in the Invoice Item List.
7. Click the Tax/Disc tab.
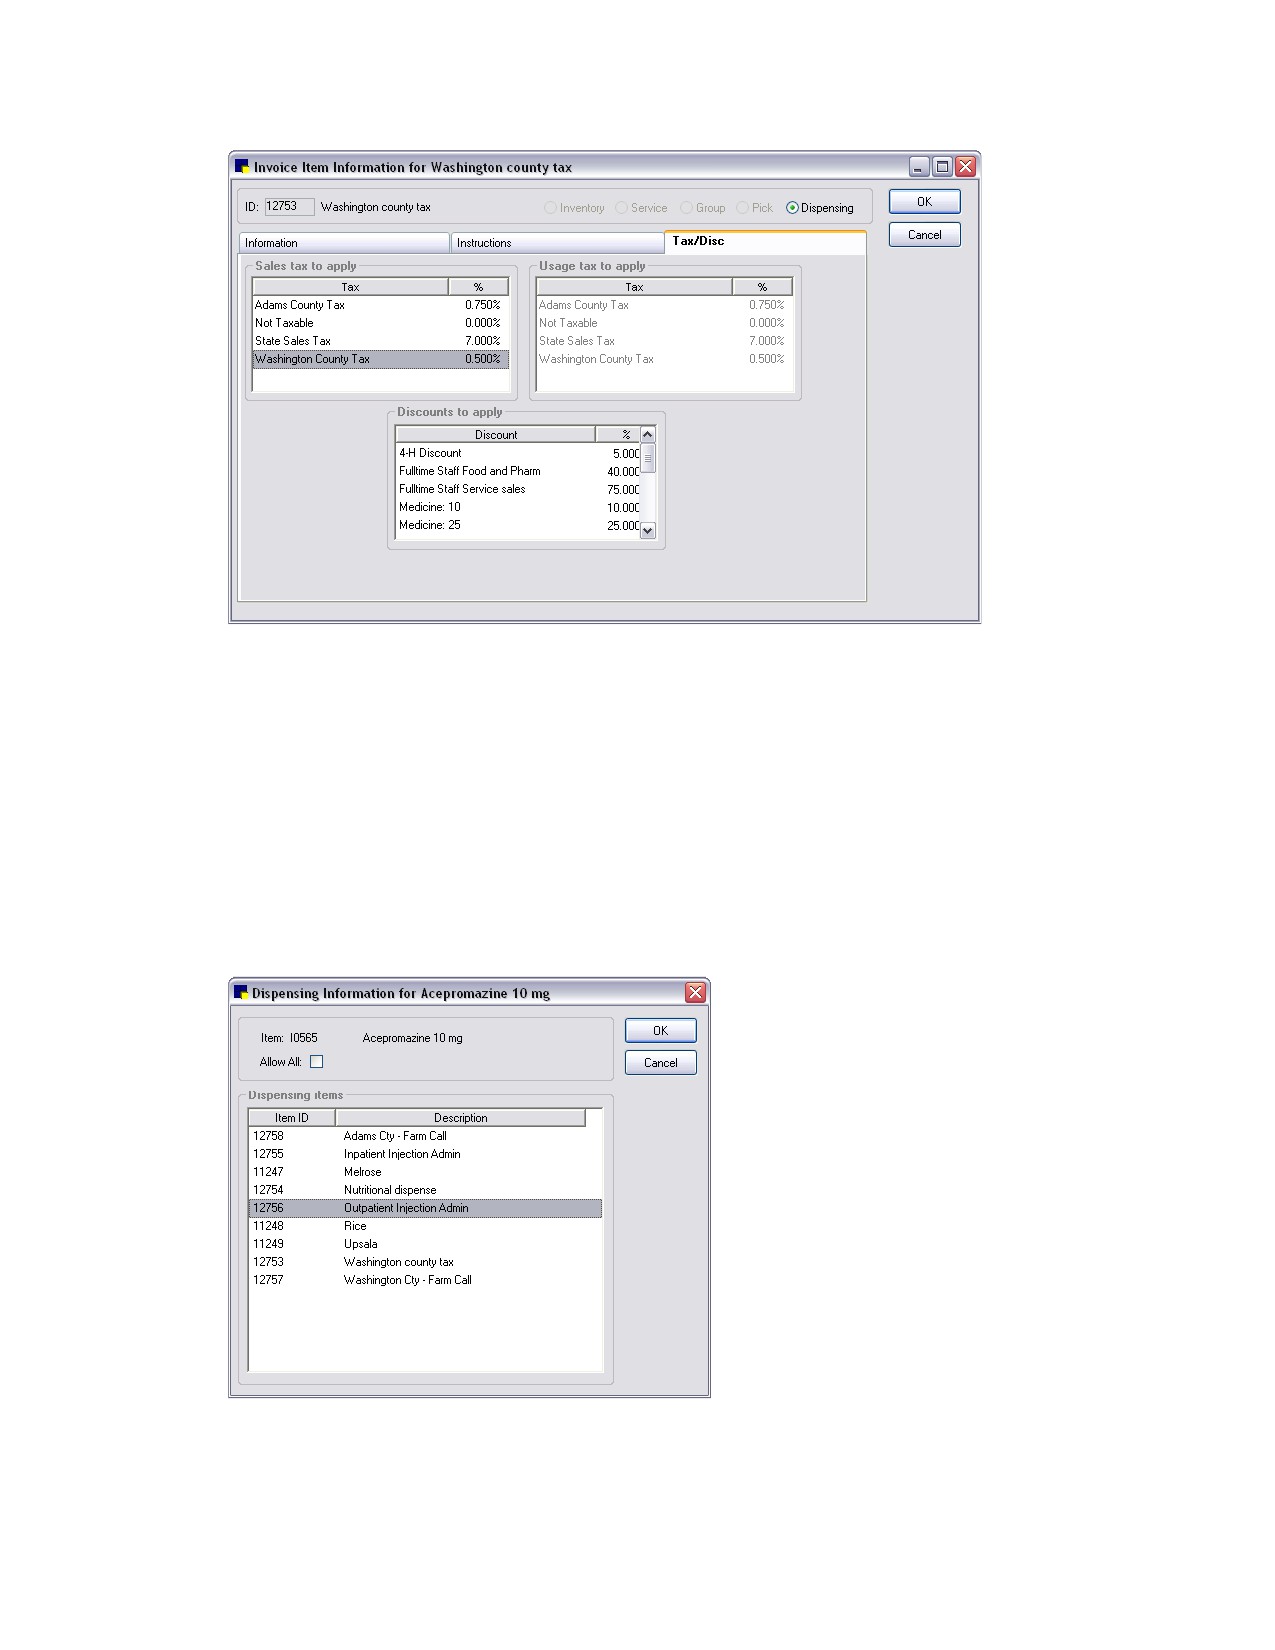
8. In the Sales tax to apply area, select each sales tax that applies to this item. This tax will be applied
when the client is invoiced and excludes clients marked as Tax Exempt in their file. (Note: It is
possible to remove a tax during invoicing.)
9. In the Discounts to apply area, select each client discount that may apply to this item. Be aware, if
the client has one or more of the discounts applied to their account, they will receive each discount
for the item. (Note: It is possible to apply or remove a discount during invoicing.)
10. Click OK to save your changes, or click another tab to add more information for the item.
After the dispensing item is set up, it must be linked to an inventory invoice item before it can be used.
For information on linking the dispensing item, see “Linking a Dispensing Item to an Inventory Item” in
the following section.
Example:
A practice is located in Washington County and its satellite practice is located in Adams County. The
counties have different county tax rates. If the practices use the same invoice items, they can set up two
dispensing items: one with the tax rate for Washington County and one with the tax rate for Adams
County. However, both counties are in your state, so you can have the state tax on the invoice items,
instead of the dispensing items.
223
Chapter 10: Setting Up Your Invoice Items
In this example, the practice set up a dispensing item for Washington County tax. When an invoice item linked with this
dispensing item is used on an invoice, you have the option of applying this county tax.
Linking a Dispensing Item to an Inventory Item
After the dispensing item is set up, it must be linked to an inventory invoice item before it can be used.
To link a dispensing item to an inventory item:
1. On the Lists menu, select Invoice Item. The Invoice Item List appears.
2. Select the invoice item record to which you want to link a dispensing item and click Update. The
Invoice Item Information window appears.
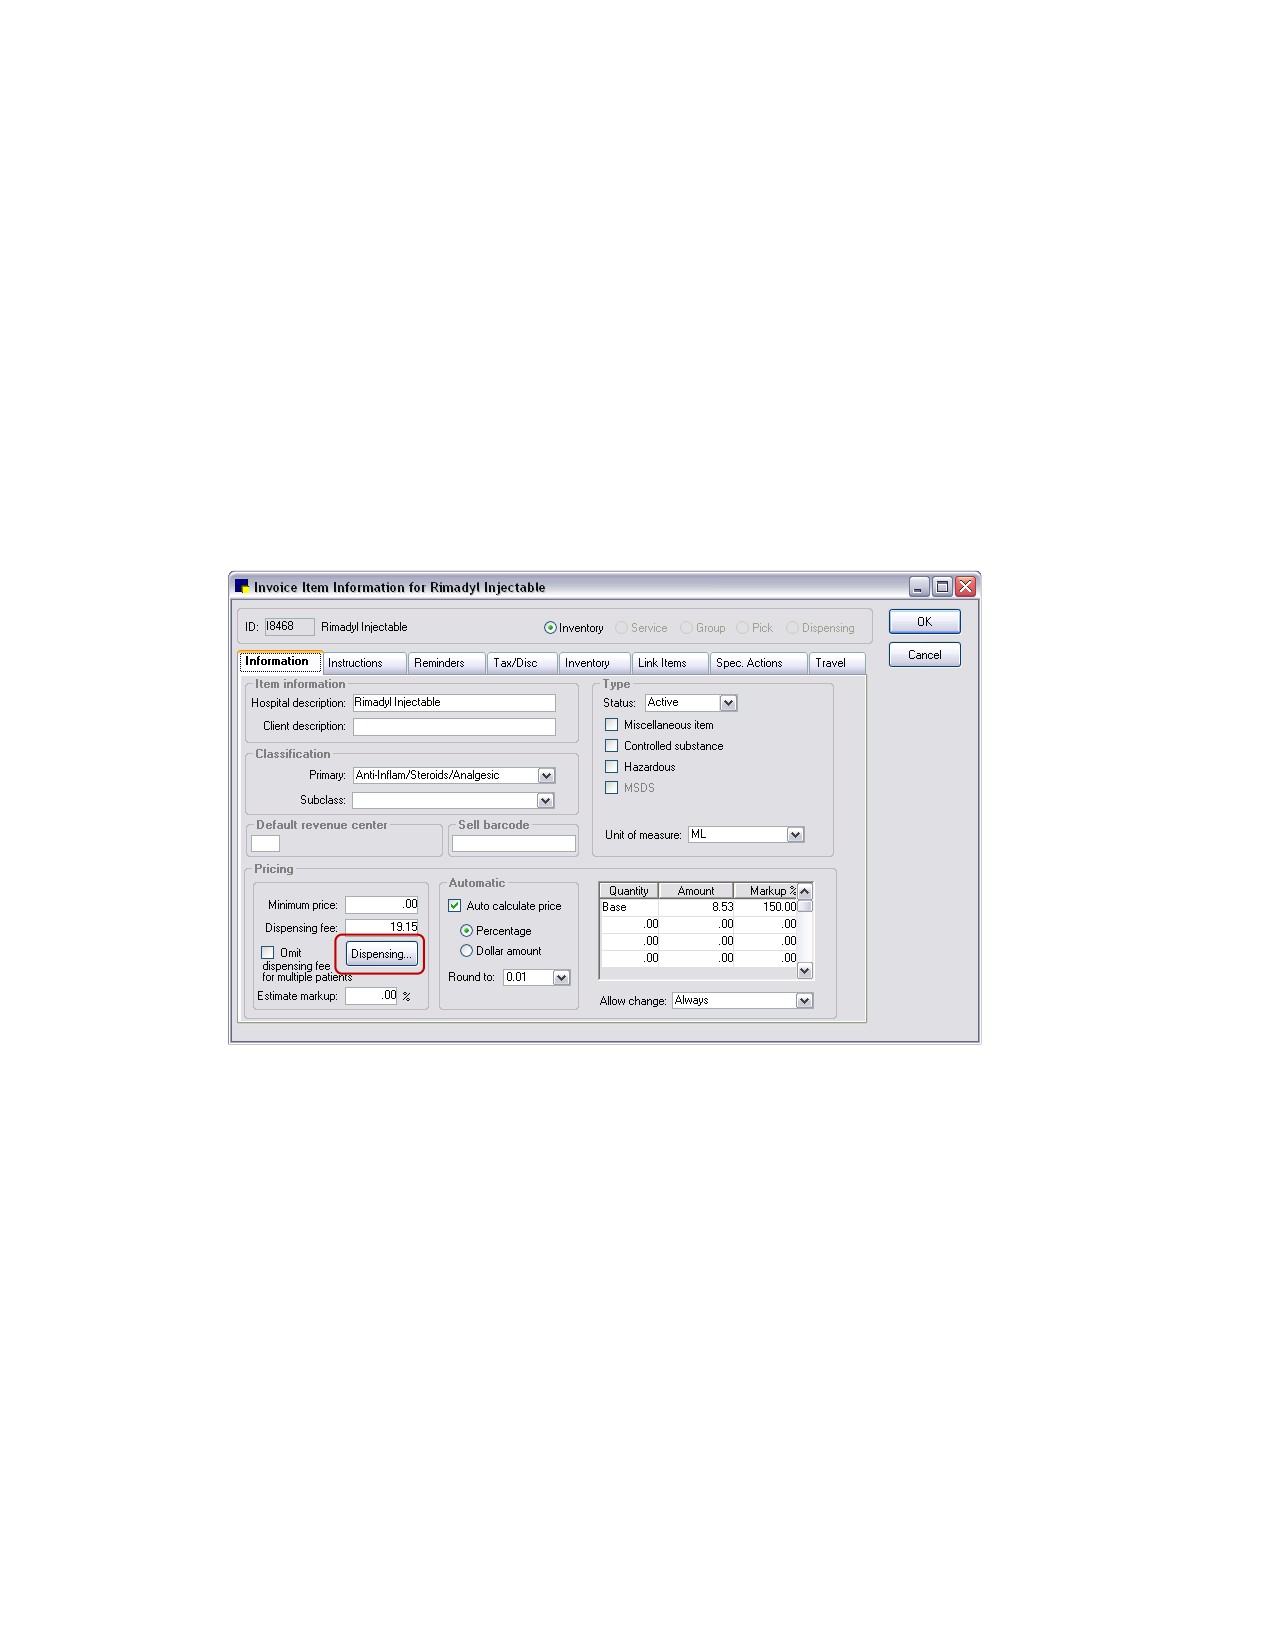
3. On the Information tab in the Pricing area, click the Dispensing button. The Dispensing Information
dialog box appears.
Dispensing Information dialog box
224
Chapter 10: Setting Up Your Invoice Items
4. Select the dispensing item(s) that apply to this inventory item.
• To select multiple dispensing items, press and hold the CTRL key while clicking on the items.
• To deselect a dispensing item, press and hold the CTRL key while clicking on the highlighted
item.
5. Select the Allow All check box if you want to allow staff members to select from a list of all active
dispensing items when billing this invoice item. (Selecting Allow All here activates the Show All
check box that will display on the Select Dispensing Item dialog box at invoice time, allowing staff to
select any dispensing item, instead of being limited to the dispensing item(s) selected at the time of
invoice item setup.)
Note: If the Allow All check box is selected, at least two dispensing items must be selected on the
Dispensing Information dialog box. (These items will display in the selection list that appears at
invoice time.)
6. Click OK to return to the Invoice Item Information window.
The Dispensing button will display ellipses (…) on the button if the inventory item has dispensing information linked to it.
7. Click OK to save your changes.
Setting Up Whiteboard Patient Order Item Defaults
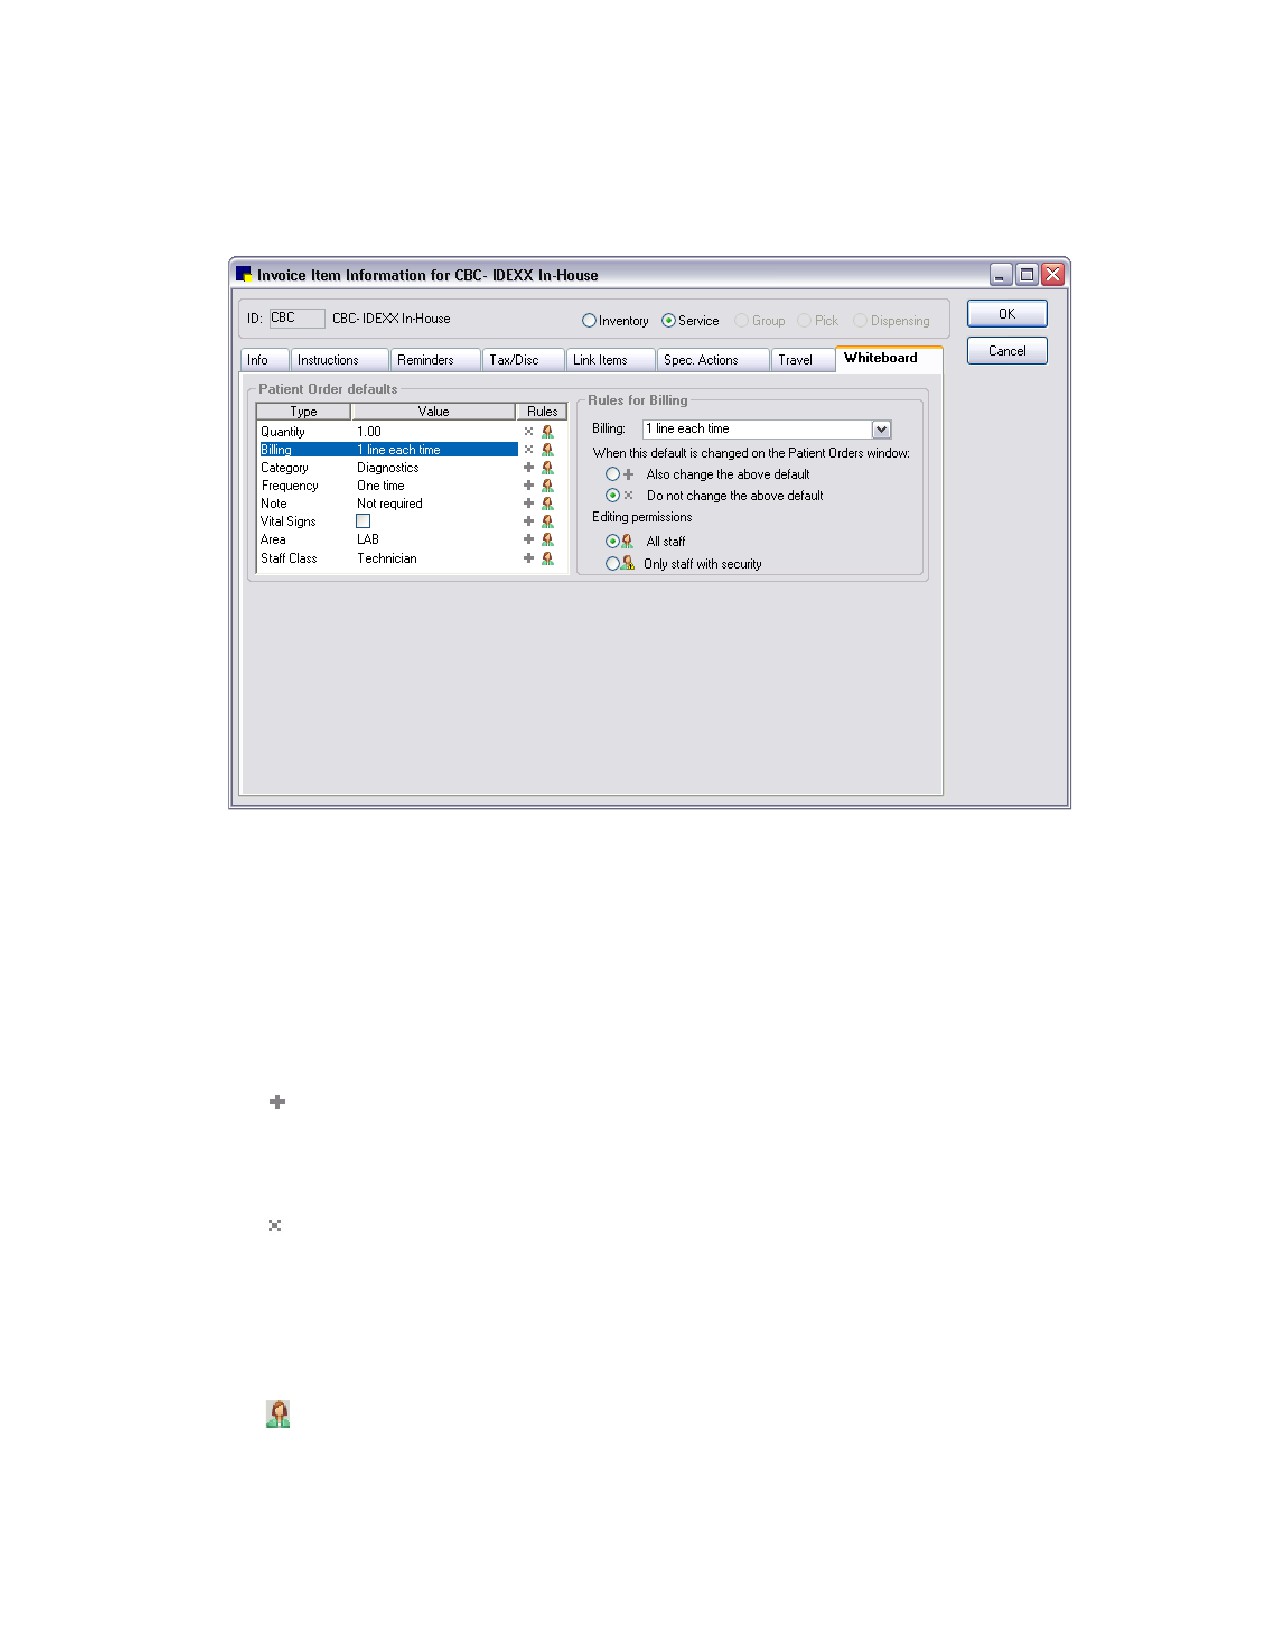
The Invoice Item Information window’s Whiteboard tab allows you to set default values and text box-
level rules for each invoice item that staff may enter on the Patient Orders window.
The Patient Order defaults area on the left of the tab lists all fields available on the Patient Orders
window entry grid. It includes information in the following three columns:
• Type column-The name of the Patient Order item field as it appears in its associated column
on the Patient Orders window.
• Value column-The default value to use for this field on the Patient Orders window.
• Rules column-Icons in this column indicate the current “change rules” set for this field (icon
descriptions provided within the procedural steps below).
225
Chapter 10: Setting Up Your Invoice Items
To set up patient order item defaults and change rules on the Whiteboard tab:
1. In the Invoice Item List (Lists > Invoice Item), double-click an invoice item to update it.
2. Click the Whiteboard tab.
Whiteboard tab on Invoice Item Information window
3.
Select an item in the Patient Order in the list on the left to display its associated rules on the right.
4.
The [Field type] default value setting (top field on the right) may display as a drop-down list, text
box, or check box, depending on the field type selected on the left. Specify the default value to use
for this Patient Orders item . If you want to require staff to enter or select the value at the time the
order item is added on the Patient Orders window, set the value to <Blank>.
5.
For the When this default is changed on the Patient Orders window setting, select one of the
following “change rules” to be followed when this value is changed on the Patient Orders window:
•
Also change the above default-When this field’s value is changed on the Patient Orders
window, Cornerstone will make the changed value the new default value for this field (and
automatically update the default value listed on the Whiteboard setup tab). For all fields except
Quantity, this is the option that will be selected by default.
•
Do not change the above default-When this field’s value is changed on the Patient Orders
window, Cornerstone will not make the changed value the new default value (it will leave the
default value as it is listed on the Whiteboard setup tab). For the Quantity field, this is the
option that will be selected by default.
6.
For the Editing permissions setting, select one of the following rules to determine which staff are
allowed to edit/overwrite the default value for this field on the Patient Orders window:
•
All staff may edit-All staff with Patient Orders permissions are allowed to edit/overwrite the
default value for this field on the Patient Orders window, regardless of whether they have been
226
Chapter 10: Setting Up Your Invoice Items
granted Whiteboard Orders Override security permissions. This is the option that will be
selected by default.
•
Only staff with security permissions may edit-Only those staff members with Whiteboard
Orders Override security permissions in Cornerstone are allowed to edit/overwrite the default
value for this field on the Patient Orders window.
Note: If a field’s default value is set to <Blank> on the Whiteboard setup tab and therefore
appears blank on the Patient Orders window, all staff with Patient Orders permissions are allowed to
enter or select a value for this field, regardless of whether they have been granted Whiteboard
Orders Override security permissions in Cornerstone.
7. Click OK to save your changes and close the Invoice Item Information window.
8. Repeat the steps above for each Patient Orders item for which you want to set up defaults and
change rules.
Tip: To quickly set Whiteboard patient order defaults for multiple invoice items at once, use the Invoice
Item Setup tool’s Whiteboard tab. See “Setting Whiteboard Patient Order Defaults for Multiple Items at
Once” on page 243 for more information.
Adding Dispensing Items Using Mass Markup
You can use the Mass Markup feature to quickly add (or remove) dispensing items to all invoice items in
a particular classification or subclassification, or to quickly add (or remove) dispensing items to multiple
invoice items at once.
To add dispensing items using Mass Markup:
1.
On the Tools menu, select Mass Markup.
2.
A “Mass Markup” message appears to remind you that a backup of the database should be made
and asks if you wish to continue. Ensure that a backup has been made, and click Yes.
The Mass Markup dialog box appears.
3.
Click the Dispensing tab.
4.
In the Invoice item information area, to narrow the list of items displayed on the Dispensing tab, do
the following:
• To add dispensing items to invoice items in a particular classification, in the Class ID text box,
type the ID of the class or press F2 to use the Invoice Item Classification List to choose an item
classification.
• To add dispensing items to invoice items in a particular subclassification, in the Subclass ID
text box, type the ID of the subclass or press F2 to use the Invoice Item Subclassification List to
choose an item subclassification.
• To add dispensing items to an individual item, in the Item ID text box, type the item’s ID or
press F2 to use the Invoice Item List to choose the item.
5.
In the lower Dispensing Item ID/Dispensing Item Description selection list, select the dispensing item
to add (or remove). You can select only one dispensing item at a time.
6.
Select the invoice items to affect by the addition or removal of dispensing items. (Selected items are
highlighted/shaded.)
• To select all items in the list, click Select All.
• To select more than one item, press and hold the CTRL key while you click to select each item.
227
Chapter 10: Setting Up Your Invoice Items
• To select a range of consecutive items, click the first item and then press and hold the SHIFT
key while you click the last item in the range.
7. Click Add to add the dispensing item to the highlighted invoice items or click Remove to remove the
dispensing item from the highlighted invoice items.
¾ The change is not applied to the highlighted items until you click Apply. After viewing the
applied dispensing items, if you decide you do not want to apply the changes, click Cancel or
deselect specific items that you do not want to link.
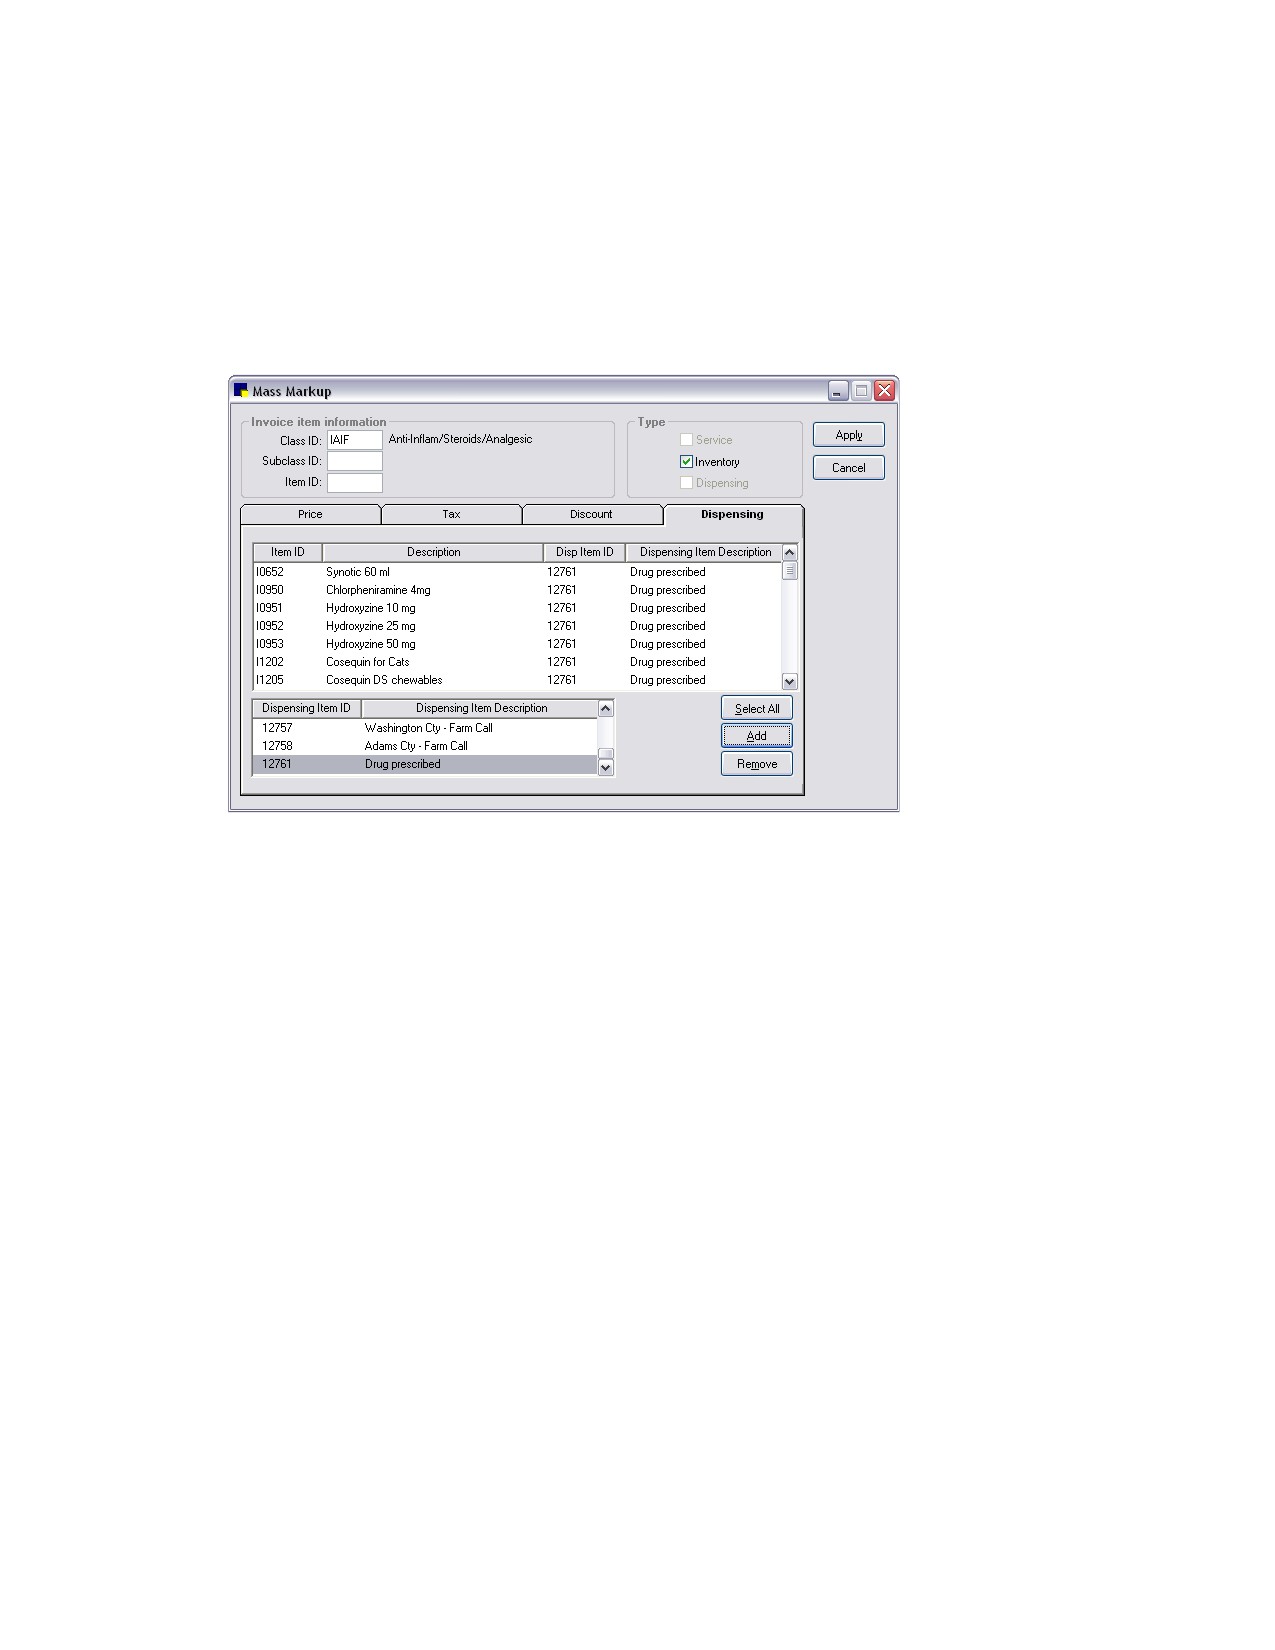
Dispensing tab on Mass Markup dialog box
8. If you want to allow staff members to select from a list of all active dispensing items when billing for
the selected invoice items, you can select Allow All - Use any Dispensing Item in the Dispensing
Item ID/Dispensing Item Description selection list. If the Allow All/Use any Dispensing Item option
is selected for an item on the Mass Markup dialog box during invoice item setup, then the Show All
option will be available on the Select Dispensing Item dialog box at invoice time. This allows staff to
select any dispensing item when billing any of the selected invoice items.
Note: In order to apply the Allow All setting to an item on the Mass Markup dialog box, that item
must have at least two dispensing items linked to it.
9. Click Apply to link the taxes or discounts to the highlighted invoice items.
Note: Because the Apply button applies any changes to highlighted invoice items in all tabs, you
should finish working in one tab, apply or cancel your work and then work in a different tab.
10. After the database has been updated, a message appears to inform you that the change is
complete. Click Close.
Example:
This example shows steps a staff member might follow to link the Allow All-Use any Dispensing Item
option to an invoice item in the Mass Markup dialog box.
1. On the Mass Markup Dispensing tab, use the Class ID field to display the entire Anti-
Inflam/Steroids/Analgesic (IAIF) class of items at once.
2. In the Dispensing Item selection list (at the bottom of the Mass Markup dialog box), select Allow
All-Use any Dispensing Item.
228
Chapter 10: Setting Up Your Invoice Items
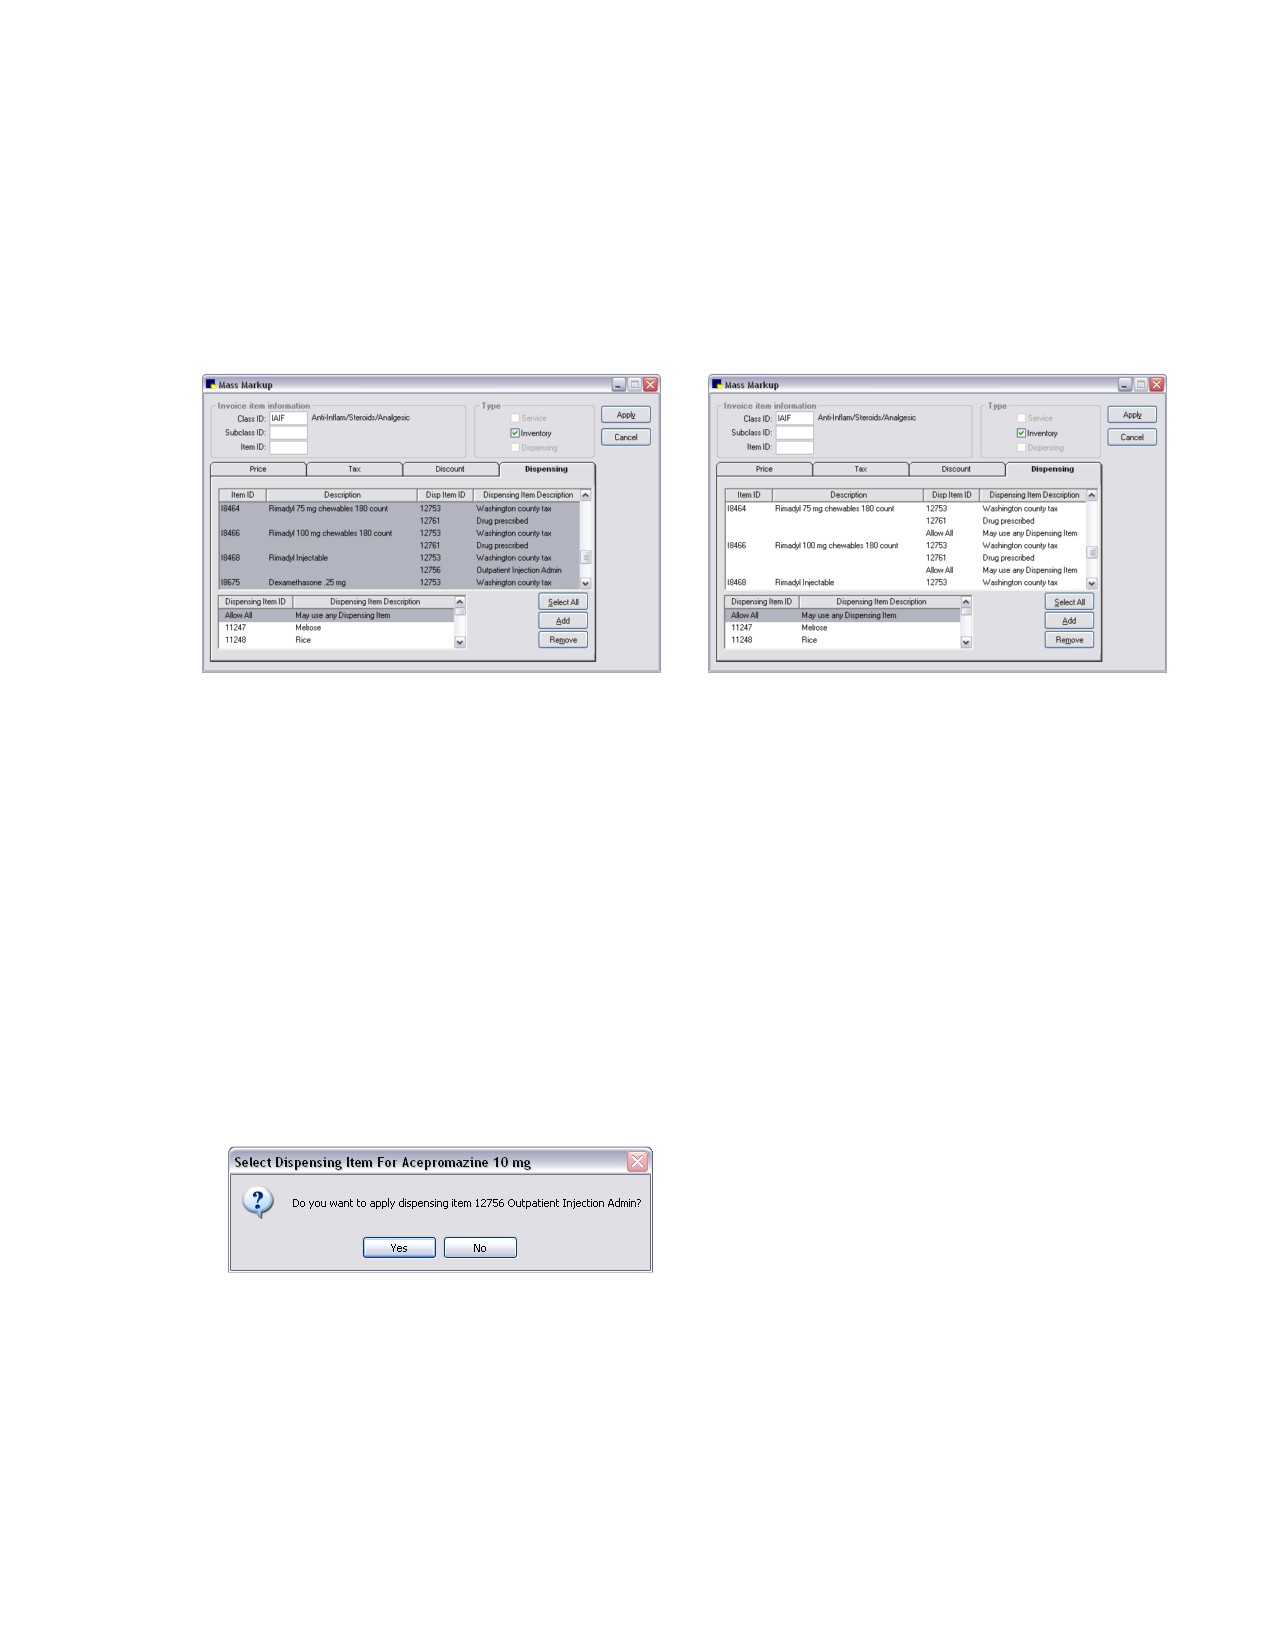
3. Click the Select All button to select all invoice items in the Anti-Inflam/Steroids/Analgesic (IAIF)
class. Note that an invoice item must have at least two dispensing items linked to it in order for the
Allow All option to be applied successfully.
4. Click the Add button to add the dispensing item to the highlighted invoice items.
Note: If some of the selected items have one or zero linked dispensing items and you click Add to
apply the Allow All setting, the Allow All setting will not be applied and these items will remain
unchanged.
Dispensing tab showing all IAIF classification items
Dispensing tab showing all IAIF classification items after the Add
selected before the Add button is clicked to link the
button is clicked to link the Allow All dispensing option. (Allow All
Allow All dispensing option.
option is set for all invoice items having at least two linked
dispensing items.)
5. If you are satisfied with the results shown, click Apply.
6. Click Close to exit.
Selecting Dispensing Items at Invoice Time
Dispensing items must be linked to an inventory invoice item and cannot be used alone. When an
inventory invoice item that is linked to a dispensing item is added to an invoice, estimate, Patient Visit
List, Rx label, Patient Advisor* exam, or Appointment Scheduler, a pop-up box appears. The type of box
that appears depends on if one or multiple dispensing items are linked to the invoice item, and if the
Allow All check box was selected during the dispensing item setup.
One Linked Dispensing Item
If only one dispensing item is linked to the invoice item, a box similar to the one shown below appears.
Click Yes to apply the dispensing item or No to not apply the dispensing item.
If only one dispensing item is linked to an invoice item,
decide whether you want to apply the dispensing item.
Two or More Linked Dispensing Items
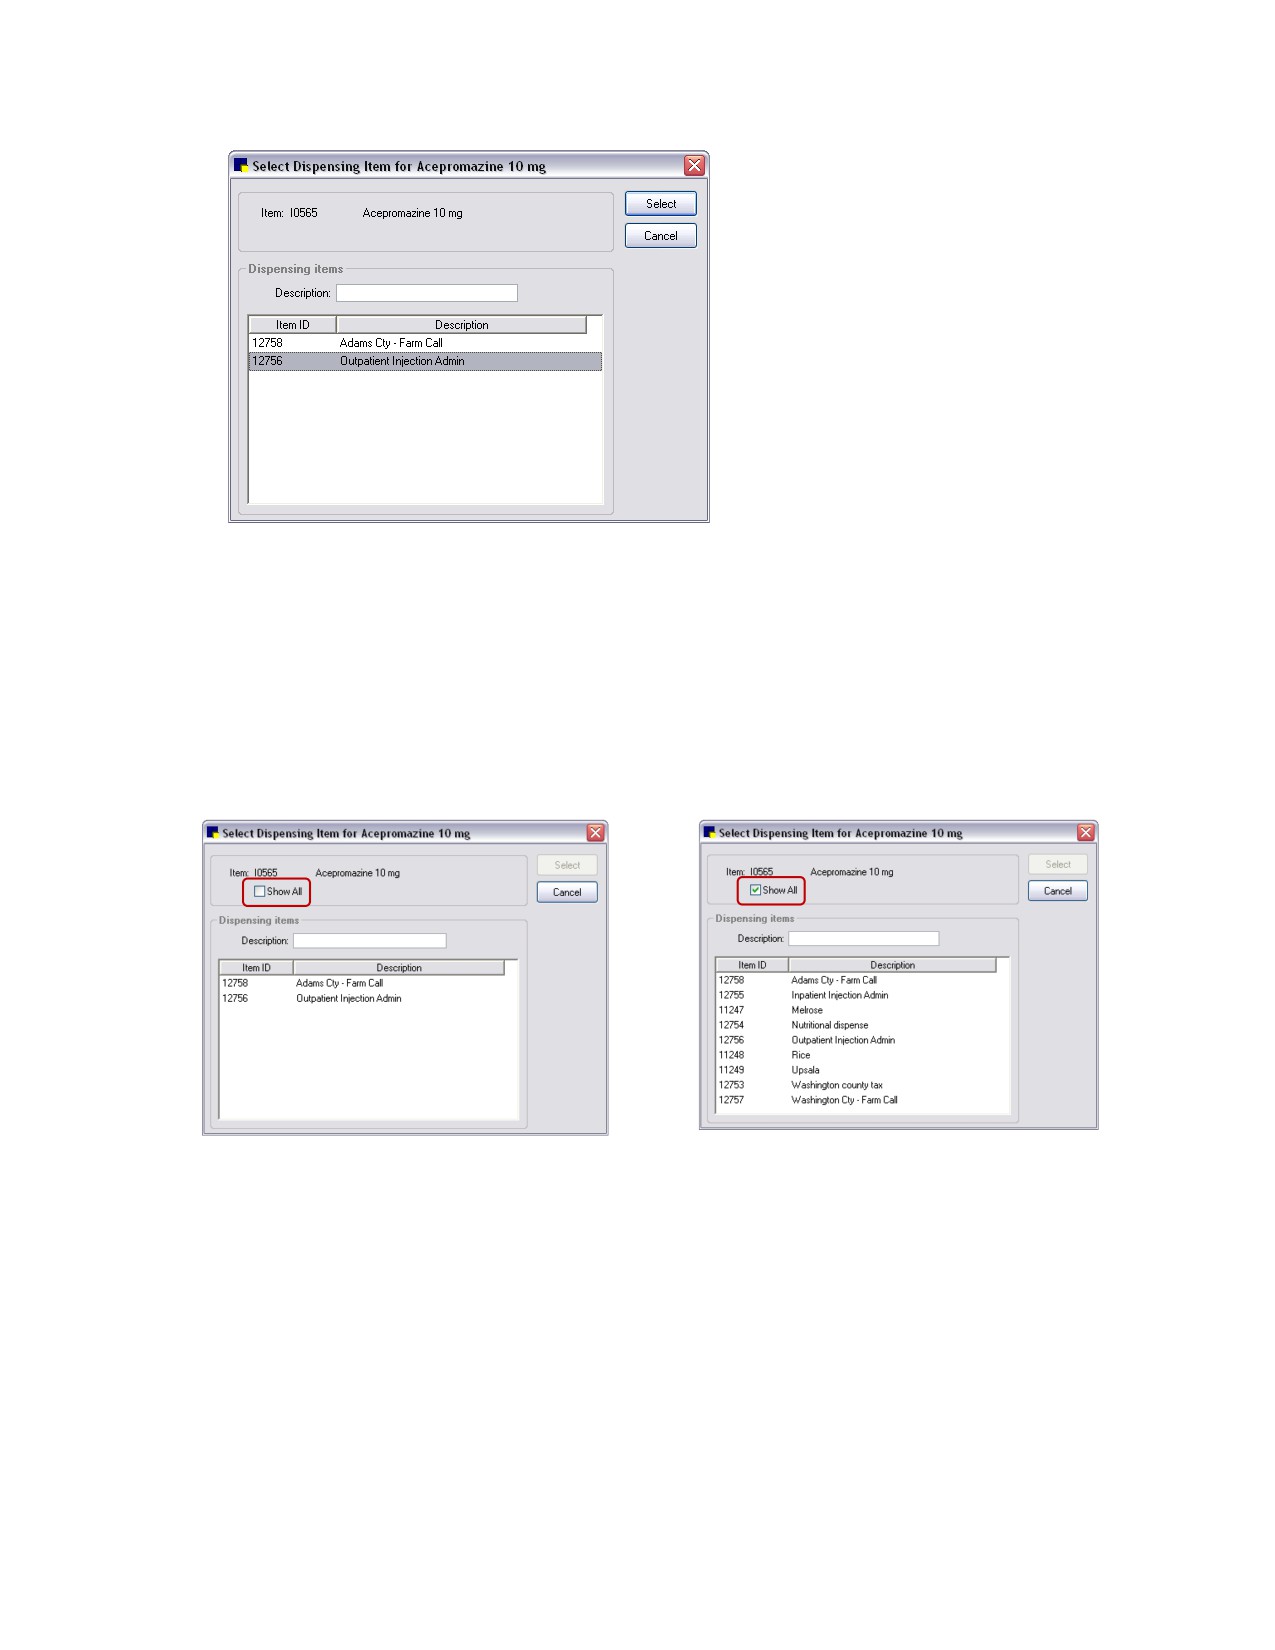
If two or more dispensing items are linked to the invoice item, a box similar to the one shown below
displays. Click the dispensing item to apply and click select.
229
Chapter 10: Setting Up Your Invoice Items
If more than one dispensing item is linked to the invoice item,
select which dispensing item to apply and click Select.
Two or More Linked Dispensing Items with SHOW ALL Enabled
If two or more dispensing items are linked to the invoice item and Allow All is selected during the
dispensing item setup, then the Show All option will be available on the Select Dispensing Item dialog
box at invoice time. This is useful if the item is dispensed a certain way most of the time but may need to
be dispensed differently once in a while.
If desired, the staff member can select the Show All check box to display all active dispensing items in
the selection list.
Show All not selected-lists only those dispensing items
Show All selected-lists all active dispensing items (not limited
previously selected during invoice item setup
to those previously selected during invoice item setup)
Viewing Calculations Associated with Dispensing Items
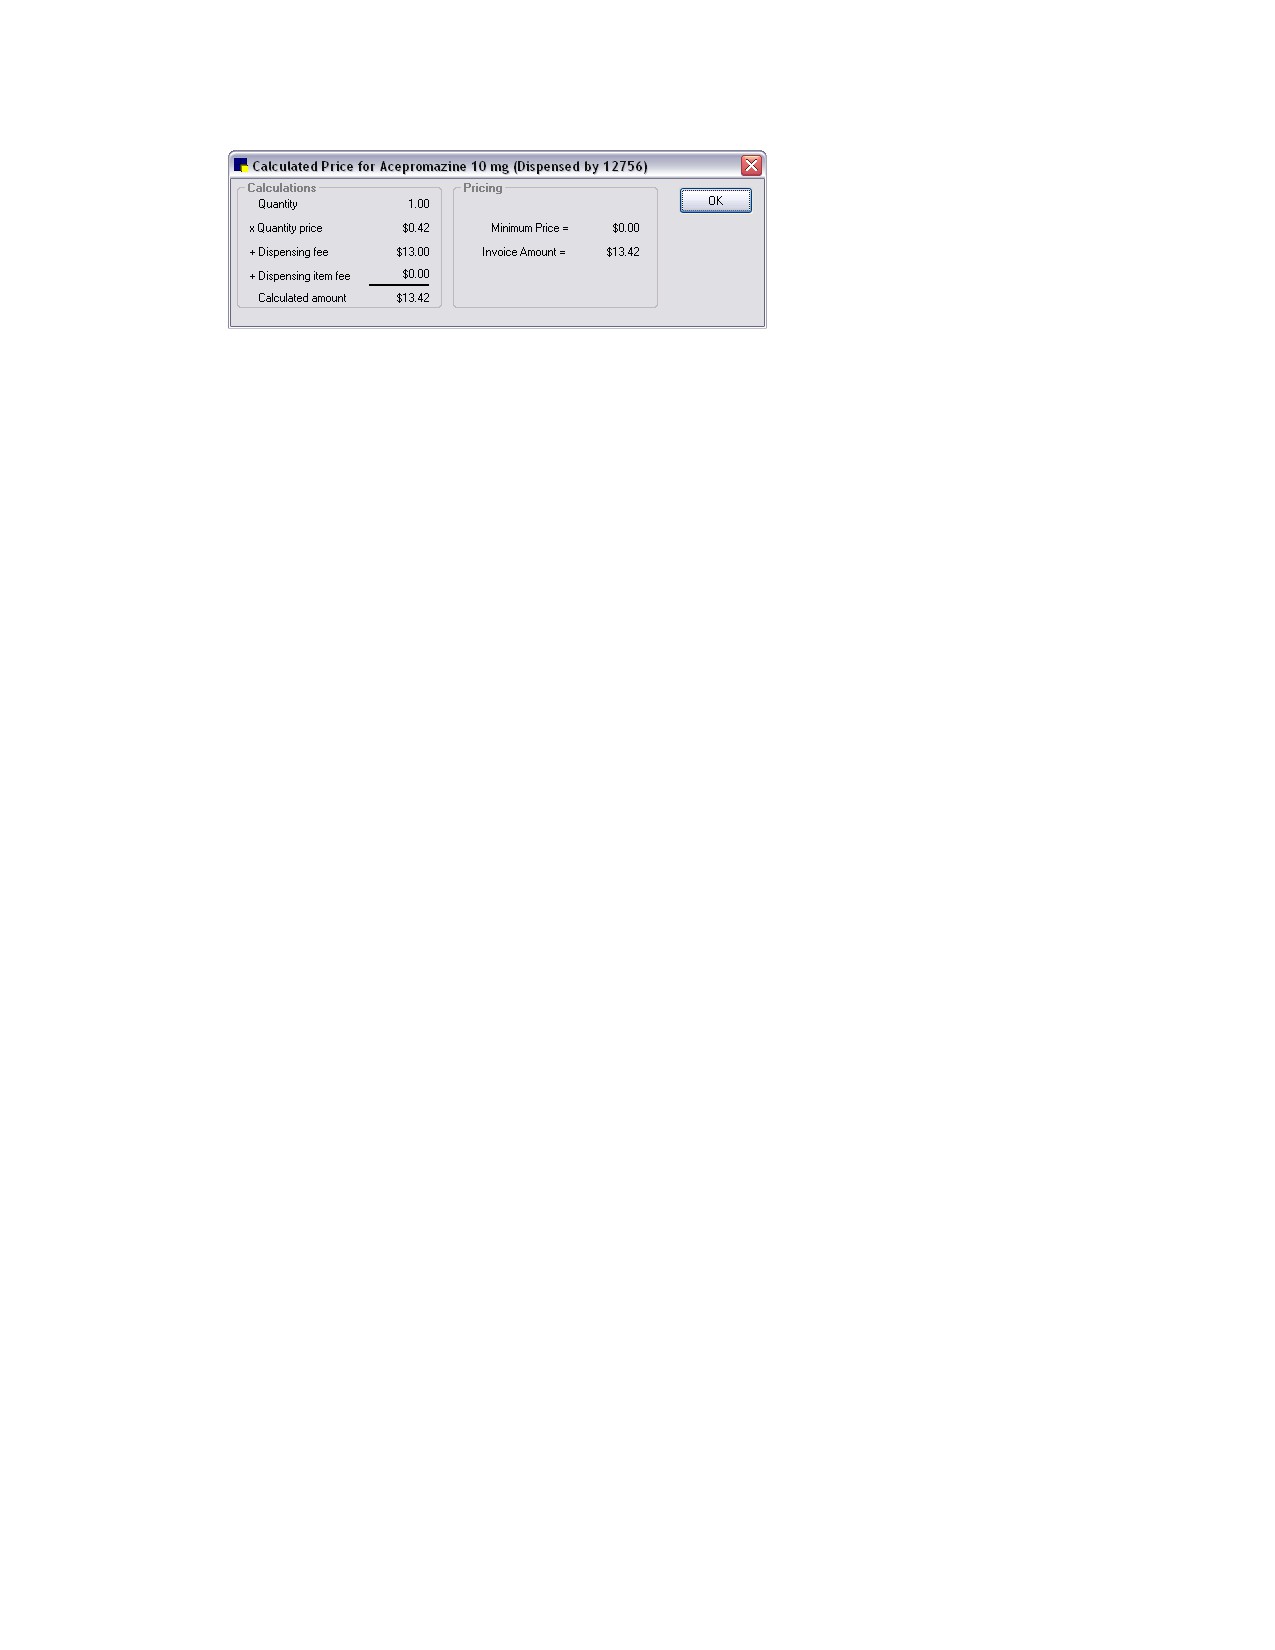
To view the breakdown of how the software calculated a fee, right-click on the line in the invoice,
estimate, reservation or Patient Visit List. The Calculated Price box (shown below) appears. Click OK to
close the box when you are done viewing it.
230
Chapter 10: Setting Up Your Invoice Items
In this example, acepromazine was dispensed at the practice. A dispensing
fee (from the invoice item record) is charged, and a dispensing item fee
(from the dispensing item), if any, is added to the total cost.
To view a list of invoice items that have dispensing items linked to them, print an Invoice Item
Dispensing Setup Report.
Changing Invoice Item Pricing Information Using Mass Markup
You can change invoice item prices by a specified dollar amount or by a percentage using Mass
Markup/Markdown. You can use mass markup for one particular invoice item, all invoice items, service
items, inventory items or for an invoice item classification or subclass.
Note: We recommend using the Cornerstone server to perform exclusive use options, such as Mass
Markup.
Before You Begin
• Make a backup of your database.
• Make sure that you are the only user logged in to Cornerstone. See “Viewing Current User
Information: Exclusive Use” on page 14.
To change invoice item prices using Mass Markup:
IMPORTANT: We strongly advise making a backup of your database before using Mass Markup to
modify invoice items.
1. On the Tools menu, select Mass Markup.
2. A “Mass Markup” message appears to remind you that a backup of the database should be made
and asks if you wish to continue. Ensure that a backup has been made, and click Yes.
The Mass Markup dialog box appears.
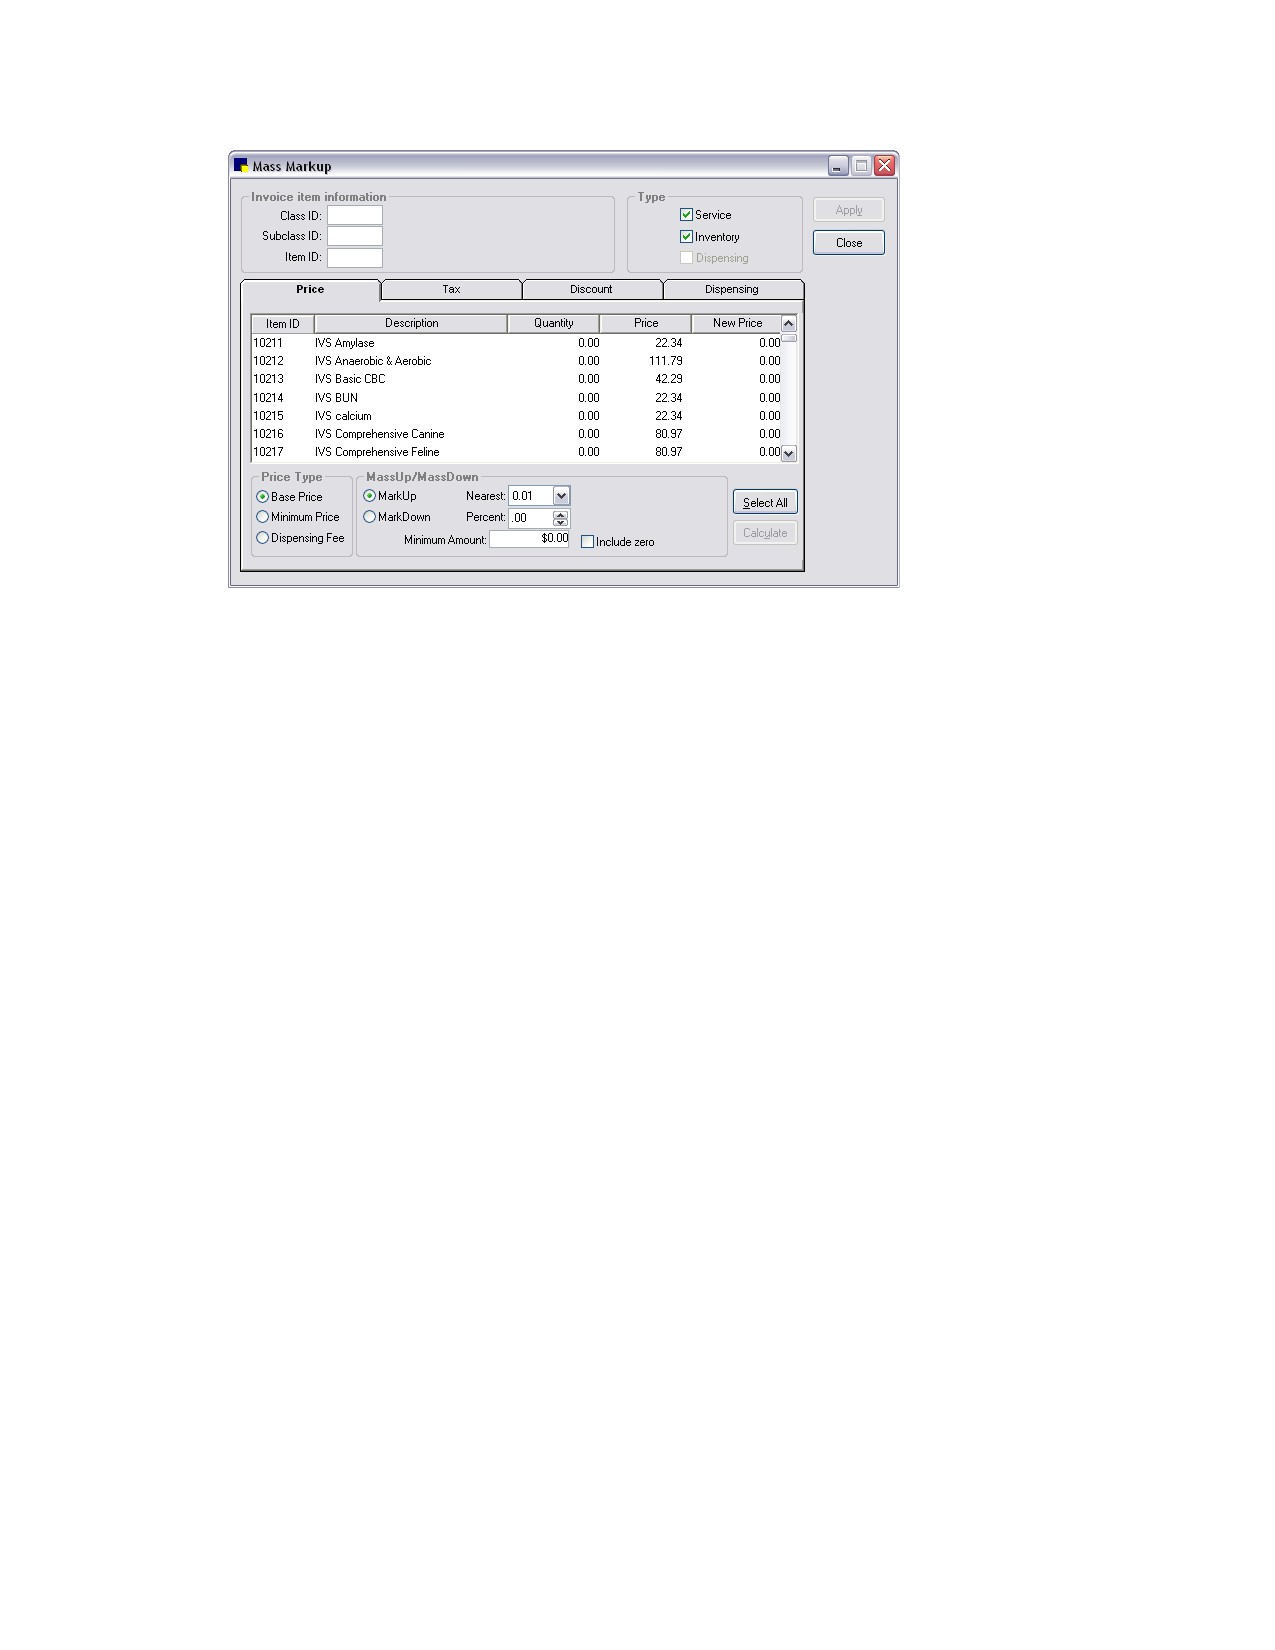
3. Click the Price tab.
231
Chapter 10: Setting Up Your Invoice Items
Price tab on Mass Markup dialog box
4. In the Invoice item information area, to narrow the list of invoice items displayed on the Price tab, do
the following:
• To change prices of items in a particular classification, in the Class ID, text box, type an ID or
press F2 to use the Invoice Item Classification List to choose an item classification.
• To change prices of items in a particular subclassification, in the Subclass ID text box, type an
ID or press F2 to use the Invoice Item Subclassification List to choose an item subclassification.
(If you specify a subclass ID, Cornerstone automatically enters the class ID.)
• To change the price of an individual item, in the Item ID text box, type a specific item ID or press
F2 to use the Invoice Item List to choose the item.
5. In the Type area, select the Service or Inventory check boxes to include those invoice item types in
the list. The list displays only the items of the types you select.
6. In the Price Type area (lower left), select Base Price to change the base prices of the selected
group or Minimum Price to change the minimum prices of the selected groups. The columns
displayed in the invoice item list change depending on the price type selected.
7. Specify whether to MarkUp or Markdown the prices of the selected group.
8. Select the Nearest amount to round uneven amounts.
9. Type or select the Percentage to change prices. (To change prices by a flat dollar amount, leave
the percentage at .00%.)
10. Type or select the Minimum Amount to change a price. If you are changing prices by a flat dollar
amount, type the dollar amount in the box.
11. Select the Include zero check box to change items with no current price by the minimum amount.
12. In the invoice item selection list on the Price tab, select the invoice items to be affected by the price
change. (Selected items are highlighted/shaded.)
• To select all items in the list, click Select All.
• To select more than one item, press and hold the CTRL key while you click to select each item.
232
Chapter 10: Setting Up Your Invoice Items
• To select a range of consecutive items, click the first item and then press and hold the SHIFT
key while you click the last item in the range.
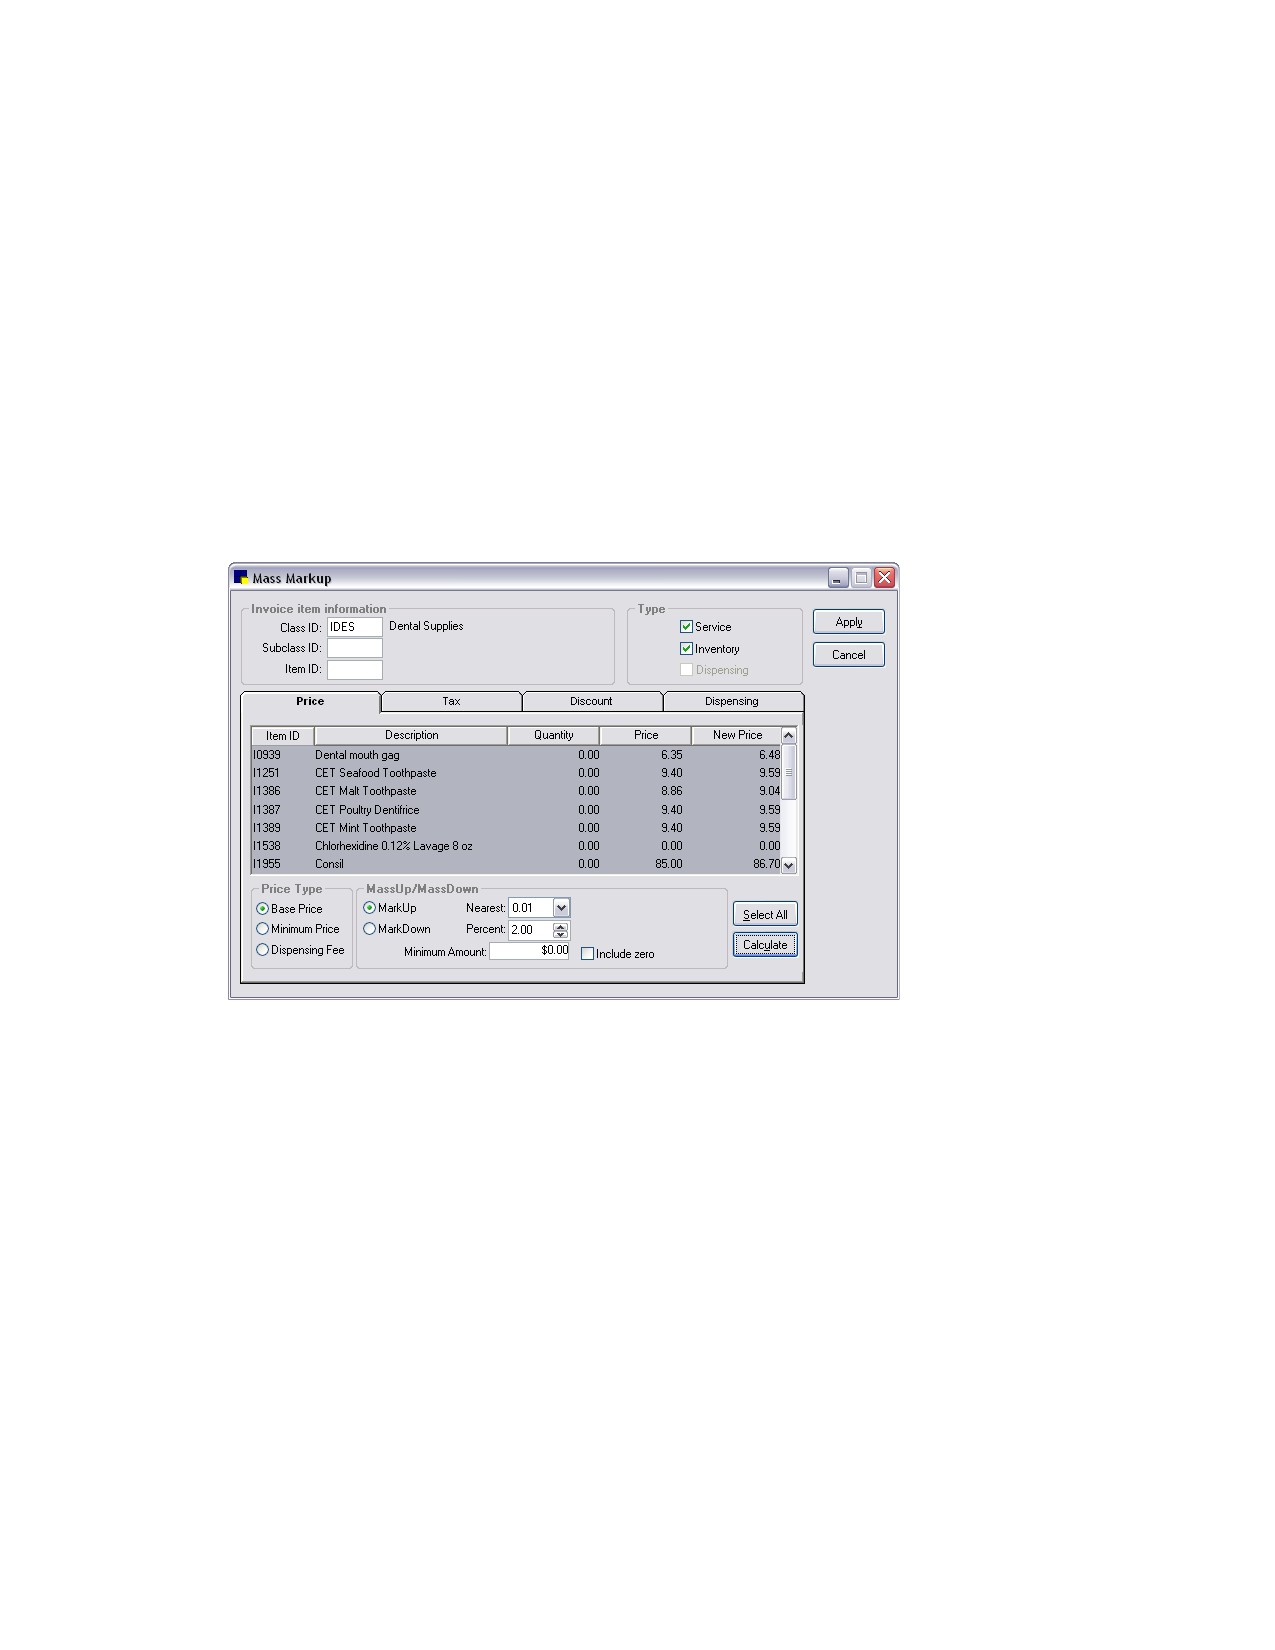
13. Click Calculate to see the effect of the price change in the New Price column. (The price change is
not applied to the selected items until you click Apply. After viewing the new prices, if you decide
you do not want to apply the price changes, click Cancel or deselect specific items that you do not
want to change.)
WARNING: Before clicking Apply in the next step, make sure you want to permanently change the
selected items. Apply applies any changes you have made to all of the items.
14. If you are sure you want to permanently change the selected items, click Apply to apply the new
pricing. You are prompted to confirm the change. Click Yes.
Note: Because the Apply button applies any changes to selected invoice items on all tabs, you
should finish working in one tab, apply or cancel your work, and then proceed to work in a different
tab.
The New Price column displays the changes you are proposing (when you click Calculate).
Click Apply to make the changes to the Cornerstone database.
15. After the database has been updated, a message appears to inform you that the price change is
complete. Click Close.
233
Chapter 10: Setting Up Your Invoice Items
To use Mass Markup to change dispensing fees:
1.
On the Tools menu, select Mass Markup.
2.
A “Mass Markup” message appears to remind you that a backup of the database should be made
and asks if you wish to continue. Ensure that a backup has been made, and click Yes.
The Mass Markup dialog box appears.
3.
Click the Price tab.
4.
In the Invoice item information area, to narrow the list of invoice items displayed on the Price tab, do
the following:
• To change dispensing fees on items in a particular classification, in the Class ID, text box, type
an ID or press F2 to use the Invoice Item Classification List to choose an item classification.
• To change dispensing fees on items in a particular subclassification, in the Subclass ID text
box, type an ID or press F2 to use the Invoice Item Subclassification List to choose an item
subclassification. (If you specify a subclass ID, Cornerstone automatically enters the class ID.)
• To change the dispensing fee for an individual item, in the Item ID text box, type a specific item
ID or press F2 to use the Invoice Item List to choose the item.
5.
In the Price Type area (lower left), select Dispensing Fee. The columns displayed in the invoice item
list change accordingly.
6.
Enter the Current Dispensing Fee and what you want the New Dispensing Fee to be.
7.
Click Calculate to see the effect of the dispensing fee change in the New Disp. Fee column. (The
fee change is not applied to the selected items until you click Apply. After viewing the new fees, if
you decide you do not want to apply the changes, click Cancel or deselect specific items that you
do not want to change.)
WARNING: Before clicking Apply in the next step, make sure you want to permanently change the
selected items. Apply applies any changes you have made to all of the items.
8.
Click Apply to apply the new pricing.
Note: Because the Apply button applies any changes to selected invoice items in all tabs, you
should finish working in one tab, apply or cancel your work and then work in a different tab.
9.
After the database has been updated, a message appears to inform you that the price change is
complete. Click Close.
Changing Linked Taxes and Discounts Using Mass Markup
You can change taxes or discounts linked to invoice items using Mass Markup. You can use mass
markup for one particular invoice item, all invoice items, or for an invoice item classification or subclass.
Note: We recommend using the Cornerstone server to perform exclusive use options, such as Mass
Markup.
234
Chapter 10: Setting Up Your Invoice Items
Before You Begin
• Make a backup of your database.
• Make sure that you are the only user logged in to Cornerstone. See “Viewing Current User
Information: Exclusive Use” on page 14.
• Set up the taxes your practice applies (Controls > Taxes).
• Set up the discounts your practice applies (Controls > Discounts).
To change taxes or discounts linked to invoice items using Mass Markup:
IMPORTANT: We strongly advise making a backup of your database before using Mass Markup to
modify invoice items.
1. On the Tools menu, select Mass Markup.
2. A “Mass Markup” message appears to remind you that a backup of the database should be made
and asks if you wish to continue. Ensure that a backup has been made, and click Yes.
The Mass Markup dialog box appears.
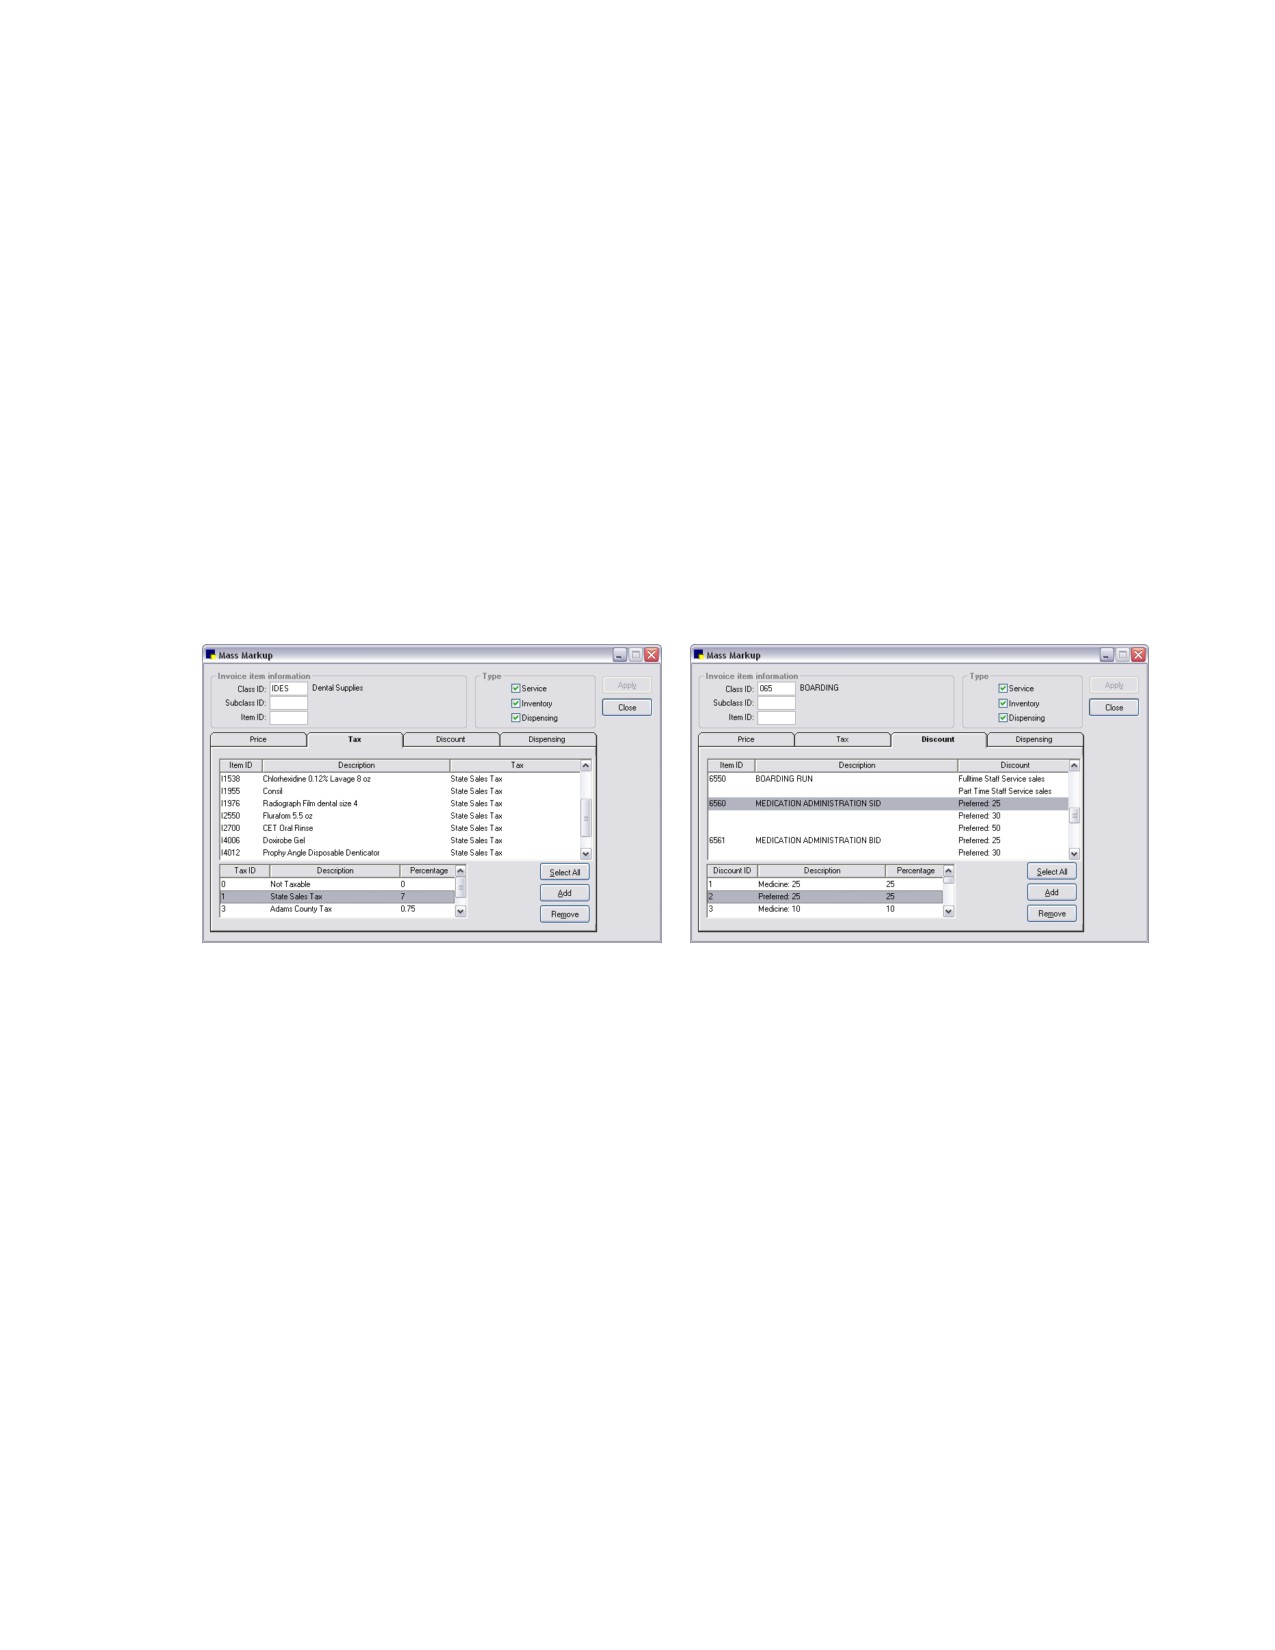
3. Click the Tax or Discount tab.
Tax tab on Mass Markup dialog box
Discount tab on Mass Markup dialog box
4. In the Invoice item information area, to narrow the list of invoice items displayed on the Tax
tab/Discount tab, do the following:
• To change taxes or discounts on items in a particular classification, in the Class ID, text box,
type an ID or press F2 to use the Invoice Item Classification List to choose an item classification.
• To change taxes or discounts on items in a particular subclassification, in the Subclass ID text
box, type an ID or press F2 to use the Invoice Item Subclassification List to choose an item
subclassification. (If you specify a subclass ID, Cornerstone automatically enters the class ID.)
• To change the tax or discount for an individual item, in the Item ID text box, type a specific item
ID or press F2 to use the Invoice Item List to choose the item.
5. In the Type area, select (or clear) the Service, Inventory or Dispensing check boxes to include
those invoice item types in the list. The list displays only the items of the types you select.
6. In the Tax ID or Discount ID selection list (bottom left), select the tax or discount to add (or remove).
You can select only one tax or discount at a time.
235
Chapter 10: Setting Up Your Invoice Items
7. Select the invoice items to affect by the addition or removal of the tax or discount. (Selected items
are highlighted/shaded.)
• To select all items in the list, click Select All.
• To select more than one item, press and hold the CTRL key while you click to select each item.
• To select a range of consecutive items, click the first item and then press and hold the SHIFT
key while you click the last item in the range.
8. Click Add to add the tax or discount to the selected invoice items, or click Remove to remove the
tax or discount from the selected invoice items. (The change is not applied to the selected items
until you click Apply. After viewing the applied taxes or discounts, if you decide you do not want to
apply the changes, click Cancel or deselect specific items that you do not want to include.)
WARNING: Before clicking Apply in the next step, make sure you want to permanently change the
selected items. Apply applies any changes you have made to all of the folders.
9. Click Apply to link the taxes or discounts to the selected invoice items.
Note: Because the Apply button applies any changes to selected invoice items in all tabs, you
should finish working in one tab, apply or cancel your work and then work in a different tab.
10. After the database has been updated, a message appears to inform you that the change is
complete. Click Close.
Note: Discounts work in the same way as taxes. Instead of the tax IDs, descriptions and percentages,
Cornerstone lists the discount IDs, discount descriptions and the discount percentages.
For a complete list of the taxes linked to invoice items, print an Invoice Item Tax Setup Report.
For a complete list of the discounts linked to invoice items, print an Invoice Item Information Report.
Using the Invoice Item Setup Tool
The Invoice Item Setup tool can be used to set up your invoice items for the first time or to quickly make
mass changes to many invoice items simultaneously.
Exclusive use is not required to use the Invoice Item Setup tool. Any items that are not updated because
of an exclusive use issue are included on a report that prints when you close the tool.
The Invoice Item Setup tool allows you to:
• Move invoice item reorder information and quantity on hand from one location to another.
• Copy invoice item reorder information from one location to another (only for multiple location
inventory).
• Set reorder points for multiple items at a specific location.
• Set up Buy Barcodes and Sell Barcodes.
• Define whether an item tracks Expiration Dates and/or Lot Numbers for one or multiple items.
• Set up Whiteboard patient order defaults for multiple items.
Note: Within the Invoice Item Setup tool, for all tabs except the Whiteboard tab, the invoice items
selected must be inventory items marked to maintain quantity on hand (select Lists > Invoice Items >
select the invoice item > Update button > Inventory tab > Maintain QOH check box).
236
Chapter 10: Setting Up Your Invoice Items
Moving Items
The Invoice Item Setup tool’s Move Items tab provides a quick way to move reorder information and
quantity on hand from one location to another. If items are being moved to a location where that item
does not exist, use the Move Items option. For example, if a new location is created and you want to
move all quantities of the item(s) and reorder points from another location to the new location, use this
option.
Tip: You can move more than one item, including moving all items in a single classification at one time.
IMPORTANT: Before using and making changes to invoice items using the Invoice Item Setup tool,
make a backup of your database.
To move items from one location to another:
1. On the Tools menu, select Invoice Item Setup.
2. A message appears to remind you that a backup of the database should be made and asks if you
wish to continue. Ensure that a backup has been made, and click Yes.
The Invoice Item Setup dialog box appears.
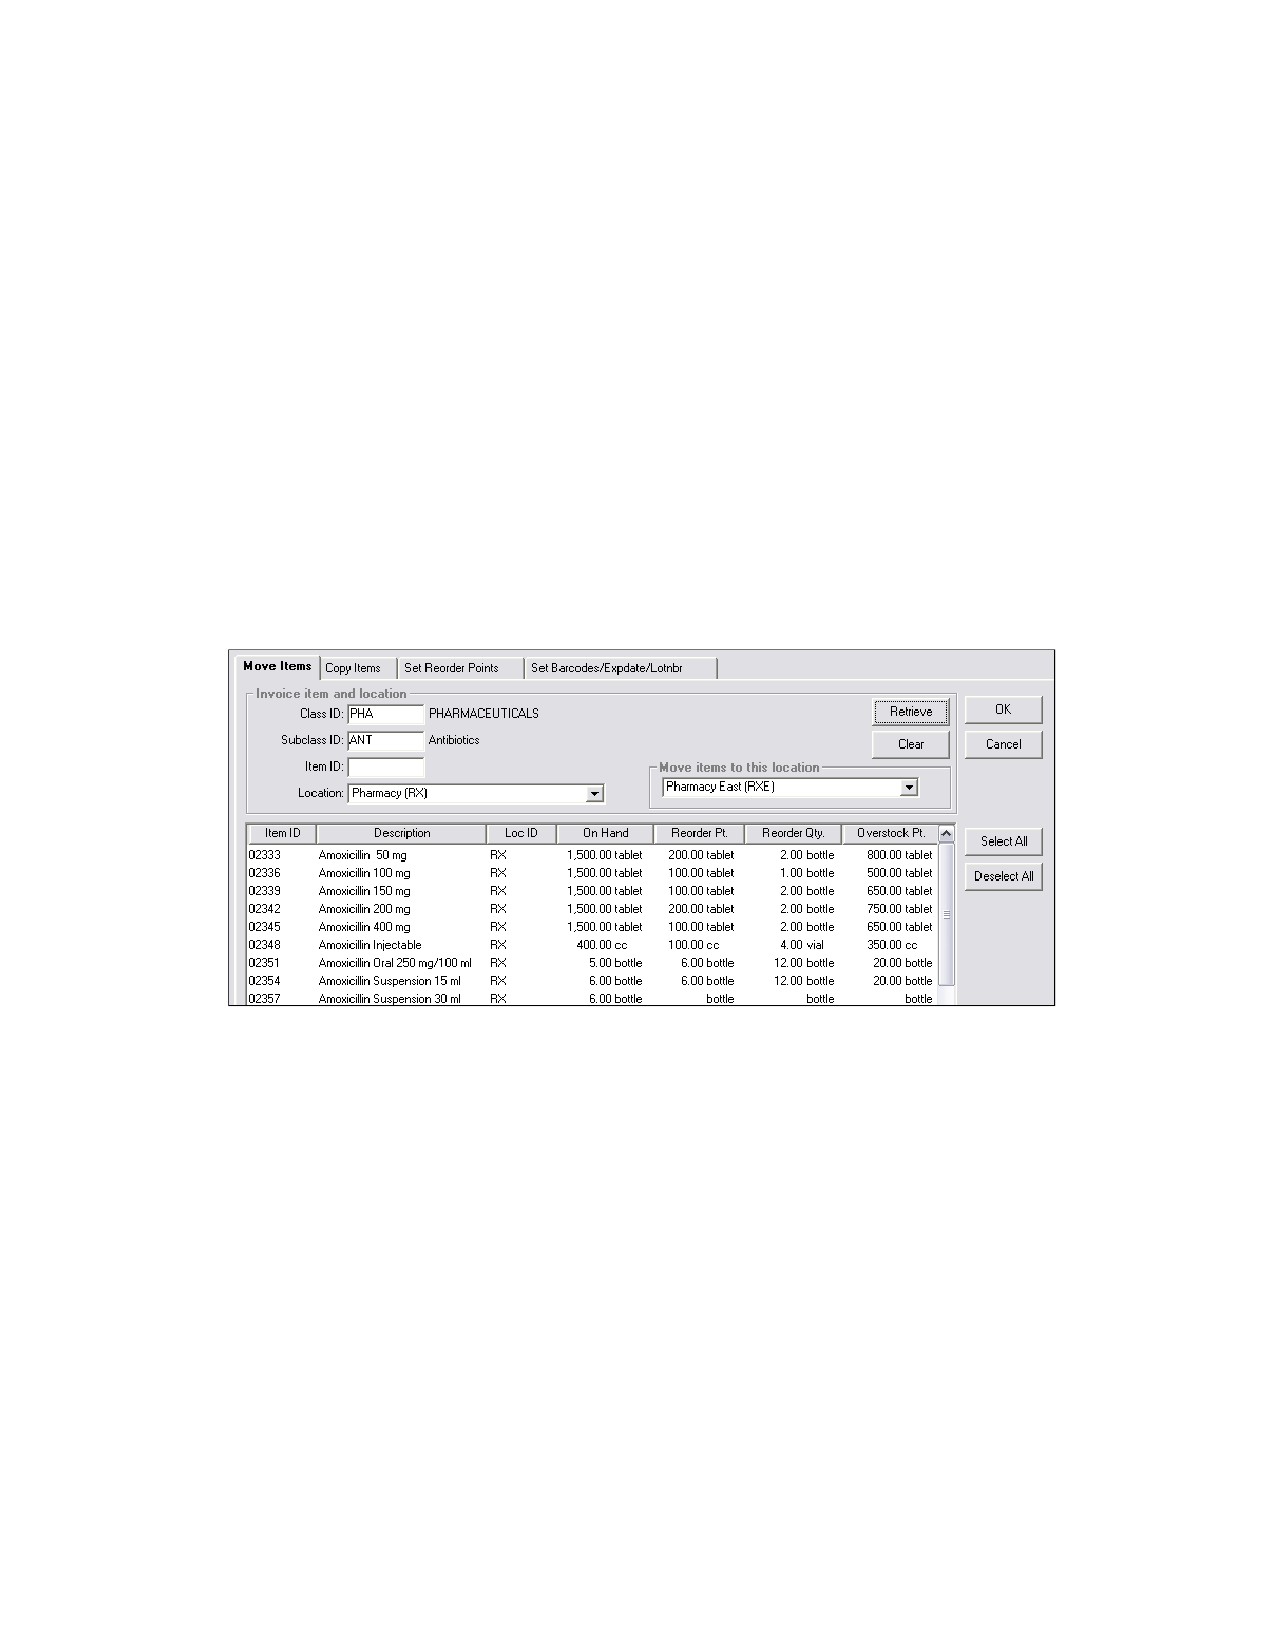
3. Click the Move Items tab.
Move Items tab on Invoice Item Setup window
4. In the Invoice item and location area, to narrow the list of items displayed on the Move Items tab, do
the following:
• To find and move items in a particular classification, in the Class ID text box, type the ID of the
class or press F2 to use the Invoice Item Classification List to choose an item classification.
• To find and move items in a particular subclassification, in the Subclass ID text box, type the ID
of the subclass or press F2 to use the Invoice Item Subclassification List to choose an item
subclassification.
• To find and move an individual item, in the Item ID text box, type the item’s ID or press F2 to
use the Invoice Item List to choose the item.
5. In the Location drop-down list, select the location from which to move items.
6. In the Move items to this location drop-down list, select the location to which to move items.
Note: It is possible to select an inactive location as the new location, but be aware that items stored
in an inactive location cannot be consumed.
237
Chapter 10: Setting Up Your Invoice Items
7. Click Retrieve. A list of inventory items appears. To remove the list and enter different criteria, click
Clear.
8. Do one of the following:
• Click Select All to select all items on the list.
• Hold the CTRL key and click each item you want to select.
Tip: To deselect an item, click the (highlighted) item again. To deselect all selected items, click
Deselect All.
9. When finished selecting items, click OK.
Copying Items (Multiple Location Inventory only)
The Invoice Item Setup tool’s Copy Items tab provides a quick way to copy inventory items and reorder
points to a new location when using a multiple location inventory setup.
Note: The Copy Items feature only copies inventory items and reorder points to a new location, but does
not copy quantities to the location.
IMPORTANT: Before using and making changes to invoice items using the Invoice Item Setup tool,
make a back up of your database.
To copy items from one location to another (multiple location inventory only):
1. On the Tools menu, select Invoice Item Setup.
2. A message appears to remind you that a backup of the database should be made and asks if you
wish to continue. Ensure that a backup has been made, and click Yes.
The Invoice Item Setup dialog box appears.
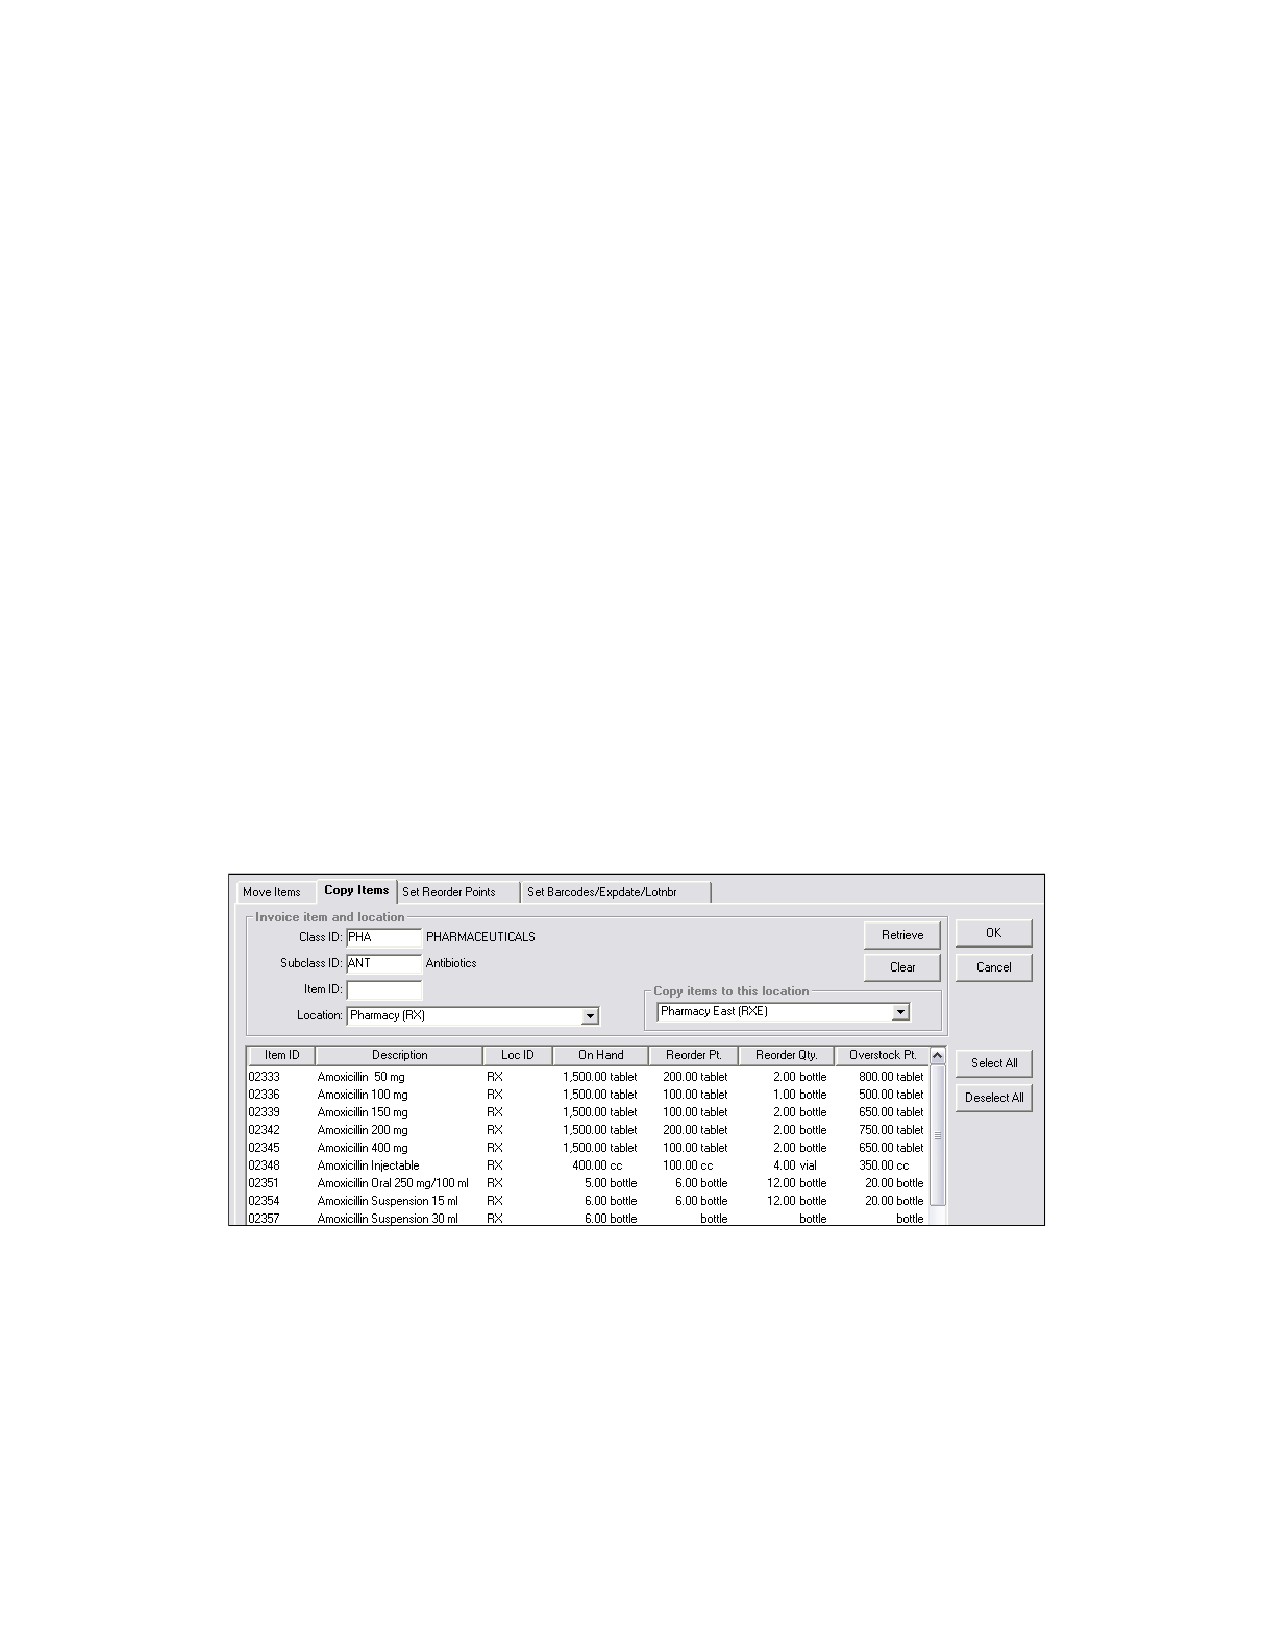
3. Click the Copy Items tab.
Copy Items tab on Invoice Item Setup window
238
Chapter 10: Setting Up Your Invoice Items
4. In the Invoice item and location area, to narrow the list of items displayed on the Copy Items tab, do
the following:
• To find and copy items in a particular classification, in the Class ID text box, type the ID of the
class or press F2 to use the Invoice Item Classification List to choose an item classification.
• To find and copy items in a particular subclassification, in the Subclass ID text box, type the ID
of the subclass or press F2 to use the Invoice Item Subclassification List to choose an item
subclassification.
• To find and copy an individual item, in the Item ID text box, type the item’s ID or press F2 to use
the Invoice Item List to choose the item.
5. In the Location drop-down list, select the location from which to copy items.
6. In the Copy items to this location drop-down list, select the location to which to copy items.
7. Click Retrieve. A list of inventory items appears. To remove the list and enter different criteria, click
Clear.
8. Do one of the following:
• Click Select All to select all items on the list.
• Hold the CTRL key and click each item you want to select.
Tip: To deselect an item, click the (highlighted) item again. To deselect all selected items, click
Deselect All.
9. When finished selecting items, click OK.
Setting Reorder Points
The Invoice Item Setup tool’s Setting Reorder Points tab provides a quick way to pull up a list of all
items in a class that are found at a selected location and individually change reorder points, reorder
quantities, and overstock points for the items. You can also retrieve a single item or retrieve a list of
items in a selected subclass and quickly set reorder points, reorder quantities and overstock points.
IMPORTANT: Before using and making changes to invoice items using the Invoice Item Setup tool,
make a backup of your database.
To set reorder points:
1. On the Tools menu, select Invoice Item Setup.
2. A message appears to remind you that a backup of the database should be made and asks if you
wish to continue. Ensure that a backup has been made, and click Yes.
The Invoice Item Setup dialog box appears.
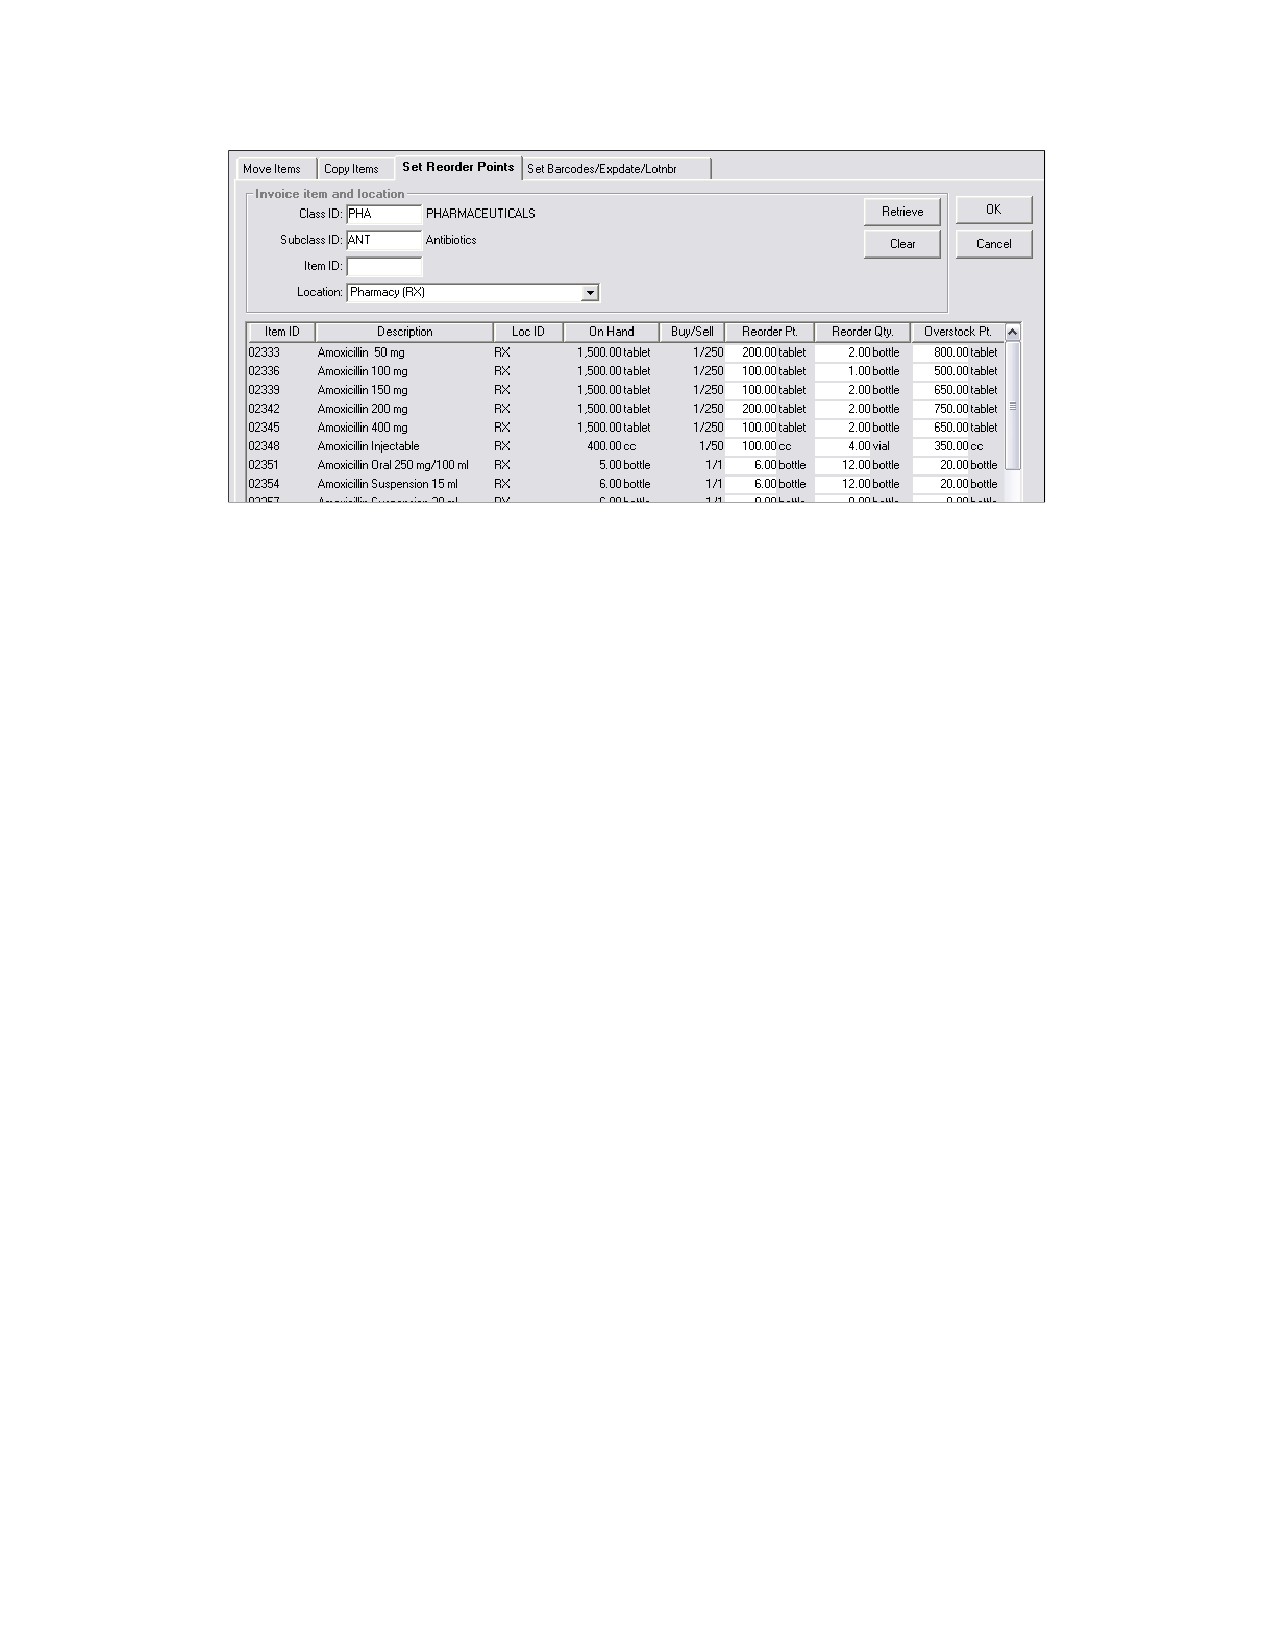
3. Click the Set Reorder Points tab.
239
Chapter 10: Setting Up Your Invoice Items
Set Reorder Points tab on Invoice Item Setup window
4. In the Invoice item and location area, to narrow the list of items displayed on the Set Reorder Points
tab, do the following:
• To find and set reorder information for items in a particular classification, in the Class ID text
box, type the ID of the class or press F2 to use the Invoice Item Classification List to choose an
item classification.
• To find and set reorder information for items in a particular subclassification, in the Subclass ID
text box, type the ID of the subclass or press F2 to use the Invoice Item Subclassification List to
choose an item subclassification.
• To find and set reorder information for an individual item, in the Item ID text box, type the item’s
ID or press F2 to use the Invoice Item List to choose the item.
5. In the Location drop-down list, select the location for which you want to set reorder information.
6. Click Retrieve. A list of inventory items appears. To remove the list and enter different criteria, click
Clear.
7. For each item on the list for which you want to reorder information, in the applicable text box, type
reorder point, reorder quantity, and overstock point.
8. When finished selecting items, click OK.
240
Chapter 10: Setting Up Your Invoice Items
Setting Barcodes, Expiration Dates and Lot Numbers
The Invoice Item Setup tool’s Set Barcodes/Expdate/Lotnbr tab provides an initial quick setup option
for item bar codes, reorder information, expiration dates and lot number tracking. For example, you can
retrieve all items in a specific class and quickly mark those items for which you want to require and track
expiration dates and/or lot numbers.
In Cornerstone, if an item is set up to track expiration dates, you must enter an expiration date when
inventory is received and when inventory is consumed. Likewise if an item is set to track lot numbers,
you must enter a lot number when inventory is received and when inventory is consumed.
Managing Expiration Dates When Upgrading from Cornerstone 6.2 or Earlier
For practices upgrading from Cornerstone 6.2 or earlier, if you have existing items with expiration dates
your existing expiration dates will be removed when you upgrade to a newer version of the
Cornerstone software because it has no way of verifying that the inventory expiration dates in your
system are correct. To protect the integrity of your data, any existing inventory will display “unknown” as
the expiration date.
For your information, an Expiration Dates Report is generated when you install the new version of
Cornerstone software. This report contains the existing expiration dates in your system and is located in
your Cornerstone directory (e.g., C:\Cstone).
If you are sure your existing expiration dates are accurate:
If you are sure your existing dates are accurate, you can move them over to your new inventory system
using the Set Barcodes/Expdate/Lotnbr tab. Once an item or a group of items has been checked to
track expiration dates, a message appears, asking if you want your existing expiration dates copied into
inventory when available. If you are confident that your existing dates are accurate, you can click Yes to
move them over to your new inventory system.
You will then need to verify the quantity on hand associated with copied expiration dates using the View
Quantity on Hand window (Inventory > View Quantity on Hand) to make any needed adjustments.
If you are not sure your existing expiration dates are accurate:
If you are not sure that all of your existing dates are accurate, you will need to do a physical inventory
count and manually make updates and adjustments using the View Quantity on Hand window (select
Inventory > View Quantity on Hand).
IMPORTANT: Before using and making changes to invoice items using the Invoice Item Setup tool,
make a back up of your database.
To set barcodes, expiration dates and lot numbers:
1. On the Tools menu, select Invoice Item Setup.
2. A message appears to remind you that a backup of the database should be made and asks if you
wish to continue. Ensure that a backup has been made, and click Yes.
The Invoice Item Setup dialog box appears.
3. Click the Set Barcodes/Expdate/Lotnbr tab.
241