IDEXX Cornerstone. Administrator’s Manual (8.3 NEXT version 8.3.6) - page 6
Chapter 5: Setting Staff Defaults
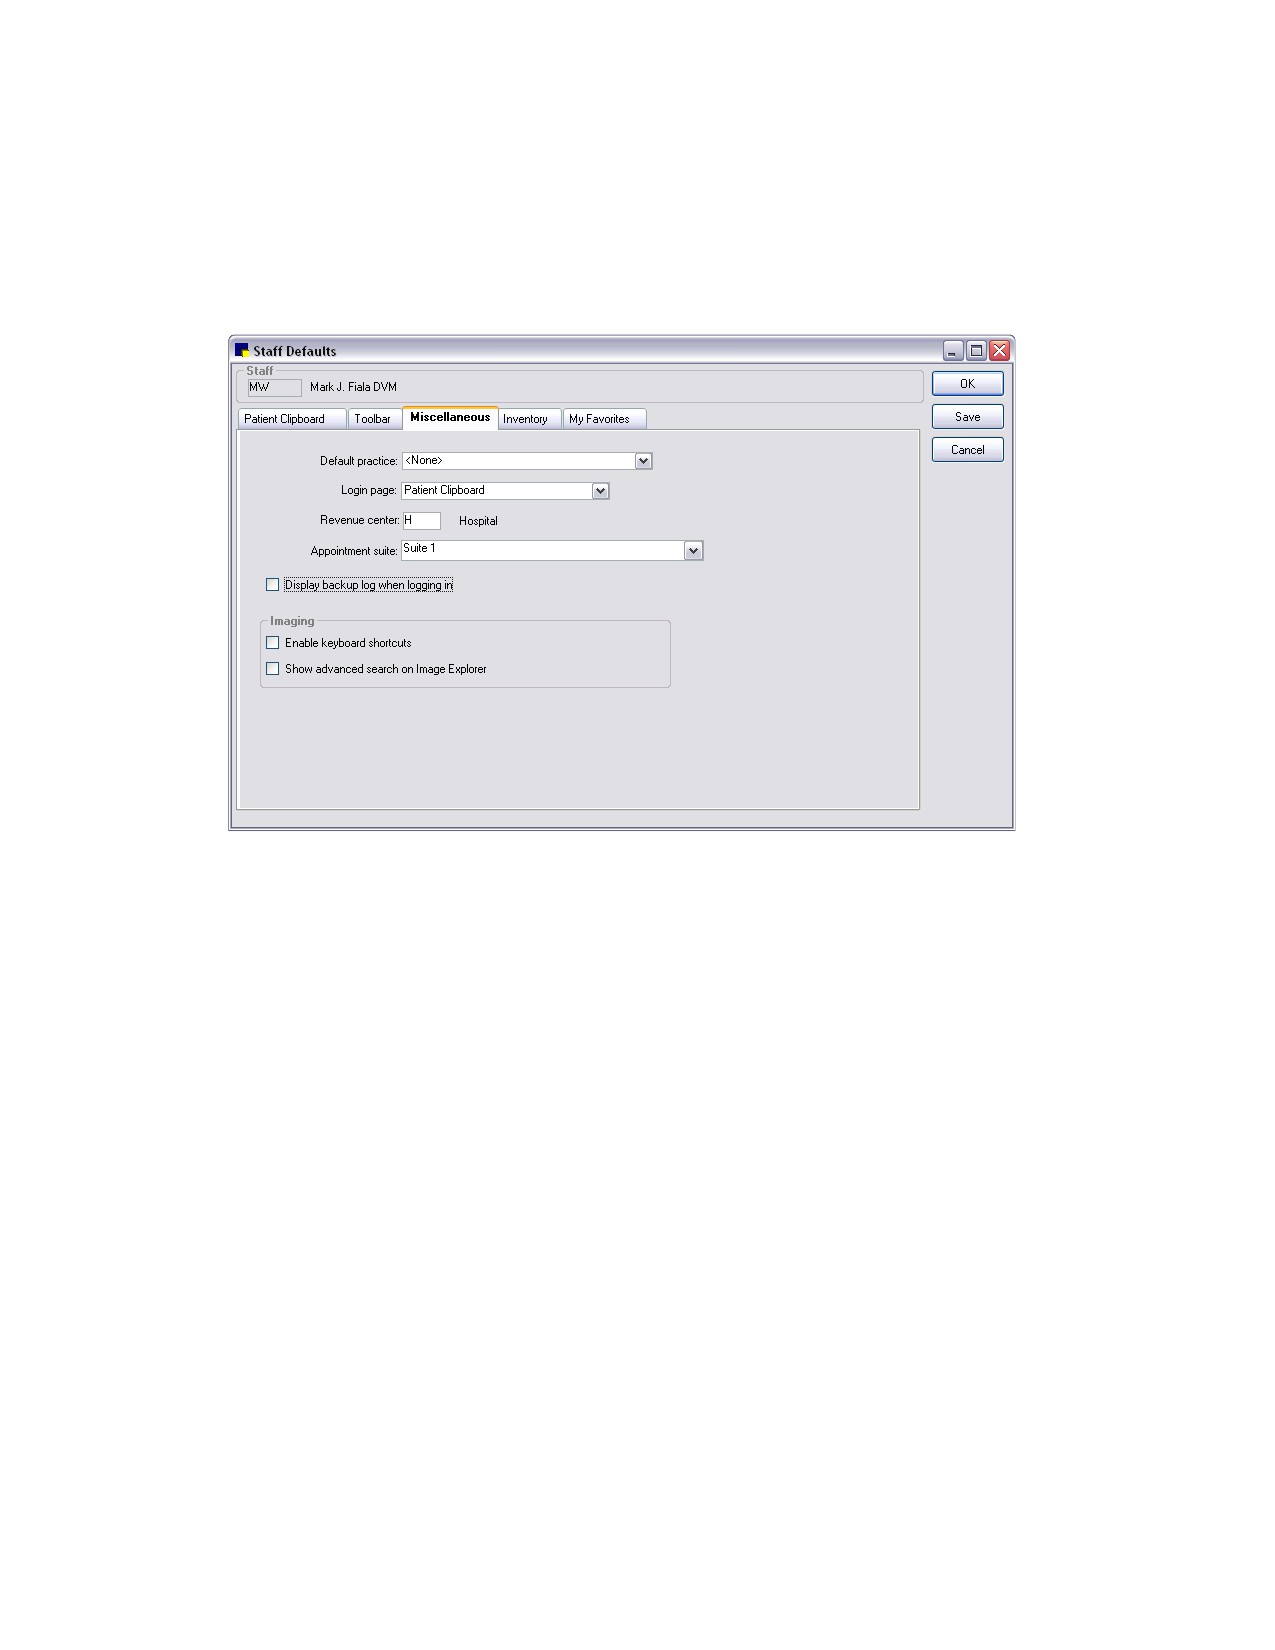
Staff Defaults for Miscellaneous Settings
The Staff defaults Miscellaneous tab allows you to set defaults for Cornerstone settings, miscellaneous
practice settings, and imaging settings to apply when a particular staff ID is logged in to Cornerstone.
To set the Staff Defaults for Miscellaneous settings:
1. On the Staff Defaults window, click the Miscellaneous tab.
Miscellaneous tab in Staff Defaults window
2. Multi-Location/Single Database configurations only: From the Default practice drop-down list, if
operating in a multi-practice environment, select the default practice to associate with this staff ID.
(This Staff default practice overrides any Workstation default practice.)
3. From the Login page drop-down list, select the window to display automatically each time the staff
ID logs into Cornerstone.
4. In the Revenue center text box, type the default revenue center to use for this staff ID.
5. From the Appointment suite drop-down list, select the suite to display when the staff member logs
in to Cornerstone and accesses the Schedule for Today window.
6. To automatically see the log from your backup when the staff ID logs in to Cornerstone, select the
Display backup log when logging in check box.
7. To enable the use of keyboard shortcuts in the Image Viewer, select the Enable keyboard
shortcuts check box.
8. To set the Advanced Search as the default search option on the Image Explorer for this staff ID,
select the Show advanced search on Image Explorer check box.
9. Click Save to save your changes and continue setting staff defaults, or click OK to save your
changes and close the Staff Defaults window.
152
Chapter 5: Setting Staff Defaults
Staff Defaults for Inventory
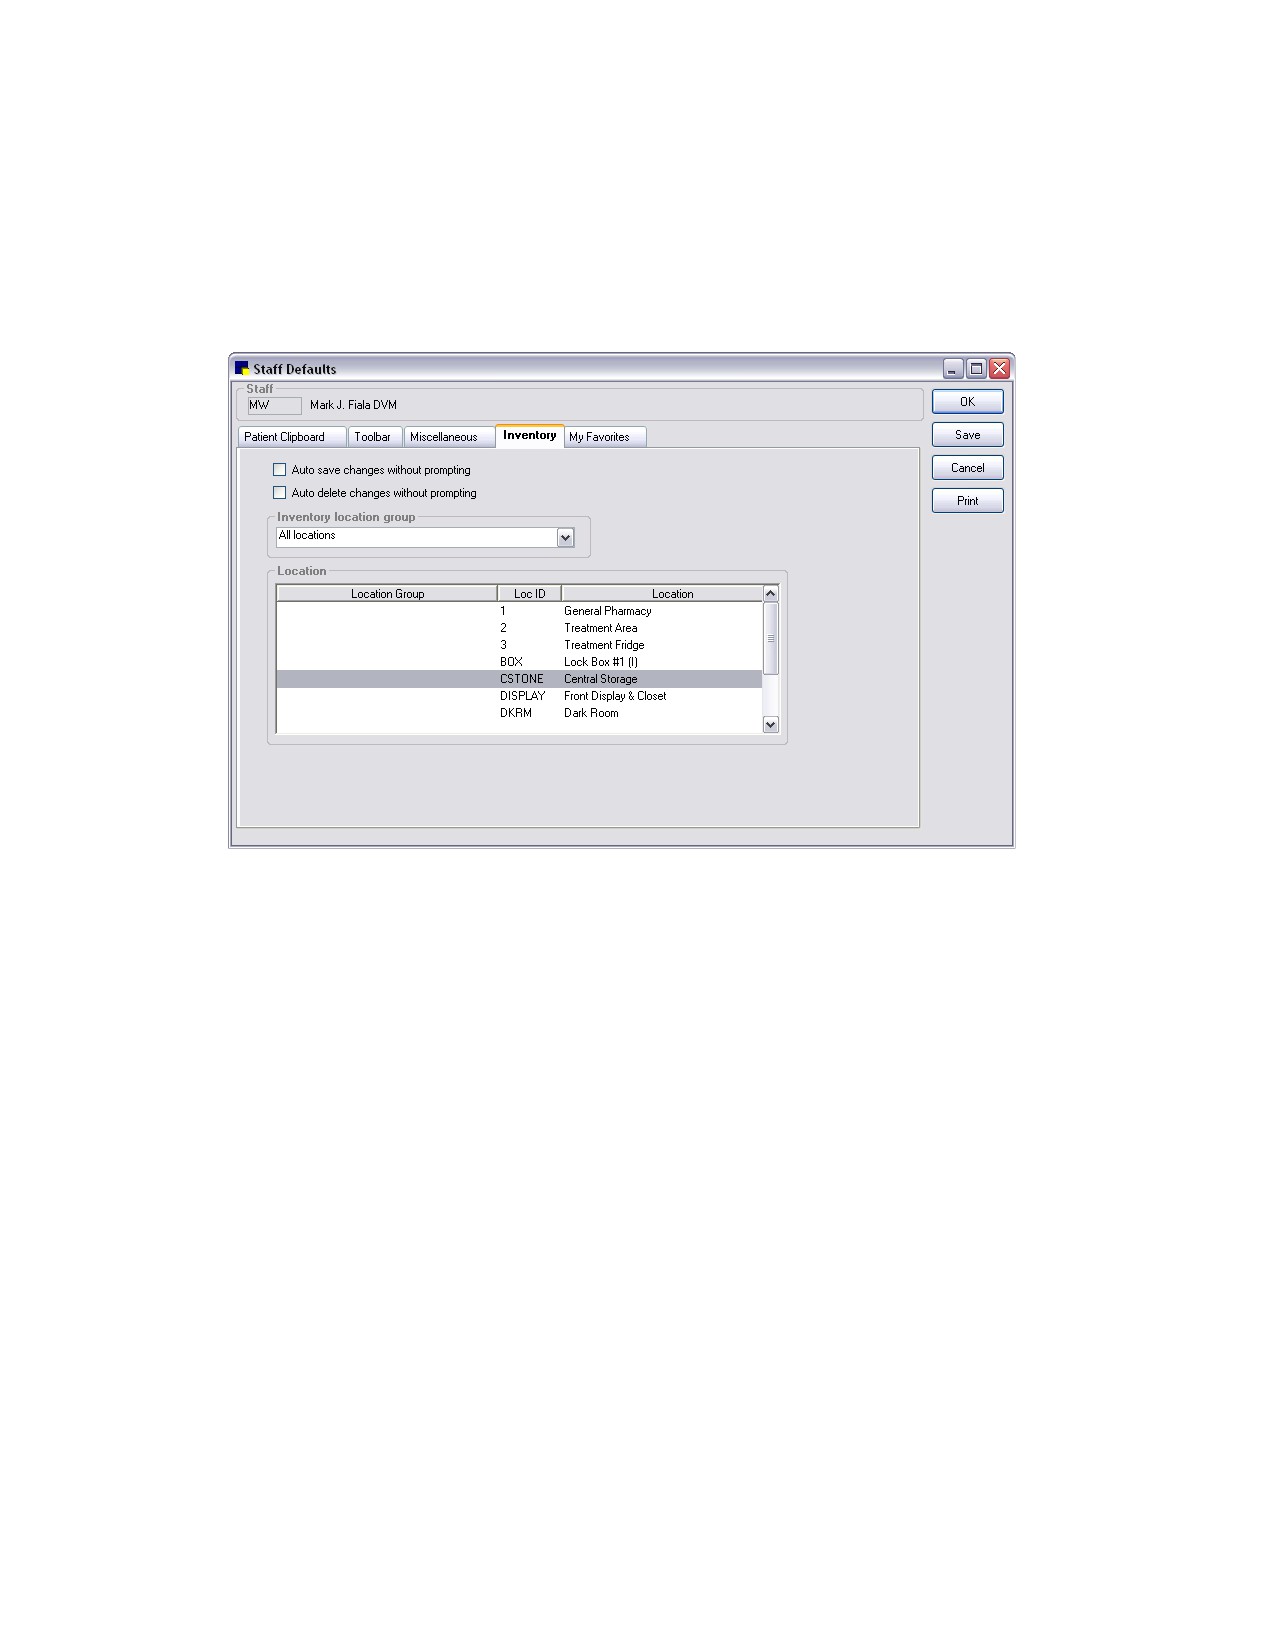
The Staff defaults Inventory tab allows you to set defaults for saving and deleting when using
Cornerstone Inventory, as well as assigning a default location for inventory depletion when a particular
staff ID is logged in to Cornerstone.
To set the Staff Defaults for Inventory:
1. On the Staff Defaults window, click the Inventory tab.
Inventory tab in Staff Defaults window
2.
For the Auto save changes without prompting check box, do one of the following:
• If you want a ”Do you want to save?” confirmation prompt to appear if the staff member
switches windows without saving inventory changes first, clear the check box (recommended).
• If you want the program to automatically save inventory changes the staff member makes
without displaying a confirmation prompt, select the check box.
3.
For the Auto delete changes without prompting check box, do one of the following:
• If you want a “Do you want to delete?’ confirmation prompt to appear for this staff member when
the Delete button is clicked on any inventory window, clear the check box (recommended).
• If you want the program to automatically delete within inventory (when the Delete button is
clicked on any inventory window) without displaying a confirmation prompt for this staff
member, select the check box.
4.
Multiple location inventory only: If using a multi-location per item inventory setup, from the Inventory
location group drop-down list, select the default group of locations the staff member will use to
deplete inventory.
Note: If a Workstation default and a Staff default location are set, the Workstation location is used.
5.
Multiple location inventory only: If using a multi-location per item inventory setup, from the Location
list, select a specific location (within the selected location group) that the staff member will use to
deplete inventory.
153
Chapter 5: Setting Staff Defaults
6. To view a list of the default inventory location assigned to each staff ID, click Print.
7. Click Save to save your changes and continue setting staff defaults, or click OK to save your
changes and close the Staff Defaults window.
Staff Defaults for Favorite Document Templates
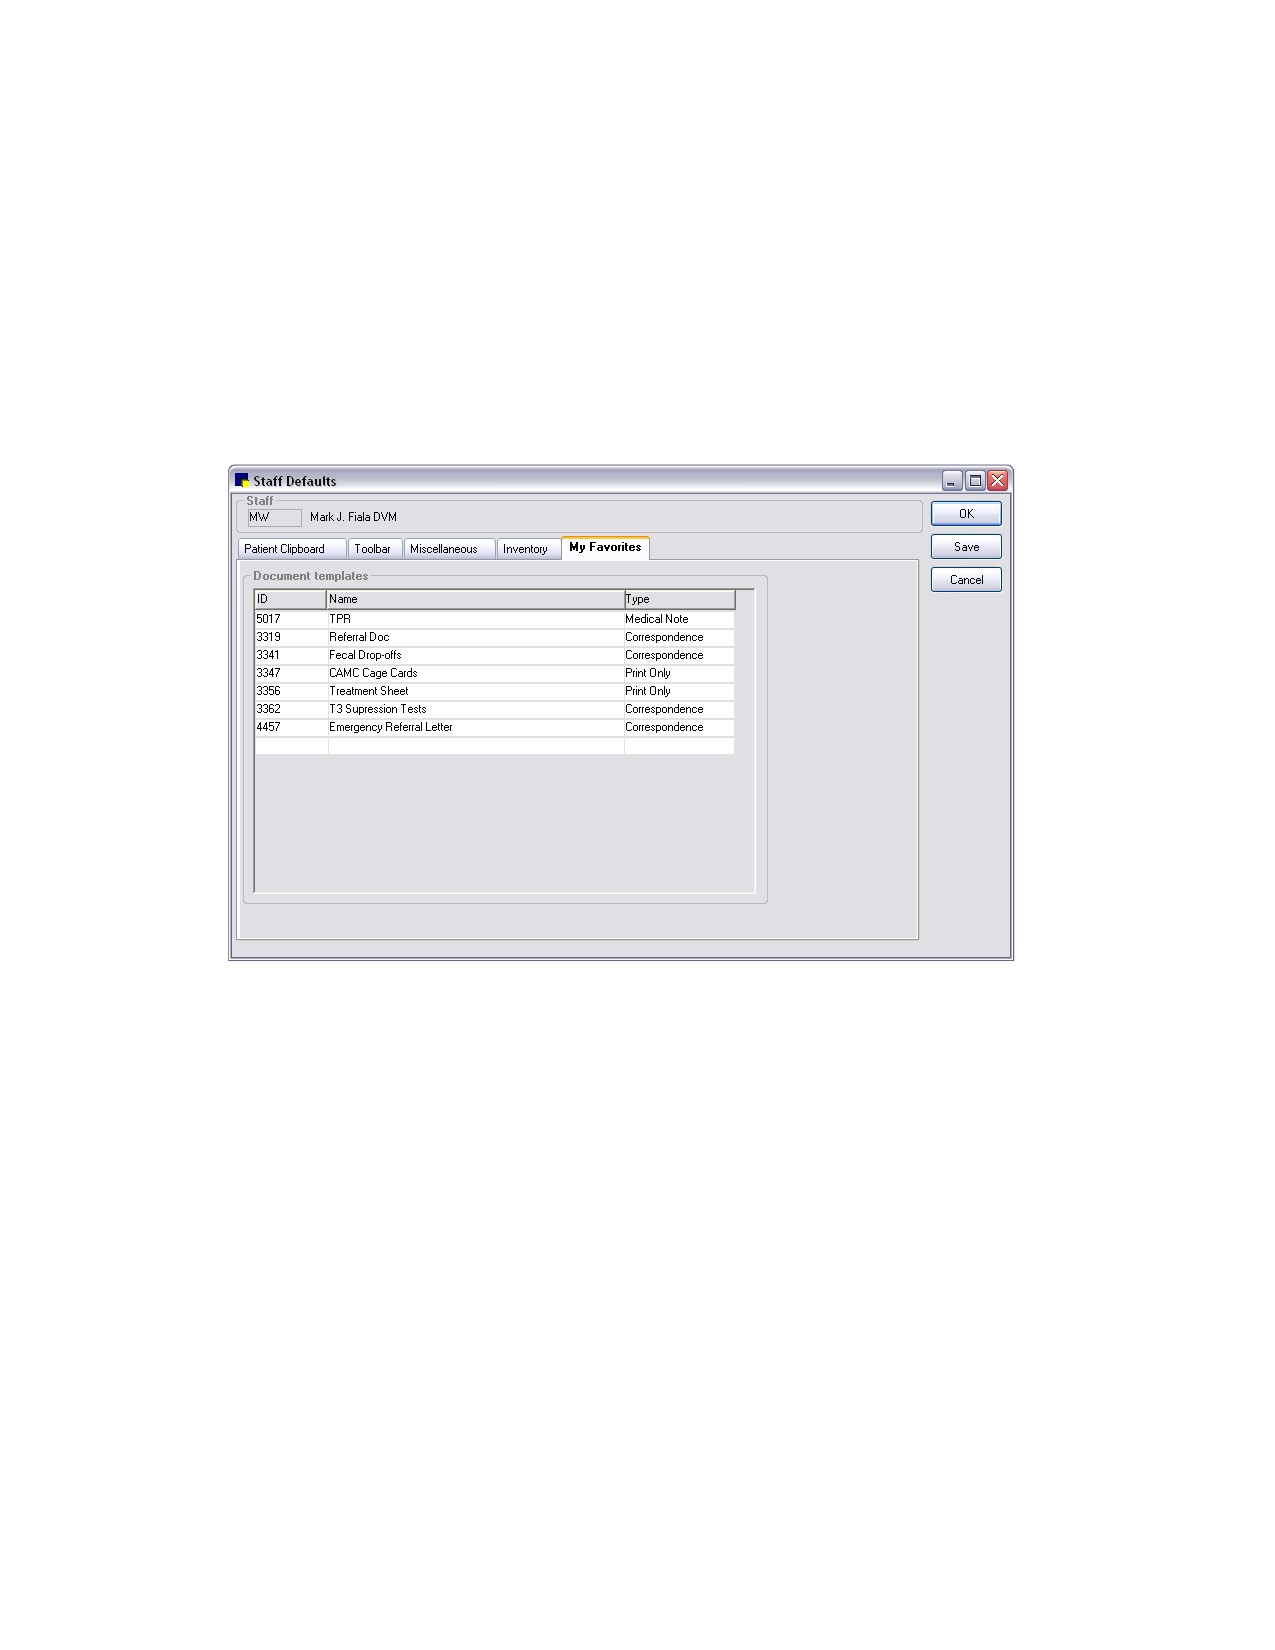
The Staff defaults My Favorites tab allows you to designate enhanced medical notes or
correspondence templates as staff favorites to appear in the template list when filtering on My Favorites
(in the Document Template List window and Start New Document window).
To set the Staff Defaults for My Favorites:
1. On the Staff Defaults window, click the My Favorites tab.
My Favorites tab in Staff Defaults window
2. In the Document templates list:
• To add a document template to the list, double-click in the blank row at the bottom of the list or
press F2 to display the Document Template List and select the template to add to the favorites
list.
• To remove a document template from the list, click on the template’s ID in the ID column and
then press CTRL+D.
Note: Classic medical note templates cannot be selected as favorites.
154
Chapter 6: Setting Cornerstone* Imaging Defaults
Overview
Cornerstone* Imaging defaults include system settings for the following areas of Cornerstone Imaging:
• Archiving images
• Setting modality layout defaults
• Emailing images
• Setting general imaging defaults
• Setting up keywords
• Setting up IDEXX Integration Technology for Telemedicine
Note: This chapter covers Cornerstone Imaging (the imaging functionality that is included with
Cornerstone software). For information on setting defaults for the IDEXX Digital Radiography module
and IDEXX Diagnostic Imaging module, see the Cornerstone Diagnostic Imaging User’s Guide (available
online at idexx.com/cornerstoneresources).
Note: For information on Practice and Workstation defaults for imaging (pet picture compression, image
storage, and IDEXX SmartLink Digital Imaging preferences for image requests), see “Imaging Defaults”
on page 108.
Image Archiving Defaults
Archiving refers to moving images from your computer to another storage location. Archiving is usually
not necessary; however, if you do choose to archive images, you can set up the software to alert you
when it is time to archive.
Note: If your Images folder nears its storage capacity, you are prompted to archive images.
To set the Archive defaults:
1. On the Controls menu, select Defaults > Imaging. The Imaging Configuration window appears.
2. In the navigation pane, select Archive.
155
Chapter 6: Setting Cornerstone* Imaging Defaults
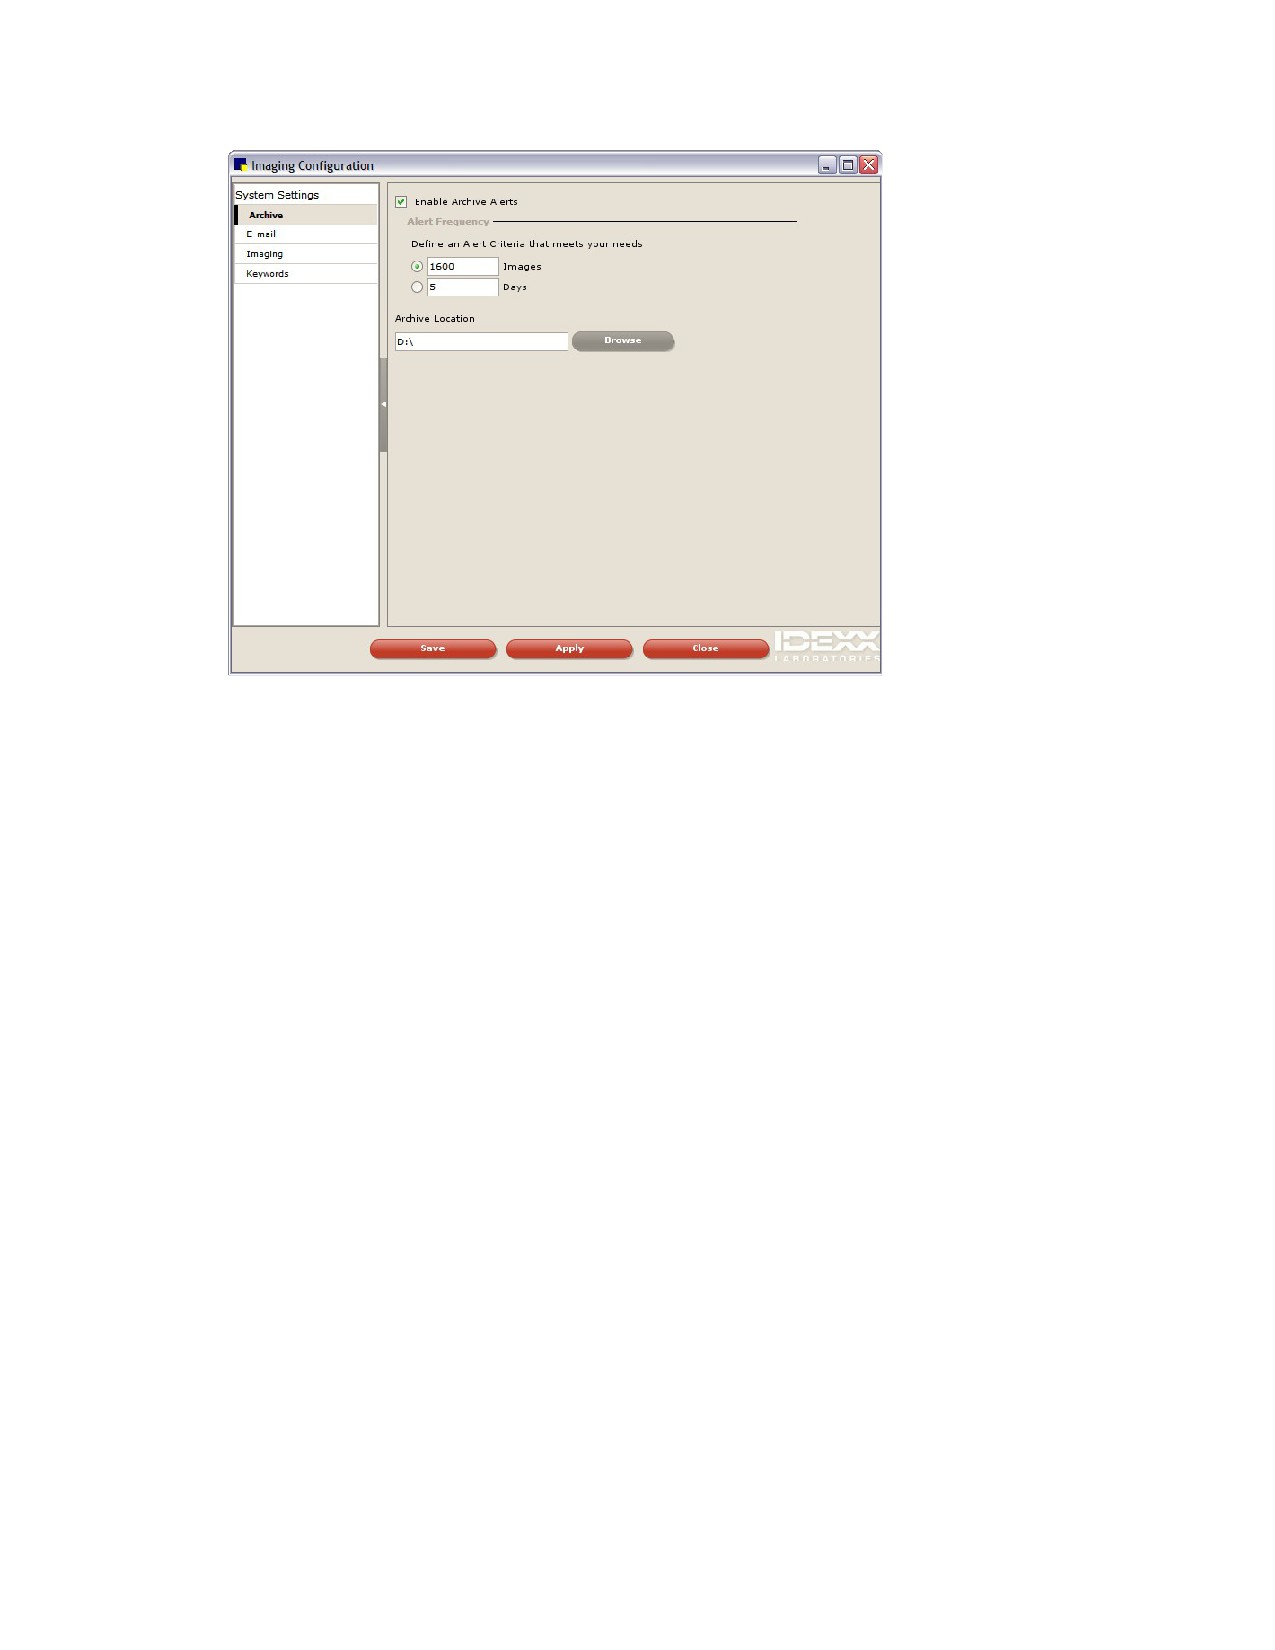
The Imaging Configuration window, displaying the Archive defaults
3. If you want the software to alert you when it is time to archive, select the Enable Archive Alerts
check box.
4. In the Alert Frequency area, specify when you want an alert to appear:
• To be alerted when a certain number of images have accumulated, select the Images option
and type the number of images in the text box.
• To be alerted when a certain number of days have occurred, select the Days option and type
the number of days in the text box.
Tip: When the value of images or days is reached, a pop-up box opens, indicating that it is time to
archive your images.
5. In the Archive Location text box, specify the location where you want to store archived files.
6. Click Save.
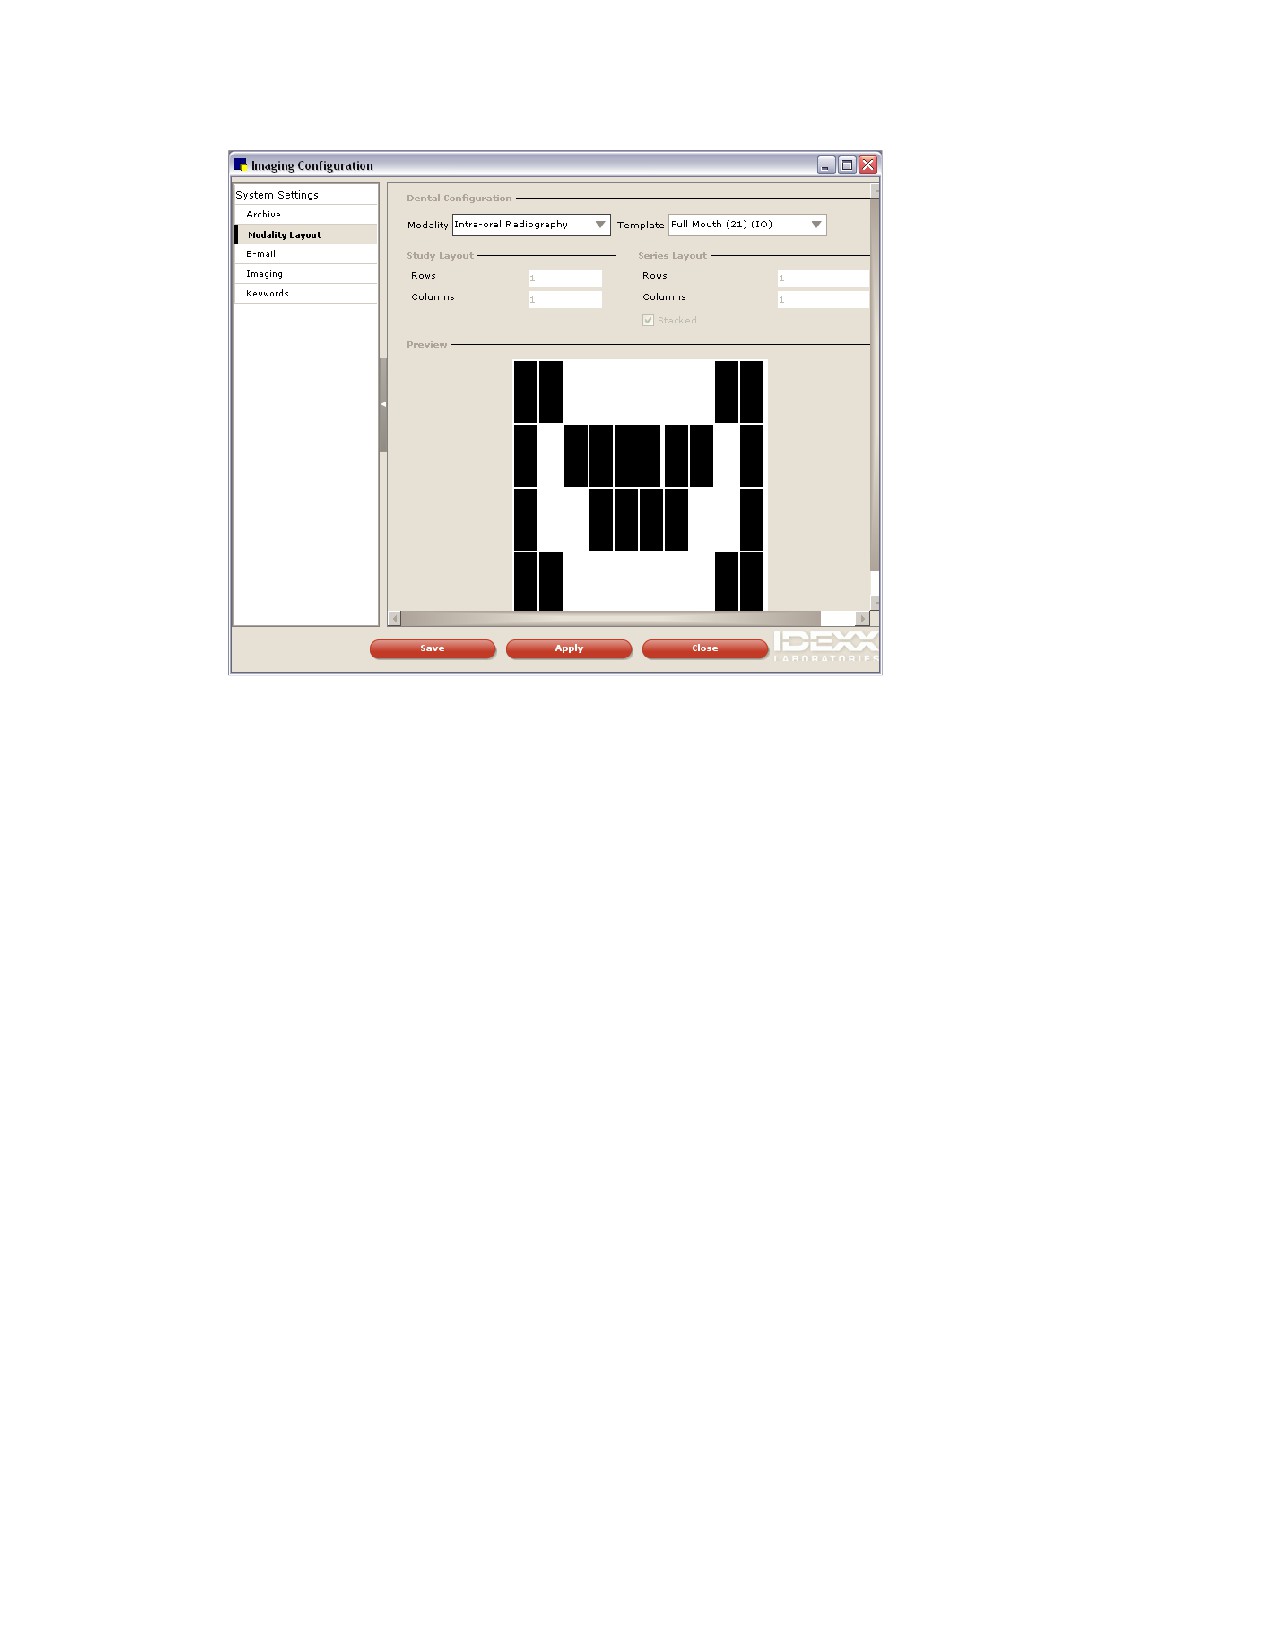
Modality Layout Defaults
You can set up how you want images to be displayed on the Image Viewer window based on the
modality of the images. Images with a modality of Intra-oral Radiography are set up in a slightly different
manner than images from other modalities.
Note: When you change these settings, you are changing how all images of that modality are displayed.
For example, if you change the settings for arranging Digital Radiography (DR) images in the viewer, the
new settings are applied any time you look at DR images.
To set Image Viewer display formats for Intra-oral Radiography:
1. On the Controls menu, select Defaults > Imaging. The Imaging Configuration window appears.
2. In the navigation pane, select Modality Layout.
156
Chapter 6: Setting Cornerstone* Imaging Defaults
The Modality Layout window, displaying the Intra-oral Radiography modality and a dental template
3. Select the image modality from the Modality drop-down list.
4. Select a dental template from the Template drop-down list. The template layout is displayed in the
Preview area of the window.
Note: The Study Layout area and the Series Layout area do not apply.
5. Click Save.
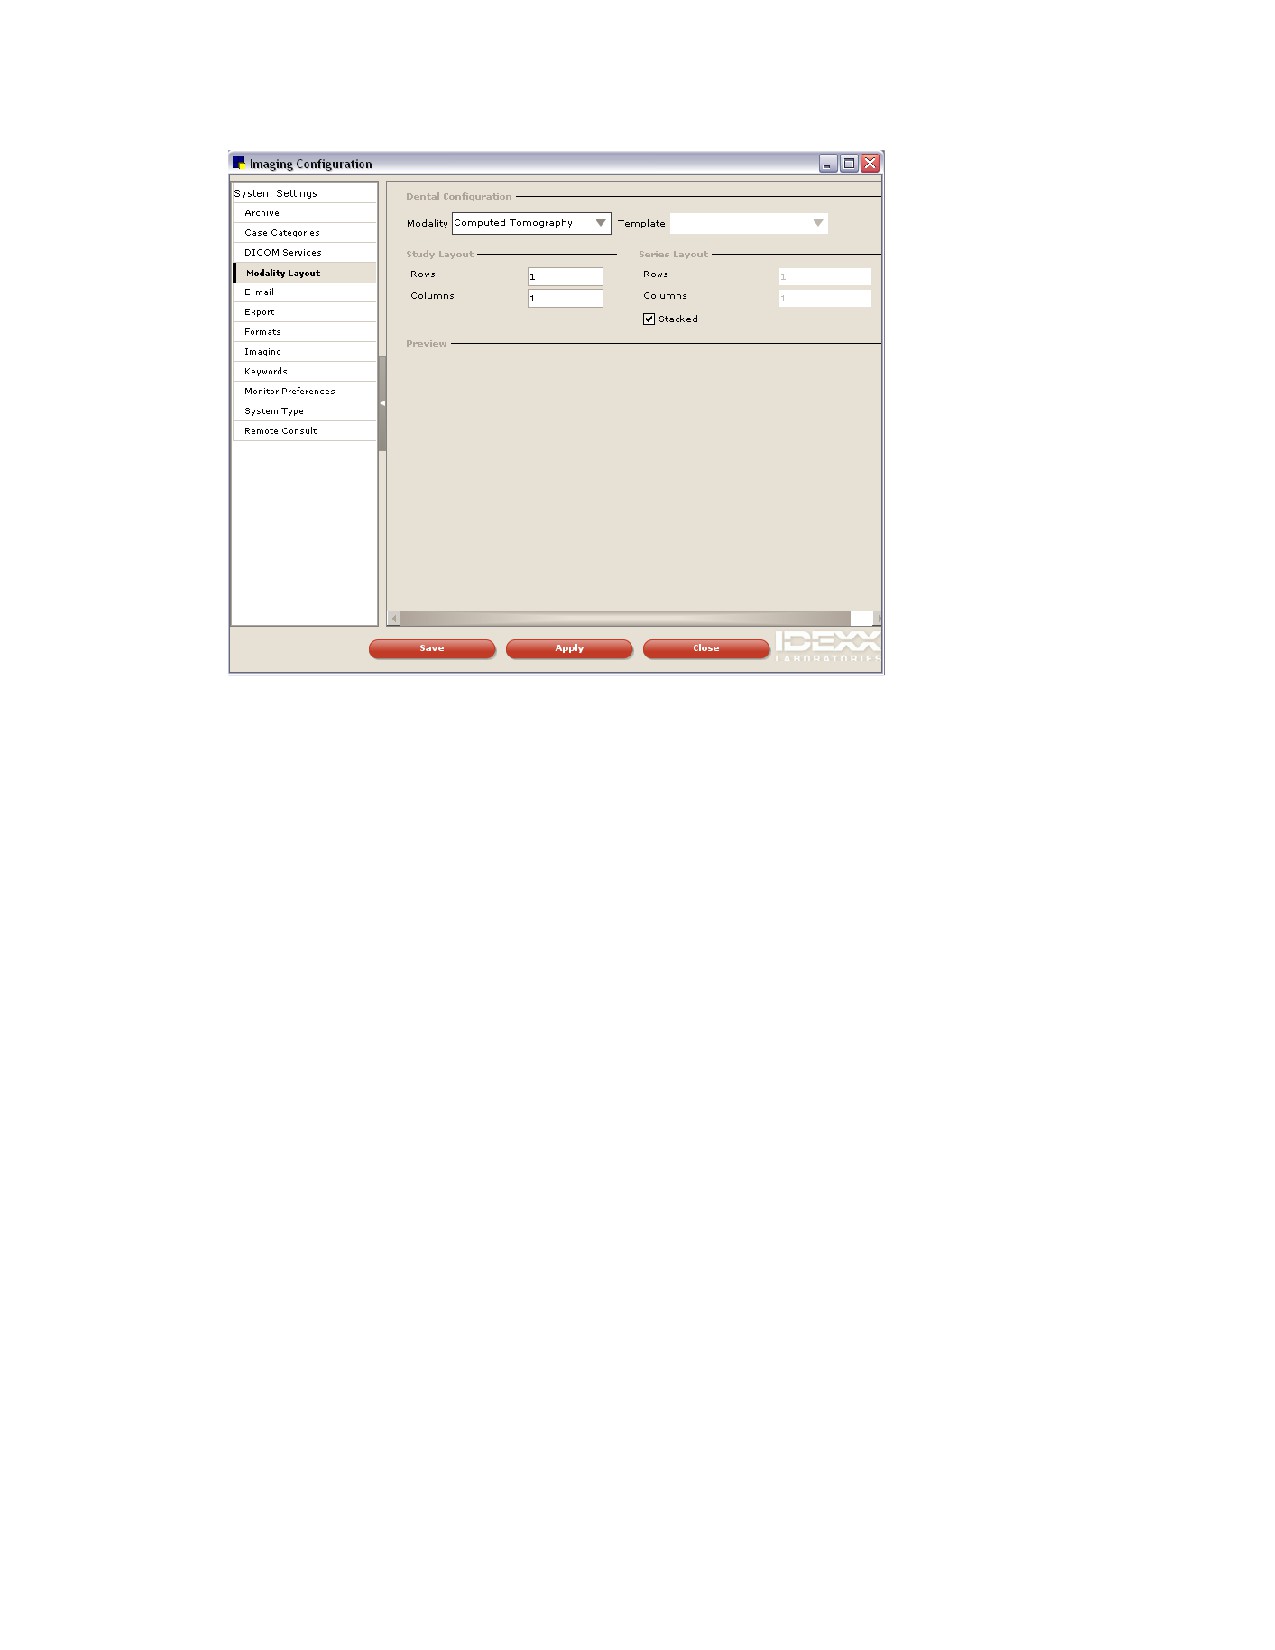
To set Image Viewer display formats for other modalities:
1. On the Controls menu, select Defaults > Imaging. The Imaging Configuration window appears.
2. In the navigation pane, select Modality Layout.
157
Chapter 6: Setting Cornerstone* Imaging Defaults
The Modality Layout window, displaying the Computed Tomography modality
3. To set up how individual series are displayed within a study, type the number of rows in the Rows
text box and columns in the Columns text box.
4. To set up how individual images are displayed within a series, type the number of rows in the Rows
text box and columns in the Columns text box.
5. If you want to display the images in a stacked display, select the Stacked check box.
Note: The Template drop-down list and the Preview area do not apply.
6. Click Save.
Image Email Defaults
To email images from within Cornerstone software, you must have an email system set up on your
computer that is configured in Cornerstone.
Note: High-speed Internet access is highly recommended because you will be transmitting large
amounts of data when you send images.
If you set up a particular email account to be used for a staff member, that account will be used for
emails sent from the Image Explorer, Image Viewer, or the Email tab of the Case Actions pane on the
Case Details window when that staff member is logged in to Cornerstone.
If you do not set up an email account for a staff member, image emails will use the account that has
been set up at the system level.
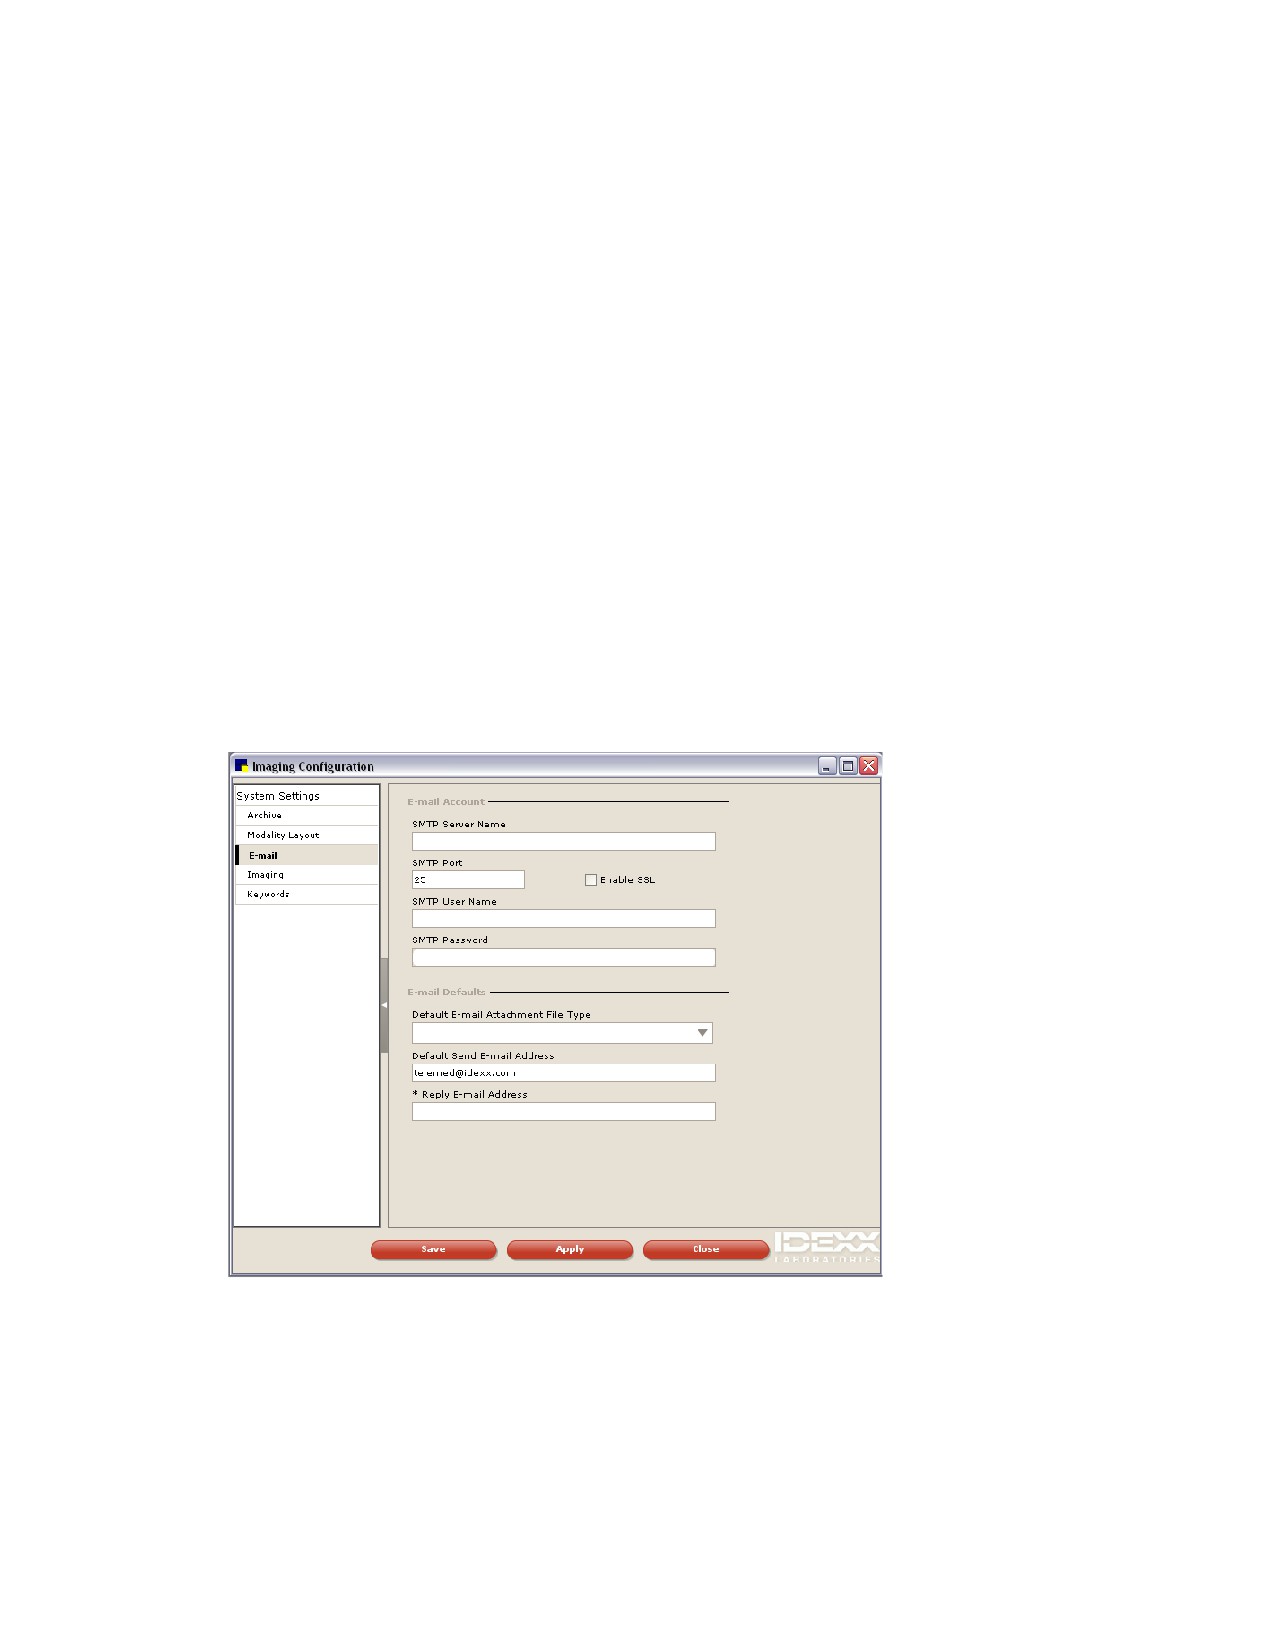
To set up image email to use a staff-member specific email account:
1. On the menu bar, select Controls> Defaults> Imaging. The Imaging Configuration window
appears.
2. In the navigation pane, click E-mail. Email configuration options appear on the right.
3. Click the tab with that staff member’s name.
158
Chapter 6: Setting Cornerstone* Imaging Defaults
4. In the SMTP Server Name text box, type the name of your email server.
5. In the SMTP Port text box, type the number of the port on your computer from which email will be
sent.
6. Select the Enable SSL check box if your email provider requires the use of SSL (Secure Socket
Layer) ports. Many Internet-based email providers have this requirement.
7. In the SMTP User Name and SMTP Password text boxes, type the information that Cornerstone
needs to log into your email server.
8. From the Default E-mail Attachment File Type drop-down list, select the type of file to use for
sending images. This default can be changed when emailing images.
9. In the Default Send E-mail Address text box, type the address to be listed as the sender.
Note The email address cannot begin with a number.
10. In the Reply E-mail Address text box, type the address to which the recipient should reply.
Note The email address cannot begin with a number.
11. Click Save to save and close the Imaging Configuration window or click Apply to save without
closing the window.
To set up the system-level image email account:
1. On the Controls menu, select Defaults > Imaging. The Imaging Configuration window appears.
2. In the navigation pane, select E-mail.
The Imaging Configuration window, displaying the Email system-level defaults
3. In the configuration pane, click the System tab.
4. In the SMTP Server Name text box, type the name of your email server.
5. In the SMTP Port text box, type the number of the port on your computer from which email will be
sent.
159
Chapter 6: Setting Cornerstone* Imaging Defaults
6. Select the Enable SSL check box if your email provider requires the use of SSL (Secure Socket
Layer) ports. Many Internet-based email providers have this requirement.
7. In the SMTP User Name and SMTP Password text boxes, type the user name and password
provided by your Internet service provider.
8. From the Default E-mail Attachment File Type drop-down list, select the type of file (.jpeg, .bmp,
etc.) to use for sending images. This default can be changed when emailing images.
9. In the Default Send E-mail Address text box, type the address to be listed as the sender.
Note The email address cannot begin with a number.
10. In the Reply E-mail Address text box, type the address to which the recipient should reply.
Note The email address cannot begin with a number.
11. Click Save.
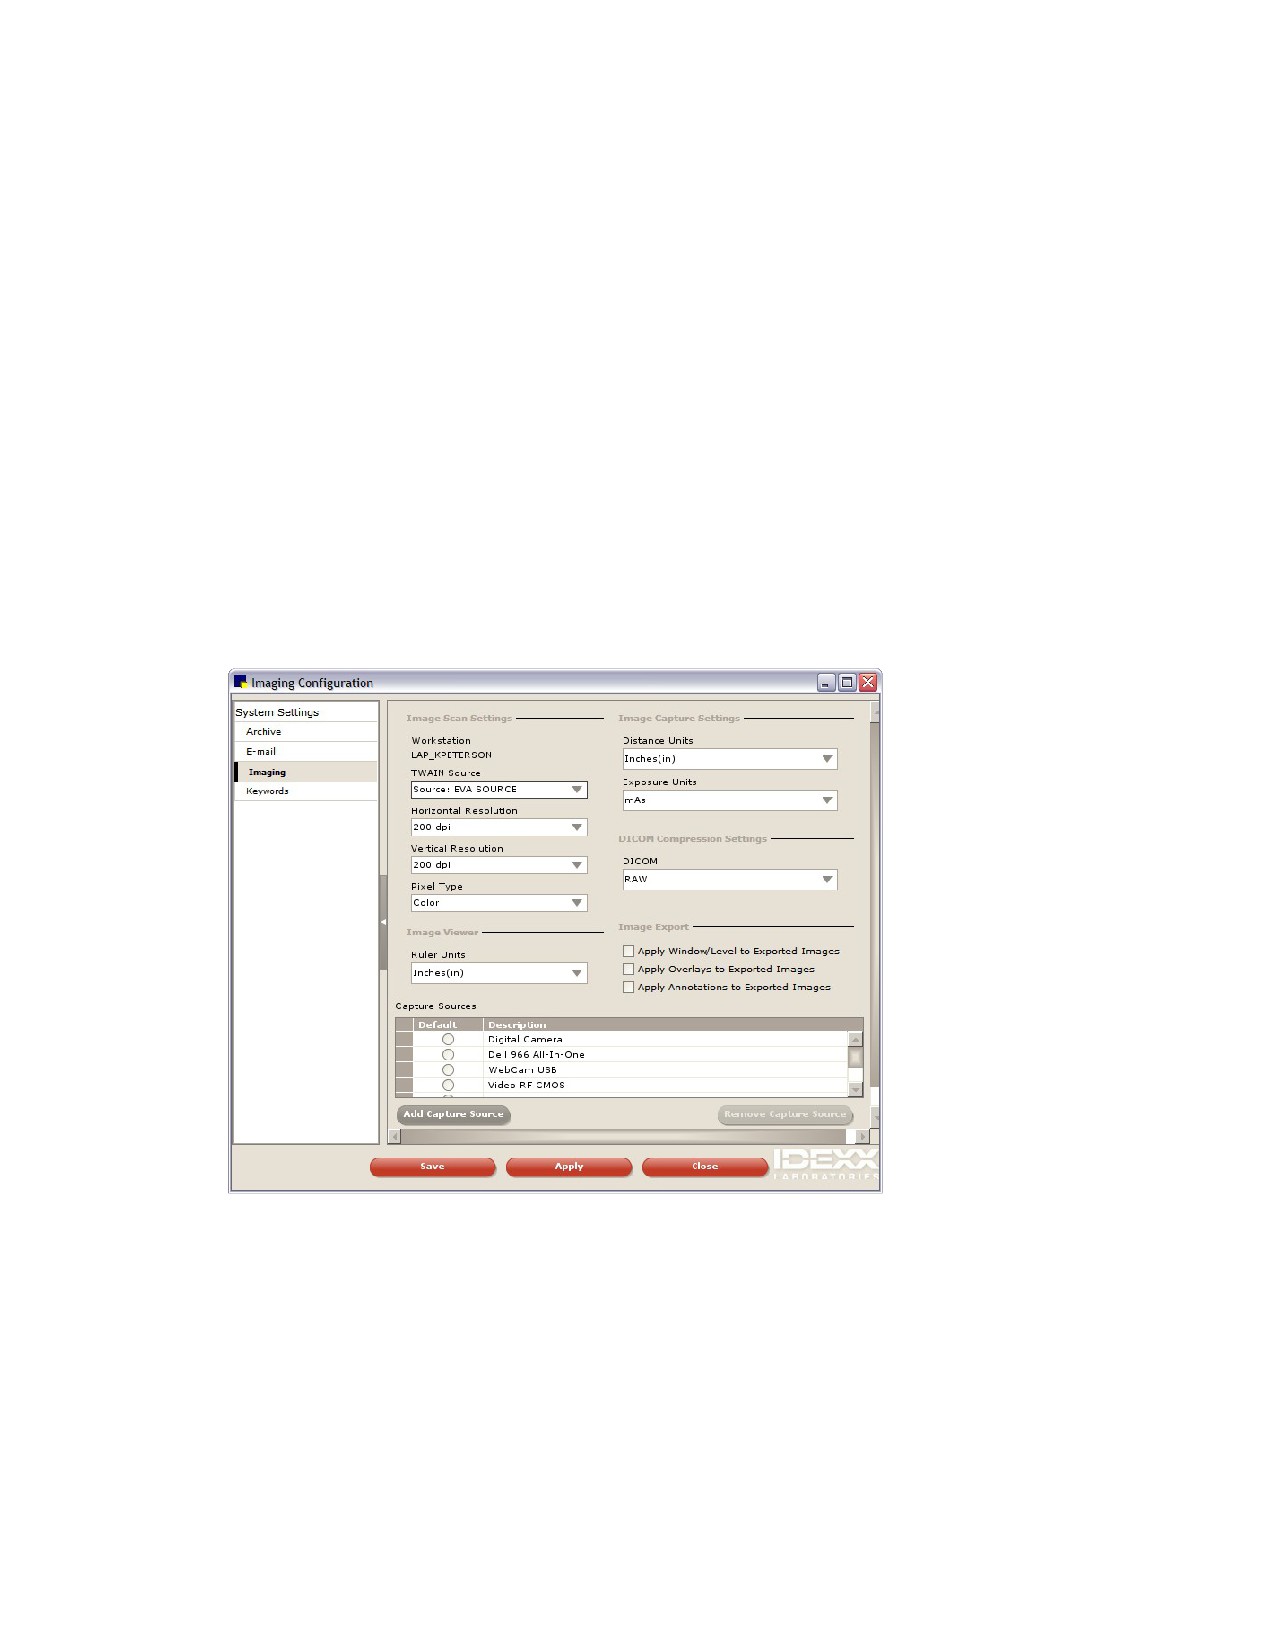
Cornerstone Imaging Defaults
To set up Cornerstone Imaging defaults:
1. On the Controls menu, select Defaults > Imaging. The Imaging Configuration window appears.
2. In the navigation pane, select Imaging.
The Imaging Configuration window, displaying the Imaging defaults
3. In the Image Scan Settings area, do the following:
a. Select your scanner from the TWAIN Source drop-down list.
b. Select the resolution values in dots per inch (dpi) from the Horizontal Resolution and Vertical
Resolution drop-down lists.
c. Select the pixel type (Black-and-white, Grayscale, or Color) from the Pixel Type drop-down
list.
160
Chapter 6: Setting Cornerstone* Imaging Defaults
d. If you want Cornerstone to use your scanner’s user interface when you scan an image, select
the Enable TWAIN UI check box.
4. In the Image Viewer area, from the Ruler Units drop-down list, select the default ruler unit for the
Image Viewer ruler.
5. Skip the Image Capture Settings area, the DICOM® Compression Settings area, and the Apply
Window/Level to Exported Images check box; these settings do not apply to Cornerstone
Imaging.
Note: For information about these settings, see section 8.7 in the Cornerstone Diagnostic Imaging
User’s Guide (available at idexx.com/cornerstoneresources).
6. In the Image Export area, do the following:
a. If you want images to contain the overlay information displayed in the Image Viewer, select the
Apply Overlays to exported images check box. When you begin a print, send, or save action,
the Apply Overlay option is selected for you, but you will be able to deselect it.
b. If you want the images to contain the annotations created in the Image Viewer, select Apply
Annotations to exported images. When you begin a print, send, or save action the Apply
Annotations option is selected for you, but you will be able to deselect it.
7. To add a capture device, in the Capture Sources area, click Add Capture Source. A blank line is
added to the list. In the Description text box, type a description of the device.
8. Click Save.
Image Keywords Defaults
Keywords (such as cardiovascular, ears, hematology) appear in a list box when you add an image,
allowing you to choose one or more keywords to associate with the image. You can also use keywords
to search for images. For more information about associating keywords with images, see section 5.13,
“Editing Image Details,” in the Cornerstone Diagnostic Imaging User’s Guide. For information about
searching for images, see section 2.2, “About the Image Explorer” in the Cornerstone Diagnostic
Imaging User’s Guide.
For your convenience, a number of keywords have been preloaded on your system. You can add,
delete, or edit keywords.
To add a keyword to the Keywords list:
1. On the Controls menu, select Defaults > Imaging. The Imaging Configuration window appears.
2. In the navigation menu, select Keywords.
161
Chapter 6: Setting Cornerstone* Imaging Defaults
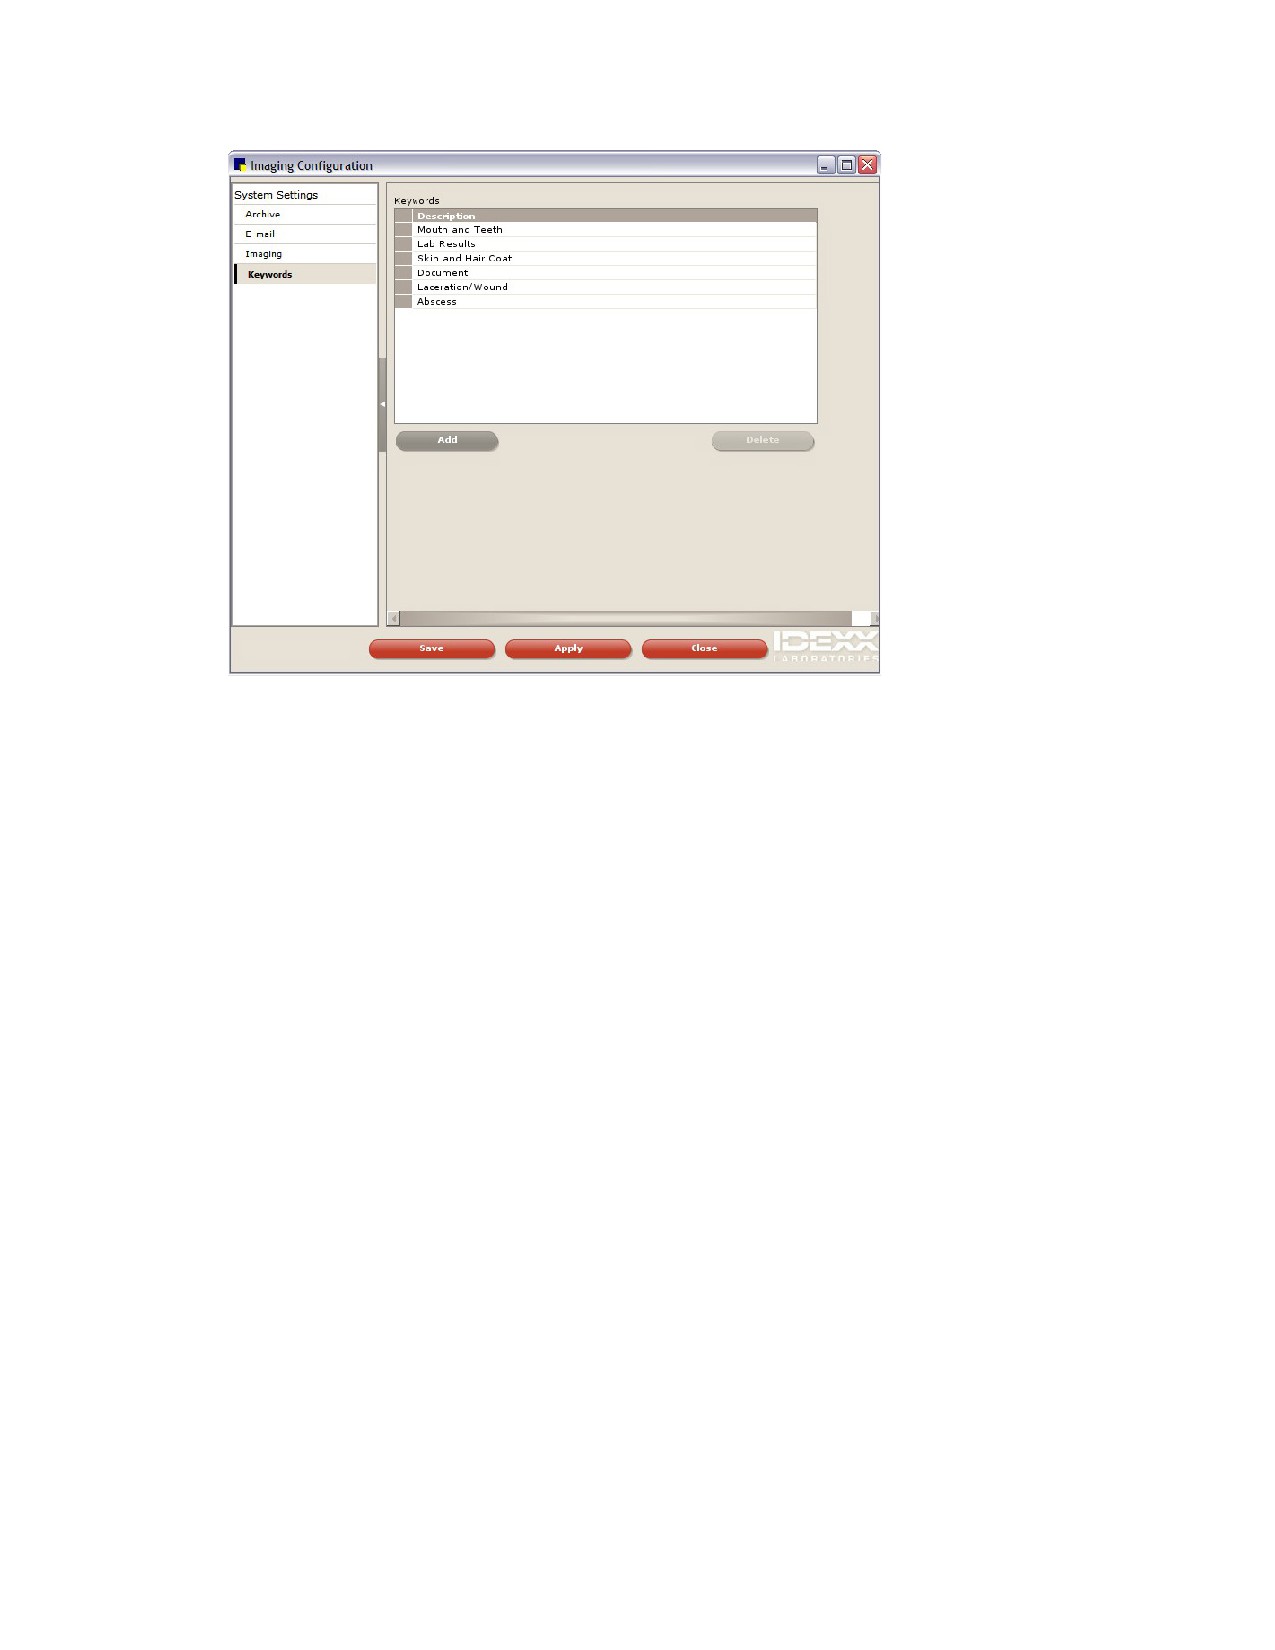
The Imaging Configuration window, displaying the Keyword defaults
3. Click Add to add a keyword to the Keywords list.
4. In the Description text box, type the name of the keyword (up to 30 characters).
5. Click Save.
To edit a keyword from the Keywords list:
1. Select a keyword in the Keywords list.
2. In the Description text box, type changes to the keyword.
3. Click Save.
To delete a keyword from the Keywords list:
¾ Select a keyword in the Keywords list and click Delete.
Note: You cannot delete a keyword once it has been associated with an image.
Telemedicine Provider Defaults
You can submit a case to a telemedicine provider directly through the telemedicine provider’s website.
The Telemedicine Provider default settings allow you to enter the provider’s website address and
associated information used to reach the telemedicine provider.
To set up Integration Technology for Telemedicine:
1. On the Controls menu, select Defaults > Imaging. The Imaging Configuration window appears.
2. On the left, click Telemedicine Provider. The Telemedicine Provider configuration table appears on
the right.
162
Chapter 6: Setting Cornerstone* Imaging Defaults
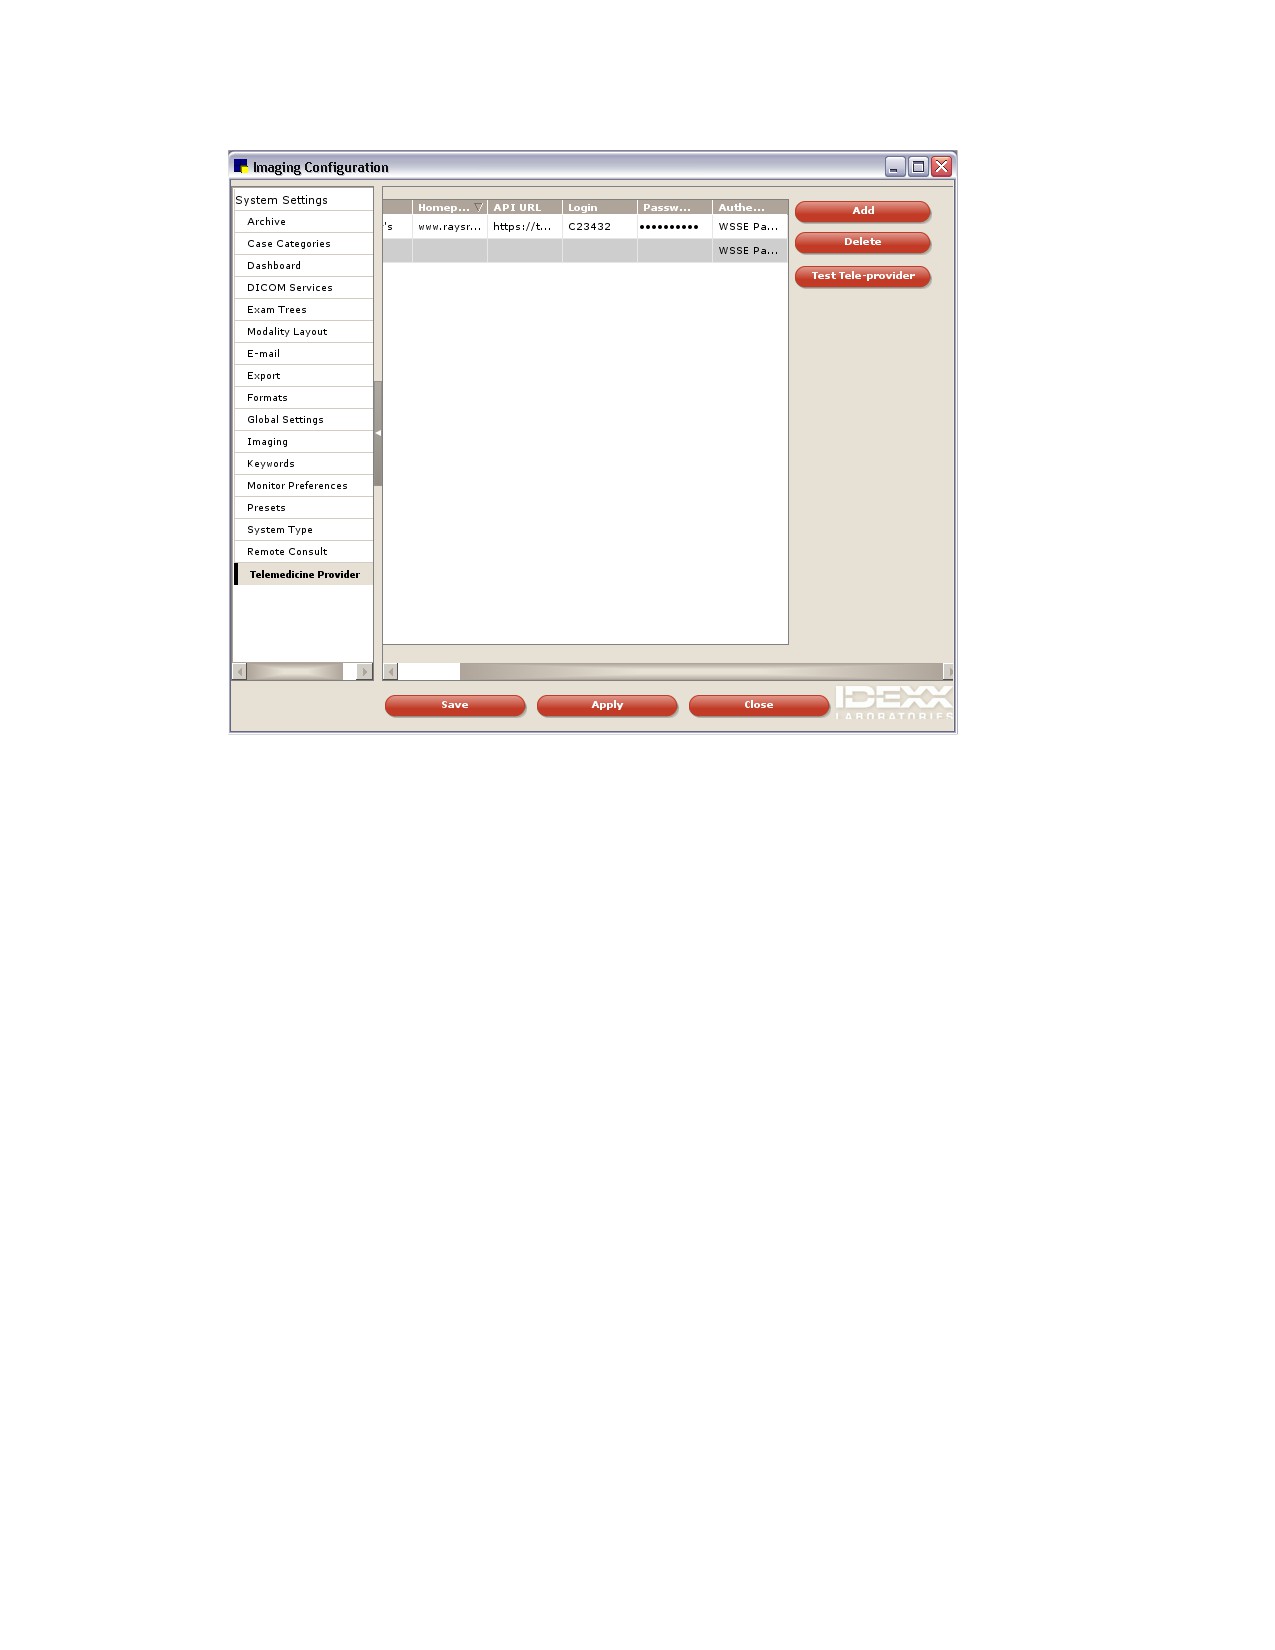
The Imaging Configuration window, displaying the Telemedicine Provider defaults
3. To add a new provider, click Add.
4. In the row that appears, in the Name text box, type the name that you want to be displayed for this
provider on the Case Detail window.
5. In the API URL text box, type the web address you use to reach the telemedicine provider. Be sure
to start with “http://” or “https://” per the instructions of your telemedicine provider. For example, you
would type https://api.vetmedstat.com/VMSIntegrations/VMSTMS.asmx for IDEXX Telemedicine
Consultants.
6. Skip the Homepage text box—it has been provided to support future functionality.
7. In the Login and Password text boxes, type the login name and password you use to log into the
telemedicine provider’s site.
8. From the Authentication drop-down list, select the password authentication method that your
telemedicine provider specifies.
9. Click the row you just entered to select it.
10. Click Apply.
11. Click Test Tele-provider. A confirmation message appears.
12. Click Save to save and close the Imaging Configuration window or click Apply to save without
closing the window.
163
Section 3-Items and Inventory Setup
Chapter 7: Getting Started with Cornerstone* Inventory Setup
Chapter 8: Setting Up a Single Location Inventory System
Chapter 9: Setting Up a Multiple Location Inventory System
Chapter 10: Setting Up Your Invoice Items
Chapter 11: Other Inventory Setup Tasks
164
Chapter 7: Getting Started with Cornerstone* Inventory Setup
Overview
Because so many components of the IDEXX Cornerstone* Practice Management System are linked to
inventory, inventory setup is an important part of your initial Cornerstone software configuration.
This chapter covers the following inventory topics:
• Comparing the two types of Cornerstone Inventory (single or multiple location)
• Setting up your list of vendors
• Setting up cost centers
• Setting up inventory adjustment reasons
Notes:
• For practices upgrading from Cornerstone 6.2 or earlier, if you have existing inventory items with
expiration dates, your existing expiration dates will be removed when you upgrade to a
newer version of the Cornerstone software because it has no way of verifying that the inventory
expiration dates in your system are correct. To protect the integrity of your data, any existing
inventory will display “unknown” as the expiration date. See “Setting Barcodes, Expiration Dates
and Lot Numbers” on page 241 for more information about using existing expiration dates from
your system.
• The inventory windows require that Windows® Internet Explorer® 7 or later be installed on each
workstation. It does not have to be used as the default Internet browser.
Inventory Setup-Single or Multiple Location
There are two different ways you can set up your Cornerstone Inventory system, depending on the
needs of your practice.
Single Location per Item Inventory (Basic)
With single location inventory, an inventory item is stored in only one location. Inventory can be stored in
multiple locations in the clinic, but each item can be stocked in only one location. For example, dog food
might be stored in the stockroom and medications might be stored in the pharmacy.
With a single location per item setup, each item is associated with a single location and quantities of an
inventory item may only be received into, adjusted in, or consumed for this single location.
Note: For Cornerstone 7.6 and later, single location inventory is the default inventory setup used for all
new Cornerstone system installations.
Multiple Locations per Item Inventory (Advanced)
With multiple location inventory, each item can have quantities stored in multiple locations (any item can
be used in any location). For example, a popular type of canned dog food might be stored both in
reception and in the stockroom.
When using multiple location inventory, a location can be assigned to a specific location group and may
have multiple location types.
If you have more than one practice using quantities of inventory stored in multiple locations, you may
want to consider using a multiple location inventory setup.
165

Chapter 7: Getting Started with Cornerstone* Inventory Setup
Single and Multiple Location Inventory-Cornerstone Functionality Comparison Table
Inventory Feature/Functionality
Single Location Inventory
Multiple Location Inventory
Want List
X
X
Order List
X
X
Purchasing Work List
X
X
Receipt List
X
X
View Quantity on Hand
X
X
Return to Vendor
X
X
Internal Stock Use
X
X
Backorder List
X
X
Adjustment List
X
X
Vendors
X
X
Locations
X
X
Cost Centers
X
X
Adjustment Reasons
X
X
Assign One or More Locations per Item
X
Find and Transfer Items
X
Use Stock Transfer List
X
Use Location Groups
X
Use Location Types
X
For information on setting up a single location inventory system, see “Chapter 8: Setting Up a Single
Location Inventory System” beginning on page 171.
For information on setting up a multiple location inventory system, see “Chapter 9: Setting Up a Multiple
Location Inventory System” beginning on page 174.
How Can I Tell Which Type of Inventory Setup Is in Use Now?
For Cornerstone versions 7.6 and later, you can check to see what type of inventory setup was installed
by checking the display of your Purchasing Work List window (Inventory > Purchasing Work List). If
you have single location inventory, the Want/Suggested List tab is the only tab available at the top of
the window. If you have multiple location inventory, the Locate an Item and Quantity at Location tabs
are also available.
Tip: For Cornerstone 7.6 and later, single location inventory is the default inventory setup used for all
new Cornerstone system installations.
What if My Practice Wants to Switch Its Inventory Setup Type?
If you have single location inventory and would like to move to multiple location inventory (or vice versa),
contact Cornerstone Support at 1-800-695-2877 for information on converting your inventory system.
166
Chapter 7: Getting Started with Cornerstone* Inventory Setup
Setting Up Your List of Vendors
From the Vendor List, you can add vendors, update a vendor’s information, delete a vendor that has
never been used, or inactivate a vendor you no longer use.
Vendor information tracked in Cornerstone Inventory includes:
• Vendor name, address and website (if applicable)
• Vendor contacts, telephone numbers, email addresses and notes
• An alert message that appears when placing an order with the vendor
• Additional notes about the vendor
To add a new vendor or edit information for a vendor:
1. On the Inventory menu, select Vendors. The Vendor List window appears.
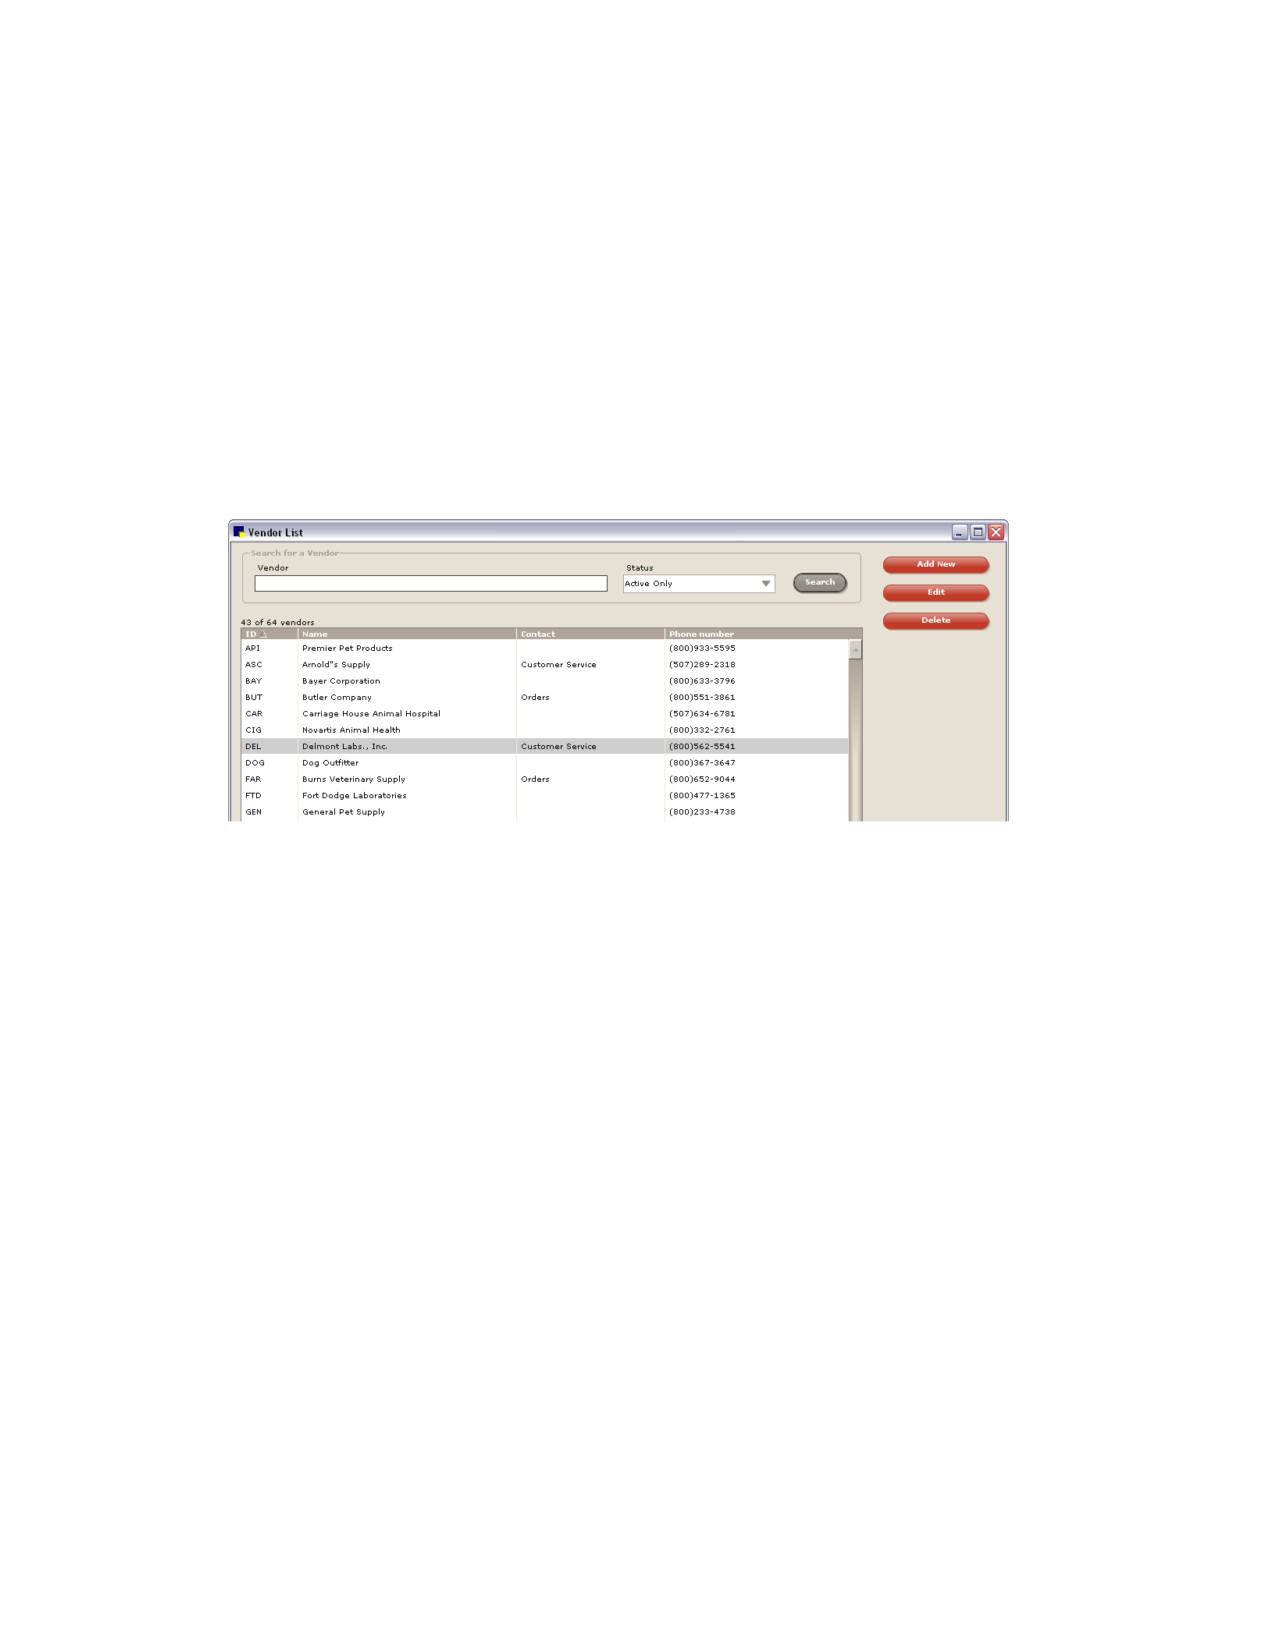
Vendor List window
Tip: To search for a vendor, in the Vendor text box, type the beginning letters or full name of the
vendor and click Search.
2. Do one of the following:
• To edit information for a vendor, select the vendor in the vendor list and click the Edit button.
The vendor’s information appears.
• To add a new vendor, click the Add New button. The Add a New Vendor window appears.
167
Chapter 7: Getting Started with Cornerstone* Inventory Setup
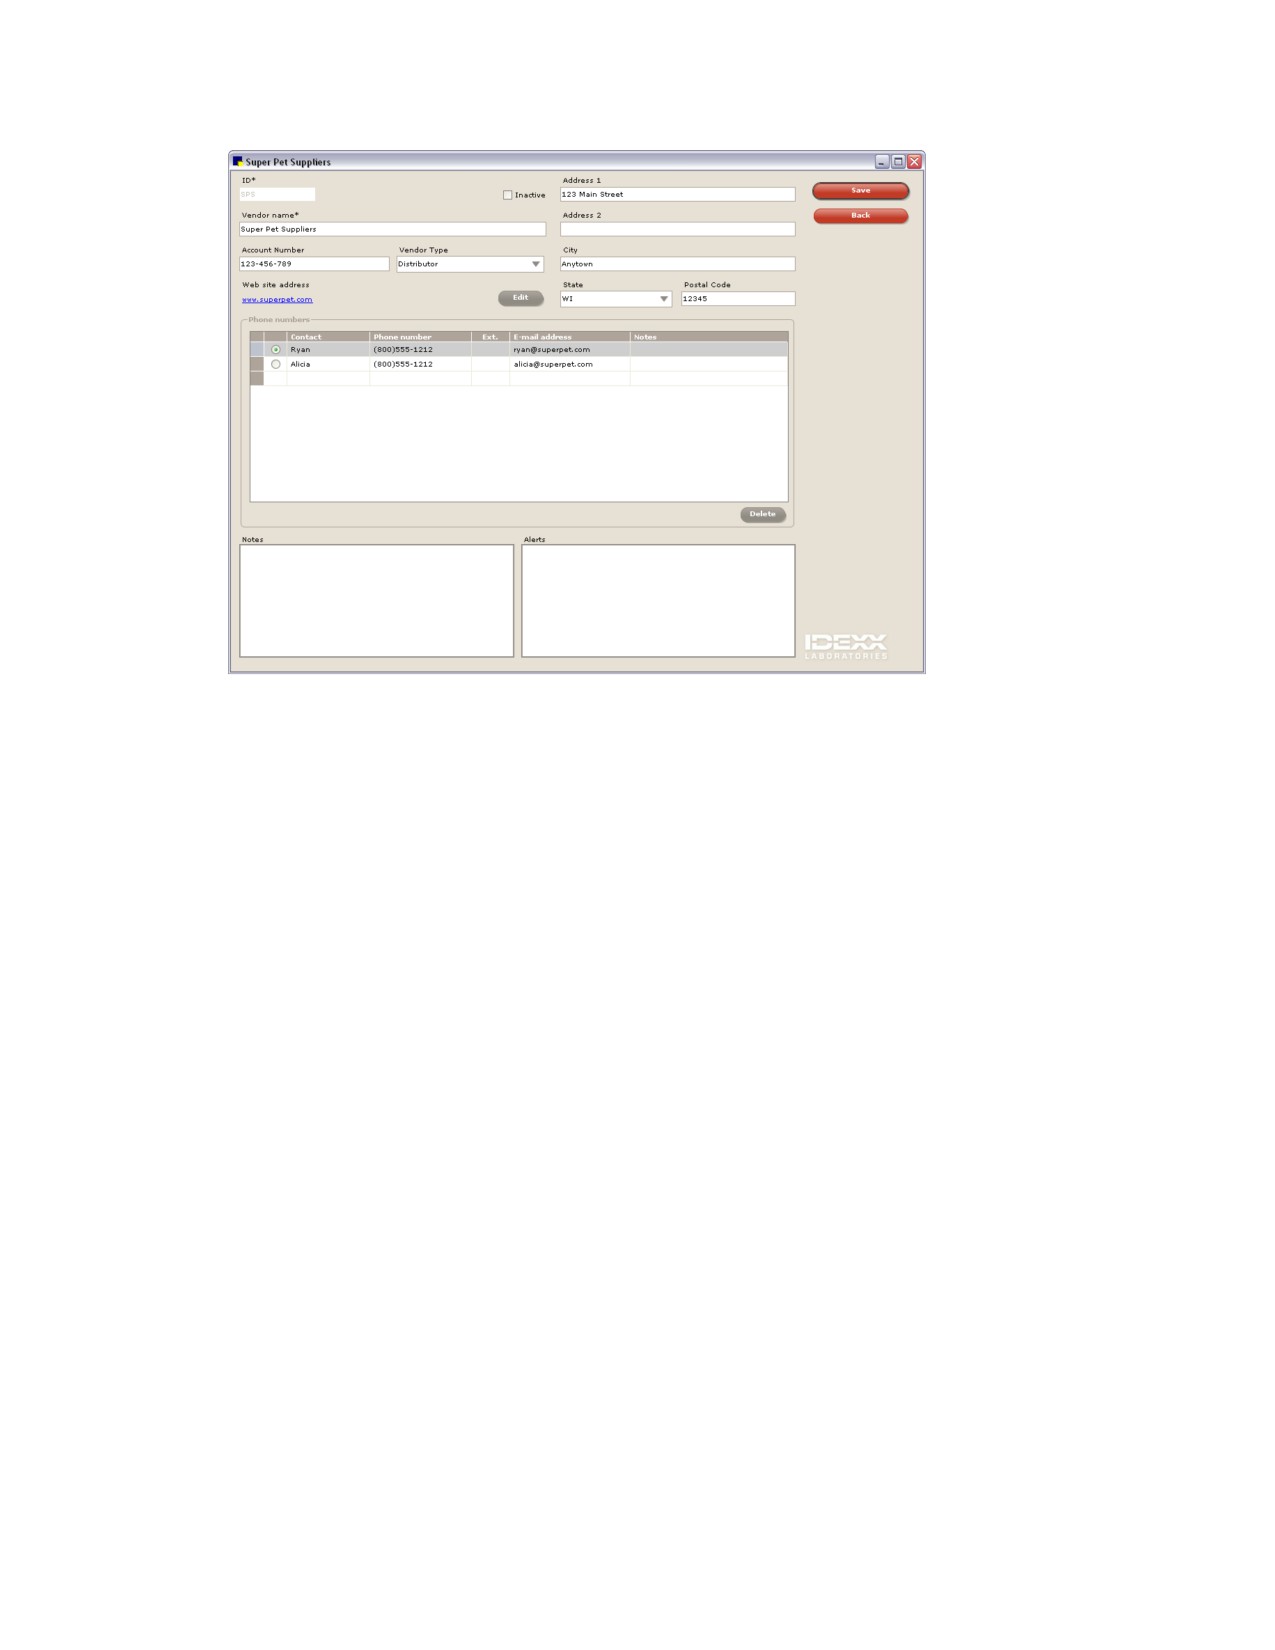
Add or edit a vendor
Note: Fields with an asterisk (*) next to them are required fields.
3. If adding a new vendor, in the ID text box, type a unique identification code to distinguish this
vendor in Cornerstone.
4. If you no longer use this vendor, select the Inactive check box to inactivate the vendor. When you
do a vendor search, inactive vendors can be hidden.
5. In the Vendor name text box, type the vendor’s name.
6. In the Account Number text box, type the practice’s account number with the vendor.
7. From the Vendor Type drop-down list, select the vendor type (Manufacturer, Distributor, or
Other).
8. In the Web site address text box, type the vendor’s website address. After you enter the address, it
becomes a hyperlink that you can click to access the site (Internet access required). To change the
website address, click the Edit button and make changes.
9. In the applicable fields, enter the vendor’s address, city, state, and postal code information.
10. In the Phone numbers area, do the following:
• Enter the names of your vendor contacts, their phone numbers, extensions, email addresses,
and any notes about the contacts.
• To indicate your primary contact with the vendor, click the round option button to the left of the
contact’s name.
• To remove a contact from the list, select the contact and then click the Delete button.
11. In the Notes area, type any notes pertaining to this vendor. The notes will print on the Vendor
Summary Report.
168
Chapter 7: Getting Started with Cornerstone* Inventory Setup
12. In the Alerts area, type any information you would like to appear in an alert when placing a new order
or receiving an order from the vendor (for example, minimum order requirements or shipping
policies).
13. Click Save to save your changes.
To delete a vendor:
Note: If there is a history with the vendor, it cannot be deleted, only inactivated.
1. On the Inventory menu, select Vendors. The Vendor List window appears.
2. To search for a vendor, in the Vendor text box, type the beginning letters or full name of the vendor
and click Search.
3. Select the vendor you want to delete and click Delete. You are prompted to confirm the deletion.
Note: If the Remember my decision check box is selected, the confirmation message will no
longer appear after performing a Delete operation within Cornerstone Inventory. We recommend that
you leave this option unchecked.
4. Click Yes to delete the vendor.
To view a list showing the primary vendor for each inventory item, print an Inventory-Item Vendor
Information Report.
For a list of vendors, print an Inventory-Vendor Summary Report.
Setting Up Internal Cost Centers
The Internal Stock Use feature tracks inventory costs associated with items you use within your practice.
In order for this feature to correctly reflect your internal inventory costs, you need to first set up cost
centers and any applicable usage taxes in your practice. (For more information on setting up taxes, see
“Taxes” on page 29.)
Cost Centers are specific areas in your practice where you use inventory items that are not invoiced. You
can set up several cost centers that represent different facets of your business.
To set up cost centers:
1. On the Inventory menu, select Cost Centers.
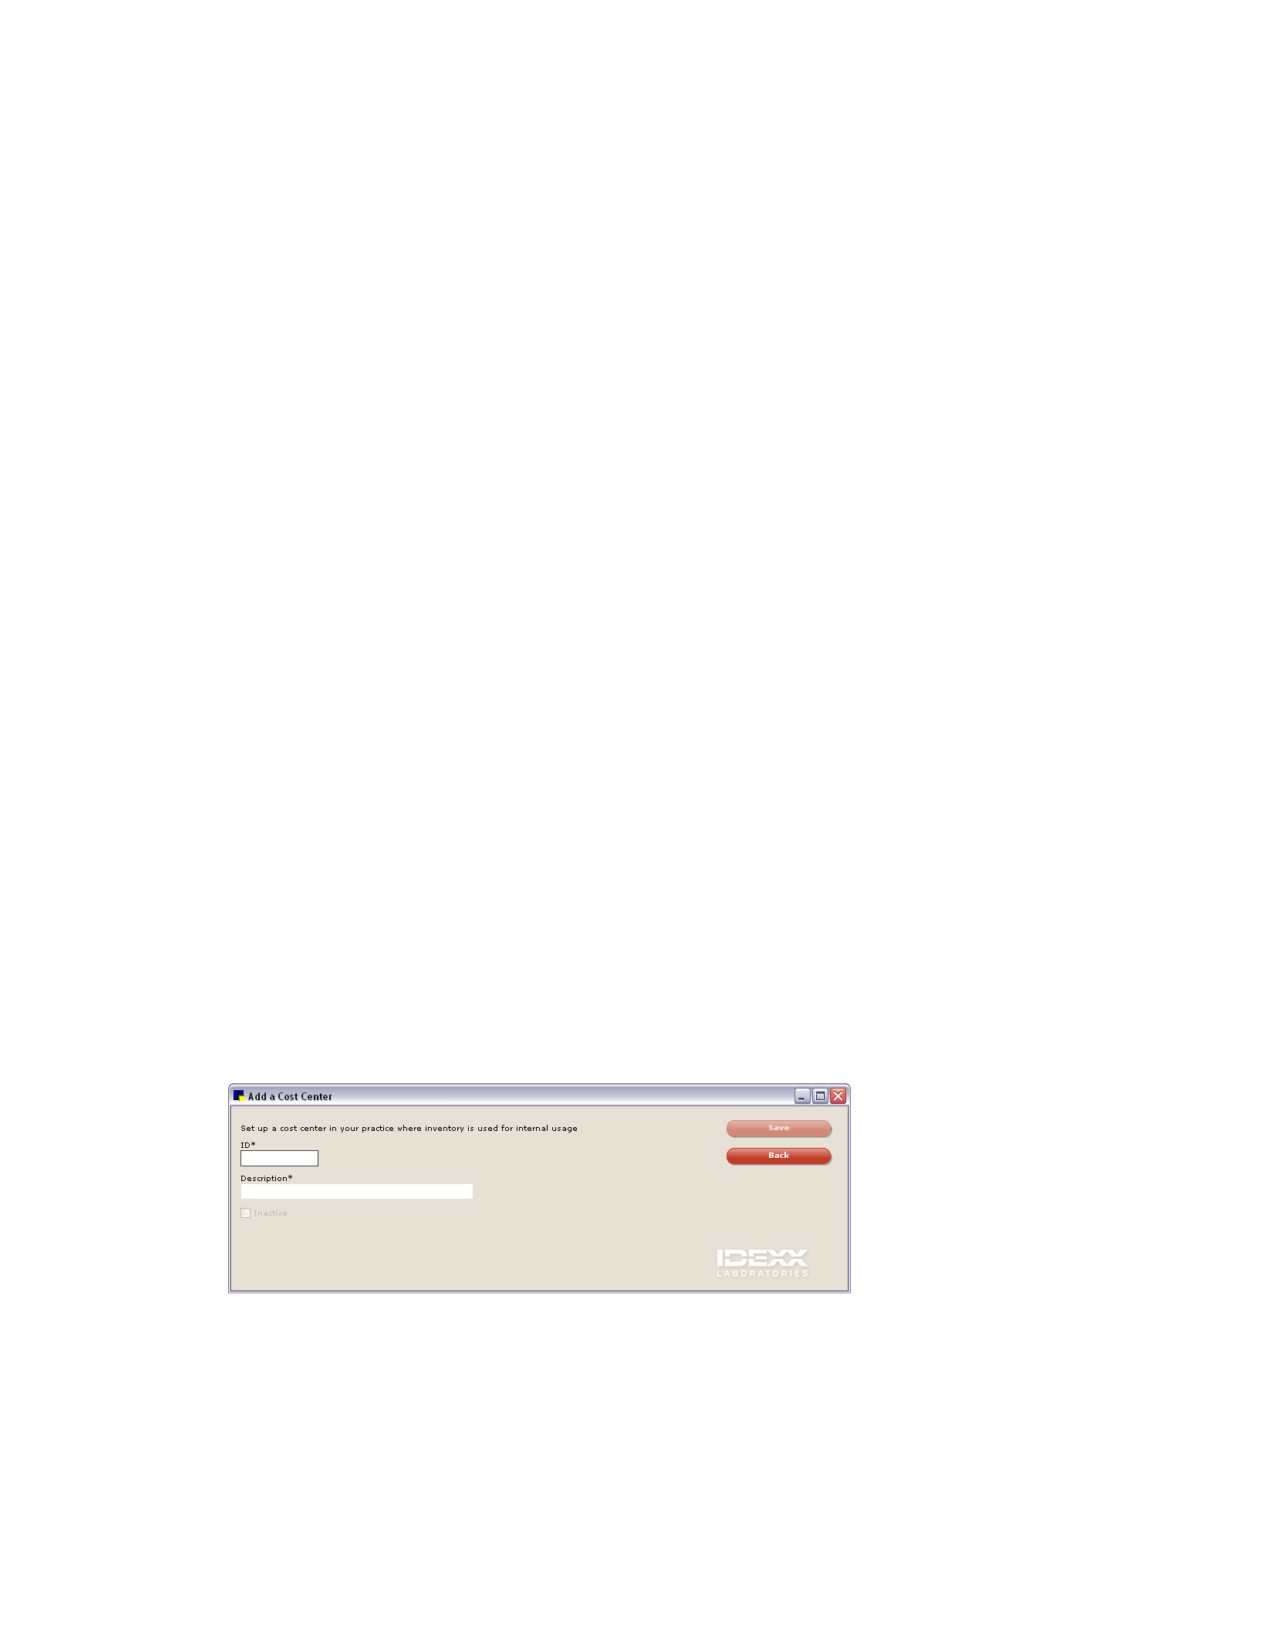
2. Click Add New. The Add a Cost Center window appears.
Add a Cost Center window
3. In the ID text box, type an ID for the cost center.
4. In the Description text box, type a brief description for the cost center.
5. To inactivate the cost center, select the Inactive check box.
6. Click OK to save your changes.
169
Chapter 7: Getting Started with Cornerstone* Inventory Setup
To see the cost of inventory used within your practice within each cost center, print an Inventory-
Internal Usage Report.
Setting Up Inventory Adjustment Reasons
An adjustment reason must be selected from a drop-down list when quantity on hand is adjusted.
Several of the most common reasons for adjusting inventory have already been set up for you in
Cornerstone. In addition to the reasons included with the software, custom adjustment reasons can be
added, edited, deleted, or designated as inactive.
To maintain the list of adjustment reasons:
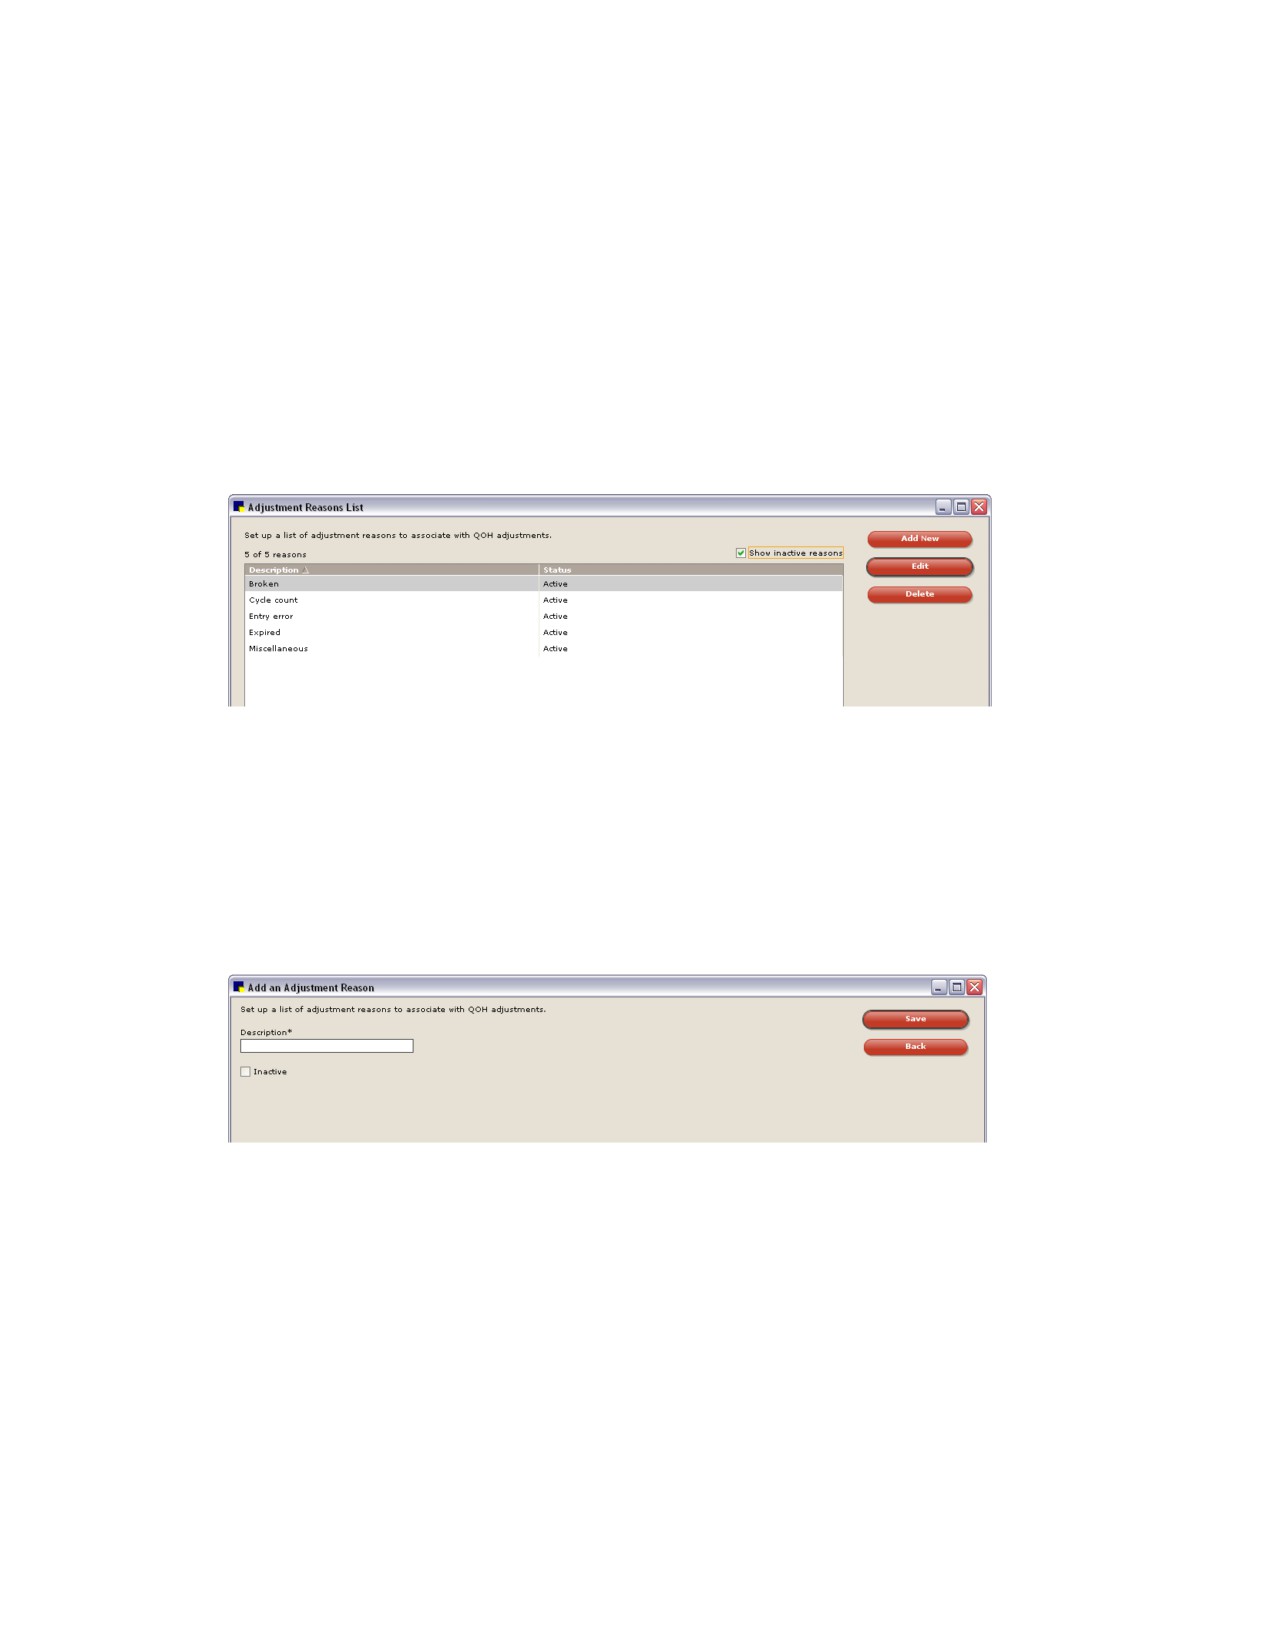
1. On the Inventory menu, select Adjustment Reasons. The Adjustment Reasons List window
appears.
Adjustment Reasons List window
2. Do one of the following:
• To add a new adjustment reason, click Add New.
• To change an existing reason, select the reason that you want to change and click Edit.
• To delete a reason, select the reason that you want to delete and click Delete.
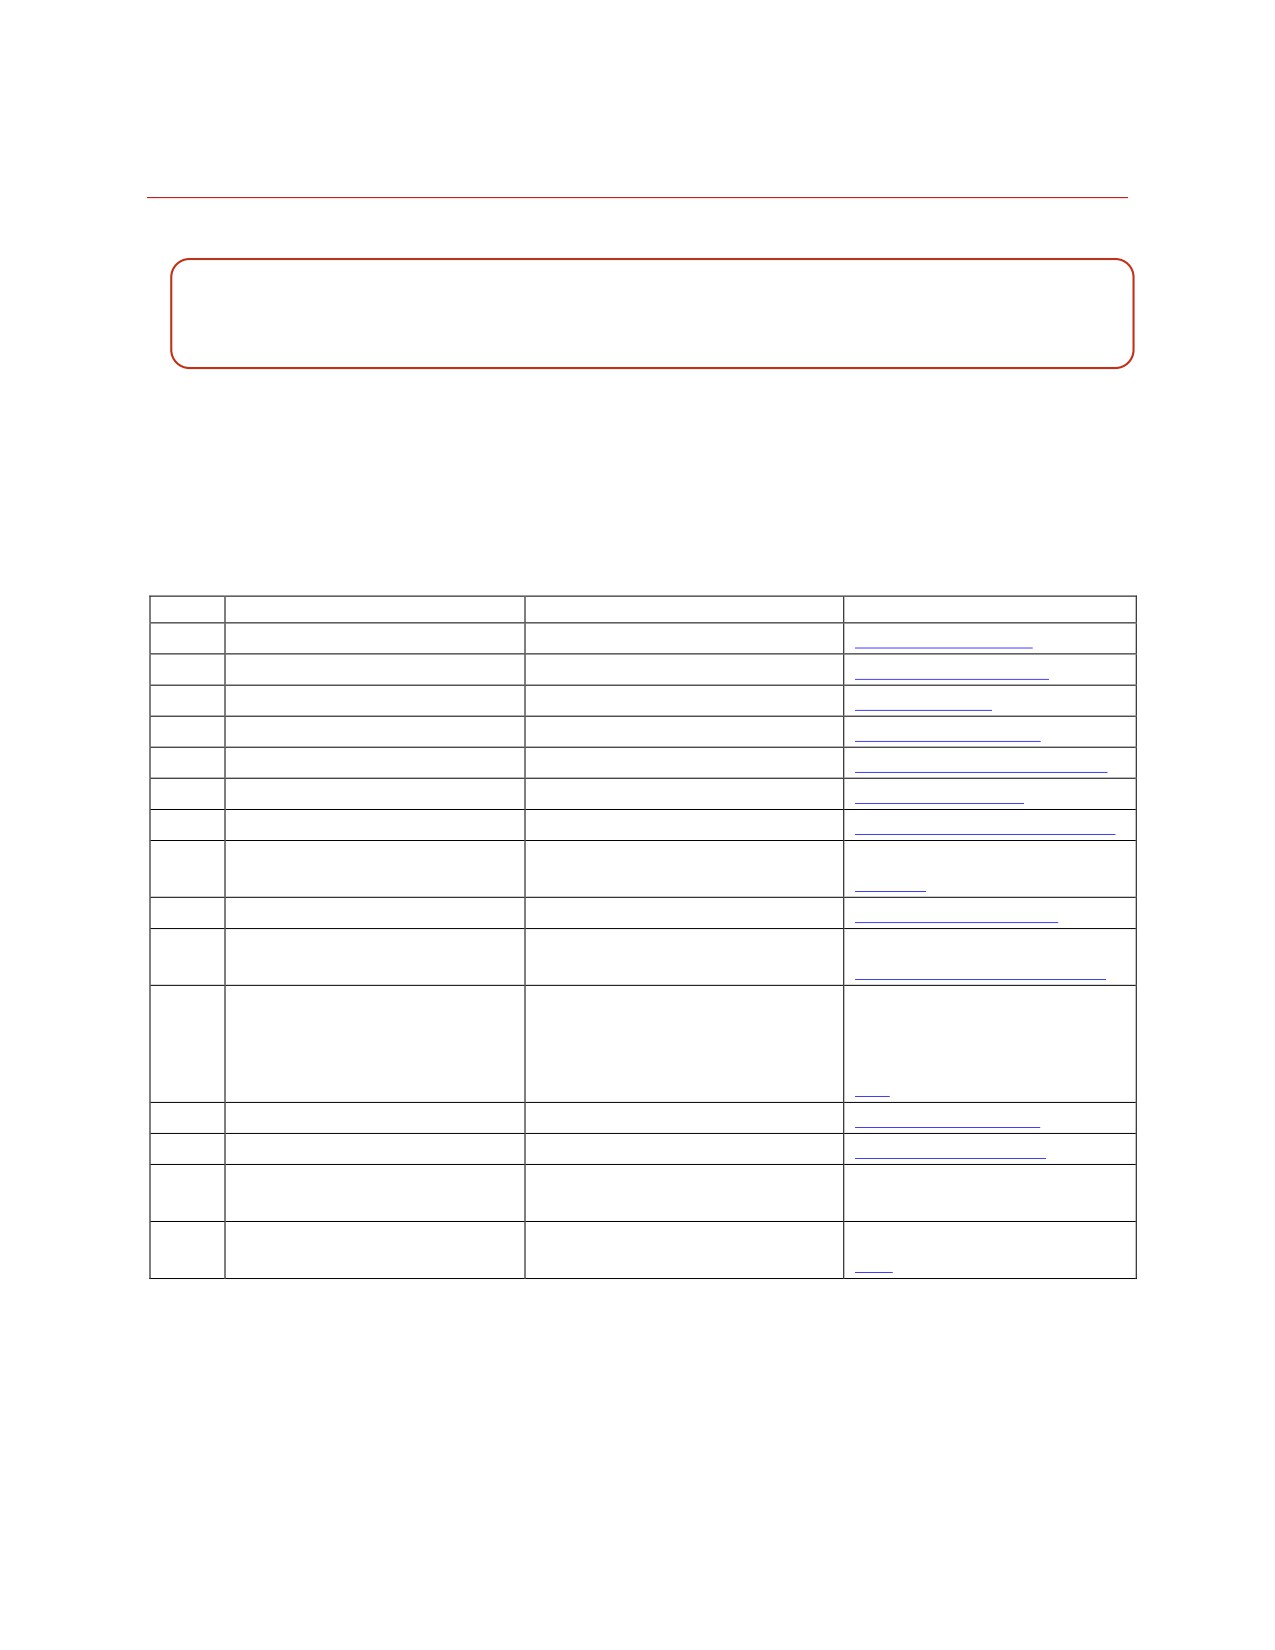
If you clicked Add New or Edit, a window appears allowing you to add or edit the description for the
adjustment reason.
Add an Adjustment Reason window
3. In the Description text box, type a brief description for the adjustment reason.
4. To inactivate the adjustment reason, select the Inactive check box.
5. When finished, click Save.
170
Chapter 8: Setting Up a Single Location Inventory System
This chapter includes steps required to set up a single location inventory system in the IDEXX
Cornerstone* Practice Management System. For information on daily usage tasks for single location
inventory, see “Chapter 22: Using a Single Location Inventory System” in the Cornerstone User’s Manual.
Overview
With single location inventory, each item is associated with a single location and quantities of an
inventory item may only be received into, adjusted in, or consumed for this single location. This makes
initial inventory setup less complicated and fairly straightforward.
The following table lists 15 steps for a complete single location inventory setup.
Step
Single Location Inventory Task
Cornerstone Location
Link to Section in this Manual
1
Set up departing instructions
Lists > Departing Instructions
Departing Instructions
2
Set up prescription instructions
Lists > Prescription Instructions
Prescription Instructions
3
Set up units of measure
Controls > Units of Measure
Units of Measure
4
Set up price change reasons
Controls > Price Change Reasons
Price Change Reasons
5
Set up vendors
Inventory > Vendors
Setting Up Your List of Vendors
6
Set up locations
Inventory > Locations
Setting Up Locations
7
Set up cost centers
Inventory > Cost Centers
Setting Up Internal Cost Centers
8
Set up adjustment reasons
Inventory > Adjustment Reasons
Setting Up Inventory Adjustment
Reasons
9
Inactivate invoice items not used
Lists > Invoice Item
Inactivating Invoice Items
10
Set up item classifications and
Lists > Invoice Item Class
Setting Up Invoice Item
subclassifications
Classifications and Subclasses
11
Set up inventory items
Lists > Invoice Item
Setting Up a New Invoice Item
Use the Invoice Item Setup tool
Tools > Invoice Item Setup
Using the Invoice Item Setup
Tool
12
Link inventory items
Lists > Invoice Item
Linking Inventory Items
13
Receive past invoices
Inventory > Receipt List
Receiving Past Invoices
14
Perform a cycle count using the
Reports > Find a Report >
Performing a Cycle Count
Inventory-Counts Report
Inventory report group
15
Adjust quantity on hand and cost
Inventory > Adjustment List
Adjusting Quantity on Hand and
Cost
Note: If you are currently using single location inventory and have more than one practice using
quantities of inventory stored in multiple locations, you may want to consider using multiple location
inventory. With this type of setup, each item can have quantities stored in multiple locations (any item
can be used in any location) and location groups are enabled. Contact Cornerstone Support at
1-800-695-2877 for instructions on activating this functionality in your Cornerstone software.
171
Chapter 8: Setting Up a Single Location Inventory System
Setting Up Locations for Single Location Inventory
In Cornerstone Inventory, locations are the physical places in your practice where you keep inventory
items. With single location inventory, more than one location can be set up by the practice for tracking
inventory, but each inventory item can be assigned to only one location.
Examples of locations include room names, room numbers, shelf numbers, reception areas,
stockrooms, trucks, refrigerators, lock boxes, kennels and controlled substance cabinets.
Note: At least one location is required if your practice wishes to track the quantity on hand of inventory
items.
Before You Begin
• Set up Practice and Workstation defaults for Inventory (see “Inventory Defaults” on page 109).
• Set up Staff defaults for Inventory (see “Staff Defaults for Inventory” on page 153).
To set up inventory locations:
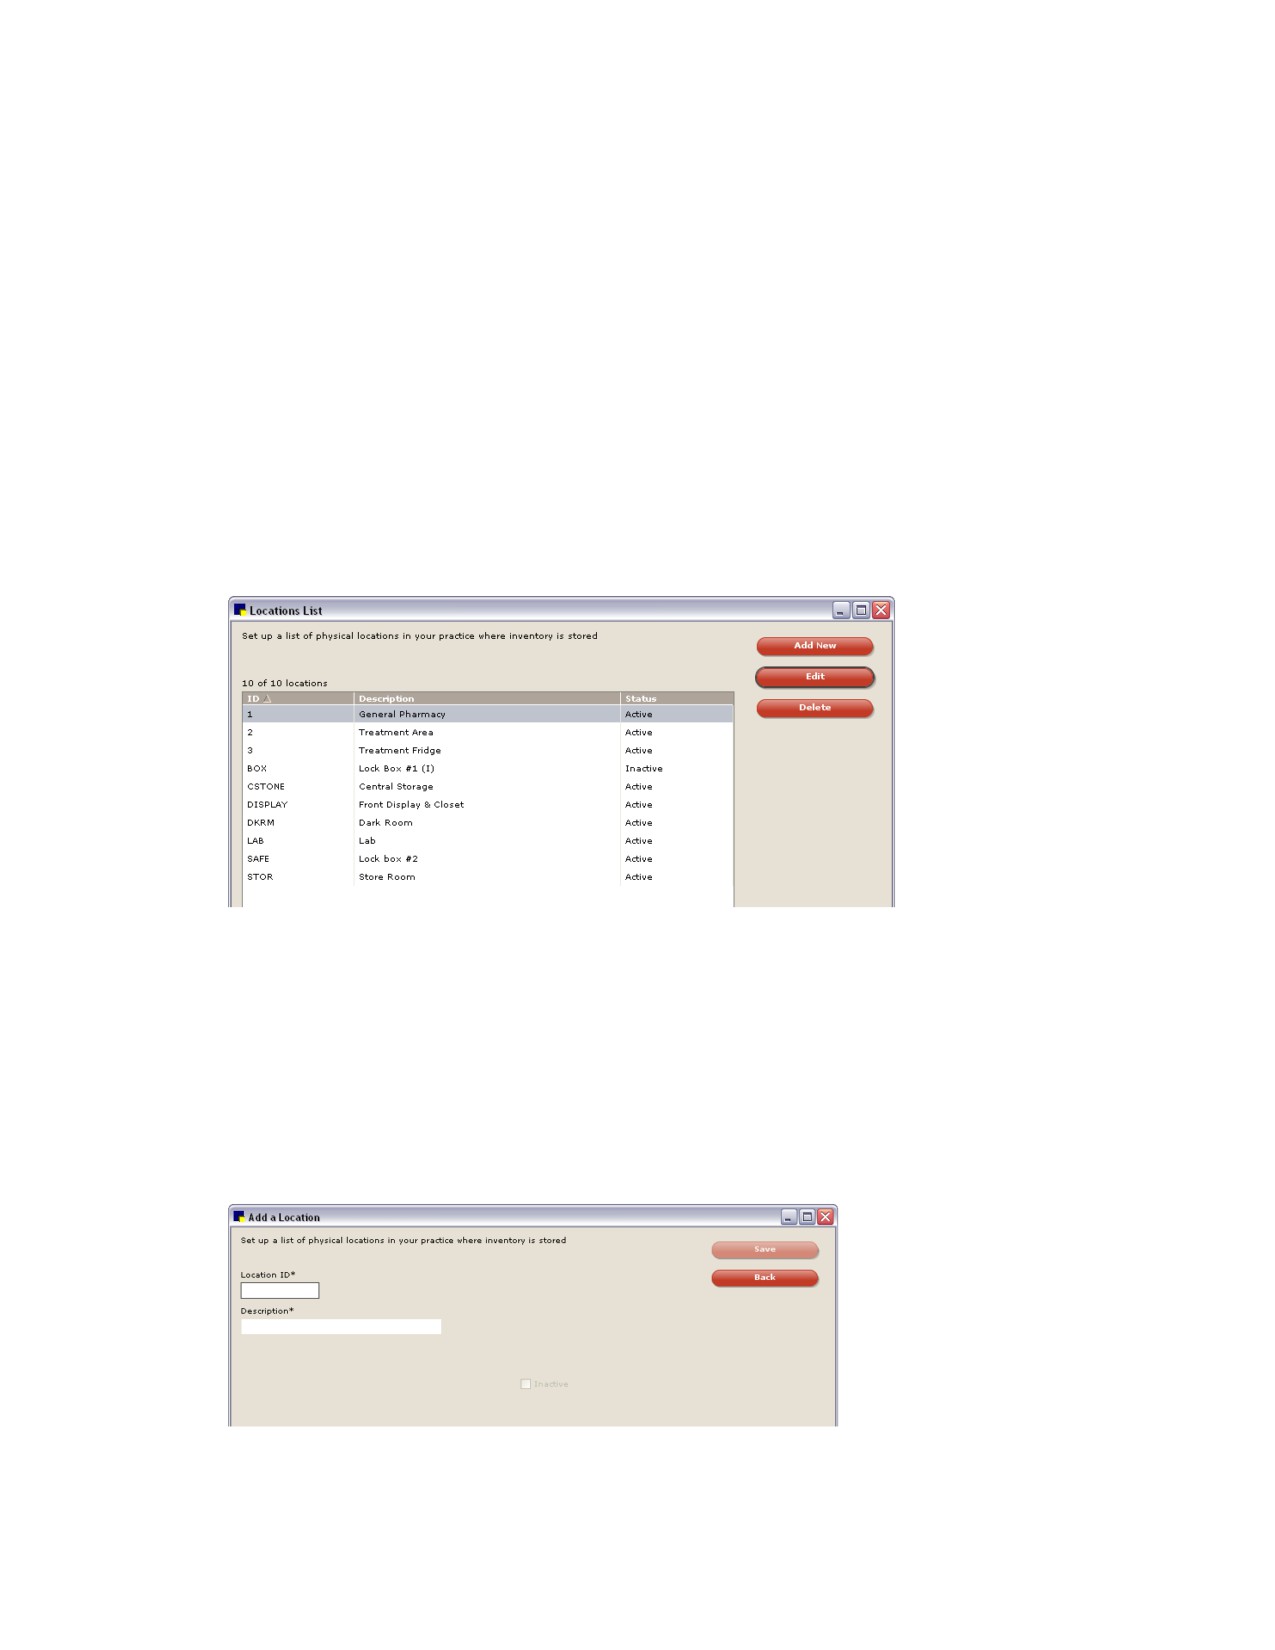
1. On the Inventory menu, select Locations. The Locations List window appears.
Locations List window
2. Do one of the following:
• To add a new location, click Add New.
• To change an existing location, select the location that you want to change and click Edit.
• To delete a location, select the location that you want to delete and click Delete. (Note: You
cannot delete a location if it is assigned to an invoice item or is part of purchase history.)
If you clicked Add New or Edit, a window appears allowing you to add/edit the identifying
information for the location.
Add or edit a Location
172
Chapter 8: Setting Up a Single Location Inventory System
Note: Fields with an asterisk (*) next to them are required fields.
3. If adding a new location, in the Location ID text box, type a unique identification code to distinguish
this location from other locations in Cornerstone.
4. In the Description text box, type a name to describe the location.
5. If this location is no longer used by the practice, select the Inactive check box to inactivate it.
6. When finished, click Save.
7. Click Back to return to the Locations List or click
to close.
173
Chapter 9: Setting Up a Multiple Location Inventory System
This chapter includes steps required to set up a multiple location inventory system in the IDEXX
Cornerstone* Practice Management System. For information on daily usage tasks for multiple location
inventory, see “Chapter 23: Using a Multiple Location Inventory System” in the Cornerstone User’s
Manual.
Overview
With multiple location inventory, each item can have quantities stored in multiple locations, and location
groups and types are enabled. The initial inventory setup for multiple location inventory can be fairly
straightforward or more advanced, depending on the needs of your practice.
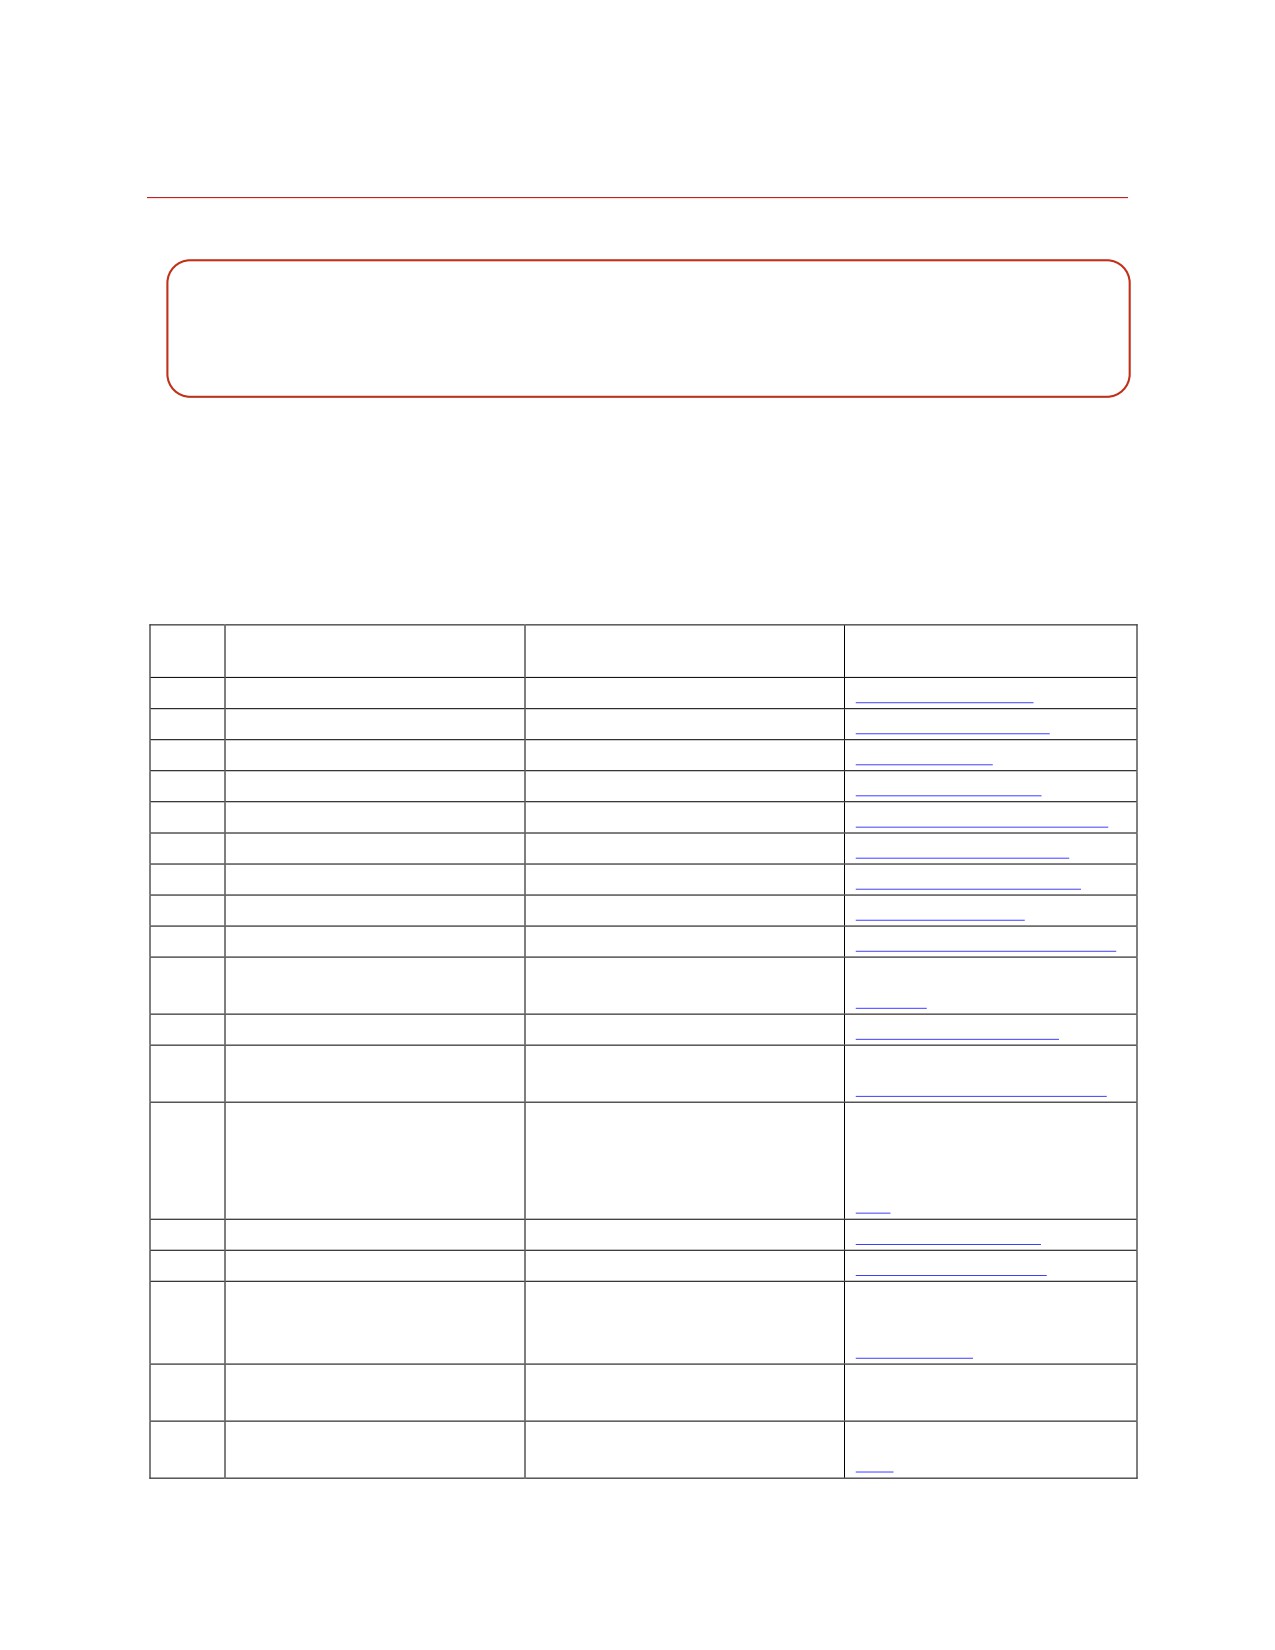
The following table lists 18 steps for a complete multiple location inventory setup.
Step
Multiple Location Inventory
Cornerstone Location
Link to Section in this Manual
Setting
1
Set up departing instructions
Lists > Departing Instructions
Departing Instructions
2
Set up prescription instructions
Lists > Prescription Instructions
Prescription Instructions
3
Set up units of measure
Controls > Units of Measure
Units of Measure
4
Set up price change reasons
Controls > Price Change Reasons
Price Change Reasons
5
Set up vendors
Inventory > Vendors
Setting Up Your List of Vendors
6
Set up location types
Inventory > Location Types
Setting Up Location Types
7
Set up location groups
Inventory > Location Groups
Setting Up Location Groups
8
Set up locations
Inventory > Locations
Setting Up Locations
9
Set up cost centers
Inventory > Cost Centers
Setting Up Internal Cost Centers
10
Set up adjustment reasons
Inventory > Adjustment Reasons
Setting Up Inventory Adjustment
Reasons
11
Inactivate invoice items not used
Lists > Invoice Item
Inactivating Invoice Items
12
Set up item classifications and
Lists > Invoice Item Class
Setting Up Invoice Item
subclassifications
Classifications and Subclasses
13
Set up inventory items
Lists > Invoice Item
Setting Up a New Invoice Item
and/or
Use the Invoice Item Setup Tool
Tools > Invoice Item Setup
Using the Invoice Item Setup
Tool
14
Link inventory items
Lists > Invoice Item
Linking Inventory Items
15
Receive past invoices
Inventory > Receipt List
Receiving Past Invoices
16
Transfer items to appropriate
Inventory > Find and Transfer Items
Transferring Items to the
locations
Appropriate Locations (Multiple
Location Only)
17
Perform a cycle count using the
Reports > Find a Report >
Performing a Cycle Count
Inventory-Counts Report
Inventory report group
18
Adjust quantity on hand and cost
Inventory > Adjustment List
Adjusting Quantity on Hand and
Cost
174
Chapter 9: Setting Up a Multiple Location Inventory System
Note: If you have a multiple locations per item inventory setup and would like to simplify inventory to
have each item associated with a single location, there is a Cornerstone Location Consolidator Utility
available that automates this process for you. Contact Cornerstone Support at 1-800-695-2877 for
instructions on using the Consolidator Utility.
Location Groups, Locations, and Location Types
Practices using multiple location inventory have the option to set up location groups and location types,
which can be helpful when needing to maintain a logical organization for complex inventory systems.
Note: You can receive inventory only into locations (not into location groups or types).
• Location Groups-Location groups are primarily used within practices that have satellite clinics
or separate facilities, where each clinic or facility can be designated as a separate location
group. This enables staff to track inventory information by locations within a specific clinic or
facility and allows ordering by location group.
Other examples of location groups include mobile units or warehouses.
• Locations-More than one location can be set up by the practice in order to track inventory. With
multiple location inventory, an inventory item can be stored in multiple locations (e.g., cans of
ABC Dog Food might be stored in both the reception room and the stockroom).
Examples of locations include room names, room numbers, shelf numbers, reception areas,
stockrooms, trucks, refrigerators, lock boxes, kennels, and controlled substance cabinets.
• Location Types-Practices that have multiple locations set up to store inventory may use
location types to categorize locations. Location types provide an additional way of defining and
distinguishing inventory storage locations.
Examples of location types include trucks, refrigerators, retail centers, pharmacy centers, and
supply centers.
Multiple Location Inventory Setup Examples
Example 1: Locations Only
In this example, the practice stores inventory items in multiple locations but does not use location
groups or location types.
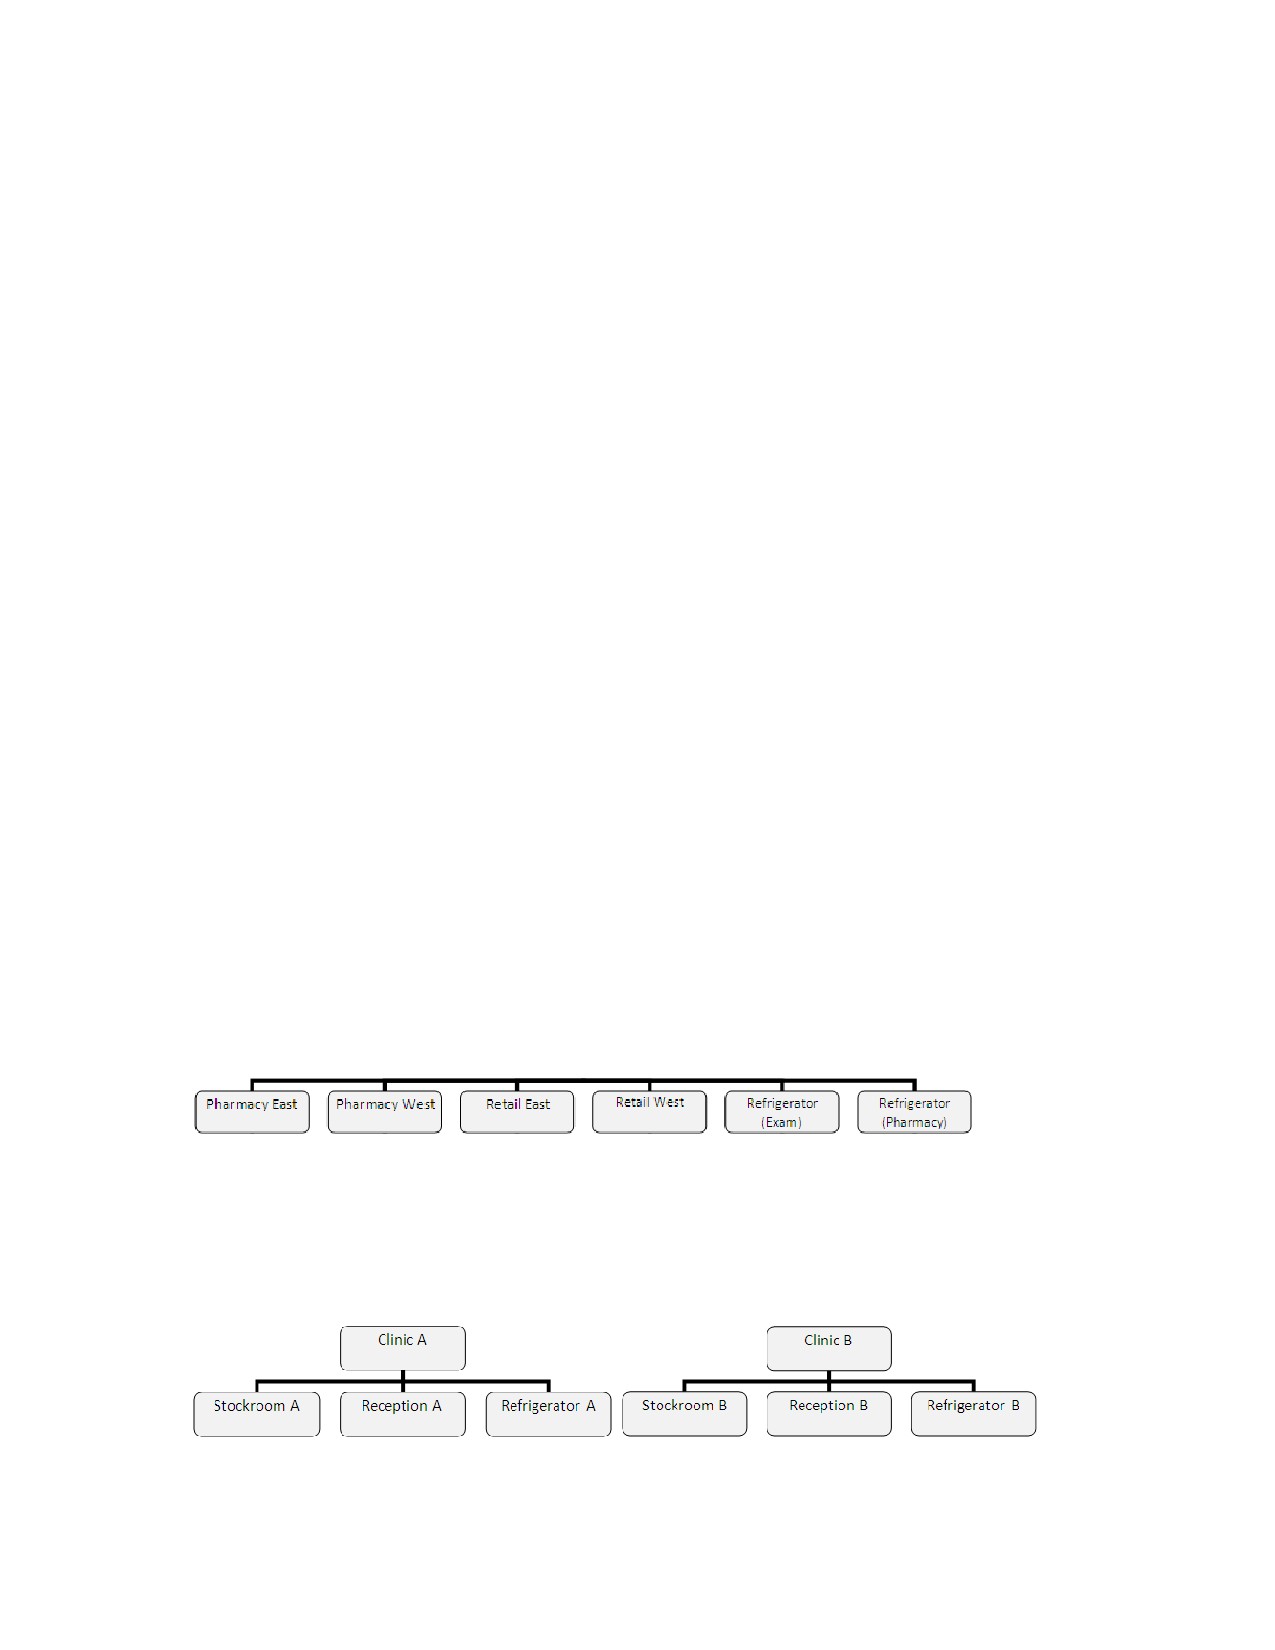
Example 2: Locations and Location Groups
In this example, the practice stores inventory items in multiple locations and uses location groups to
separate the two different clinic locations.
Location Groups
Locations
175
Chapter 9: Setting Up a Multiple Location Inventory System
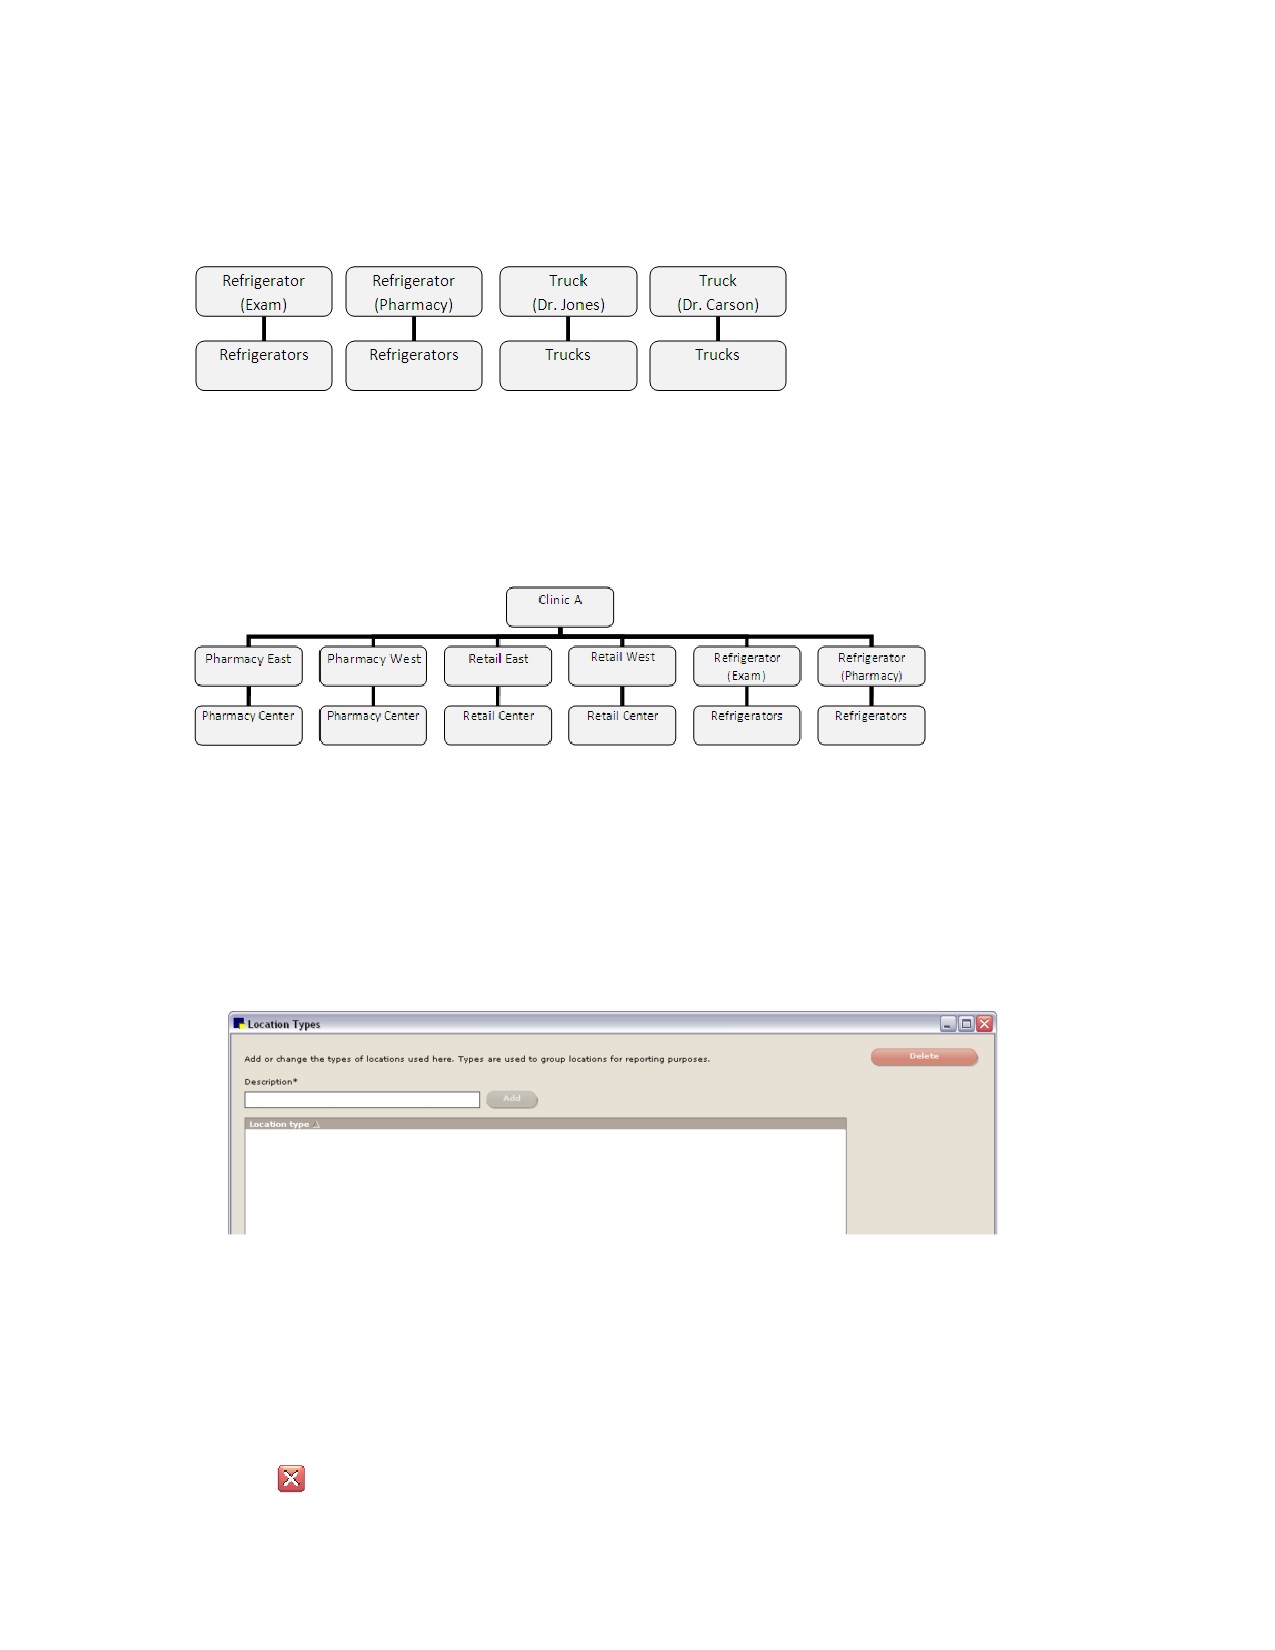
Example 3: Locations and Location Types
In this example, the practice stores inventory items in multiple locations and uses location types.
Locations
Location Types
Example 4: Locations, Location Groups and Location Types
In this example, the practice stores inventory items in multiple locations and uses location groups and
location types.
Location Group
Locations
Location Types
Setting Up Location Types
Location types are an optional inventory feature available only with a multiple location per item inventory
setup. Location types provide an additional way of defining inventory storage locations. See “Location
Groups, Locations, and Location Types” on page 175 for more information on location types.
To set up a location type:
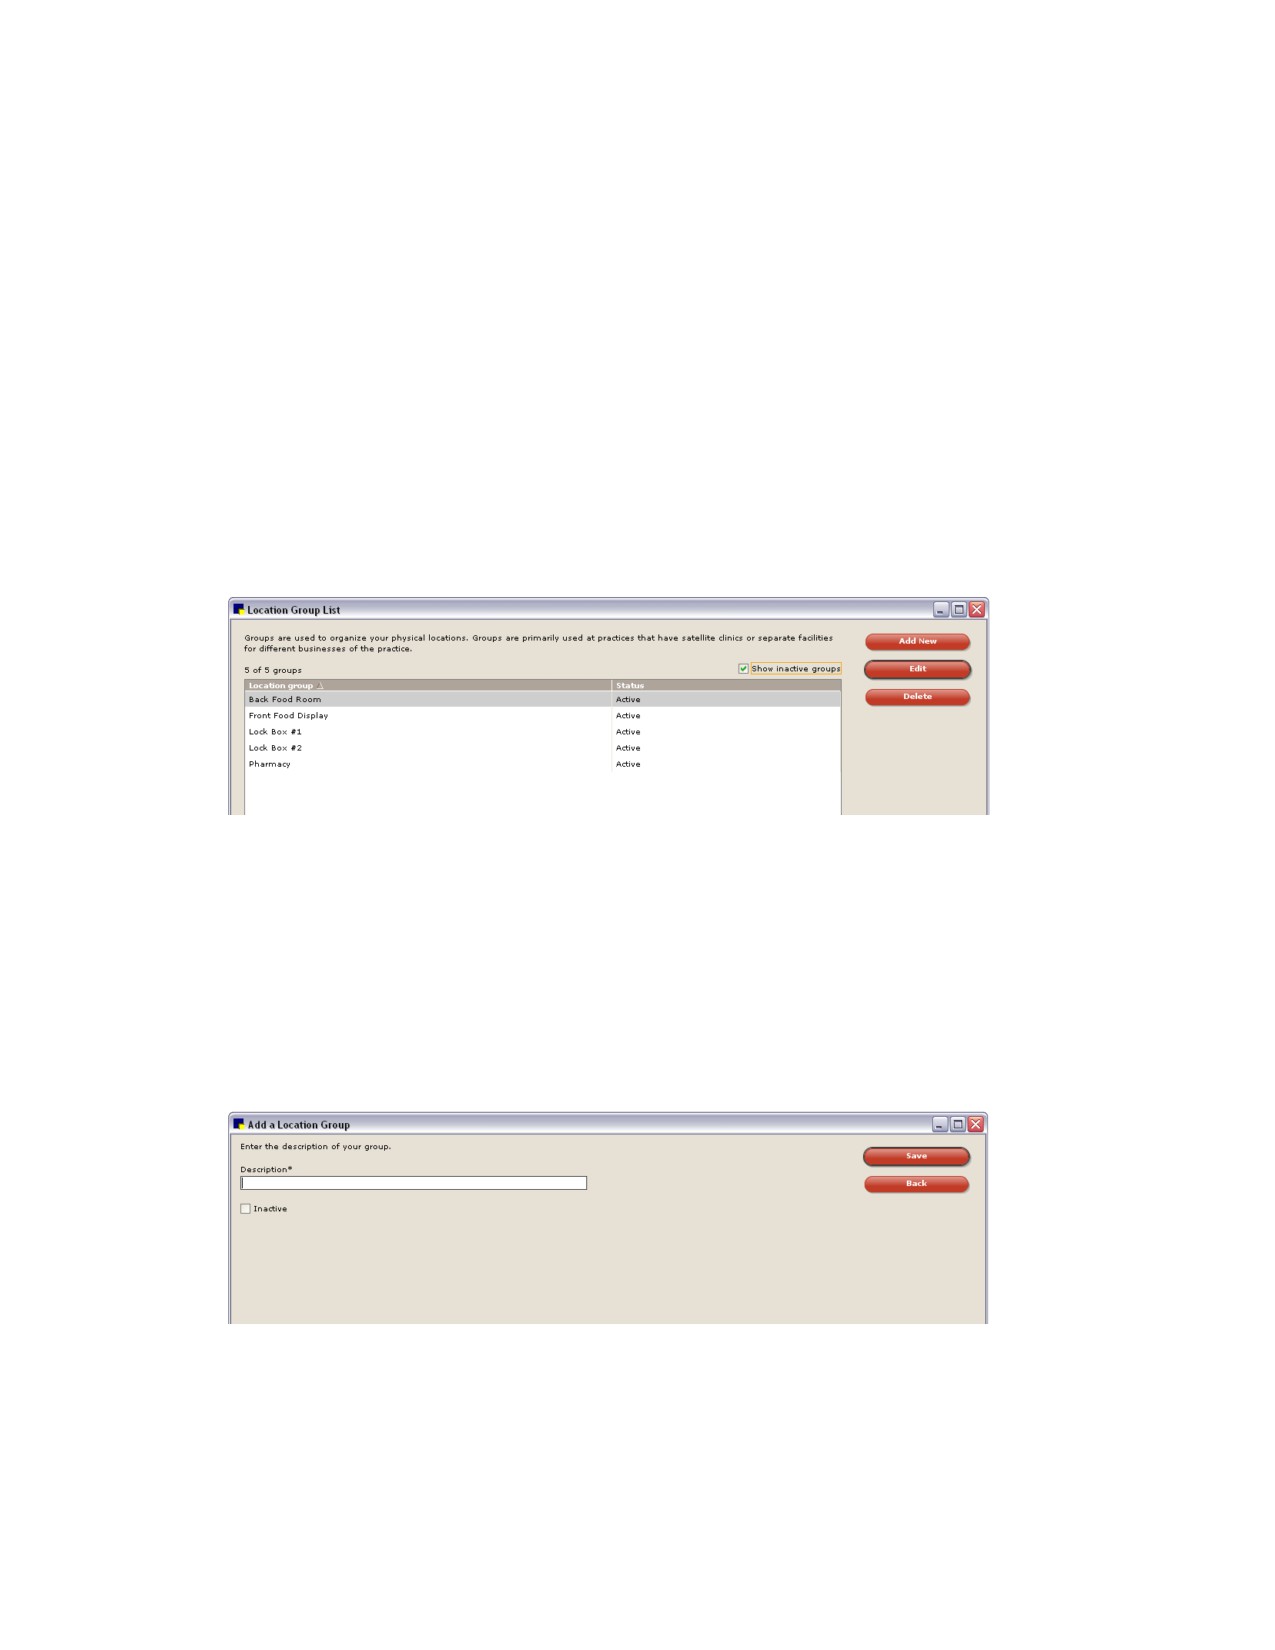
1. On the Inventory menu, select Location Types. The Location Types window appears.
Location Types window
2. In the Description text box, type a description for the type of location (e.g., Primary Storage,
Refrigerators, Supply Centers, etc.).
3. Click Add.
4. If an existing location type is no longer used by the practice, you can delete it by highlighting it in the
list and clicking Delete. (Note: You cannot delete a location type if it is assigned to a location.)
5. Click
to close.
176
Chapter 9: Setting Up a Multiple Location Inventory System
Setting Up Location Groups
Location groups are an optional inventory feature available only with a multiple location per item
inventory setup. Location groups are especially useful for practices that have satellite clinics or separate
facilities, where each clinic or facility can be designated as a separate location group. See “Location
Groups, Locations, and Location Types” on page 175 for more information on location groups.
After inventory groups are set up, inventory locations can be assigned to them. Note, however, that a
location may be part of only one location group.
Before You Begin
• Set up Practice and Workstation defaults for Inventory (see “Inventory Defaults” on page 109).
• Set up Staff defaults for Inventory (see “Staff Defaults for Inventory” on page 153).
• Set up Workstation defaults for Inventory (see “Workstation-All Defaults” on page 148).
To add or maintain location groups:
1. On the Inventory menu, select Location Groups. The Location Group List window appears.
Location Group List window
2. Do one of the following:
• To add a new location group, click Add New.
• To change an existing location group, select the group that you want to change and click Edit.
• To delete a location group, select the group that you want to delete and click Delete. (Note: You
cannot delete a location group if it is assigned to a location, order or Want List item.)
If you clicked Add New, or Edit, a window appears allowing you to add/edit the identifying
information for the location group.
Add a Location Group window
3. In the Description text box, type a brief description for the location group.
4. To inactivate the location group, select the Inactive check box.
5. When finished, click Save.
177
Chapter 9: Setting Up a Multiple Location Inventory System
6. Click Back to return to the Location Group List or click
to close.
Setting Up Locations for Multiple Location Inventory
In Cornerstone Inventory, locations are the physical places in your practice where you keep inventory
items. With multiple location inventory, you can set up multiple locations within your practice and track
inventory items by location (with one inventory item being stored in multiple locations). More than one
location can be set up by the practice in order to track inventory in specific areas within the practice, as
well as in satellite clinics or mobile units.
Examples of locations include room names, room numbers, shelf numbers, reception areas,
stockrooms, trucks, refrigerators, lock boxes, kennels, and controlled substance cabinets.
If you choose to set up multiple locations per inventory item, when orders are received or inventory is
adjusted, you must select a location for items for which you track quantity on hand.
A location can be assigned to a specific location group and may have multiple location types.
Note: At least one location is required if your practice wishes to track the quantity on hand of inventory
items.
To set up inventory locations:
1. On the Inventory menu, select Locations. The Locations List window appears.
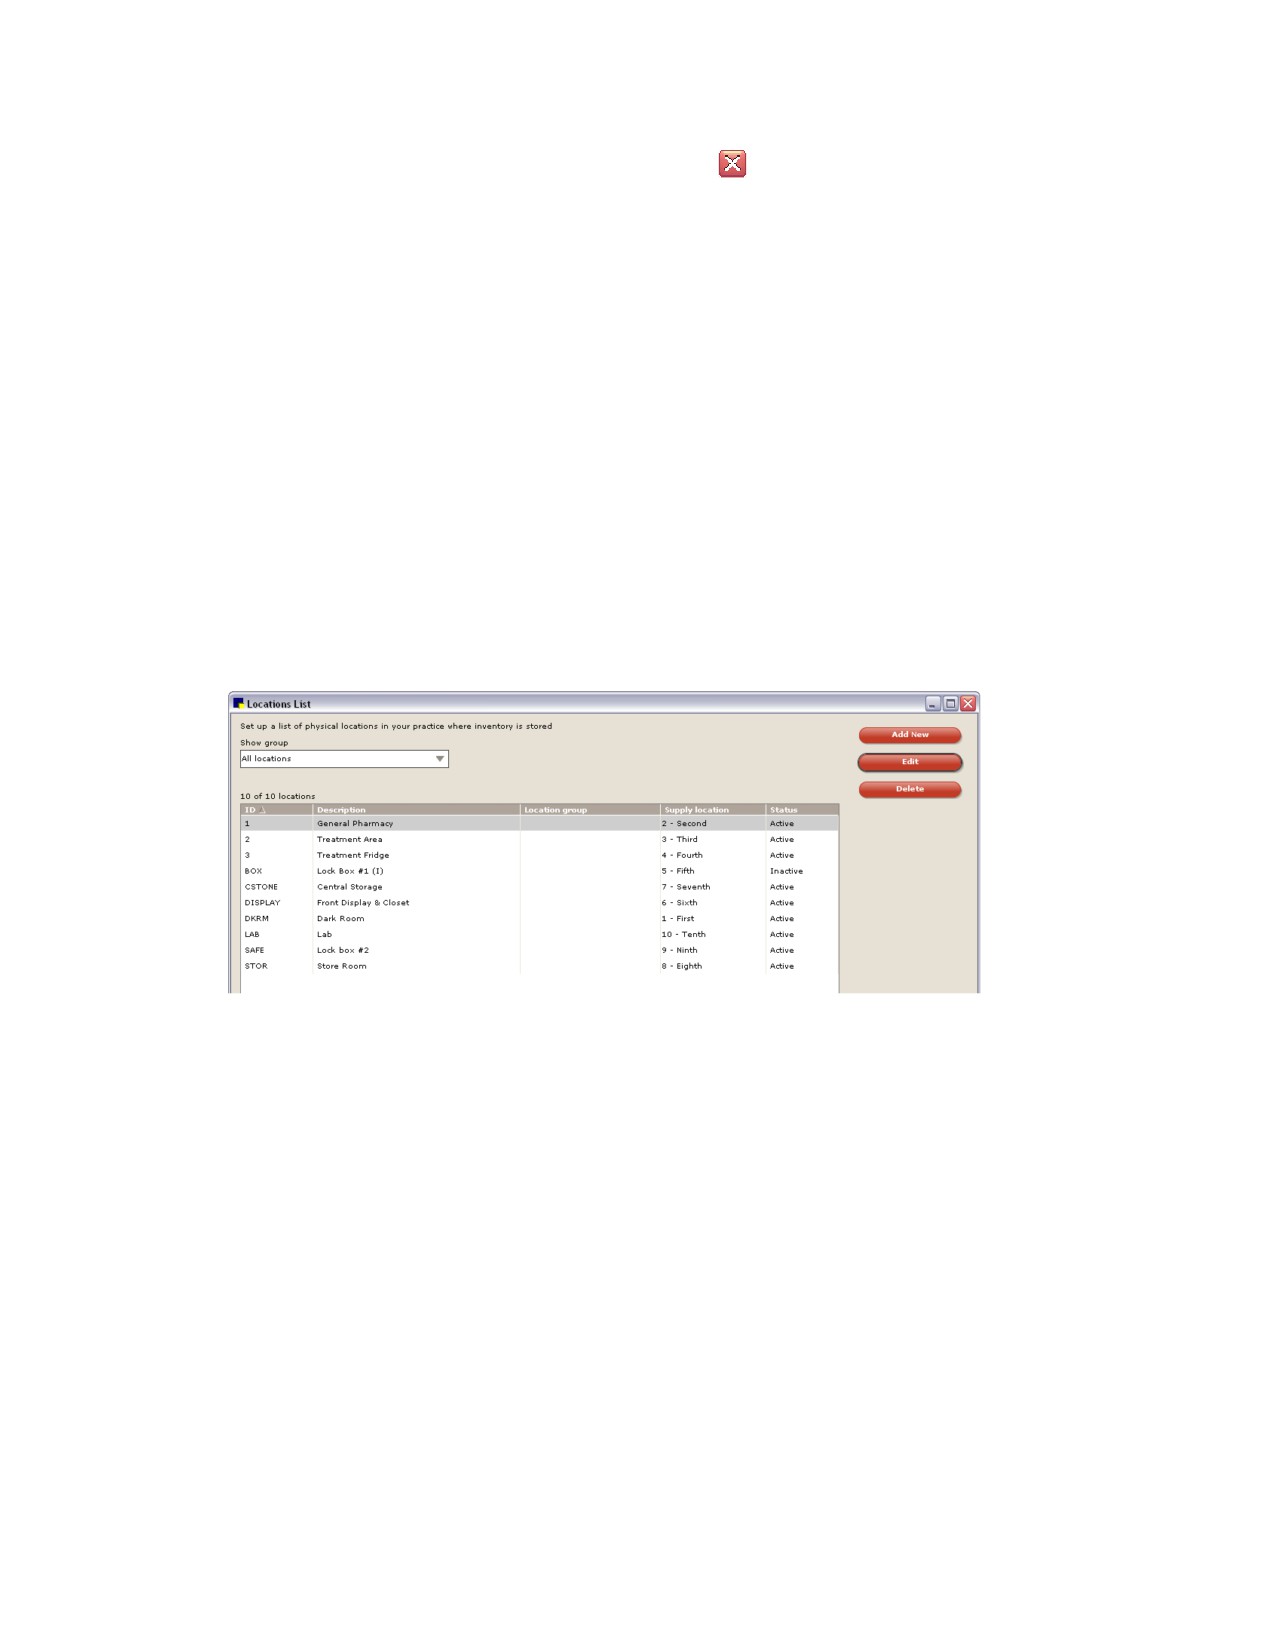
Locations List window
2. Do one of the following:
• To add a new location, click Add New.
• To change an existing location, select the location that you want to change and click Edit.
• To delete a location, select the location that you want to delete and click Delete. (Note: You
cannot delete a location if it is assigned to an invoice item or is part of purchase history.)
If you clicked Add New or Edit, a window appears allowing you to add/edit the identifying
information for the location.
178
Chapter 9: Setting Up a Multiple Location Inventory System
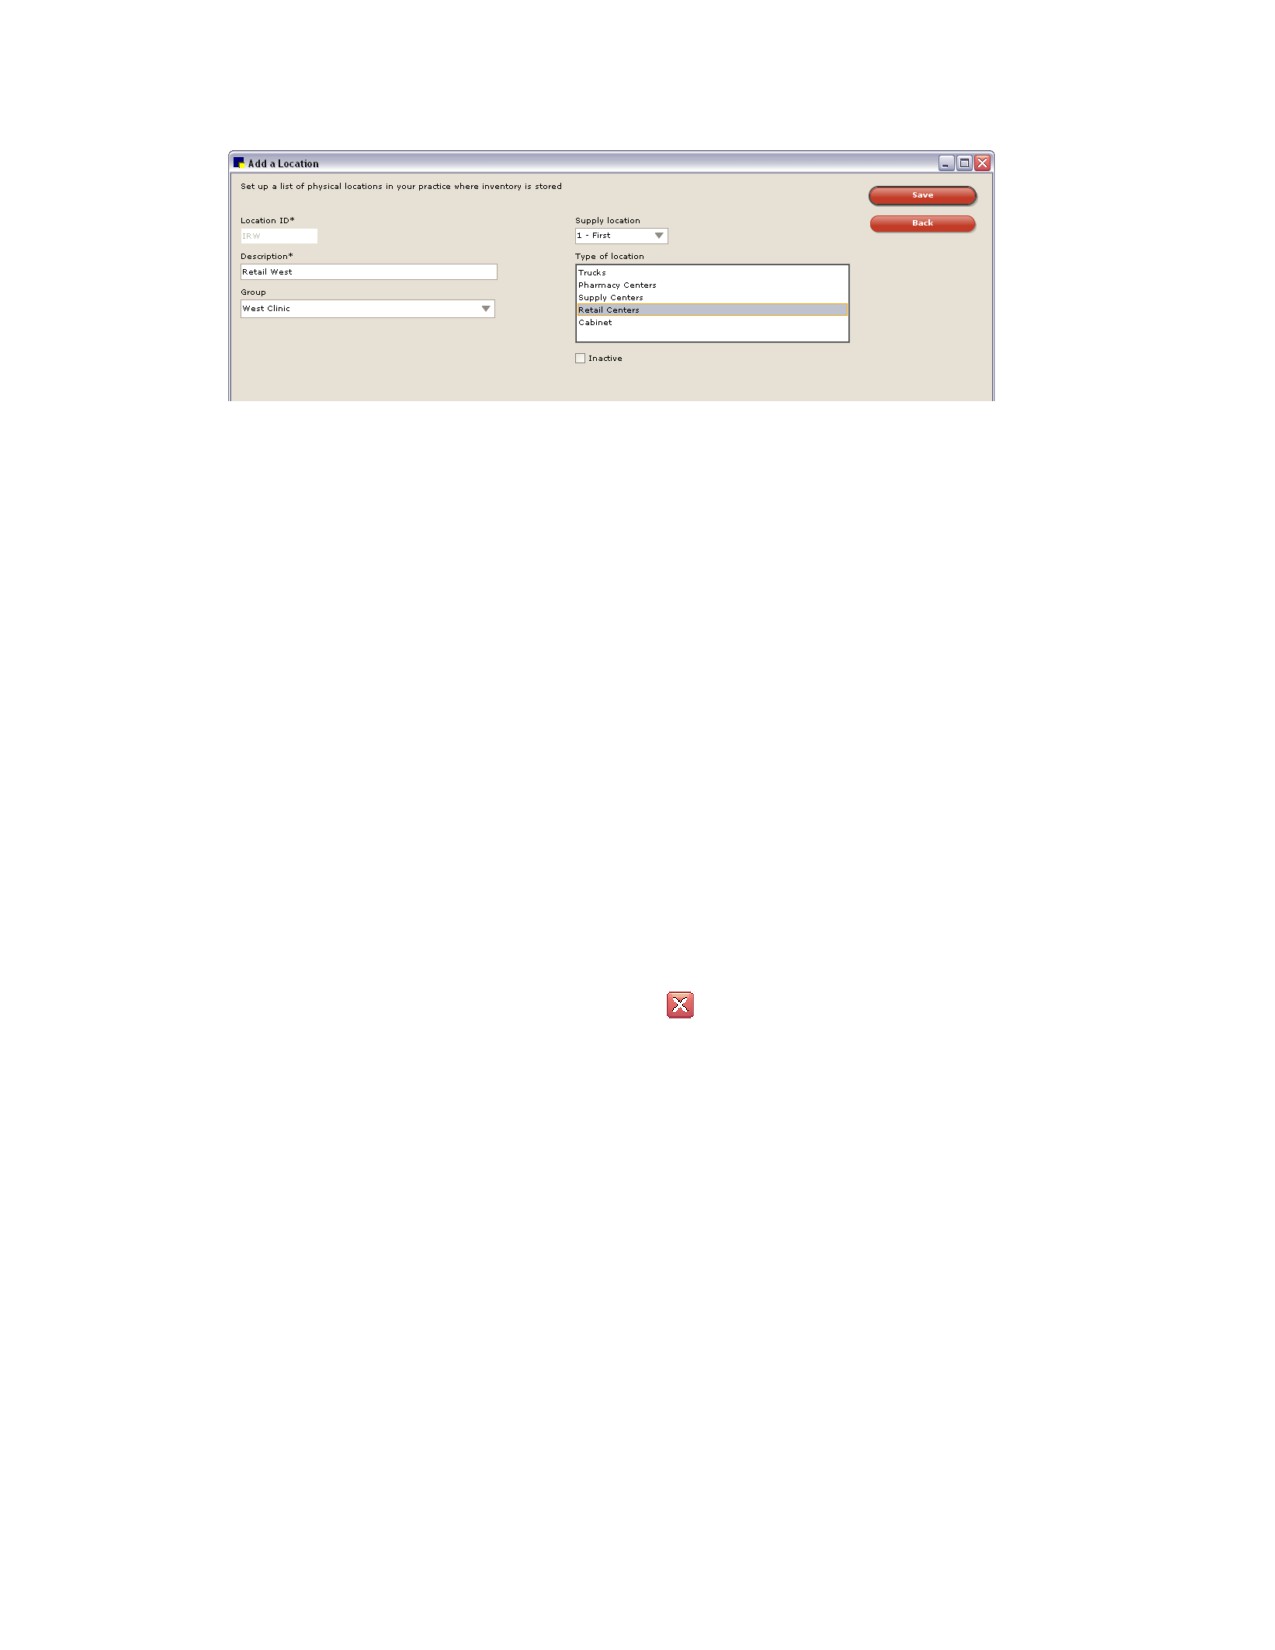
Add or edit a location
Note: Fields with an asterisk (*) next to them are required fields.
3. If adding a new location, in the Location ID text box, type a unique identification code to distinguish
this location from other locations in Cornerstone.
4. In the Description text box, type a name to describe the location.
5. If you are using location groups and you want to include this location in a group, select the specific
group this location should be assigned to from the Group drop-down list.
Tip: To set up location groups, see “Setting Up Location Groups” on page 177.
6. If this is a location from which you supply other locations, select the supply order for the location
(First, Second, etc.) from the Supply location drop-down list. For example, if the supply order for
this location is second, then staff would come to this location if the first supply location did not have
the needed item.
7. If you are using location types, in the Type of location list, highlight the applicable types that are
included in this location.
Tip: To set up location types, see “Setting Up Location Types” on page 176.
8. If this location is no longer used by the practice, select the Inactive check box to inactivate it.
9. When finished, click Save.
10. Click Back to return to the Locations List or click
to close.
179

Chapter 10: Setting Up Your Invoice Items
Overview
Invoice items are the service and inventory items that you sell. As you invoice these items, you will:
• Add the items to the patient’s medical history
• Add the invoice amount to the client’s A/R balance (for credit accounts)
• Print item-specific departing instructions on the invoice
• Add reminders to the patient’s medical history
• Take the items out of your physical inventory
Invoice Item Terminology
Before you begin setting up your invoice items, you should understand the terminology used in the
program.
Term
Definition
Usage Tax
Tax applied when the item is used internally.
Sell UOM
The unit of measure used when invoicing.
Buy UOM
The unit of measure used when purchasing the item from the vendor.
Buy/Sell Ratio
The ratio that defines how many sell units are in each unit purchased from the
vendor. (For example, 1 case to 24 cans.)
Quantity on Hand (QOH)
The current physical inventory of the item (using the Sell UOM).
Average Cost
The average cost you pay the vendor for the item for each unit you sell (using
the Sell UOM). The total cost is calculated by multiplying the average cost by
the quantity on hand.
Markup (dollar amount or
The amount or percentage to mark the item up when the vendor increases their
percentage)
cost to you.
Reorder Point
The stock level (using the Sell UOM) at which the item appears as a suggested
item to order.
Reorder Quantity
The amount (using the Buy UOM) Cornerstone* Inventory automatically enters
when you place an order for this item. (You can change this number in the
order itself.)
Overstock Point
The stock level you do not want to exceed. This number must be greater than
the Reorder Point plus the Reorder Quantity (using the Sell UOM).
Primary Vendor
The main supplier for this product.
Inventory Calculations
The IDEXX Cornerstone* Practice Management System uses the following calculations for determining
inventory quantities, costs, and prices.
Place Order
Buy UOM
New Qty On Order = Qty Ordered + Current Qty On Order
Sell UOM
New Qty On Order = Qty Ordered / Sell Ratio + Current Qty On Order
180
Chapter 10: Setting Up Your Invoice Items
Backordered Items
Buy UOM
New Qty On Order = Qty Back ordered + Current Qty On Order
New Qty On Backorder = Qty Back ordered + Current On Back order
Sell UOM
New Qty On Order = Quantity Back ordered / Sell Ratio + Current Qty On Order
New Qty On Backorder = Qty Back ordered / Sell Ratio + Current Qty On Back order
Return to Vendor
Buy UOM
New QOH = Current QOH - (Qty Returned * Sell Ratio)
Total Cost = If [Old Total Cost - (Qty Returned * Cost Returned)] < 0, then 0
Total Cost = If [Old Total Cost - (Qty Returned * Cost Returned)] > 0, then Old Total
Cost - (Qty Returned * Cost Returned)
Sell UOM
New QOH = Current QOH - Qty Returned
Total Cost = If [Old Total Cost - (Qty Returned * Cost Returned)] < 0, then 0
Total Cost = If [Old Total Cost - (Qty Returned * Cost Returned)] > 0, then Old Total
Cost - (Qty Returned * Cost Returned)
Receive Order
Buy UOM
On Hand = Current QOH + (Qty Received * Sell Ratio)
Total Cost = Current Total Cost + [(Qty Rec'd * Sell Ratio) * (Rec'd Cost / Sell Ratio)]
If QOH < 0 = [Current Total Cost + (Qty Rec'd * Sell Ratio)] * (Rec'd Cost / Sell
Ratio)
On Order = Current Qty On Order - Qty Rec'd
On Backorder = Current Qty On Back order - Qty Rec'd
Sell UOM
On Hand = Current QOH = Qty Received
Total Cost = Current Total Cost + (Qty Rec'd * Rec'd Cost);
If QOH < 0 = (Current Total Cost + Qty Rec'd) * Rec'd Cost
On Order = Current Qty On Order - (Qty Rec'd / Sell Ratio)
On Backorder = Current Qty On Back order - (Qty Rec'd / Sell Ratio)
Item Markup
If Auto Calculate is checked:
$ (If received using the Sell UOM)
New Price = Unit Cost on Receipt + Markup
$ (If received using the Buy UOM)
New Price = (Unit Cost on Receipt / Sell Ratio) + Markup
% (Sell UOM)
New Price = (Unit Cost on Receipt * Markup) + Unit Cost on
Receipt
% (Buy UOM)
New Price = [(Unit Cost on Receipt / Sell Ratio) * Markup] +
(Unit Cost on Receipt / Sell Ratio)
All calculations are rounded up to the Round To value.
181