IDEXX Cornerstone. Administrator’s Manual (8.3 NEXT version 8.3.6) - page 4
Chapter 4: Setting Practice and Workstation Defaults
5.
Select the Assign cage numbers check box to automatically assign cages when making or
checking in reservations. If this option is selected, the system will not let you check in a reservation
without first assigning a cage number.
Note: If you select this option and pets are already checked in for boarding, the system displays a
list of the checked-in pets and prompts you to enter valid cage numbers for them.
6.
In the Hotel Style check-in time/check-out time text boxes, type the default check-in and check-
out times to use when making hotel-style boarding reservations.
Tip: Depending on the type of reservation (hotel style or daycare style), the default check-in (or
check-out) time is automatically placed in the Arrival text box (or Departure text box) on the
Reservations window when a reservation is made. You can enter a different time or press TAB to
accept the default time.
7.
In the Daycare Style check-in time/check-out time text boxes, type the default check-in and
check-out times to use when making daycare-style boarding reservations.
8.
In the How to bill for multiple pets area, select one of the following fee options:
• Select Use primary fee for first pet if none of your cages are shared or if cages are shared but
you want to charge only one fee for the cage and not assess a separate fee for each pet sharing
the cage. For example, if this option is selected and the cage is shared, the same price is
charged for cage occupancy whether one pet or five pets occupy the cage.
• Select Use primary fee for first, multiple fee for all others if cages are shared and you want to
charge a separate fee for the first pet and a different fee for additional pets that occupy a cage.
• Select Use multiple fee for each pet if cages are shared and you want to charge the same fee
for each pet occupying the cage.
Tip: You can automatically link an invoice item to a cage type with the fee to charge for cage
occupancy, depending on whether the fee charged is a primary fee, a multiple fee, or both. Then
each time a reservation is made for a cage, the invoice item and its price are automatically included
on the reservation. If necessary, you can change this invoice item and price.
9.
In the Round down reservation hourly charge area, select the time increment that you want to round
down to (15, 30, or 60 minutes). These options apply only to reservation types with the Number of
times to charge for cage set as Once each hour.
¾ For example, if you choose to round down to 15 minutes, the client is charged for 15 minutes
only after the entire 15 minutes has passed. So if a pet is checked in at 1:00 p.m. and checked
out at 6:12 p.m. the same day, the charges will be calculated for 5 hours (not 5.25 hours).
10. In the Grooming appointment area, do the following:
a. From the Staff classification drop-down list, select the default staff classification to use for
making grooming appointments.
b. From the Reason for visit drop-down list, select the default reason for visit to use for making
grooming appointments.
c. In the Check rooms to use for grooming table, select the check box in the Use For Grooming
column for each room you use for grooming appointments. These rooms are used when
searching for available grooming appointments.
11. Click Apply to save your changes and continue setting defaults, or click OK to save your changes
and close the window.
92
Chapter 4: Setting Practice and Workstation Defaults
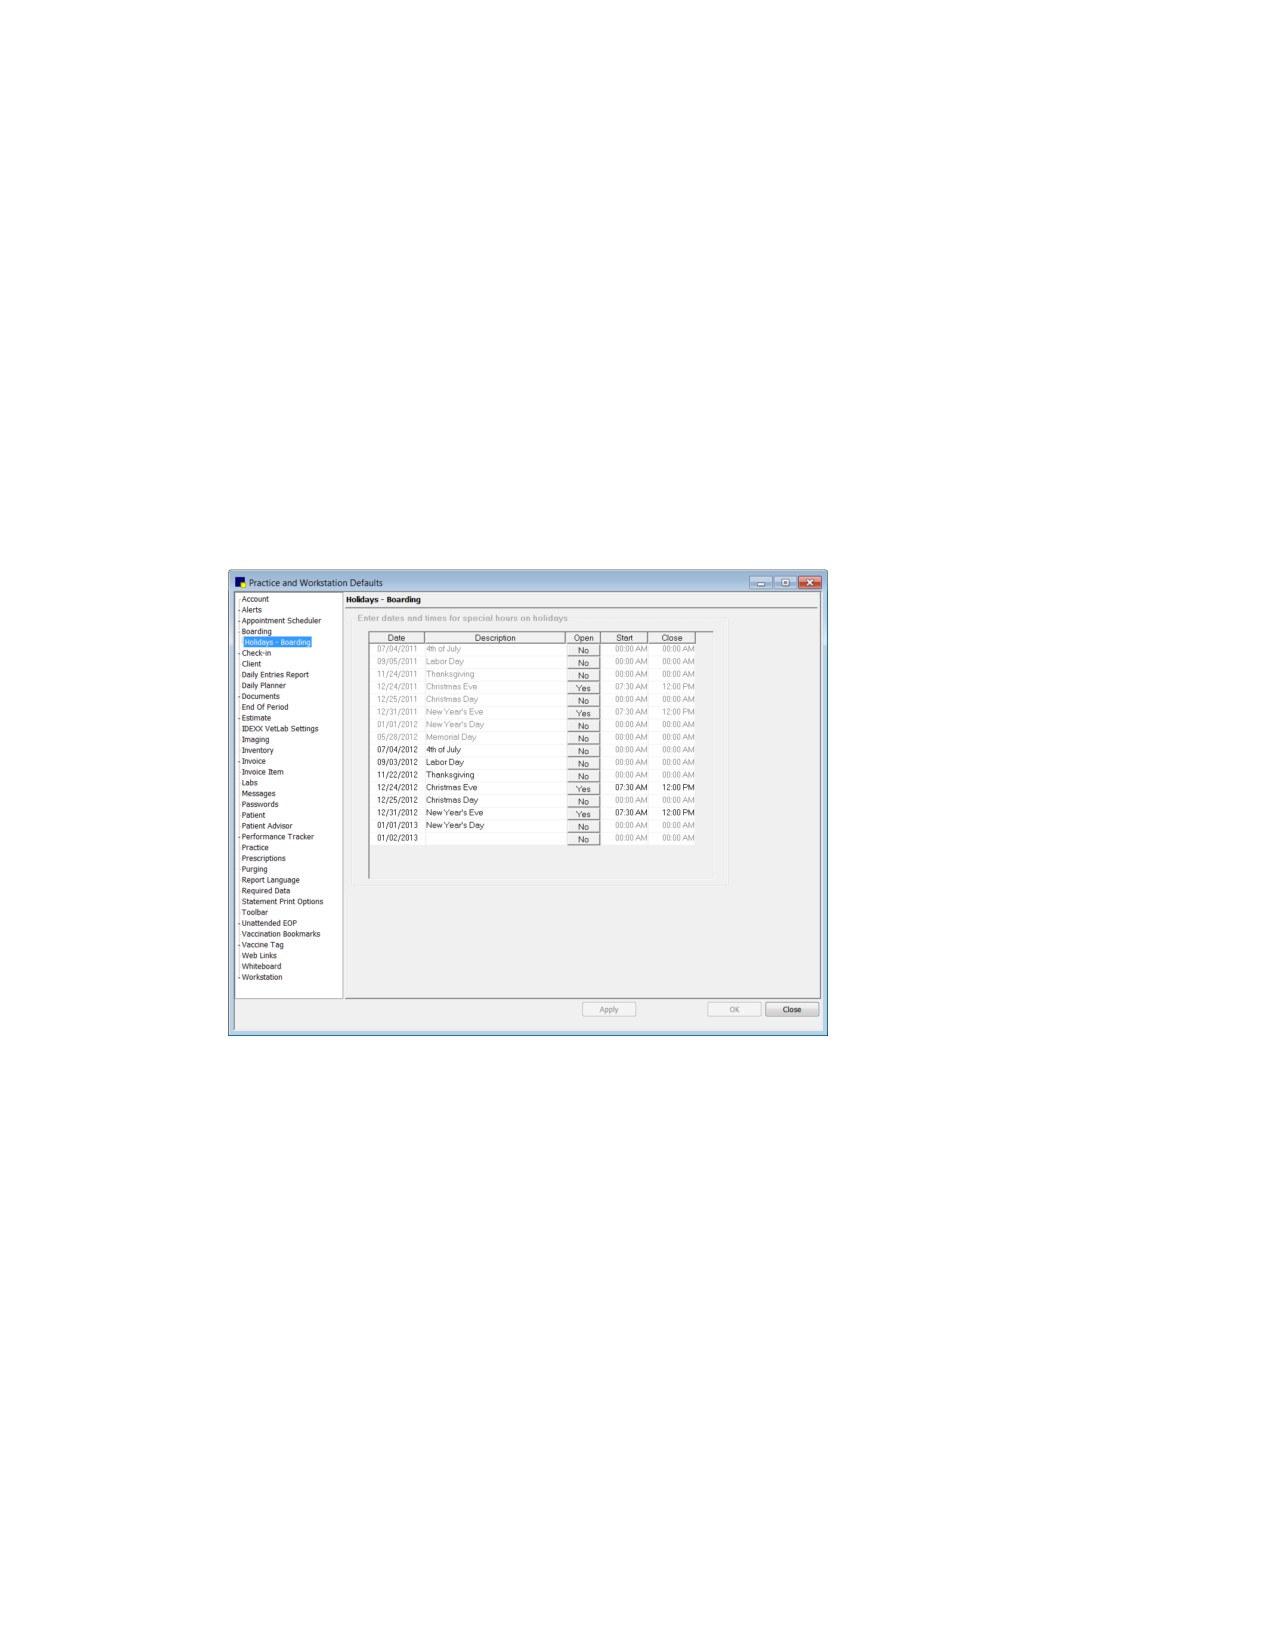
Holidays-Boarding Defaults
Holidays-Boarding defaults indicate when the boarding facility is staffed to provide service to clients
independently of the veterinary practice. Set up boarding facility holidays so you can schedule boarding
check-in/out on holidays when staff are available and avoid scheduling on holidays when staff members
are not on duty.
Tip: Boarding holidays must be set up specifically for each year; they do not automatically carry over to
the next year. If you use a 5-year calendar to set up holidays in advance, you will not have to remember
to do this every year.
To set the Holidays-Boarding defaults:
1. On the Controls menu, select Defaults > Practice and Workstation. The Practice and Workstation
Defaults window appears.
2. In the navigation pane, click Boarding to expand its subproperties, and then click the Holidays-
Boarding subproperty. The Holidays-Boarding configuration pane appears.
Holidays-Boarding defaults
3. In the Date column, type the date of the holiday or press F2 to use the Calendar tool to choose a
date, and then press TAB.
4. In the Description column, type a description (name) for the holiday.
5. If the boarding facility is open for check-in/out on a holiday, click No in the Open column for that
holiday to switch it to Yes. The standard office hours for that date (set up in Appointment Scheduler)
appear in the Start and Close columns.
6. If the boarding facility start and close times are different from the practice hours for that date, type
the times in the Start and Close columns.
Note: To remove a holiday from the list, select a field in the holiday line that you want to delete and
press CTRL+D.
7. Click Apply to save your changes and continue setting defaults, or click OK to save your changes
and close the window.
93
Chapter 4: Setting Practice and Workstation Defaults
Check-in Defaults
Check-in defaults include the information to print on check-in reports, as well as the most commonly
used check-in reason for visit, staff ID, and room.
Before You Begin
• Set up reasons for visit (Controls > Reason For Visit).
• Enter staff members (Controls > Staff).
• Set up rooms (Lists > Room).
To set the Check-in defaults:
1. On the Controls menu, select Defaults > Practice and Workstation. The Practice and Workstation
Defaults window appears.
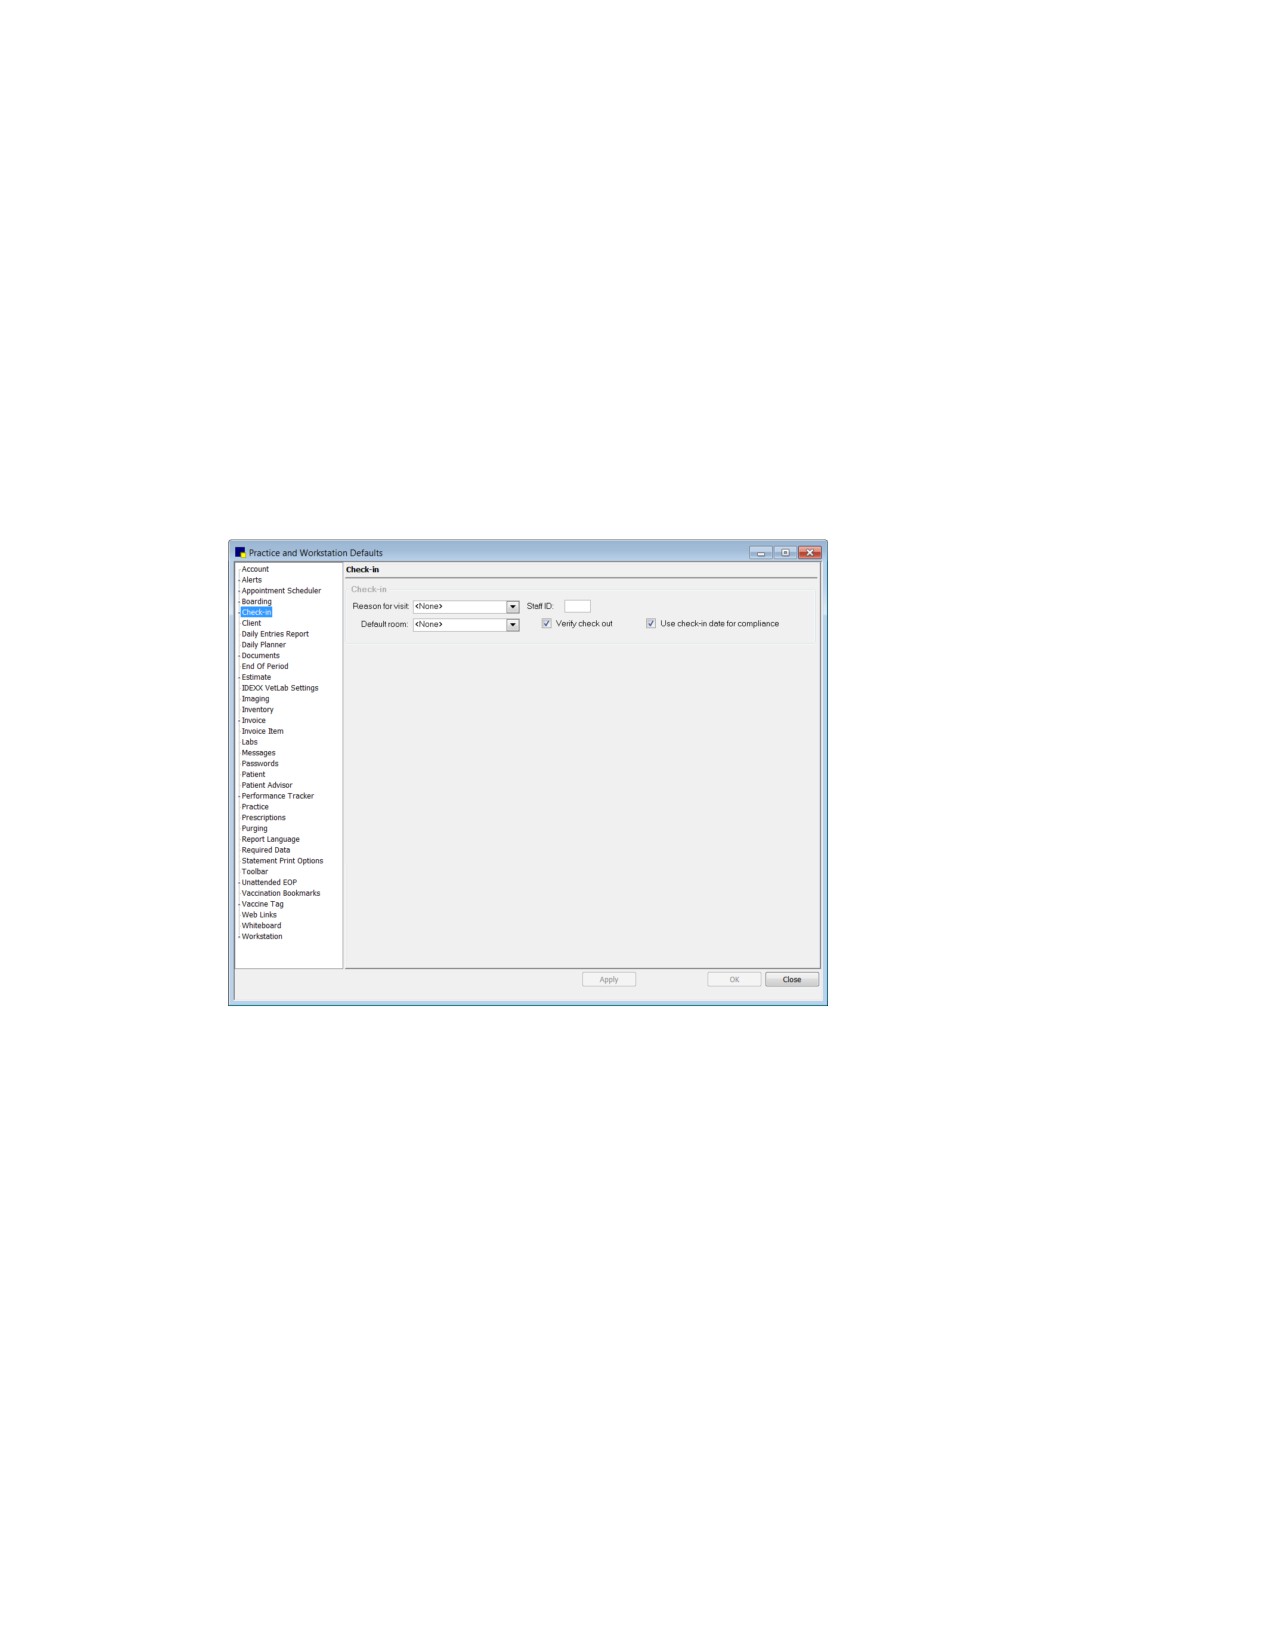
2. In the navigation pane, click Check-in. The Check-in configuration pane appears.
Check-in defaults
3. From the Reason for visit drop-down list, select the reason for visit that applies to the majority of
your patients (or select <None> if you don’t want a default reason).
4. In the Staff ID text box, type the staff ID of the staff member who sees most of the patients or press
F2 to select a staff member from the Staff List. (Leave the Staff ID blank if you do not want to specify
a default staff member for check-in.)
5. From the Default room drop-down list, select the room where most patients are received (or select
<None> if you don’t want a default room).
6. Select the Verify check out check box to have the software prompt: “Are you sure you want to
check out?” when you click Check-out from the Census List or the Check-in window.
7. If your practice wants to count only compliance for patients that were checked into the practice
through Cornerstone, click the Use check-in date for compliance check box.
8. Click Apply to save your changes and continue setting defaults, or click OK to save your changes
and close the window.
94
Chapter 4: Setting Practice and Workstation Defaults
Check-in Print Options Defaults
The Check-in Print Options defaults allow you to set printing preferences and specify the types of
information to print on the Check-In Report.
To set the Check-in Print Options defaults:
1. On the Controls menu, select Defaults > Practice and Workstation. The Practice and Workstation
Defaults window appears.
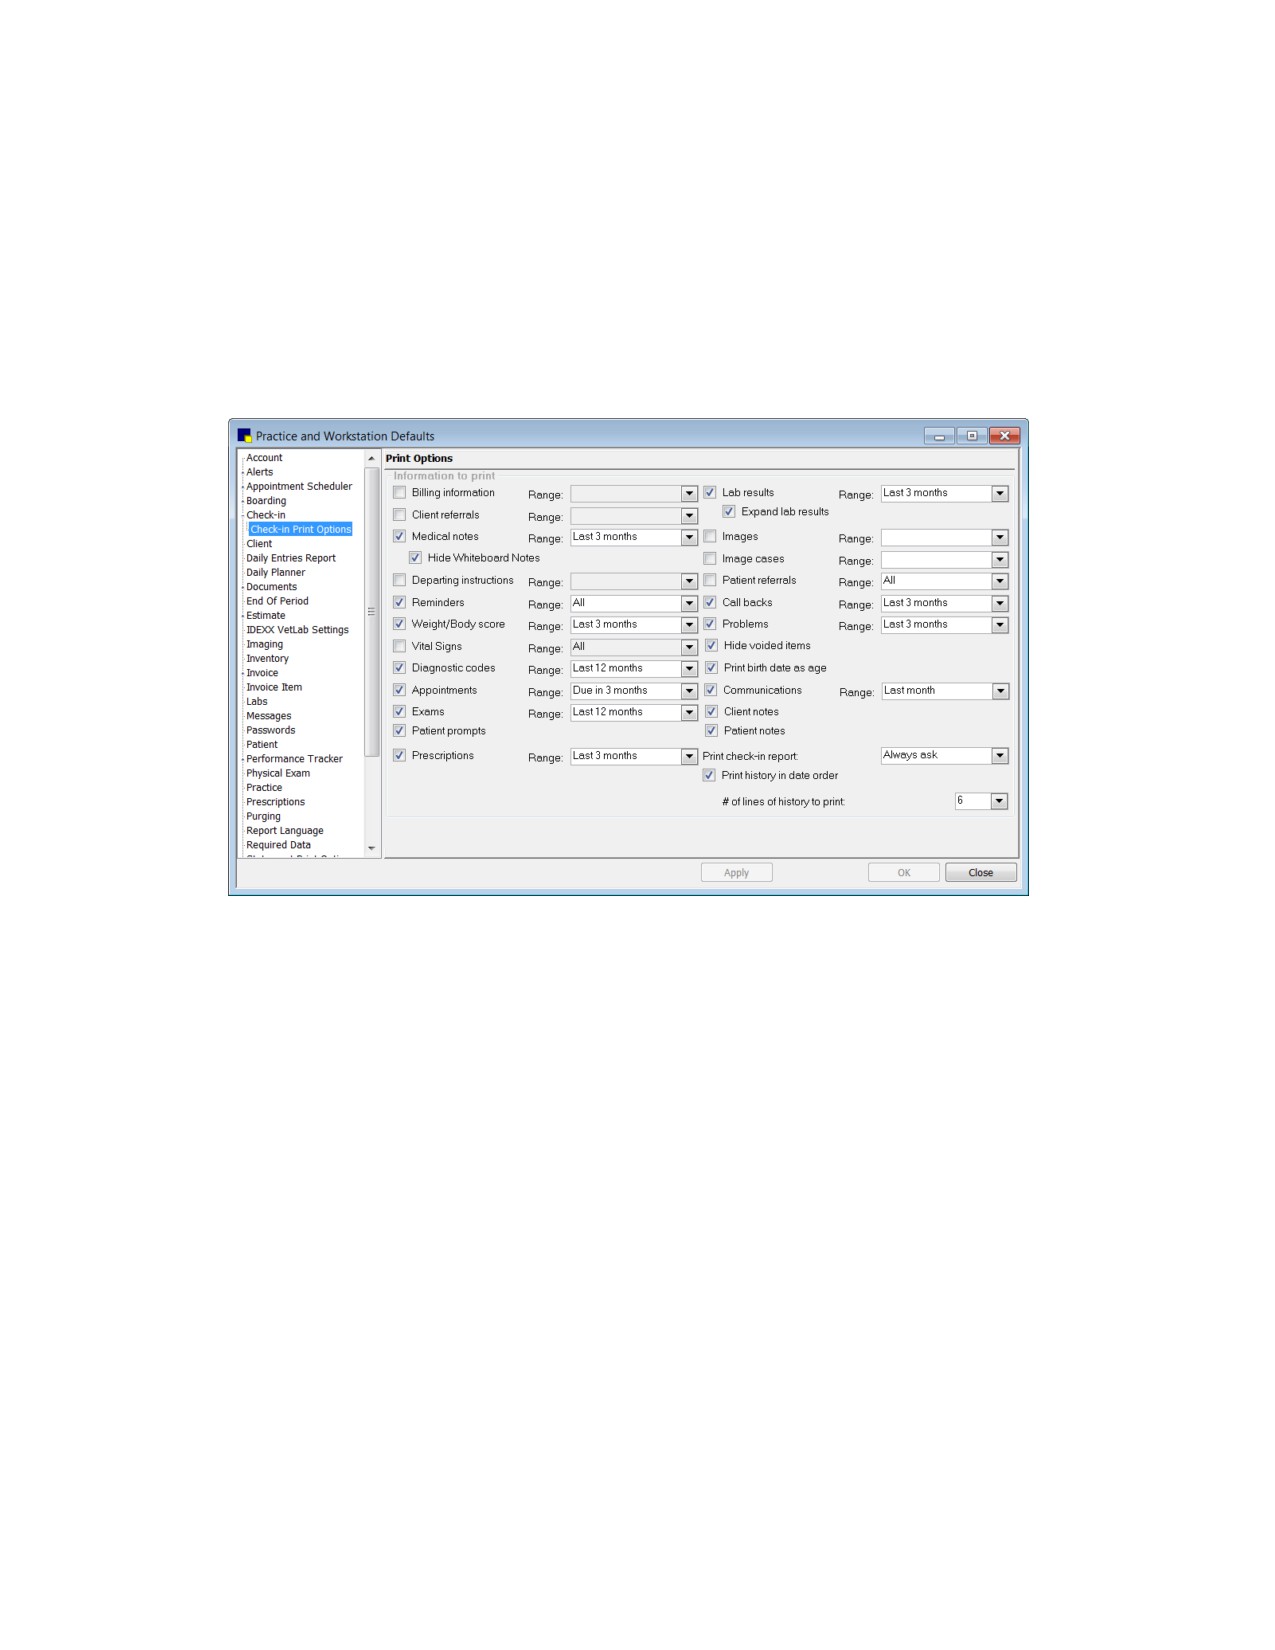
2. In the navigation pane, click Check-in to expand its subproperties, and then click the Check-in
Print Options subproperty. The Print Options configuration pane appears.
Check-in Print Options defaults
3. In the Information to print area, clear the check boxes of any information that you do not want to print
on the Check-In Report (for example, billing messages). A check mark in a check box means that
the corresponding item will print.
4. In the Information to print area, if you do not want all information for a selected item to print, select a
time range from the drop-down list.
Note: The Exams (Patient Advisor exams), Lab results, and Image cases check boxes are
applicable only if your practice has purchased the corresponding Cornerstone modules.
5. To exclude voided items on the Check-In Report, select the Hide voided items check box.
6. To print the patient’s birth date as the age (such as 2 yrs, 3 mths, 1 day), select the Print birth date
as age check box.
7. From the Print check-in report drop-down list, select one of the following options to set the default
behavior for printing a Check-In Report when a patient is checked in:
• Always ask displays a message box asking if you want to print the report.
• Always print automatically prints the report.
• Never print does nothing (no report prints).
95
Chapter 4: Setting Practice and Workstation Defaults
8. If you want to print patient history in date order on the Check-In Report, select the Print history in
date order check box. If this option is selected, you also need to specify the # of lines of history to
print (default number of patient history lines to print) on the Check-In Report.
9. Click Apply to save your changes and continue setting defaults, or click OK to save your changes
and close the window.
Client Defaults
Use Client defaults to set up the selections you use most frequently when setting up a new client’s
information or accounts receivable (A/R) information. Setting up Client defaults saves you time when you
add new clients.
Before You Begin
• Practices in a network environment should devise a system for entering new clients. If you
choose to assign your own IDs, either specify which users enter new clients or specify ranges of
IDs to use at specific workstations.
• Set up client classifications (Controls > Classifications > Client tab).
• Set up credit codes (Controls > Credit Codes).
• Set up postal codes (Lists > Postal Codes).
• If your practice uses CareCredit®, set up client user-defined prompts (Controls > User Defined
Prompts > Client tab).
To set the Client defaults:
1. On the Controls menu, select Defaults > Practice and Workstation. The Practice and Workstation
Defaults window appears.
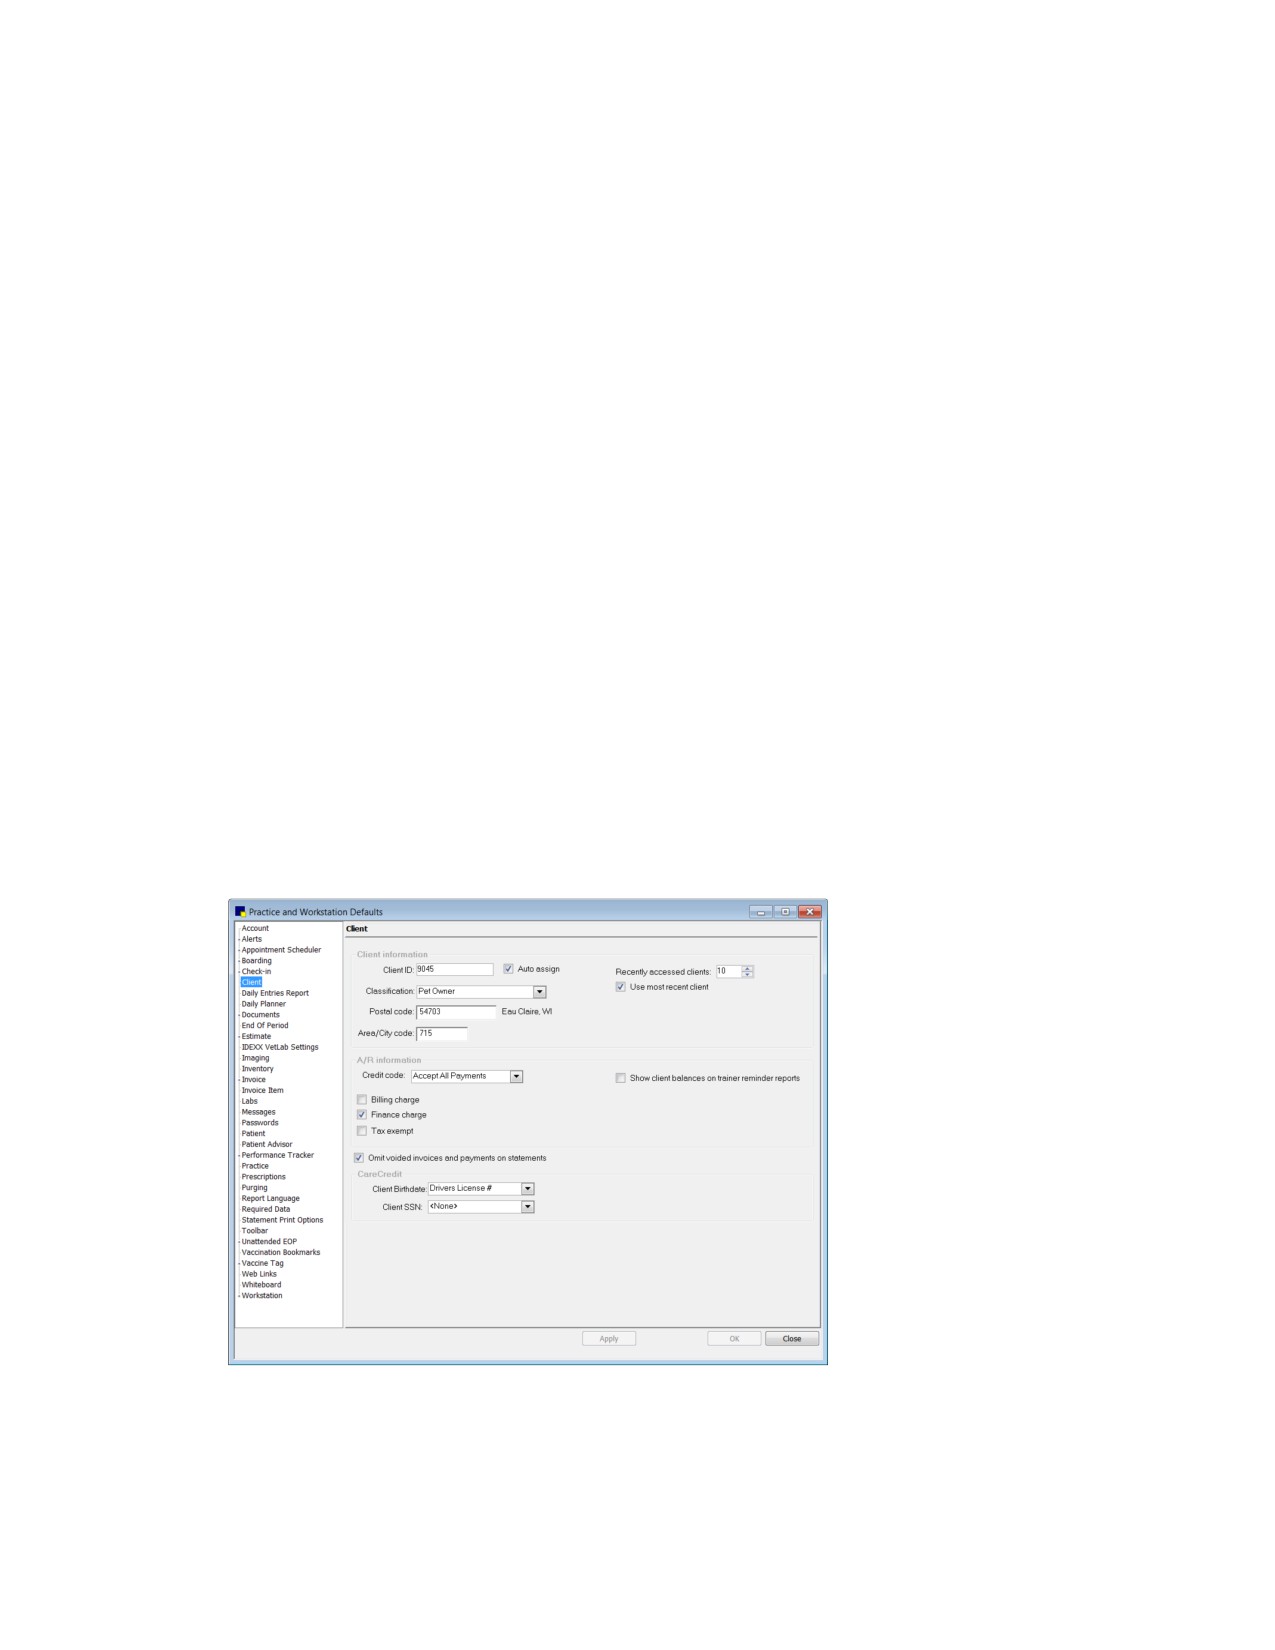
2. In the navigation pane, click Client. The Client configuration pane appears.
Client defaults
3. In the Client information area, do the following:
96
Chapter 4: Setting Practice and Workstation Defaults
a. In the Client ID text box, type the beginning client ID. You can use both letters and numbers;
however, only numeric client IDs are automatically assigned.
Note: The Cornerstone system uses an alphanumeric sorting process that allows you to use
alphanumeric IDs. This means that numbers are treated as letters when they are sorted (like a
dictionary). Numbers do not appear to be sorted “numerically.” The ID “10” appears after “1”
and before “2.” If you want a “numerical” sort, you must start your IDs at a large enough number
that Cornerstone will not have to add another digit. For example, setting the beginning ID at
1,000 gives you 8,999 IDs before Cornerstone adds another digit (at 10,000).
b. Select the Auto assign check box if you want ID numbers to be generated automatically when
setting up new clients.
c. From the Classification drop-down list, select the client classification used most often (or select
<None> if you don’t want a default classification).
d. In the Recently accessed clients text box, enter the number of clients (up to 99) you want
Cornerstone to remember. The recent clients appear first when you press F2 to select a client
from the Client List. See “Chapter 1: Getting Started with Cornerstone” in the Cornerstone User’s
Manual for information on using recent clients.
e. Select the Use most recent client check box to display the client whose record was last open
in any of these windows: estimate, invoice, correspondence, prescriptions, lab requests, and
client account.
f.
In the Postal code and Area/City code text boxes, type the postal code and area or city code
to appear by default in Client Information when setting up new clients.
4.
In the A/R information area, do the following:
a. From the Credit code drop-down list, select the credit code used most often (or select
<None> if you do not want a default credit code).
b. Select the applicable check boxes (Billing charge, Finance charge, and Tax exempt) for A/R
defaults.
c. Select the Show client balances on trainer reminder groups check box if you want to include
account balances on trainer reminder groups.
5.
If you would like to omit voided invoices when printing monthly statements and invoices, select the
Omit voided invoices and payments on statements check box. (If necessary, you can override
this setting at statement time on the Statements and Monthly Invoices dialog box.)
Note: If Omit voided invoices… is selected, note that a voided invoice is omitted only if the original
invoice is also part of the current statement. If the original invoice was included in a prior Month-End
period that is not selected, the voided invoice is included in the current statement (regardless of the
Omit voided invoices… setting).
6.
CareCredit users only: In the CareCredit area, select settings from the Client Birthdate and Client
SSN drop-down lists, if applicable. (You can set up these fields in Controls > User Defined
Prompts, on the Client tab.)
7.
Click Apply to save your changes and continue setting defaults, or click OK to save your changes
and close the window.
97
Chapter 4: Setting Practice and Workstation Defaults
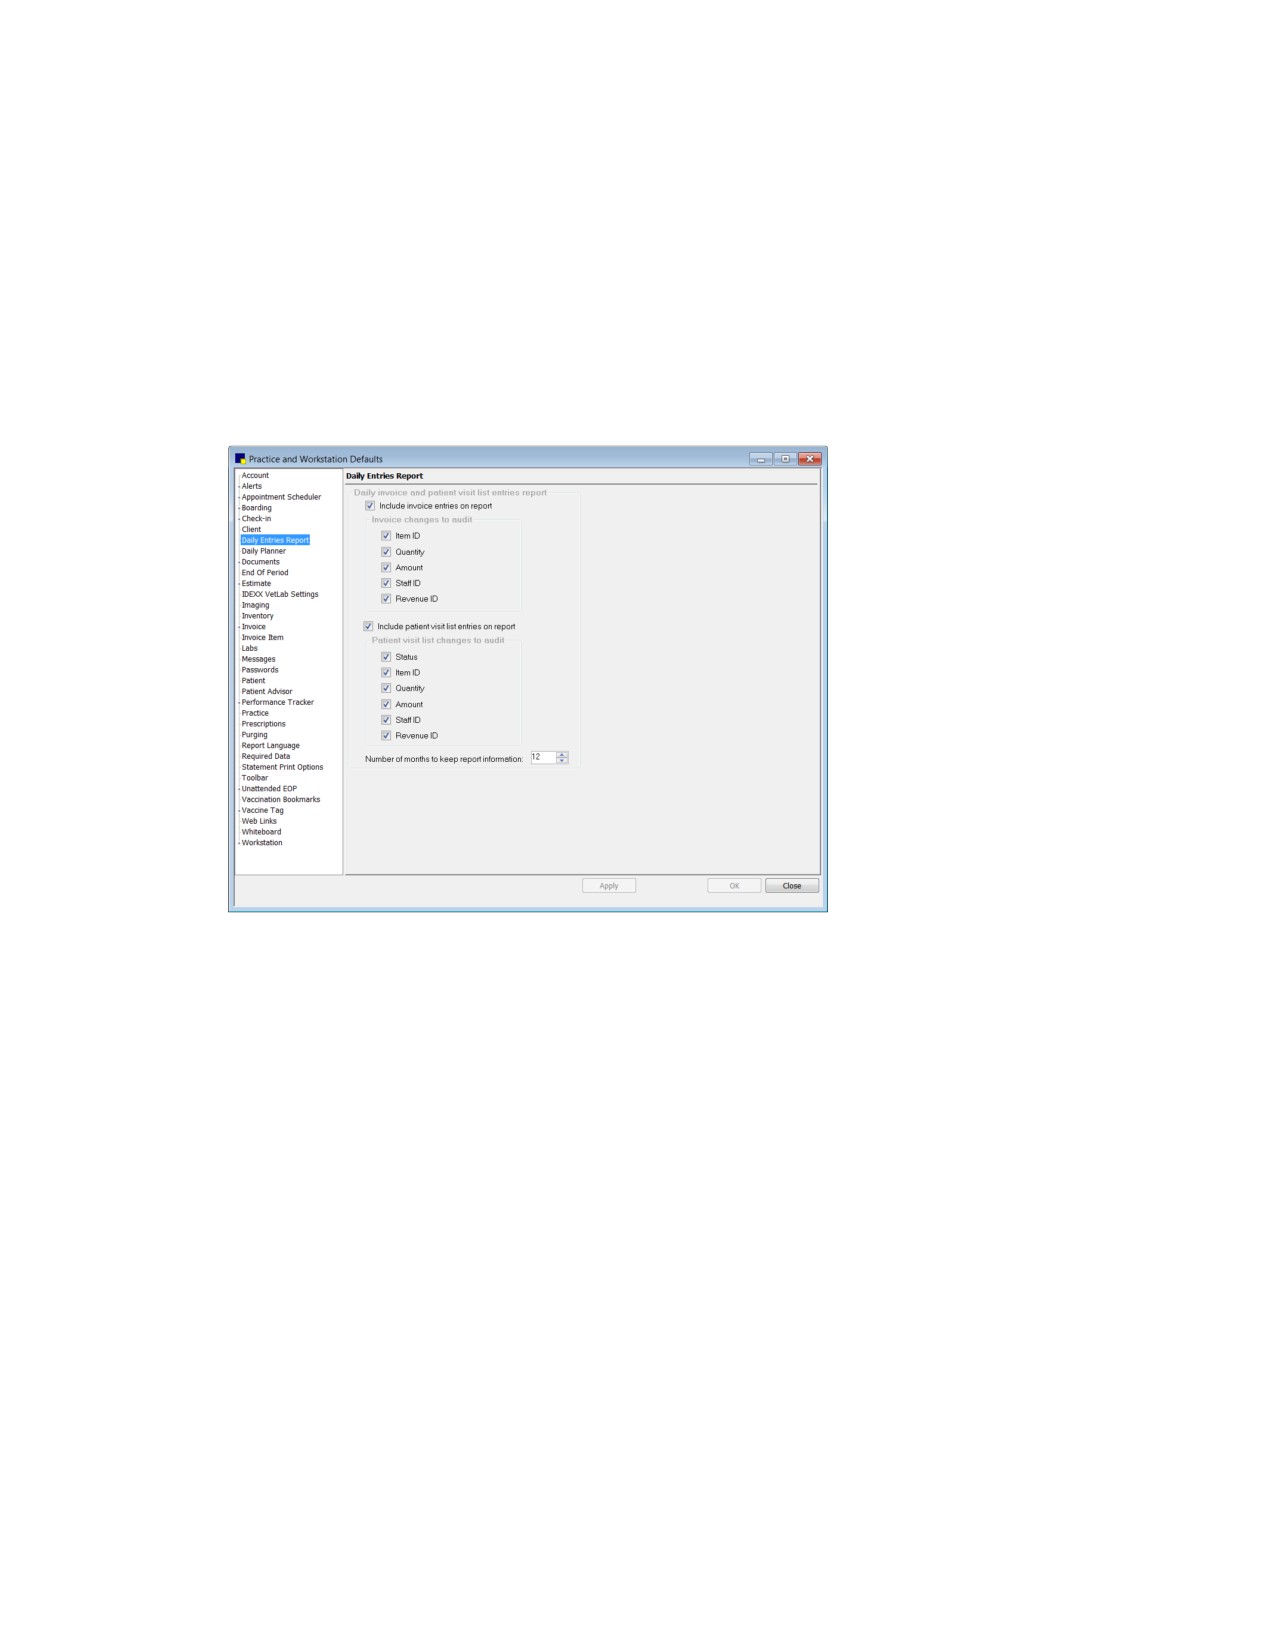
Daily Entries Report Defaults
Use the Daily Entries Report defaults to specify the types of information to use for tracking changes,
additions and deletions of billed lines on invoices, and the Patient Visit List (PVL). The invoice and PVL
information options selected here print on the Daily Inv. and PVL Entries reports.
To set the Daily Entries Report defaults:
1. On the Controls menu, select Defaults > Practice and Workstation. The Practice and Workstation
Defaults window appears.
2. In the navigation pane, click Daily Entries Report. The Daily Entries Report configuration pane
appears.
Daily Entries Report defaults
3. Select the Include invoice entries on report check box and select the invoice changes your
practice wants to audit and include on End of Period reports.
4. Select the Include patient visit list entries on report check box and select the Patient Visit List
changes your practice wants to audit and print on End of Period reports.
5. In the Number of months to keep report information text box, enter the number of months.
6. Click Apply to save your changes and continue setting defaults, or click OK to save your changes
and close the window.
Daily Planner Defaults
The Daily Planner defaults allow you to specify settings pertaining to the Daily Planner Diagnostics tab,
which allows you to manage laboratory results and requests for a specific staff member or for all staff.
To set the Daily Planner defaults:
1. On the Controls menu, select Defaults > Practice and Workstation. The Practice and Workstation
Defaults window appears.
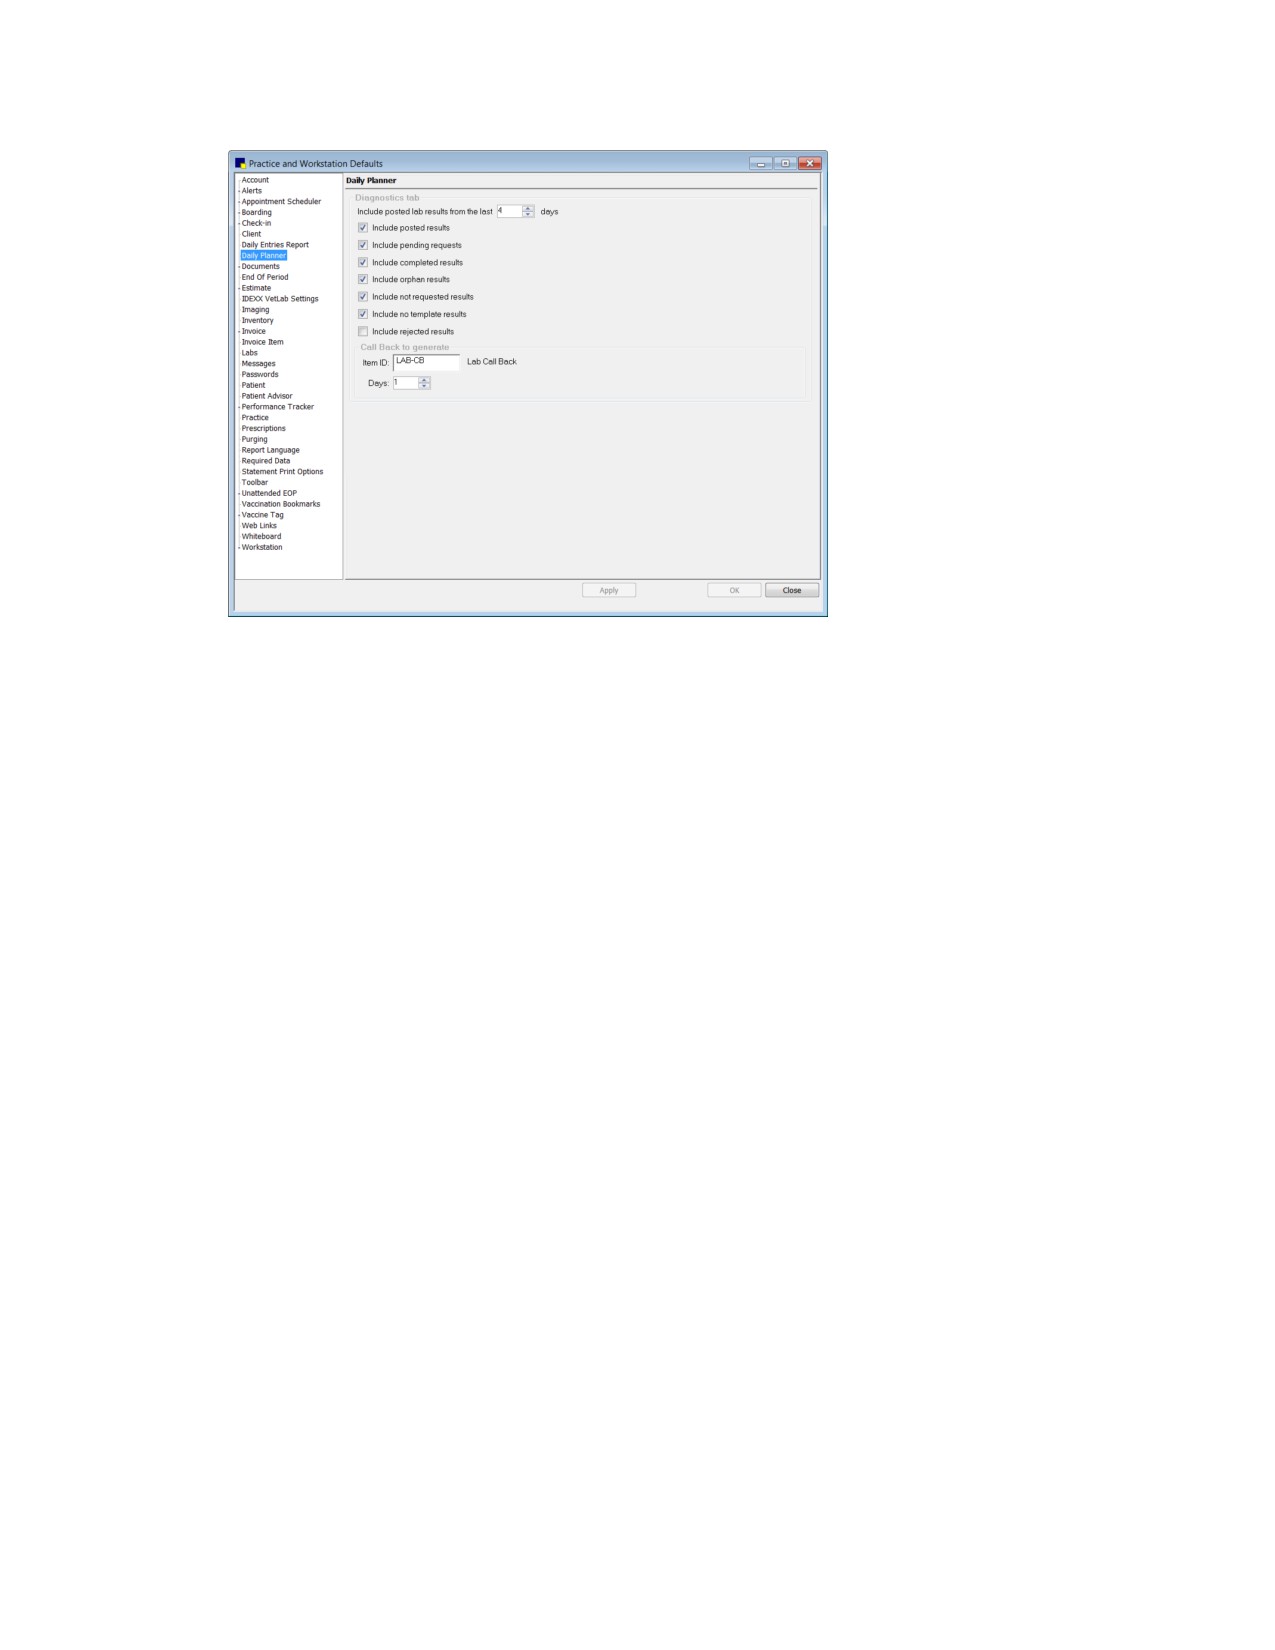
2. In the navigation pane, click Daily Planner. The Daily Planner configuration pane appears.
98
Chapter 4: Setting Practice and Workstation Defaults
Daily Planner defaults
3.
In the Include posted lab results from the last __ days text box, set the time frame (in days) for
displaying posted laboratory results on the Diagnostics tab.
4.
Using the Include… check boxes, select the check box for each type of laboratory request and
result to display by default on the Diagnostics tab:
• Include posted results-Display laboratory results that have been posted to the patient’s
history.
• Include pending results-Display laboratory requests.
• Include completed results-Display laboratory results that need to be reviewed and posted to
the patient’s history or rejected.
• Include orphan results-Display laboratory results that cannot be matched to a patient within
Cornerstone.
• Include not requested results-Display laboratory results that were not part of the original
request.
• Include no template results-Display laboratory results that do not fit in one of the existing
templates within Cornerstone.
• Include rejected results-Display laboratory results that have been declined by staff and not
posted to the patient’s history.
5.
If staff would like the option to generate call backs for lab results within the Diagnostics tab, do the
following:
a. In the Item ID text box, type the ID of the invoice item you have set up for lab call backs or press
F2 to select the item from the Invoice Item List.
b. In the Days text box, enter the standard number of days needed before a lab call back is due.
This number is used to calculate the date listed by default when scheduling a call back within
the Diagnostics tab.
99
Chapter 4: Setting Practice and Workstation Defaults
Note: You must specify a lab call back item ID in Daily Planner defaults in order to use the call back
features on the Diagnostics tab.
6. Click Apply to save your changes and continue setting defaults, or click OK to save your changes
and close the window.
Documents Defaults
The Documents defaults allow you to set preferences for creating and printing medical notes and
correspondence documents.
To set the Documents defaults:
1. On the Controls menu, select Defaults > Practice and Workstation. The Practice and Workstation
Defaults window appears.
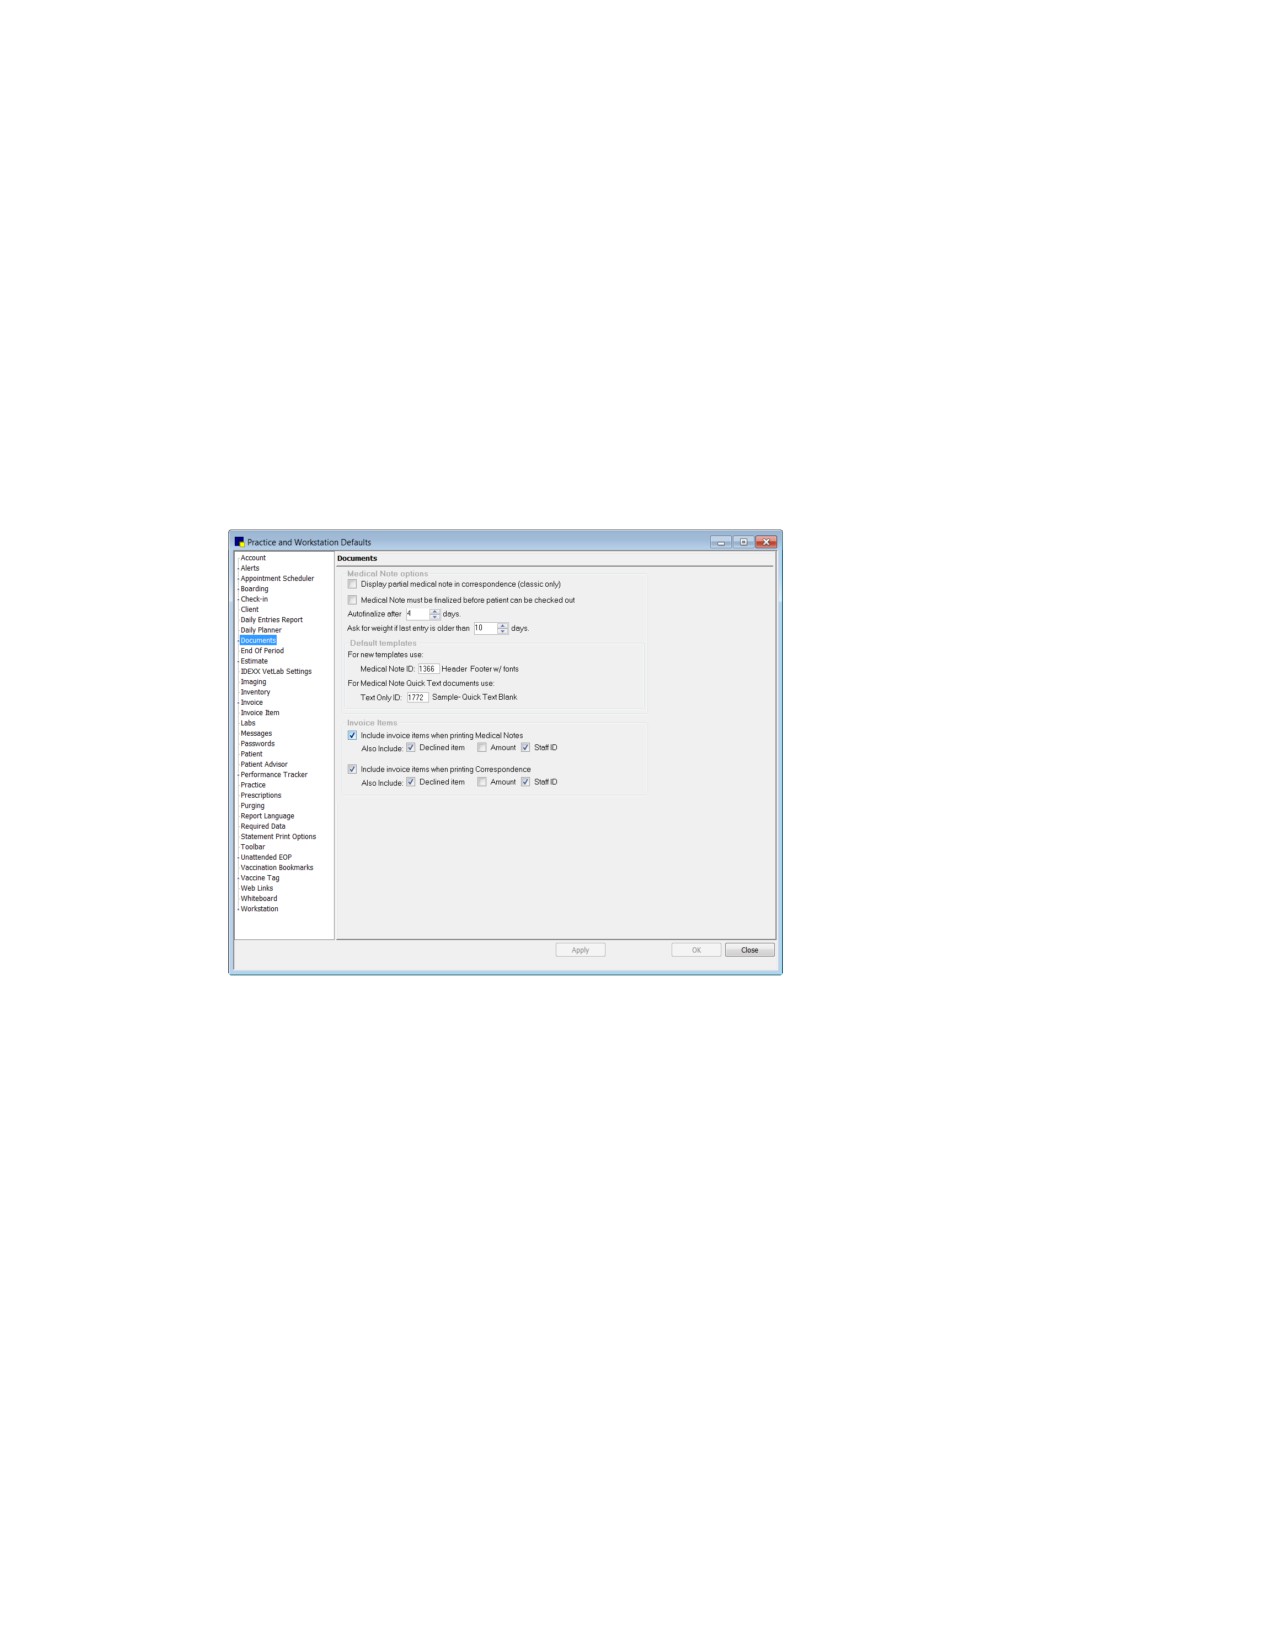
2. In the navigation pane, click Documents. The Documents configuration pane appears.
Documents defaults
3. In the Medical Note options area, do the following:
a. Select the Display partial medical note in correspondence (classic only) check box if you
want to be able to select the information from your medical note templates to include in
correspondence (available only for Classic medical notes). See “Chapter 18: Setting Up Classic
Medical Notes” beginning on page 351 for information on Classic medical notes.
b. Select the Medical Note must be finalized before patient can be checked out check box if
you want to require medical note templates be finalized before a patient can be checked out
from the Check-in/out window (with no override available at check-out time). As this type of
setup could cause delays at check-out time, in most cases you would not want to select this
option.
c. If you want medical note templates to be finalized automatically after a certain number of days,
enter the time period in the Autofinalize after __ days text box. The number of days specified
here is the general default used for all documents (including correspondence), but you can
change this value for each document.
Note: Medical notes and correspondence documents saved in Draft mode will not auto finalize.
100
Chapter 4: Setting Practice and Workstation Defaults
d. Type a number in the Ask for weight if last entry is older than __ days text box to specify the
number of days to use for determining if the most recent patient weight entry is considered
current. The Cornerstone Editor compares this setting to the date of the most recent weight
recorded for the patient in Cornerstone. If the date of the weight is older than the specified
number of days, the staff member is prompted to enter a current weight for the patient.
4.
In the Default templates area, specify the templates to use by default for creating or converting to a
new enhanced template or adding a Medical Note Quick Text document for a patient:
•
For new templates use-This setting allows you to specify the default setup document
template used for creating a new enhanced document template or for converting to a new
enhanced document template. To designate this default template, in the Medical Note ID text
box, type the ID of the template or press F2 to select the template from the Document Template
List. See “Customizing the Default Setup Document Template” on page 335 for more
information.
• For Medical Note Quick Text documents use-This setting allows you to specify the text-only
template that is used when you add a Quick Text medical note for a patient. To designate this
default template, in the Text Only ID text box, type the ID of the template or press F2 to select
the template from the Document Template List.
5.
In the Invoice Items area, select your preferences for printing invoice items on medical notes or
correspondence:
• Include invoice items when printing Medical Notes-On medical notes, prints invoice items
with a Patient Visit List (PVL) status of Recommended, Selected, or Performed.
• Include invoice items when printing Correspondence-On correspondence, prints invoice
items with a PVL status of Recommended, Selected, or Performed.
If either of the above options is selected, its Also Include options are also available:
o Declined item-Also prints items with a PVL status of Declined, Declined to history, or Blank.
o Amount-Also prints the Amount for each invoice item.
o Staff ID-Also prints the Staff ID for each invoice item.
6.
Click Apply to save your changes and continue setting defaults, or click OK to save your changes
and close the window.
Favorite Documents Defaults
The Favorite Documents defaults allow you to designate a list of the practice’s favorite document
templates, which can simplify document template searches on the Document Template List window and
Start New Document window.
To set the Favorite Documents defaults:
1. On the Controls menu, select Defaults > Practice and Workstation. The Practice and Workstation
Defaults window appears.
2. In the navigation pane, click Documents to expand its subproperties, and then click the Favorite
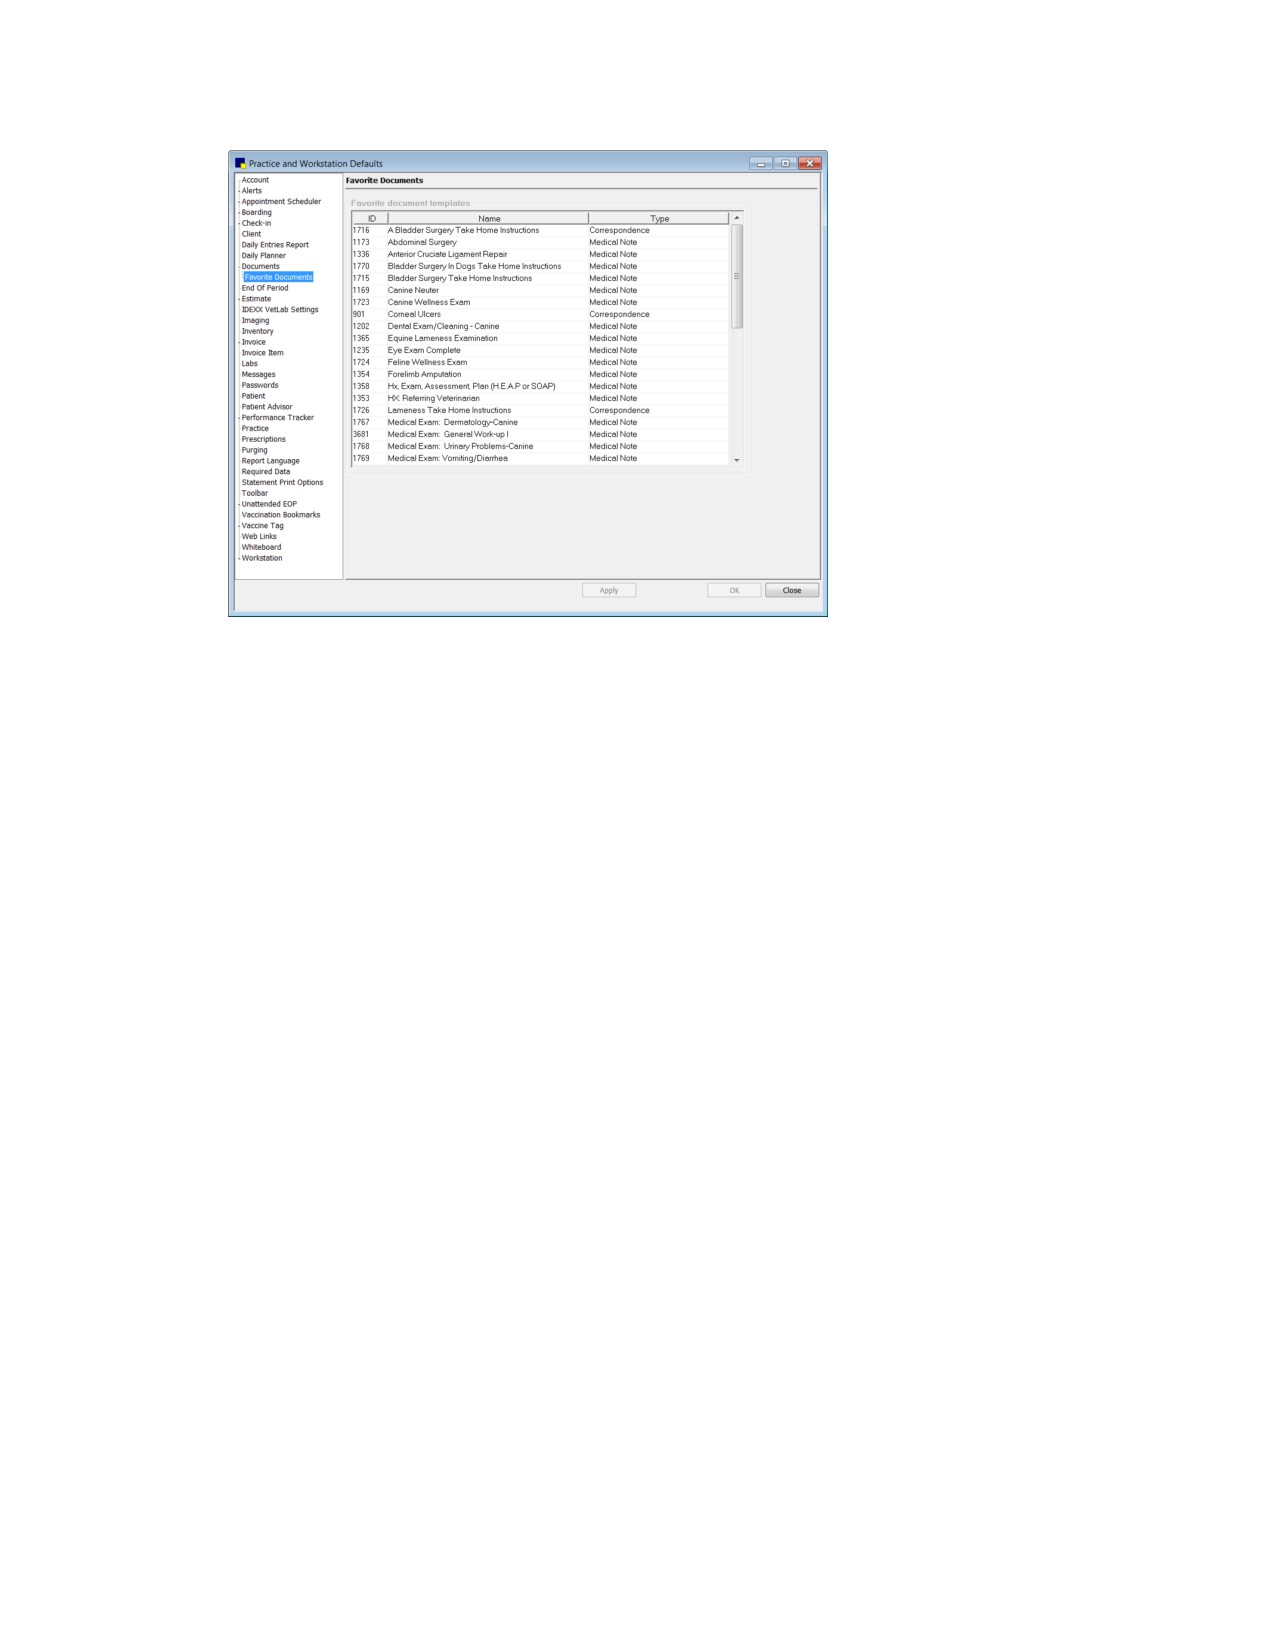
Documents subproperty. The Favorite Documents configuration pane appears.
101
Chapter 4: Setting Practice and Workstation Defaults
Favorite Documents defaults
3. In the Favorite document templates area, specify the “Practice Favorites” templates to appear in the
Favorites drop-down list when searching for a template.
Note: You cannot select Classic medical note templates as favorites.
• To add a document template to the list, in the first available row’s ID column, type the template
ID or press F2 to select a template from the Document Template List.
• To remove a document template from the list, click the template’s ID in the ID column and then
press CTRL+D.
Tip: You can also designate a template as a favorite by selecting the Show in Practice Favorites
check box in the Template Properties when creating or updating a template.
4. Click Apply to save your changes and continue setting defaults, or click OK to save your changes
and close the window.
End of Period Defaults
End of Period defaults include the reports that automatically print when you process End of Day, End of
Month, and End of Year, as well as the charges that are calculated by default at End of Month.
To set the End of Period defaults:
1. On the Controls menu, select Defaults > Practice and Workstation. The Practice and Workstation
Defaults window appears.
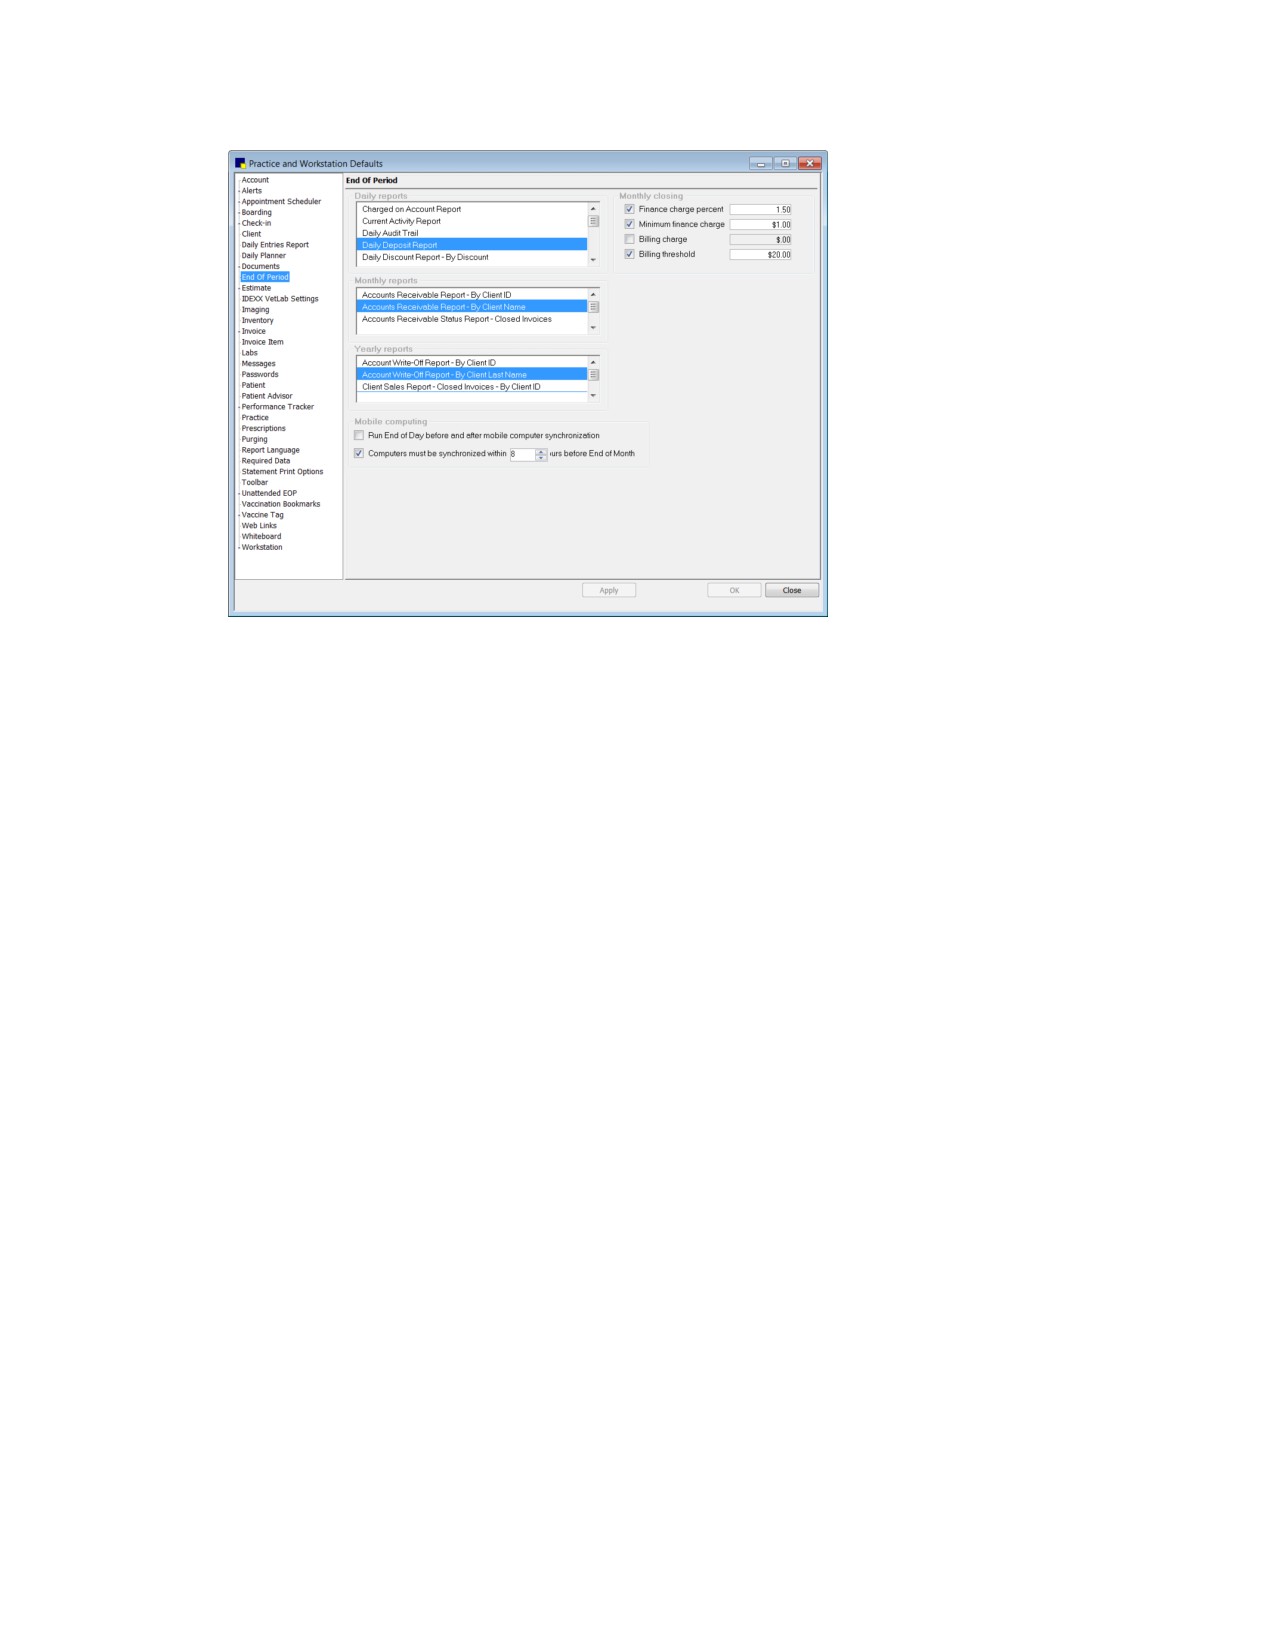
2. In the navigation pane, click End Of Period. The End Of Period configuration pane appears.
102
Chapter 4: Setting Practice and Workstation Defaults
End of Period defaults
3. To select the reports to print by default when you print End of Period reports, select each report
name under Daily reports, Monthly reports, and Yearly reports. Use the scroll bars to view each
complete list. (Highlighted/shaded reports are selected.)
4. In the Monthly closing area, select the appropriate check boxes to specify the End of Month closing
charges to apply and type the corresponding amount or percentage in the text box:
• Finance charge percent (monthly percentage)
• Minimum finance charge (amount)
• Billing charge (amount)
• Billing threshold (minimum amount for billing charge). The minimum owed to the practice must
be more than the billing threshold or a statement will not print.
Tip: A billing charge is applied to all accounts that will receive a bill at End of Month closing. If you
would like to apply a billing charge only to accounts 30 days and over, we suggest you put the
charge amount in the Minimum finance charge text box instead.
5. Click Apply to save your changes and continue setting defaults, or click OK to save your changes
and close the window.
Note: For information on the settings in the Mobile computing area, see “Chapter 31: Setting Up the
Mobile Computing Module” beginning on page 462.
Estimate Defaults
The Estimate defaults allow you to set estimate printing preferences and specify the default messages
used most frequently when printing estimates.
To set the Estimate defaults:
1. On the Controls menu, select Defaults > Practice and Workstation. The Practice and Workstation
Defaults window appears.
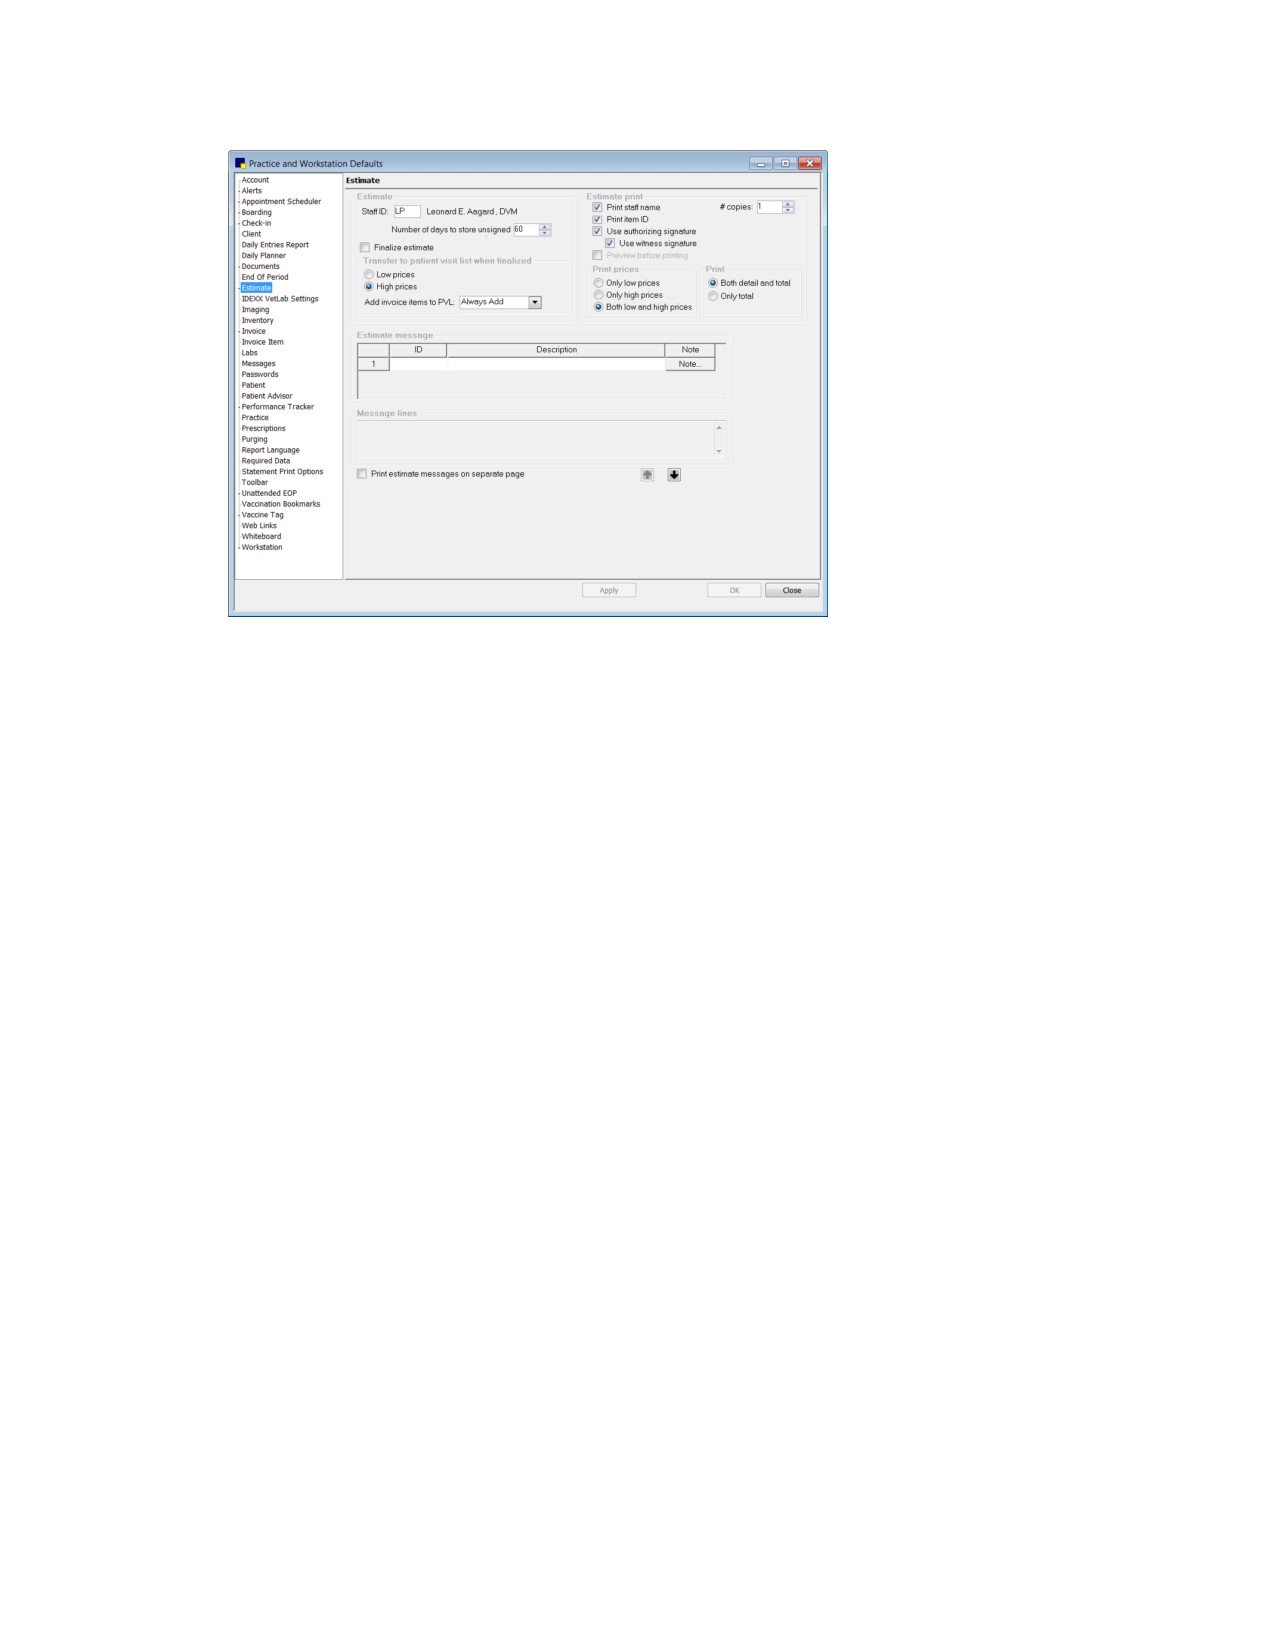
2. In the navigation pane, click Estimate. The Estimate configuration pane appears.
103
Chapter 4: Setting Practice and Workstation Defaults
Estimate defaults
3.
In the Estimate area, do the following:
a. In the Staff ID text box, type the ID for the staff member to use by default on new estimates or
press F2 to select a staff member from the Staff List.
b. In the Number of days to store unsigned estimates text box, enter the default number of days
(up to 999). Estimates that have not been electronically signed by the client are deleted during
End of Day processing after the specified number of days.
c. Select the Finalize estimate check box to set the default status of an estimate to final when it is
saved. (Depending on how Add invoice items to PVL field is set, invoice items may
automatically transfer to the Patient Visit List when the estimate is finalized.)
4.
In the Transfer to patient visit list when finalized area, do the following:
a. Select Low prices to automatically transfer the low prices from a finalized estimate to the Patient
Visit List, or select High prices to automatically transfer high prices.
b. Use the Add invoice items to PVL drop-down list to specify if invoice items should
automatically be added to the Patient Visit List from a finalized estimate.
5.
In the Estimate print area, do the following:
a. Select the Print staff name check box if you want to print the staff name on estimates.
b. Select the Print item ID check box if you want to print invoice item IDs on estimates. These IDs
will print instead of the date on each line of the estimate.
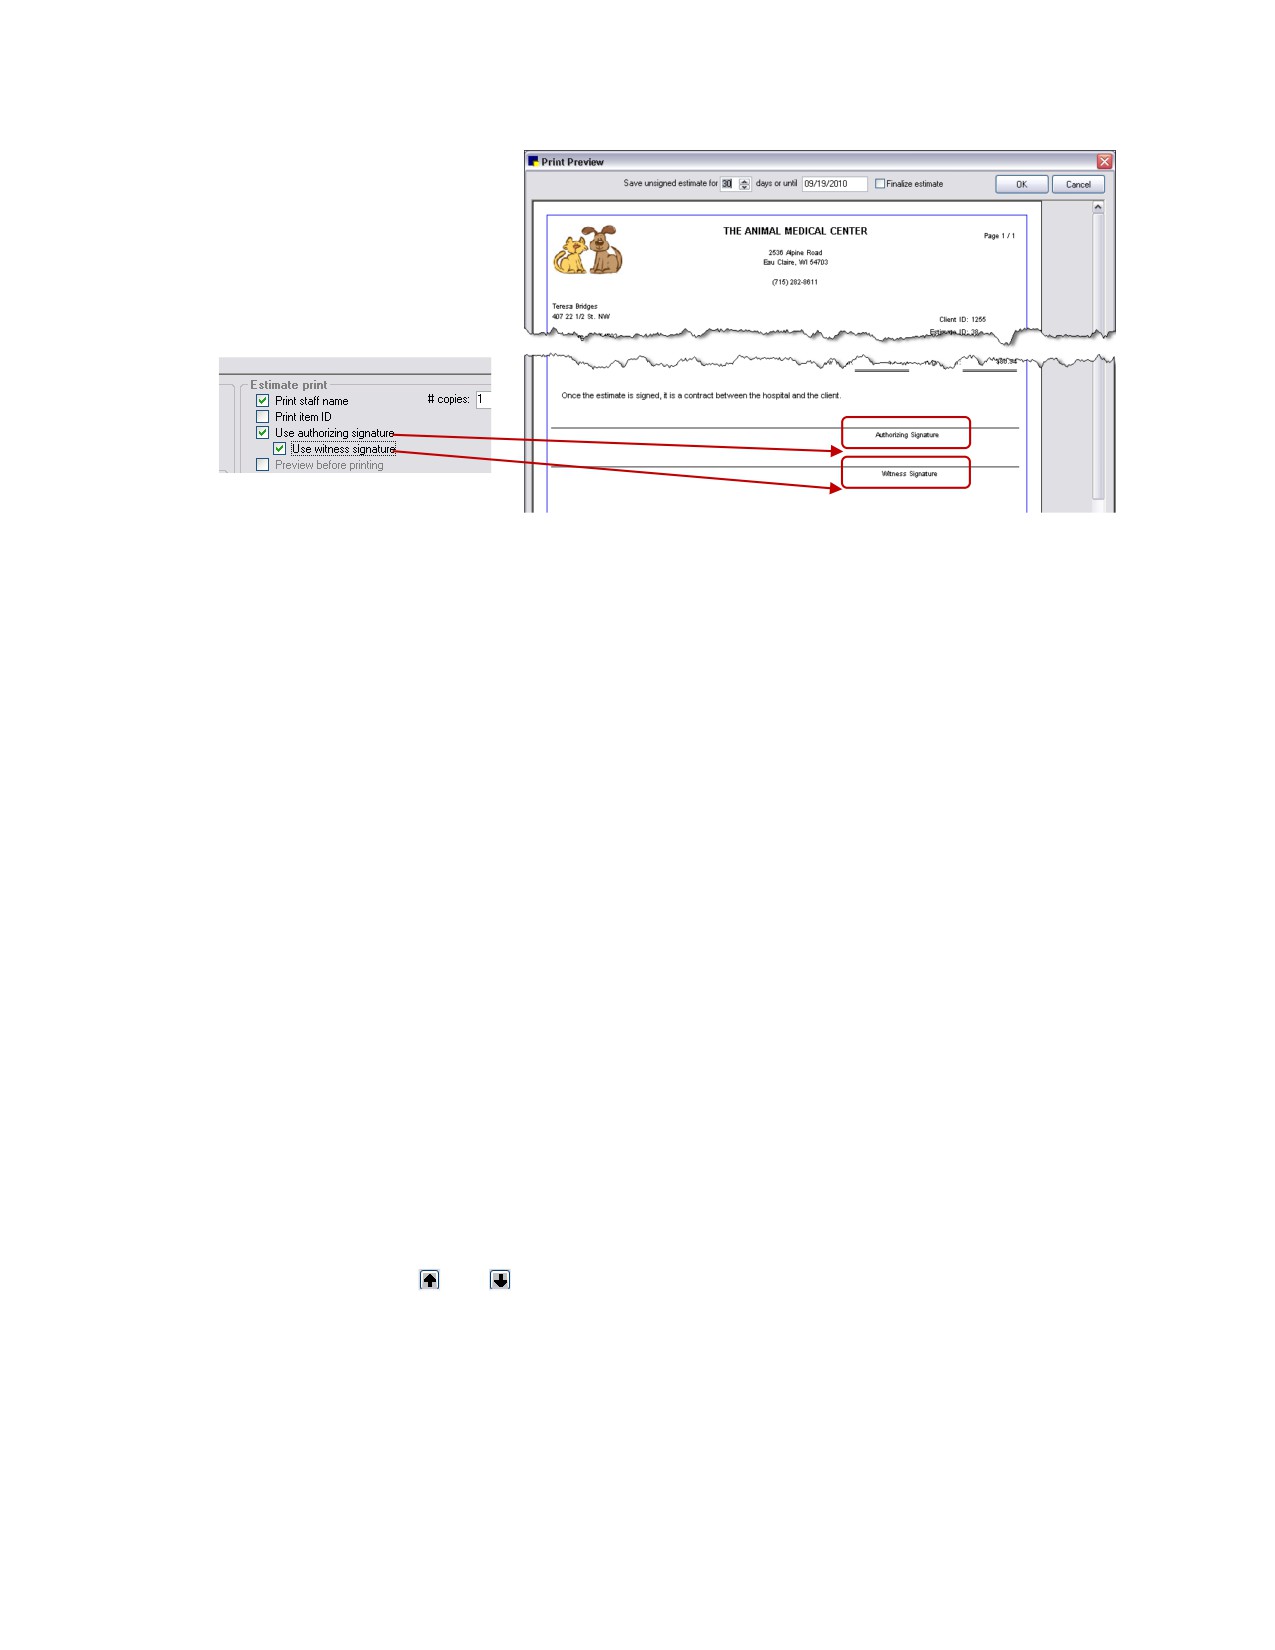
c. Select the Use authorizing signature check box if you want the option to have clients provide
electronic signatures on estimates. This setting also determines which option is selected by
default on the Save Estimate dialog box—Preview/Signature (if check box is selected) or Save
and continue (if check box is not selected).
d. If the Use authorizing signature check box is selected, a Use witness signature check box is
also available. Select the Use witness signature check box to add a Witness Signature line to
the estimate.
104
Chapter 4: Setting Practice and Workstation Defaults
e. If you are not using electronic signatures on estimates (for example, if Use authorizing
signature is not selected), you can select the Preview before printing check box to set the
Preview option to be selected by default on the Save Estimate dialog box.
f.
In the # copies text box, enter the number of estimate copies to print by default.
6.
In the Print prices area, select one of the following print prices options:
• Only low prices prints only low prices on the estimate.
• Only high prices prints only high prices on the estimate.
• Both low and high prices prints both low and high prices on the estimate.
Note: The default estimate price options set here can be changed at the time a new estimate is
saved by clicking the Options button on the Save Estimate dialog box.
7.
In the Print area, select one of the following print options:
• Both detail and total prints detailed pricing on the estimate.
• Only total prints only the total prices on the estimate.
8.
In the Estimate message area, you can specify one or more estimate messages to use by default on
estimates. Do the following:
a. In the ID text box, type the estimate message ID or press F2 to select a message from the
Estimate Message List. You can click the estimate number (to the left of the message row) to
view the associated message text in the Message lines area.
b. Add additional messages as needed.
9.
Select the Print estimate messages on separate page check box if you want estimate messages
to print on a separate page, not on the same page as the actual estimate.
10. If necessary, use the
and arrow buttons (below the Message lines area) to change the order
in which the messages display on the estimate.
11. Click Apply to save your changes and continue setting defaults, or click OK to save your changes
and close the window.
Estimate Address Defaults
The Estimate Address defaults allow you to change where the practice and client addresses print on
the estimate to accommodate different types of window envelopes.
105
Chapter 4: Setting Practice and Workstation Defaults
If you specified a practice logo in Practice defaults, you have the option to include that logo in the
header of your estimates. You can set up your estimate header layout to include or exclude the practice
address and practice logo, depending on your preferences and the information included in your logo.
See “Practice Defaults” on page 127 for more information on adding a practice logo.
IMPORTANT: If you choose to print a practice logo on your estimates, ensure that the logo does not
cover important header information, such as the client name, address, and date. Other header
information is not adjusted or positioned relative to the physical space taken up by the logo.
To set the Estimate Address defaults:
1. On the Controls menu, select Defaults > Practice and Workstation. The Practice and Workstation
Defaults window appears.
2. In the navigation pane, click Estimate to expand its subproperties, and then click the Estimate
Address subproperty. The Estimate Address configuration pane appears.
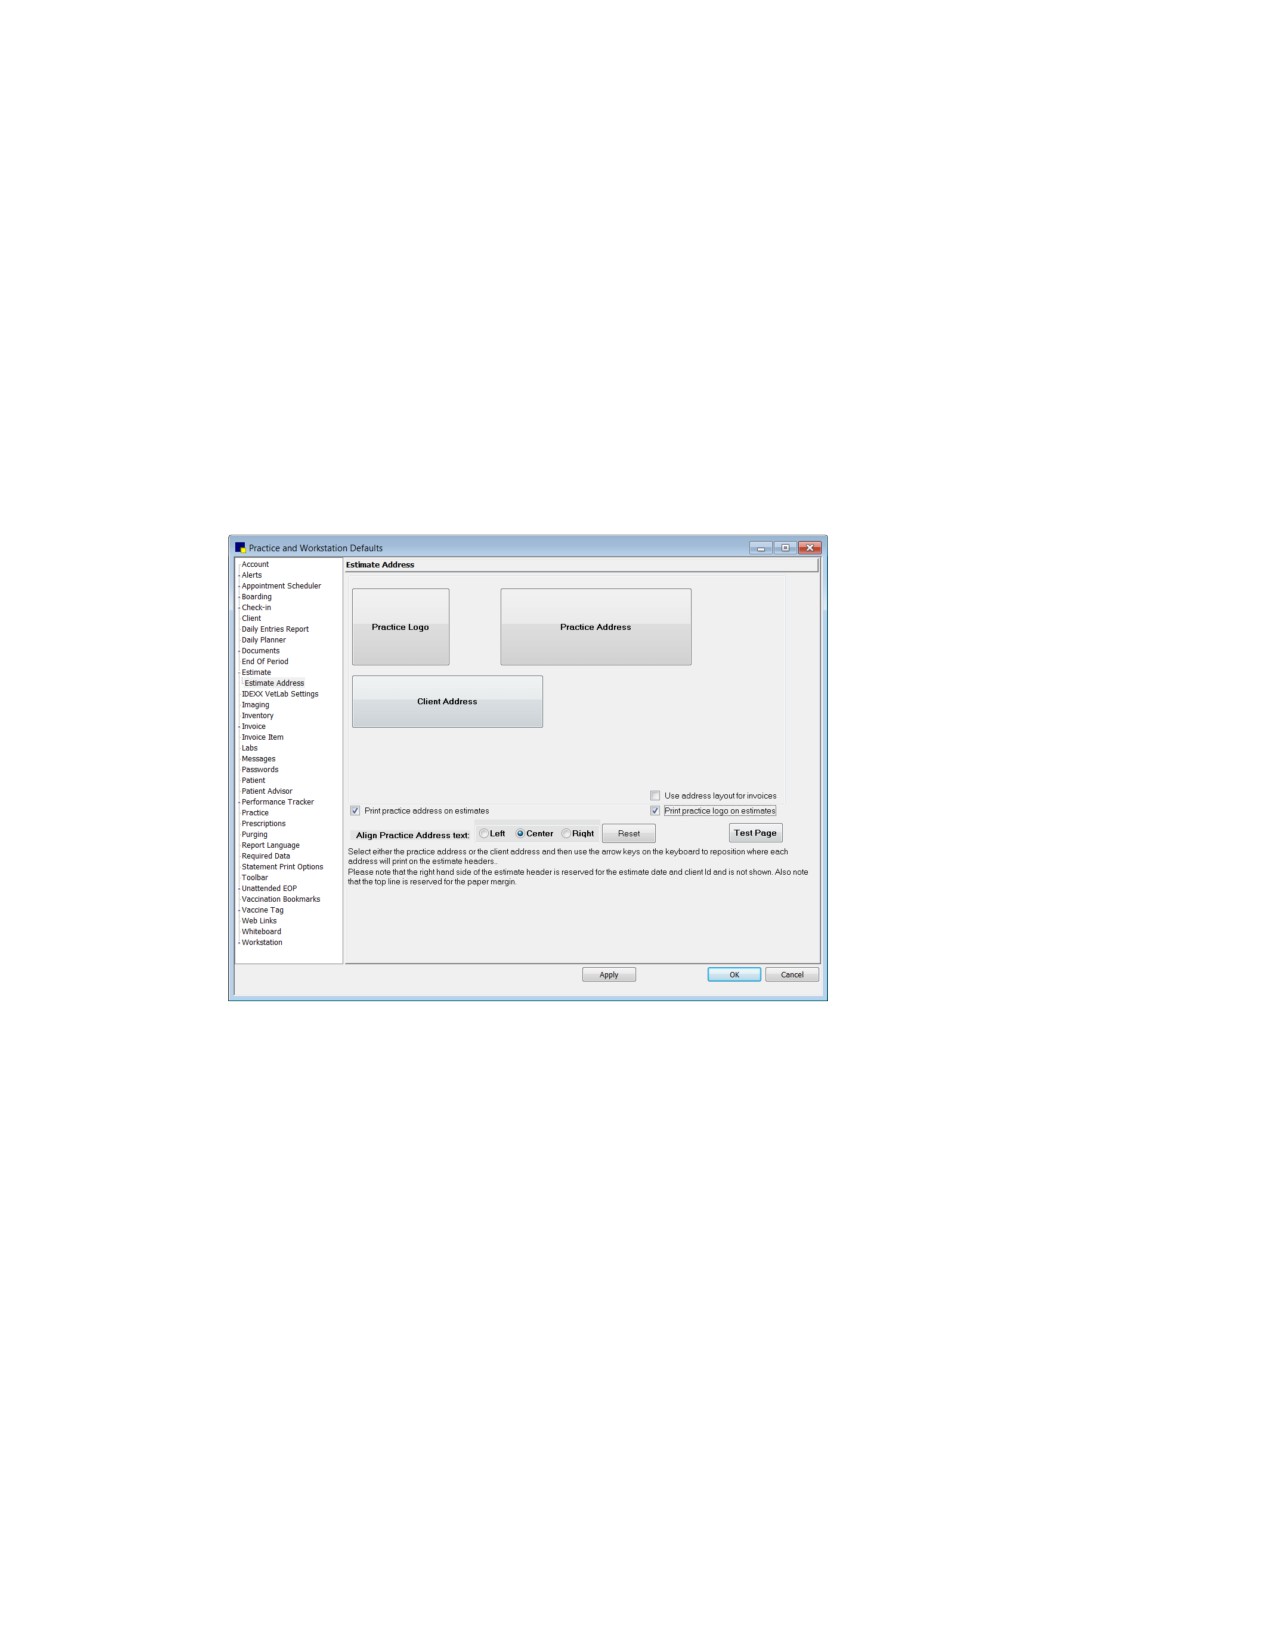
Estimate Address defaults
Tip: If you have already set up a header layout for use on invoices and want to use the same layout
for estimates, in Invoice Address defaults, select the Use address layout for estimates check box.
This allows you to set up your header positioning once for use on both invoices and estimates.
3. To include the practice address in the estimate header, select the Print practice address on
estimates check box. The Practice Address positioning box appears.
4. To include a practice logo in the estimate header, select the Print practice logo on estimates
check box. (Note: This option is not enabled until you specify a practice logo graphic file in Practice
defaults.) The Practice Logo positioning box appears.
5. Click the logo or address positioning box you want to move, and then use your keyboard arrow keys
to reposition the box.
6. Depending on the Practice Logo and Practice Address box positioning, you may want to change
the Align practice address text setting (Left, Center, or Right) to align the name and address text
accordingly. For example, if you position the Practice Address at the left margin, you may also want
to align the name and address text at the left margin.
106
Chapter 4: Setting Practice and Workstation Defaults
7. To print a test page that includes placeholder blocks for the header and footer fields in your current
layout, first click Apply and then click Test Page.
Note: On the test page, the two sets of blocks on the right side of the header are reserved for the
estimate date and client ID; you cannot move these blocks.
8. If necessary, click Reset to undo your positioning changes and start over based on the default
alignment settings.
9. If you want to use the same layout for invoices, select the Use address layout for invoices check
box. This allows you to set up your header positioning once for use on both estimates and invoices.
10. Click Apply to save your changes and continue setting defaults, or click OK to save your changes
and close the window.
Tip: We recommend printing a sample estimate to check your address alignment before printing actual
client estimates. You may need to readjust depending on your envelope.
IDEXX VetLab* Settings
You can specify default computers to be used for specific workstations and practice locations. When
ordering tests, staff can always override these defaults and choose from the entire list of IDEXX VetLab*
Station computers. When patients are checked in through the Cornerstone Census List, the patient
information is automatically displayed on the Census List of the IDEXX VetLab Station computers
associated with the check-in practice or the check-in workstation.
To specify default IDEXX VetLab Station computers for a practice and/or workstation:
1. On the Controls menu, select Defaults > Practice and Workstation. The Practice and Workstation
Defaults window appears.
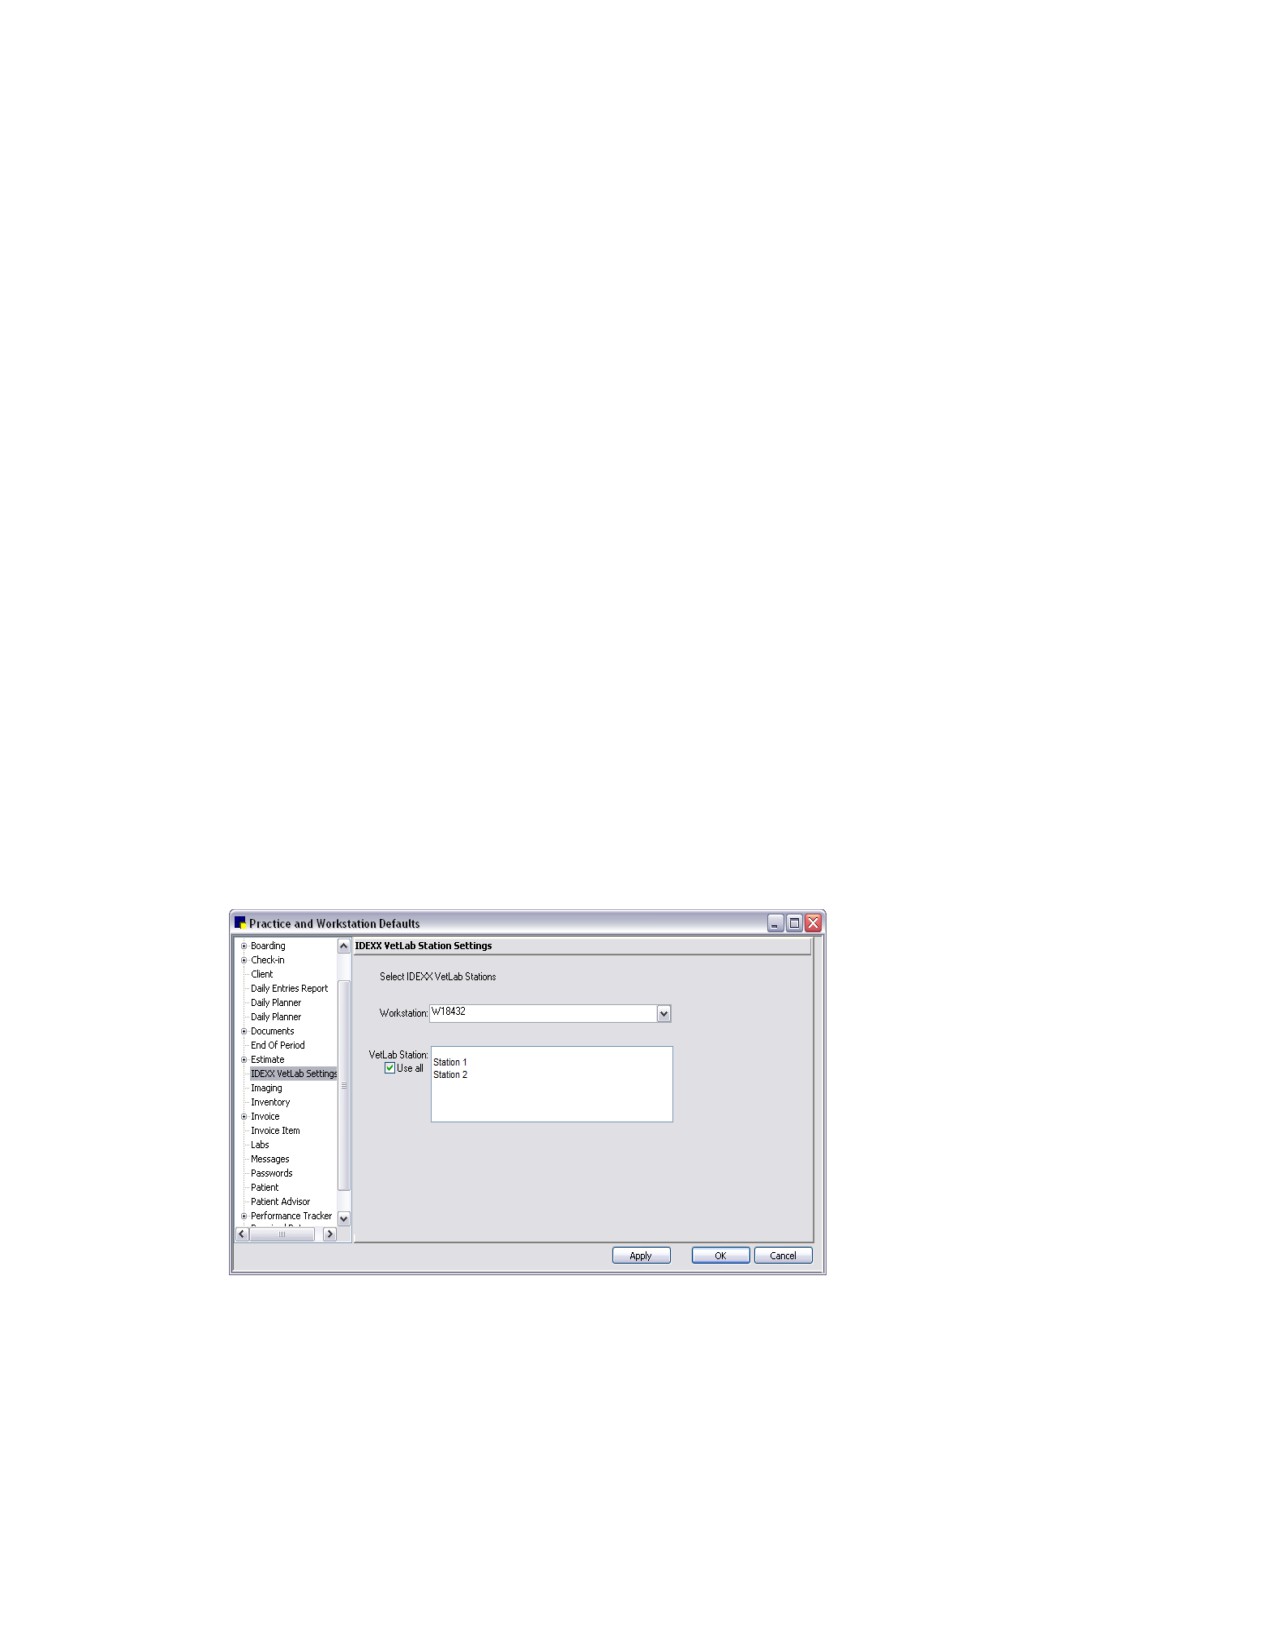
2. In the navigation pane, click IDEXX VetLab Settings. The IDEXX VetLab Settings configuration pane
appears.
IDEXX VetLab Station Settings defaults
3. Multi-Location/Single Database Only: To specify a default IDEXX VetLab Station for a practice
location, select the practice name from the Practice drop-down list, and then select the IDEXX
VetLab Station from the VetLab Station box or select the Use all check box.
4. To specify a default IDEXX VetLab Station for a workstation, select the workstation name
(workstation names are displayed on each IDEXX VetLab Station) from the Workstation drop-down
107
Chapter 4: Setting Practice and Workstation Defaults
list, and then select the IDEXX VetLab Station from the VetLab Station box or select the Use all
check box.
Note: If practice and workstation settings conflict, the workstation settings take precedence.
5. Click Apply.
6. Repeat steps 3-5, as needed, for other practice locations and workstations.
7. When finished, click OK.
Imaging Defaults
The Imaging defaults allow you to set preferences for pet picture compression and image storage. In
addition, if IDEXX Diagnostic Digital Imaging Integration is activated, you can set preferences for using
image request features in Cornerstone.
Note: System settings for imaging are defined in Controls > Defaults > Imaging. See “Chapter 6:
Setting Cornerstone* Imaging Defaults” beginning on page 155 for information.
To set the Imaging defaults:
1. On the Controls menu, select Defaults > Practice and Workstation. The Practice and Workstation
Defaults window appears.
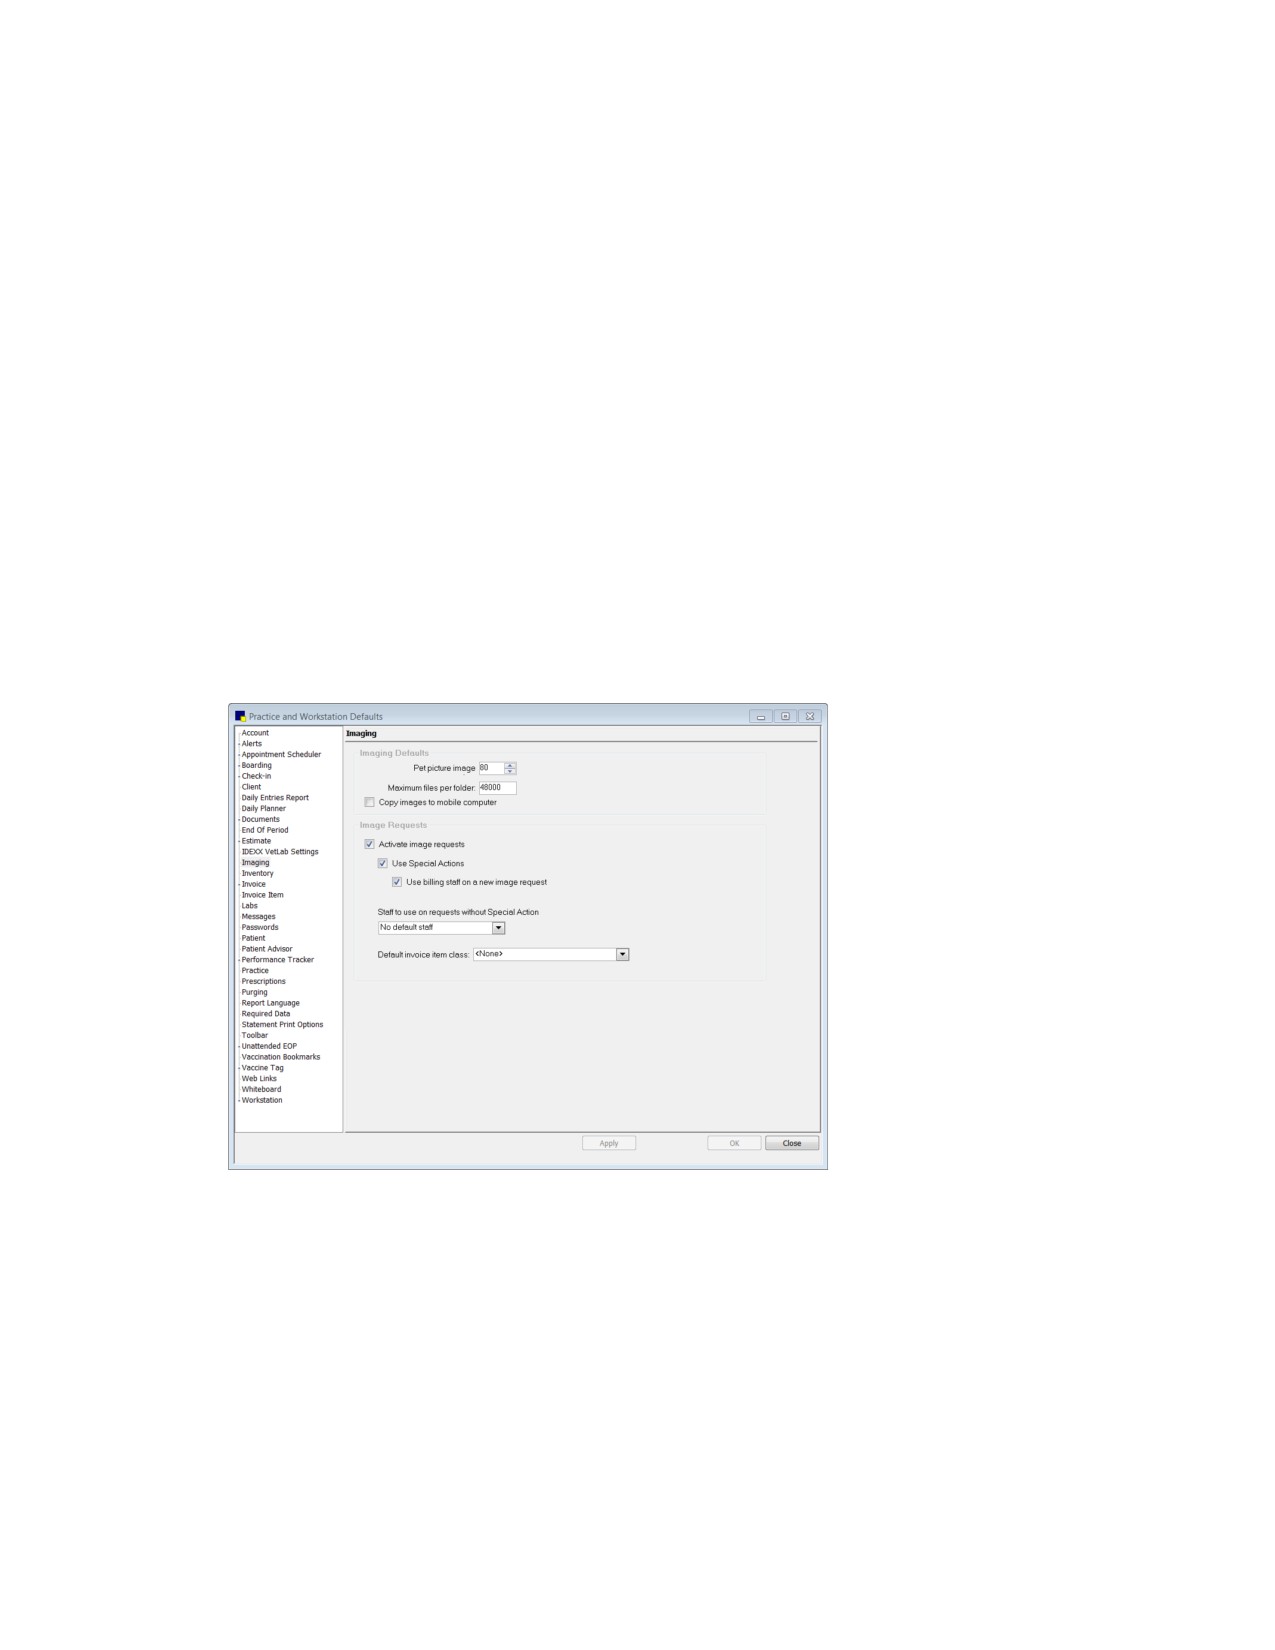
2. In the navigation pane, click Imaging. The Imaging configuration pane appears.
Imaging defaults
3. In the Imaging Defaults area, do the following, if necessary:
• Adjust the Pet picture image compression setting. Enter a range from 1 (small file and lower
quality) to 99 (larger file and highest possible quality).
• Change the Maximum files per folder setting to specify the number of images stored per
folder.
Note: For information on the Copy images to mobile computer setting, see “Copying Images to a
Mobile Computer” on page 465.
4. IDEXX Digital Imaging Integration only: In the Image Requests area, do the following:
108
Chapter 4: Setting Practice and Workstation Defaults
Note: The Activate image requests option is used to activate IDEXX Digital Imaging Integration if
you have purchased this feature.
a. Select the Use Special Actions check box if you want invoice items that are set up to initiate the
Image Request special action to also activate the New Image Requests dialog box when the
item is added to the Patient Visit List (PVL) or invoice for a patient.
b. If the Use Special Actions check box is selected, you can select the Use billing staff on a new
image request check box to use the billing staff on the PVL or invoice as the staff who is
associated with an image request when the request is initiated using a special action. If this
option is not selected, the default staff is based on the last staff member who performed an
image request on that workstation.
c. From the Staff to use on requests without Special Action drop-down list, select the default
staff to associate with an image request that is created without the use of a special action.
Options include:
• No default staff-No default staff is associated with the image request, requiring you to
select a staff member at the time the request is created.
• Last staff used on workstation-Uses the last staff member who performed an image
request on that workstation.
• Specific staff-To designate a specific staff member, type the staff ID or press F2 to select a
staff member from the Staff List.
d. From the Default invoice item class drop-down list, specify a default classification (such as
Radiology) to narrow the list of items displayed when creating an image request. This allows you
to filter out unrelated invoice items and speed up the search process.
5.
Click Apply to save your changes and continue setting defaults, or click OK to save your changes
and close the window.
Inventory Defaults
The Inventory defaults save time and keystrokes when placing orders and setting up inventory items.
Enter the most commonly used answers or actions as the default settings. You can always modify
default settings when they appear in a window.
Note: Some Inventory default settings are available only if using a multiple location per item inventory
setup.
Before You Begin
• Set up taxes (Controls > Taxes).
• Set up vendors (Inventory > Vendors).
• Set up inventory locations (Inventory > Locations).
To access the Inventory Defaults:
1. On the Controls menu, select Defaults > Practice and Workstation. The Defaults window
appears.
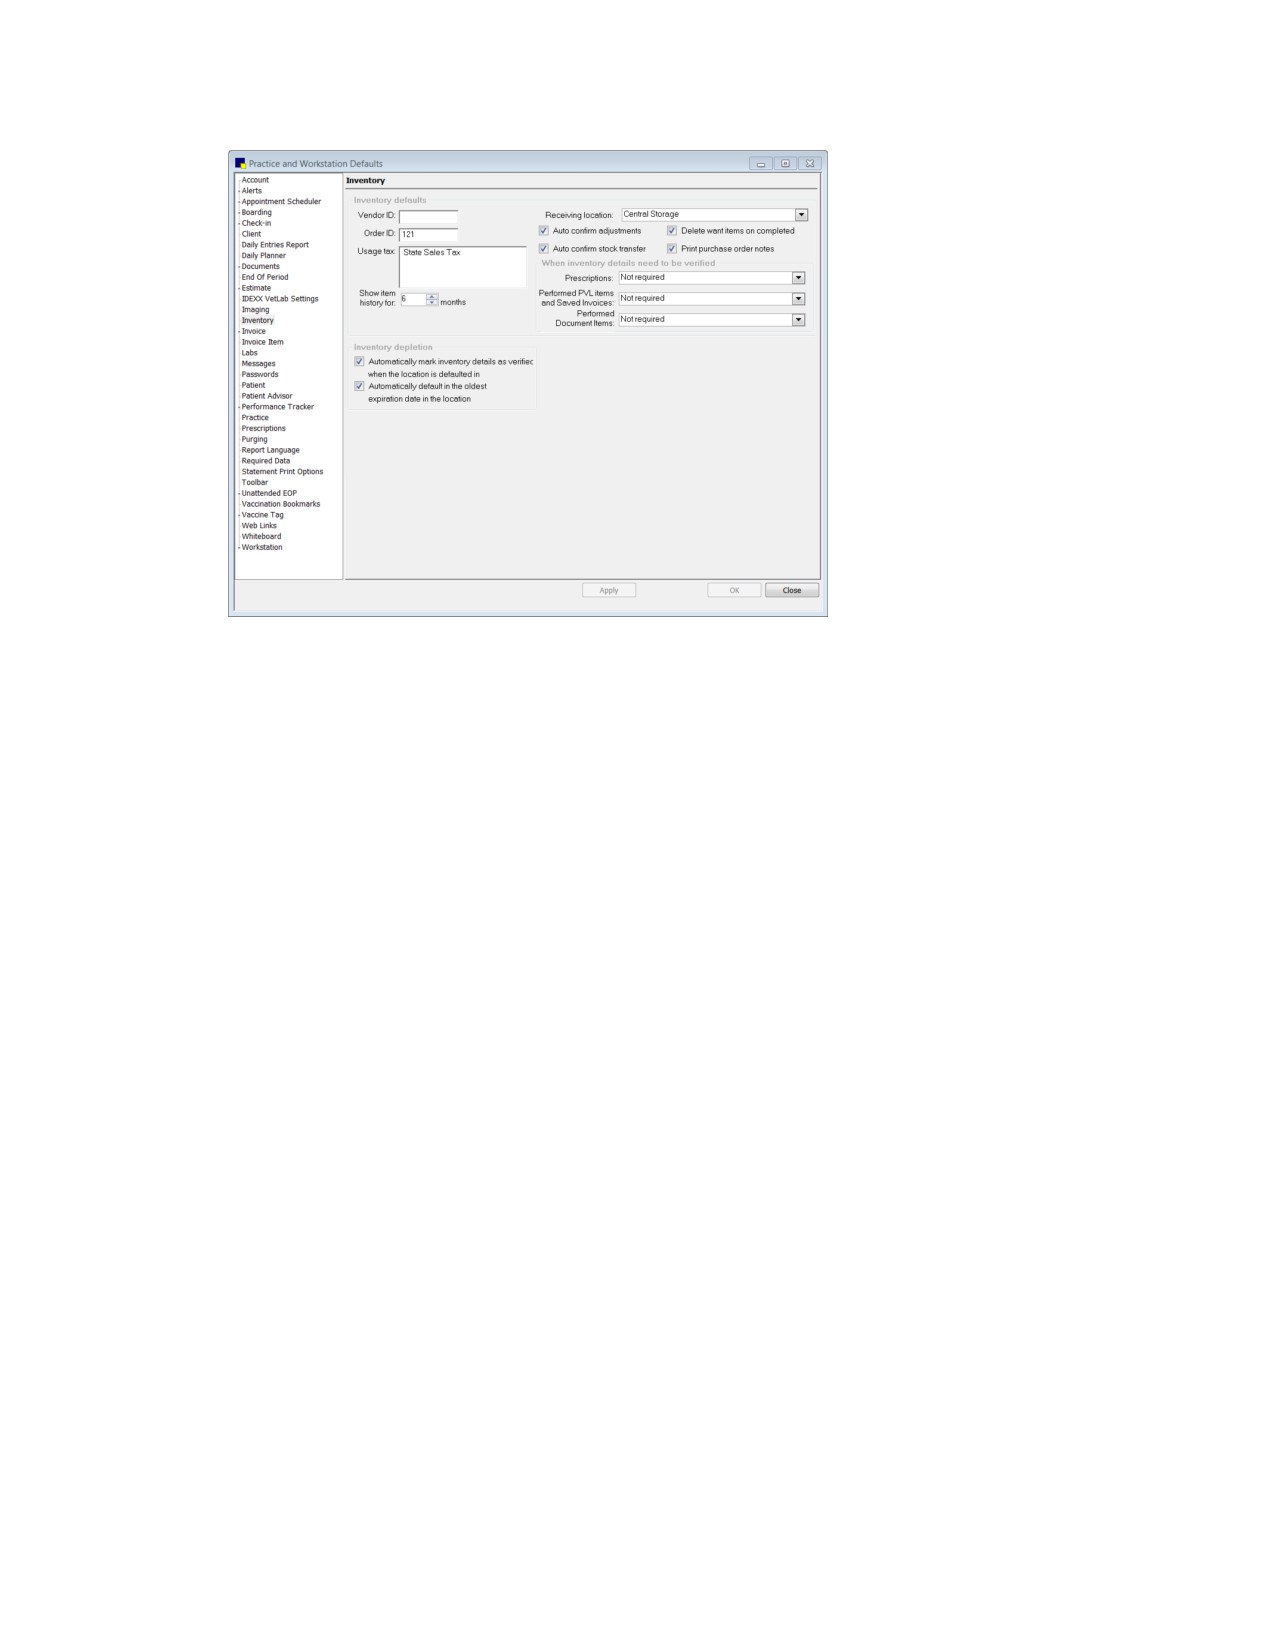
2. In the navigation pane, click Inventory. The Inventory configuration pane appears.
109
Chapter 4: Setting Practice and Workstation Defaults
Inventory defaults
3.
In the Inventory defaults area, do the following:
a.
In the Vendor ID text box, type the ID of your primary vendor (the vendor that you order from
most often) if you want this vendor to be used by default when setting up new inventory items.
You can also press F2 to select the vendor from the Vendor List.
b.
In the Order ID text box, type the number to use to begin numbering new orders. The next
available ID appears in a new order. (The default order ID is updated as numbers are used.)
c.
In the Usage tax list, select the usage taxes that apply to the majority of your inventory items
(you can apply more than one tax). See “Linking Taxes and Discounts to Invoice Items” on page
194 for information on usage taxes.
Note: You can also set up taxes for an entire invoice item classification by updating an item
classification in Lists > Invoice Item Class. Any defaults that apply to the item classification are
in addition to the taxes set up here.
d.
In the Show item history for_ months text box, enter the number of months to display an
inventory item’s history (receipts, returns, orders, and transfers). To view an item’s history, click
the Item History tab on applicable Cornerstone Inventory windows.
e.
Multiple location inventory only: From the Receiving location drop-down list, select a default
receiving location. Initially, the default location is Central Storage; however, you can select any
location at the practice.
f.
If you do not want to review adjustments before confirming them, select the Auto confirm
adjustments check box. (Note: Unconfirmed adjustments can be voided; confirmed
adjustments cannot be voided.)
g.
If you do not want to review transfers before confirming them, select the Auto confirm stock
transfer check box.
h.
To automatically delete items from the Want List after they are completed, select the Delete
want items on completed check box. (Want Items are “completed” when they are added to an
order.)
110
Chapter 4: Setting Practice and Workstation Defaults
i.
To automatically print notes attached to the purchase order, select the Print purchase order
notes check box.
4.
In the When inventory details need to be verified area, specify when inventory details (location, lot
number, expiration date) need to be verified.
a.
Inventory details are required for a prescription when you post an invoice; however, you can
require inventory details earlier, when the prescription is created. In the Prescriptions drop-
down list, select one of the following:
• Not required-Do not require inventory details when the prescription is created.
• Warn if not verified-Display a warning if the inventory details are not filled in and verified
when the prescription is created.
• Required-Require staff to fill in the inventory details and mark as verified when the
prescription is created.
b.
Inventory details are required when you post an invoice; however, you can require inventory
details earlier when you save the Patient Visit List (PVL), invoices, and Patient Advisor* exams.
From the Performed PVL items and Saved Invoices drop-down list, select one of the
following:
• Not required-Do not require inventory details when the PVL, invoice, or exam is saved.
• Warn if not verified-Display a warning if inventory details are not filled in and verified when
the PVL, invoice, or exam is saved.
• Required-Require staff to fill in inventory details and mark as verified before they can save
the PVL, invoice, or exam.
c.
You can specify what should happen if a staff member tries to send invoice items from a
document (medical note or correspondence) to the PVL when inventory details have not been
verified. From the Performed Document Items drop-down list, select one of the following:
• Not required-Do not require inventory details to be verified at the time that the invoice
items are sent from the document to the PVL. (The inventory details would still need to be
verified later on the PVL or invoice.)
• Warn if not verified-Display a warning if inventory details are not filled in and verified at the
time that the invoice items are sent from the document to the PVL. (The inventory details
would still need to be verified later on the PVL or invoice.)
• Required-Require staff to fill in inventory details and mark as verified before they can send
invoice items from a document to the PVL.
5.
In the Inventory depletion area, do the following:
a. Multiple location inventory only: When inventory items that track quantity on hand are
consumed, to automatically set a default location and mark it as verified, select the
Automatically mark inventory details as verified when location is defaulted in check box. (If
you want to require staff to verify the location when an item that tracks quantity on hand is
consumed, clear this check box.)
b. If you want to select the item with the oldest expiration date at a location as the default when
consuming inventory (for example, when invoicing an item), select the Automatically default in
the oldest expiration date in the location check box.
111
Chapter 4: Setting Practice and Workstation Defaults
IMPORTANT: Use the Automatically default in the oldest expiration date in the location option
only if your practice’s policy is to always consume the oldest inventory stock first.
6. Click Apply to save your changes and continue setting defaults, or click OK to save your changes
and close the window.
Invoice Defaults
Use Invoice defaults to set up the selections you use most frequently when working with invoices.
Before You Begin
¾ Set up invoice types (Controls > Invoice Types).
To set the Invoice defaults:
1. On the Controls menu, select Defaults > Practice and Workstation. The Practice and Workstation
Defaults window appears.
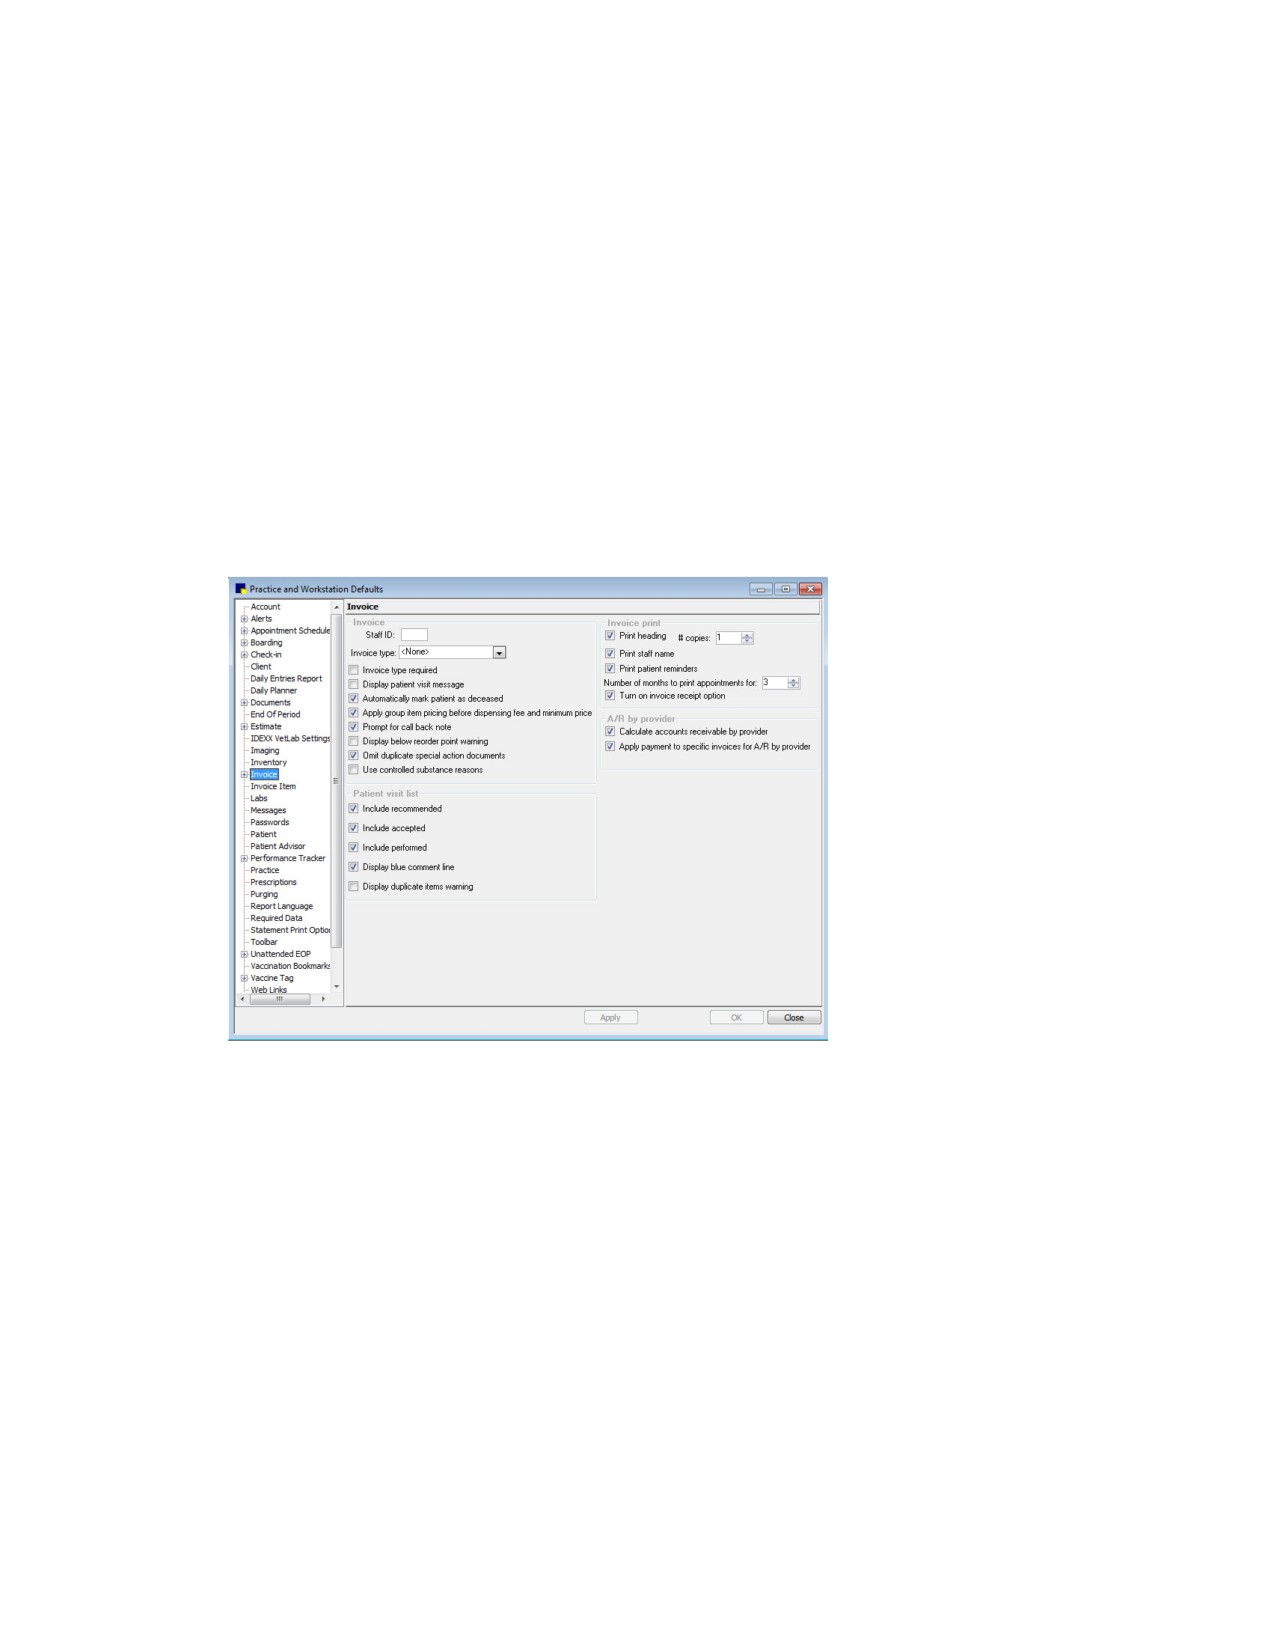
2. In the navigation pane, click Invoice. The Invoice configuration pane appears.
Invoice defaults
3. In the Invoice area, do the following:
a. In the Staff ID text box, type the ID for the staff member to use by default on new invoice or
press F2 to select a staff member from the Staff List.
b. From the Invoice type drop-down list, select the type of invoice to use by default when creating
a new invoice.
c. Select the Invoice type required check box to make an invoice type mandatory.
d. Select the Display patient visit message check box if you always want to see a message
asking you if you want to see the Patient Visit List (PVL). Clear the check box if you want the PVL
to automatically appear when it includes items for the patient you are invoicing.
e. Select the Automatically mark patient as deceased check box to automatically change a
patient’s status to Deceased when they are invoiced for an item with the special action Mark As
112
Chapter 4: Setting Practice and Workstation Defaults
Deceased. If this option is not selected, staff must verify the patient’s status each time the
special action is used.
f.
Select the Apply group item pricing before dispensing fee and minimum price check box if
your practice gives discounts on invoice item groups and you want to exclude dispensing fees
and minimum prices from the discount.
g. Select the Prompt for call back note check box if you want to be prompted to enter a call back
note when a call back reminder is entered on an invoice. Clear the check box if you do not want
a prompt.
h. Select the Display below reorder point warning check box if you want an alert box to open
when an item that is at or below the reorder point is placed on an invoice. Clear the check box if
you do not want an alert.
i.
Select the Omit duplicate special action documents check box to prevent duplicate
documents from printing when multiple items on the invoice are set up to print the same
document.
j.
Select the Use controlled substance reasons check box if you want to require staff to enter a
reason when a controlled substance is dispensed. The controlled substance reason prints on
the Controlled Substance Log. See “Controlled Substance Reasons” on page 35.
4.
In the Invoice print area, do the following:
a. Select the Print heading check box if you want your practice information to appear at the top of
invoices. Clear the check box if you do not want to print practice information; for example, if your
practice uses invoice paper with a preprinted logo.
b. In the # copies text box, specify the number of invoice copies to print by default.
c. Select the Print staff name check box if you want the name of the provider who performed the
service to print on the invoice. Clear the check box if you do not want the name to print.
d. Select the Print patient reminders check box if you want to print patient reminders on invoices.
e. To print future appointments for active patients on the bottom of invoices, enter the number of
months in the Number of months to print appointments for text box.
f.
Select the Turn on invoice receipt option check box to allow printing 3-1/8” invoice receipts
instead of full page invoices (an Epson TM-T88IV receipt printer is required for printing invoice
receipts). You can also specify Full Invoice or Invoice Receipt as the default for this
workstation using the Workstation default settings.
5.
In the A/R by provider area, do the following:
a. Select the Calculate accounts receivable by provider check box if you pay your providers
based on collected accounts receivable. Selecting the A/R by provider defaults activates the
Aged Accounts Receivable Report by Staff and the Productivity by Staff Report. If you do not
pay your providers this way, do not activate these reports.
b. Select the Apply payment to specific invoices for A/R by provider check box to always apply
payments received to the specific invoice (if this option is not selected, the payment on the
invoice will be applied to the oldest balance first). In general, we recommend that you do not
select this option unless you are also using the previous Calculate accounts receivable by
provider option.
113
Chapter 4: Setting Practice and Workstation Defaults
Note: If you activate the A/R by provider defaults, when you save the defaults, the system requires
that you enter the percentage of accounts receivable for each aging period (30, 60, 90) that currently
exists for each provider.
6. In the Patient visit list area, do the following:
a. When you open the Patient Visit List, recommended, accepted, and performed items are
automatically selected to be transferred to an invoice. To change the types of items that are
selected automatically, clear the Include recommended, Include accepted, and Include
performed check boxes as needed.
b. To turn off the blue comment line that displays in the Patient Visit List by default, clear the
Display blue comment line check box.
c. Select the Display duplicate items warning check box if you want the software to warn you
when duplicate items are entered for a patient on the Patient Visit List.
7. Click Apply to save your changes and continue setting defaults, or click OK to save your changes
and close the window.
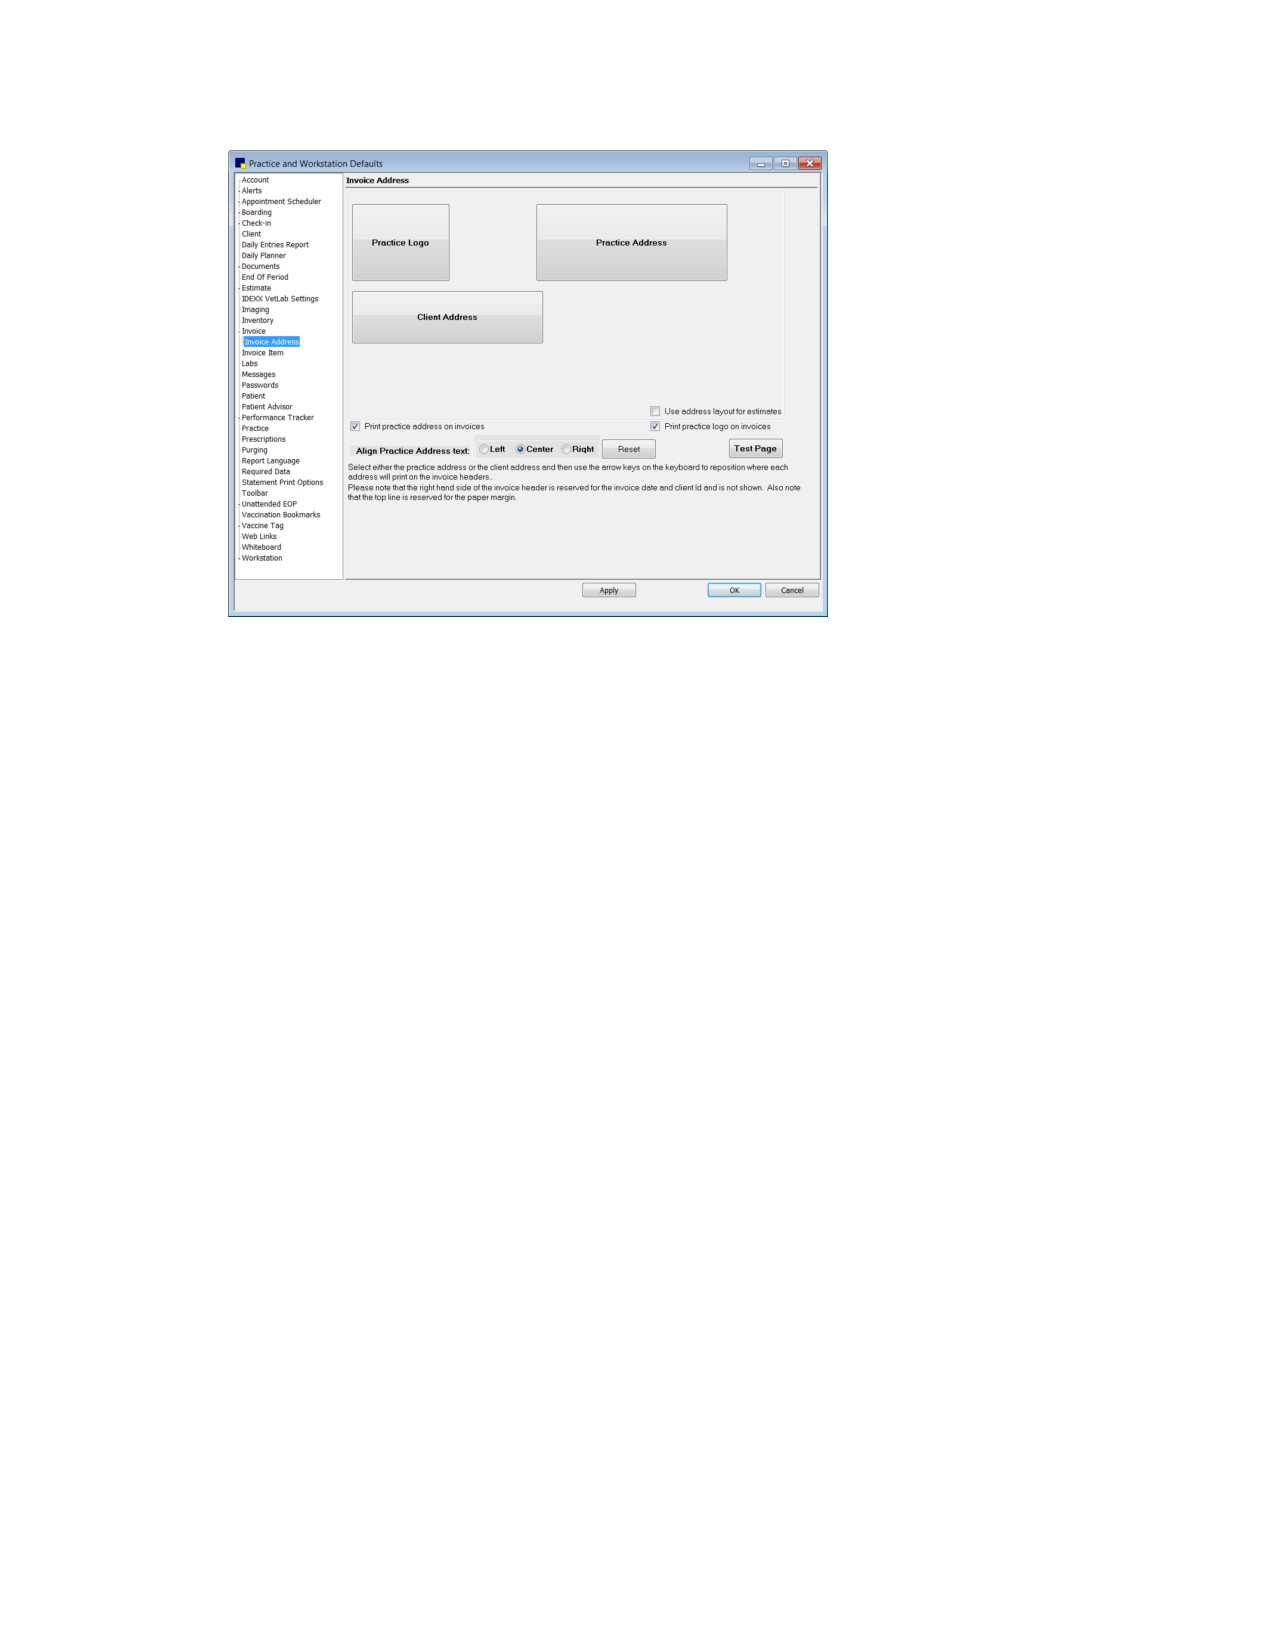
Invoice Address Defaults
The Invoice Address defaults allow you to change where the practice and client addresses print on the
invoice to accommodate different types of window envelopes.
If you specified a practice logo in Practice defaults, you have the option to include that logo in the
header of your invoices. You can set up your invoice header layout to include or exclude the practice
address and practice logo, depending on your preferences and the information included in your logo.
See “Practice Defaults” on page 127 for more information on adding a practice logo.
IMPORTANT: If you choose to print a practice logo on your invoices, ensure that the logo does not
cover important header information, such as the client name, address, and date. Other header
information is not adjusted or positioned relative to the physical space taken up by the logo.
To set the Invoice Address defaults:
1. On the Controls menu, select Defaults > Practice and Workstation. The Practice and Workstation
Defaults window appears.
2. In the navigation pane, click Invoice to expand its subproperties, and then click the Invoice
Address subproperty. The Invoice Address configuration pane appears.
114
Chapter 4: Setting Practice and Workstation Defaults
Invoice Address defaults
Tip: If you have already set up a header layout for use on estimates and want to use the same
layout for invoices, in Estimate Address defaults, select the Use address layout for invoices check
box. This allows you to set up your header positioning once for use on both estimates and invoices.
3.
To include the practice address in the invoice header, select the Print practice address on
invoices check box. The Practice Address positioning box appears.
4.
To include a practice logo in the invoice header, select the Print practice logo on invoices check
box. (Note: This option is not enabled until you specify a practice logo graphic file in Practice
defaults.) The Practice Logo positioning box appears.
5.
Click the logo or address positioning box you want to move, and then use your keyboard arrow keys
to reposition the box.
6.
Depending on the Practice Logo and Practice Address box positioning, you may want to also
change the Align Practice Address text setting (Left, Center, or Right) to align the name and
address text accordingly. For example, if you position the Practice Address at the left margin, you
may also want to align the name and address text at the left margin.
7.
To print a test page that includes placeholder blocks for the header and footer fields in your current
layout, first click Apply, and then click Test Page.
Note: On the test page, three blocks on the right side of the header are reserved for the client ID,
invoice number, and date; you cannot move these blocks.
8.
If necessary, click Reset to undo your positioning changes and start over based on the default
alignment settings.
9.
If you want to use the same layout for estimates, select the Use address layout for estimates
check box. This allows you to set up your header positioning once for use on both invoices and
estimates.
10. Click Apply to save your changes and continue setting defaults, or click OK to save your changes
and close the window.
115
Chapter 4: Setting Practice and Workstation Defaults
Tip: We recommend printing a sample invoice to check your address alignment before printing
actual client invoices. You may need to readjust depending on your envelope.
Invoice Item Defaults
Invoice Item defaults are used when you set up new invoice items. The defaults include ID numbering,
applying taxes and discounts, dispensing fee amount, and the item’s unit of measure.
Before You Begin
• Set up taxes (Controls > Taxes).
• Set up discounts (Controls > Discounts).
To set the Invoice Item Defaults:
1. On the Controls menu, select Defaults > Practice and Workstation. The Practice and Workstation
Defaults window appears.
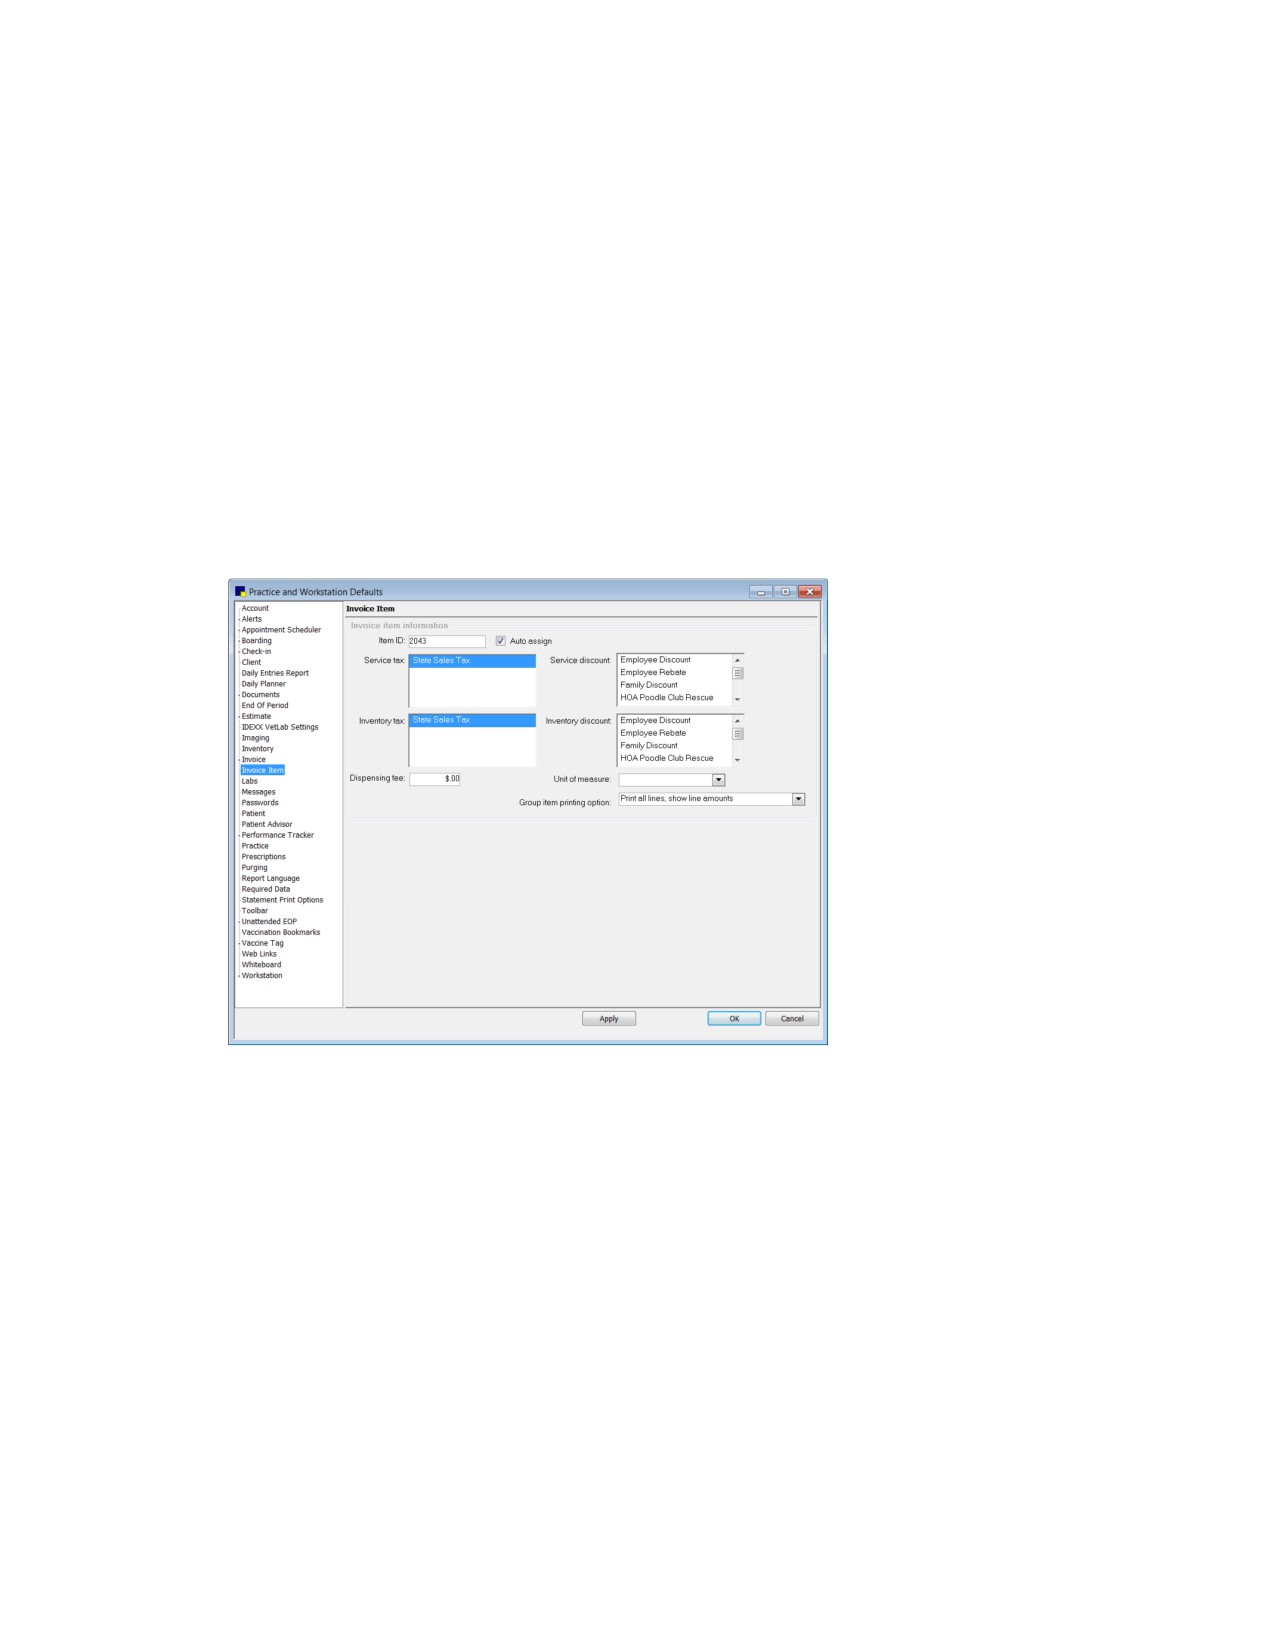
2. In the navigation pane, click Invoice Item. The Invoice Item configuration pane appears.
Invoice Item defaults
3. In the Item ID text box, type the beginning invoice item ID. If item IDs are auto-assigned,
Cornerstone uses the item ID entered here as the starting (first) ID from which to increment when
generating a new ID.
4. To have Cornerstone automatically generate item ID numbers when setting up new invoice items,
select the Auto assign check box.
5. In the Service tax and Inventory tax lists, select the tax settings that apply to the majority of invoice
items (you can apply more than one tax).
Note: You can also set up taxes for an entire invoice item classification when updating an item
classification in Lists > Invoice Item Class. Any defaults that apply to the item classification are in
addition to the taxes set up in Invoice Item defaults.
6. In the Service discount and Inventory discount lists, select the discount settings that apply to the
majority of invoice items (you can apply more than one discount).
116
Chapter 4: Setting Practice and Workstation Defaults
7. In the Dispensing fee text box, type the dispensing fee that applies to the majority of new invoice
items. This is the default dispensing fee that will display when you set up a new invoice item, but you
can change it at that time.
8. From the Unit of measure drop-down list, select the unit of measure that applies to the majority of
new invoice items. Select [None] if you do not want to use a default unit of measure.
9. From the Group item printing option drop-down list, select the default printing option to use for
printing group items on the invoice:
• Print all lines, show line amounts-Prints the name of the group and individual lines for each
item in the group and amounts for each item.
• Print all lines, show group total amount-Prints the name of the group and individual lines for
each item in the group but shows only the total amount on the group line at the top. The
individual lines will have an amount of zero.
• Print detail lines only-Prints only the individual lines for each item in the group and the amount
for each item.
• Print group line only-Prints only the name of the group and the total amount.
10. Click Apply to save your changes and continue setting defaults, or click OK to save your changes
and close the window.
Labs Defaults
You can specify a default staff ID for laboratory requests, including a “No default staff” option.
To set the Labs defaults:
1. On the Controls menu, select Defaults > Practice and Workstation. The Practice and Workstation
Defaults window appears.
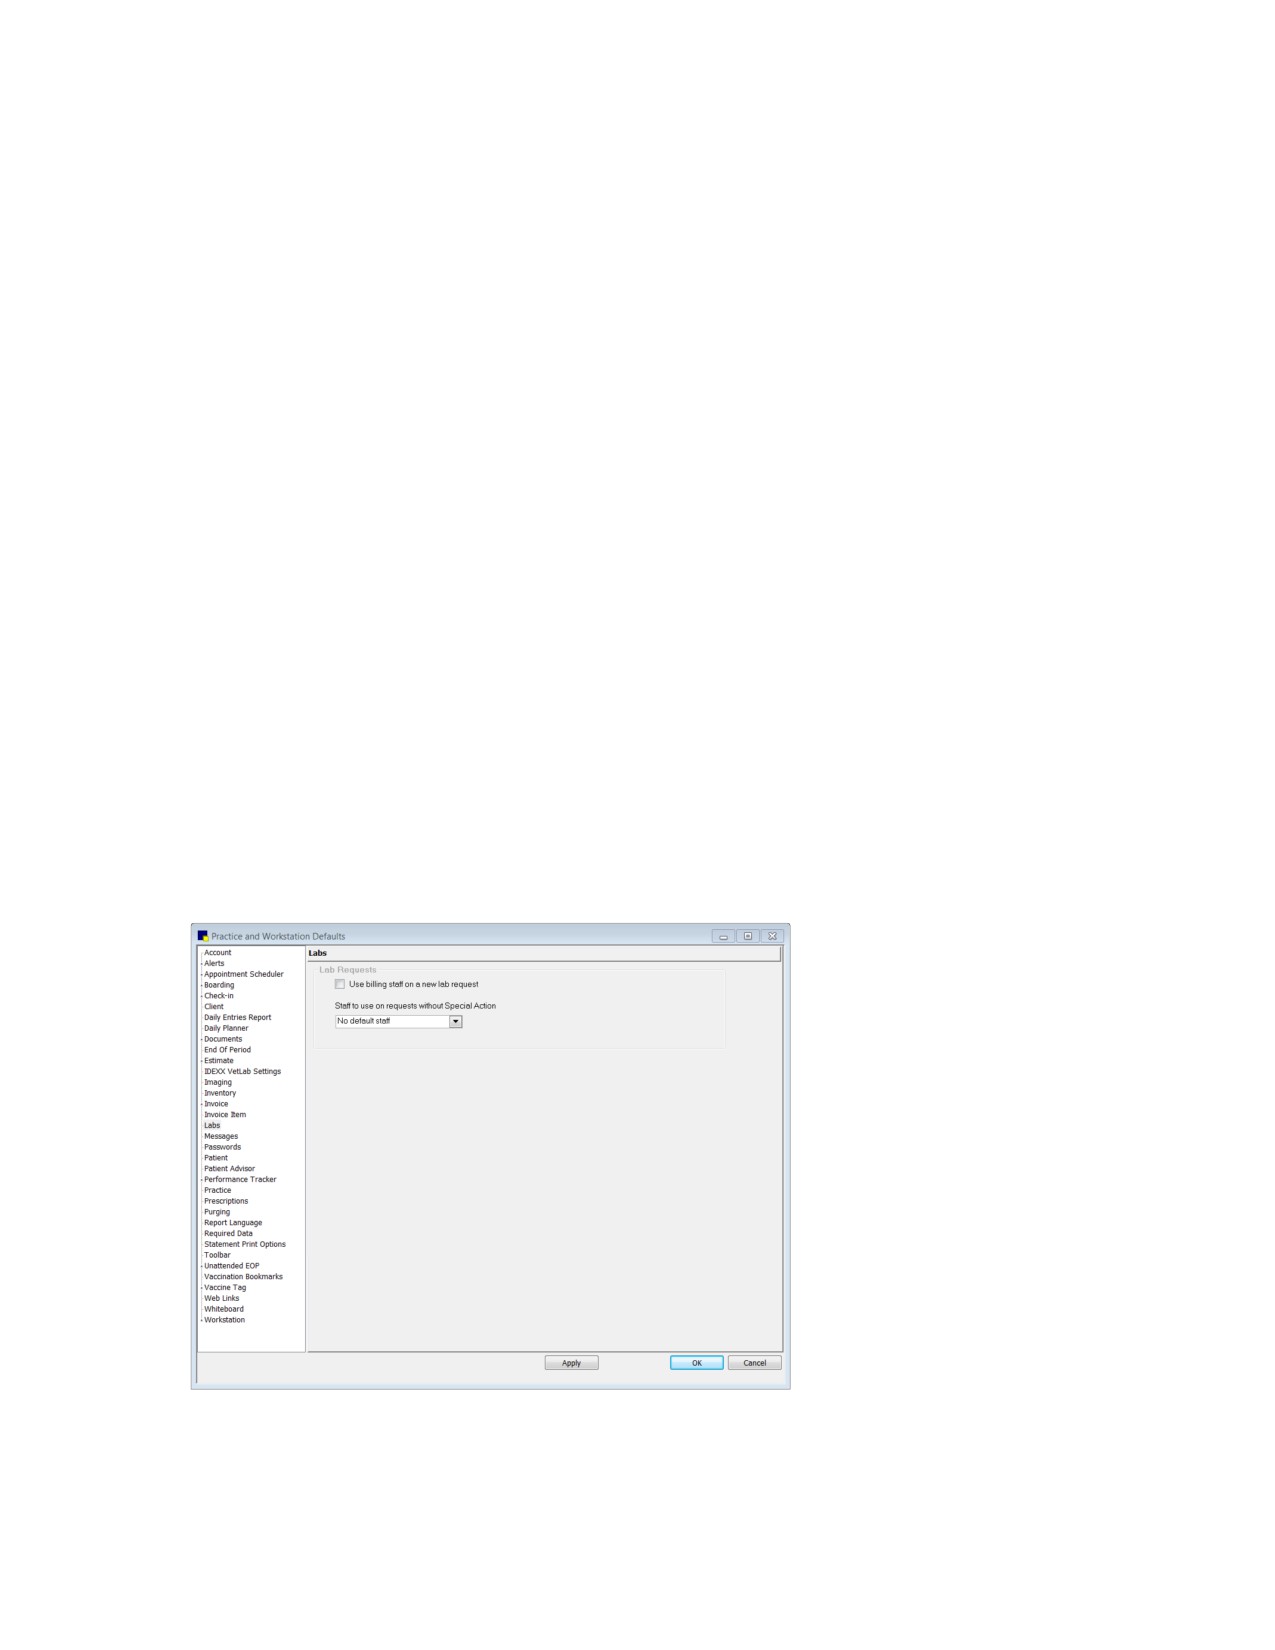
2. In the navigation pane, click Labs. The Labs configuration pane appears.
Labs defaults
117
Chapter 4: Setting Practice and Workstation Defaults
3. For requests associated with special actions, select the Use billing staff on a new lab request
check box to designate that the billing staff on the Patient Visit List or the invoice should be used as
the default staff ID on the request.
If this option is not selected, then the default staff ID for special action requests is the ID of the last
staff member who performed a lab request on the workstation.
4. For lab requests not associated with special actions, select from the following options:
• No default staff—The person creating a request will need to select a staff ID for each request.
• Last staff used on workstation—The default staff ID will be the ID of the last staff member who
created a request on the workstation.
• Specific staff—Type a default staff ID, or press F2 to search for and select the ID.
5. Click OK.
Messages Defaults
Use Messages defaults to select the messages you print most often on invoices, estimate footers, and
statements.
Before You Begin
¾ Set up billing messages (Controls > Billing Messages).
To set the Messages defaults:
1. On the Controls menu, select Defaults > Practice and Workstation. The Practice and Workstation
Defaults window appears.
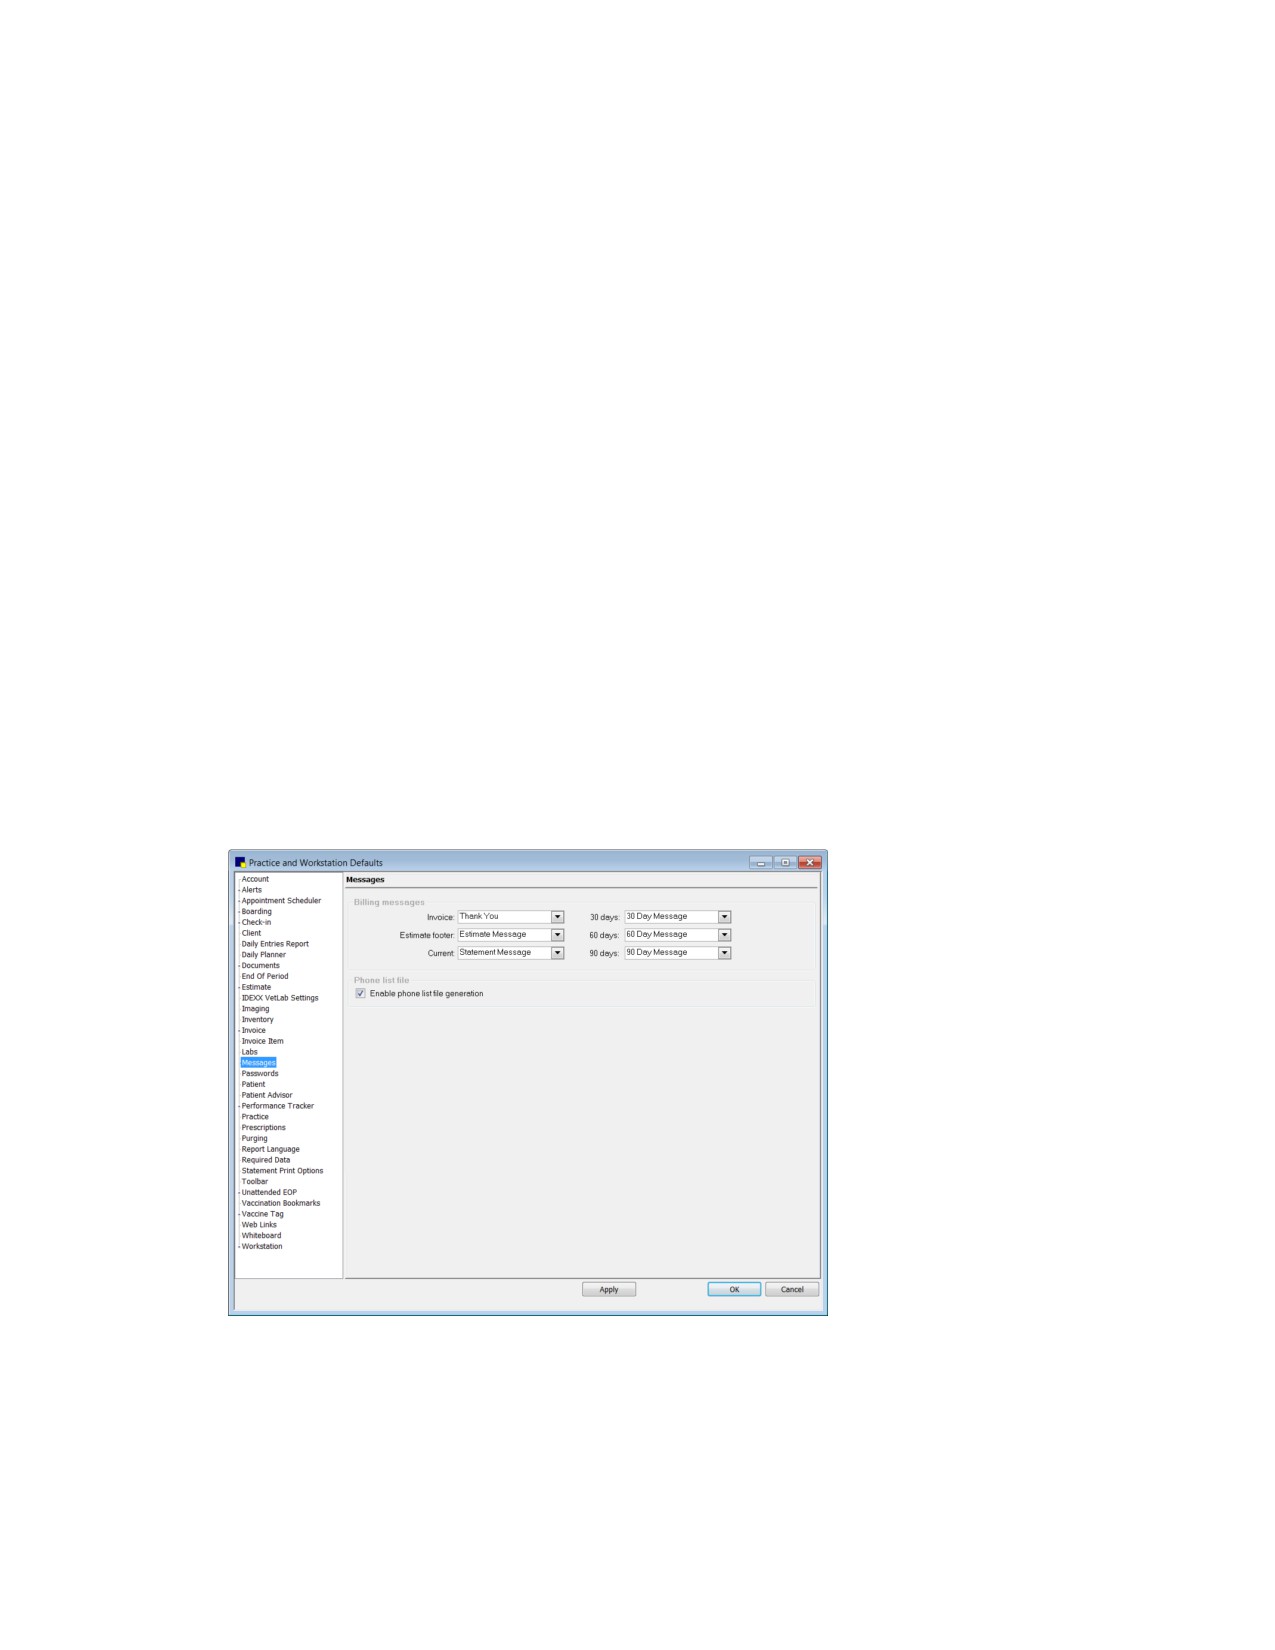
2. In the navigation pane, click Messages. The Messages configuration pane appears.
Messages defaults
3. From the Invoice, Estimate footer, Current, 30 days, 60 days, and 90 days drop-down lists,
select the default messages to print. (These messages are set up in Controls > Billing Messages.)
Note: Current, 30, 60, and 90 days messages print on the statement according to the client’s
account status.
118
Chapter 4: Setting Practice and Workstation Defaults
4. Click Apply to save your changes and continue setting defaults or click OK to save your changes
and close the window.
Password Defaults
The Password defaults allow practices to set a higher level of system security for increased information
control or to meet regulatory compliance requirements. With the enhanced password security settings,
you can add a new level of security to your Cornerstone software by managing password strength and
duration requirements.
Note: The staff member modifying Password defaults must have appropriate security permissions to
perform such tasks in Cornerstone. We recommend that only the Cornerstone Administrator have
access to the Password defaults.
To set the Passwords defaults:
1. On the Controls menu, select Defaults > Practice and Workstation. The Practice and Workstation
Defaults window appears.
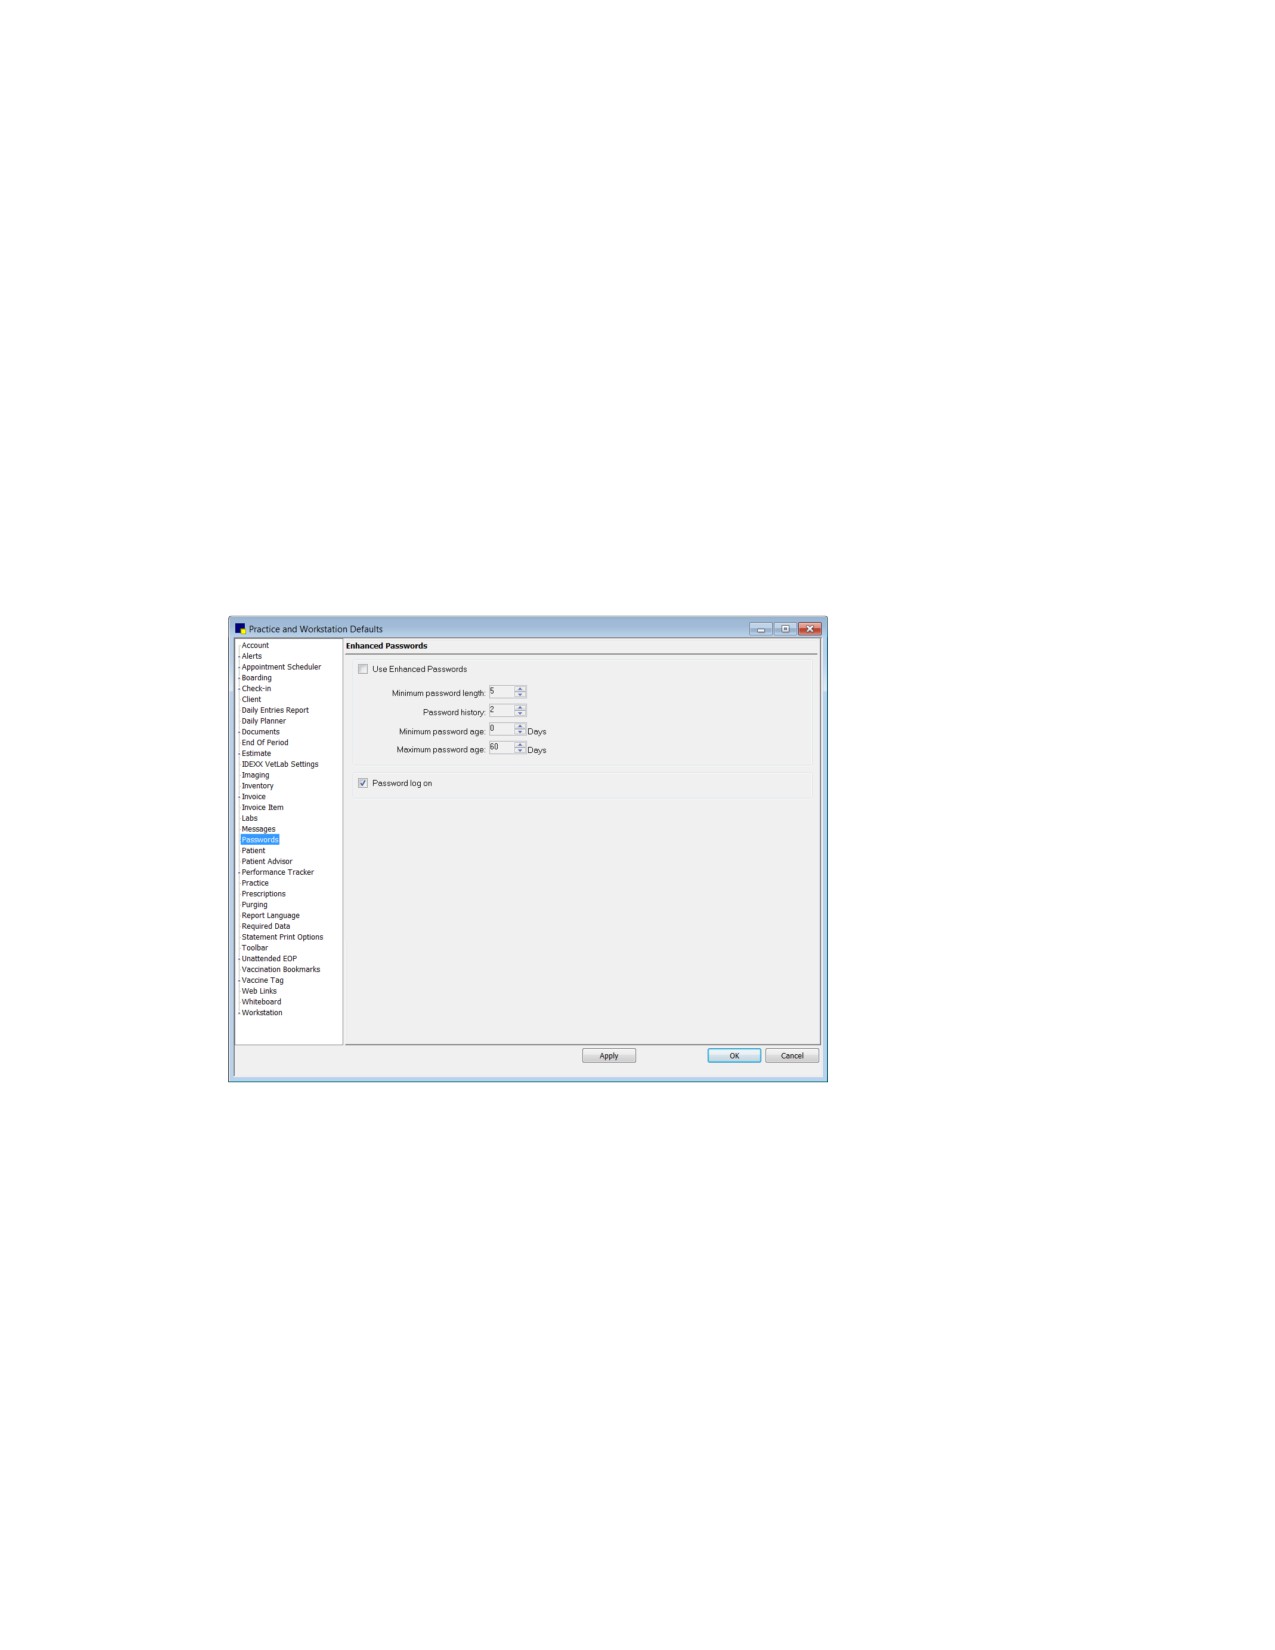
2. In the navigation pane, click Passwords. The Enhanced Passwords configuration pane appears.
Passwords defaults
3. If you want to set up requirements for password strength and duration, select the Use Enhanced
Passwords check box. With this option selected, each password must contain a combination of
three of the following:
• Uppercase letter
• Lowercase letter
• Number
• Special character (such as !@#$%)
4. Specify the enhanced password requirements using the following settings:
• Minimum password length-Password must meet the specified minimum character length to
be valid.
119
Chapter 4: Setting Practice and Workstation Defaults
• Password history-Password cannot be the same as the last [specified number] of passwords
used.
• Minimum password age-Password must be [specified number] of days old before it can be
changed.
• Maximum password age-Password must be changed every [specified number] of days.
5. To allow staff members to log in using only a password, select the Password log on check box. To
use this feature, each staff member’s login must have a unique password .
6. Click Apply to save your changes and continue setting defaults, or click OK to save your changes
and close the window.
Patient Defaults
Patient defaults include preferences for patient information and the Patient List display.
Before You Begin
• Set up patient classifications (Controls > Classifications).
To set the Patient defaults:
1. On the Controls menu, select Defaults > Practice and Workstation. The Practice and Workstation
Defaults window appears.
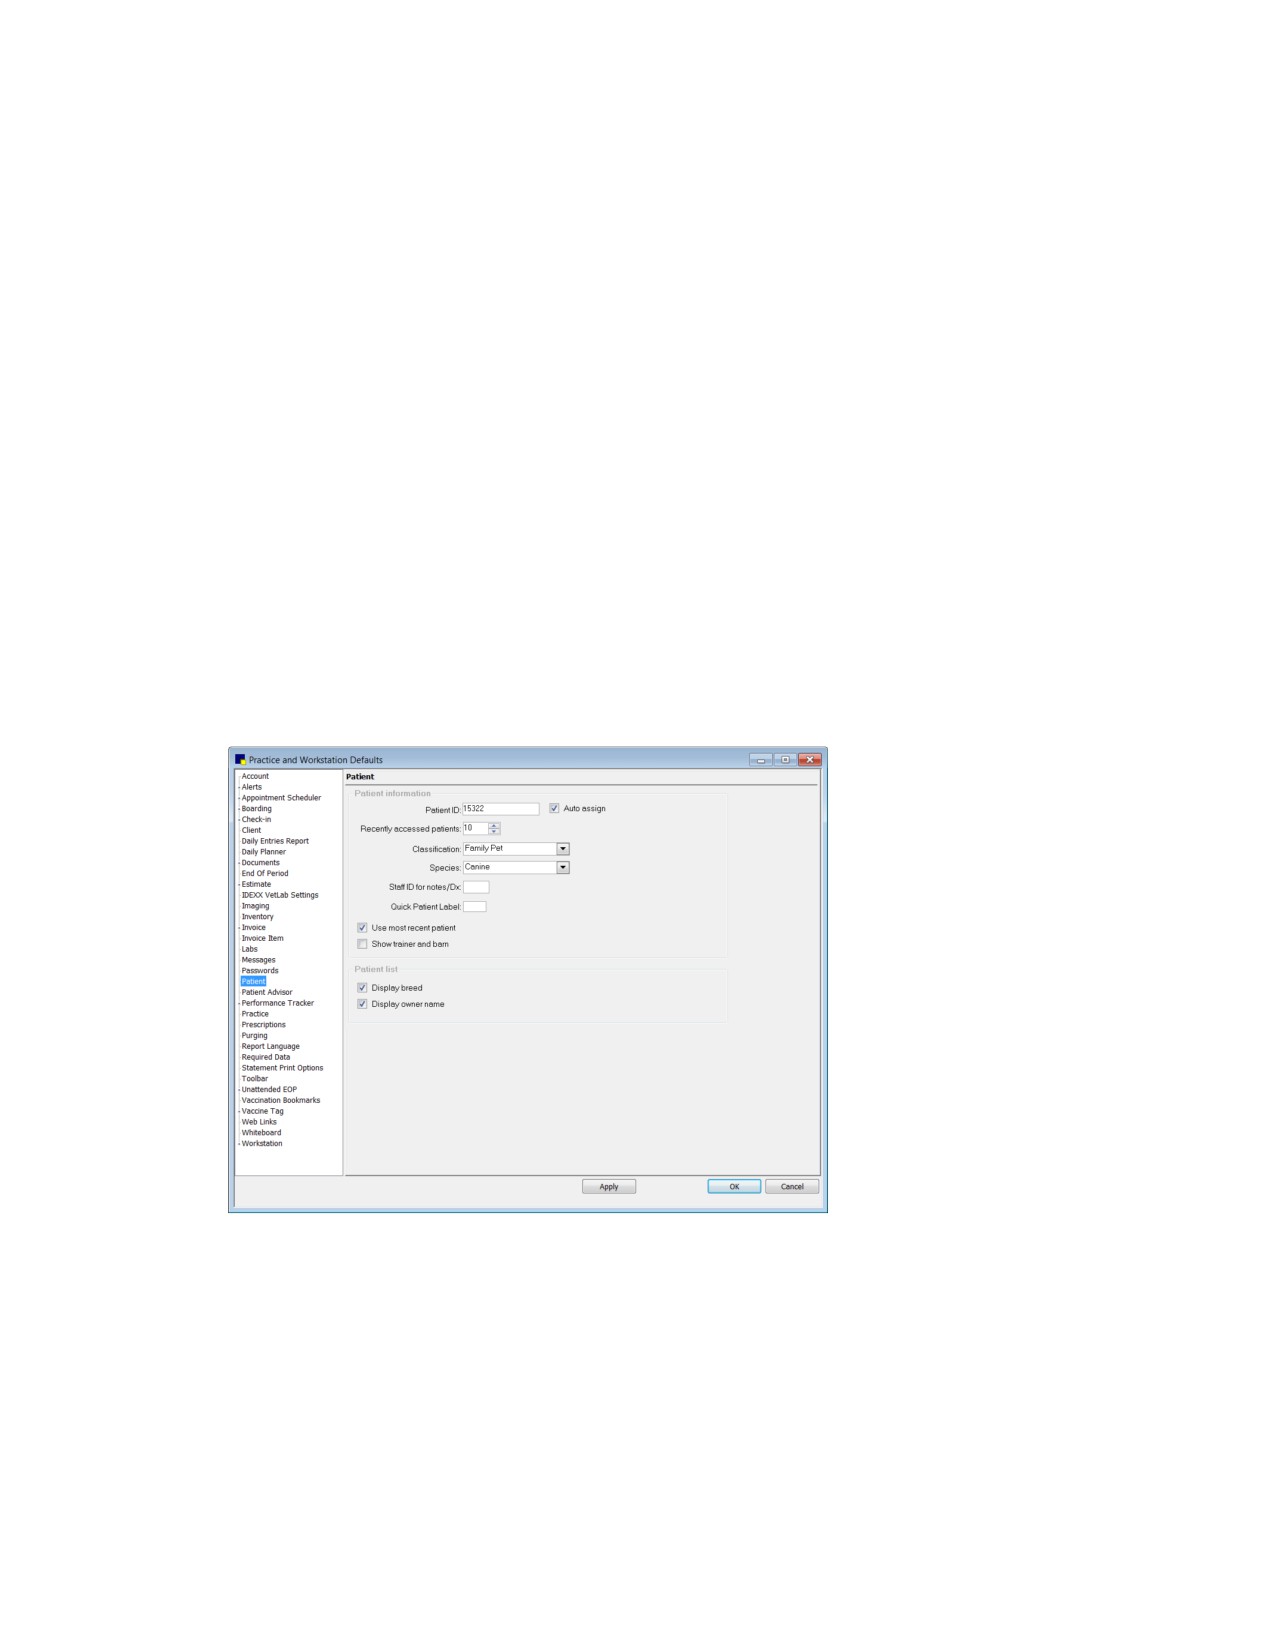
2. In the navigation pane, click Patient. The Patient configuration pane appears.
Patient defaults
3. In the Patient information area, set the following options as needed for your practice:
a. In the Patient ID text box, type the beginning Patient ID to be used when a new patient record is
created.
b. Select the Auto assign check box if you want ID numbers to be generated automatically when
setting up new patients. Clear the check box if you do not want ID numbers to be generated
automatically.
120
Chapter 4: Setting Practice and Workstation Defaults
c. In the Recently accessed patients text box, enter the number of patients (up to 99) you want
Cornerstone to remember. The recent patients appear first when you press F2 to select a
patient from the Patient List. See the Cornerstone User’s Manual for information on using recent
patients.
d. From the Classification and Species drop-down lists, select the classification and species that
apply to the majority of your patients.
e. In the Staff ID for notes/Dx text box, type the ID of the staff member most likely to be entering
medical notes and diagnostic codes. You can also press F2 to select the staff member from the
Staff List.
f.
In the Quick Patient Label text box, type the document ID (Doc ID) of a label (or document) to
automatically print each time you add a new patient.
g. Select the Use most recent patient check box to display the patient whose record was last
opened when you accessed the Patient File or Patient Visit List or one of these windows: patient
weight, patient diagnosis, patient reminders, or medical notes.
h. Select the Show trainer and barn check box if you want to be able to designate clients as
trainers or barns and associate patients with trainers and barns.
4.
In the Patient list area, do the following:
a. Select the Display breed check box if you want Cornerstone to display the breed of the animal
in the Patient List.
b. Select the Display owner name check box if you want the Owner Name column to replace the
Client ID column in the Patient List. The owner names display in alphabetical order for quick
retrieval.
5.
Click Apply to save your changes and continue setting defaults, or click OK to save your changes
and close the window.
Physical Exam/Patient Advisor* Defaults
The Patient Exam/Patient Advisor defaults allow you to specify preferences for printing Pet Health
Report Cards. In addition, if you have Patient Advisor*, you can set preferences for printing and posting
Treatment Plans.
The Physical Exam feature (also known as Patient Exam) is included with all Cornerstone systems. It
allows practices to record physical exam observations and comments using standard body system
templates and to print a Pet Health Report Card.
The Patient Advisor feature is available if your practice purchased the module before it was
discontinued. If Patient Advisor is installed, it replaces the basic Physical Exam features in the program.
Patient Advisor includes all of the functionality of Physical Exam, plus it includes client instructions and
medical protocols that you can customize to your practice’s needs to create and print a Treatment Plan.
Note: If you have installed the Patient Advisor module, “Patient Advisor” displays in place of “Physical
Exam” in several areas within Cornerstone (Practice and Workstation defaults, right-click menu on
Patient Clipboard, Activities menu, etc.).
To set the Physical Exam/Patient Advisor defaults:
1. On the Controls menu, select Defaults > Practice and Workstation. The Practice and Workstation
Defaults window appears.
121