IDEXX Cornerstone. Administrator’s Manual (8.3 NEXT version 8.3.6) - page 3
Chapter 3: Setting Up Lists and Information
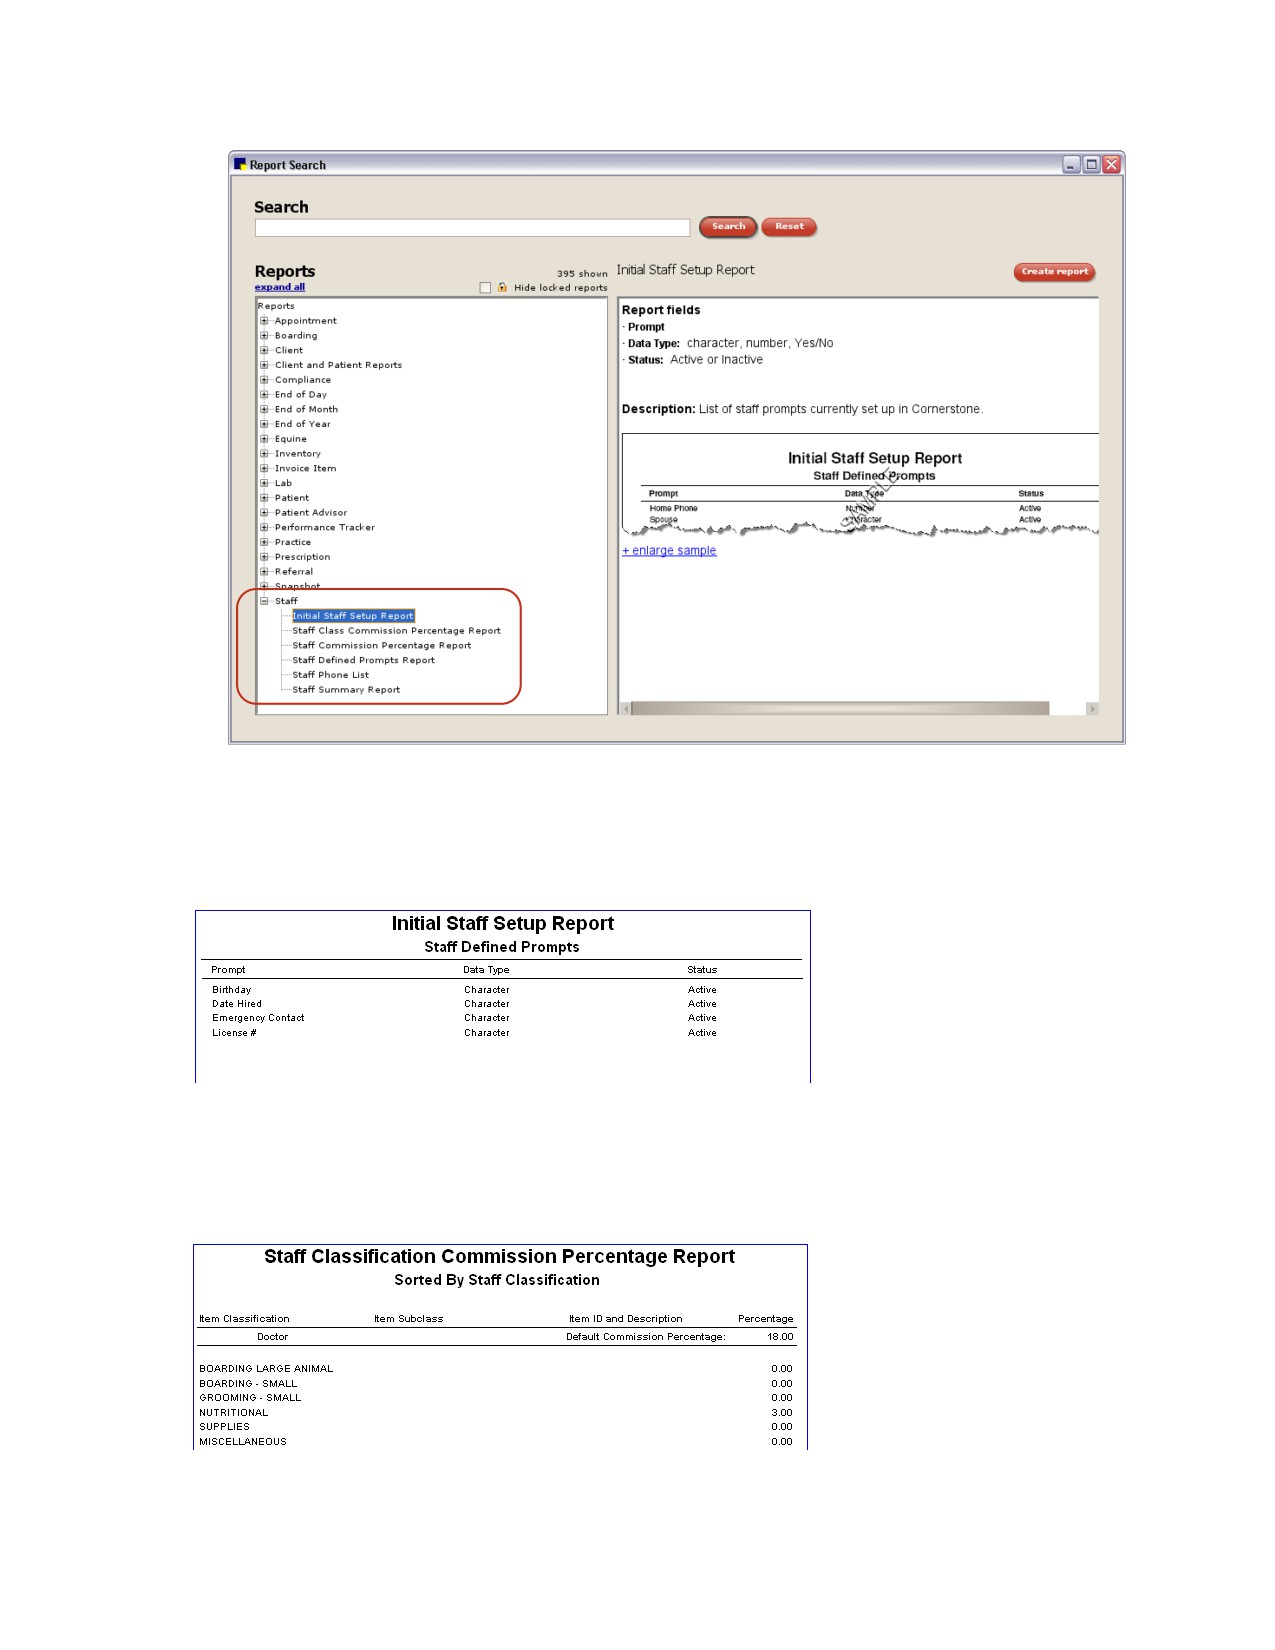
Staff Reports
Initial Staff Setup Report
This report shows the custom staff prompts designed for your system.
Sort options: Staff Defined Prompts
Staff Class Commission Percentage Report
This report lists staff commission percentages that are based on classification.
Sort options: Staff Classification
62
Chapter 3: Setting Up Lists and Information
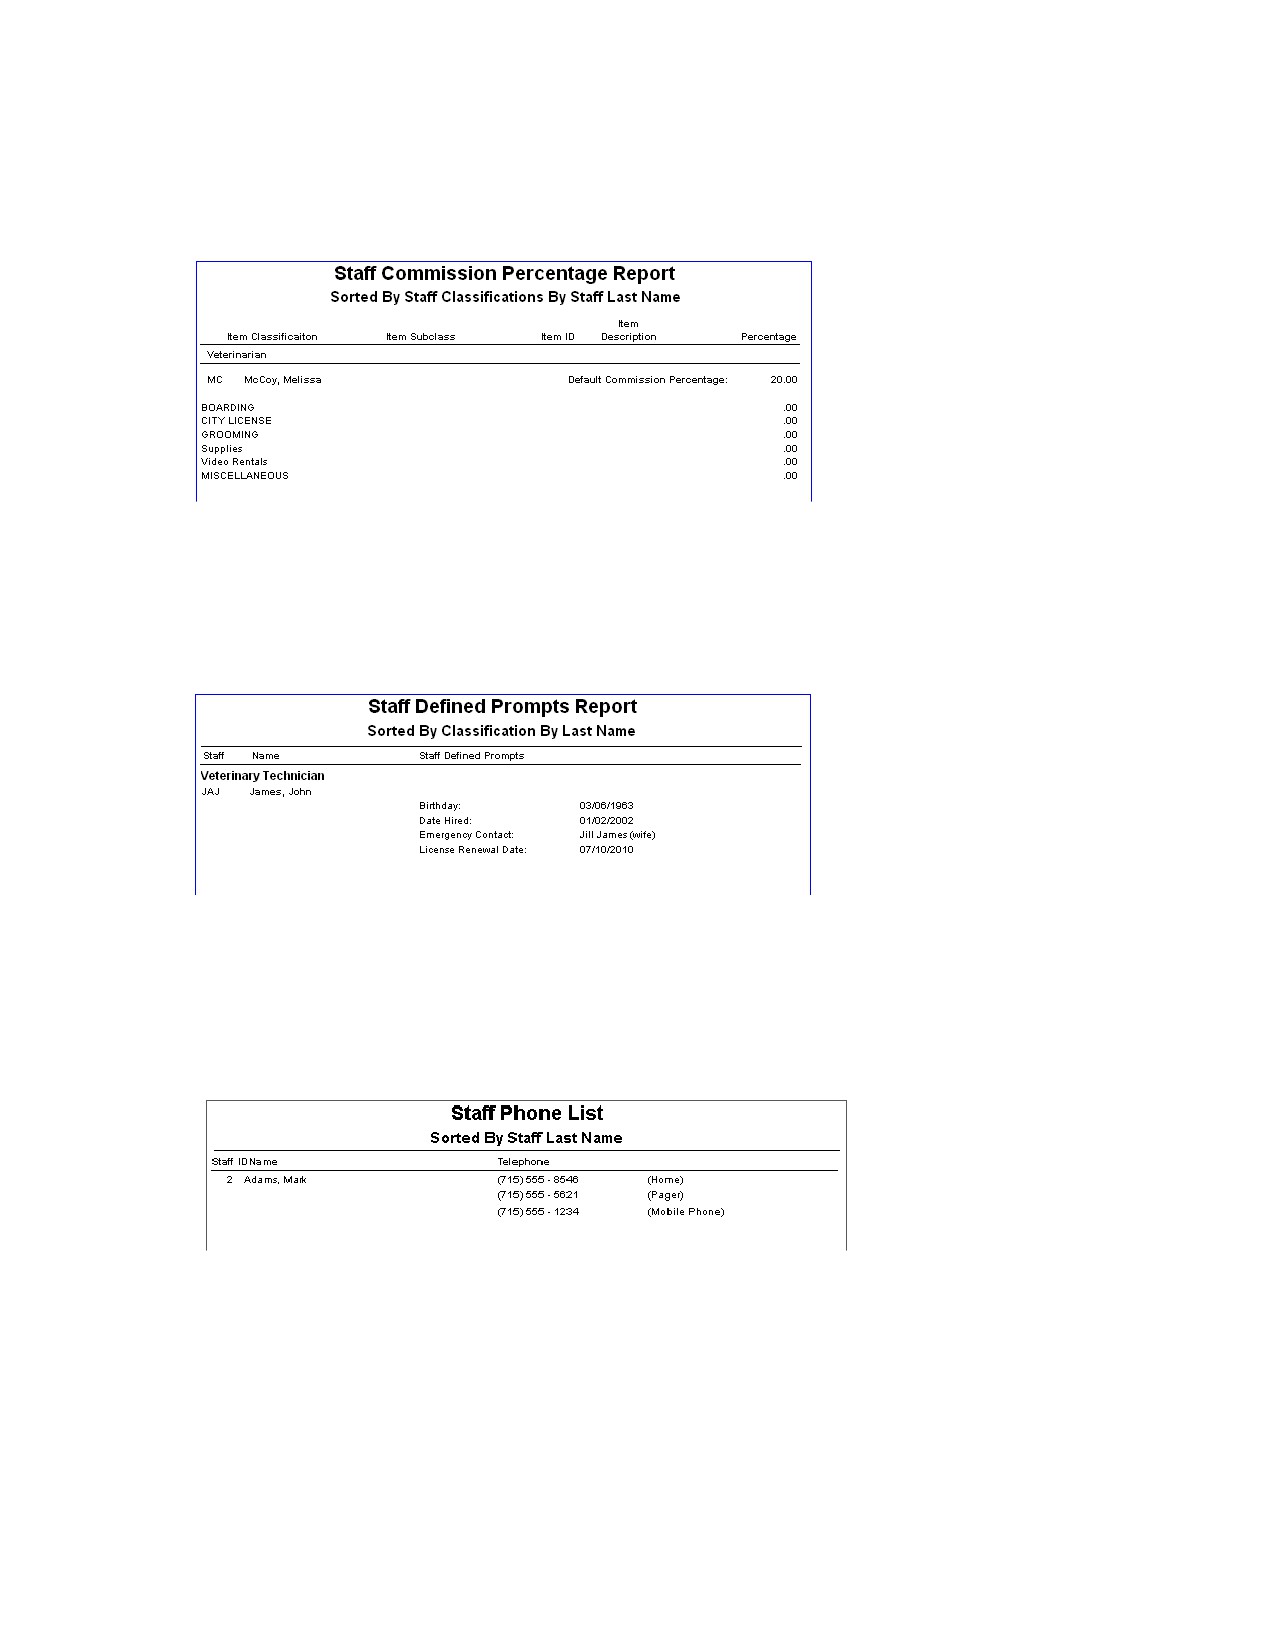
Staff Commission Percentage Report
This report lists staff commission percentages for individual staff members.
Sort options: Staff Classification by Last Name
Staff Defined Prompts Report
This report lists the answers to prompts for staff members. Staff members who do not have answers to
the prompts in their record do not appear on the report.
Sort options: Classification by Last Name, Classification by Staff ID
Staff Phone List
This report lists all the phone numbers for staff members. You can choose to print the report for all staff
or for active staff only.
Sort options: Staff ID, Staff Last Name
63
Chapter 3: Setting Up Lists and Information
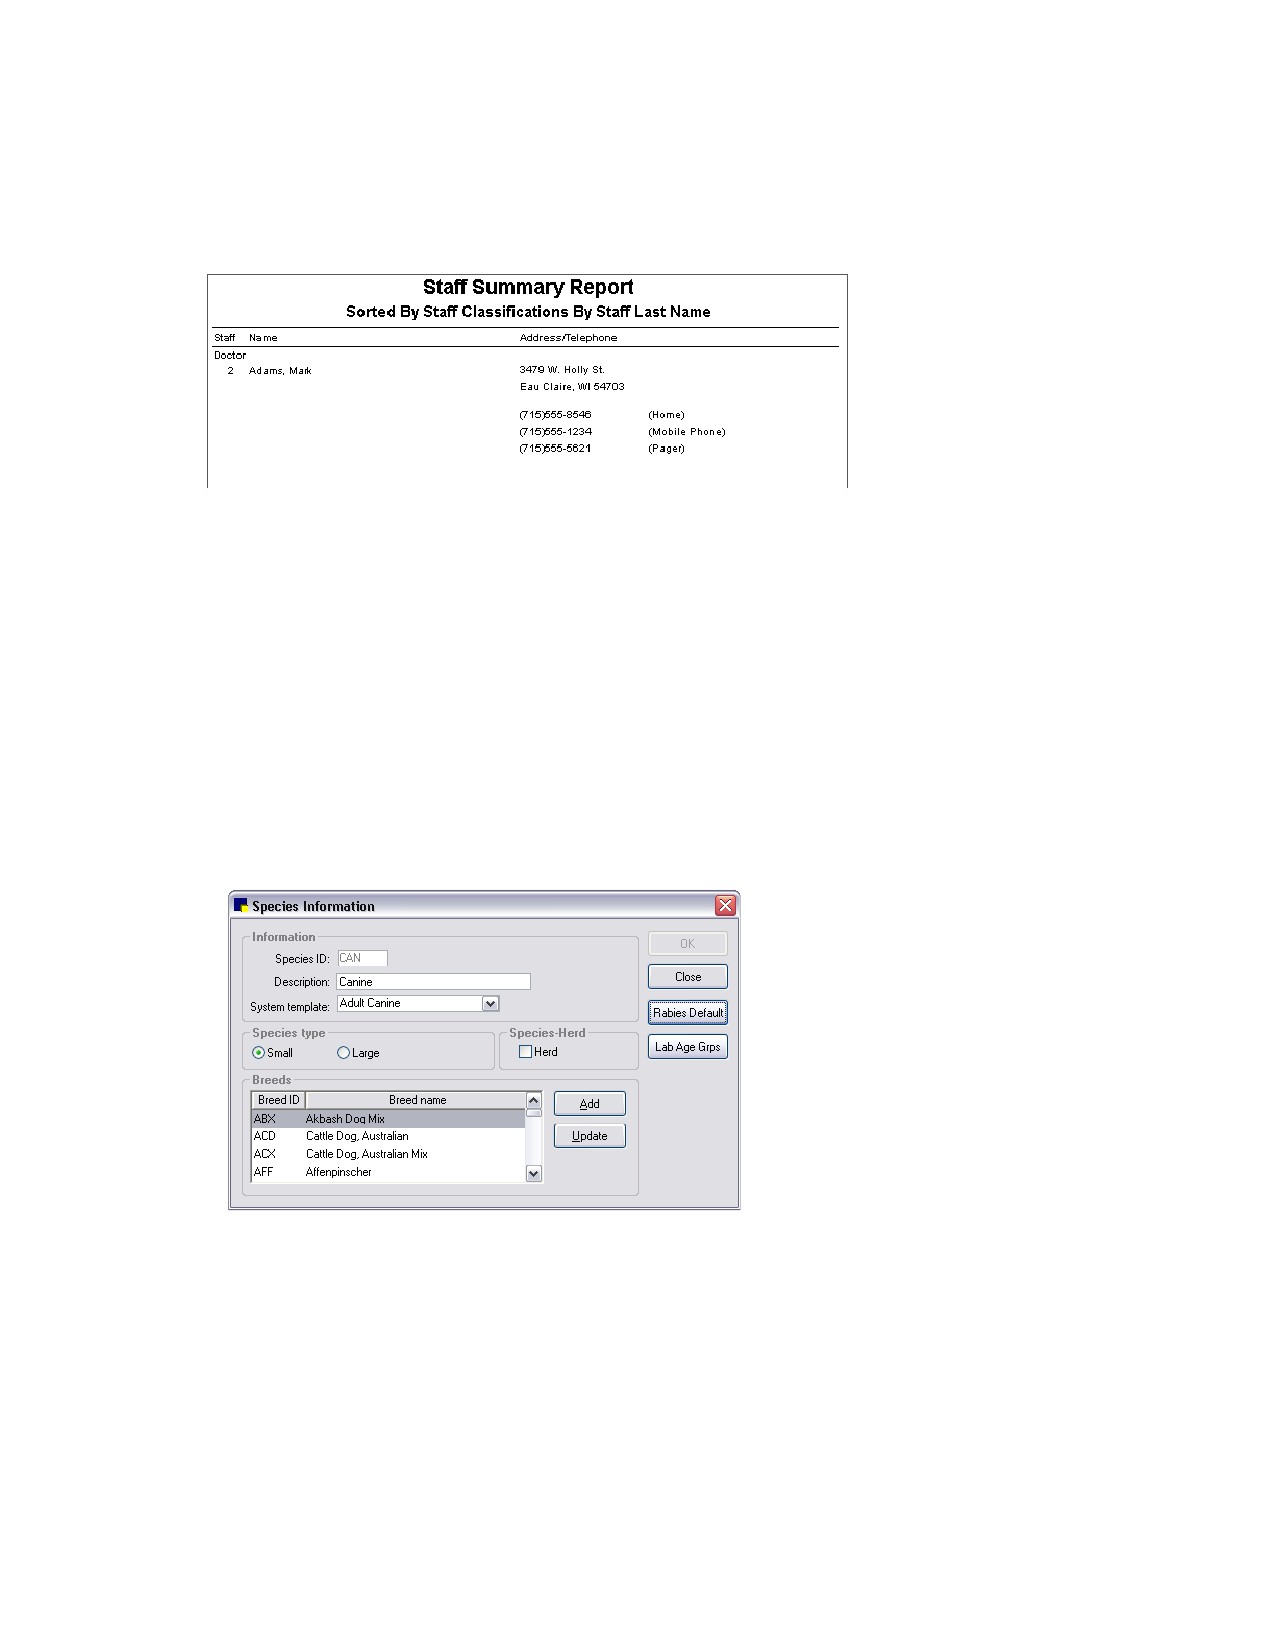
Staff Summary Report
This report shows a list of staff members with a summary of their information.
Sort options: Classification by Last Name, Classification by Staff ID
Species and Breeds
Use Species and Breeds to identify patients. Most common species and breeds are already set up for
you in Cornerstone, but you can add to or update this list if needed.
Before You Begin
¾ If you started with a Fastart* or FastInstall database, review the species and breeds already set up
in the Species List.
To add or edit a species:
1. On the Lists menu, select Species. The Species List dialog box appears.
2. Click New to add a new species or double-click an existing species to update it. The Species
Information dialog box appears.
Species Information dialog box
3. In the Species ID text box, type an ID (up to three characters) for this species.
4. In the Description text box, type an identifying name for this species.
5. In the System template drop-down list, select a default system template for this species. This is
used with the Physical Exam feature and the Patient Advisor* module.
6. Under Species type, select Small or Large so Cornerstone can filter the species list accordingly
when generating reminders.
64
Chapter 3: Setting Up Lists and Information
7. If this species is used for herd records (such as bovine), select the Herd check box. This option
prevents Missing Birthdate, Missing Weight, and Patient Born In alerts from displaying on herd
records.
8. Click OK, and then click Close.
For a list of the species and breeds in Cornerstone, print an Initial Patient Setup Report sorted by
Species/Breed.
To add a breed to a species:
1. On the Lists menu, select Species. The Species List dialog box appears.
2. Select the applicable species and click Update. The Species Information dialog box appears.
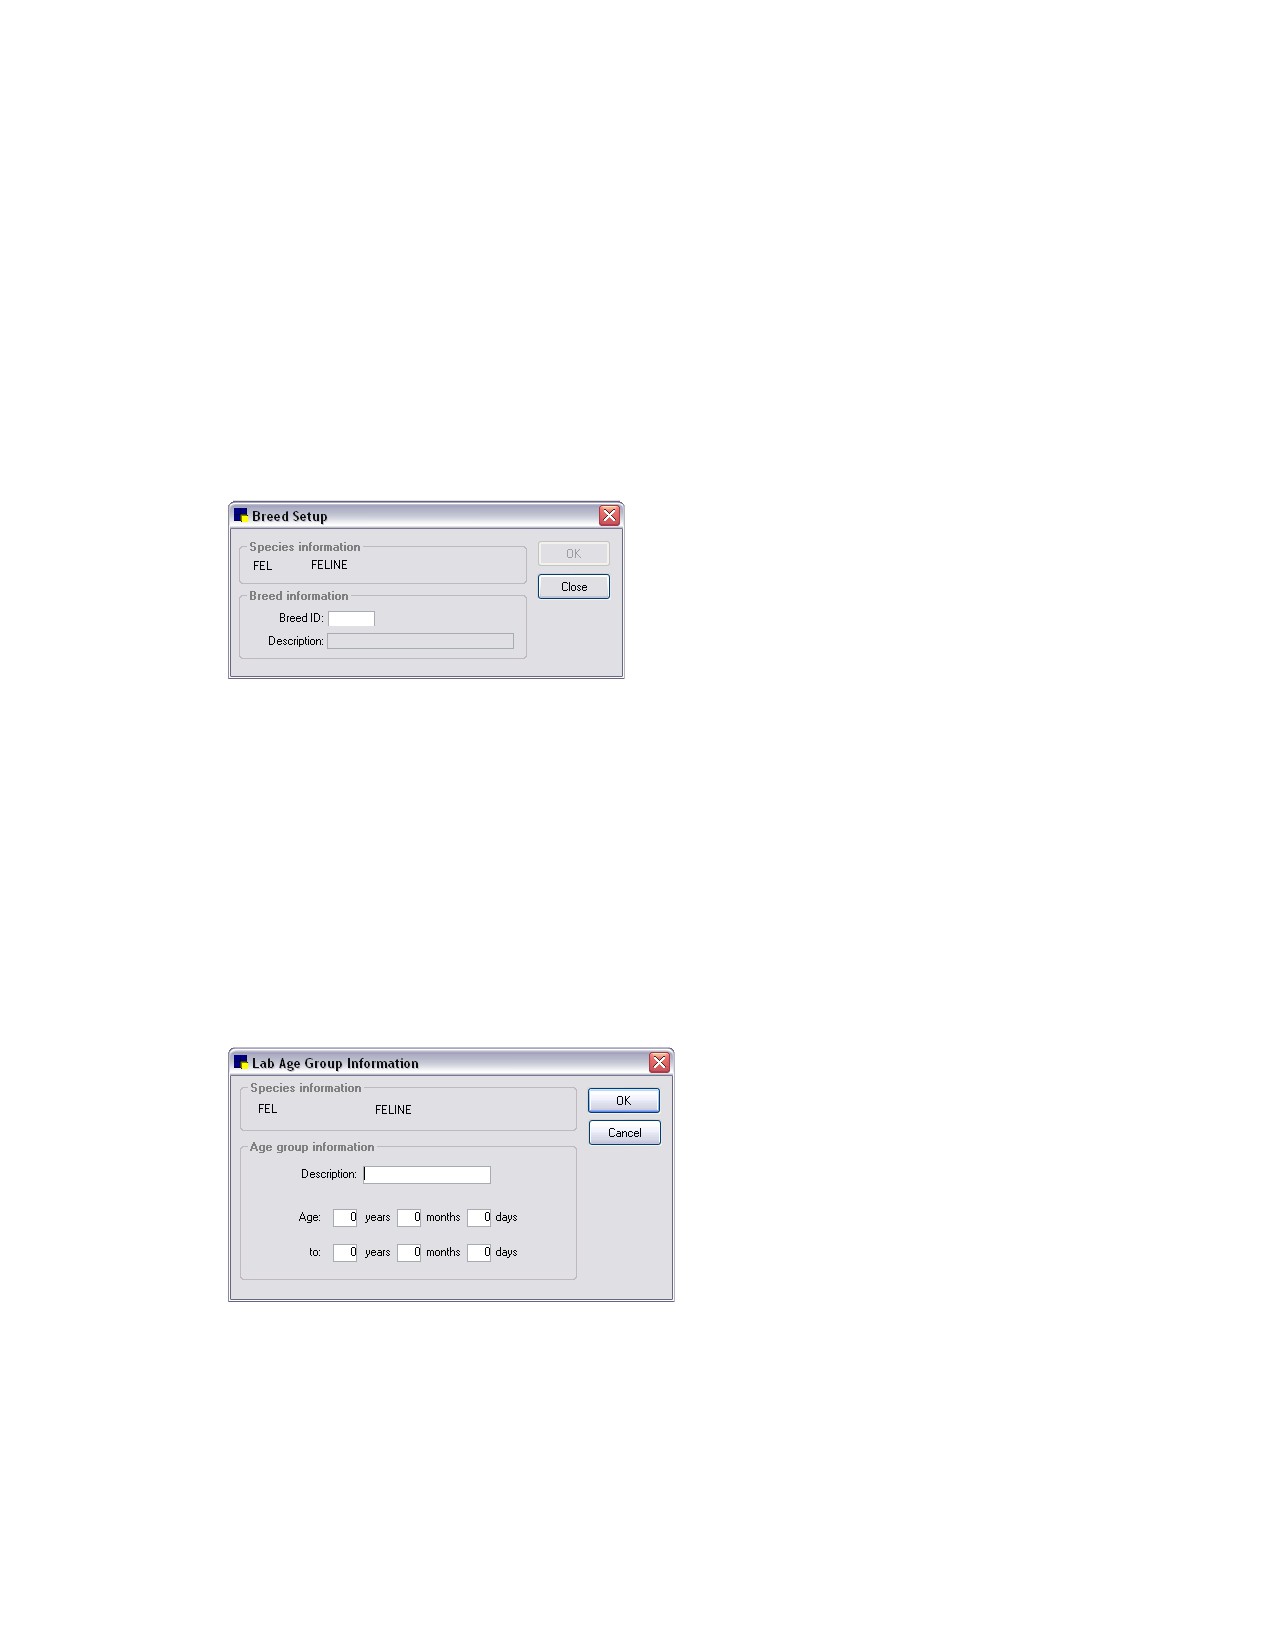
3. In the Breeds area, click Add. The Breed Setup dialog box appears.
Breed Setup dialog box
4. In the Breed ID text box, type an ID.
5. In the Description text box, type a description.
6. Click OK to add the new breed and close the Breed Setup dialog box.
To define lab age groups for a species:
Lab age groups are used when setting up default template ranges for manually entered lab results.
1. On the Species Information dialog box (Lists > Species > Name > Update), click the Lab Age
Grps button. The Lab Age Groups dialog box appears.
2. Click New to add a new age group, or double-click an existing group to update it. The Lab Age
Group Information dialog box appears.
Lab Age Group Information dialog box
3. In the Description text box, type an identifying name for the age group.
4. Use the Age/to years, months, and days text boxes to set the range for this age group.
5. Click OK to save the lab age group settings and close the Lab Age Group Information dialog box.
65
Chapter 3: Setting Up Lists and Information
Setting Species-Specific Rabies Tag Defaults
Practices that set up their vaccine/vaccination invoice items prior to Cornerstone 8.1 may have a
SERVICE-based system in place, where items are set up as vaccination service items (with no links to
vaccine inventory items). If this is the case, you can use the Species Specific Rabies Tag defaults to set
up species-specific rabies tag information for the vaccine used most often for a species. This
information is used on the Vaccine Tag window when issuing a tag, if you have a SERVICE-based
vaccine/vaccination system in place.
See “Rabies Default Settings” on page 142 for information on the Rabies Default settings used on the
window if species-specific defaults have not been set.
Note: If you have an INVENTORY-based vaccine/vaccination system in place, species-specific
rabies/vaccine tag defaults are set on the Invoice Item Information Vaccine tab. See “Setting Up Vaccine
Invoice Items” on page 206 for information.
To set Species-Specific Rabies Tag Defaults:
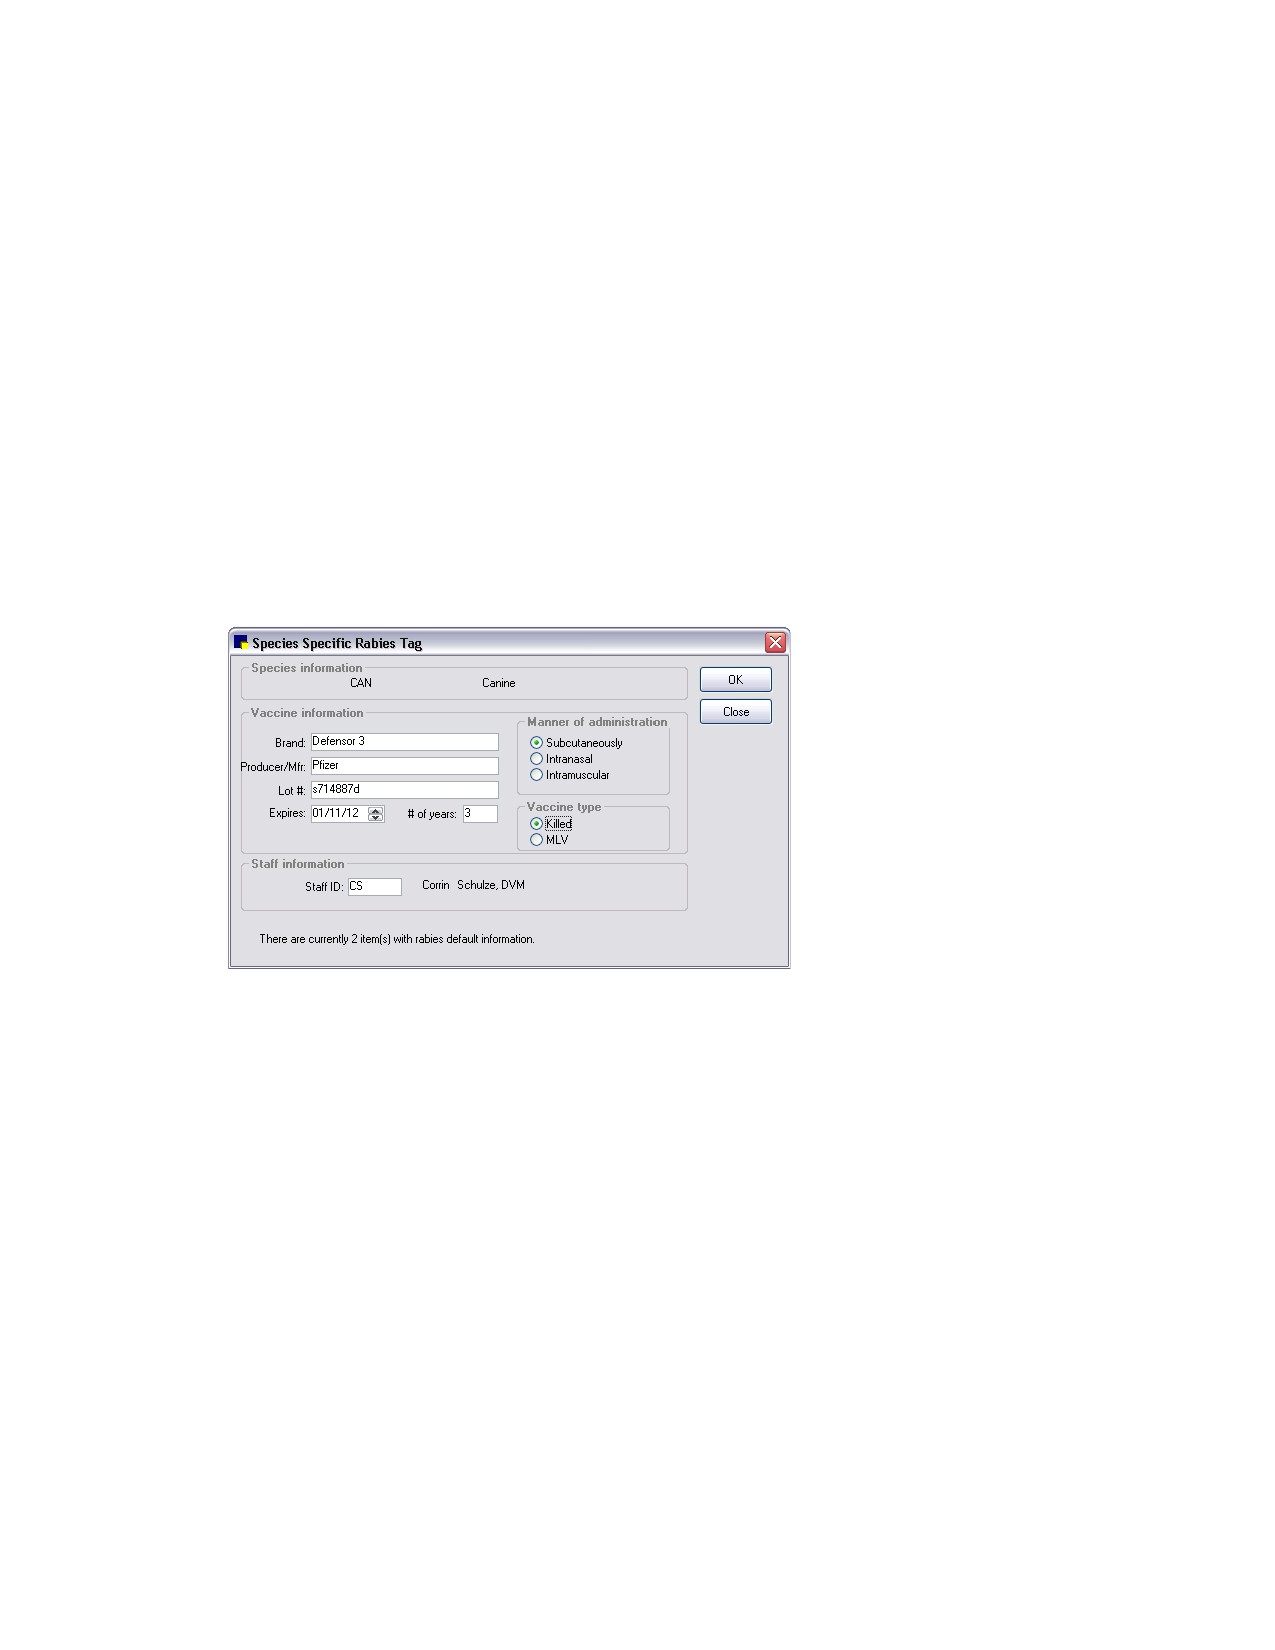
1. On the Species Information dialog box, click the Rabies Default button. The Species Specific
Rabies Tag dialog box appears.
Species Specific Rabies Tag dialog box
2. In the Brand and Producer/Mfr. text boxes, type the vaccine brand and producer/manufacturer
information for the vaccine used most often for this species.
3. In the Lot. # text box, type the vaccine lot number.
4. In the Expires text box, enter the date this lot of vaccines expires.
5. In the # of years text box, type the number of years the vaccine is viable (the certificate expiration).
6. In the Manner of administration area, specify how this vaccine is administered (Subcutaneously,
Intranasal, or Intramuscular.
7. In the Vaccine type area, select the vaccine type (Killed or MLV)
8. In the Staff ID text box, specify a staff member to display by default on the Vaccine Tag window
when issuing a tag. Type the ID or press F2 to select a staff member from the Staff List.
Note: An informational message displays at the bottom of the dialog box if there are any existing
inventory items with rabies/vaccine tag defaults set up on the Invoice Item Information Vaccine tab.
If vaccine/vaccination inventory items exist, this message indicates the number of items and serves
as a reminder that the Vaccine tab defaults will be used for those items.
66
Chapter 3: Setting Up Lists and Information
9. Click OK to save the rabies tag settings and close the Species Specific Rabies Tag dialog box.
Diagnostic Codes
Use Diagnostic Codes to enter information in a patient’s medical history to target and track patients
with particular disorders and characteristics. Obesity, infectious diseases, and skin problems are
examples of conditions that could have diagnostic codes.
You can also use diagnostic codes with insurance billing. VPI (Veterinary Pet Insurance) codes are
already set up for you and cannot be deleted. You cannot change a VPI code, but you can update the
description.
You can print diagnostic codes on the Check-In Report and Patient History Report. You can also print a
Patient Diagnosis Report that includes patients with the same diagnosis.
You can link documents to a specific diagnostic code.
To add or edit a diagnostic code:
Note: We recommend that you create a new diagnostic code if the description you want to use does not
exist. Do not use the Hospital description to change the meaning of a VPI code name.
1. On the Lists menu, select Diagnostic Codes. The Diagnostic Codes dialog box appears.
2. Click New to add a new diagnostic code, or double-click an existing code to update it. The
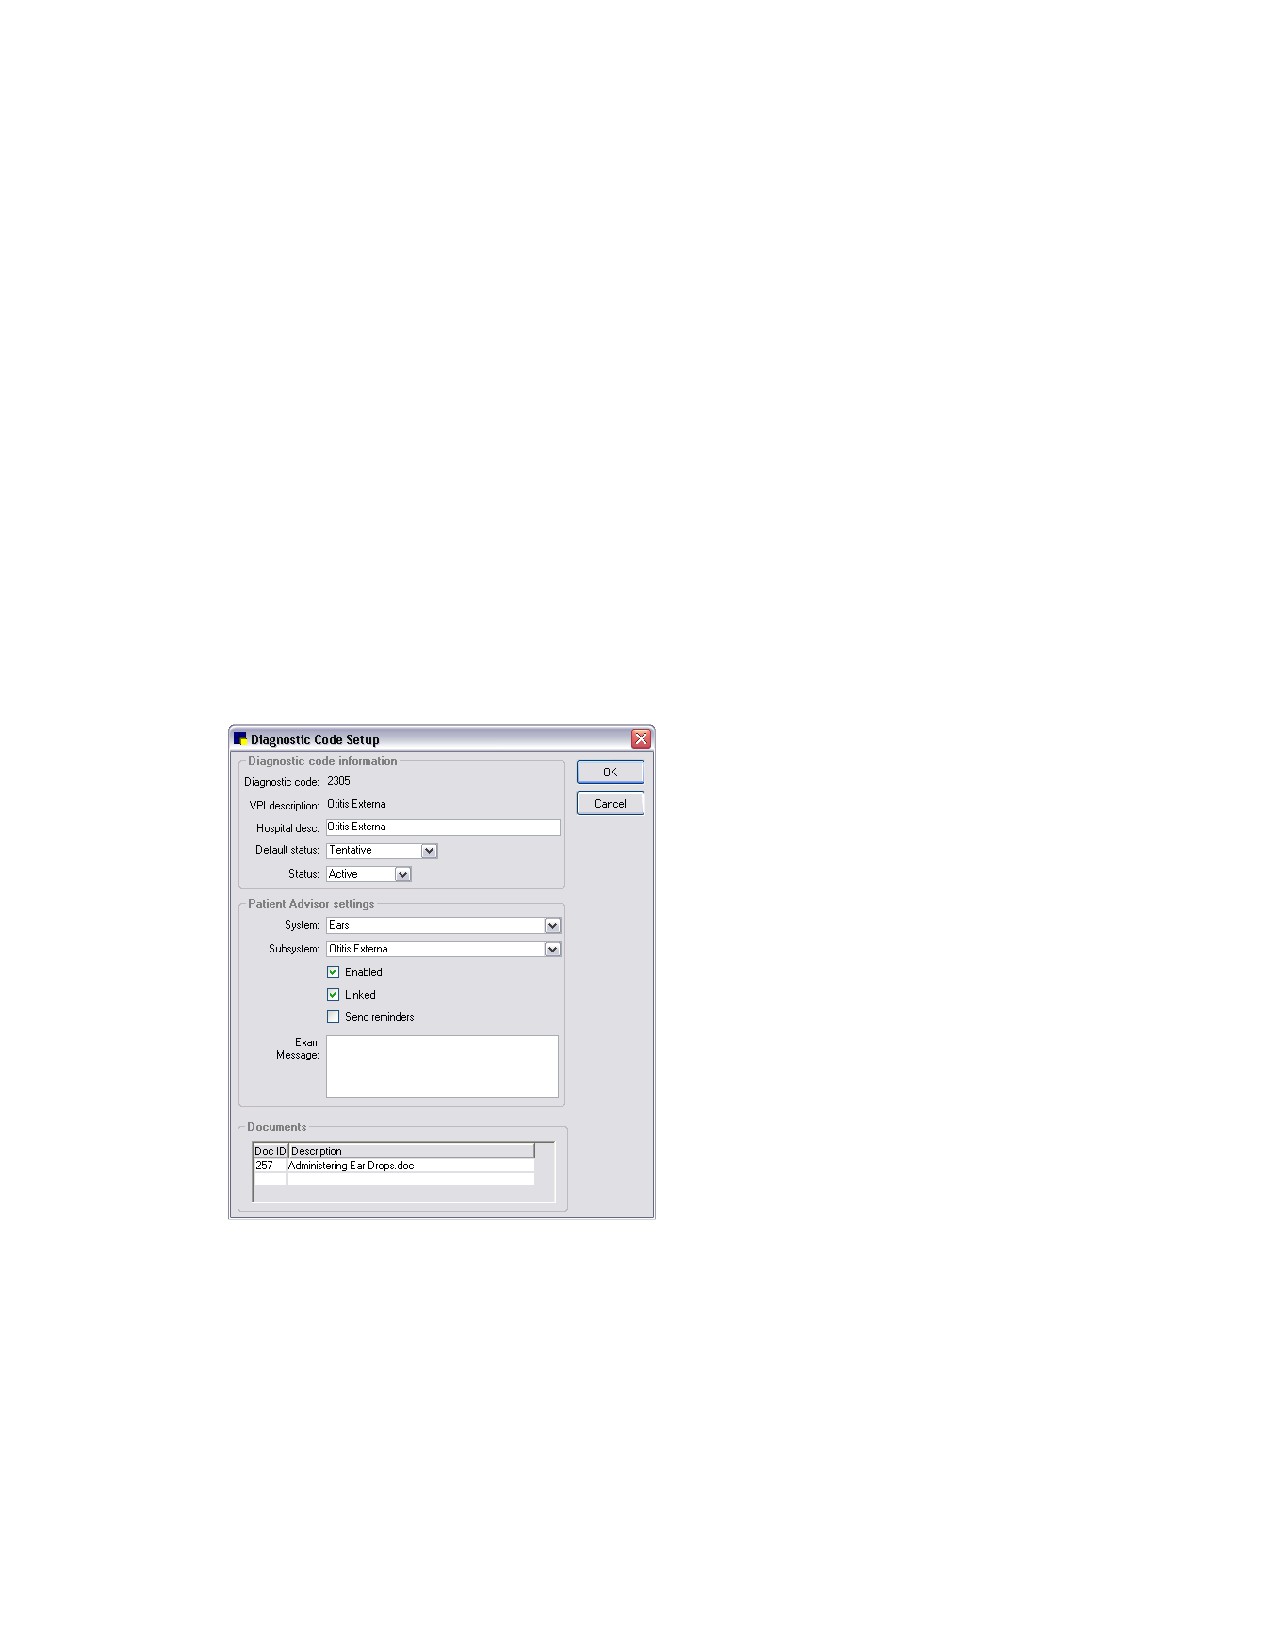
Diagnostic Code Setup dialog box appears.
Diagnostic Code Setup dialog box
3. In the Diagnostic code text box, type the diagnostic code. The code must begin with a letter and
cannot exceed ten characters. (You may notice that you have codes with numbers on your system;
only VPI codes begin with numbers. By beginning your code with a letter, it will be easy to
distinguish the codes created by your practice.)
4. In the Hospital description text box, type the description.
5. From the Default status drop-down list, select Tentative or Final. (You can change the diagnosis
status when you use it.)
67
Chapter 3: Setting Up Lists and Information
6. From the Status drop-down list, select Active or Inactive. You cannot enter an inactive code as a
diagnosis. (Change the status to Inactive only if you no longer want to use a diagnostic code.)
7. If your practice uses the Cornerstone Patient Advisor module, in the Patient Advisor settings area,
change the settings as needed. See the Patient Advisor documentation for details.
8. To link documents to this diagnostic code, in the Documents area, in an empty Doc ID field, double-
click or press F2 search for and select a document template from the Document Template List.
Repeat the step as needed to select all applicable documents to link to this diagnostic code.
9. Click OK, and then click Close.
For a list of the diagnostic codes in Cornerstone, print a Diagnostic Code Report.
Cashier IDs
Cashier IDs allow you to track which staff members can accept payments.
If cashier IDs are required in your practice, when the Payment window appears, the staff member must
enter his or her cashier password. Cashier passwords are also required when processing a returned
check or giving a refund.
You can also use Cashier IDs to specify a location; for example, the cash drawer in the reception area or
a satellite clinic.
Note: Only a staff member with administrator privileges can add or update cashier IDs.
Before You Begin
¾ Select the Use Cashier ID check box in Account defaults (see “Account Defaults” on page 84).
To add or edit a cashier ID:
1. On the Lists menu, select Cashier ID. The Cashier ID List dialog box appears.
2. Click New to add a new cashier ID or double-click an existing ID to update it.
3. The Administrator Login box appears. Type an administrator name and password and then click OK.
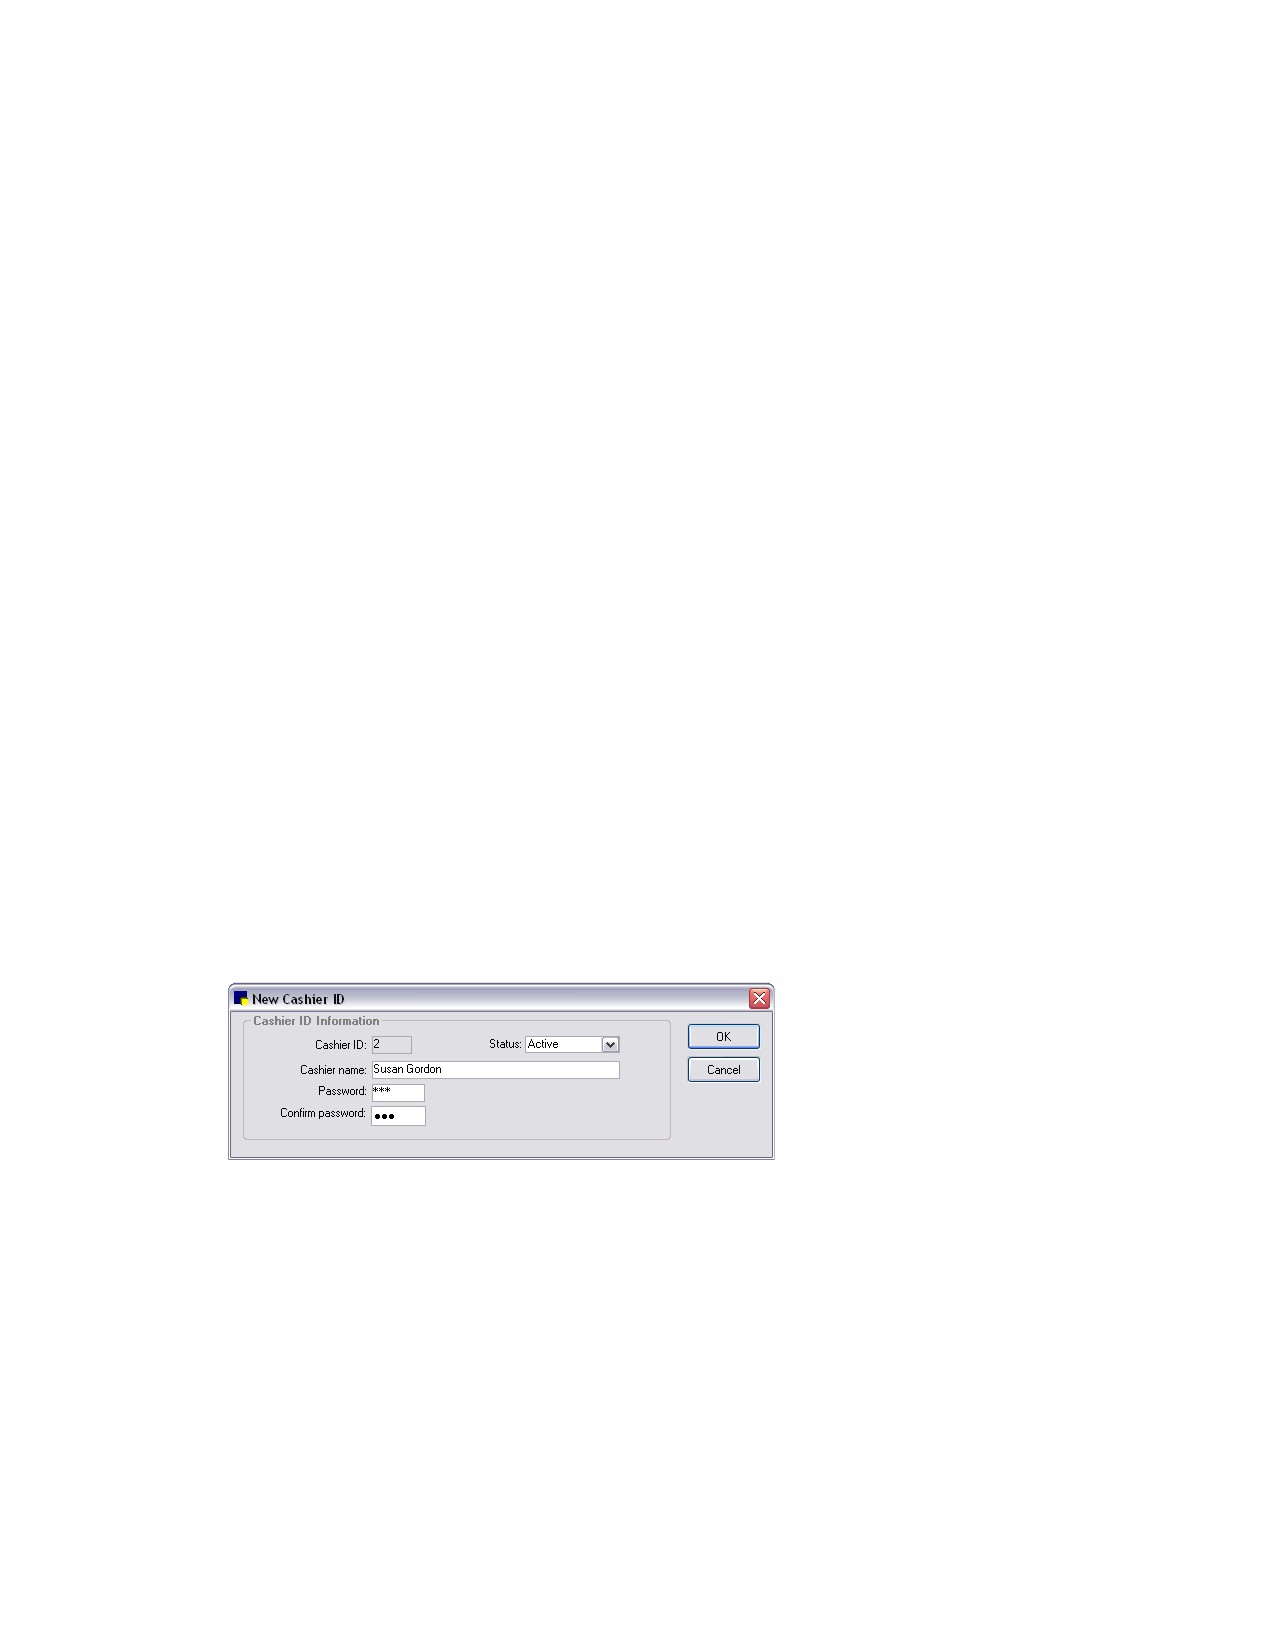
The New Cashier ID dialog box appears.
New Cashier ID dialog box
4. In the Cashier ID text box, type a cashier ID. You can use up to three letters or numbers. This
cashier ID prints on End of Day and End of Month reports.
5. From the Status drop-down list, select Active or Inactive. (Change the status to Inactive only if you
no longer want this cashier ID to be used.)
6. In the Cashier name text box, type the cashier name.
7. In the Password text box, type the password (up to six letters or numbers). For security, asterisks
display when the password is typed.
8. In the Confirm password text box, retype the password to confirm it.
68
Chapter 3: Setting Up Lists and Information
9. Click OK, and then click Close.
Rooms
Rooms are an integral part of Cornerstone software and are used in many areas of the program,
including the Appointment Scheduler and the Patient Advisor module.
You can check a patient into a specific room in the Patient Check-in/out window (you can select a
default room in Check-in defaults) and track where the patient is within your practice. The room a patient
is checked into displays in the Census List.
Before You Begin
¾ Define an appointment scheduling plan for your practice before setting up rooms. See “Creating an
Appointment Scheduling Plan” on page 264 for information.
IMPORTANT: Carefully choose your room setup now, as it is very difficult to delete a room once it is in
use.
To add or edit a room:
1. On the Lists menu, select Room. The Room List dialog box appears.
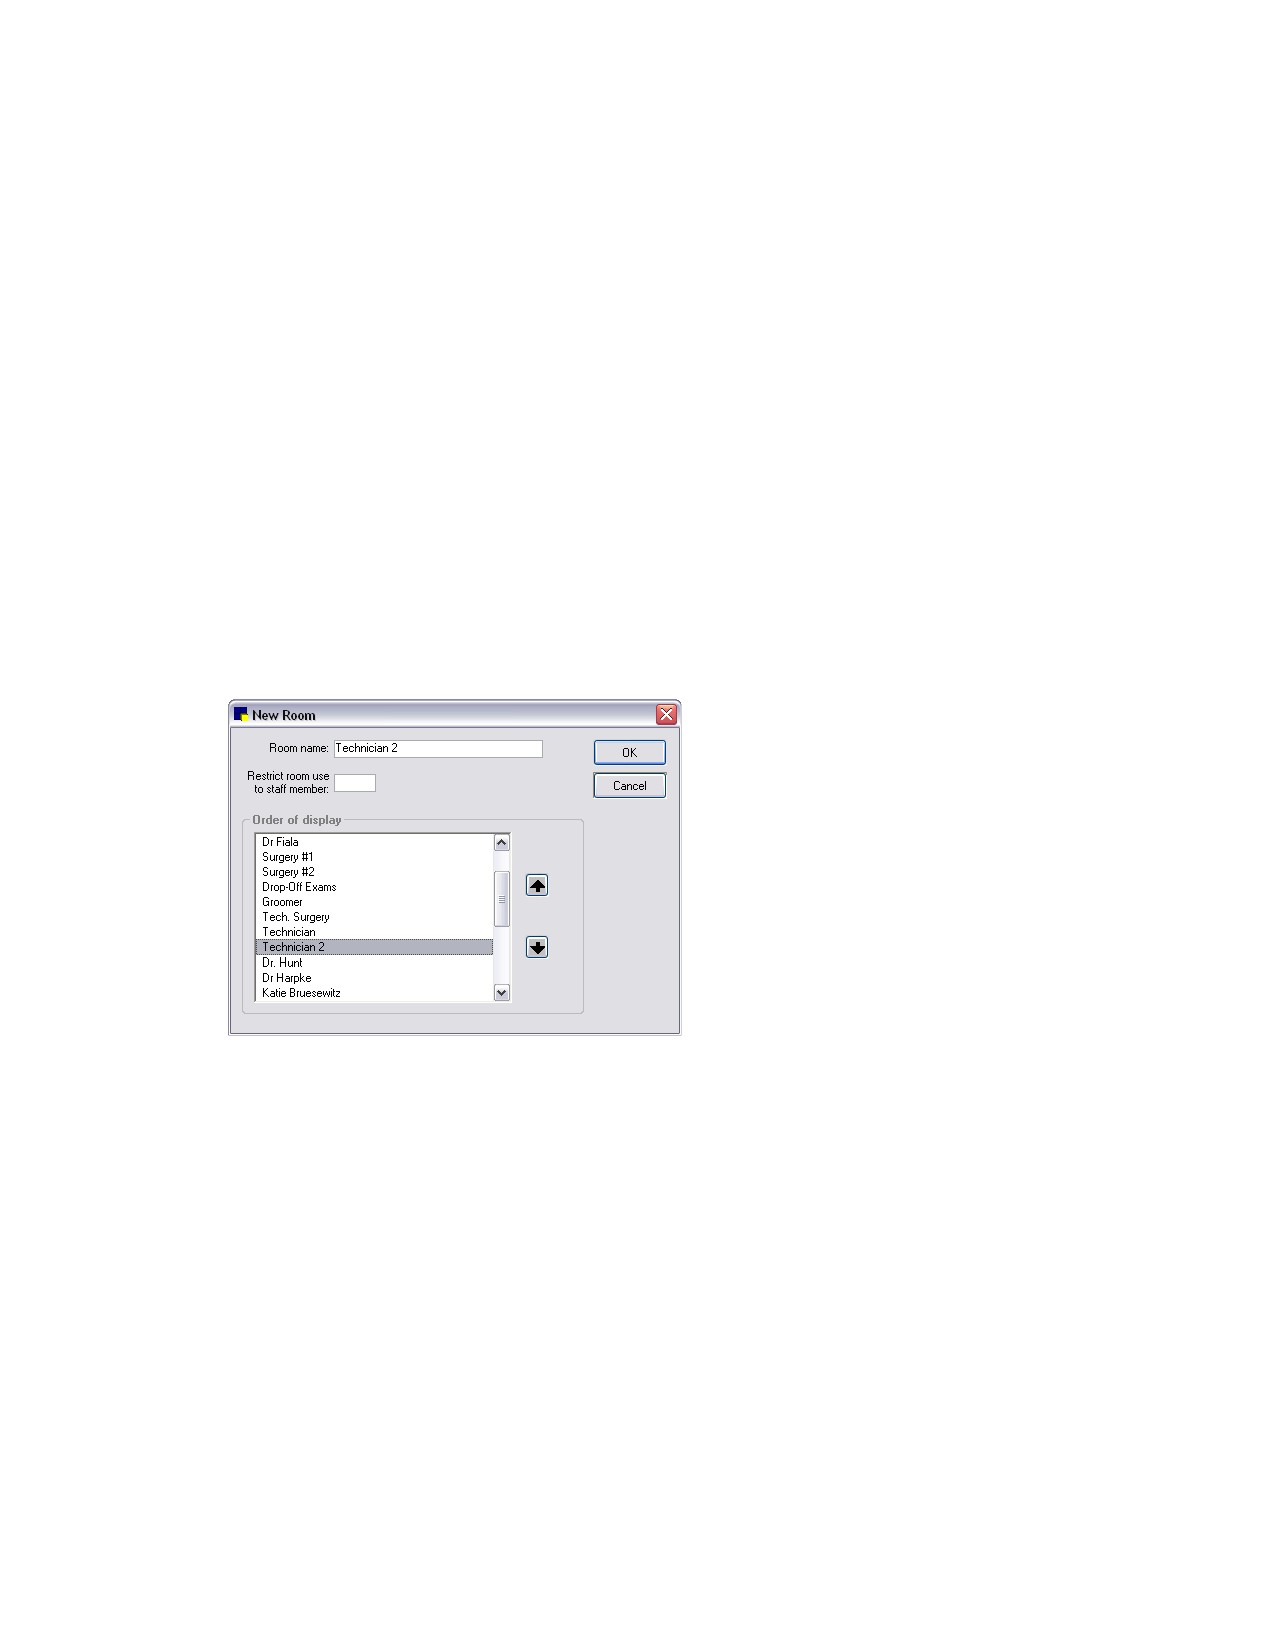
2. Click New to add a new room, or double-click an existing room to update it. The New Room dialog
box appears.
New Room dialog box
3. In the Room name text box, type a name for the room (such as a doctor’s name, a location or room
number in the facility, or Grooming). The room name is used as the column header displayed in the
Appointment Scheduler’s “Schedule for Today” window.
If overbooking is allowed in the practice, you should create a separate Overbook room column. For
example, you might want to set up a Dr. Jones column and a Dr. Jones-Overbooks column and
arrange them to display next to each other to view at a glance from the Schedule for Today window.
Tip: If you use the Boarding and Grooming module, you can link grooming appointments to an
Appointment Scheduler “Grooming” column through the Boarding and Grooming module.
4. If the room will be used to schedule appointments exclusively for a particular staff member, in the
Restrict room use to staff member text box, type the staff ID or press F2 to select a staff member
from the Staff List. For example, if you are adding the “Dr. Jones” room name and only Dr. Jones will
have appointments scheduled in this room, specify his staff ID here.
69
Chapter 3: Setting Up Lists and Information
Note: When using the Appointment Scheduler, if an appointment is moved to a restricted room, a
message appears to notify you that this room is restricted to the specific staff member. The original
staff member on the appointment is changed automatically to the designated staff member for this
room.
5. If you want to change the order in which rooms are listed, click the room and then click the
or
arrow button to move the room up or down in the list. The order of the rooms as they appear here
and in the Room List is the order used to display their associated column headers in the Schedule
for Today window.
6. Click OK, and then click Close.
To delete an unused room:
If you are using the Appointment Scheduler, we recommend that you contact Cornerstone Support at
1-800-695-2877 before deleting rooms. You cannot delete a room if a patient is currently checked into
that room or if there are scheduled appointments for that room.
1. In the Room List, select the room to delete and click Delete. You are prompted to confirm the
deletion.
2. Click OK.
Patient Hospital Status
The Patient Hospital Status feature provides staff with a way to quickly determine the status of a patient
in the hospital.
The patient’s hospital status appears on the Census List, Patient Clipboard*, and Electronic Whiteboard
windows. On the Patient Orders window, the status can be changed as the patient’s status in the
hospital changes.
The following status options are included with Cornerstone and cannot be updated or deleted:
• Inpatient
• Ready to go home
• Discharged
Note: A custom status is considered equal to the “Ready to go home” status in Cornerstone only if it
contains one of the following keywords: Ready, Home, Pick, Release, or Discharge.
To add or edit a hospital status:
1. On the menu bar, select Lists > Patient Hospital Status. The Patient Hospital Status List dialog
box appears.
2. Click New to add a new status or double-click an existing status to update it. The Patient Hospital
Status Information dialog box appears.
3. In the Description text box, type a hospital status description.
4. Click OK, and then click Close.
To set the order of the Status drop-down list:
1. On the Lists menu, select Patient Hospital Status. The Patient Hospital Status List dialog box
appears.
2. Click Order. The Patient Hospital Status Display Order dialog box appears.
70
Chapter 3: Setting Up Lists and Information
3. For each status you want to move, select the status and use the
or
arrow button to move the
status to a different position on the list.
4. When you have finished setting the order of the list, click OK and then click Close.
Wards/Locations
You can use the Ward/Loc feature to set up a ward or designate a specific location within the practice
where patients reside before and after treatments are performed. Common examples of wards and
locations include Recovery, ICU, Treatment, and Kennel Ward Number.
You can view wards and locations for a patient on the Census List, Patient Clipboard, and Whiteboard.
This helps staff keep track of patients within the hospital.
To add or edit a ward or location:
1. On the Lists menu, select Ward/Loc. The Ward/Loc List dialog box appears.
2. Click New to add a new ward/location, or double-click an existing ward/location to update it. The
Ward/Loc Information dialog box appears.
3. In the Description text box, type an identifying name for the ward or location.
4. Click OK, and then click Close.
Postal Codes
You can set up commonly used Postal Codes (ZIP Codes) and their corresponding cities and states.
When these codes are set up, whenever you enter a postal code in Cornerstone and press the TAB key,
the city and state automatically appear. This can save time when staff members add new clients to your
system.
Tip: You can press F2 in any postal code text box in Cornerstone to select a postal code from the Postal
Code List.
To add or edit a postal code:
1. On the Lists menu, select Postal Codes. The Postal Code List dialog box appears.
2. Click New to add a new postal code, or double-click an existing postal code to update it. The Postal
Code Setup dialog box appears.
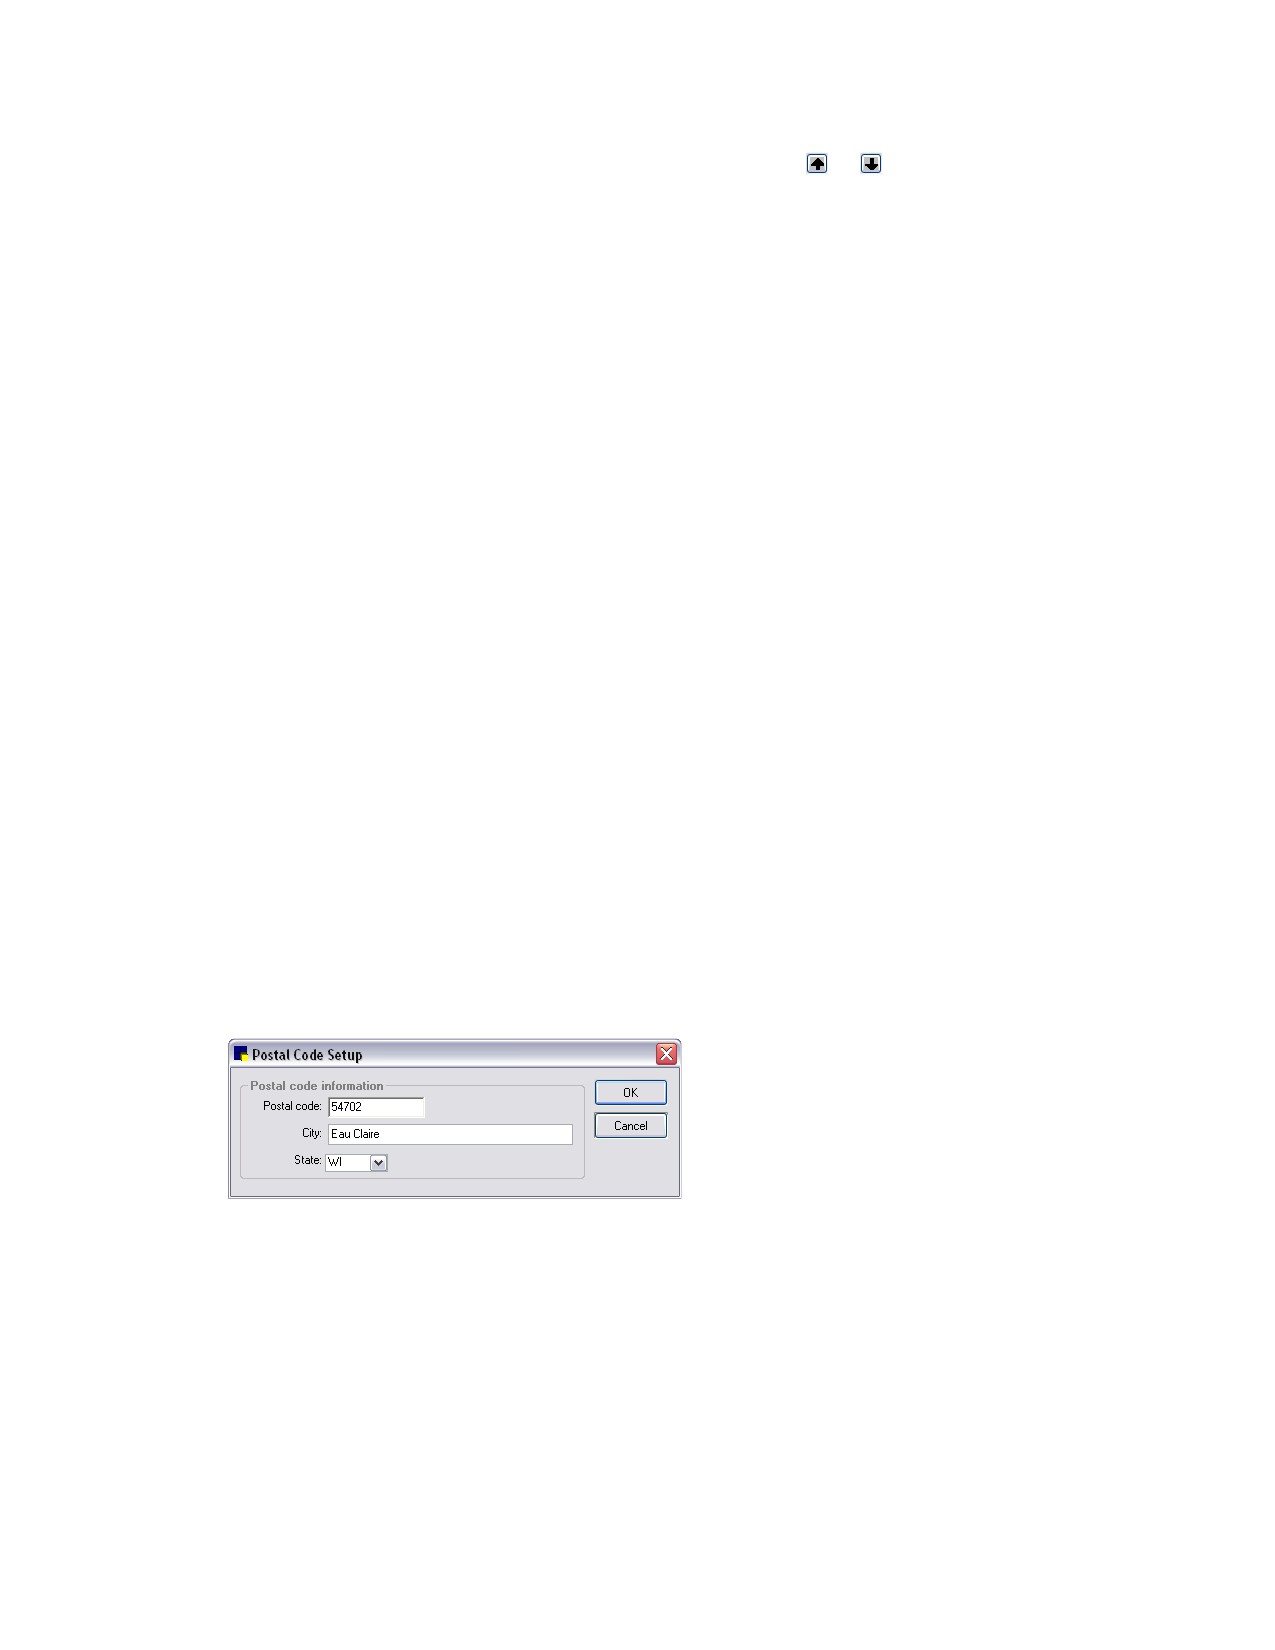
Postal Code Setup dialog box
3. Enter the postal code information..
4. Click OK, and then click Close.
Revenue Centers
The Revenue Centers feature allows practices to track revenue separately. You can use revenue
centers in different ways.
• You can use revenue centers to keep track of your business by department.
71
Chapter 3: Setting Up Lists and Information
• Practices that have separate businesses that are run independently of the practice business,
like a boarding facility or a satellite clinic, may use revenue centers.
• Practices that run an emergency clinic at night may want to use revenue centers to track
business during the day and at night.
Note: H-hospital is the default revenue center. All revenue is credited to the H revenue center unless
you set up additional revenue centers. You cannot delete the H revenue center.
How Cornerstone Manages Revenue Centers
You can assign default revenue centers to individual invoice items, invoice item classifications, and
individual staff members. In addition, if you are using a Multi-Location/Single Database configuration,
you can assign a revenue center to each practice (used for reporting purposes).
Cornerstone checks for an assigned revenue center in this order: 1) the individual invoice item, 2) the
invoice item classification, 3) the staff member’s defaults, 4) the practice default revenue center.
Revenue centers may also be changed on the invoice. If a default revenue center is not set up, you must
manually enter the revenue center.
Note: If, after using Cornerstone, you update or change revenue centers and you want the change to
apply to all open invoices and estimates, on the Tools menu, select Update Revenue Centers.
To add or edit a revenue center:
1. On the Lists menu, select Revenue Centers. The Revenue Center List dialog box appears.
2. Click New to add a new revenue center or double-click an existing revenue center to update it. The
Revenue Center Information dialog box appears.
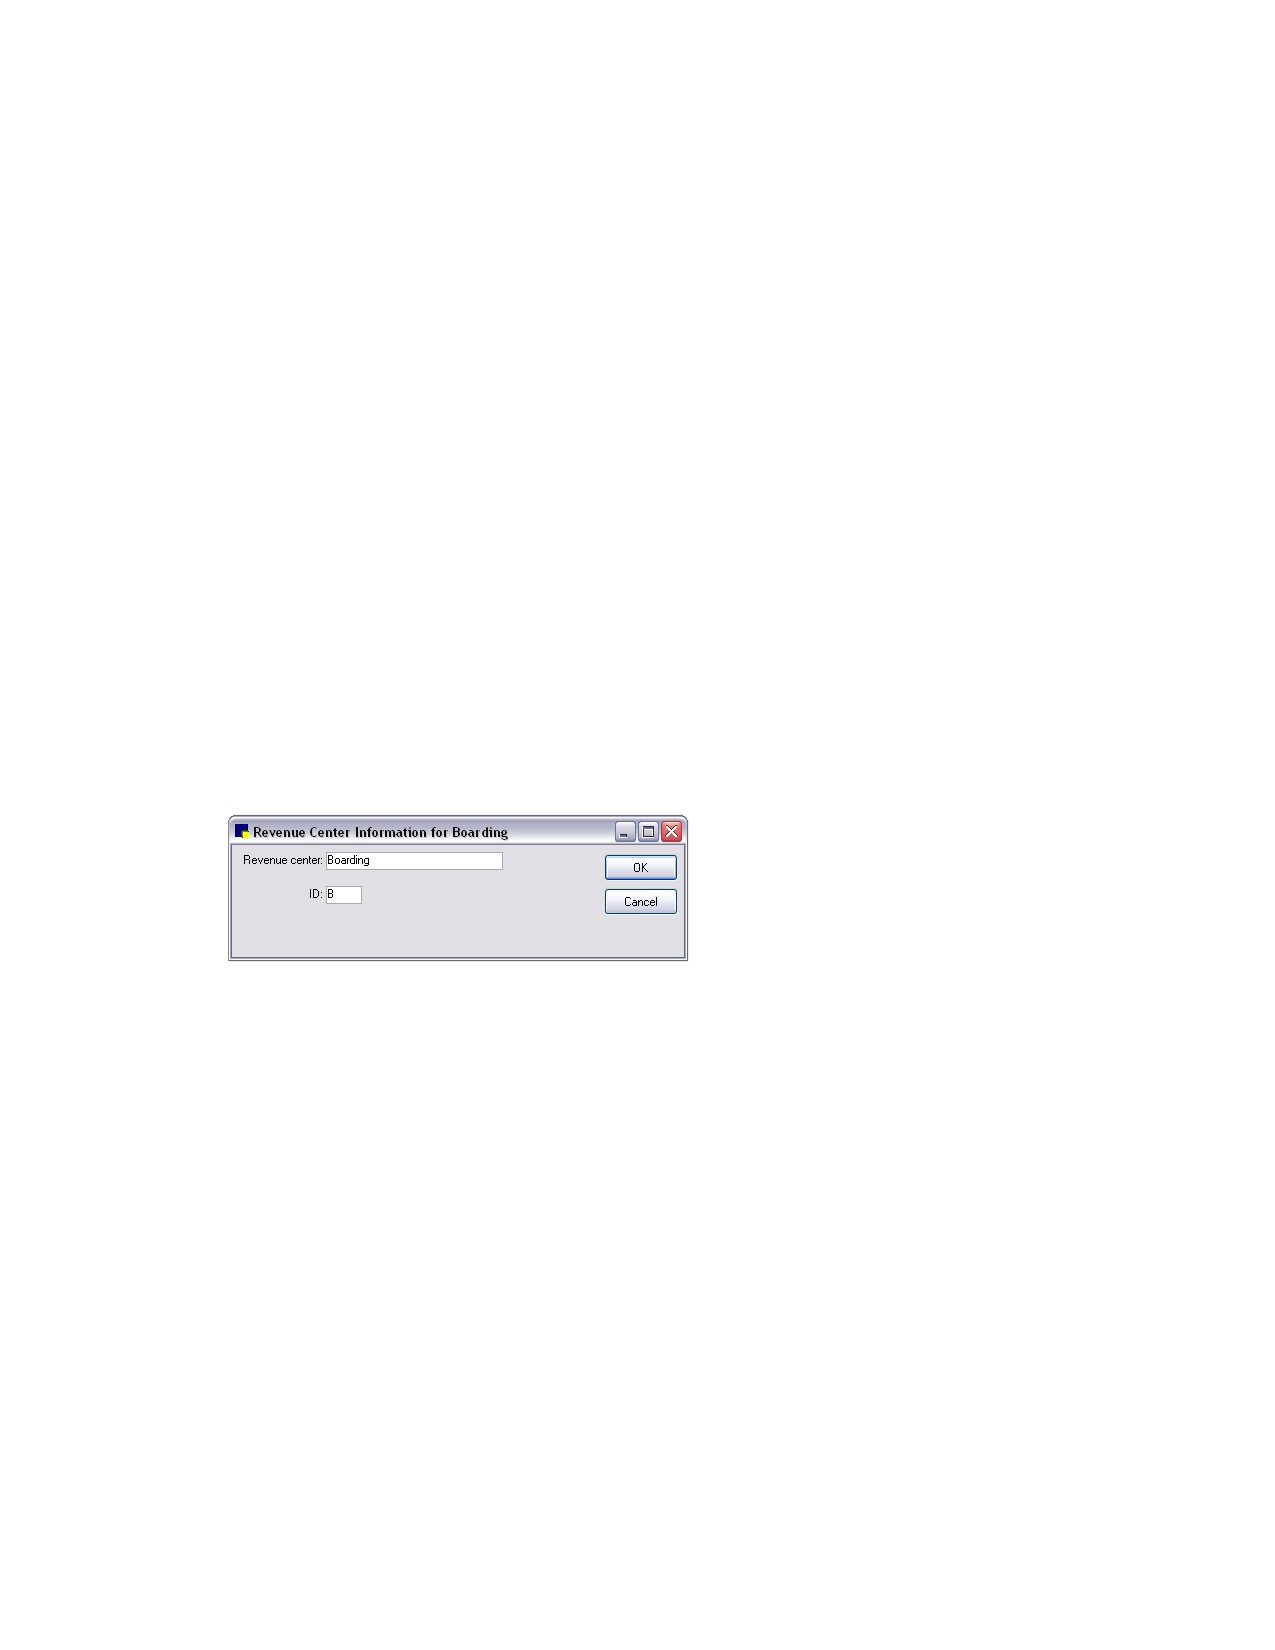
Revenue Center Information dialog box
3. In the Revenue center text box, type a brief name to identify this revenue center.
4. In the ID text box, type the ID (up to three characters) to use for this revenue center.
5. Click OK, and then click Close.
For daily reports of your sales by revenue center, print a Serv. And Inv. Sales by Revenue Center
Report, a Sales Tax Summary-by Revenue Center Report, or an Itemized Audit Trail for Revenue
Center Report.
For monthly sales reports by revenue center, print the Sales Tax Summary-by Revenue Center
Report, the Inventory Sales - by Revenue Center Report, or the Service Sales-by Revenue Center
Report.
For a yearly sales tax report, print the Sales Tax Summary-by Revenue Center Report.
Using Revenue Centers with a Multi-Location/Single Database Configuration
For a Multi-Location/Single Database configuration, reports for each practice are based on the revenue
centers set up for that practice. When EOP reports are run by practice (such as Daily Summary Report-
By Practice), the assigned revenue centers are automatically used to print the applicable sales amounts.
72
Chapter 3: Setting Up Lists and Information
You can also use separate sales, taxes, and discounts by practice using revenue centers. This includes
support for differing sales tax rates across multiple locations. (Note: There is one set of services and
inventory. If separate pricing is needed, you must create multiple services and inventory items.)
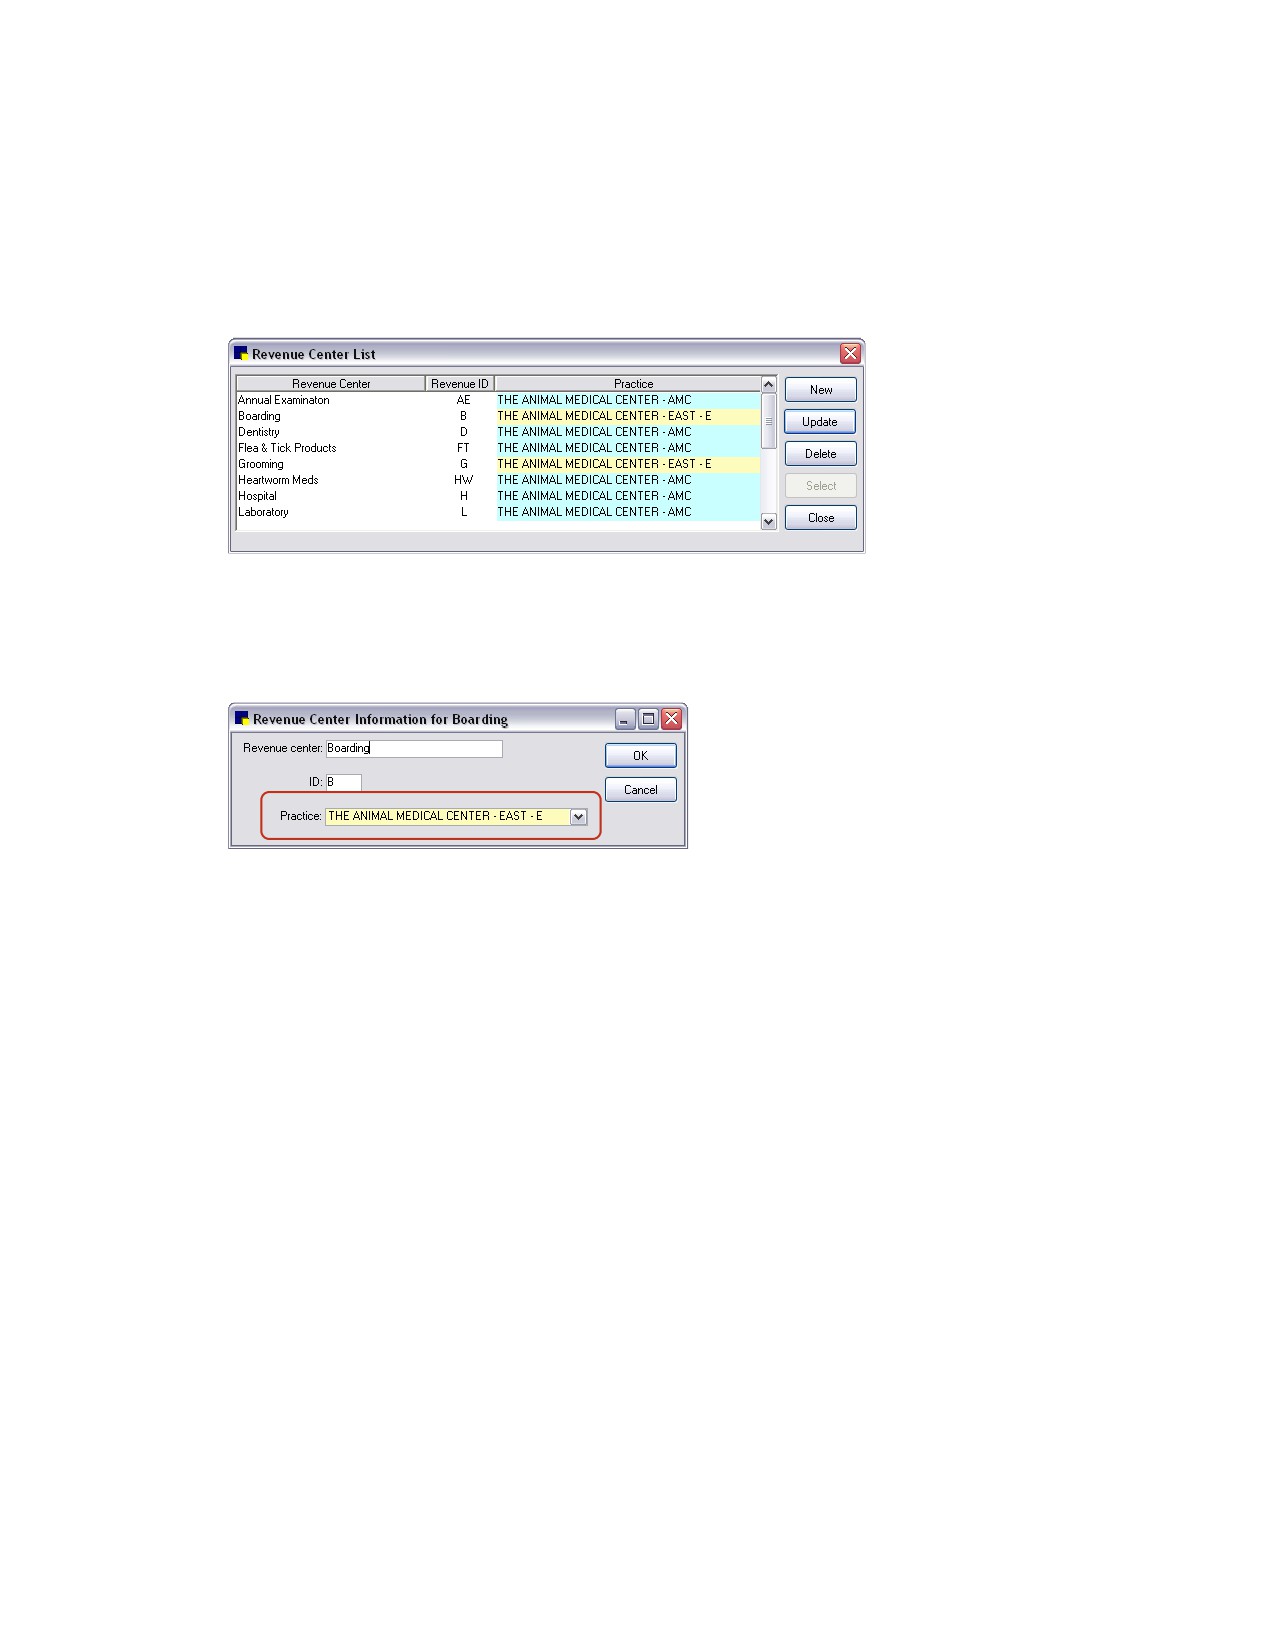
For a Multi-Location/Single Database configuration, each revenue center and the practice associated
with it are indicated on the Revenue Center List by practice-specific color coding to distinguish the
practice assignments.
Revenue Center List dialog box
When adding or updating a revenue center with a Multi-Location/Single Database configuration, select a
practice from the color-coded Practice drop-down list to associate the practice with the revenue center
for reporting purposes.
Revenue Center Information dialog box
Partnerships
The Split Billing feature allows you to divide the total owed to the practice among multiple owners of a
patient, based on the percentage of ownership. The patient must be owned by the Partnership. You
must set up partnerships before you can use Split Billing.
• You can divide the dollar amount owed among multiple owners. Separate invoices are sent to
the owners.
• Bills are automatically split when End of Month processing is run; however, you can split the bills
at any time.
To add or edit a partnership:
1. On the Lists menu, select Partnerships. The Partnership List dialog box appears.
2. Click New to add a new partnership, or double-click an existing partnership to update it. The
Partnership Information window appears.
73
Chapter 3: Setting Up Lists and Information
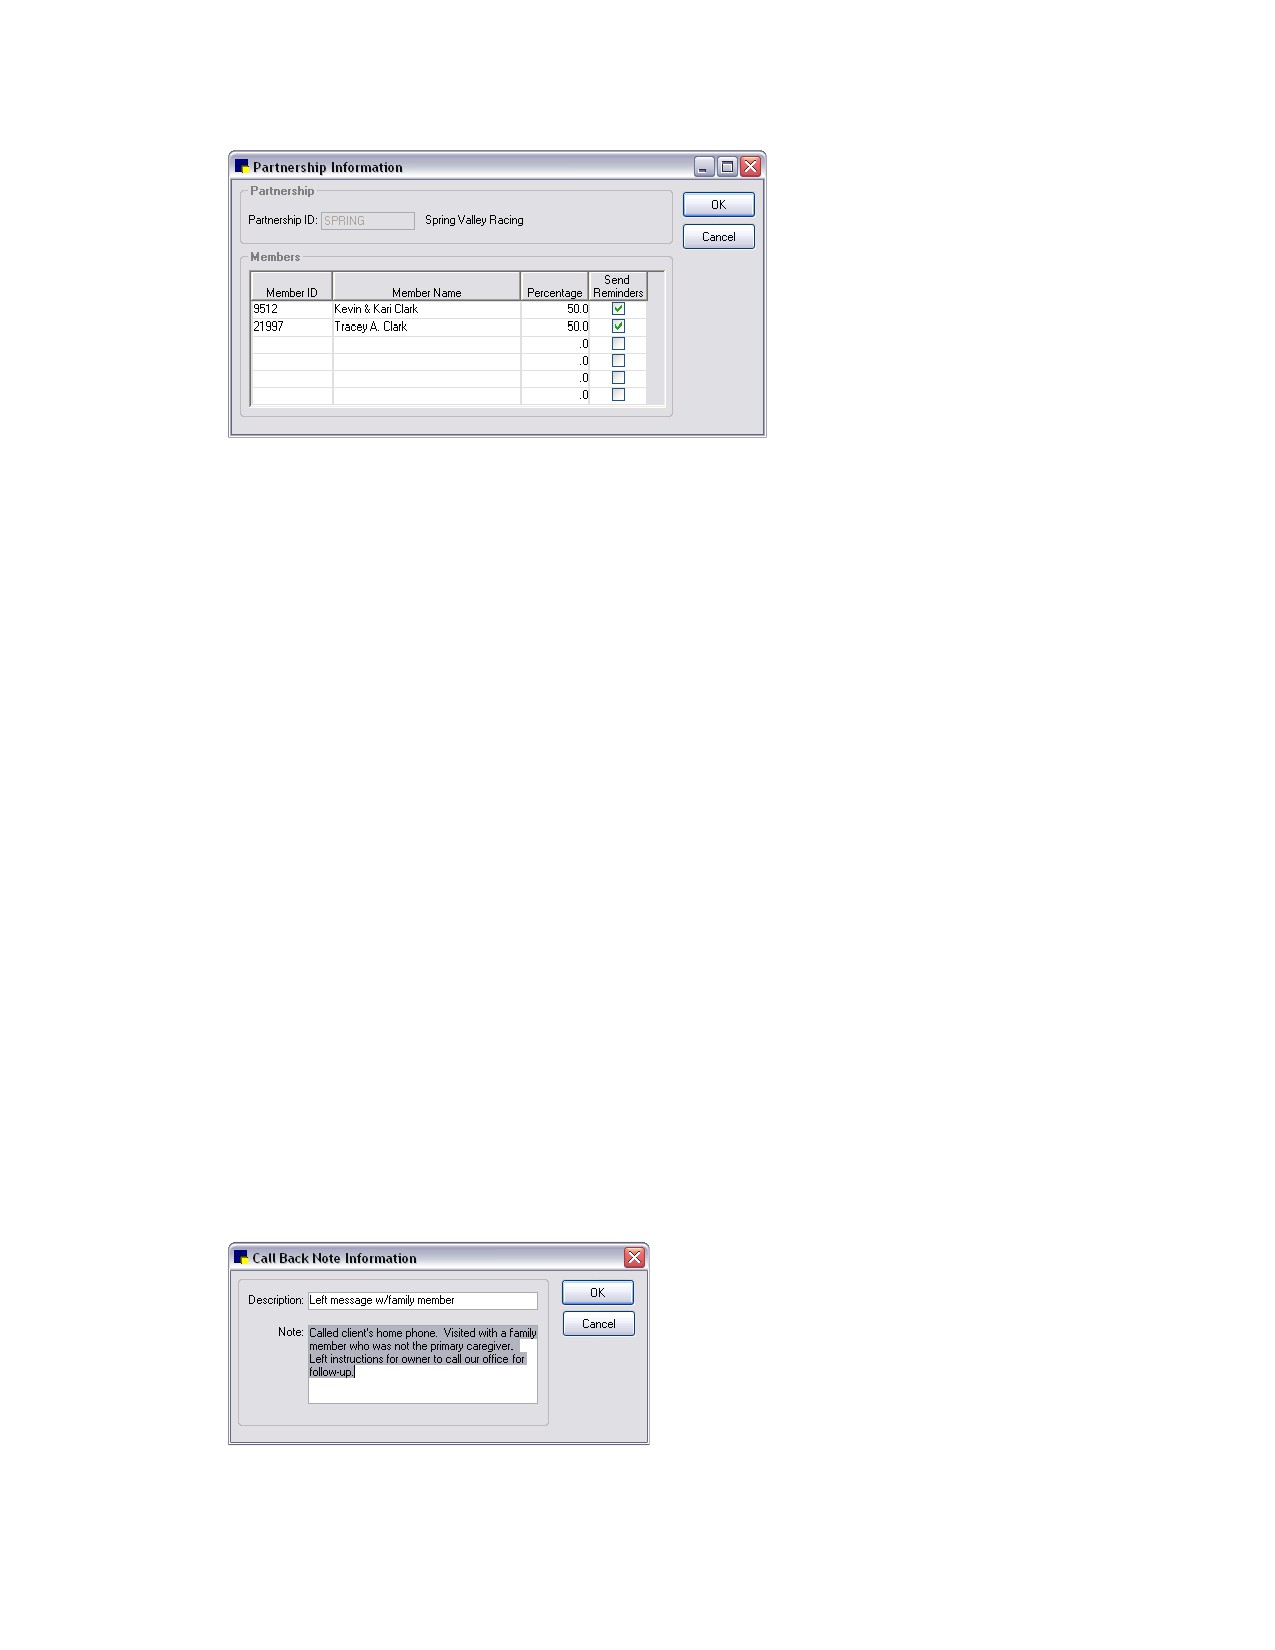
Partnership Information window
3. In the Partnership ID text box, enter the client ID for the partnership. Press F2 to select an existing
partnership from the Client List or enter a new partnership as a new client record.
IMPORTANT: You can use an existing client ID for a partnership only if the existing client ID does
not have a balance and the ID is not the client ID for a member of the partnership.
4. In the Members area, in the Member ID column, type the client ID of the first member of the
partnership or press F2 to select the client from the Client List. The associated Member Name
appears.
5. In the Percentage column, enter the percentage of ownership that the first member holds.
6. Select the Send Reminders check box if this partnership member should receive reminders. You
must also set the classification on the client record to receive reminders.
7. Continue adding partnership members until all the members are added. The total of the
percentages must equal 100%.
8. Click OK, and then click Close.
For a complete list of partnerships, print a Partnership Report.
Call Back Notes
You can create a Call Back Notes list of commonly used call back notes, such as “Left message on
answering machine.” When you call the client back, you can quickly retrieve the call back record, and
select the applicable note from the Call Back Notes list.
To add or edit a call back note:
1. On the Lists menu, select Call Back Notes. The Call Back Notes dialog box appears.
2. Click New to add a new call back note, or double-click an existing note to update it. The Call Back
Note Information dialog box appears.
Call Back Note Information dialog box
74
Chapter 3: Setting Up Lists and Information
3. In the Description text box, type a description for the note.
4. In the Note text box, type the call back note text.
5. Click OK, and then click Close.
To add a note to a call back in invoicing:
When an invoice item with a reminder call back is entered on an invoice, a Call Back Note Information
dialog box appears. This is the default.
Note: If you do not want to enter call back notes during invoicing, you can turn off this option by clearing
the Prompt for call back note check box in Invoice defaults (see “Invoice Defaults” on page 112).
1. On the Activities menu, select Invoice and then select the client and patient.
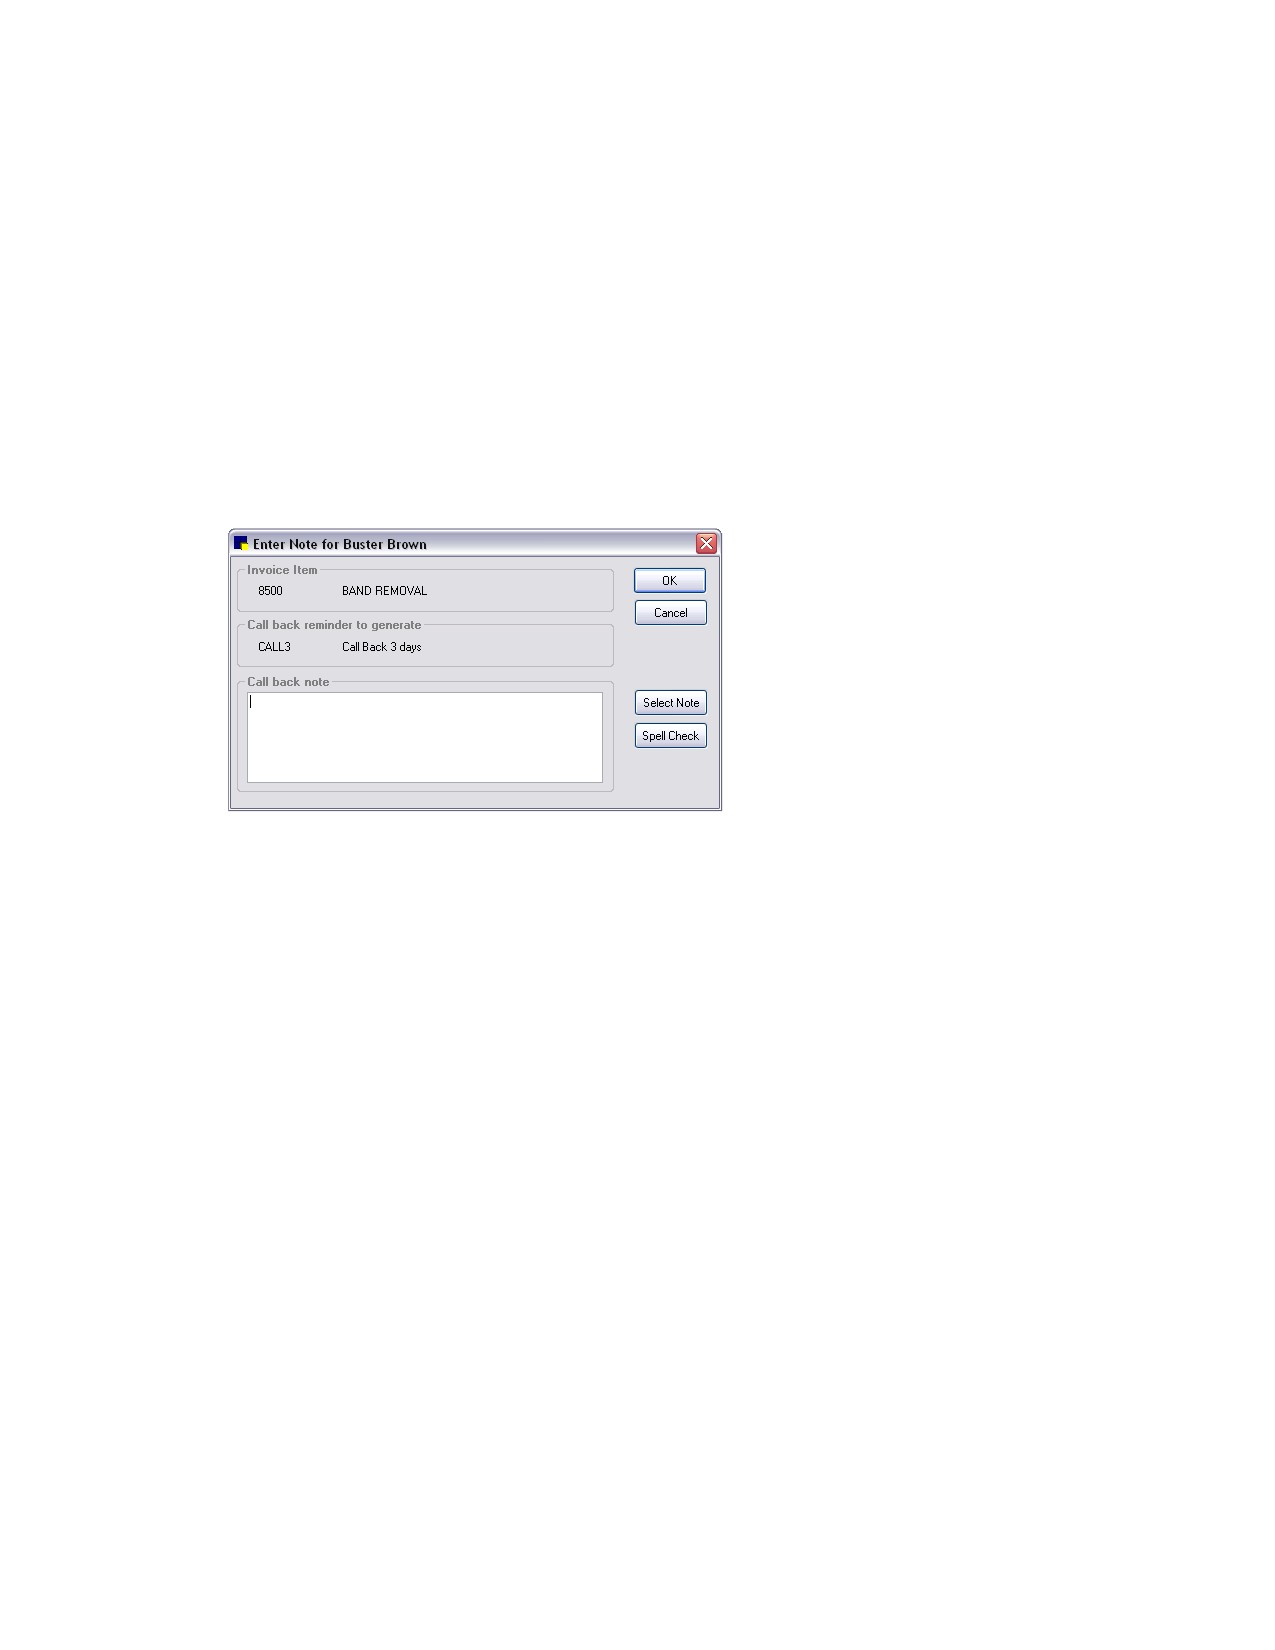
2. Enter items as usual. When an invoice item with a reminder call back is entered, the Enter Note
dialog box appears.
Enter Note dialog box in invoicing
3. In the Call back note area, do one of the following:
• Type the note.
• Click the Select Note button to select a note from a list of commonly used call back notes. The
Call Back Notes List appears. Select the note that applies to the call back and click Select.
Click Close to return to the Enter Note dialog box.
4. Click Spell Check to review the call back note for spelling errors.
5. Click OK to exit the Enter Note dialog box and return to the invoice.
Note: For information on setting up invoice items, see “Chapter 10: Setting Up Your Invoice Items” on
page 180.
Travel Sheets
Create custom Travel Sheets of frequently used products and services used in your practice. You can
use the travel sheet on your computer or print copies.
When you install your software, Cornerstone automatically creates a Sample Travel Sheet with the top
150 invoice items from the last twelve months to help you get started. You cannot make changes to the
Sample Travel Sheet; however, you can save the travel sheet with a different name and make changes
to the new travel sheet.
To add or edit a travel sheet:
1. On the Lists menu, select Travel Sheets. The Travel Sheet List dialog box appears.
75
Chapter 3: Setting Up Lists and Information
2. Click New to add a new travel sheet or double-click an existing travel sheet to update it. The Travel
Sheet Setup dialog box appears.
3. In the Enter description for travel sheet text box, type a description.
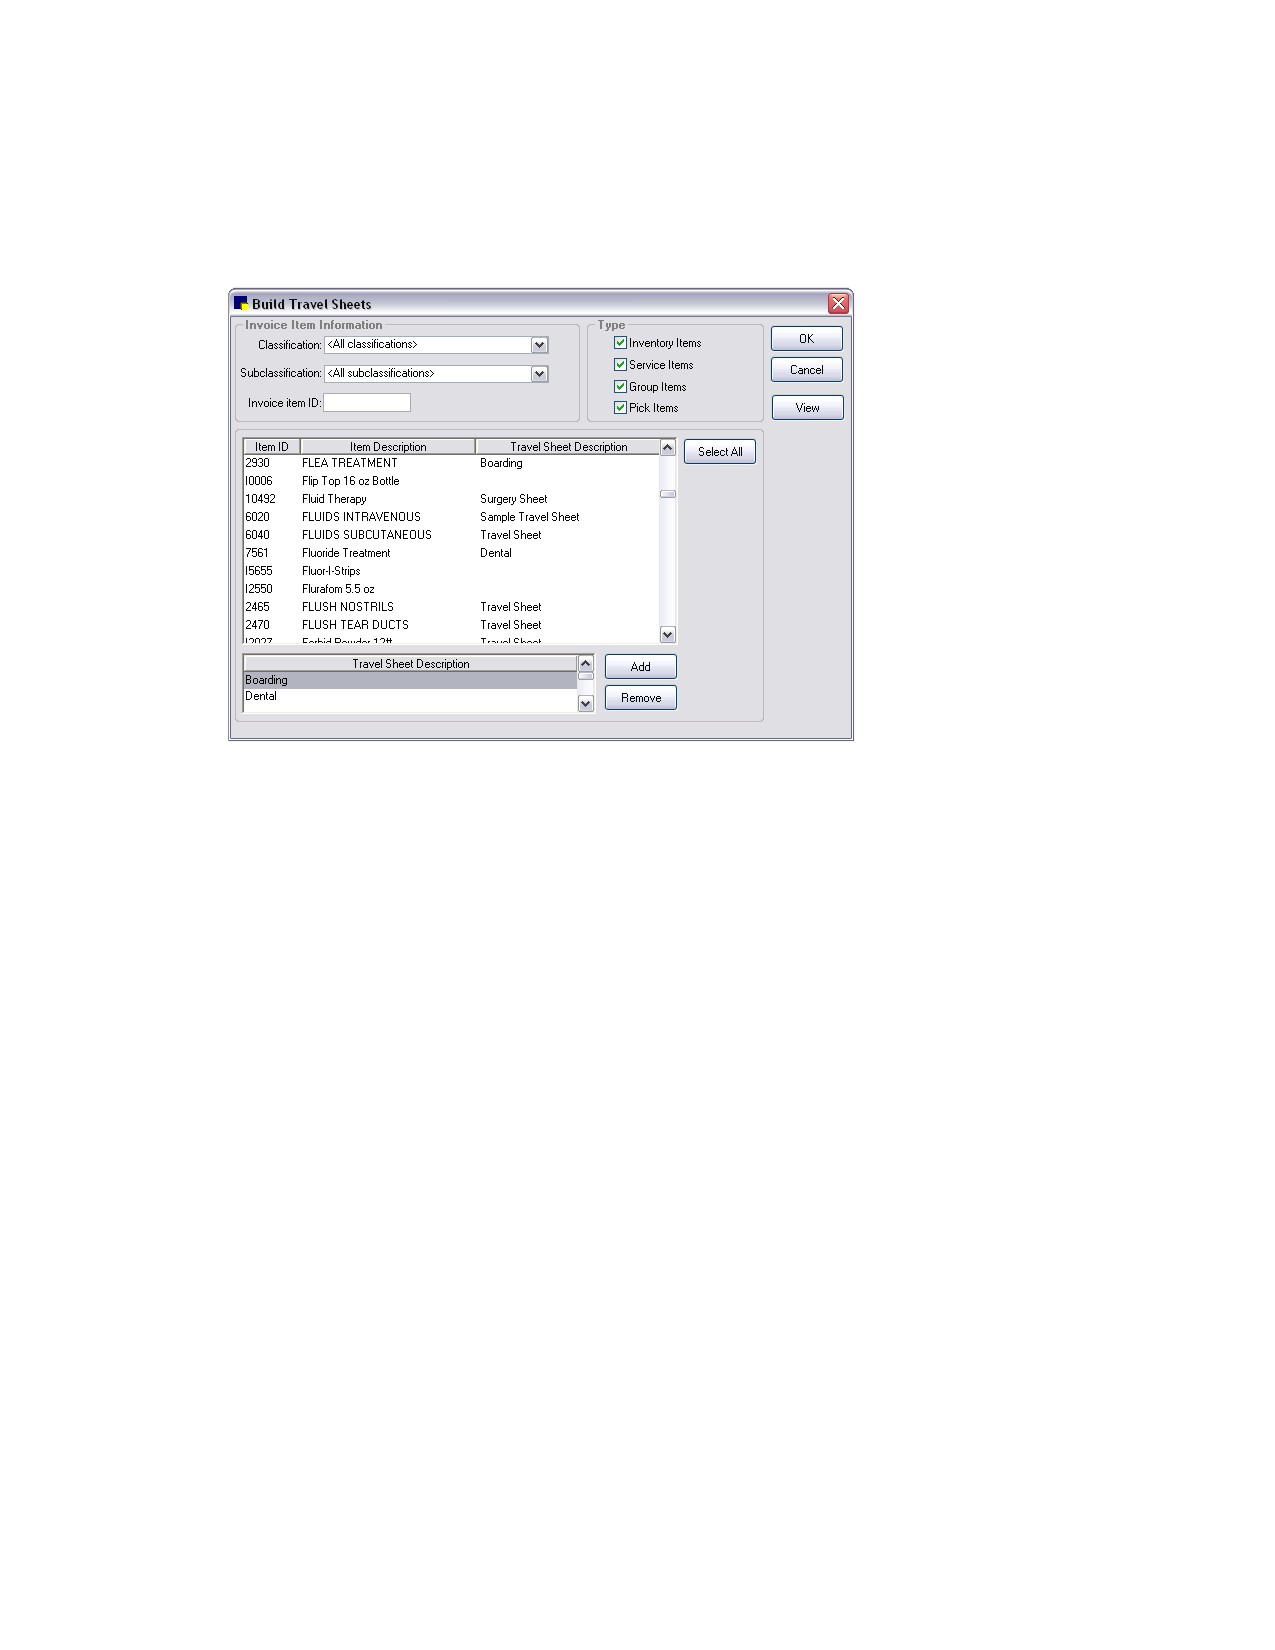
4. Click Setup to build your travel sheet. The Build Travel Sheets dialog box appears.
Build Travel Sheets dialog box
5. In the Invoice Item Information area and Type area, use the drop-down lists and check boxes to filter
the item IDs list for quick selection from a narrowed list of items.
6. In the Item ID list, select the items to add to the travel sheet(s).
• To select all item IDs in the list, click Select All.
• To select more than one item, press and hold the CTRL key while you click to select each item.
• To select a range of consecutive items, click the first item and then press and hold the SHIFT
key while you click the last item in the range.
7. In the Travel Sheet Description list, select the travel sheets to which you want to add the selected
products and services and click Add.
• To select more than one travel sheet, press and hold the CTRL key while you click to select
each sheet.
• To select a range of consecutive travel sheets, click the first sheet and then press and hold the
SHIFT key while you click the last sheet in the range.
8. Repeat steps 5-7 until you have added all items.
9. To remove an item from a travel sheet, select the item in the Item ID scroll list, select the applicable
travel sheet or sheets in the Travel Sheet Description list, and click Remove.
10. To see a list of all items selected for an individual travel sheet, click View. On the View Travel Sheet
dialog box, select a travel sheet and scroll through the list to view the items. Click Close when
finished.
11. When finished building your travel sheet, click OK two times, and then click Close.
76
Chapter 3: Setting Up Lists and Information
To arrange the order of the classifications on your travel sheet:
Note: You cannot change the order of the items on your travel sheet, but you can change the order of
the classifications.
1. On the Lists menu, select Travel Sheets.
2. Select the travel sheet to change and click Update.
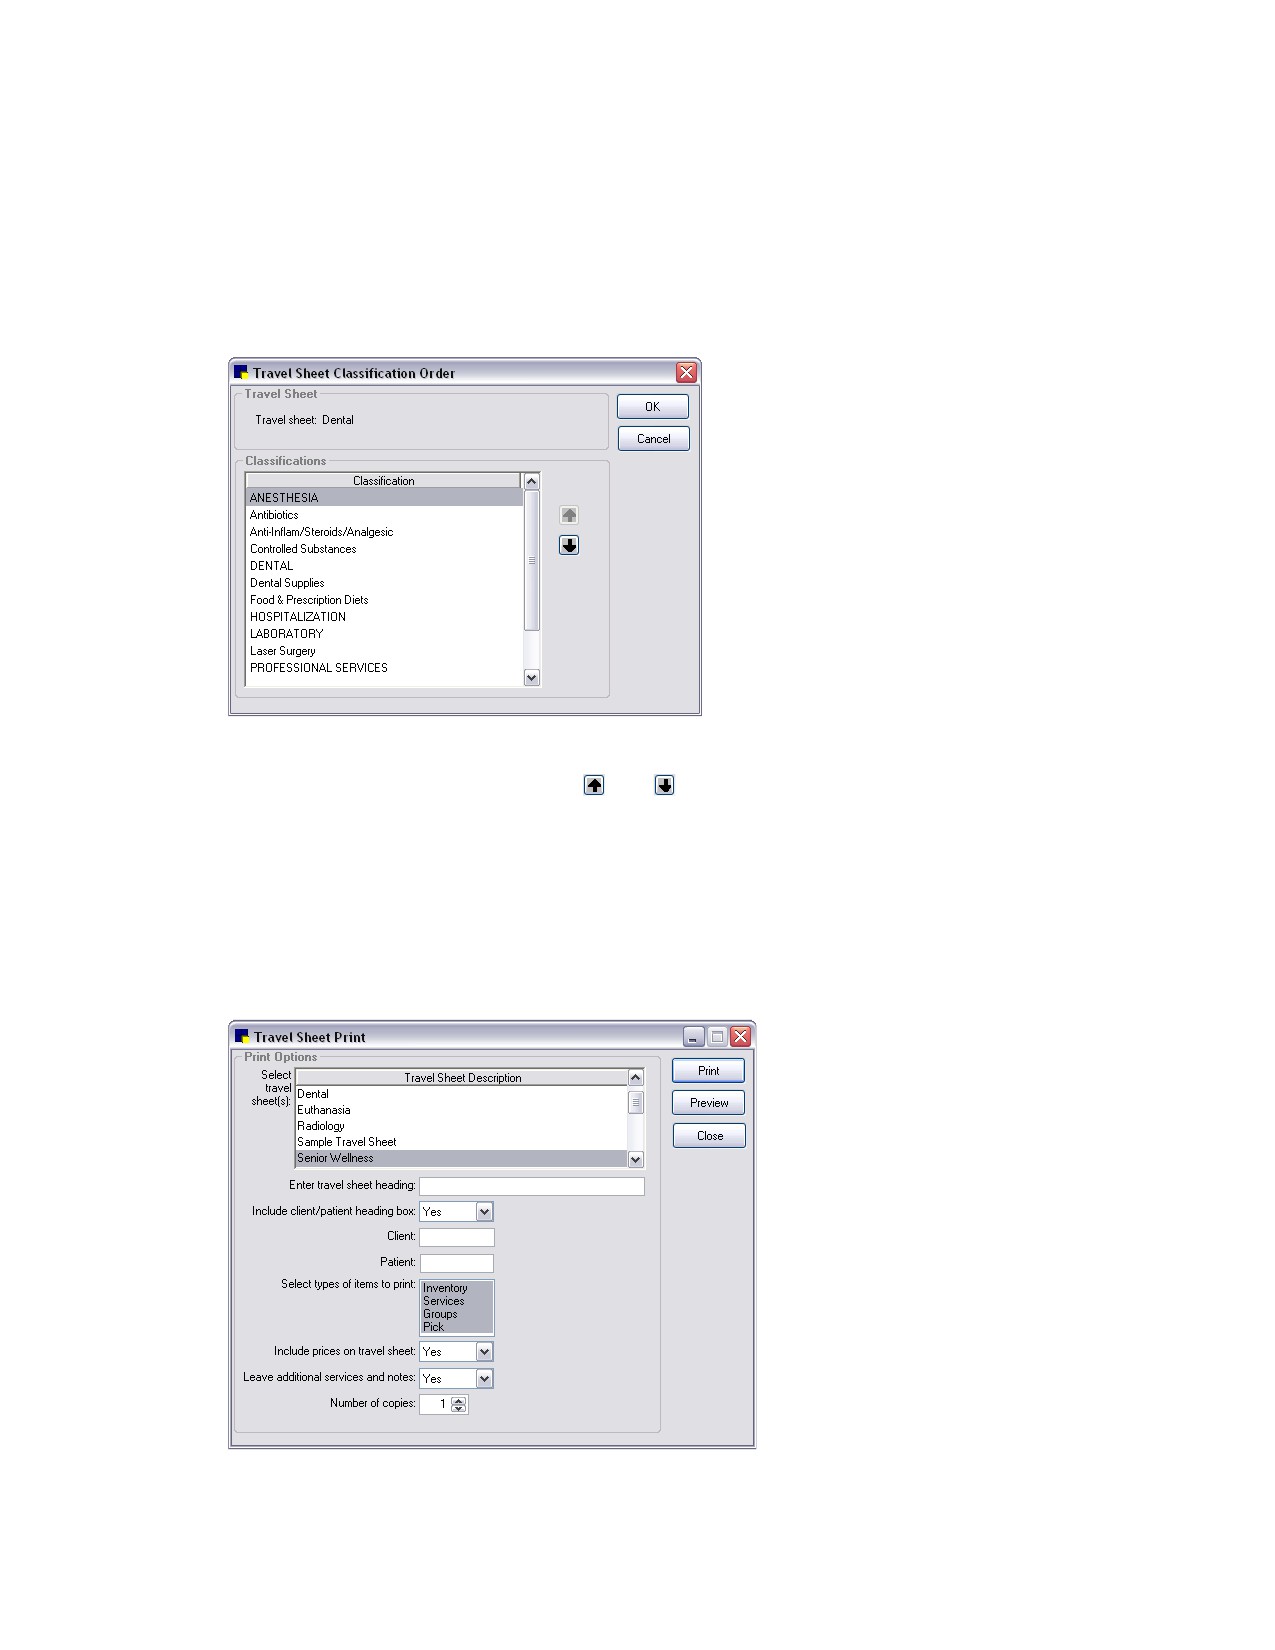
3. Click Order. The Travel Sheet Classification Order dialog box appears.
Travel Sheet Classification Order dialog box
4. Select a classification and then use the
and arrow buttons to move the classification into a
different order on your travel sheet.
5. Continue to move classifications using the arrow buttons until they are in the order you want.
6. Click OK two times and then click Close.
To print a travel sheet:
1. On the Lists menu, select Travel Sheets. The Travel Sheet List dialog box appears.
2. Select the travel sheet and click Print. The Travel Sheet Print window appears.
Travel Sheet Print window
77
Chapter 3: Setting Up Lists and Information
3. Set the print options.
4. To view a preview of the travel sheet before printing, click Preview.
5.
To print the travel sheet, click Print.
To save an existing travel sheet under a new name:
1. On the Lists menu, select Travel Sheets. The Travel Sheet List dialog box appears.
2. Select the travel sheet to save under a new name and click Save As. The Travel Sheet Save As
dialog box appears.
3. Type the new name and click Save.
To base a travel sheet on your Sample Travel Sheet:
1. On the Lists menu, select Travel Sheets.
2. In the list of travel sheets, select the Sample Travel Sheet and click Save As.
Note: If the Sample Travel Sheet is not listed, use Tools > Update/Create Sample Travel Sheet to
create it.
3. Enter the new name for the travel sheet and click Save.
You can now edit your new travel sheet as needed.
To update your Sample Travel Sheet:
As the top 150 items sold may change over time, you can update the Sample Travel Sheet at any time to
reflect the current picture of sales.
1. On the Tools menu, select Update/Create Sample Travel Sheet.
2. When notified that the update is complete, click OK.
Departing Instructions
Use Departing Instructions to explain the care of an animal after treatment, surgery, or after
administering medications or vaccinations. You can also use these educational paragraphs to
recommend needed services and to advise when a return visit is necessary.
Set up departing instructions now and link them to invoice items later. Invoicing a linked item
automatically prints the departing instruction on the invoice.
To add or edit a departing instruction:
1. On the Lists menu, select Departing Instructions. The Departing Instruction List dialog box
appears.
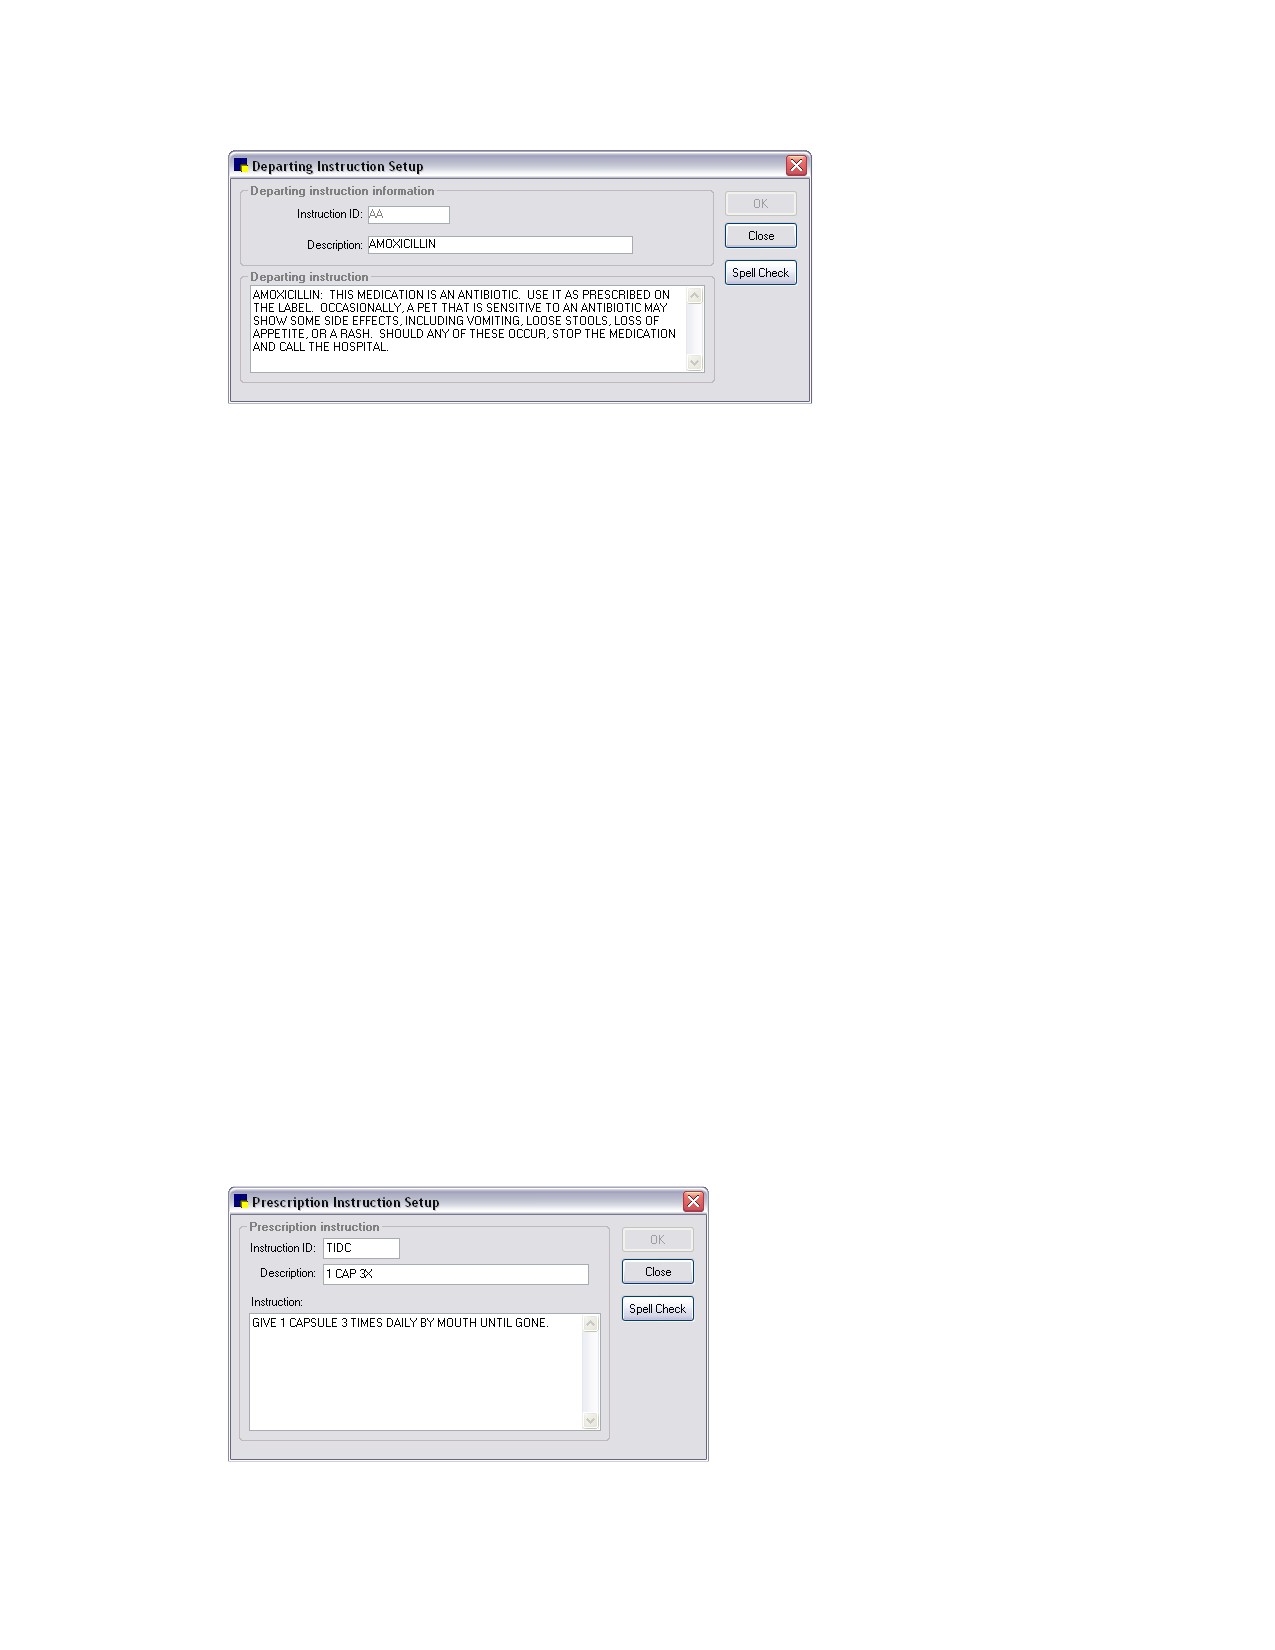
2. Click New to add a new departing instruction or double-click an existing instruction to update it. The
Departing Instruction Setup dialog box appears.
78
Chapter 3: Setting Up Lists and Information
Departing Instruction Setup dialog box
3. In the Instruction ID text box, type an ID (up to 7 characters) for the departing instruction.
4. In the Description text box, type a description for the departing instruction.
5. In the Departing instruction area, type the departing instruction text. You can edit the instruction
during invoicing.
6. Click Spell Check to review your departing instruction for spelling errors.
7. Click OK, and then click Close.
Tip: Set up a miscellaneous departing instruction to use during invoicing for “special” instructions.
For a complete list of departing instructions, print a Departing Instructions Report. (See “Departing
Instructions Report” on page 247.)
Prescription Instructions
Setting up Prescription Instructions is similar to setting up departing instructions: create a list of
instructions and then link a specific instruction to a prescription invoice item. The prescription instruction
prints on the prescription label.
You can use departing instructions with prescription invoice items, even if the items have a prescription
instruction; however, you can use only one (1) prescription instruction per prescription invoice item.
Note: You cannot delete a prescription instruction if it is linked to an invoice item.
To add or edit a prescription instruction:
1. On the Lists menu, select Prescription Instructions. The Prescription Instruction List dialog box
appears.
2. Click New to add a new prescription instruction, or double-click an existing instruction to update it.
The Prescription Instruction Setup dialog box appears.
Prescription Instruction Setup dialog box
79
Chapter 3: Setting Up Lists and Information
3. In the Instruction ID text box, type an ID (up to 7 characters) for the prescription instruction.
4.
In the Description text box, type a description for the prescription instruction. Use descriptions that
are easily connected to the prescription instruction ID.
5. In the Instruction text box, type the prescription instruction. Limit the prescription instruction text to
fit the size of your label. You can edit the instruction when you create a prescription label.
6. Click Spell Check to review your prescription instruction for spelling errors.
7. Click OK, and then click Close.
For a complete list of prescription instructions currently set up in Cornerstone, print a Prescription
Instruction Report.
Staff Commission
You can set up Staff Commission percentages for staff members or for an entire staff classification
(such as all groomers). Percentages can be set up by invoice item classification, subclass, or invoice
item. Staff commissions are based on sales totals, not receipts.
To add or edit staff commissions:
1. On the Lists menu, select Staff Commission. The Staff Commission List dialog box appears.
2. Click New to add a new staff commission, or double-click an existing staff commission to update it.
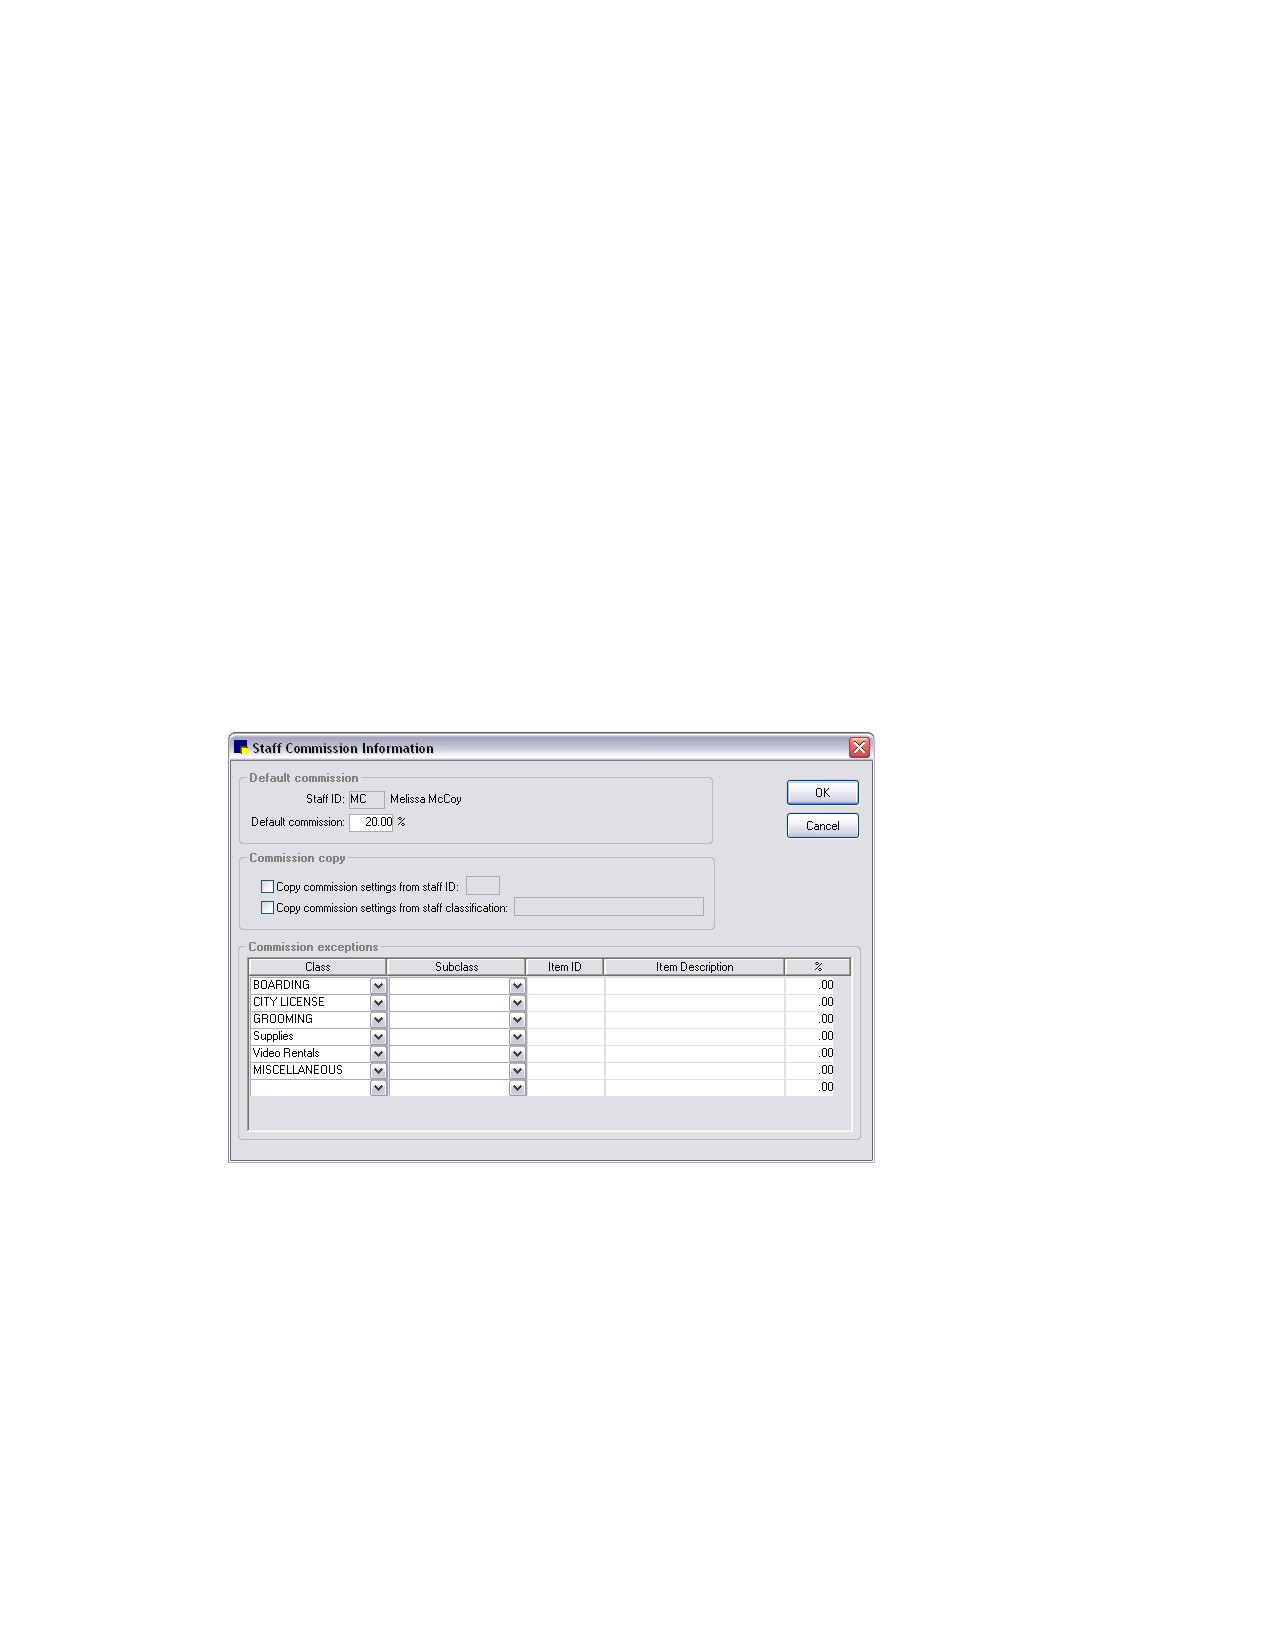
The Staff Commission Information dialog box appears.
Staff Commission Information dialog box
3. In the Staff ID text box, type the staff ID or press F2 to select a staff member from the Staff List.
4. In the Default commission text box, type the percentage. This percentage is used on all items not
listed as exceptions.
5. To copy the commission settings from another staff member, select the Copy commission settings
from staff ID check box and type the staff ID in the text box.
6. To copy the commission settings from a staff classification, select the Copy commission settings
from staff classification check box and type the classification in the text box. (You must have set up
your staff commissions by classification to use this option.)
80
Chapter 3: Setting Up Lists and Information
Note: If you copy settings from another staff member or staff classification, it creates a new record.
Any changes you make to the original at a later time will not be reflected in the new record.
7. To enter individual exceptions to the commission, in the Commission exceptions area, enter the
class, subclass, or item ID, as appropriate, and the percentage. (The percentage can be zero if no
commission is received for this item.)
8. Click OK, and then click Close.
To set up staff commissions based on classification:
1. On the Lists menu, select Staff Classification Commission. The Staff Classification Commission
List dialog box appears.
2. Click New to add a new staff classification commission, or double-click an existing commission to
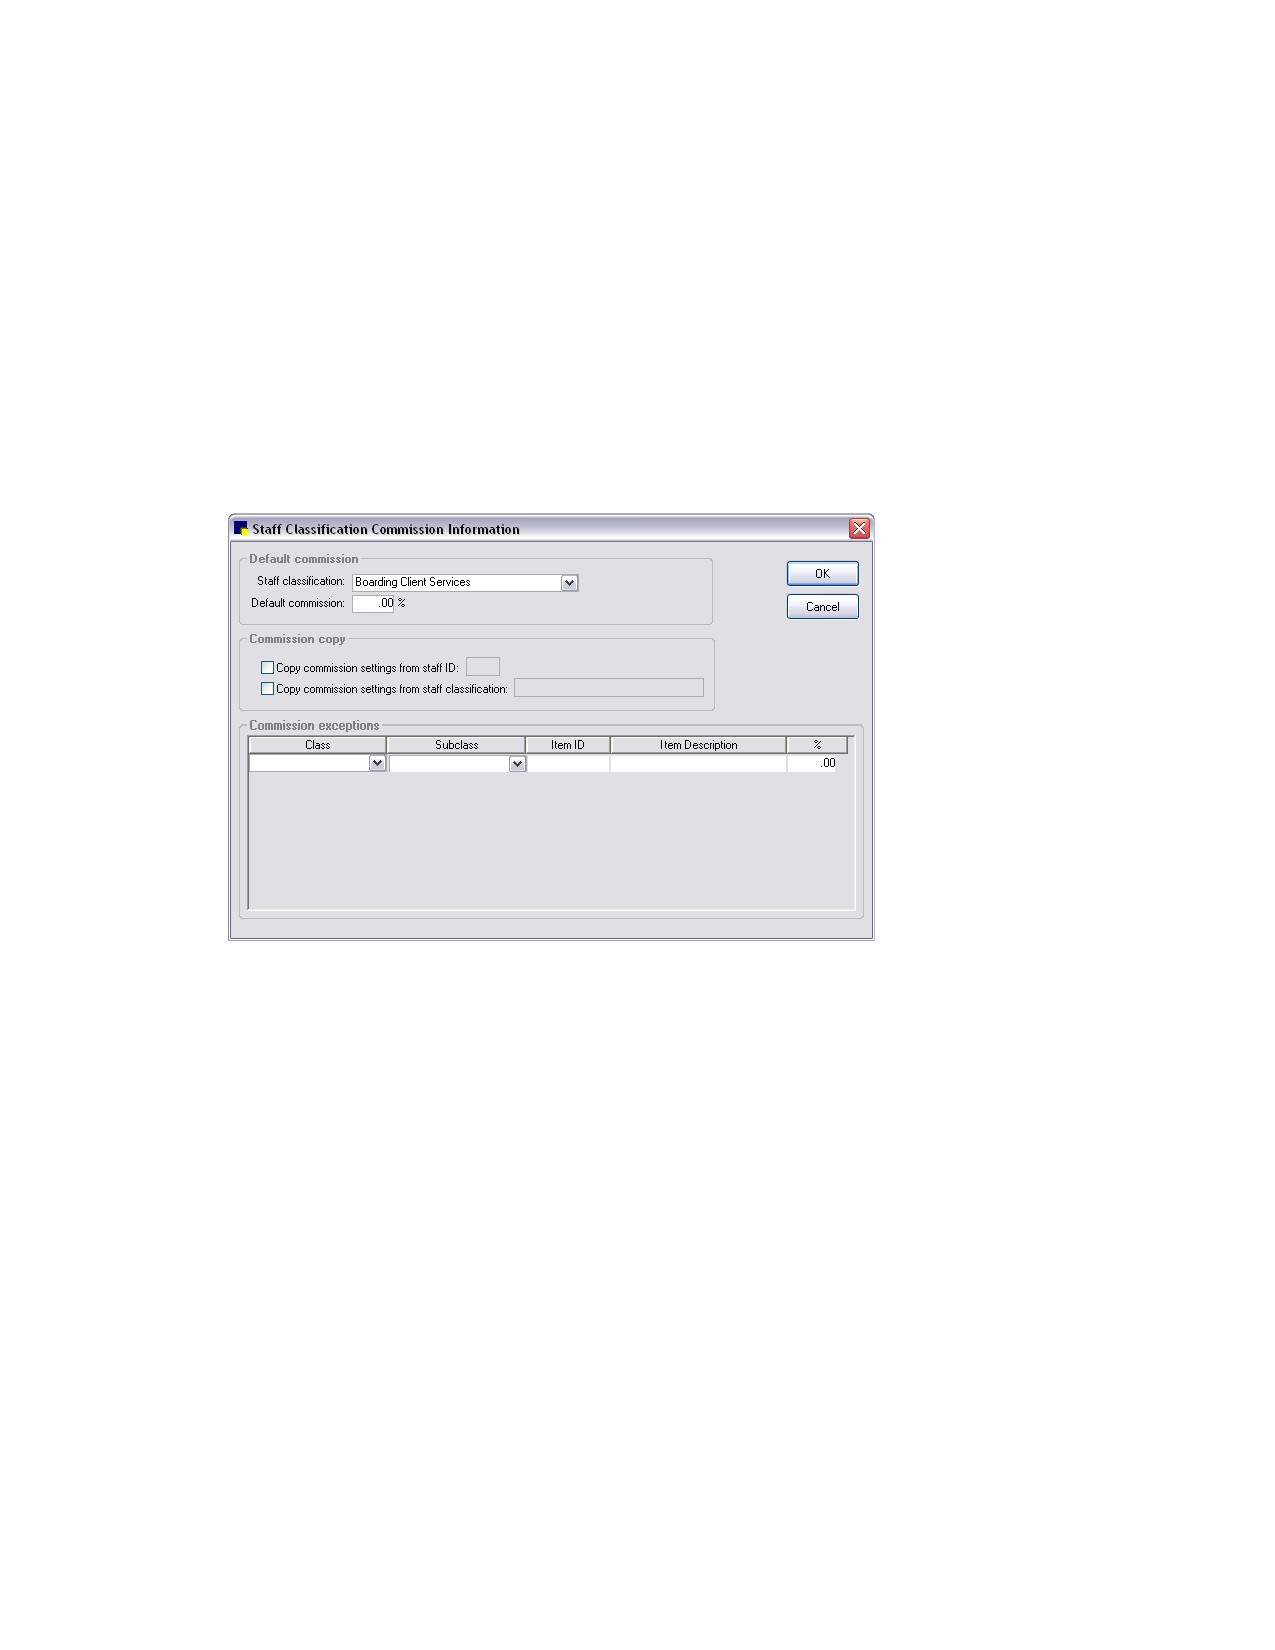
update it. The Staff Classification Commission Information dialog box appears.
Staff Classification Commission Information dialog box
3. From the Staff classification drop-down list, select the staff classification.
4. In the Default commission text box, type the percentage.
5. To copy the commission settings from another staff member, select the Copy commission settings
from staff ID check box and type the staff ID in the text box.
6. To copy the commission settings from another staff classification, select the Copy commission
settings from staff classification check box and type the classification in the text box.
7. In the Commission exceptions area, enter individual exceptions to the commission (Class,
Subclass, or Item ID, as appropriate) and the percentage.
8. Click OK, and then click Close.
81
Section 2-Cornerstone* Defaults Setup
Chapter 4: Setting Practice and Workstation Defaults
Chapter 5: Setting Staff Defaults
Chapter 6: Setting Cornerstone* Imaging Defaults
82
Chapter 4: Setting Practice and Workstation Defaults
Overview
A default is a setting you define so that either a particular setting automatically appears in a commonly
used dialog box or the software automatically performs a particular action.
You do not have to set defaults; however, setting defaults saves time later if you enter the most
commonly used answers or actions as the default settings. You can change the default settings that
were preset when the IDEXX Cornerstone* Practice Management System was installed.
Accessing Practice and Workstation Defaults
1. On the Controls menu, select Defaults > Practice and Workstation. The Practice and Workstation
Defaults window appears.
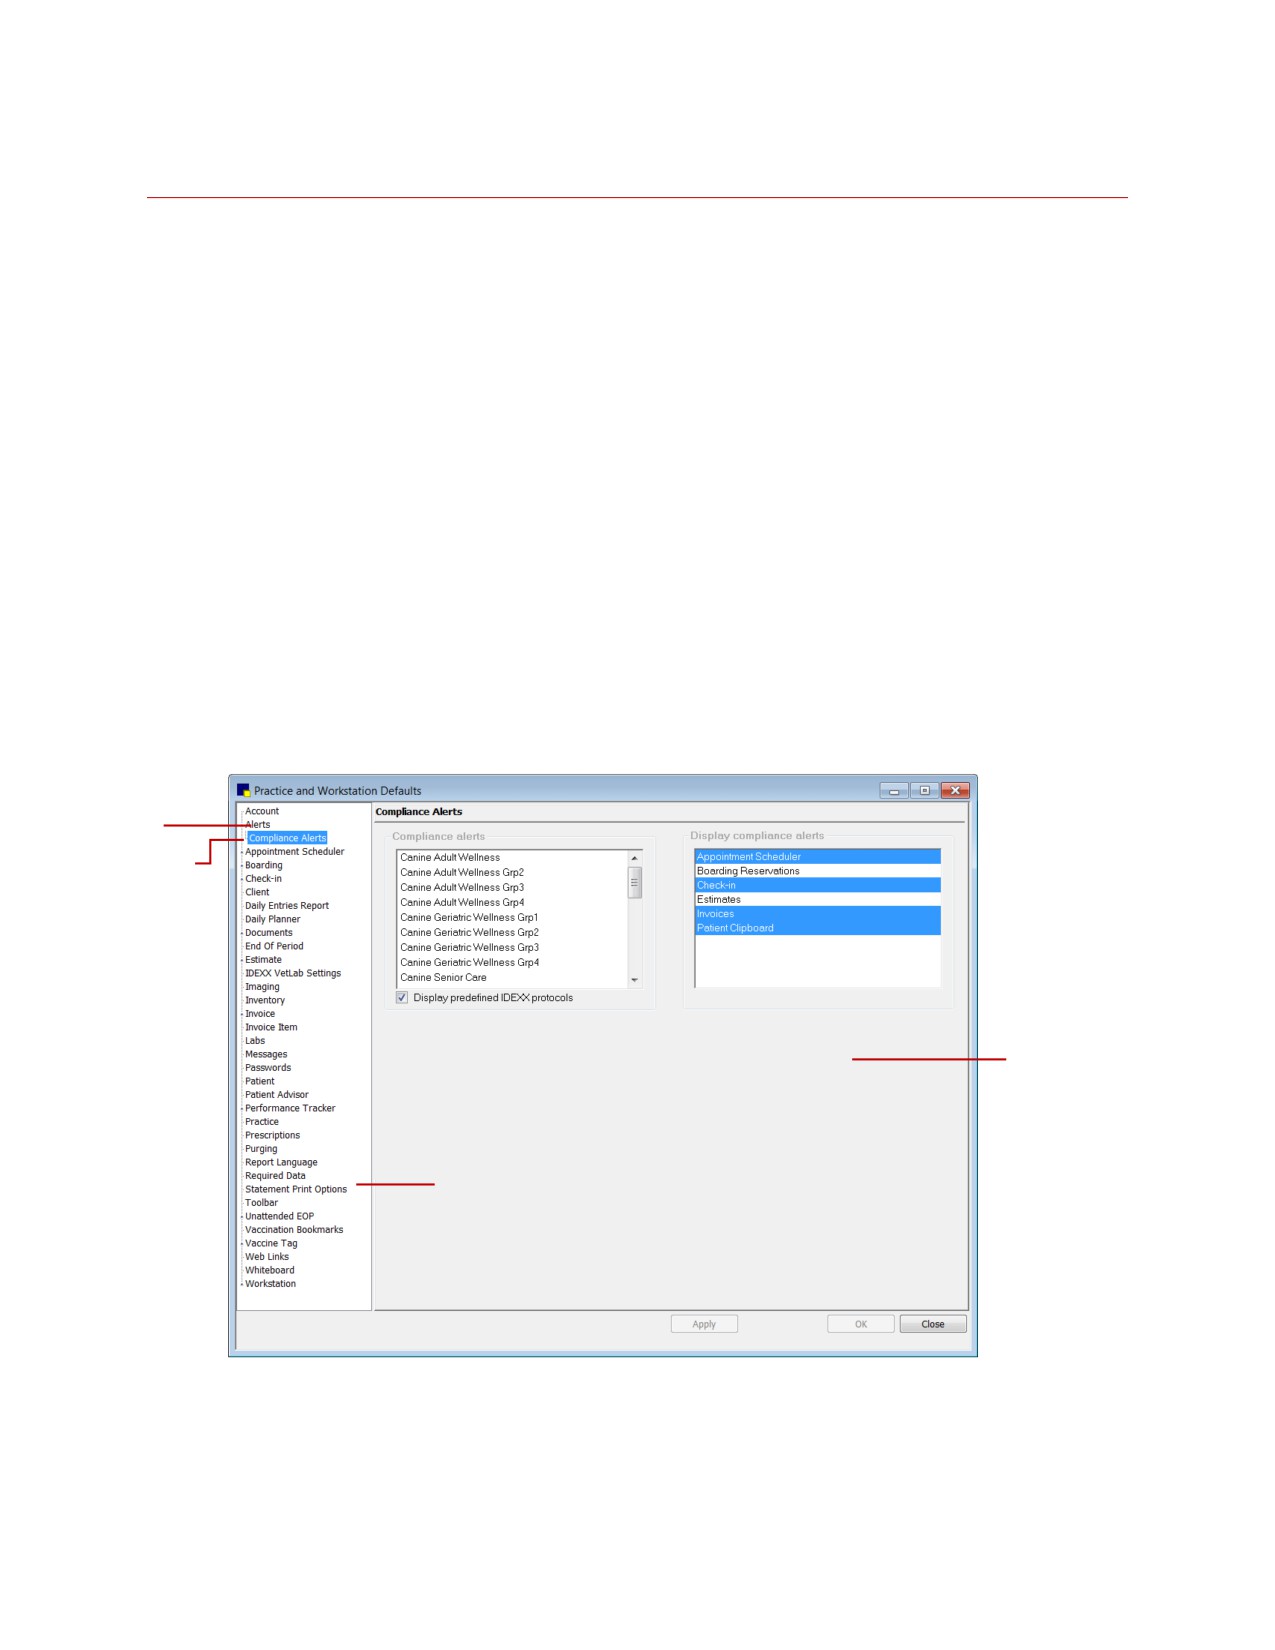
2. The left navigation pane lists the available properties that you can configure. A plus sign [+] box to
the left of a property indicates that it has one or more associated subproperties—click the [+] box
(or click the property) to expand its list of subproperties. Select the property or subproperty to
configure.
The corresponding configuration pane shows on the right.
Practice and Workstation Defaults Window
Property
Subproperty
Configuration
pane
Navigation
pane
Note: The default properties listed in the navigation pane in the figure above may differ from the
properties appearing in your installation of Cornerstone software. This may be because appropriate
security permissions have not been granted for these areas of Cornerstone or because your
83
Chapter 4: Setting Practice and Workstation Defaults
practice has not purchased and installed the Cornerstone feature associated with a particular
default property.
Depending on your actions, the following buttons may be available on the bottom of the Practice
and Workstation Defaults window:
• Apply-Applies any changes made since the last time you clicked Apply and leaves the Practice
and Workstation Defaults window open so you can continue viewing and changing additional
properties as needed.
• OK-Applies any changes and closes the Practice and Workstation Defaults window.
• Cancel-If you have made any changes, you are asked if you want to save the changes and
then closes the Practice and Workstation Defaults window. (Any previous changes applied
using the Apply button are retained, not cancelled.)
• Close-Closes the Practice and Workstation Defaults window (appears in place of the Cancel
button if no changes have been made or if changes have been applied).
Account Defaults
Use Account defaults to set up the selections you use most frequently when working with client
payments, returned checks, and account adjustments.
Before You Begin
• Set up payment types (Controls > Payment Types).
• Set up billing messages (Controls > Billing Messages).
To set the Account defaults:
1. On the Controls menu, select Defaults > Practice and Workstation. The Practice and Workstation
Defaults window appears.
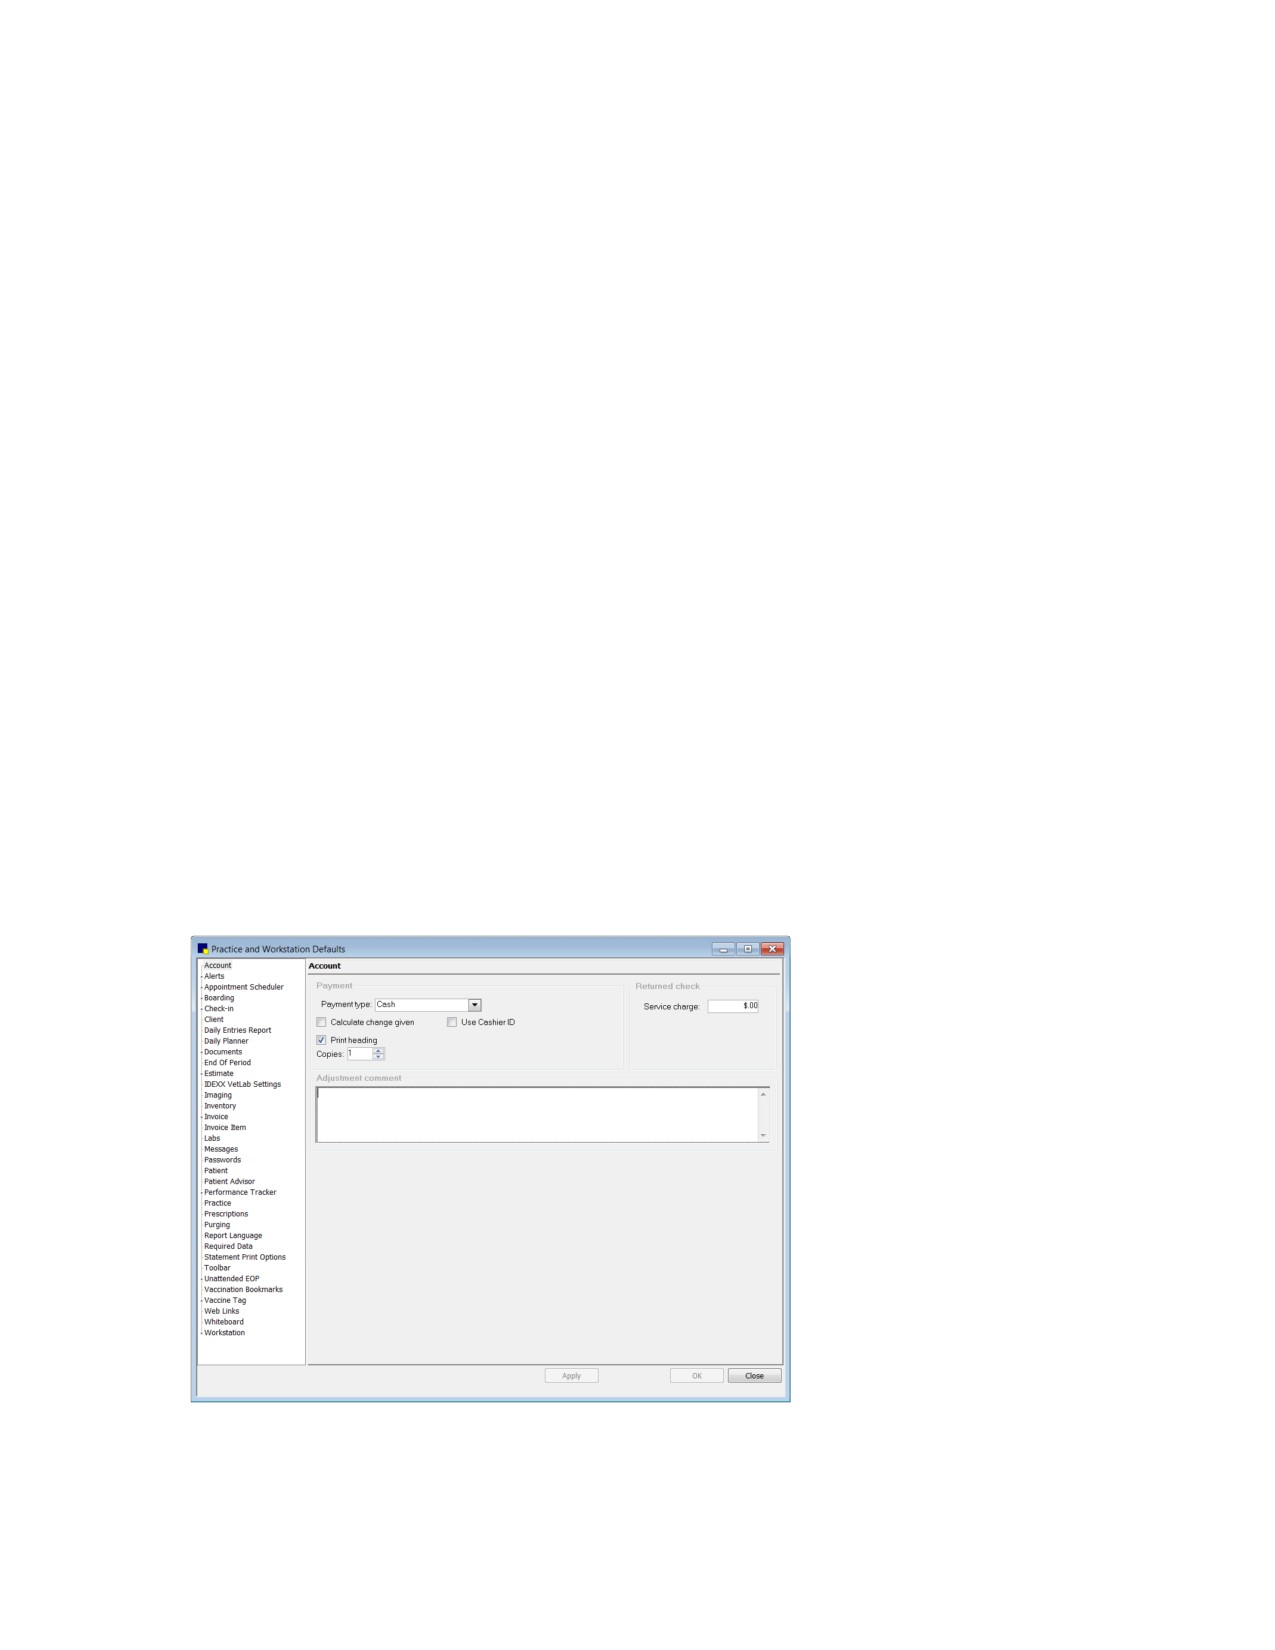
2. In the navigation pane, click Account. The Account configuration pane appears.
Account defaults
3. In the Payment area, do the following:
84
Chapter 4: Setting Practice and Workstation Defaults
a. From the Payment type drop-down list, select the payment type to appear when a client makes
a payment.
b. Select the Calculate change given check box to automatically calculate the amount of change
to give to the client after receiving a payment. If you do not select this option, you must manually
type the amount you return to the client.
c. Select the Use Cashier ID check box to track which staff members can accept payments.
d. Select the Print heading check box if you want your practice information to print on the
payment receipt. (At posting, the payment appears on the invoice if payments have been
applied on an invoice.)
e. In the Copies text box, enter the default number of copies of the payment receipt to print.
4. In the Returned check area, in the Service charge text box, type the service charge to apply for
returned checks.
5. In the Adjustment comment area, type the default comment to appear when you adjust an account.
You can edit this comment whenever you adjust an account.
Tip: If you are just starting to set up your system, type the adjustment comment that you want to
appear when you set up your clients’ accounts, such as “Balance transferred on 00/00/00.”
6. Click Apply to save your changes and continue setting defaults, or click OK to save your changes
and close the window.
Alerts Defaults
Alerts defaults allow you to set up alerts boxes to appear when you access records for a patient or client
who meets certain conditions. You can also customize alerts using client and patient classifications.
When an alert appears, you can immediately update the missing information by clicking the Process
button. When you have updated the information, Cornerstone returns you to the alert box so any other
alerts can be processed. You must click OK to close the message box or process the alert before you
can continue.
Alerts make staff aware of the following:
• Missing client or patient information
• Illogical information (such as a patient with a birth date over 100 years ago)
• Bad payment history
• Open invoices
• Multiple patient ownership
• Overdue or missing reminders
• Check-in alerts
• Specific types of clients and patients in your practice
Notes:
• Cancelled and Failed Appointment alerts are used with the Appointment Scheduler.
• The No show reservation alert applies only if you have the Boarding and Grooming module.
85
Chapter 4: Setting Practice and Workstation Defaults
• The Classification alert appears only if the Alert check box is selected in the Client
Classification Setup or Patient Classification Setup. (The classification description and the
classification answer both appear in the Alerts message box.)
Tip: You can set up a “Seasonal” client classification alert to notify staff if a client lives out of the
area for some time during the year. The staff member can then take this into account when setting
up reminders or payment schedules.
Before You Begin
• Set up client classifications for types of clients you want to identify (Controls > Classifications
> Client tab).
• Set up patient classifications for types of patients you want to identify (Controls >
Classifications > Patient tab).
To set the Alerts defaults:
1. On the Controls menu, select Defaults > Practice and Workstation. The Practice and Workstation
Defaults window appears.
2. In the navigation pane, click Alerts. The Alerts configuration pane appears.
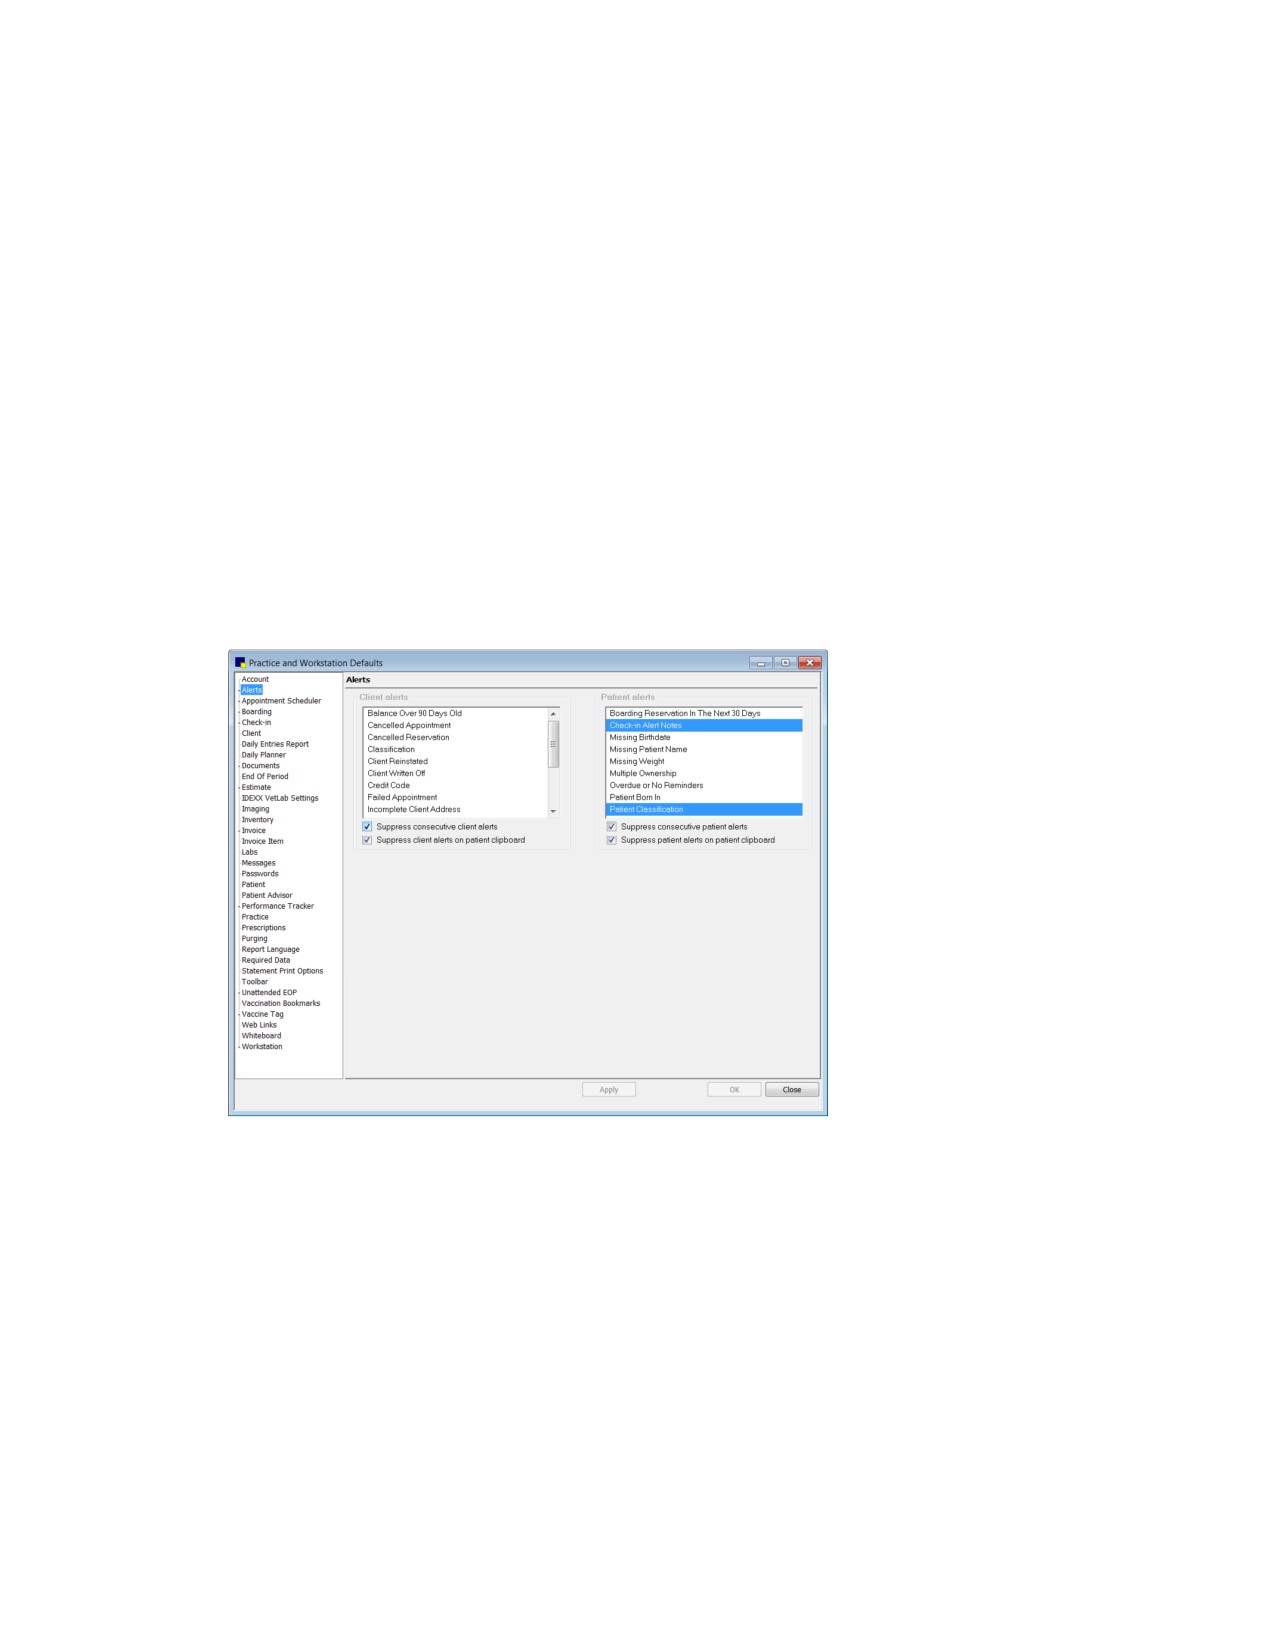
Alerts defaults
3. Select or clear the client and patient alerts that you want to use or not use. Selected alerts are active.
4. If you are activating client and patient alerts and you do not want the alerts to reappear when the
same client or patient is used multiple times on the same computer, select the Suppress
consecutive client/patient alerts check box.
5. If you are activating client and patient alerts and you do not want the alerts to appear when a client
or patient record is accessed from the Patient Clipboard*, select the Suppress client/patient alerts
on patient clipboard check box.
6. Click Apply to save your changes and continue setting defaults, or click OK to save your changes
and close the window.
86
Chapter 4: Setting Practice and Workstation Defaults
Compliance Alerts Defaults
With Compliance Alerts defaults, you can set up your system to display an alert when a patient who
needs a recommended service is seen. When the alert displays, you can process the alert to see which
services or tests are missing from the patient record.
Before You Begin
¾ Set up protocols (Reports > Compliance Assessment Tool > Protocol Setup Wizard).
To set the Compliance Alerts defaults:
1. On the Controls menu, select Defaults > Practice and Workstation. The Practice and Workstation
Defaults window appears.
2. In the navigation pane, click Alerts to expand its subproperties, and then click the Compliance
Alerts subproperty. The Compliance Alerts configuration pane appears.
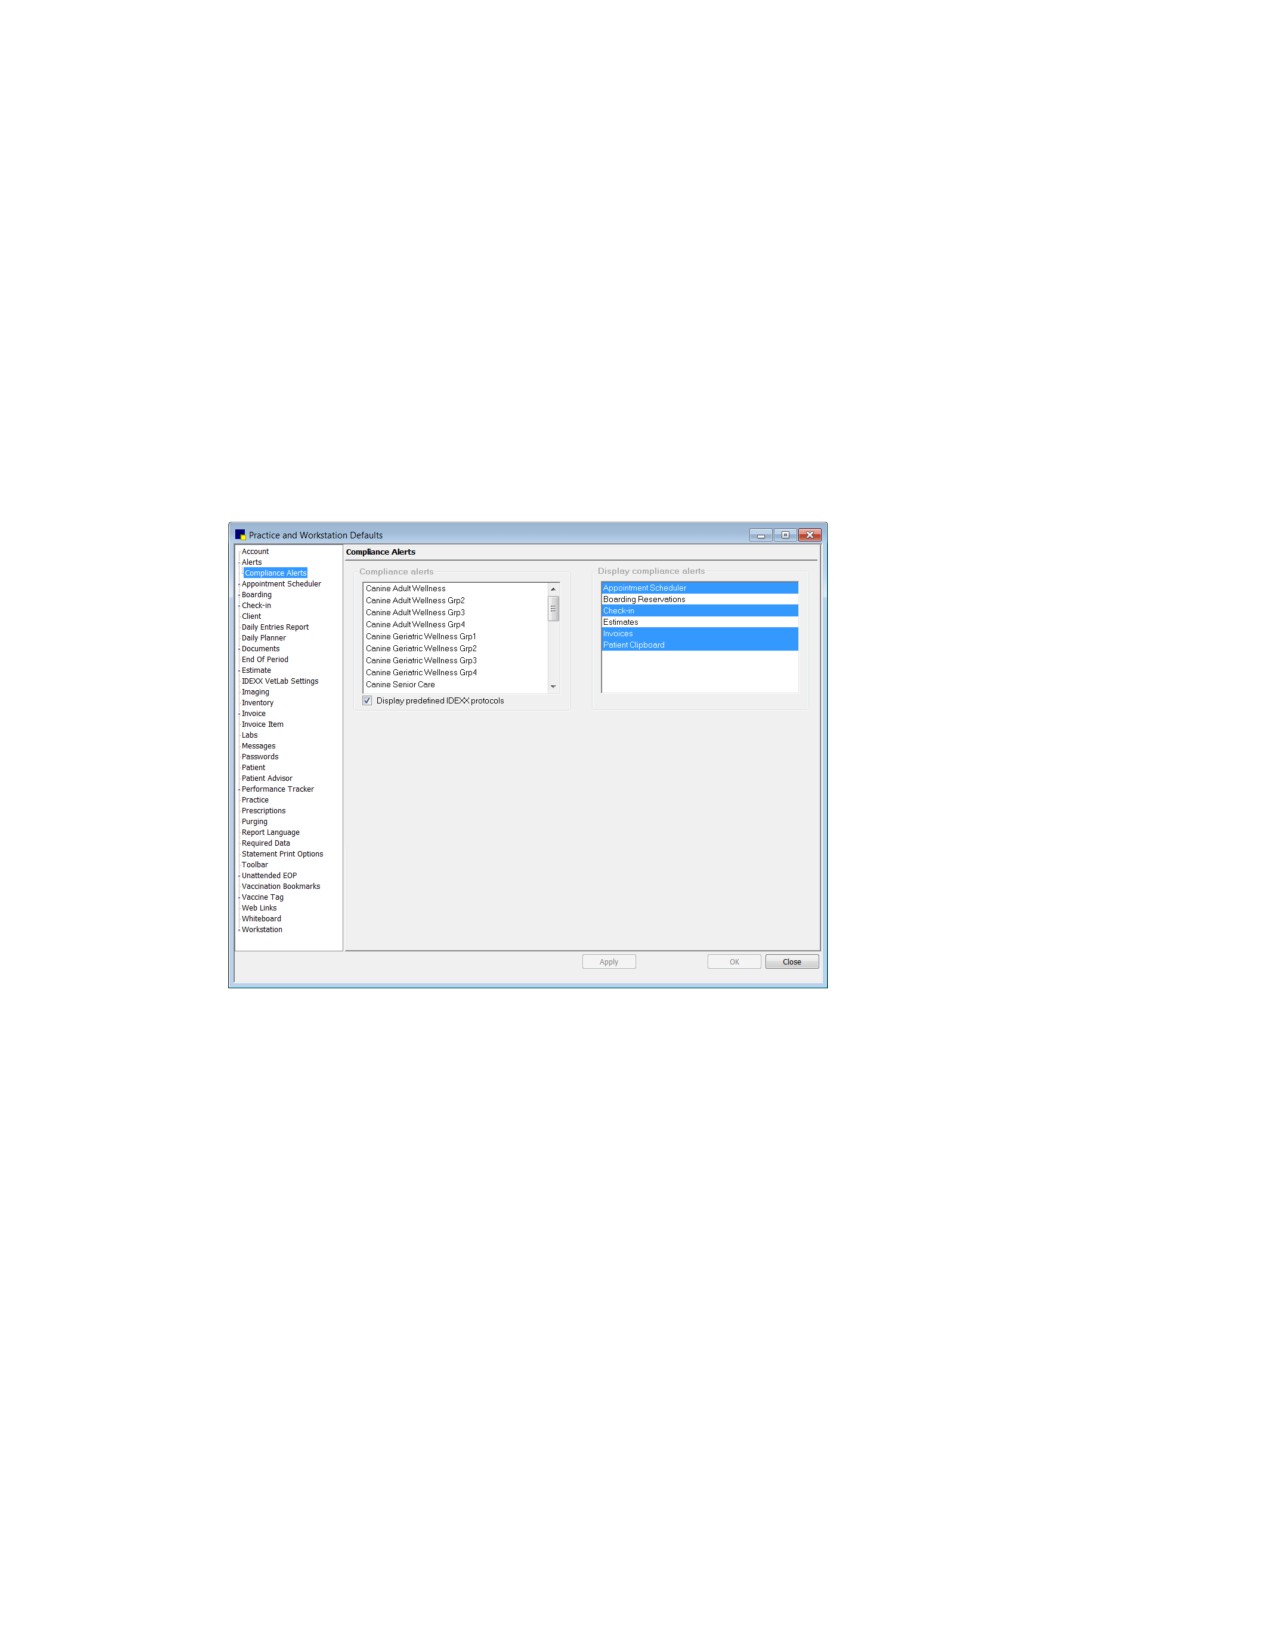
Compliance Alerts defaults
3. In the Compliance alerts area, select the protocols for which you want an alert to appear. Selected
protocols are active. You can select more than one protocol.
¾ A number of predefined protocols are available with Cornerstone. Click the Display predefined
IDEXX protocols check box to view the protocols.
4. In the Display compliance alerts area, select where in Cornerstone you want the compliance alerts to
appear (Appointment Scheduler, Boarding Reservations, Check-In, Estimates, Invoices, Patient
Clipboard). Selected display areas are active.
5. Click Apply to save your changes and continue setting defaults, or click OK to save your changes
and close the window.
Appointment Scheduler Defaults
The general Appointment Scheduler defaults allow you to set the Appointment Scheduler refresh rate,
display, and resizing options, as well as specify the default appointment suite to display.
87
Chapter 4: Setting Practice and Workstation Defaults
To set the Appointment Scheduler defaults:
1. On the Controls menu, select Defaults > Practice and Workstation. The Practice and Workstation
Defaults window appears.
2. In the navigation pane, click Appointment Scheduler. The Appointment Scheduler configuration
pane appears.
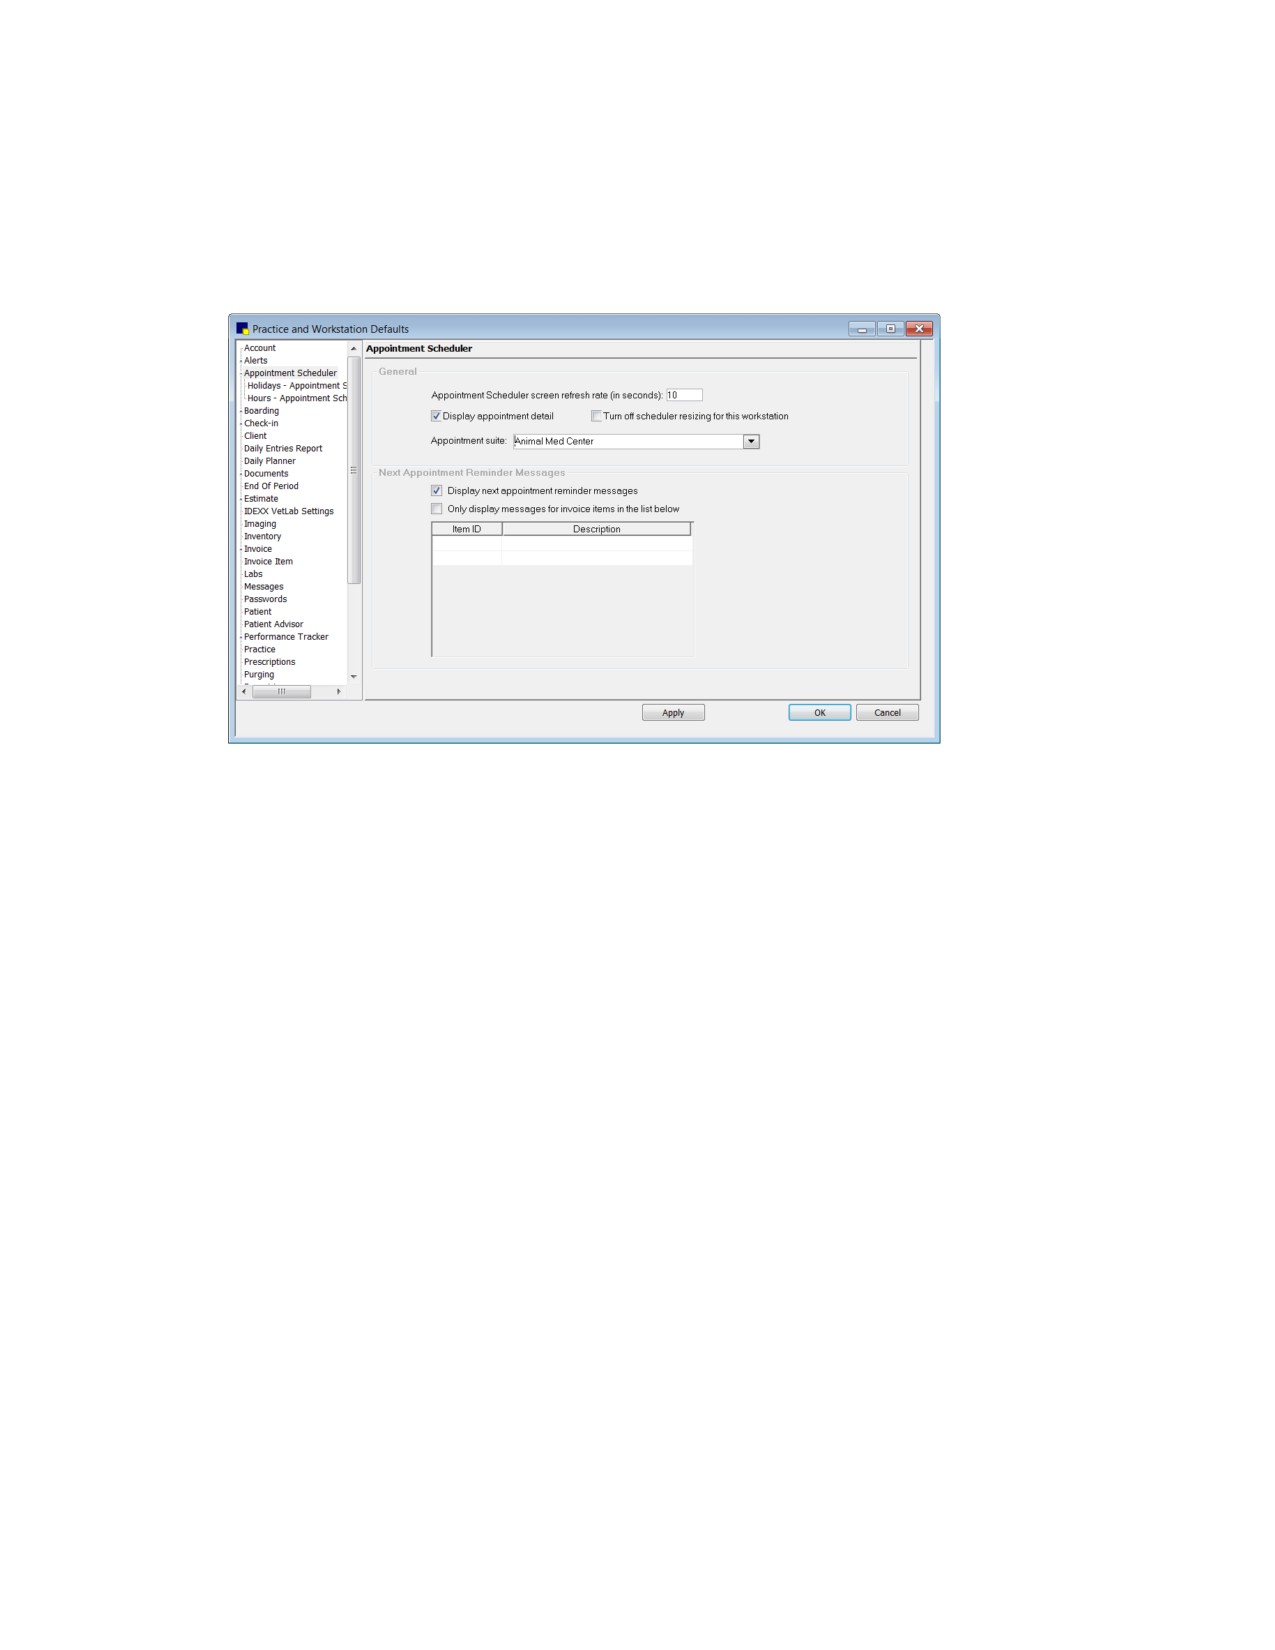
Appointment Scheduler defaults
3.
The Appointment Scheduler screen refresh rate (in seconds) option allows the screen to refresh
to reflect appointments made recently by other staff members on other workstations. In the text box,
type the time (in seconds) you want to pass before the screen refreshes.
Note: In general, a refresh rate of 60-90 seconds is recommended. Depending on your system
resources, a rate below 60 seconds may slow down your system.
4.
Select the Display appointment detail check box to view tooltip-style appointment details when you
move the mouse over an appointment slot.
5.
By default, the Schedule for Today window automatically resizes to fit the screen. Select the Turn off
scheduler resizing for this workstation check box to turn off the resizing option. For practices
using Terminal Services, turning off this option may help the Schedule for Today load faster.
6.
From the Appointment suite drop-down list, select the suite to display by default when accessing
the Schedule for Today window. The default suite displays unless there is a different suite assigned
to the staff member currently logged in.
7.
In the Next Appointment Reminder Messages area:
a. Select the Display next appointment reminders check box. This check box is selected by
default. If you don’t want reminders, clear the check box.
b. To display messages only for certain items, select the Only display messages for invoice
items in the list below check box. To add items to the list, enter the invoice item ID in an
empty Item ID box or press F2 to select from a list.
8.
Click Apply to save your changes and continue setting defaults, or click OK to save your changes
and close the window.
88
Chapter 4: Setting Practice and Workstation Defaults
Appointment Scheduler-Holiday Defaults
Holiday defaults allow you to define and set up the holidays on which your practice will be closed so that
appointments cannot be scheduled for those days.
Tip: Use a 5-year planning calendar to set up holidays in advance.
To set the Appointment Scheduler-Holiday defaults:
1. On the Controls menu, select Defaults > Practice and Workstation. The Practice and Workstation
Defaults window appears.
2. In the navigation pane, click Appointment Scheduler to expand its subproperties, and then click
the Holidays-Appointment Scheduler subproperty. The Holidays-Appointment Scheduler
configuration pane appears.
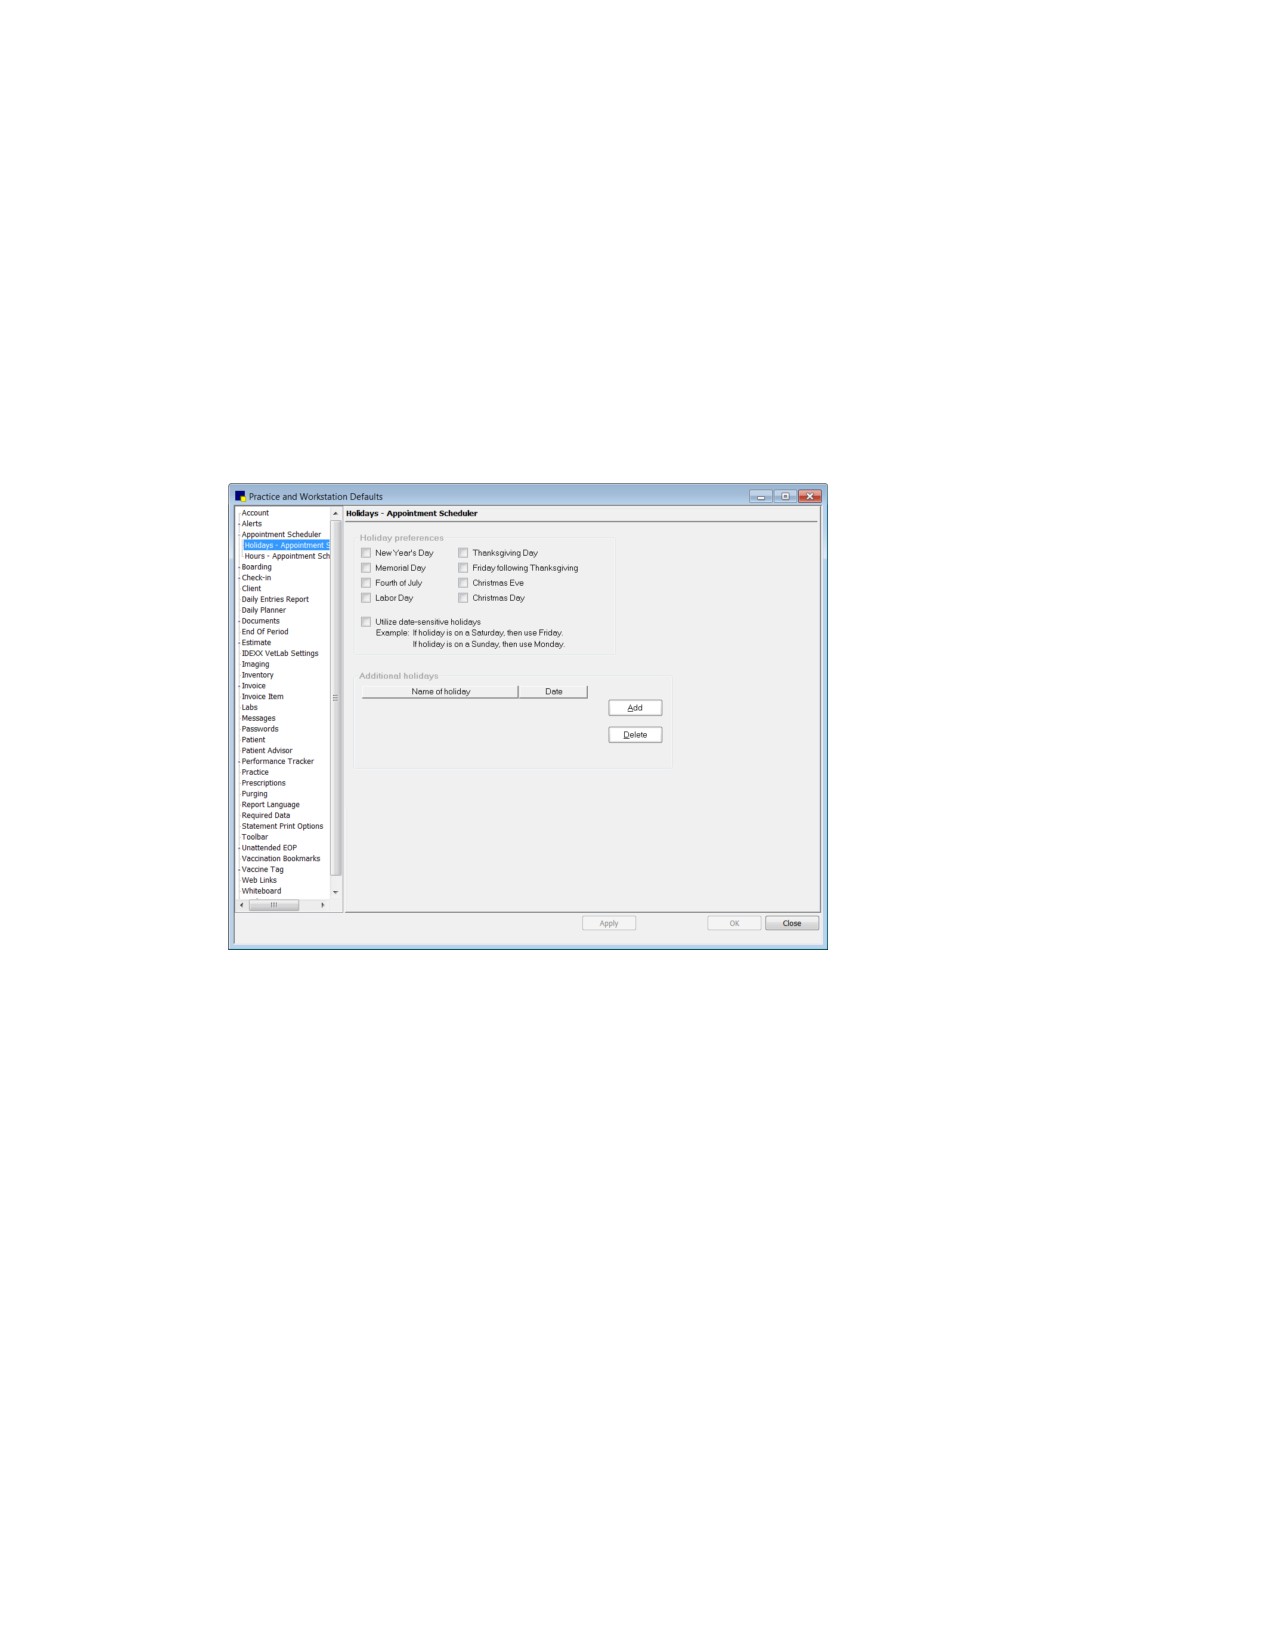
Holidays-Appointment Scheduler defaults
3. In the Holiday preferences area, select the check box for each holiday that your practice will be
closed. (Appointments can be scheduled on these days, but Cornerstone displays a Practice
Holiday message and the time slots are shaded gray.)
4. Select the Utilize date-sensitive holidays check box to automatically schedule holidays that fall on
weekends. (A Saturday holiday is taken on Friday; a Sunday holiday is taken on Monday.)
5. In the Additional holidays area, do the following to schedule additional holidays:
a. Click Add. The cursor will appear in the next available row in the Name of holiday column.
b. In the Name of holiday column, type the name of the holiday and press TAB.
c. In the Date column, type the date of the holiday (or date that the practice is closed for in-
service, etc.) or press F2 to use the Calendar tool to choose a date.
Note: You must enter additional holiday dates for each year they occur.
d. To delete an additional holiday you have added, click within the holiday’s row and click the
Delete button.
6. Click Apply to save your changes and continue setting defaults, or click OK to save your changes
and close the window.
89
Chapter 4: Setting Practice and Workstation Defaults
Appointment Scheduler-Practice Hours Defaults
You must set up practic hour defaults before you can begin to schedule appointments using the
Appointment Scheduler. This involves defining which days and hours the practice will be open.
To set the Appointment Scheduler-Practice Hours defaults:
IMPORTANT: Carefully choose the length of appointment times now. In order to change the time units
after you have saved your changes here, you must purge all appointments, remove the practice hours,
and start the practice hours setup again.
1. On the Controls menu, select Defaults > Practice and Workstation. The Defaults window
appears.
2. In the navigation pane, click Appointment Scheduler to expand its subproperties, and then click
the Hours-Appointment Scheduler subproperty. The Hours-Appointment Scheduler configuration
pane appears.
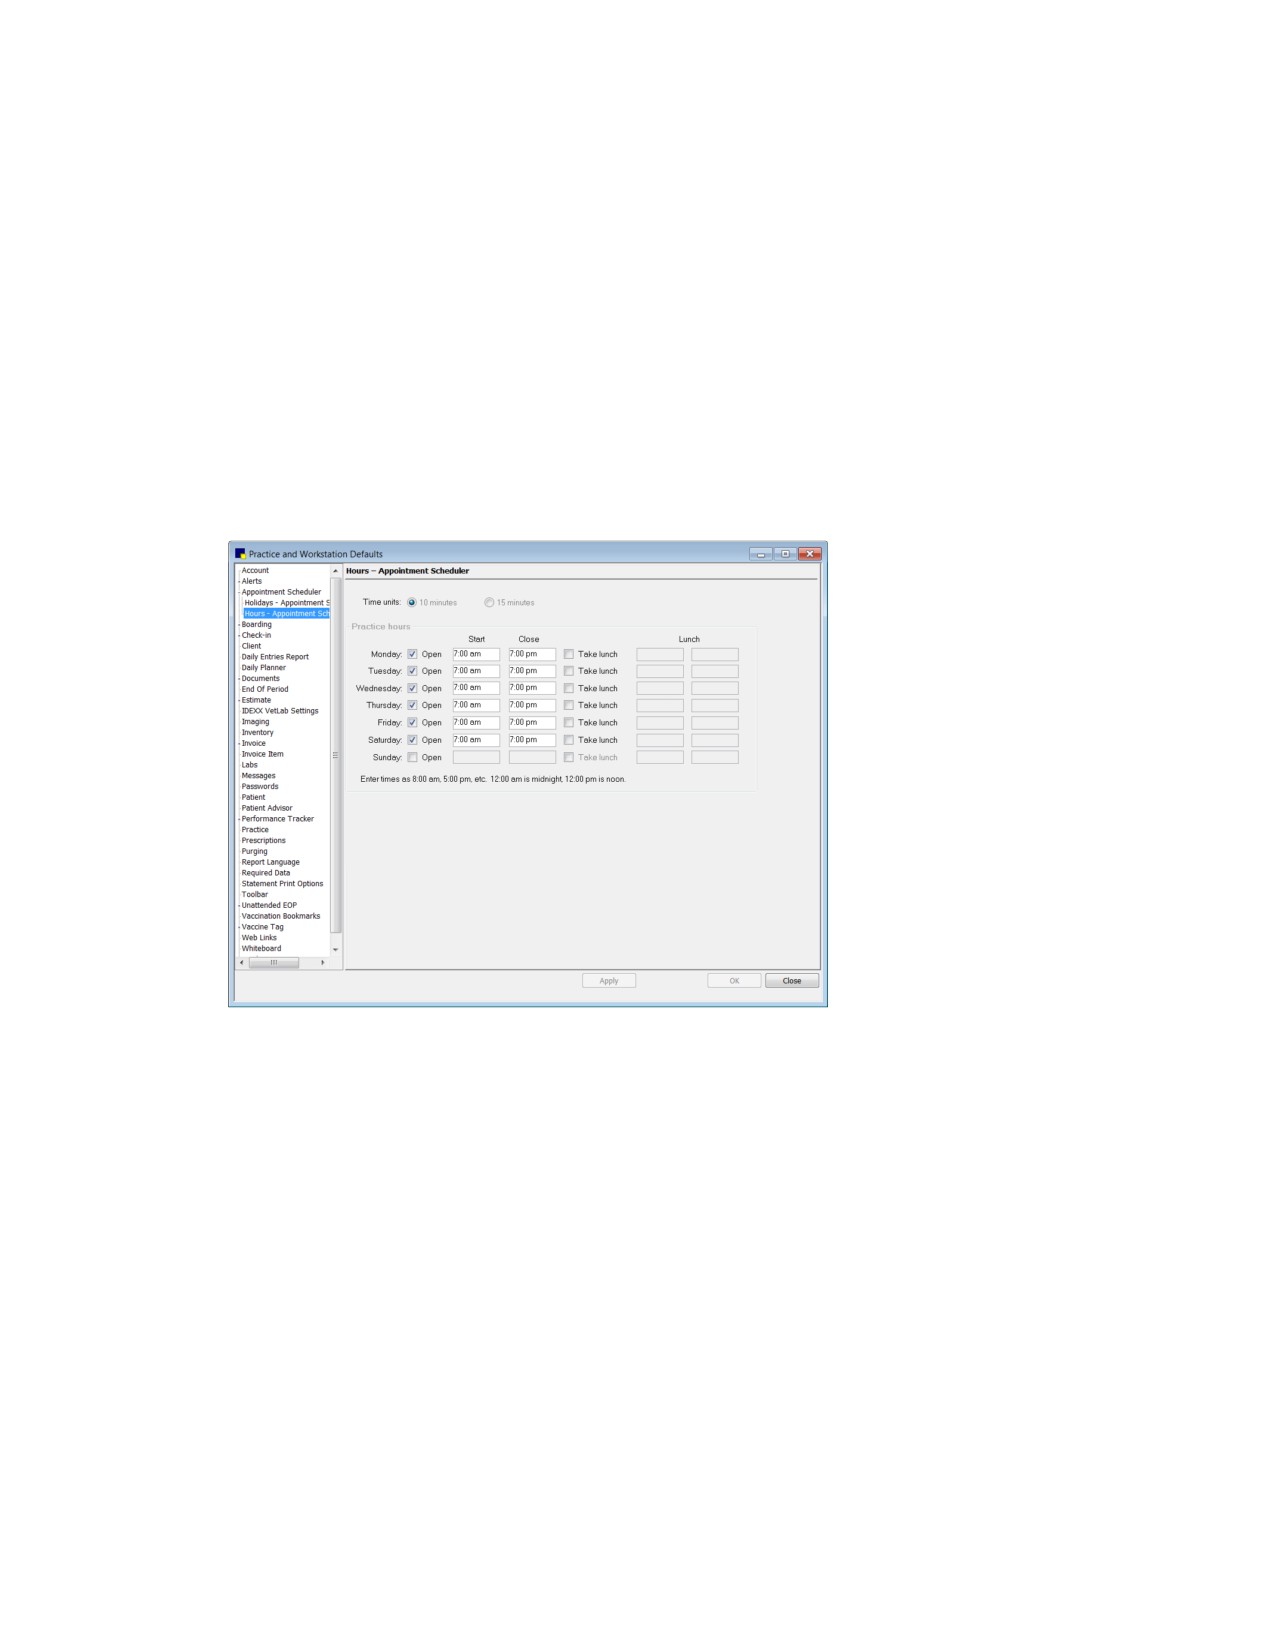
Hours-Appointment Scheduler defaults
3. For the Time units option, select 10 minutes or 15 minutes to specify the increment for scheduling
appointments. This should be the minimum amount of time scheduled for an appointment. (If the
practice schedules 20-minute appointments, select 10 minutes so you can easily block two 10-
minute time units for the 20-minute appointments.)
4. Select the Open check box for each day your practice is open, and then type the start and close
times for each day in the Start and Close text boxes. (Enter times as 8:00 am, 5:00 pm, etc.)
Tip: You can use military time to quickly enter times that are on the hour (for example, 14 is 2:00
p.m.). You can also use Copy (CTRL+C) and Paste (CTRL+V) to enter times.
5. Select the Take lunch check box for days you close for lunch. Type the time you close for lunch and
the time you reopen the practice in the Lunch text boxes for each day. The lunch block appears in
yellow on the Appointment Scheduler. (Appointments can still be scheduled during this time.)
6. Click Apply to save your changes and continue setting defaults, or click OK to save your changes
and close the window.
90
Chapter 4: Setting Practice and Workstation Defaults
Boarding Defaults
IDEXX Cornerstone Boarding & Grooming allows you to schedule boarding reservations and check your
reservations in and out independently of your clinic/hospital patients. Although Cornerstone Boarding &
Grooming is an optional module that is sold separately, its Boarding defaults are defined from the main
Cornerstone program’s Practice and Workstation Defaults window.
There are two “styles” of boarding reservations in Cornerstone:
• A hotel style reservation spans more than one day, with check-in and check-out occurring on
different dates.
• A daycare style reservation is for a period of time within a single day, with check-in and check-
out occurring on the same date.
Before You Begin
• Set up classifications for clients, patients, and staff (Controls > Classifications).
• Set up the reasons for visit (Controls > Reasons For Visit).
• Set up rooms (Lists > Room).
• Set up cage types and reservation types (Activities > Boarding > Cage Types or Activities >
Boarding > Reservation Types).
To set the Boarding defaults:
1. On the Controls menu, select Defaults > Practice and Workstation. The Practice and Workstation
Defaults window appears.
2. In the navigation pane, click Boarding. The Boarding configuration pane appears.
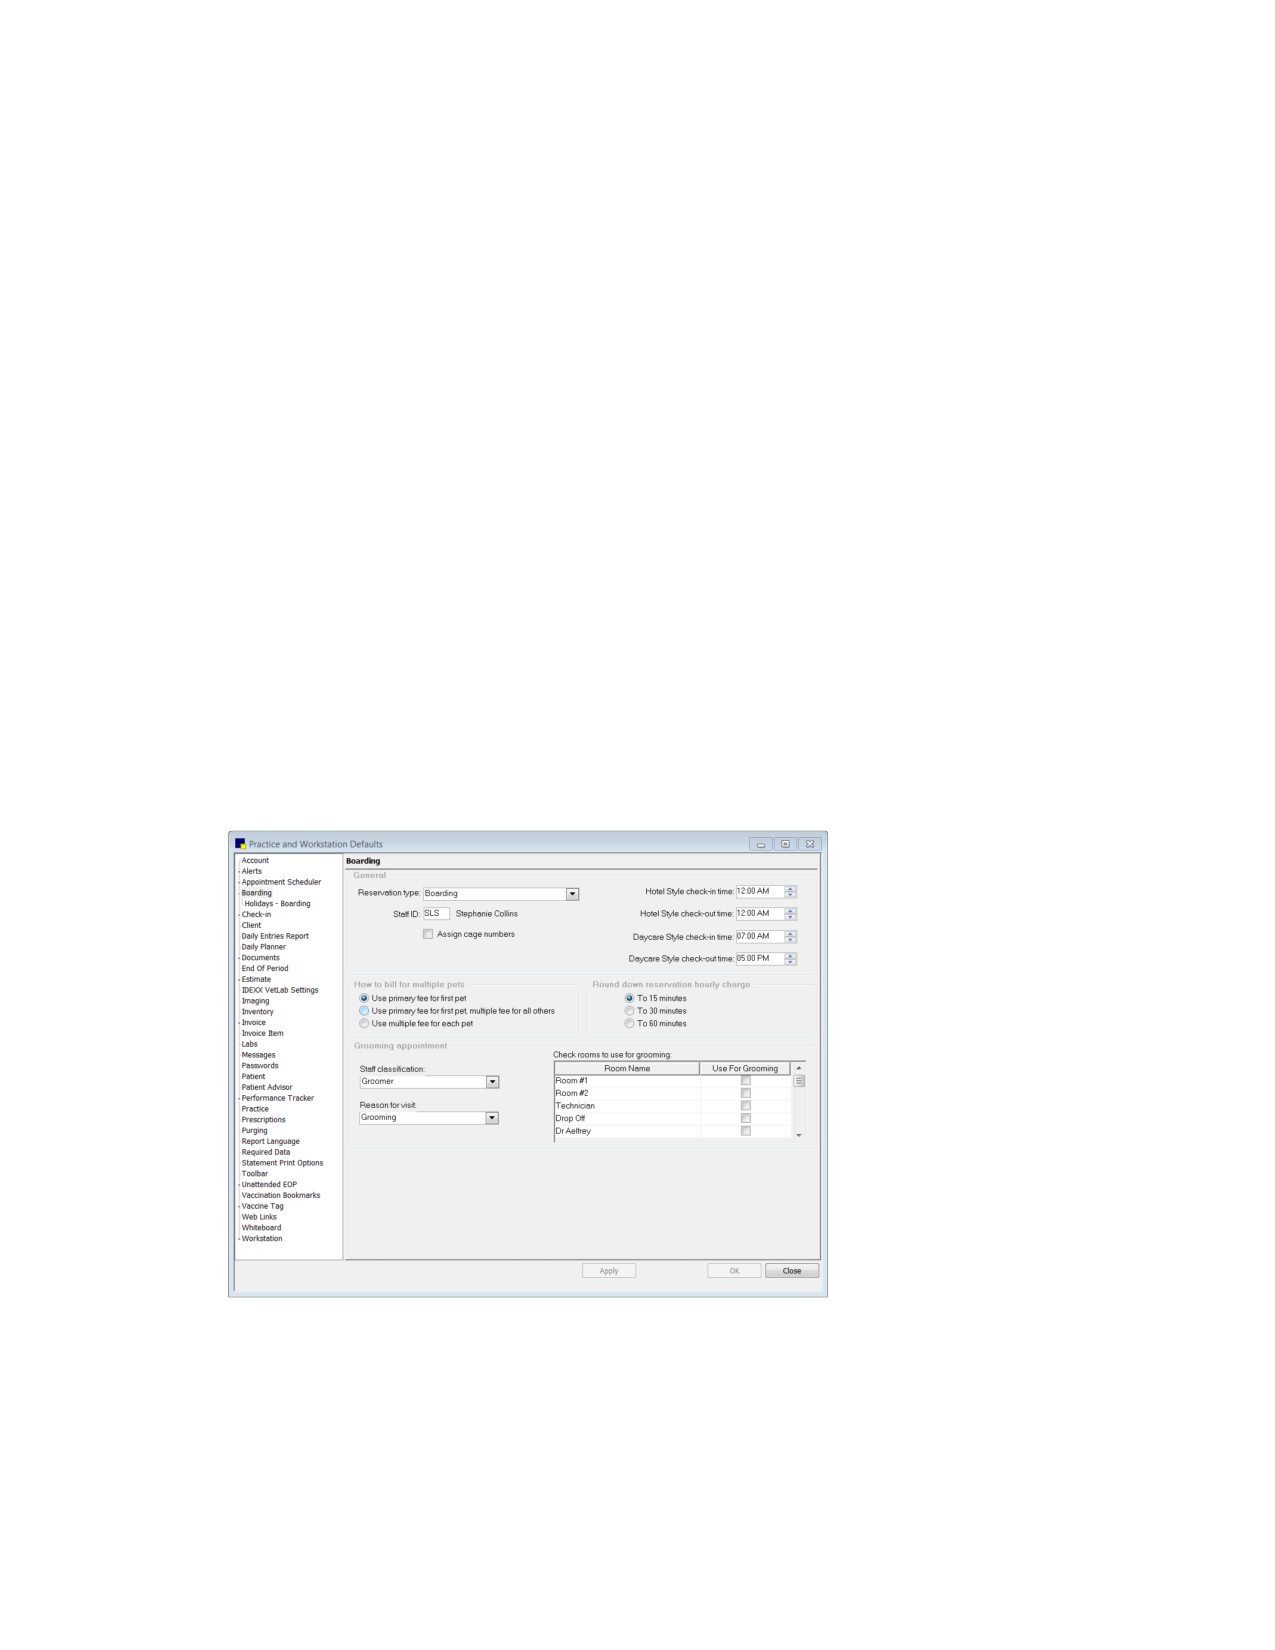
Boarding defaults
3. From the Reservation type drop-down list, select the default reservation type to use for making
boarding reservations. Select <None> if you don’t want a default reason.
4. In the Staff ID text box, type the staff ID of the staff member who usually provides boarding services
or press F2 to select a staff member from the Staff List. (Leave the Staff ID blank if you have multiple
staff members who provide boarding services.)
91