IDEXX Cornerstone. Administrator’s Manual (8.3 NEXT version 8.3.6) - page 2
Chapter 2: Setting Up Cornerstone* Controls
Invoice Types
You can select an Invoice Type for each invoice. Invoice types allow you to analyze the productivity of
different areas of your practice. You can also use invoice types to prevent certain invoices (such as
hospitalization) from closing at the end of the month.
To add or edit an invoice type:
1. On the Controls menu, Invoice Types. The Invoice Types dialog box appears.
2. Click New to add a new invoice type, or double-click an existing invoice type to update it. The
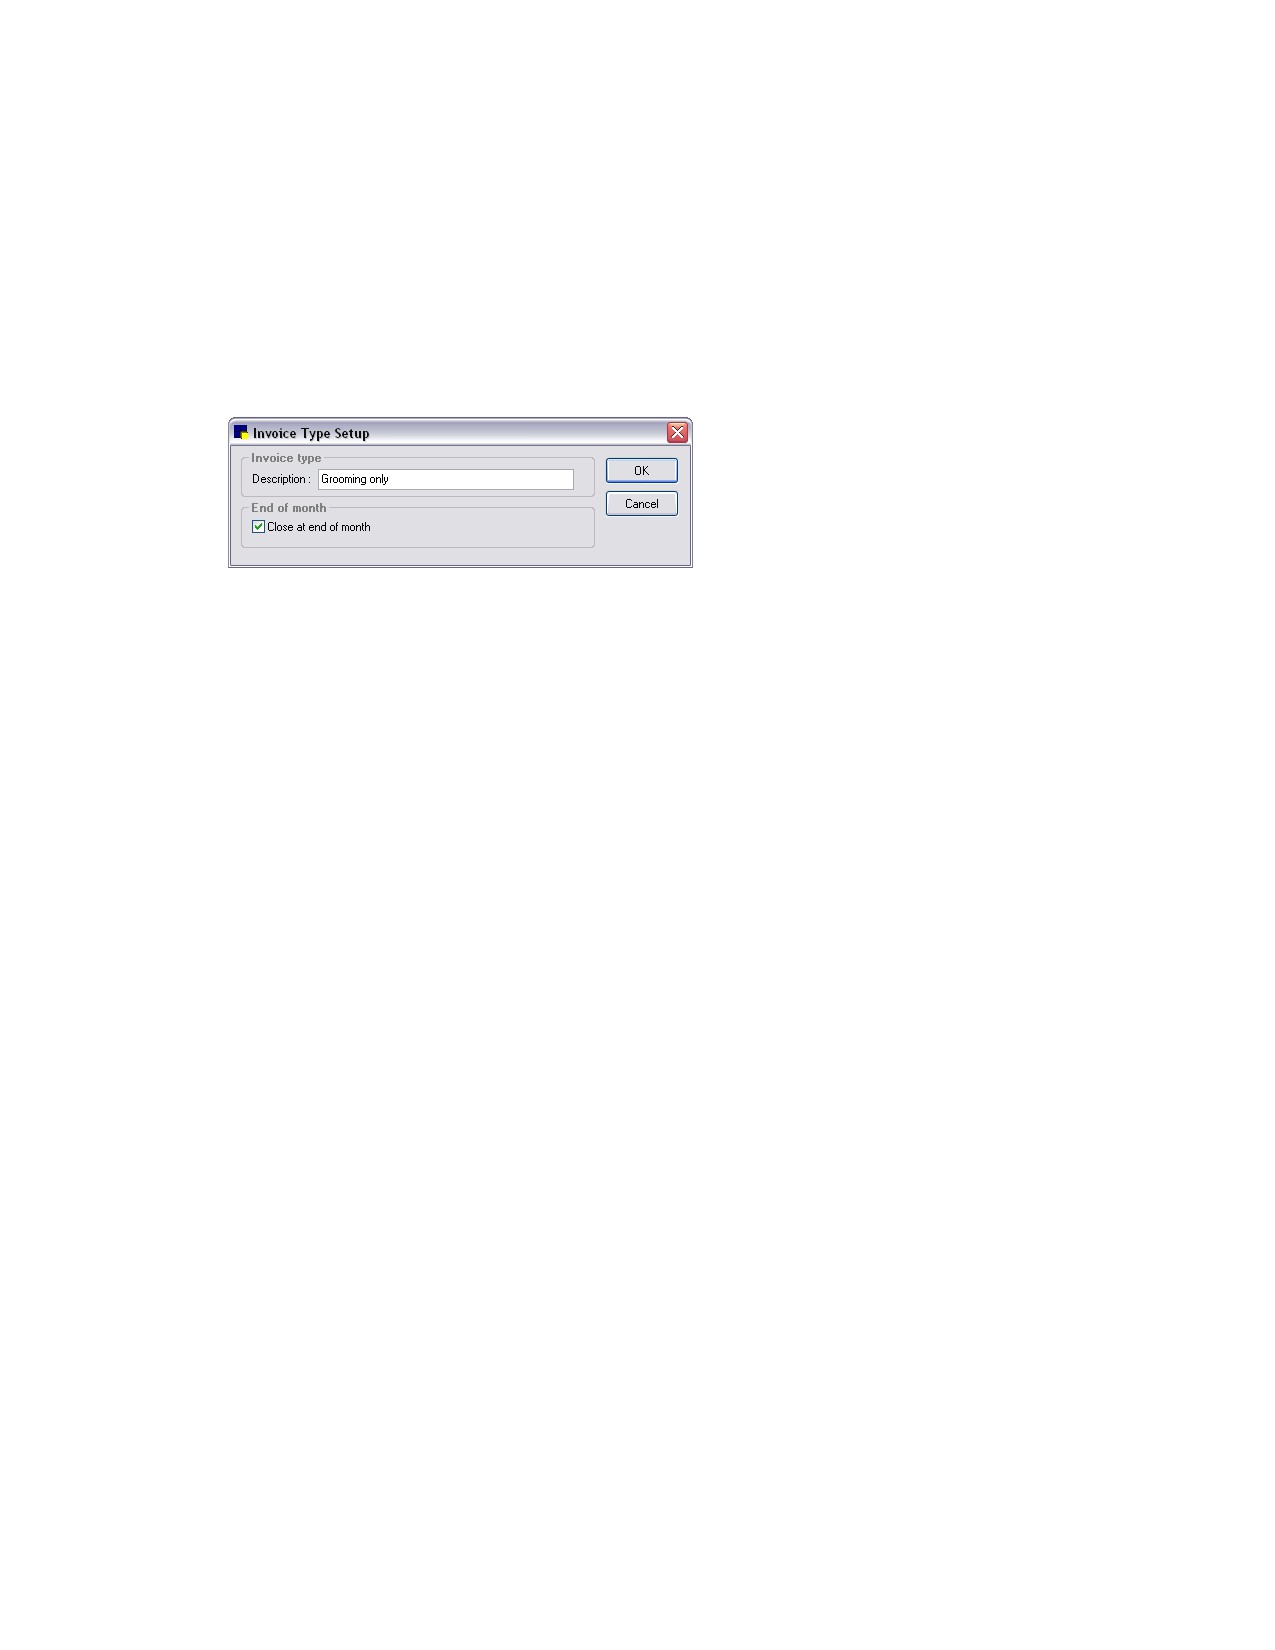
Invoice Type Setup dialog box appears.
Invoice Type Setup dialog box
3. In the Description text box, type an identifying name for this invoice type.
4. Select the Close at end of month check box if you want Cornerstone to automatically close any
invoice of this type during End of Month processing. Clear the Close at end of month check box if
you want invoices of this type to remain open when you process End of Month.
5. Click OK and then click Close.
Units of Measure
Each item in your inventory is sold in a Unit of Measure (UOM), such as bag, bottle, can, capsule, or
tablet. A variety of common weights, measurements, and amounts are predefined for you in the
Cornerstone software, but, if needed, you can set up additional units of measure.
Note: If you do not assign a UOM to an invoice item, Cornerstone uses the UOM specified in Invoice
Item defaults (see “Invoice Item Defaults” on page 116).
Before You Begin
¾ If you started with a Fastart or FastInstall database, review the weights, measurements, and
amounts already set up in the Invoice Item Units of Measure dialog box. If your practice uses the
metric system, you may need to replace certain measurements with metric units.
To add or edit a unit of measure:
1. On the Controls menu, select Units of Measure. The Invoice Item Units of Measure dialog box
appears.
2. Click New to add a new UOM, or double-click an existing UOM to update it. The Invoice Item Unit of
Measure Setup dialog box appears.
3. In the Description text box, type an identifying name for this unit of measure.
4. Click OK, and then click Close.
32
Chapter 2: Setting Up Cornerstone* Controls
Price Change Reasons
You can specify if the prices on invoice items can be changed. If prices can be changed, your practice
can set up Price Change Reasons to track why a price was changed. For example, if Dr. Smith
approved a price change on the invoice, you might use a price change code called “Dr. Smith
approved.”
Note: If you want to require that a reason is selected when an item’s price is changed, you must set the
item’s Allow change setting to Only with reason (on the Info tab in Invoice Item Information). See
“Setting Up Invoice Item Information” on page 186 for more information.
To add or edit a price change reason:
1. On the Controls menu, select Price Change Reasons. The Price Change Reason List dialog box
appears.
2. Click New to add a new reason, or double-click an existing reason to update it. The Price Change
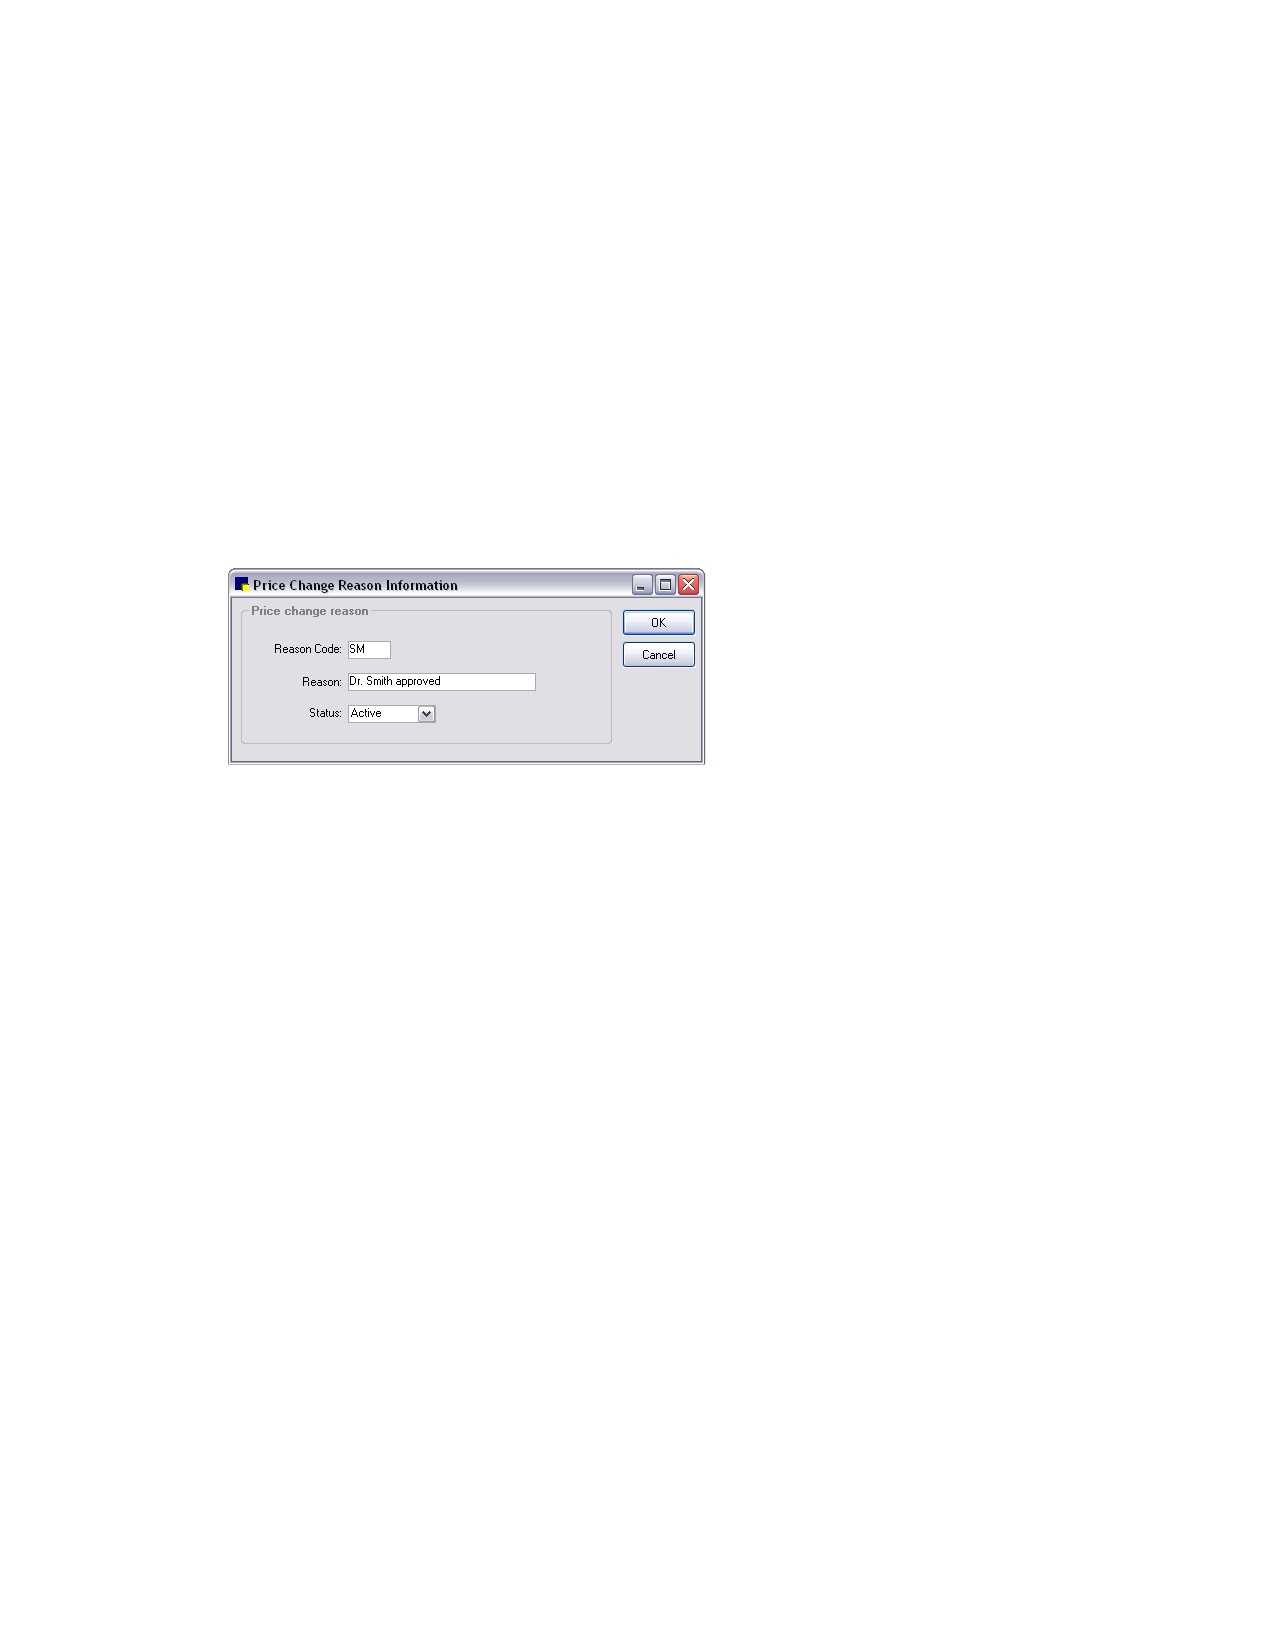
Reason Information dialog box appears.
Price Change Reason Information dialog box
3. In the Reason Code text box, type a reason code (up to three letters or numbers) to assign to this
price change reason.
4. In the Reason text box, type a brief explanation describing the reason for the price change (for
example; Group Item Discount, Free Dose, As per Dr. ___).
5. From the Status drop-down list, select Active or Inactive. (Change the status to Inactive only if you
no longer want to use this reason code.)
6. Click OK, and then click Close.
When a price is changed, the reason prints on the Standard Fee Exception Report, along with the
staff member who changed the price.
Controlled Substance Export List
Cornerstone provides an export Controlled Substance feature that exports state-required controlled
substance information from Cornerstone to a file that can be sent by email or FTP to the appropriate
state agency.
Before You Begin
¾ Contact your state’s controlled substance agency to obtain the state’s electronic filing form
requirements.
IMPORTANT: We recommend keeping a paper record of your practice’s controlled substance
information until your state confirms that the electronic filing form that you submit includes all required
information.
33
Chapter 2: Setting Up Cornerstone* Controls
To add or edit a controlled substance electronic filing form to export:
1. On the Controls menu, select Controlled Substance > Controlled Substance Export. The
Controlled Substance Export List appears.
2. Click New to add a new export form, or double-click an existing export form to update it. The
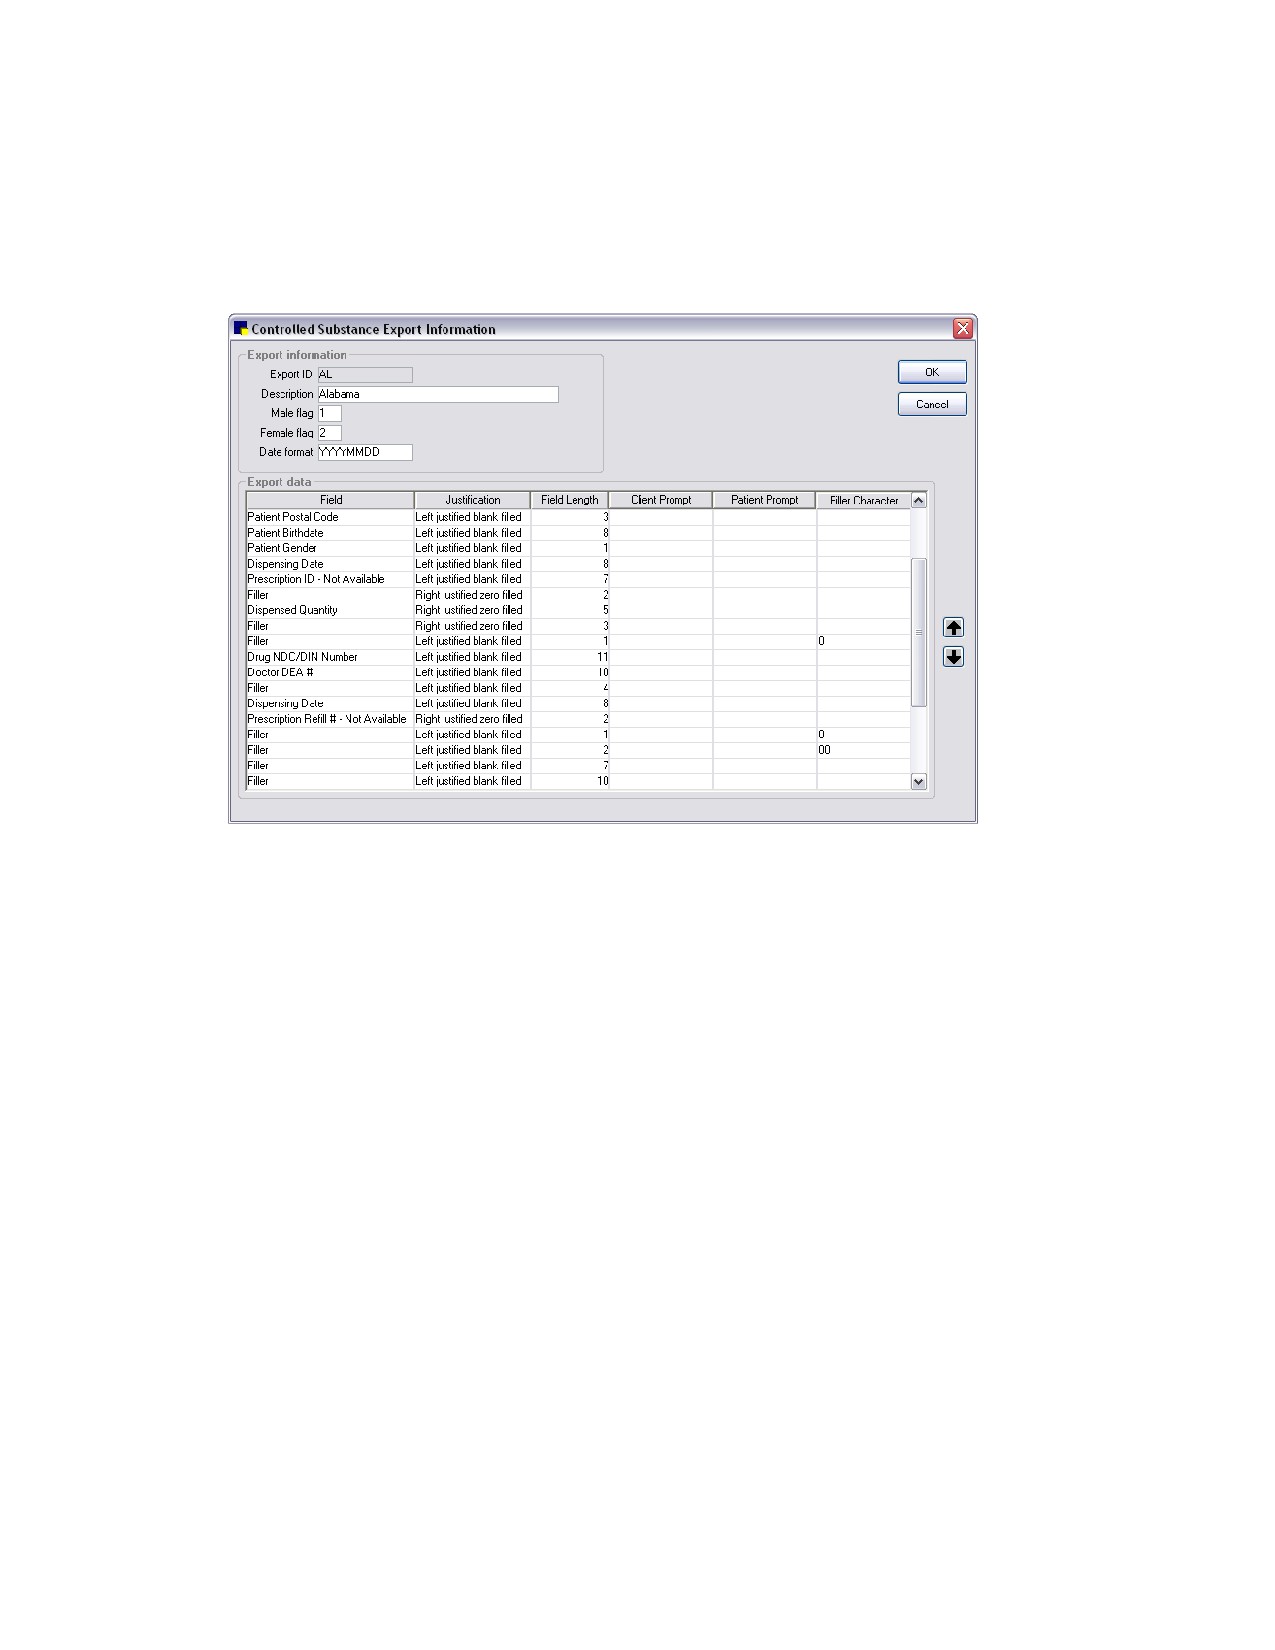
Controlled Substance Export List dialog box appears.
Controlled Substance Export Information dialog box
3. In the Export ID text box, type an ID for this filing form.
4. In the Description text box, type an identifying name for this filing form.
5. In the Male flag and Female flag text boxes, refer to your state’s controlled substance document
and type the required information.
6. Click in the Date format text box, and from the drop-down list, select the date format specified by
your state.
IMPORTANT: In the Export data area, required data items must be entered in the order provided on
your state’s controlled substance requirements document.
7. Click in the Field column and select the applicable data item from the drop-down list. If the data
item is not available, select Filler to save space for the item (you will enter the filler characters in
step 12).
8. In the Justification column, refer to your state's requirement document and select the applicable
right or left justification option from the drop-down list.
9. In the Field Length column, refer to your state’s requirement document and type the required
number of characters for the data item.
10. If Client User Defined Prompt is selected in the Field column, in the Client Prompt column, select
the required data from the drop-down list.
11. If Patient User Defined Prompt is selected in the Field column, in the Patient Prompt column,
select the required data from the drop-down list.
34
Chapter 2: Setting Up Cornerstone* Controls
12. If Filler is selected in the Field column; in the Filler character column, type the characters to use for
the filler or leave it blank.
13. To move an item up or down the list, click the item and then click the
or
arrow button.
14. When you have entered the required information, click OK, and then click Close.
To export the controlled substance electronic filing form:
1. On the Controls menu, select Controlled Substance > Controlled Substance Export. The
Controlled Substance Export List dialog box appears.
2. In the list, select the applicable state filing form and click Export. The Controlled Substance Export
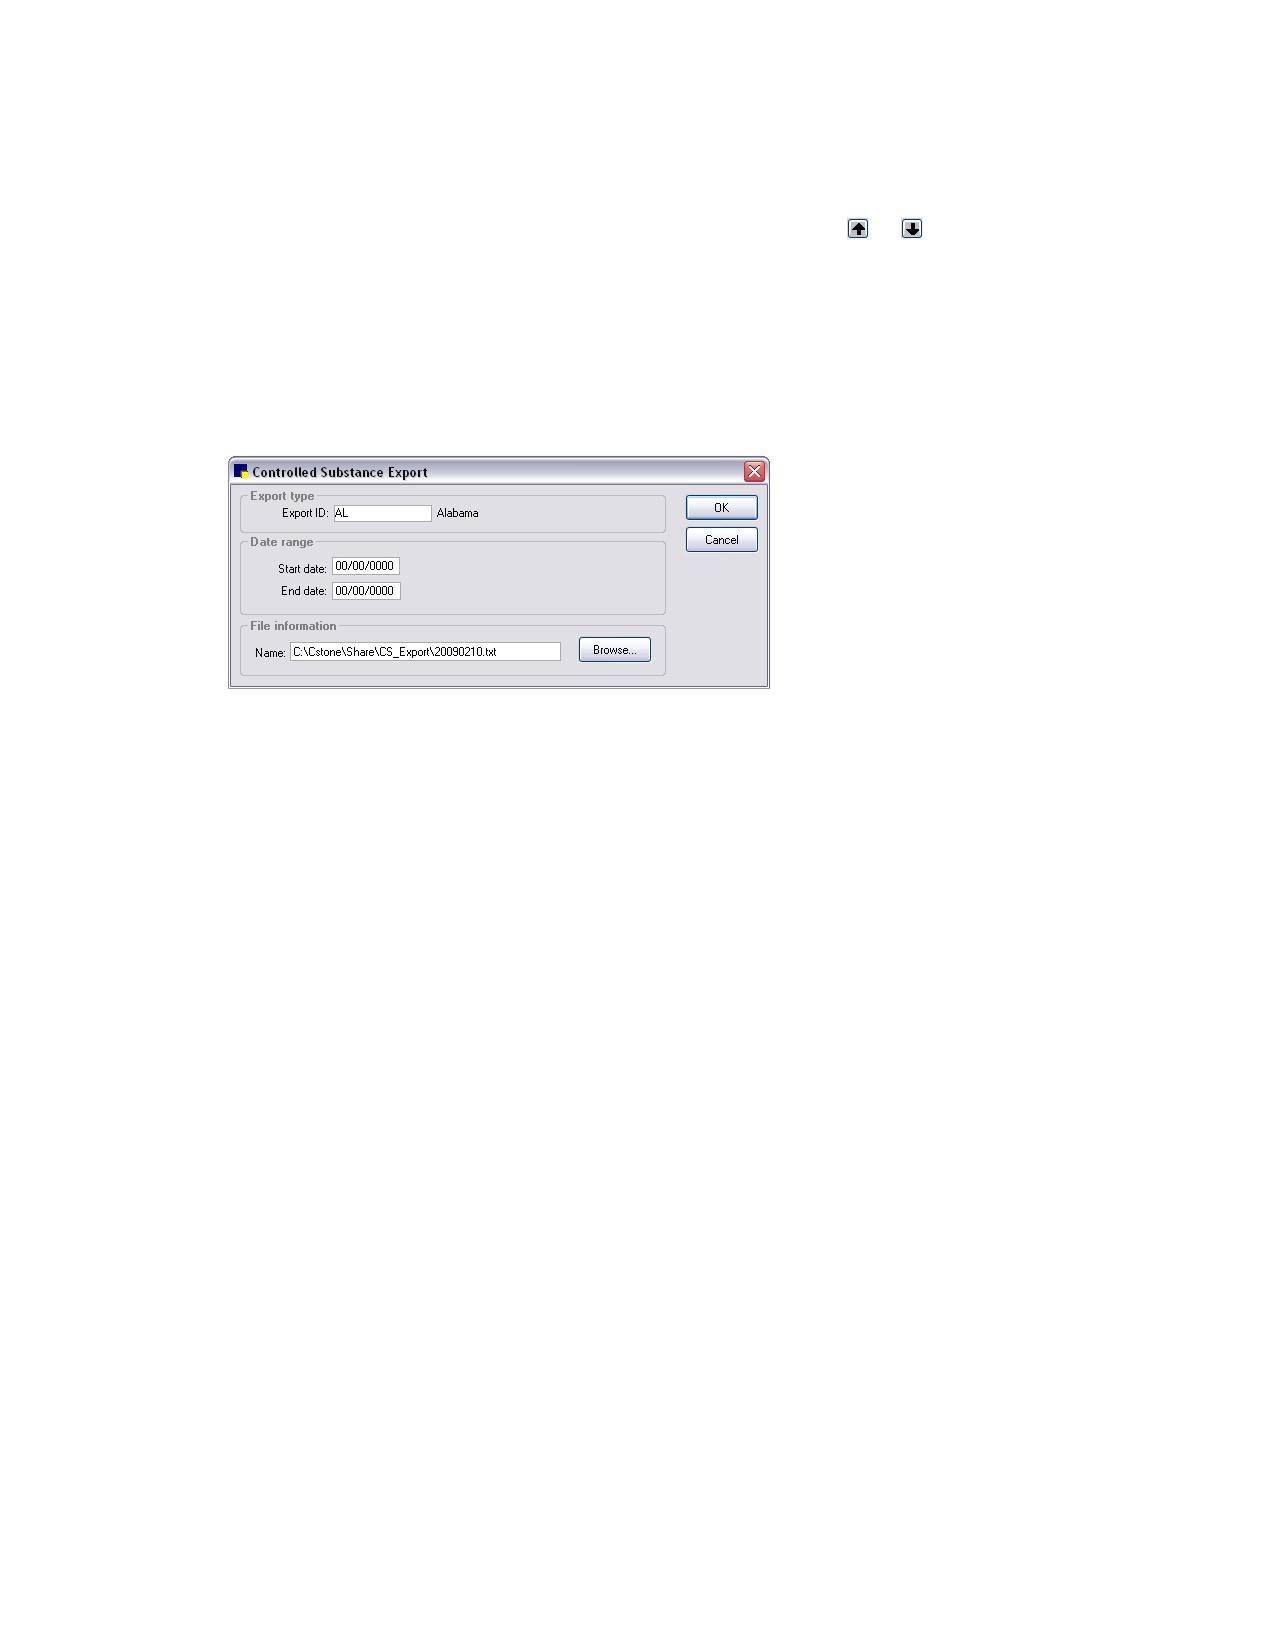
dialog box appears.
Controlled Substance Export dialog box
3. In the Date range area, in the Start date and End date text boxes, type the dates that apply to this
controlled substance export.
4. In the File information area, note the path and file name for the electronic filing form (a .txt file). The
default folder is C:\Cstone\Share\CS_Export.
5. Click OK, and then click Close.
After the electronic filing form (.txt file) has been generated, retrieve it from the folder where it is
stored and send it by email or FTP to the appropriate state agency.
Controlled Substance Reasons
You can set up a Controlled Substance Reasons list to use when a controlled substance is added to an
invoice. Some common reasons are included with your software. When a controlled substance is added
to an invoice, the list of controlled substance reasons appears. From the list, select the reason for which
the controlled substance is used. This reason prints on the Controlled Substance Log so that you can
track why the controlled substance was used.
To add or edit a controlled substance reason:
1. On the Controls menu, select Controlled Substance > Controlled Substance Reasons. The
Controlled Substance Reason List dialog box appears.
2. Click New to add a new reason or double-click an existing reason to update it. The Controlled
Substance Reason Information dialog box appears.
3. In the Description text box, type an identifying name to indicate the reason a controlled substance
would be used.
4. From the Status drop-down list, select Active or Inactive. (Change the status to Inactive only if you
no longer want to use this controlled substance reason.)
5. Click OK, and then click Close.
35
Chapter 2: Setting Up Cornerstone* Controls
Note: After you create a list of reasons for the use of controlled substances, you must select the Use
controlled substance reasons check box in Invoice defaults to display the controlled substance
reasons in invoicing. See “Invoice Defaults” on page 112.
For a list of controlled substances that are invoiced in Cornerstone, print a Controlled Substance
Report. (See “Controlled Substance Report” on page 247 for more information.)
Problem List
The Problem List provides a list of common medical ailments and issues. You can use this list when
you enter medical notes on the patient record.
To add or edit a problem category:
1. On the Controls menu, select Problems > Problem Categories.
2. Click New to add a new category, or double-click an existing category to update it. The Problem
Category Information dialog box appears.
3. In the Description text box, type an identifying name for this problem category.
4. Click OK, and then click Close.
To add or edit a problem on the Problems List:
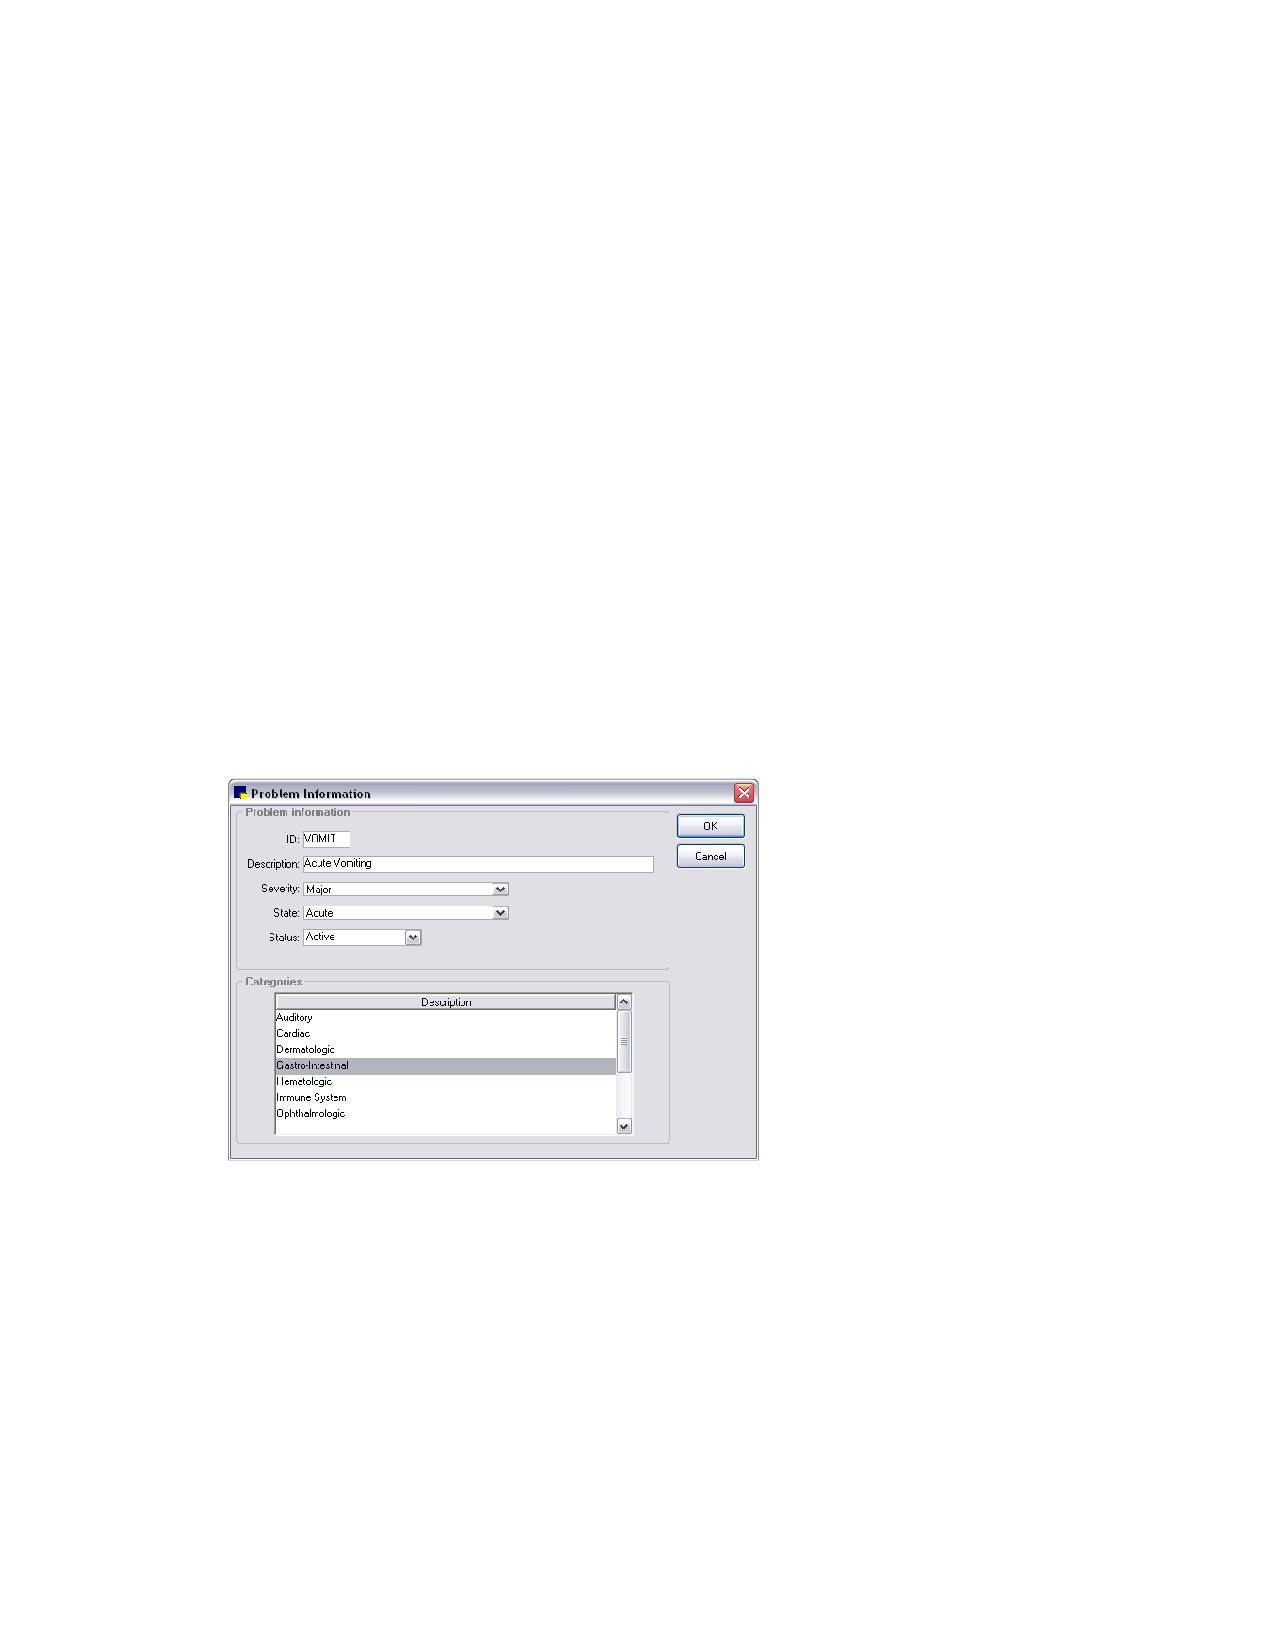
1. On the Controls menu, select Problems > Problem List. The Problem List dialog box appears.
2. Click New to add a new problem, or double-click an existing problem to update it. The Problem
Information dialog box appears.
Problem Information dialog box
3. In the ID text box, type the ID to use for this problem (for example, an abbreviation of the problem).
4. In the Description text box, type the description of the problem.
5. From the Severity drop-down list, select the severity (Major or Minor) that would most commonly
be assigned for this problem. You can change the severity when recording the problem in the
patient record.
6. From the State drop-down list, select the state (Active, Acute, Chronic, Resolved or Verified
incorrect) that would most commonly be assigned for this problem. You can change the state when
recording the problem in the patient record.
36
Chapter 2: Setting Up Cornerstone* Controls
7. From the Status drop-down list, select Active or Inactive. (Change the status to Inactive only if you
no longer want to use this problem.)
8. Click OK, and then click Close.
Initial Setup Reports
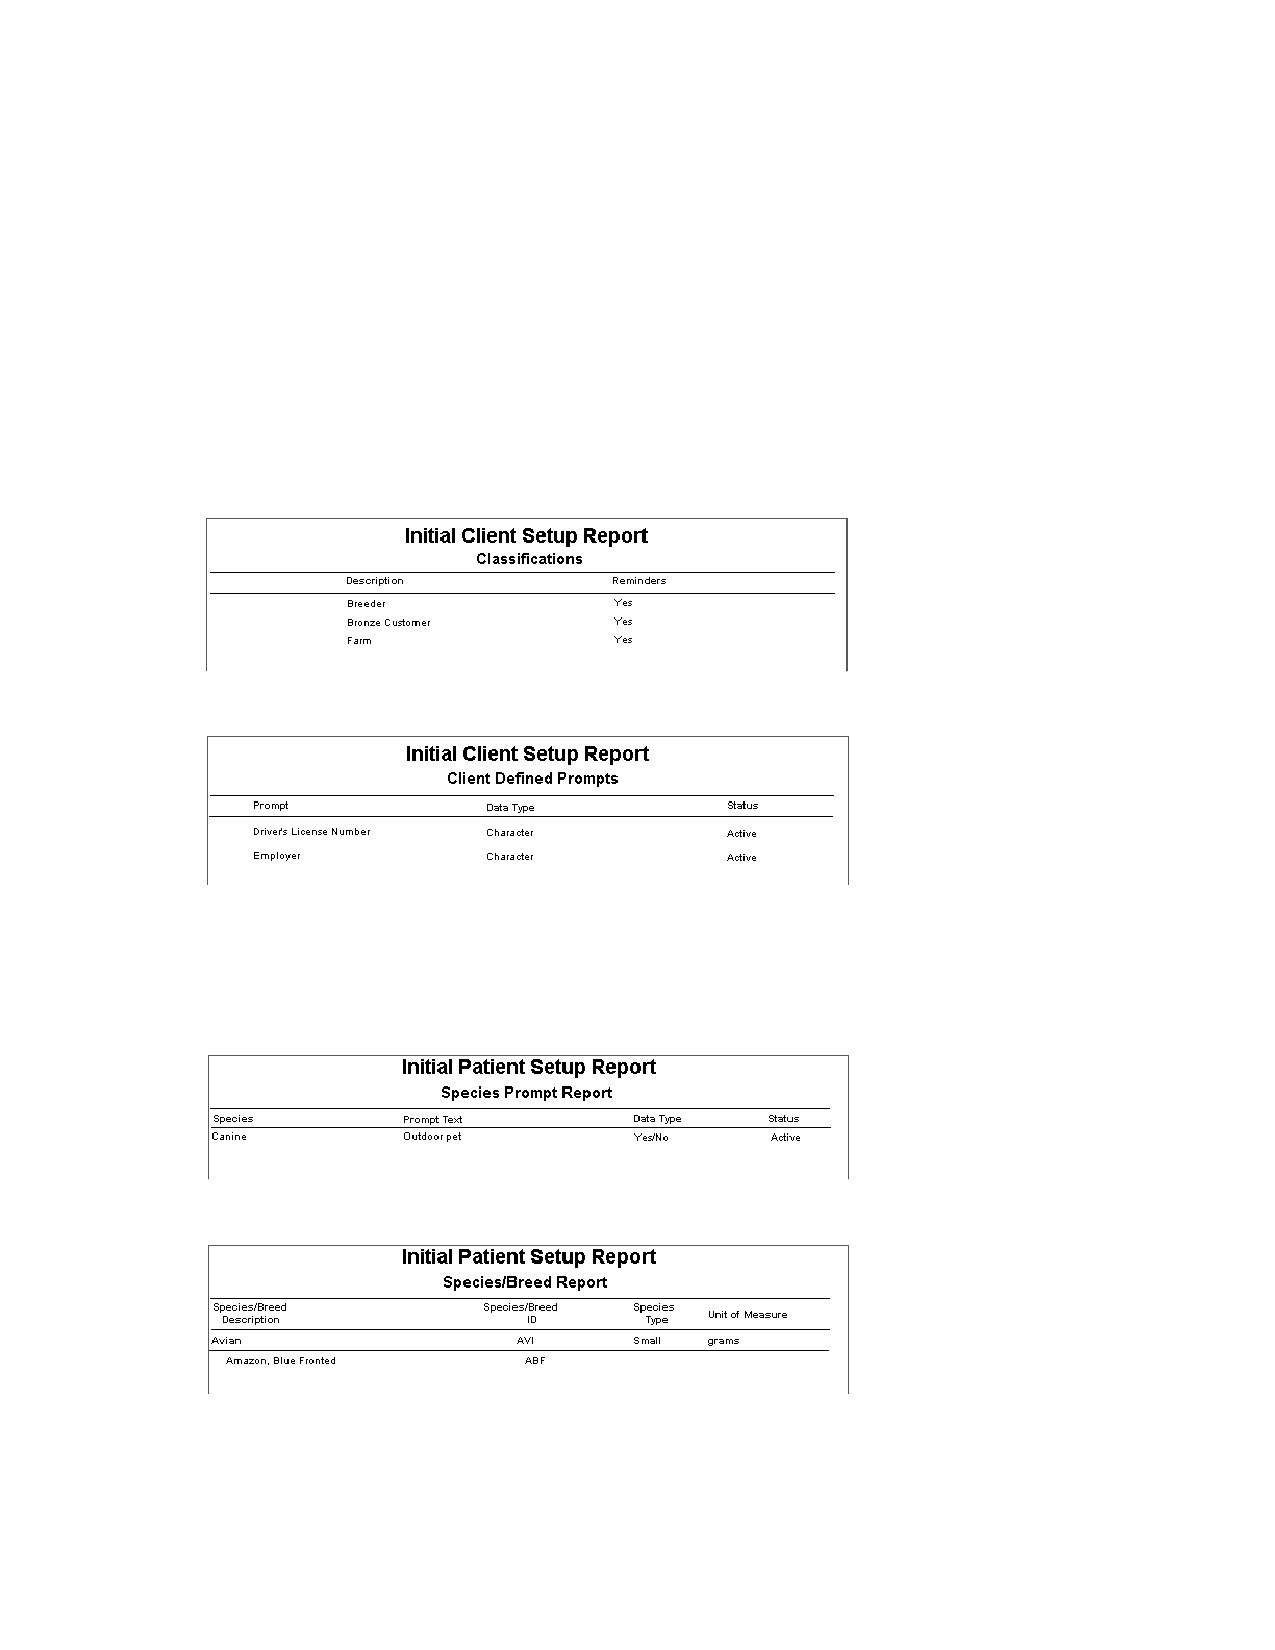
Cornerstone includes several reports that show you how the system is currently set up. Reviewing these
reports will help you maintain your system.
Note: You must have your practice information entered to see data in the initial setup reports. See
“Practice Information” on page 41.
Initial Client Setup Report (Report Group: Client)
Use the Initial Client Setup Report to review your Cornerstone system settings.
Initial Patient Setup Report (Report Group: Patient)
Print the Initial Patient Setup Report before setting up species and breeds. To see the species prompts
currently set up in your Cornerstone system, select the Species Prompt sort order.
37
Chapter 2: Setting Up Cornerstone* Controls
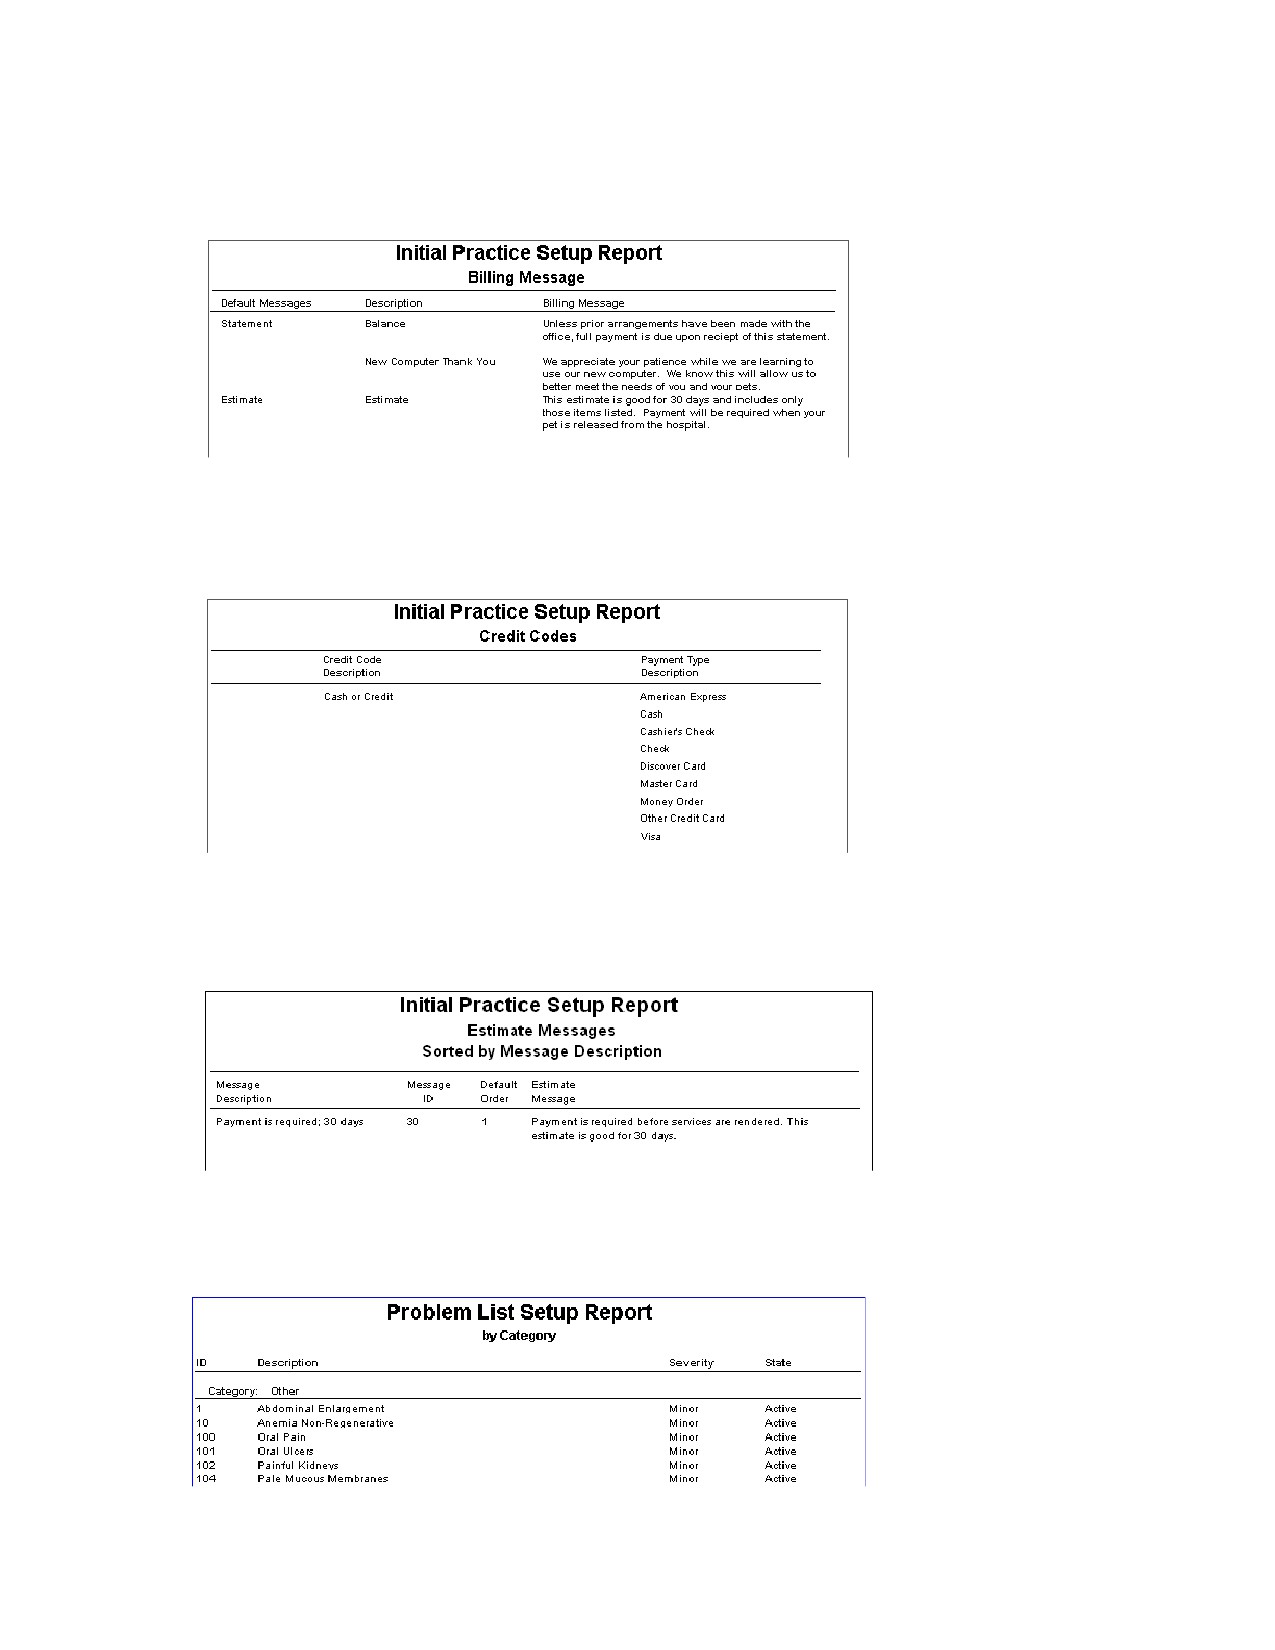
Initial Practice Setup Report By Billing Messages (Report Group: Practice)
This report shows all the billing messages that you have set up for your practice.
Initial Practice Setup Report By Credit Codes (Report Group: Practice)
This report shows all the credit codes that you have set up for your practice.
Initial Practice Setup Report By Estimate Messages (Report Group: Practice)
This report shows all the estimate messages that you have set up for your practice.
Problem List Setup Report (Report Group: Practice)
This report provides a list of problems and shows severity and status.
38

Chapter 2: Setting Up Cornerstone* Controls
Initial Staff Setup Report (Report Group: Staff)
This report shows the custom staff prompts designed for your system.
39
Chapter 3: Setting Up Lists and Information
Overview
List information in the IDEXX Cornerstone* Practice Management System is generally associated with
some type of ID (such as client ID, patient ID, species ID, or staff ID)that you set up based on the needs
of your practice using the Lists menu. After you have entered your List information, you can press F2 (or
double-click) in certain fields to search for and select the needed information.
Updating List Items
To update a List item’s information:
1. On the Lists menu, select the type of list item you want to change.
2. From the List, select the item to update and click Update (or double-click the item). The appropriate
window appears.
3. Update the information, as applicable.
4. Click OK, and then click Close.
Note: Making certain changes may lead to meaningless information.
Deleting Unused List Items
Note: When you delete a specific item from a Lists menu, it no longer appears as a choice in dialog
boxes or in F2 searches.
You can delete any item in a List if the item is not linked to a patient, client or invoice item record.
Deleting items you’ll never use saves you time when you select information from windows.
Some information dialog boxes contain subsets of information that you may want to remove. (For
example, you may want to remove an invoice item subclass from an invoice item classification or an
owner from a patient.) To do this, follow the instructions in the “To delete information from within
Information dialog boxes” section below.
Note: You cannot delete the postal code that is set up in Client defaults and you cannot delete a VPI®
(Veterinary Pet Insurance) diagnostic code.
To delete items set up through the Lists menu:
1. On the Lists menu, select the type of List item you want to delete.
2. In the list, select the item to remove and click Delete. You are prompted to confirm the deletion.
Click Yes.
To delete information from within Information dialog boxes:
1. From the list, select the item to remove information from and click Update (or double-click the item).
2. Select the row with the information to delete.
3. Press the DELETE key to delete.
40
Chapter 3: Setting Up Lists and Information
Practice Information
Practice information includes the practice name, address, phone number, and other practice-specific
settings. Enter this information exactly as you want it to appear on invoices, statements, and estimates.
Include only practice phone numbers that you want your clients to use.
Note: You must have your practice information entered to see data in the initial setup reports.
Setting Up Practice Information for a Single Location Configuration (Standard)
The Single Location configuration is the standard (default) practice setup in Cornerstone. With this type
of setup, a single practice name, practice ID, and practice address is configured, and no additional
setup is required.
To enter practice information for a Single Location configuration:
1. On the Lists menu, select Practice. The Practice List dialog box appears.
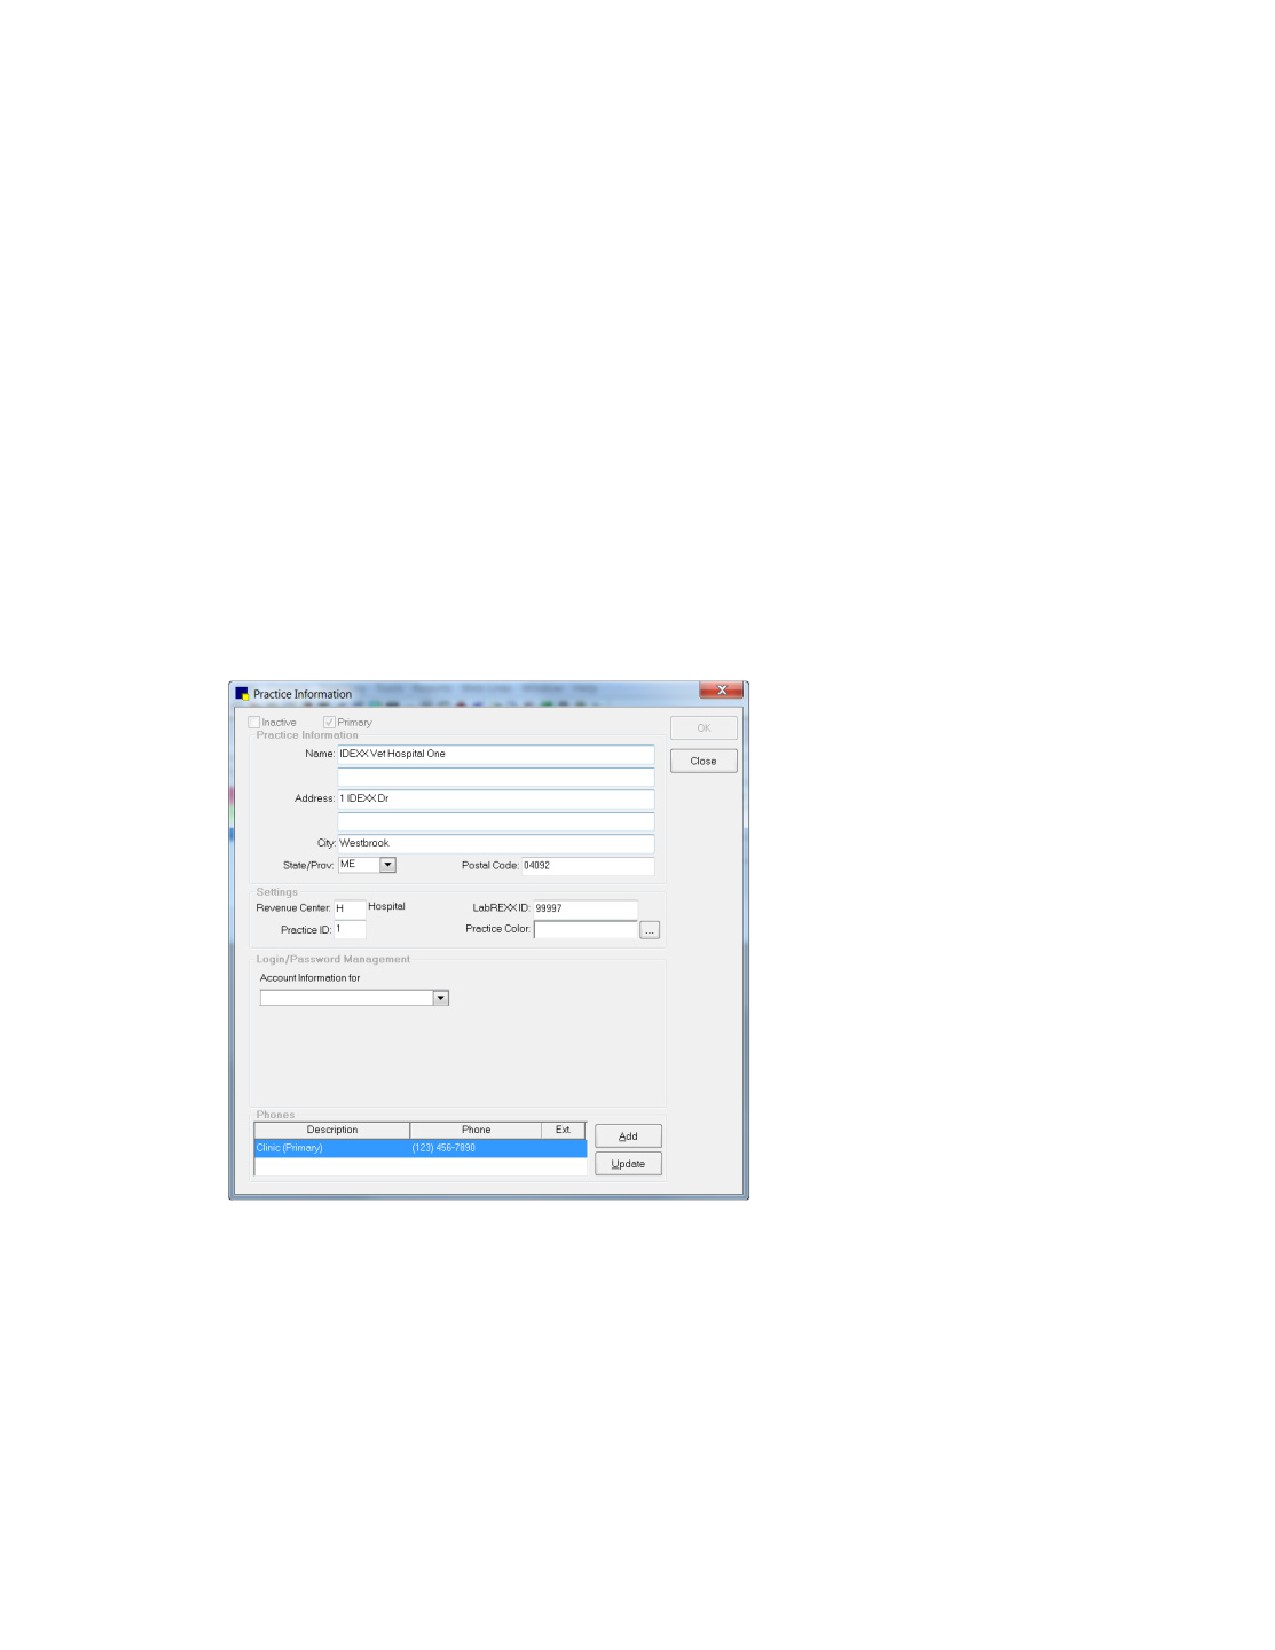
2. With your practice name selected, click Update (or double-click the practice). The Practice
Information dialog box appears.
Note: With a standard Single Location configuration, there can be only one practice set up in the
Practice List. If you click New, a “Please call Cornerstone Support to set up multiple practices”
message appears.
Practice Information dialog box
3. In the Practice Information area, edit the practice name and address information, if necessary.
4. In the Settings area, edit the following information, if necessary:
• Revenue Center-If you want to specify the revenue center to use for the practice when adding
an item to an invoice, type the revenue center ID or press F2 to use the Revenue Center List.
When adding an item to an invoice, Cornerstone checks for an assigned revenue center in this
order: 1) the individual invoice item, 2) the invoice item classification, 3) the staff member’s
defaults, and 4) the practice default revenue center.
41
Chapter 3: Setting Up Lists and Information
Note: Cornerstone does not use the revenue center that’s assigned to the practice unless you
remove the revenue center from the Staff defaults (or from the individual invoice item or invoice
item classification).
• Practice ID-Type up to three alphanumeric characters to use as the abbreviated practice name
throughout Cornerstone.
• LabREXX ID-If applicable, type the IDEXX LabREXX* ID for the practice (all practices may use
the same ID or each practice may have its own ID). This is the ID that identifies this practice to
IDEXX Reference Laboratories when printing LabREXX forms. You must enter this ID before the
LabREXX feature can be turned on in the Lab Information setup.
• Practice Color-You can select a color to use as the identifying color for the practice throughout
Cornerstone and on the status bar at the bottom of the main Cornerstone application window.
Note: This color identifier is used with a Multi-Location/Single Database configuration and is not
necessary for a Single Location configuration.
5.
In the Login/Password Management area, set up login and password information for the following
features:
•
Antech Reference Lab Results - The Antech Diagnostics® laboratory module allows you to
order tests online and automatically download results. Contact your IDEXX Cornerstone Sales
Representative at 1-800-283-8386 for information about purchasing and activating the Antech
Diagnostics laboratory module. For detailed information on setting up and using the Antech
Laboratory module, see the help within Cornerstone.
To activate the Antech Diagnostics Laboratory Module:
a. From the Account information for drop-down list, select Antech Reference Lab
Results.
b. If you already have Antech set up in Cornerstone, click Apply Primary Practice Settings.
The account information boxes are automatically completed.
c. If you don’t already have existing Antech account information, enter the information
provided when you set up your account.
d. Click Test. Then, when the Login Settings Passed message appears, click OK.
•
Communications - Email - Use IDEXX Email Service to email medical notes, correspondence
documents, and estimates directly from the Cornerstone Editor (this service must be activated
in Cornerstone). To activate Communications Management email features, you may need to
perform a one-time setup to specify your account information. If you are already using
Microsoft® Outlook® for email, this setup is not necessary.
To activate IDEXX Email Service and set login/password settings:
a. From the Account Information for drop-down list, select Communications - Email.
b. Select the email service you prefer to use:
o My Desktop email client—Select this option if you plan to use your existing email
software.
Note: This will already be selected if you are using your existing email software. You
must have properly configured software to use this option.
o Cornerstone Imaging SMTP email settings—Select this option if you want to use the
SMTP (web-based mail, such as Gmail™and Hotmail®) set up in Imaging defaults. To
42
Chapter 3: Setting Up Lists and Information
view and edit current settings, click the edit imaging SMTP settings link to open the
Configuration window and click Email to view the default settings. For more information,
see “Image Email Defaults” on page 158.
•
Communication - Fax - Use IDEXX Faxing Service to fax medical notes, correspondence
documents, and estimates directly from the Cornerstone Editor (this service must be activated
in Cornerstone). To activate IDEXX Faxing Service, you must be an administrator or be provided
administrative rights and complete the activation setup process below. For more information on
the IDEXX Faxing Service, contact Cornerstone Support at 1-800-695-2877.
To activate IDEXX Faxing Service and set login/password settings:
a. From the Account information for drop-down list, select Communication - Fax.
b. Select the Use IDEXX Faxing Service check box. A pop-up box displays the terms and
conditions of use.
c. Review the terms and click Accept to activate the service.
Upon successful activation, the system will log the user who enrolled the IDEXX Faxing
Service. In the Practice Information window, the name, time/date stamp, and a link to the
IDEXX Faxing terms and conditions are displayed. Note that all practices in a Multi-
Location/Single Database configuration must accept the terms and conditions.
To terminate IDEXX Faxing Services:
a. On the menu bar, select Lists > Practice. The Practice List dialog box appears.
b. With your practice name selected, click Update (or double-click the practice). The
Practice Information dialog box appears.
c. On the Practice Information window, in the Login/Password Management area, select
Communications - Fax from the Account information for drop-down list.
d. Clear the Use IDEXX Faxing Service check box.
e. Click OK when you are prompted to confirm your intent to terminate the service.
To reactivate IDEXX Faxing Services:
¾ If you have previously activated and then terminated the IDEXX Faxing Service, follow the
instructions for initial activation and enrollment, select the Use IDEXX Faxing Service
check box, and follow the same steps involved in the initial activation.
Note: You must agree to the terms and conditions again and will be subject to the
activation setup fees agreed to in the terms and conditions.
•
Vendor - MWI Veterinary Supply - IDEXX SmartOrder* electronic inventory ordering in
Cornerstone allows for a more efficient inventory work flow with real-time online inventory
ordering through MWI® Veterinary Supply. For additional information, see the “Electronic
Inventory Ordering” help topic in Cornerstone.
IDEXX SmartOrder service requires the following:
• Have or establish an account with MWI at mwivet.com. If you do not have an account,
contact your MWI representative.
o New MWI customers must contact MWI to set up your account and activate online
ordering with mwivet.com. If you do not have an account set up, contact your MWI
representative.
43
Chapter 3: Setting Up Lists and Information
o Existing MWI customers can use their current MWI customer number to activate
electronic inventory ordering in Cornerstone, but you must also contact MWI to enable
online ordering through MWI.
• A consistent, high-speed Internet connection.
To activate IDEXX SmartOrder service and set login/password settings for MWI
Veterinary Supply:
a. From the Account Information for drop-down list, select Vendor - MWI Veterinary
Supply.
b. From the Associated Cornerstone Vendor drop-down list, select the practice-specific
vendor associated with MWI to use for this service.
c. In the Customer Number text box, enter your practice’s MWI customer number. You can
find this information on your mwivet.com account.
d. Select the Enable Online Ordering check box.
e. A pop-up box displays the terms and agreement. Review the terms and click Accept to
activate the service.
f.
When you are notified that activation was successful, click OK.
Click Test to verify that you have a working Internet connection and valid login information
for accessing the vendor’s online ordering system.
In the Practice Information window, the user acceptance, date/time stamp, and a link to
the MWI terms and agreement is displayed when online ordering is enabled.
Note: You have now setup Cornerstone for online ordering. If you have not contacted
MWI E-Commerce Support to activate online ordering with MWI, you must do so before
you can begin placing orders. If you have not activated online ordering and place an
order through Cornerstone, it will not be processed and you will not receive your order.
To disable electronic inventory ordering with MWI Veterinary Supply:
a. On the Lists menu, select Practice. The Practice List dialog box appears.
b. With your practice name selected, click Update (or double-click the practice). The
Practice Information dialog box appears.
c. On the Practice Information window, in the Login/Password Management area, select
Vendor-MWI Veterinary Supply from the drop-down list.
d. Clear the Enable Online Ordering check box.
Note: If you have open orders, a message indicating that you cannot disable online
ordering until all orders are closed appears.
e. If you have no open orders, click Yes when the message confirming your intent to disable
online ordering appears.
f.
A message informing you that you have disabled online ordering in Cornerstone appears.
To complete your MWI unenrollment, you must contact MWI E-Commerce Support.
To reactivate electronic inventory ordering with MWI Veterinary Supply:
¾ If you have disabled your enrollment with MWI, you must first contact MWI E-Commerce
Support (see above) to establish or reactivate your account. Then, follow the setup
instructions above to reactivate online ordering within Cornerstone.
44
Chapter 3: Setting Up Lists and Information
•
VetConnect* PLUS - VetConnect PLUS is a web-based tool that lets you view and compare
IDEXX in-house diagnostics and IDEXX Reference Laboratories data side by side.
Your practice must have:
• Internet access at the workstation where you want to view VetConnect PLUS.
• Windows®Internet Explorer® 7 or later must be installed on each Cornerstone workstation. It
does not have to be the default Internet browser.
• If you want to view in-house results, you must have IDEXX SmartLink* technology to provide
bidirectional flow between Cornerstone and your IDEXX VetLab* Station. In addition, IDEXX
SmartService* Solutions must be set up for the IDEXX VetLab Station. Call your IDEXX
Connectivity Consultant at 1-877-256-8457 to order IDEXX SmartLink for your IDEXX VetLab
Station if your practice does not already have it.
• If you want to view IDEXX Reference Laboratories results, you must have IDEXX SmartLink*
technology to provide bidirectional flow between Cornerstone and the IDEXX Reference
Laboratories. Call your IDEXX Connectivity Consultant at 1-877-256-8457 to order IDEXX
SmartLink if your practice does not already have it.
• A VetConnect* account with administrator user name and password. Call VetConnect PLUS
Client Services at 1-888-433-9987 to request an account if your practice does not already
have one.
Note: This must be your primary practice if you are a Multi-Location/Single Database user.
To activate VetConnect PLUS and set login/password settings:
You can activate VetConnect PLUS immediately following installation of Cornerstone 8.3
software or anytime after that. After you activate VetConnect PLUS from within Cornerstone,
activate VetConnect PLUS from your IDEXX VetLab Station (if applicable).
a. From the Account information for drop-down list, select VetConnect PLUS.
b. If you are a new IDEXX Reference Laboratories user, select the VetConnect option, enter
your practice’s VetConnect administrator user name and password, and then click
Submit to Activate VetConnect PLUS.
OR
If you are an existing IDEXX Reference Laboratories user, the VCAgent option should be
selected and your VetConnect user name and password should be completed. Click
Submit to Activate VetConnect PLUS.
c. Read the agreement, and then click Accept.
A message states that IDEXX Reference Laboratories historical data will be uploaded.
d. Click Next.
e. IDEXX VetLab Station only: A message giving you the option to print instructions on
uploading data displays. Click Yes to open the printable message or No to continue.
f.
Click Finish.
g. A message states that activation is complete and that data upload will continue. Close the
message window.
The upload of IDEXX Reference Laboratories historical data that began during activation will
continue, with the most recent results uploaded first. Upload can take up to 24 hours,
45
Chapter 3: Setting Up Lists and Information
depending on the number of results being uploaded. You can continue to use Cornerstone
software during the upload; Cornerstone performance will not be affected.
To upload data from your IDEXX VetLab Station:
a. On the IDEXX VetLab Station, tap Settings, and then select the VetConnect PLUS tab.
b. Tap Activate VetConnect PLUS.
c. Accept the VetConnect PLUS user agreement.
d. Enter your VetConnect user name and password.
e. Tap Next. A confirmation message is displayed. Close the message. Data is uploaded in
reverse order, starting with your most recent results. You can continue to use the IDEXX
VetLab Station during the upload.
If you prefer to use the standard Cornerstone work flow for viewing results, you do not need to
deactivate VetConnect PLUS. All your test results are always available in standard
Cornerstone windows. However, if you want to disable access to VetConnect PLUS, you can
do so in Cornerstone.
To disable access to VetConnect PLUS:
a. From the Account information for drop-down list, select VetConnect PLUS.
b. Select Disable VetConnect PLUS online services, and then click OK.
6.
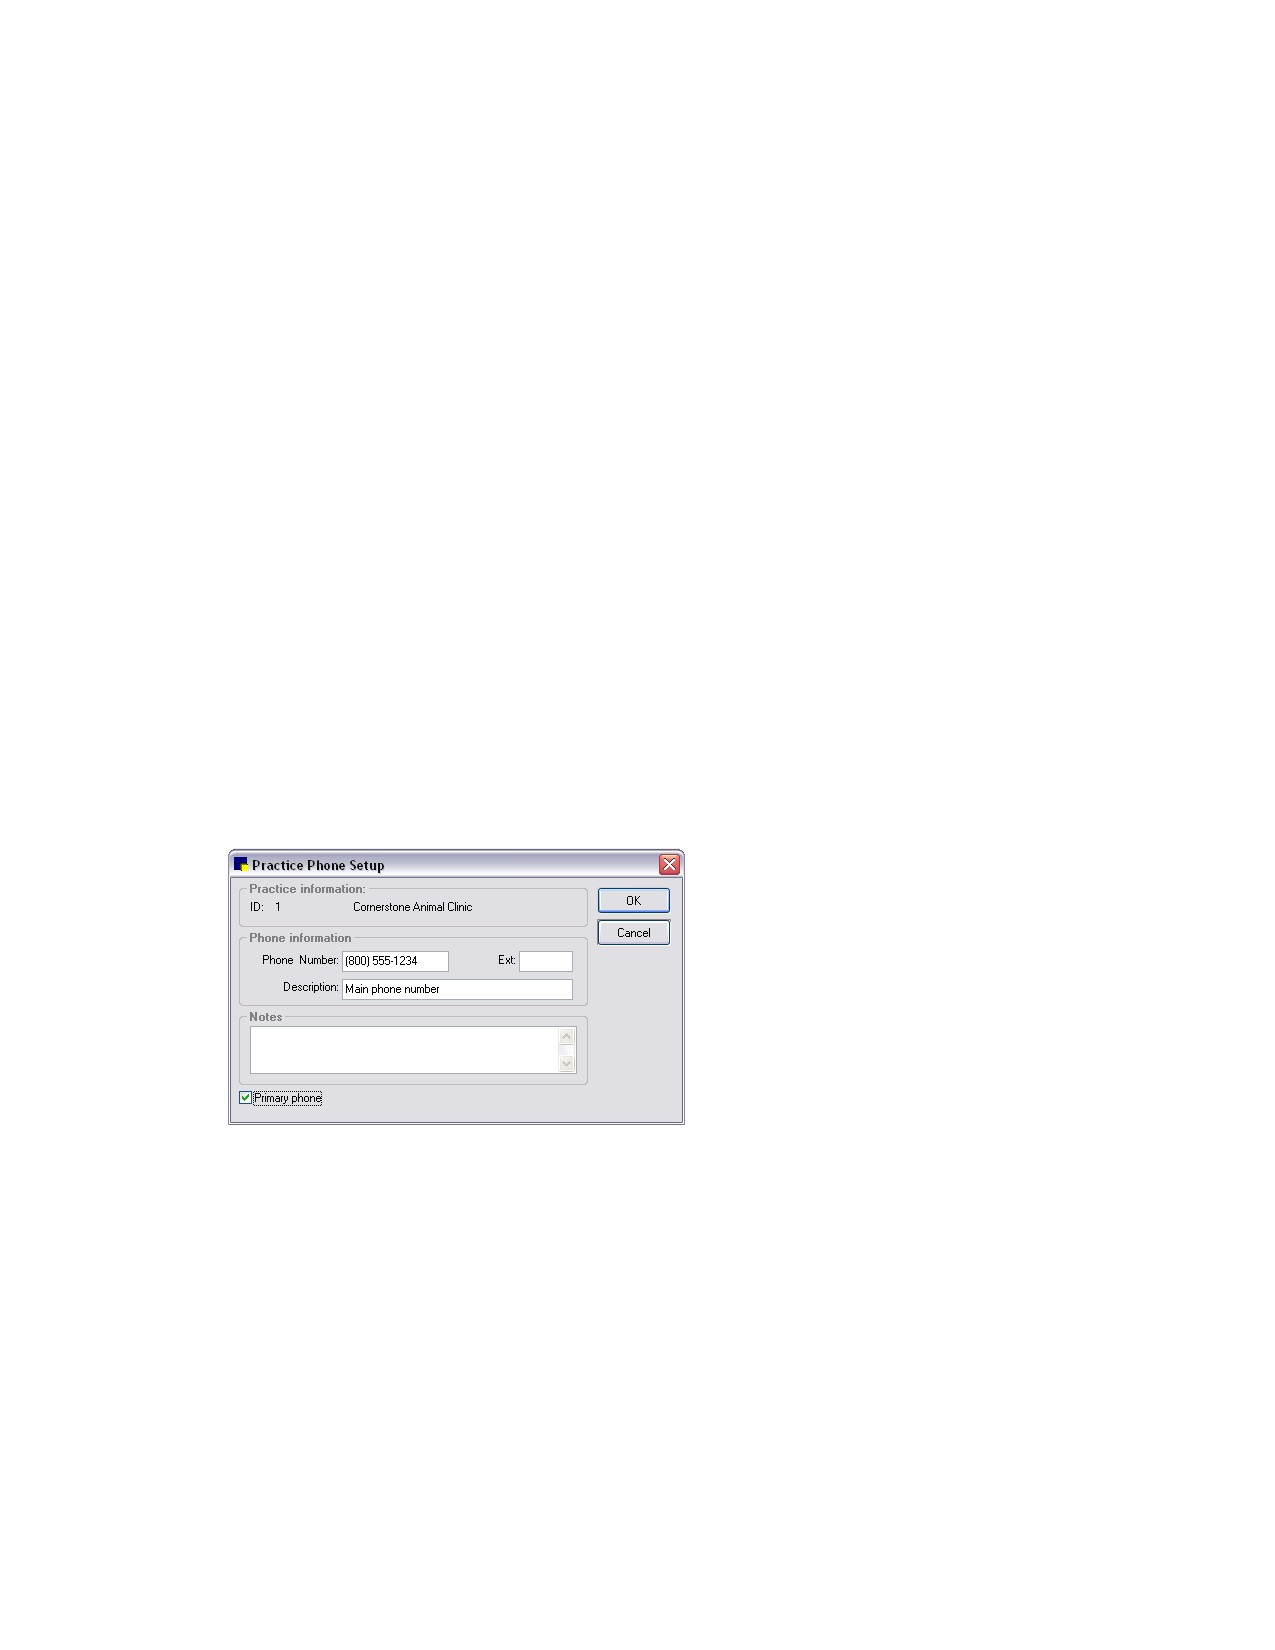
In the Phones area, click Add to enter a new practice phone number, or select an existing phone
number, and then click Update to edit the information. The Practice Phone Setup dialog box
appears.
Practice Phone Setup dialog box
7. In the Practice Phone Setup dialog box, do the following:
a. In the Phone information area, enter the phone number, extension (if applicable), and the phone
number description.
b. In the Notes area, type any notes pertaining to this phone number.
Tip: If a phone number has a note, type “see notes” (or an asterisk * to indicate a note exists) in
the Description text box. Phone notes do not appear in the Practice Information dialog box.
c. If this is the main phone number for your practice, select the Primary phone check box.
46
Chapter 3: Setting Up Lists and Information
Note: The primary phone number is the only practice phone number that prints on invoices,
statements, and estimates. However, you can choose to include multiple practice phone
numbers in correspondence documents.
d. When finished, click OK to return to the Practice Information dialog box.
8. Click OK, and then click Close.
47
Chapter 3: Setting Up Lists and Information
Setting Up Practice Information for a Multi-Location/Single Database Configuration
(Advanced)
The Multi-Location/Single Database configuration option is available for those practices running multiple
businesses or sites that need to use a single shared Cornerstone database. A Multi-Location/Single
Database configuration allows you to view and separate specific areas of Cornerstone by practice. This
allows for practice-specific workstation logins, letterhead information on client documents, invoices,
estimates, and more.
Note: The staff member who configures the Multi-Location/Single Database settings must have
appropriate security permissions to access the associated screens in Cornerstone.
Step 1-Activate Multi-Location/Single Database
To ensure a smooth transition of your Cornerstone software to a Multi-Location/Single Database
configuration, your practice’s Cornerstone Administrator must contact Cornerstone Support at 1-800-
695-2877 for activation instructions. Upon activation of a Multi-Location/Single Database configuration,
you can then begin to add the additional practices and separate clients by practice.
Notes:
• After you convert to a Multi-Location/Single Database configuration, to convert back to your
previous Single-Location (single practice) configuration, you must inactivate the unwanted
practices and have your practice’s Cornerstone Administrator contact Cornerstone Support for
further assistance.
• Many of the features described in this section are not available until a Multi-Location/Single
Database configuration is activated and more than one practice exists in your Practice List.
Step 2-Add Practices to the Practice List
Once a Multi-Location/Single Database configuration is activated, the Practice Information dialog box
allows you to add as many practices as necessary, with one practice designated as the primary
practice.
To add a new practice with a Multi-Location/Single Database configuration:
1. On the Lists menu, select Practice. The Practice List dialog box appears.
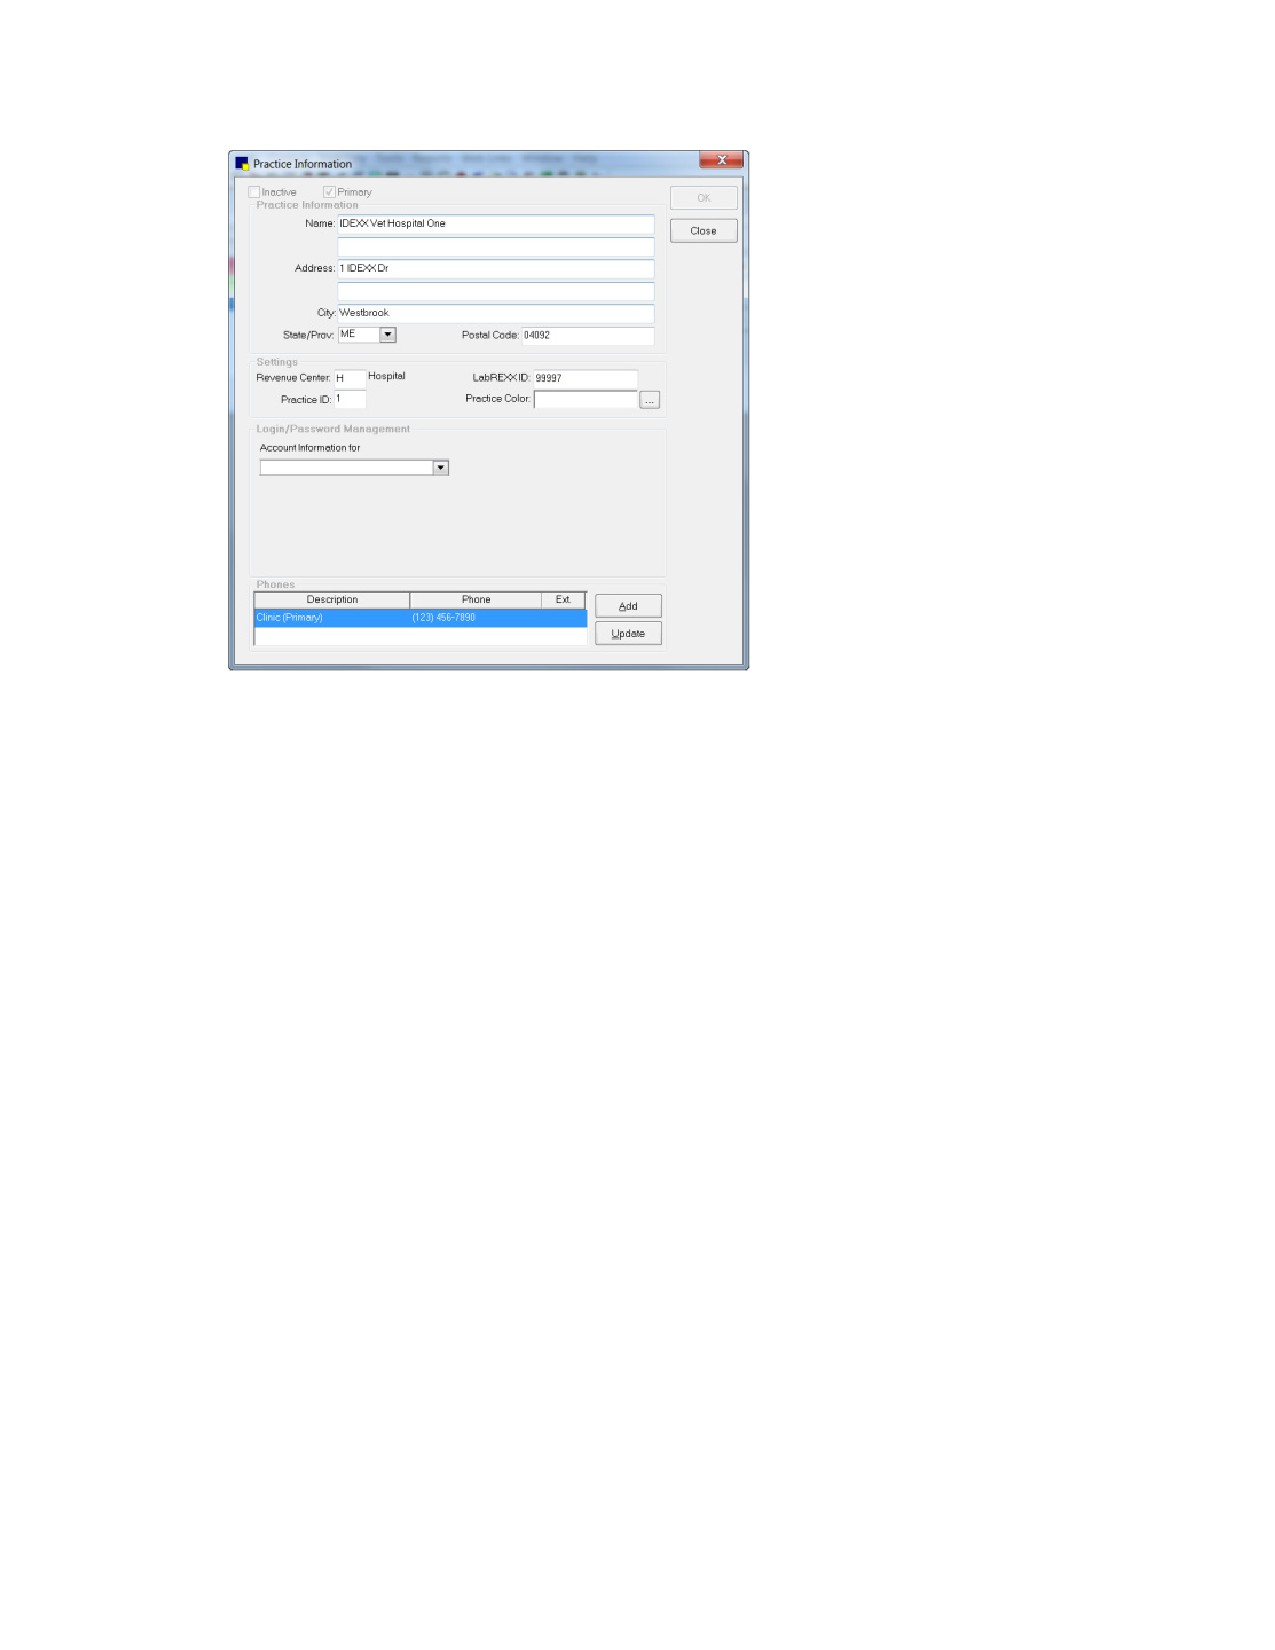
2. Click New. The Practice Information dialog box appears.
Note: If a “Please call Cornerstone Software Support to enable multiple practices” message
appears, you must complete Step 1-Activate Multi-Location/Single Database (earlier in this section)
before continuing.
48
Chapter 3: Setting Up Lists and Information
Practice Information dialog box
3.
To designate this practice as the primary practice, select the Primary check box. (Note that the
primary practice cannot be flagged as inactive.)
Note: If a practice is flagged as inactive, things such as saved invoices and reprints continue to use
the practice that was used when they were originally created, even if that practice is now inactive.
4.
In the Practice Information area, enter the practice name and address information.
5.
In the Settings area, enter the following practice-specific information:
• Revenue Center-If you want to specify the revenue center to use for the practice when adding
an item to an invoice, type the revenue center ID or press F2 to use the Revenue Center List.
When adding an item to an invoice, Cornerstone checks for an assigned revenue center in this
order: 1) the individual invoice item, 2) the invoice item classification, 3) the staff member’s
defaults, 4) the practice default revenue center.
• Note: Cornerstone does not use the revenue center that’s assigned to the practice unless you
remove the revenue center from the Staff defaults (or from the individual invoice item or invoice
item classification).
• Practice ID-Type up to three alphanumeric characters to use as the abbreviated practice name
throughout Cornerstone.
• LabREXX ID-If applicable, type the IDEXX LabREXX* ID for the practice (all practices may use
the same ID or each practice may have its own ID). This is the ID that identifies this practice to
IDEXX Reference Laboratories when printing LabREXX forms. You must enter this ID before the
LabREXX feature can be turned on in the Lab Information setup.
• Practice Color-You can select a color to use as the identifying color for the practice throughout
Cornerstone and on the status bar at the bottom of the main Cornerstone application window.
Note: This color identifier is used with a Multi-Location/Single Database configuration and is not
necessary for a Single Location configuration.
49
Chapter 3: Setting Up Lists and Information
6.
In the Login/Password Management area, set up login and password information for the following
features:
•
Antech Reference Lab Results - The Antech Diagnostics® laboratory module allows you to
order tests online and automatically download results. Contact your IDEXX Cornerstone Sales
Representative at 1-800-283-8386 for information about purchasing and activating the Antech
Diagnostics laboratory module. For detailed information on using the Antech Laboratory
module, see the help within Cornerstone.
To activate the Antech Diagnostics Laboratory Module:
a. From the Account information for drop-down list, select Antech Reference Lab
Results.
b. If you already have Antech set up in Cornerstone, click Apply Primary Practice Settings.
The account information boxes are automatically completed.
c. If you don’t already have existing Antech account information, enter the information
provided when you set up your account.
d. Click Test. Then, when the Login Settings Passed message appears, click OK.
•
Communications - Email - Use IDEXX Email Service to email medical notes, correspondence
documents, and estimates directly from the Cornerstone Editor (this service must be activated
in Cornerstone). To activate Communications Management email features, you may need to
perform a one-time setup to specify your account information. If you are already using
Microsoft® Outlook® for email, this setup is not necessary.
To activate IDEXX Email Service and set login/password settings:
a. From the Account Information for drop-down list, select Communications - Email.
b. Select the email service you prefer to use:
o My Desktop email client—Select this option if you plan to use your existing email
software.
Note: This will already be selected if you are using your existing email software. You
must have properly configured software to use this option.
o Cornerstone Imaging SMTP email settings—Select this option if you want to use the
SMTP (web-based mail, such as Gmail and Hotmail) set up in Imaging defaults. To view
and edit current settings, click the edit imaging SMTP settings link to open the
Configuration window and click Email to view the default settings. For more information,
see “Image Email Defaults” on page 158.
•
Communication - Fax - Use IDEXX Faxing Service to fax medical notes, correspondence
documents, and estimates directly from the Cornerstone Editor (this service must be activated
in Cornerstone). To activate IDEXX Faxing Service, you must be an administrator or be provided
administrative rights and complete the activation setup process below. For more information on
the IDEXX Faxing Service, contact Cornerstone Support at 1-800-695-2877.
To activate IDEXX Faxing Service and set login/password settings:
a. From the Account information for drop-down list, select Communication - Fax.
b. Select the Use IDEXX Faxing Service check box. A pop-up box displays the terms and
conditions of use.
50
Chapter 3: Setting Up Lists and Information
c. Review the terms and click Accept to activate the service.
Upon successful activation, the system will log the user who enrolled the IDEXX Faxing
Service. In the Practice Information window, the name, time/date stamp, and a link to the
IDEXX Faxing terms and conditions are displayed. Note that all practices in a Multi-
Location/Single Database configuration must accept the terms and conditions.
To terminate IDEXX Faxing Services:
a. On the menu bar, select Lists > Practice. The Practice List dialog box appears.
b. With your practice name selected, click Update (or double-click the practice). The
Practice Information dialog box appears.
c. On the Practice Information window, in the Login/Password Management area, select
Communications - Fax from the Account information for drop-down list.
d. Clear the Use IDEXX Faxing Service check box.
e. Click OK when you are prompted to confirm your intent to terminate the service.
To reactivate IDEXX Faxing Services:
¾ If you have previously activated and then terminated the IDEXX Faxing Service, follow the
instructions for initial activation and enrollment, select the Use IDEXX Faxing Service
check box, and follow the same steps involved in the initial activation.
Note: You must agree to the terms and conditions again and will be subject to the
activation setup fees agreed to in the terms and conditions.
•
Vendor - MWI Veterinary Supply - IDEXX SmartOrder* electronic inventory ordering in
Cornerstone allows for a more efficient inventory work flow with real-time online inventory
ordering through MWI® Veterinary Supply.
IDEXX SmartOrder service requires the following:
• An account with MWI at mwivet.com. If you do not have an account, contact your MWI
representative.
• A consistent, high-speed Internet connection.
To activate IDEXX SmartOrder service and set login/password settings for MWI
Veterinary Supply:
a. From the Account Information for drop-down list, select Vendor - MWI Veterinary
Supply.
b. From the Associated Cornerstone Vendor drop-down list, select the practice-specific
vendor associated with MWI to use for this service.
c. In the Customer Number text box, enter your practice’s MWI customer number. You can
find this information on your mwivet.com account.
d. Select the Enable Online Ordering check box.
e. A pop-up box displays the terms and agreement. Review the terms and click Accept to
activate the service.
f.
When you are notified that activation was successful, click OK.
Click Test to verify that you have a working Internet connection and valid login information
for accessing the vendor’s online ordering system.
In the Practice Information window, the user acceptance, date/time stamp, and a link to
51
Chapter 3: Setting Up Lists and Information
the MWI terms and agreement is displayed when online ordering is enabled.
Note: Multi-Location/Single Database (MLSD) configuration only—The primary practice
reviews and agrees to the MWI terms of sale on behalf of all locations within the MLSD
group. An administrator must set up each secondary practice by following steps 1-4
above. Each secondary location can click the Apply Primary Practice Settings button to
use those settings or enter its own MWI customer number (if applicable). The user
acceptance, date/time stamp, and a link to the MWI terms of sale agreed to by the
primary practice are displayed for both primary and secondary practices when online
ordering is enabled.
To disable electronic inventory ordering with MWI Veterinary Supply:
a. On the Lists menu, select Practice. The Practice List dialog box appears.
b. With your practice name selected, click Update (or double-click the practice). The
Practice Information dialog box appears.
c. On the Practice Information window, in the Login/Password Management area, select
Vendor-MWI Veterinary Supply from the drop-down list.
d. Clear the Enable Online Ordering check box.
Note: If you have open orders, a message indicating that you cannot disable online
ordering until all orders are closed appears.
e. If you have no open orders, click Yes when the message confirming your intent to disable
online ordering appears.
f.
A message informing you that you have disabled online ordering in Cornerstone appears.
To complete your MWI unenrollment, you must contact MWI E-Commerce Support.
To reactivate electronic inventory ordering with MWI Veterinary Supply:
If you have disabled your enrollment with MWI, you must first contact MWI E-Commerce
Support (see above) to establish or reactivate your account. Then, follow the setup
instructions above to reactivate online ordering within Cornerstone.
•
VetConnect PLUS - VetConnect PLUS is a web-based tool that lets you view and compare
IDEXX in-house diagnostics and IDEXX Reference Laboratories data side by side.
Your practice must have:
• Internet access at the workstation where you want to view VetConnect PLUS.
• If you want to view in-house results, you must have IDEXX SmartLink technology to provide
bidirectional flow between Cornerstone and your IDEXX VetLab Station. Call your IDEXX
Connectivity Consultant at 1-877-256-8457 to order IDEXX SmartLink for your IDEXX VetLab
Station if your practice does not already have it.
• If you want to view IDEXX Reference Laboratories results, you must have IDEXX SmartLink*
technology to provide bidirectional flow between Cornerstone and the IDEXX Reference
Laboratories. Call your IDEXX Connectivity Consultant at 1-877-256-8457 to order IDEXX
SmartLink if your practice does not already have it.
• A VetConnect account with administrator user name and password. Call VetConnect PLUS
Client Servicves at 1-888-433-9987 to request an account if your practice does not already
have one.
Note: This must be your primary practice if you are a Multi-Location/Single Database user.
52
Chapter 3: Setting Up Lists and Information
To activate VetConnect PLUS and set login/password settings:
a. From the Account information for drop-down list, select VetConnect PLUS.
b. If you are a new IDEXX Reference Laboratories user, select the VetConnect option, enter
your practice’s VetConnect administrator user name and password, and then click
Submit to Activate VetConnect PLUS.
OR
If you are an existing IDEXX Reference Laboratories user, the VCAgent option should be
selected and your VetConnect user name and password should be completed. Click
Submit to Activate VetConnect PLUS.
c. Read the agreement, and then click Accept.
A message states that IDEXX Reference Laboratories historical data will be uploaded.
d. Click Next.
e. IDEXX VetLab Station only: A message giving you the option to print instructions on
uploading data displays. Click Yes to open the printable message or No to continue.
f.
Click Finish.
g. A message states that activation is complete and that data upload will continue. Close the
message window.
The upload of IDEXX Reference Laboratories historical data that began during activation will
continue, with the most recent results uploaded first. Upload can take up to 24 hours,
depending on the number of results being uploaded. You can continue to use the Cornerstone
software during the upload; Cornerstone performance will not be affected.
To upload data from your IDEXX VetLab Station:
a. On the IDEXX VetLab Station, tap Settings, and then select the VetConnect PLUS tab.
b. Tap Activate VetConnect PLUS.
c. Accept the VetConnect PLUS user agreement.
d. Enter your VetConnect user name and password.
e. Tap Next. A confirmation message is displayed. Close the message. Data is uploaded in
reverse order, starting with your most recent results. You can continue to use the IDEXX
VetLab Station during the upload.
If you prefer to use the standard Cornerstone work flow for viewing results, you do not need to
deactivate VetConnect PLUS. All your test results are always available in standard Cornerstone
windows. However, if you want to disable access to VetConnect PLUS, you can do so in
Cornerstone.
To disable access to VetConnect PLUS:
f.
From the Account information for drop-down list, select VetConnect PLUS.
g. Select Disable VetConnect PLUS online services, and then click OK.
7.
In the Phones area, click Add to enter a new practice phone number or select an existing phone
number, and then click Update to edit the information. The Practice Phone Setup dialog box
appears.
53
Chapter 3: Setting Up Lists and Information
8. In the Practice Phone Setup dialog box, do the following:
a. In the Phone information area, enter the phone number, extension (if applicable), and the phone
number description.
b. In the Notes area, type any notes pertaining to this phone number.
Tip: If a phone number has a note, type “see notes” (or an asterisk * to indicate a note exists) in
the Description text box. Phone notes do not appear in the Practice Information dialog box.
c. If this is the main phone number for your practice, select the Primary phone check box.
Note: The primary phone number designated for each practice is the only practice phone
number that prints on invoices, statements, and estimates for that practice. However, you can
choose to include multiple practice phone numbers in correspondence documents.
9. Click OK, and then click Close.
The newly added practice displays in the Practice List with the designated background color.
Step 3-Update Settings for the Original Practice
Before continuing with your Multi-Location/Single Database setup, be sure to update the practice
information for your original practice (the one that existed in the database prior to setting up the
additional practices).
To update the original practice:
1. On the Lists menu, select Practice.
2. In the Practice List, select the original practice and click Update. The Practice Information dialog box
appears.
3. In the Settings area, update the Revenue Center, Practice ID, and Practice Color, and LabREXX
ID fields as needed. (See step 5 in the previous section for more information.)
4. In the Login/Password Management area, update the Account Information for settings as needed.
(See step 6 in the previous section for more information.)
5. Click OK.
Step 4-Designate a Default Practice
In Staff Defaults:
With a Multi-Location/Single Database configuration activated, you can use the Default practice setting
on the Staff Defaults Miscellaneous tab to set the default practice to use when a staff member logs into
Cornerstone. At login, the staff member is automatically logged in to the correct practice. All invoices,
statements, estimates, etc. are created using this practice.
Note: When determining the practice to use at login time, Cornerstone first looks at the Staff default
practice. If no Staff default practice has been set, it uses the Workstation default practice. If a default
practice has not been set for Staff or Workstation defaults, then the primary practice is used.
See “Chapter 5: Setting Staff Defaults” beginning on page 150 for information.
In Workstation Defaults:
With a Multi-Location/Single Database configuration activated, you can set a default practice to use
when logging in from each workstation. All invoices, statements, estimates, etc. are created using this
practice.
54
Chapter 3: Setting Up Lists and Information
Note: When determining the practice to use at login time, Cornerstone first looks at the Staff default
practice. If no Staff default practice has been set, it uses the Workstation default practice. If a default
practice has not been set for Staff or Workstation defaults, then the primary practice is used.
See “Workstation-All Defaults” on page 148 for information.
Step 5-Configure Security Settings
Before your staff can begin to take full advantage of the features and reports available with a Multi-
Location/Single Database configuration, a Cornerstone Administrator must first ensure that all necessary
security permissions are given to applicable staff members.
Step 6-Assign Clients to a Practice
If a Multi-Location/Single Database configuration is activated, you can use the Assign Clients to Practice
tool to perform a mass update that assigns an entire group of clients to a particular “home” practice (the
practice ID is associated with that client).
When using the Assign Clients to Practice tool, you can quickly select a group of clients by filtering the
client list by current home practice, client ID range, client classification, area code, phone prefix, state,
postal code range, and client user-defined prompt and answer.
Notes:
• At the time that a Multi-Location/Single Database configuration is activated, the current (logged
in) practice is automatically assigned as the home practice for all clients.
• The home practice is used to separate accounts receivable (A/R). When A/R reports are
generated, the client appears on the A/R list for only their home practice, regardless of where
the services were performed.
• The client balance reflects the total outstanding balance for charges from all practices
combined.
• The Assign Clients to Practice tool is not available on mobile computers.
To assign clients to a practice:
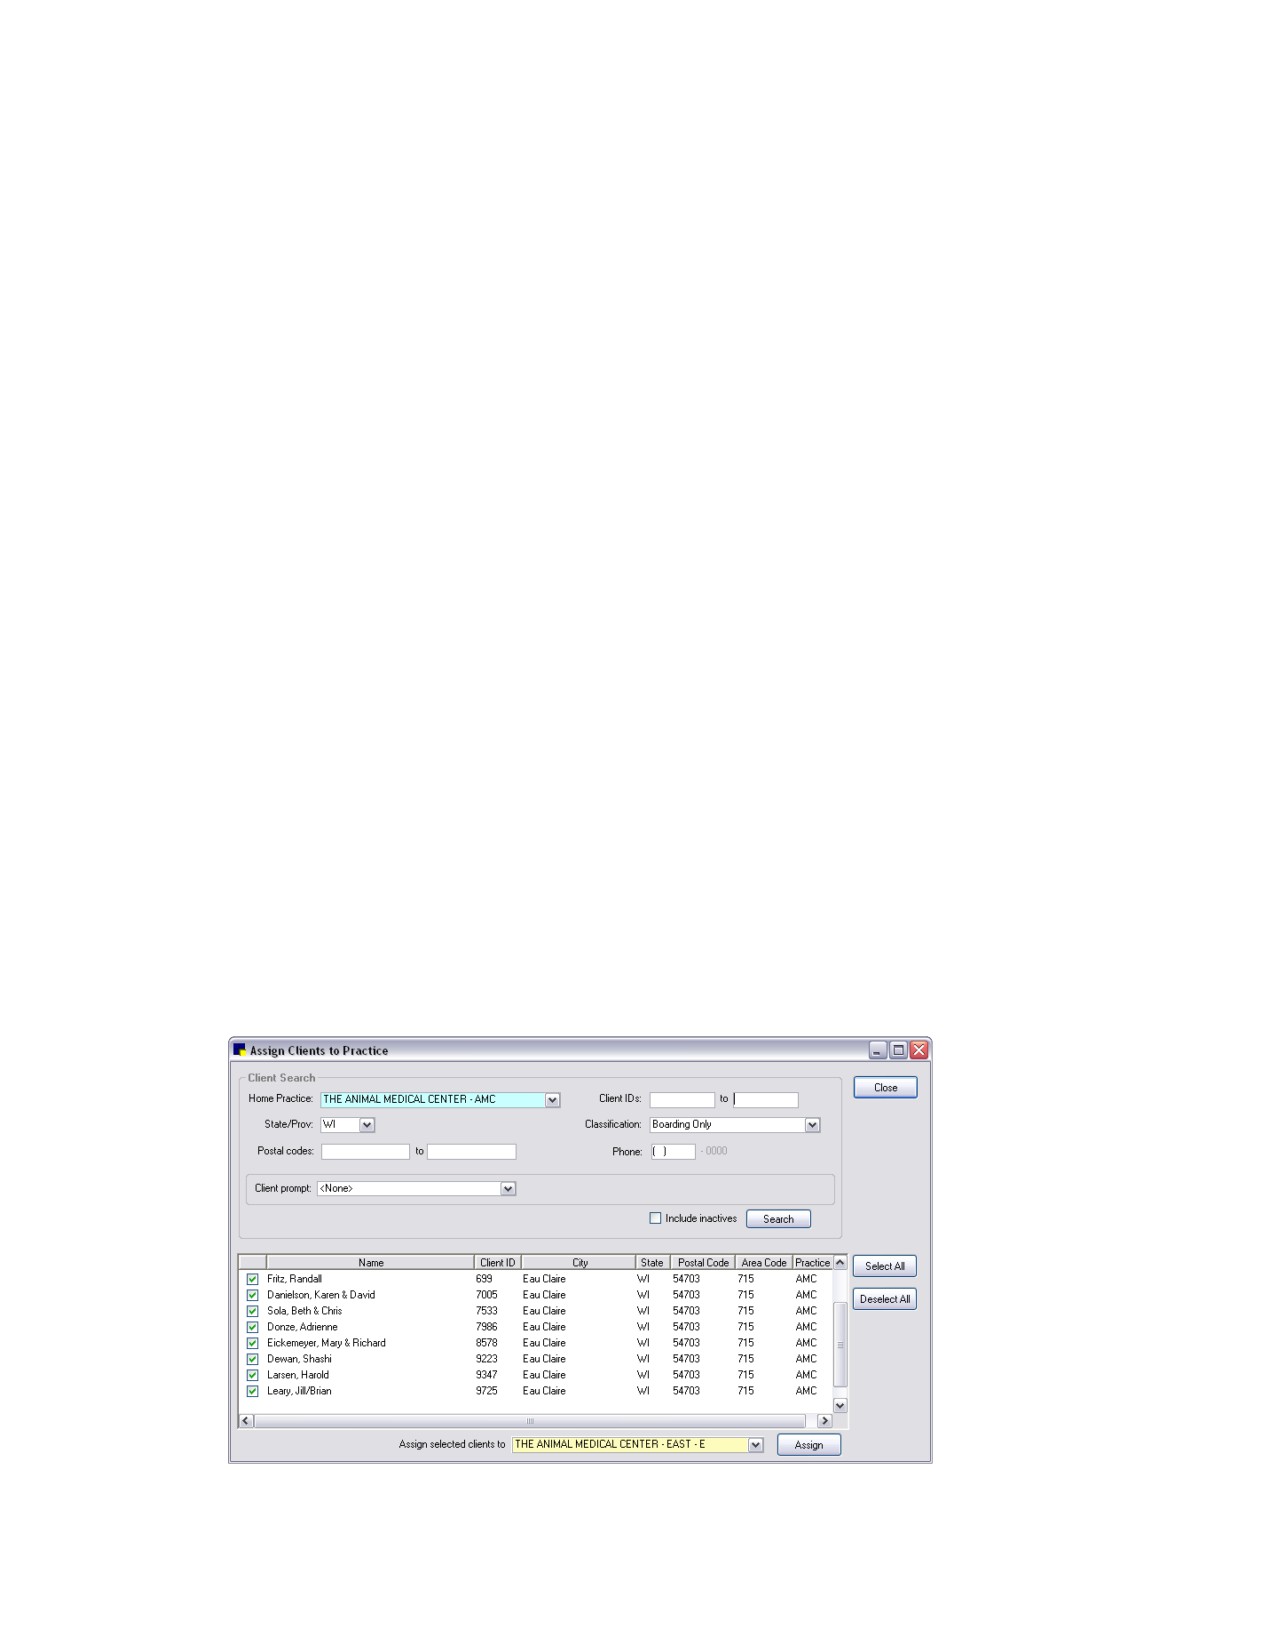
1. On the Tools menu, select Assign Clients to Practice. The Assign Clients to Practice window
appears.
Assign Clients to Practice window
55
Chapter 3: Setting Up Lists and Information
2.
In the Client Search area, set up one or more client search filters using the following fields:
•
Home Practice-Allows you to specify a currently assigned home practice for finding clients who
belong to the same home practice and reassigning them to a different practice. (If setting up a
Multi-Location/Single Database configuration for the first time, all clients in your database will
have the same home practice.)
•
Client IDs-Allows you to specify a range of client IDs for reassigning clients who have IDs within
a particular number range. (Note: You can leave either the first or second text box blank to open
up the range to all client IDs above or below a given ID number. For example, if you leave the
first text box blank and enter 2000 in the second text box, the range is 0 to 2000.)
•
State/Prov-Allows you to specify a particular state/province for reassigning clients who reside in
the same geographic area.
•
Classification-Allows you to select a client classification (for example, Boarding only) for
reassigning clients in a particular classification.
•
Postal codes-Allows you to specify a range of postal codes (ZIP Codes) in either standard
(such as 54701) or postal + 4 (such as 54703-3234) format for reassigning clients who reside in
the same geographic area. (Note: You can leave either the first or second text box blank to open
up the range to all postal codes above or below a given code. For example, if you enter 54700
in the first text box and leave the second text box blank, the range is 54700 to 99999.)
•
Phone-Allows you to specify a telephone number area code (3 numeric characters) and prefix
(3 numeric characters) for reassigning clients who have phone numbers associated with a
particular geographic area.
Note: The Phone search options are not available in Australia.
•
Client prompt/Prompt answer-If your practice uses a custom client prompt (Controls > User
Defined Prompts, select the Client tab) to flag specific clients, you can select that client
prompt and prompt answer here to distinguish a certain group of clients and reassign them to a
different practice.
•
Include inactives-Select this check box if you want to include both active and inactive clients in
your search.
3.
Once you have set the search criteria, click Search. All clients matching the defined search criteria
appear in the client list area.
4.
To change the sort order of the client list, click a column header (City, State, etc.) to sort the list by
that property.
5.
To select the clients to assign to a different practice, select the check box to the left of each client’s
row. You can also click Select All to select all clients in the list or click Deselect All to deselect all
clients.
6.
After selecting one or multiple clients, from the Assign selected clients to drop-down list (below the
client list), select the practice to which you want to assign the selected clients.
7.
Click the Assign button to assign the selected clients to the selected practice.
8.
Repeat steps 2-7 as necessary to assign clients to practices.
9.
When finished, click Close.
56
Chapter 3: Setting Up Lists and Information
Step 7-Assign Revenue Centers
When adding or updating a revenue center, the color-coded Practice drop-down list allows you to
assign a practice to associate with the revenue center for reporting purposes.
When End of Period (EOP) reports are run by practice (such as Daily Summary Report-By Practice), the
assigned revenue center(s) are used to automatically print the applicable sales amounts.
See “Revenue Centers” on page 71 for information on setting up revenue centers.
(Optional)-Switch Between Practices
The Switch Logged In Practice option allows a staff member (with proper security) to switch between
multiple practices.
To change the logged in practice:
1. Close all active Cornerstone windows and dialog boxes on the workstation (do not close
Cornerstone).
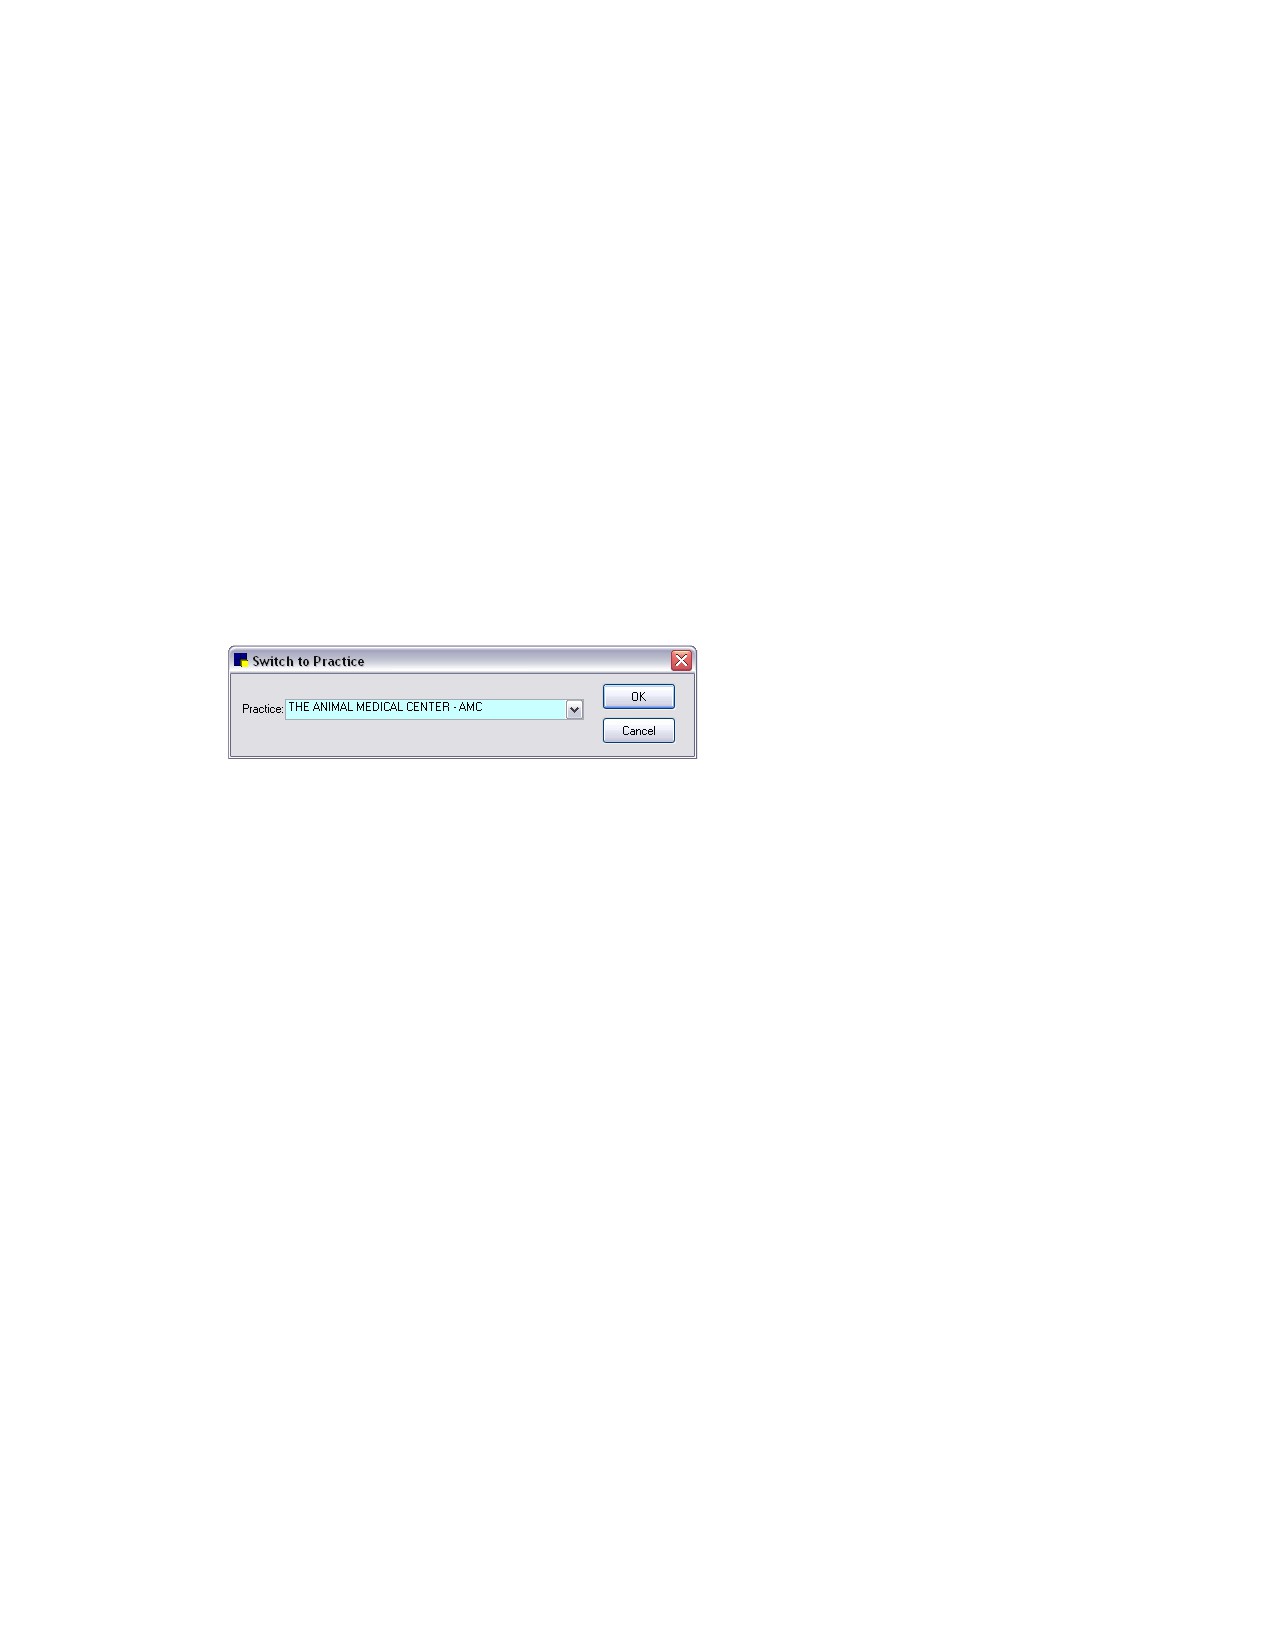
2. On the File menu, select Switch Logged in Practice (this menu option is available only if multiple
active practices exist). The Switch to Practice dialog box appears, displaying a list of color-coded
practices.
Switch to Practice dialog box
3. From the Practice drop-down list, select the applicable practice.
4. Click OK.
The Cornerstone status bar refreshes to display the newly selected practice name and associated
background color.
Staff Information
Entering Staff Members in the Cornerstone System
Set up each of your staff members in Cornerstone and assign them to a staff classification. Staff
classifications are used for staff commissions and in Cornerstone performance tracker.
Note: You should also set up security for each staff member. Until a staff member has security access
set up, the “Access denied” message appears when the staff member tries to open a dialog box or
generate a report. To set up security for each staff member, follow the Cornerstone Staff Security
instructions you received separately when you purchased your Cornerstone software.
Before You Begin
¾ Set up your staff classifications. You do not have to set up classifications if you are setting up a
temporary staff member for initial setup of your system.
57
Chapter 3: Setting Up Lists and Information
To add or edit a staff member:
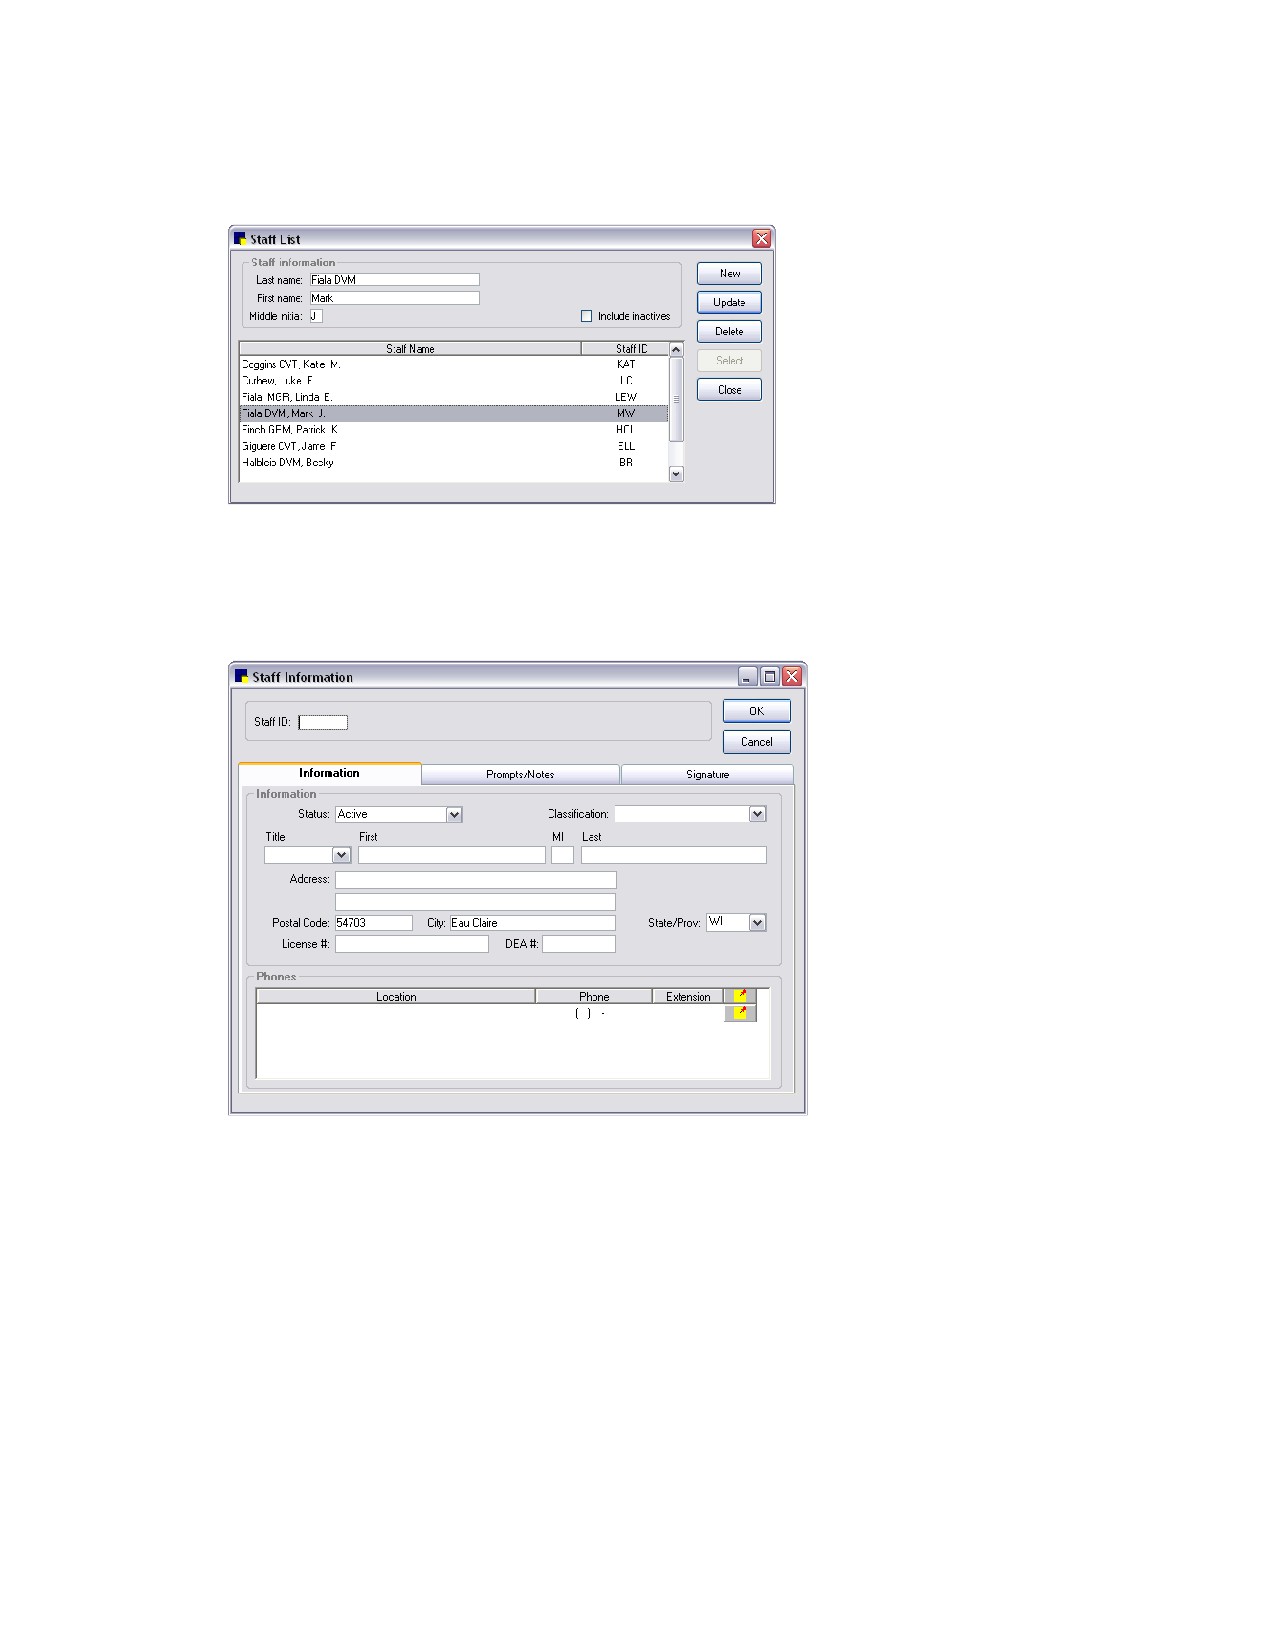
1. On the Lists menu, select Staff. The Staff List dialog box appears.
Staff List dialog box
Tip: To include inactive staff members in the staff list, select the Include inactives check box.
2. Click New to add a new staff member or double-click an existing staff member to update the
information. The Staff Information window appears.
Information tab on Staff Information window
3. Type a unique Staff ID.
4. On the Information tab, from the Status drop-down list, select Active or Inactive. (Change the
status to Inactive only if a staff member is no longer employed at your practice.)
5. From the Classification drop-down list, select the staff member’s classification.
6. Enter the staff member’s name and address information.
7. If applicable, type the staff member’s license number in the License # text box. The license number
is included on rabies certificates.
8. If applicable, type the staff member’s DEA number in the DEA # text box. The DEA # is used only in
the controlled substance export if required by a specific state.
58

Chapter 3: Setting Up Lists and Information
9. In the Phones area, double-click or right-click and select New (or press CTRL+N) to open the
Phone Information dialog box.
Phone Information dialog box
10. In the Phone Information dialog box, do the following:
a. In the Phone information area, type the phone number and extension in the Phone number and
Extension text boxes (if applicable).
b. From the Location drop-down list, select the location associated with this phone number, such
as home, cellular, etc. You can view the location from the Staff Information window.
c. In the Notes text box, type any notes associated with this phone number, such as times
available. If you enter notes, a special note
icon shows next to this phone number on the
Staff Information window. To view the notes from the Staff Information window, double-click the
note
icon. (Phone notes do not appear in the Staff Information window.)
d. When finished, click OK to return to the Staff Information window.
11. Click OK to save your changes and close, or click another tab to add more information for the staff
member.
To view a list of staff members and their telephone and address information, print a Staff Summary
Report.
To view staff phone numbers only (no address information), print a Staff Phone List.
Answering Staff Prompts and Adding Notes to Staff Information
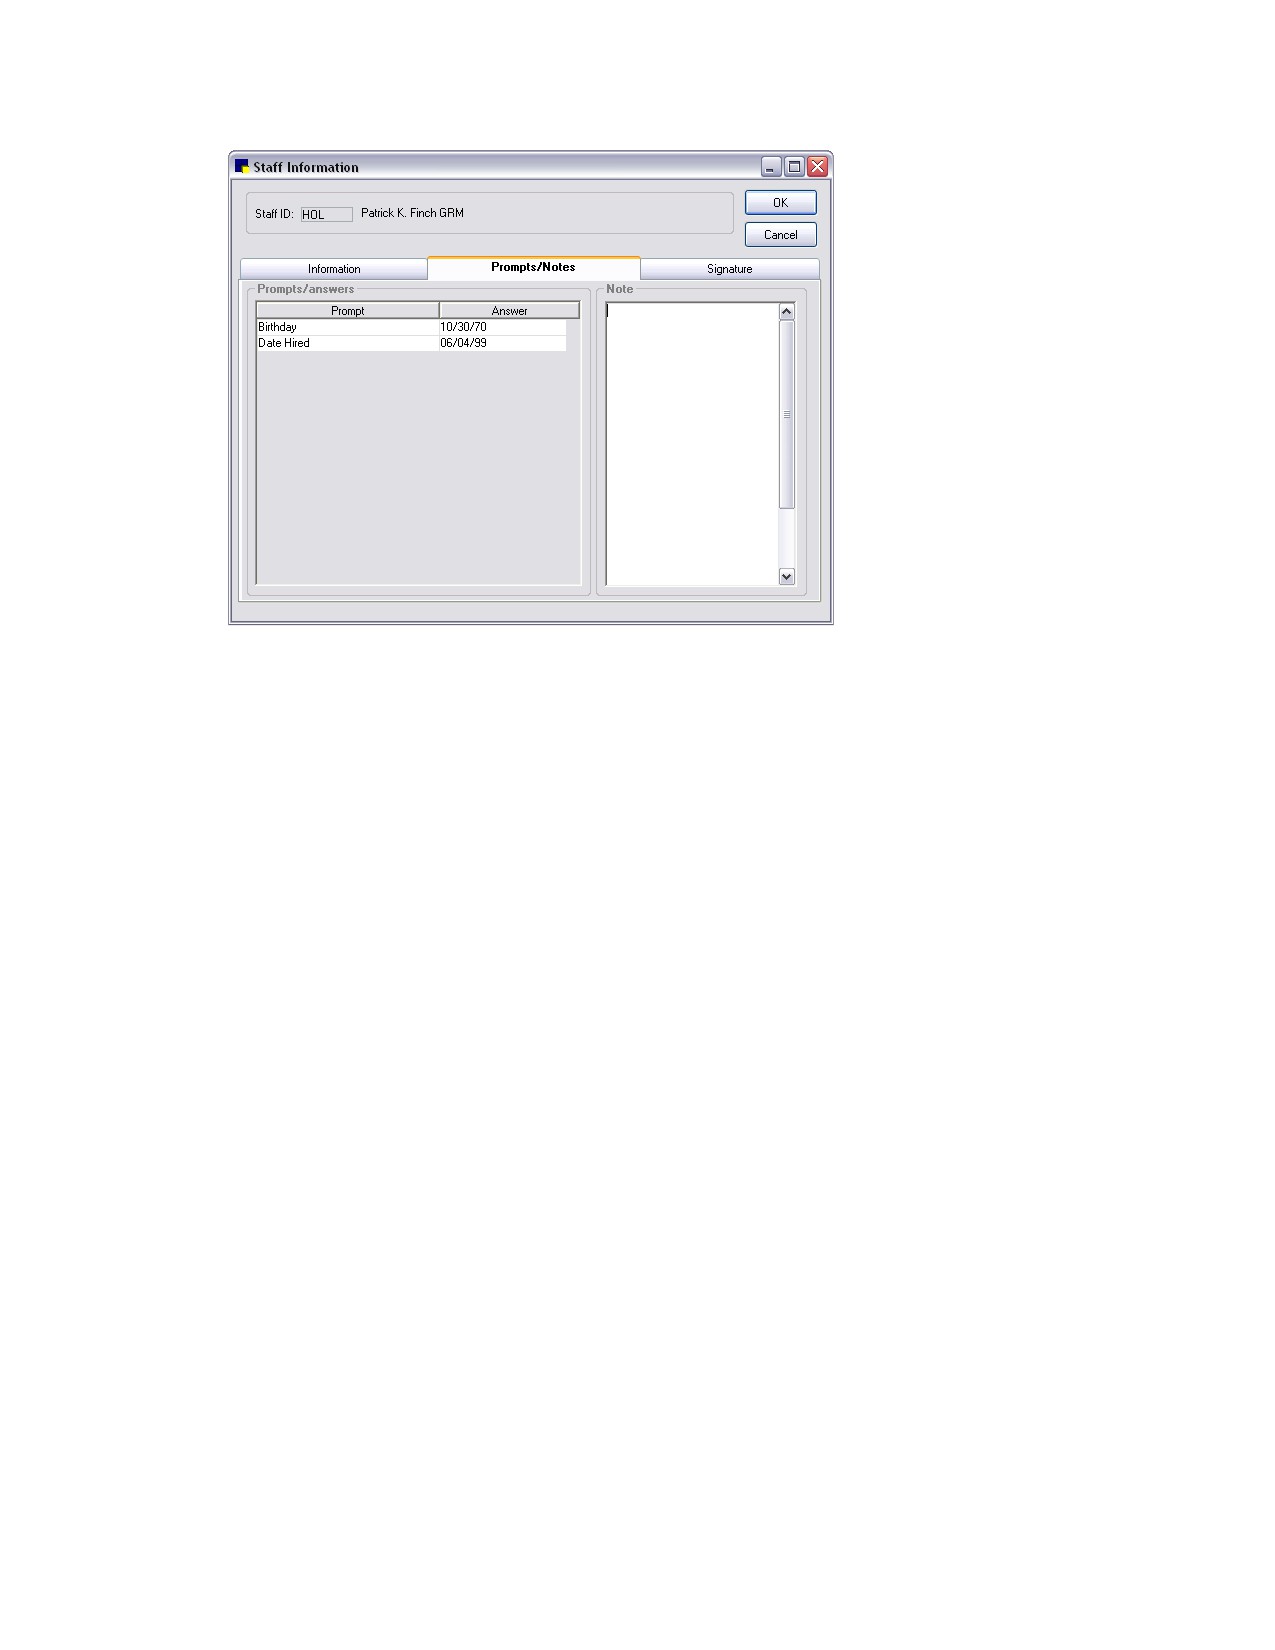
You can record additional information about employees on the Prompts/Notes tab in the Staff
Information window. You can view a note in Staff Information at any time, and the note also appears on
the Staff Summary Report.
Before You Begin
¾ Set up your staff prompts (Controls > User Defined Prompts > Staff tab). You don’t have to set
up prompts if you are setting up a temporary staff member to initially set up your system.
To answer staff prompts and add a staff note:
1. On the Lists menu, select Staff.
2. Select a staff member and click Update.
3. Click the Prompts/Notes tab.
59
Chapter 3: Setting Up Lists and Information
Prompts/Notes tab on Staff Information window
4. Answer the staff Prompts and in the Note area, add any note concerning the staff member.
5. Click OK to save your changes and close, or click another tab to add more information for the staff
member.
For a list of the answers to staff prompts, print a Staff Defined Prompts Report. (See “Staff Defined
Prompts Report” on page 63.)
Adding Electronic Signatures for Staff
You can create an electronic staff signature and store it for use in medical notes or correspondence
documents. (See “Chapter 17: Using Medical Notes and Correspondence” in the Cornerstone User’s
Manual for information on including electronic signatures in a document.)
To create an electronic signature for a staff member:
1. On the Lists menu, select Staff.
2. Select a staff member and click Update.
3. Click the Signature tab.
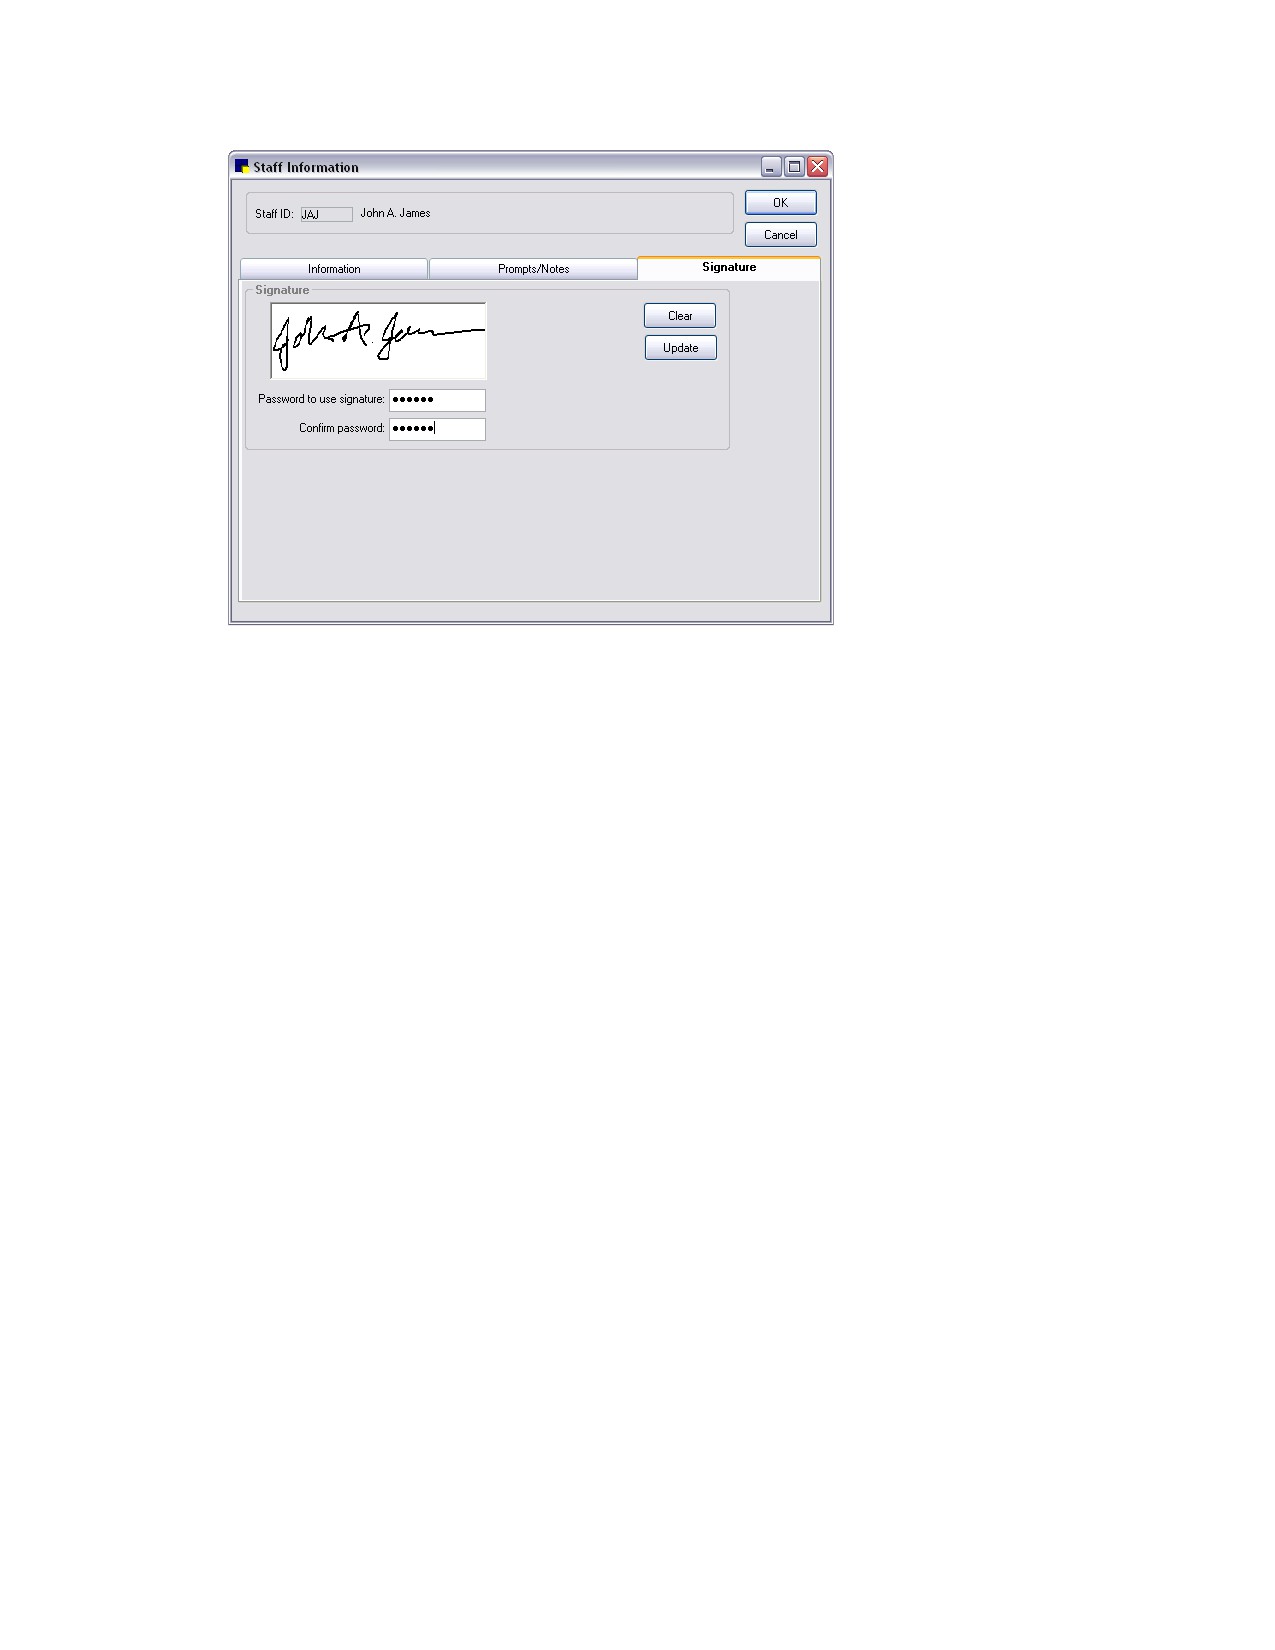
4. Click the New button. A pop-up box appears, asking for your signature.
5. Using the signature capture device, sign your name and click OK. The signature appears in the
Signature box.
60
Chapter 3: Setting Up Lists and Information
Signature tab on Staff Information window
6. If you want to password protect the signature, type and confirm the password in the provided text
boxes on the Signature tab. When the Signature w/pwd bookmark is used in a document, the
signature password is required before placing the signature on the document.
7. Click OK to save your changes and close, or click another tab to add more information for the staff
member.
Staff Reports
You can generate a variety of reports related to staff information.
To access Staff reports:
1. On the Reports menu, select Find a Report. The Report Search window appears.
2. In the Reports list, click the plus sign to the left of Staff to expand the list of staff reports.
61