IDEXX Cornerstone. Administrator’s Manual (8.3 NEXT version 8.3.6) - page 5
Chapter 4: Setting Practice and Workstation Defaults
2. In the navigation pane, click Physical Exam or Patient Advisor. The Physical Exam or Patient
Advisor configuration pane appears.
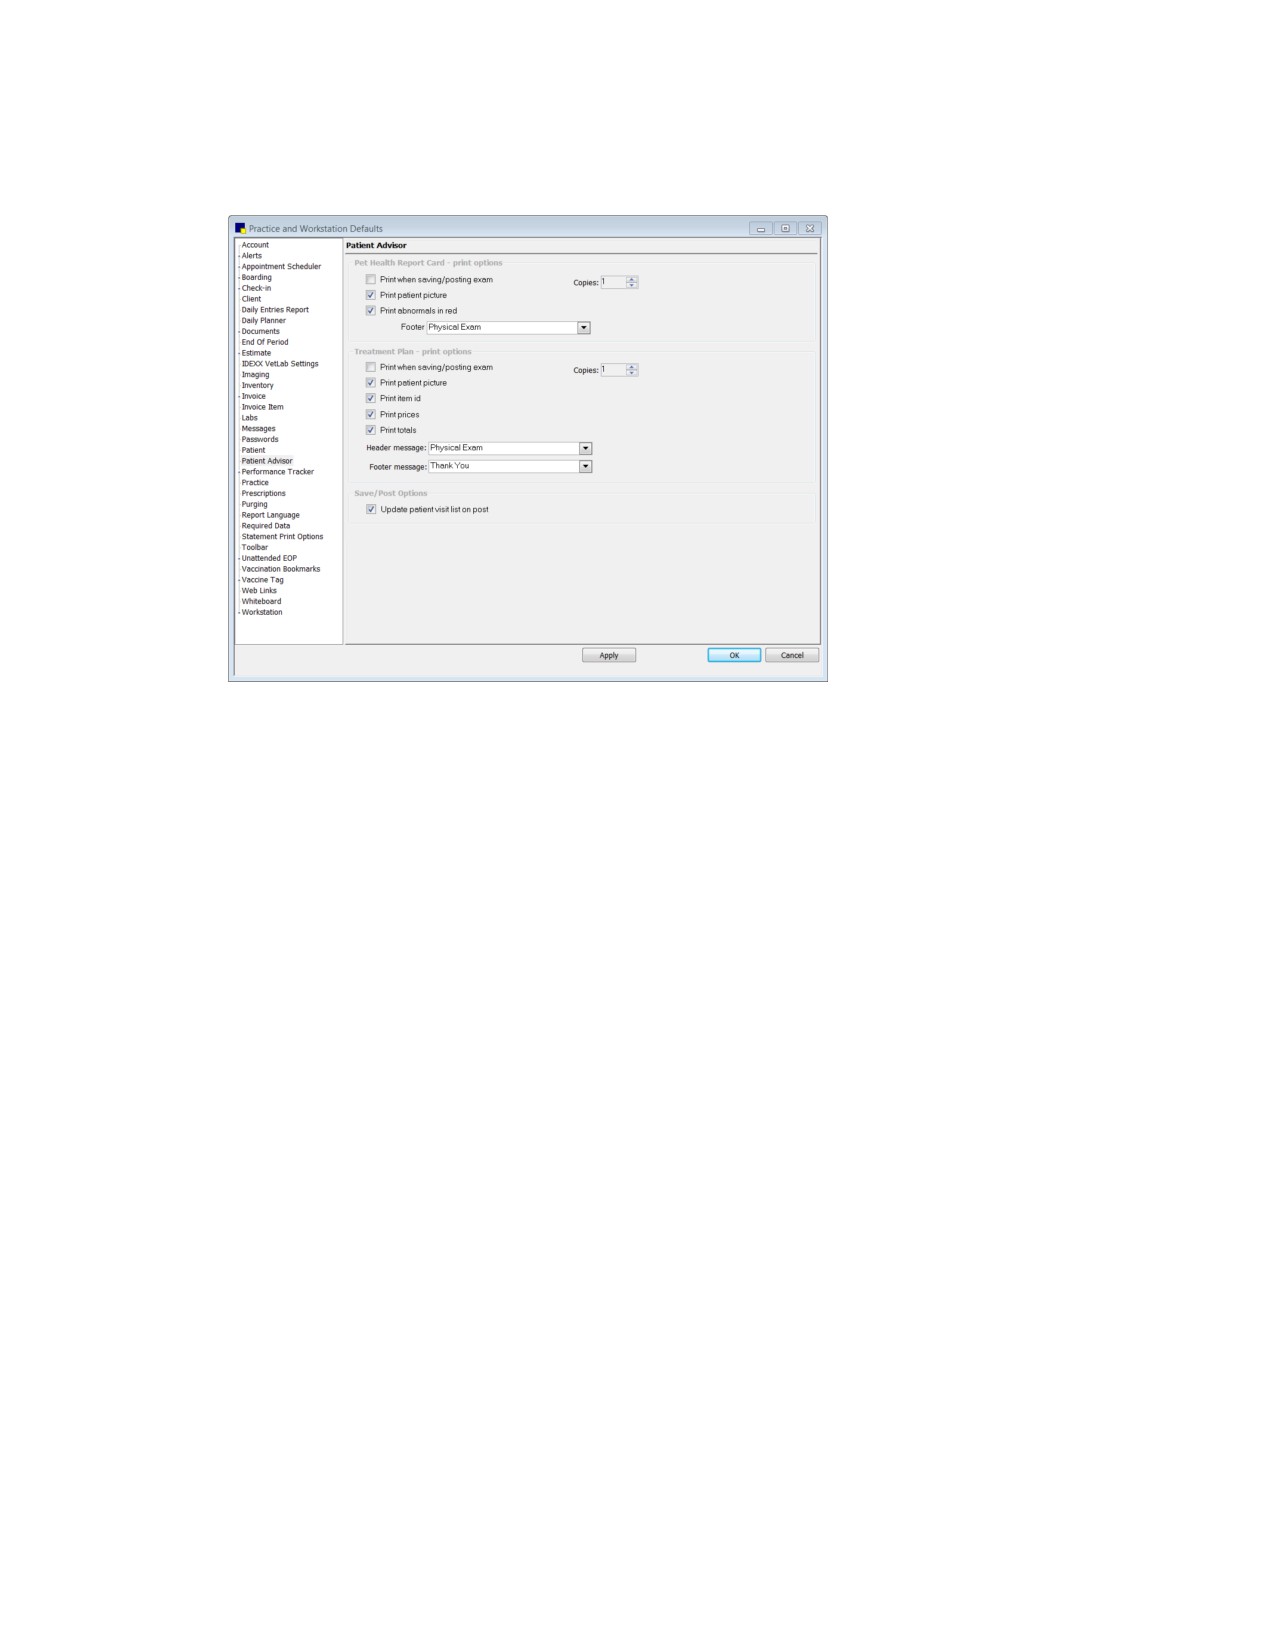
Physical Exam/Patient Advisor defaults
Note: The figure above shows the configuration pane for the Patient Advisor defaults. If you have not
purchased the Patient Advisor feature, you will use the Physical Exam configuration pane, which does
not include all of the options shown above.
3.
In the Pet Health Report Card-print options area, do the following:
a. To print the Pet Health Report Card after the physical exam is saved or posted, select the Print
when saving/posting exam check box. Then in the adjacent Copies text box, enter the default
number of copies to print.
b. To print the pet’s picture on the Pet Health Report Card, select the Print patient picture check
box.
c. If you have a color printer and want the abnormal observations headings to print in red, select
the Print abnormals in red check box.
d. In the Footer message drop-down list, select a message to print by default in the footer of the
Pet Health Report Card. (You can add or edit messages in Controls > Billing Messages.)
4.
Patient Advisor only: In the Treatment Plan-print options area, do the following:
a. To print the Treatment Plan after the physical exam is saved or posted, select the Print when
saving/posting exam check box. Then, in the adjacent Copies text box, enter the default
number of copies to print.
b. To print the pet’s picture on the Treatment Plan, select the Print patient picture check box.
c. To print your practice’s invoice item IDs on the Treatment Plan, select the Print item ID check
box. Do not select this option if you want to keep your practice’s item IDs confidential.
d. To print prices on the Treatment Plan, select the Print prices check box.
e. To print totals on the Treatment Plan, select the Print totals check box.
122
Chapter 4: Setting Practice and Workstation Defaults
f.
Select the Header message and Footer message to print on the top and bottom of the
Treatment Plan. If necessary, you can change the messages when you print the Treatment Plan.
5. Patient Advisor only: In the Save/Post Options area, if you want to automatically update the Patient
Visit List (PVL) with items in the Treatment Plan only when you post it (versus when you post it and
when you save it), select the Update patient visit list on post check box. If the check box is
cleared, the PVL is also updated upon saving, not just upon posting.
Note: Each time the PVL is updated, all prior lines that were written to the PVL are deleted and then
replaced with the updated lines.
6. Click Apply to save your changes and continue setting defaults, or click OK to save your changes
and close the window.
Performance Tracker Defaults
The Performance Tracker defaults allow you to set preferences for displaying data and dynamic graphs
using the Cornerstone performance tracker feature.
To set the Performance Tracker defaults:
1. On the Controls menu, select Defaults > Practice and Workstation. The Practice and Workstation
Defaults window appears.
2. In the navigation pane, click Performance Tracker. The Performance Tracker Summary
configuration pane appears.
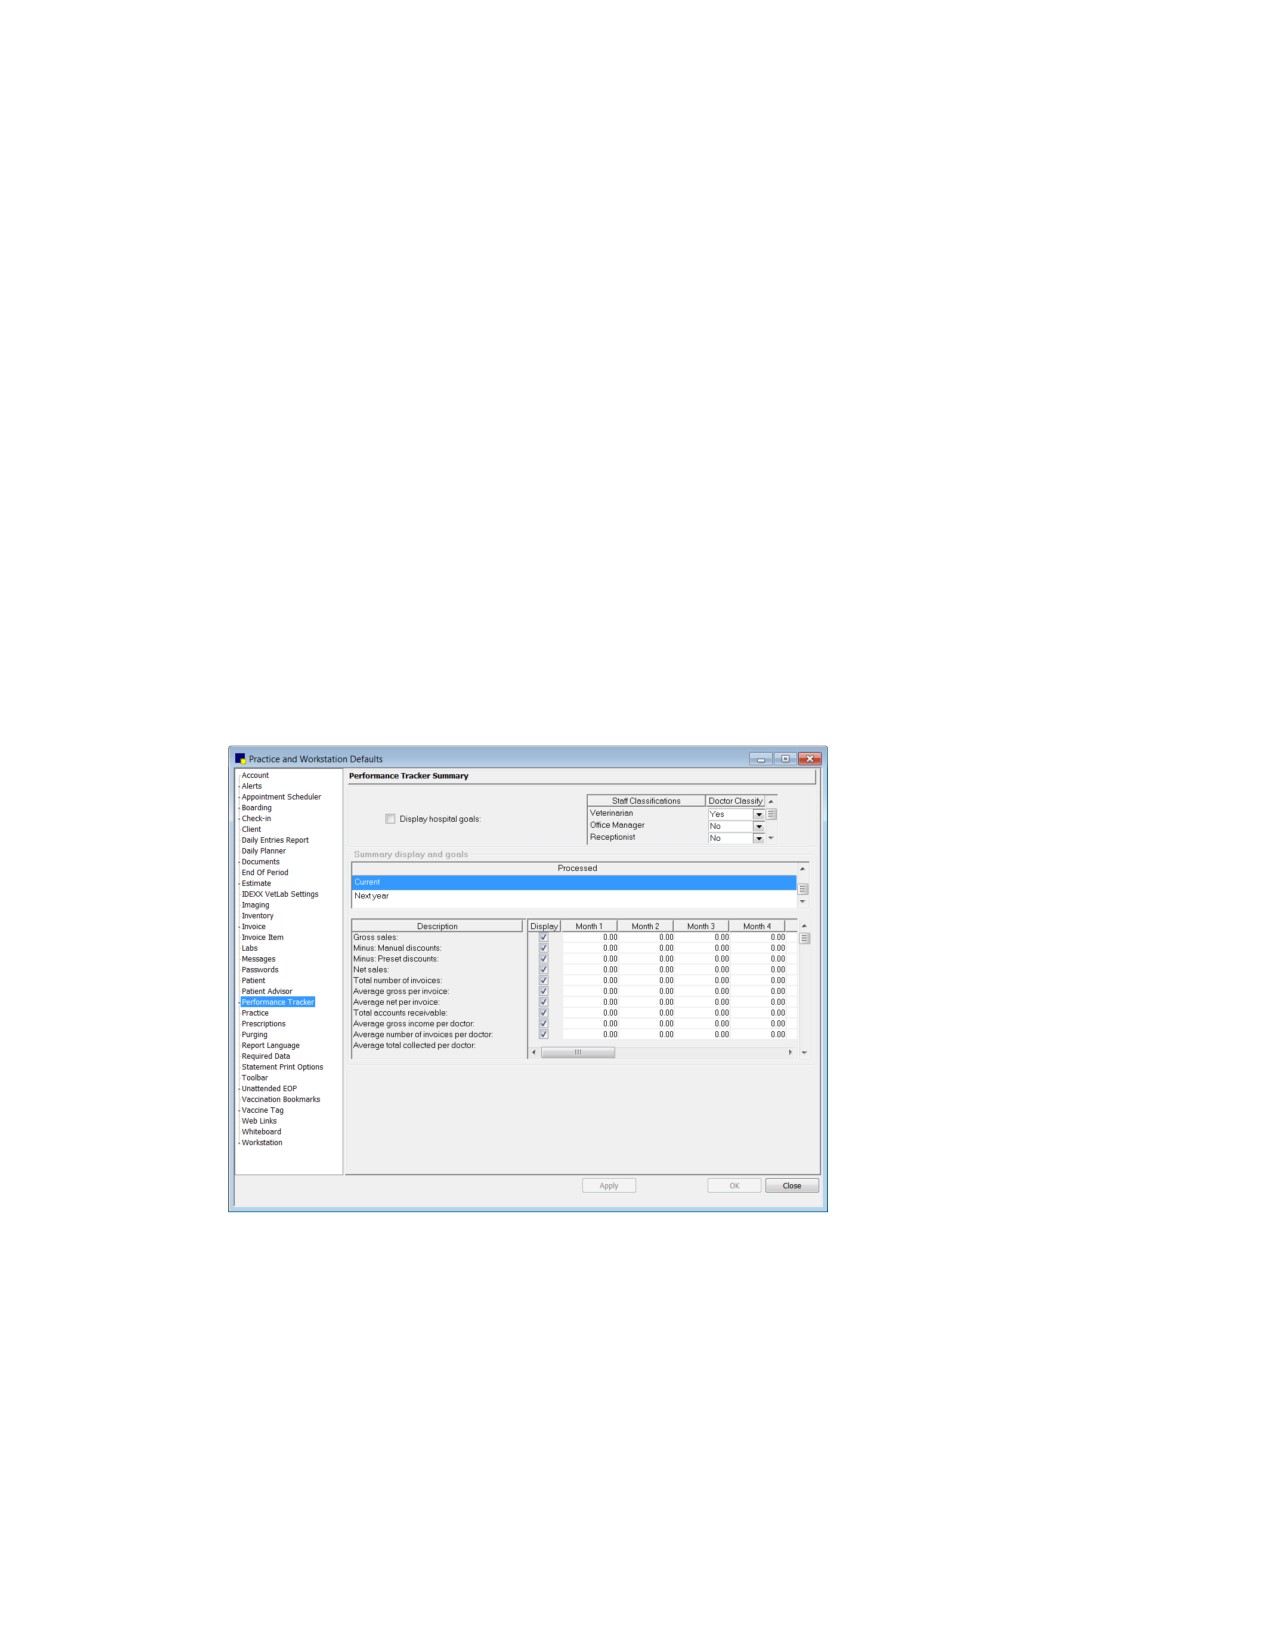
Performance Tracker Summary defaults
3. If you want to see the practice goals in Cornerstone performance tracker, select the Display
hospital goals check box.
4. In the Doctor Classify column, select Yes or No for each type under Staff Classifications used at
your practice for “doctors.”
5. In the Summary display and goals area, select the time period for which you want to set goals (by
month), and then click to select options for which you want to set goals and enter the dollar
amounts.
123
Chapter 4: Setting Practice and Workstation Defaults
6. Click Apply to save your changes and continue setting defaults, or click OK to save your changes
and close the window.
Example:
Your practice wants to set a goal of $5,000 in gross sales for this January. To do this, under
Processed, click Current. Under Description, locate gross sales and select the check box next to
Gross sales. Enter $5,000 as the dollar amount you want your practice to attain in the first month.
Miscellaneous-Performance Tracker Defaults
The Miscellaneous-Performance Tracker defaults allow you to define miscellaneous settings and
sales ranges for use in Cornerstone performance tracker.
To set the Miscellaneous-Performance Tracker defaults:
1. On the Controls menu, select Defaults > Practice and Workstation. The Practice and Workstation
Defaults window appears.
2. In the navigation pane, click Performance Tracker to expand its subproperties, and then click the
Miscellaneous-Performance Tracker subproperty. The Performance Tracker Miscellaneous
configuration pane appears.
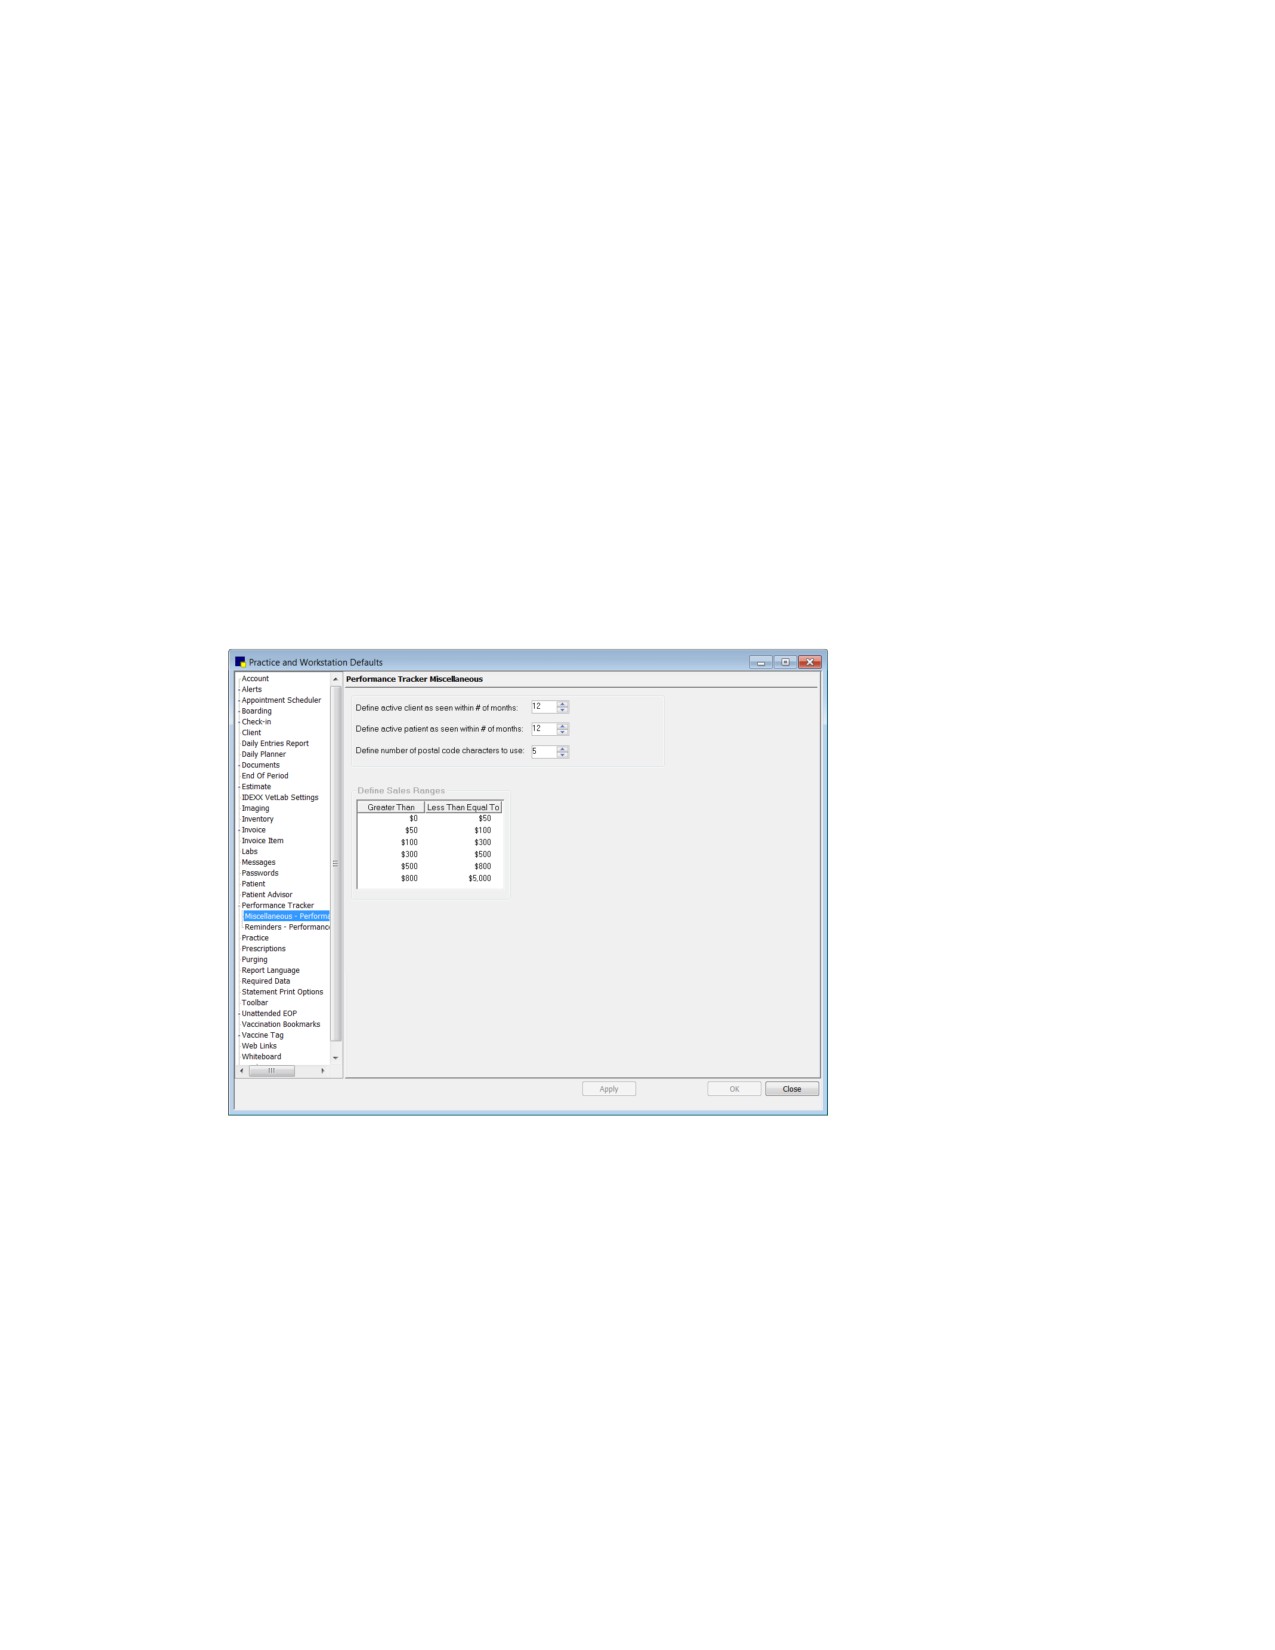
Performance Tracker Miscellaneous defaults
3. In the Define active client as seen within # of months text box, enter the frequency of office visits
in months used to determine your practice’s definition of an active client. For example, if your
practice defines an “active client” as a client who has visited your office in the last year, enter 12
months.
4. In the Define active patient as seen within # of months text box, enter the frequency of office
visits in months used to determine your practice’s definition of an active patient. For example, if your
practice defines an “active patient” as a patient that has been seen in your office in the last two
years, enter 24 months.
5. In the Define number of postal code characters to use text box, specify the number of postal
characters by which results will be sorted (Cornerstone performance tracker sorts your sales by
postal code). In most cases, we recommend that United States locations leave this setting at the
124
Chapter 4: Setting Practice and Workstation Defaults
default of 5 characters (or set to 9 characters to sort results by 9-digit ZIP Codes); Canada locations
would typically use 6 characters.
6. Sales ranges display on the Client tab in Cornerstone Performance Tracker. If you want to adjust the
default ranges, in the Define Sales Ranges area, click the sales range number to change in the Less
Than Equal To column and type the new number.
7. Click Apply to save your changes and continue setting defaults, or click OK to save your changes
and close the window.
Reminders-Performance Tracker Defaults
The Reminders-Performance Tracker defaults allow you to select the species and their associated
reminders and services to use in Cornerstone Performance Tracker.
To set the Reminders-Performance Tracker defaults:
1. On the Controls menu, select Defaults > Practice and Workstation. The Practice and Workstation
Defaults window appears.
2. In the navigation pane, click Performance Tracker to expand its subproperties, and then click the
Reminders-Performance Tracker subproperty. The Performance Tracker Reminders configuration
pane appears.
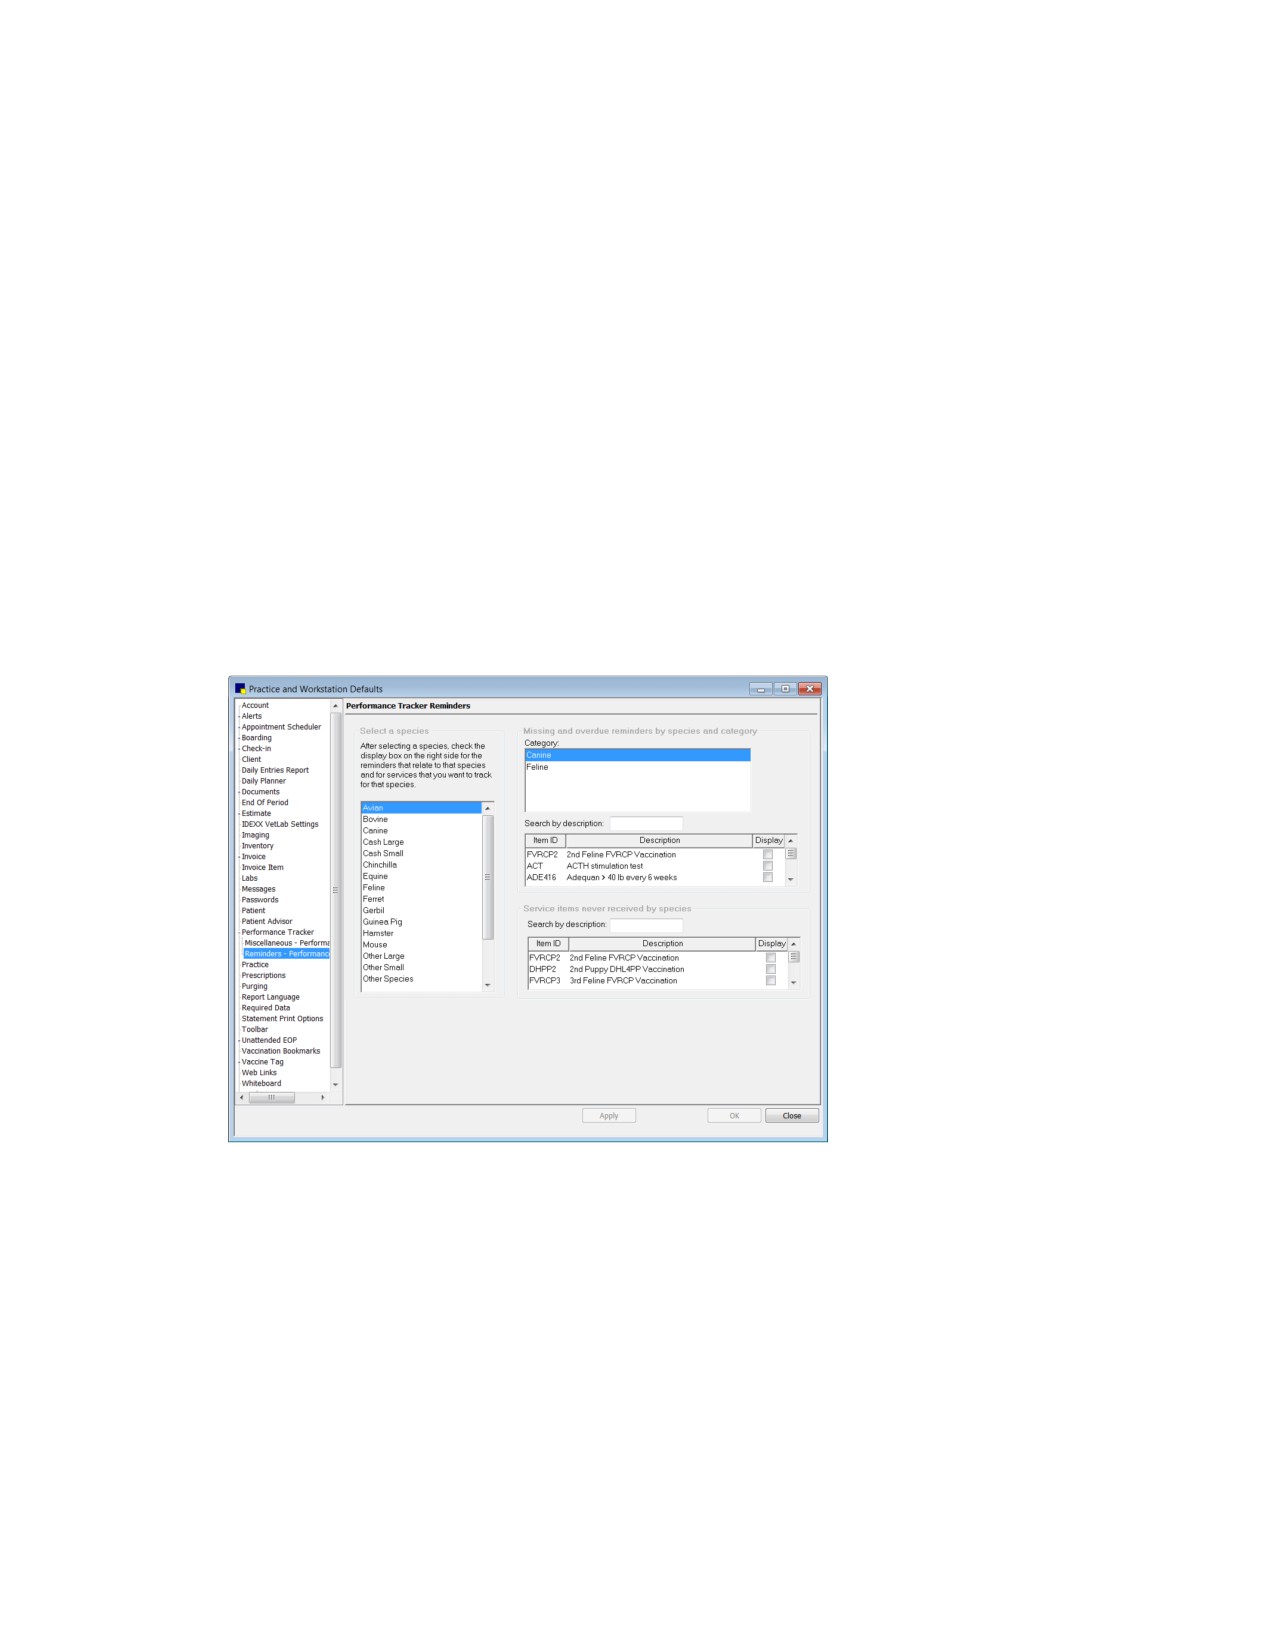
Performance Tracker Reminders defaults
3. In the Select a species area, select a species. The reminders and services related to that species
display on the right side of the configuration pane.
4. In the Missing and overdue reminders by species and category area, do the following:
a. Select the category from the Category box.
b. To create a new reminder category, right-click in the Category box and select New, then type
the name of your new category. To update an existing category, right-click it and select Update;
then, type the new category name in the text box. To delete an existing category, right-click it
and select Delete.
125
Chapter 4: Setting Practice and Workstation Defaults
c. Use the Search by description text box to locate the reminders you want to place in this
category, and select the Display check box next to the applicable reminders.
5. In the Service items never received by species area, use the Search by description box to locate
the services you want to associate with this species, and click the Display check box next to the
applicable services.
Note: If you do not select reminders and services for which you want to collect data, nothing will
display on the Reminders tab in Cornerstone Performance Tracker.
6. Click Apply to save your changes and continue setting defaults, or click OK to save your changes
and close the window.
Example:
Your practice wants to know which clients own dogs that have never received a rabies vaccination. To
do this, select Canine for the species and create a new category called Rabies. Then locate all item IDs
that are used for rabies vaccinations.
Pharmacy Formulary Defaults
Pharmacy Formulary is a separate module available for purchase. Before using the Pharmacy
Formulary, you must set up the Pharmacy Formulary defaults to match the species codes in
Cornerstone with the species codes in the formulary.
To set the Pharmacy Formulary defaults:
1. On the Controls menu, select Defaults > Practice and Workstation. The Practice and Workstation
Defaults window appears.
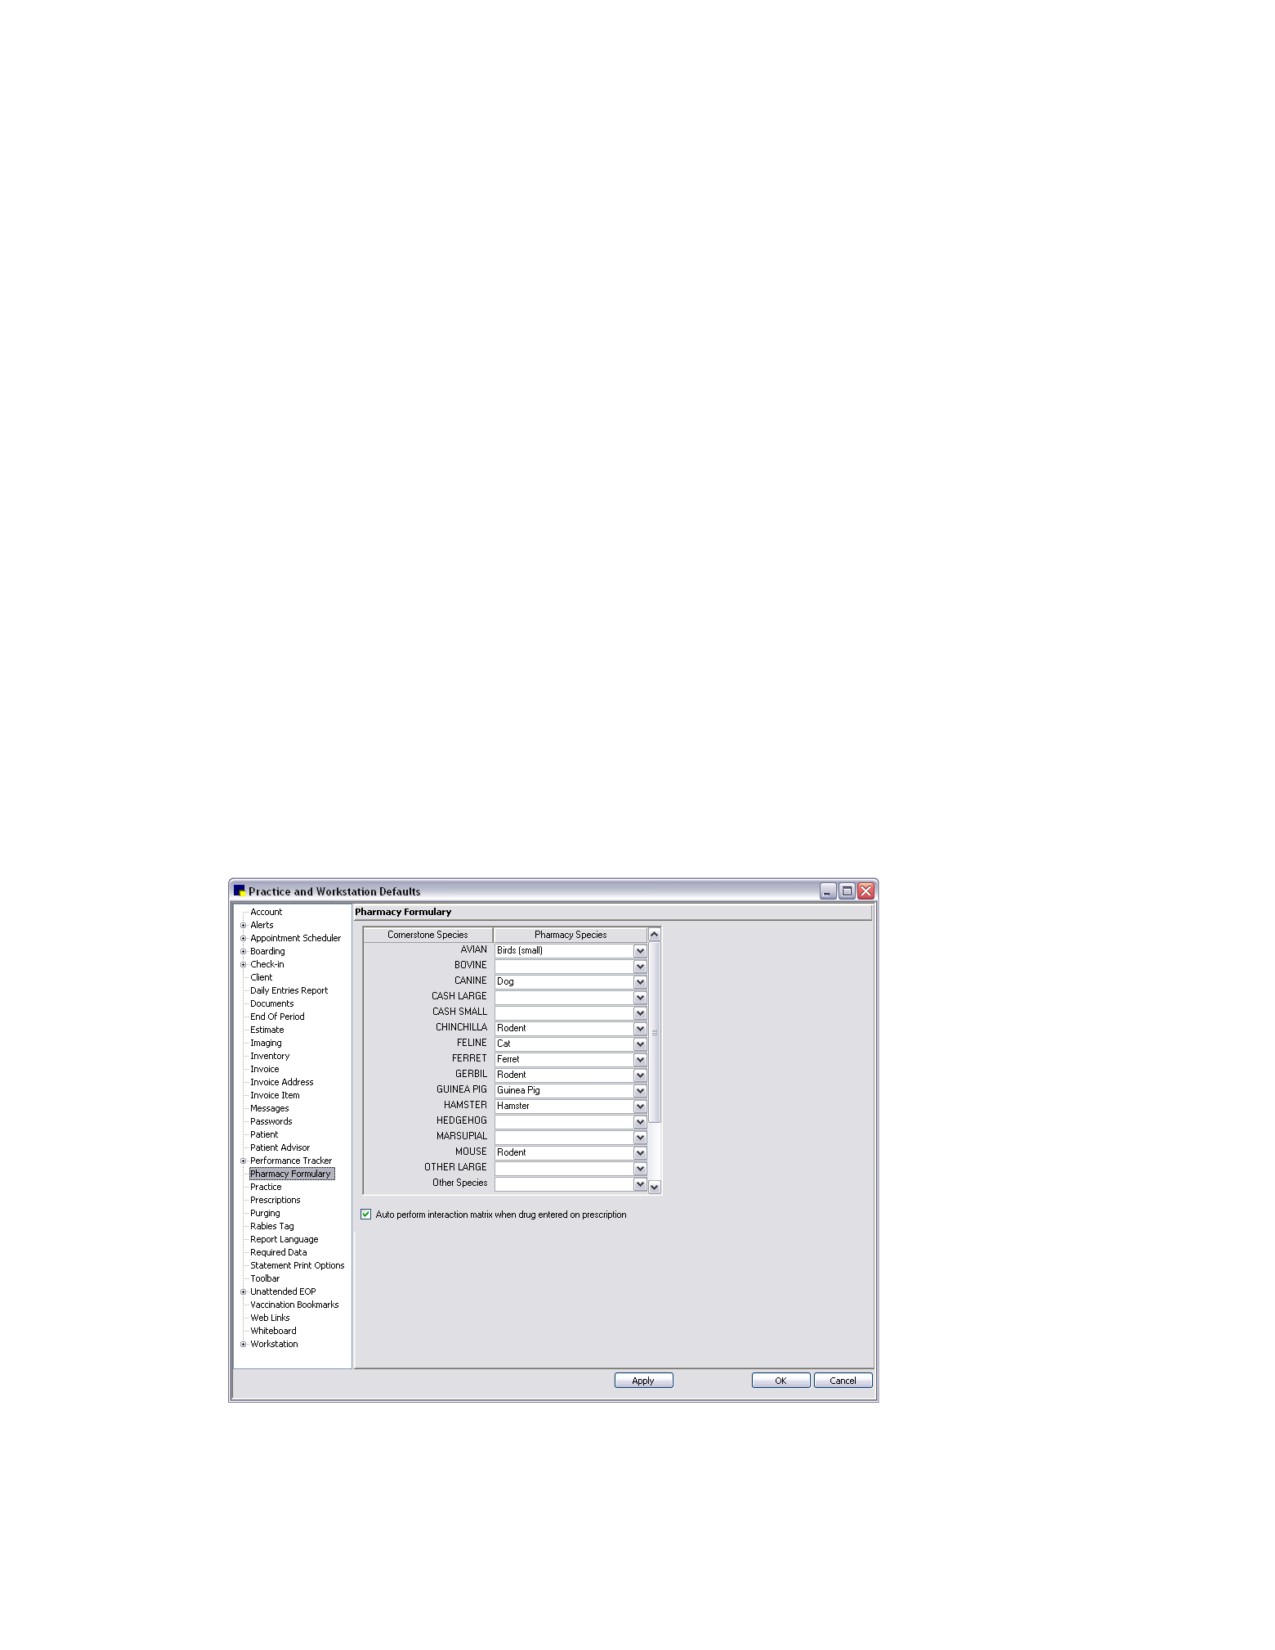
2. In the navigation pane, click Pharmacy Formulary. The Pharmacy Formulary configuration pane
appears.
Pharmacy Formulary defaults
126
Chapter 4: Setting Practice and Workstation Defaults
3. The Cornerstone species are found in the left column and cannot be changed. Under the Pharmacy
Species column, select the matching species from the drop-down list.
4. Select the Auto perform interaction matrix when drug entered on prescription check box if you
want the drug interaction to be automatically performed when you choose a drug on the Prescription
window. Selecting this option may take more time because your software will always perform the
drug matrix when you choose the drug.
5. Click Apply to save your changes and continue setting defaults, or click OK to save your changes
and close the window.
Practice Defaults
Practice defaults allow you to specify a health certificate document and a practice logo—the logo can
be printed on estimates, invoices and monthly statements.
If setting up a practice logo, note the following:
• The logo prints on the estimate, invoice, and statement in the exact size displayed in Practice
defaults. If the size of the logo is not suitable, you should modify it in a separate graphics editing
program outside of Cornerstone and then import the image. (Press F1 on the Practice defaults
pane to view Help instructions on resizing your logo in Microsoft® Paint.)
• The anchor point for all logos is based off the top left corner of the Practice Logo repositioning
box, regardless of whether the logo has a horizontal or vertical orientation.
• If you have a logo that includes your practice name, address, and phone number (similar to
letterhead), you may want to set up the estimate, invoice, and/or statement headers to include
only the Practice Logo, as the text-based Practice Address information included would be a
duplicate of the information already included in the logo.
• Multi-Location/Single Database configurations only: If you have multiple practices activated in
Cornerstone, you can use a different logo image for each practice. It is important to note that
although you can specify a different logo for each practice, the logo use and placement settings
(set up in defaults for Estimate Address, Invoice Address, and Statement Print Options) apply
for all logos across all practices. For any practices that do not have a logo specified, the
estimates, invoices, and statements will print with the standard text-based practice name and
address information.
To set the Practice defaults:
1. On the Controls menu, select Defaults > Practice and Workstation. The Practice and Workstation
Defaults window appears.
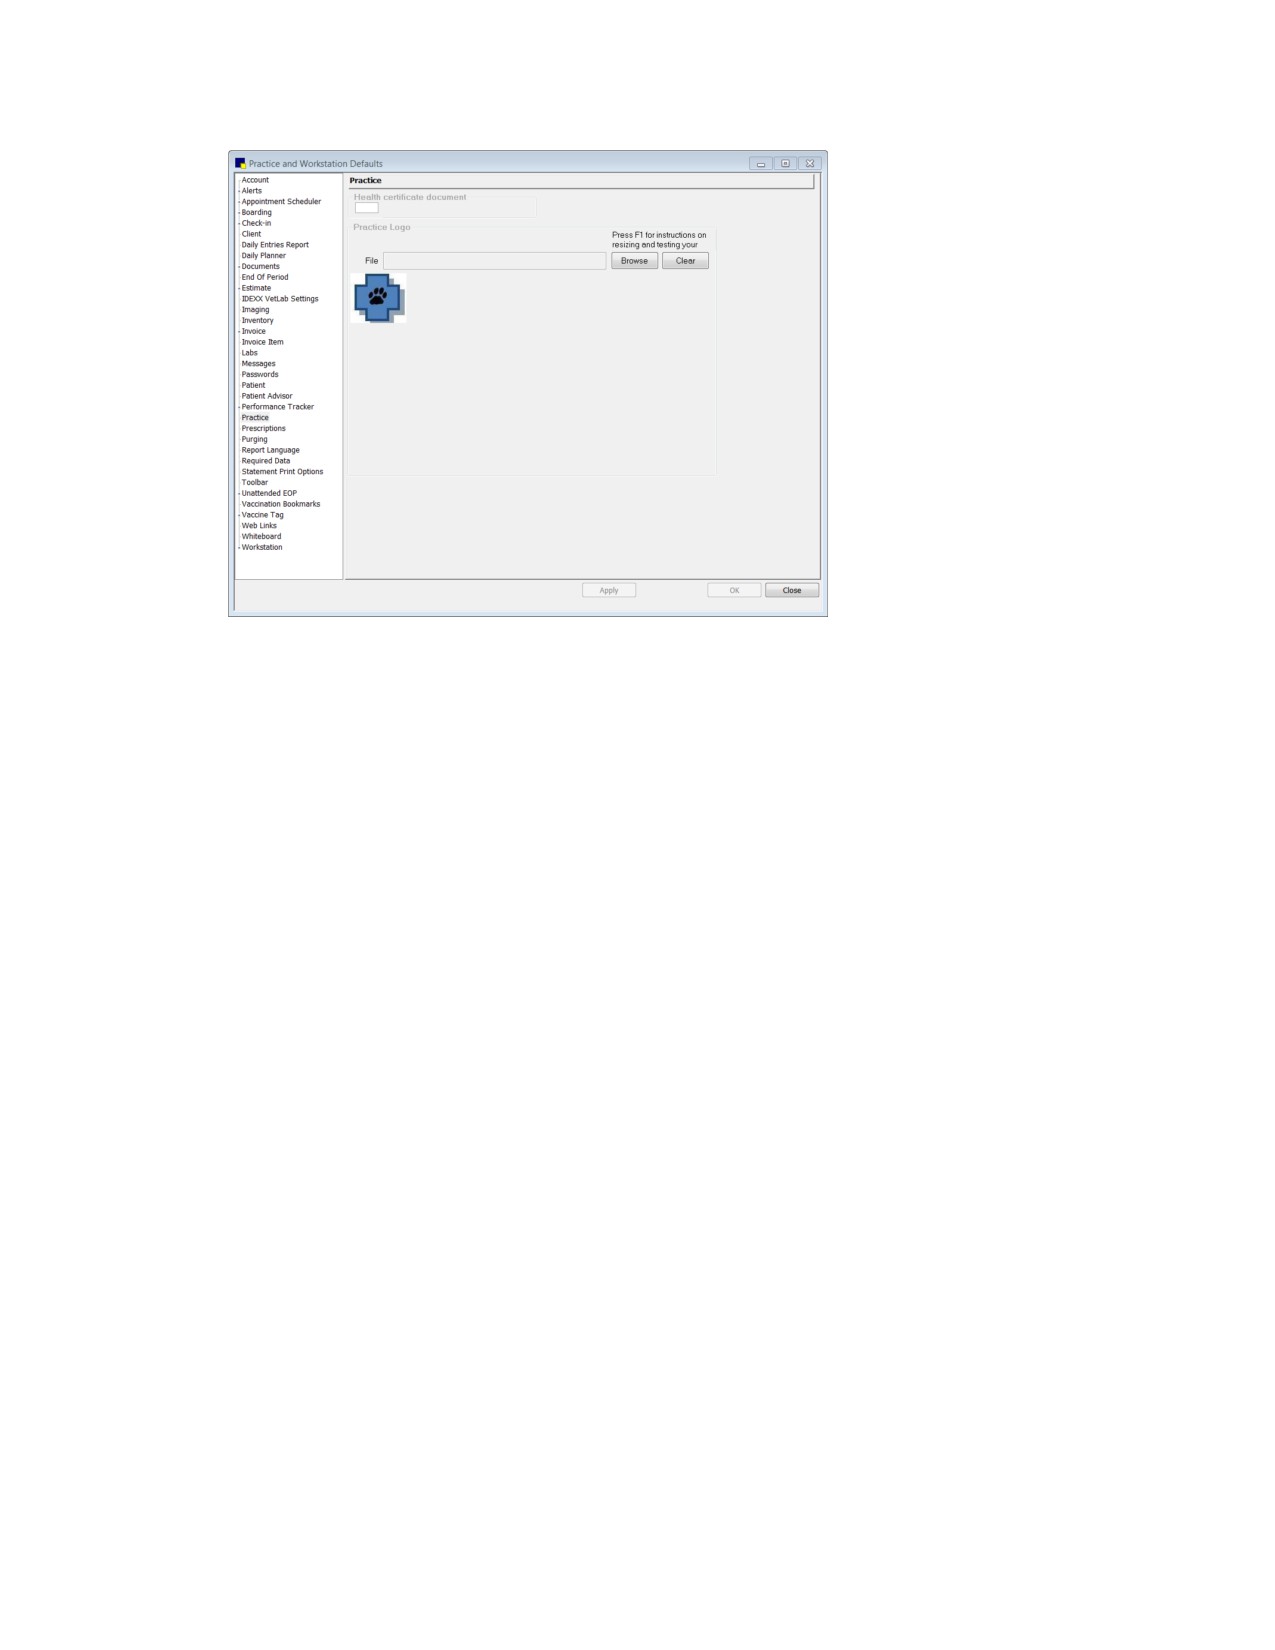
2. In the navigation pane, click Practice. The Practice configuration pane appears.
127
Chapter 4: Setting Practice and Workstation Defaults
Practice defaults
3. In the Health certificate document text box, type the ID of the document you want to designate as
the practice’s default health certificate (prints when Print button > Health Certificate is selected in
patient reminders). Press F2 to use the Document Template List to choose a document.
4. If you want to set up a practice logo to print on invoices, estimates, or monthly statements, in the
Practice Logo area, do the following:
a. Multi-Location/Single Database configuration only: In the Practice drop-down list, select the
applicable practice.
b. If necessary, click Clear to remove a previously added logo.
c. Click Browse to find and select the graphic file to be used for the practice logo. Supported
graphic file types include BMP, GIF, JPG, and JPEG. The selected logo graphic file will display
in its original size.
Tip: Use the defaults for Estimate Address, Invoice Address, and Statement Print Options to set
up logo use and placement for printing.
5. Click Apply to save your changes and continue setting defaults or click OK to save your changes
and close the window.
Prescriptions Defaults
The Prescriptions defaults allow you to set preferences for creating and printing prescriptions and lab
request labels.
To set the Prescriptions defaults:
1. On the Controls menu, select Defaults > Practice and Workstation. The Practice and Workstation
Defaults window appears.
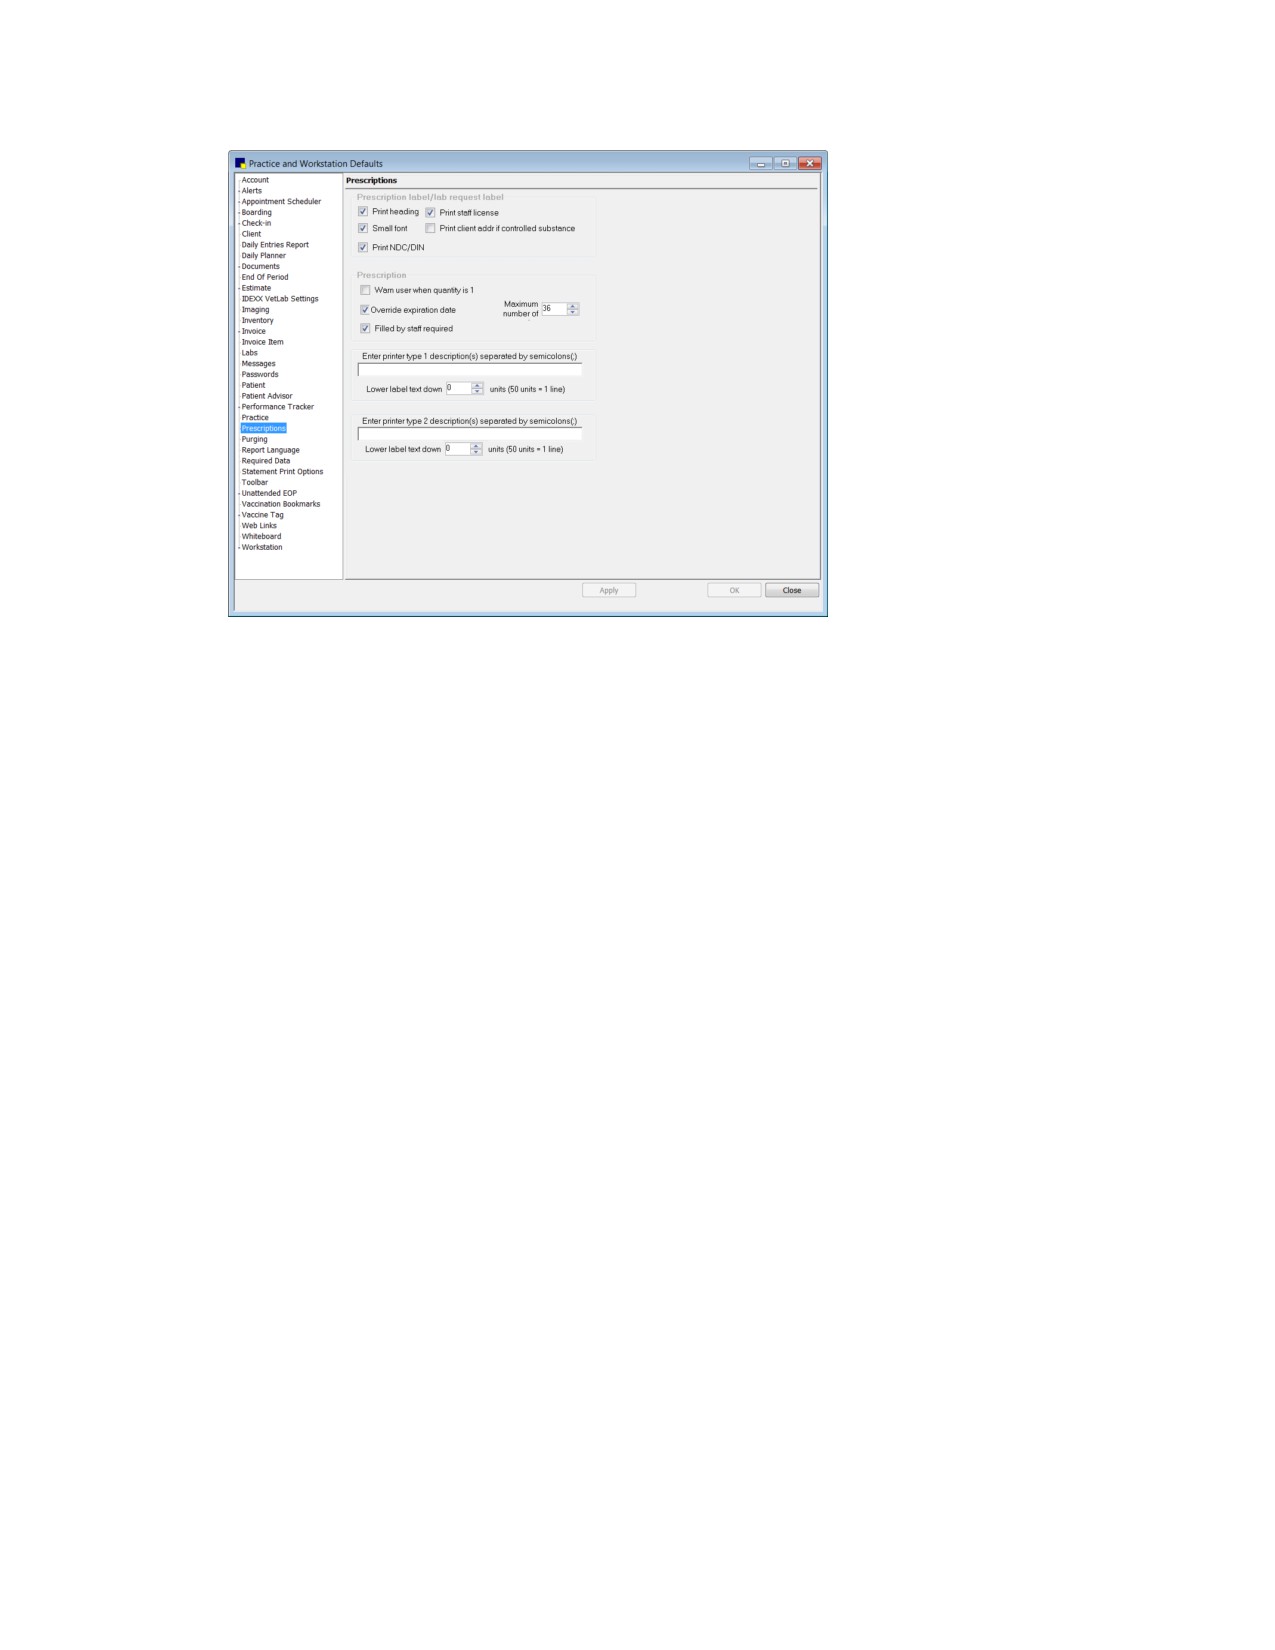
2. In the navigation pane, click Prescriptions. The Prescriptions configuration pane appears.
128
Chapter 4: Setting Practice and Workstation Defaults
Prescriptions defaults
3.
In the Prescription label/lab request label area, do the following:
a. Select the Print heading check box to print practice information on prescription and lab request
labels.
b. Select the Print staff license check box to print the staff license on the prescription label.
c. Select the Small font check box to use a smaller font for the text on labels.
d. Select the Print client addr if controlled substance check box to print the client’s address on
prescription labels for controlled substances. (You must also select the Small font check box.)
e. Select the Print NDC/DIN (National Drug Code/Drug Identification Number) check box to print
drug identification numbers on prescription labels. If one exists, the NDC/DIN Code prints on the
prescription label in place of the serial number.
4.
In the Prescription area, do the following:
a. Select the Warn user when quantity is 1 check box to display an alert if a prescription quantity
is 1.
b. Select the Override expiration date check box and enter the Maximum number of months.
This feature applies to veterinary practices in states mandating that a maximum expiration date
print on prescription labels. If a maximum expiration date is not set here and your practice uses
Cornerstone Inventory, the expiration date from the item’s record is used on the prescription
label.
Note: If the expiration date for the invoice item has not expired and occurs before the current
date plus the maximum number of months, the expiration date on the invoice item is used on
the prescription label. If the expiration date occurs after the current date plus the maximum
number of months, then the current date plus the maximum number of months is printed on the
label.
c. Select the Filled by staff required check box if staff must complete the Filled by text box on the
Prescription Information dialog box before processing a prescription.
129
Chapter 4: Setting Practice and Workstation Defaults
5. If you are having difficulty with text positioning on pharmacy or lab labels, you can adjust the printer
using the Enter printer type settings.
a. In the Enter printer type 1 text box, type the share name of the printer. (This is the name
assigned to the printer in the Windows® setup.) If you have more than one printer of the same
printer model, type the share names for each printer, separated by a semicolon.
b. If it is necessary to adjust text positioning on labels, in the Lower label text down text box, enter
the number of units to lower the text. Approximately 10 units equal 1 line.
c. If you have more than one printer type that needs adjusting, repeat the previous steps as
needed in the Enter printer type 2 fields.
Note: Only prescription and lab labels are adjusted by these defaults. Labels set up in
correspondence are not.
6. Click Apply to save your changes and continue setting defaults, or click OK to save your changes
and close the window.
Purging Defaults
The Purging defaults allow you to specify the default number of periods to retain information when
purging data.
To set the Purging defaults:
1. On the Controls menu, select Defaults > Practice and Workstation. The Practice and Workstation
Defaults window appears.
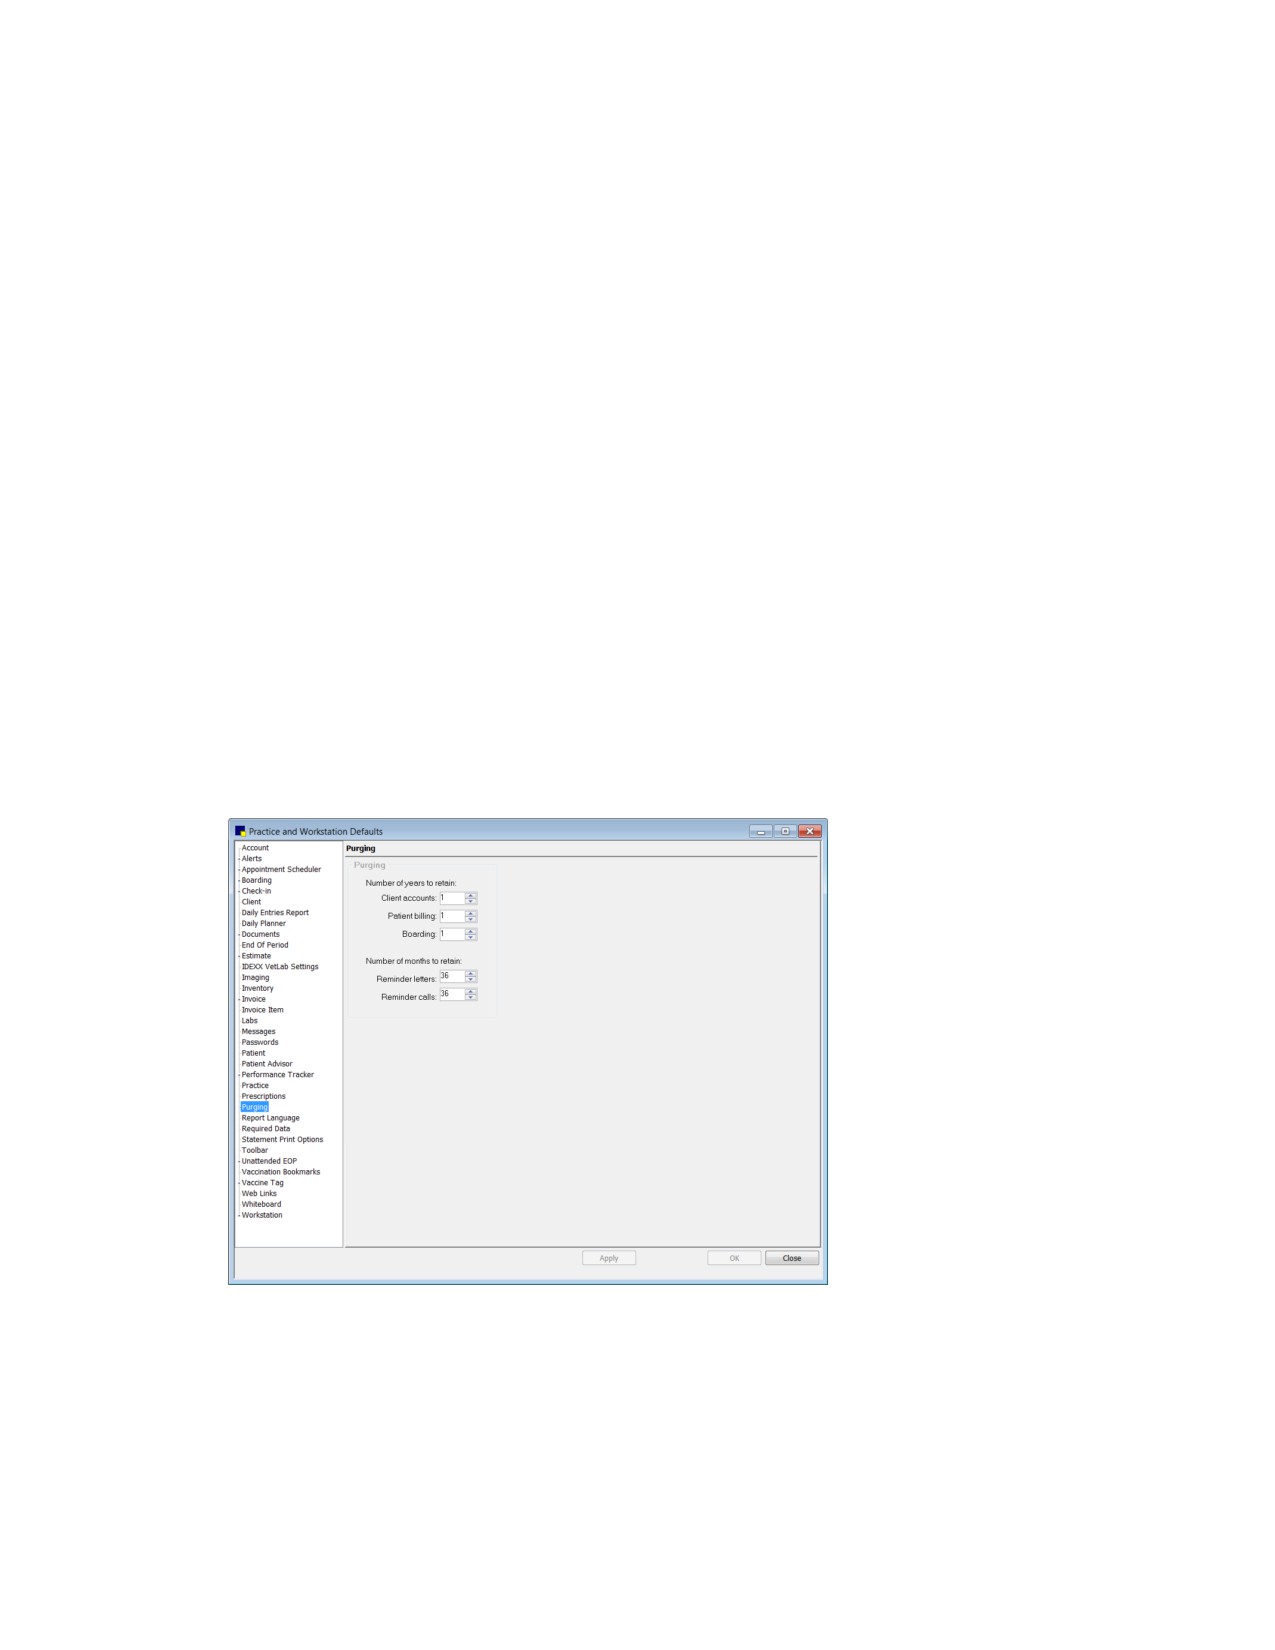
2. In the navigation pane, click Purging. The Purging configuration pane appears.
Purging defaults
3. In the Number of years to retain text boxes, enter the number of years to retain Client accounts,
Patient billing, and Boarding information. You cannot purge client or patient information within this
number of years. Cornerstone also uses this date as the default Last date to purge when you open
the Purge Information window.
130
Chapter 4: Setting Practice and Workstation Defaults
4. In the Number of months to retain text boxes, enter the number of months to retain reminder letters
and reminder calls information. You cannot purge reminders within this number of months.
Note: This purges the prompt to call; it does not purge the actual history of the call.
5. Click Apply to save your changes and continue setting defaults, or click OK to save your changes
and close the window.
Report Language Defaults
The Report Language defaults allow you to set the language and customize specific headings that print
on the following types of client documents:
• Invoices
• Estimates
• Statements
• Payment on account documents
• Rabies certificates
• Prescription labels
• Inventory order forms
To set the Report Language defaults:
1. On the Controls menu, select Defaults > Practice and Workstation. The Practice and Workstation
Defaults window appears.
2. In the navigation pane, click Report Language. The Report Language configuration pane appears.
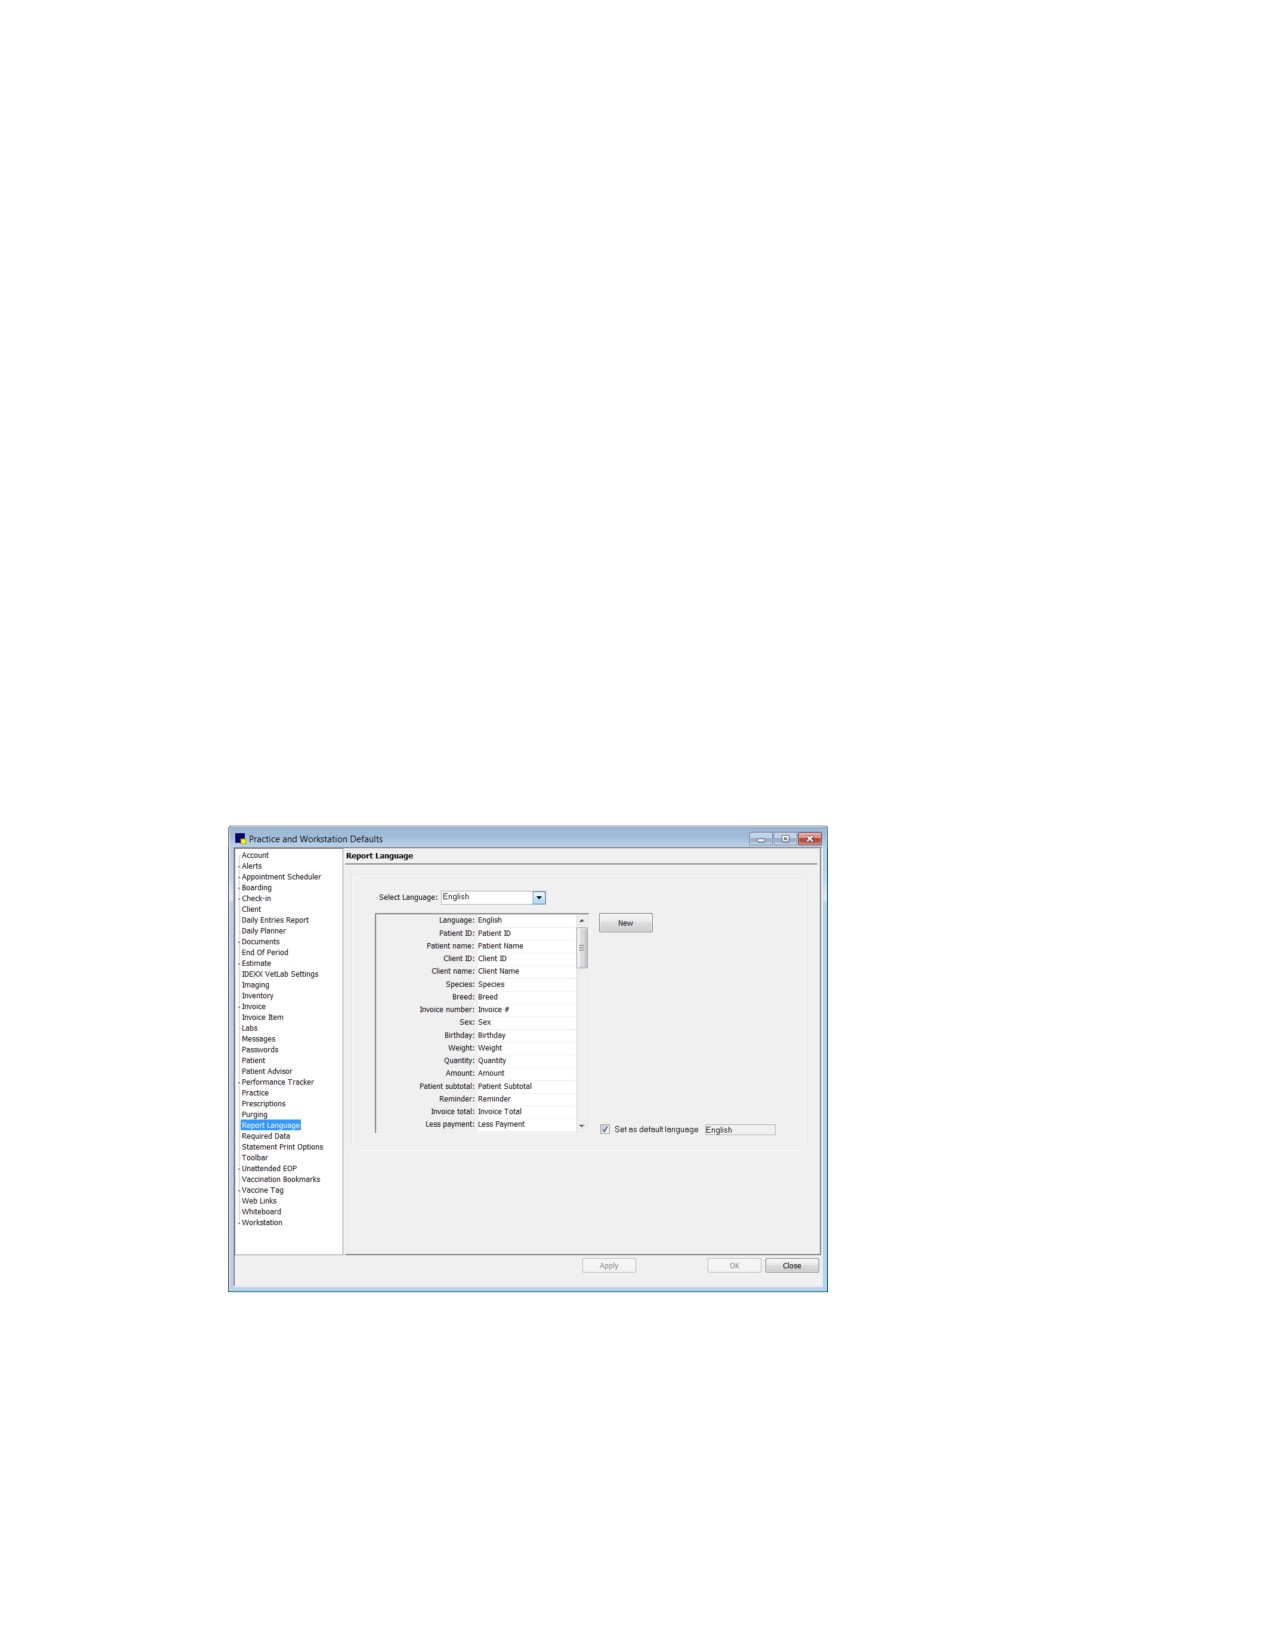
Report Language defaults
3. Select the language (English, Spanish, or French).
4. To change the text that appears for a specific item, click the text in the right column and type the
new text. For example, instead of printing “Expire date” you may want to print “Expiration Date.”
Tip: Click New to clear the entire right column.
131
Chapter 4: Setting Practice and Workstation Defaults
5. Select the Set as default language check box if you want this language text to appear on the client
documents. (If another language was previously selected, the prior language is no longer the
default.)
6. Click Apply to save your changes and continue setting defaults, or click OK to save your changes
and close the window.
Required Data Defaults
The Required Data defaults allow your practice to require information in selected fields in client and
patient records. This means Cornerstone users who enter information in client and patient must provide
information in the required fields to save a record.
For example, if the patient’s birth date is set as a required field at your practice, when you try to save a
new patient record without entering a birth date, a message box appears to remind you to enter the birth
date. You cannot save the record until you enter a birth date.
To set the Required Data defaults:
1. On the Controls menu, select Defaults > Practice and Workstation. The Practice and Workstation
Defaults window appears.
2. In the navigation pane, click Required Data. The Required Data configuration pane appears.
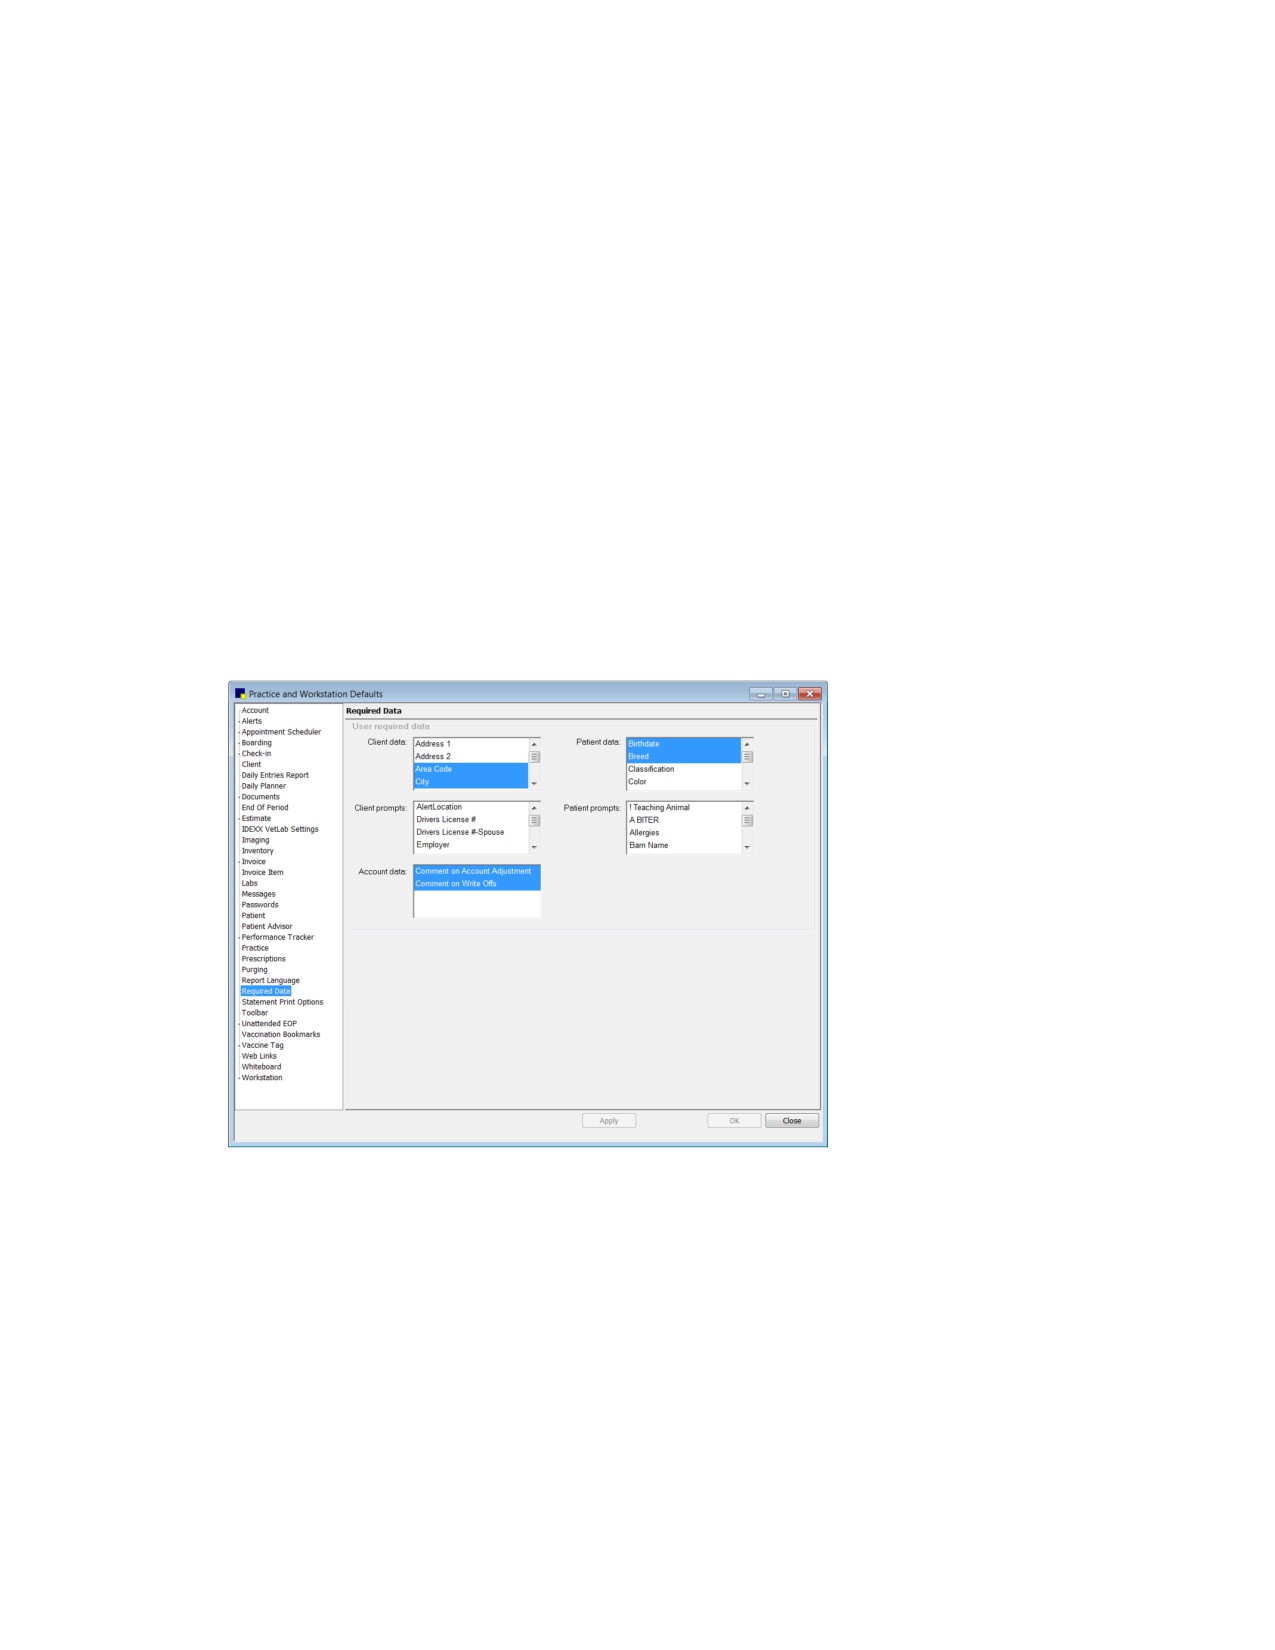
Required Data defaults
3. In the boxes, select (or deselect) the data fields to specify the mandatory data at your practice. Use
the scroll bars to view all of your choices. (Highlighted/shaded data fields are selected.)
4. Click Apply to save your changes and continue setting defaults, or click OK to save your changes
and close the window.
Statement Print Options Defaults
The Statement Print Options defaults allow you to change where the practice and client addresses
print on the monthly statement to accommodate different types of window envelopes that may be used
to mail statements.
132
Chapter 4: Setting Practice and Workstation Defaults
If you specified a practice logo in Practice defaults, you have the option to include that logo in the
header of your statements. You can set up your statement header layout to include or exclude the
practice address and practice logo, depending on your preferences and the information included in your
logo. See “Practice Defaults” on page 127 for more information on adding a practice logo.
IMPORTANT: If you choose to print a practice logo on your statements, ensure that the logo does not
cover important header information, such as the client name, address, and date. Other header
information is not adjusted or positioned relative to the physical space taken up by the logo.
Before You Begin
¾ If you plan to print a practice logo in the header of statements, specify the logo graphic file in
Practice defaults.
To set the Statement Print Options defaults:
1. On the Controls menu, select Defaults > Practice and Workstation. The Practice and Workstation
Defaults window appears.
2. In the navigation pane, click Statement Print Options. The Statements Print Options configuration
pane appears.
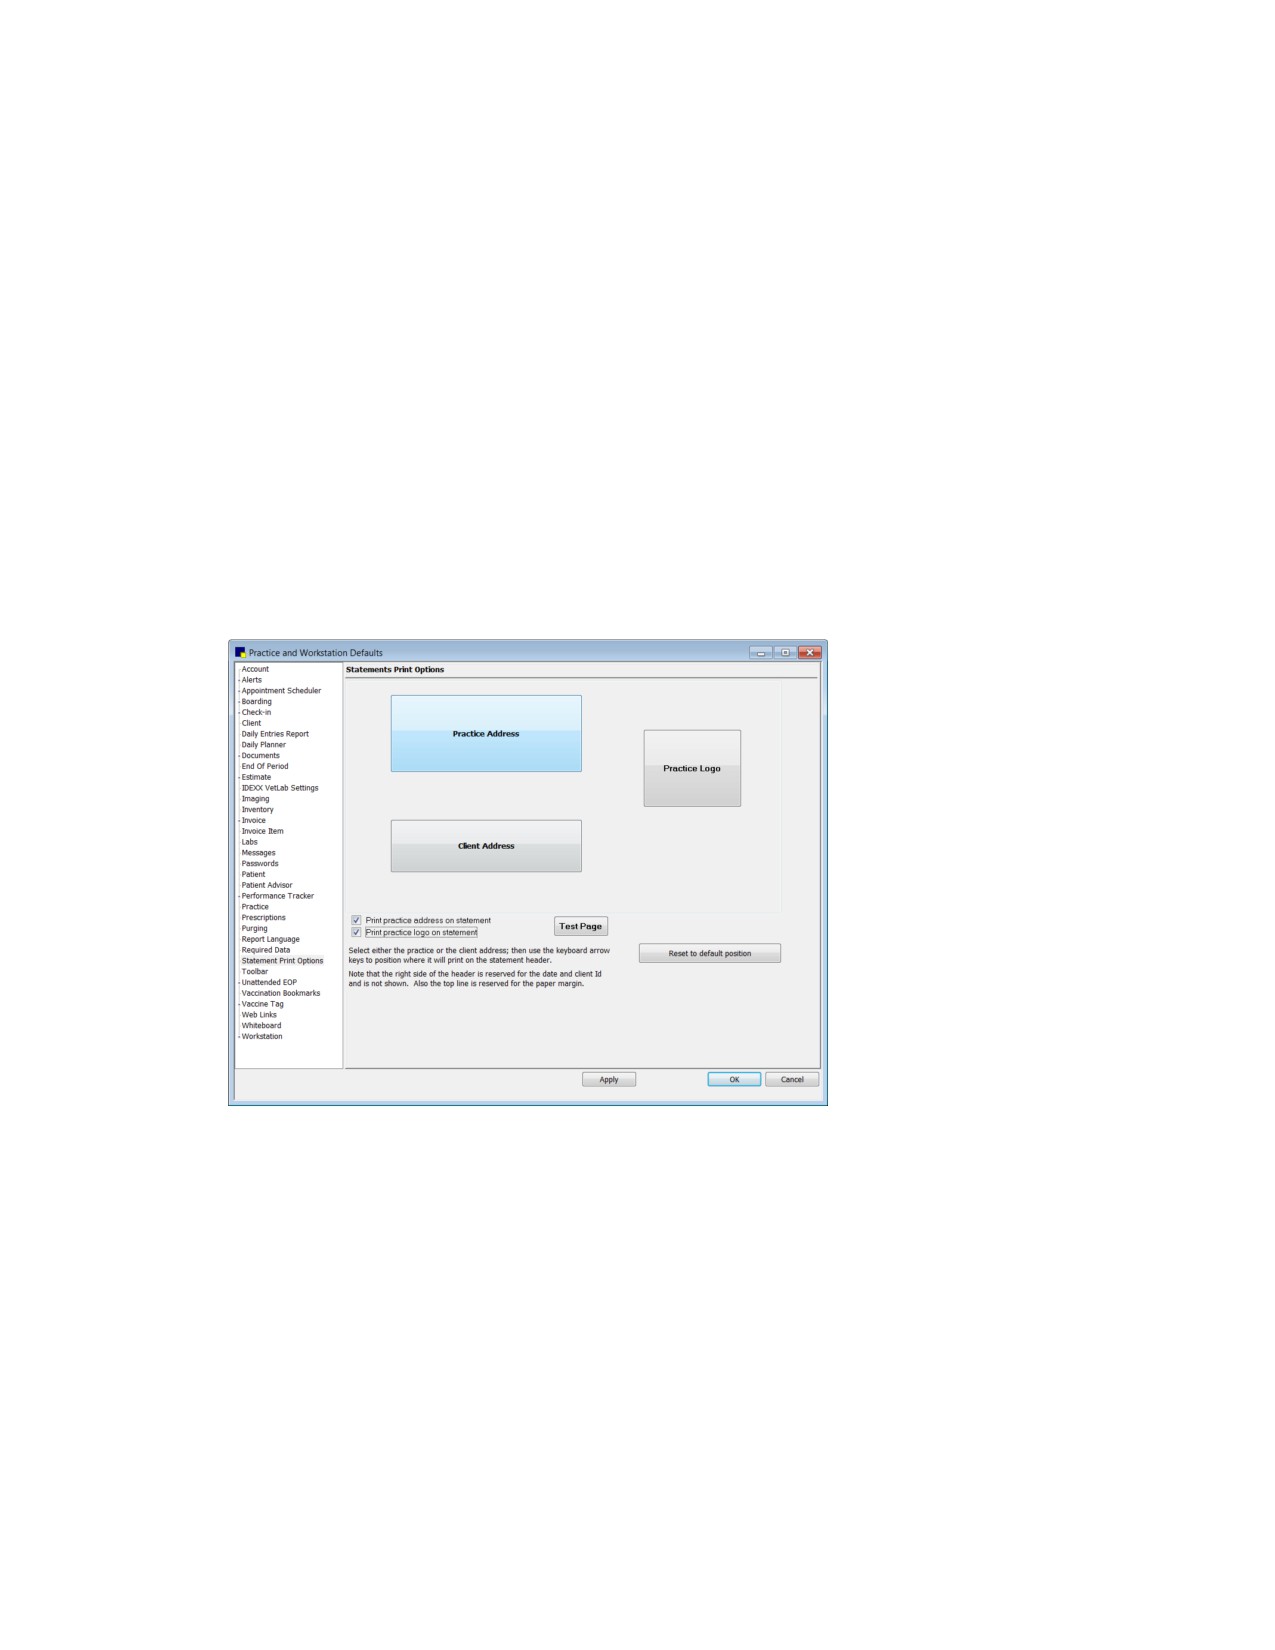
Statements Print Options defaults
3. To include the practice address in the statement header, select the Print practice address on
statement check box.
4. Multi-Location/Single Database configuration only: If printing the practice address on statements,
specify the practice address to print—select Print Primary Practice Address or Print Client Home
Practice Address.
5. To include a practice logo in the statement header, select the Print practice logo on statement
check box. (Note: This option is not enabled until you specify a practice logo graphic file in Practice
defaults.) The Practice Logo positioning box appears.
6. Click the logo or address positioning box you want to move, and then use your keyboard arrow keys
to reposition the box.
133
Chapter 4: Setting Practice and Workstation Defaults
7. To print a test page that includes placeholder blocks for the header and footer fields in your current
layout, first click Apply and then click Test Page.
Note: On the test page, the blocks on the right side of the header are reserved for the statement
date and client ID; you cannot move these blocks.
8. If necessary, click the Reset to default position button to undo your positioning changes and start
over based on the default alignment settings.
9. Click Apply to save your changes and continue setting defaults, or click OK to save your changes
and close the window.
Tip: Print a sample statement to check your address alignment before printing an entire batch of
statements. You may need to readjust depending on your envelope.
Toolbar Defaults
The Toolbar defaults allow you to designate which Cornerstone buttons are visible on the main
Cornerstone toolbar. In addition, you can select the type of animal picture to be used for the Patient
button.
To set the Toolbar defaults:
1. On the Controls menu, select Defaults > Practice and Workstation. The Practice and Workstation
Defaults window appears.
2. In the navigation pane, click Toolbar. The Toolbar configuration pane appears.
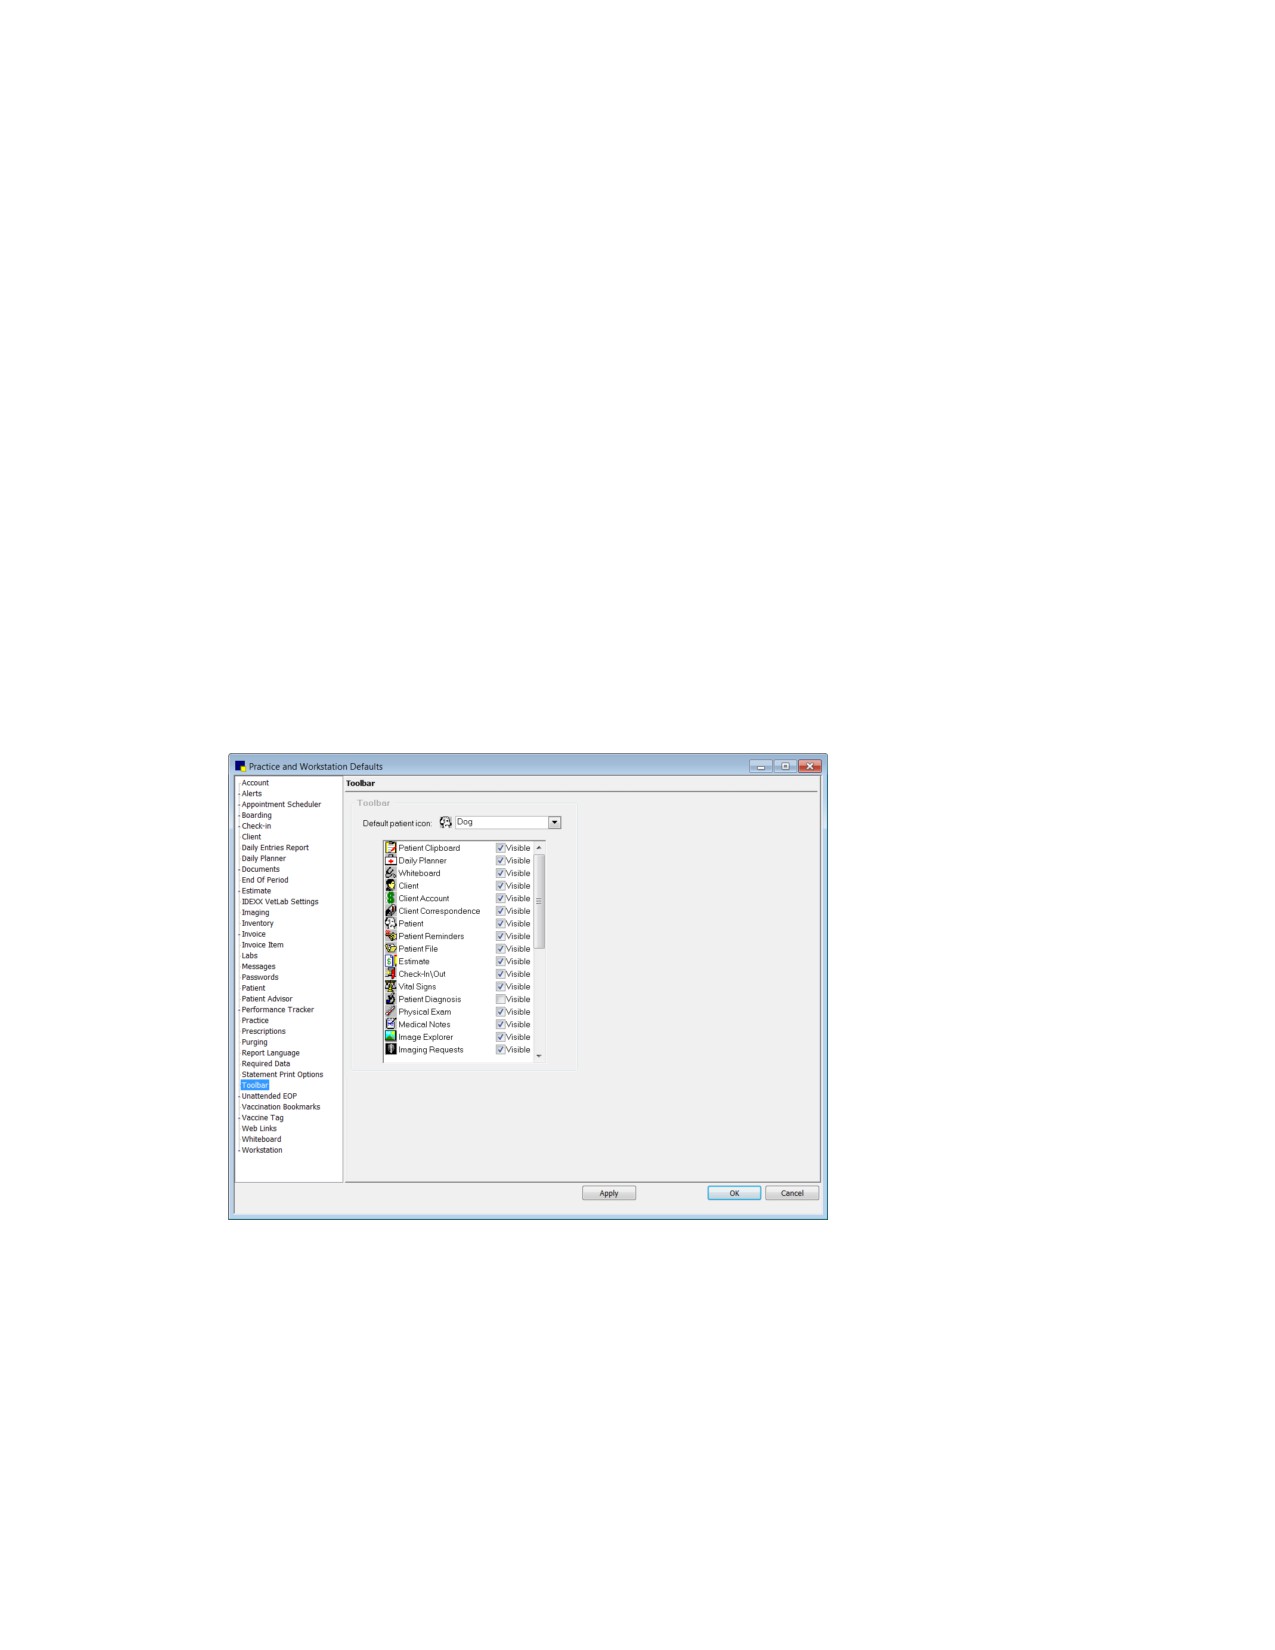
Toolbar defaults
3. If you want to change the picture that displays on the Patient toolbar button, select the animal you
want (Cat, Dog, or Horse) from the Default patient icon drop-down list.
4. All toolbar buttons display on the Cornerstone toolbar by default. To remove a toolbar button from
the display, clear the Visible check box next to the toolbar button.
Note: The toolbar buttons selected here are the practice defaults. The toolbar button display can
also be set separately for each staff member in Staff defaults (Controls > Defaults > Staff >
Toolbar tab).
134
Chapter 4: Setting Practice and Workstation Defaults
5. Click Apply to save your changes and continue setting defaults, or click OK to save your changes
and close the window.
Unattended End of Period (EOP) Defaults
If you plan to use unattended End of Period processing, set your preferences using the Unattended
EOP defaults.
If you plan to use unattended End of Period processing, you must also select a workstation to use as
your End of Period workstation (see “Workstation Defaults” on page 146) and specify End of Period
default settings (see “End of Period Defaults” on page 102).
To set the Unattended EOP defaults:
1. On the Controls menu, select Defaults > Practice and Workstation. The Practice and Workstation
Defaults window appears.
2. In the navigation pane, click Unattended EOP. The Unattended EOP configuration pane appears.
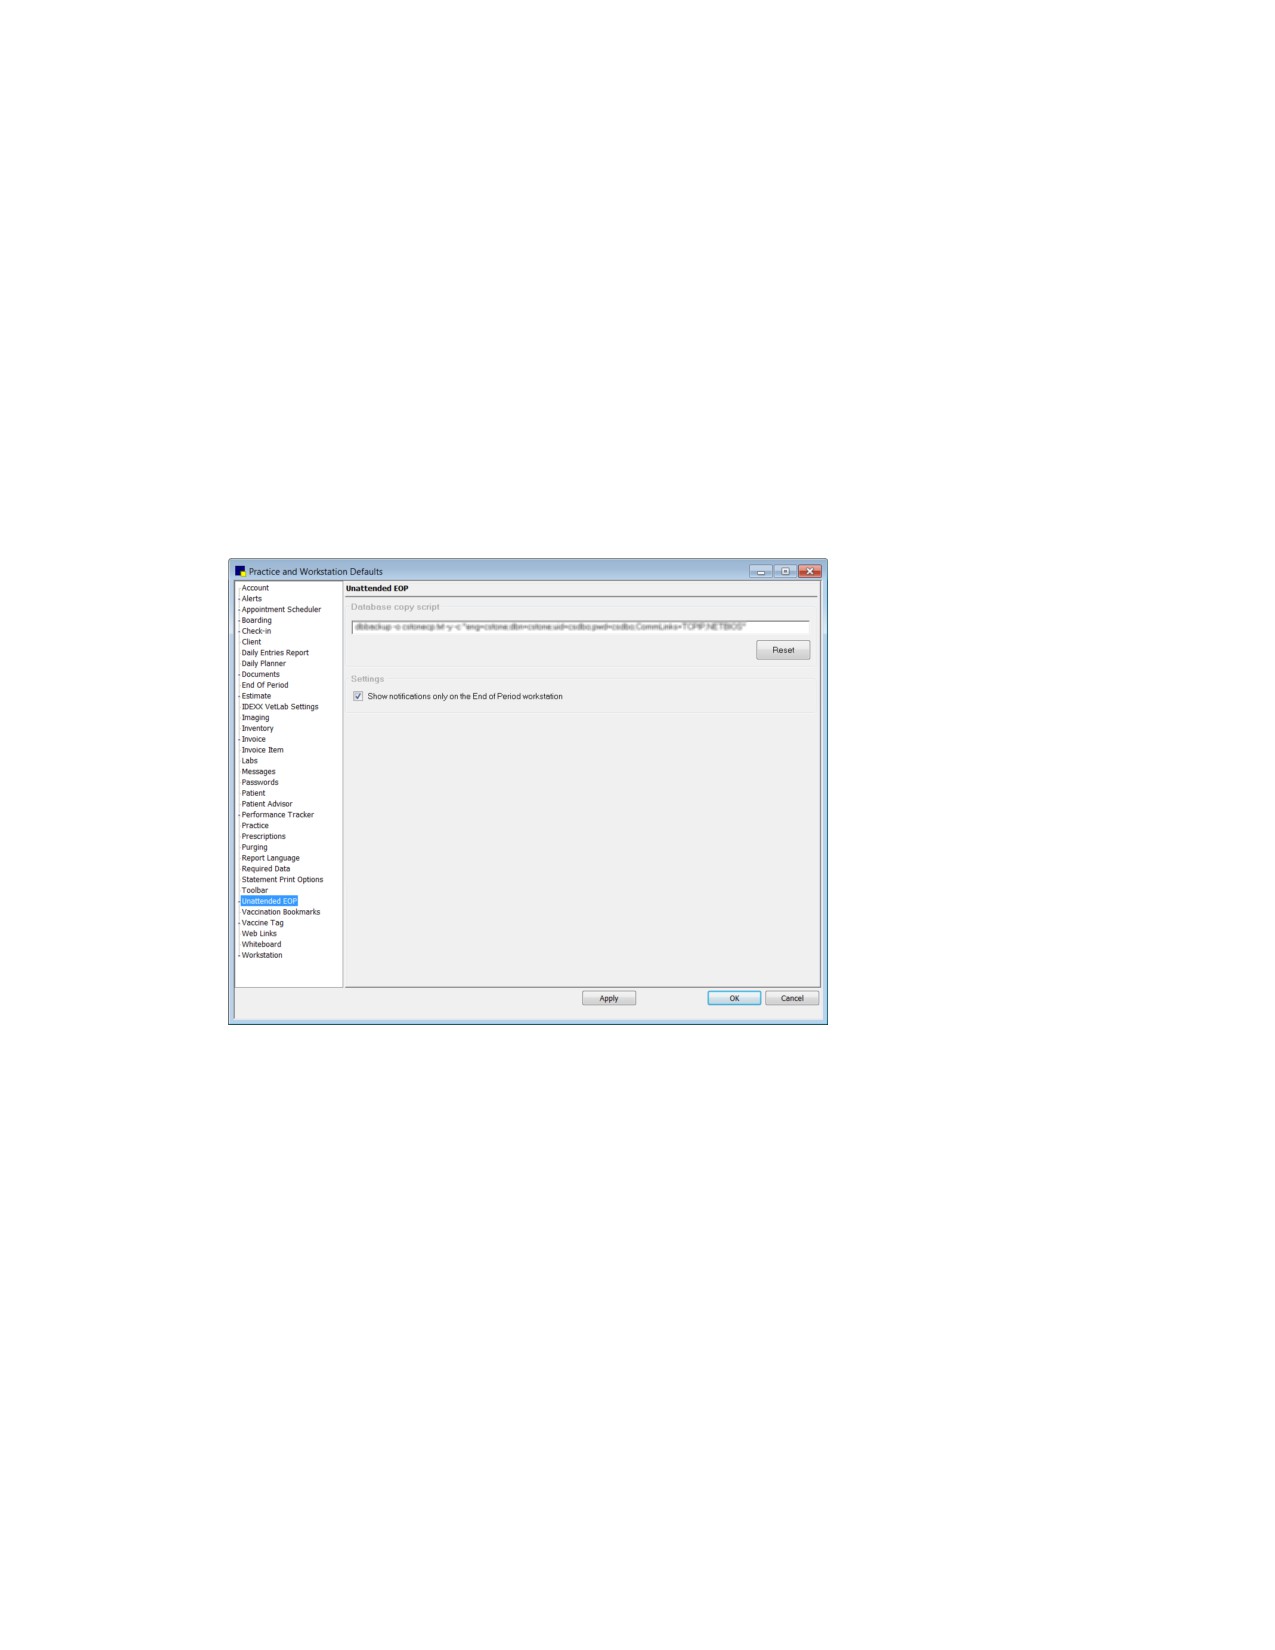
Unattended EOP defaults
WARNING: Only the Cornerstone Administrator should have access to the Database copy script
setting. Most practices will probably not need to change the database copy script. We recommend
that this option be adjusted only with the help of Cornerstone Support.
3. If it is necessary to make changes to the Database copy script, contact Cornerstone Support at
1-800-695-2877 for assistance.
Note: You can click Reset to change the copy script to the original default.
4. Select the Show notifications only on the End of Period workstation check box if you want any
warnings or errors that are encountered during End of Period to display only on your End of Period
workstation. If this box is not selected, warnings or errors will display on all workstations.
5. Click Apply to save your changes and continue setting defaults or click OK to save your changes
and close the window.
135
Chapter 4: Setting Practice and Workstation Defaults
Unattended End of Day (EOD) Defaults
Use Unattended EOD defaults to set up your Cornerstone system to automatically process End of Day
and/or automatically make a copy of your database. When unattended EOD runs, Cornerstone displays
a progress window that allows you to view the status. Warnings will display if anything goes wrong
during processing.
IMPORTANT: The copy of the database does not replace your normal backup procedures. The
automatic copy is made on the server and the selected workstation. We strongly recommend backing
up your Cornerstone files regularly on backup tapes, CDs or DVDs. Store your backup files off the
premises every night.
Note: When the Cornerstone Administrator logs in, Cornerstone software displays a window to remind
the administrator to set up unattended End of Day preferences. Once you set up the system to copy the
database every day, the reminder window will not display and you will not need to access these options
unless changes need to be made. ( To turn off the reminder, select the Do not remind me again check
box on the reminder window.)
To set the Unattended EOD defaults:
1. On the Controls menu, select Defaults > Practice and Workstation. The Practice and Workstation
Defaults window appears.
2. In the navigation pane, click Unattended EOP to expand its subproperties, and then click the
Unattended EOD subproperty. The Unattended EOD configuration pane appears.
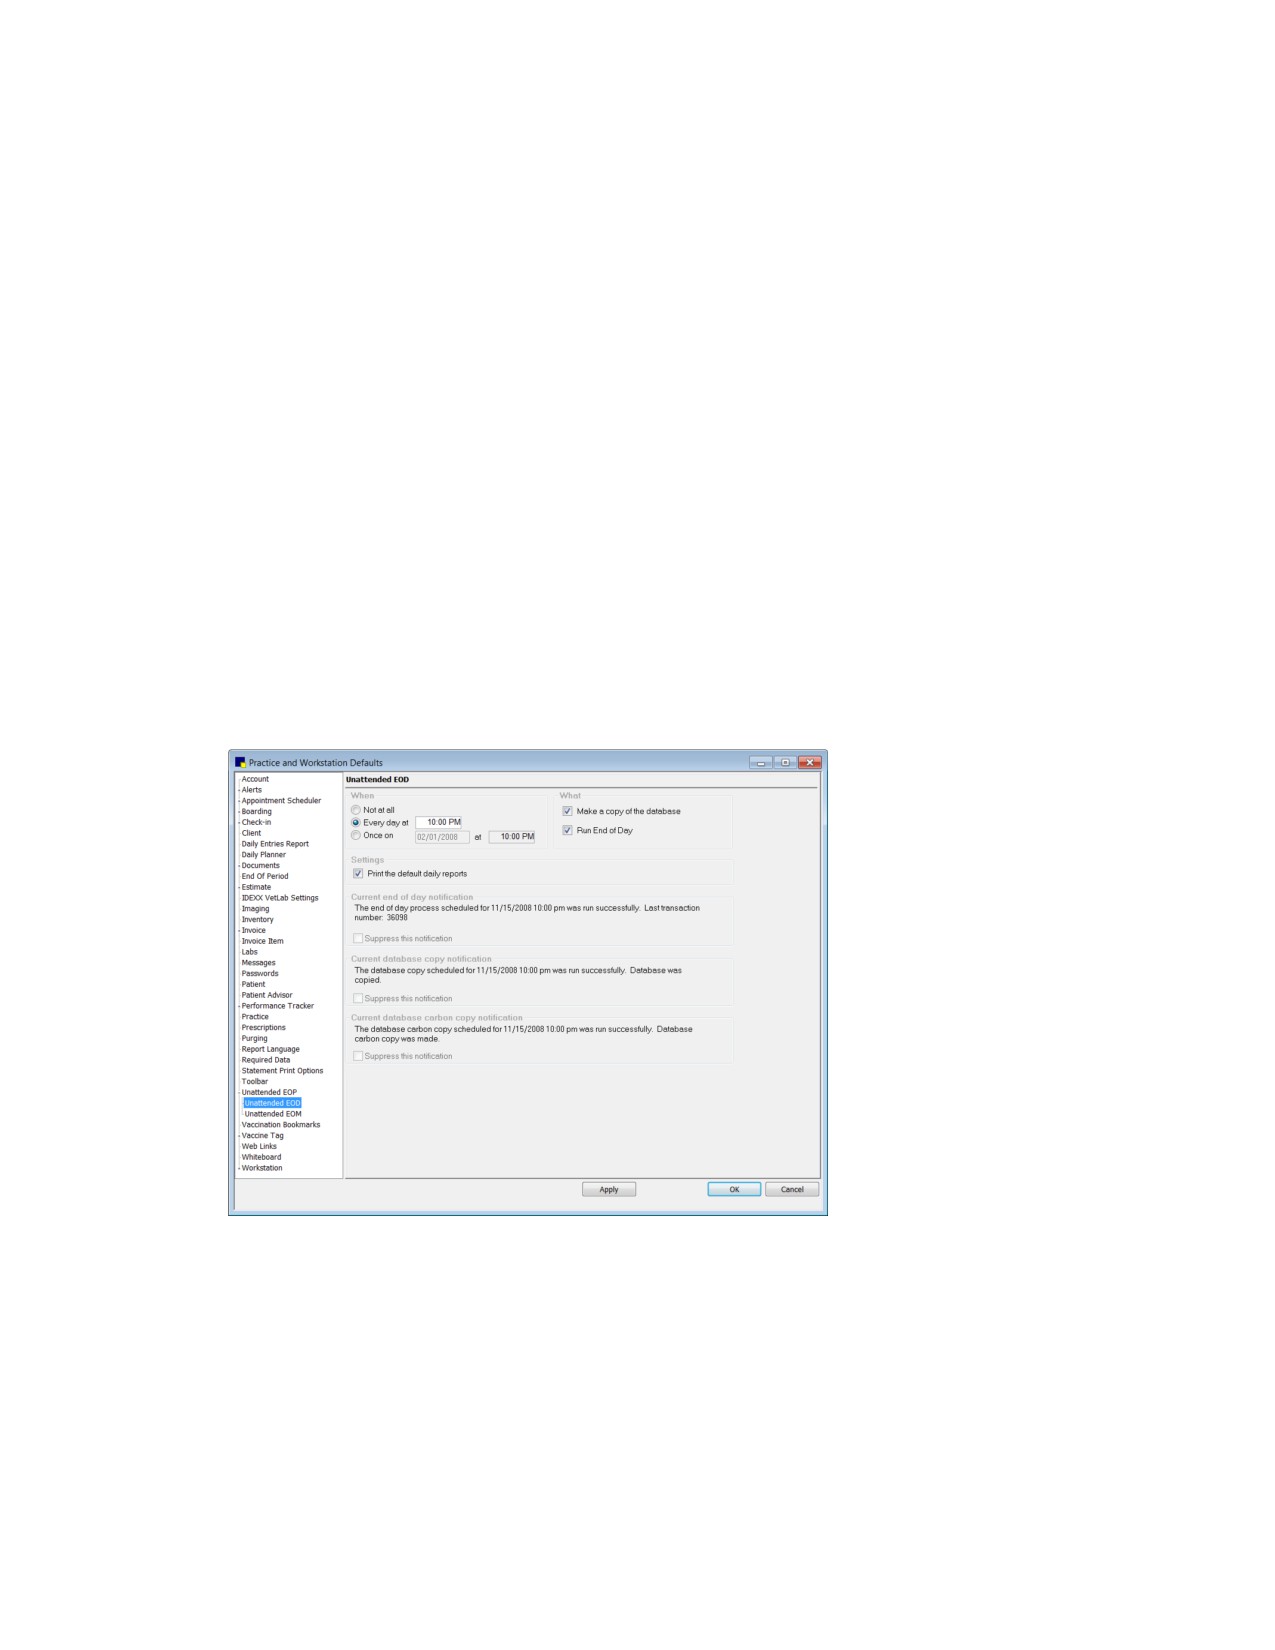
Unattended EOD defaults
3. In the When area, specify when you want to automatically run End of Day processing.
4. In the What area, select Make a copy of the database, Run End of Day, or both. If you choose to
make a copy of the database, the database will be copied to both the dailycopy folder on the End of
Period workstation and the dailycc shared folder on the server. These copies of the database are
overwritten each time a new copy is made. This process does not replace your normal backup
procedure.
136
Chapter 4: Setting Practice and Workstation Defaults
5. In the Settings area, select the Print the default daily reports check box if you want daily reports to
print automatically. (Default daily reports are set in Controls > Defaults > Practice and
Workstation > End of Period.)
Tip: At any time, you can view the details from the most recent unattended EOD process. The
details include the date and time the process was run and whether or not the process was
successful. These details are provided in the Current end of day notification area, the Current
database copy notification area, and the Current database carbon copy notification area within the
Unattended EOD defaults.
6. Cornerstone will display a notification window every half hour if an unattended End of Day process
was not run successfully. For example, if a user left an exclusive use window open on a workstation,
Cornerstone cannot start the process and will display a notification. To suppress a specific
notification message at the time it is generated (and only for the day on which it occurs), select the
applicable Suppress this notification check box. (The notification will then reappear after the next
unsuccessful unattended EOD process.)
7. Click Apply to save your changes and continue setting defaults, or click OK to save your changes
and close the window.
Unattended End of Month (EOM) Defaults
Use Unattended EOM defaults to set up your Cornerstone system to automatically process End of
Month and/or automatically make a copy of your database. When Unattended EOM runs, Cornerstone
displays a progress window that allows you to view the status. Warnings will display if anything goes
wrong during processing.
IMPORTANT: The copy of the database does not replace your normal backup procedures. The
automatic copy is made on the server and the selected workstation. We strongly recommend backing
up your Cornerstone files regularly on backup tapes, CDs, or DVDs. Store your backup files off the
premises every night.
To set the Unattended EOM defaults:
1. On the Controls menu, select Defaults > Practice and Workstation. The Practice and Workstation
Defaults window appears.
2. In the navigation pane, click Unattended EOP to expand its subproperties, and then click the
Unattended EOM subproperty. The Unattended EOM configuration pane appears.
137
Chapter 4: Setting Practice and Workstation Defaults
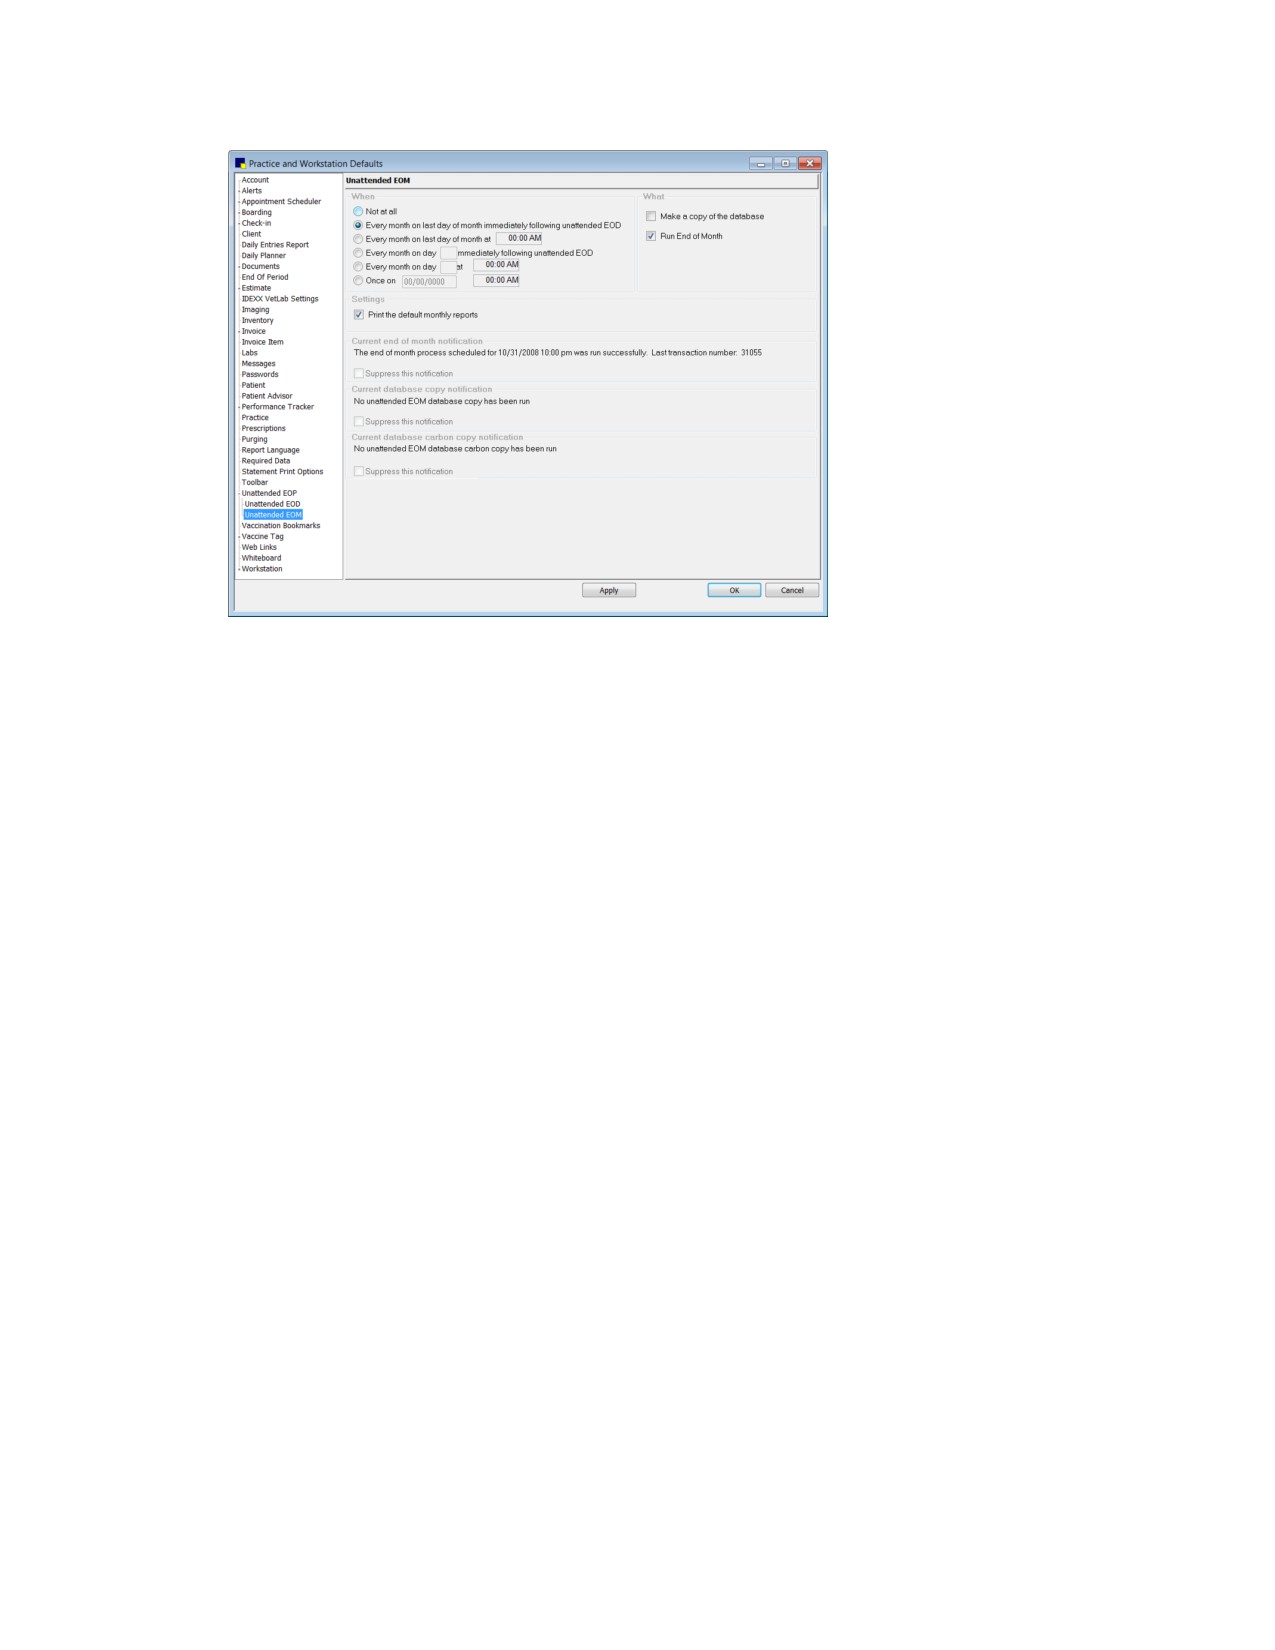
Unattended EOM defaults
3.
In the When area, specify when you want to automatically run End of Month (EOM) processing. If
you choose one of the options that does not run following an unattended End of Day (EOD)
process, Cornerstone automatically runs an EOM process before running the End of Month process.
4.
In the What area, select Make a copy of the database, Run End of Month, or both. If you make a
copy of the database, the database is copied to both the dailycopy\monthly folder on the End of
Period workstation and the dailycc\monthly shared folder on the server. These copies of the
database are overwritten each time a new copy is made.
5.
In the Settings area, select the Print the default monthly reports check box if you want monthly
reports to print automatically.
Tip: At any time, you can view the details from the most recent unattended EOM process. The
details include the date and time the process was run and whether or not the process was
successful. These details are provided in the Current end of month notification area, the Current
database copy notification area, and the Current database carbon copy notification area within the
Unattended EOM defaults.
6.
Cornerstone displays a notification window every half hour if an unattended EOM process was not
run successfully. For example, if a user left an exclusive use window open on a workstation,
Cornerstone cannot start the process and will display a notification. To suppress a specific
notification message at the time it is generated (and only for the month on which it occurs), select
the applicable Suppress this notification check box. (The notification will then reappear after the
next unsuccessful unattended EOM process.)
7.
Click Apply to save your changes and continue setting defaults, or click OK to save your changes
and close the window.
Vaccination Bookmarks Defaults
The Vaccination Bookmarks defaults allow you to select a set of vaccinations to include on documents,
such as health certificates. Only those vaccinations selected in vaccination preferences that correspond
to vaccination reminders found in the patient’s record are included on a health certificate for the patient.
138
Chapter 4: Setting Practice and Workstation Defaults
This allows you to create one set of vaccination preferences for multiple species. For example, if your
vaccination preferences include Feline Leukemia Booster and Canine DHLPPC, only Canine DHLPPC is
included on a health certificate for a canine patient because no vaccination reminder for Feline
Leukemia Booster will be found in the patient’s record.
To set the Vaccination Bookmarks defaults:
1. On the Controls menu, select Defaults > Practice and Workstation. The Practice and Workstation
Defaults window appears.
2. In the navigation pane, click Vaccination Bookmarks. The Vaccination Bookmarks configuration
pane appears.
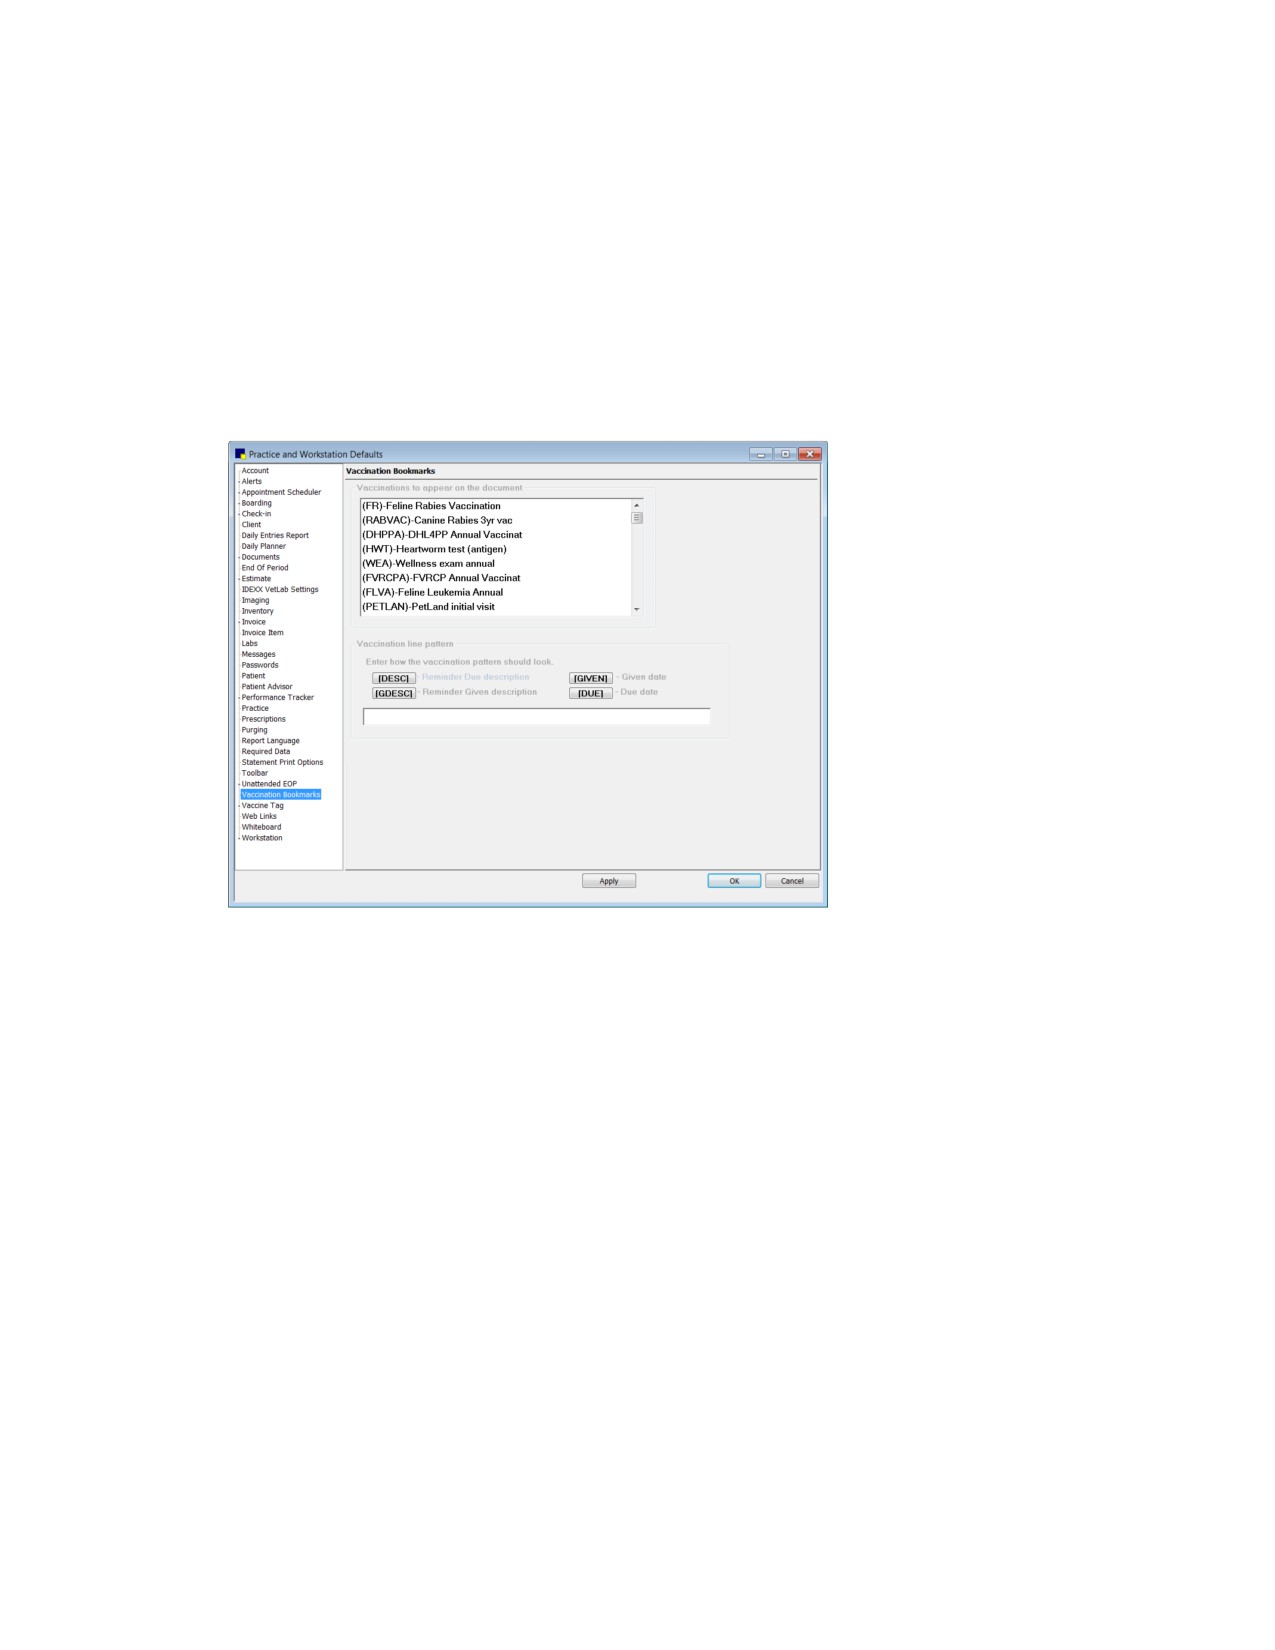
Vaccination Bookmarks defaults
3. The Vaccinations to appear on the document area lists all items for which reminders are generated
when an item is added to an invoice (for example, if Item A generates a reminder for Item B, Item B
will appear in this list as an option). In the list, click to select all of the vaccinations you want
Cornerstone to include in the search when a vaccination certificate (or similar document) is created
for a patient. Only those vaccinations selected here that correspond to vaccination reminders found
in the patient’s record are included on a patient’s certificate.
4. In the Vaccination line pattern area, click the buttons in the order you want vaccination reminder
information to appear on the vaccination certificate. On the certificate, the reminder information
appears in the order the buttons are selected (this pattern displays in the text box as buttons are
selected). For example, click the DESC button if you want the Reminder Due description to print
first, and then click DUE to print the reminder due date next to the description.
¾ To delete the pattern and start over, click in the text box and press DELETE.
5. Click Apply to save your changes and continue setting defaults or click OK to save your changes
and close the window.
139
Chapter 4: Setting Practice and Workstation Defaults
Vaccine Tag Defaults
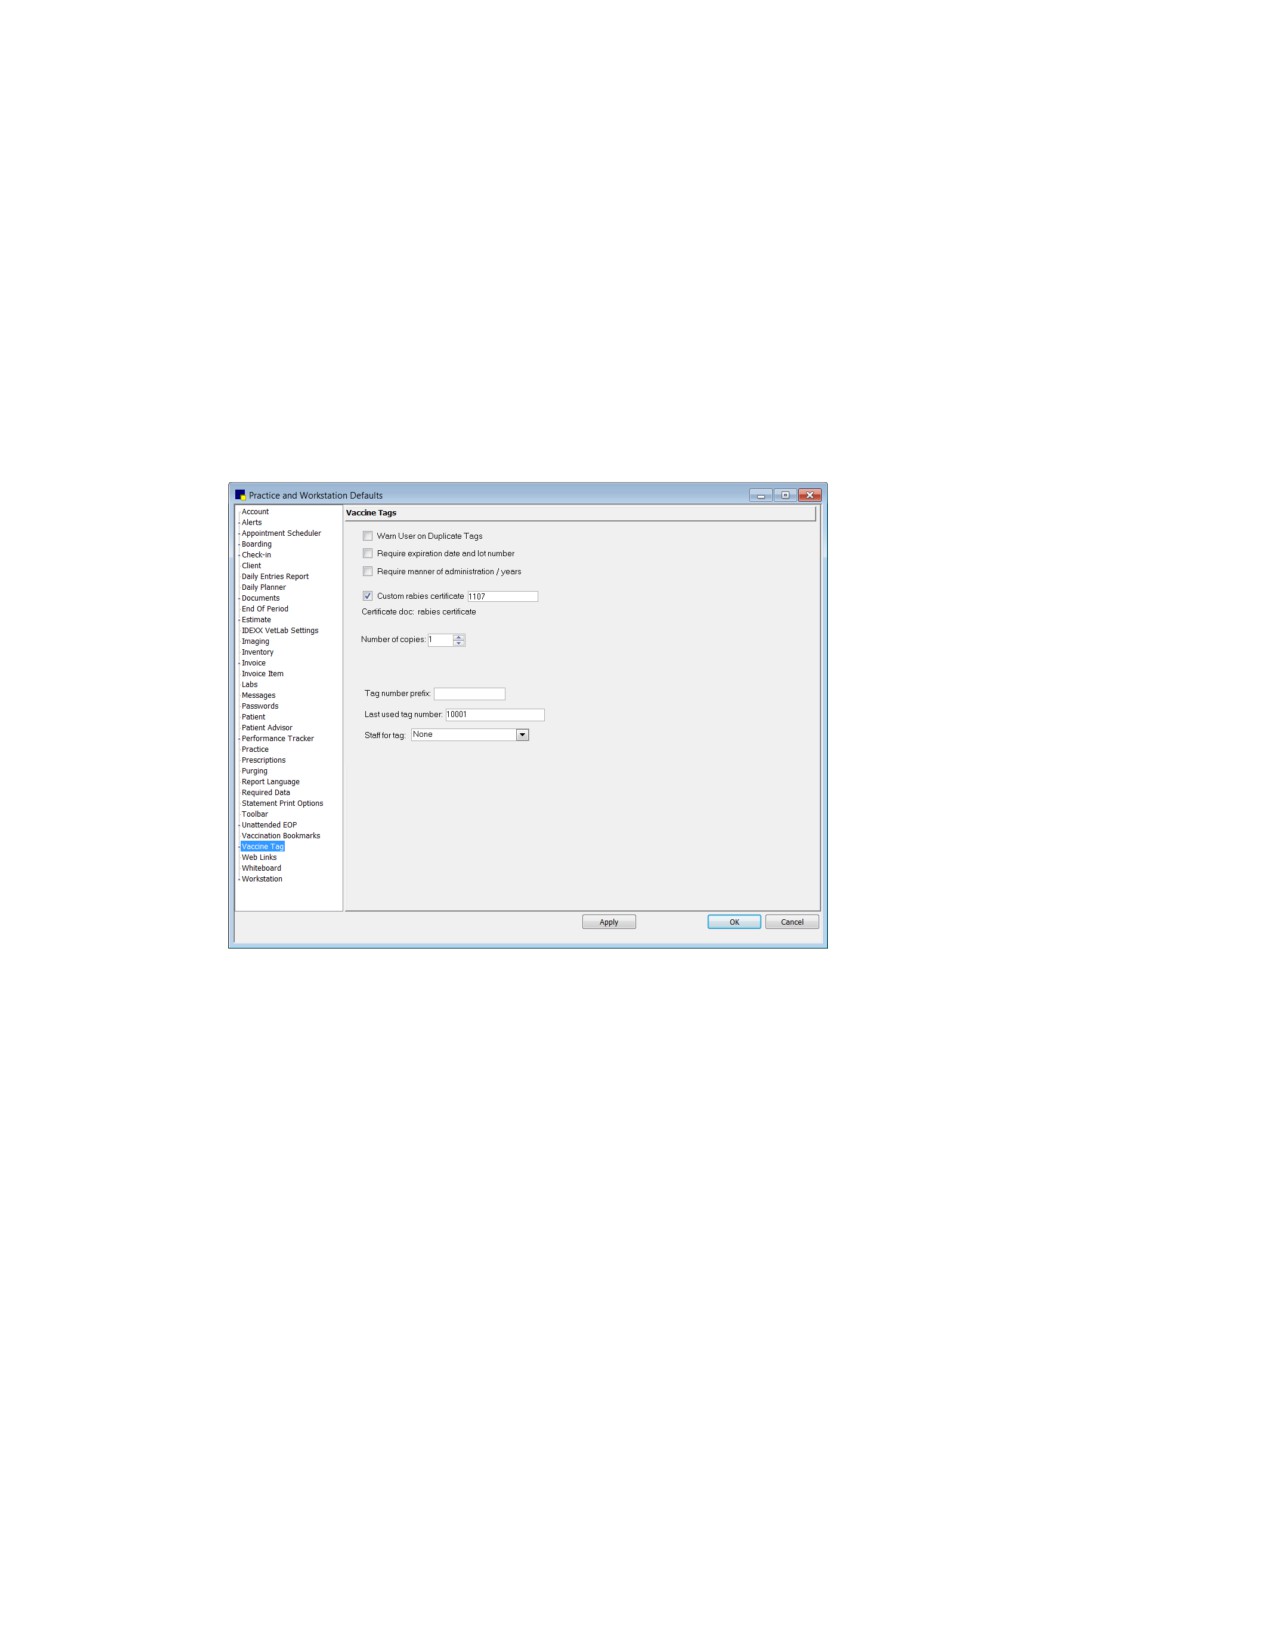
The Vaccine Tag defaults allow you to specify required fields, a custom rabies certificate, and default
tag number settings to be used on the Vaccine Tag window when issuing a rabies/vaccine tag for a
patient. These global default settings apply to all vaccine tags, including rabies.
Note: To set up species-specific defaults for your vaccine/vaccination inventory items, see “Setting Up
Vaccine Invoice Items” on page 206.
To set the Vaccine Tag defaults:
1. On the Controls menu, select Defaults > Practice and Workstation. The Practice and Workstation
Defaults window appears.
2. In the navigation pane, click Vaccine Tag. The Vaccine Tags configuration pane appears.
Vaccine Tags defaults
3. To have Cornerstone display a warning if a duplicate tag number is entered on the Vaccine Tag
window when issuing a tag, select the Warn User on Duplicate Tags check box.
4. To require a vaccine expiration date and lot number to be specified on the Vaccine Tag window,
select the Require expiration date and lot number check box. (Note: If lot numbers and expiration
dates are tracked through Cornerstone Inventory, these settings will be controlled by consumption.)
5. To require the Manner of Administration and Number of Years information to be provided on the
Vaccine Tag window when issuing a tag, select the Require manner of administration/years check
box.
6. To print a document other than the standard rabies certificate in Cornerstone, select the Custom
rabies certificate check box. Then, in the adjacent text box, type the ID of the document to use as
your custom rabies certificate or press F2 to search for and select the custom certificate from the
Document Template List. (See the “Standard Cornerstone Rabies Certificate” section that follows for
information on the standard rabies certificate provided in Cornerstone.)
7.
If you want to specify the default number of rabies certificates to print, enter the number in the
Number of copies text box. This setting can be changed at print time if necessary.
140
Chapter 4: Setting Practice and Workstation Defaults
8. Multi-Location/Single Database configuration only: The Tag number prefix, Last used tag number
and Staff for tag defaults can be set up by practice if a Multi-Location/Single Database
configuration has been activated. If you would like to specify these settings by practice, select the
practice from the Practice drop-down list.
9. If you use a prefix with your tag numbers, specify a default prefix (up to five characters) in the Tag
number prefix text box. This prefix displays automatically on the Vaccine Tag window when you
issue a tag, but it can be changed or removed at that time if necessary.
10. If you want Cornerstone to automatically generate tag numbers, provide the Last used tag number
in the text box. When issuing a tag on the Vaccine Tag window, you can click the Increment Tag
button to use the next available tag number (increments by one for each vaccine tag created).
11. If you want to specify the staff to display by default on the Vaccine Tag window when issuing a tag,
select an option from the Staff for tag drop-down list. Options include None (no default staff),
Billing Staff (the staff ID listed for this line item on the Patient Visit List or invoice), or Always Use
This Staff (type the staff ID or press F2 to search for and select a staff member from the Staff List).
12. Click Apply to save your changes and continue setting defaults or click OK to save your changes
and close the window.
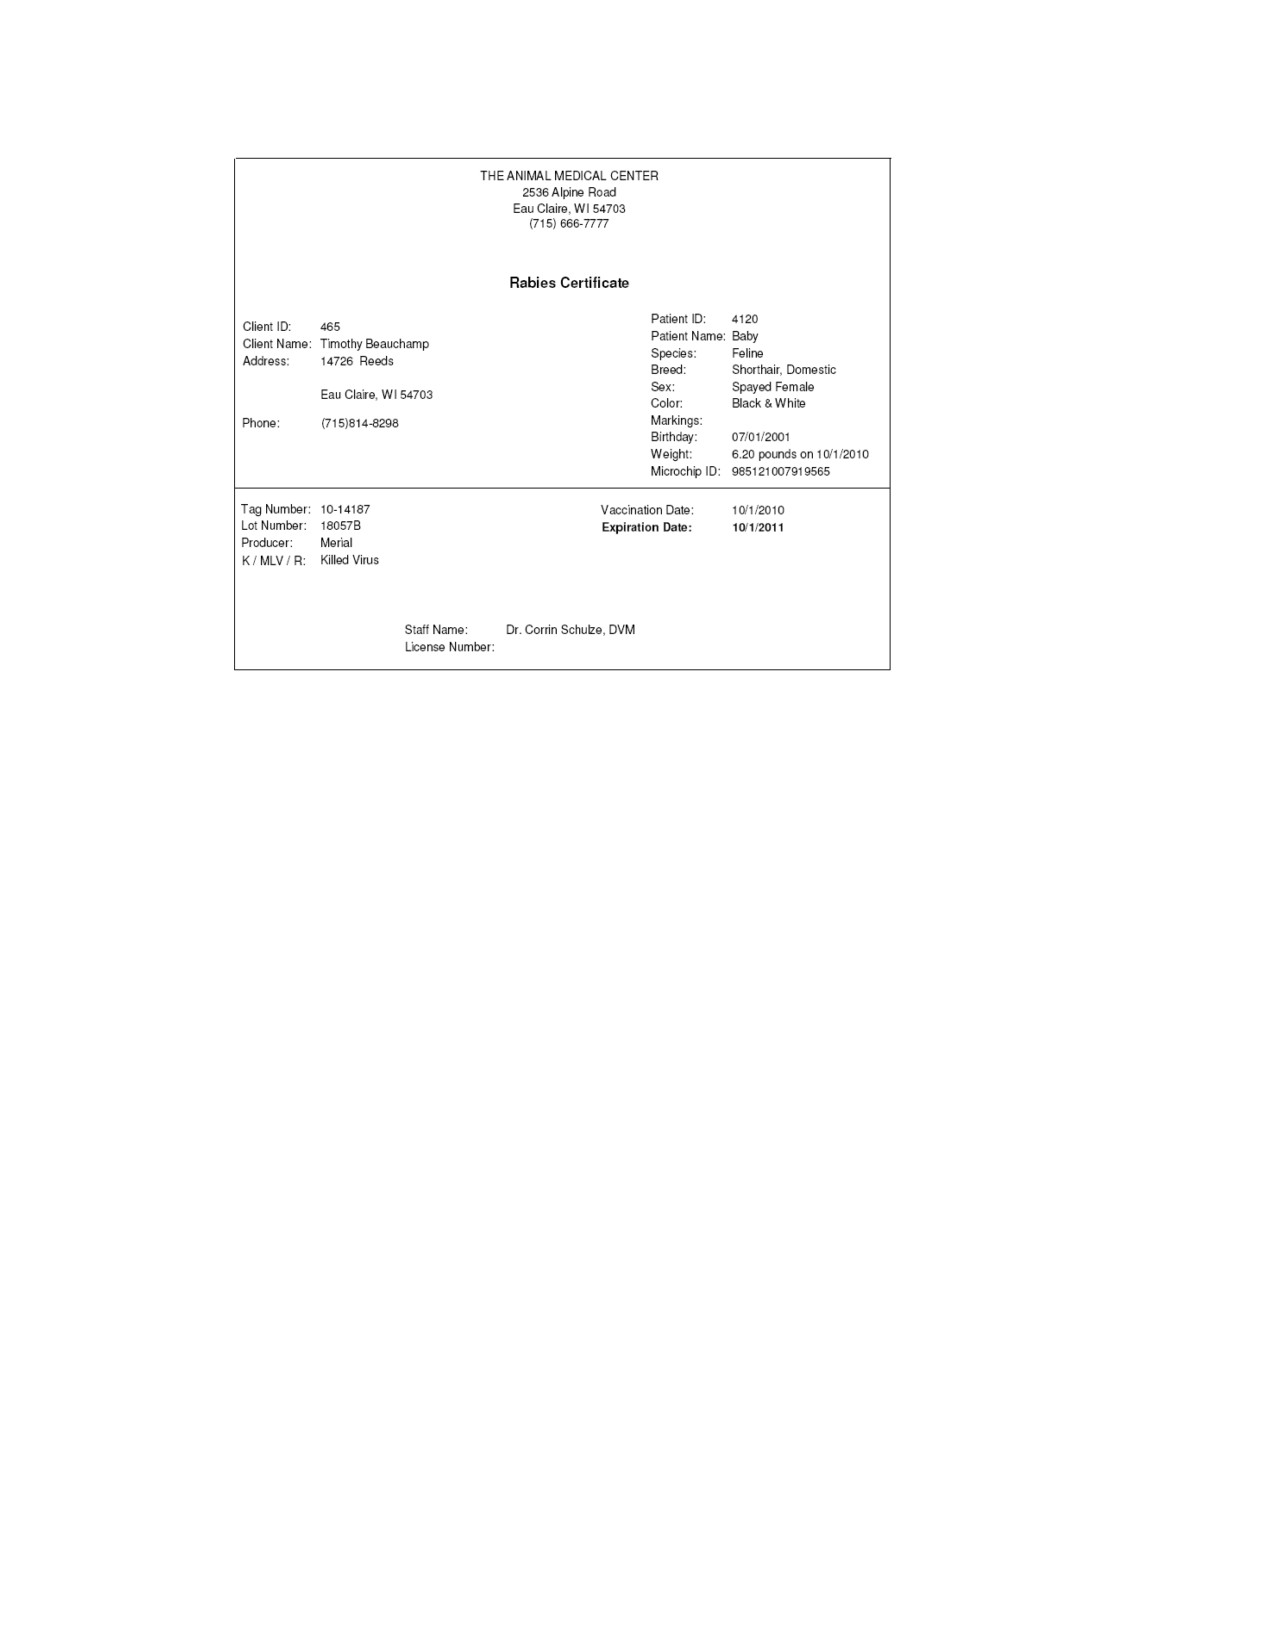
Standard Cornerstone Rabies Certificate
Cornerstone provides a standard rabies certificate that includes the following:
• Practice name and address
• Client name, ID, address, and phone number
• Patient ID, name, species, breed, sex, color, markings, birthday, and weight
• Vaccine tag number
• Vaccine invoice item lot number, producer, and type (killed or MLV)
• Date the vaccine was given and the date it expires
• Name and license number of the staff member who administered the vaccination
• Microchip ID
• Picture of the patient (Note: The patient’s picture will print on the certificate only if you have set
up this option in Workstation defaults and there is a picture of the patient in the patient’s record.)
141
Chapter 4: Setting Practice and Workstation Defaults
Example of a standard rabies certificate
Rabies Default Settings
Practices that set up their vaccine/vaccination invoice items prior to Cornerstone 8.1 may have a
SERVICE-based system in place, where items are set up as vaccination service items (with no links to
vaccine inventory items). If this is the case, you have several options:
• Continue using your current setup without taking advantage of new rabies/vaccine tag features
that were introduced in Cornerstone 8.1. This option uses the prior version Species-Specific
Rabies Tag defaults (accessed from the Species Information window and covered on page 66)
and the prior version Rabies Default settings (covered here).
• Reconfigure your current setup as an INVENTORY-based system that takes advantage of
rabies/vaccine tag features, such as the ability to set up multiple rabies/vaccine tag defaults per
species. See “Setting Up Vaccine Invoice Items” on page 206 for more information.
If you are continuing to use your current SERVICE-based system, use the Rabies Default settings to
specify the default rabies tag information for the vaccine used most often in your practice. This
information will be used on the Vaccine Tag window when a tag is issued only if you have not set up
Species-Specific Rabies Tag defaults for the species.
To set the Rabies Defaults:
1. On the Controls menu, select Defaults > Practice and Workstation. The Practice and Workstation
Defaults window appears.
2. In the navigation pane, click Vaccine Tag to expand its subproperties, and then click the Rabies
Default subproperty. The Rabies Default configuration pane appears.
142
Chapter 4: Setting Practice and Workstation Defaults
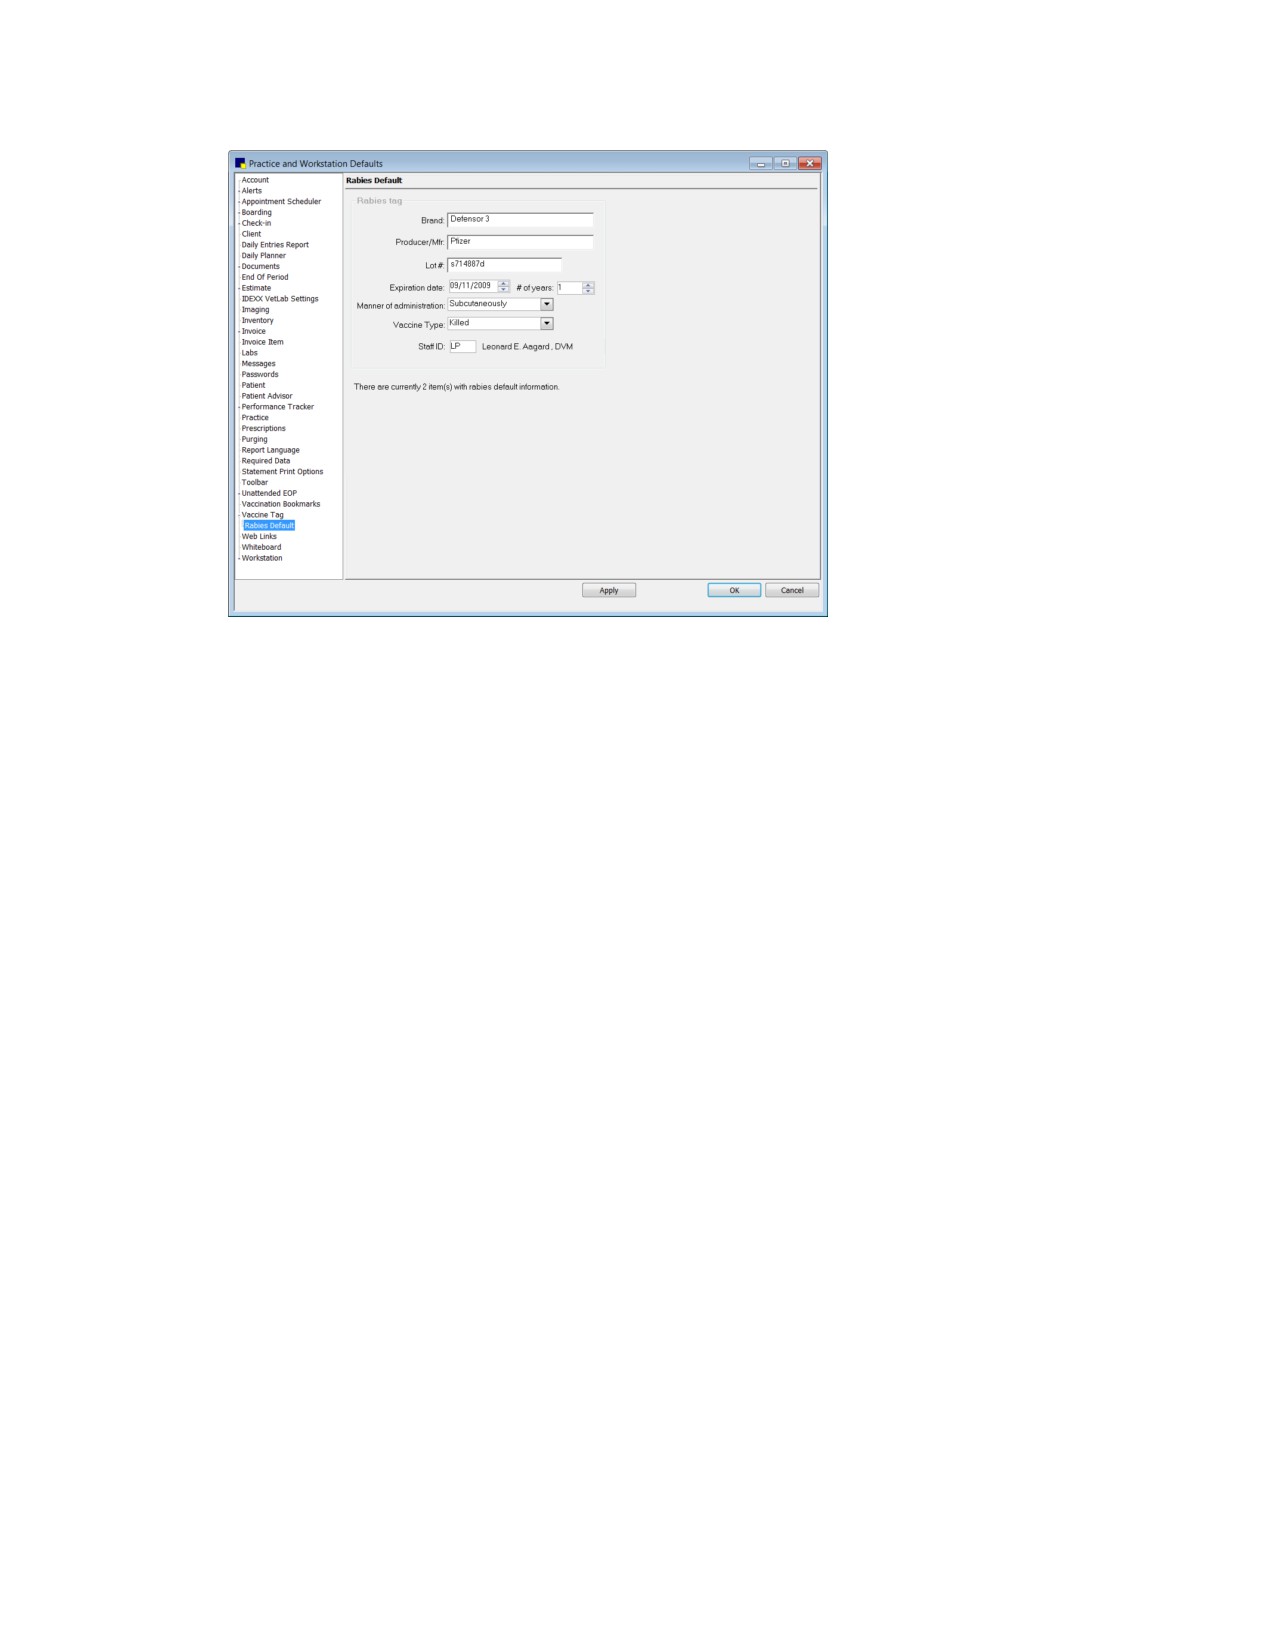
Rabies Default settings
3. In the Brand and Producer/Mfr text boxes, type the vaccine brand and producer/manufacturer
information for the vaccine used most often in your practice.
4. In the Lot. # text box, type the vaccine lot number.
5. In the Expiration date text box, enter the date this lot of vaccines expires.
6. In the # of years text box, enter the number of years the vaccine is viable (the certificate expiration).
7. From the Manner of administration drop-down list, select the appropriate option to specify how this
vaccine is administered.
8. From the Vaccine Type drop-down list, select the applicable vaccine type (Killed or MLV).
9. In the Staff ID text box, specify a default staff member to for the Vaccine Tag window when issuing a
tag by typing the ID or pressing F2 to search for and select a staff member from the Staff List.
Note: An informational message displays at the bottom of the Rabies Default pane if there are any
existing inventory items with rabies/vaccine tag defaults set up on the Invoice Item Information
Vaccine tab. If vaccine/vaccination inventory items exist, this message indicates the number of
items and serves as a reminder that the Vaccine tab defaults will be used for those items.
10. Click Apply to save your changes and continue setting defaults or click OK to save your changes
and close the window.
Web Links Defaults
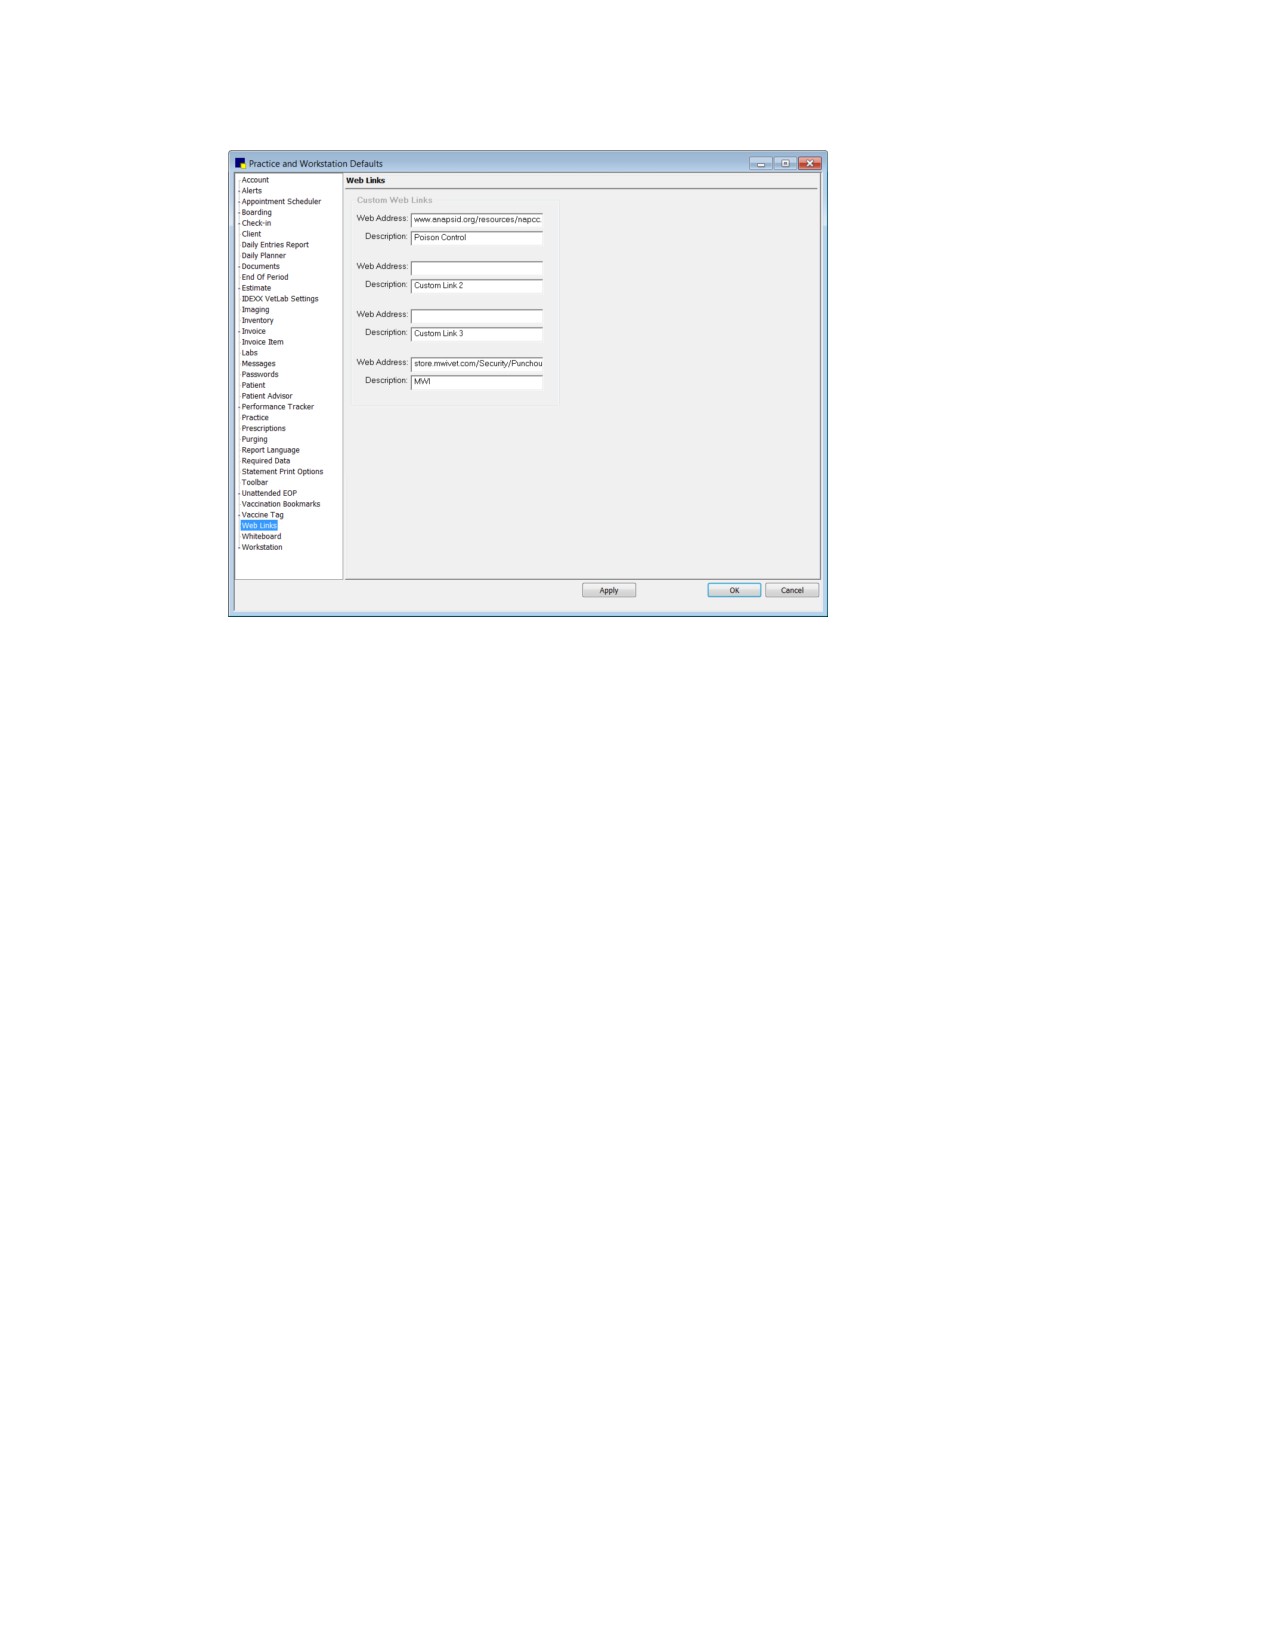
The Web Links defaults allow you to add up to four links to directly access your favorite websites from
the Cornerstone Web Links menu.
To set the Web Links defaults:
1. On the Controls menu, select Defaults > Practice and Workstation. The Practice and Workstation
Defaults window appears.
2. In the navigation pane, click Web Links. The Web Links configuration pane appears.
143
Chapter 4: Setting Practice and Workstation Defaults
Web Links defaults
3. For each Web link you want to add to the Web Links menu in Cornerstone:
a. In an available Web Address text box, type the web address of the website you want to link to
from Cornerstone. (Note: Do not include the http:// prefix.)
b. In the corresponding Description text box, type a brief description (site name) for the web link.
This is the text that will appear in the Cornerstone Web Links menu.
Note: The custom web links will be available in the Web Links menu on all workstations in the
practice. To activate the links, you must close and reopen Cornerstone.
4. Click Apply to save your changes and continue setting defaults, or click OK to save your changes
and close the window.
Whiteboard Defaults
The Whiteboard defaults allow you to set preferences for display settings and invoicing settings
pertaining to Electronic Whiteboard windows in Cornerstone.
To set the Whiteboard defaults:
1. On the Controls menu, select Defaults > Practice and Workstation. The Practice and Workstation
Defaults window appears.
2. In the navigation pane, click Whiteboard. The Whiteboard configuration pane appears.
144
Chapter 4: Setting Practice and Workstation Defaults
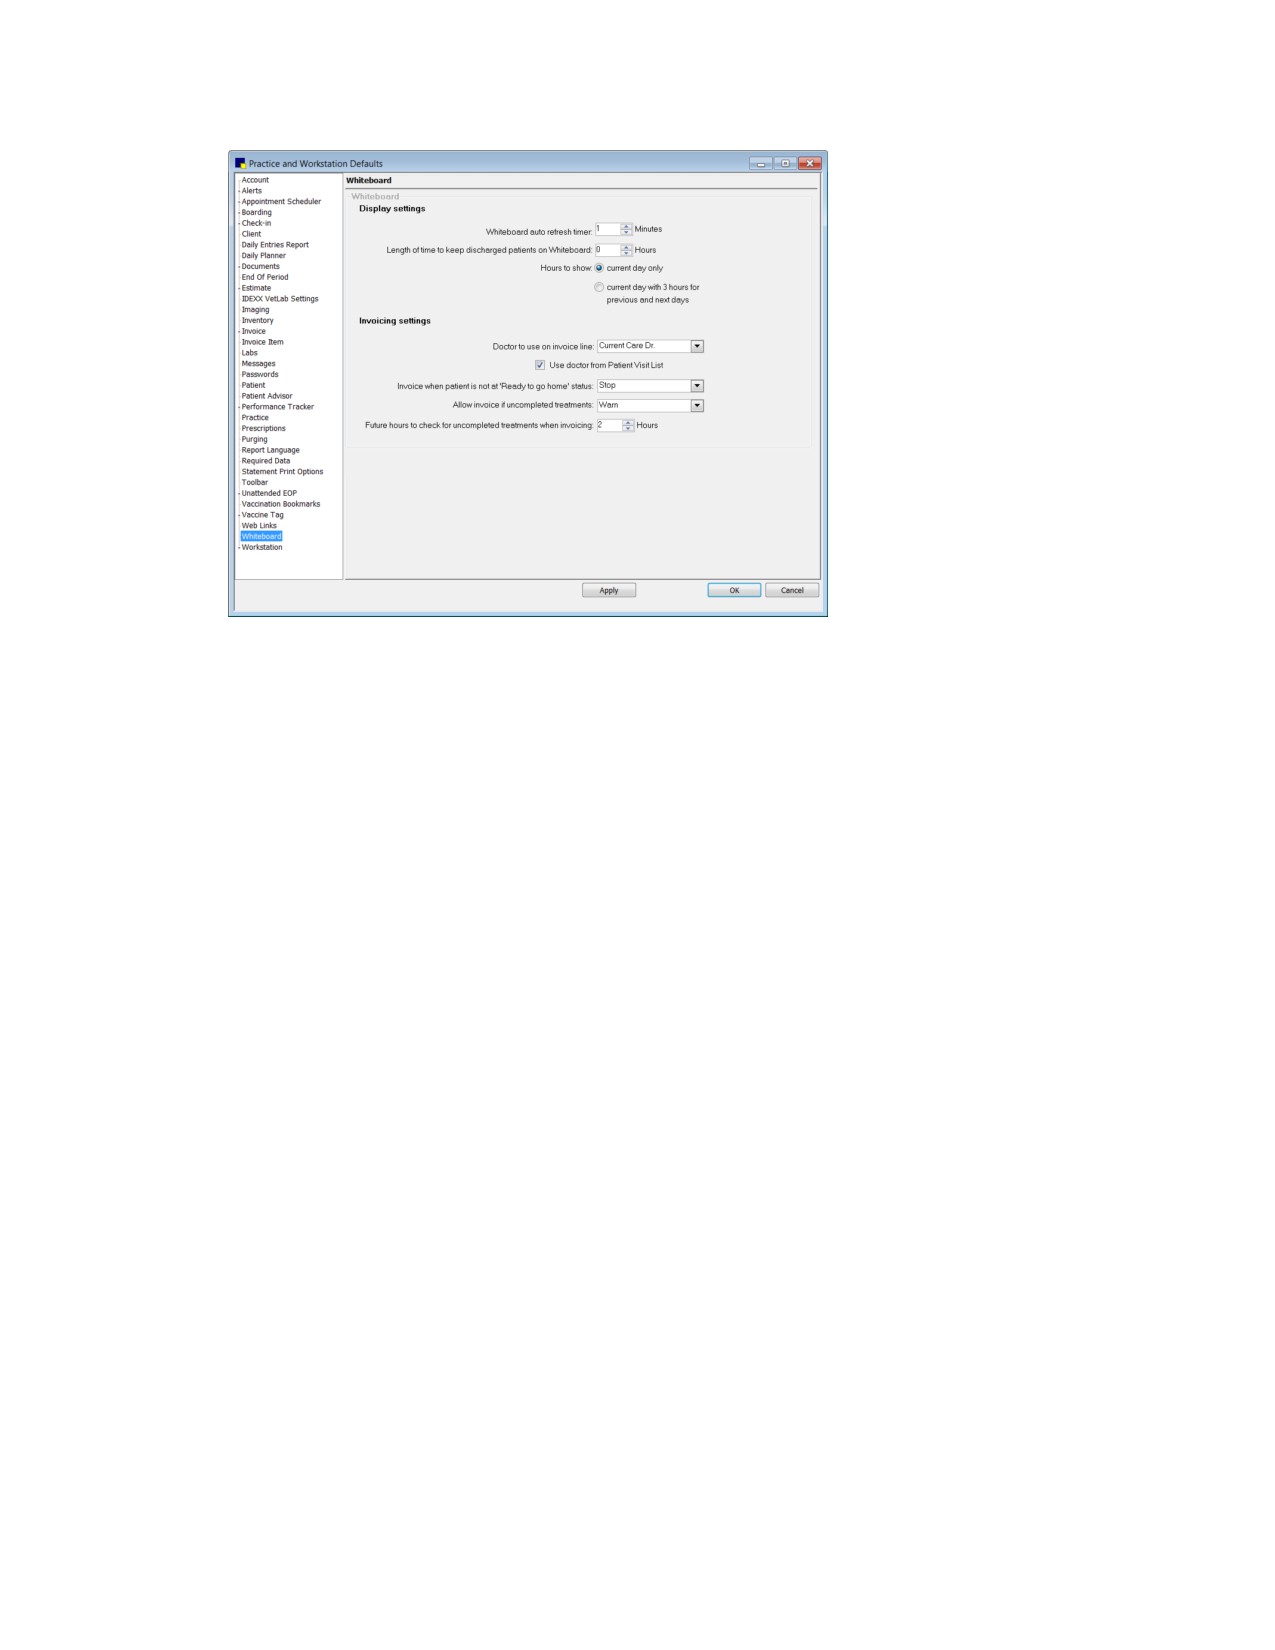
Whiteboard defaults
3.
In the Whiteboard auto refresh timer text box, specify the default number of minutes between each
refresh of the information on the Whiteboard. If the rate is set to zero, the Whiteboard will not refresh
automatically.
Note: In general, a refresh rate of 1 minute or more is recommended. Depending on your system
resources, a rate of less than 1 minute may slow down your system.
Tip: When using the Whiteboard, click Refresh to refresh immediately (before the auto-refresh time
period has elapsed).
4.
In the Length of time to keep discharged patients on the Whiteboard text box, enter the number
of hours to keep discharged patients on the Whiteboard.
5.
Select one of the following Hours to show options to specify the number of one-hour columns to
include on the Whiteboard:
• Current day only-Includes 24 1-hour columns on the Whiteboard window.
• Current day with 3 hours for previous and next days-Includes 24 1-hour columns, with 3
1-hour columns added before and after this 24-hour period. This option adds blue
<< Previous and Next >> links that display when you scroll horizontally to the outer limits of
the displayed hour columns. You can click the appropriate link to move the grid columns to
change the date and display the hours for the previous day or next day.
This ability to see into the next day without manually changing the date is helpful for preparing for
the next day and especially useful for 24-hour clinics.
Note: For both Hours to show options, the number of columns visible at one time without scrolling
depends on the monitor size.
145
Chapter 4: Setting Practice and Workstation Defaults
6.
From the Doctor to use on invoice line drop-down list, select which default staff ID, based on the
provider type selected here, will display within the Items area of the Patient Treatment window for
each line item completed. The charge for the line item will be credited to this person unless the staff
ID is changed when the treatment is posted. Options include:
• Current Care Dr.-Doctor who assumes care of patient because of shift change or because the
supervising doctor is unavailable. The Current Care Dr. is the doctor present in the clinic who
makes “on the spot” decisions for patients.
• Supervising Dr.-Doctor who admits the case and is the overriding decision maker for the case.
• Who Performed-Staff member who does the work.
7.
Select the Use doctor from Patient Visit List check box if you want Cornerstone to override the
Doctor to use on invoice line default and insert the staff ID associated with the item if it was
originally on the Patient Visit List.
8.
From the Invoice when patient is not at 'Ready to go home' status drop-down list, select one of
the following as the default setting:
• Allow-Allow staff to invoice an inpatient without a ”Ready to go home” status.
• Manager Override-Display a warning and prompt for a manager’s approval before staff are
allowed to continue invoicing.
• Stop-Prohibit invoicing until the patient is given a “Ready to go” status.
• Warn-Display a warning message about the status, but allow staff to continue invoicing.
Note: If a user-defined patient hospital status is used, this custom status will be considered equal to
the “Ready to go home” status only if it contains one of the following keywords: Ready, Home, Pick,
Release, or Discharge.
9.
In the Allow invoice if uncompleted treatments text box, select one of the following as the default
setting:
• Allow-Allow staff to invoice without all the patient’s treatments being marked as completed.
• Manager Override-Display a warning and prompt for a manager’s approval before staff are
allowed to continue invoicing.
• Stop-Prohibit invoicing until all treatments are completed.
• Warn-Display a warning message indicating uncompleted treatments, but allow staff to
continue invoicing.
10. In the Future hours to check for uncompleted treatments when invoicing text box, based on
discharge time, enter the number of hours in the future to check for uncompleted items when
invoicing.
11. Click Apply to save your changes and continue setting defaults, or click OK to save your changes
and close the window.
Workstation Defaults
The Workstation defaults allow you to specify workstation-specific preferences for pet picture use on
documents, invoice type to print, and default document margin and font settings. In addition, you can
designate the workstation as the End of Period workstation.
146
Chapter 4: Setting Practice and Workstation Defaults
To set the Workstation defaults:
1. On the Controls menu, select Defaults > Practice and Workstation. The Practice and Workstation
Defaults window appears.
2. In the navigation pane, click Workstation. The Workstation configuration pane appears.
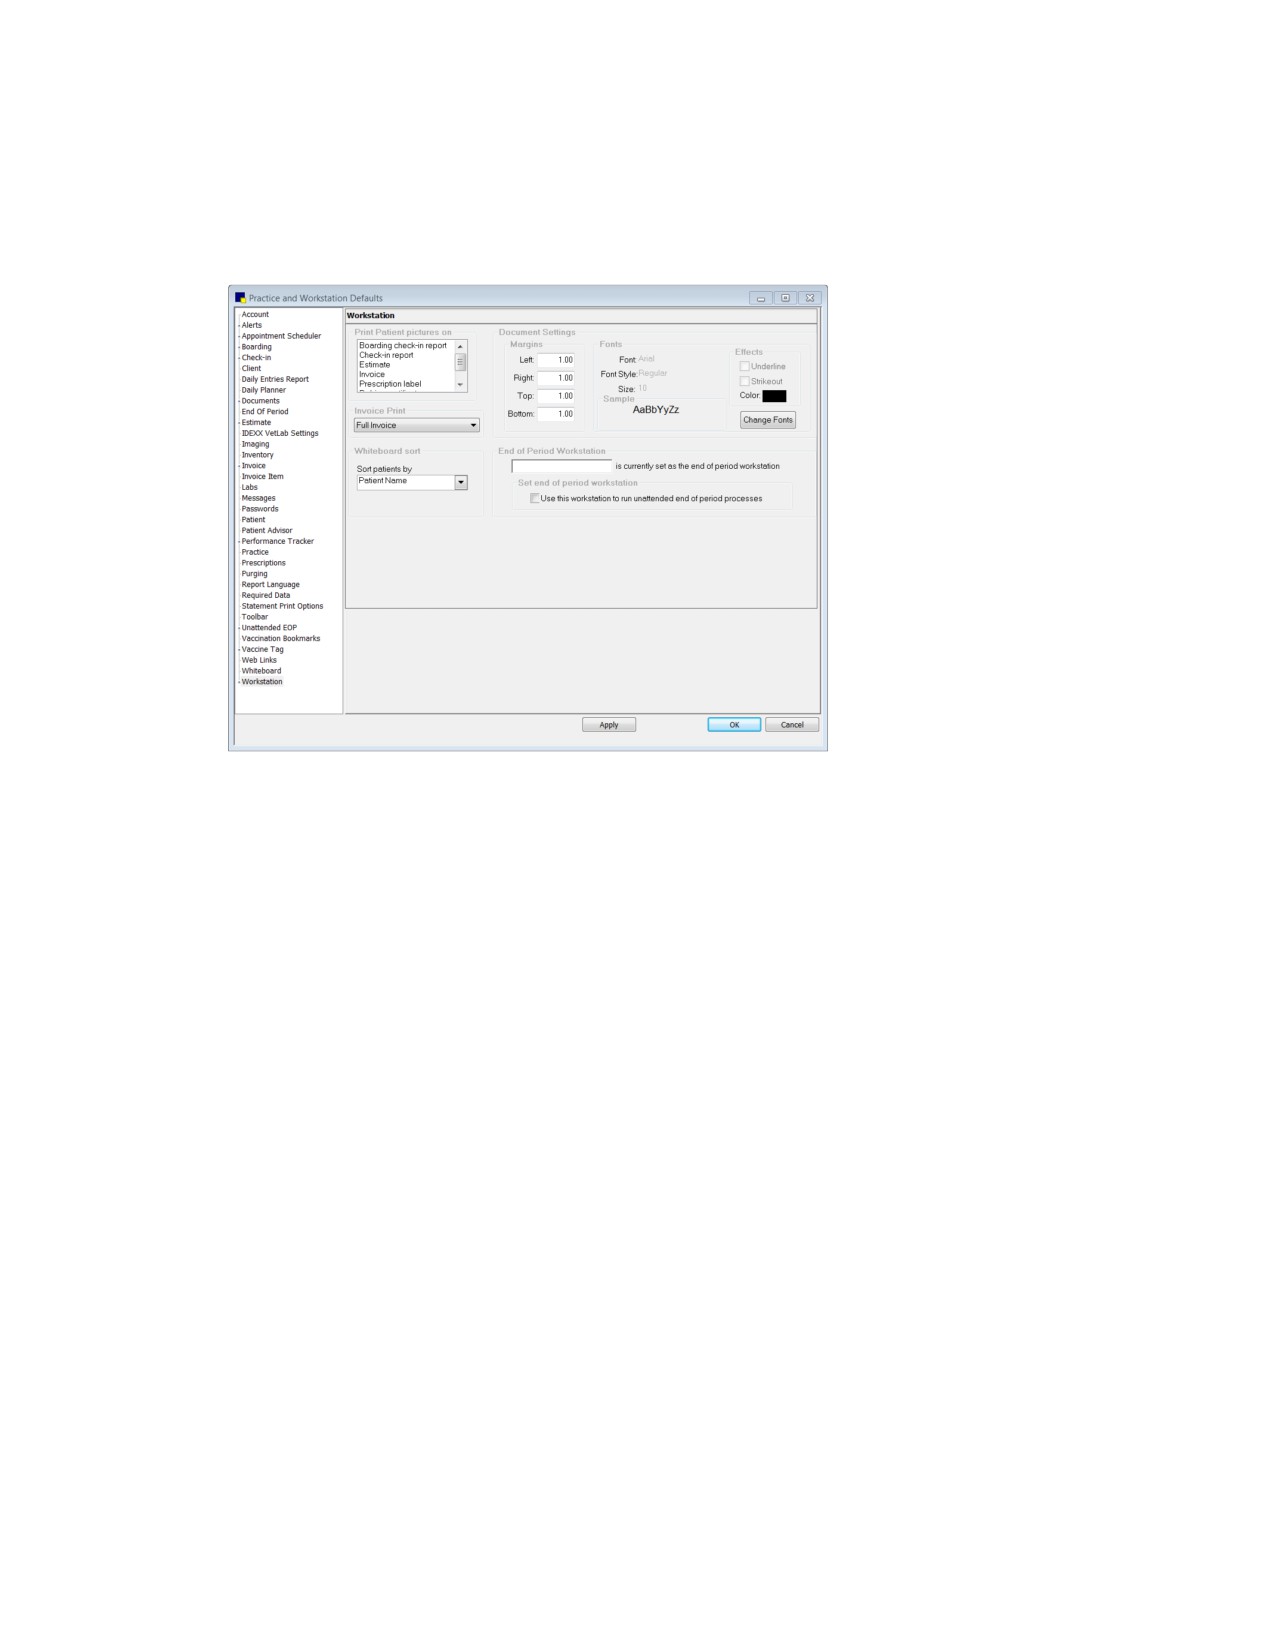
Workstation defaults
3.
In the Print patient pictures on area, select the client communication documents on which you want
to include the pet’s picture when printing from this workstation.
4.
The Invoice Print drop-down list is available if the Turn on invoice receipt option check box is
selected in Invoice defaults. Once enabled, the Invoice Print drop-down list allows you to select one
of the following options as the default for this workstation:
• Full Invoice-Prints full page (8-1/2” x 11”) invoices.
• Invoice Receipt-Prints 3-1/8” invoice receipts (an Epson TM-T88IV receipt printer is required for
printing invoice receipts).
5.
In the Document Settings area, set the Margins, Fonts, and Effects to use by default for documents
created on this workstation.
6.
In the Whiteboard sort area, specify a default sort order for the Whiteboard Patients column on this
workstation (for example, Boarding may want a different default sort order than ICU). If a sort order
is not specified here, the column is sorted by Patient Name.
Note: You can also change the Patients column sort order at any time directly on the Whiteboard
using its Sort drop-down list.
7.
In the End of Period Workstation area, type the workstation to use as your End of Period (EOP)
workstation for unattended EOP processing.
8.
On the workstation you have selected as your EOP workstation (for unattended EOP processing),
select the Use this workstation to run unattended end of period processes check box. The
currently selected EOP workstation displays.
147
Chapter 4: Setting Practice and Workstation Defaults
Tip: To select a different workstation as your EOP workstation, follow the above steps on that
workstation and the software will change your workstation selection automatically.
Note: The workstation you select as the EOP workstation must be turned on and be running
Cornerstone at the time the End of Day or End of Month process is set to run. However, a user does
not have to be logged into Cornerstone.
9. Click Apply to save your changes and continue setting defaults, or click OK to save your changes
and close the window.
Workstation-All Defaults
The Workstation-All defaults allow you to set up workstation-specific settings for each workstation in
the practice.
You can designate the default inventory location to be used on each workstation (only applies to
inventory items for which quantity on hand is tracked). By default, inventory items on the invoice are
automatically assigned to the default location and the quantity on hand for the items is decreased in the
default location. But if the item is taken from a different location, this location can be selected to replace
the default location when the item is put on the Patient Visit List or invoice.
In addition, if you have a Multi-Location/Single Database configuration, you can set the practice to be
used by default when logging in on each workstation.
To set the Workstation-All defaults:
1. On the Controls menu, select Defaults > Practice and Workstation. The Practice and Workstation
Defaults window appears.
2. In the navigation pane, click Workstation to expand its subproperties, and then click the
Workstation-All subproperty. The Workstation-All configuration pane appears.
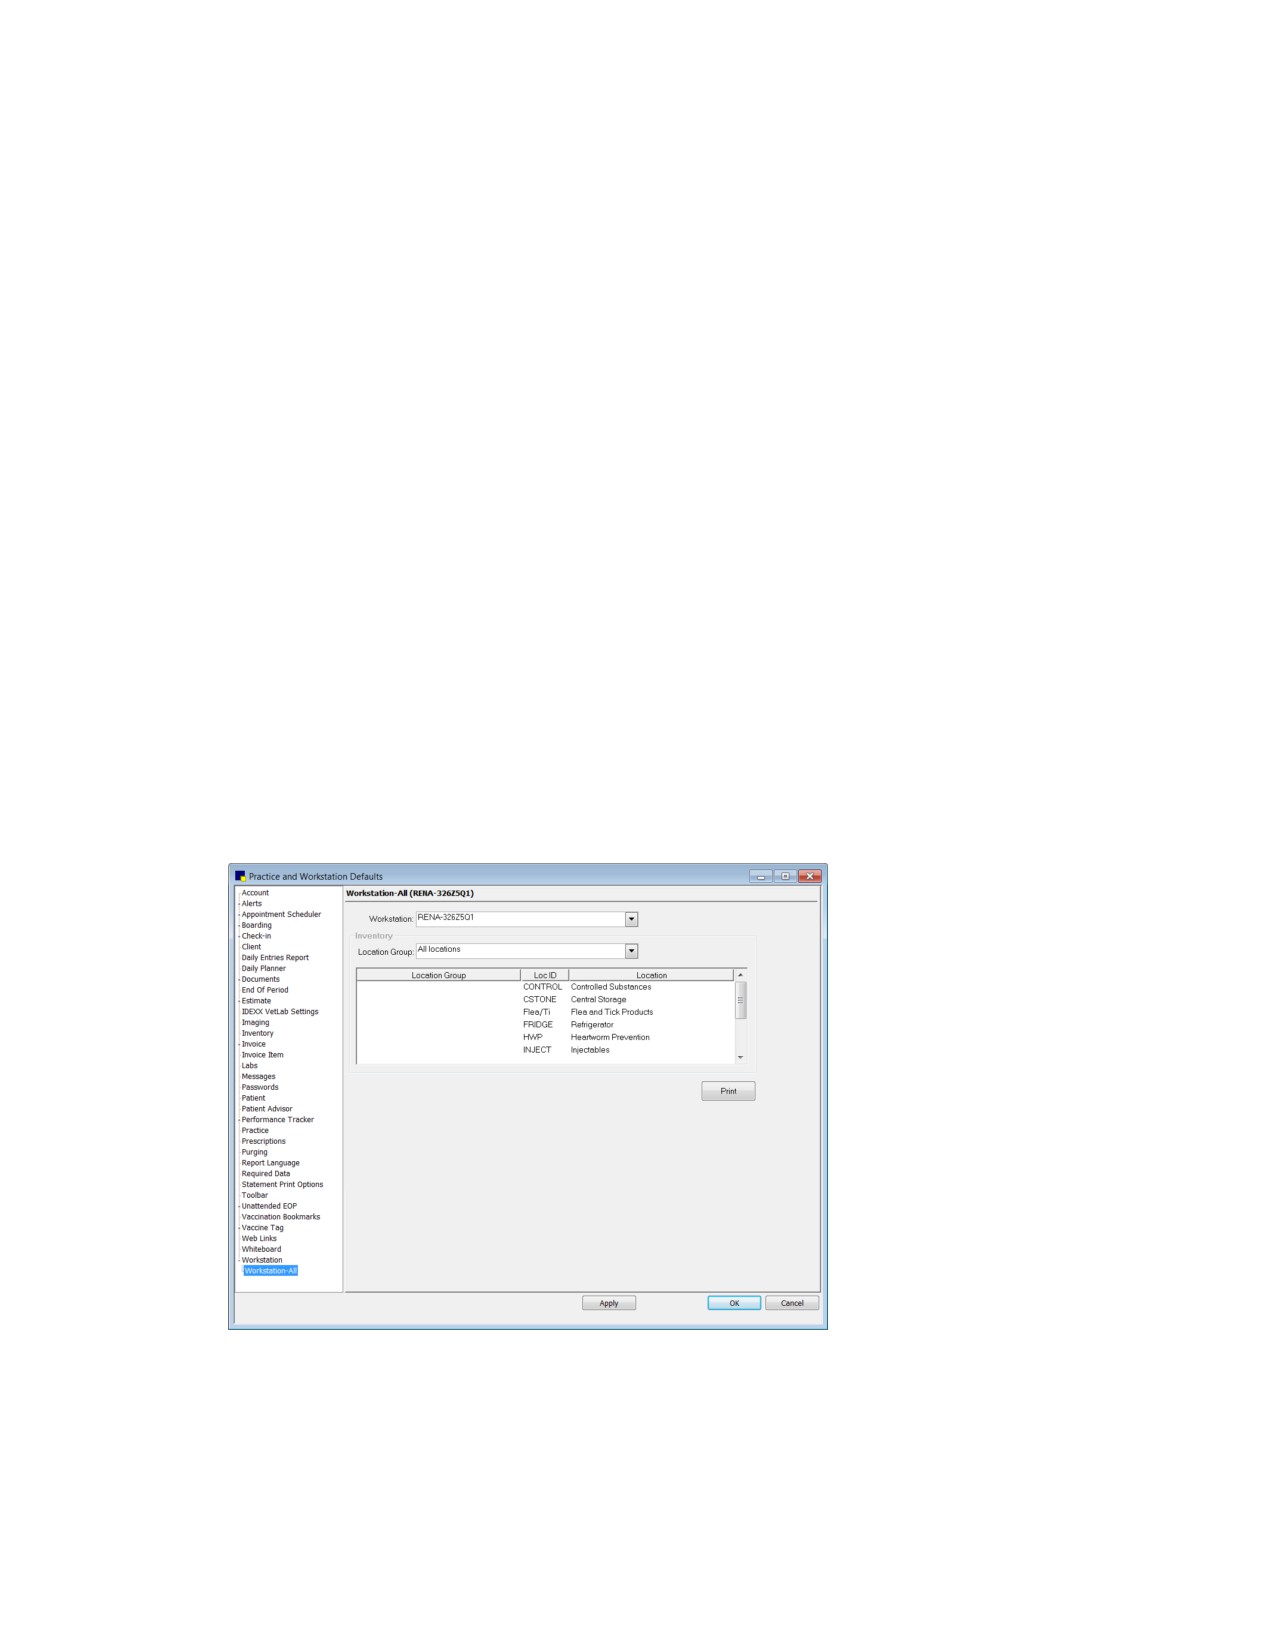
Workstation-All defaults
3. In the Workstation drop-down list, select the workstation to which you want to assign a default
inventory location (and select a default practice, if applicable).
148
Chapter 4: Setting Practice and Workstation Defaults
4. Multi-Location/Single Database configuration only: In the Default Practice drop-down list, select the
practice to be used by default when logging in on the selected workstation.
5. In the Inventory area, do the following:
a. If applicable, in the inventory Location Group drop-down list, select All locations or a specific
group location. The corresponding locations display in the list.
b. In the Location list, select the default inventory location to be used on the selected workstation.
6. Click Apply to save your changes for the currently selected workstation.
7. Repeat steps 3-6 as needed to set up defaults for additional workstations.
8. Click Apply to save your changes and continue setting defaults, or click OK to save your changes
and close the window.
149
Chapter 5: Setting Staff Defaults
Overview
Staff defaults allow you to personalize your IDEXX Cornerstone* Practice Management System settings
for a specific staff ID. For individual staff members, you can customize the Patient Clipboard* and
specify the toolbar buttons to appear on the Cornerstone toolbar. In addition, you can also set staff-
specific defaults and favorite document templates for medical notes and correspondence.
Accessing Staff Defaults
1. On the Controls menu, select Defaults > Staff. The Staff Defaults window appears.
2. In the Staff box, type the staff ID of the staff member for whom you want to set defaults, or press F2
to use the Staff List to choose a staff ID.
3. Press TAB.
The Staff defaults configuration settings are available on the five tabs.
Note: A staff member must have appropriate security permissions to make changes to his or her Staff
defaults. The Cornerstone Administrator can make changes to any staff member’s default settings.
Staff Defaults for Patient Clipboard
The Staff defaults Patient Clipboard tab allows you to select the tabs to display on the Patient Clipboard
when a particular staff ID is logged in to Cornerstone.
To set the Staff Defaults for Patient Clipboard:
1. On the Staff Defaults window, click the Patient Clipboard tab.
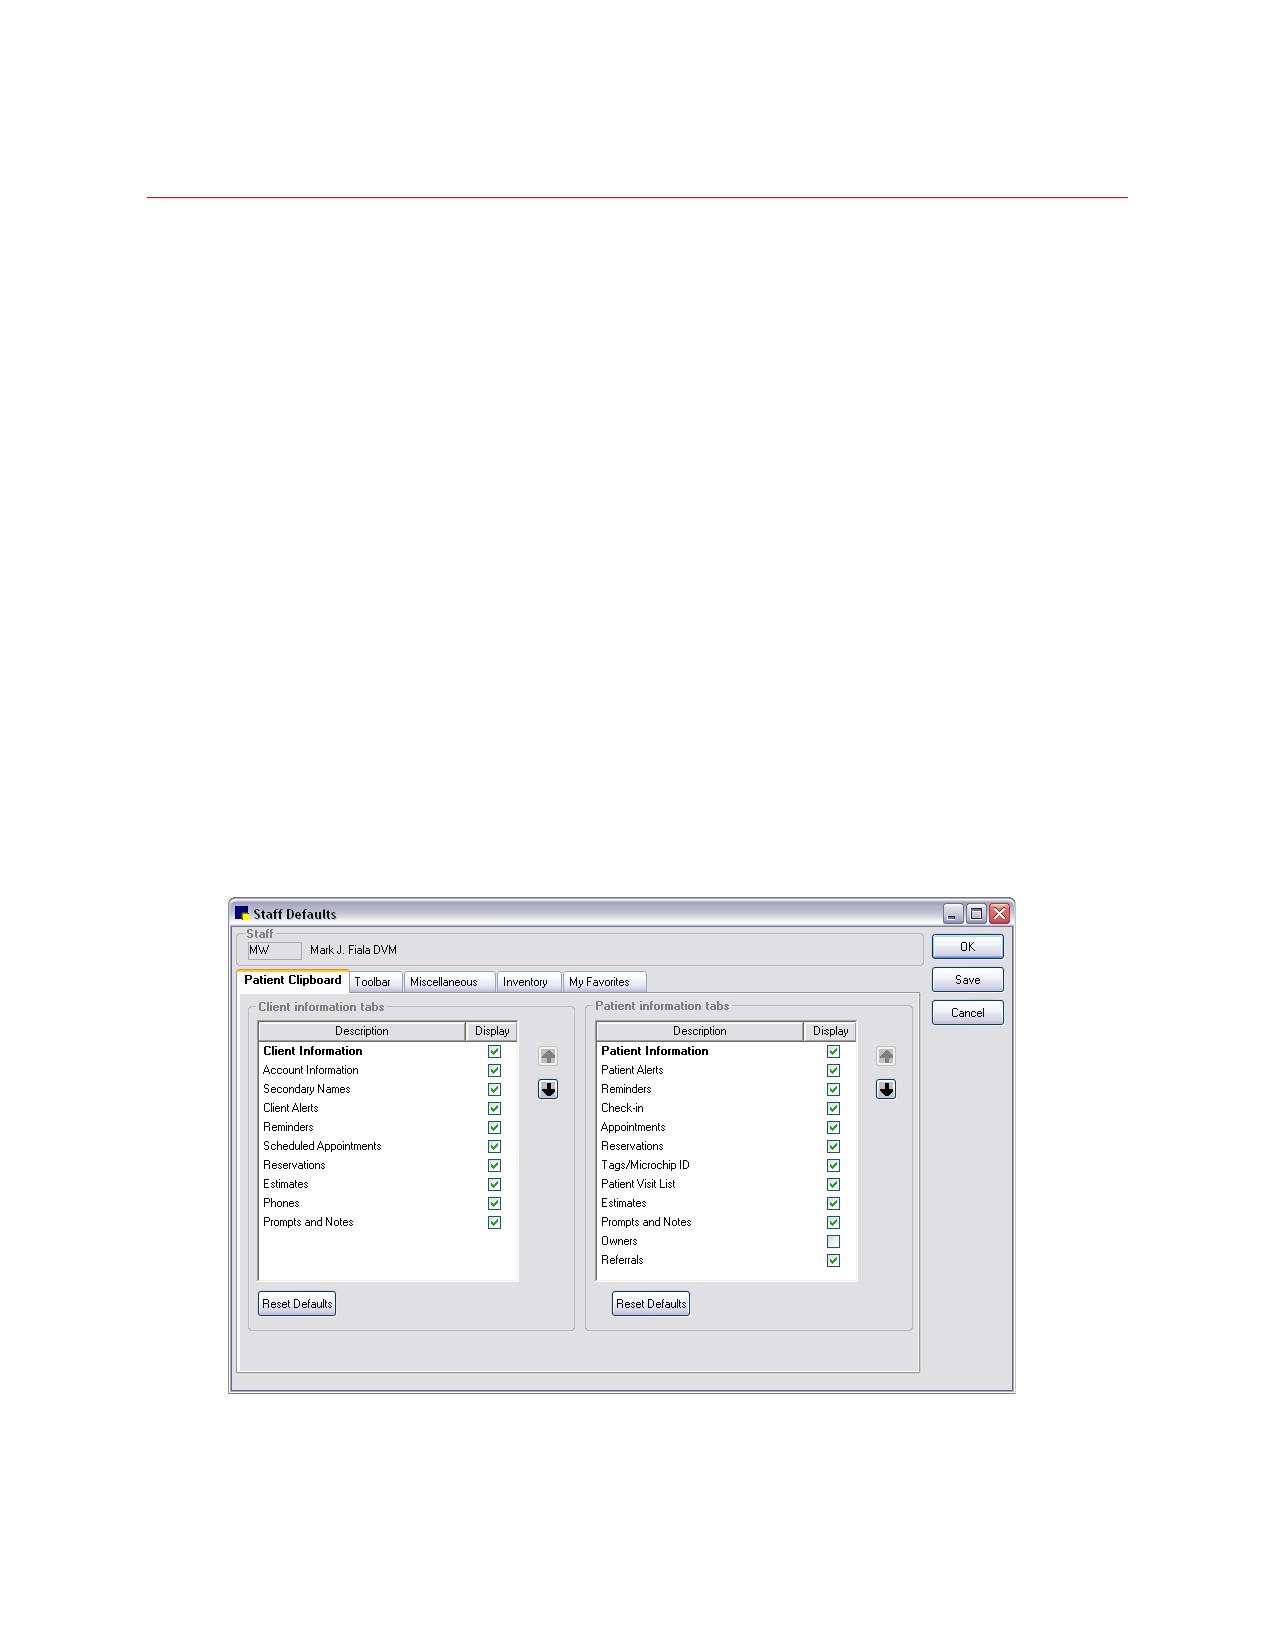
Patient Clipboard tab in Staff Defaults window
150
Chapter 5: Setting Staff Defaults
2. In the Client information tabs area, in the Display column, select the check box for each tab to
appear in the Client information area on the Patient Clipboard for this staff ID. To change the
settings back to the original selections, click the Reset Defaults button.
3. In the Patient information tabs area, in the Display column, select the check box for each tab to
appear in the Patient information area on the Patient Clipboard for this staff ID. To change the
settings back to the original selections, click the Reset Defaults button.
4. To change the display order of the tabs on the Patient Clipboard, use the
and arrow buttons.
5. Click Save to save your changes and continue setting staff defaults, or click OK to save your
changes and close the Staff Defaults window.
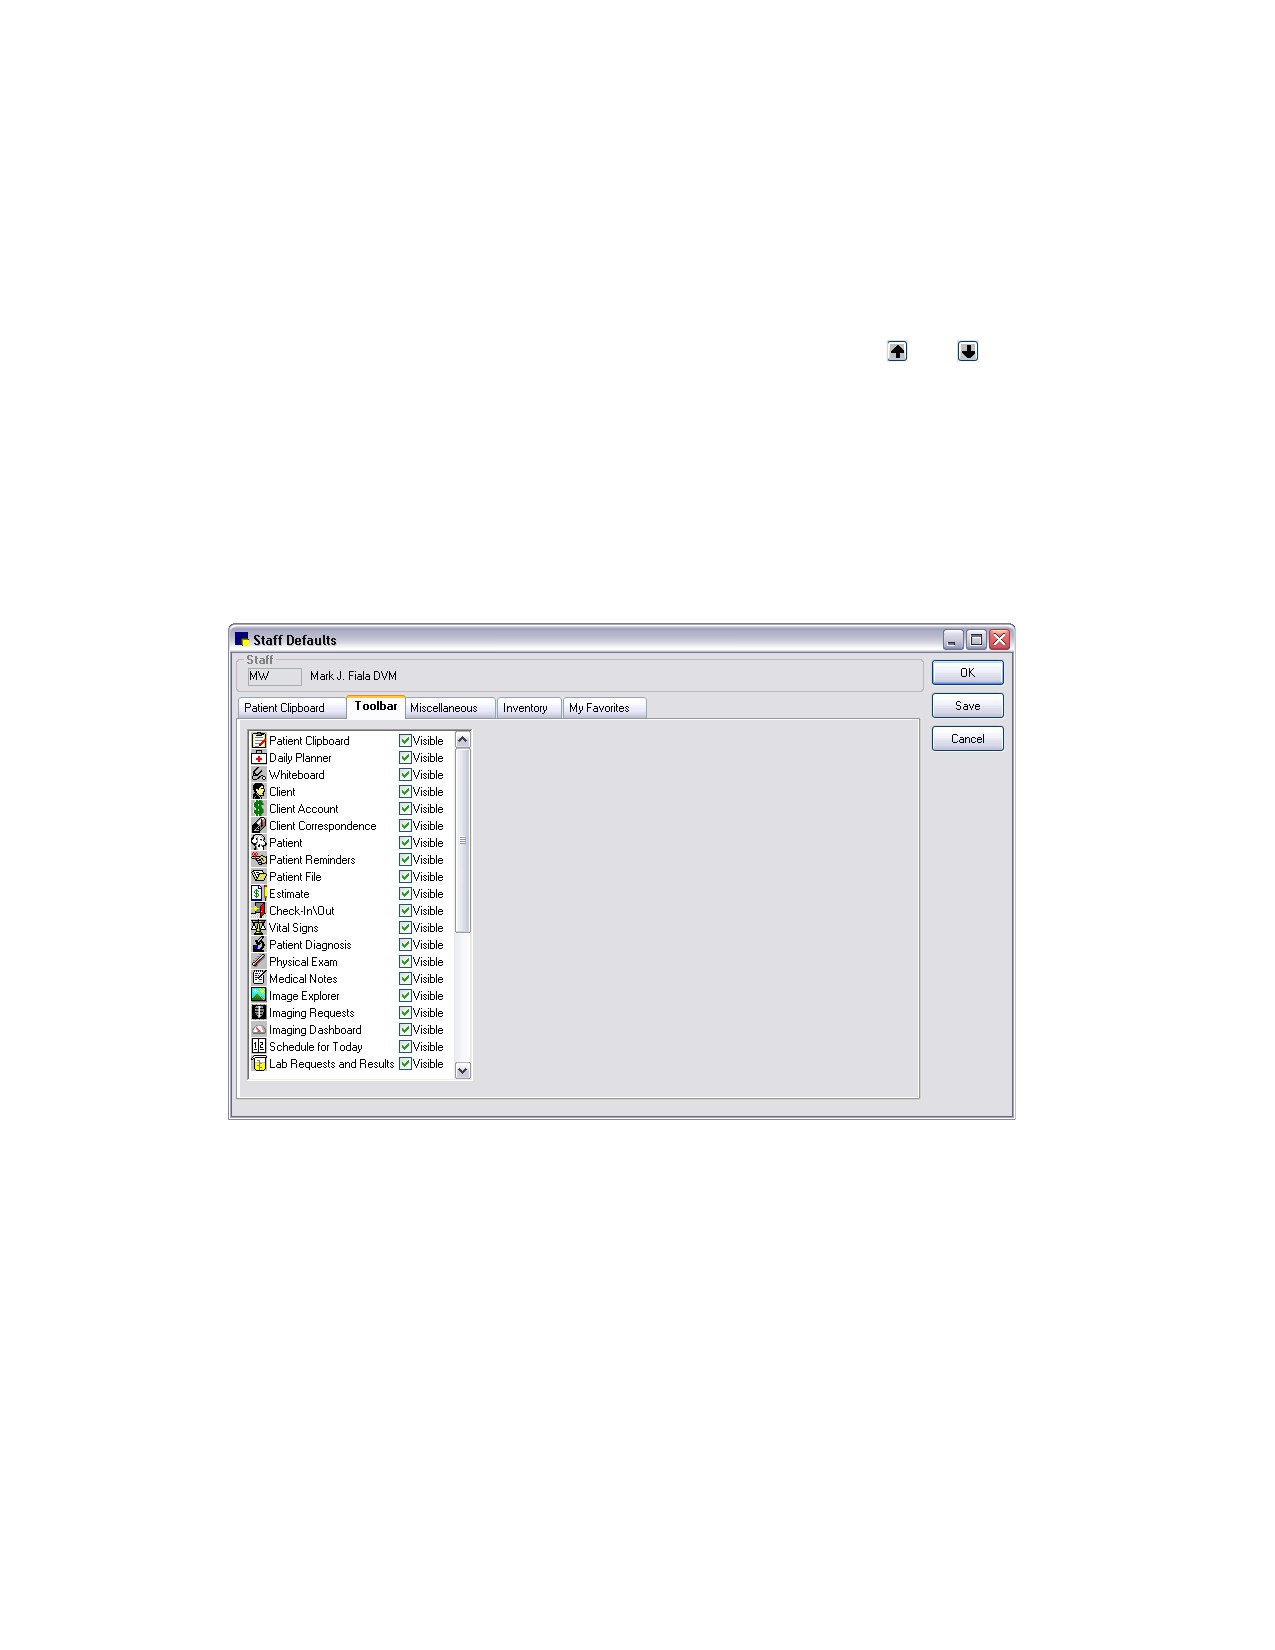
Staff Defaults for the Toolbar Display
The Staff defaults Toolbar tab allows you to select the buttons to display on the Cornerstone toolbar
when a particular staff ID is logged in to Cornerstone.
To set the Staff Defaults for the Toolbar display:
1. On the Staff Defaults window, click the Toolbar tab.
Toolbar tab on Staff Defaults window
2. Select the Visible check box for each toolbar button to display for this staff ID. To remove a toolbar
button from the display, clear the Visible check box.
3. Click Save to save your changes and continue setting staff defaults or click OK to save your
changes and close the Staff Defaults window.
151