IDEXX Cornerstone. Administrator’s Manual (8.3 NEXT version 8.3.6) - page 7
Chapter 10: Setting Up Your Invoice Items
You can choose to increase the item base price by either a markup percentage or a margin
percentage.
Markup %
Base price ÷ Cost minus 1
Margin %
1 minus Cost ÷ Base price
Internal Usage and Invoices
On Hand
Current QOH - Qty Returned
Total Cost
Current Total Cost - [Qty Returned * (Current Total Cost / Current
QOH)]
Linked Items On Hand
Current QOH - (Qty Returned * Link Qty)
Linked Items Total Cost
Current Total Cost - [(Qty Returned * Link Qty) * (Current Total
Cost / Current QOH)]
Setting Up Invoice Item Classifications and Subclasses
Invoice items are divided into primary classes and then divided further into subclasses. By classifying
invoice items, you can:
• Generate more specific information in reports
• Mark up or mark down entire groups of similar invoice items
• Narrow invoice item searches
• Create pick lists
Anesthesia, Supplies, and Pharmaceuticals are examples of invoice item classifications.
Before You Begin
¾ If you started with a Fastart* or FastInstall database, review the classifications and subclasses
already set up in the Invoice Item Classification List.
To add an invoice item class and subclass:
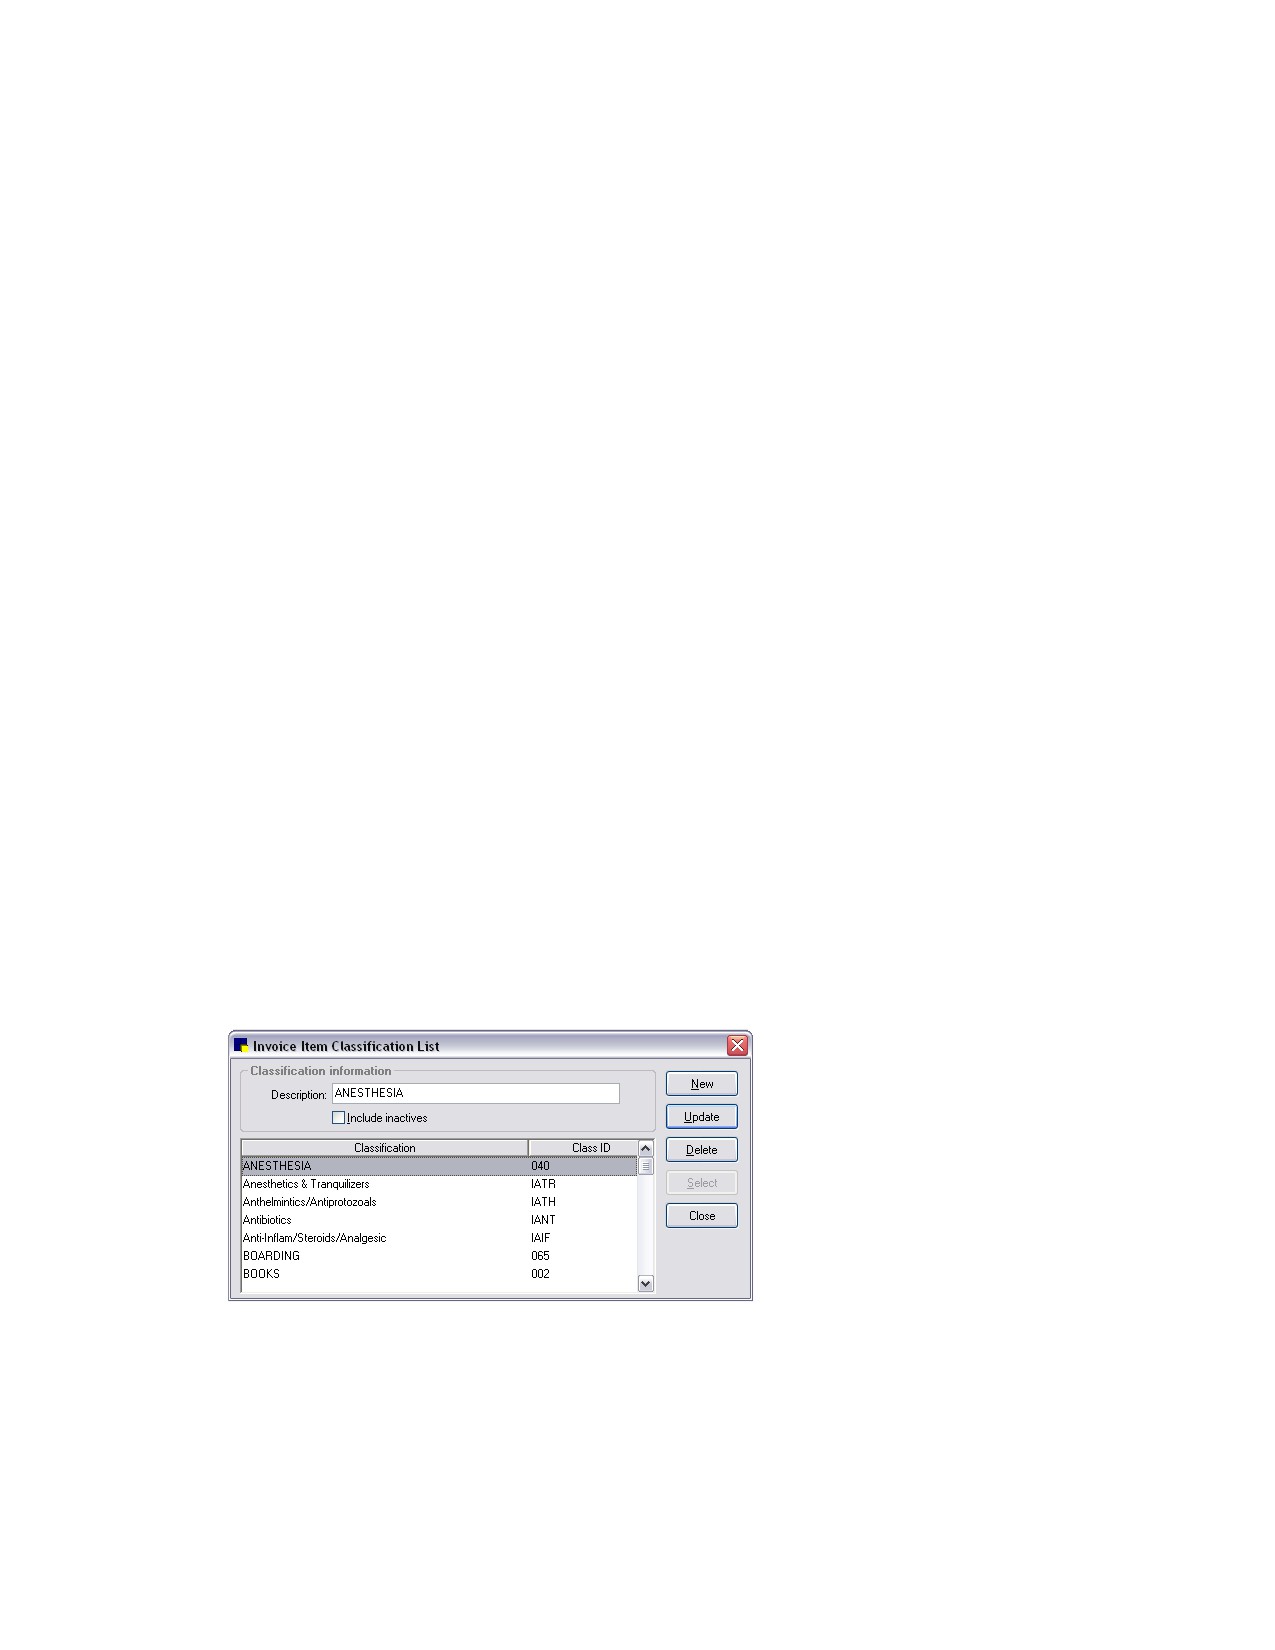
1. On the Lists menu, select Invoice Item Class. The Invoice Item Classification List dialog box
appears.
Invoice Item Classification List dialog box
2. Click New. The Invoice Item Classification Information dialog box appears.
182
Chapter 10: Setting Up Your Invoice Items
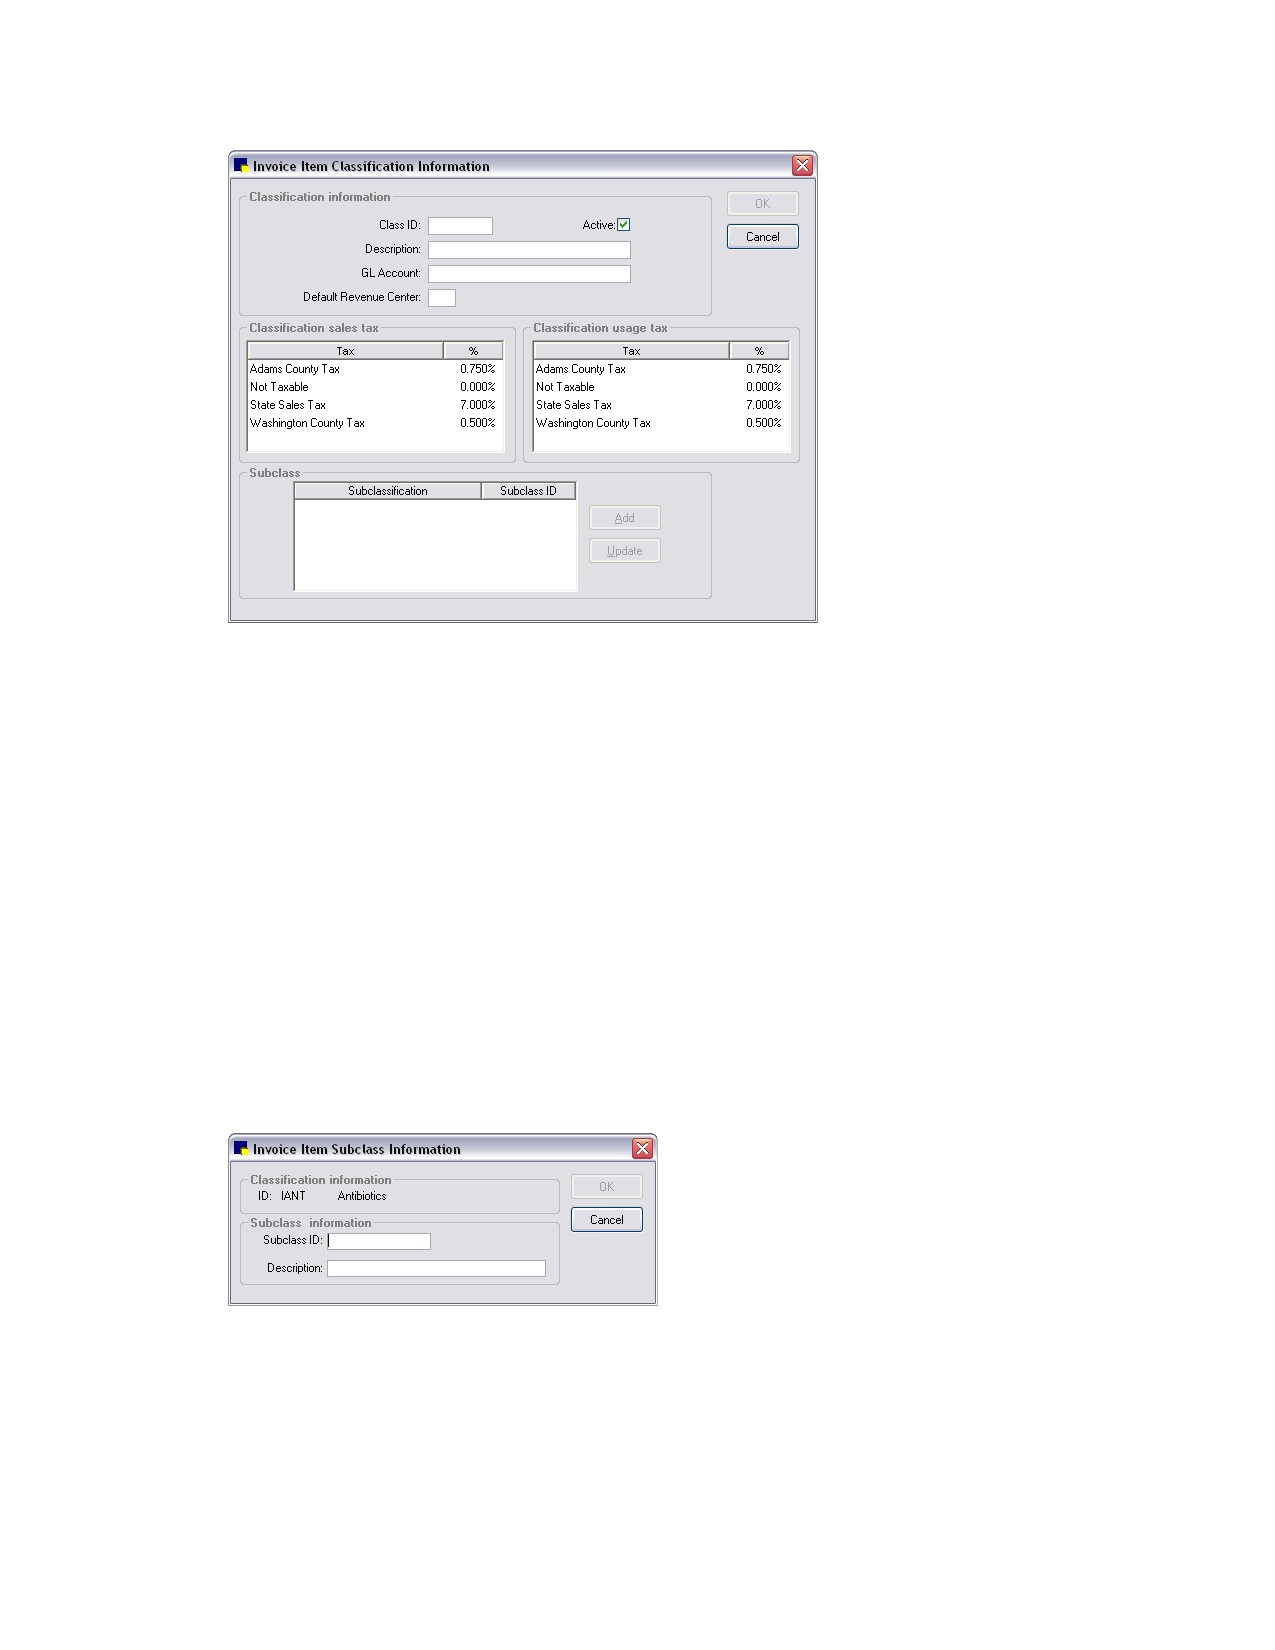
Invoice Item Classification Information dialog box
3. In the Class ID text box, type the classification ID.
4. In the Description text box, type the classification description.
5. If your practice uses the General Ledger Interface, in the GL Account text box, type a GL Account
name.
6. In the Default Revenue Center text box, type the default revenue center for this classification.
7. In the Classification sales tax and Classification usage tax areas, click any taxes that you want to
automatically apply to all invoice items in the class. Class taxes are applied only to new invoice
items.
Note: In addition to the selected class taxes, if there are any practice default taxes, these taxes will
also be applied to new items in the class. Practice default taxes are set in Inventory defaults (see
“Inventory Defaults” on page 109) and in Invoice Item defaults (see “Invoice Item Defaults” on page
116).
8. If you want to add a subclass for this class, in the Subclass area, click Add. The Invoice Item
Subclass Information dialog box appears.
Invoice Item Subclass Information dialog box
9. In the Subclass ID and Description text boxes, type the ID and description and then click OK to
return to the Invoice Item Classification Information dialog box.
10. Click OK.
183
Chapter 10: Setting Up Your Invoice Items
For a complete list of classifications and subclasses, print an Invoice Item Classification Setup
Report.
The Invoice Item List
Many item setup tasks can be initiated from the Invoice Item List (Lists > Invoice Item), including
creating, modifying, deleting, or selecting invoice items within Cornerstone.
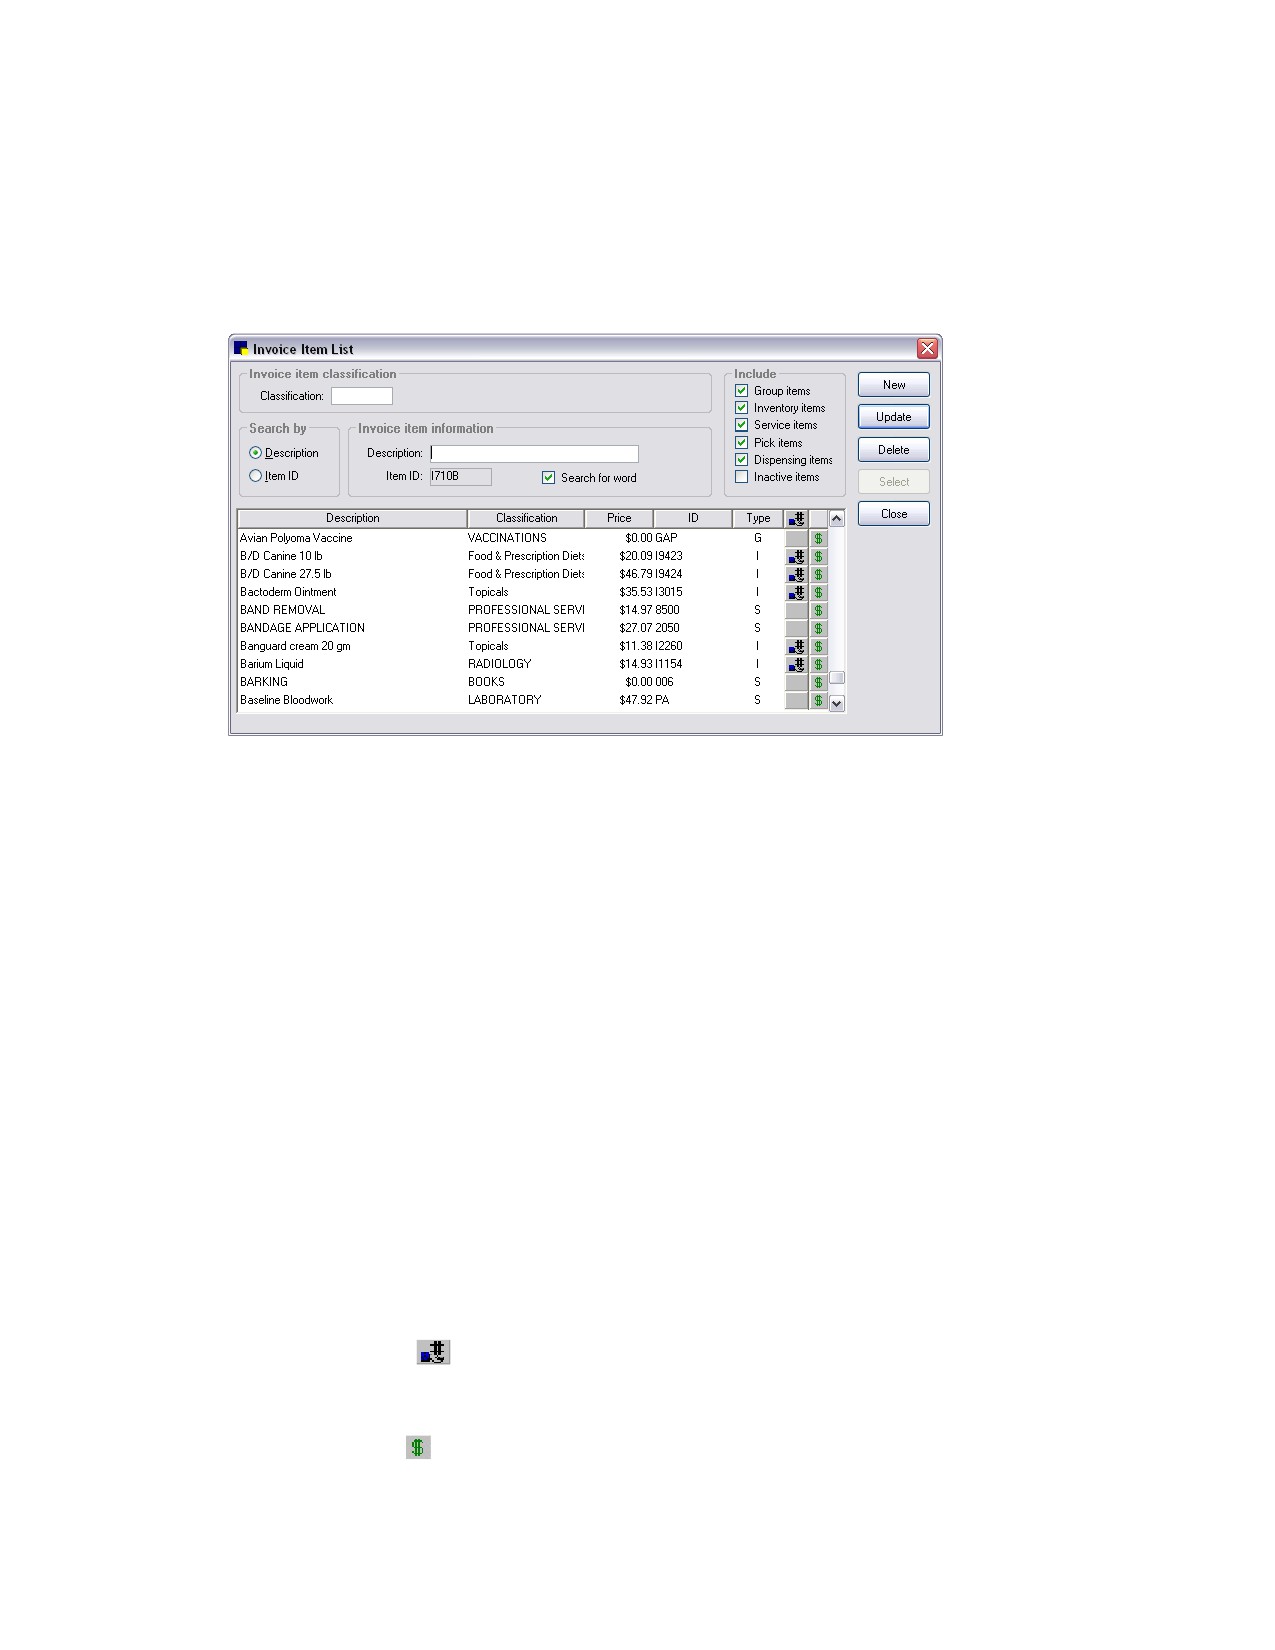
Invoice Item List
The different areas and elements on the Invoice Item List help you to accomplish a variety of tasks.
Invoice item classification area
• Classification text box-Allows you to narrow the list of invoice items to a specific category.
Search by area
• Description option-Allows you to search the list of items by name.
• Item ID option-Allows you to search the list of items by item ID.
Invoice item information area
• Description text box-If searching by description, type the name of the invoice item you are
searching for. The list automatically scrolls to the area that most closely matches what you have
typed.
• Item ID text box-If searching by item ID, type the identification code of an invoice item.
• Search for word check box-If searching by description, select this check box to narrow the list
to any item containing the letters typed in the Description text box. For example, if you type
“rabies” in the description text box with Search for word selected, any invoice item containing
this word will display in the list (such as Rabies Canine 1 Year and Feline Rabies 1 Year).
• Include area check boxes-Narrows the list of invoice items to a specific type of item.
• Pound sign (#)
icon-Indicates the inventory item is marked to maintain quantity on hand
in Cornerstone. In other words, Cornerstone is tracking the quantity of the inventory item that is
received and consumed.
• Dollar sign ($)
button-Click the button to display the Invoice Item Price Information window
to view general pricing information for the item.
184
Chapter 10: Setting Up Your Invoice Items
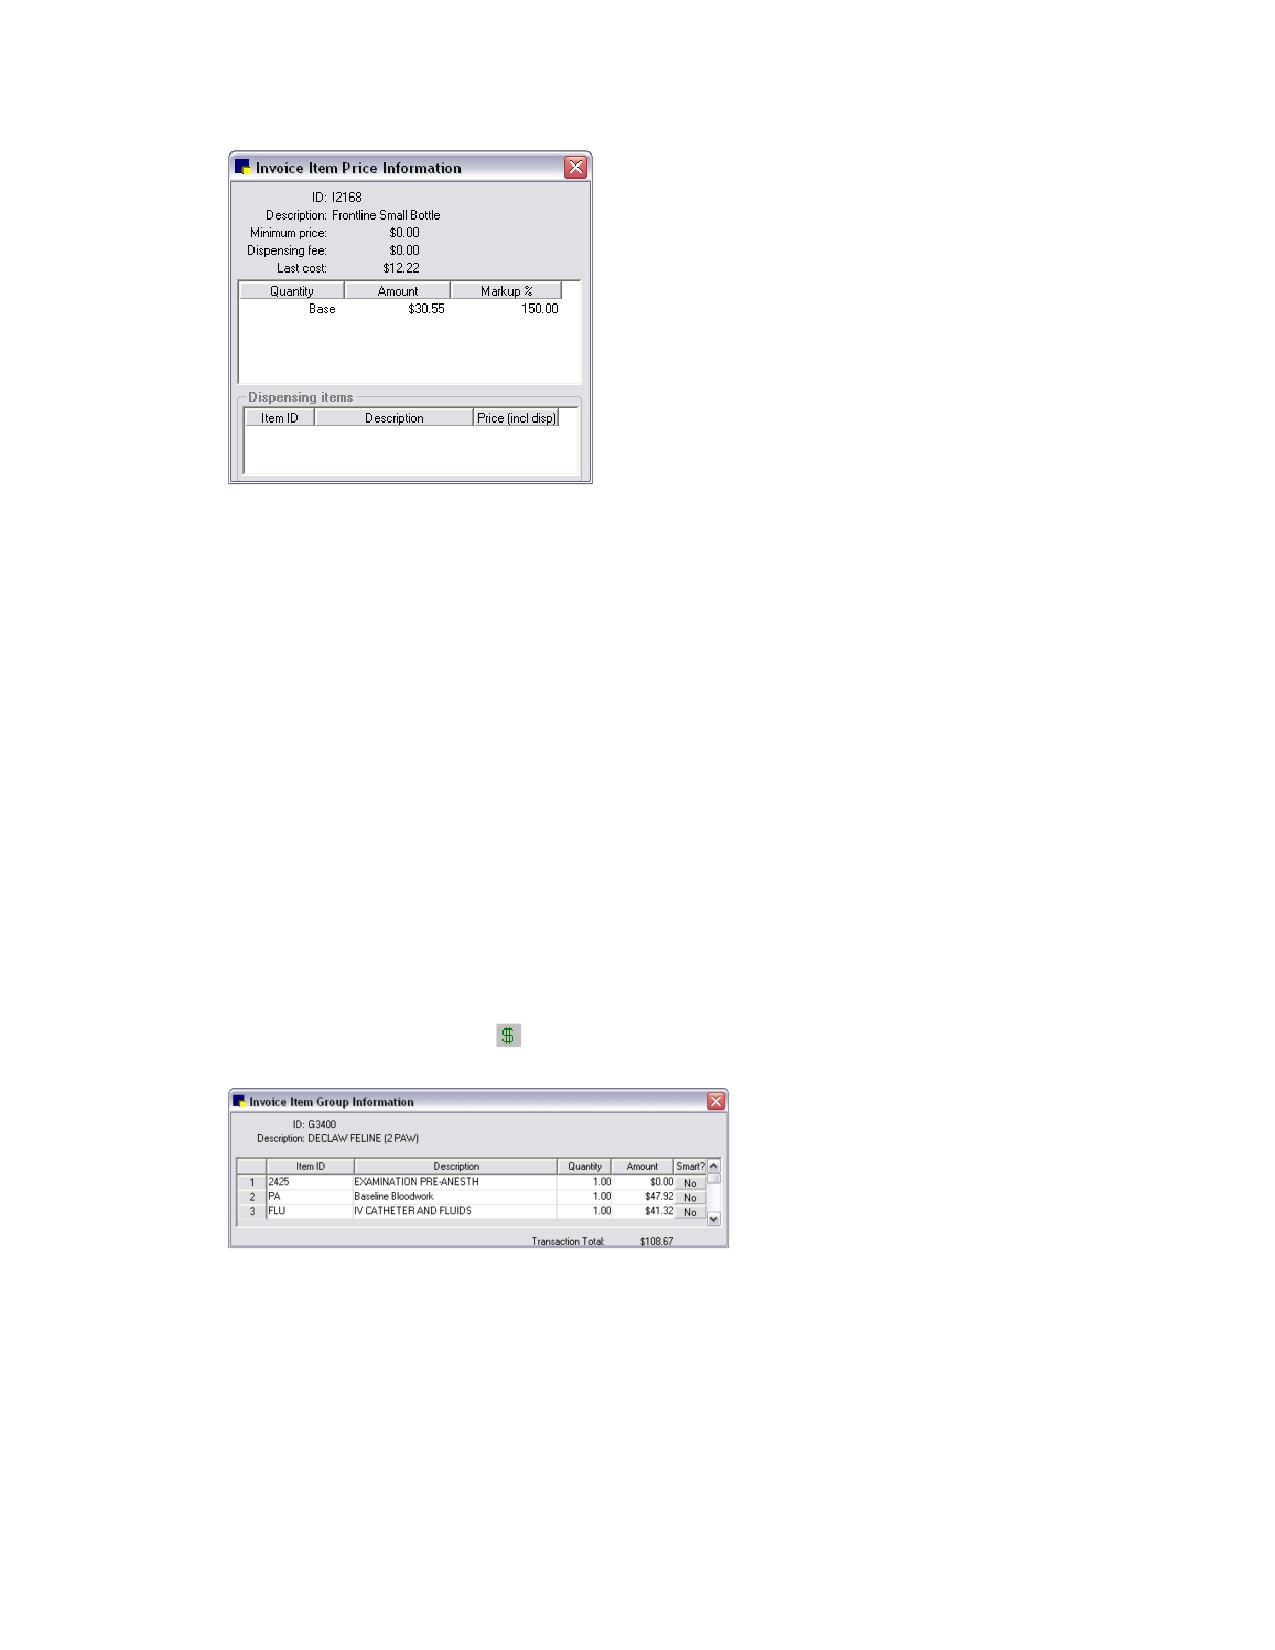
Item Price Information window
The Invoice Item Price Information window includes:
o Minimum price-The minimum price to charge for the item. (This price is set in the Invoice Item
Information window Information tab Minimum price text box.)
o Dispensing fee-The additional fee added to the price of the product. (This fee amount is set in
the Invoice Item Information window Information tab Dispensing fee text box.)
o Last cost-The vendor’s last cost for the item based on when this item was last received.
Note: The last cost information is displayed only if the logged in staff member has the
appropriate security permissions in Cornerstone.
o Quantity/Amount/Markup %-General pricing breakdown for the product, including price
breaks. (This information is set up in the lower right area of the Invoice Item Information window
Information tab.)
o Dispensing items-The list of choices for dispensing fees associated with the product. (This
information can be set up by clicking the Dispensing button in the Invoice Item Information
window Information tab Dispensing button. Each dispensing code that is highlighted on this list
displays in the Dispensing items list.)
If you click the Dollar sign ($)
button for a group item, the Invoice Item Group Information
window displays information for all items included in the group.
Invoice Item Group Information window
For a complete list of invoice items currently set up in Cornerstone, print an Invoice Item Setup
Report.
185
Chapter 10: Setting Up Your Invoice Items
Setting Up Invoice Item Information
Before you can begin invoicing, you must set up all of the items you sell. These include products
(inventory invoice items) and services (service invoice items). In addition, you can set up common
combinations of several items (group invoice items), pick items, and dispensing items.
• For information on adding Group items, see “Setting Up Invoice Item Groups” on page 213.
• For information on adding Pick items, see “Setting Up Pick Lists” on page 211.
• For information on adding Dispensing items, see “Setting Up Dispensing Items” on page 221.
Before You Begin
• If you started with a Fastart or FastInstall database, review the invoice items included.
Customize these items to meet the specific needs of your practice by adding or modifying item
information, reminders, taxes, discounts, departing instructions, and prescription instructions.
Enter additional invoice items and delete unnecessary invoice items.
• Set your Invoice Item defaults (see “Invoice Item Defaults” on page 116).
For a complete list of invoice items currently set up in Cornerstone, print an Invoice Item Setup
Report.
To add or update an invoice item:
1. On the Lists menu, select Invoice Item. The Invoice Item List appears.
2. Do one of the following:
• To create a new invoice item, click New.
• To modify information for an existing invoice item, select the item and then click Update.
The Invoice Item Information window appears.
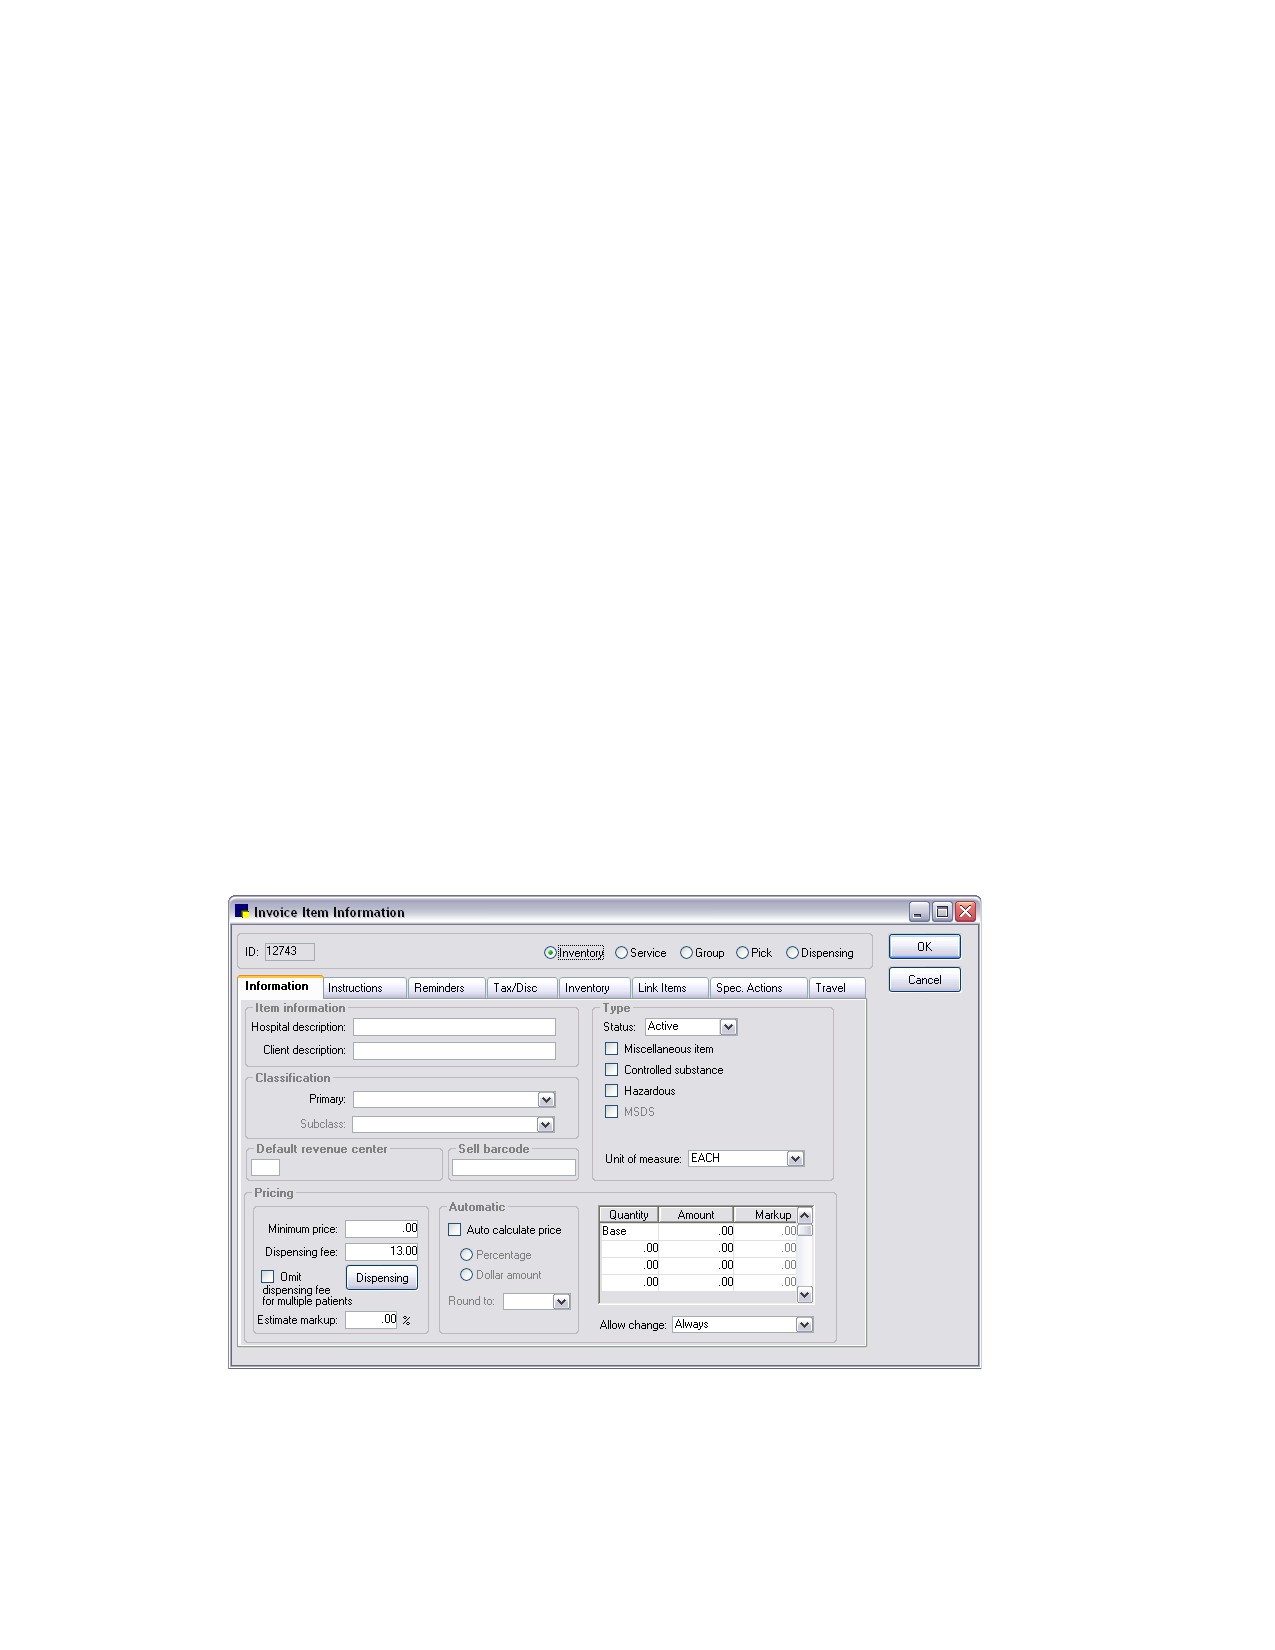
Information tab on Invoice Item Information window
186
Chapter 10: Setting Up Your Invoice Items
3.
If you are creating a new item, if your practice enters new invoice item IDs manually, type the invoice
item ID in the ID text box (top left). If your system is set up to generate invoice item IDs
automatically, an ID appears. Press TAB.
4.
If you are creating a new item, specify the type of item by selecting the appropriate option:
Inventory, Service, Group, Pick, and Dispensing.
Note: The tabs and settings available on this window will change depending on the item type
selected.
5.
On the Information tab, in the Item information area, do the following:
a. In the Hospital description text box, type an internal description of the item to display in the
Invoice Item List in your reports, in the patient’s medical file, and on invoices and reminders if
there is not a Client description.
b. If you would like an alternate description to display on client documents, in the Client
description text box, type a description of the item to print on the invoice and estimate, and
also on reminders.
6.
In the Classification area, do the following:
a. Select a classification for the item from the Primary drop-down list. The classification is used to
generate more specific information in reports, to mark up or mark down entire groups of similar
invoice items and narrow invoice item searches.
b. If applicable, select a subclassification for the item from the Subclass drop-down list.
Tip: A benefit of creating subclasses and assigning these to individual invoice items is that these
items can easily be grouped into pick lists.
7.
In the Type area, do the following:
a. Select the item status from the Status drop-down list. For a new item, do not change the default
status of Active. Mark an invoice item as Inactive only when you have discontinued use of the
item and do not want it to display on lookup lists related to invoicing.
b. Select the Miscellaneous item check box if you want to be able to type over the description of
the item when it is invoiced. The client description will not print if the item is marked as
miscellaneous.
c. Inventory items only: Select the Controlled substance check box to track the item on the
Controlled Substance Report.
Note: The Controlled Substance Report records the amount of the drug that is invoiced. It does
not reflect the difference between the invoiced amount and the administered amount. See
“Controlled Substance Report” on page 247 for more information on the Controlled Substance
Report.
d. Inventory items only: Select the Hazardous check box if the product is considered hazardous
material. If this item is marked as a hazardous material, select the MSDS check box if your
practice has the product’s Materials Safety Data Sheet required by law. This information does
not print from Cornerstone.
e. Inventory items only: From the Unit of measure drop-down list, select the selling unit of
measure (UOM) for the item. If you do not want to use a UOM with this item, select [None].
187
Chapter 10: Setting Up Your Invoice Items
Note: If this item is marked to maintain quantity on hand, the UOM should be the lowest unit
administered or dispensed. If the UOM is not on the list of options, you can add the UOM using
Controls > Units of Measure.
8. In the Default revenue center text box, specify a default revenue center for this item by typing a
revenue ID or pressing F2 to use the Revenue Center List to choose a revenue center. This is used
to track revenue separately by different areas for the business. See “Revenue Centers” on page 71
for information about revenue centers.
9. If your practice uses barcodes, in the Sell barcode text box, scan (or type) the barcode used to sell
the invoice item.
Note: The Sell barcode is how you sell the item to your clients. If the item is sold by the bottle, scan
or type the barcode used on the bottle.
10. In the Pricing area, do the following:
a.
If applicable, type a Minimum price to charge the client for this item. For example, you may
want to charge a minimum price on a medication item that is dispensed per capsule. This price
appears on the invoice until the invoice item’s (quantity x price) + dispensing fee equals the
base price (located in the Amount column on the right). Then the item is priced as usual.
b.
If your practice has an additional charge that’s assessed for dispensing this item, type the
amount in the Dispensing fee text box. The dispensing fee is included in the cost of the item
when the item is invoiced. Dispensing fees are in addition to the price of the product set in the
Amount column on the right. This fee generally covers costs of extra items such as bottles and
labels and time spent preparing the item for the client. If your practice charges dispensing fees,
use either the Dispensing fee text box or the Dispensing button; not both.
c.
Inventory items only: Select the Omit dispensing fee for multiple patients check box to charge
for the dispensing fee only once per invoice, regardless of the number of patients charged for
the item. Use this option if you charge only one fee for dispensing medications to multiple
patients in the same household. The invoice item is still placed in each patient’s medical file.
d.
If the practice has several possible dispensing fees that may be charged for the invoice item
depending on different situations, click the Dispensing button and set up the dispensing
information for the item. See “Setting Up Dispensing Items” on page 221 for more information
on setting up dispensing information.
e.
In the Estimate markup text box, type the percentage used to estimate the high price range on
estimates for this item. (The low price range on the estimate is based on the price listed in the
Amount column on the right.)
f.
To have Cornerstone automatically calculate a new price to charge clients for this item when it’s
received from the vendor, select the Auto calculate price check box. Cornerstone will calculate
a new price when the last cost from the vendor is higher than the last time the item was
received. (If the cost is lower, the unit cost will recalculate, but the current price will not change.)
If you have selected this option, specify how Cornerstone should calculate the price:
• Select Percentage to have Cornerstone automatically calculate the new price to charge the
client based on the percentage entered in the Markup (%) column on the right.
• Select Dollar amount to have Cornerstone automatically calculate the new price to charge
the client based on the dollar amount entered in the Markup ($) column on the right.
188
Chapter 10: Setting Up Your Invoice Items
g. From the Round to drop-down list, select the amount to round to if an amount does not
calculate evenly.
11. In the Quantity/Amount/Markup table, do the following:
a. In the Base row in the Amount column, type the base amount (price for one selling unit of the
item) to charge the client. This price appears in the Price column in the Invoice Item List.
b. If your practice offers price breaks (tiered pricing) for the item and you want this pricing
calculated automatically, type the price to charge the client in the Amount column based on the
associated quantity listed in the Quantity column to the left. For service and inventory items,
quantity pricing information appears when you click the Price button for an item in the Invoice
Item List.
Example:
A can of food is sold for $2.00 each, but if the client buys a case of 12 cans, they are charged
$1.85 per can for the case. In the Base Amount column, the price would be $2.00; the next line
would list 12.00 in the Quantity column with $1.85 in the Amount column. If the client buys 13
cans, the client would still be charged $1.85 per can. (Note: If the client purchases a case of
food and returns all but 1, the client may get back more money than they paid originally.)
c. In the Markup (%)/Markup ($) column, type the percentage/dollar amount that will be added to
the cost when the item is received in inventory. (Note: This applies only if the Auto calculate
price check box is selected.)
12. In certain circumstances, a price may need to be changed on an estimate, on the Patient Visit List,
or on an invoice. From the Allow change drop-down list, select one of the following price change
settings to apply to this invoice item:
• Always-Allows the price to be overwritten.
• Never-Does not allow the price to be overwritten unless the user has administrator security
privileges.
• Only increases-Allows the price to be increased, never decreased (except by a user with
administrator security privileges).
• Only with reason-Allows the price to be changed, but a reason must be selected for the
change. To use this option, you must first create a list of price change reasons (Controls >
Price Change Reasons). When a price is changed, the reason will print on the Standard Fee
Exception Report, along with the staff member who changed the price. See “Price Change
Reasons” on page 33 for more information.
• Require change-Always forces the price to be changed. This safeguard is used in cases where
the price fluctuates and ensures that the correct price is charged. The price on the item must be
set to $0.00.
13. Click OK to save your changes, or click another tab to add more information for the item.
189
Chapter 10: Setting Up Your Invoice Items
Inactivating Invoice Items
You can inactivate discontinued invoice items. Inactive invoice items will not appear on lookup lists
related to invoicing but will still appear on some reports.
Note: You cannot inactivate an invoice item that is in a group or listed as a reminder.
To inactivate an invoice item:
1. On the Lists menu, select Invoice Item. The Invoice Item List appears.
2. Select the Invoice Item to inactivate and click Update. The Invoice Item Information window
appears.
3. On the Information tab, in the Type area Status drop-down list, select Inactive.
4. Click OK to save your changes.
Deleting Invoice Items
If your practice does not need all of the invoice items provided, remove any unnecessary items.
Note: You cannot delete an item if it is used in an invoice or an estimate.
To delete an invoice item:
1. On the Lists menu, select Invoice Item. The Invoice Item List appears.
2. Select the invoice item to delete and click Delete. You are prompted to confirm the deletion. Click
Yes.
3. Click OK.
Linking Instructions to Invoice Items
Departing instructions print on the invoice based on the items invoiced. You can link an unlimited
number of departing instructions to an invoice item. While invoicing, you can add, modify, or delete
departing instructions for that specific invoice.
Prescription instructions print on the prescription label based on the items invoiced. You can link only
one prescription instruction per invoice item.
Before You Begin
• Set up your departing instructions (Lists > Departing Instructions).
• Set up your prescription instructions (Lists > Prescription Instructions).
To link or unlink a Departing Instruction or Prescription Instruction to an invoice item:
1. On the Lists menu, select Invoice Item. The Invoice Item List appears.
2. Select the item that you want to add instructions to and click Update. The item information displays
in the Invoice Item Information window.
3. Click the Instructions tab.
190
Chapter 10: Setting Up Your Invoice Items
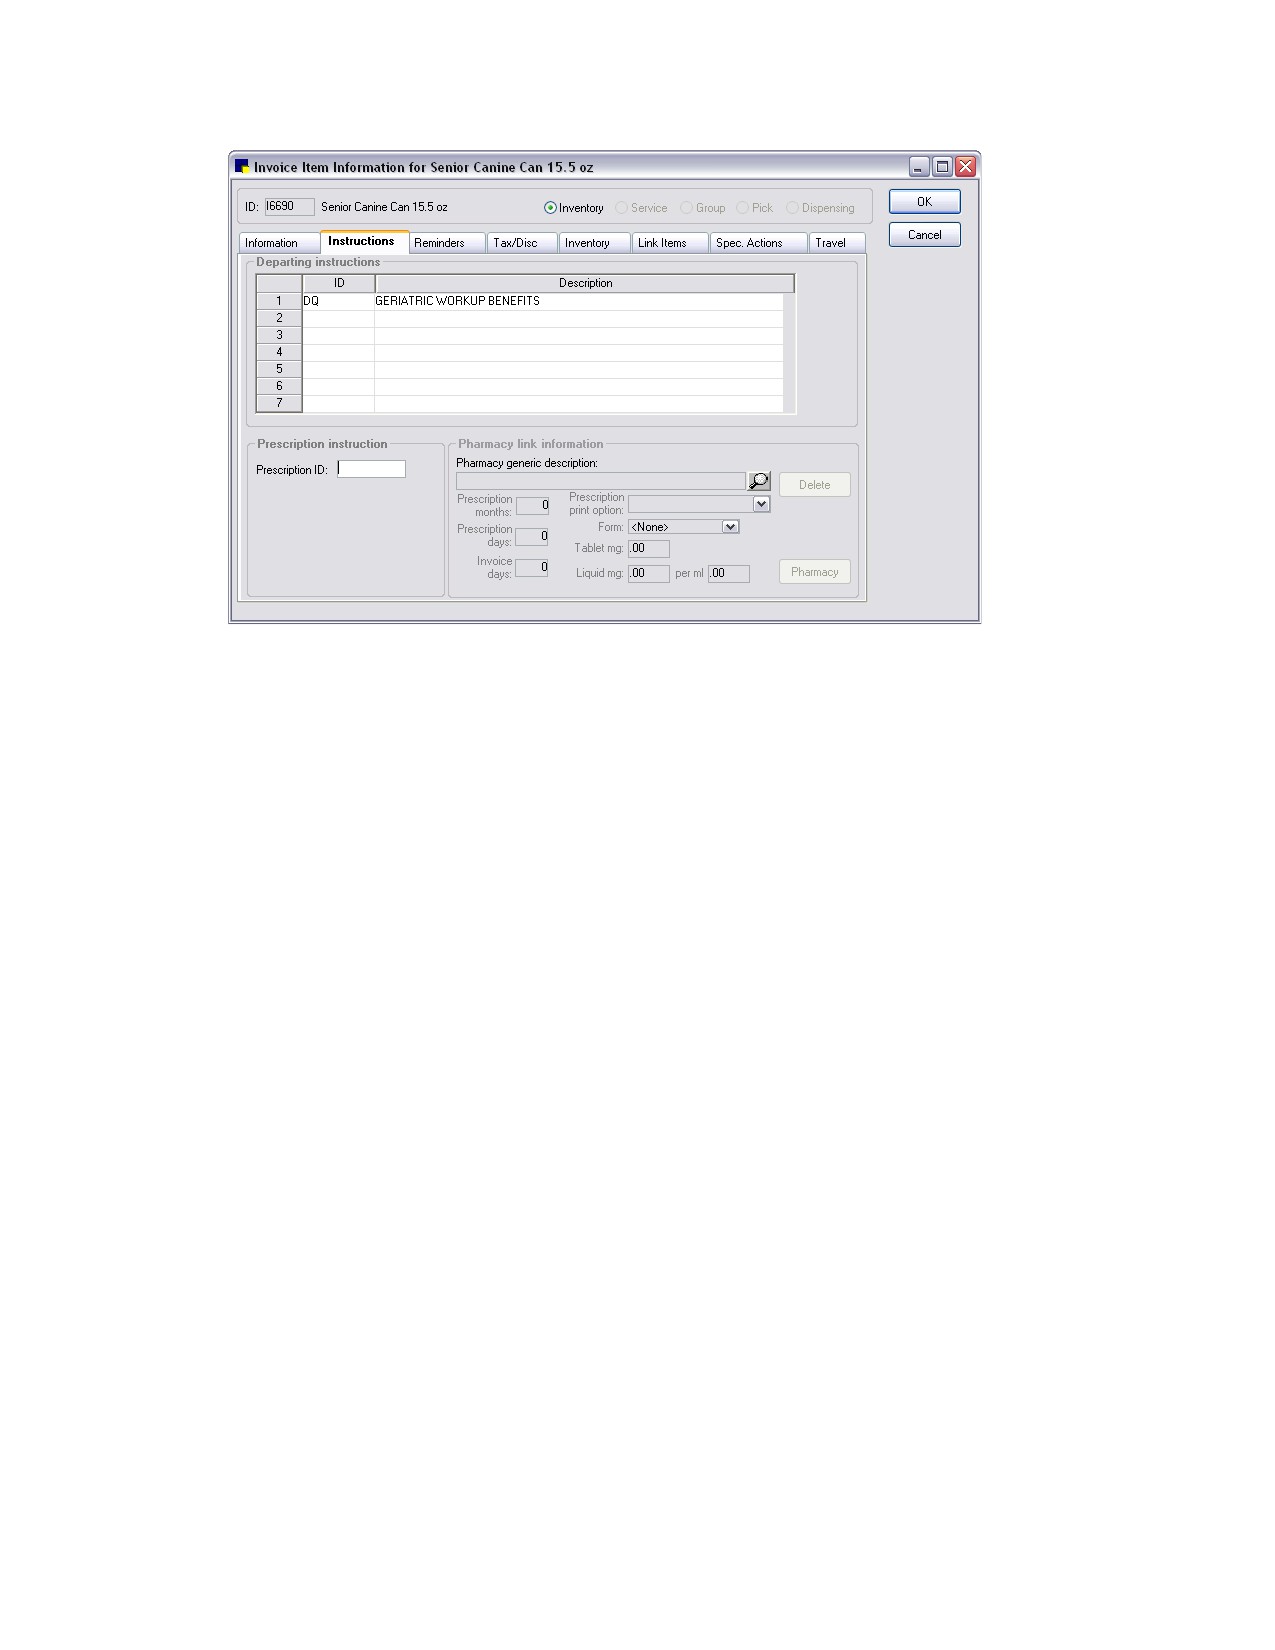
Instructions tab on Invoice Item Information window
4. In the Departing instructions area, do the following:
a. In the ID column, type a departing instruction ID or press F2 to use the Departing Instruction List
to choose a departing instruction to link to the item. The instruction(s) will print on invoices and
are listed in the patient’s medical history.
b. To unlink an item, select the departing instruction to delete and then press CTRL+D.
5. In the Prescription instruction area, do the following:
a. In the Prescription ID text box, type a prescription instruction ID or press F2 to use the
Prescription Instruction List to choose a default prescription instruction to link to the item. This
instruction will display when creating prescription labels for the item; it can be changed on an
individual basis.
b. To unlink an item, select the prescription instruction to unlink and press the DELETE key.
Note: The Pharmacy link information area settings are for use with the Pharmacy Formulary module.
6. Click OK to save your changes, or click another tab to add more information for the item.
For a list of departing instructions currently set up in Cornerstone, print a Departing Instructions
Report.
For a complete list of invoice items and their linked departing instructions currently set up in
Cornerstone, print an Invoice Item Information Report.
For a list of prescription instructions currently set up in Cornerstone, print a Prescription Instructions
Report.
191
Chapter 10: Setting Up Your Invoice Items
Adding Reminder Information to Invoice Items
Reminders are an important means of contacting clients. With a solid reminder strategy, a practice can
protect its client base, enhance client loyalty, improve preventative care, and increase revenue.
You can automatically add reminders to patients’ records if you link reminders to invoice items. When
the item is invoiced, a reminder for a future item or service is placed in the patient’s file.
If a reminder exists in a patient’s file, the reminder is satisfied whenever the future item or service is
invoiced for that patient. Many times, reminders may satisfy themselves (when the item that generates
the reminder and the item that satisfies the reminder are one in the same).
There are two types of reminders that can be set up from the Invoice Item Information Reminders tab:
• Letter-The reminder will be printed and sent to the client or emailed as a reminder to come in
for a future service(s).
• Call-Staff will contact the client by phone to remind them to come in for the service(s). Calls are
used to contact clients in more immediate situations, such as follow-up calls after a surgery and
reports on hospitalized patients.
Tip: Call reminders are often referred to as “call backs,” which can be viewed on the Daily Planner
or the Reminder Recall Report.
Common reminder strategies include the following:
• Reminders for vaccinations in a series
• Preventative care
• Prescription refills
• Call backs
Before You Begin
• See “Reminder Strategies” on page 278 to better understand reminder strategies.
• Set up reminders to satisfy sequential items and interchangeable items. See “Setting Up a
Reminder System” on page 281 for more information.
To add reminders to an invoice item:
1. On the Lists menu, select Invoice Item. The Invoice Item List appears.
2. Select the item that you want to add reminders to and click Update. The item information displays in
the Invoice Item Information window.
3. Click the Reminders tab.
192
Chapter 10: Setting Up Your Invoice Items
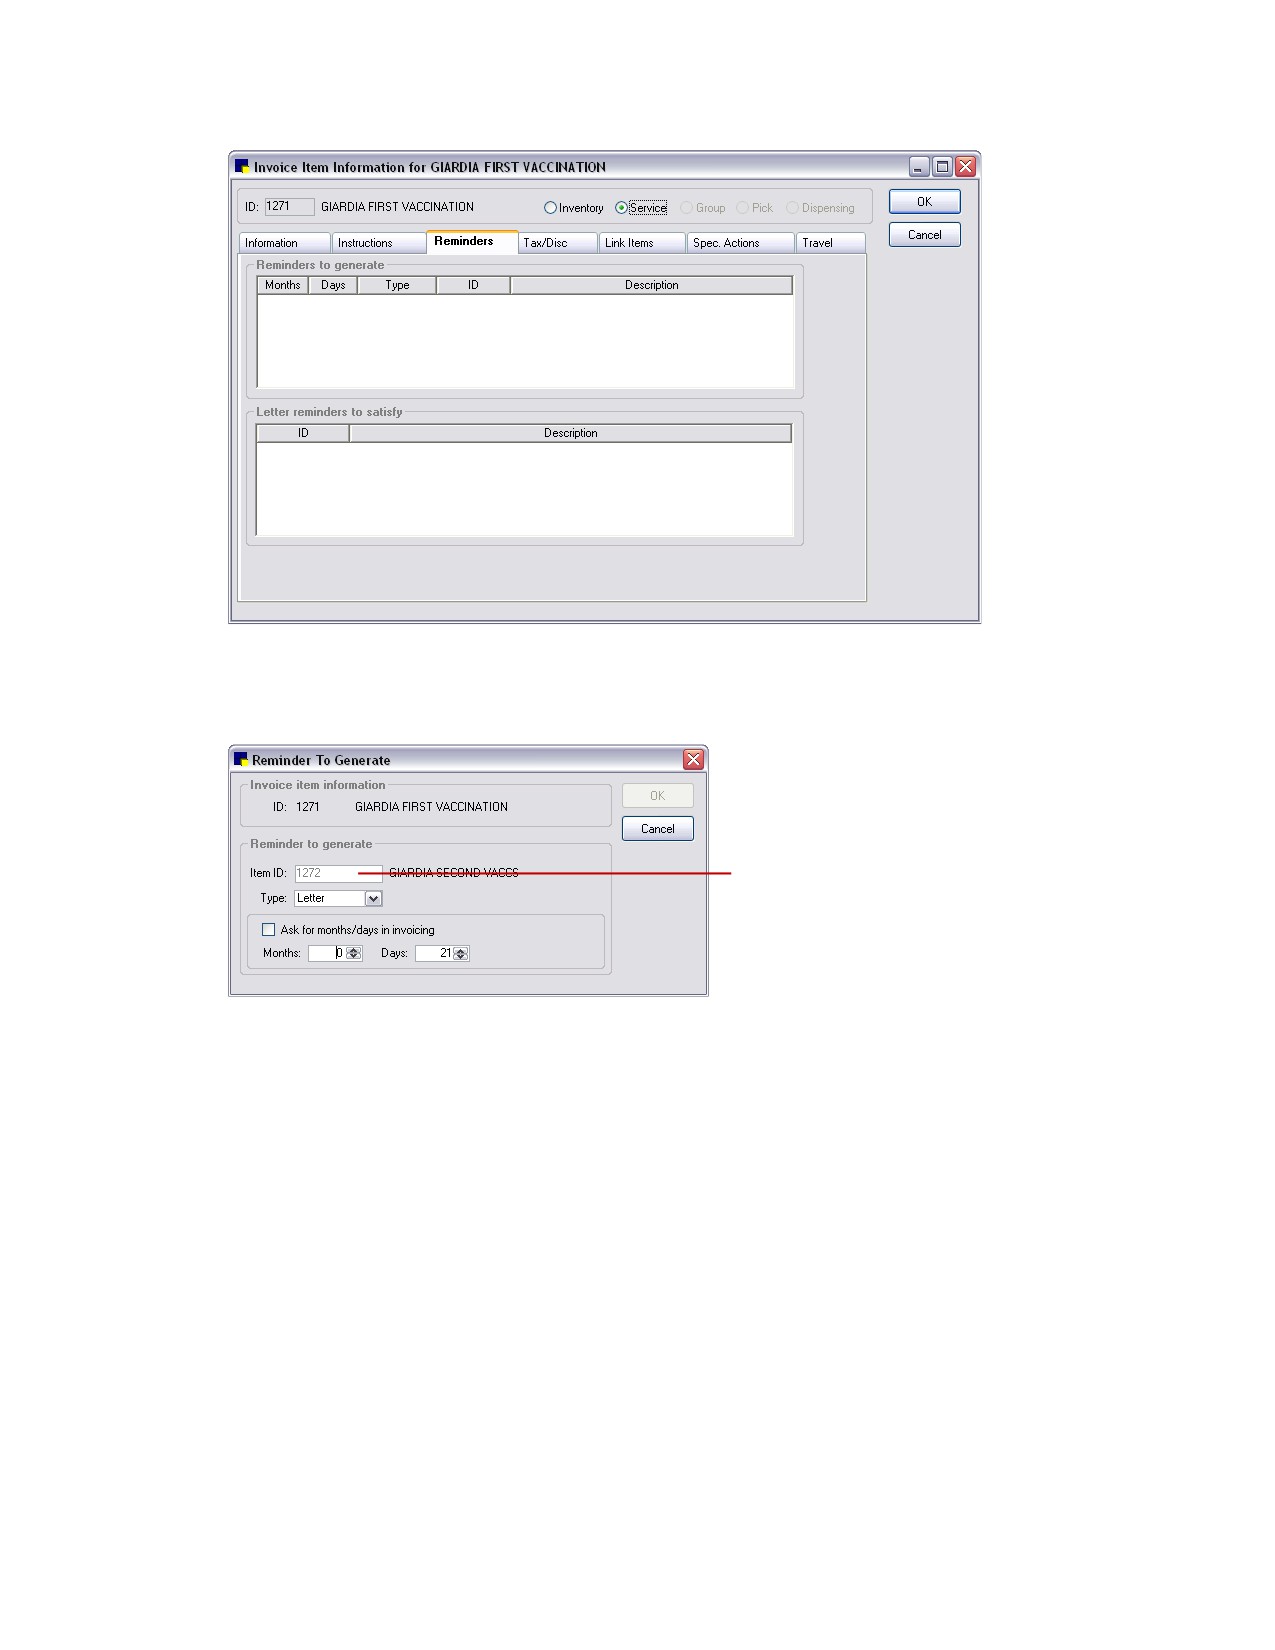
Reminders tab on Invoice Item Information window
4. In the Reminders to generate area, right-click and select New. The Reminder To Generate dialog
box appears.
The Item ID specified
here is the ID of the
future item or service
of which to remind
the client
Reminder To Generate dialog box
5. In the Reminder to generate area Item ID text box, type the item ID or press F2 to use the Invoice
Item List to choose the product or service of which you want to remind the client (such as the
service that is due next). (For call backs, this item displays as the Reminder Item in the Daily Planner
Call Backs tab.)
When the invoice item that you are creating a reminder for is invoiced, the invoice item listed in the
Reminder to generate area (as a reminder for a future service) is inserted in the patient’s history.
6. From the Type drop-down list, select Letter or Call as the method for reminding the client.
7. To set the reminder timeframe, choose one of the following options:
• If the reminder time often varies, select the Ask for month/days in invoicing check box to
prompt staff to enter the reminder due date when invoicing the client.
• If there is a standard reminder time for this item that does not often vary, specify the Months
and/or Days for the reminder.
8. Click OK to save changes and return to the Invoice Item Information window.
193
Chapter 10: Setting Up Your Invoice Items
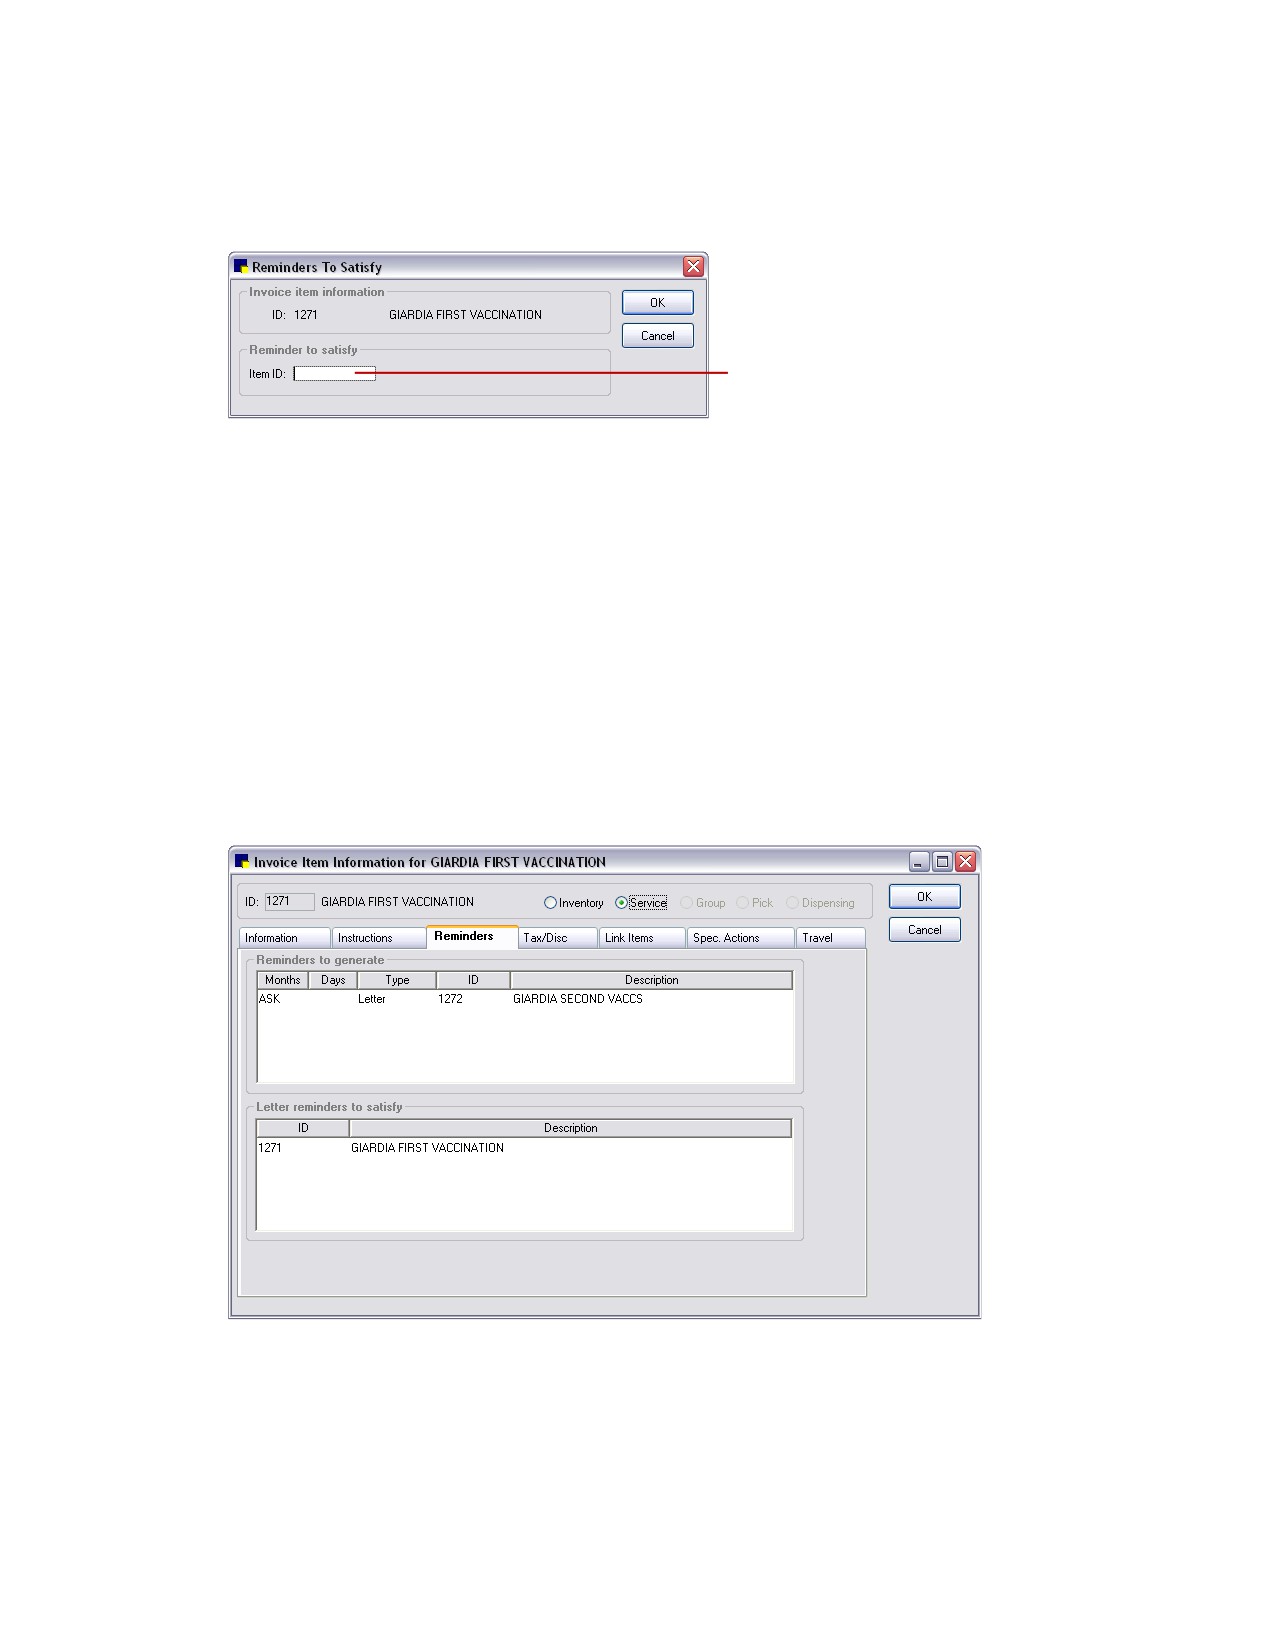
9. Reminder letters only: If applicable, in the Letter reminders to satisfy area, do the following to specify
the reminder to satisfy:
a. Right-click and select New. The Reminders To Satisfy dialog box appears.
The Item ID specified
here is the invoice item to
satisfy
Reminders To Satisfy dialog box
b. In the Item ID text box, type the item ID or press F2 to use the Invoice Item List to choose the
invoice item to satisfy (e.g., the service that was performed first). Some reminders may satisfy
themselves.
c. Click OK to save changes and return to the Invoice Item Information window.
10. Click OK to save your changes, or click another tab to add more information for the item.
For a complete list of the reminders linked to invoice items, print an Invoice Item Reminder
Information Report.
Example:
In this example, when a patient is invoiced for item 1271 (the first vaccination), a reminder for the second
vaccination (item 1272) will be created in the patient’s record. If a reminder for item 1271 exists in the
patient’s record, when the second item is invoiced, the reminder will be satisfied.
Invoice Item Reminders example
Linking Taxes and Discounts to Invoice Items
You must set up the applicable taxes and discounts for each invoice item so that Cornerstone can
automatically tax items or apply discounts at invoicing time.
194
Chapter 10: Setting Up Your Invoice Items
Note that a tax is not applied for an item on the invoice if the client is tax exempt, and a discount is
applied only if the client being invoiced is set up to receive the discount.
Tip: The taxes and discounts that appear in the Invoice Item Information window Tax/Disc tab are taxes
and discounts set up using Controls > Taxes and Controls > Discounts.
Before You Begin
• Set up the taxes your practice uses (Controls > Taxes).
• Set up the discounts your practice applies (Controls > Discounts).
To link a tax or discount to an invoice item:
1. On the Lists menu, select Invoice Item. The Invoice Item List appears.
2. Select the item that you want to link taxes or discounts to and click Update. The item information
displays in the Invoice Item Information window.
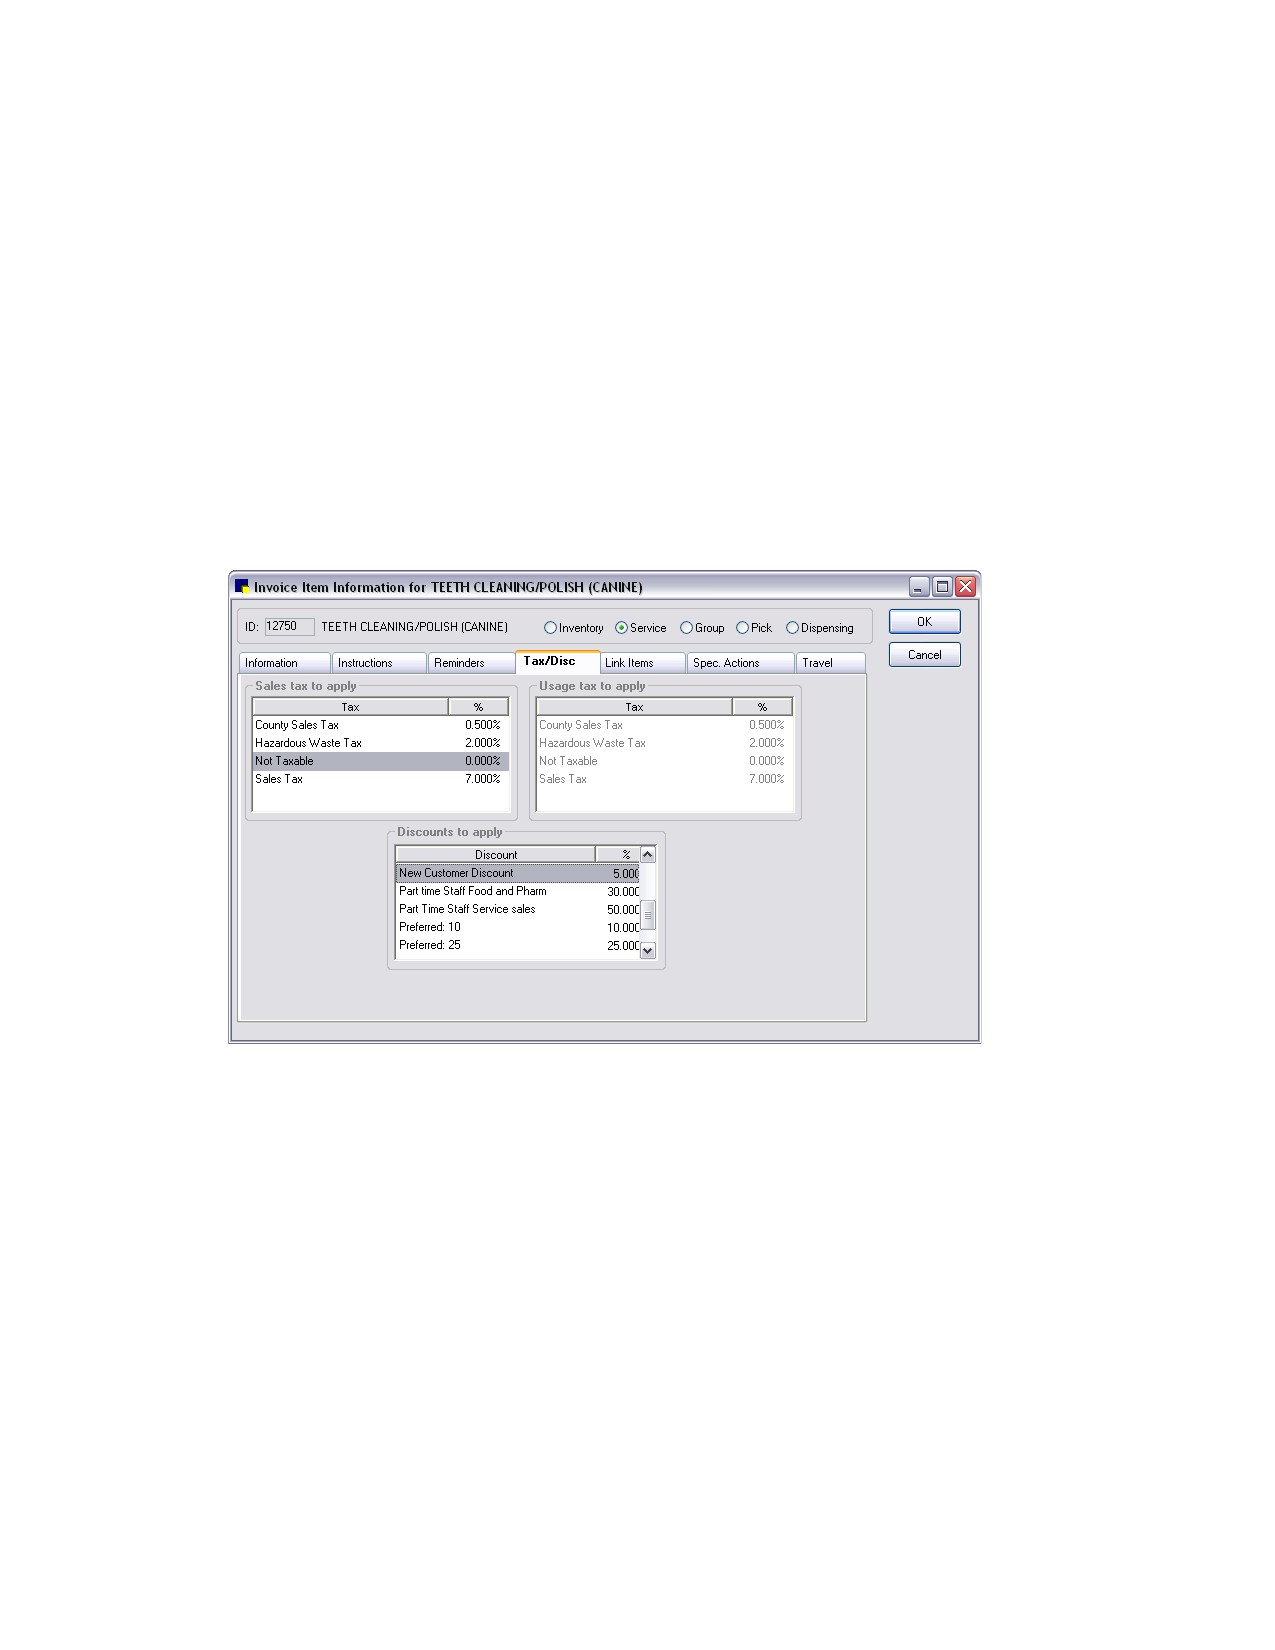
3. Click the Tax/Disc tab.
Tax/Disc tab on Invoice Item Information window
Note: If this is a new item, some taxes or discounts appear highlighted/shaded if they were
previously selected as defaults.
4. In the Sales tax to apply area, select each sales tax that applies to this item. This tax will be applied
when the client is invoiced and excludes clients marked as tax exempt in their file. (Note: It is
possible to remove a tax during invoicing.)
Tip: Do not link the Non Taxable tax designation to an invoice item.
5. In the Usage tax to apply area, select each tax to apply to items used internally by the practice but
not invoiced. (This tax is not associated with tax applied to the client when invoicing.)
6. In the Discounts to apply area, select each client discount that may apply to this item. Be aware that
if the client has one or more of the discounts applied to their account, they will receive each discount
for the item. (Note: It is possible to apply or remove a discount during invoicing.)
7. Click OK to save your changes, or click another tab to add more information for the item.
195
Chapter 10: Setting Up Your Invoice Items
Tip: To apply or remove taxes or discounts from a group of invoice items (such as a classification or
subclass), use the Mass Markup feature (select Tools > Mass Markup).
For a complete list of the taxes linked to invoice items, print an Invoice Item Tax Setup Report.
For a complete list of the discounts linked to invoice items, print an Invoice Item Information
Report.
Adding Inventory Information to an Invoice Item
Once an item is entered as an invoice item in Cornerstone, you can add the inventory information to the
item.
To add inventory information:
1. From the Lists menu, select Invoice Item. The Invoice Item List appears.
2. Select the item that you want to add inventory information to and click Update. The item information
displays in the Invoice Item Information window.
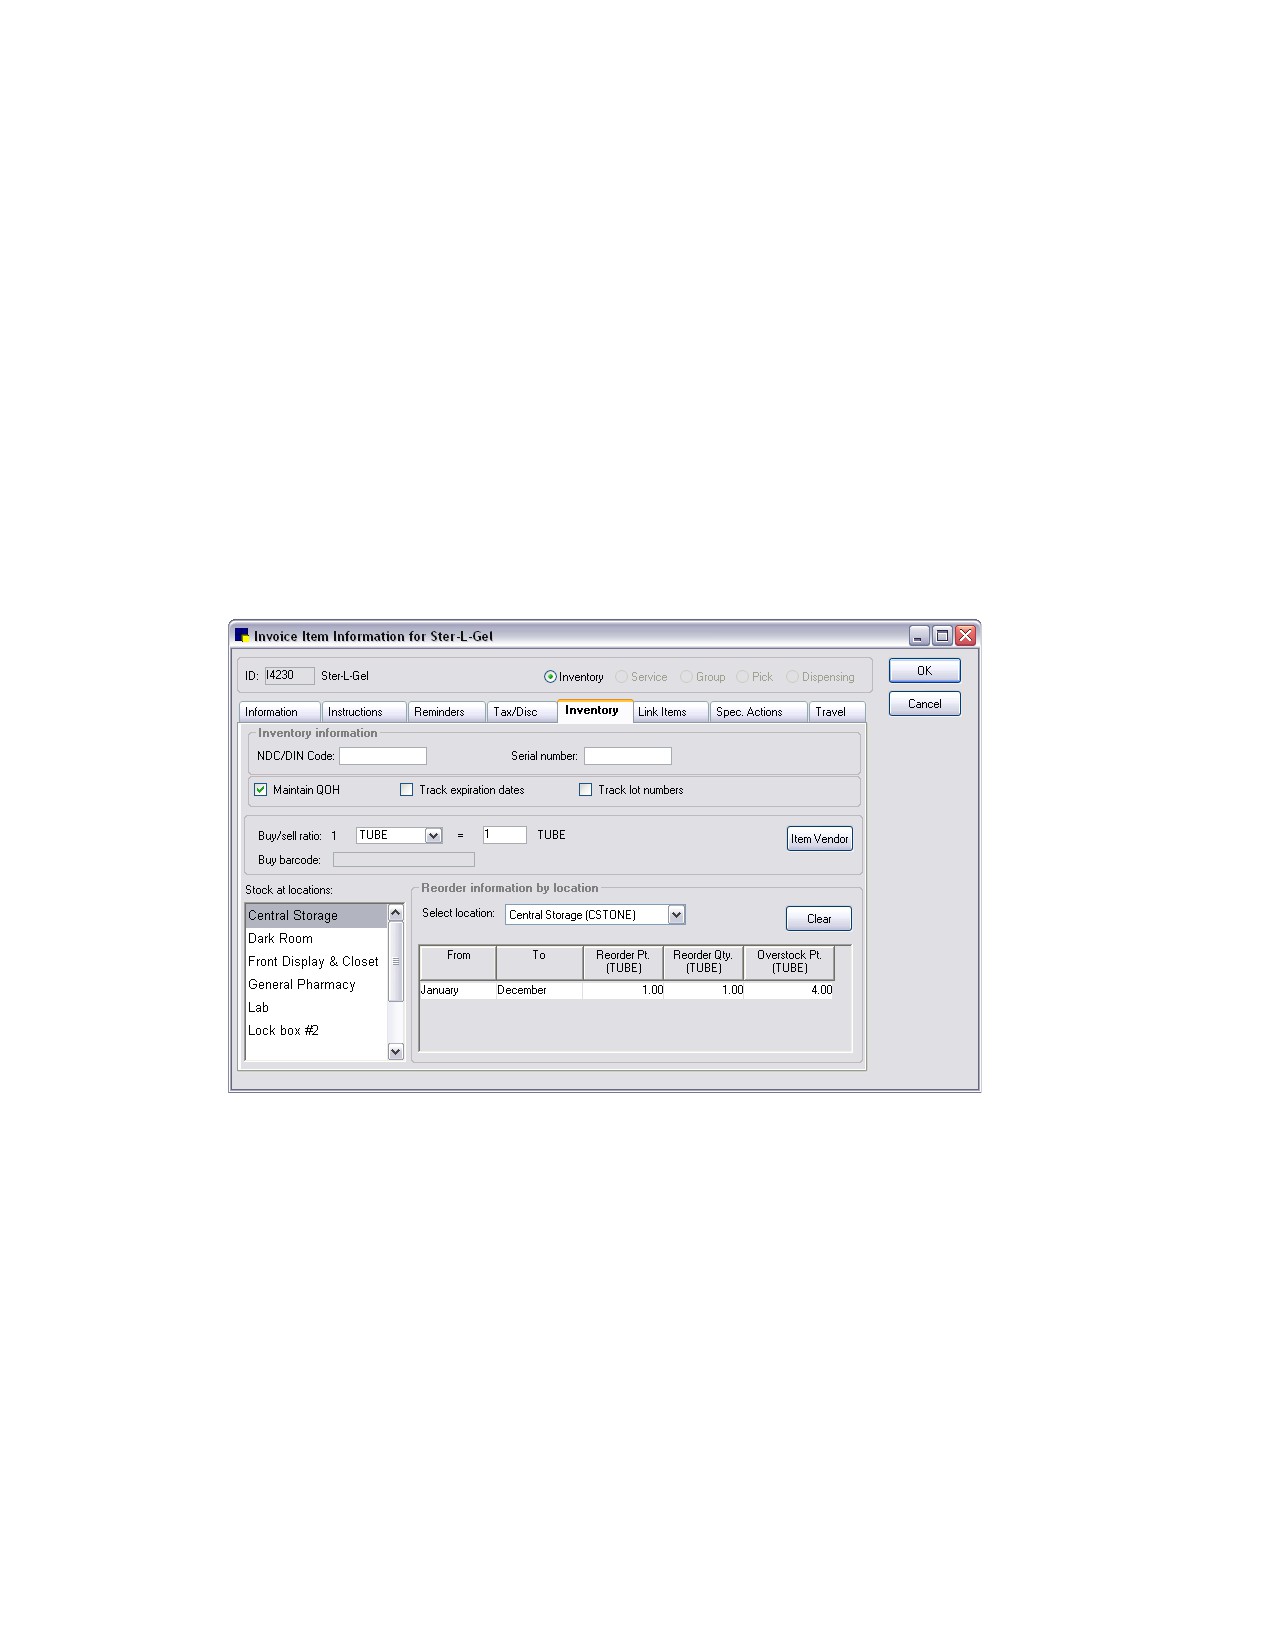
3. Click the Inventory tab.
Inventory tab on Invoice Item Information window
4. If applicable, in the NDC/DIN Code text box, type the National Drug Code/Drug Identification
Number of the item. This information will print on the Controlled Substance Report. It will also print
on prescription labels if the Print NDC/DIN check box is selected in Prescriptions defaults (see
“Prescriptions Defaults” on page 128). If the Print NDC/DIN check box is selected and an NDC/DIN
Code exists, it will print on the prescription label in place of the information listed in the Serial
number text box.
5. If applicable, in the Serial number text box, type the serial number of the item.
6. To track the item’s quantity on hand (QOH) with Cornerstone, select the Maintain QOH check box.
Note: The Maintain QOH check box must be selected to activate many of the settings on the
Inventory tab.
196
Chapter 10: Setting Up Your Invoice Items
7.
To track the item’s expiration date within Cornerstone, select the Track expiration dates check box.
Expiration dates can be tracked only if the item is marked to Maintain QOH; this information must
then be entered when receiving or depleting inventory.
8.
To track the item’s lot numbers within Cornerstone, select the Track lot numbers check box. This
allows staff to track this drug by lot number. Lot numbers can be tracked only if the item is marked
to Maintain QOH; this information must then be entered when receiving or depleting inventory.
9.
If maintaining the item’s quantity on hand, specify the Buy/sell ratio by doing the following:
a. From the drop-down list, select the Buy unit of measure to indicate how the practice purchases
the item (e.g., 1 case).
b. In the text box to the right of the = sign, enter the total number of sellable units (e.g., 24 cans)
contained in the purchase unit of measure. (Note: The Sell unit of measure is assigned on the
Information tab.)
Note: “Item on Order” displays if the item is on a purchase order; you cannot change the buy/sell
ratio for an item on order.
Examples:
If you sell Amoxicillin (50 mg.) by the tablet, but purchase it in bottles that contain 100 tablets, the
buy-to-sell ratio would be 1 (bottle) = 100 (tablets). Other examples include 1 case = 24 can, 1 bag
= 1 bag, 1 bottle = 500 tablets, 1 tray = 50 doses.
Tip: For bottle/tablet ratios where a client may purchase 250 or 500 tablets as one invoice item, set
the buy/sell ratio to 1:1. Then, when receiving, staff must enter the number of tablets that were
received and then calculate the unit cost per tablet.
10. If your practice uses barcodes, in the Buy barcode text box, scan (or type) the barcode used when
the practice buys the item from a vendor. For example, if your practice purchases canned dog food
from the vendor by the case, scan the barcode located on the case packaging.
Note: The Buy barcode text box is available only if the buy/sell ratio is greater than 1:1.
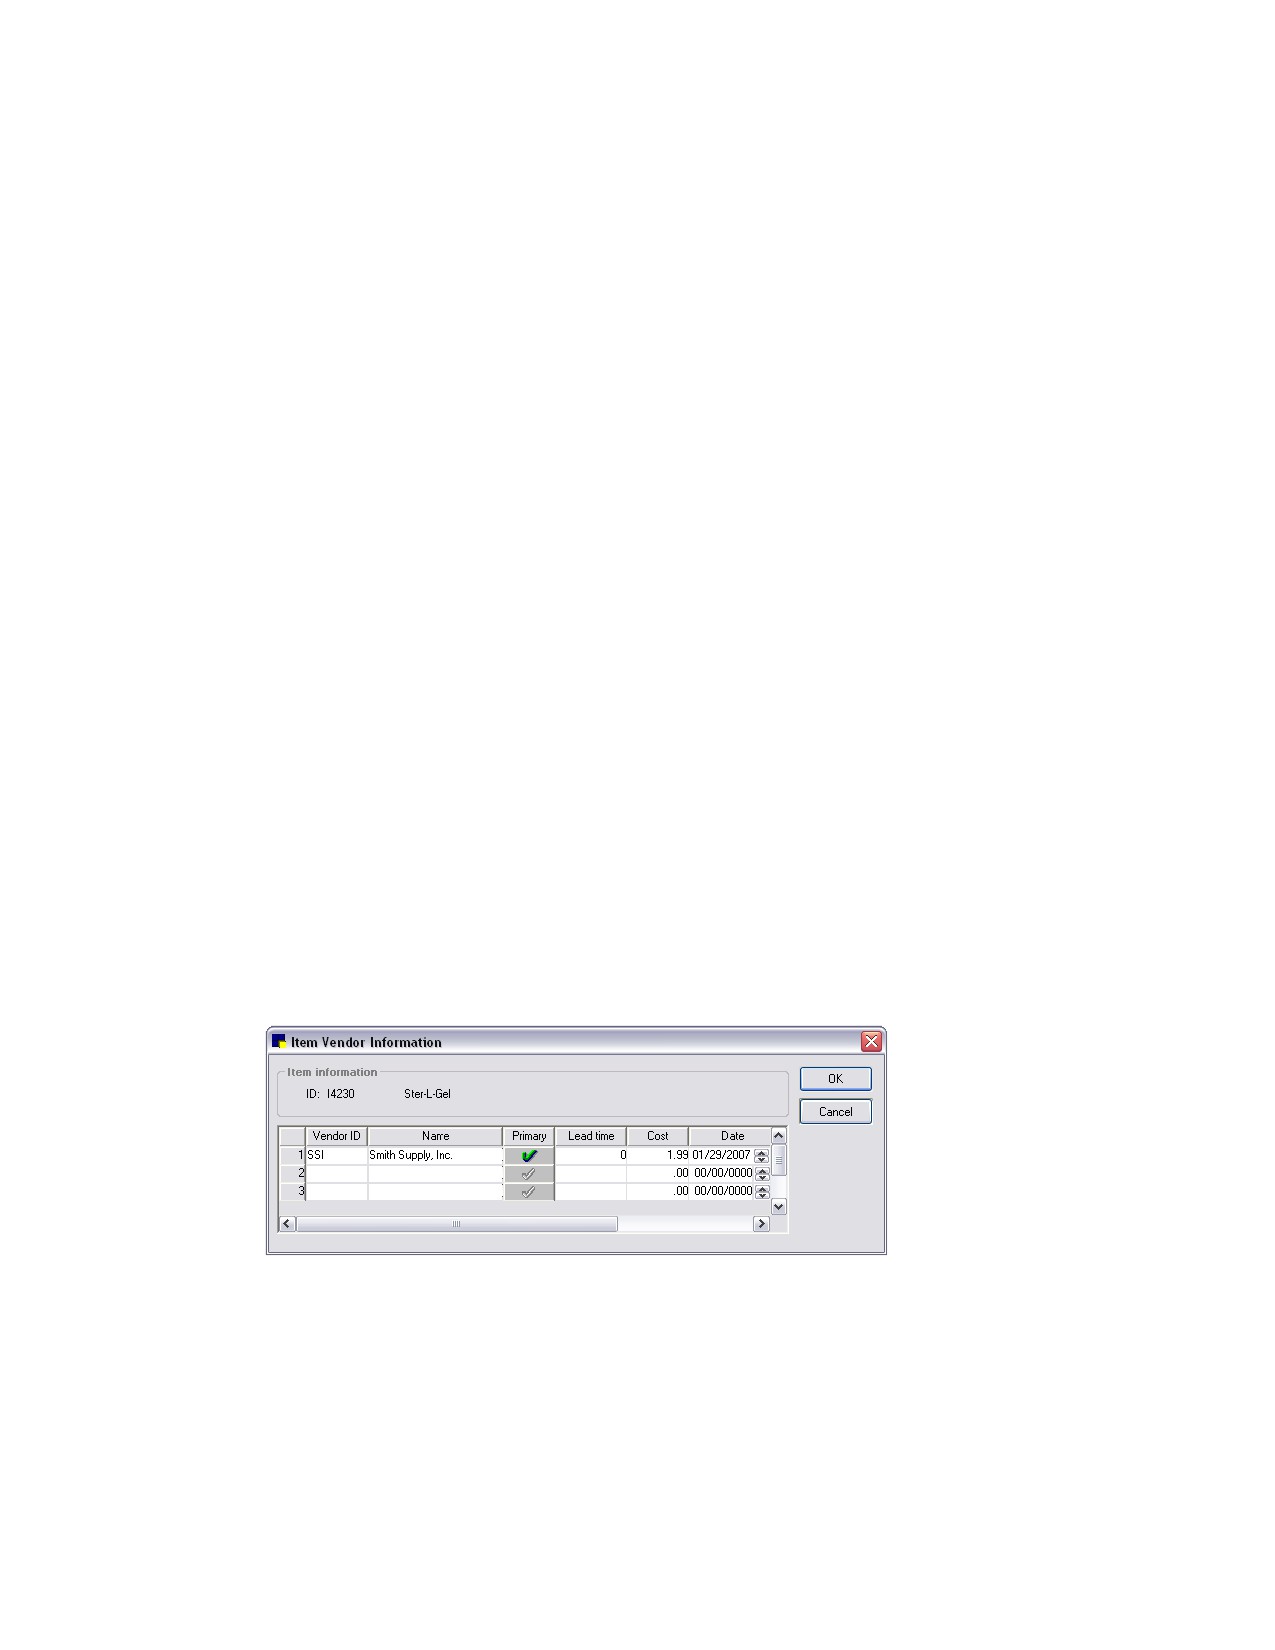
11. To display and/or set up information about the vendor(s) used to purchase this product:
a. Click the Item Vendor button to display the Item Vendor Information dialog box.
Note: Item Vendor Information is available for all inventory items, regardless of whether quantity
on hand is tracked for the item. If the item is received by a vendor that is not currently on this
list, it will automatically be added after posting the receipt.
b. To add a vendor for this item, in the Vendor ID column, type the vendor ID or press F2 to use
the Vendor List to choose a vendor. Note that you can have multiple vendors for each inventory
item, but you can specify only one primary vendor.
197
Chapter 10: Setting Up Your Invoice Items
c. To designate a primary vendor for this item, click the Primary check mark button for the vendor
that the item is ordered from a majority of the time.
d. In the Lead time column, enter the number of days it usually takes to receive the item after an
order is placed.
e. In the Cost column, type the item’s cost (per Buy UOM).
f.
In the Date column, type a date or press F2 to use the Calendar tool to choose a date, and then
press TAB.
Tip: The Cost and Date are automatically updated when items are received from this vendor,
unless the received item is marked Special Price. It displays the last cost the practice brought
the product for and the last date it was received.
g. In the Vendor item ID column, type the vendor’s item ID (product ID). If the vendor’s item ID is
provided, it will automatically print on purchase orders and on the Inventory - Vendor Information
Report, which is helpful if faxing or emailing orders.
h. In the Contact column, type the name of the vendor contact person, if applicable.
i.
To add or view a note about this inventory item, click the Notes
button. (This information is
only available via the Item Vendor button.)
j.
Click OK to save your changes and return to the Inventory tab.
12. On the Inventory tab, in the Stock at locations list (bottom left), click the location or locations
where this item will be stored. If the Maintain QOH check box is selected, you must select at least
one location.
Note: If you have items marked to maintain QOH and they are already assigned the Central Storage
location, you can use the Move Items tab in Tools > Invoice Item Setup to quickly assign many
items to a different location all at once.
13. In the Reorder information by location area, to set up reorder information, do the following:
a. Multiple location inventory only: Scroll through the Select location drop-down list of locations
where the item is stored and select a location to which the reorder information will apply. The
associated reorder information displays in the area below the selected location.
b. If setting up seasonal reorder information for the item, after selecting the location, select the
monthly ranges for the breakdown of the seasons using the From and To text boxes.
Note: Quantities for the reorder point, reorder quantity and overstock point can be set to 0.00,
as long as they are not set up for seasonal reordering.
c. In the Reorder Pt text box, specify the lowest quantity allowed (in selling units) for this location
before the item should be placed on the list of suggested items to order. If the item reaches or
gets below this reorder point, the item is automatically placed on the Suggested Items list,
accessed from the Purchasing Work List window. (Note: An alert box will appear when the item
gets below this reorder point when placed on the invoice if the Display below reorder point
warning default is selected in Invoice defaults. See “Invoice Defaults” on page 112.)
d. Type the amount to purchase, based on the buying unit, once the reorder point is reached in the
Reorder Qty text box. This recommended reorder quantity will display on the Purchasing Work
List’s Want/Suggested List.
198
Chapter 10: Setting Up Your Invoice Items
Example:
The practice has the rabies vaccine set up as 1 tray = 50 doses with a reorder point of 50
doses, a reorder quantity of 2 trays, and an overstock of 101 doses. If the practice has more
than 50 doses, the Purchasing Work List does not display the item because there is enough in
stock according to the reorder information. However, if the vaccine has 50-0 doses of the
vaccine, the Purchasing Work List will display 1 tray as the suggested reorder quantity. If the
item gets below 0 doses, the Purchasing Work List will display 2 trays as the suggested reorder
quantity.
e. Type the maximum amount of the product the practice would like to keep in stock at the
location, based on the selling unit, in the Overstock Pt text box.
Tip: The calculation used for this is Minimum overstock: Reorder Pt + Reorder Qty (converted
to how many selling units this would be) + 1 selling UOM.
f.
Type the Reorder Pt., Reorder Qty., and Overstock Pt. for each period.
g. If necessary, click the Clear button to remove the reorder information that displays.
Tip: Most practices sell more heartworm preventatives from March through August. To make sure
enough stock is maintained to meet the higher demand (without overstocking the product during
periods of lower demand), adjust the Reorder Information. Each season (monthly range) you define
must have a Reorder Point, Reorder Quantity, and Overstock Point.
14. Click OK to save your changes, or click another tab to add more information for the item.
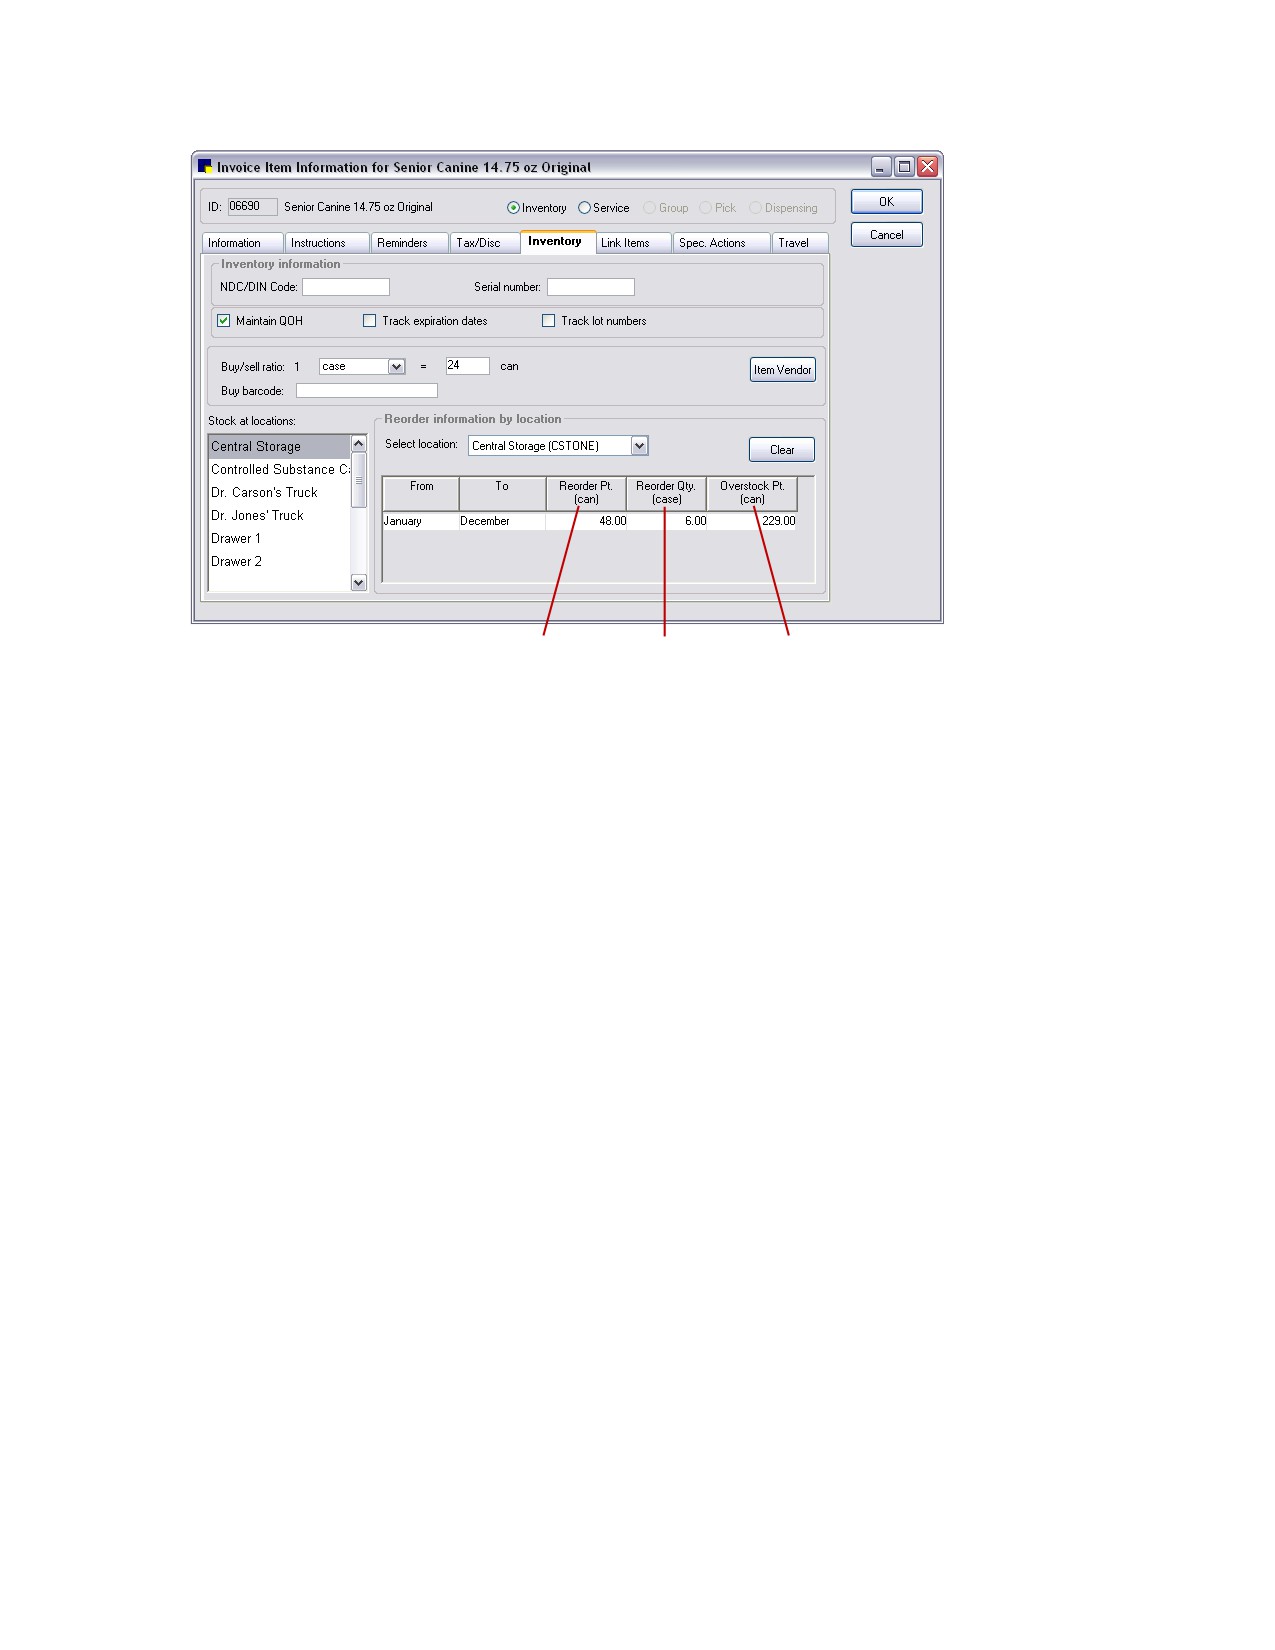
Example:
This example will show the setup for an item that is ordered in cases of 24 cans. Case is the Buy UOM.
The Buy/Sell Ratio is 1 (case) to 24 (cans).
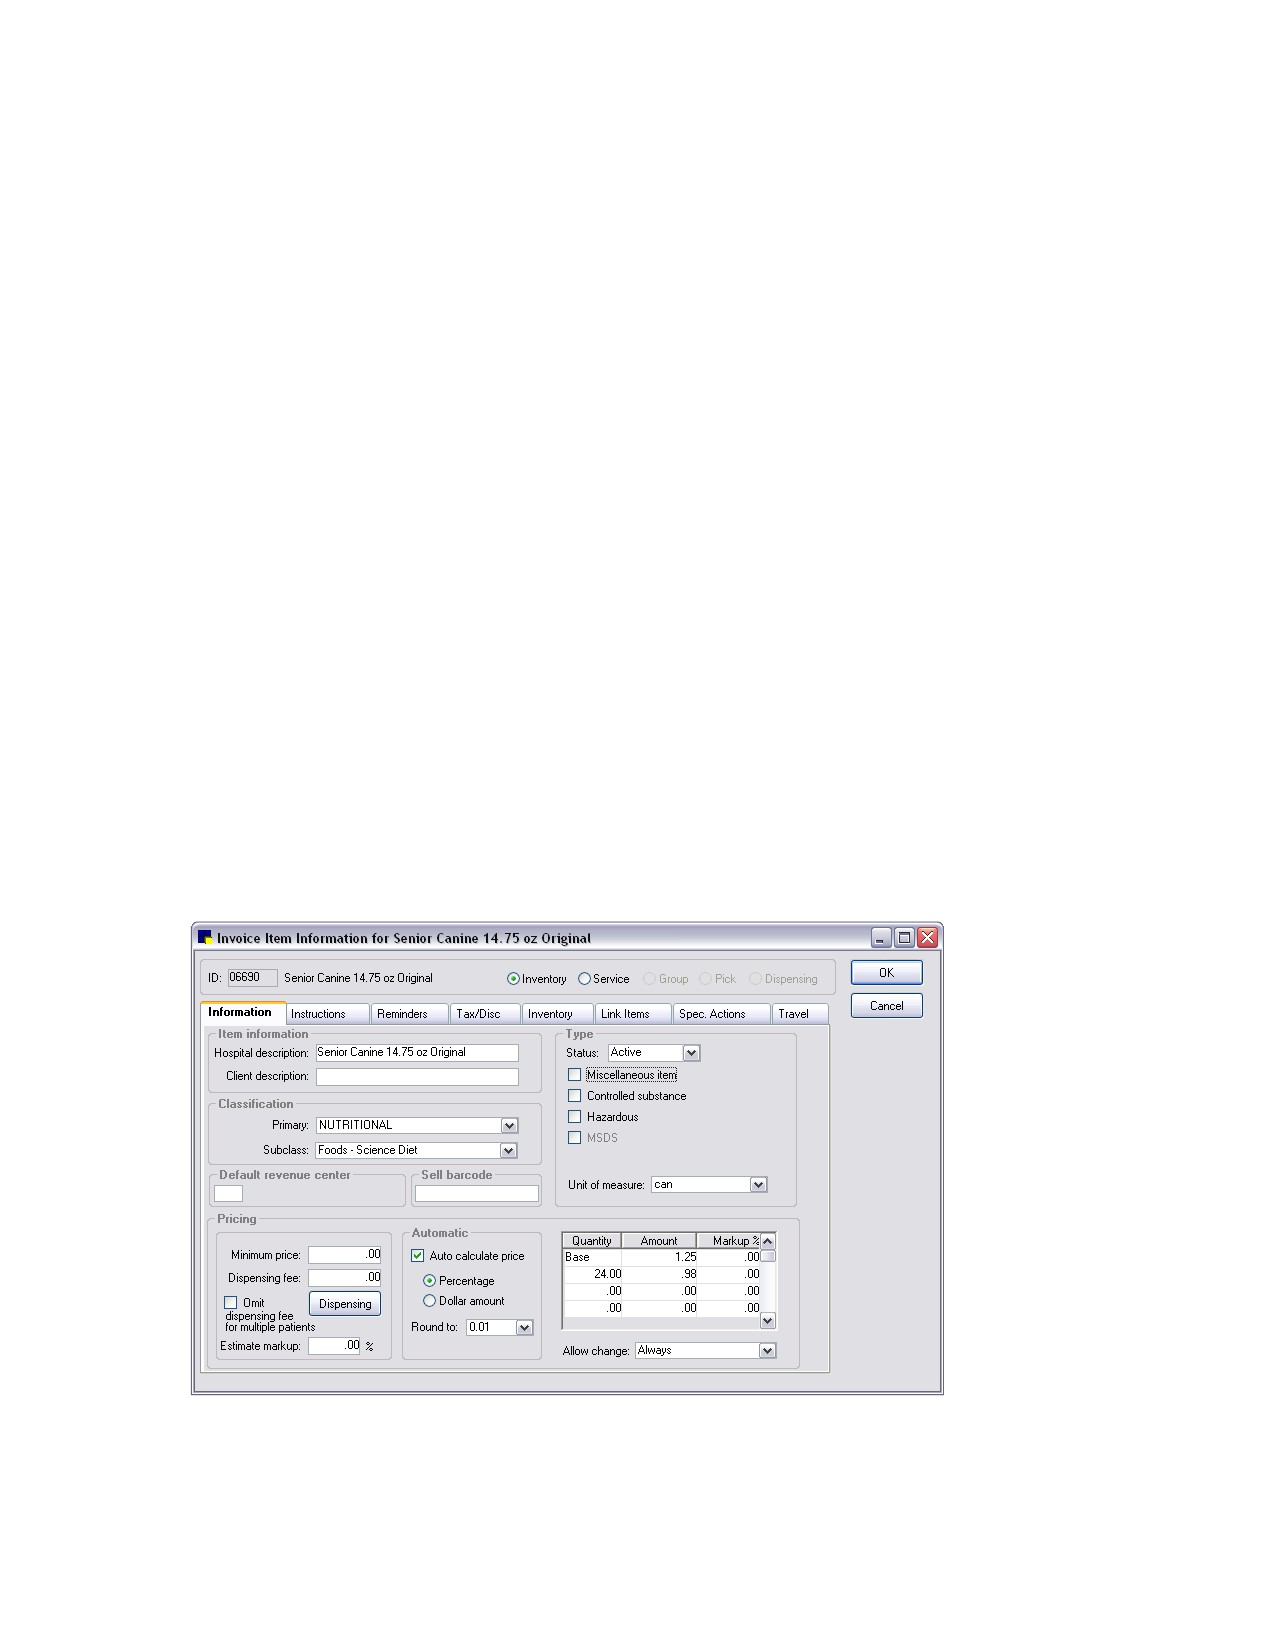
First, we set up invoice item 06690 in Cornerstone as Senior Canine 14.75 oz Original, which the practice
sells by the can (for $1.25) or by the case of 24 (at $0.98 per can).
Next, we determine the number of cans we want to have on the shelf when it’s time to reorder this item.
This information is on the Inventory tab of the Invoice Item Information window.
199
Chapter 10: Setting Up Your Invoice Items
The reorder
The reorder
The overstock
point uses
quantity uses
point uses the
the Sell UOM
the Buy UOM
Sell UOM
Let’s choose 48 as the reorder point. When the quantity on hand of item 06690 falls to 48 cans,
Cornerstone Inventory suggests you order more.
A typical order of this item is 6 cases; this is the reorder quantity. Cornerstone Inventory automatically
enters 6 cases when item 06690 is added to an order as a suggested item. You can change the number
(and UOM) in the order itself.
If there are 12 cans on the shelf at the time of the order, Cornerstone Inventory notes that we first need
36 cans (1.5 case) to get the inventory level up to the reorder point. Next, Cornerstone adds the reorder
quantity of 6 cases. In this scenario, Cornerstone will suggest that you reorder 7.5 cases (1.5 + 6).
The final calculation to determine is the overstock point. If an order will cause the quantity on hand to
reach this number, a warning appears in the order. The minimum overstock point is 1 (Sell UOM) greater
than the reorder point plus the reorder quantity. So, in this example, the overstock point must equal at
least 229 (cans).
1 Sell UOM + reorder point + reorder quantity =
1 can + 48 cans + 7.5 cases =
1 + 48 + 180 (cans) = 229 (cans)
Your reorder point can also be set by month to cover seasonal usages. For example, if you have product
that is used mostly in the summer, enter May through September in the reorder information.
Linking Inventory Items
Use the Link Items tab in the Invoice Item Information window to:
• Identify inventory items that you want to track as they are used in services or internally
• Group items you do not want listed separately on invoices
Linked items are deducted from quantity on hand (QOH) through Internal Usage or from the invoice.
Note: Only items marked to track QOH can be linked to another inventory item or to a service item.
200
Chapter 10: Setting Up Your Invoice Items
The difference between a group item and a link item is that each item within a group item appears
separately on invoices. Group items also cannot be deducted through internal usage. See “Setting Up
Invoice Item Groups” on page 213 for instructions on setting up group items.
Note: Taxes are applied only to the invoice item. Individual items within the Link Items tab will not have
tax applied; therefore, adjust the invoice item’s tax accordingly.
To set up a Link Item:
1. From the Lists menu, select Invoice Item. The Invoice Item List appears.
2. Select the item to be linked and click Update. The item information displays in the Invoice Item
Information window.
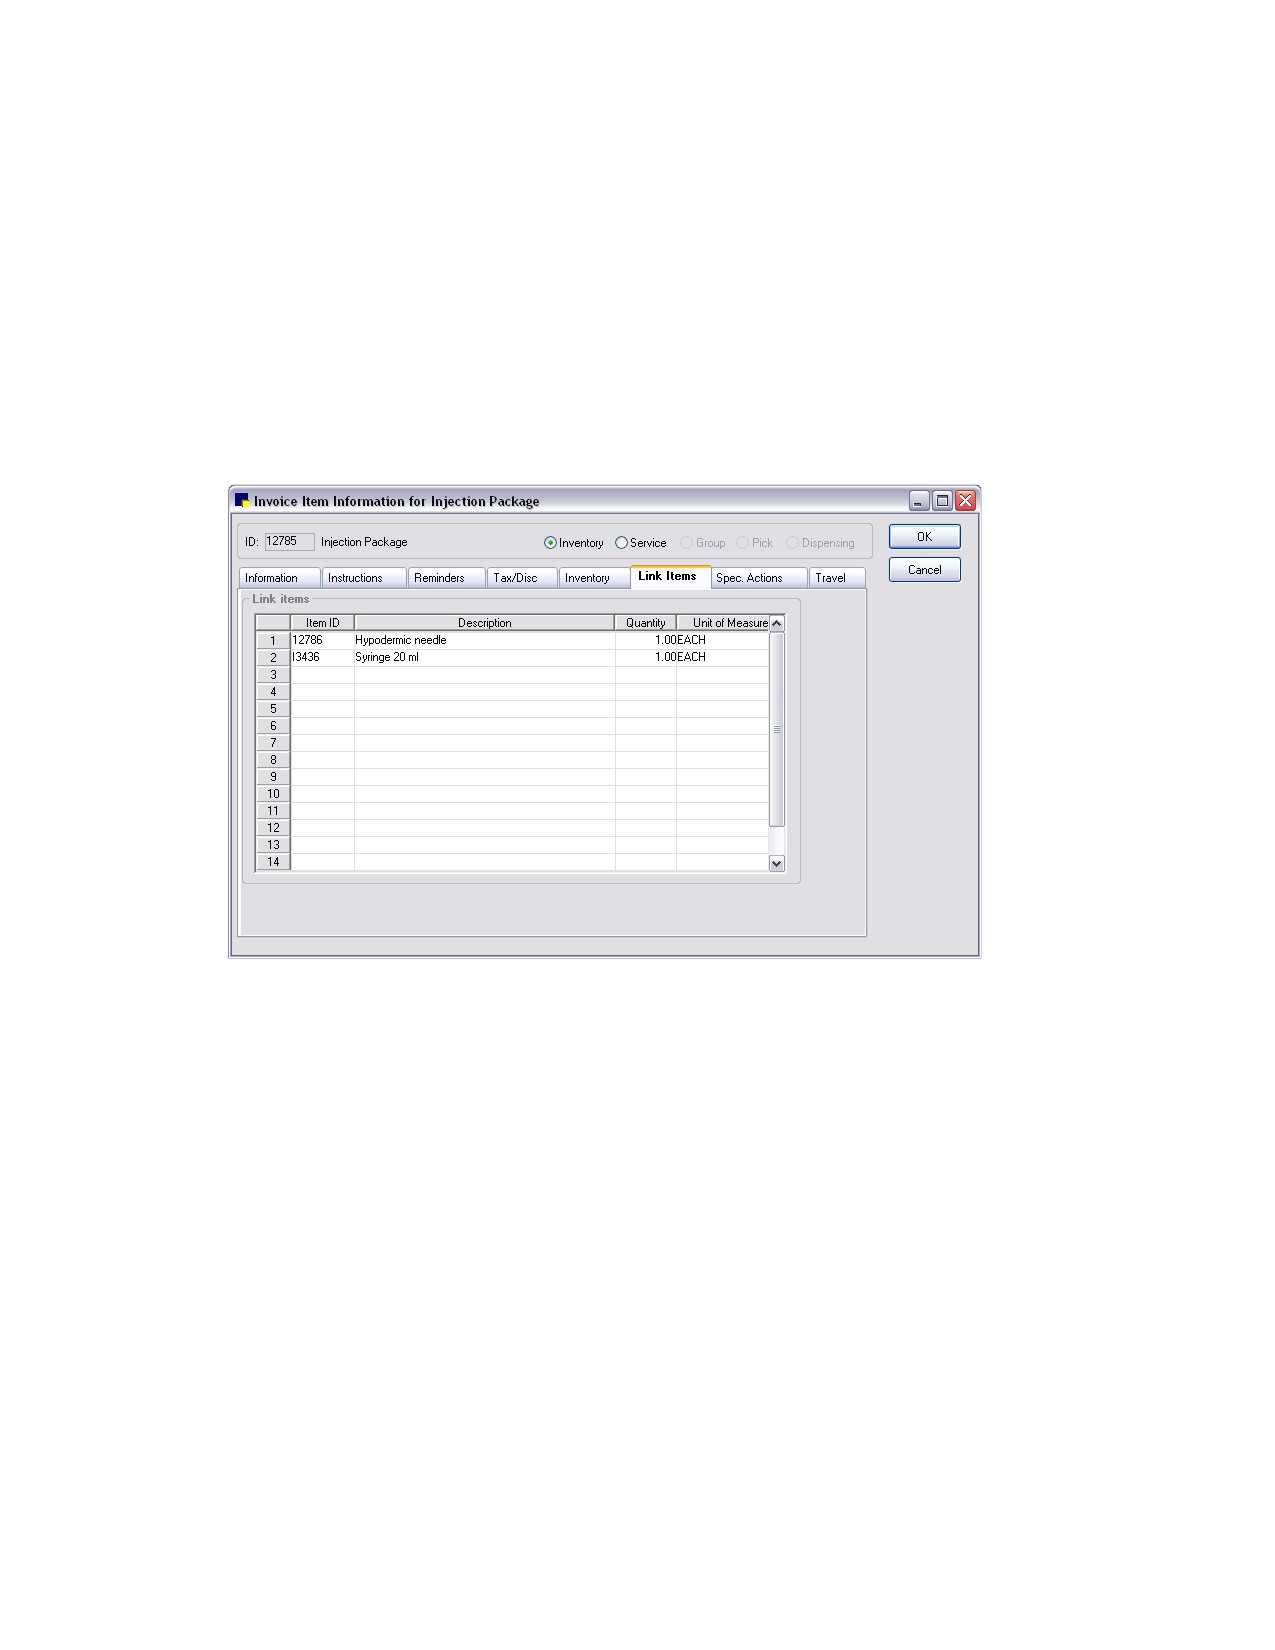
3. Click the Link Items tab.
Link Items tab on Invoice Item Information window
4. In the Item ID column, type the ID of the item to link to the invoice item or press F2 to use the
Invoice Item List to choose the item. (Items must maintain QOH and have reorder information set up
before you can link them on the Link Items tab.)
¾ The name of the inventory item will display in the Description column, and the selling unit of
measure (UOM) for the item will display in the Unit of Measure column.
5. In the Quantity column, type the quantity of the item to remove from inventory (based on the sell
UOM).
6. Repeat steps 4 and 5 as needed to link additional items.
7. Click OK to save your changes, or click another tab to add more information for the item.
Example:
A practice usually sells a flea pills product in a package of 6 pills. They also occasionally sell the flea pills
individually. To keep an accurate QOH total for this product, the practice maintains quantity on hand
only on the package of 6 pills. Using the Link Items tab, they linked a sixth of a package to the
individual flea pill (Quantity of 1 and UOM is Pill). Therefore, each time they sell 1 pill, the computer
automatically takes 1 out of the pack of 6.
201

Chapter 10: Setting Up Your Invoice Items
Tip: Set up an inventory invoice item called Injection Package. Link one syringe and one hypodermic
needle to this item, then link the Injection Package item to each of your vaccinations. (Make sure that
you have already set up Reorder Information for the items "hypodermic needle" and "syringe" to use the
items within Cornerstone Inventory.)
Setting Up Invoice Items to Initiate a Special Action
A special action is an option you can set up for an invoice item so that use of the item on the Patient
Visit List (PVL) or invoice will automatically prompt Cornerstone to perform a certain action.
The following table lists the special action options and gives examples of common uses:
Special Action
Description
When to Apply
Information to Provide
During Setup
Feeding Guide
Set up a Hill’s® Pet Food
Optional on invoice
N/A
Software
product (invoice item) to print
special feeding instructions
you can provide to clients.
Image Request
(Available for Service items
Immediately on invoice/PVL
: Click if you want to
(IDEXX SmartLink*
only)
select image shots to be
Digital Imaging
Set up an imaging item to
associated with this item
module only)
initiate an imaging request.
by default.
Exam Description: Type
any needed shot request
notes to display with the
invoice item by default
when an image request
is made for this item.
Lab Request
Set up a lab item to initiate a
Immediately on invoice/PVL
Profile: Click in the right-
(Lab module only)
lab request.
most text box and press
F2 to search for and
select the lab profile to
link to the invoice item.
Mark as Deceased
Associate with special
Optional on invoice
N/A
invoice items (such as
euthanasia or cremation) to
change the patient’s status to
Deceased during the
invoicing process. You will
also have the option to
remove any future
appointments associated
with the patient.
Prescription Label
Associate with prescription
• Optional on invoice
N/A
invoice items so staff is
• Immediately on invoice/PVL
prompted to create a
prescription.
202

Chapter 10: Setting Up Your Invoice Items
Special Action
Description
When to Apply
Information to Provide
During Setup
Print Document
Associate with an invoice
• Optional on invoice
Doc ID: Click in the text
item so that a specified
box and press F2 to
• Before invoice is posted
document automatically
search for and select the
• Immediately on invoice/PVL
opens in the Cornerstone
document template to
• Print after invoice is posted
Editor when the designated
print.
‘When to apply’ action takes
Note: Verify the selected
place. At that point, staff can
document template
add information to the
does not contain this
document and save it in
item as a default invoice
patient history and/or print it.
item, as this would
create a perpetual loop.
Sex Modification
Associate with sex
Optional on invoice
N/A
modification invoice items
(such as ovariohysterectomy)
to change the patient’s sex
during the invoicing process.
If you have assigned
Modified Sexes for applicable
patient sexes, Cornerstone
will update the sex in the
patient’s record
automatically.
Update Microchip ID
Associate with an invoice
• Optional on invoice
N/A
item so that staff will be
• Before invoice is posted
prompted to enter the
• Immediately on invoice/PVL
patient’s microchip ID.
Update Vital Signs
Associate with certain invoice
• Optional on invoice
Weight days: Type the
items (such as exams and
number of days before
• Before invoice is posted
anesthesia) so that staff will
staff must enter a new
• Immediately on invoice/PVL
be prompted to enter the
weight for a patient
patient’s weight if it is not
(default is 30 days).
current. Staff can also access
the Vital Signs window, if
necessary, to enter additional
vitals for the patient.
Vaccine Tag
Associate with vaccine/
• Optional on invoice
N/A
vaccination invoice items so
• Before invoice is posted
that staff will be prompted to
• Immediately on invoice/PVL
issue a rabies/vaccine tag for
the patient (and print a rabies
certificate, if applicable).
Notes:
• If you process the Update Vital Signs special action during invoicing or on the PVL, Cornerstone
displays the weight entry dialog box. If you process it from the Whiteboard Patient Treatments
window, Cornerstone displays the full Vital Signs entry and viewing window.
203

Chapter 10: Setting Up Your Invoice Items
• Vaccination invoice items must be set up to initiate the Vaccine Tag special action, which
displays the Vaccine Tag window during invoicing. This is the only way to issue a new
rabies/vaccine tag (and rabies certificate) for a patient.
• To make sure that all patients who are invoiced for items with the special action Mark as
Deceased are changed to a status of Deceased, select the Automatically mark patient as
deceased check box in the Invoice defaults. See “Invoice Defaults” on page 112.
Options for When to Apply a Special Action
The following table describes the special action When to apply options that determine when the special
action will be applied during invoicing or on the Patient Visit List (PVL).
When to Apply option
Result on the Invoice/Patient Visit List
Optional on invoice
With the invoice item added to the invoice/PVL, staff can choose when to perform
the special action:
• To process the special action at any time while in the invoice/PVL, click the
Special button, highlight the desired special action, and click Process.
• If the special action has not yet been processed when the invoice/PVL is
saved or posted, the Special Action dialog box appears. At this point you can
highlight the desired special action and click Process or bypass it by clicking
Continue.
Note: For the Mark as Deceased and Sex Modification special actions, the special
action can be processed only on the invoice, not on the Patient Visit List.
Before invoice is posted
With the invoice item added to the invoice, this option displays the Special Action
dialog box when you click the Post button on the invoice (before the invoice is
actually posted). At this point you can highlight the desired special action and click
Process or bypass it by clicking Continue.
Note: For the Print Document special action, information on the invoice will not be
available for inclusion in the document.
Immediately on invoice/PVL
When the invoice item is added to the invoice/PVL, Cornerstone immediately
processes the special action or displays the Special Action dialog box. At this point
you can highlight the desired special action and click Process or bypass it by
clicking Continue.
Print after invoice is posted
For the Print Document special action, the selected document will open in the
(applies only to the Print
Cornerstone Editor for printing once the invoice has been posted. Because the
Document special action)
invoice has already been posted, information on the invoice will be available for
inclusion in the document.
Note: If the document template you are linking contains default invoice items, it
cannot be set up to print after the invoice is posted.
Before You Begin
• If you started with a Fastart or FastInstall database, review the special actions linked to invoice
items. To do this, print an Invoice Item Information Report.
• Set up your Feeding Guide Software. See “Setting Up the Feeding Guide Software” on page
420.
• Set up your patient sexes and associated modified sexes (Controls > Sex).
204
Chapter 10: Setting Up Your Invoice Items
To link or unlink a Special Action to an invoice item:
1. On the Lists menu, select Invoice Item. The Invoice Item List appears.
2. Select the item that you want to add instructions or special actions to and click Update. The item
information displays in the Invoice Item Information window.
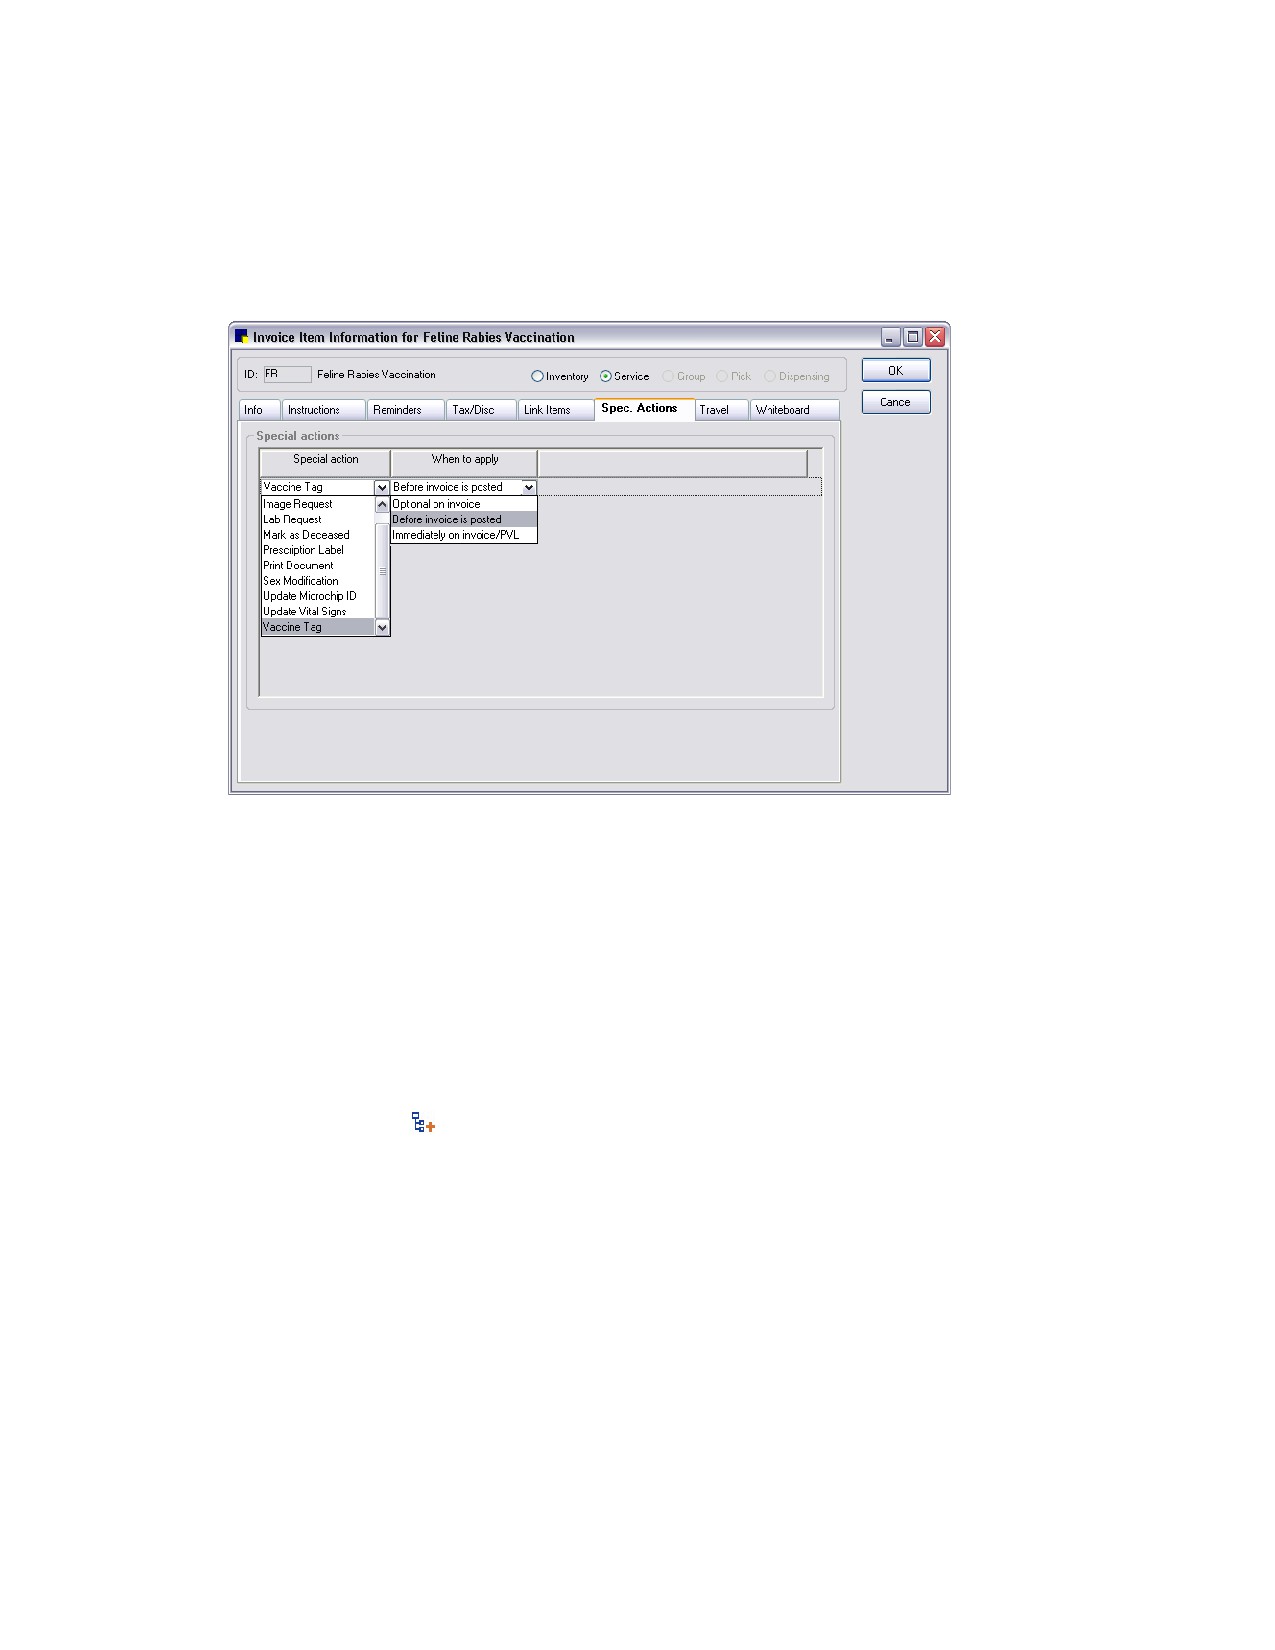
3. Click the Spec. Actions tab.
Special Actions tab on Invoice Item Information window
4.
From the Special action drop-down list, select a special action to be automatically performed for
this invoice item.
5.
From the When to apply drop-down list, select an option to specify when to apply the special
action: See “Options for When to Apply a Special Action” on page 204 for information on the When
to apply options.
Note: All When to apply options are not available for all special actions.
6.
For the following special actions, provide additional information on the Spec. Actions tab as needed:
• Image Request-If you want to select shots to be associated with this item by default, click the
Shot Selection
icon and select the image shots. If necessary, in the Exam Description text
box, type any needed shot request notes to display with the invoice item by default when an
image request is made for this item.
• Lab Request-In the Profile text box (right-most text box), press F2 to search for and select the
lab profile to link to the invoice item.
• Print Document-In the Doc ID text box, type a document ID or press F2 to search for and
select a document template from the Document Template List.
• Update Vital Signs-In the Weight days text box, enter the number of days that the weight is
considered current. (Staff will not be prompted for a new weight if the patient’s weight is
current.)
7.
Click OK to save your changes, or click another tab to add more information for the item.
205
Chapter 10: Setting Up Your Invoice Items
For a complete list of invoice items and their linked special actions currently set up in Cornerstone,
print an Invoice Item Information Report.
For information on processing special actions during invoicing, see “Chapter 12: Invoicing” in the
Cornerstone User’s Manual.
Setting Up Vaccine Invoice Items
Rabies/Vaccine Tag Terminology
The following terms are used throughout this section to differentiate between different types of tags and
types of vaccine/vaccination invoice items you can set up in Cornerstone.
Term
Definition
Vaccine tag
Encompasses tags issued for all types of vaccinations, including rabies and large
animal vaccinations (e.g., Brucellosis vaccinations). The term “vaccine tag” is used
interchangeably with “vaccination tag.” Vaccine tags (including rabies) that have
been issued by the practice appear on the Vaccine Tag Report.
Rabies tag
Specifically refers to tags issued for a rabies vaccination. In most cases, a rabies
certificate is printed when a rabies tag is issued. Rabies tags that have been issued
by the practice appear on the Rabies Tag Report.
Vaccine item
Invoice item for the actual product/tangible good (bottle, dose, vial, etc.); usually set
up as an Inventory item.
Vaccination item
Invoice item for the service performed to administer the vaccine; commonly set up
as a Service item.
Inventory item
An invoice item with the type set to Inventory on the Invoice Item Information
window. The Vaccine tab is available in Invoice Item Information only for inventory
items.
Service item
An invoice item with the type set to Service on the Invoice Item Information window.
(Note: The Invoice Item Information Vaccine tab is not available for service items.)
Vaccine Invoice Item Setup Options
Cornerstone offers several options for setting up your vaccine/vaccination items. When trying to
determine the best option for your practice, the initial factor to consider is whether your practice tracks
vaccination revenue as services or as inventory.
If You Track Vaccination Revenue as Services
For those practices that track vaccination revenue as services, the recommended option uses a
vaccination SERVICE item that includes a link to a vaccine INVENTORY item. This setup option allows
you to:
• Track vaccinations as services using Cornerstone service revenue reports
• Use service revenue information to compare against industry benchmarks
• Set up multiple species-specific Manner of Administration/Years combinations for each vaccine
• Auto-populate the rabies/vaccine tag vaccination certificate default information on each
Inventory item through invoicing
206
Chapter 10: Setting Up Your Invoice Items
Vaccine/Vaccination Setup
Recommendation for
Special Considerations
Option
Reminders
Vaccination SERVICE item that
Set up reminders on the
If you use the same vaccine for variable years
includes a link to a vaccine
vaccination SERVICE item.
(e.g., use IMRAB for both 1 yr and 3 yr), set the
INVENTORY item
Years text box to Ask on the Vaccine tab
during setup. Then, when issuing a tag, train
Example:
staff to look at the vaccination SERVICE item
Canine Rabies 1 Yr Booster
description (e.g., Rabies 1 Yr Booster) as a
(service item) includes a link to
guide for entering the number of years for the
IMRAB® (inventory item)
tag (the certificate expiration).
Note: Although it is possible to set up vaccine/vaccination items as service only (with no link to an
inventory item), this option is not recommended as it does not offer multiple species-specific defaults or
the ability to auto-populate rabies/vaccine tag vaccination certificate default information.
If You Track Vaccination Revenue as Inventory
For those practices that track vaccination revenue as inventory, there are two available setup options:
¾ An INVENTORY item only (one invoice item serves as both vaccination/vaccine for simpler invoice
item setup and management)
¾ A vaccination INVENTORY item that includes a link to a vaccine INVENTORY item
These setup options allow you to:
• Measure profitability using the Items Profit Analysis Report
• Set up multiple species-specific Manner of Administration/Years combinations for each vaccine
• Auto-populate the rabies/vaccine tag vaccination certificate default information on each
inventory item through invoicing
Vaccine/Vaccination Setup
Recommendation for
Special Considerations
Option
Reminders
INVENTORY item only (serves
Set up reminders on the
If you are tracking quantity on hand (QOH), this
as both vaccination/vaccine
INVENTORY item (the only
is a good option only if you use a different
item)
option with this type of setup).
vaccine for each species/year combination
(e.g., IMRAB® Canine 1 Yr, PUREVAX® Feline 3
Examples:
Yr, etc.).
Rabies IMRAB 1 Yr
If your practice wants to set up multiple
Rabies IMRAB 3 Yr
species/years combinations but uses only one
vaccine, you would have to set up the same
invoice item multiple times, which would prevent
you from accurately tracking QOH for inventory.
Vaccination INVENTORY item
Set up reminders on the
This is a good option if you change brands of
that includes a link to a vaccine
vaccination INVENTORY item
vaccine often.
INVENTORY item
(not on the linked vaccine item).
If you use the same vaccine for variable years
(e.g., use IMRAB for both 1 yr and 3 yr), set the
Example:
Years text box to Ask on the Vaccine tab during
Canine Rabies Vaccination 1 Yr
setup. Then, when issuing a tag, train staff to
(Inventory item) includes a link
look at the vaccination INVENTORY item
to IMRAB (Inventory item)
description (e.g., Rabies Vaccination 1 Yr) as a
guide for entering the number of years for the
tag.
207
Chapter 10: Setting Up Your Invoice Items
Setting Up a Vaccine Invoice Item
The Invoice Item Information window’s Vaccine tab allows you to set vaccine inventory item defaults for
the most frequently used vaccine information and set up multiple species-specific Manner of
Administration/Years combinations for each vaccine. These settings will be automatically completed for
you when issuing a tag during invoicing (although you can change these settings at invoice time, if
necessary).
Note: The following procedure covers only those steps needed to create an invoice item and set the
rabies/vaccine tag defaults on the Vaccine tab. For information on other invoice item setup tasks (for
adding inventory information, linked items, reminders, taxes, discounts, etc.) on the Invoice Item
Information tabs, see the corresponding section in this chapter.
To set up a vaccine Inventory item:
1. On the Lists menu, select Invoice Item. The Invoice Item List appears.
2. Click New. The Invoice Item Information window appears.
3. If your practice enters new invoice item IDs manually, type the invoice item ID in the ID text box (top
left). If your system is set up to generate invoice item IDs automatically, an ID appears.
4. Press TAB.
5. At the top of the Invoice Item Information window, select the Inventory item type to designate this
item as an Inventory item.
6. On the Information tab, in the Hospital description text box, type a description of the vaccine for
internal use. This description enables your staff to identify the vaccine invoice item.
7. If you would like an alternate description to display on client documents, in the Client description
text box, type a description of the item to print on the invoice and estimate, and also on reminders.
8. Select a classification for the item (e.g., Vaccines) from the Primary drop-down list.
9. If applicable, select a subclassification for the item from the Subclass drop-down list.
10. Click the Vaccine tab.
Note: The Vaccine tab is available in Invoice Item Information only for inventory items.
208
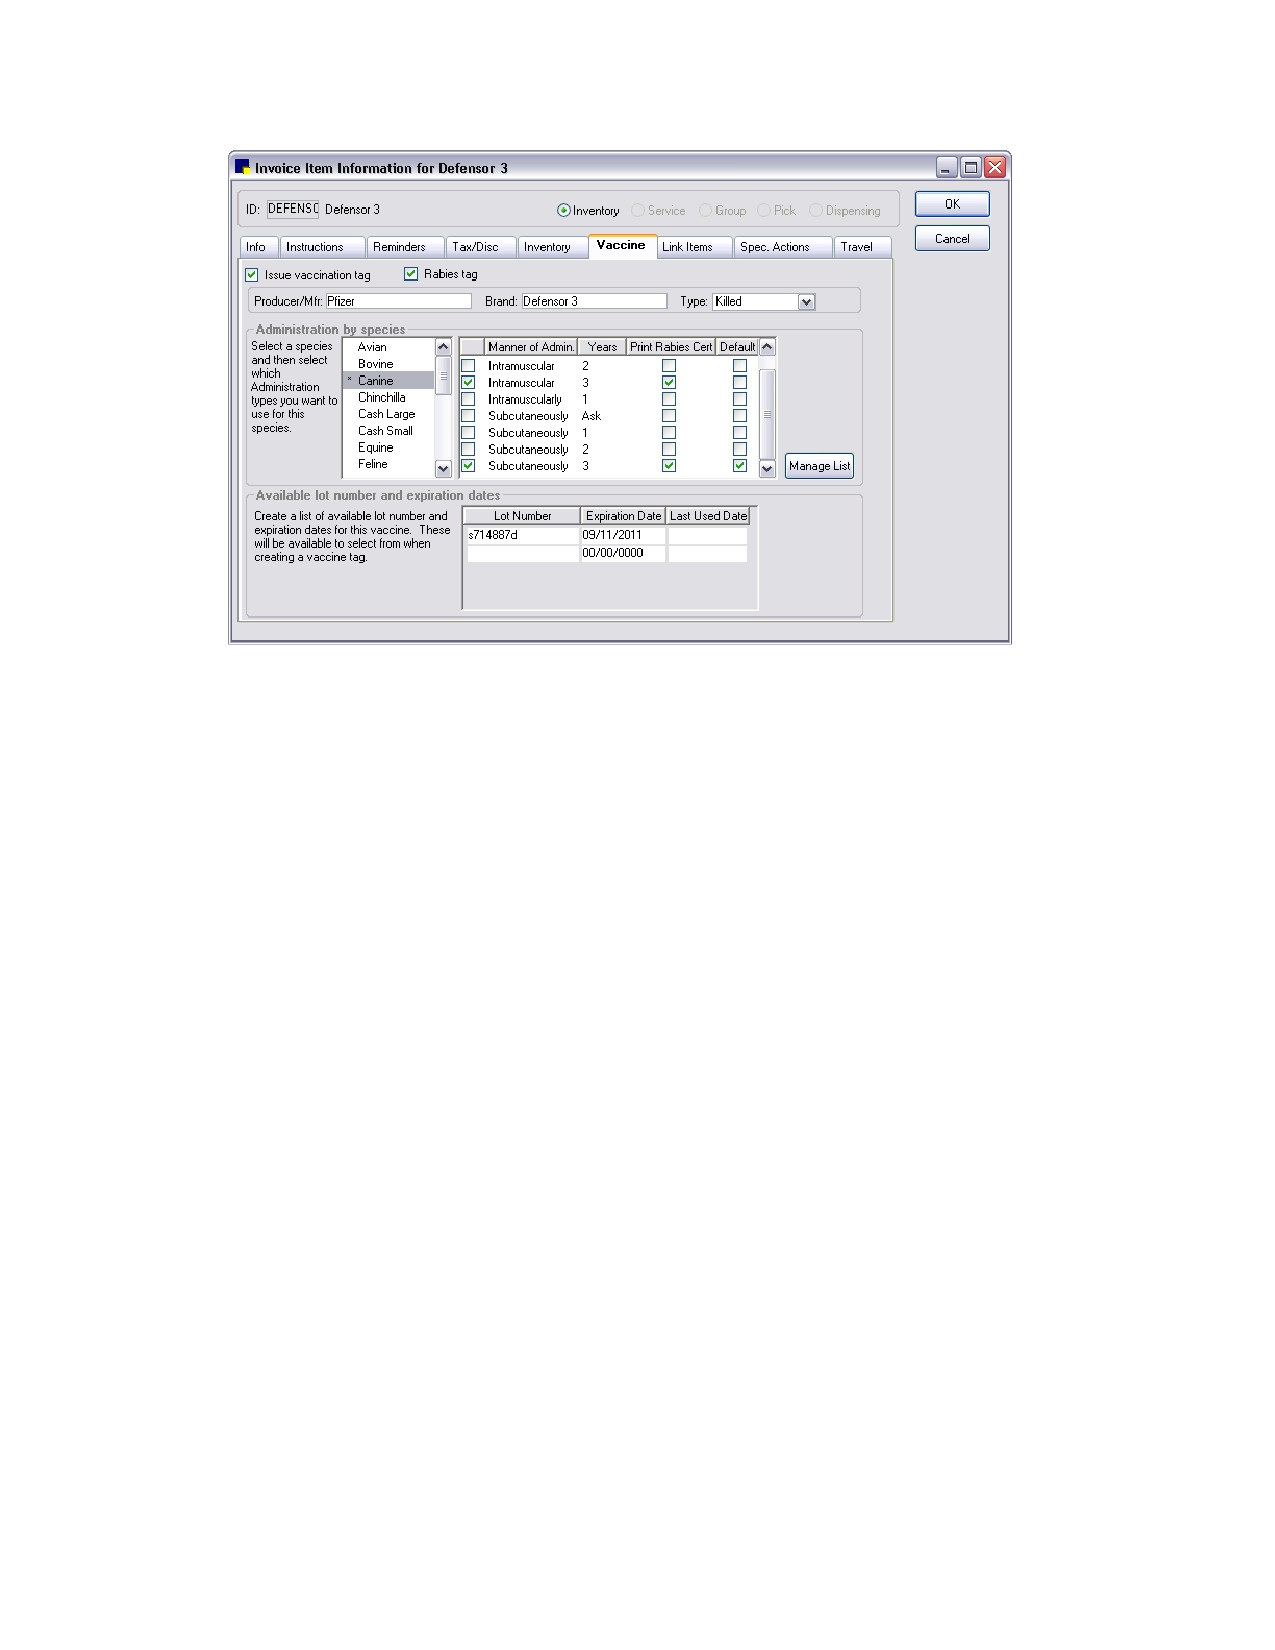
Chapter 10: Setting Up Your Invoice Items
Vaccine tab on Invoice Item Information window
11. Select the Issue vaccination tag check box to enable the vaccine tag settings. (Note: The Issue
vaccination tag and Rabies tag check boxes will be selected automatically if the Vaccine Tag
special action has been set up for the inventory item.)
12. If this is a rabies vaccine (vs. a nonrabies large animal vaccine), select the Rabies tag check box.
This flags the item as a rabies vaccine to be added to the Rabies Tag Report, which is available for
those practices required to submit rabies tag information to a state agency. Selecting this check box
will also display the Print certificate check box on the Vaccine Tag window.
13. Type the Producer/Mfr. and Brand information for this vaccine so staff will not need to complete
this information manually when generating a vaccine tag at invoice time.
14. In the Type drop-down list, select the applicable vaccine type (Killed, MLV, etc.)
15. In the Administration by species area, do the following:
a. In the scroll-list on the left, select the species for which you want to set up rabies/vaccine tag
defaults.
b. In the adjacent check box selection area on the right, select all possible Manner of
Administration/Years combinations that apply to this vaccine and species by selecting the
applicable check box in the left-most column. All combinations selected here will be available
for selection from drop-down lists on the Vaccine Tag window.
c. For a selected Manner of Admin./Years combination, if you want the Print certificate check box
to be selected by default on the Vaccine Tag window at invoice time, select the Print Rabies
Cert. check box next to the applicable combination.
d. If you want to designate a particular Manner of Admin./Years combination as the default for this
species, select the Default check box next to the applicable combination. This default
combination will automatically populate Manner of administration and Number of years on
the Vaccine Tag window at invoice time (although you can select different settings from the
drop-down lists, if necessary).
209
Chapter 10: Setting Up Your Invoice Items
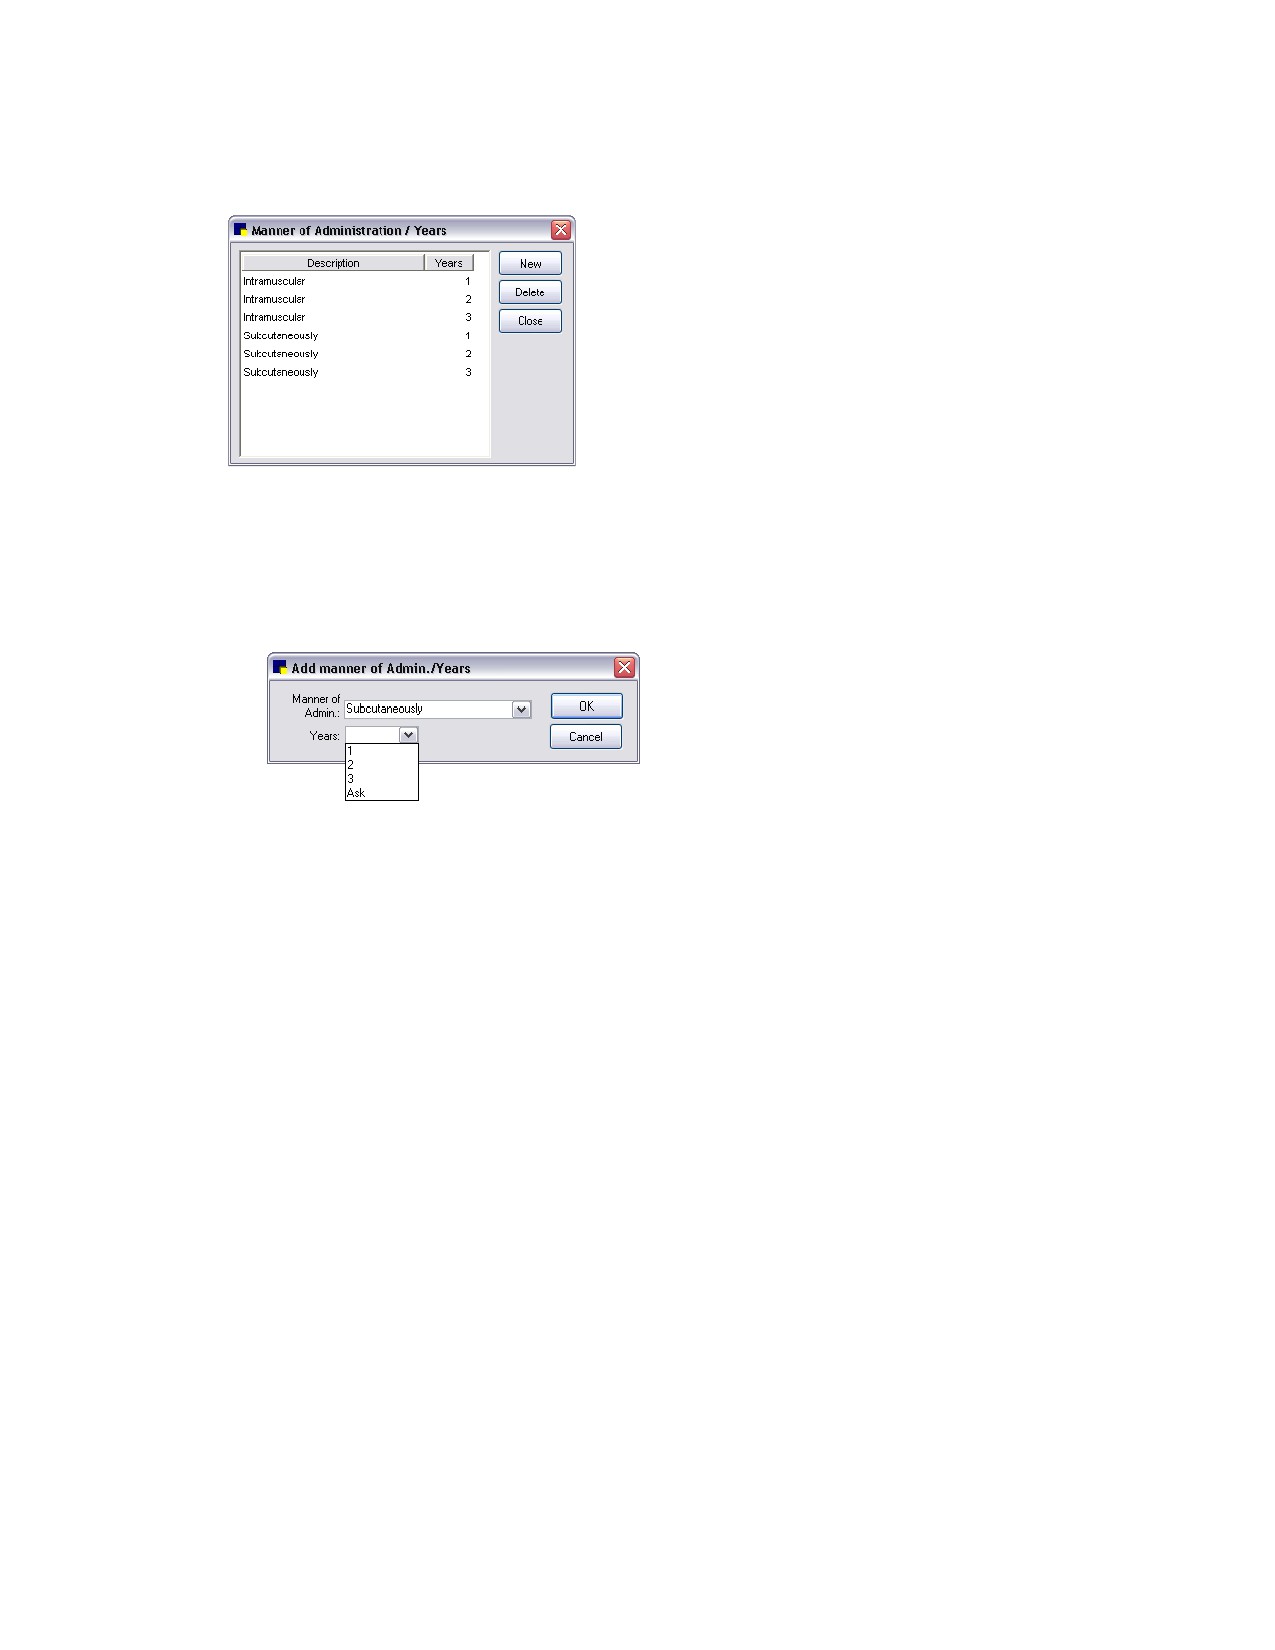
16. If you would like to add or delete Manner of Admin/Years combinations, click the Manage List
button. The Manner of Administration/Years dialog box appears, with all existing combinations listed.
Manner of Administration/Years dialog box
a. To add a new combination, click New, select the appropriate Manner of Admin. and Years
settings, and click OK.
Note: For the Years setting, if the number of years for a vaccine can vary, set the years to Ask,
which will require staff to input the years manually on the Vaccine Tag window at invoice time.
b. To remove a combination, select the combination in the list and click Delete. You are prompted
to confirm the deletion. Click Yes.
c. When you are finished, click Close. Any Manner of Administration/Years combinations you
added or deleted will be reflected in the list available on the Vaccine tab.
17. In the Available lot number and expiration dates area, create a list of valid lot numbers and expiration
dates for this vaccine. This information will be available for selection from the Lot number and Drug
expires drop-down lists on the Vaccine Tag window.
Note: The Lot Number/Expiration Date settings are not available if lot numbers and expiration dates
are tracked through Cornerstone Inventory and controlled by consumption.
18. Click OK to save your changes, or click another tab to add more information for the item.
For information on issuing a rabies/vaccine tag on the Vaccine Tag window during invoicing, see
“Chapter 12: Invoicing” in the Cornerstone User’s Manual.
Placing Invoice Items on Travel Sheets
After an invoice item is created, you can choose to have it print on any of your practice’s travel sheets.
See “Travel Sheets” on page 75 for more information on travel sheets.
Before You Begin
¾ Set up your travel sheets (Lists > Travel Sheets).
210
Chapter 10: Setting Up Your Invoice Items
To place an invoice item on a travel sheet:
1. On the Lists menu, select Invoice Item. The Invoice Item List appears.
2. Select the item that you want to add to a travel sheet and click Update. The item information
displays in the Invoice Item Information window.
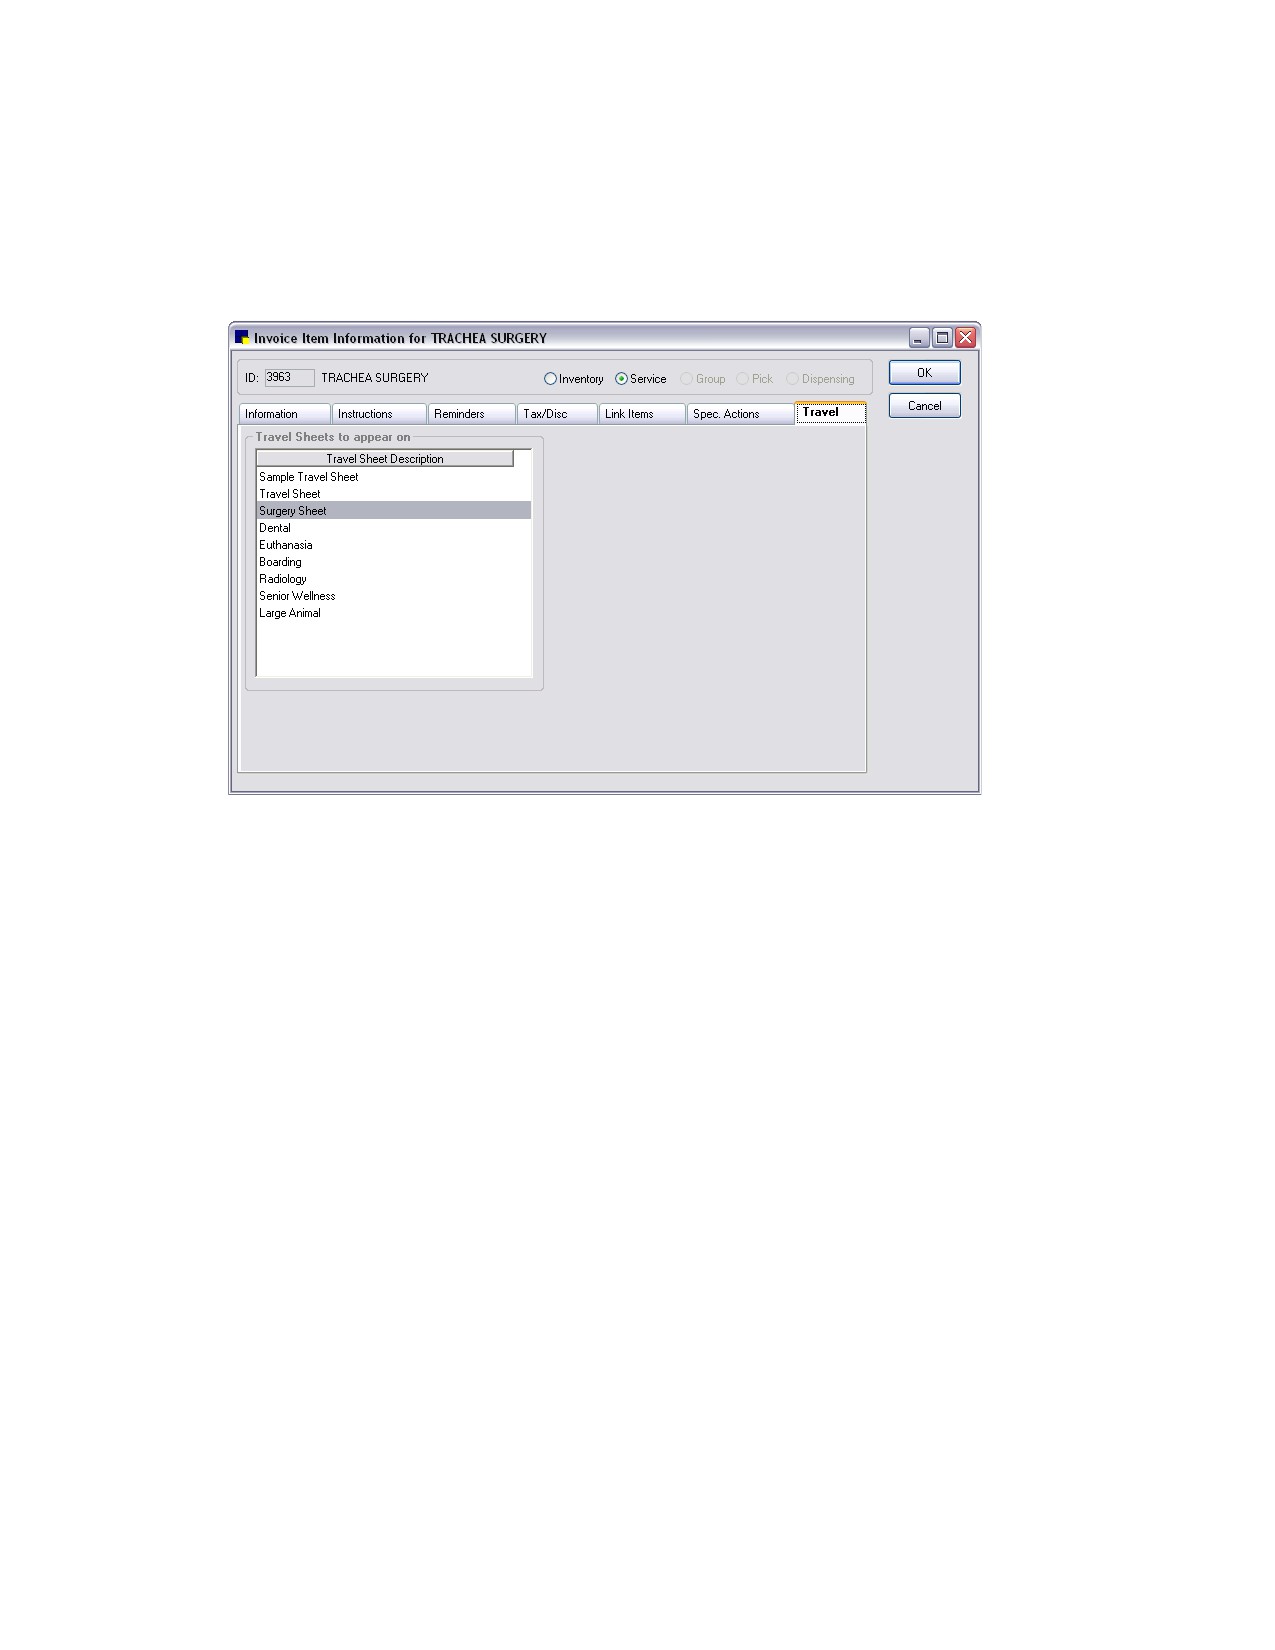
3. Click the Travel tab.
Travel tab on Invoice Item Information window
4. In the Travel Sheets to appear on list, select each travel sheet the invoice item should be linked to.
(Note: Items that appear on the Sample Travel Sheet cannot be changed.)
Note: Travel sheets must be set up in Lists > Travel Sheets in order to appear in the list on the
Travel tab.
5. Click OK to save your changes, or click another tab to add more information for the item.
Setting Up Pick Lists
Pick lists allow you to quickly choose from a list of related invoice items. Pick lists are also useful when
using smart codes. (See “Setting Up Smart Codes” on page 216 for information on smart codes.)
Note: Pick lists are not available in prescriptions, boarding, lab requests, or reminders.
To set up a pick list:
1. On the Lists menu, select Invoice Item. The Invoice Item List appears.
2. Click New. The Invoice Item Information window appears.
3. If your practice enters new invoice item IDs manually, type the invoice item ID in the ID text box (top
left). If your system is set up to generate invoice item IDs automatically, an ID appears.
4. Press TAB.
5. At the top of the Invoice Item Information window, select the Pick item type to designate this item as
a pick list. The number of available tabs is reduced to three.
6. On the Information tab, in the Hospital Description text box, type a description of your pick list for
internal use. This description enables your staff to identify the pick list.
211