IDEXX Cornerstone. Administrator’s Manual (8.3 NEXT version 8.3.6) - page 16
Chapter 29: Purging Data from Cornerstone*
4. In the Options area, do the following:
• Select the Print list of records purged check box if you want to print a list of the records
purged. (Note: Cornerstone does not print records purged for all types of information.)
• Specify whether to select the range of patients to purge by ID or by last name.
5. In the Patient selection area, type the ID or last name (or part of the ID or name) of the first and last
patient to delete.
Note: You can press F2 to use the Patient List to choose a patient.
Note: You can purge a range of IDs or names or one single patient. If you want to purge a single
patient’s records, enter the patient’s ID (or exact name) in both the First patient and Last patient
boxes. (Use the ID if two patients have the same name.)
6. Select the Status of patients to delete: Active, All, Deceased or Inactive.
7. Select the Classifications of patients to delete. Select <All> to include all classifications.
8. Click OK.
9. If you decided to print a list of purged records, a message appears to inform you that Cornerstone
will print the purged history next. Click OK.
10. A message appears to inform you that the purge is now completed. Click OK.
Purging Specific Types of Client or Patient Information
If you want to remove old information from a client or patient record, you can select to purge specific
types of information without deleting the client or patient.
You can purge any of the following information (provided it was entered before the selected date):
Client Information
Account History-all client account transactions including payments, invoices, returned checks, written
off (and reinstated) amounts, account comments and transferred amounts
Patient Information
Billing (invoiced items)
Lab Results
Boarding
Medical Notes
Census History (check-in and check-out information)
Patient Visit List (items on the Patient Visit List)
Correspondence Documents
Prescription Labels
Declined History
Problems
Departing Instructions
Rabies Tags
Diagnoses
Reminder Call Backs
Estimates
Reminder Letters
Exams (from the Patient Advisor* module)
Vital Signs (including weight history)
Lab Requests
Before You Begin
• Process End of Year, if necessary. End of Year must be run before the database can be purged.
You must have entered one full year of data and processed at least two End of Year periods
before you can purge data.
• Check with your accountant to make sure your practice is complying with state and local
regulations regarding the length of time data should be kept.
452
Chapter 29: Purging Data from Cornerstone*
• Review your purging defaults to prevent you from purging recent client or patient information.
See “Purging Defaults” on page 130.
IMPORTANT: Back up your Cornerstone database.
To purge specific client or patient information:
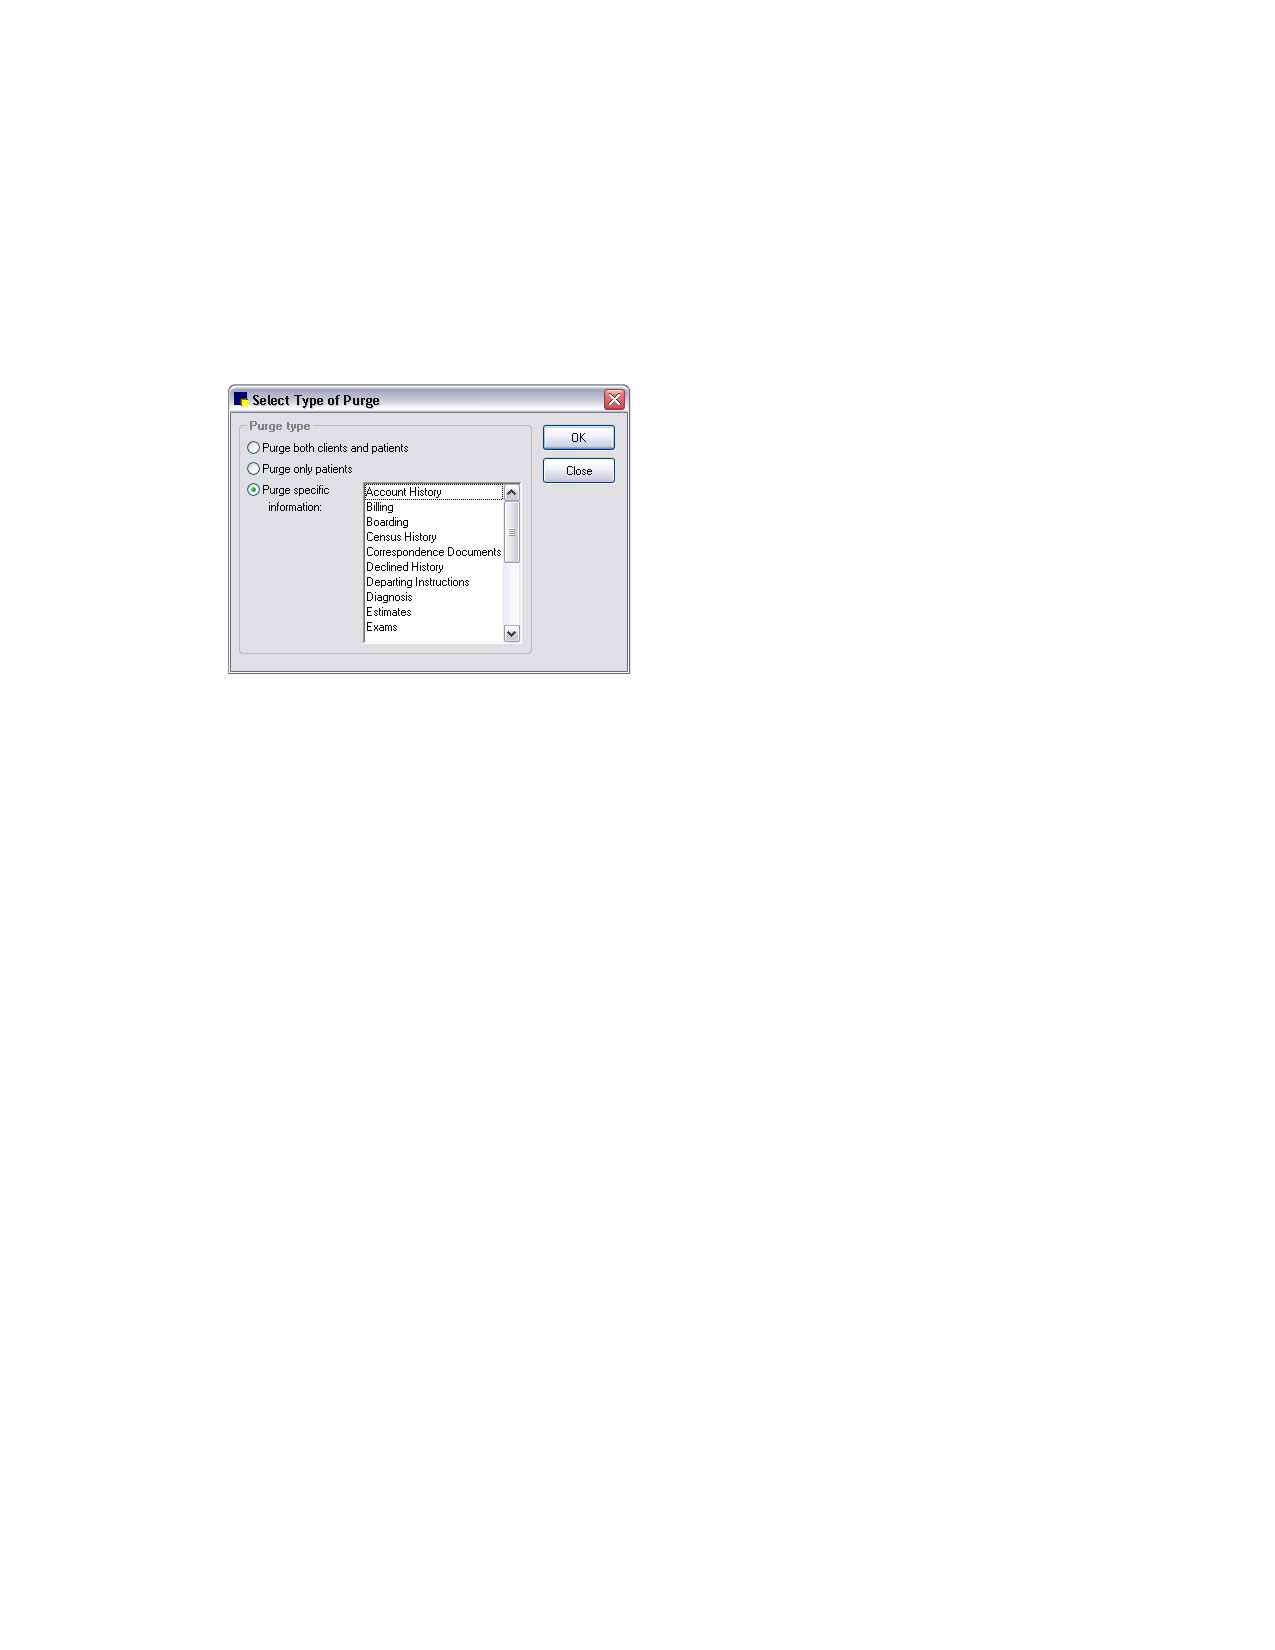
1. On the Tools menu, select Purge Data. A message appears to remind you to back up your
database before continuing. If you have backed up your database, click OK. The Select Type of
Purge dialog box appears.
Select Type of Purge dialog box
2.
Specify Purge specific information, click the type(s) of information to purge. and click OK. The
Purge Information dialog box appears.
3.
If necessary, change the Last date to purge. The date that appears by default is based on the
periods entered in the Purging Defaults. You cannot purge data from a more current date than the
default period.
Note: If the records to purge contain both client and patient account information and reminders,
Cornerstone retains data using the oldest possible date from the defaults.
4.
In the Options area, specify whether to select clients or patients by ID or by name.
5.
Enter the appropriate ID or name of the first client or patient whose information you want to delete.
6.
In the Last client or patient box, enter the ID or name of the last client or patient whose information
you want to delete. (Remember, if you are purging information for a single client or patient, enter the
same ID in both the First and Last boxes.)
7.
Select the Status of the clients or patients to delete: Active, All, Deceased (Patient only) or Inactive.
8.
Select the Classifications of the clients or patients whose information you want to delete. Select
<All> to include all classifications.
9.
Click OK.
If prescriptions for the patient exist, Cornerstone prompts you to save the refill information.
If the patient’s weight has not been updated after the selected date, Cornerstone prompts you to
retain the patient’s most recent weight.
10. If you decided to print a list of purged records, a message appears to inform you that Cornerstone
will print the purged history next. Click OK.
11. A message appears to inform you that the purge is now completed. Click OK.
453
Chapter 29: Purging Data from Cornerstone*
12. If there is a reason a client or patient was not deleted, the reason is displayed in the Purge
Summary. Click Print to print the summary.
Purging Patient Reminders
If you purge patient reminders, Cornerstone will delete all Call or Letter reminders (whichever you
choose) for the selected patient before the selected date.
Before You Begin
• Process End of Year, if necessary. End of Year must be run before the database can be purged.
You must have entered one full year of data and processed at least two End of Year periods
before you can purge data.
• Check with your accountant to make sure your practice is complying with state and local
regulations regarding the length of time data should be kept.
• Review your purging defaults to prevent you from purging recent client or patient information.
See “Purging Defaults” on page 130.
IMPORTANT: Back up your Cornerstone database.
To purge patient reminders:
1.
On the Tools menu, select Purge Data. A message appears to remind you to back up your
database before continuing. If you have backed up your database, click OK. The Select Type of
Purge dialog box appears.
2.
Specify Purge specific information, click Call Backs or Reminder Letters or both and click OK. The
Purge Information dialog box appears.
3.
If necessary, change the Last date to purge. The date that appears by default is based on the
periods entered in the Purging Defaults. You cannot purge data from a more current date than the
default period allows.
Note: If the records to purge contain both patient account information and reminders, Cornerstone
retains data using the oldest possible date from the defaults.
4.
Select the Print list of records purged check box if you want to print a list of the reminder records
purged.
Note: Cornerstone does not print records purged for all types of information.
5.
Specify whether to select the range of patients by ID or by name.
6.
Under Patient selection, type the ID or name (or part of the ID or name) of the first and last patient
whose reminders you want to delete.
Note: You can press F2 to use the Patient List to choose a patient.
Note: You can purge for a range of patient IDs or names or one single patient. If you want to purge
a single patient’s reminders, enter the patient’s ID (or exact name) in both the First patient and Last
patient boxes. (Use the ID if two patients have the same name.) If you want to purge all patient
records, leave these fields blank.
7.
Select the Status of patients to delete: Active, All, Deceased or Inactive.
8.
Select the Classifications of patients to delete. Select <All> to include all classifications.
9.
Click OK.
454
Chapter 29: Purging Data from Cornerstone*
10. If the Print list of records purged check box was selected, a message appears to inform you that
Cornerstone will print the purged history next. Click OK.
11. A message appears to inform you that the purge is now completed. Click OK.
12. If there is a reason a client or patient was not deleted, the reason is displayed in the Purge
Summary. Click Print to print the summary.
For a complete list of dates when purge functions were performed at your practice, print a Purge
Report.
Purging Inventory Records
Inventory history accumulates throughout the year. You can purge inventory history information at any
time; however, if items are still on order or backordered, the record will not be purged. Purging records
deletes all of the information associated with the internal usage, return, receipt, Quantity on Hand (QOH)
adjustment, or order from the database.
IMPORTANT: We recommend you backup your database before purging history or making any mass
changes to the database.
To purge order history:
1. On the Tools menu, select Inventory Purge.
2. A Database purge message appears to remind you to back up the database before continuing.
Click OK. The Inventory Purge dialog box appears.
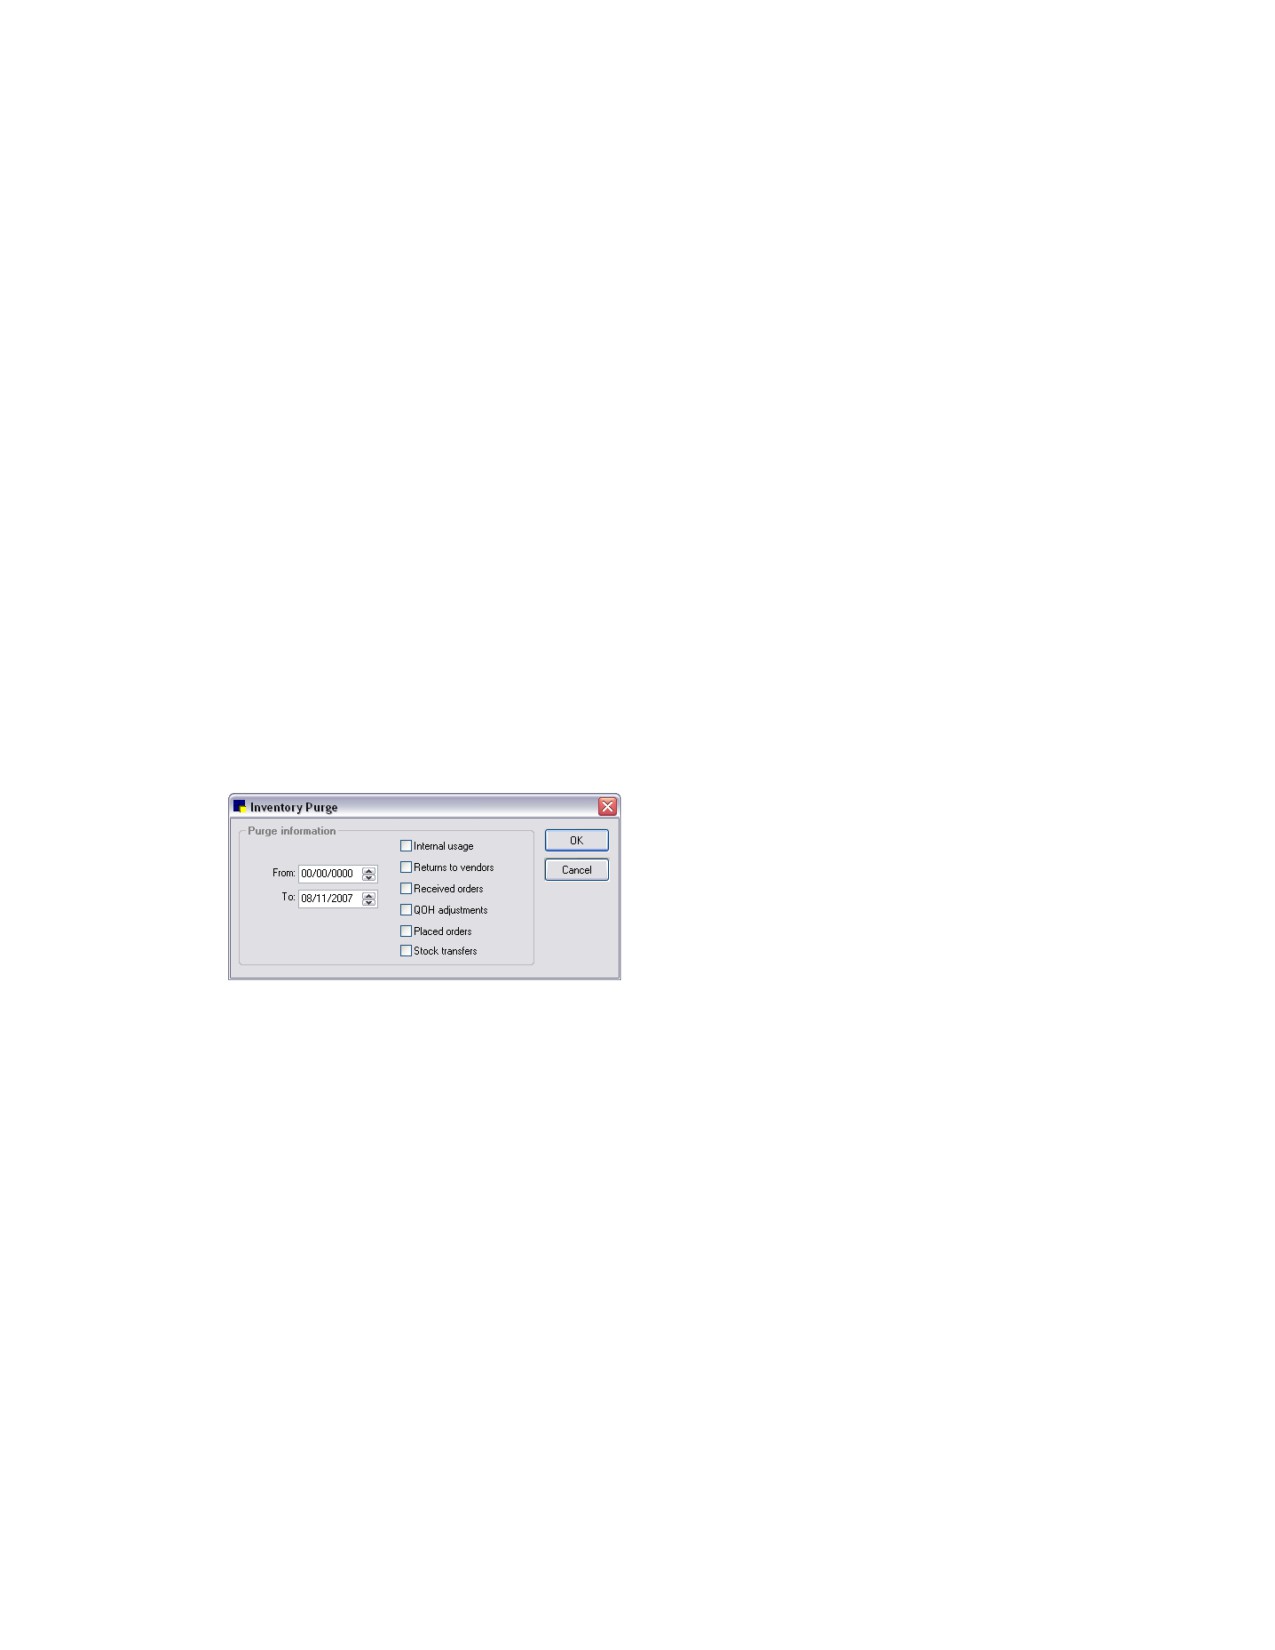
Inventory Purge dialog box
3. Specify the date to begin purging From and the date To end purging.
4. Select all applicable records to purge (Internal usage, Returns to vendors, Received orders, QOH
adjustments, Placed orders, and/or Stock transfers).
5. Click OK to delete the records.
455
Chapter 30: Using the Time Clock
Overview
The Time Clock is a computerized version of a standard time clock that will keep track of staff hours.
Time Clock can also:
• Record and track regular, sick, and vacation time.
• Print attendance information reports based on options you select.
Staff members can record their own hours, but only a person with appropriate security can make
corrections or changes once entries are made.
Time Clock Toolbar Buttons
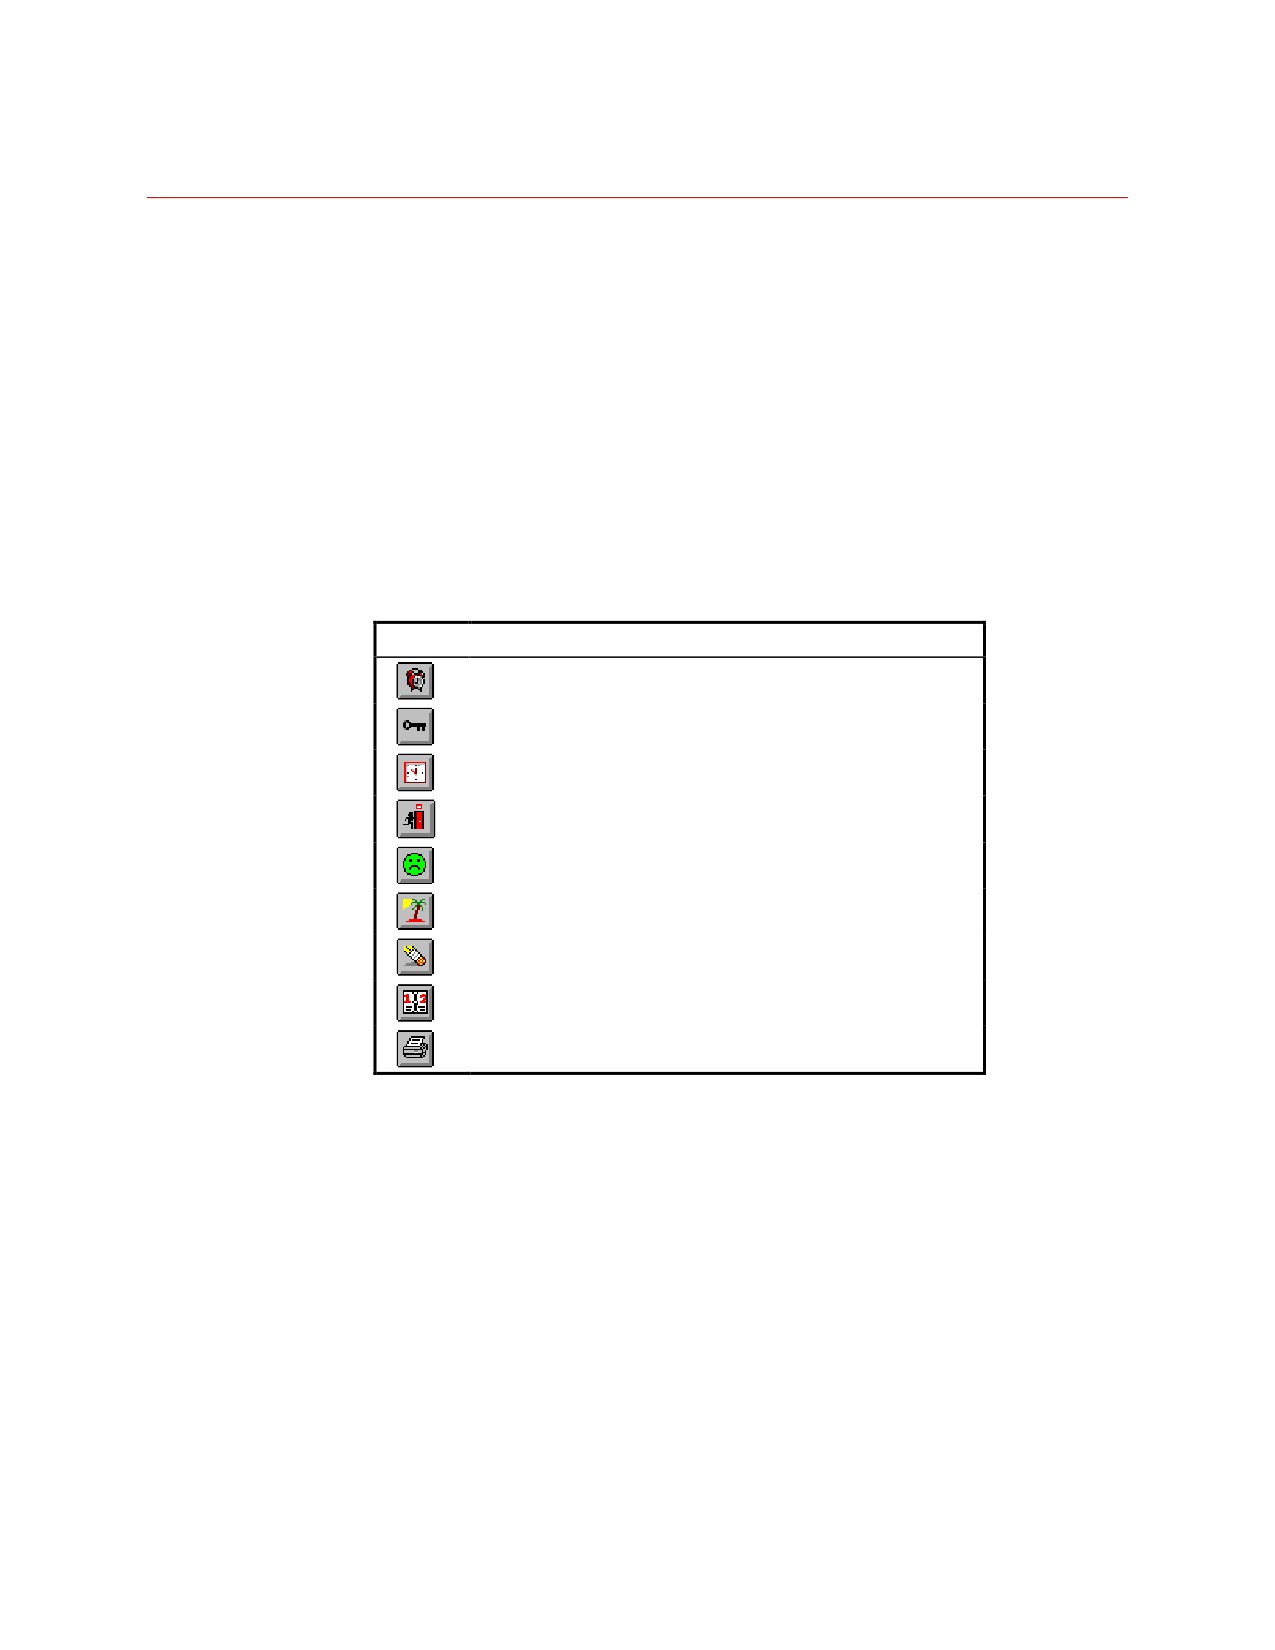
Time Clock provides the following toolbar buttons that allow you to easily access commonly used
features.
Click:
To:
Display the Timesheet
Log in a different staff member using password entry
Clock in
Clock out
Record sick time
Record vacation and holiday time
Edit times in the Timesheet
Display hours entered for a specific week
Print the Staff Hours Report
Setting Up Security
Due to its confidential nature, specific security instructions are not provided in this manual. To set up
security for each staff member, from the File menu, select Security Setup and follow the IDEXX
Cornerstone* Practice Management System Staff Security instructions you received separately when you
purchased your Cornerstone software.
Setting Up Staff Members
All of the staff members set up in Cornerstone are automatically set up as employees in Time Clock.
Note: You cannot delete staff members if they have punched in or out.
456
Chapter 30: Using the Time Clock
The Timesheet
When you enter Time Clock, the Timesheet window displays. Select your name or ID from the staff
member list to display your hours in the Timesheet.
To open the Timesheet:
¾ Click the Timesheet
button or on the Activities menu, select Timesheet.
To change the week displayed:
The Timesheet will display one week—from Sunday through Saturday (or beginning the first day you
work after Sunday, through the following Saturday). To change the week displayed in the Timesheet
window, the Timesheet must be open.
1. Click the Display Week
button or on the Activities menu, select Display Week.
2. Enter any date from the week you want to view and click OK.
The hours for the selected week will display in the Timesheet window.
To change the day the Timesheet begins:
You can change the day the Timesheet begins, for example, if you want your work week to start on
Monday instead of Sunday.
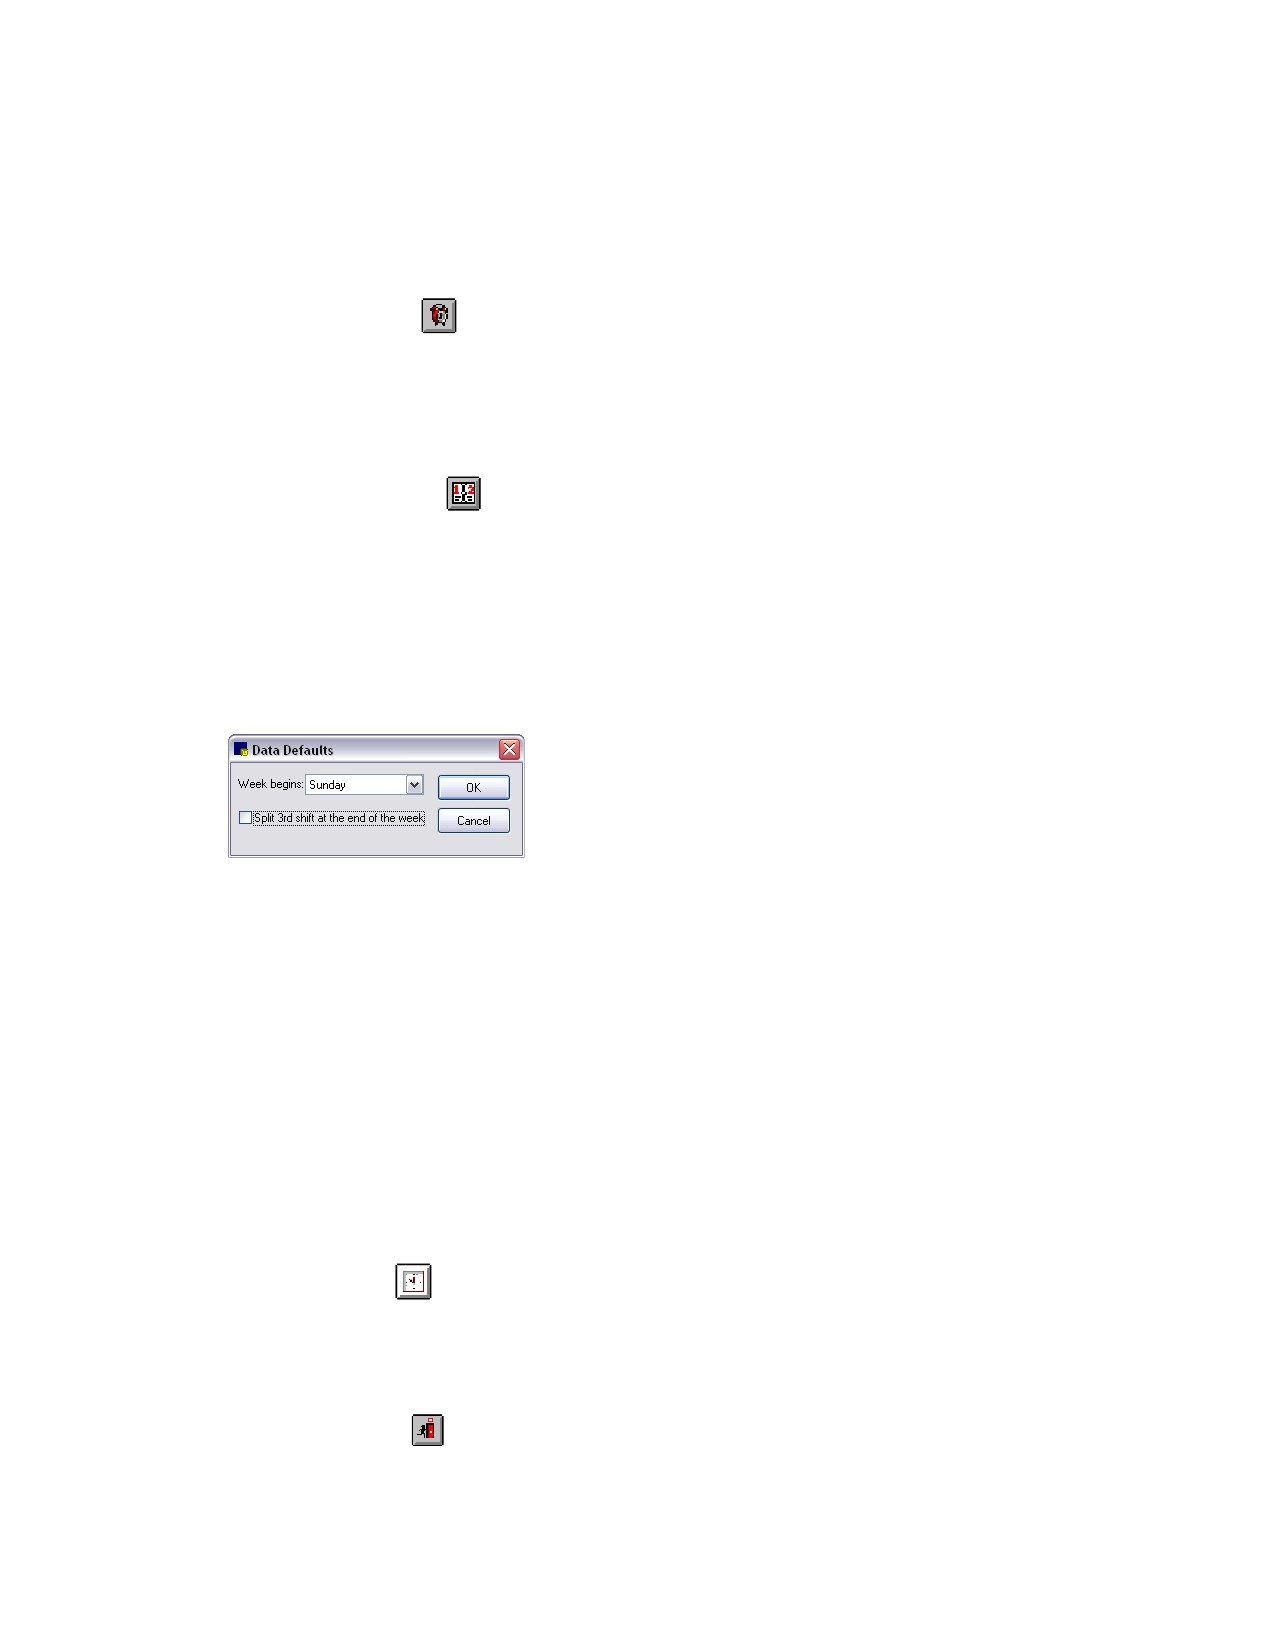
1. On the Activities menu, select Data Defaults. The Data Defaults dialog box appears.
Data Defaults dialog box
2. Select the appropriate day from the drop-down list.
3. If your practice is open 24 hours and you want all employee hours for the week on one time sheet,
select the Split 3rd shift at the end of the week check box to have Cornerstone automatically split
employee hours into the correct work week.
4. Click OK.
Clocking In and Out
For Cornerstone Time Clock to accurately record the hours you have worked, you must clock in and out
from the Timesheet.
To clock in:
1. From the staff list on the Timesheet, select your name.
2. Click the Clock In
button or on the Activities menu, select Clock In. Time Clock will record
your starting time.
To clock out:
1. From the staff list on the Timesheet, select your name.
2. Click the Clock Out
button or on the Activities menu, select Clock Out. Time Clock will record
your ending time and the total number of hours you worked for that time period.
457
Chapter 30: Using the Time Clock
Note: If the user who is currently logged in does not have appropriate security privileges, the user is the
only one shown in the staff list. This user can only clock in and out and can only view his or her
timesheet. If the user who is currently logged in does have appropriate security privileges, the system
will automatically select that staff member’s ID in order to clock in. Users with administrator status will
still be allowed to clock other employees in or out and view other employees’ timesheets. This option
can be set in security to give an employee without administrator status access to other employees’
timesheets.
Recording Absences
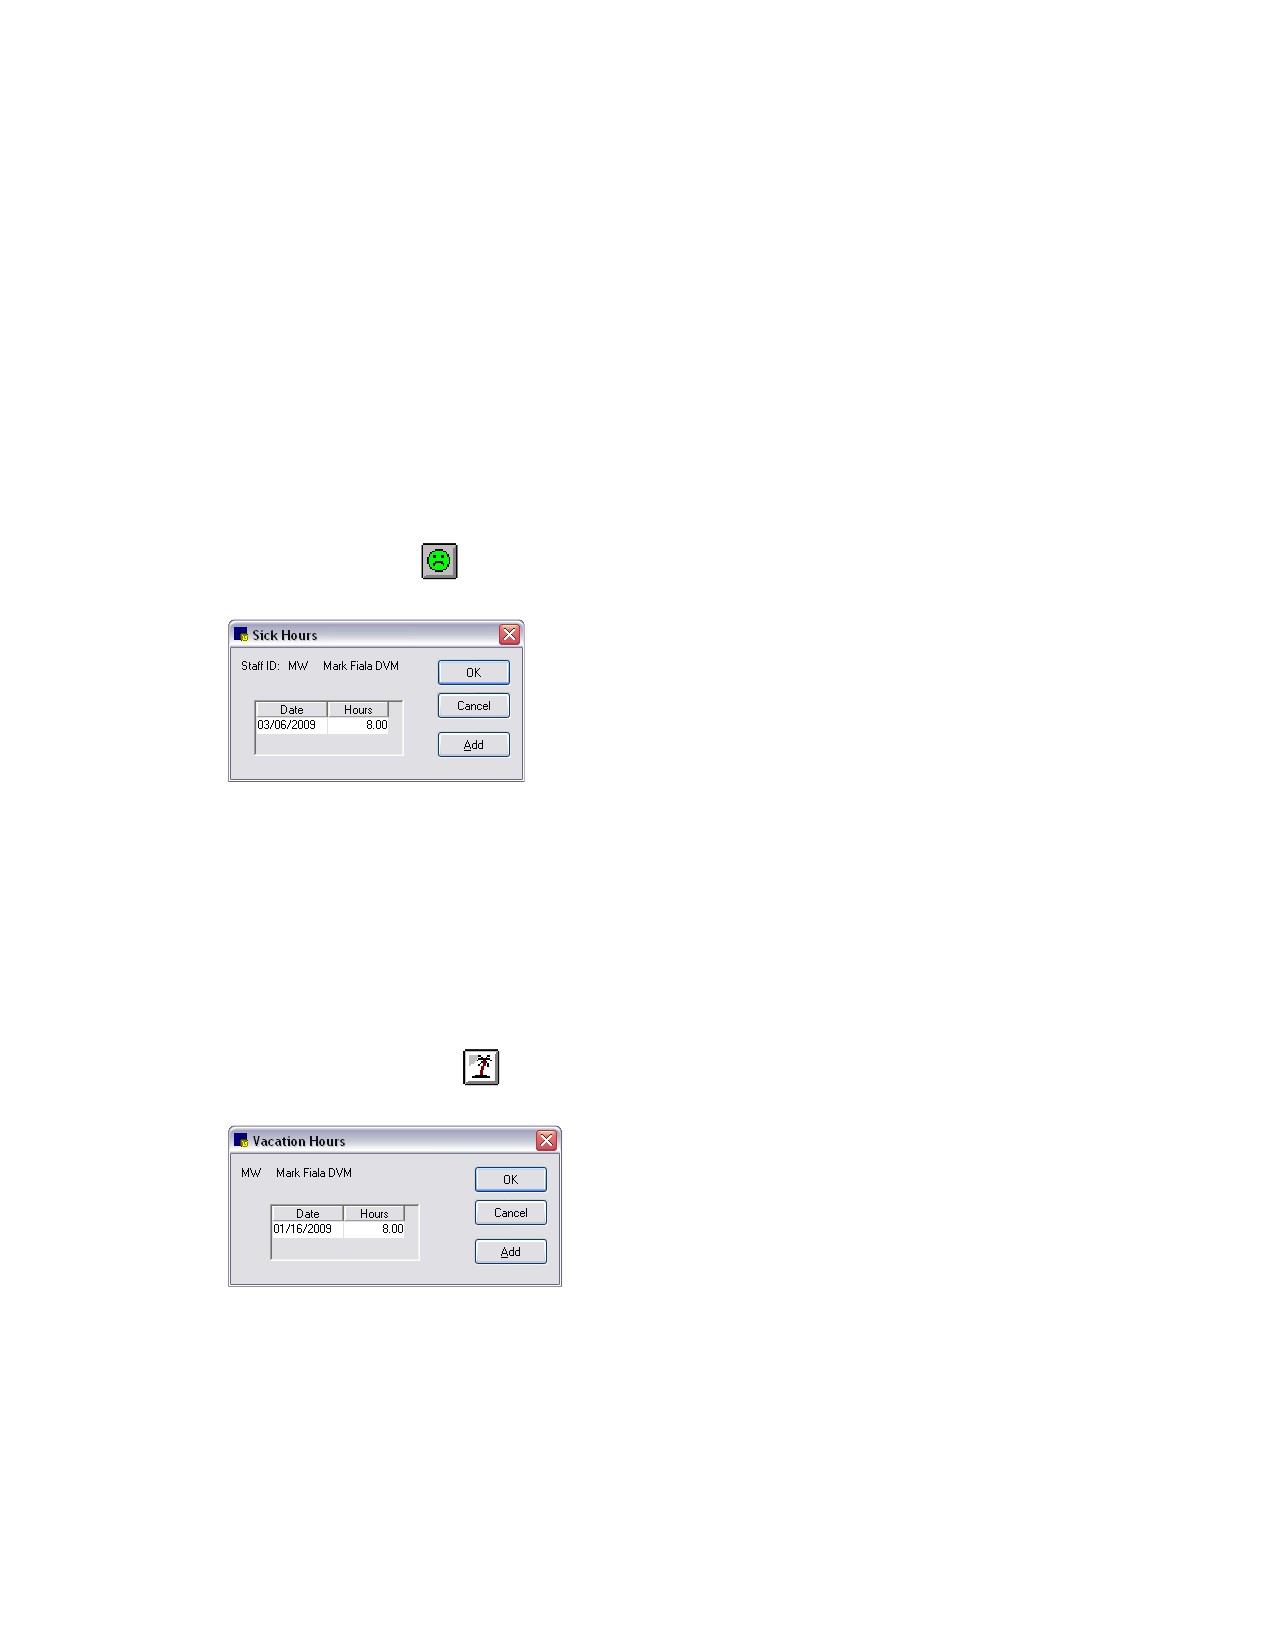
Time Clock will record and track your absences from work. Specify whether it was sick time or
vacation/holiday time, and enter the date(s) and amount of time you were away.
To record sick time:
1. Select your name from the staff list on the Timesheet.
2. Click the Sick Hours
button or on the Activities menu, select Sick Hours. The Sick Hours
dialog box appears.
Sick Hours dialog box
3. Click Add. The current date and eight hours appear. Revise the date or number of hours if
necessary.
Note: To add another sick day, click Add again and enter the date and number of hours.
4. Click OK.
To record vacation time:
1. From the staff list on the Timesheet, select your name.
2. Click the Vacation Hours
button or on the Activities menu, select Vacation Hours. The
Vacation Hours dialog box appears.
Vacation Hours dialog box
3. Click Add. The current date and eight hours appear. Revise the date or number of hours if
necessary.
Note: To add another vacation day, click Add again and enter the date and number of hours.
4. Click OK.
458
Chapter 30: Using the Time Clock
Changing Previously Recorded Times
Staff time sheets occasionally need to be revised. Only a staff member with security access to the Edit
Times dialog box can add to or modify a staff member’s hours.
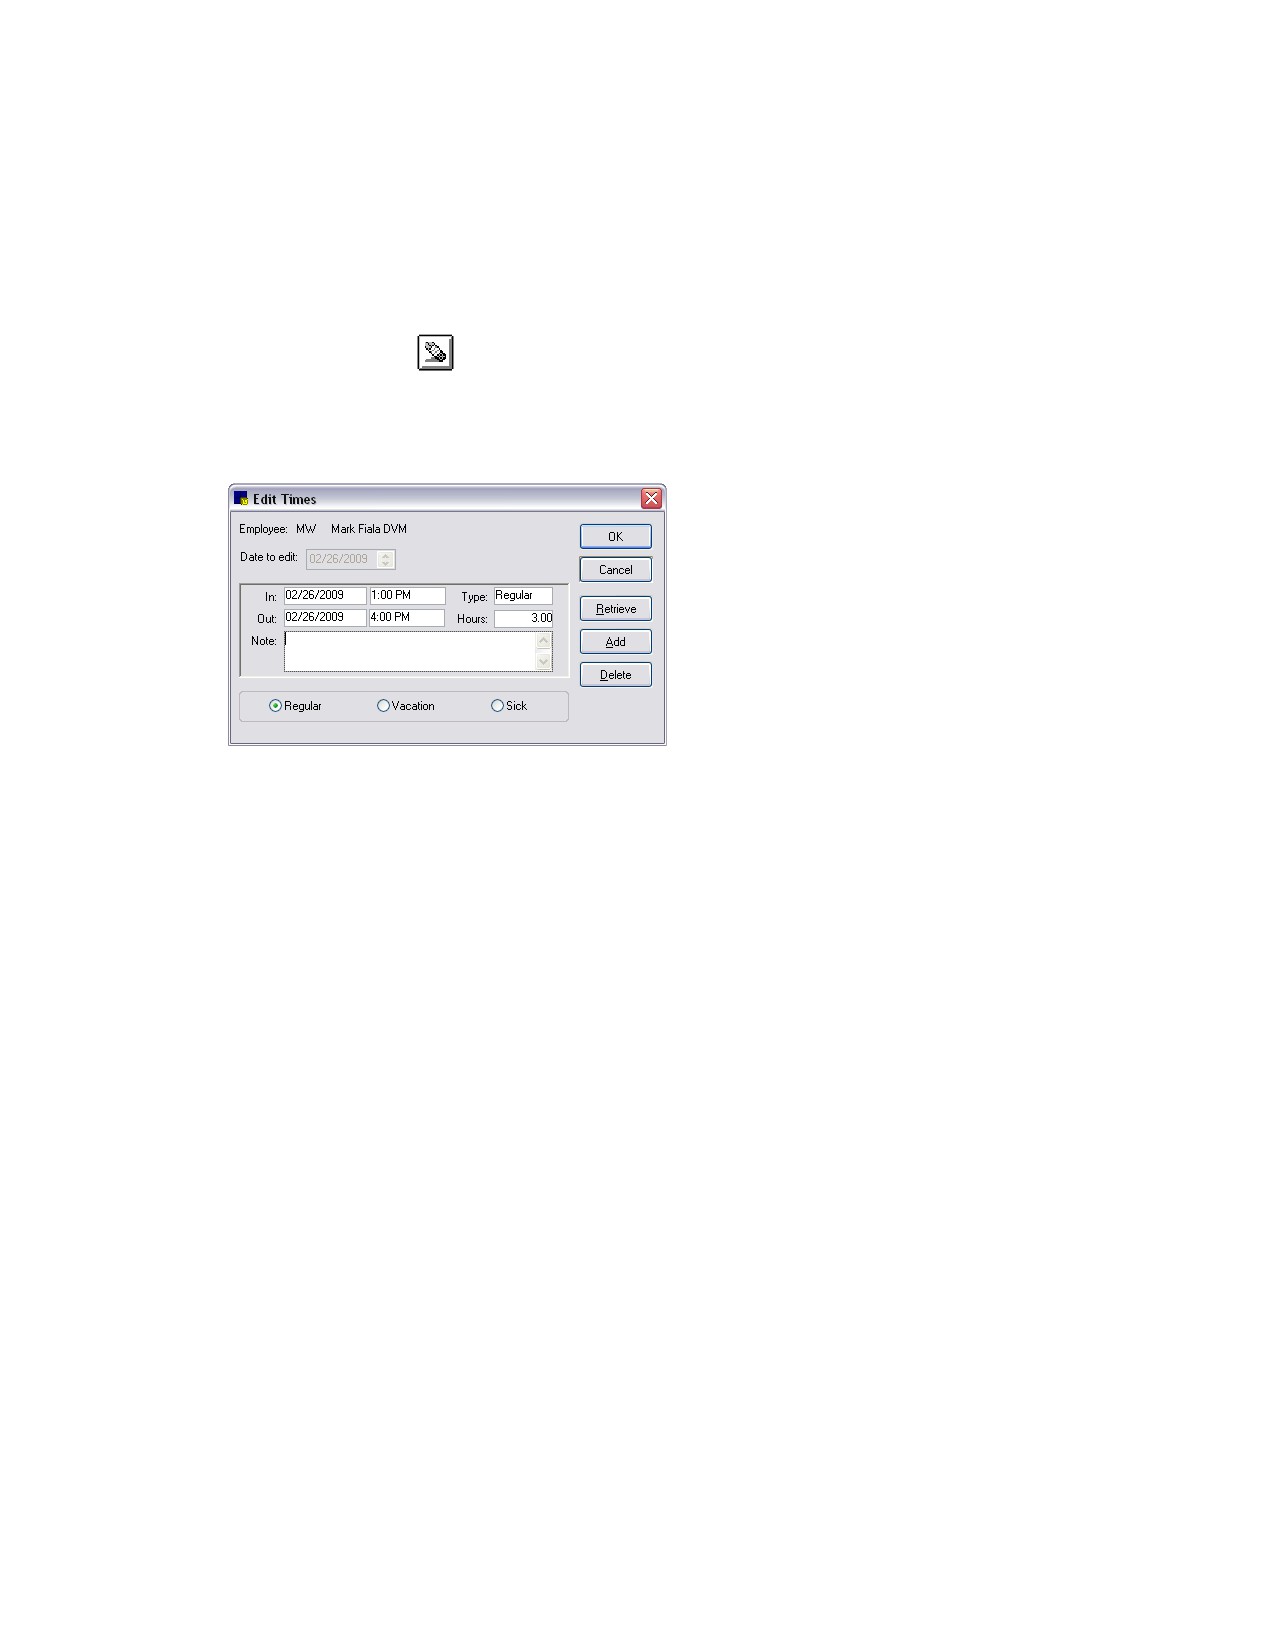
To edit staff member hours:
1. From the staff list on the Timesheet, select the staff member whose time sheet needs revision.
2. Click the Edit Times
button or on the Activities menu, select Edit Times.
3. On the Time Clock Login dialog box, log in using your User name and Password. You must have
security access to the Edit Times dialog box in order to add to or modify a staff member’s hours.
The Edit Times dialog box appears.
Edit Times dialog box
4. Enter the Date to edit and click Retrieve. The staff member’s hours for that date appear.
Tip: Press F2 to use the Calendar tool to select dates.
Note: If hours have not been entered for that date, a message asks if you want to add hours for that
date. Click Yes to add hours or No to enter a different date to edit.
5. To change the type of hours, click the Regular, Vacation, or Sick option at the bottom of the dialog
box.
• For regular hours, revise the Date and Time In or Date and Time Out. The hours are calculated
automatically.
• For vacation or sick hours, change the Date or number of Hours.
6. To delete hours, click Delete. You are prompted to confirm the deletion. Click Yes.
7. To add hours, click Add.
8. Enter the reason for the change in the Note field.
9. Click OK. A message asks if you are finished editing this staff member’s hours. Click Yes to finish or
No to edit additional hours.
Entering Hours Using the Edit Times Dialog Box
When a staff member forgets to clock in or needs to be compensated for work done outside of the
office, you can add hours to staff time sheets with the Edit Times dialog box.
459
Chapter 30: Using the Time Clock
Printing Attendance Reports
Using Cornerstone Time Clock to record and track staff hours generates data that can be used to
analyze staff hours. The Staff Hours report makes it easy to collect the necessary data.
Staff Hours Report
The Staff Hours Report details your staff’s hours. For each date in the selected period, the report
includes:
• Time of day each staff member clocked in and out.
• Number of hours clocked in for each period.
• Total number of hours for all dates included on the report, broken down into weekly subtotals.
(Does not apply when one page per staff member is selected.)
• Type of hours (regular, sick, vacation), based on which type of hours you selected to view.
Note: Time Clock does not calculate overtime.
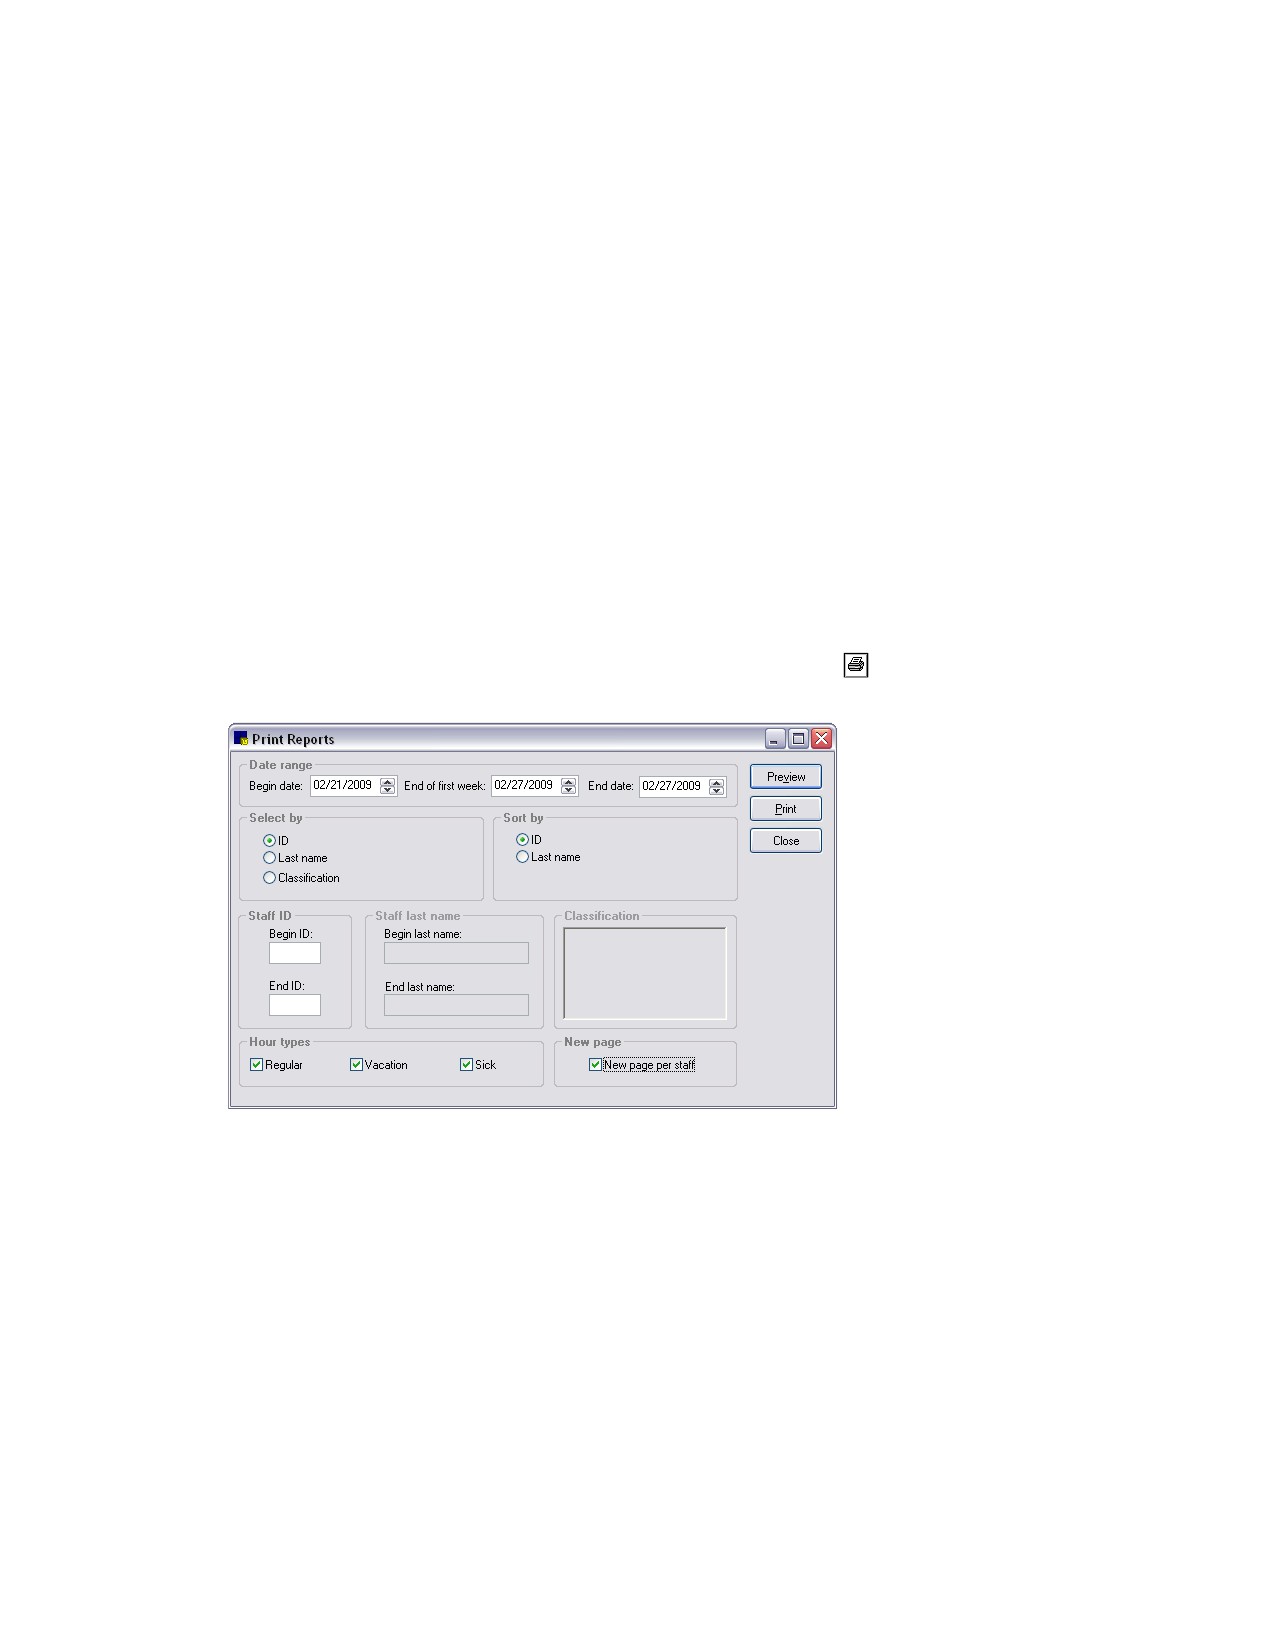
To print or preview the Staff Hours report:
1. Open Cornerstone Time Clock.
2. On the Reports menu, select Report Selection or click the Reports
button. The Print Reports
window appears.
Print (Time Clock) Reports window
3. In the Date range area, enter the Begin date, End of first week and End date. This is the time
period that will be reflected in the report.
Tip: Press F2 to use the Calendar tool to select dates.
460
Chapter 30: Using the Time Clock
4.
In the Select by area, choose one of the following options:
• Select ID to generate the Staff Hour Report for staff members selected by staff IDs and under
Staff ID, enter a beginning ID and an ending ID.
• Select Last Name to generate the Staff Hour Reports for staff members selected by staff last
names and under Staff last name, enter a beginning last name and ending last name.
• Select Classification and then under Classification, select the staff classification(s) to include on
the time card report. Staff members with the selected classification are included in the report.
Tip: Multiple classifications can be selected by holding the CTRL key down while clicking on each
additional classification you want to select.
5.
In the Sort by area, select ID to sort and print the report in staff ID order or select Last name to sort
and print by staff last name.
6.
To not include an hour type (regular, vacation or sick) on the report, under Hour types, deselect the
hour type that you do not want to include. (A ; means the Hour Type will be included.)
7.
Select the New page per staff check box if you want to print only one staff member per page on the
report. If you choose this option, the total hours for all staff are not included on the report.
8.
Choose one of the following options:
• Click Preview to preview the report. From the Preview window, click Print to print, Save to save
the report or Cancel to return to the previous window.
• Click Print to print the report, select print options and click OK.
9.
Click Close.
461
Chapter 31: Setting Up the Mobile Computing Module
This chapter covers the steps required to set up the Mobile Computing module. For information on daily
usage tasks in the Mobile Computing module, see “Chapter 27: Using the Mobile Computing Module” in
the Cornerstone User’s Manual.
Overview
The Mobile Computing module with mobile computer synchronization provides the ability to use the
IDEXX Cornerstone* Practice Management System outside of the practice. A mobile computer could be
a laptop or a tablet PC.
After returning to the practice, the data on a mobile computer can be downloaded to the main practice
database. The database on the mobile computer is also updated to match the main database.
Some possible scenarios where the Mobile Computing module would be valuable include the following:
• Large animal or equine practices where veterinarians need to travel to see patients
• Practices that run vaccination clinics
• Doctors who want to update medical notes or correspondence from home
Note: Machines that have been designated as the End of Period workstation or the Lab workstation
cannot be used as mobile computers.
Mobile Computing Functionality—Mobile Computer vs. Main System
The following information shows the mobile computing-related tasks that can be performed on the
mobile computer and those that can be performed from any workstation on the main system’s network.
Tasks that can be performed on the mobile computer
• Create a mobile computer
• Assign a printer on the mobile computer
• Synchronize a mobile computer to update the laptop and main system’s database
• Undo a mobile computer to use as a workstation at the practice
Tasks that can be performed on the main system
• Set security and defaults
• View a list of created mobile computers
• View exception and End of Day reports after synchronizing a mobile computer
• Delete a mobile computer that is no longer accessible
462
Chapter 31: Setting Up the Mobile Computing Module
Setting Up the Mobile Computing Module
Before You Begin
Before you set up a mobile computer, review the following checklist.
Check to ensure that you have enough disk space on the mobile computer machine. You will need
approximately three times the size of your Cornerstone database. If you plan to view your images on
the mobile computer, you will also need to make sure you have enough space for your images
folders. See “Copying Images to a Mobile Computer” on page 465.
Make sure the appropriate security has been set up for mobile computer users. At least one user
should have permission to access all mobile computer options.
Set the mobile computing defaults and any workstation-specific defaults. Once the mobile computer
database is created, you will not be able to change any of these settings without undoing the mobile
computer. See the “Setting Mobile Computing Defaults” section that follows for information on
mobile computing defaults.
Printer assignments may be set on the mobile computer. However, these assignments are temporary
and will be overwritten the next time synchronization is run.
Setting Mobile Computing Defaults
You can set up the End of Period defaults to specify that End of Day processing automatically run before
and after mobile computing synchronization. If this default is enabled, you will have separate End of Day
records according to mobile computers.
Note: If the Run End of Day before and after mobile computer synchronization option is selected,
End of Day processing will be run on the main system every time a mobile computer is synchronized.
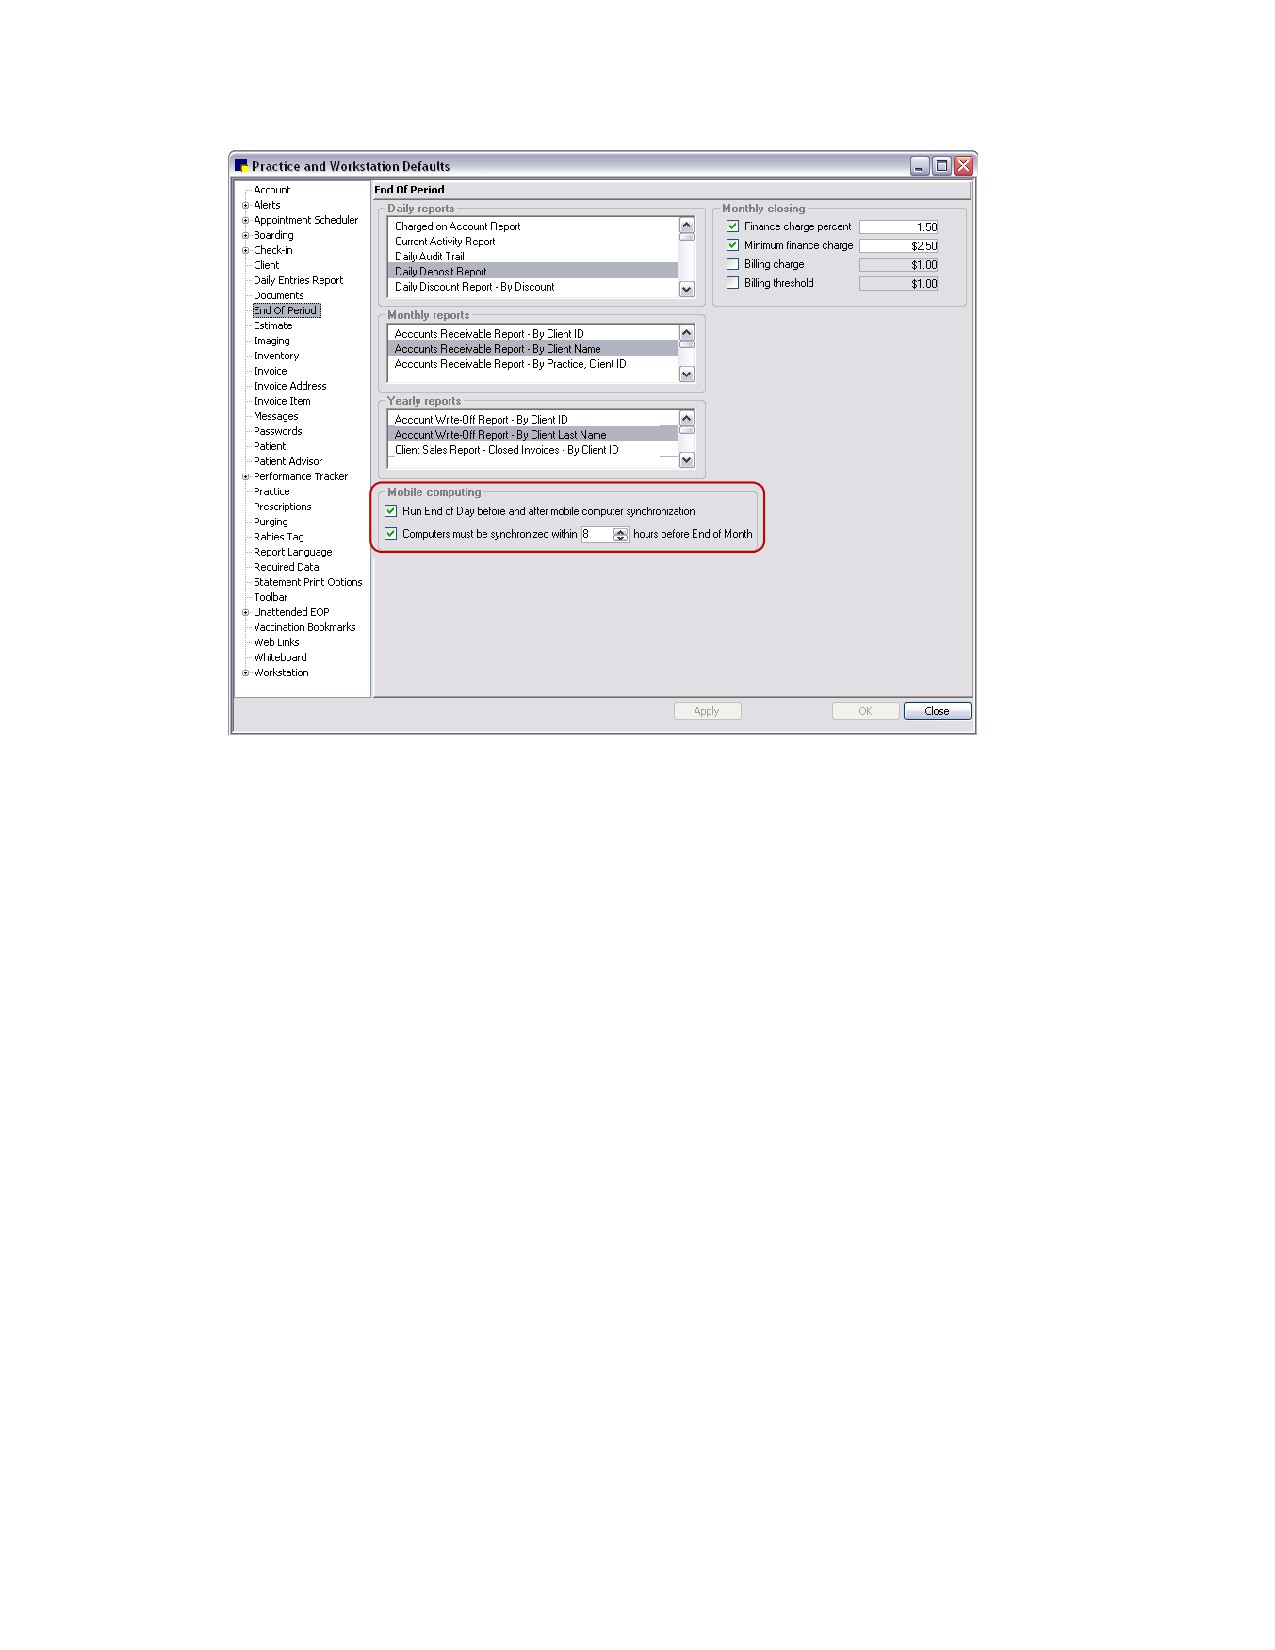
To set the mobile computer (End of Period) defaults:
Note: Perform this task on your main system.
1. On the Controls menu, select Defaults > Practice and Workstation. The Practice and Workstation
Defaults window appears.
2. In the navigation pane, click End Of Period. The End Of Period configuration pane appears on the
right side of the window.
463
Chapter 31: Setting Up the Mobile Computing Module
End of Period defaults
3.
To run separate End of Day processing for the mobile computers, select the Run End of Day
before and after mobile computer synchronization check box.
If selecting this option, note the following:
• When synchronization occurs on the mobile computer, an End of Day is processed initially for
the main database and then a separate End of Day is processed for the mobile computer’s
data.
• End of Day processing will be run on the main system every time a mobile computer is
synchronized.
Tip: If you choose to run separate End of Day during the synchronization of the mobile computers,
you can see if the End of Day was run on the mobile computer or server by clicking the Details
button on the Daily Reports dialog box (Reports > End of Period > End of Day).
4.
To specify that synchronization of the mobile computer(s) must be performed within a certain
number of hours of End of Month processing or an alert will appear, select the Computers must be
synchronized within __ hours before End of Month check box and specify the timeframe.
If selecting this option, note the following:
• If your practice is set up to automatically run End of Month and the specified time frame is
exceeded, automatic End of Month processing will not run.
• If you attempt to manually process End of Month and the specified time frame is exceeded, an
alert will display. If necessary, you can override this alert and continue your End of Month
processing.
5.
Click OK.
464
Chapter 31: Setting Up the Mobile Computing Module
Copying Images to a Mobile Computer
When your practice sets up a mobile computer to be used with the Mobile Computing module, you have
the option to copy your images from your main system to your mobile computers.
Note: If you do not have enough space on the mobile computer for your images, you may decide not to
copy images to it. If you choose to not copy images to the mobile computer, images can still be created
and uploaded to the main system, but images stored on the main system cannot be viewed on the
mobile computer.
To set the option to copy images to the mobile computer:
Note: Perform this task on your main system.
1. On the Controls menu, select Defaults > Practice and Workstation. The Practice and Workstation
Defaults window appears.
2. In the navigation pane, click Imaging. The Imaging configuration pane appears on the right side of
the window.
3. Select the Copy images to mobile computer check box if you want images from your main system
to be copied to your mobile computer(s).
4. Click OK.
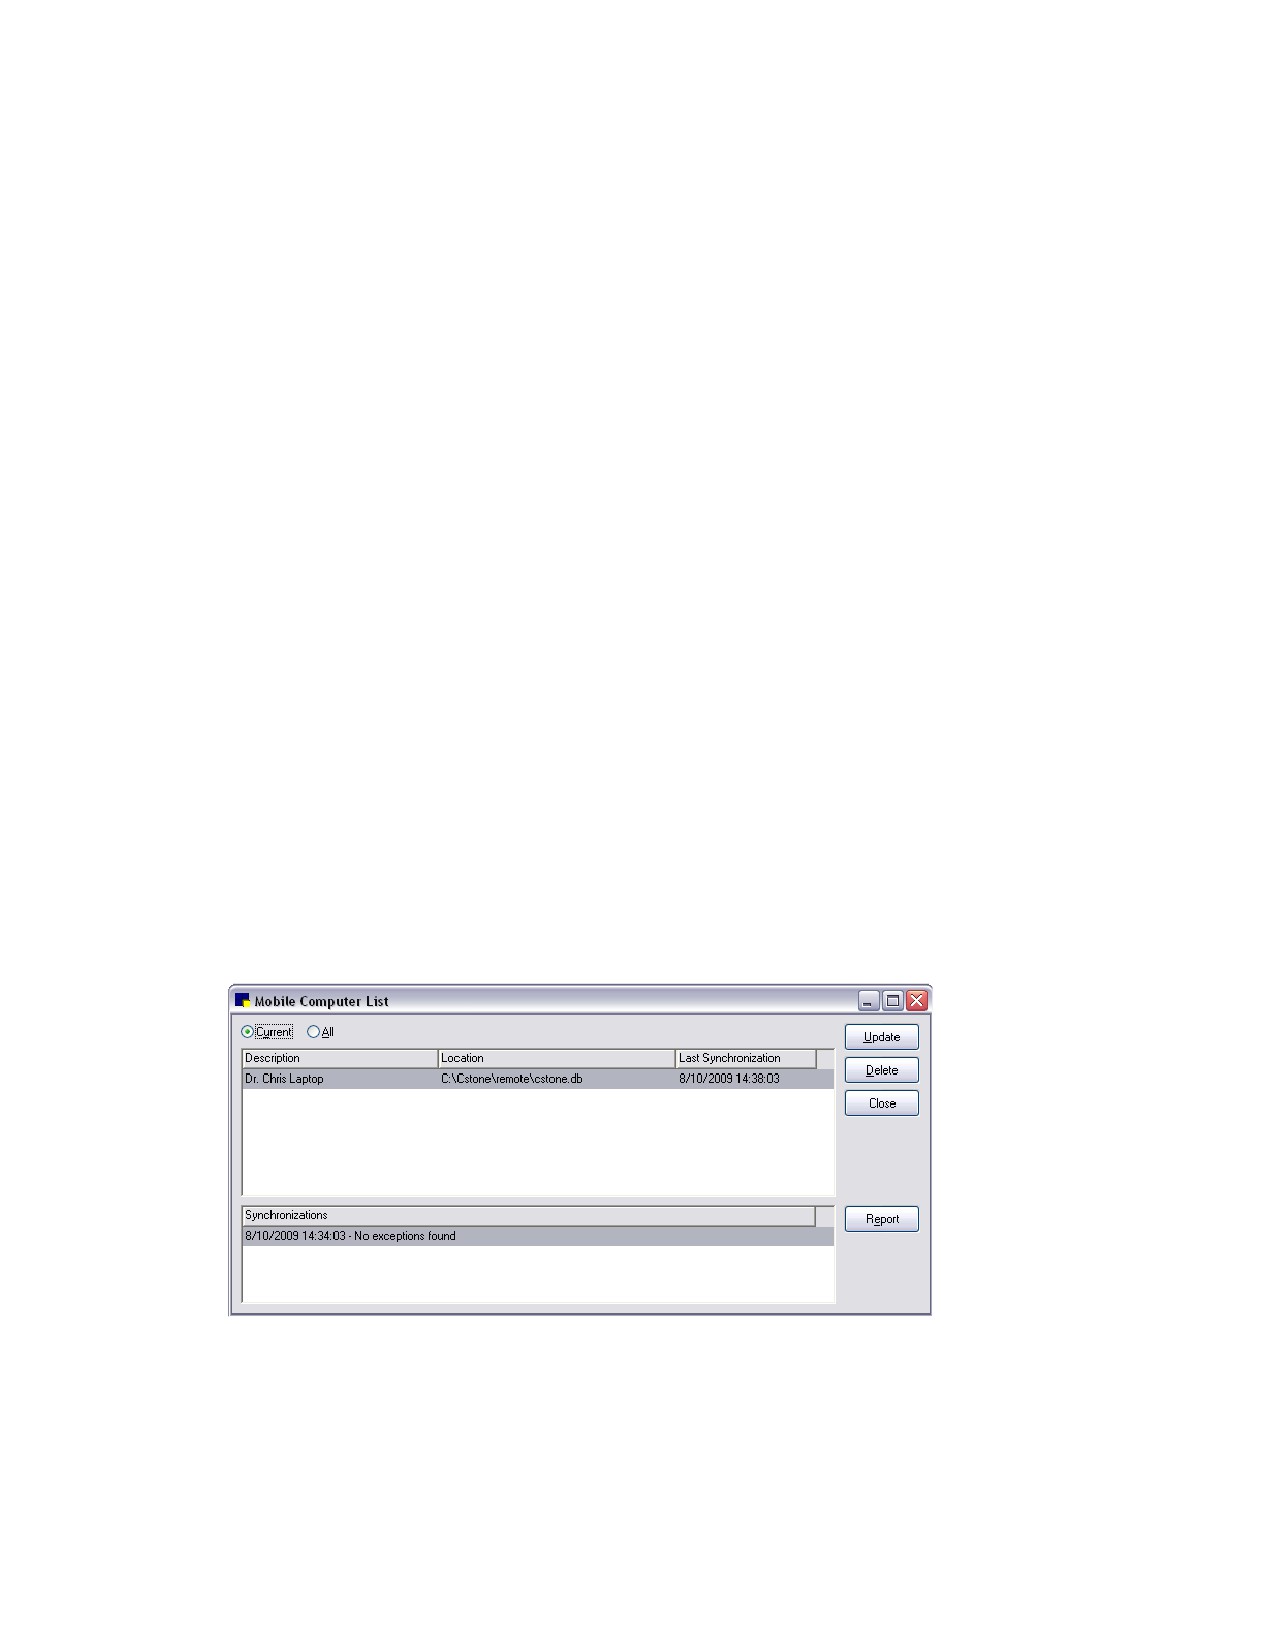
Viewing the Mobile Computer List
The Mobile Computer List shows the mobile computers that have been created from your database and
when synchronizations took place. If you want to check which mobile computers are in use or when the
last data synchronization for a mobile computer occurred, view the Mobile Computer List. Also, if you
need to reprint an Exception Report, this can be done from the Mobile Computer List.
To view the Mobile Computer List:
Note: Perform this task on your main system.
1. On the Tools menu, select Mobile Computing > Mobile Computing List. The Mobile Computer
List dialog box appears.
Mobile Computer List dialog box
2. To reprint an Exception Report, select the synchronization date and click Report. If your practice has
multiple mobile computers, select the mobile computer first, and then select the synchronization
date.
465
Chapter 31: Setting Up the Mobile Computing Module
Deleting a Mobile Computer
You should only use this option if you cannot access the mobile computer; for example, if the mobile
computer is lost or stolen or if it’s broken.
Note: Even if a lost or stolen mobile computer is recovered, you will not be able to synchronize it with the
main system once you have deleted it from the Mobile Computer List.
To delete a mobile computer:
Note: Perform this task on your main system.
1. On the Tools menu, select Mobile Computing > Mobile Computer List.
2. Select the mobile computer to delete from the system and click Delete. You are prompted to
confirm the deletion.
3. Click Yes to delete the mobile computer.
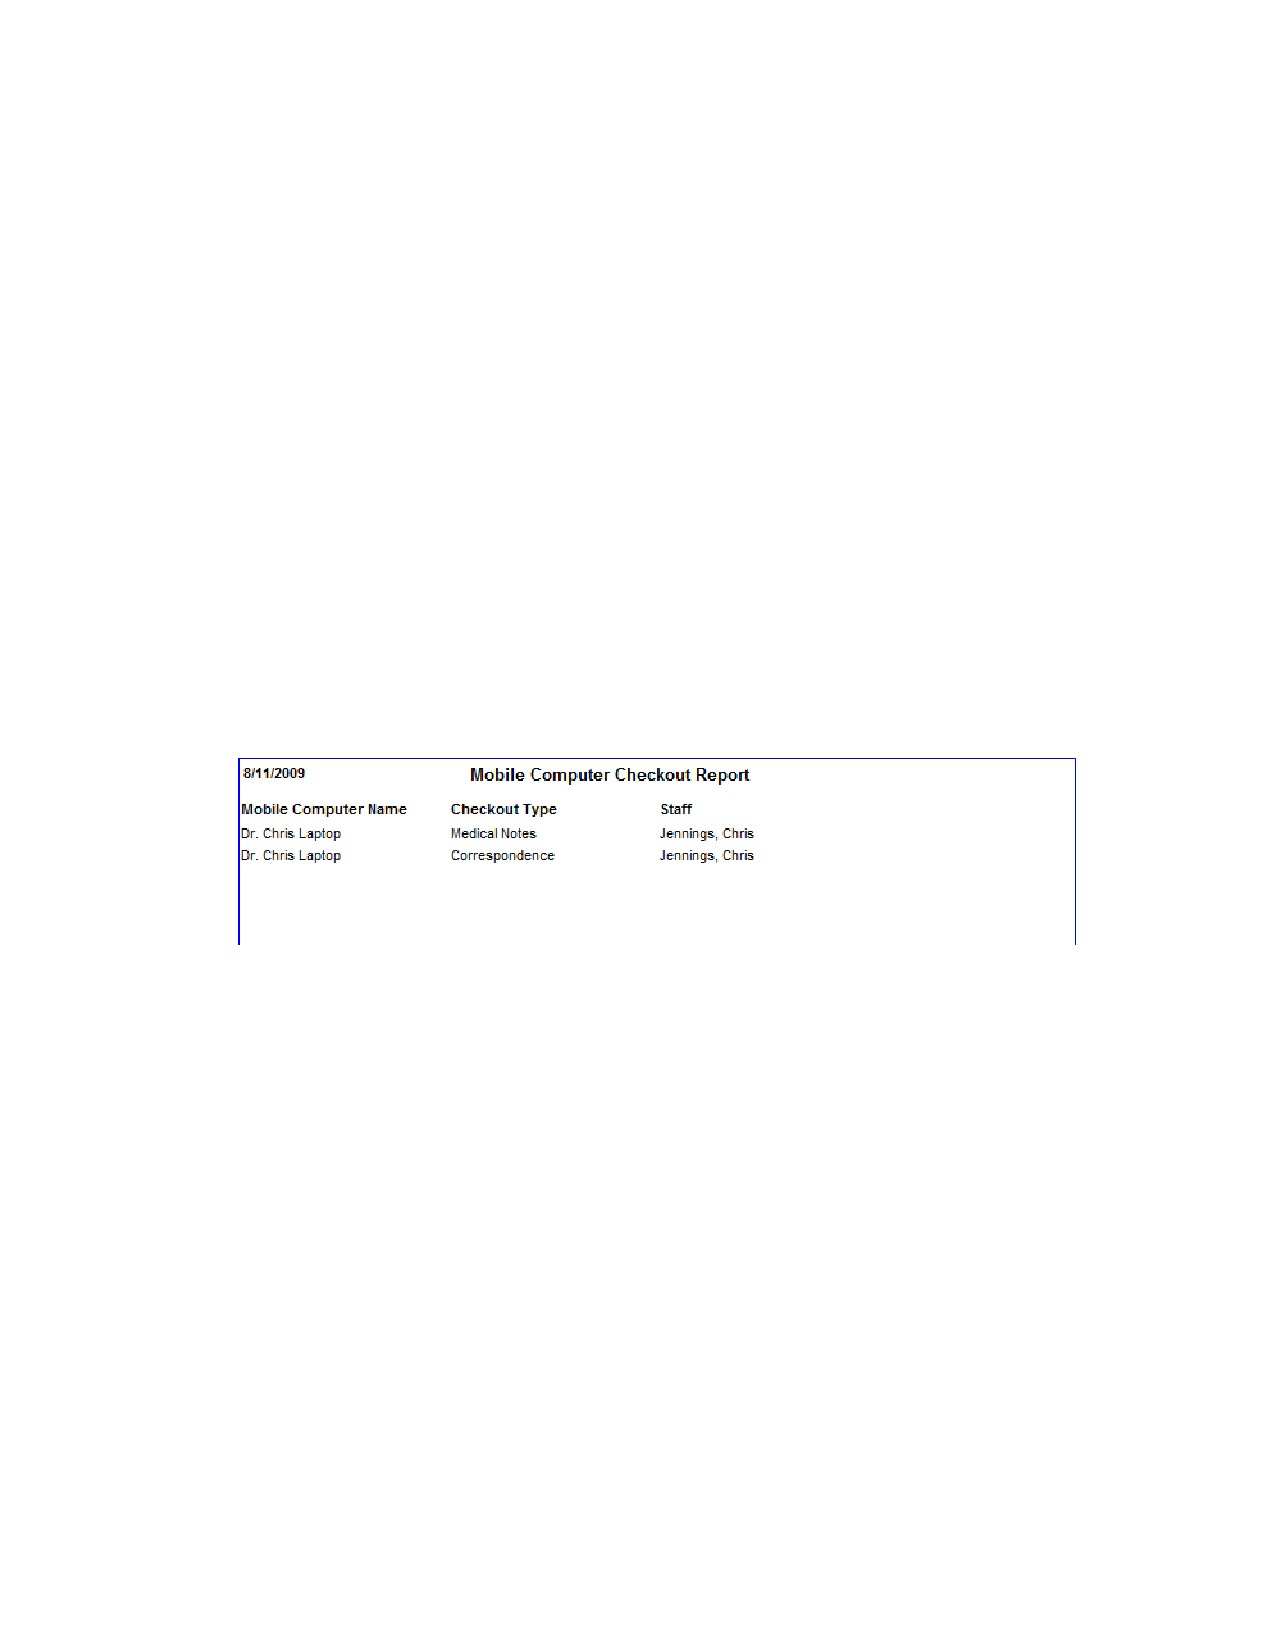
Generating a Mobile Computing Checkout Report
The Mobile Computing Checkout Report shows which staff members have checked out medical notes
or correspondence. This report must be accessed from the main system.
To run the Mobile Computing Checkout Report:
Note: Perform this task on your main system.
¾ On the Tools menu, select Mobile Computing > Mobile Computing Checkout Report.
Mobile Computing Checkout Report
466