OMRON NB-Designer OPERATION MANUAL (NB-series, 2020) - page 16
3 Functions of NB-Designer
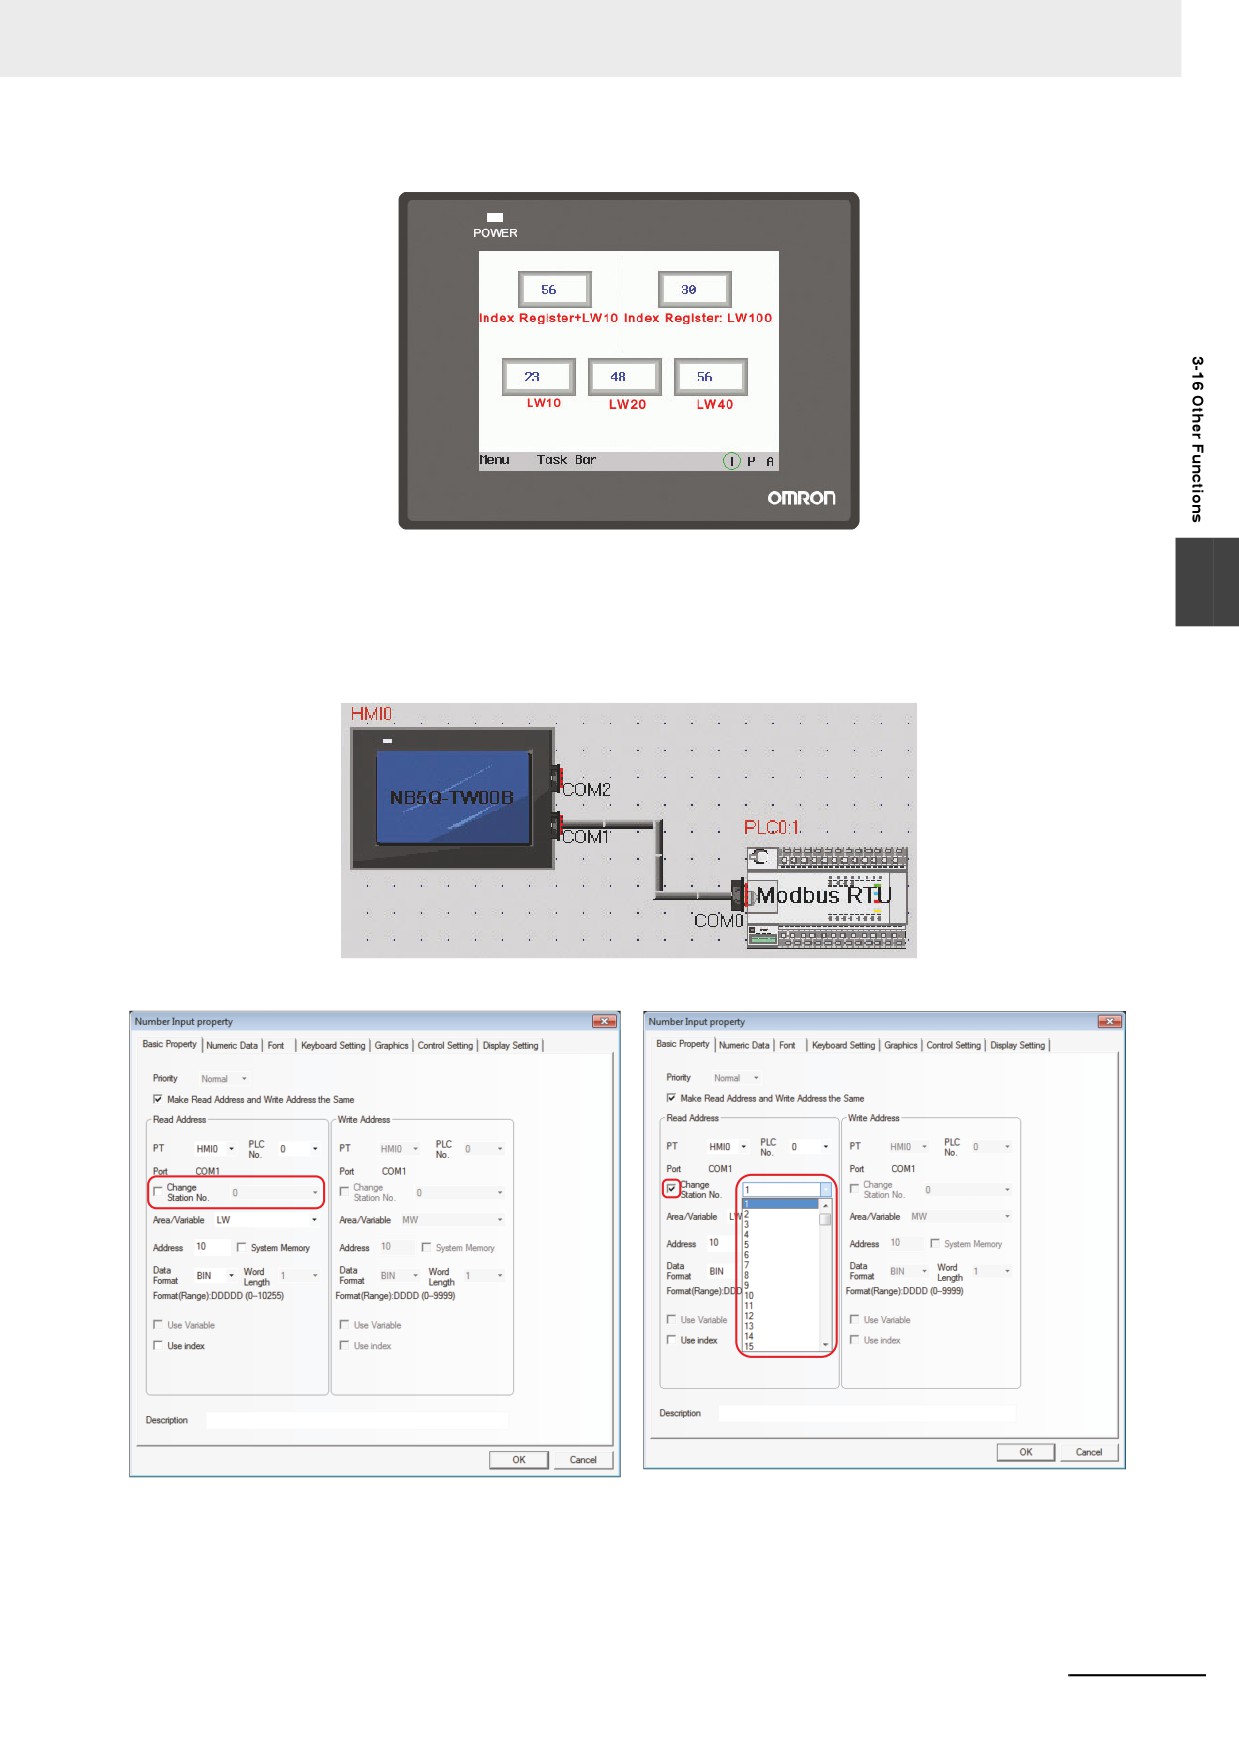
When the value of index memory is 30, the addresses of NI4 and NI0 are the same.
34 Station Num Index Function
3
Station number index function is invalid for the background components and Macros.
Only one PLC can be connected with the connection wire, while multiple station numbers can
be set during the editing, thus it is the same effect as the connection with multiple PLCs.
3-413
3 Functions of NB-Designer
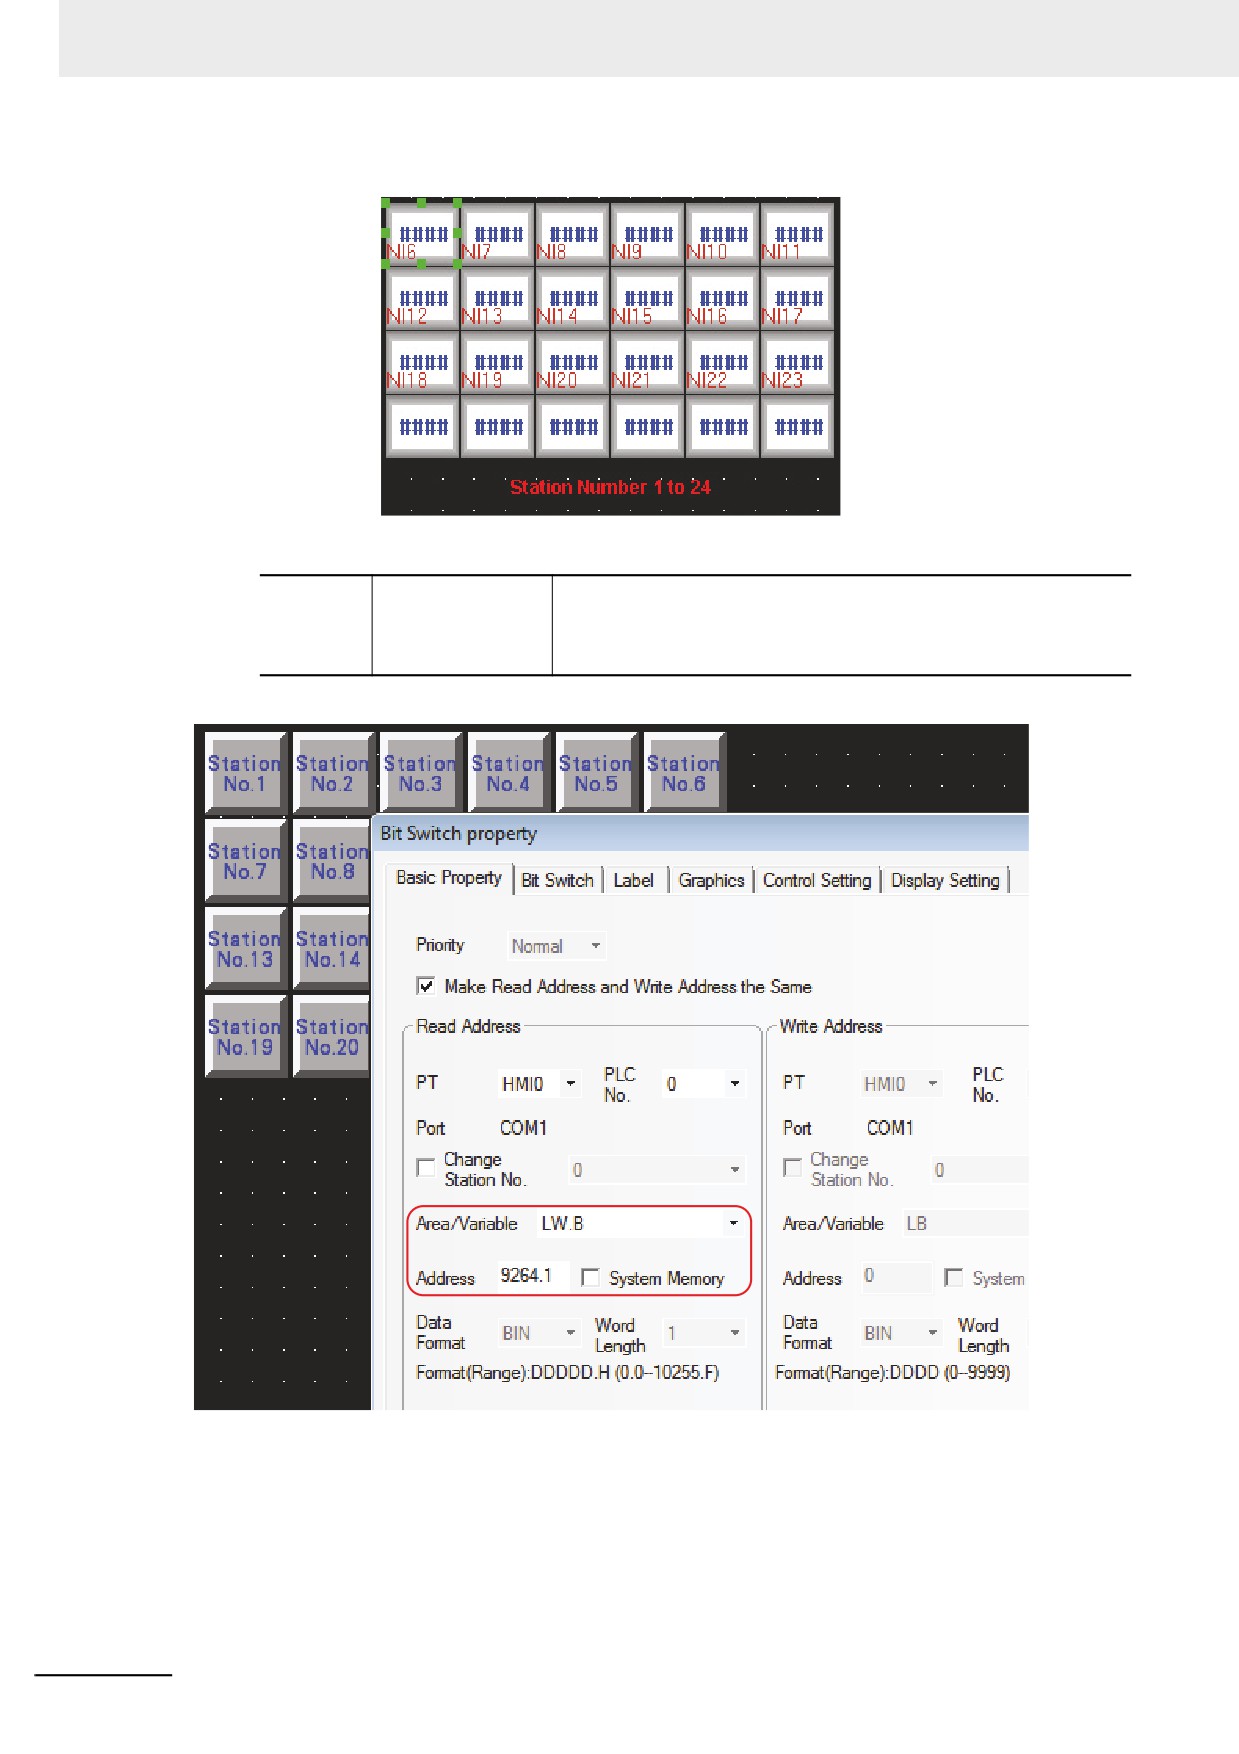
Test of Mask Station No.
9264~9279
Mask code of PLC
Each bit corresponds to one Station No. of COM 2 (i.e. 9264.0
Station No.(COM 2)
corresponds to Station No. 0... and 9279.F corresponds to Station
No. 255). When the bit is turned ON, the communication
corresponding to Station No. will be masked (read/write).
3-414
3 Functions of NB-Designer
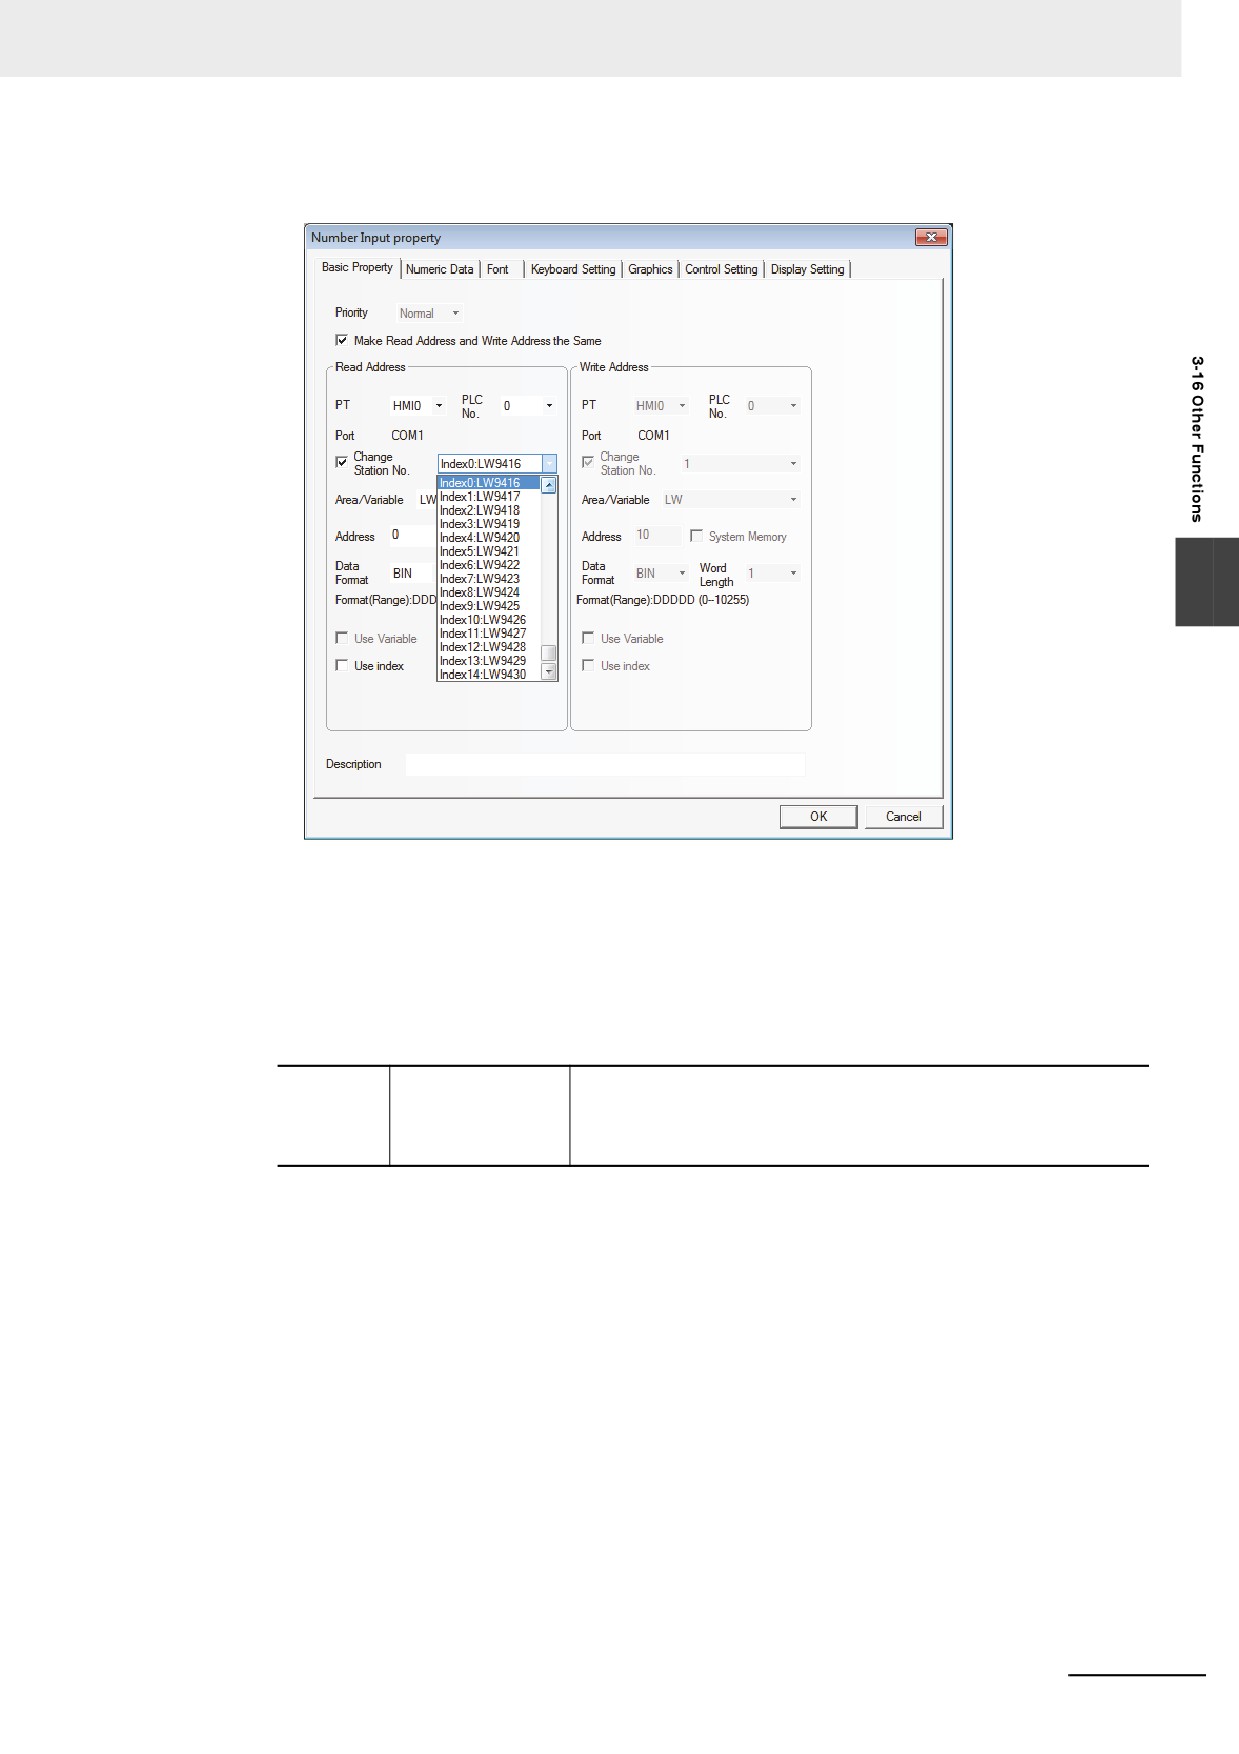
Station No. use the special memories (LW9416 to LW9431). When the special memories are
used, the Station No. is determined by the value of the memory.
3
35 PT Mask and PLC Station No. Mask
PT Mask function:
LW9400 to LW9415 (totaling 256 bits) correspond to PT Station No. 0 to 255. When these bits
are set to ON, the access to the corresponding PT numbers will be masked.
PLC Station No. Mask Function:
9264~9279
Mask code of PLC
Each bit corresponds to one Station No. of COM 2 (i.e. 9264.0
Station No.(COM 2)
corresponds to Station No. 0... and 9279.F corresponds to Station
No. 255). When the bit is turned ON, the communication
corresponding to Station No. will be masked (read/write).
3-415
3 Functions of NB-Designer
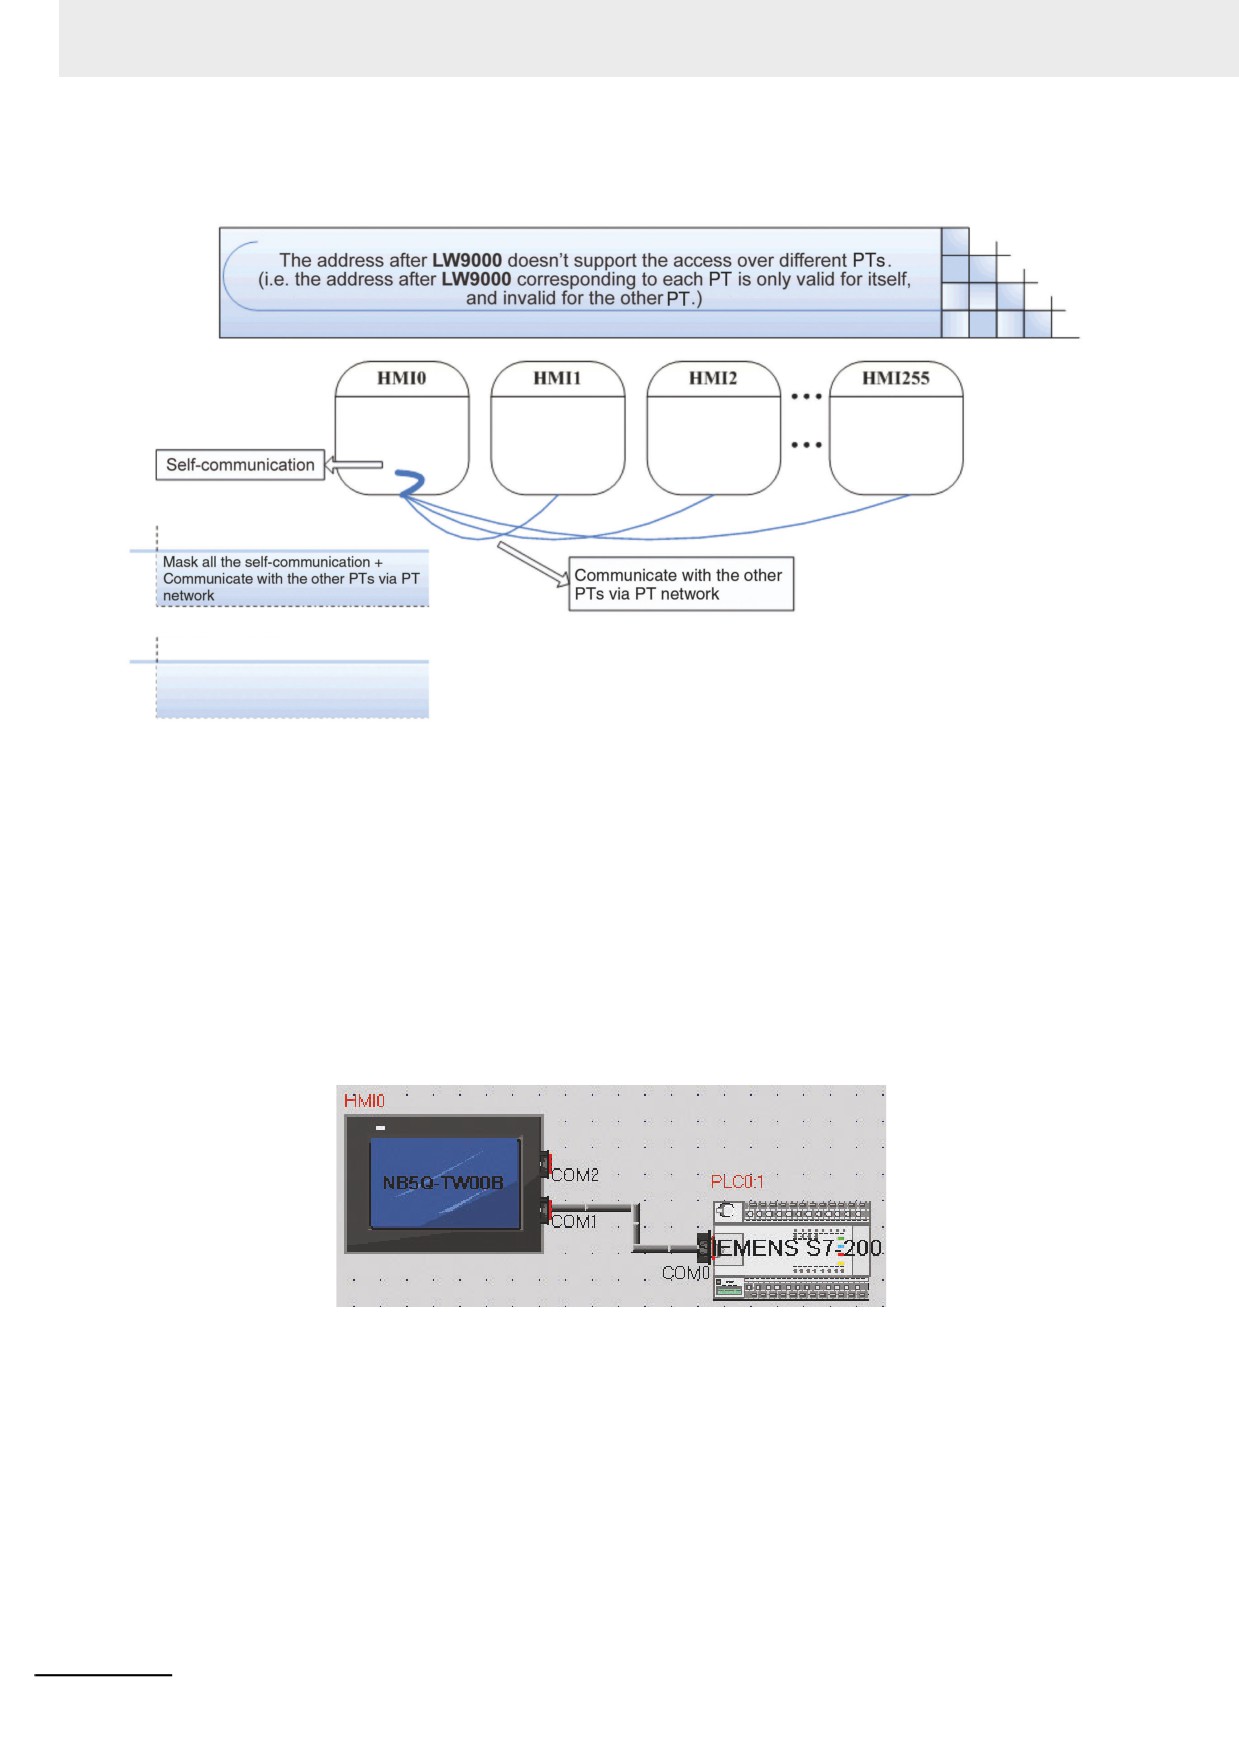
Taking an example the case using masking function for HMI0, the corresponding of LW
memory and masking object is displayed as below.
LW.B 9400.0
LW.9264~9279
The communications with the PLC to
connect COM 2 will be being masking.
36 Mask System Prompt Information
NB-Designer provides the system information mask function which is controlled by the special
memories LW9296 (read/write) and each bit corresponds to one piece of system error
information, and the system error information will be masked when the corresponding bits are
set to ON. For example, LW.B9296.2 corresponds to the prompt information “PLC No
Response”.
Note Place Bit Button component and others in the screen which should be being masking of error display and
specify [Set to ON when screen is open] for Type and specify LW.B9296.2 to On.
Take Mask of “PLC No Response” as example
(1) Create one project, and connect NB5Q-TW00B with SIMENS S7-200 for communication.
(2) Place one Number Input component VW0 (One memory in SiemensS7-200) and one Bit
Button component with the address of LW.B9296.2 and Type of “Bit Button” in Edit
Window.
(3) Actually, PT0 is not connected with Siemens S7-200 PLC. The prompt information of “PLC
No Response” should appear before, but now the system error prompt information doesn’t
appear for the LW9296 mask function.
3-416
3 Functions of NB-Designer
37 How to clear RW area for recipe saving
Clear the address by system memory related RW memory
(1) Set the Read Address to LW9260 and input the starting address objected of clearing RW
area to the Number Input component which is specified the word length to [DWORD].
(2) Set the Read Address to LW9262 and input the word length objected of clearing RW area
to the Number Input component which is specified the word length to [DWORD].
(3) Set LB9130 (PT system memory) to ON and clear the content of RW area.
How to clear values of RW at a time:
(1) Specify this parameter using the [Clear system memory related to RW memory] method. In
order to clear the stored values in RW memory, specify the longest word length of RW
memory to the range from LW9262 to LW 9263.
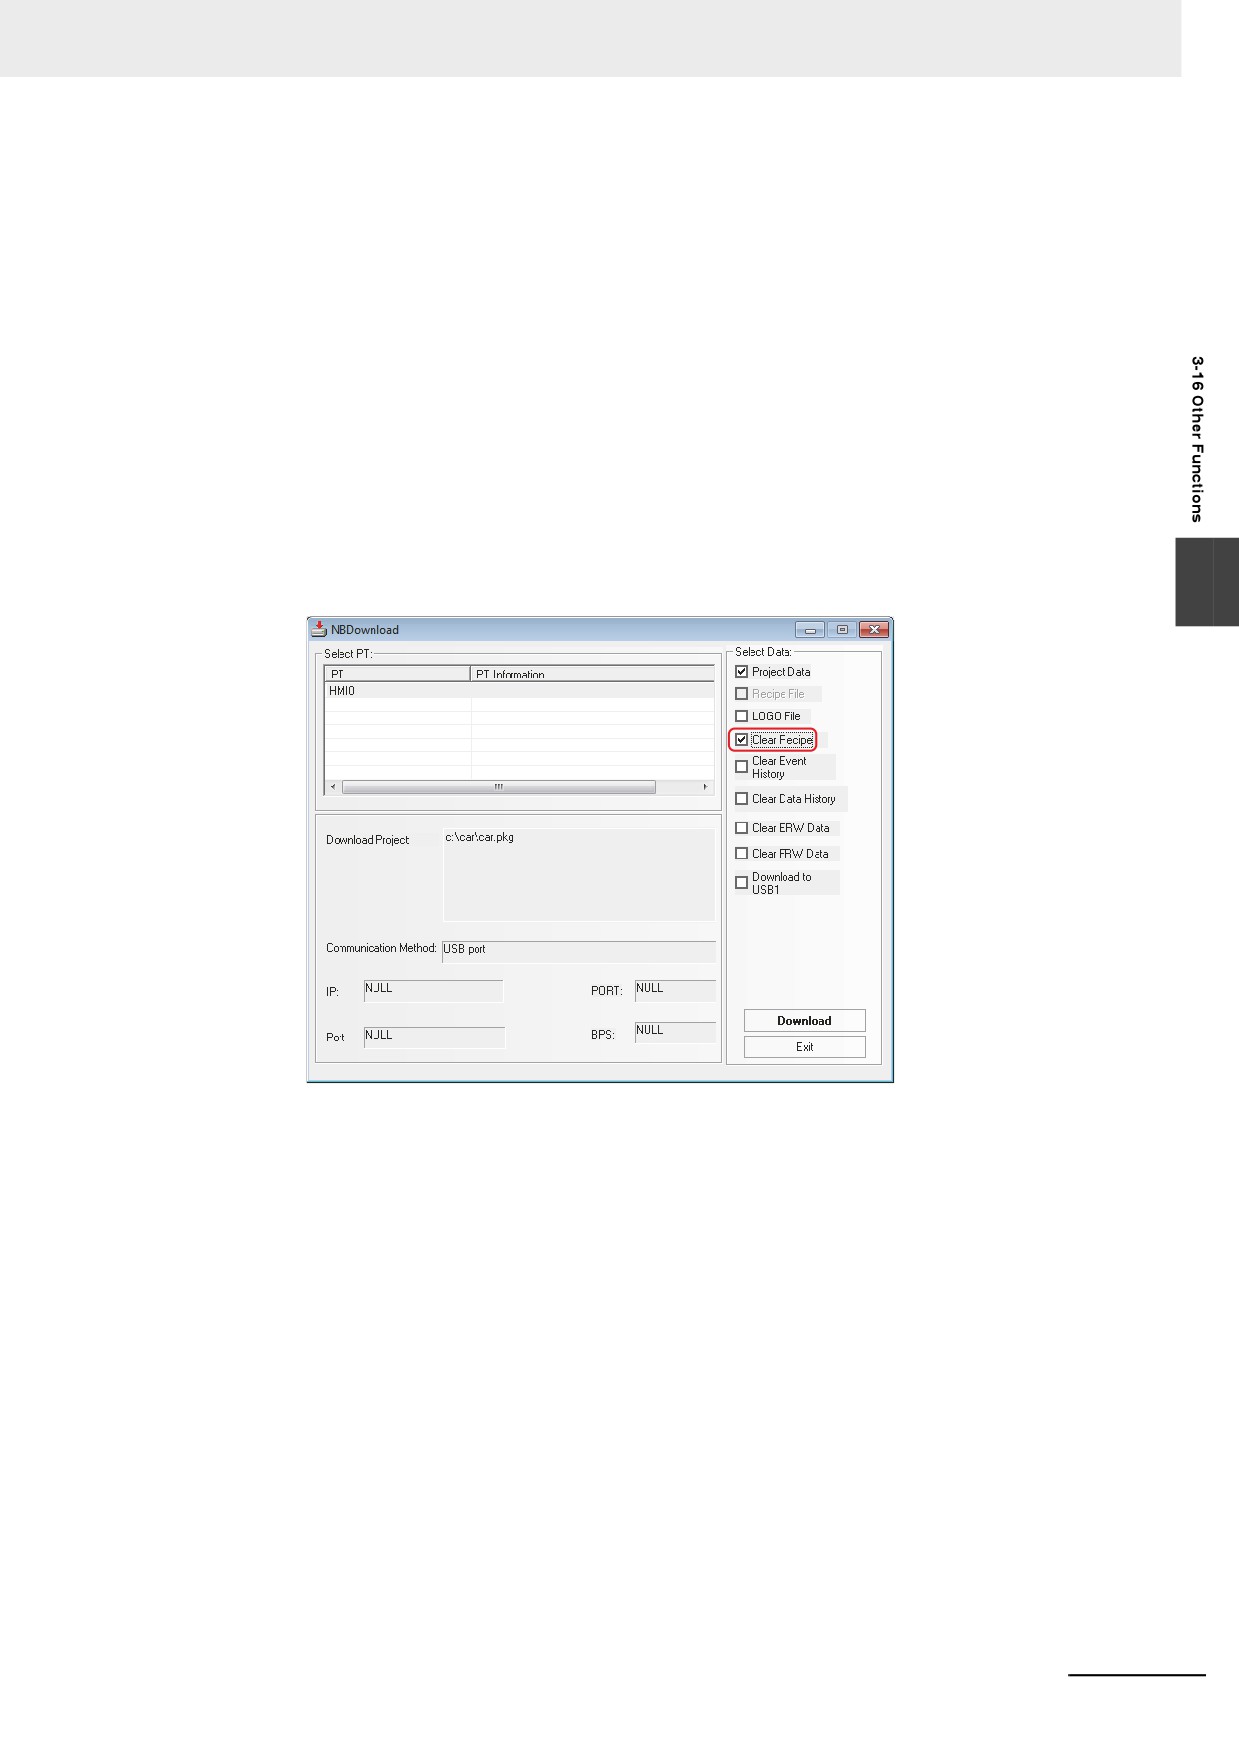
(2) Select “Clear Recipe” in “Select Section” for downloading the NB Manager and click
“Execute”.
(3) Check the [Clear Recipe] check box during the download.
3
38 Data Encryption
For the data stored in the CSV format in the external memory, data encryption function can be
used to restrict the modification, edition, and others by the user.
Note 1
If the [Decompile] operation is not performed to the CSV file generated for the component using [Data
Encryption], the illegible characters will be displayed in the opened CSV file.
2
If the [Decompile] operation is performed through the NB-Designer, the CSV file can only be opened for
viewing instead of modifying or editing.
3
If the encrypted file is modified by someone intentionally, the error prompt will appear during the [Decom-
pile] operation in NB-Manager, making the damage of source file informed to the user.
4
The components supporting [Data Encryption] function are Data Log, XY Graph and Data History compo-
nents.
5
When the data encryption is set, the display of the component is also encrypted.
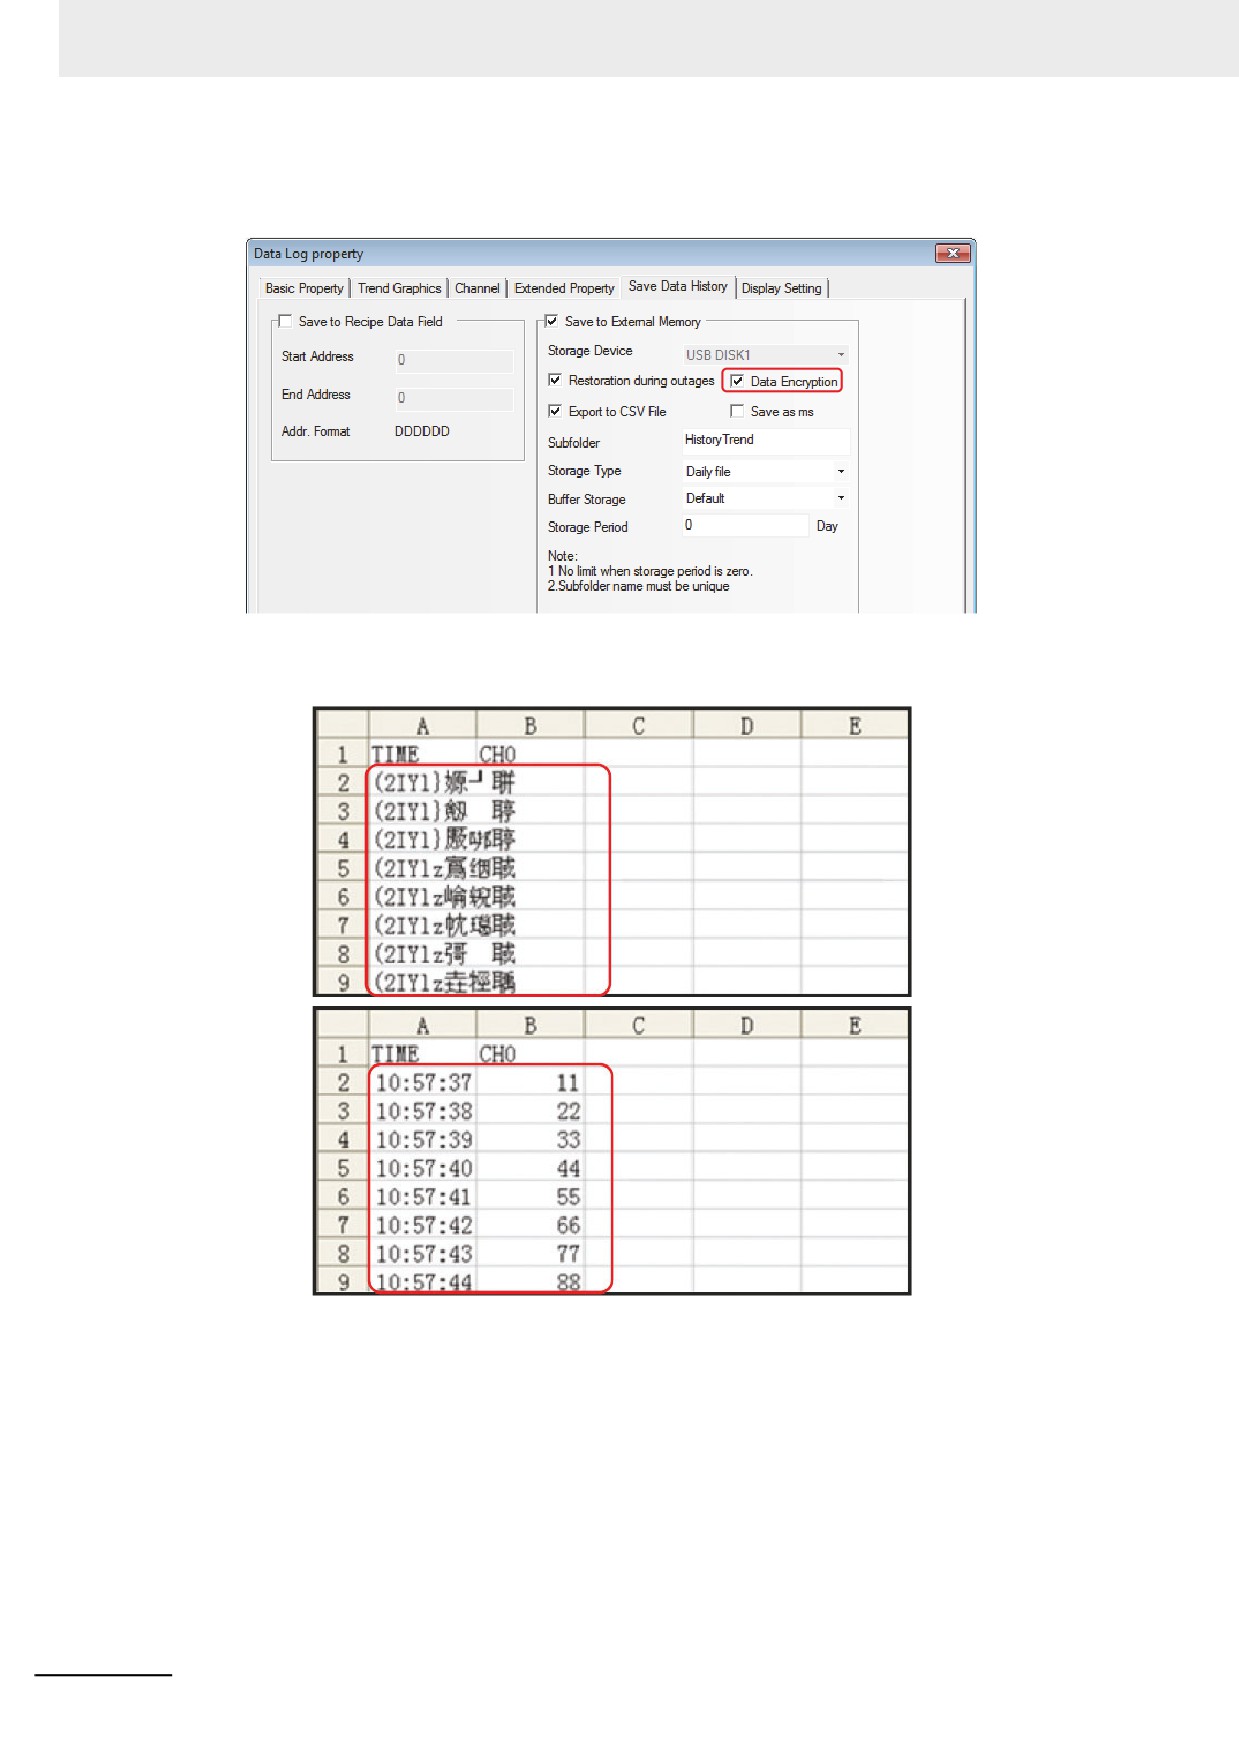
Take the setting method of [Data Encryption] for sampling data file of the Data Log as example:
3-417
3 Functions of NB-Designer
(1) Check the [Data Encryption] option after the [Save to External Device] option is checked in
the [Save Data History] tab in the [Data Log Property] dialog box.
(2) The illegible characters will be displayed in the generated CSV file after the encryption if it
is directly opened.
Using the [Data Encryption] function
Not using the [Data Encryption]
function
3-418
3 Functions of NB-Designer
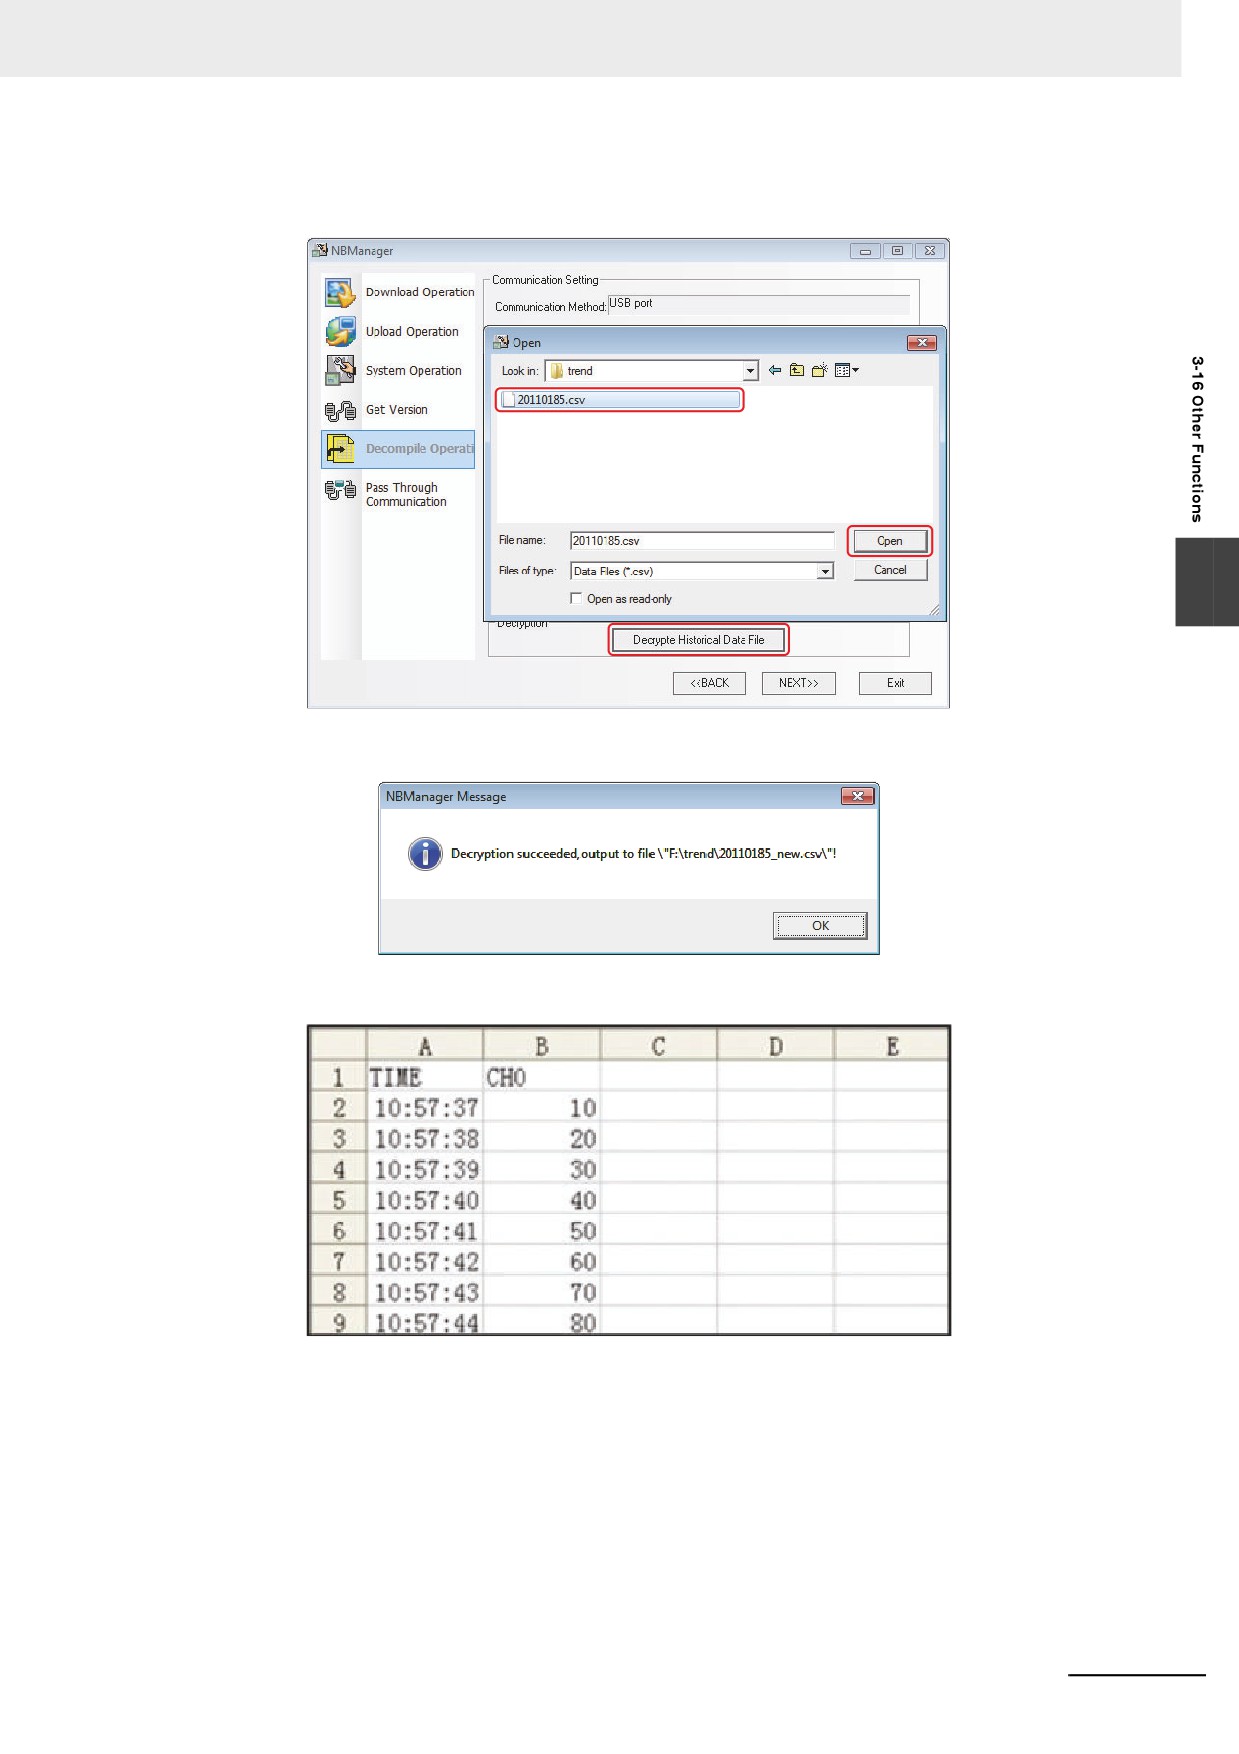
(3) The procedure of decompiling the CSV file by using the [Decompile] function of NB-
Manager is as shown below:
3
The following dialog box will pop up after the successful decryption.
The display effect of the CSV file decrypted successfully is as shown below.
3-419
3 Functions of NB-Designer
• VNC Server
VNC server is used to monitor and operate the display status of the NB Unit from the PC connected
through Ethernet. For settings, refer to 3-10-1 PT (Page 3-291).
To use VNC server function, make the connection from the PC with the following settings.
Server: IP Address of the NB Unit
Password: The value set in PT property setting
Port: 5900
This function can be performed in several modes by combining system memories.
Operation mode: Screens can be monitored and operated from remote locations. To change to
operation mode, turn OFF LB9291 and turn ON LB9292 while operating in monitor
mode.
Monitor mode: Screens can be only monitored from remote locations, but not operated.
To change to monitor mode, turn ON LB9291 and LB9293 while operating in operation
mode.
Additional Information
This function can be enabled or disabled by changing the value of LB9290 on the NB Unit.
Operational conflict may occur if a remote operation is attempted while an on-site operation is
already being performed. Also, screen, which is not intended by the on-site operator, may
appear. For the connection, careful consideration must be given to the on-site situations.
3-420
3 Functions of NB-Designer
3-17 RecipeEditor
z Description of RecipeEditor Function
RecipeEditor is an Editor attached in the NB-Designer, and it is mainly used for the user to check,
edit or create the recipe file conveniently and visually. The supported formats currently are as
follows: files in .rcp format uploaded from or downloaded to NBManager, the specific files in .csv
format, the file of FRW memory in .frp format, and the file of ERW memory in .erp format.
3
The Recipe Editor supports the functions as below.
The following functions are supported currently:
(1) Display the data in recipe file.
(2) Modify the data in recipe file.
(3) Import the CSV file in specific format, and export the recipe data as the CSV file in specific
format.
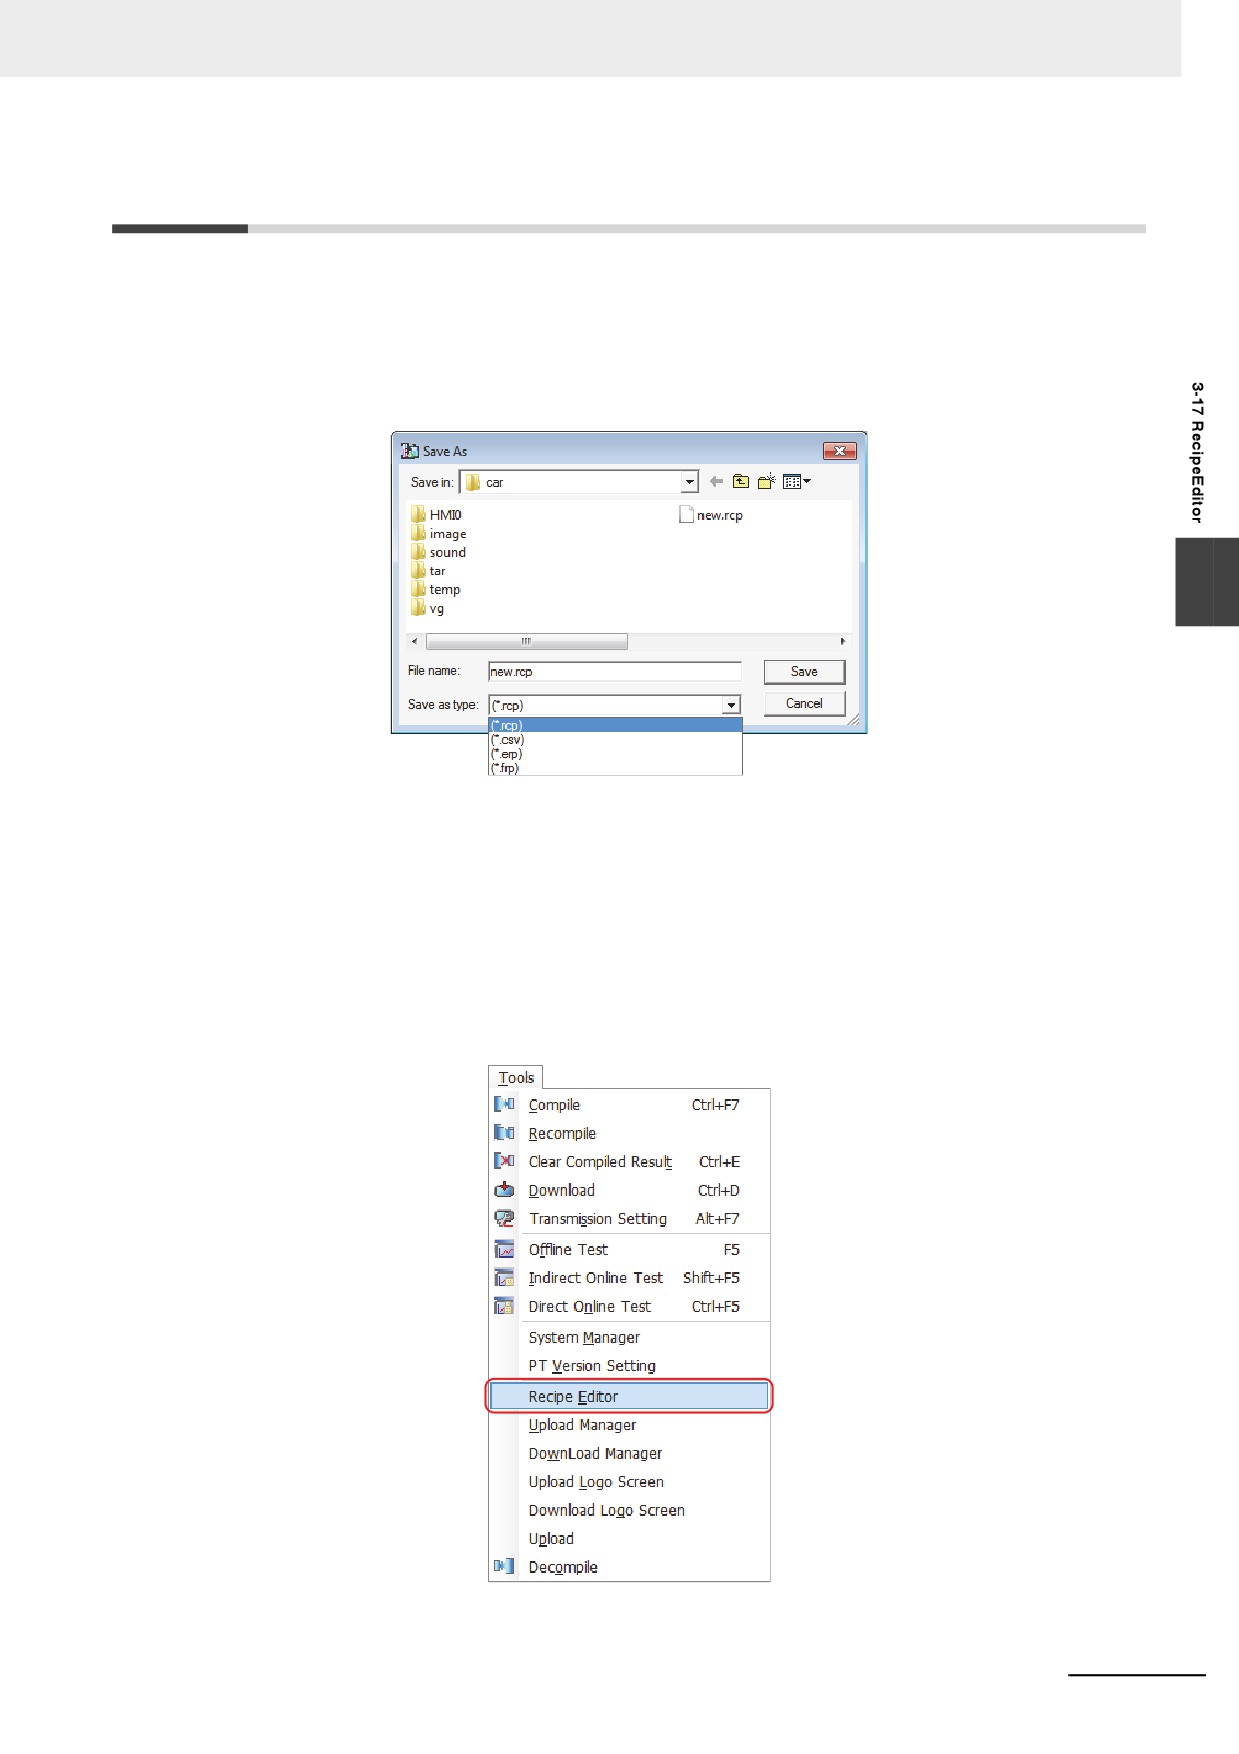
z Method of calling RecipeEditor
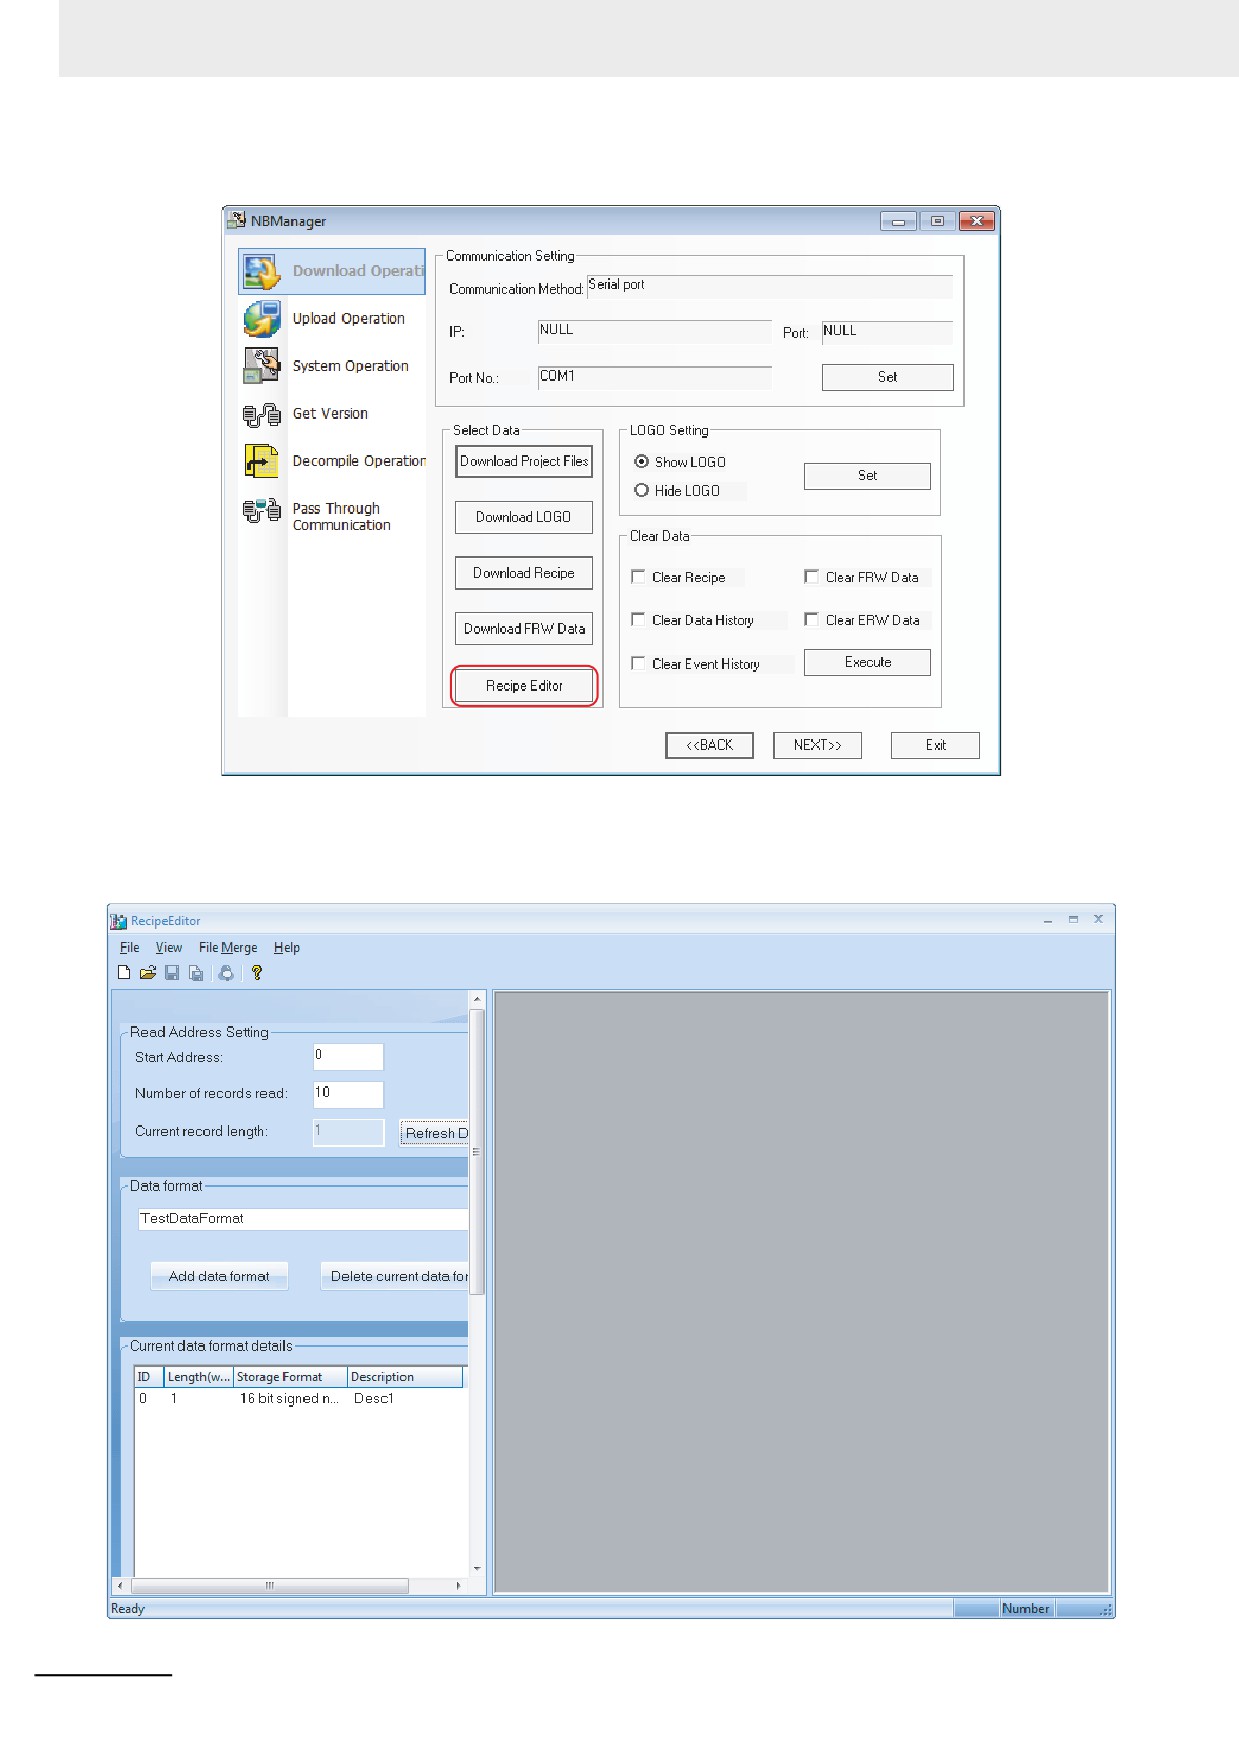
(1) Click Recipe Editor in the Tools menu in NB-Designer software.
3-421
3 Functions of NB-Designer
(2) Click [Recipe Editor] in Download Operate tab of NBManager screen.
z Introduction of RecipeEditor Screen
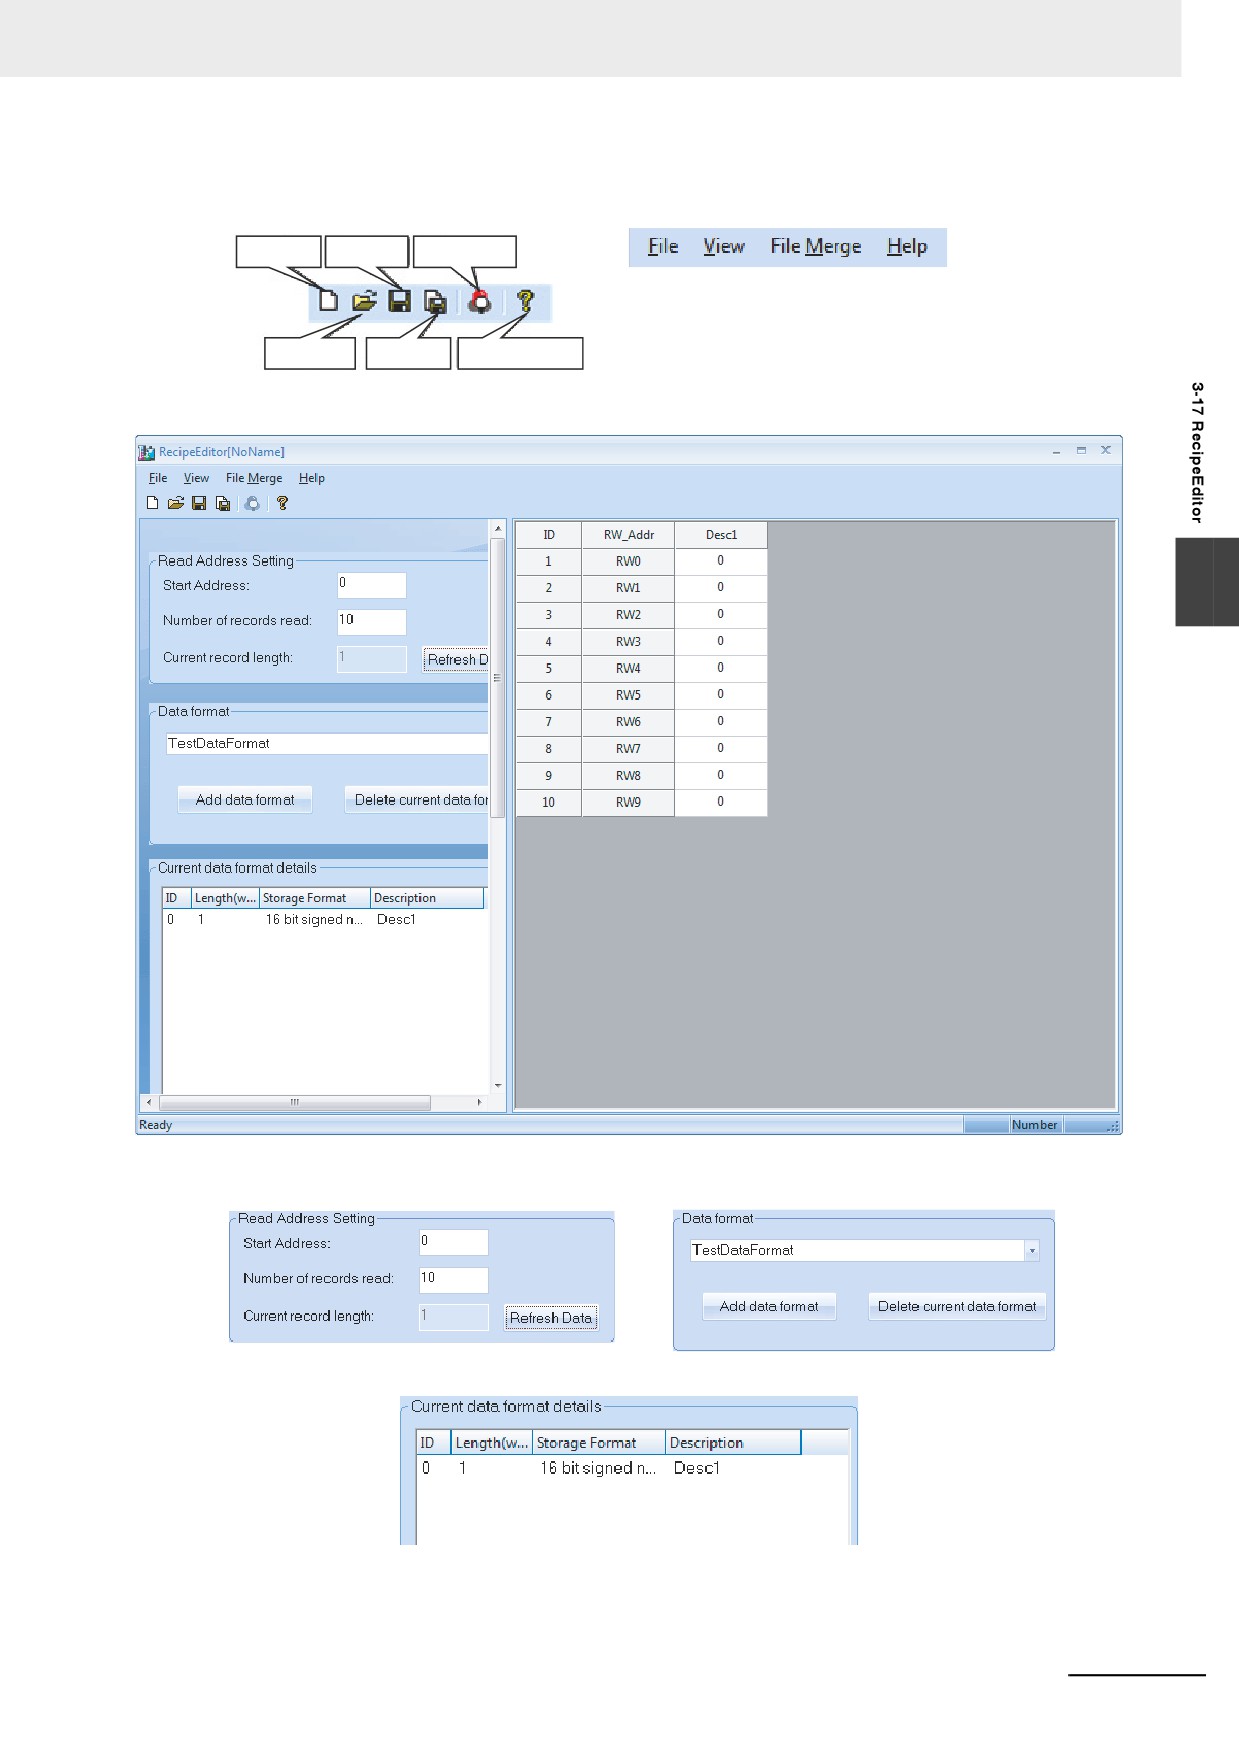
The screen corresponding to the initial operation of program is as shown below:
3-422
3 Functions of NB-Designer
• Toolbar and Menu Bar
New
Save
Binary Browser
Open
Save as
Version Information
Click New, then the initial screen will pop up as below.
3
•
“Read Address setting” area, “Data Format” area and “Current data format details” area
3-423
3 Functions of NB-Designer
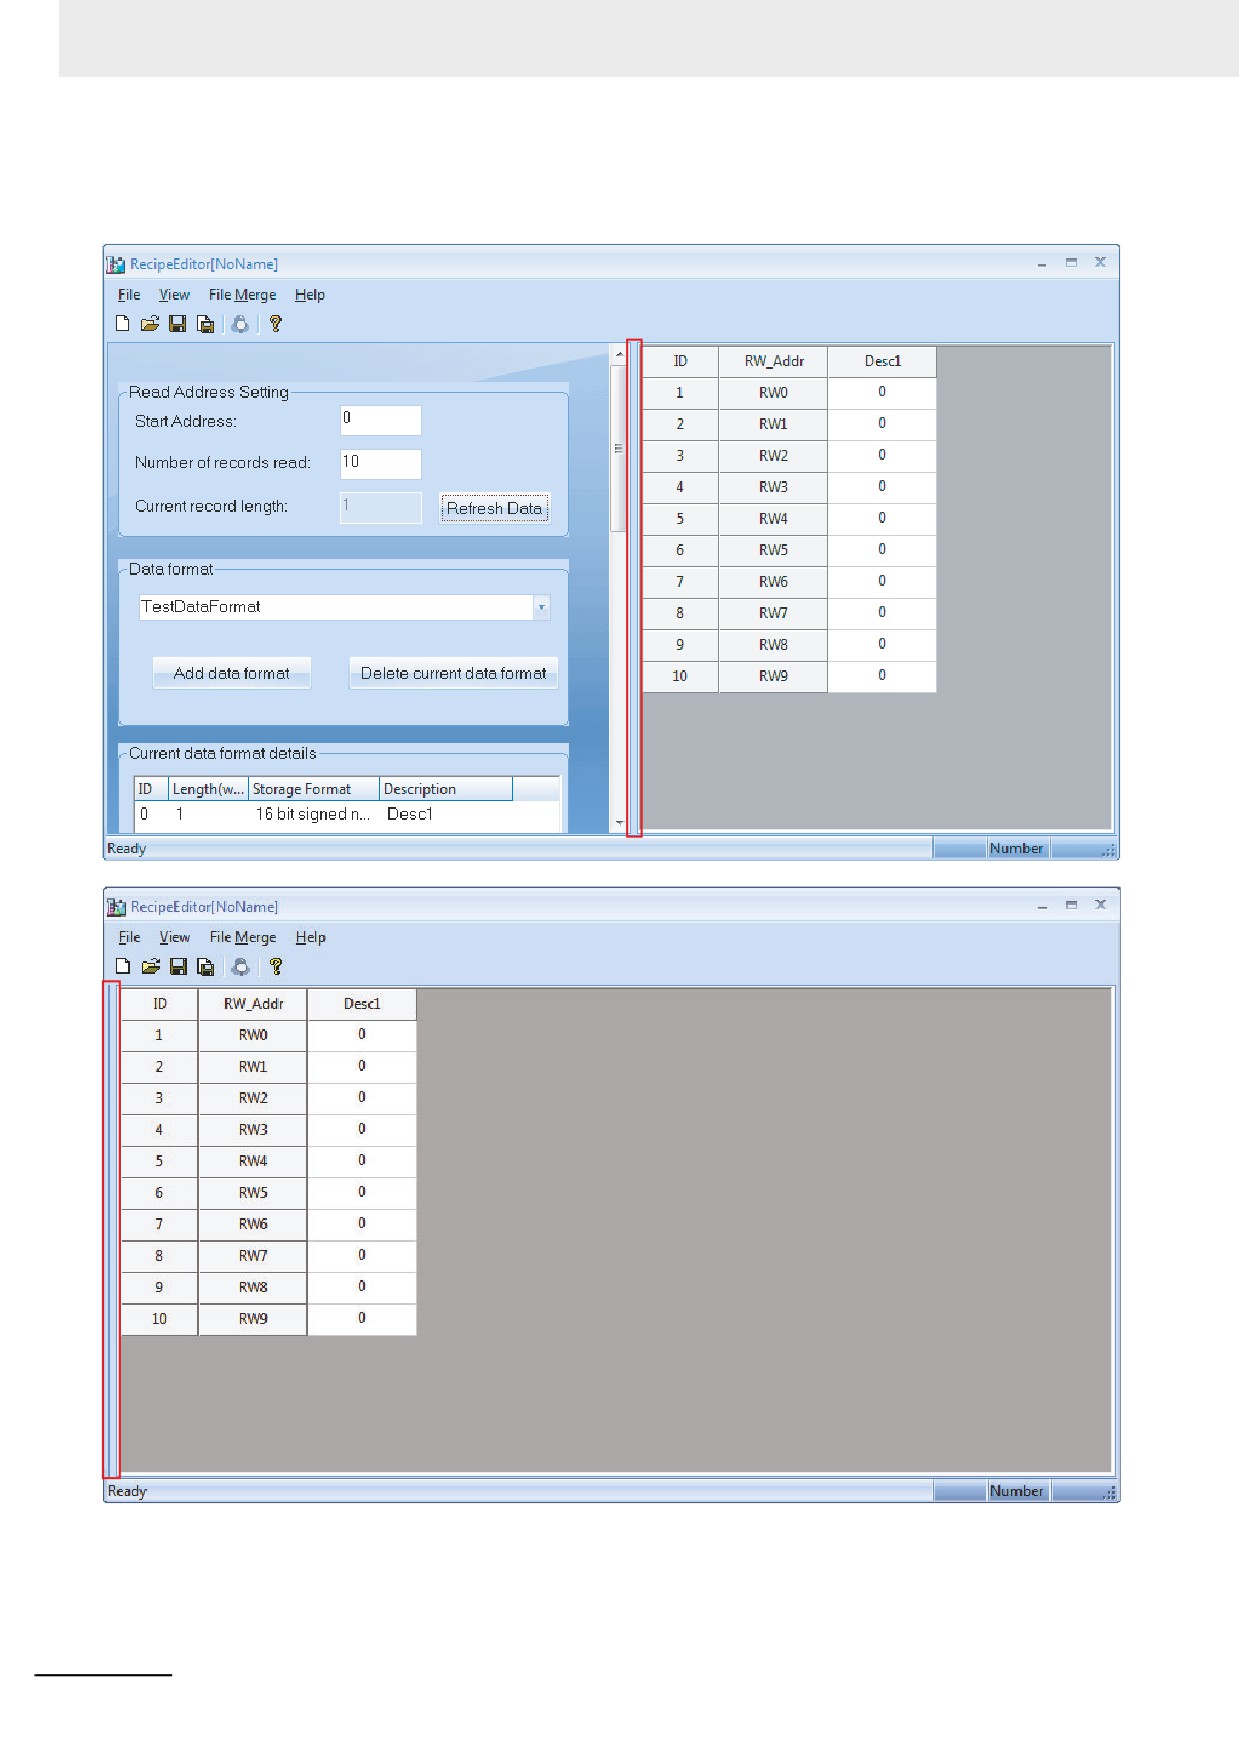
The red frame is the boundary of the setting area and data area, and the former is in the left side while
the latter is in the right side. Move the cursor to this boundary and click it, then the setting area will be
hidden, and if you click it again, the setting area will appear again.
3-424
3 Functions of NB-Designer
• Input Data in Data Area and Binary Browser
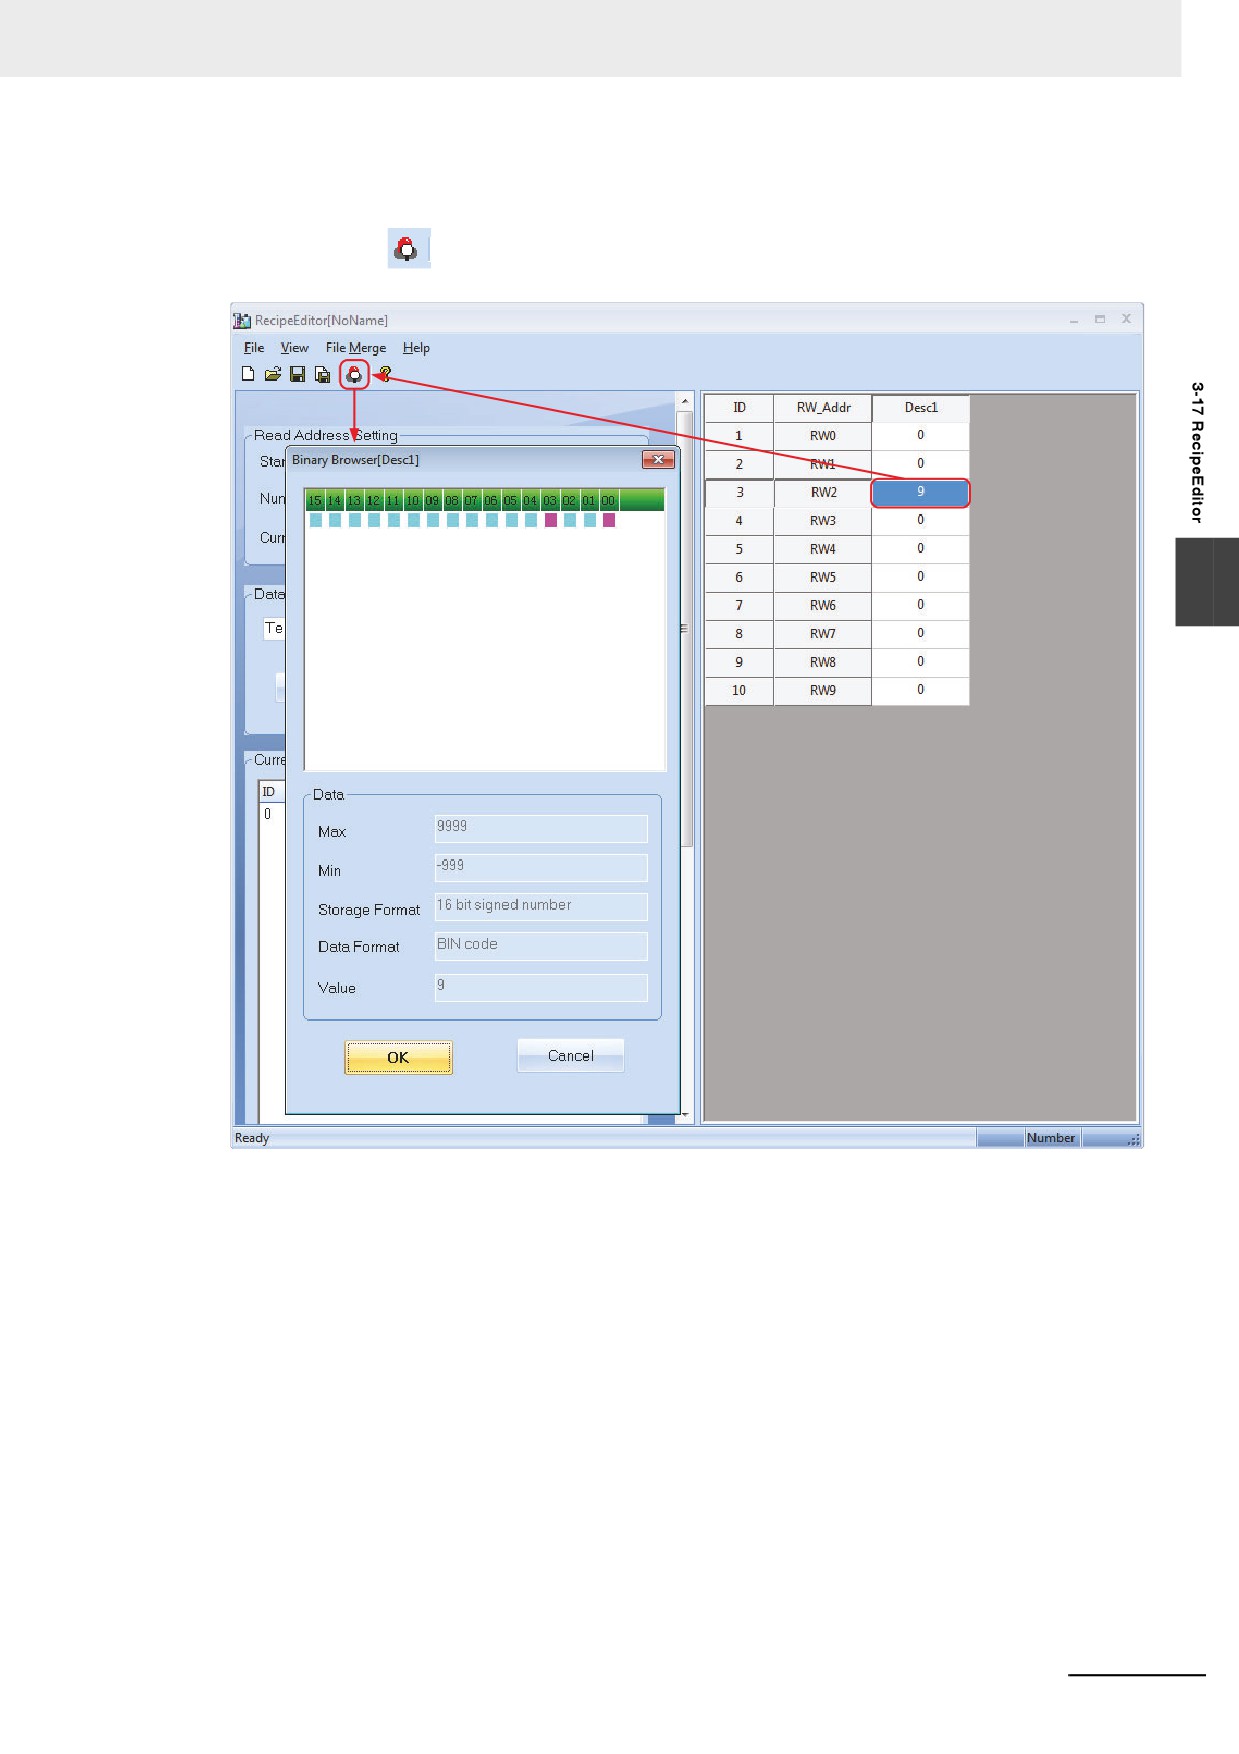
Directly input data in data area and right-click the mouse in the address where the bits to be
browsed or click
(Binary Browser) icon to perform the bit browsing with selected the address
which should be checked the state of the bit.
3
In this case, the value of RW2 is 9, and bit addresses of 03 and 00 indicate the status of ON in
binary browser.
3-425
3 Functions of NB-Designer
z Usage of RecipeEditor
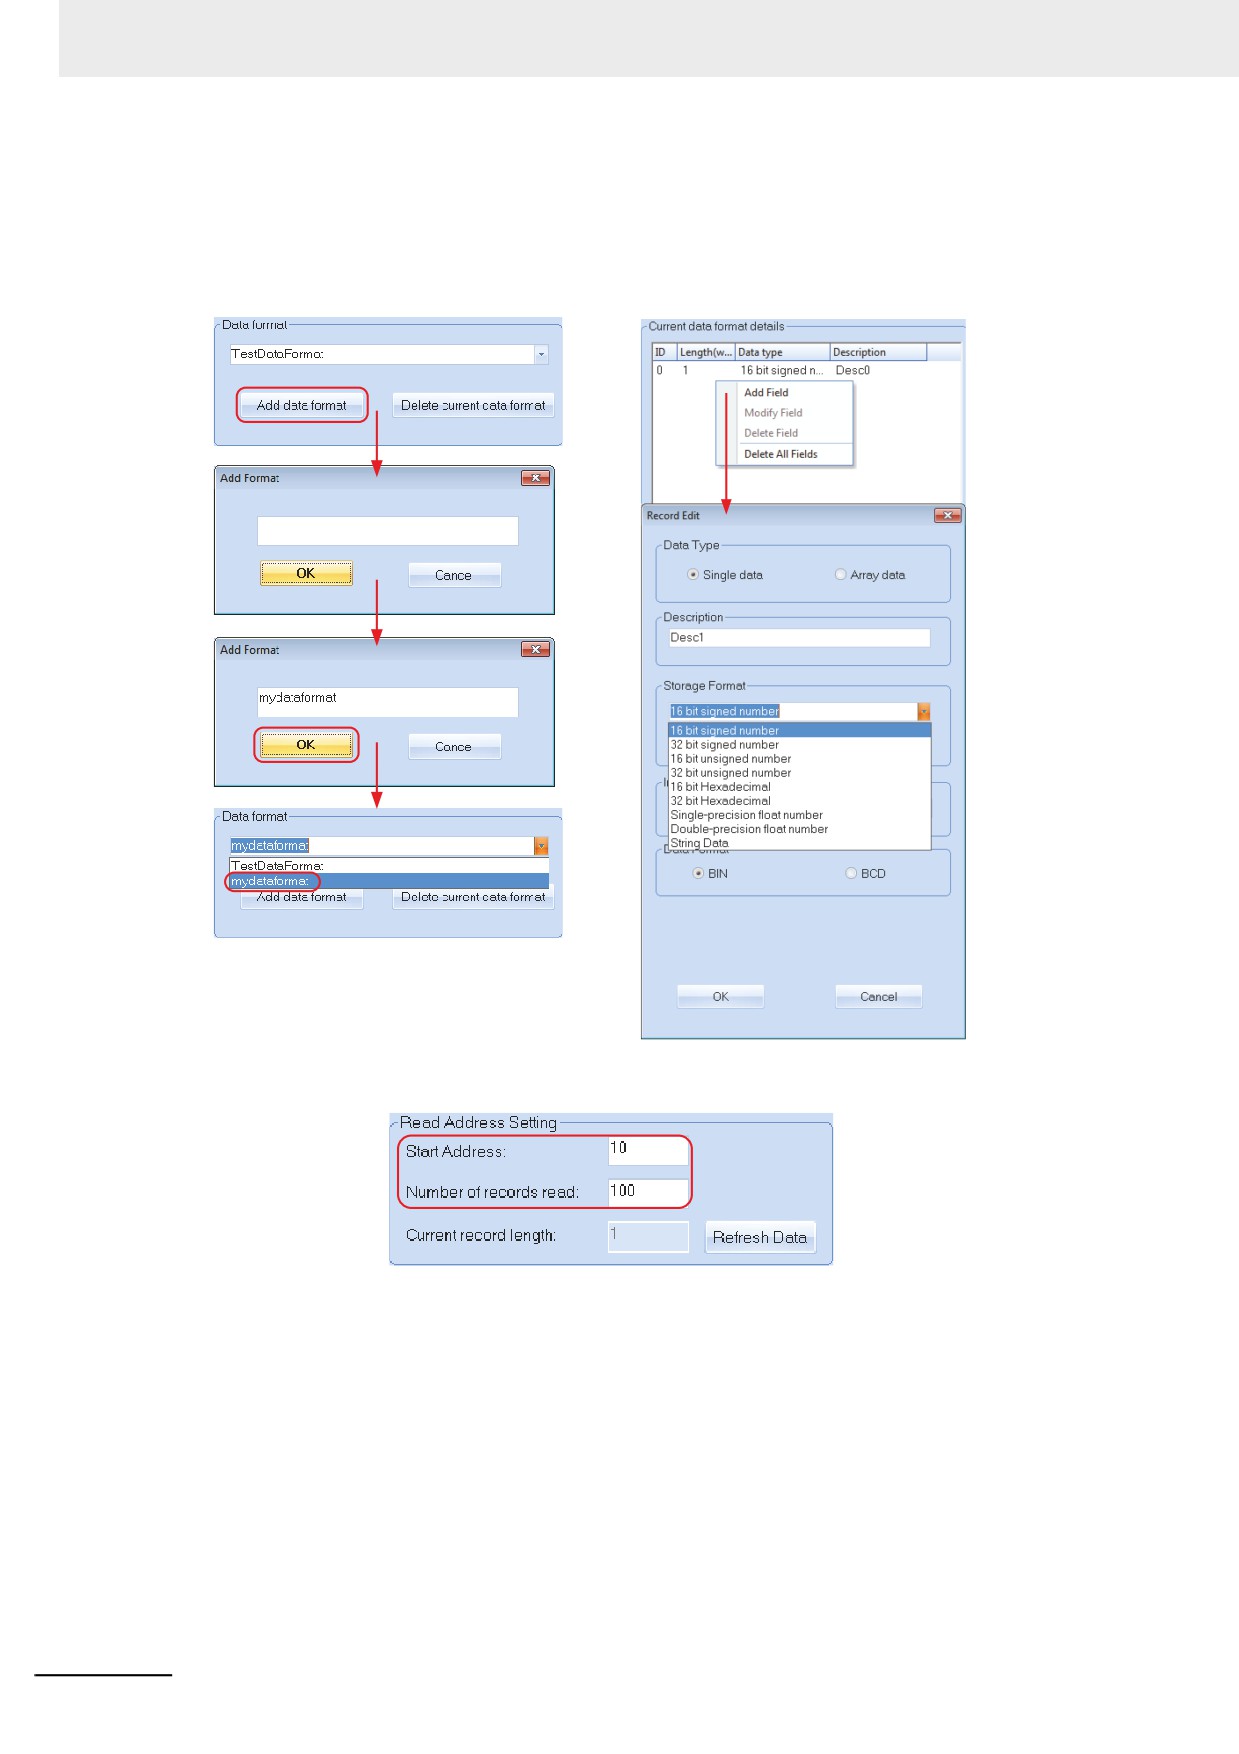
1
Add Data format, Data Type and Adjustment of Data Start Address and Data Length
Procedure of Adding Data Format
Procedure of Adding Data Type
Adjustment of Data Start Address and Data Length
3-426
3 Functions of NB-Designer
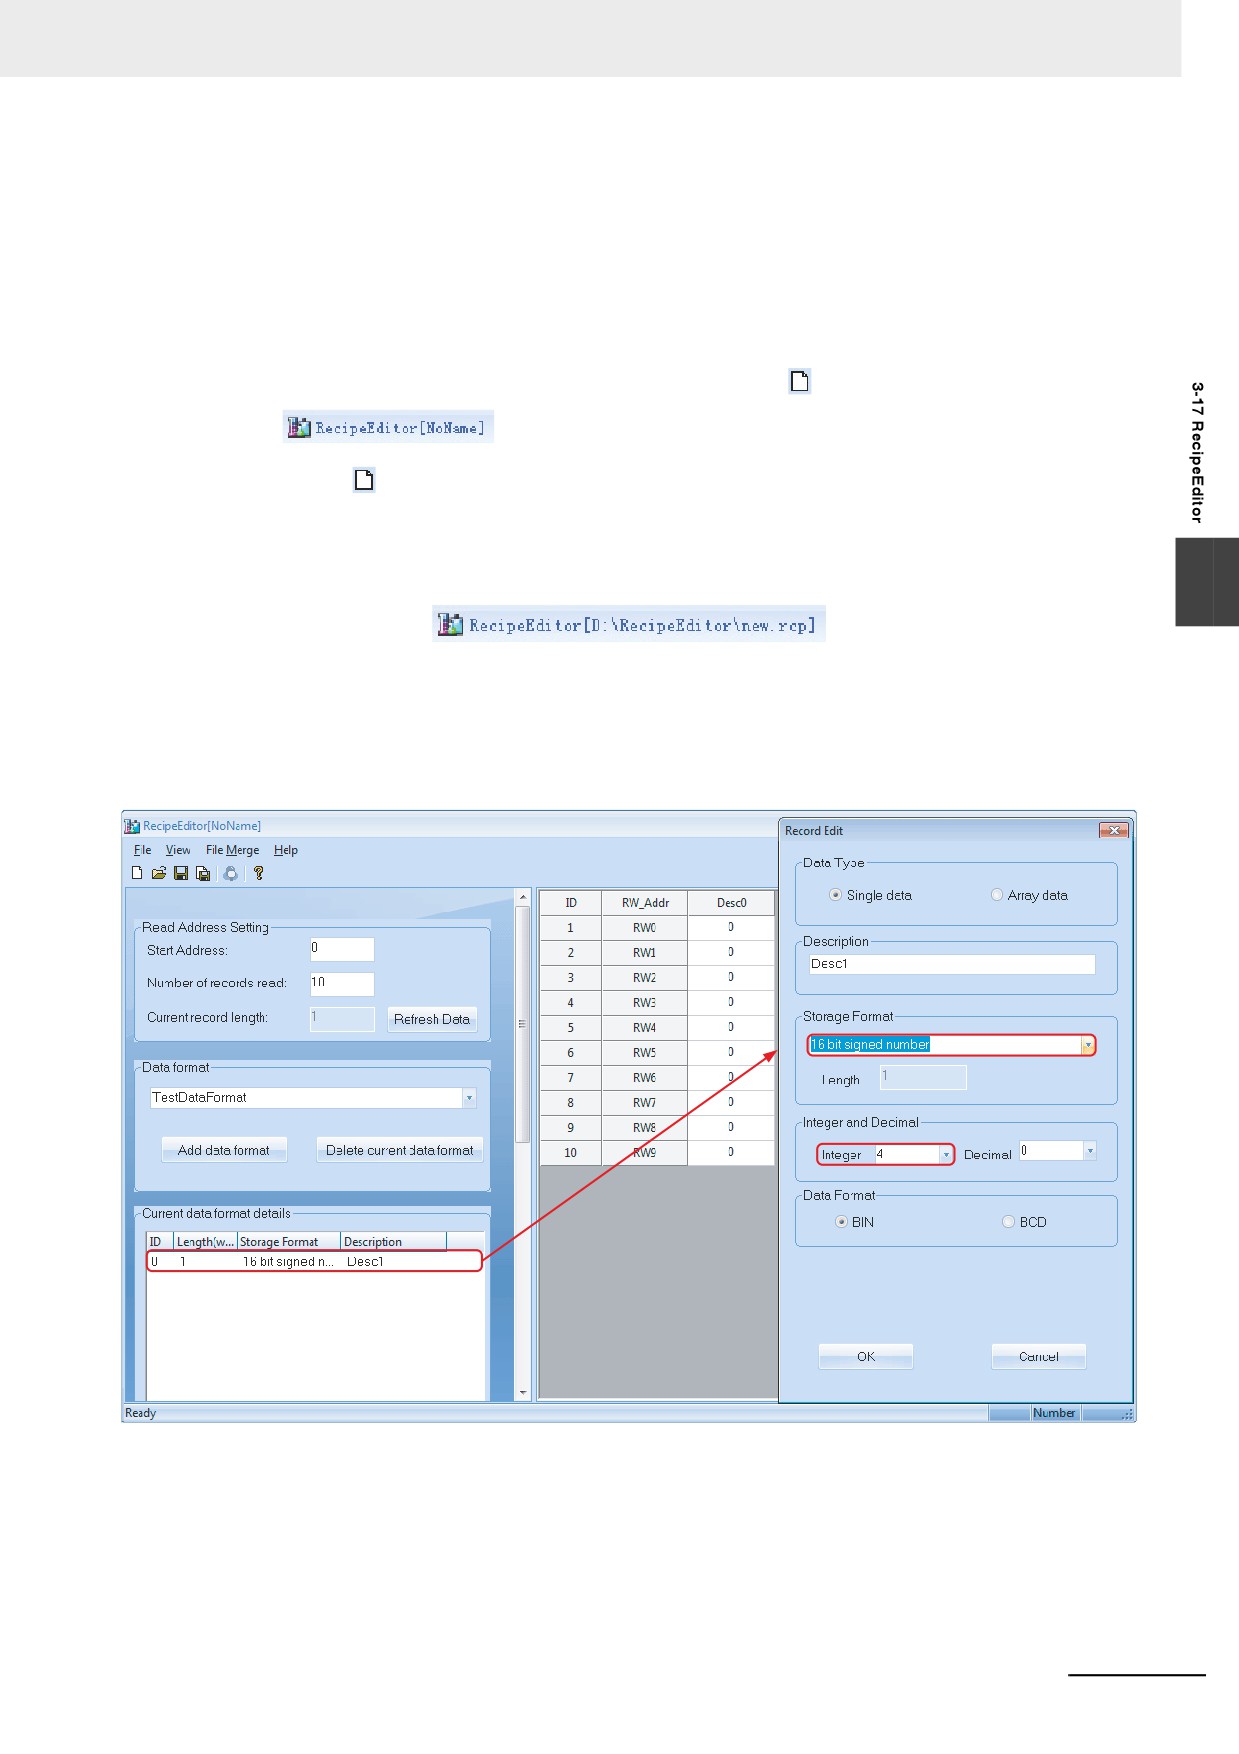
2
Creating new Recipe file and Saving the file
When new Recipe file is created, the data type is needed to be specified. When the existing
Recipe file is read, the file's specification should be corresponded to the data type specified to
the file. If the file is specified the different data type, the contents of the file cannot be read
correctly.
The available file format to be edited by Recipe file are .rcp, .frp and .csv.
When RecipeEditor is opened for the first time, clicking
(New) icon will make
displayed in the title bar; while Save As dialog box will pop up if
clicking
(New) icon after the creation of recipe file. Therefore, create another recipe file only
after the previous created file is saved. When opening the Recipe file, if [File] - [Open] is
selected in the state of the file is already opened, [Save as] dialog box will be opened and
[Open file] dialog box will be displayed. For the already saved files, the complete file path will
appear in the title bar.
3
3
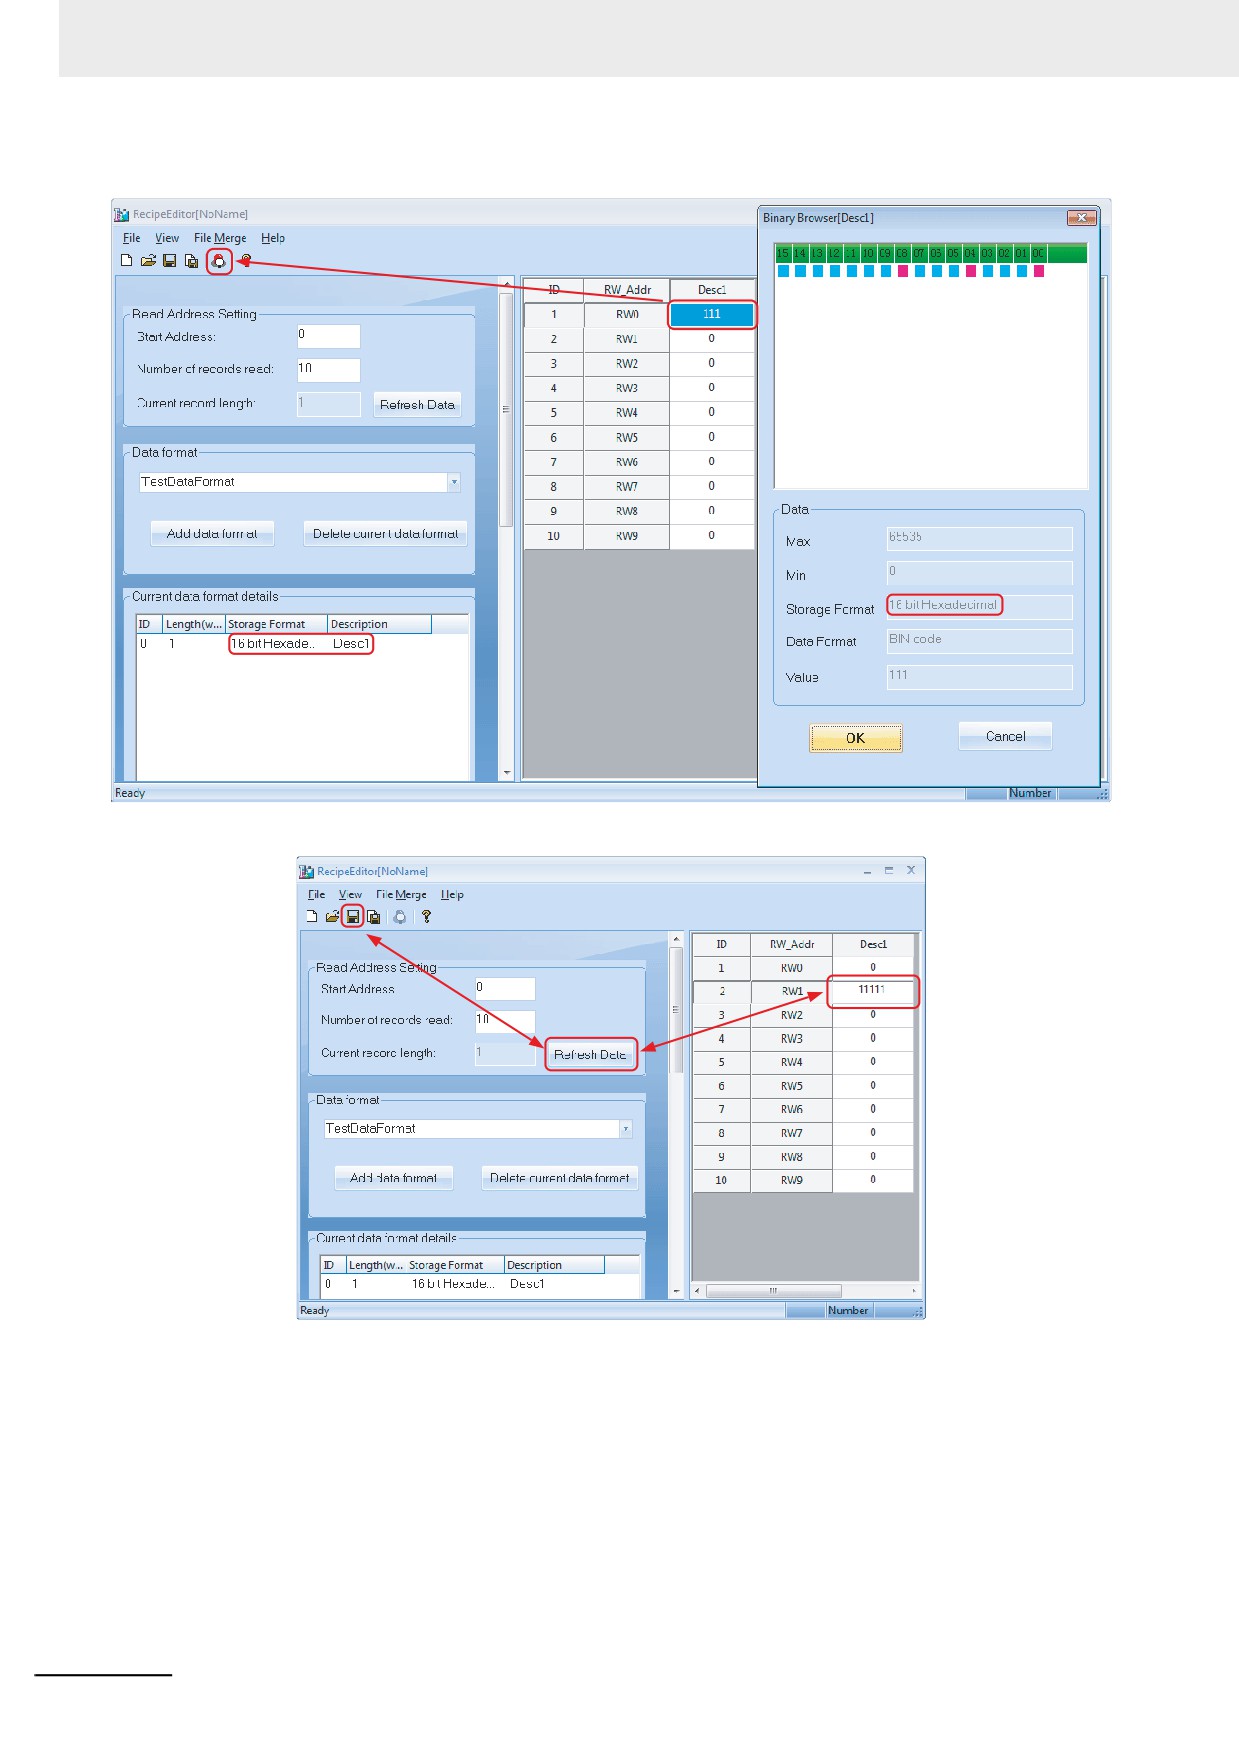
Data type and changing data
For example, double-click the mouse at the red box during the edition to make the Record Edit
Dialog pop up, and then change Storage Format from “16 bit signed number” as the lower left
graphics shown to “16 bit Hexadecimal” as the lower right graphics shown.
3-427
3 Functions of NB-Designer
3-428
3 Functions of NB-Designer
3
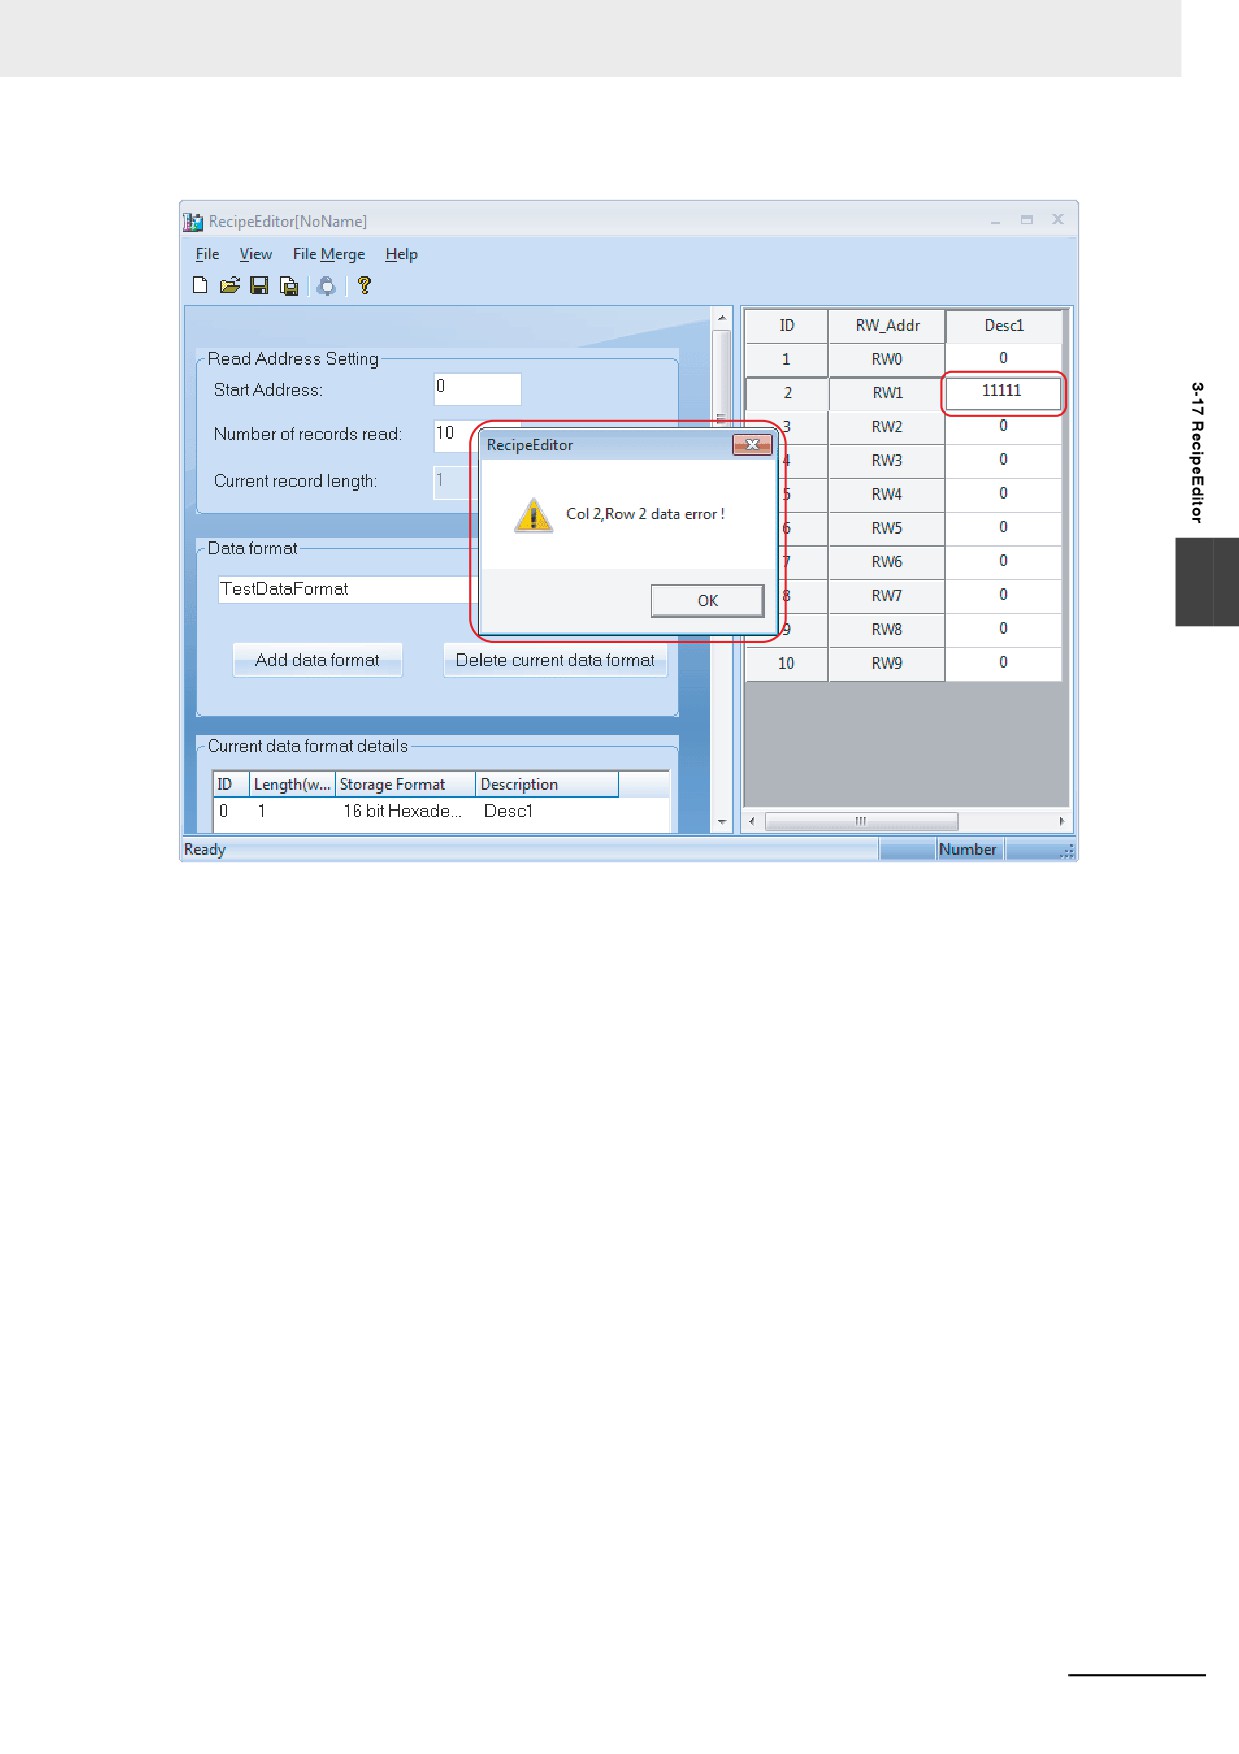
After the completion of number input, it would better to have the Enter key pressed, and it must
be saved.
If the file is not saved and click the [Update Data] button, the data which was entered before
clicking the button will be lost.
The value exceeds the data type and range of digits cannot be input.
4
Single data and Array data.
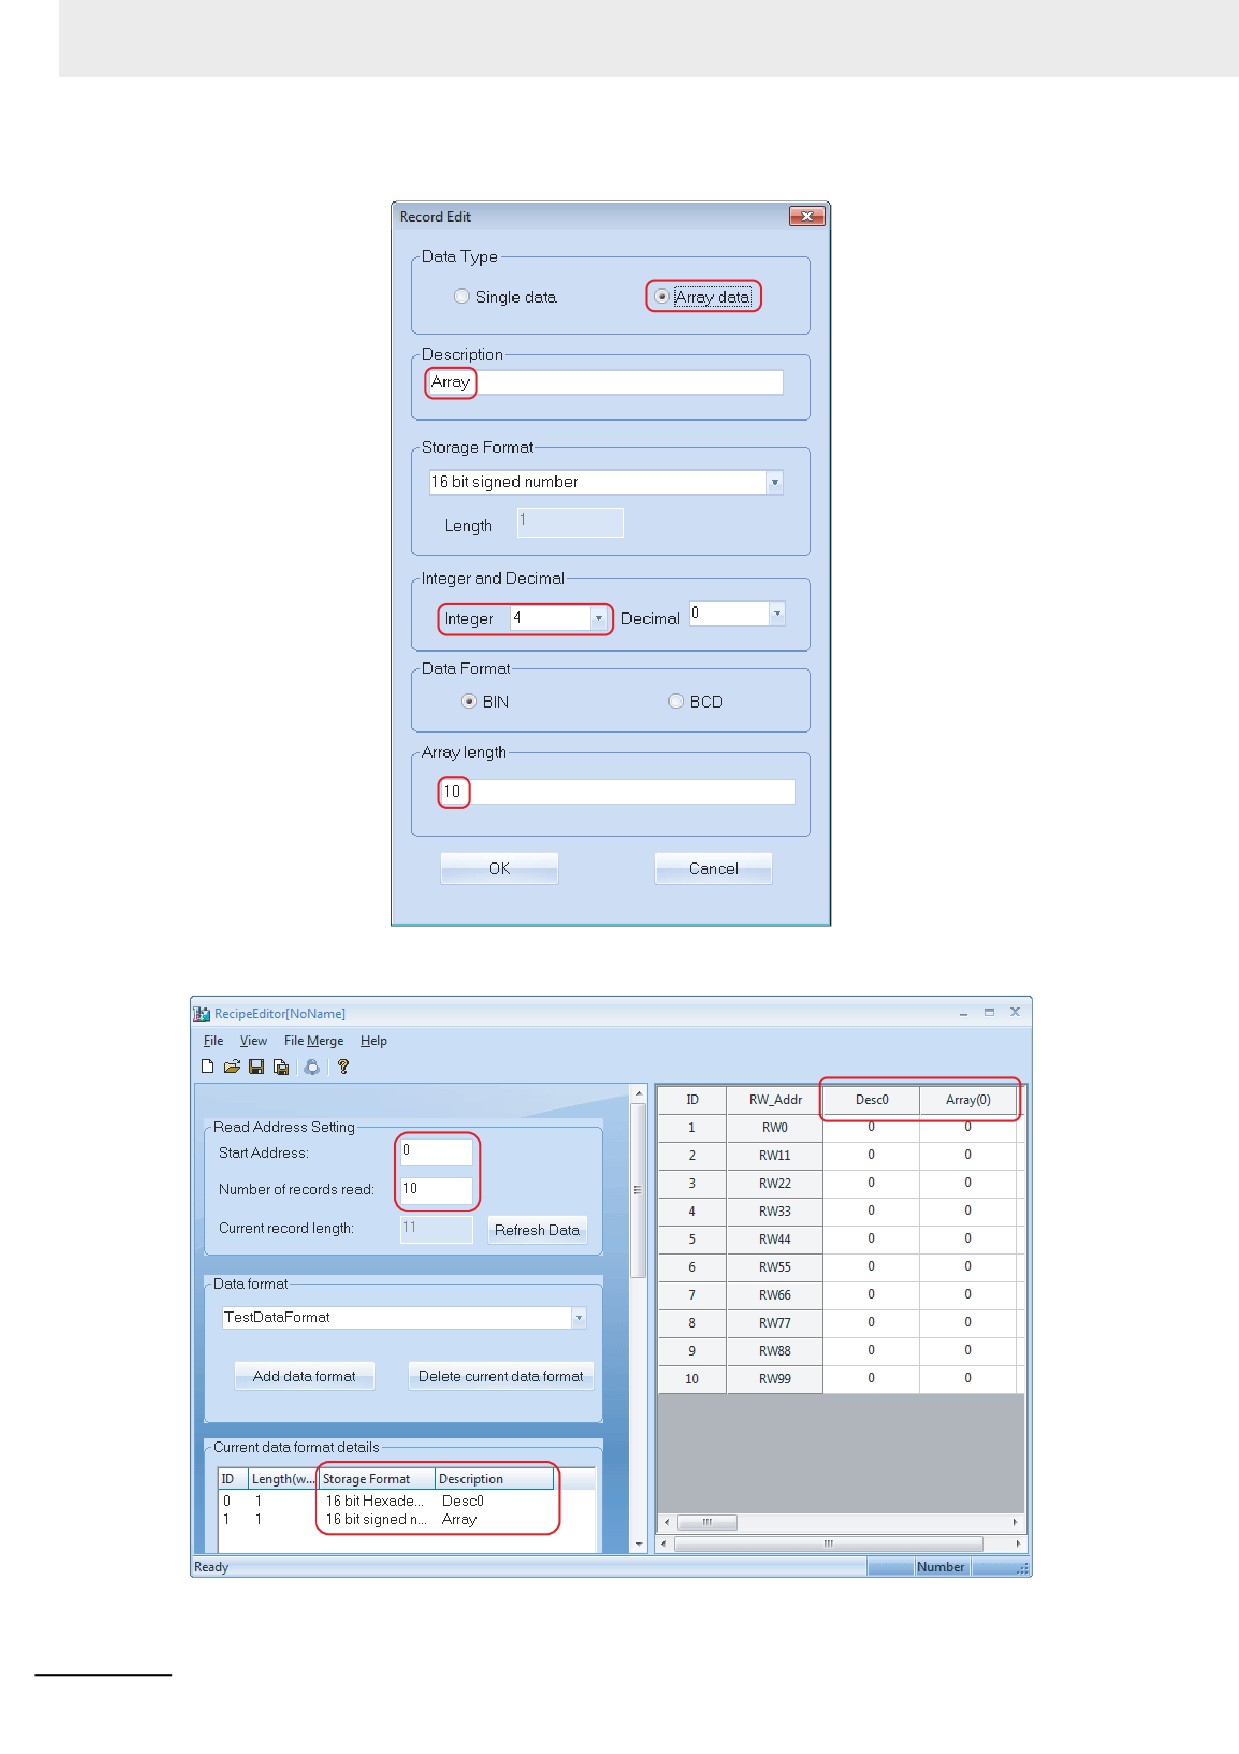
The data shown in the previous case is single data, i.e. a group of data. Provide a brief of array
data. Array data, i.e. the data belonging to the same classification is placed together, which is
helpful to the data edition, as shown below:
3-429
3 Functions of NB-Designer
3-430
3 Functions of NB-Designer
5
File Merge Function.
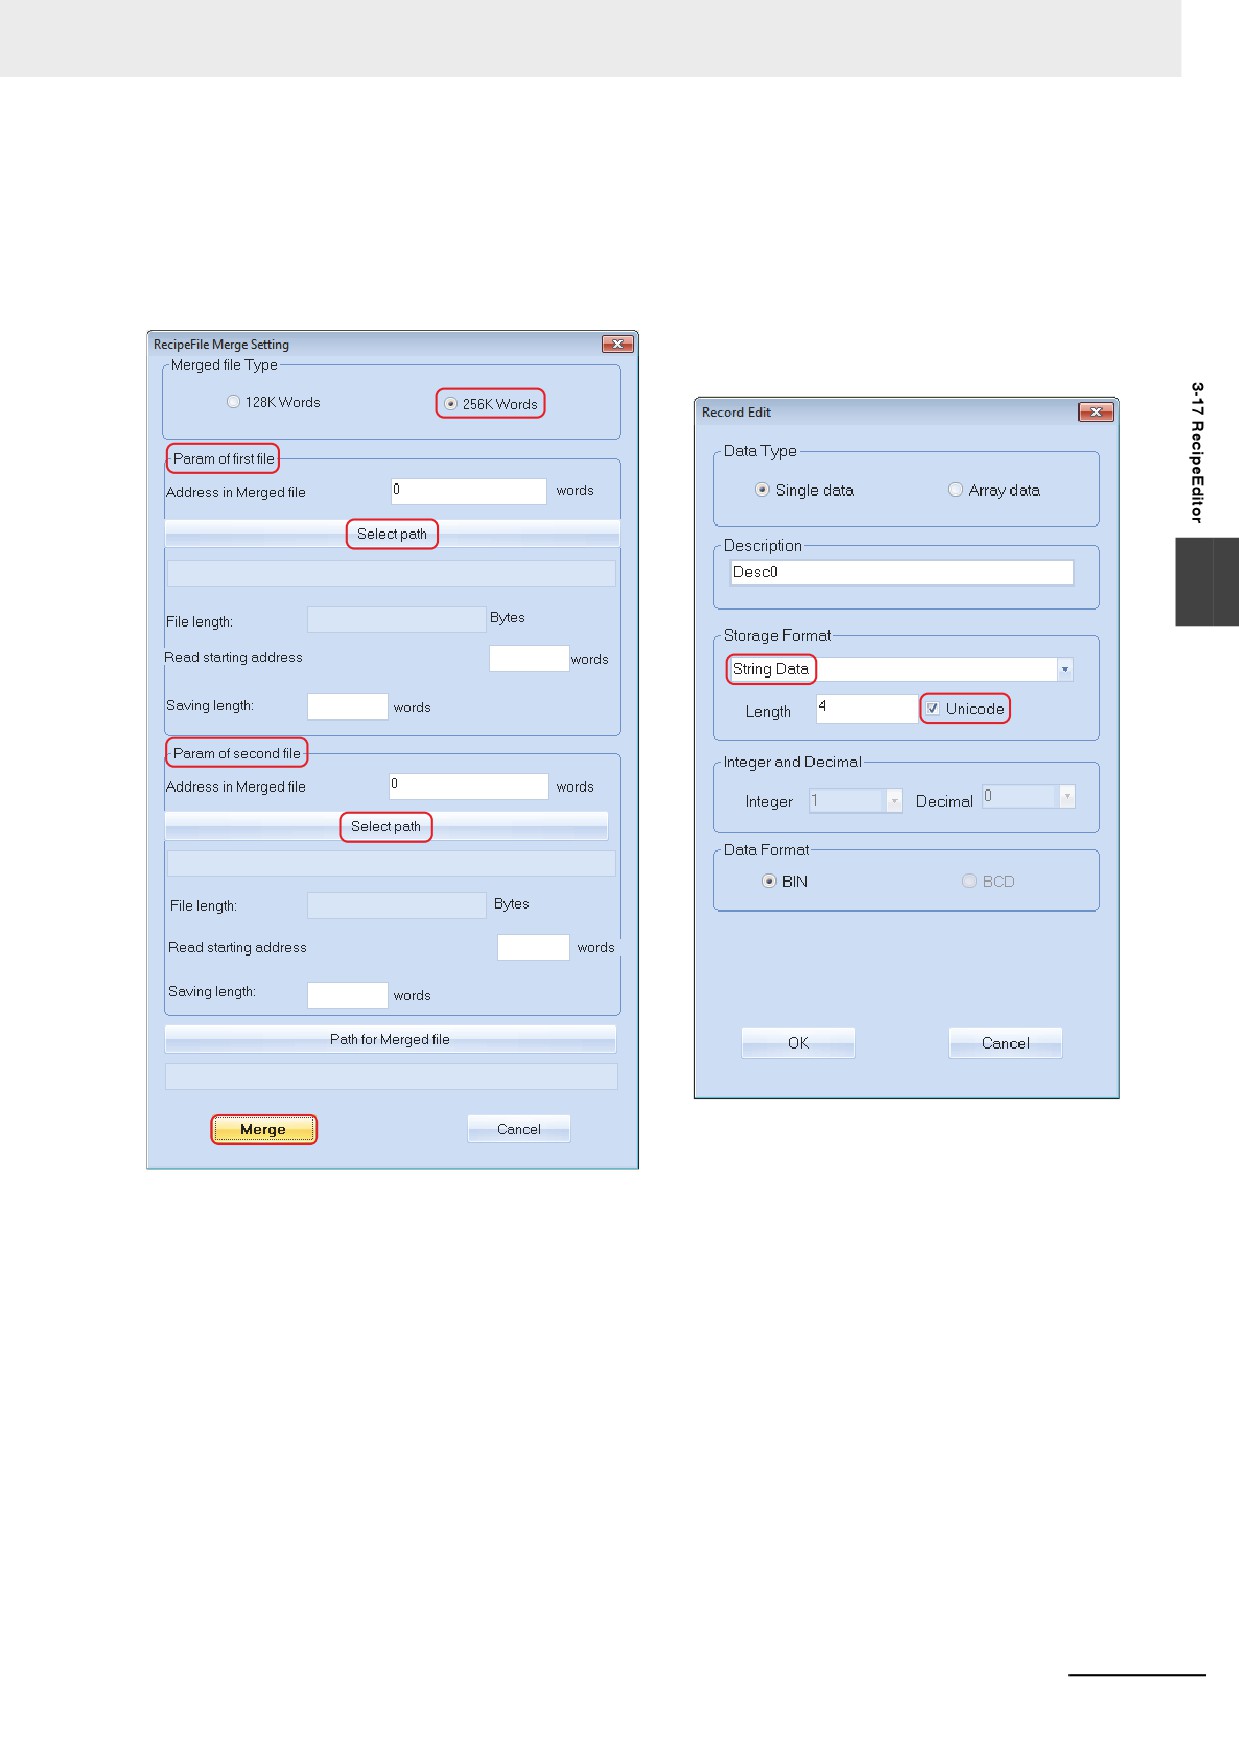
File merge function is mainly applicable to the 2 recipe files with the different recipe addresses.
These 2 recipe files can be merged into 1 file after they are edited separately, then the 1
merged file can be downloaded into PT, as the lower left graphics shown:
3
6
Unicode can be checked for String Data.
As the above right graphics shown, Unicode can be checked for String Data.
3-431
3 Functions of NB-Designer
7
Part of data type supports Binary Browser
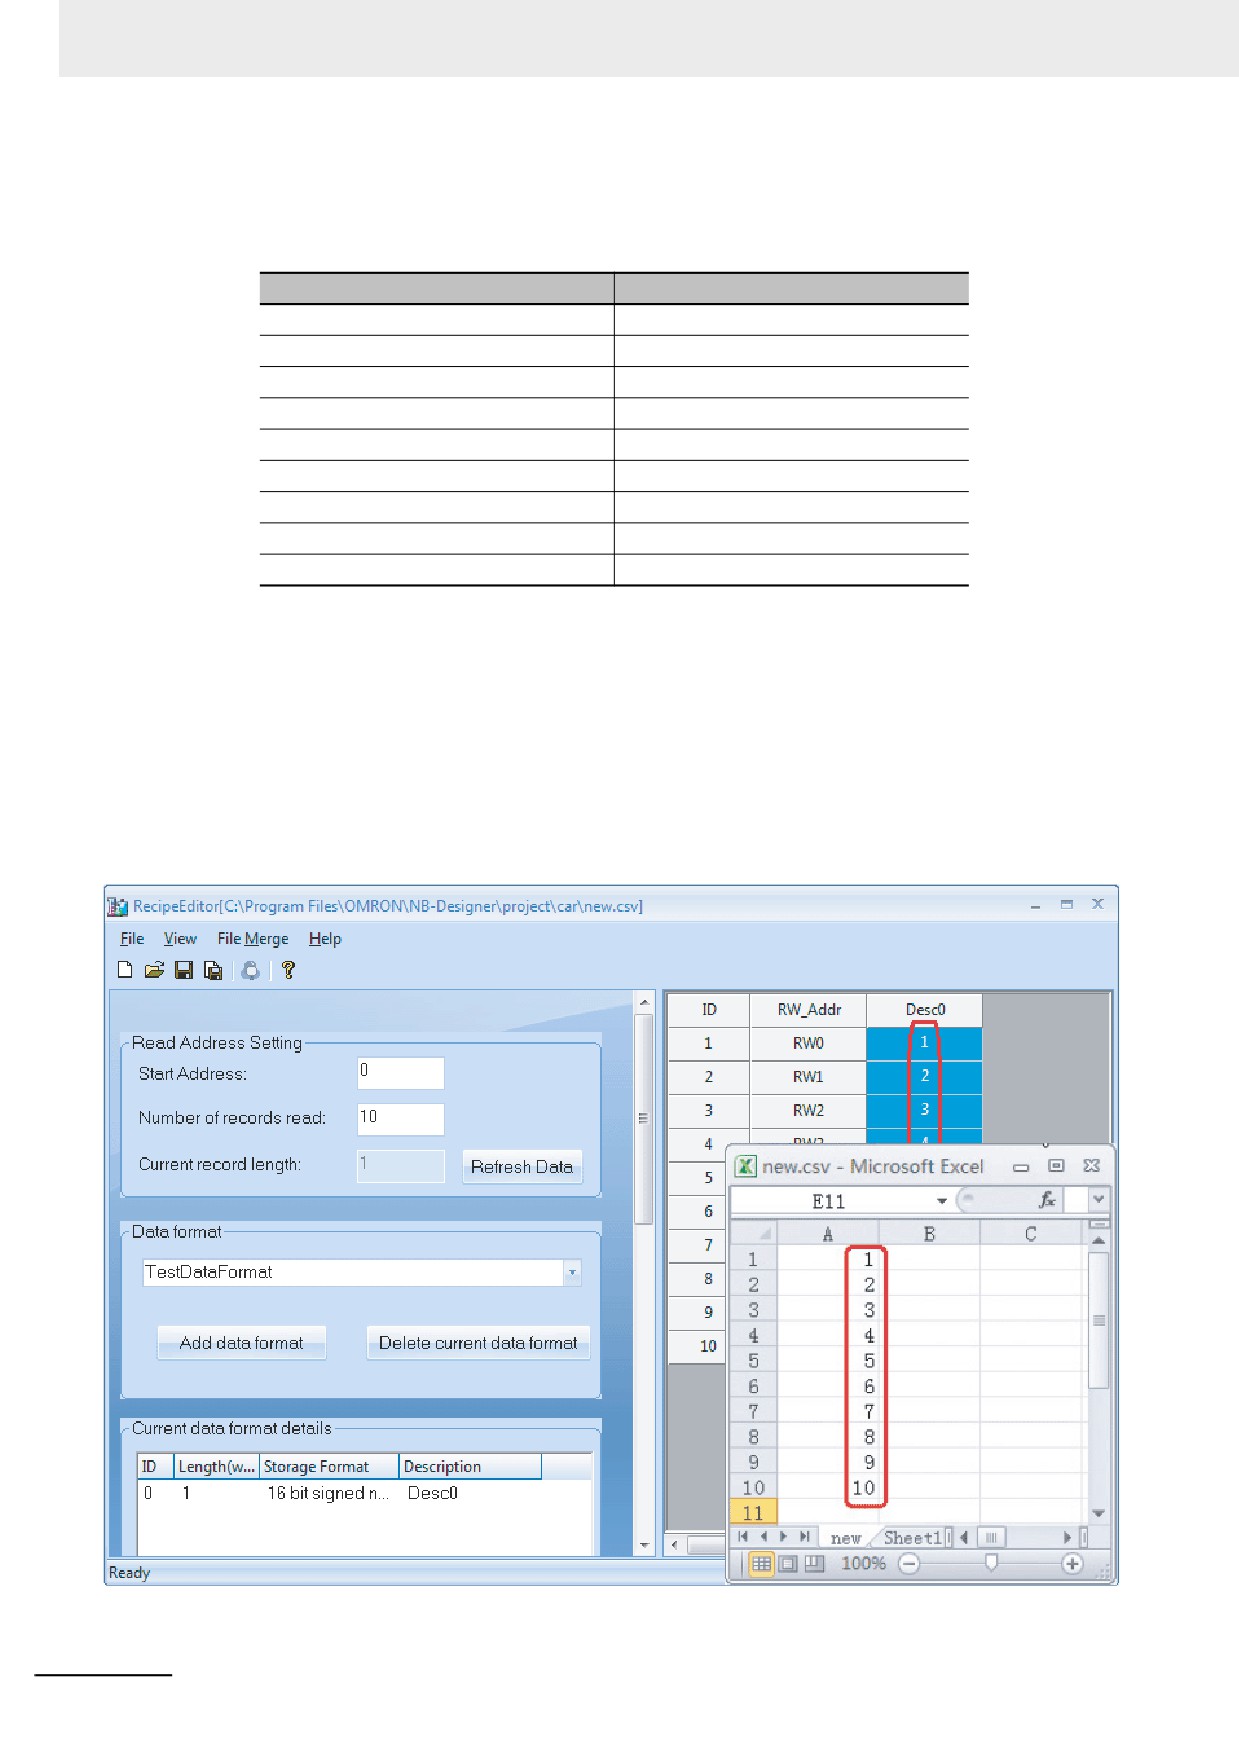
Binary Browser is one special function provided by RecipeEditor, which is convenient for the
user to check the data which is shown as “Supported”, as shown below:
Data Type
Supported or Not
16 bit signed number
Supported
32 bit signed number
Supported
16 bit unsigned number
Supported
32 bit unsigned number
Supported
16 bit Hexadecimal
Supported
32 bit Hexadecimal
Supported
Single-precision float number
Not supported
Double-precision float number
Not supported
String Data
Not supported
z
3 Data Types (.rcp, .frp and .csv)
.rcp format
This is the recipe file format which can be identified by PT. The recipe file in this format can be
uploaded or downloaded with NBManager. (The size of this file is limited by the recipe memory in
PT device.)
.frp format
This is the file format to be stored in Flash memory of PT.
.csv format
The data can be edited by Excel.
3-432
Functions of NBManager
This section describes the NBManager.
4
4-1
Introduction of NBManager
4-2
4-2
Download Operation
4-3
4-2-1
Communication Setting
4-3
4-2-2
Select Data
4-6
4-2-3
LOGO Setting
4-9
4-2-4
Clear Data
4-10
4-3
Upload Operation
4-12
4-4
System Operation
4-15
4-5
Get Version
4-16
4-6
Decompile Operation
4-17
4-7
Pass Through Communication
4-18
4-8
Web Interface Operation
4-20
4-1
4 Functions of NBManager
4-1
Introduction of NBManager
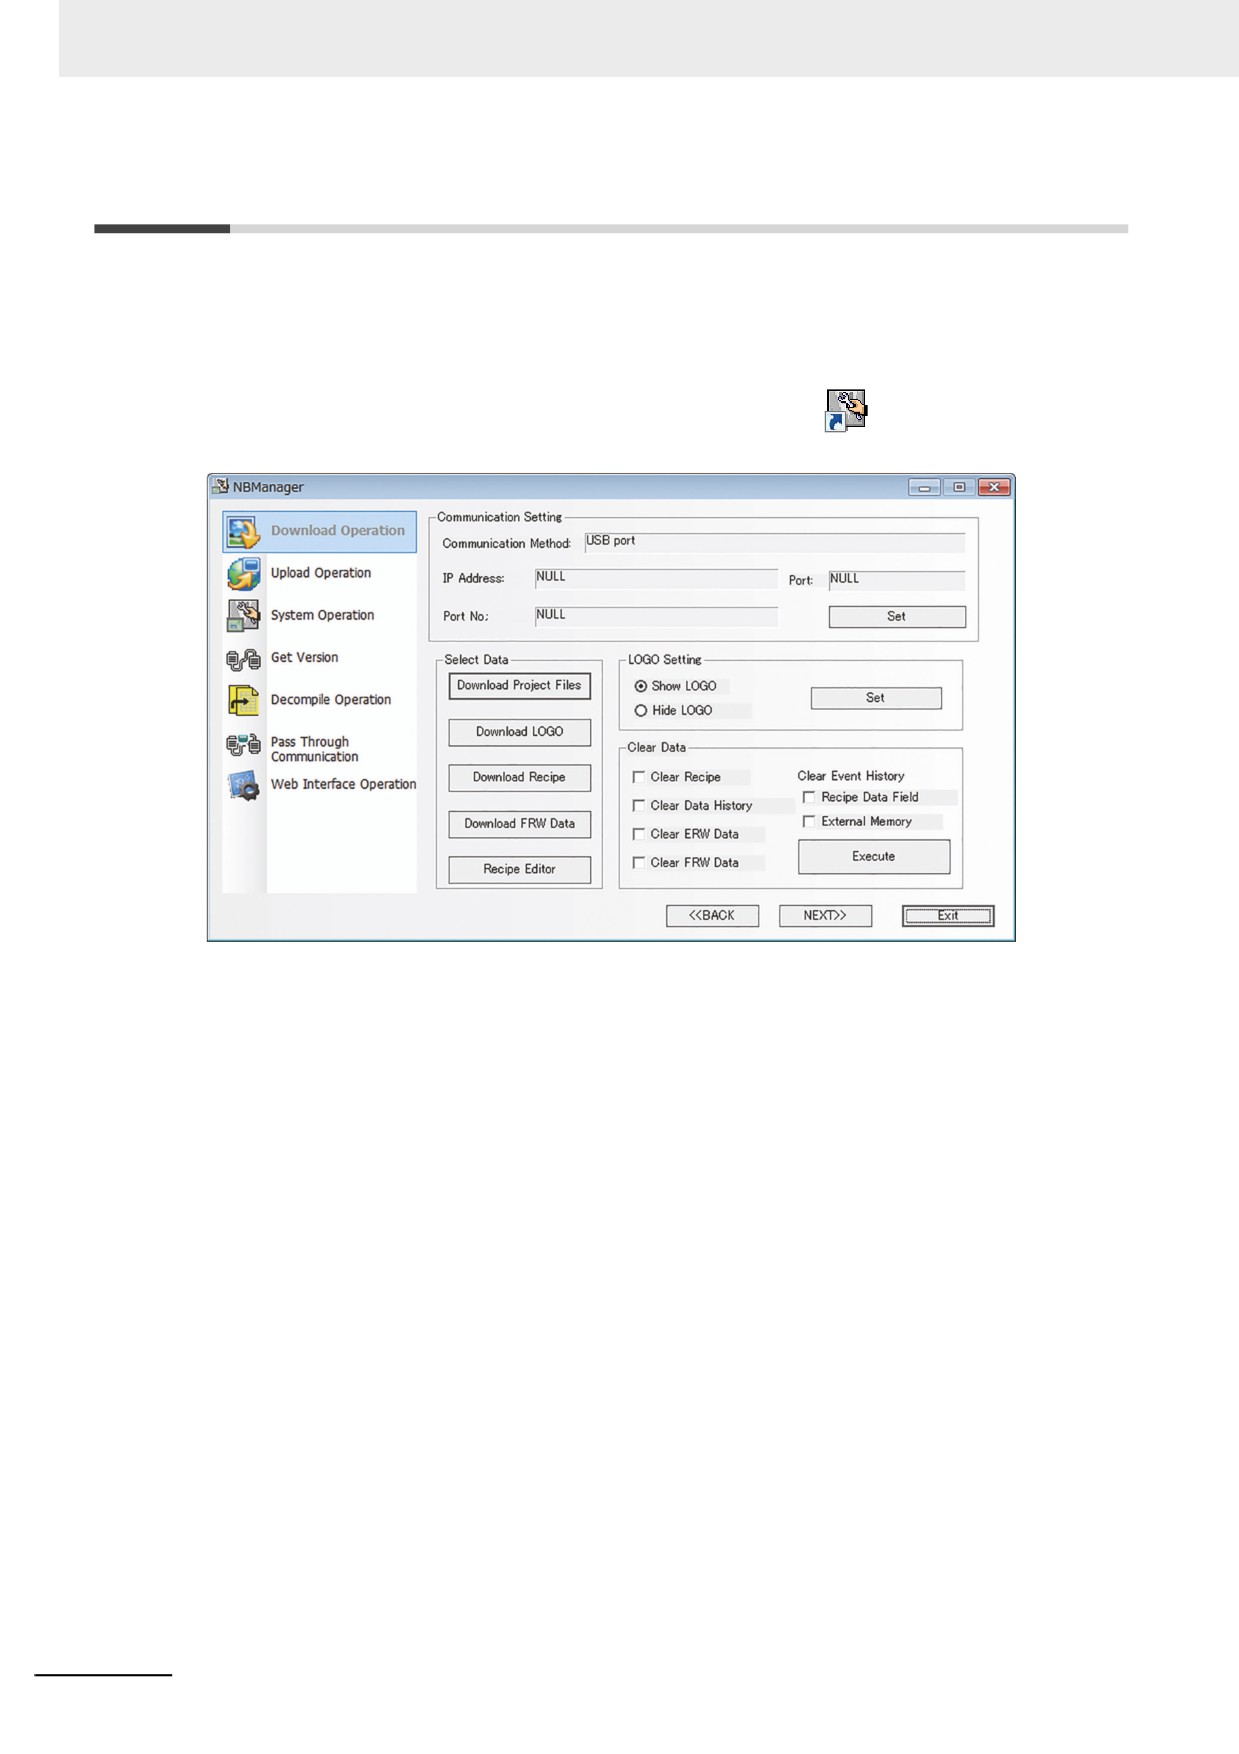
NBManager is a tool managing the whole NB-Designer software, which includes 6 operates, i.e.
Download Operation, Upload Operation, System Operation, Get Version, Decompile Operation and
Pass Through Communication.
Clicking [Start]-[All Programs]-[OMRON]-[NB-Designer]-[Tools]-[NBManager] will make NBManager
dialog box pop up, as shown below. Double-clicking the shortcut icon (
) on desktop also allows the
NBManager to start.
4-2
4 Functions of NBManager
4-2
Download Operation
Download Operation is mainly used for the download from PC to PT.
The Communication Setting must be set before the download.
4-2-1
Communication Setting
The setting of Communication Setting is the same with the settings of project options in the edit
window. For details, refer to 3-15 Download (Page 3-363).
z Communication Setting
• The Communications Type with Serial Port
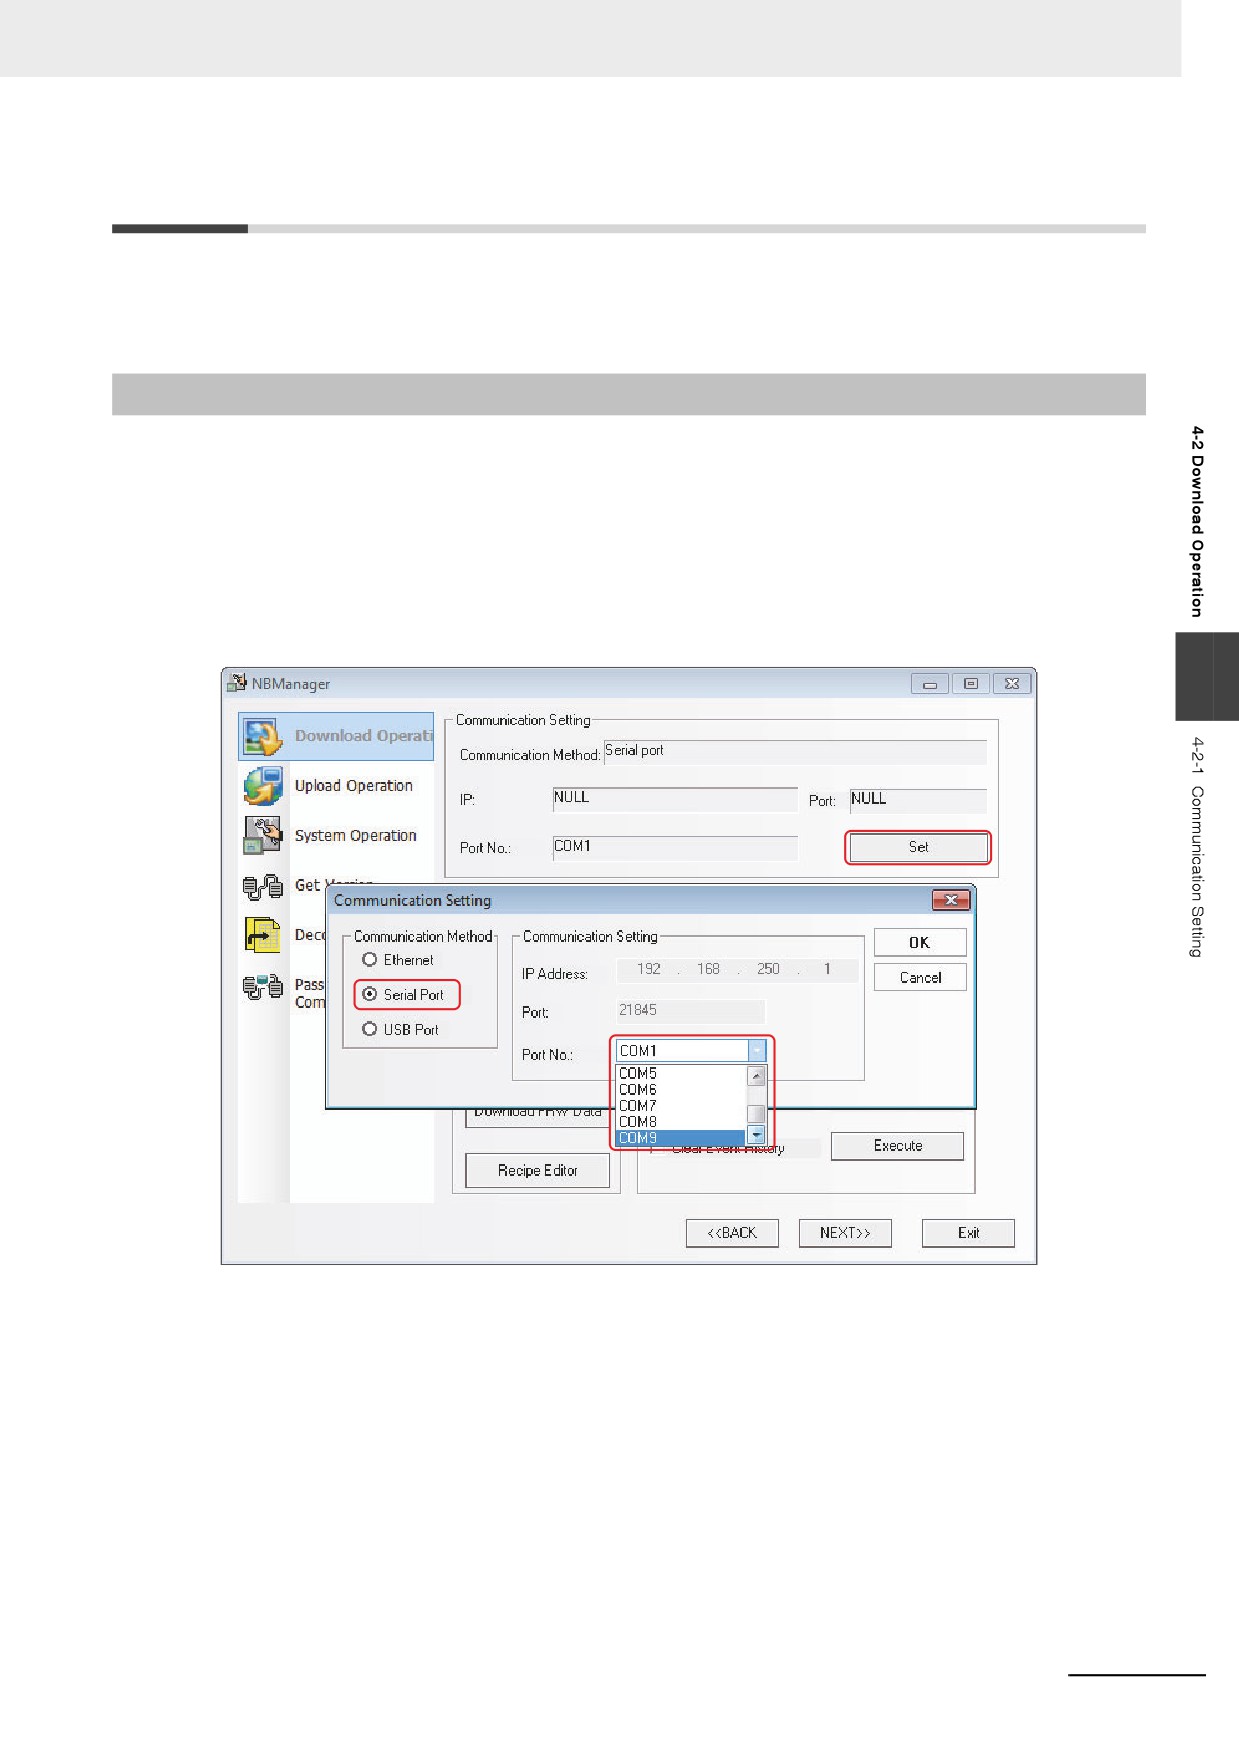
Click the [Set] button and select [Serial Port] and the Serial Port of your PC from [Serial No.] in the
popup [Communication Setting] dialog box, then click the [OK] button.
4
4-3
4 Functions of NBManager
• The Communications Type with USB
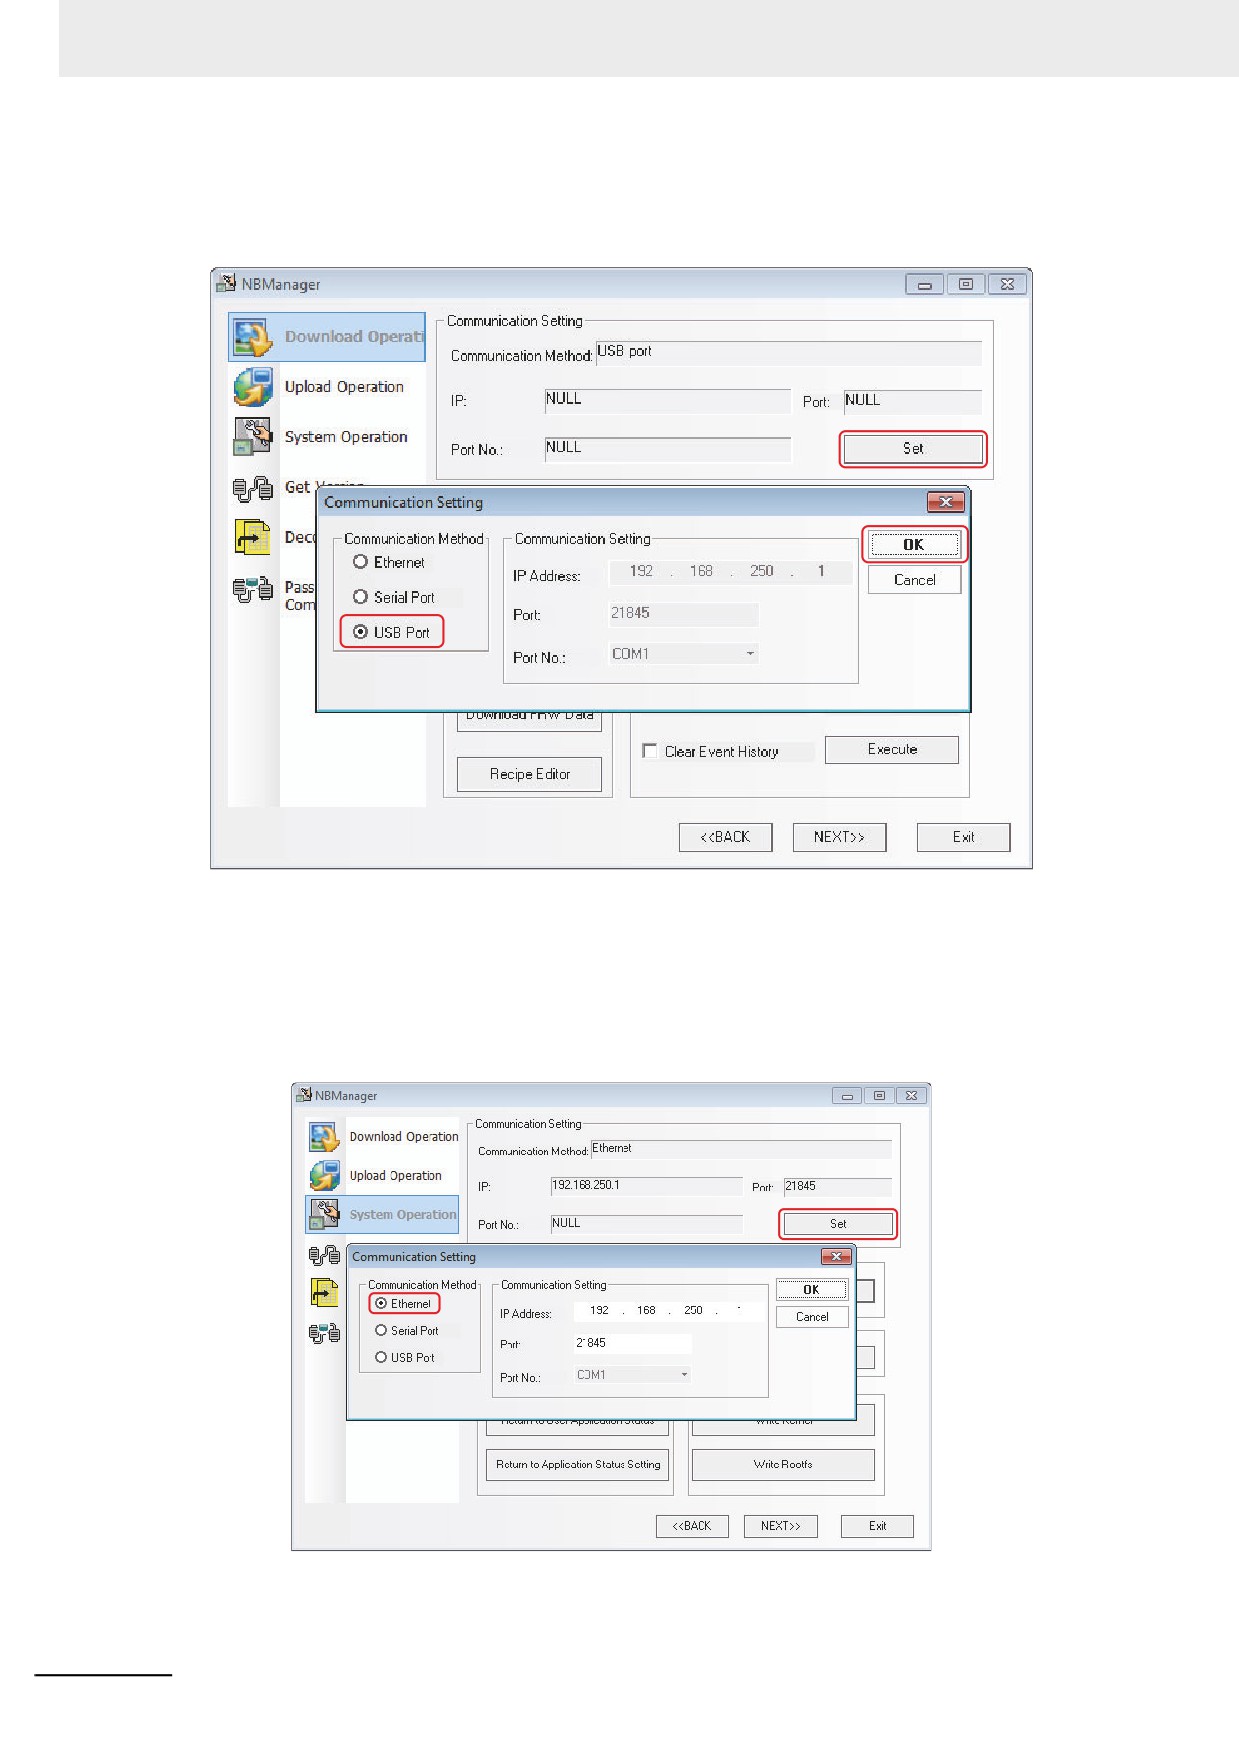
USB Port is the system default type. If you use the USB to perform the download, it doesn’t need to
make settings again.
• The Communications Type with Ethernet
• Settings for using Ethernet
In the [NBManager] dialog box, click the [Set] button in the [Communication Setting] option, and
then check the [Ethernet] in Communication Method option in the Communication Setting dialog
box with the various parameters same as that of PT Unit. At the same time, set the IP address of
PC to the same network segment as that for PT Unit, as shown below:
4-4
4 Functions of NBManager
• Setting and obtaining IP address and Port
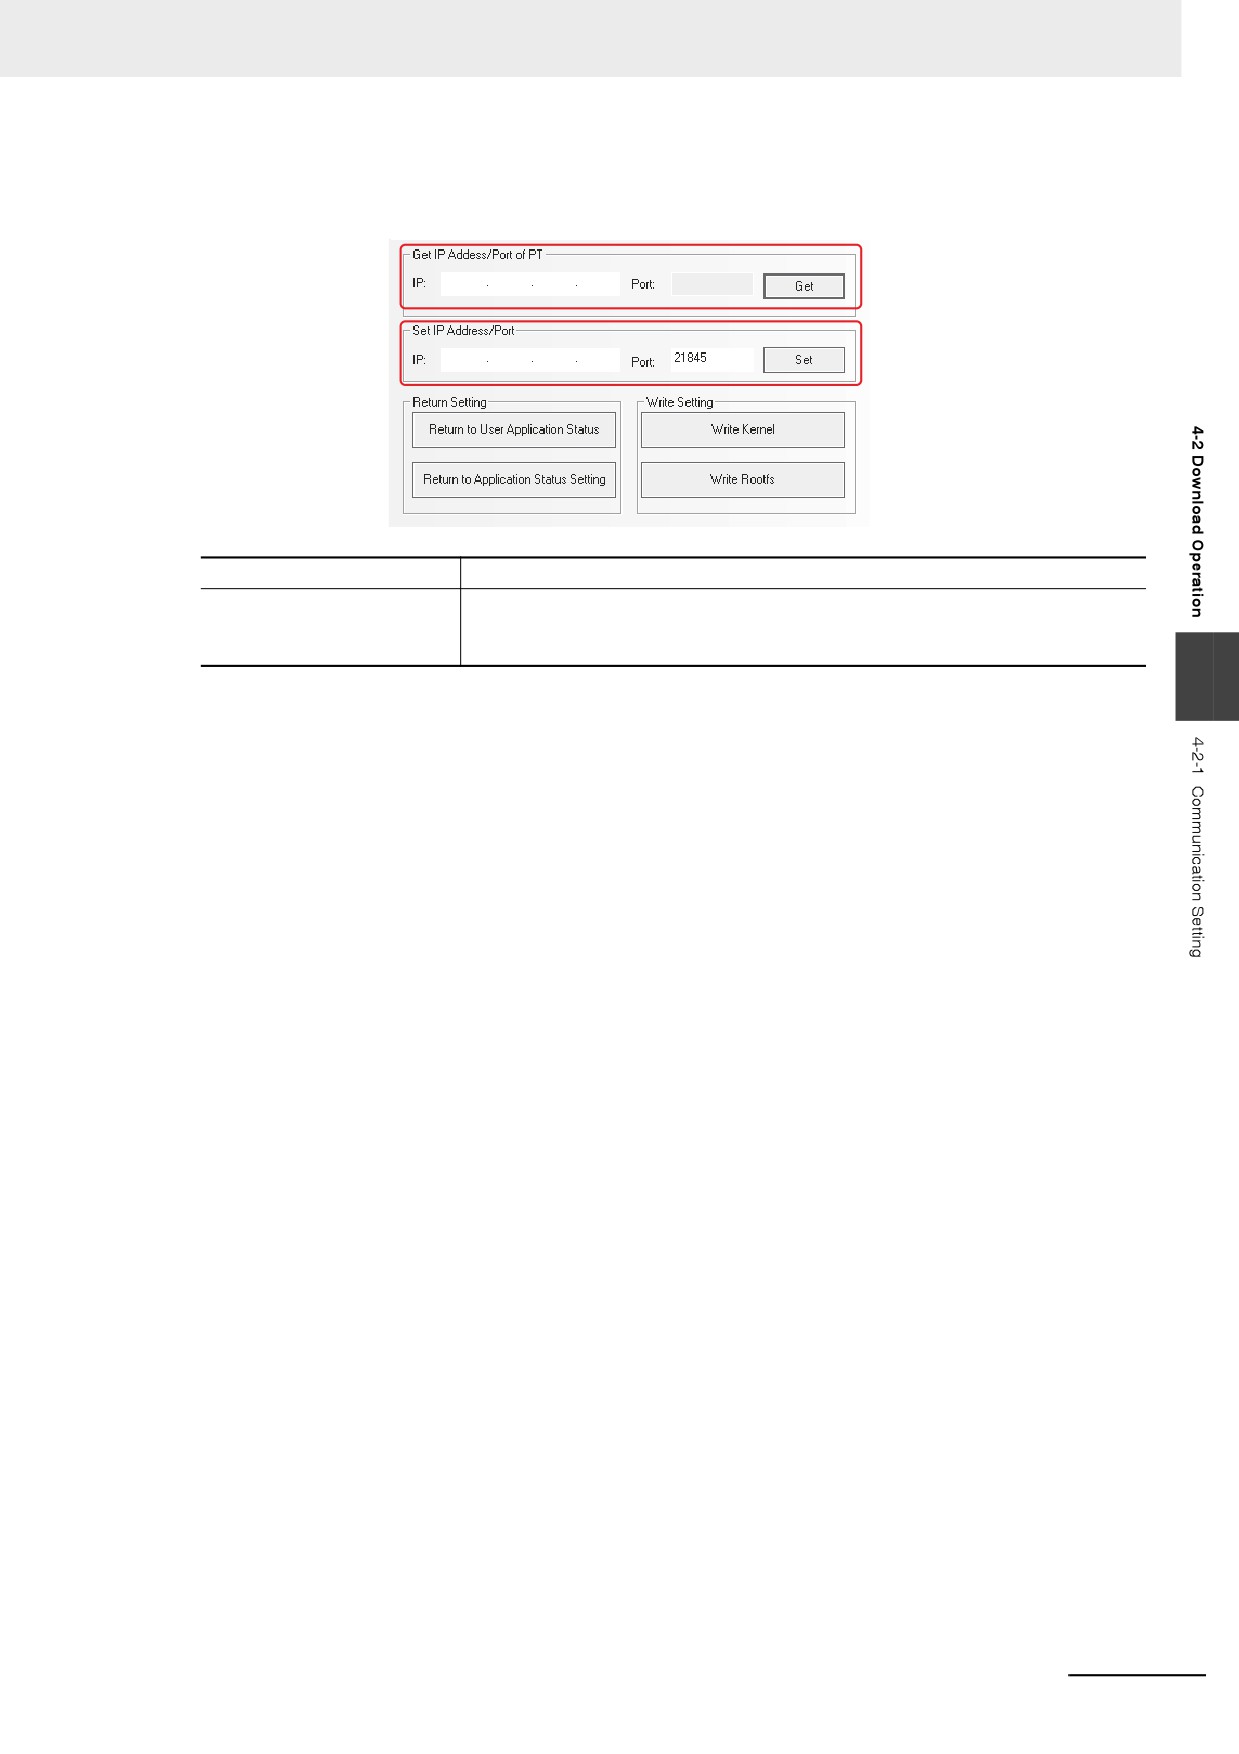
In the [NBManager] dialog box, click the [System Operate].
Get IP Address/Port of PT
Obtain IP address and port number of PT.
Set IP Address/Port of PT
Modify the IP address and Port of PT to the parameters which were set to [IP]
and [Port]. (IP Address/Port can be updated only when the connection is realized
via USB port or serial port.)
4
After setting of the Communication Setting, move to the settings of Select Data.
4-5
4 Functions of NBManager
4-2-2
Select Data
The operation is the same as the one of edit window. For details, refer to 3-15 Download (Page 3-363).
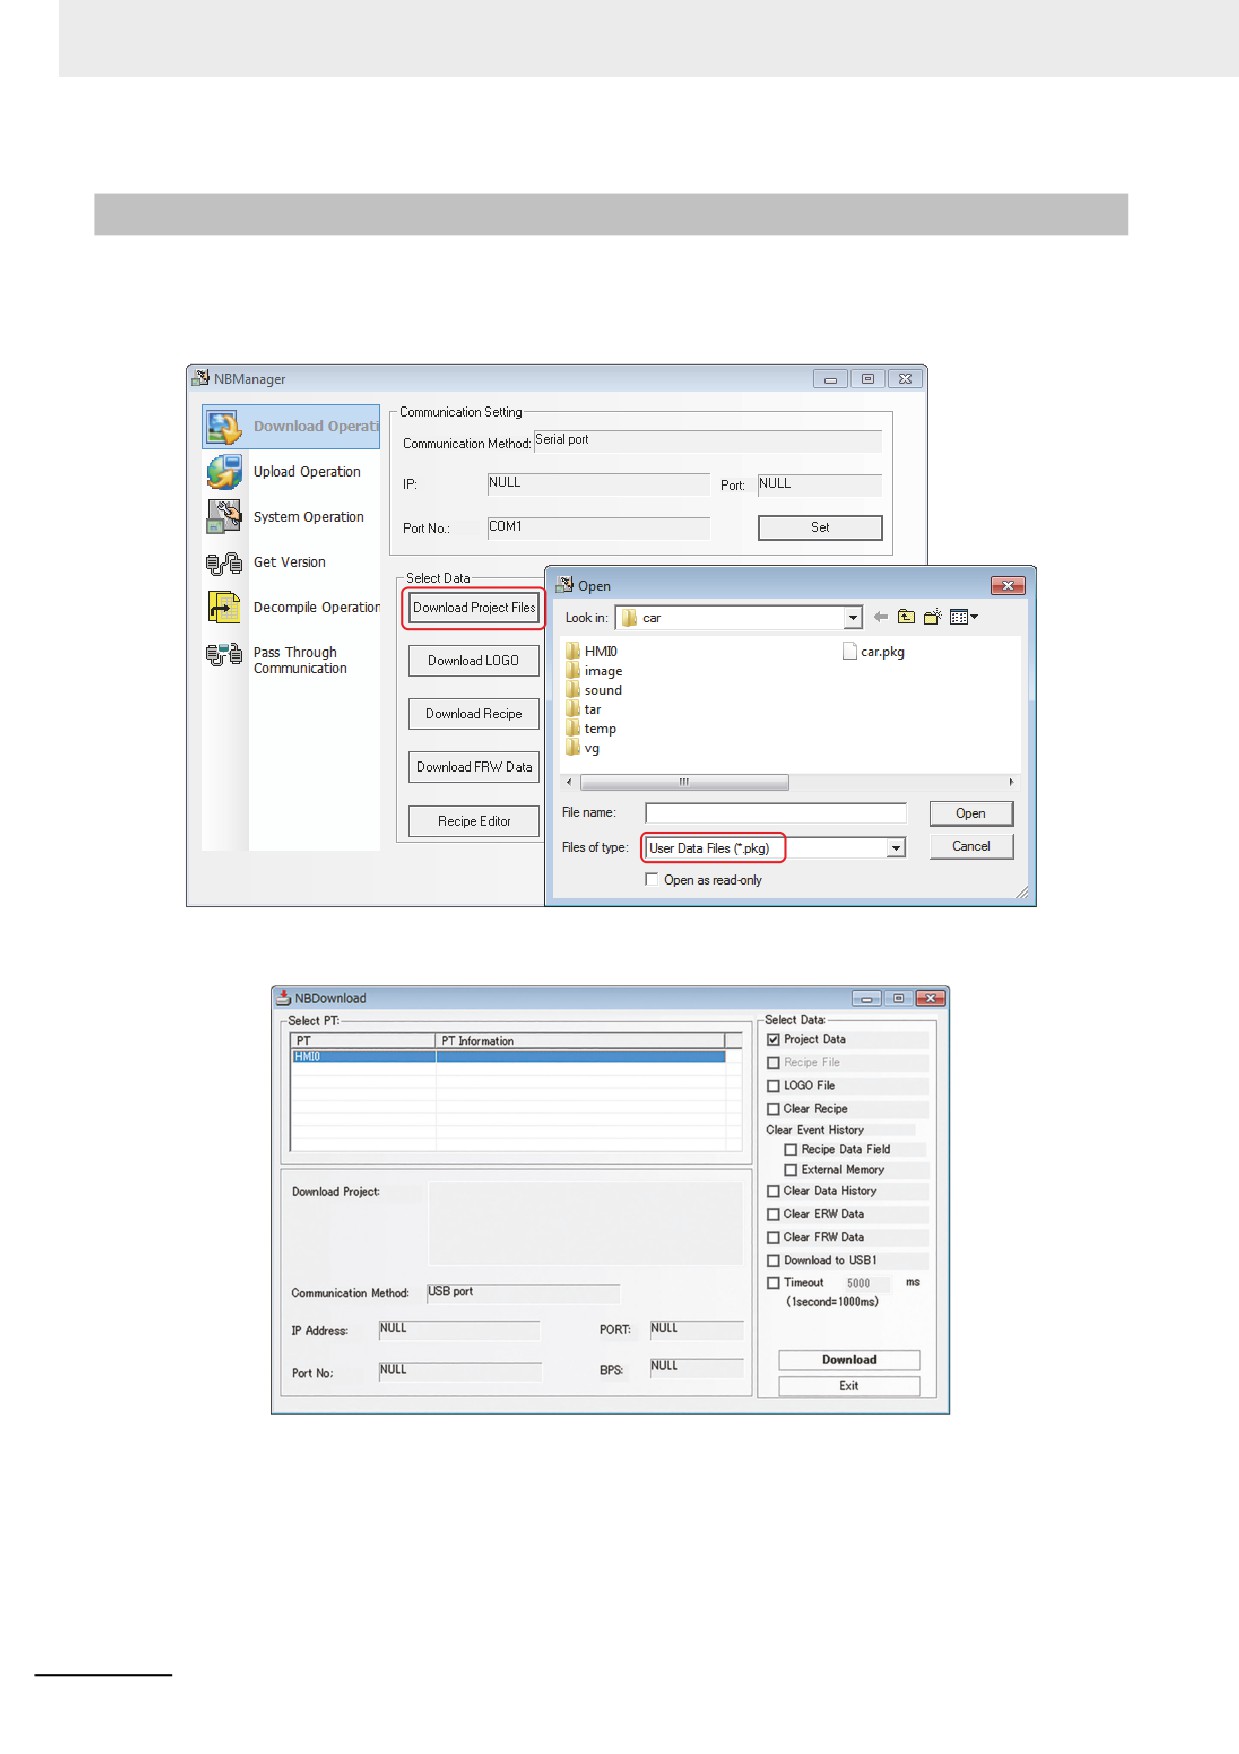
Download Project Files: Refers to download the edited project files (*.pkg) to the PT.
Click the [Download Project Files] button:
Select the generated *.pkg file after compiling the edited project file, then click the [Open] button to
make the following dialog box pop up.
If there are several PTs in your project, firstly select the No. corresponding to the destination PT to be
downloaded, and then click the [Download] button.
4-6
4 Functions of NBManager
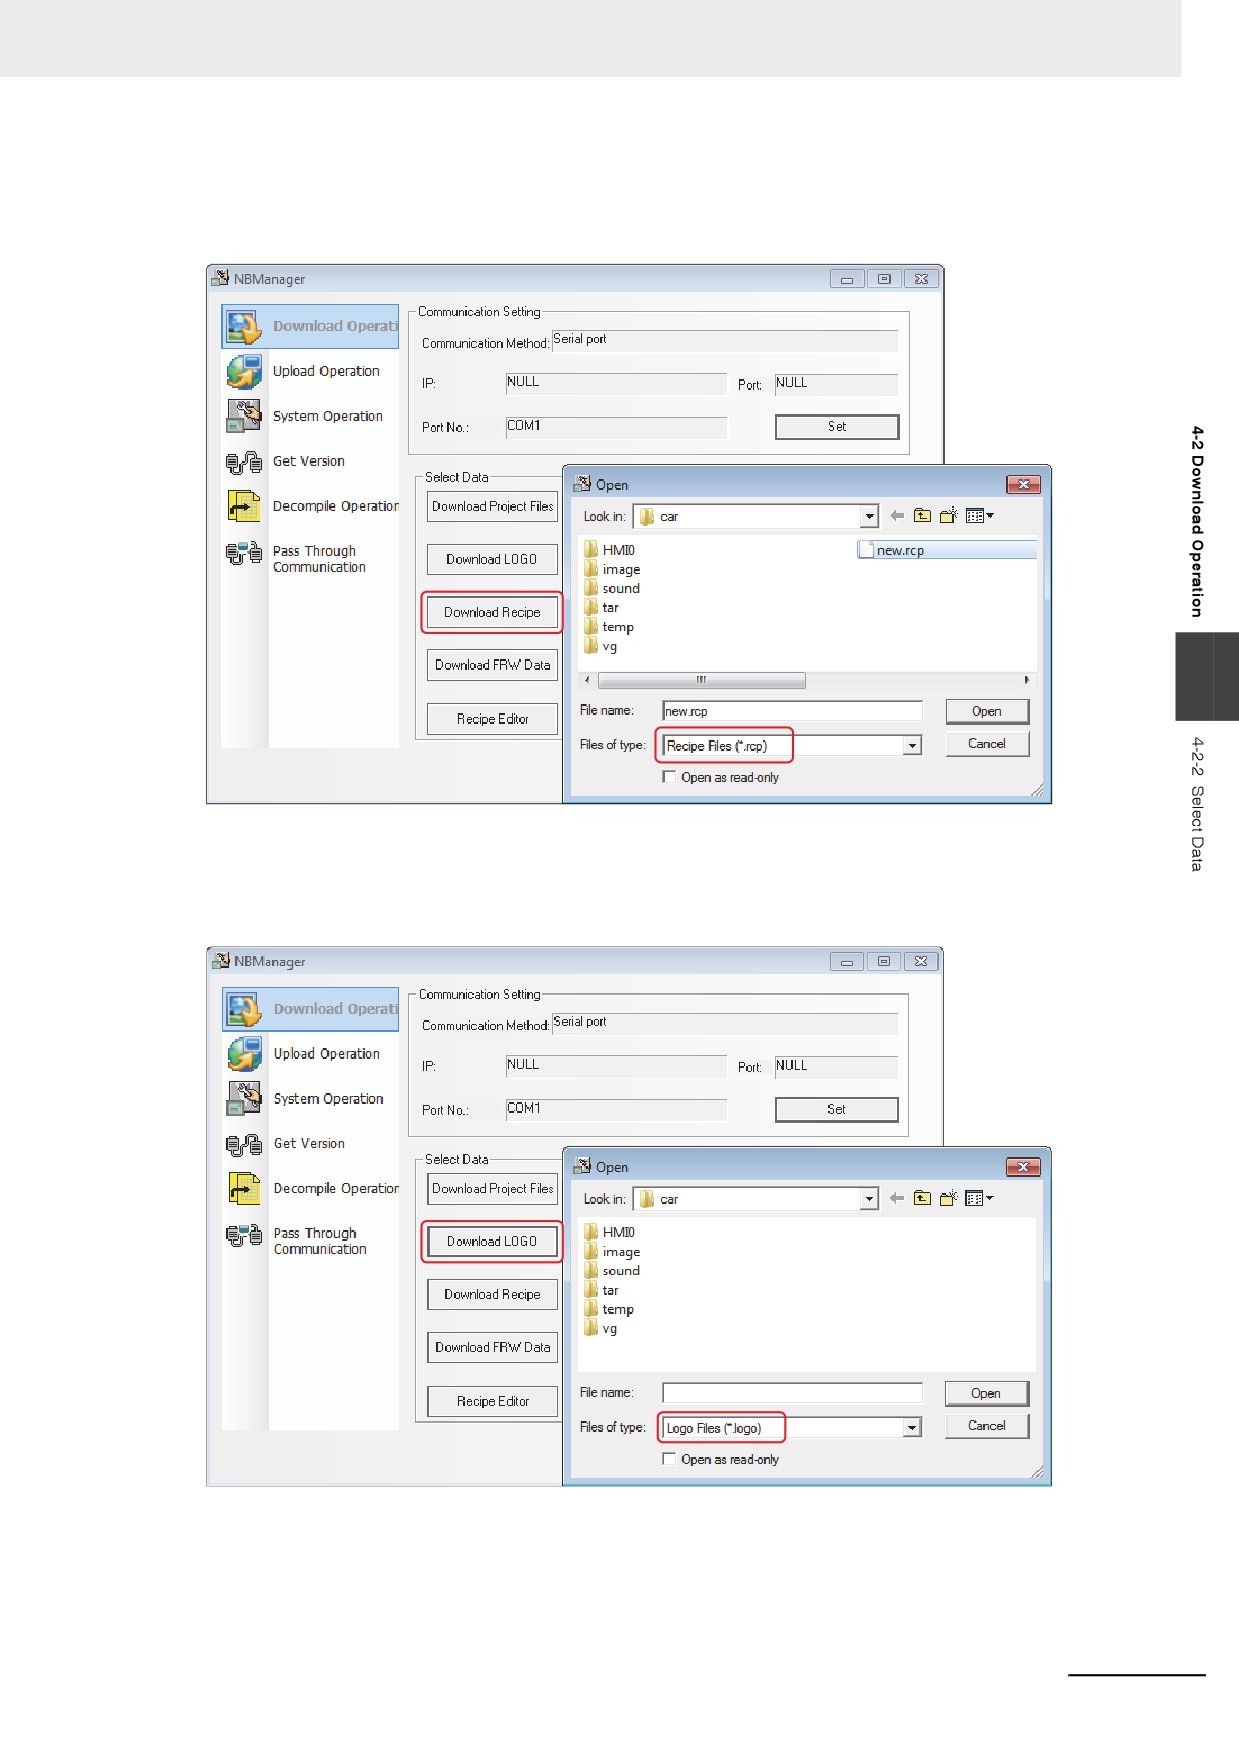
z Download Recipe
Firstly, click the [Download Recipe] button and select the pre-edited file with the suffix of “.rcp”, then
click the [Open] button to perform the download.
4
z Download LOGO
Click the [Download LOGO] button and select the edited project, i.e. the file with the suffix of “*.logo”
in PT folder under “car” folder, and then click the [Open] button to perform the download.
4-7
4 Functions of NBManager
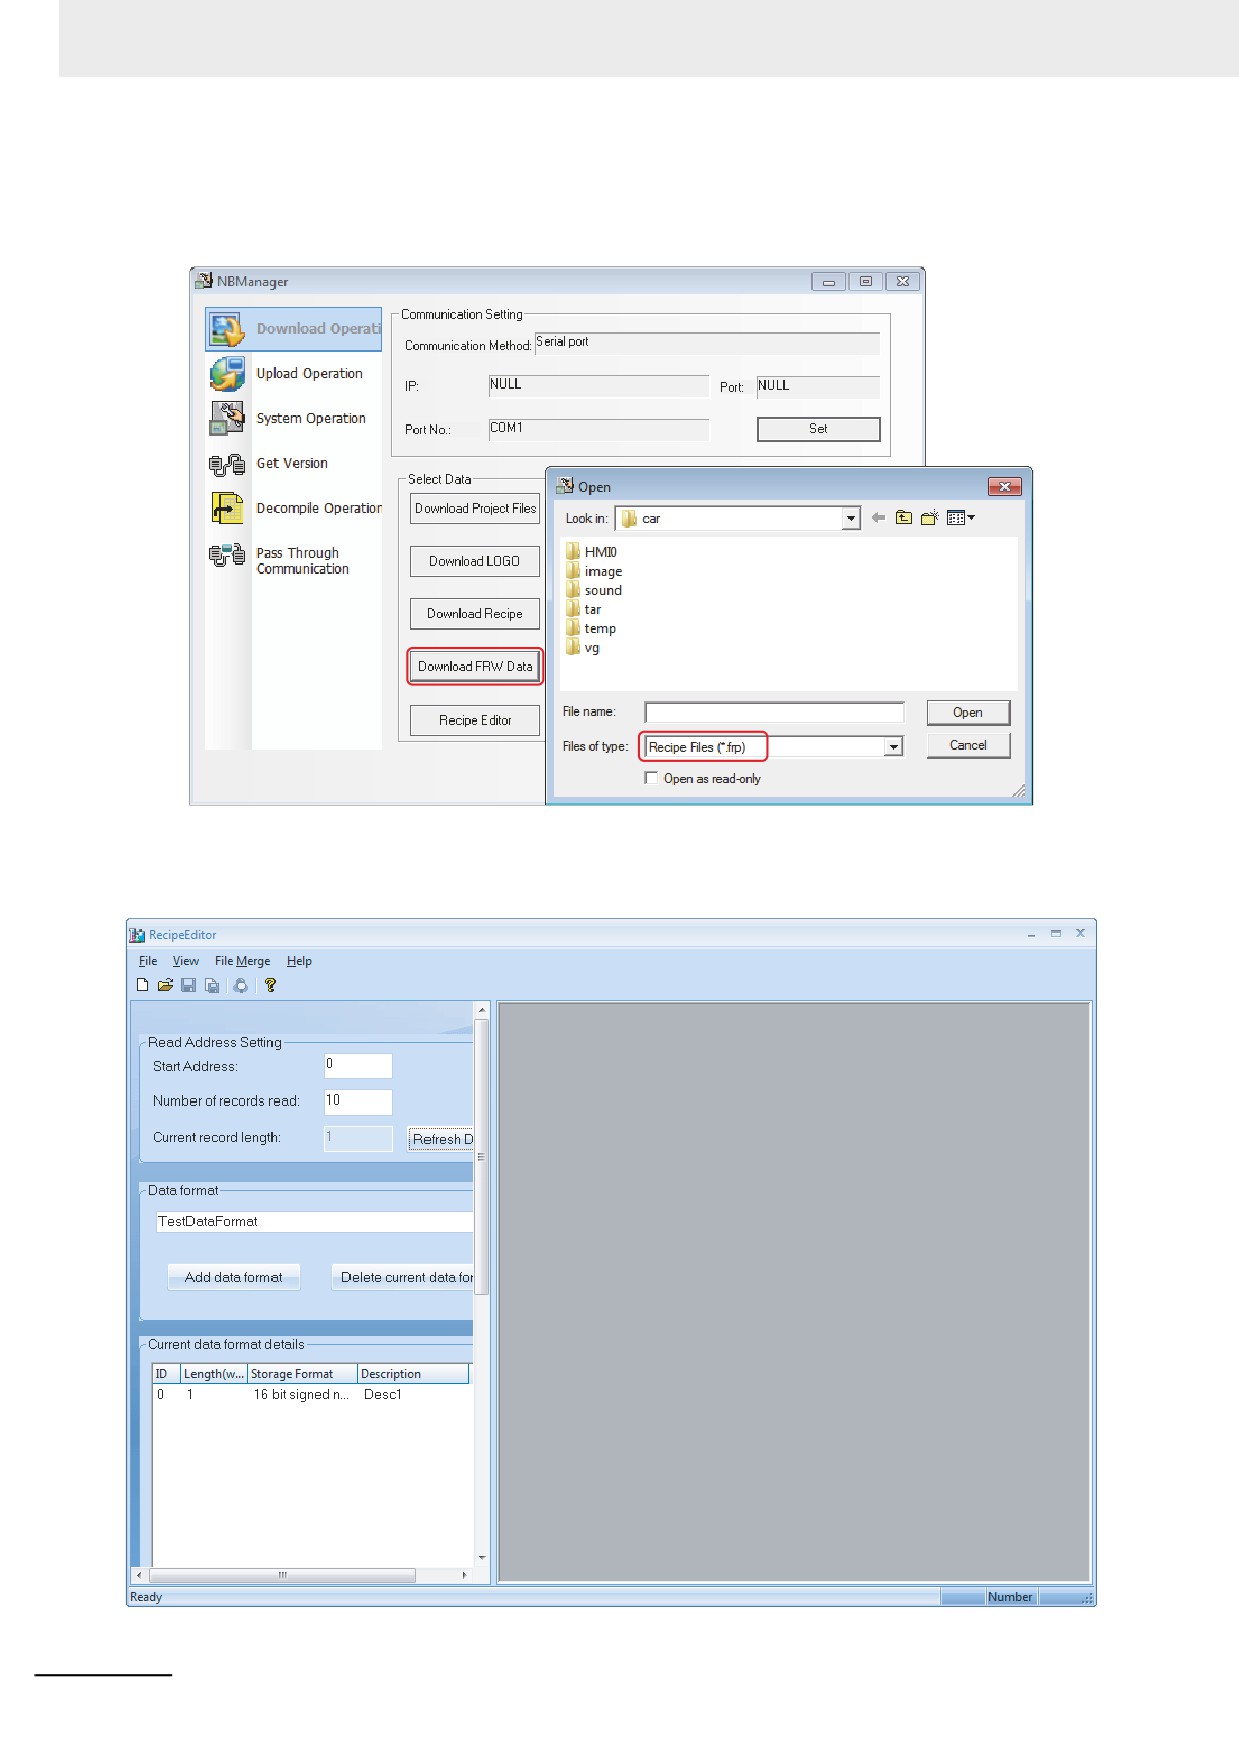
z Download FRW Data
Click the [Download FRW Data] button and select the edited project, i.e. the file with the suffix of
“*.frp” in PT folder under “car” folder, and then click the [Open] button to perform the download.
z Recipe Editor
Clicking the [Recipe Editor] button will open the RecipeEditor.
4-8
4 Functions of NBManager
4-2-3
LOGO Setting
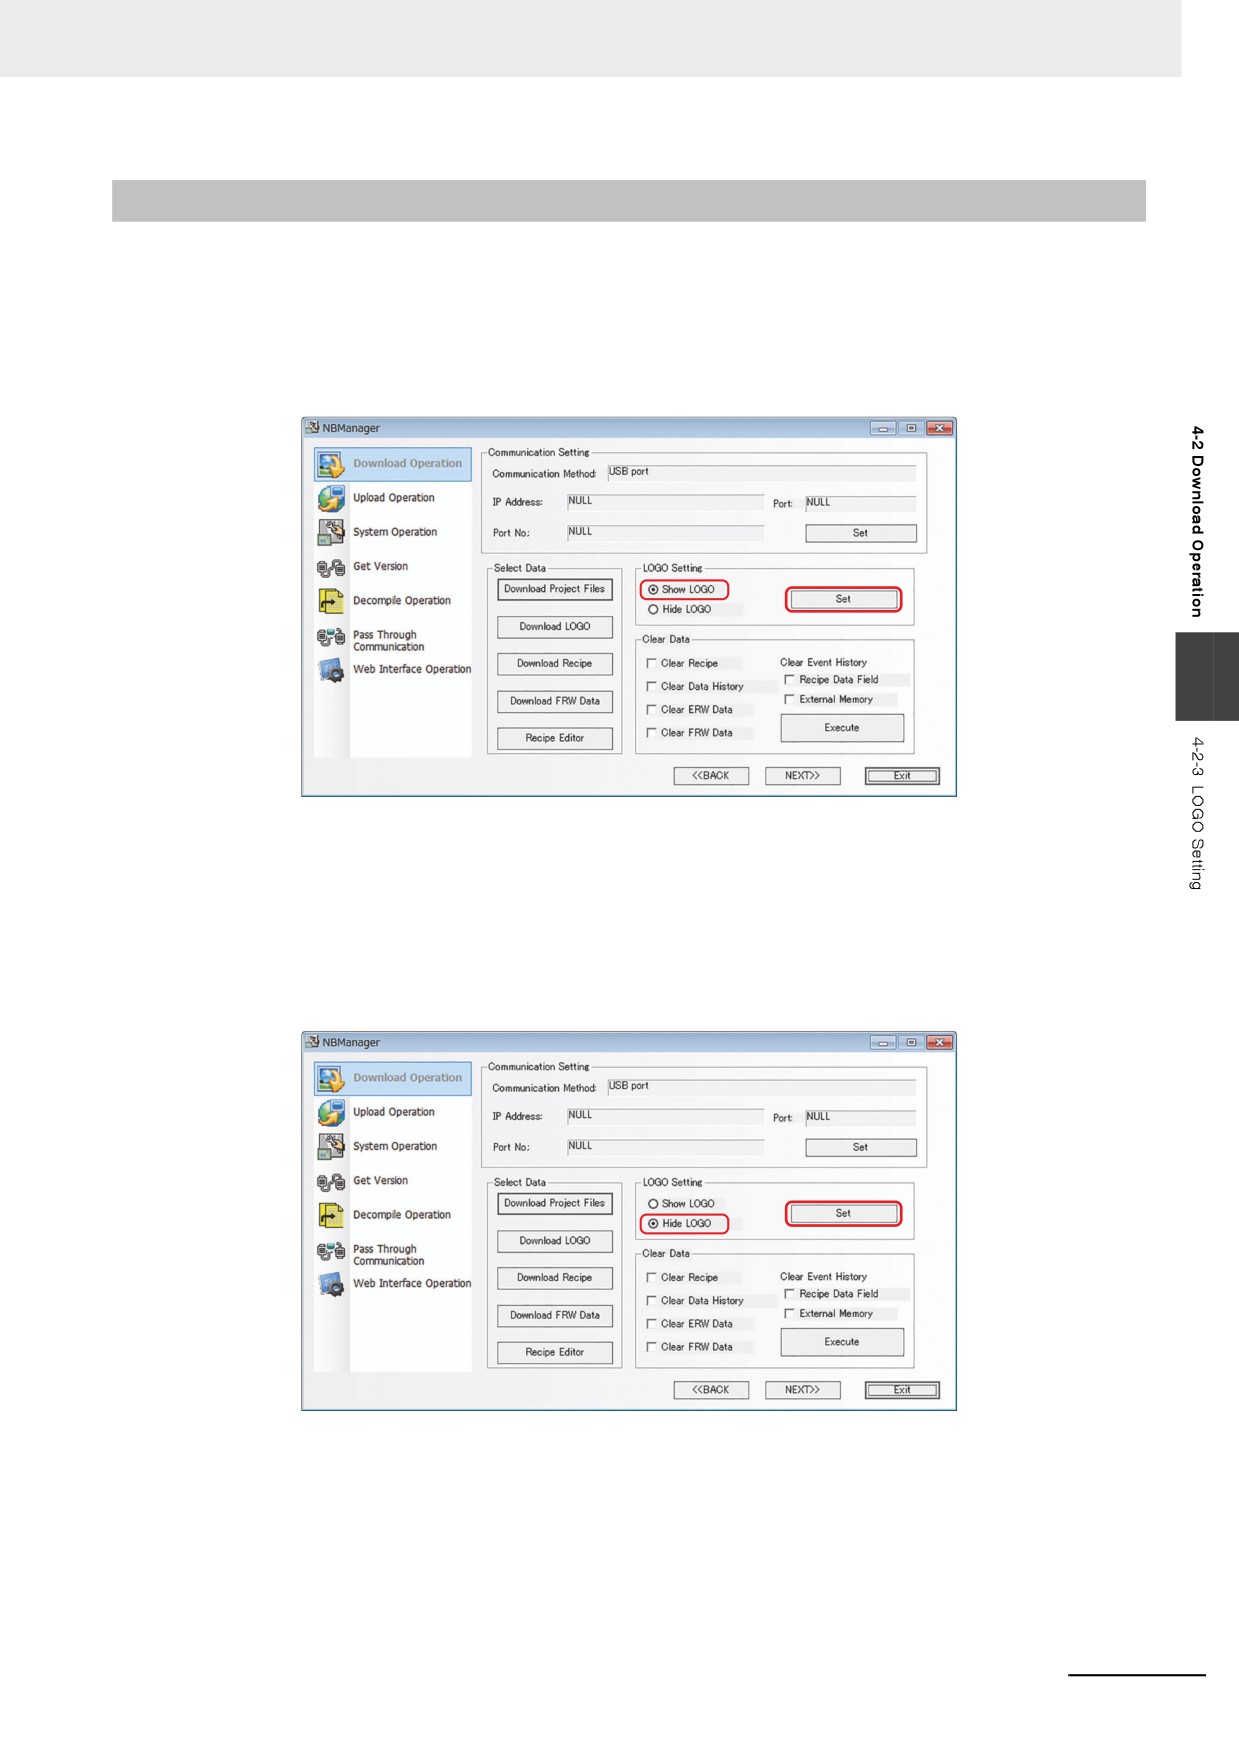
It is used to set the display of LOGO screen at the PT startup.
z Show LOGO
The specific operation is as follows: Select [Show LOGO] and click the [Set] button as shown below.
If the setting is successful, [Set Successfully] dialog box will appear. Once the setting is successful,
The transfered LOGO screen will be displayed at the next startup of PT.
4
If the setting is failed, please modify the Communication Setting again after the “Error occurs” dialog
box pops up.
z Hide LOGO
The specific operations are as follows: Select [Hide LOGO] and click the [Set] button as shown
below. If the setting is successful, [Set Successfully] dialog box will appear. Once the setting is suc-
cessful, LOGO screen will not appear during the startup of PT next time.
4-9
4 Functions of NBManager
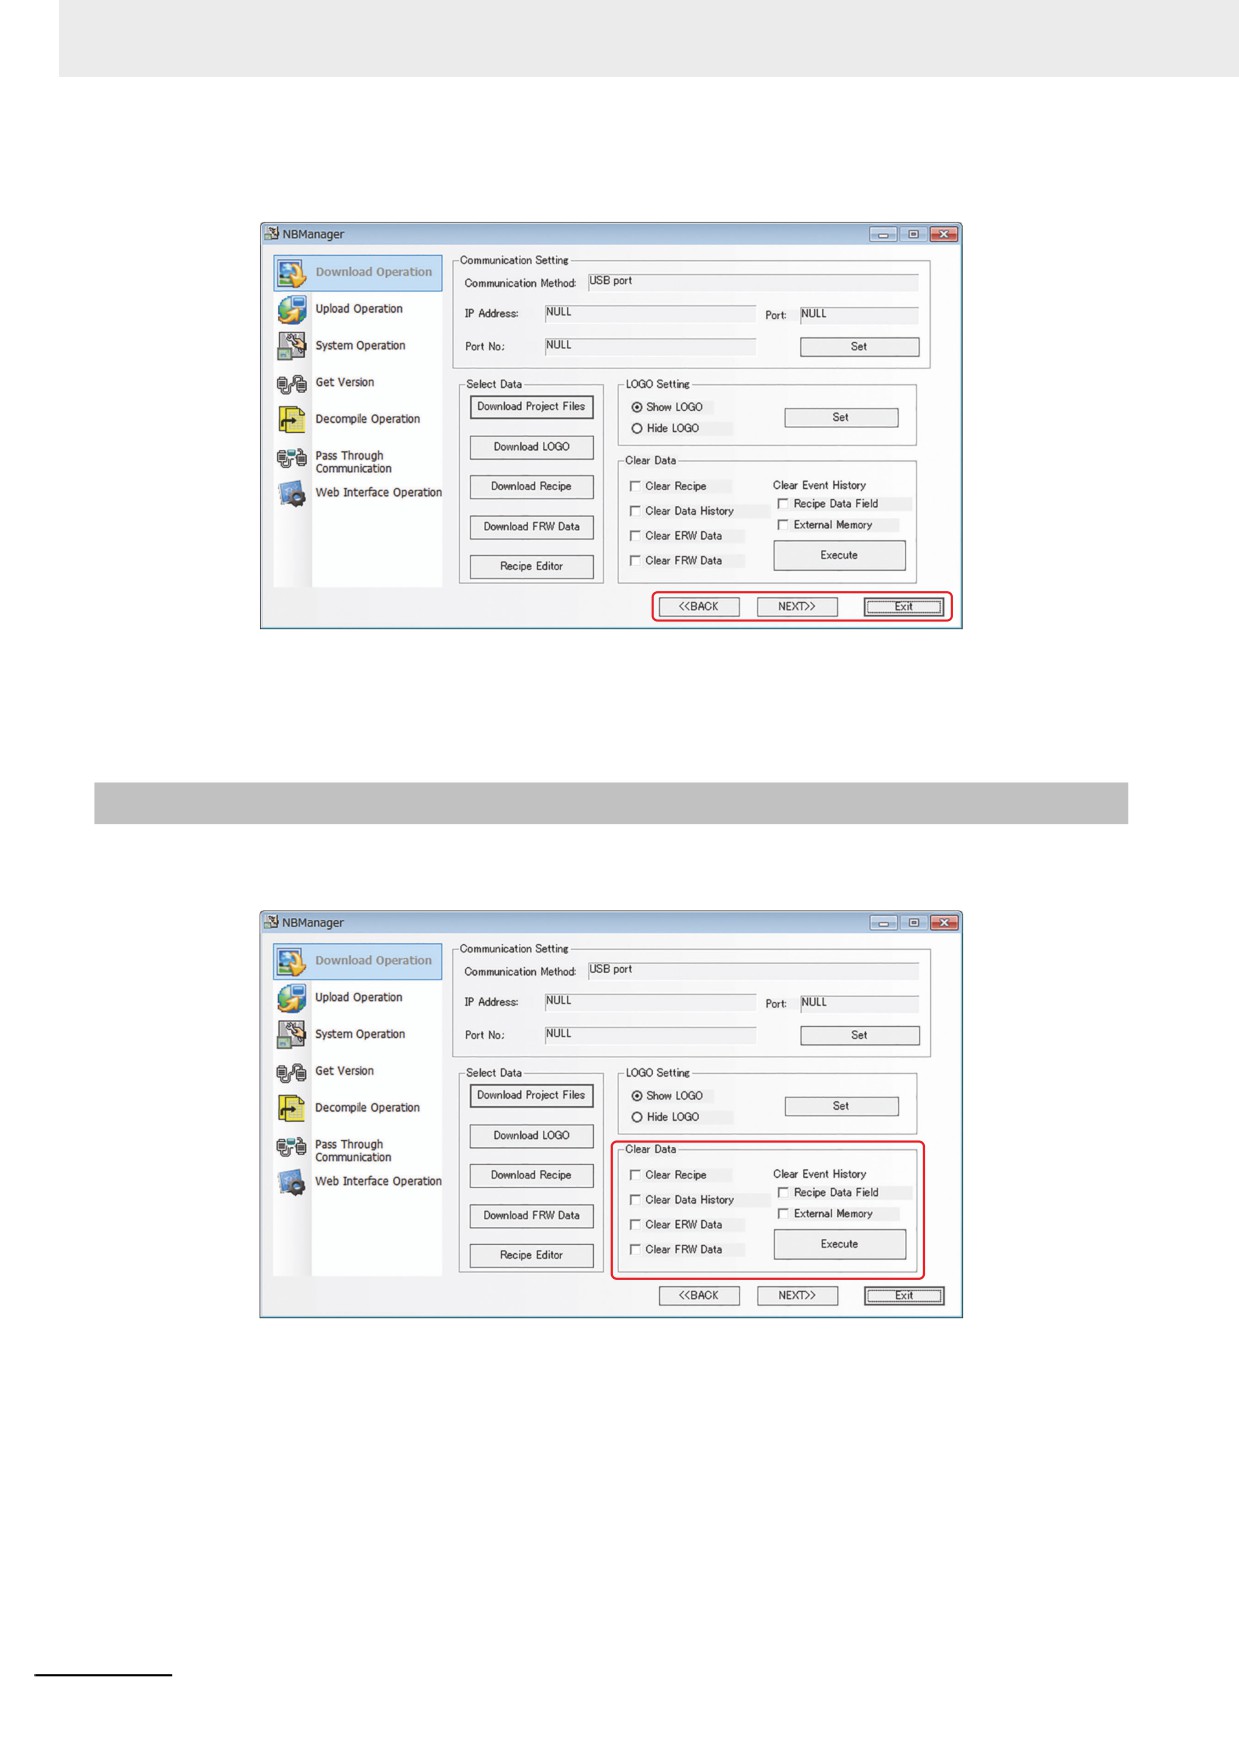
If the setting is failed, please modify the Communication Setting again after the “Error occurs” dialog
box pops up.
Clicking the [BACK] and [Next] buttons can make switching among the Download Operate, Upload
Operate, System Operate, Get Version, Decompile Operate and Pass Through Communication.
Click the [Exit] button to exit from the NBManager.
4-2-4
Clear Data
The option in Clear Data are consistent with the corresponding options in “Select Section” of NB-
Designer. After checking the required options, press the [Execute] button.
4-10