Cisco Industrial Ethernet 4000, 4010 and 5000 Switch Software. Configuration Guide (2022) - page 22
Configuring Network Security with ACLs
Understanding ACLs
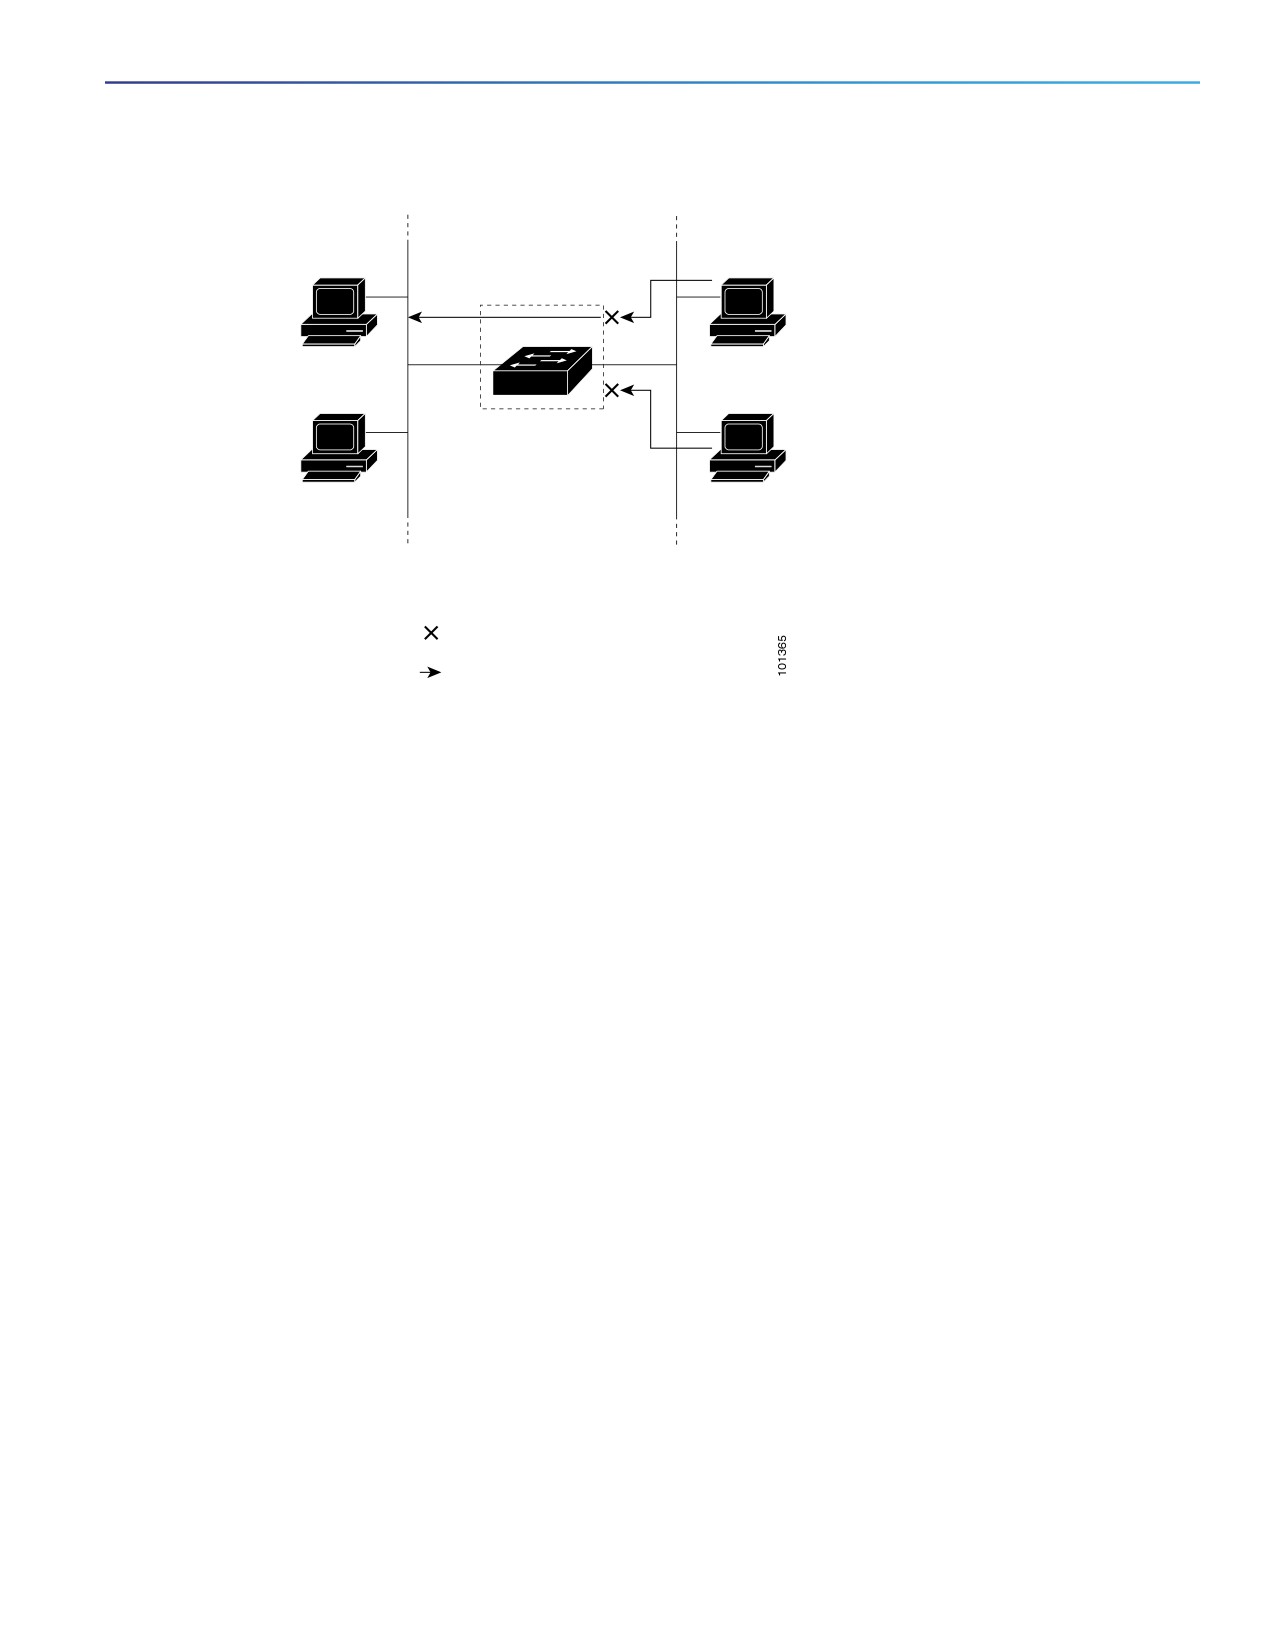
Figure 74
Using ACLs to Control Traffic to a Network
Host A
Host B
Human
Research &
Resources
Development
network
network
= ACL denying traffic from Host B
and permitting traffic from Host A
= Packet
When you apply a port ACL to a trunk port, the ACL filters traffic on all VLANs present on the trunk port. When you apply
a port ACL to a port with voice VLAN, the ACL filters traffic on both data and voice VLANs.
With port ACLs, you can filter IP traffic by using IP access lists and non-IP traffic by using MAC addresses. You can filter
both IP and non-IP traffic on the same Layer 2 interface by applying both an IP access list and a MAC access list to the
interface.
Note: You cannot apply more than one IP access list and one MAC access list to a Layer 2 interface. If an IP access list
or MAC access list is already configured on a Layer 2 interface and you apply a new IP access list or MAC access list to
the interface, the new ACL replaces the previously configured one.
Router ACLs
You can apply router ACLs on switch virtual interfaces (SVIs), which are Layer 3 interfaces to VLANs; on physical Layer
3 interfaces; and on Layer 3 EtherChannel interfaces. You apply router ACLs on interfaces for specific directions (inbound
or outbound). You can apply one router ACL in each direction on an interface.
An ACL can be used with multiple features for a given interface, and one feature can use multiple ACLs. When a single
router ACL is used by multiple features, it is examined multiple times.
Supported access lists for IPv4 traffic:
Standard IP access lists use source addresses for matching operations.
Extended IP access lists use source and destination addresses and optional protocol information for matching
operations.
As with port ACLs, the switch examines ACLs associated with features configured on a given interface. However, you
can apply only inbound port ACLs, while router ACLs are supported in both directions. As packets enter the switch on
an interface, ACLs associated with all inbound features configured on that interface are examined. After packets are
routed and before they are forwarded to the next hop, all ACLs associated with outbound features configured on the
egress interface are examined.
577
Configuring Network Security with ACLs
Understanding ACLs
ACLs permit or deny packet forwarding based on how the packet matches the entries in the ACL and can be used to
control access to a network or to part of a network. In Figure 37-1, ACLs applied at the router input allow Host A to
access the Human Resources network but prevent Host B from accessing the same network.
VLAN Maps
Use VLAN ACLs or VLAN maps to access-control all traffic. You can apply VLAN maps to all packets that are routed into
or out of a VLAN or are bridged within a VLAN in the switch.
Use VLAN maps for security packet filtering. VLAN maps are not defined by direction (input or output).
You can configure VLAN maps to match Layer 3 addresses for IPv4 traffic.
All non-IP protocols are access-controlled through MAC addresses and Ethertype using MAC VLAN maps. (IP traffic is
not access controlled by MAC VLAN maps.) You can enforce VLAN maps only on packets going through the switch; you
cannot enforce VLAN maps on traffic between hosts on a hub or on another switch connected to this switch.
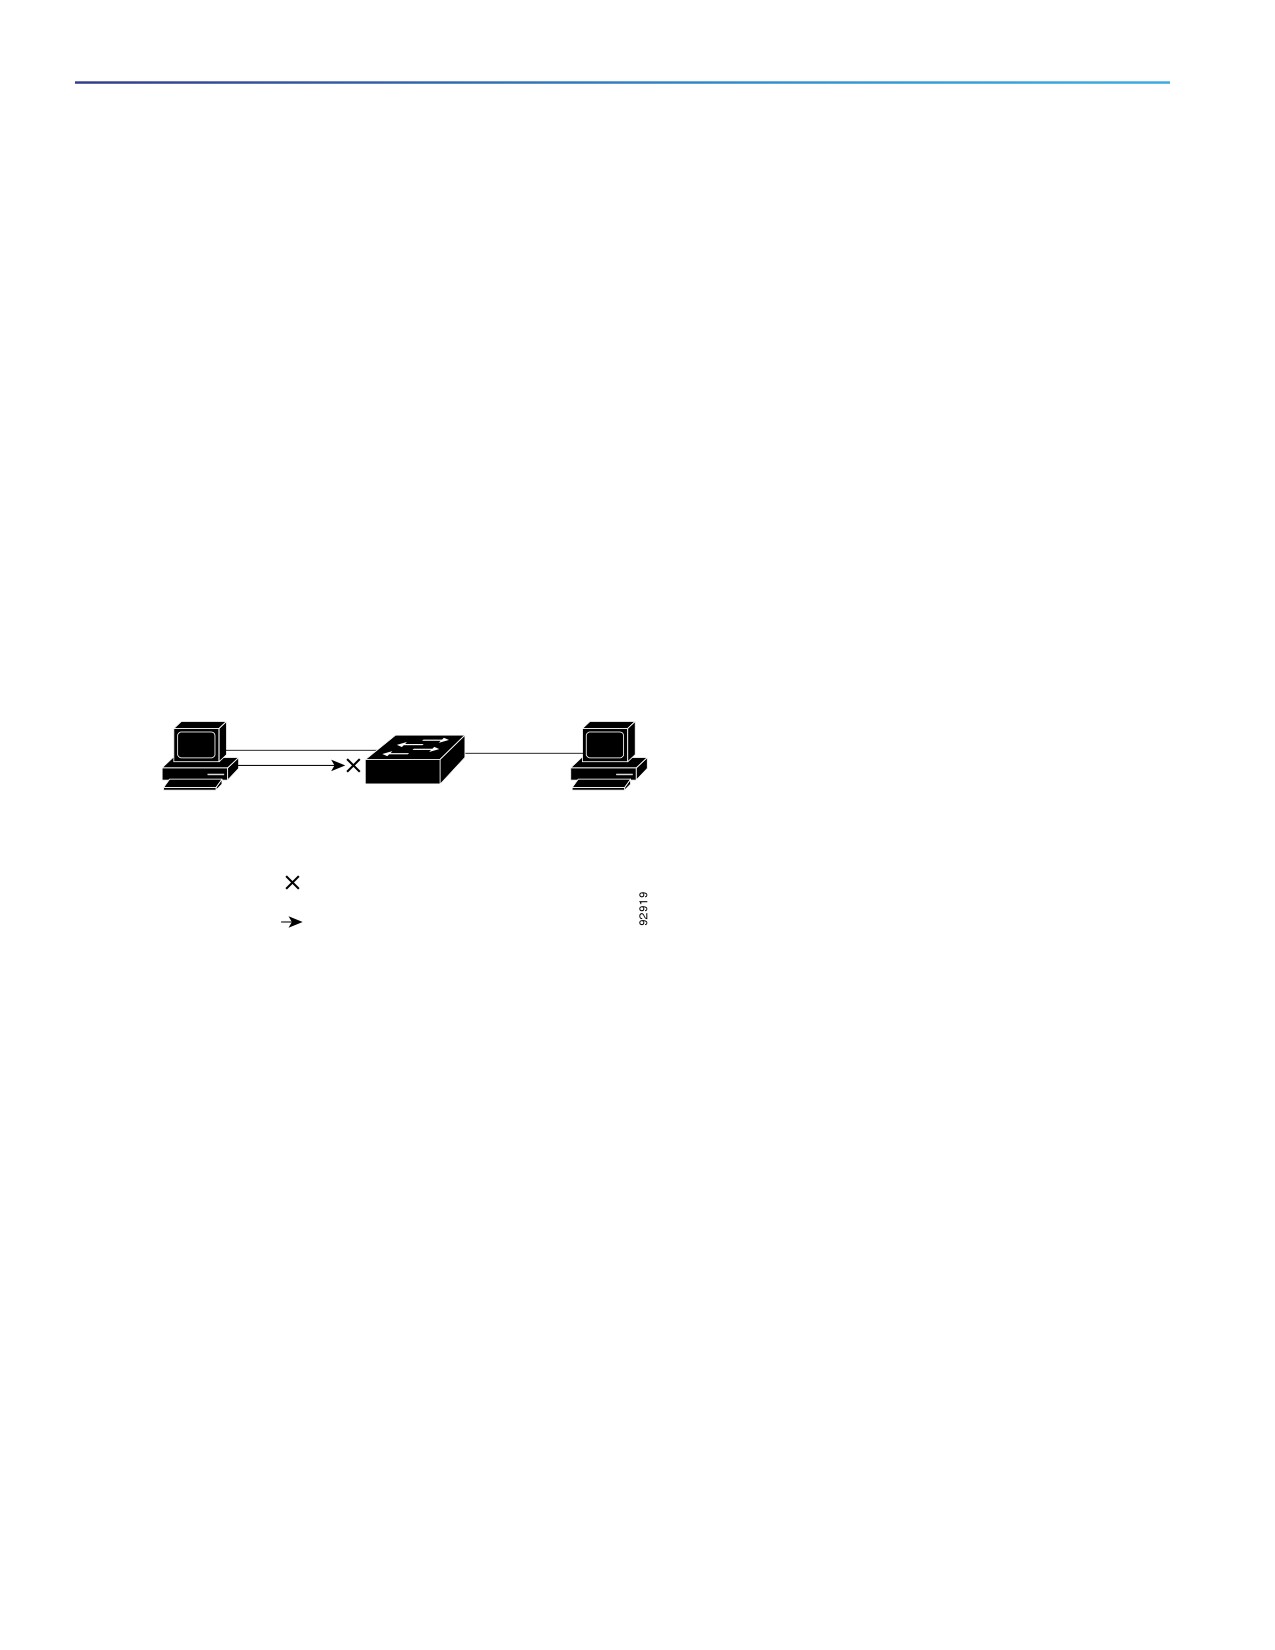
With VLAN maps, forwarding of packets is permitted or denied, based on the action specified in the map. Figure 37-2
shows how a VLAN map is applied to prevent a specific type of traffic from Host A in VLAN 10 from being forwarded.
You can apply only one VLAN map to a VLAN.
Figure 75
Using VLAN Maps to Control Traffic
Host A
Host B
(VLAN 10)
(VLAN 10)
= VLAN map denying specific type
of traffic from Host A
= Packet
Handling Fragmented and Unfragmented Traffic
IP packets can be fragmented as they cross the network. When this happens, only the fragment containing the beginning
of the packet contains the Layer 4 information, such as TCP or UDP port numbers, ICMP type and code, and so on. All
other fragments are missing this information.
Some ACEs do not check Layer 4 information and therefore can be applied to all packet fragments. ACEs that do test
Layer 4 information cannot be applied in the standard manner to most of the fragments in a fragmented IP packet. When
the fragment contains no Layer 4 information and the ACE tests some Layer 4 information, the matching rules are
modified:
Permit ACEs that check the Layer 3 information in the fragment (including protocol type, such as TCP, UDP, and so
on) are considered to match the fragment regardless of what the missing Layer 4 information might have been.
Deny ACEs that check Layer 4 information never match a fragment unless the fragment contains Layer 4 information.
Consider access list 102, configured with these commands, applied to three fragmented packets:
Switch(config)# access-list 102 permit tcp any host 10.1.1.1 eq smtp
Switch(config)# access-list 102 deny tcp any host 10.1.1.2 eq telnet
Switch(config)# access-list 102 permit tcp any host 10.1.1.2
Switch(config)# access-list 102 deny tcp any any
578
Configuring Network Security with ACLs
Configuring IPv4 ACLs
Note: In the first and second ACEs in the examples, the eq keyword after the destination address means to test for the
TCP-destination-port well-known numbers equaling Simple Mail Transfer Protocol (SMTP) and Telnet, respectively.
Packet A is a TCP packet from host 10.2.2.2., port 65000, going to host 10.1.1.1 on the SMTP port. If this packet is
fragmented, the first fragment matches the first ACE (a permit) as if it were a complete packet because all Layer 4
information is present. The remaining fragments also match the first ACE, even though they do not contain the SMTP
port information, because the first ACE only checks Layer 3 information when applied to fragments. The information
in this example is that the packet is TCP and that the destination is 10.1.1.1.
Packet B is from host 10.2.2.2, port 65001, going to host 10.1.1.2 on the Telnet port. If this packet is fragmented,
the first fragment matches the second ACE (a deny) because all Layer 3 and Layer 4 information is present. The
remaining fragments in the packet do not match the second ACE because they are missing Layer 4 information.
Instead, they match the third ACE (a permit).
Because the first fragment was denied, host 10.1.1.2 cannot reassemble a complete packet, so packet B is
effectively denied. However, the later fragments that are permitted will consume bandwidth on the network and
resources of host 10.1.1.2 as it tries to reassemble the packet.
Fragmented packet C is from host 10.2.2.2, port 65001, going to host 10.1.1.3, port ftp. If this packet is fragmented,
the first fragment matches the fourth ACE (a deny). All other fragments also match the fourth ACE because that ACE
does not check any Layer 4 information and because Layer 3 information in all fragments shows that they are being
sent to host 10.1.1.3, and the earlier permit ACEs were checking different hosts.
Configuring IPv4 ACLs
Configuring IPv4 ACLs on the switch is the same as configuring IPv4 ACLs on other Cisco switches and routers.
1. Create an ACL by specifying an access list number or name and the access conditions.
2. Apply the ACL to interfaces or terminal lines.
Refer to the following sections for configuration information:
Creating Standard and Extended IPv4 ACLs
Applying an IPv4 ACL to a Terminal Line
IPv4 ACL Application to an Interface Guidelines
Hardware and Software Handling of IP ACLs
Troubleshooting ACLs
Creating Standard and Extended IPv4 ACLs
This section describes IP ACLs. An ACL is a sequential collection of permit and deny conditions. One by one, the switch
tests packets against the conditions in an access list. The first match determines whether the switch accepts or rejects
the packet. Because the switch stops testing after the first match, the order of the conditions is critical. If no conditions
match, the switch denies the packet.
The software supports these types of ACLs or access lists for IPv4:
Standard IP access lists use source addresses for matching operations.
Extended IP access lists use source and destination addresses for matching operations and optional protocol-type
information for finer granularity of control.
579

Configuring Network Security with ACLs
Configuring IPv4 ACLs
The switch always rewrites the order of standard access lists so that entries with host matches and entries with matches
having a don’t care mask of 0.0.0.0 are moved to the top of the list, above any entries with non-zero don’t care masks.
Therefore, in show command output and in the configuration file, the ACEs do not necessarily appear in the order in
which they were entered.
After creating a numbered standard IPv4 ACL, you can apply it to terminal lines (see Applying an IPv4 ACL to a Terminal
Line, page 595), to interfaces (see Applying an IPv4 ACL to an Interface, page 596), or to VLANs (see Monitoring and
Maintaining Network Security with ACLs, page 598).
Access List Numbers
The number you use to denote your ACL shows the type of access list that you are creating. Table 56 on page 580 lists
the access-list number and corresponding access list type and shows whether or not they are supported in the switch.
The switch supports IPv4 standard and extended access lists, numbers 1 to 199 and 1300 to 2699.
Table 56
Access List Number Support
Access List Number
Type
Supported
1-99
IP standard access list
Yes
100-199
IP extended access list
Yes
200-299
Protocol type-code access list
No
300-399
DECnet access list
No
400-499
XNS standard access list
No
500-599
XNS extended access list
No
600-699
AppleTalk access list
No
700-799
48-bit MAC address access list
No
800-899
IPX standard access list
No
900-999
IPX extended access list
No
1000-1099
IPX SAP access list
No
1100-1199
Extended 48-bit MAC address access list
No
1200-1299
IPX summary address access list
No
1300-1999
IP standard access list (expanded range)
Yes
2000-2699
IP extended access list (expanded range)
Yes
Note: In addition to numbered standard and extended ACLs, you can also create standard and extended named IP ACLs
by using the supported numbers. That is, the name of a standard IP ACL can be 1 to 99; the name of an extended IP ACL
can be 100 to 199. The advantage of using named ACLs instead of numbered lists is that you can delete individual entries
from a named list.
ACL Logging
The switch software can provide logging messages about packets permitted or denied by a standard IP access list. That
is, any packet that matches the ACL causes an informational logging message about the packet to be sent to the console.
The level of messages logged to the console is controlled by the logging console commands controlling the syslog
messages.
Note: Because routing is done in hardware and logging is done in software, if a large number of packets match a permit
or deny ACE containing a log keyword, the software might not be able to match the hardware processing rate, and not
all packets will be logged.
580

Configuring Network Security with ACLs
Configuring IPv4 ACLs
The first packet that triggers the ACL causes a logging message right away, and subsequent packets are collected over
5-minute intervals before they appear or logged. The logging message includes the access list number, whether the
packet was permitted or denied, the source IP address of the packet, and the number of packets from that source
permitted or denied in the prior 5-minute interval.
Creating a Numbered Standard ACL
Command
Purpose
Step 1
configure terminal
Enter global configuration mode.
Step 2
access-list access-list-number {deny | permit}
Define a standard IPv4 access list by using a source
source [source-wildcard] [log]
address and wildcard.
The access-list-number is a decimal number from 1
to 99 or 1300 to 1999.
Enter deny or permit to specify whether to deny or
permit access if conditions are matched.
The source is the source address of the network or
host from which the packet is being sent specified as:
The 32-bit quantity in dotted-decimal format.
The keyword any as an abbreviation for source
and source-wildcard of 0.0.0.0
255.255.255.255. You do not need to enter a
source-wildcard.
The keyword host as an abbreviation for source
and source-wildcard of source 0.0.0.0.
(Optional) The source-wildcard applies wildcard bits
to the source.
(Optional) Enter log to cause an informational logging
message about the packet that matches the entry to
be sent to the console.
(Optional) Enter log to cause an informational logging
message about the packet that matches the entry to
be sent to the console.
Step 3
end
Return to privileged EXEC mode.
Step 4
show access-lists [number | name]
Show the access list configuration.
Step 5
copy running-config startup-config
(Optional) Save your entries in the configuration file.
Note: Use the no access-list access-list-number global configuration command to delete the entire ACL. You cannot
delete individual ACEs from numbered access lists.
Use the no access-list access-list-number global configuration command to delete the entire ACL. You cannot delete
individual ACEs from numbered access lists.
This example shows how to create a standard ACL to deny access to IP host 171.69.198.102, permit access to any
others, and display the results.
581
Configuring Network Security with ACLs
Configuring IPv4 ACLs
Switch (config)# access-list 2 deny host 171.69.198.102
Switch (config)# access-list 2 permit any
Switch(config)# end
Switch# show access-lists
Standard IP access list 2
10 deny
171.69.198.102
20 permit any
The switch always rewrites the order of standard access lists so that entries with host matches and entries with matches
having a don't care mask of 0.0.0.0 are moved to the top of the list, above any entries with non-zero don't care masks.
Therefore, in show command output and in the configuration file, the ACEs do not necessarily appear in the order in
which they were entered.
Creating a Numbered Extended ACL
Although standard ACLs use only source addresses for matching, you can use extended ACL source and destination
addresses for matching operations and optional protocol type information for finer granularity of control. When you are
creating ACEs in numbered extended access lists, remember that after you create the ACL, any additions are placed at
the end of the list. You cannot reorder the list or selectively add or remove ACEs from a numbered list.
Some protocols also have specific parameters and keywords that apply to that protocol.
These IP protocols are supported (protocol keywords are in parentheses in bold):
Authentication Header Protocol (ahp), Enhanced Interior Gateway Routing Protocol (eigrp), Encapsulation Security
Payload (esp), generic routing encapsulation (gre), Internet Control Message Protocol (icmp), Internet Group
Management Protocol (igmp), any Interior Protocol (ip), IP in IP tunneling (ipinip), KA9Q NOS-compatible IP over IP
tunneling (nos), Open Shortest Path First routing (ospf), Payload Compression Protocol (pcp), Protocol Independent
Multicast (pim), Transmission Control Protocol (tcp), User Datagram Protocol (udp),
Note: ICMP echo-reply cannot be filtered. All other ICMP codes or types can be filtered.
Note: The switch does not support dynamic or reflexive access lists. It also does not support filtering based on the type
of service (ToS) minimize-monetary-cost bit.
Supported parameters can be grouped into these categories: TCP, UDP, ICMP, IGMP, or other IP.
After an ACL is created, any additions (possibly entered from the terminal) are placed at the end of the list. You cannot
selectively add or remove access list entries from a numbered access list.
Note: When you are creating an ACL, remember that, by default, the end of the access list contains an implicit deny
statement for all packets if it did not find a match before reaching the end.
After creating a numbered extended ACL, you can apply it to terminal lines (see Applying an IPv4 ACL to a Terminal Line,
page 595), to interfaces (see Applying an IPv4 ACL to an Interface, page 596), or to VLANs (see Monitoring and
Maintaining Network Security with ACLs, page 598)
582
Configuring Network Security with ACLs
Configuring IPv4 ACLs
583
Configuring Network Security with ACLs
Configuring IPv4 ACLs
Command
Purpose
Step 1
configure terminal
Enter global configuration mode.
Step 2a
access-list access-list-number {deny | permit}
Define an extended IPv4 access list and the access
protocol source source-wildcard destination
conditions. The access-list-number is a decimal
destination-wildcard [precedence precedence]
number from 100 to 199 or 2000 to 2699.
[tos tos] [fragments] [log] [log-input]
Enter deny or permit to specify whether to deny or
[time-range time-range-name] [dscp dscp]
permit the packet if conditions are matched.For
Note: If you enter a dscp value, you cannot enter
protocol, enter the name or number of an IP protocol:
tos or precedence. You can enter both a tos and
ahp, eigrp, esp, gre, icmp, igmp, igrp, ip, ipinip, nos,
a precedence value with no dscp.
ospf, pcp, pim, tcp, or udp, or an integer in the range
0 to 255 representing an IP protocol number. To
match any Internet protocol (including ICMP, TCP, and
UDP), use the keyword ip.
Note: This step includes options for most IP
protocols. For additional specific parameters for TCP,
UDP, ICMP, and IGMP, see steps 2b through 2e.
The source is the number of the network or host from
which the packet is sent.
The source-wildcard applies wildcard bits to the
source.
The destination is the network or host number to
which the packet is sent.
The destination-wildcard applies wildcard bits to the
destination.
Source, source-wildcard, destination, and
destination-wildcard can be specified as:
The 32-bit quantity in dotted-decimal format.
The keyword any for 0.0.0.0 255.255.255.255
(any host).
The keyword host for a single host 0.0.0.0.
584

Configuring Network Security with ACLs
Configuring IPv4 ACLs
Command
Purpose
Step 2a,
The other keywords are optional and have these
continued
meanings:
precedence—Enter to match packets with a
precedence level specified as a number from 0 to
7 or by name: routine (0), priority (1), immediate
(2), flash (3), flash-override (4), critical (5)
internet (6), network (7).
fragments—Enter to check non-initial fragments.
tos—Enter to match by type of service level,
specified by a number from 0 to 15 or a name:
normal (0), max-reliability (2), max-throughput
(4), min-delay (8).
log—Enter to create an informational logging
message to be sent to the console about the
packet that matches the entry or log-input to
include the input interface in the log entry.
If you enter a dscp value, you cannot enter tos or
precedence. You can enter both a tos and a
precedence value with no dscp
time-range—For an explanation of this keyword,
see the “Using Time Ranges with ACLs” section
on page 37-17.
dscp—Enter to match packets with the DSCP
value specified by a number from 0 to 63, or use
the question mark (?) to see a list of available
values.
or
access-list access-list-number {deny | permit}
In access-list configuration mode, define an
protocol any any [precedence precedence] [tos
extended IP access list using an abbreviation for a
tos] [fragments] [log] [log-input] [time-range
source and source wildcard of 0.0.0.0
time-range-name] [dscp dscp]
255.255.255.255 and an abbreviation for a
destination and destination wildcard of 0.0.0.0
255.255.255.255.
You can use the any keyword in place of source and
destination address and wildcard.
or
access-list access-list-number {deny | permit}
Define an extended IP access list by using an
protocol host source host destination
abbreviation for a source and a source wildcard of
[precedence precedence] [tos tos] [fragments]
source 0.0.0.0 and an abbreviation for a destination
[log] [log-input] [time-range time-range-name]
and destination wildcard of destination 0.0.0.0.
[dscp dscp]
You can use the host keyword in place of the source
and destination wildcard or mask.
585

Configuring Network Security with ACLs
Configuring IPv4 ACLs
Command
Purpose
Step 2b
access-list access-list-number {deny | permit}
(Optional) Define an extended TCP access list and
tcp source source-wildcard [operator port]
the access conditions.
destination destination-wildcard [operator port]
[established] [precedence precedence] [tos tos]
Enter tcp for Transmission Control Protocol.
[fragments] [log] [log-input] [time-range
The parameters are the same as those described in
time-range-name] [dscp dscp] [flag]
Step 2a, with these exceptions:
(Optional) Enter an operator and port to compare
source (if positioned after source source-wildcard) or
destination (if positioned after destination
destination-wildcard) port. Possible operators
include eq (equal), gt (greater than), lt (less than), neq
(not equal), and range (inclusive range). Operators
require a port number (range requires two port
numbers separated by a space).
Enter the port number as a decimal number (from 0 to
65535) or the name of a TCP port. To see TCP port
names, use the ? or see the "Configuring IP
Services" section in the "IP Addressing and
Services" chapter of the Cisco IOS IP Configuration
Guide, Release 12.2. Use only TCP port numbers or
names when filtering TCP.
The other optional keywords have these meanings:
established—Enter to match an established
connection. This has the same function as
matching on the ack or rst flag.
flag—Enter one of these flags to match by the
specified TCP header bits: ack (acknowledge),
fin (finish), psh (push), rst (reset), syn
(synchronize), or urg (urgent)
Step 2c
access-list access-list-number
(Optional) Define an extended UDP access list and
{deny | permit} udp
the access conditions.
source source-wildcard [operator port]
destination destination-wildcard [operator port]
Enter udp for the User Datagram Protocol.
[precedence precedence] [tos tos] [fragments]
The UDP parameters are the same as those
[log] [log-input] [time-range time-range-name]
described for TCP except that the [operator [port]]
[dscp dscp]
port number or name must be a UDP port number or
name, and the flag and established parameters are
not valid for UDP.
586

Configuring Network Security with ACLs
Configuring IPv4 ACLs
Command
Purpose
Step 2d
access-list access-list-number {deny | permit}
(Optional) Define an extended ICMP access list and
icmp source source-wildcard destination
the access conditions.
destination-wildcard [icmp-type | [[icmp-type
icmp-code] | [icmp-message]] [precedence
Enter icmp for Internet Control Message Protocol.
precedence] [tos tos] [fragments] [log]
The ICMP parameters are the same as those
[log-input] [time-range time-range-name]
described for most IP protocols in Step 2a, with the
[dscp dscp]
addition of the ICMP message type and code
parameters. These optional keywords have these
meanings:
icmp-type—Enter to filter by ICMP message type,
a number from 0 to 255.
icmp-code—Enter to filter ICMP packets that are
filtered by the ICMP message code type, a
number from 0 to 255.
icmp-message—Enter to filter ICMP packets by
the ICMP message type name or the ICMP
message type and code name. To see a list of
ICMP message
Step 2e
access-list access-list-number
(Optional) Define an extended IGMP access list and
{deny | permit} igmp source source-wildcard
the access conditions.
destination destination-wildcard [igmp-type]
Enter igmp for Internet Group Management Protocol.
[precedence precedence] [tos tos] [fragments]
[log] [log-input] [time-range time-range-name]
The IGMP parameters are the same as those
[dscp dscp]
described for most IP protocols in Step 2a, with this
optional parameter.
igmp-type—To match IGMP message type, enter a
number from 0 to 15, or enter the message name
(dvmrp, host-query, host-report, pim, or trace)
Step 3
end
Return to privileged EXEC mode.
Step 4
show access-lists [number | name]
Verify the access list configuration.
Step 5
copy running-config startup-config
(Optional) Save your entries in the configuration file.
Use the no access-list access-list-number global configuration command to delete the entire access list. You cannot
delete individual ACEs from numbered access lists.
This example shows how to create and display an extended access list to deny Telnet access from any host in network
171.69.198.0 to any host in network 172.20.52.0 and to permit any others. (The eq keyword after the destination address
means to test for the TCP destination port number equaling Telnet.)
Switch(config)# access-list 102 deny tcp 171.69.198.0 0.0.0.255 172.20.52.0 0.0.0.255 eq telnet
Switch(config)# access-list 102 permit tcp any any
Switch(config)# end
Switch# show access-lists
Extended IP access list 102
10 deny tcp 171.69.198.0 0.0.0.255 172.20.52.0 0.0.0.255 eq telnet
20 permit tcp any any
After an ACL is created, any additions (possibly entered from the terminal) are placed at the end of the list. You cannot
selectively add or remove access list entries from a numbered access list.
587
Configuring Network Security with ACLs
Configuring IPv4 ACLs
Note: When you are creating an ACL, remember that, by default, the end of the access list contains an implicit deny
statement for all packets if it did not find a match before reaching the end.
After creating a numbered extended ACL, you can apply it to terminal lines (see the Applying an IPv4 ACL to a Terminal
Line section), to interfaces (see the Applying an IPv4 ACL to an Interface section), or to VLANs (see the Configuring VLAN
Maps section
Resequencing ACEs in an ACL
Sequence numbers for the entries in an access list are automatically generated when you create a new ACL. You can
use the ip access-list resequence global configuration command to edit the sequence numbers in an ACL and change
the order in which ACEs are applied. For example, if you add a new ACE to an ACL, it is placed at the bottom of the list.
By changing the sequence number, you can move the ACE to a different position in the ACL.
Named Standard and Extended ACLs
You can identify IPv4 ACLs with an alphanumeric string (a name) rather than a number. You can use named ACLs to
configure more IPv4 access lists in a router than if you were to use numbered access lists. If you identify your access list
with a name rather than a number, the mode and command syntax are slightly different. However, not all commands that
use IP access lists accept a named access list.
Note: The name you give to a standard or extended ACL can also be a number in the supported range of access list
numbers. That is, the name of a standard IP ACL can be 1 to 99; the name of an extended IP ACL can be 100 to 199.
The advantage of using named ACLs instead of numbered lists is that you can delete individual entries from a named list.
Consider these guidelines and limitations before configuring named ACLs:
Not all commands that accept a numbered ACL accept a named ACL. ACLs for packet filters and route filters on
interfaces can use a name.
A standard ACL and an extended ACL cannot have the same name.
Numbered ACLs are also available, as described in the Creating a Numbered Standard ACL, page 591.
When you are creating standard extended ACLs, remember that, by default, the end of the ACL contains an implicit deny
statement for everything if it did not find a match before reaching the end. For standard ACLs, if you omit the mask from
an associated IP host address access list specification, 0.0.0.0 is assumed to be the mask.
After you create an ACL, any additions are placed at the end of the list. You cannot selectively add ACL entries to a
specific ACL. However, you can use no permit and no deny access-list configuration mode commands to remove entries
from a named ACL. This example shows how you can delete individual ACEs from the named access list border-list:
Switch(config)# ip access-list extended border-list
Switch(config-ext-nacl)# no permit ip host 10.1.1.3 any
Being able to selectively remove lines from a named ACL is one reason you might use named ACLs instead of numbered
ACLs.
Time Ranges with ACLs
You can selectively apply extended ACLs based on the time of day and the week by using the time-range global
configuration command. First, define a time-range name and set the times and the dates or the days of the week in the
time range. Then enter the time-range name when applying an ACL to set restrictions to the access list. You can use the
time range to define when the permit or deny statements in the ACL are in effect, for example, during a specified time
period or on specified days of the week.
These are some of the many possible benefits of using time ranges:
You have more control over permitting or denying a user access to resources, such as an application (identified by
an IP address/mask pair and a port number).
588
Configuring Network Security with ACLs
Configuring IPv4 ACLs
You can control logging messages. ACL entries can be set to log traffic only at certain times of the day. Therefore,
you can simply deny access without needing to analyze many logs generated during peak hours.
Time-based access lists trigger CPU activity because the new configuration of the access list must be merged with other
features and the combined configuration loaded into the TCAM. For this reason, you should be careful not to have several
access lists configured to take affect in close succession (within a small number of minutes of each other.)
Note: The time range relies on the switch system clock; therefore, you need a reliable clock source. We recommend that
you use Network Time Protocol (NTP) to synchronize the switch clock.
Comments in ACLs
You can use the remark keyword to include comments (remarks) about entries in any IP standard or extended ACL. The
remarks make the ACL easier for you to understand and scan. Each remark line is limited to 100 characters.
The remark can go before or after a permit or deny statement. You should be consistent about where you put the remark
so that it is clear which remark describes which permit or deny statement. For example, it would be confusing to have
some remarks before the associated permit or deny statements and some remarks after the associated statements.
To include a comment for IP numbered standard or extended ACLs, use the access-list access-list number remark
remark global configuration command. To remove the remark, use the no form of this command.
Applying an IPv4 ACL to a Terminal Line
You can use numbered ACLs to control access to one or more terminal lines. You cannot apply named ACLs to lines. You
must set identical restrictions on all the virtual terminal lines because a user can attempt to connect to any of them.
For procedures for applying ACLs to interfaces, see Applying an IPv4 ACL to an Interface, page 596. For applying ACLs
to VLANs, see Monitoring and Maintaining Network Security with ACLs, page 598.
IPv4 ACL Application to an Interface Guidelines
Apply an ACL only to inbound Layer 2 ports.
Apply an ACL to either outbound or inbound Layer 3 interfaces.
When controlling access to an interface, you can use a named or numbered ACL.
If you apply an ACL to a port that is a member of a VLAN, the port ACL takes precedence over an ACL applied to
the VLAN interface.
If you apply an ACL to a Layer 2 interface that is a member of a VLAN, the Layer 2 (port) ACL takes precedence over
an input Layer 3 ACL applied to the VLAN interface. The port ACL always filters incoming packets received on the
Layer 2 port.
If you apply an ACL to a Layer 3 interface and routing is not enabled, the ACL only filters packets that are intended
for the CPU, such as SNMP, Telnet, or web traffic. You do not have to enable routing to apply ACLs to Layer 2
interfaces.
When private VLANs are configured, you can apply router ACLs only on the primary-VLAN SVIs. The ACL is applied
to both primary and secondary VLAN Layer 3 traffic.
Note: By default, the router sends Internet Control Message Protocol (ICMP) unreachable messages when a packet is
denied by an access group. These access-group denied packets are not dropped in hardware but are bridged to the
switch CPU so that it can generate the ICMP-unreachable message. Port ACLs are an exception. They do not generate
589
Configuring Network Security with ACLs
Configuring IPv4 ACLs
ICMP unreachable messages.
ICMP unreachable messages can be disabled on router ACLs with the no ip unreachables interface command.
For inbound ACLs, after receiving a packet, the switch checks the packet against the ACL. If the ACL permits the packet,
the switch continues to process the packet. If the ACL rejects the packet, the switch discards the packet.
For outbound ACLs, after receiving and sending a packet to a controlled interface, the switch checks the packet against
the ACL. If the ACL permits the packet, the switch sends the packet. If the ACL rejects the packet, the switch discards
the packet.
By default, the input interface sends ICMP Unreachable messages whenever a packet is discarded, regardless of whether
the packet was discarded because of an ACL on the input interface or because of an ACL on the output interface. ICMP
Unreachables are normally limited to no more than one every one-half second per input interface, but this can be
changed by using the ip icmp rate-limit unreachable global configuration command.
When you apply an undefined ACL to an interface, the switch acts as if the ACL has not been applied to the interface
and permits all packets. Remember this behavior if you use undefined ACLs for network security.
Hardware and Software Handling of IP ACLs
ACL processing is primarily accomplished in hardware, but requires forwarding of some traffic flows to the CPU for
software processing. If the hardware reaches its capacity to store ACL configurations, packets are sent to the CPU for
forwarding. The forwarding rate for software-forwarded traffic is substantially less than for hardware-forwarded traffic.
Note: If an ACL configuration cannot be implemented in hardware due to an out-of-resource condition on a switch, then
only the traffic in that VLAN arriving on that switch is affected (forwarded in software). Software forwarding of packets
might adversely impact the performance of the switch, depending on the number of CPU cycles that this consumes.
For router ACLs, other factors can cause packets to be sent to the CPU:
Using the log keyword
Generating ICMP unreachable messages
When traffic flows are both logged and forwarded, forwarding is done by hardware, but logging must be done by
software. Because of the difference in packet handling capacity between hardware and software, if the sum of all flows
being logged (both permitted flows and denied flows) is of significant bandwidth, not all of the packets that are forwarded
can be logged.
If router ACL configuration cannot be applied in hardware, packets arriving in a VLAN that must be routed are routed in
software, but are bridged in hardware. If ACLs cause large numbers of packets to be sent to the CPU, the switch
performance can be negatively affected.
When you enter the show ip access-lists privileged EXEC command, the match count displayed does not account for
packets that are access controlled in hardware. Use the show access-lists hardware counters privileged EXEC
command to obtain some basic hardware ACL statistics for switched and routed packets.
Troubleshooting ACLs
If this ACL manager message appears, where [chars] is the access-list name, the switch then has insufficient resources
to create a hardware representation of the ACL.
ACLMGR-2-NOVMR: Cannot generate hardware representation of access list [chars]
The resources include hardware memory and label space but not CPU memory. A lack of available logical operation units
or specialized hardware resources causes this problem. Logical operation units are needed for a TCP flag match or a
test other than eq (ne, gt, lt, or range) on TCP, UDP, or SCTP port numbers.
Use one of these workarounds:
590
Configuring Network Security with ACLs
How to Configure Network Security with ACLs
Modify the ACL configuration to use fewer resources.
Rename the ACL with a name or number that alphanumerically precedes the ACL names or numbers.
To determine the specialized hardware resources, enter the show platform layer4 acl map privileged EXEC command.
If the switch does not have available resources, the output shows that index 0 to index 15 are not available.
For more information about configuring ACLs with insufficient resources, see CSCsq63926 in the Bug Toolkit.
Named MAC Extended ACLs
You can filter non-IPv4 traffic on a VLAN or on a Layer 2 interface by using MAC addresses and named MAC extended
ACLs. The procedure is similar to that of configuring other extended named ACLs.
Note: You cannot apply named MAC extended ACLs to Layer 3 interfaces.
Note: Though visible in the command-line help strings, appletalk is not supported as a matching condition for the deny
and permit MAC access-list configuration mode commands.
MAC ACL to a Layer 2 Interface
After you create a MAC ACL, you can apply it to a Layer 2 interface to filter non-IP traffic coming in that interface. When
you apply the MAC ACL, consider these guidelines:
If you apply an ACL to a Layer 2 interface that is a member of a VLAN, the Layer 2 (port) ACL takes precedence over
an input Layer 3 ACL applied to the VLAN interface. Incoming packets received on the Layer 2 port are always filtered
by the port ACL.
You can apply no more than one IP access list and one MAC access list to the same Layer 2 interface. The IP access
list filters only IP packets, and the MAC access list filters non-IP packets.
A Layer 2 interface can have only one MAC access list. If you apply a MAC access list to a Layer 2 interface that has
a MAC ACL configured, the new ACL replaces the previously configured one.
How to Configure Network Security with ACLs
Creating a Numbered Standard ACL
Note: When creating an ACL, remember that, by default, the end of the ACL contains an implicit deny statement for all
packets that it did not find a match for before reaching the end. With standard access lists, if you omit the mask from an
associated IP host address ACL specification, 0.0.0.0 is assumed to be the mask.
591

Configuring Network Security with ACLs
How to Configure Network Security with ACLs
Command
Purpose
1.
configure terminal
Enters global configuration mode.
2.
access-list access-list-number {deny |
Defines a standard IPv4 access list by using a source address and
permit} source [source-wildcard] [log]
wildcard.
Note: Use the no access-list
access-list-number—Specifies a decimal number from 1 to 99 or
access-list-number global configuration
1300 to 1999.
command to delete the entire ACL.
deny or permit—Specifies whether to deny or permit access if
conditions are matched.
source—Specifies the source address of the network or host from
which the packet is being sent specified as:
The 32-bit quantity in dotted-decimal format.
The keyword any as an abbreviation for source and
source-wildcard of 0.0.0.0 255.255.255.255. You do not
need to enter a source-wildcard.
The keyword host as an abbreviation for source and
source-wildcard of source 0.0.0.0.
(Optional) source-wildcard—Applies wildcard bits to the source.
(Optional) log—Causes an informational logging message about
the packet that matches the entry to be sent to the console.
3.
end
Returns to privileged EXEC mode.
4.
show access-lists [number | name]
Show the access list configuration.
5.
copy running-config startup-config
(Optional) Save your entries in the configuration file.
Creating a Numbered Extended ACL
Although standard ACLs use only source addresses for matching, you can use extended ACL source and destination
addresses for matching operations and optional protocol type information for finer granularity of control. When you are
creating ACEs in numbered extended access lists, remember that after you create the ACL, any additions are placed at
the end of the list. You cannot reorder the list or selectively add or remove ACEs from a numbered list.
Some protocols also have specific parameters and keywords that apply to that protocol.
These IP protocols are supported (protocol keywords are in parentheses in bold):
Authentication Header Protocol (ahp), Enhanced Interior Gateway Routing Protocol (eigrp), Encapsulation Security
Payload (esp), generic routing encapsulation (gre), Internet Control Message Protocol (icmp), Internet Group
Management Protocol (igmp), any Interior Protocol (ip), IP in IP tunneling (ipinip), KA9Q NOS-compatible IP over IP
tunneling (nos), Open Shortest Path First routing (ospf), Payload Compression Protocol (pcp), Protocol Independent.
592
Configuring Network Security with ACLs
How to Configure Network Security with ACLs
593

Configuring Network Security with ACLs
How to Configure Network Security with ACLs
Command
Purpose
1.
configure terminal
Enters global configuration mode.
2.
a
access-list access-list-number
Defines an extended IPv4 access list and the access conditions.
{ deny | permit } protocol source
source-wildcard destination
access-list-number — Specifies a decimal number from 100 to 199 or 2000
destination-wildcard
to 2699.
[ precedence precedence ] [ tos tos
deny or permit —Specifies whether to deny or permit the packet if
] [ fragments ] [ log ] [ log-input ]
conditions are matched.
[ time-range time-range-name ]
[ dscp dscp]
protocol —Specifies the name or number of an IP protocol: ahp, eigrp, esp,
gre, icmp, igmp, igrp, ip, ipinip, nos, ospf, pcp, pim, tcp, or udp, or an
Note: If you enter a dscp value, you
integer in the range 0 to 255 representing an IP protocol number. To match
cannot enter tos or precedence. You
any Internet protocol (including ICMP, TCP, and UDP), use the keyword ip.
can enter both a tos and a
precedence value with no dscp
Note: This step includes options for most IP protocols. For additional
specific parameters for TCP, UDP, ICMP, and IGMP, see steps 2b through
2e.
source —The number of the network or host from which the packet is sent.
source-wildcard— Applies wildcard bits to the source.
destination— The network or host number to which the packet is sent.
destination-wildcard— Applies wildcard bits to the destination.
source, source-wildcard, destination, and destination-wildcard can be
specified as:
■The 32-bit quantity in dotted-decimal format.
■The keyword any for 0.0.0.0 255.255.255.255 (any host).
■The keyword host for a single host 0.0.0.0.
The other keywords are optional and have these meanings:
■ precedence —Matches packets with a precedence level specified as a
number from 0 to 7 or by name: routine (0), priority (1), immediate (2), flash
(3), flash-override (4), critical (5), internet (6), network (7).
■ fragments —Checks non-initial fragments.
■ tos —Matches by type of service level, specified by a number from 0 to 15
or a name: normal (0), max-reliability (2), max-throughput (4), min-delay
(8).
■ log —Creates an informational logging message to be sent to the console
about the packet that matches the entry or log-input to include the input
interface in the log entry.
■ time-range —For an explanation of this keyword, see Using Time Ranges
with ACLs.
■ dscp —Matches packets with the DSCP value specified by a number from
0 to 63, or use the question mark (?) to see a list of available values.
594

Configuring Network Security with ACLs
How to Configure Network Security with ACLs
Command
Purpose
or
access-list access-list-number {
In access-list configuration mode, defines an extended IP access list using
deny | permit } protocol any any [
an abbreviation for a source and source wildcard of 0.0.0.0
precedence precedence ] [ tos tos ] [
255.255.255.255 and an abbreviation for a destination and destination
fragments ] [ log ] [log-input] [
wildcard of 0.0.0.0 255.255.255.255. You can use the any keyword in place
time-range time-range-name] [
of source and destination address and wildcard.
dscp dscp]
Creating Named Standard and Extended ACLs
Note: When creating an ACL, remember that, by default, the end of the ACL contains an implicit deny statement for all
packets that it did not find a match for before reaching the end. With standard access lists, if you omit the mask from an
associated IP host address ACL specification, 0.0.0.0 is assumed to be the mask.
<insert tables/steps>
Using Time Ranges with ACLs
Command
Purpose
1.
configure terminal
Enters global configuration mode.
2.
time-range time-range-name
Assigns a meaningful name (for example, workhours) to the time range
to be created, and enters time-range configuration mode. The name
cannot contain a space or quotation mark and must begin with a letter.
3.
absolute [start time date]
Specifies when the function it will be applied to is operational.
[end time date]
You can use only one absolute statement in the time range. If you
or
configure more than one absolute statement, only the one
periodic day-of-the-week hh:mm to
configured last is executed.
[day-of-the-week] hh:mm
You can enter multiple periodic statements. For example, you could
or
configure different hours for weekdays and weekends.
periodic {weekdays | weekend | daily}
hh:mm to hh:mm
See the example configurations.
4.
end
Returns to privileged EXEC mode.
Applying an IPv4 ACL to a Terminal Line
This task restricts incoming and outgoing connections between a virtual terminal line and the addresses in an ACL:
595

Configuring Network Security with ACLs
How to Configure Network Security with ACLs
Command
Purpose
1.
configure terminal
Enters global configuration mode.
2.
line [console | vty] line-number
Identifies a specific line to configure, and enters in-line configuration mode.
console—Specifies the console terminal line. The console port is DCE.
vty—Specifies a virtual terminal for remote console access.
The line-number is the first line number in a contiguous group that you want
to configure when the line type is specified. The range is from 0 to 16.
3.
access-class access-list-number
Restricts incoming and outgoing connections between a particular virtual
{in | out}
terminal line (into a device) and the addresses in an access list.
4.
end
Returns to privileged EXEC mode.
Applying an IPv4 ACL to an Interface
Command
Purpose
1.
configure terminal
Enters global configuration mode.
2.
interface interface-id
Identifies a specific interface for configuration, and enters interface
configuration mode.
The interface is a Layer 2 interface (port ACL).
3.
ip access-group {access-list-number
Controls access to the specified interface.
| name} {in | out}
The out keyword is not supported for Layer 2 interfaces (port ACLs).
4.
end
Returns to privileged EXEC mode.
596

Configuring Network Security with ACLs
How to Configure Network Security with ACLs
Creating Named MAC Extended ACLs
Command
Purpose
1.
configure terminal
Enters global configuration mode.
2.
mac access-list extended name
Defines an extended MAC access list using a name.
3.
{deny | permit} {any | host source MAC
In extended MAC access-list configuration mode, specifies to
address | source MAC address mask} {any |
permit or deny any source MAC address, a source MAC address
host destination MAC address | destination
with a mask, or a specific host source MAC address and any
MAC address mask} [type mask | lsap lsap
destination MAC address, destination MAC address with a mask,
mask | aarp | amber | dec-spanning |
or a specific destination MAC address.
decnet-iv | diagnostic | dsm | etype-6000 |
etype-8042 | lat | lavc-sca | mop-console |
(Optional) You can also enter these options:
mop-dump | msdos | mumps | netbios |
type mask—Specifies an arbitrary EtherType number of a
vines-echo |vines-ip | xns-idp | 0-65535]
packet with Ethernet II or SNAP encapsulation in decimal,
[cos cos]
hexadecimal, or octal with optional mask of don’t care bits
applied to the EtherType before testing for a match.
lsap lsap mask—Specifies an LSAP number of a packet with
IEEE 802.2 encapsulation in decimal, hexadecimal, or octal
with optional mask of don’t care bits.
aarp | amber | dec-spanning | decnet-iv | diagnostic | dsm
| etype-6000 | etype-8042 | lat | lavc-sca | mop-console |
mop-dump | msdos | mumps | netbios | vines-echo
|vines-ip | xns-idp—Specifies a non-IP protocol.
cos cos—Specifies an IEEE 802.1Q cost of service number
from 0 to 7 used to set priority.
4.
end
Returns to privileged EXEC mode.
Applying a MAC ACL to a Layer 2 Interface
Command
Purpose
1.
configure terminal
Enters global configuration mode.
2.
interface interface-id
Identifies a specific interface, and enters interface configuration
mode. The interface must be a physical Layer 2 interface (port
ACL).
3.
mac access-group {name} {in}
Controls access to the specified interface by using the MAC
access list.
Port ACLs are supported only in the inbound direction.
4.
end
Returns to privileged EXEC mode.
597

Configuring Network Security with ACLs
Monitoring and Maintaining Network Security with ACLs
Monitoring and Maintaining Network Security with ACLs
Command
Purpose
show access-lists [number | name]
Displays the contents of one or all current IP and MAC address access
lists or a specific access list (numbered or named).
show ip access-lists [number | name]
Displays the contents of all current IP access lists or a specific IP access
list (numbered or named).
show ip interface interface-id
Displays detailed configuration and status of an interface. If IP is enabled
on the interface and ACLs have been applied by using the ip
access-group interface configuration command, the access groups are
included in the display.
show running-config [interface interface-id]
Displays the contents of the configuration file for the switch or the
specified interface, including all configured MAC and IP access lists and
which access groups are applied to an interface.
show mac access-group [interface
Displays MAC access lists applied to all Layer 2 interfaces or the specified
interface-id]
Layer 2 interface.
show access-lists [number | name]
Displays the access list configuration.
show time-range
Verifies the time-range configuration.
show mac access-group [interface
Displays the MAC access list applied to the interface or all Layer 2
interface-id]
interfaces.
Configuration Examples for Network Security with ACLs
Creating a Standard ACL: Example
This example shows how to create a standard ACL to deny access to IP host 171.69.198.102, permit access to any
others, and display the results.
Switch (config)# access-list 2 deny host 171.69.198.102
Switch (config)# access-list 2 permit any
Switch(config)# end
Switch# show access-lists
Standard IP access list 2
10 deny
171.69.198.102
20 permit any
Creating an Extended ACL: Example
This example shows how to create and display an extended access list to deny Telnet access from any host in network
171.69.198.0 to any host in network 172.20.52.0 and to permit any others. (The eq keyword after the destination address
means to test for the TCP destination port number equaling Telnet.)
Switch(config)# access-list 102 deny tcp 171.69.198.0 0.0.0.255 172.20.52.0 0.0.0.255 eq telnet
Switch(config)# access-list 102 permit tcp any any
Switch(config)# end
Switch# show access-lists
Extended IP access list 102
10 deny tcp 171.69.198.0 0.0.0.255 172.20.52.0 0.0.0.255 eq telnet
20 permit tcp any any
598
Configuring Network Security with ACLs
Configuration Examples for Network Security with ACLs
Configuring Time Ranges: Examples
This example shows how to configure time ranges for workhours and to configure January 1, 2006, as a company holiday
and to verify your configuration.
Switch(config)# time-range workhours
Switch(config-time-range)# periodic weekdays 8:00 to 12:00
Switch(config-time-range)# periodic weekdays 13:00 to 17:00
Switch(config-time-range)# exit
Switch(config)# time-range new_year_day_2006
Switch(config-time-range)# absolute start 00:00 1 Jan 2006 end 23:59 1 Jan 2006
Switch(config-time-range)# end
Switch# show time-range
time-range entry: new_year_day_2003 (inactive)
absolute start 00:00 01 January 2006 end 23:59 01 January 2006
time-range entry: workhours (inactive)
periodic weekdays 8:00 to 12:00
periodic weekdays 13:00 to 17:00
To apply a time range, enter the time-range name in an extended ACL that can implement time ranges. This example
shows how to create and verify extended access list 188 that denies TCP traffic from any source to any destination during
the defined holiday times and permits all TCP traffic during work hours.
Switch(config)# access-list 188 deny tcp any any time-range new_year_day_2006
Switch(config)# access-list 188 permit tcp any any time-range workhours
Switch(config)# end
Switch# show access-lists
Extended IP access list 188
10 deny tcp any any time-range new_year_day_2006 (inactive)
20 permit tcp any any time-range workhours (inactive)
Using Named ACLs: Example
This example uses named ACLs to permit and deny the same traffic.
Switch(config)# ip access-list extended deny_access
Switch(config-ext-nacl)# deny tcp any any time-range new_year_day_2006
Switch(config-ext-nacl)# exit
Switch(config)# ip access-list extended may_access
Switch(config-ext-nacl)# permit tcp any any time-range workhours
Switch(config-ext-nacl)# end
Switch# show ip access-lists
Extended IP access list lpip_default
10 permit ip any any
Extended IP access list deny_access
10 deny tcp any any time-range new_year_day_2006 (inactive)
Extended IP access list may_access
10 permit tcp any any time-range workhours (inactive)
Including Comments in ACLs: Examples
In this example, the workstation that belongs to Jones is allowed access, and the workstation that belongs to Smith is
not allowed access:
Switch(config)# access-list 1 remark Permit only Jones workstation through
Switch(config)# access-list 1 permit 171.69.2.88
Switch(config)# access-list 1 remark Do not allow Smith through
Switch(config)# access-list 1 deny 171.69.3.13
599
Configuring Network Security with ACLs
Configuration Examples for Network Security with ACLs
For an entry in a named IP ACL, use the remark access-list configuration command. To remove the remark, use the no
form of this command.
In this example, the Jones subnet is not allowed to use outbound Telnet:
Switch(config)# ip access-list extended telnetting
Switch(config-ext-nacl)# remark Do not allow Jones subnet to telnet out
Switch(config-ext-nacl)# deny tcp host 171.69.2.88 any eq telnet
Applying ACL to a Port: Example
This example shows how to apply access list 2 to a port to filter packets entering the port:
Switch(config)# interface GigabitEthernet1/17
Switch(config-if)# ip access-group 2 in
Applying an ACL to an Interface: Example
For example, if you apply this ACL to an interface:
permit tcp source source-wildcard destination destination-wildcard range 5 60
permit tcp source source-wildcard destination destination-wildcard range 15 160
permit tcp source source-wildcard destination destination-wildcard range 115 1660
permit tcp source source-wildcard destination destination-wildcard
And if this message appears:
ACLMGR-2-NOVMR: Cannot generate hardware representation of access list [chars]
The flag-related operators are not available. To avoid this issue,
Move the fourth ACE before the first ACE by using ip access-list resequence global configuration command:
permit tcp source source-wildcard destination destination-wildcard
permit tcp source source-wildcard destination destination-wildcard range 5 60
permit tcp source source-wildcard destination destination-wildcard range 15 160
permit tcp source source-wildcard destination destination-wildcard range 115 1660
or
Rename the ACL with a name or number that alphanumerically precedes the other ACLs (for example, rename ACL
79 to ACL 1).
You can now apply the first ACE in the ACL to the interface. The switch allocates the ACE to available mapping bits in
the Opselect index and then allocates flag-related operators to use the same bits in the TCAM.
Router ACLs function as follows:
The hardware controls permit and deny actions of standard and extended ACLs (input and output) for security
access control.
If log has not been specified, the flows that match a deny statement in a security ACL are dropped by the hardware
if ip unreachables is disabled. The flows matching a permit statement are switched in hardware.
Adding the log keyword to an ACE in a router ACL causes a copy of the packet to be sent to the CPU for logging
only. If the ACE is a permit statement, the packet is still switched and routed in hardware.
600
Configuring Network Security with ACLs
Configuration Examples for Network Security with ACLs
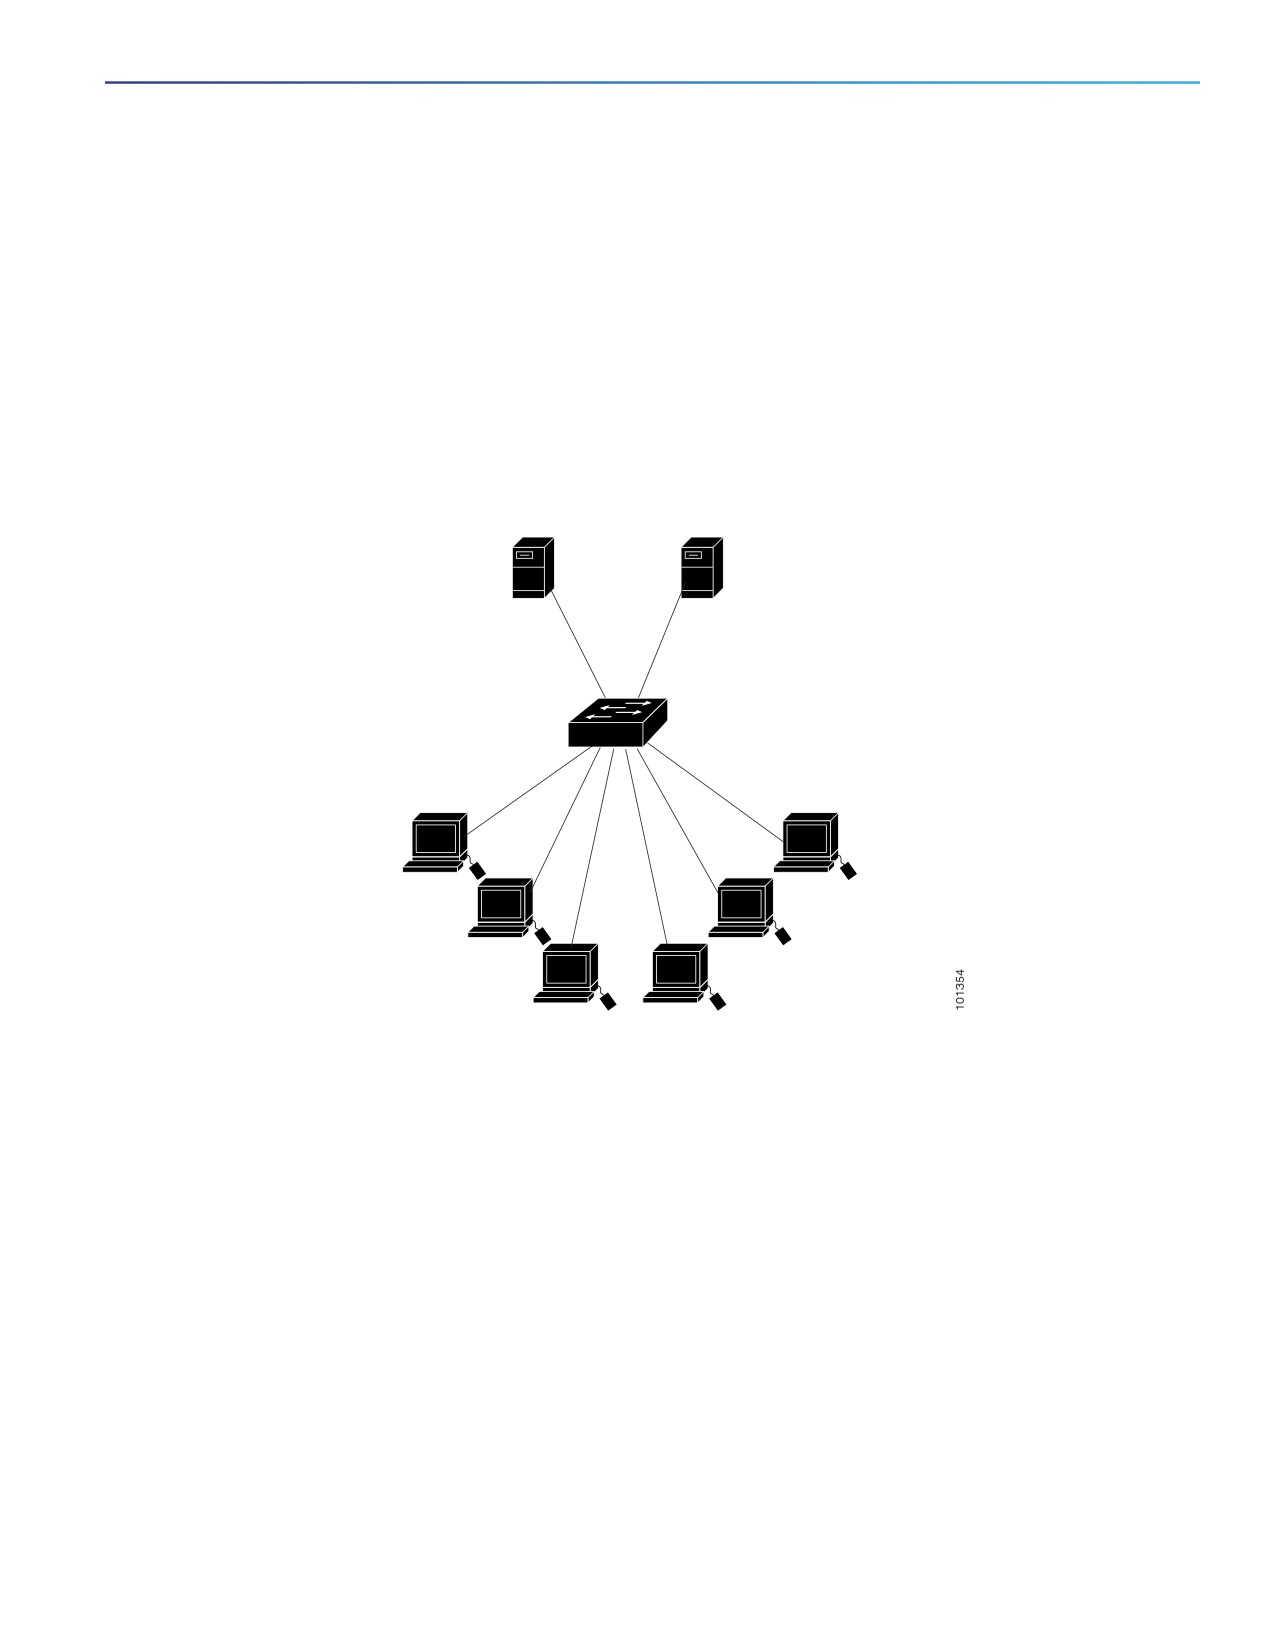
Routed ACLs: Examples
Figure 76 on page 601 shows a small networked office environment with routed Port 2 connected to Server A, containing
benefits and other information that all employees can access, and routed Port 1 connected to Server B, containing
confidential payroll data. All users can access Server A, but Server B has restricted access.
Use router ACLs to do this in one of two ways:
Create a standard ACL, and filter traffic coming to the server from Port 1.
Create an extended ACL, and filter traffic coming from the server into Port 1.
Figure 76
Using Router ACLs to Control Traffic
Server A
Server B
Benefits
Payroll
Port 2
Port 1
Human Resources
Accounting
172.20.128.0-31
172.20.128.64-95
This example uses a standard ACL to filter traffic coming into Server B from a port, permitting traffic only from
Accounting’s source addresses 172.20.128.64 to 172.20.128.95. The ACL is applied to traffic coming out of routed Port
1 from the specified source address.
Switch(config)# access-list 6 permit 172.20.128.64 0.0.0.31
Switch(config)# end
Switch# show access-lists
Standard IP access list 6
permit 172.20.128.64, wildcard bits 0.0.0.31
Switch(config)# interface GigabitEthernet1/17
Switch(config-if)# ip access-group 6 out
This example uses an extended ACL to filter traffic coming from Server B into a port, permitting traffic from any source
address (in this case Server B) to only the Accounting destination addresses 172.20.128.64 to 172.20.128.95. The ACL
is applied to traffic going into routed Port 1, permitting it to go only to the specified destination addresses. Note that with
extended ACLs, you must enter the protocol (IP) before the source and destination information.
Switch(config)# access-list 106 permit ip any 172.20.128.64 0.0.0.31
Switch(config)# end
Switch# show access-lists
Extended IP access list 106
601
Configuring Network Security with ACLs
Configuration Examples for Network Security with ACLs
permit ip any 172.20.128.64 0.0.0.31
Switch(config)# interface GigabitEthernet1/17
Switch(config-if)# ip access-group 106 in
Configuring Numbered ACLs: Example
In this example, network 36.0.0.0 is a Class A network whose second octet specifies a subnet; that is, its subnet mask
is 255.255.0.0. The third and fourth octets of a network 36.0.0.0 address specify a particular host. Using access list 2,
the switch accepts one address on subnet 48 and reject all others on that subnet. The last line of the list shows that the
switch accepts addresses on all other network 36.0.0.0 subnets. The ACL is applied to packets entering a port.
Switch(config)# access-list 2 permit 36.48.0.3
Switch(config)# access-list 2 deny 36.48.0.0 0.0.255.255
Switch(config)# access-list 2 permit 36.0.0.0 0.255.255.255
Switch(config)# interface GigabitEthernet1/17
Switch(config-if)# ip access-group 2 in
Configuring Extended ACLs: Examples
In this example, the first line permits any incoming TCP connections with destination ports greater than 1023. The second
line permits incoming TCP connections to the Simple Mail Transfer Protocol (SMTP) port of host 128.88.1.2. The third
line permits incoming ICMP messages for error feedback.
Switch(config)# access-list 102 permit tcp any 128.88.0.0 0.0.255.255 gt 1023
Switch(config)# access-list 102 permit tcp any host 128.88.1.2 eq 25
Switch(config)# access-list 102 permit icmp any any
Switch(config)# interface GigabitEthernet1/17
Switch(config-if)# ip access-group 102 in
In this example, suppose that you have a network connected to the Internet, and you want any host on the network to be
able to form TCP connections to any host on the Internet. However, you do not want IP hosts to be able to form TCP
connections to hosts on your network, except to the mail (SMTP) port of a dedicated mail host.
SMTP uses TCP port 25 on one end of the connection and a random port number on the other end. The same port
numbers are used throughout the life of the connection. Mail packets coming in from the Internet have a destination port
of 25. Outbound packets have the port numbers reversed. Because the secure system of the network always accepts
mail connections on port 25, the incoming and outgoing services are separately controlled. The ACL must be configured
as an input ACL on the outbound interface and an output ACL on the inbound interface.
In this example, the network is a Class B network with the address 128.88.0.0, and the mail host address is 128.88.1.2.
The established keyword is used only for the TCP to show an established connection. A match occurs if the TCP
datagram has the ACK or RST bits set, which show that the packet belongs to an existing connection. Gigabit Ethernet
interface 1 is the interface that connects the router to the Internet.
Switch(config)# access-list 102 permit tcp any 128.88.0.0 0.0.255.255 established
Switch(config)# access-list 102 permit tcp any host 128.88.1.2 eq 25
Switch(config)# interface GigabitEthernet1/17
Switch(config-if)# ip access-group 102 in
Creating Named ACLs: Example
This example creates a standard ACL named Internet_filter and an extended ACL named marketing_group. The
Internet_filter ACL allows all traffic from the source address 1.2.3.4.
Switch(config)# ip access-list standard Internet_filter
Switch(config-ext-nacl)# permit 1.2.3.4
Switch(config-ext-nacl)# exit
602
Configuring Network Security with ACLs
Configuration Examples for Network Security with ACLs
The marketing_group ACL allows any TCP Telnet traffic to the destination address and wildcard 171.69.0.0 0.0.255.255
and denies any other TCP traffic. It permits ICMP traffic, denies UDP traffic from any source to the destination address
range 171.69.0.0 through 179.69.255.255 with a destination port less than 1024, denies any other IP traffic, and
provides a log of the result.
Switch(config)# ip access-list extended marketing_group
Switch(config-ext-nacl)# permit tcp any 171.69.0.0 0.0.255.255 eq telnet
Switch(config-ext-nacl)# deny tcp any any
Switch(config-ext-nacl)# permit icmp any any
Switch(config-ext-nacl)# deny udp any 171.69.0.0 0.0.255.255 lt 1024
Switch(config-ext-nacl)# deny ip any any log
Switch(config-ext-nacl)# exit
The Internet_filter ACL is applied to outgoing traffic and the marketing_group ACL is applied to incoming traffic on a
Layer 3 port.
Switch(config)# interface GigabitEthernet1/17
Switch(config-if)# no switchport
Switch(config-if)# ip address 2.0.5.1 255.255.255.0
Switch(config-if)# ip access-group Internet_filter out
Switch(config-if)# ip access-group marketing_group in
Applying Time Range to an IP ACL: Example
This example denies HTTP traffic on IP on Monday through Friday between the hours of 8:00 a.m. and 6:00 p.m (18:00).
The example allows UDP traffic only on Saturday and Sunday from noon to 8:00 p.m. (20:00).
Switch(config)# time-range no-http
Switch(config)# periodic weekdays 8:00 to 18:00
!
Switch(config)# time-range udp-yes
Switch(config)# periodic weekend 12:00 to 20:00
!
Switch(config)# ip access-list extended strict
Switch(config-ext-nacl)# deny tcp any any eq www time-range no-http
Switch(config-ext-nacl)# permit udp any any time-range udp-yes
!
Switch(config-ext-nacl)# exit
Switch(config)# interface GigabitEthernet1/17
Switch(config-if)# ip access-group strict in
Creating Commented IP ACL Entries: Examples
In this example of a numbered ACL, the workstation that belongs to Jones is allowed access, and the workstation that
belongs to Smith is not allowed access:
Switch(config)# access-list 1 remark Permit only Jones workstation through
Switch(config)# access-list 1 permit 171.69.2.88
Switch(config)# access-list 1 remark Do not allow Smith workstation through
Switch(config)# access-list 1 deny 171.69.3.13
In this example of a numbered ACL, the Winter and Smith workstations are not allowed to browse the web:
Switch(config)# access-list 100 remark Do not allow Winter to browse the web
Switch(config)# access-list 100 deny host 171.69.3.85 any eq www
Switch(config)# access-list 100 remark Do not allow Smith to browse the web
Switch(config)# access-list 100 deny host 171.69.3.13 any eq www
In this example of a named ACL, the Jones subnet is not allowed access:
Switch(config)# ip access-list standard prevention
603
Configuring Network Security with ACLs
Configuration Examples for Network Security with ACLs
Switch(config-std-nacl)# remark Do not allow Jones subnet through
Switch(config-std-nacl)# deny 171.69.0.0 0.0.255.255
In this example of a named ACL, the Jones subnet is not allowed to use outbound Telnet:
Switch(config)# ip access-list extended telnetting
Switch(config-ext-nacl)# remark Do not allow Jones subnet to telnet out
Switch(config-ext-nacl)# deny tcp 171.69.0.0 0.0.255.255 any eq telnet
Configuring ACL Logging: Examples
Two variations of logging are supported on router ACLs. The log keyword sends an informational logging message to the
console about the packet that matches the entry; the log-input keyword includes the input interface in the log entry.
In this example, standard named access list stan1 denies traffic from 10.1.1.0 0.0.0.255, allows traffic from all other
sources, and includes the log keyword.
Switch(config)# ip access-list standard stan1
Switch(config-std-nacl)# deny 10.1.1.0 0.0.0.255 log
Switch(config-std-nacl)# permit any log
Switch(config-std-nacl)# exit
Switch(config)# interface GigabitEthernet1/17
Switch(config-if)# ip access-group stan1 in
Switch(config-if)# end
Switch# show logging
Syslog logging: enabled (0 messages dropped, 0 flushes, 0 overruns)
Console logging: level debugging, 37 messages logged
Monitor logging: level debugging, 0 messages logged
Buffer logging: level debugging, 37 messages logged
File logging: disabled
Trap logging: level debugging, 39 message lines logged
Log Buffer (4096 bytes):
00:00:48: NTP: authentication delay calculation problems
<output truncated>
00:09:34:%SEC-6-IPACCESSLOGS:list stan1 permitted 0.0.0.0 1 packet
00:09:59:%SEC-6-IPACCESSLOGS:list stan1 denied 10.1.1.15 1 packet
00:10:11:%SEC-6-IPACCESSLOGS:list stan1 permitted 0.0.0.0 1 packet
This example is a named extended access list ext1 that permits ICMP packets from any source to 10.1.1.0 0.0.0.255
and denies all UDP packets.
Switch(config)# ip access-list extended ext1
Switch(config-ext-nacl)# permit icmp any 10.1.1.0 0.0.0.255 log
Switch(config-ext-nacl)# deny udp any any log
Switch(config-std-nacl)# exit
Switch(config)# interface GigabitEthernet1/17
Switch(config-if)# ip access-group ext1 in
Applying a MAC ACL to a Layer 2 Interface: Examples
This example shows how to create and display an access list named mac1, denying only EtherType DECnet Phase IV
traffic, but permitting all other types of traffic.
Switch(config)# mac access-list extended mac1
Switch(config-ext-macl)# deny any any decnet-iv
Switch(config-ext-macl)# permit any any
Switch(config-ext-macl)# end
604
Configuring Network Security with ACLs
Configuring VLAN Maps with ACLs
Switch # show access-lists
Extended MAC access list mac1
10 deny
any any decnet-iv
20 permit any any
This example shows how to apply MAC access list mac1 to a port to filter packets entering the port:
Switch(config)# interface GigabitEthernet1/17
Switch(config-if)# mac access-group mac1 in
Note: The mac access-group interface configuration command is only valid when applied to a physical Layer 2
interface.You cannot use the command on EtherChannel port channels.
After receiving a packet, the switch checks it against the inbound ACL. If the ACL permits it, the switch continues to
process the packet. If the ACL rejects the packet, the switch discards it. When you apply an undefined ACL to an
interface, the switch acts as if the ACL has not been applied and permits all packets. Remember this behavior if you use
undefined ACLs for network security.
Configuring VLAN Maps with ACLs
This section describes how to configure VLAN maps, which is the only way to control filtering within a VLAN. VLAN maps
have no direction.
To filter traffic in a specific direction by using a VLAN map, you need to include an ACL with specific source or destination
addresses. If there is a match clause for that type of packet (IP or MAC) in the VLAN map, the default action is to drop
the packet if the packet does not match any of the entries within the map. If there is no match clause for that type of
packet, the default is to forward the packet.
For complete syntax and usage information for the commands used in this section, see the command reference for this
release.
To create a VLAN map and apply it to one or more VLANs, perform these steps:
1. Create the standard or extended IPv4 ACLs or named MAC extended ACLs that you want to apply to the VLAN.
See the "Creating Standard and Extended IPv4 ACLs" section and the "Creating a VLAN Map" section.
2. Enter the vlan access-map global configuration command to create a VLAN ACL map entry.
3. In access-map configuration mode, optionally enter an action—forward (the default) or drop—and enter the match
command to specify an IP packet or a non-IP packet (with only a known MAC address) and to match the packet
against one or more ACLs (standard or extended).
Note: If the VLAN map is configured with a match clause for a type of packet (IP or MAC) and the map action is
drop, all packets that match the type are dropped. If the VLAN map has no match clause, and the configured action
is drop, all IP and Layer 2 packets are dropped.
4. Use the vlan filter global configuration command to apply a VLAN map to one or more VLANs.
VLAN Map Configuration Guidelines
Follow these guidelines when configuring VLAN maps:
If there is no ACL configured to deny traffic on an interface and no VLAN map is configured, all traffic is permitted.
Each VLAN map consists of a series of entries. The order of entries in an VLAN map is important. A packet that
comes into the switch is tested against the first entry in the VLAN map. If it matches, the action specified for that
part of the VLAN map is taken. If there is no match, the packet is tested against the next entry in the map.
605

Configuring Network Security with ACLs
Configuring VLAN Maps with ACLs
If the VLAN map has at least one match clause for the type of packet (IP or MAC) and the packet does not match
any of these match clauses, the default is to drop the packet. If there is no match clause for that type of packet in
the VLAN map, the default is to forward the packet.
The system might take longer to boot up if you have configured a very large number of ACLs.
Logging is not supported for VLAN maps.
When a switch has an IP access list or MAC access list applied to a Layer 2 interface, and you apply a VLAN map to
a VLAN that the port belongs to, the port ACL takes precedence over the VLAN map.
If VLAN map configuration cannot be applied in hardware, all packets in that VLAN must be bridged and routed by
software.
You can configure VLAN maps on primary and secondary VLANs. However, we recommend that you configure the
same VLAN maps on private-VLAN primary and secondary VLANs.
When a frame is Layer-2 forwarded within a private VLAN, the same VLAN map is applied at the ingress side and at
the egress side. When a frame is routed from inside a private VLAN to an external port, the private-VLAN map is
applied at the ingress side.
— For frames going upstream from a host port to a promiscuous port, the VLAN map configured on the secondary
VLAN is applied.
— For frames going downstream from a promiscuous port to a host port, the VLAN map configured on the primary
VLAN is applied.
To filter out specific IP traffic for a private VLAN, you should apply the VLAN map to both the primary and secondary
VLANs. For more information about private VLANs, see Chapter 19 "Configuring Private VLANs."
For configuration examples, see the "Using VLAN Maps in Your Network" section.
For information about using both router ACLs and VLAN maps, see the "VLAN Maps and Router ACL Configuration
Guidelines" section.
Creating a VLAN Map
Each VLAN map consists of an ordered series of entries. Beginning in privileged EXEC mode, follow these steps to create,
add to, or delete a VLAN map entry:
Command
Purpose
Step 1
configure terminal
Enter global configuration mode.
Step 2
vlan access-map
Create a VLAN map, and give it a name and (optionally) a number. The
name [number]
number is the sequence number of the entry within the map.
When you create VLAN maps with the same name, numbers are assigned
sequentially in increments of 10. When modifying or deleting maps, you
can enter the number of the map entry that you want to modify or delete.
Entering this command changes to access-map configuration mode.
Step 3
action {drop | forward}
(Optional) Set the action for the map entry. The default is to forward.
Step 4
match {ip | mac} address
Match the packet (using either the IP or MAC address) against one or more
{name | number} [name |
standard or extended access lists. Note that packets are only matched
number]
against access lists of the correct protocol type. IP packets are matched
against standard or extended IP access lists. Non-IP packets are only
matched against named MAC extended access lists.
606