Cisco Industrial Ethernet 4000, 4010 and 5000 Switch Software. Configuration Guide (2022) - page 17
Configuring DHCP
Additional References
hostname switch
!
no aaa new-model
clock timezone EST 0
ip subnet-zero
ip dhcp relay information policy removal pad
no ip dhcp use vrf connected
ip dhcp use subscriber-id client-id
ip dhcp subscriber-id interface-name
ip dhcp excluded-address 10.1.1.1 10.1.1.3
!
ip dhcp pool dhcppool
network 10.1.1.0 255.255.255.0
address 10.1.1.7 client-id “Et1/0” ascii
<output truncated>
This example shows that the preassigned address was correctly reserved in the DHCP pool:
switch# show ip dhcp pool dhcppool
Pool dhcp pool:
Utilization mark (high/low) : 100 / 0
Subnet size (first/next) : 0 / 0
Total addresses : 254
Leased addresses : 0
Excluded addresses : 4
Pending event : none
1 subnet is currently in the pool:
Current index
IP address range
Leased/Excluded/Total
10.1.1.1
10.1.1.1 - 10.1.1.254
0
/ 4 / 254
1 reserved address is currently in the pool
Address
Client
10.1.1.7 Et1/0
Enabling DHCP Snooping: Example
This example shows how to enable DHCP snooping globally and on VLAN 10 and to configure a rate limit of 100 packets
per second on a port:
Switch(config)# ip dhcp snooping
Switch(config)# ip dhcp snooping vlan 10
Switch(config)# ip dhcp snooping information option
Switch(config)# interface GigabitEthernet1/17
Switch(config-if)# ip dhcp snooping limit rate 100
Additional References
The following sections provide references related to switch administration:
426

Configuring DHCP
Additional References
Related Documents
Related Topic
Document Title
Cisco IOS basic commands
Cisco IOS Configuration Fundamentals Command Reference
Cisco IOS DHCP Commands
Cisco IOS IP Command Reference, Volume 1 of 3: Addressing and
Services
Cisco IOS DHCP Configuration
“IP Addressing and Services” chapter of the Cisco IOS IP
Configuration Guide
Cisco IOS DHCP server port-based address allocation
Cisco IOS DHCP Configuration Task List
“Configuring DHCP” chapter of the Cisco IOS IP Configuration
Guide
Standards
Standards
Title
No new or modified standards are supported by this
—
feature, and support for existing standards has not
been modified by this feature.
MIBs
MIBs
MIBs Link
—
To locate and download MIBs using Cisco IOS XR software, use the
Cisco MIB Locator found at the following URL and choose a platform
under the Cisco Access Products menu:
RFCs
RFCs
Title
No new or modified RFCs are supported by this
—
feature, and support for existing RFCs has not been
modified by this feature.
427
Configuring DHCP
Additional References
428

Configuring Dynamic ARP Inspection
Prerequisites for Dynamic ARP Inspection
Dynamic Address Resolution Protocol (ARP) inspection depends on the entries in the DHCP snooping binding
database to verify IP-to-MAC address bindings in incoming ARP requests and ARP responses. Make sure to enable
DHCP snooping to permit ARP packets that have dynamically assigned IP addresses.
Restrictions for Dynamic ARP Inspection
To use this feature, the switch must be running the LAN Base image.
Information About Dynamic ARP Inspection
Dynamic ARP Inspection
Dynamic ARP inspection (DAI) helps prevent malicious attacks on the switch by not relaying invalid ARP requests and
responses to other ports in the same VLAN.
ARP provides IP communication within a Layer 2 broadcast domain by mapping an IP address to a MAC address. For
example, Host B wants to send information to Host A but does not have the MAC address of Host A in its ARP cache.
Host B generates a broadcast message for all hosts within the broadcast domain to obtain the MAC address associated
with the IP address of Host A. All hosts within the broadcast domain receive the ARP request, and Host A responds with
its MAC address. However, because ARP allows a gratuitous reply from a host even if an ARP request was not received,
an ARP spoofing attack and the poisoning of ARP caches can occur. After the attack, all traffic from the device under
attack flows through the attacker’s computer and then to the router, switch, or host.
A malicious user can attack hosts, switches, and routers connected to your Layer 2 network by poisoning the ARP caches
of systems connected to the subnet and by intercepting traffic intended for other hosts on the subnet. Figure 63 on
page 429 shows an example of ARP cache poisoning.
Figure 63
ARP Cache Poisoning
A
B
Host A
Host B
(IA, MA)
(IB, MB)
C
Host C (man-in-the-middle)
(IC, MC)
Hosts A, B, and C are connected to the switch on interfaces A, B and C, all of which are on the same subnet. Their IP
and MAC addresses are shown in parentheses; for example, Host A uses IP address IA and MAC address MA. When
Host A needs to communicate to Host B at the IP layer, it broadcasts an ARP request for the MAC address associated
with IP address IB. When the switch and Host B receive the ARP request, they populate their ARP caches with an ARP
429
Configuring Dynamic ARP Inspection
Information About Dynamic ARP Inspection
binding for a host with the IP address IA and a MAC address MA; for example, IP address IA is bound to MAC address
MA. When Host B responds, the switch and Host A populate their ARP caches with a binding for a host with the IP
address IB and the MAC address MB.
Host C can poison the ARP caches of the switch, Host A, and Host B by broadcasting forged ARP responses with
bindings for a host with an IP address of IA (or IB) and a MAC address of MC. Hosts with poisoned ARP caches use the
MAC address MC as the destination MAC address for traffic intended for IA or IB. This means that Host C intercepts that
traffic. Because Host C knows the true MAC addresses associated with IA and IB, it can forward the intercepted traffic
to those hosts by using the correct MAC address as the destination. Host C has inserted itself into the traffic stream from
Host A to Host B, the classic man-in-the middle attack.
DAI is a security feature that validates ARP packets in a network. It intercepts, logs, and discards ARP packets with invalid
IP-to-MAC address bindings. This capability protects the network from certain man-in-the-middle attacks.
DAI ensures that only valid ARP requests and responses are relayed. The switch performs these activities:
Intercepts all ARP requests and responses on untrusted ports
Verifies that each of these intercepted packets has a valid IP-to-MAC address binding before updating the local ARP
cache or before forwarding the packet to the appropriate destination
Drops invalid ARP packets
DAI determines the validity of an ARP packet based on valid IP-to-MAC address bindings stored in a trusted database,
the DHCP snooping binding database. This database is built by DHCP snooping if DHCP snooping is enabled on the
VLANs and on the switch. If the ARP packet is received on a trusted interface, the switch forwards the packet without
any checks. On untrusted interfaces, the switch forwards the packet only if it is valid.
Interface Trust States and Network Security
DAI associates a trust state with each interface on the switch. Packets arriving on trusted interfaces bypass all DAI
validation checks, and those arriving on untrusted interfaces undergo the DAI validation process.
In a typical network configuration, you configure all switch ports connected to host ports as untrusted and configure all
switch ports connected to switches as trusted. With this configuration, all ARP packets entering the network from a given
switch bypass the security check. No other validation is needed at any other place in the VLAN or in the network. You
configure the trust setting by using the ip arp inspection trust interface configuration command.
Caution: Use the trust state configuration carefully. Configuring interfaces as untrusted when they should be
trusted can result in a loss of connectivity.
In Figure 64 on page 431, assume that both Switch A and Switch B are running DAI on the VLAN that includes Host 1
and Host 2. If Host 1 and Host 2 acquire their IP addresses from the DHCP server connected to Switch A, only Switch A
binds the IP-to-MAC address of Host 1. Therefore, if the interface between Switch A and Switch B is untrusted, the ARP
packets from Host 1 are dropped by Switch B. Connectivity between Host 1 and Host 2 is lost.
430

Configuring Dynamic ARP Inspection
Information About Dynamic ARP Inspection
Figure 64
ARP Packet Validation on a VLAN Enabled for DAI
DHCP server
Switch A
Switch B
Port 1
Port 3
Host 1
Host 2
Configuring interfaces to be trusted when they are actually untrusted leaves a security hole in the network. If Switch A is
not running DAI, Host 1 can easily poison the ARP cache of Switch B (and Host 2, if the link between the switches is
configured as trusted). This condition can occur even though Switch B is running DAI.
DAI ensures that hosts (on untrusted interfaces) connected to a switch running DAI do not poison the ARP caches of
other hosts in the network. However, DAI does not prevent hosts in other portions of the network from poisoning the
caches of the hosts that are connected to a switch running DAI.
If some switches in a VLAN run DAI and other switches do not, configure the interfaces connecting these switches as
untrusted. However, to validate the bindings of packets from non-DAI switches, configure the switch running DAI with
ARP ACLs. When you cannot determine the bindings, at Layer 3 isolate switches running DAI from switches not running
DAI switches.
Note: Depending on the setup of the DHCP server and the network, it might not be possible to validate a given ARP
packet on all switches in the VLAN.
Rate Limiting of ARP Packets
The switch CPU performs DAI validation checks; therefore, the number of incoming ARP packets is rate-limited to
prevent a denial-of-service attack. By default, the rate for untrusted interfaces is 15 packets per second (pps). Trusted
interfaces are not rate-limited. You can change this setting by using the ip arp inspection limit interface configuration
command.
When the rate of incoming ARP packets exceeds the configured limit, the switch places the port in the error-disabled
state. The port remains in that state until you intervene. You can use the errdisable recovery global configuration
command to enable error-disable recovery so that ports automatically emerge from this state after a specified timeout
period.
Note: Unless you configure a rate limit on an interface, changing the trust state of the interface also changes its rate limit
to the default value for that trust state. After you configure the rate limit, the interface retains the rate limit even when its
trust state is changed. If you enter the no ip arp inspection limit interface configuration command, the interface reverts
to its default rate limit.
Relative Priority of ARP ACLs and DHCP Snooping Entries
DAI uses the DHCP snooping binding database for the list of valid IP-to-MAC address bindings.
431

Configuring Dynamic ARP Inspection
Information About Dynamic ARP Inspection
ARP ACLs take precedence over entries in the DHCP snooping binding database. The switch uses ACLs only if you
configure them by using the ip arp inspection filter vlan global configuration command. The switch first compares ARP
packets to user-configured ARP ACLs. If the ARP ACL denies the ARP packet, the switch also denies the packet even if
a valid binding exists in the database populated by DHCP snooping.
Logging of Dropped Packets
When the switch drops a packet, it places an entry in the log buffer and then generates system messages on a
rate-controlled basis. After the message is generated, the switch clears the entry from the log buffer. Each log entry
contains flow information, such as the receiving VLAN, the port number, the source and destination IP addresses, and
the source and destination MAC addresses.
You use the ip arp inspection log-buffer global configuration command to configure the number of entries in the buffer
and the number of entries needed in the specified interval to generate system messages. You specify the type of packets
that are logged by using the ip arp inspection vlan logging global configuration command.
A log-buffer entry can represent more than one packet. For example, if an interface receives many packets on the same
VLAN with the same ARP parameters, the switch combines the packets as one entry in the log buffer and generates a
single system message for the entry.
If the log buffer overflows, it means that a log event does not fit into the log buffer, and the display for the show ip arp
inspection log privileged EXEC command is affected. Dashes in the display appears in place of all data except the packet
count and the time. No other statistics are provided for the entry. If you see this entry in the display, increase the number
of entries in the log buffer or increase the logging rate.
Default Dynamic ARP Inspection Settings
Feature
Default Setting
DAI
Disabled on all VLANs.
Interface trust state
All interfaces are untrusted.
Rate limit of incoming ARP packets
The rate is 15 pps on untrusted interfaces, assuming that the
network is a switched network with a host connecting to as many
as 15 new hosts per second.
The rate is unlimited on all trusted interfaces.
The burst interval is 1 second.
ARP ACLs for non-DHCP environments
No ARP ACLs are defined.
Validation checks
No checks are performed.
Log buffer
When DAI is enabled, all denied or dropped ARP packets are
logged.
The number of entries in the log is 32.
The number of system messages is limited to 5 per second.
The logging-rate interval is 1 second.
Per-VLAN logging
All denied or dropped ARP packets are logged.
Dynamic ARP Inspection Configuration Guidelines
DAI is an ingress security feature; it does not perform any egress checking.
432
Configuring Dynamic ARP Inspection
How to Configure Dynamic ARP Inspection
DAI is not effective for hosts connected to switches that do not support DAI or that do not have this feature enabled.
Because man-in-the-middle attacks are limited to a single Layer 2 broadcast domain, separate the domain with DAI
checks from the one with no checking. This action secures the ARP caches of hosts in the domain enabled for DAI.
DAI depends on the entries in the DHCP snooping binding database to verify IP-to-MAC address bindings in
incoming ARP requests and ARP responses. Make sure to enable DHCP snooping to permit ARP packets that have
dynamically assigned IP addresses. For configuration information, see Configuring Dynamic ARP Inspection,
page 429
When DHCP snooping is disabled or in non-DHCP environments, use ARP ACLs to permit or to deny packets.
DAI is supported on access ports, trunk ports, EtherChannel ports, and private VLAN ports.
Note: Do not enable DAI on RSPAN VLANs. If DAI is enabled on RSPAN VLANs, DAI packets might not reach the
RSPAN destination port.
A physical port can join an EtherChannel port channel only when the trust state of the physical port and the channel
port match. Otherwise, the physical port remains suspended in the port channel. A port channel inherits its trust state
from the first physical port that joins the channel. Consequently, the trust state of the first physical port need not
match the trust state of the channel.
Conversely, when you change the trust state on the port channel, the switch configures a new trust state on all the
physical ports that comprise the channel.
The operating rate for the port channel is cumulative across all the physical ports within the channel. For example,
if you configure the port channel with an ARP rate-limit of 400 pps, all the interfaces combined on the channel
receive an aggregate 400 pps. The rate of incoming ARP packets on EtherChannel ports is equal to the sum of the
incoming rate of packets from all the channel members. Configure the rate limit for EtherChannel ports only after
examining the rate of incoming ARP packets on the channel-port members.
The rate of incoming packets on a physical port is checked against the port-channel configuration rather than the
physical-ports configuration. The rate-limit configuration on a port channel is independent of the configuration on
its physical ports.
If the EtherChannel receives more ARP packets than the configured rate, the channel (including all physical ports) is
placed in the error-disabled state.
Make sure to limit the rate of ARP packets on incoming trunk ports. Configure trunk ports with higher rates to reflect
their aggregation and to handle packets across multiple DAI-enabled VLANs. You also can use the ip arp inspection
limit none interface configuration command to make the rate unlimited. A high rate-limit on one VLAN can cause a
denial-of-service attack to other VLANs when the software places the port in the error-disabled state.
When you enable DAI on the switch, policers that were configured to police ARP traffic are no longer effective. The
result is that all ARP traffic is sent to the CPU.
How to Configure Dynamic ARP Inspection
Configuring Dynamic ARP Inspection in DHCP Environments
This procedure shows how to configure DAI when two switches support this feature. Host 1 is connected to Switch A,
and Host 2 is connected to Switch B as shown in Figure 64 on page 431. Both switches are running DAI on VLAN 1 where
the hosts are located. A DHCP server is connected to Switch A. Both hosts acquire their IP addresses from the same
DHCP server. Therefore, Switch A has the bindings for Host 1 and Host 2, and Switch B has the binding for Host 2.
Before You Begin
You must perform this procedure on both switches. This procedure is required.
433

Configuring Dynamic ARP Inspection
How to Configure Dynamic ARP Inspection
Command
Purpose
1.
show cdp neighbors
Verifies the connection between the switches.
2.
configure terminal
Enters global configuration mode.
3.
ip arp inspection vlan vlan-range
Enables DAI on a per-VLAN basis. By default, DAI is disabled on
all VLANs.
vlan-range—Specifies a single VLAN identified by VLAN ID
number, a range of VLANs separated by a hyphen, or a series of
VLANs separated by a comma. The range is 1 to 4096.
Specifies the same VLAN ID for both switches.
4.
interface interface-id
Specifies the interface connected to the other switch, and
enters interface configuration mode.
5.
ip arp inspection trust
Configures the connection between the switches as trusted.
By default, all interfaces are untrusted.
The switch does not check ARP packets that it receives from the
other switch on the trusted interface; it only forwards the
packets.
For untrusted interfaces, the switch intercepts all ARP requests
and responses. It verifies that the intercepted packets have valid
IP-to-MAC address bindings before updating the local cache
and before forwarding the packet to the appropriate destination.
The switch drops invalid packets and logs them in the log buffer
according to the logging configuration specified with the ip arp
inspection vlan logging global configuration command.
6.
end
Returns to privileged EXEC mode.
Configuring ARP ACLs for Non-DHCP Environments
This procedure shows how to configure DAI when Switch B shown in Figure 64 on page 431 does not support DAI or
DHCP snooping.
If you configure port 1 on Switch A as trusted, a security hole is created because both Switch A and Host 1 could be
attacked by either Switch B or Host 2. To prevent this possibility, you must configure port 1 on Switch A as untrusted. To
permit ARP packets from Host 2, you must set up an ARP ACL and apply it to VLAN 1. If the IP address of Host 2 is not
static (it is impossible to apply the ACL configuration on Switch A) you must separate Switch A from Switch B at Layer 3
and use a router to route packets between them.
434

Configuring Dynamic ARP Inspection
How to Configure Dynamic ARP Inspection
Command
Purpose
1.
configure terminal
Enters global configuration mode.
2.
arp access-list acl-name
Defines an ARP ACL, and enters ARP access-list configuration
mode. By default, no ARP access lists are defined.
Note: At the end of the ARP access list, there is an implicit deny
ip any mac any command.
3.
permit ip host sender-ip mac host sender-mac
Permits ARP packets from the specified host (Host 2).
[log]
sender-ip—Enters the IP address of Host 2.
sender-mac—Enters the MAC address of Host 2.
(Optional) log—Logs a packet in the log buffer when it
matches the access control entry (ACE). Matches are
logged if you also configure the matchlog keyword in the
ip arp inspection vlan logging global configuration
command. For more information, see Configuring the Log
Buffer, page 438.
4.
exit
Returns to global configuration mode.
5.
ip arp inspection filter arp-acl-name vlan
Applies the ARP ACL to the VLAN. By default, no defined ARP
vlan-range [static]
ACLs are applied to any VLAN.
arp-acl-name—Specifies the name of the ACL created in
Step 2.
vlan-range—Specifies the VLAN that the switches and
hosts are in. You can specify a single VLAN identified by
VLAN ID number, a range of VLANs separated by a hyphen,
or a series of VLANs separated by a comma. The range is
1 to 4096.
(Optional) static—Specifies to treat implicit denies in the
ARP ACL as explicit denies and to drop packets that do not
match any previous clauses in the ACL. DHCP bindings are
not used.
If you do not specify this keyword, it means that there is no
explicit deny in the ACL that denies the packet, and DHCP
bindings determine whether a packet is permitted or
denied if the packet does not match any clauses in the ACL.
ARP packets containing only IP-to-MAC address bindings are
compared against the ACL. Packets are permitted only if the
access list permits them.
435

Configuring Dynamic ARP Inspection
How to Configure Dynamic ARP Inspection
Command
Purpose
6.
interface interface-id
Specifies the Switch A interface that is connected to Switch B,
and enters interface configuration mode.
7.
no ip arp inspection trust
Configures the Switch A interface that is connected to Switch B
as untrusted.
By default, all interfaces are untrusted.
For untrusted interfaces, the switch intercepts all ARP requests
and responses. It verifies that the intercepted packets have
valid IP-to-MAC address bindings before updating the local
cache and before forwarding the packet to the appropriate
destination. The switch drops invalid packets and logs them in
the log buffer according to the logging configuration specified
with the ip arp inspection vlan logging global configuration
command.
8.
end
Returns to privileged EXEC mode.
Limiting the Rate of Incoming ARP Packets
Command
Purpose
1.
configure terminal
Enters global configuration mode.
2.
interface interface-id
Specifies the interface to be rate-limited, and enters interface
configuration mode.
3.
ip arp inspection limit {rate pps [burst
Limits the rate of incoming ARP requests and responses on the
interval seconds] | none}
interface.
The default rate is 15 pps on untrusted interfaces and unlimited on
trusted interfaces. The burst interval is 1 second.
rate pps—Specifies an upper limit for the number of incoming
packets processed per second. The range is 0 to 2048 pps.
(Optional) burst interval seconds—Specifies the consecutive
interval in seconds, over which the interface is monitored for a high
rate of ARP packets. The range is 1 to 15.
rate none—Specifies no upper limit for the rate of incoming ARP
packets that can be processed.
4.
exit
Returns to global configuration mode.
5.
errdisable recovery cause
(Optional) Enables error recovery from the DAI error-disabled state.
arp-inspection interval interval
By default, recovery is disabled, and the recovery interval is 300
seconds.
interval interval—Specifies the time in seconds to recover from the
error-disabled state. The range is 30 to 86400.
6.
exit
Returns to privileged EXEC mode.
436
Configuring Dynamic ARP Inspection
How to Configure Dynamic ARP Inspection
Performing Validation Checks
Command
Purpose
1.
configure terminal
Enters global configuration mode.
2.
ip arp inspection validate
Performs a specific check on incoming ARP packets. By default, no checks are
{[src-mac] [dst-mac] [ip]}
performed.
src-mac—Checks the source MAC address in the Ethernet header against the
sender MAC address in the ARP body. This check is performed on both ARP
requests and responses. When enabled, packets with different MAC addresses
are classified as invalid and are dropped.
dst-mac—Checks the destination MAC address in the Ethernet header against
the target MAC address in ARP body. This check is performed for ARP
responses. When enabled, packets with different MAC addresses are classified
as invalid and are dropped.
ip—Checks the ARP body for invalid and unexpected IP addresses. Addresses
include 0.0.0.0, 255.255.255.255, and all IP multicast addresses. Sender IP
addresses are checked in all ARP requests and responses, and target IP
addresses are checked only in ARP responses.
You must specify at least one of the keywords. Each command overrides the
configuration of the previous command; that is, if a command enables src and dst
mac validations, and a second command enables IP validation only, the src and dst
mac validations are disabled as a result of the second command.
3.
exit
Returns to privileged EXEC mode.
437

Configuring Dynamic ARP Inspection
How to Configure Dynamic ARP Inspection
Configuring the Log Buffer
Command
Purpose
1.
configure terminal
Enters global configuration mode.
2.
ip arp inspection log-buffer {entries
Configures the DAI logging buffer.
number | logs number interval
By default, when DAI is enabled, denied, or dropped, ARP packets are
seconds}
logged. The number of log entries is 32. The number of system messages
is limited to 5 per second. The logging-rate interval is 1 second.
entries number—Specifies the number of entries to be logged in the
buffer. The range is 0 to 1024.
logs number interval seconds—Specifies the number of entries to
generate system messages in the specified interval.
logs number—Specifies the range 0 to 1024. A 0 value means that the
entry is placed in the log buffer, but a system message is not generated.
interval seconds—Specifies the range 0 to 86400 seconds (1 day). A 0
value means that a system message is immediately generated (and the
log buffer is always empty).
An interval setting of 0 overrides a log setting of 0.
The logs and interval settings interact. If the logs number X is greater than
interval seconds Y, X divided by Y (X/Y) system messages are sent every
second. Otherwise, one system message is sent every Y divided by X (Y/X)
seconds.
3.
ip arp inspection vlan vlan-range
Controls the type of packets that are logged per VLAN. By default, all denied
logging {acl-match {matchlog |
or all dropped packets are logged. The term logged means the entry is
none} | dhcp-bindings {all | none |
placed in the log buffer and a system message is generated.
permit}}
vlan-range—Specifies a single VLAN identified by VLAN ID number, a
range of VLANs separated by a hyphen, or a series of VLANs separated
by a comma. The range is 1 to 4096.
acl-match matchlog—Specifies log packets based on the ACE logging
configuration. If you specify the matchlog keyword in this command
and the log keyword in the permit or deny ARP access-list
configuration command, ARP packets permitted or denied by the ACL
are logged.
acl-match none—Does not log packets that match ACLs.
dhcp-bindings all—Logs all packets that match DHCP bindings.
dhcp-bindings none—Does not log packets that match DHCP bindings.
dhcp-bindings permit—Logs DHCP-binding permitted packets.
4.
exit
Returns to privileged EXEC mode.
438

Configuring Dynamic ARP Inspection
Monitoring and Maintaining Dynamic ARP Inspection
Monitoring and Maintaining Dynamic ARP Inspection
Command
Description
clear ip arp inspection log
Clears the DAI log buffer.
clear ip arp inspection statistics
Clears the DAI statistics.
show arp access-list [acl-name]
Displays detailed information about ARP ACLs.
show errdisable recovery
Displays the error-disabled recovery timer information.
show ip arp inspection interfaces [interface-id]
Displays the trust state and the rate limit of ARP packets for the specified
interface or all interfaces.
show ip arp inspection log
Displays the configuration and contents of the DAI log buffer.
show ip arp inspection vlan vlan-range
Displays the configuration and the operating state of DAI for the specified
VLAN. If no VLANs are specified or if a range is specified, displays
information only for VLANs with DAI enabled (active).
show ip arp inspection statistics [vlan
Displays statistics for forwarded, dropped, MAC validation failure, IP
vlan-range]
validation failure, ACL permitted and denied, and DHCP permitted and
denied packets for the specified VLAN. If no VLANs are specified or if a
range is specified, displays information only for VLANs with DAI enabled
(active).
show ip dhcp snooping binding
Verifies the DHCP bindings.
Configuration Examples for Dynamic ARP Inspection
Configuring Dynamic ARP Inspection in DHCP Environments: Example
This example shows how to configure DAI on Switch A in VLAN 1. You would perform a similar procedure on Switch B:
Switch(config)# ip arp inspection vlan 1
Switch(config)# interface GigabitEthernet1/17
Switch(config-if)# ip arp inspection trust
Configuring ARP ACLs for Non-DHCP Environments: Example
This example shows how to configure an ARP ACL called host2 on Switch A, to permit ARP packets from Host 2 (IP
address 1.1.1.1 and MAC address 0001.0001.0001), to apply the ACL to VLAN 1, and to configure port 1 on Switch A
as untrusted:
Switch(config)# arp access-list host2
Switch(config-arp-acl)# permit ip host 1.1.1.1 mac host 1.1.1
Switch(config-arp-acl)# exit
Switch(config)# ip arp inspection filter host2 vlan 1
Switch(config)# interface GigabitEthernet1/17
Switch(config-if)# no ip arp inspection trust
Additional References
The following sections provide references related to switch administration:
439

Configuring Dynamic ARP Inspection
Additional References
Related Documents
Related Topic
Document Title
Cisco IOS basic commands
Cisco IOS Configuration Fundamentals Command Reference
DHCP configuration
“Configuring DHCP on the IE 5000 Switch”
Standards
Standards
Title
No new or modified standards are supported by this
—
feature, and support for existing standards has not
been modified by this feature.
MIBs
MIBs
MIBs Link
—
To locate and download MIBs using Cisco IOS XR software, use the
Cisco MIB Locator found at the following URL and choose a platform
under the Cisco Access Products menu:
RFCs
RFCs
Title
No new or modified RFCs are supported by this
—
feature, and support for existing RFCs has not been
modified by this feature.
Technical Assistance
Description
Link
The Cisco Technical Support website contains
thousands of pages of searchable technical content,
including links to products, technologies, solutions,
technical tips, and tools. Registered Cisco.com users
can log in from this page to access even more content.
440
Configuring IP Source Guard
Prerequisites for IP Source Guard
You must globally configure the ip device tracking maximum limit-number interface configuration command
globally for IPSG for static hosts to work. If you only configure this command on a port without enabling IP device
tracking globally or setting an IP device tracking maximum on that interface, IPSG with static hosts will reject all the
IP traffic from that interface. This requirement also applies to IPSG with static hosts on a Layer 2 access port.
Restrictions for IP Source Guard
To use this feature, the switch must be running the LAN Base image.
IP source guard (IPSG) is supported only on Layer 2 ports, including access and trunk ports.
Do not use IPSG for static hosts on uplink ports or trunk ports.
Information About IP Source Guard
IP Source Guard
IPSG is a security feature that restricts IP traffic on nonrouted, Layer 2 interfaces by filtering traffic based on the DHCP
snooping binding database and on manually configured IP source bindings. You can use IPSG to prevent traffic attacks
if a host tries to use the IP address of its neighbor.
You can enable IPSG when DHCP snooping is enabled on an untrusted interface. After IPSG is enabled on an interface,
the switch blocks all IP traffic received on the interface except for DHCP packets allowed by DHCP snooping. A port
access control list (ACL) is applied to the interface. The port ACL allows only IP traffic with a source IP address in the IP
source binding table and denies all other traffic.
Note: The port ACL takes precedence over any router ACLs or VLAN maps that affect the same interface.
The IP source binding table bindings are learned by DHCP snooping or are manually configured (static IP source
bindings). An entry in this table has an IP address with its associated MAC address and VLAN number. The switch uses
the IP source binding table only when IPSG is enabled.
You can configure IPSG with source IP address filtering or with source IP and MAC address filtering.
Source IP Address Filtering
When IPSG is enabled with this option, IP traffic is filtered based on the source IP address. The switch forwards IP traffic
when the source IP address matches an entry in the DHCP snooping binding database or a binding in the IP source
binding table.
When a DHCP snooping binding or static IP source binding is added, changed, or deleted on an interface, the switch
modifies the port ACL by using the IP source binding changes and re-applies the port ACL to the interface.
441
Configuring IP Source Guard
Information About IP Source Guard
If you enable IPSG on an interface on which IP source bindings (dynamically learned by DHCP snooping or manually
configured) are not configured, the switch creates and applies a port ACL that denies all IP traffic on the interface. If you
disable IPSG, the switch removes the port ACL from the interface.
Source IP and MAC Address Filtering
IP traffic is filtered based on the source IP and MAC addresses. The switch forwards traffic only when the source IP and
MAC addresses match an entry in the IP source binding table.
When address filtering is enabled, the switch filters IP and non-IP traffic. If the source MAC address of an IP or non-IP
packet matches a valid IP source binding, the switch forwards the packet. The switch drops all other types of packets
except DHCP packets.
The switch uses port security to filter source MAC addresses. The interface can shut down when a port-security violation
occurs.
IP Source Guard for Static Hosts
IPSG for static hosts extends the IPSG capability to non-DHCP and static environments. The previous IPSG used the
entries created by DHCP snooping to validate the hosts connected to a switch. Any traffic received from a host without
a valid DHCP binding entry is dropped. This security feature restricts IP traffic on nonrouted Layer 2 interfaces. It filters
traffic based on the DHCP snooping binding database and on manually configured IP source bindings. The previous
version of IPSG required a DHCP environment for IPSG to work.
IPSG for static hosts allows IPSG to work without DHCP. IPSG for static hosts relies on IP device tracking-table entries
to install port ACLs. The switch creates static entries based on ARP requests or other IP packets to maintain the list of
valid hosts for a given port. You can also specify the number of hosts allowed to send traffic to a given port. This is
equivalent to port security at Layer 3.
IPSG for static hosts also supports dynamic hosts. If a dynamic host receives a DHCP-assigned IP address that is
available in the IP DHCP snooping table, the same entry is learned by the IP device tracking table. When you enter the
show ip device tracking all EXEC command, the IP device tracking table displays the entries as ACTIVE.
Note: Some IP hosts with multiple network interfaces can inject some invalid packets into a network interface. The
invalid packets contain the IP or MAC address for another network interface of the host as the source address. The
invalid packets can cause IPSG for static hosts to connect to the host, to learn the invalid IP or MAC address bindings,
and to reject the valid bindings. Consult the vendor of the corresponding operating system and the network interface
to prevent the host from injecting invalid packets.
IPSG for static hosts initially learns IP or MAC bindings dynamically through an ACL-based snooping mechanism. IP or
MAC bindings are learned from static hosts by ARP and IP packets. They are stored in the device tracking database.
When the number of IP addresses that have been dynamically learned or statically configured on a given port reaches a
maximum, the hardware drops any packet with a new IP address. To resolve hosts that have moved or gone away for
any reason, IPSG for static hosts leverages IP device tracking to age out dynamically learned IP address bindings. This
feature can be used with DHCP snooping. Multiple bindings are established on a port that is connected to both DHCP
and static hosts. For example, bindings are stored in both the device tracking database as well as in the DHCP snooping
binding database.
IP Source Guard Configuration Guidelines
By default, IP source guard is disabled.
You can configure static IP bindings only on nonrouted ports. If you enter the ip source binding mac-address vlan
vlan-id ip-address interface interface-id global configuration command on a routed interface, this error message
appears:
Static IP source binding can only be configured on switch port.
442

Configuring IP Source Guard
How to Configure IP Source Guard
When IP source guard with source IP filtering is enabled on an interface, DHCP snooping must be enabled on the
access VLAN for that interface.
If you are enabling IP source guard on a trunk interface with multiple VLANs and DHCP snooping is enabled on all
the VLANs, the source IP address filter is applied on all the VLANs.
If IP source guard is enabled and you enable or disable DHCP snooping on a VLAN on the trunk interface, the
switch might not properly filter traffic.
If you enable IP source guard with source IP and MAC address filtering, DHCP snooping and port security must be
enabled on the interface. You must also enter the ip dhcp snooping information option global configuration
command and ensure that the DHCP server supports option 82. When IP source guard is enabled with MAC address
filtering, the DHCP host MAC address is not learned until the host is granted a lease. When forwarding packets from
the server to the host, DHCP snooping uses option-82 data to identify the host port.
When configuring IP source guard on interfaces on which a private VLAN is configured, port security is not
supported.
IP source guard is not supported on EtherChannels.
You can enable this feature when 802.1x port-based authentication is enabled.
If the number of ternary content addressable memory (TCAM) entries exceeds the maximum, the CPU usage
increases.
How to Configure IP Source Guard
Enabling IP Source Guard
Command
Purpose
1.
configure terminal
Enters global configuration mode.
2.
interface interface-id
Specifies the interface to be configured, and enters interface
configuration mode.
3.
ip verify source
Enables IPSG with source IP address filtering.
or
ip verify source port-security
Enables IPSG with source IP and MAC address filtering.
Note: When you enable both IPSG and port security by using the ip verify
source port-security interface configuration command, there are two
caveats:
• The DHCP server must support option-82, or the client is not
assigned an IP address.
• The MAC address in the DHCP packet is not learned as a secure
address. The MAC address of the DHCP client is learned as a
secure address only when the switch receives non-DHCP data
traffic.
443

Configuring IP Source Guard
How to Configure IP Source Guard
Command
Purpose
4.
exit
Returns to global configuration mode.
5.
ip source binding mac-address vlan
Adds a static IP source binding.
vlan-id ip-address inteface interface-id
Enter this command for each static binding.
6.
end
Returns to privileged EXEC mode.
Configuring IP Source Guard for Static Hosts on a Layer 2 Access Port
Command
Purpose
1.
configure terminal
Enters global configuration mode.
2.
ip device tracking
Opens the IP host table, and globally enables IP device
tracking.
3.
interface interface-id
Enters interface configuration mode.
4.
switchport mode access
Configures a port as access.
5.
switchport access vlan vlan-id
Configures the VLAN for this port.
6.
ip verify source tracking port-security
Enables IPSG for static hosts with MAC address filtering.
Note: When you enable both IPSG and port security by
using the ip verify source port-security interface
configuration command:
• The DHCP server must support option-82, or
the client is not assigned an IP address.
• The MAC address in the DHCP packet is not
learned as a secure address. The MAC address
of the DHCP client is learned as a secure
address only when the switch receives
non-DHCP data traffic.
7.
ip device tracking maximum number
Specifies a maximum limit for the number of static IPs
that the IP device tracking table allows on the port. The
range is 1to 10. The maximum number is 10.
Note: You must configure the ip device tracking
maximum limit-number interface configuration
command.
8.
switchport port-security
(Optional) Activates port security for this port.
9.
switchport port-security maximum value
(Optional) Specifies a maximum of MAC addresses for
this port.
444

Configuring IP Source Guard
Monitoring and Maintaining IP Source Guard
Command
Purpose
10.
end
Returns to privileged EXEC mode.
11.
show ip verify source interface interface-id
Verifies the configuration and displays IPSG permit
ACLs for static hosts.
12.
show ip device track all
Verifies the configuration by displaying the IP-to-MAC
[active | inactive] count
binding for a given host on the switch interface.
all active—Displays only the active IP or MAC
binding entries
all inactive—Displays only the inactive IP or MAC
binding entries
all—Displays the active and inactive IP or MAC
binding entries
Monitoring and Maintaining IP Source Guard
Command
Purpose
show ip device tracking
Displays the active IP or MAC binding entries for all interfaces.
show ip source binding
Displays the IP source bindings on a switch.
show ip verify source
Displays the IP source guard configuration on the switch.
copy running-config startup-config
Saves your entries in the configuration file.
Configuration Examples for IP Source Guard
Enabling IPSG with Source IP and MAC Filtering: Example
This example shows how to enable IPSG with source IP and MAC filtering on VLANs 10
and 11:
Switch# configure terminal
Enter configuration commands, one per line. End with CNTL/Z.
Switch(config)# interface GigabitEthernet1/17
Switch(config-if)# ip verify source port-security
Switch(config-if)# exit
Switch(config)# ip source binding 0100.0022.0010 vlan 10 10.0.0.2 interface GigabitEthernet1/17
Switch(config)# ip source binding 0100.0230.0002 vlan 11 10.0.0.4 interface GigabitEthernet1/17
Switch(config)# end
Disabling IPSG with Static Hosts: Example
This example shows how to stop IPSG with static hosts on an interface:
Switch(config-if)# no ip verify source
Switch(config-if)# no ip device tracking max
445
Configuring IP Source Guard
Configuration Examples for IP Source Guard
Enabling IPSG for Static Hosts: Examples
This example shows how to enable IPSG with static hosts on a port:
Switch(config)# ip device tracking
Switch(config)# ip device tracking max 10
Switch(config-if)# ip verify source tracking port-security
This example shows how to enable IPSG for static hosts with IP filters on a Layer 2 access port and to verify the valid IP
bindings on the interface Gi0/3:
Switch# configure terminal
Enter configuration commands, one per line. End with CNTL/Z.
Switch(config)# ip device tracking
Switch(config)# interface gigabitethernet 0/3
Switch(config-if)# switchport mode access
Switch(config-if)# switchport access vlan 10
Switch(config-if)# ip device tracking maximum 5
Switch(config-if)# ip verify source tracking
Switch(config-if)# end
Switch# show ip verify source
Interface Filter-type Filter-mode IP-address
Mac-address
Vlan
---------
-----------
-----------
---------------
-----------------
----
Gi0/3
ip trk
active
40.1.1.24
10
Gi0/3
ip trk
active
40.1.1.20
10
Gi0/3
ip trk
active
40.1.1.21
10
This example shows how to enable IPSG for static hosts with IP-MAC filters on a Layer 2 access port, to verify the valid
IP-MAC bindings on the interface Gi0/3, and to verify that the number of bindings on this interface has reached the
maximum:
Switch# configure terminal
Enter configuration commands, one per line. End with CNTL/Z.
Switch(config)# ip device tracking
Switch(config)# interface gigabitethernet 0/3
Switch(config-if)# switchport mode access
Switch(config-if)# switchport access vlan 1
Switch(config-if)# ip device tracking maximum 5
Switch(config-if)# switchport port-security
Switch(config-if)# switchport port-security maximum 5
Switch(config-if)# ip verify source tracking port-security
Switch(config-if)# end
Switch# show ip verify source
Interface Filter-type Filter-mode IP-address
Mac-address
Vlan
---------
-----------
-----------
---------------
-----------------
----
Gi0/3
ip-mac trk
active
40.1.1.24
00:00:00:00:03:04
1
Gi0/3
ip-mac trk
active
40.1.1.20
00:00:00:00:03:05
1
Gi0/3
ip-mac trk
active
40.1.1.21
00:00:00:00:03:06
1
Gi0/3
ip-mac trk
active
40.1.1.22
00:00:00:00:03:07
1
Gi0/3
ip-mac trk
active
40.1.1.23
00:00:00:00:03:08
1
Displaying IP or MAC Binding Entries: Examples
This example displays all IP or MAC binding entries for all interfaces. The CLI displays all active as well as inactive entries.
When a host is learned on a interface, the new entry is marked as active. When the same host is disconnected from that
interface and connected to a different interface, a new IP or MAC binding entry displays as active as soon as the host is
detected. The old entry for this host on the previous interface is marked as INACTIVE.
Switch# show ip device tracking all
IP Device Tracking = Enabled
IP Device Tracking Probe Count = 3
446
Configuring IP Source Guard
Configuration Examples for IP Source Guard
IP Device Tracking Probe Interval = 30
---------------------------------------------------------------------
IP Address
MAC Address
Vlan Interface
STATE
---------------------------------------------------------------------
200.1.1.8
0001.0600.0000
8
GigabitEthernet1/17
INACTIVE
200.1.1.9
0001.0600.0000
8
GigabitEthernet1/17
INACTIVE
200.1.1.10
0001.0600.0000
8
GigabitEthernet1/17
INACTIVE
200.1.1.1
0001.0600.0000
9
GigabitEthernet1/18
ACTIVE
200.1.1.1
0001.0600.0000
8
GigabitEthernet1/17
INACTIVE
200.1.1.2
0001.0600.0000
9
GigabitEthernet1/18
ACTIVE
200.1.1.2
0001.0600.0000
8
GigabitEthernet1/17
INACTIVE
200.1.1.3
0001.0600.0000
9
GigabitEthernet1/18
ACTIVE
200.1.1.3
0001.0600.0000
8
GigabitEthernet1/17
INACTIVE
200.1.1.4
0001.0600.0000
9
GigabitEthernet1/18
ACTIVE
200.1.1.4
0001.0600.0000
8
GigabitEthernet1/17
INACTIVE
200.1.1.5
0001.0600.0000
9
GigabitEthernet1/18
ACTIVE
200.1.1.5
0001.0600.0000
8
GigabitEthernet1/17
INACTIVE
200.1.1.6
0001.0600.0000
8
GigabitEthernet1/17
INACTIVE
200.1.1.7
0001.0600.0000
8
GigabitEthernet1/17
INACTIVE
This example displays all active IP or MAC binding entries for all interfaces:
Switch# show ip device tracking all active
IP Device Tracking = Enabled
IP Device Tracking Probe Count = 3
IP Device Tracking Probe Interval = 30
---------------------------------------------------------------------
IP Address
MAC Address
Vlan Interface
STATE
---------------------------------------------------------------------
200.1.1.1
0001.0600.0000
9
GigabitEthernet1/17
ACTIVE
200.1.1.2
0001.0600.0000
9
GigabitEthernet1/17
ACTIVE
200.1.1.3
0001.0600.0000
9
GigabitEthernet1/17
ACTIVE
200.1.1.4
0001.0600.0000
9
GigabitEthernet1/17
ACTIVE
200.1.1.5
0001.0600.0000
9
GigabitEthernet1/17
ACTIVE
This example displays all inactive IP or MAC binding entries for all interfaces. The host was first learned on
GigabitEthernet 0/1 and then moved to GigabitEthernet 0/2. The IP or MAC binding entries learned on GigabitEthernet
0/1 are marked as inactive.
Switch# show ip device tracking all inactive
IP Device Tracking = Enabled
IP Device Tracking Probe Count = 3
IP Device Tracking Probe Interval = 30
---------------------------------------------------------------------
IP Address
MAC Address
Vlan Interface
STATE
---------------------------------------------------------------------
200.1.1.8
0001.0600.0000
8
GigabitEthernet1/17
INACTIVE
200.1.1.9
0001.0600.0000
8
GigabitEthernet1/17
INACTIVE
200.1.1.10
0001.0600.0000
8
GigabitEthernet1/17
INACTIVE
200.1.1.1
0001.0600.0000
8
GigabitEthernet1/17
INACTIVE
200.1.1.2
0001.0600.0000
8
GigabitEthernet1/17
INACTIVE
200.1.1.3
0001.0600.0000
8
GigabitEthernet1/17
INACTIVE
200.1.1.4
0001.0600.0000
8
GigabitEthernet1/17
INACTIVE
200.1.1.5
0001.0600.0000
8
GigabitEthernet1/17
INACTIVE
200.1.1.6
0001.0600.0000
8
GigabitEthernet1/17
INACTIVE
200.1.1.7
0001.0600.0000
8
GigabitEthernet1/17
INACTIVE
This example displays the count of all IP device tracking host entries for all interfaces:
Switch# show ip device tracking all count
Total IP Device Tracking Host entries: 5
---------------------------------------------------------------------
Interface
Maximum Limit
Number of Entries
447

Configuring IP Source Guard
Additional References
---------------------------------------------------------------------
Gi0/3
5
Additional References
The following sections provide references related to switch administration:
Related Documents
Related Topic
Document Title
Cisco IOS basic commands
Cisco IOS Configuration Fundamentals Command Reference
Standards
Standards
Title
No new or modified standards are supported by this
—
feature, and support for existing standards has not
been modified by this feature.
MIBs
MIBs
MIBs Link
—
To locate and download MIBs using Cisco IOS XR software, use the
Cisco MIB Locator found at the following URL and choose a platform
under the Cisco Access Products menu:
RFCs
RFCs
Title
No new or modified RFCs are supported by this
—
feature, and support for existing RFCs has not been
modified by this feature.
448
Configuring IGMP Snooping and MVR
Restrictions for IGMP Snooping and MVR
You can set the maximum number of IGMP groups that a Layer 2 interface can join by using the ip igmp max-groups
interface configuration command. Use the no form of this command to set the maximum back to the default, which
is no limit. This restriction can be applied to Layer 2 ports only—you cannot set a maximum number of IGMP groups
on routed ports or SVIs. You also can use this command on a logical EtherChannel interface but cannot use it on
ports that belong to an EtherChannel port group.
Information About IGMP Snooping and MVR
This chapter describes how to configure Internet Group Management Protocol (IGMP) snooping on the switch, including
an application of local IGMP snooping, Multicast VLAN Registration (MVR). It also includes procedures for controlling
multicast group membership by using IGMP filtering and procedures for configuring the IGMP throttling action.
Note: For IP Version 6 (IPv6) traffic, Multicast Listener Discovery (MLD) snooping performs the same function as IGMP
snooping for IPv4 traffic.
Note: You can either manage IP multicast group addresses through features such as IGMP snooping and MVR, or you
can use static IP addresses.
IGMP Snooping
Layer 2 switches can use IGMP snooping to constrain the flooding of multicast traffic by dynamically configuring Layer 2
interfaces so that multicast traffic is forwarded to only those interfaces associated with IP multicast devices. As the name
implies, IGMP snooping requires the LAN switch to snoop on the IGMP transmissions between the host and the router
and to keep track of multicast groups and member ports. When the switch receives an IGMP report from a host for a
particular multicast group, the switch adds the host port number to the forwarding table entry; when it receives an IGMP
Leave Group message from a host, it removes the host port from the table entry. It also periodically deletes entries if it
does not receive IGMP membership reports from the multicast clients.
Note: For more information on IP multicast and IGMP, see RFC 1112 and RFC 2236.
The multicast router sends out periodic general queries to all VLANs. All hosts interested in this multicast traffic send join
requests and are added to the forwarding table entry. The switch creates one entry per VLAN in the IGMP snooping IP
multicast forwarding table for each group from which it receives an IGMP join request.
The switch supports IP multicast group-based bridging, rather than MAC-addressed based groups. With multicast MAC
address-based groups, if an IP address being configured translates (aliases) to a previously configured MAC address or
to any reserved multicast MAC addresses (in the range 224.0.0.xxx), the command fails. Because the switch uses IP
multicast groups, there are no address aliasing issues.
The IP multicast groups learned through IGMP snooping are dynamic. However, you can statically configure multicast
groups by using the ip igmp snooping vlan vlan-id static ip_address interface interface-id global configuration
command. If you specify group membership for a multicast group address statically, your setting supersedes any
automatic manipulation by IGMP snooping. Multicast group membership lists can consist of both user-defined and IGMP
snooping-learned settings.
449
Configuring IGMP Snooping and MVR
Information About IGMP Snooping and MVR
You can configure an IGMP snooping querier to support IGMP snooping in subnets without multicast interfaces because
the multicast traffic does not need to be routed. For more information about the IGMP snooping querier, see Configuring
the IGMP Snooping Querier, page 461.
If a port spanning-tree, a port group, or a VLAN ID change occurs, the IGMP snooping-learned multicast groups from
this port on the VLAN are deleted.
When you enable IGMP Immediate Leave, the switch immediately removes a port when it detects an IGMP Version 2 leave
message on that port. You should only use the Immediate-Leave feature when there is a single receiver present on every
port in the VLAN.
IGMP Versions
The switch supports IGMP Version 1, IGMP Version 2, and IGMP Version 3. These versions are interoperable on the
switch. For example, if IGMP snooping is enabled on an IGMPv2 switch and the switch receives an IGMPv3 report from
a host, the switch can forward the IGMPv3 report to the multicast router.
Note: The switch supports IGMPv3 snooping based only on the destination multicast MAC address. It does not support
snooping based on the source MAC address or on proxy reports.
An IGMPv3 switch supports Basic IGMPv3 Snooping Support (BISS), which includes support for the snooping features
on IGMPv1 and IGMPv2 switches and for IGMPv3 membership report messages. BISS constrains the flooding of
multicast traffic when your network includes IGMPv3 hosts. It constrains traffic to approximately the same set of ports as
the IGMP snooping feature on IGMPv2 or IGMPv1 hosts.
Note: IGMPv3 join and leave messages are not supported on switches running IGMP filtering or MVR.
An IGMPv3 switch can receive messages from and forward messages to a device running the Source Specific Multicast
(SSM) feature.
Joining a Multicast Group
When a host connected to the switch wants to join an IP multicast group and it is an IGMP Version 2 client, it sends an
unsolicited IGMP join message, specifying the IP multicast group to join. Alternatively, when the switch receives a general
query from the router, it forwards the query to all ports in the VLAN. IGMP Version 1 or Version 2 hosts wanting to join
the multicast group respond by sending a join message to the switch. The switch CPU creates a multicast
forwarding-table entry for the group if it is not already present. The CPU also adds the interface where the join message
was received to the forwarding-table entry. The host associated with that interface receives multicast traffic for that
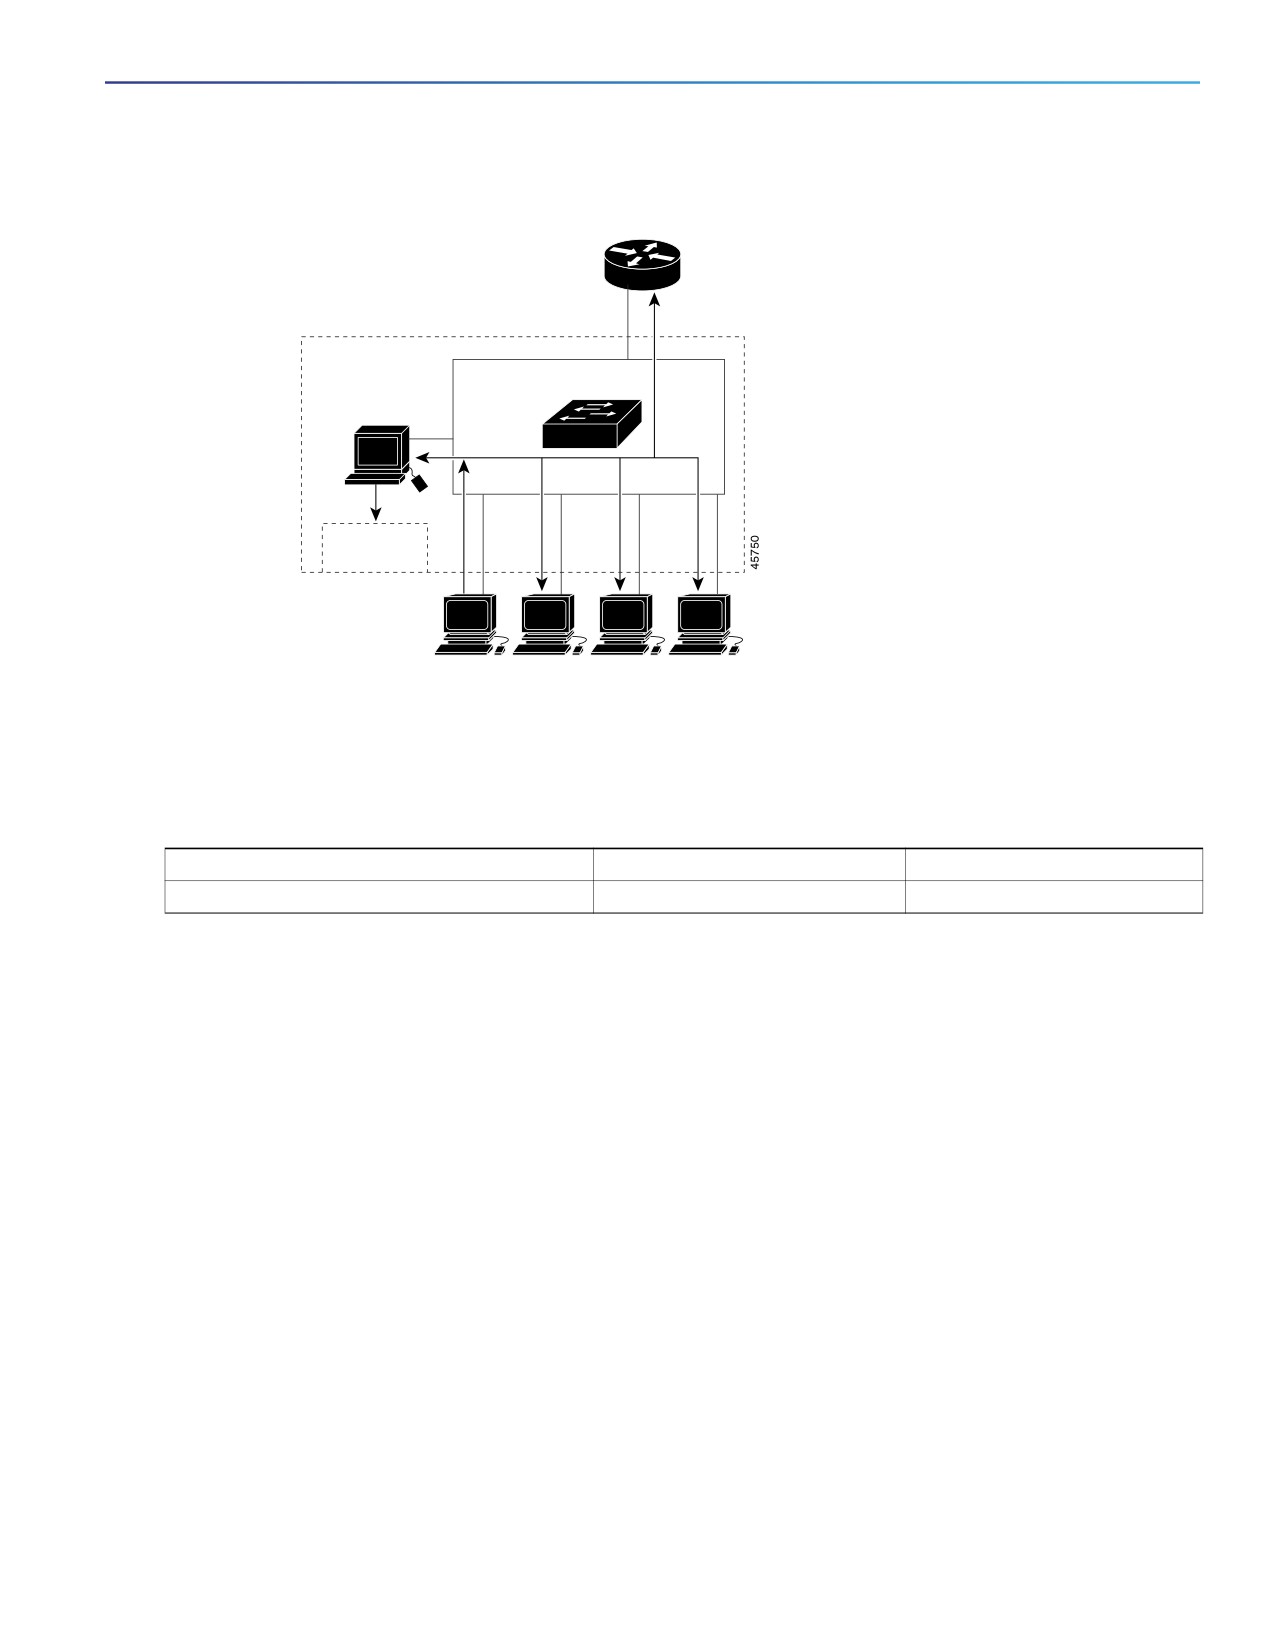
multicast group. See Figure 65 on page 451.
450
Configuring IGMP Snooping and MVR
Information About IGMP Snooping and MVR
Figure 65
Initial IGMP Join Message
Router A
1
IGMP report 224.1.2.3
VLAN
PFC
CPU
0
Forwarding
table
2
3
4
5
Host 1
Host 2
Host 3
Host 4
Router A sends a general query to the switch, which forwards the query to ports 2 through 5, which are all members of
the same VLAN. Host 1 wants to join multicast group 224.1.2.3 and multicasts an IGMP membership report (IGMP join
message) to the group. The switch CPU uses the information in the IGMP report to set up a forwarding-table entry, as
shown in the table below, that includes the port numbers connected to Host 1 and the router.
Destination Address
Type of Packet
Ports
224.1.2.3
IGMP
1, 2
The switch hardware can distinguish IGMP information packets from other packets for the multicast group. The
information in the table tells the switching engine to send frames addressed to the 224.1.2.3 multicast IP address that
are not IGMP packets to the router and to the host that has joined the group.
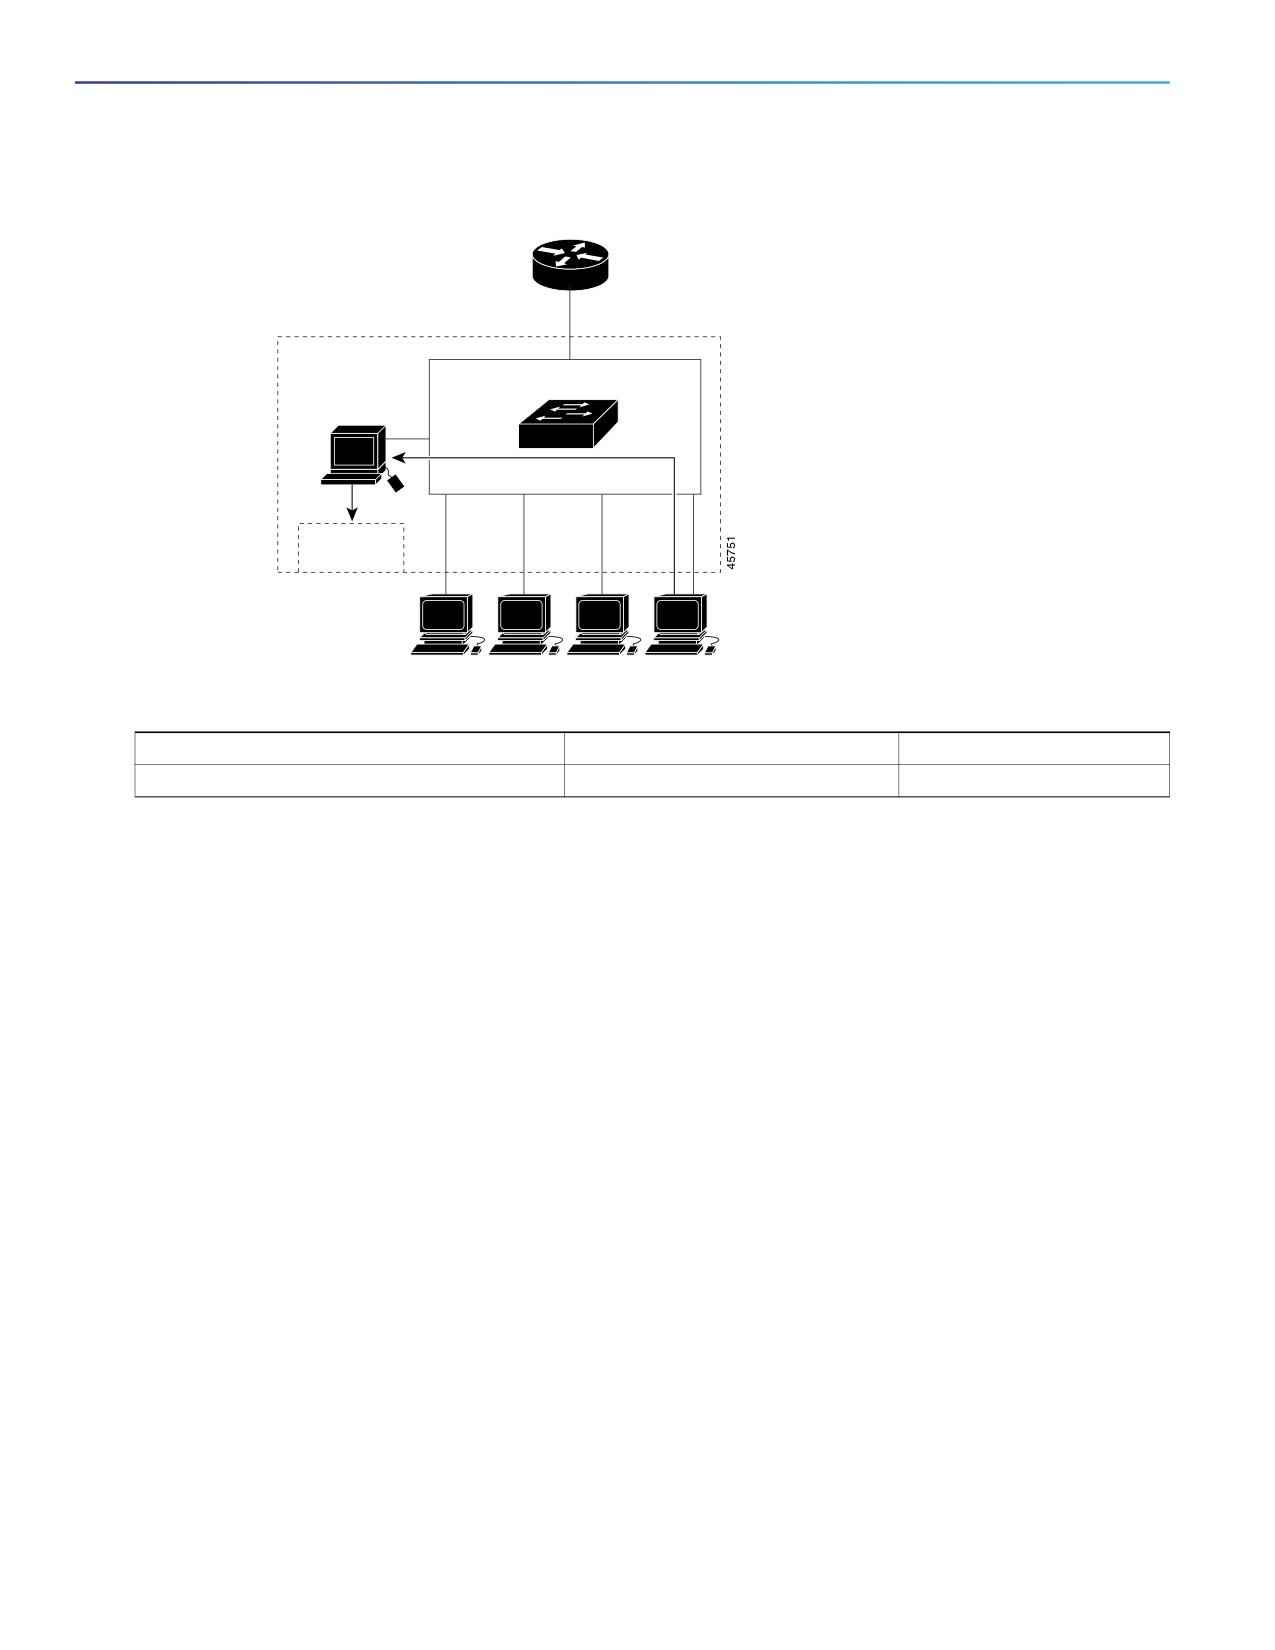
If another host (for example, Host 4) sends an unsolicited IGMP join message for the same group (Figure 66 on
page 452), the CPU receives that message and adds the port number of Host 4 to the forwarding table as shown below.
Note that because the forwarding table directs IGMP messages only to the CPU, the message is not flooded to other
ports on the switch. Any known multicast traffic is forwarded to the group and not to the CPU.
451
Configuring IGMP Snooping and MVR
Information About IGMP Snooping and MVR
Figure 66
Second Host Joining a Multicast Group
Router A
1
VLAN
PFC
CPU
0
Forwarding
table
2
3
4
5
Host 1
Host 2
Host 3
Host 4
Destination Address
Type of Packet
Ports
224.1.2.3
IGMP
1, 2, 5
Leaving a Multicast Group
The router sends periodic multicast general queries, and the switch forwards these queries through all ports in the VLAN.
Interested hosts respond to the queries. If at least one host in the VLAN wishes to receive multicast traffic, the router
continues forwarding the multicast traffic to the VLAN. The switch forwards multicast group traffic only to those hosts
listed in the forwarding table for that IP multicast group maintained by IGMP snooping.
When hosts want to leave a multicast group, they can silently leave, or they can send a leave message. When the switch
receives a leave message from a host, it sends a group-specific query to learn if any other devices connected to that
interface are interested in traffic for the specific multicast group. The switch then updates the forwarding table for that
MAC group so that only those hosts interested in receiving multicast traffic for the group are listed in the forwarding table.
If the router receives no reports from a VLAN, it removes the group for the VLAN from its IGMP cache.
Immediate Leave
Immediate Leave is only supported on IGMP Version 2 hosts.
The switch uses IGMP snooping Immediate Leave to remove from the forwarding table an interface that sends a leave
message without the switch sending group-specific queries to the interface. The VLAN interface is pruned from the
multicast tree for the multicast group specified in the original leave message. Immediate Leave ensures optimal
bandwidth management for all hosts on a switched network, even when multiple multicast groups are simultaneously in
use.
Note: You should only use the Immediate Leave feature on VLANs where a single host is connected to each port. If
Immediate Leave is enabled in VLANs where more than one host is connected to a port, some hosts might inadvertently
be dropped.
When you enable IGMP Immediate Leave, the switch immediately removes a port when it detects an IGMP Version 2 leave
message on that port. You should only use the Immediate-Leave feature when there is a single receiver present on every
port in the VLAN.
452

Configuring IGMP Snooping and MVR
Information About IGMP Snooping and MVR
IGMP Configurable-Leave Timer
You can configure the time that the switch waits after sending a group-specific query to determine if hosts are still
interested in a specific multicast group. The IGMP leave response time can be configured from 100 to 5000 milliseconds.
The default leave time is 1000 milliseconds. The timer can be set either globally or on a per-VLAN basis. The VLAN
configuration of the leave time overrides the global configuration.
The actual leave latency in the network is usually the configured leave time. However, the leave time might vary around
the configured time, depending on real-time CPU load conditions, network delays and the amount of traffic sent through
the interface.
Note: The IGMP configurable leave time is only supported on hosts running IGMP Version 2.
IGMP Report Suppression
Note: IGMP report suppression is supported only when the multicast query has IGMPv1 and IGMPv2 reports. This feature
is not supported when the query includes IGMPv3 reports.
The switch uses IGMP report suppression to forward only one IGMP report per multicast router query to multicast
devices. When IGMP router suppression is enabled (the default), the switch sends the first IGMP report from all hosts for
a group to all the multicast routers. The switch does not send the remaining IGMP reports for the group to the multicast
routers. This feature prevents duplicate reports from being sent to the multicast devices.
If the multicast router query includes requests only for IGMPv1 and IGMPv2 reports, the switch forwards only the first
IGMPv1 or IGMPv2 report from all hosts for a group to all the multicast routers.
If the multicast router query also includes requests for IGMPv3 reports, the switch forwards all IGMPv1, IGMPv2, and
IGMPv3 reports for a group to the multicast devices.
If you disable IGMP report suppression, all IGMP reports are forwarded to the multicast routers. For configuration steps,
see Disabling IGMP Report Suppression, page 462.
Default IGMP Snooping Configuration
Feature
Default Setting
IGMP snooping
Enabled globally and per VLAN
Multicast routers
None configured
Multicast router learning (snooping) method
PIM-DVMRP
IGMP snooping Immediate Leave
Disabled
Static groups
None configured
TCN1 flood query count
2
TCN query solicitation
Disabled
IGMP snooping querier
Disabled
IGMP report suppression
Enabled
1. TCN = Topology Change Notification
Snooping Methods
Multicast-capable router ports are added to the forwarding table for every Layer 2 multicast entry. The switch learns of
such ports through one of these methods:
453
Configuring IGMP Snooping and MVR
Information About IGMP Snooping and MVR
Snooping on IGMP queries, Protocol Independent Multicast (PIM) packets, and Distance Vector Multicast Routing
Protocol (DVMRP) packets
Listening to Cisco Group Management Protocol (CGMP) packets from other routers
Statically connecting to a multicast router port with the ip igmp snooping mrouter global configuration command
You can configure the switch either to snoop on IGMP queries and PIM/DVMRP packets or to listen to CGMP self-join or
proxy-join packets. By default, the switch snoops on PIM/DVMRP packets on all VLANs. To learn of multicast router ports
through only CGMP packets, use the ip igmp snooping vlan vlan-id mrouter learn cgmp global configuration command.
When this command is entered, the router listens to only CGMP self-join and CGMP proxy-join packets and to no other
CGMP packets. To learn of multicast router ports through only PIM-DVMRP packets, use the ip igmp snooping vlan
vlan-id mrouter learn pim-dvmrp global configuration command.
Note: If you want to use CGMP as the learning method and no multicast routers in the VLAN are CGMP proxy-enabled,
you must enter the ip cgmp router-only command to dynamically access the router.
Multicast Flooding Time After a TCN Event
You can control the time that multicast traffic is flooded after a topology change notification (TCN) event by using the ip
igmp snooping tcn flood query count global configuration command. This command configures the number of general
queries for which multicast data traffic is flooded after a TCN event. Some examples of TCN events are when the client
changed its location and the receiver is on same port that was blocked but is now forwarding, and when a port went
down without sending a leave message.
If you set the TCN flood query count to 1 by using the ip igmp snooping tcn flood query count command, the flooding
stops after receiving 1 general query. If you set the count to 7, the flooding continues until 7 general queries are received.
Groups are relearned based on the general queries received during the TCN event.
Flood Mode for TCN
When a topology change occurs, the spanning-tree root sends a special IGMP leave message (also known as global
leave) with the group multicast address 0.0.0.0. However, when you enable the ip igmp snooping tcn query solicit
global configuration command, the switch sends the global leave message whether or not it is the spanning-tree root.
When the router receives this special leave, it immediately sends general queries, which expedite the process of
recovering from the flood mode during the TCN event. Leaves are always sent if the switch is the spanning-tree root
regardless of this configuration command. By default, query solicitation is disabled.
Multicast Flooding During a TCN Event
When the switch receives a TCN, multicast traffic is flooded to all the ports until 2 general queries are received. If the
switch has many ports with attached hosts that are subscribed to different multicast groups, this flooding might exceed
the capacity of the link and cause packet loss. You can use the ip igmp snooping tcn flood interface configuration
command to control this behavior.
IGMP Snooping Querier Guidelines
Configure the VLAN in global configuration mode.
Configure an IP address on the VLAN interface. When enabled, the IGMP snooping querier uses the IP address as
the query source address.
If there is no IP address configured on the VLAN interface, the IGMP snooping querier tries to use the configured
global IP address for the IGMP querier. If there is no global IP address specified, the IGMP querier tries to use the
VLAN switch virtual interface (SVI) IP address (if one exists). If there is no SVI IP address, the switch uses the first
available IP address configured on the switch. The first IP address available appears in the output of the show ip
interface privileged EXEC command. The IGMP snooping querier does not generate an IGMP general query if it
cannot find an available IP address on the switch.
454
Configuring IGMP Snooping and MVR
Information About IGMP Snooping and MVR
The IGMP snooping querier supports IGMP Versions 1 and 2.
When administratively enabled, the IGMP snooping querier moves to the nonquerier state if it detects the presence
of a multicast router in the network.
When it is administratively enabled, the IGMP snooping querier moves to the operationally disabled state under these
conditions:
— IGMP snooping is disabled in the VLAN.
— PIM is enabled on the SVI of the corresponding VLAN.
IGMP Report Suppression
IGMP report suppression is enabled by default. When it is enabled, the switch forwards only one IGMP report per
multicast router query. When report suppression is disabled, all IGMP reports are forwarded to the multicast routers.
Multicast VLAN Registration
Note: To use this feature, the switch must be running the LAN Base image.
Multicast VLAN Registration (MVR) is designed for applications using wide-scale deployment of multicast traffic across
an Ethernet ring-based service-provider network (for example, the broadcast of multiple television channels over a
service-provider network). MVR allows a subscriber on a port to subscribe and unsubscribe to a multicast stream on the
network-wide multicast VLAN. It allows the single multicast VLAN to be shared in the network while subscribers remain
in separate VLANs. MVR provides the ability to continuously send multicast streams in the multicast VLAN, but to isolate
the streams from the subscriber VLANs for bandwidth and security reasons.
MVR assumes that subscriber ports subscribe and unsubscribe (join and leave) these multicast streams by sending out
IGMP join and leave messages. These messages can originate from an IGMP Version-2-compatible host with an Ethernet
connection. Although MVR operates on the underlying mechanism of IGMP snooping, the two features operate
independently of each other. One can be enabled or disabled without affecting the behavior of the other feature.
However, if IGMP snooping and MVR are both enabled, MVR reacts only to join and leave messages from multicast
groups configured under MVR. Join and leave messages from all other multicast groups are managed by IGMP snooping.
The switch CPU identifies the MVR IP multicast streams and their associated IP multicast group in the switch forwarding
table, intercepts the IGMP messages, and modifies the forwarding table to include or remove the subscriber as a receiver
of the multicast stream, even though the receivers might be in a different VLAN from the source. This forwarding behavior
selectively allows traffic to cross between different VLANs.
You can set the switch for compatible or dynamic mode of MVR operation:
In compatible mode, multicast data received by MVR hosts is forwarded to all MVR data ports, regardless of MVR
host membership on those ports. The multicast data is forwarded only to those receiver ports that MVR hosts have
joined, either by IGMP reports or by MVR static configuration. IGMP reports received from MVR hosts are never
forwarded from MVR data ports that were configured in the switch.
In dynamic mode, multicast data received by MVR hosts on the switch is forwarded from only those MVR data and
client ports that the MVR hosts have joined, either by IGMP reports or by MVR static configuration. Any IGMP reports
received from MVR hosts are also forwarded from all the MVR data ports in the switch. This eliminates using
unnecessary bandwidth on MVR data port links, which occurs when the switch runs in compatible mode.
Only Layer 2 ports take part in MVR. You must configure ports as MVR receiver ports. Only one MVR multicast VLAN per
switch is supported.
455