ABB Freelance Getting Started (Version 9.2 SP1) - page 3
Modify option
Section 2 Freelance Installation
Modify option
This option can be used to add or remove components of the Freelance software.
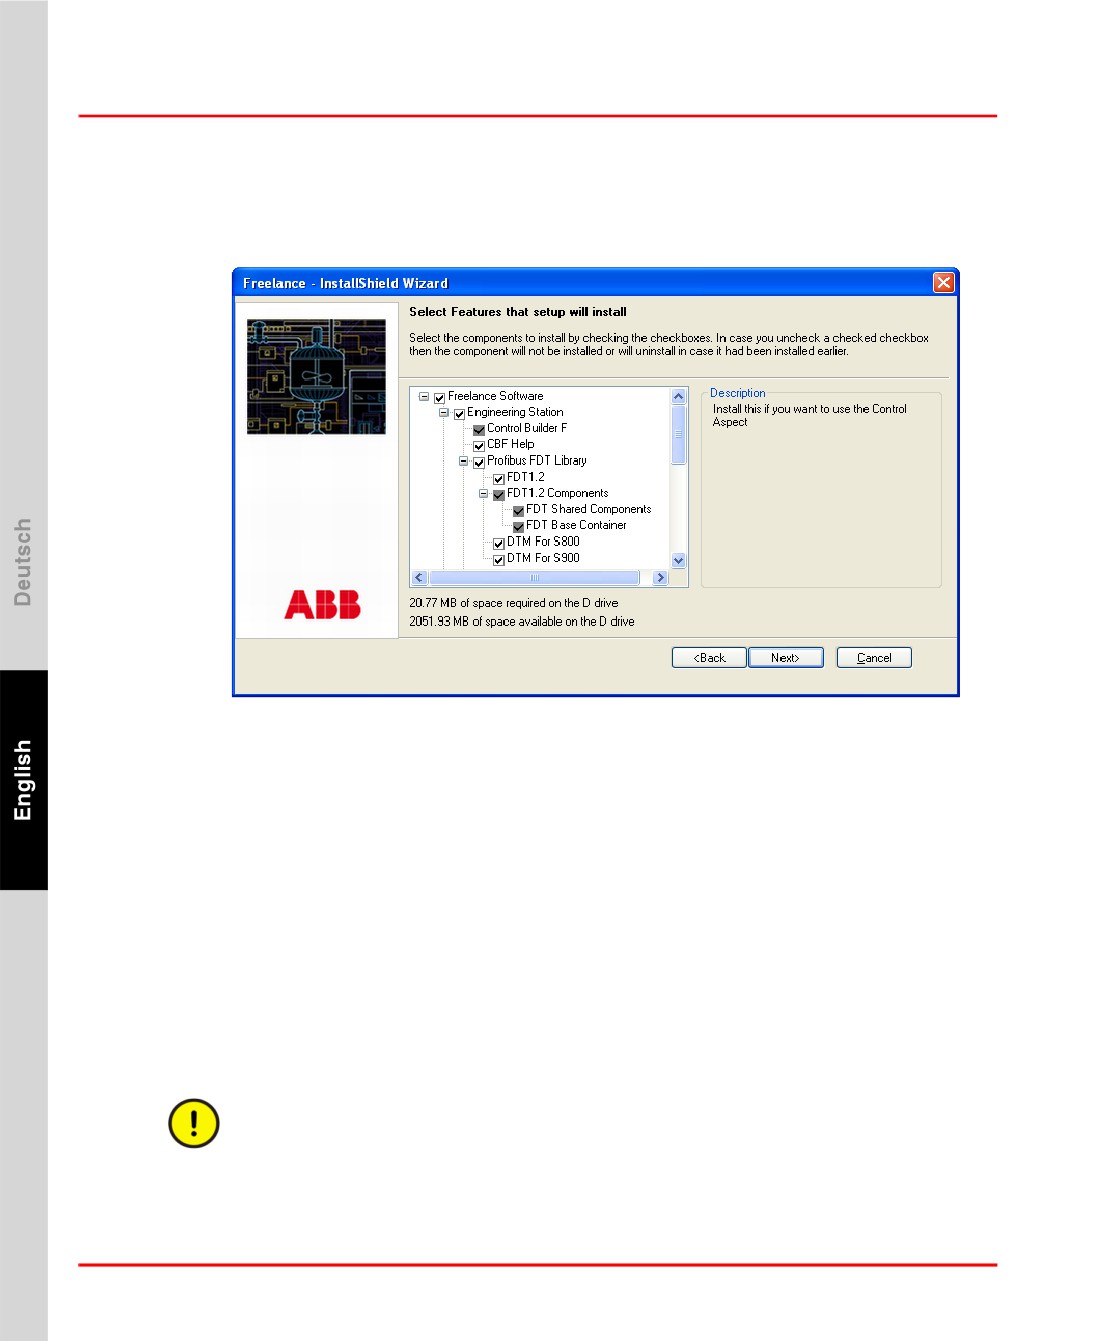
Choosing this option and clicking Next will bring up the “feature-tree” dialog.
tb500_16.bmp
The components that are already installed on the System will appear with a check
mark against them, all other components will be unchecked.
If you want to uninstall a component that is already installed on the System, then
uncheck that component from the list.
Check the components that are to be installed and click on Next.
The Setup makes the required modification and displays the “Maintenance
complete” screen. Click on Finish to complete the installation.
Repair option
This option is used to reinstall components that have already been installed on the
System, in order to repair files or settings that may have been overwritten.
The repair option will overwrite the content of the Hot Fixes, Roll ups and all
manual changes to setup files. All Hot Fixes and Roll ups have to be manually
reinstalled.
64
Section 2 Freelance Installation
Remove option
If any file, registry key or content of any installed component is corrupted in the
system, choosing this option will repair or put back the contents of the components.
Setup replaces or repairs and verifies files and registry keys contained in the
Freelance software components.
Select the Repair option and click on Next, the Setup makes the necessary repairs.
The configuration screen is displayed when the repair process is completed. Modify
the settings if required. The settings can be modified retroactively after the
installation has been completed without having to carry out the installation again.
For a detailed description refer to chapter Modify Installation Settings on page 66.
Click on OK and the Maintenance complete screen is displayed. There is an option
in this dialog to choose between restarting the System right away or later. Choose
the appropriate option. Click on Finish to complete the repair of the software
components.
Remove option
This will remove all Freelance components from your System. Choosing this option
and clicking on Next will remove all installed Freelance components from the
system.
Select the Remove option in the Maintenance screen and the Setup asks the user to
confirm the removal of the components. Click on Yes to proceed with the
uninstallation.
All Freelance software components will be removed from the System. Application
data like logs, archives, projects and export files will not be removed. These can be
deleted manually if they are no longer needed. In case a user account was created by
the setup this user account will also remain.
After the uninstallation the Setup displays the Uninstall complete screen. There is
an option in this dialog to choose between restarting the System right away or later.
Choose the appropriate option and click on Finish to complete the removal of the
software components.
Further information about the unistallation of Freelance is given in Uninstall Before
a New Installation on page 45
65
Modify Installation Settings
Section 2 Freelance Installation
Modify Installation Settings
The Configure program is provided to accomplish basic configuration and
maintenance tasks for the Freelance software. It is automatically started at the end
of the software installation, but can be started manually using the Windows start
menu as well.
> Start > All Programs > ABB Industrial IT > Freelance V9.2 SP1
> Configure
First Freelance Configuration
In the tree structure in the left part of the dialog box, select all entries one by one
and configure the settings. After the configuration is complete press OK to apply
the changes and close the dialog.
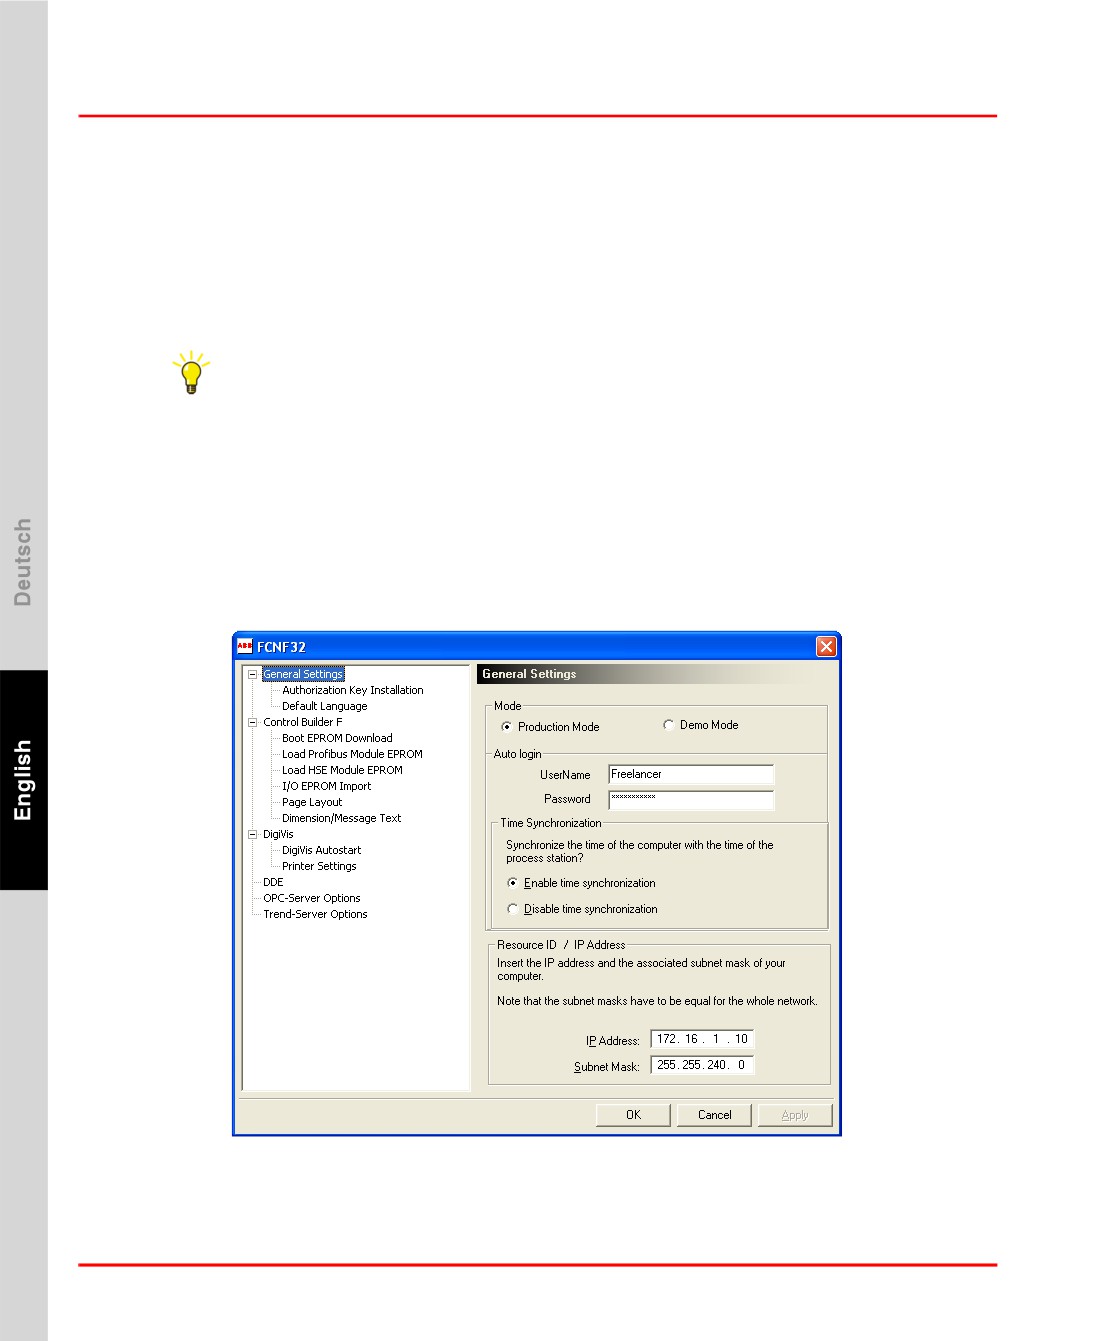
General Settings
tb500_20.bmp
66
Section 2 Freelance Installation
General Settings
Installation Modes
The Installation mode can be changed from Demo to Production or vice versa in
this dialog without having to reinstall the Software.
Demo Mode: To install the Software for demo-purpose or for a try-out.
Production Mode:
To install the Software in the production environment.
Selecting Production Mode will enable DigiVis Autostart. After reboot Windows
will start DigiVis automatically. This will prevent access to the Operating
System.
User account details
The DigiVis-user for the Production Mode in the Autostart mode is
defined in this dialog. The default User is “Freelancer” and the
default password is “welcome123#”. This can be changed as
required.
If the “Freelancer” user does not exist, it is created by the setup with
administrative rights. He is member of the “Administrators” group.
If another user is specified, it must be ensured that he has administrative rights
and is member of “Administrators” group as well.
Time Synchronization
This allows for the synchronization of the Windows computer time
with the time of the process station.
This parameter should be set consistently for all computers in a Freelance
system.
Time synchronization must be activated if DigiVis software and trend displays
are used in the Freelance system.
IP Address
The IP address uniquely identifies devices in the network.
Entry of IP address: 172.16.1.x,
For more information, see Network and IP Address Settings on
page 36.
67
General Settings
Section 2 Freelance Installation
Subnet Mask Defines whether the addressed device is located in the same
network or has to be addressed through routers.
Entry: 255.255.240.0
If you operate your Freelance system in a network with other network
components, you should contact your network administrator before allocating
the IP addresses.
Authorization Key Installation
You should have received an authorization key file from ABB. Enter the drive name
and/or directory path or select the directory where the authorization key file is
located, using the browser button.
When the Install button is clicked, the authorization code is transferred to the
installation directory.
Default Language
If you have installed Freelance Software in more than one language then the
language for the user interface can be selected by setting the locale in the windows
control panel to the required setting.
In case you set a locale in the Windows control panel and Freelance is not installed
in the language of this locale, then with this configuration dialog option you
determine which language Freelance uses for the user interface.
Example:
You have installed Freelance in English and in French, but have set the Windows
locale to Russian, then with this configuration dialog option you can specify that the
Freelance Software should use the English (or French) language for the user
interface.
There is a choice of the following
•
Control Builder F
•
DigiVis
•
DigiBrowse
•
Security Lock
68
Section 2 Freelance Installation
Settings for Control Builder F
•
OPC/Trend Server
A locale can only be chosen, if the relevant packages have been installed on the
concerned computer.
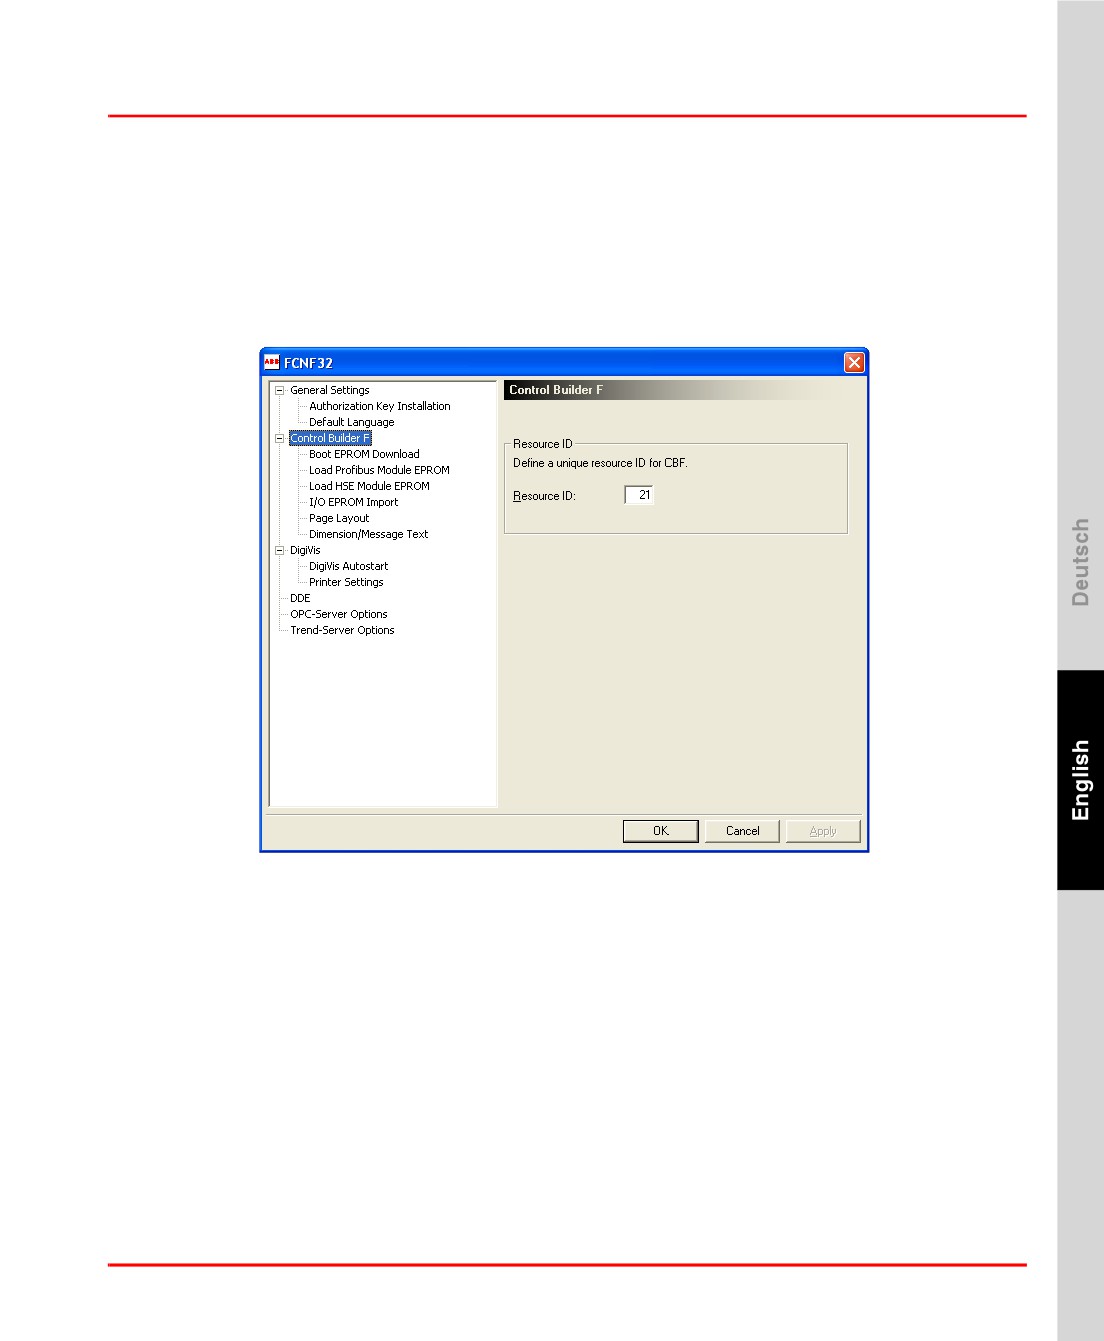
Settings for Control Builder F
tb500_21.bmp
Resource ID Several software packages can be run at the same time on a PC. To
enable these software packages to be addressed unambiguously,
each one must be assigned a unique number, the resource
identification number.
All the resources within a Control Builder F project must also have
a unique resource ID.
69
Settings for Control Builder F
Section 2 Freelance Installation
Boot EPROM Download
The boot EPROMs of AC 800F, AC 700F controllers, CPU modules of the rack-
based process station as well as the DCP gateway stations are updated.
The process station cold-starts after loading the boot EPROMs.
This requires that the TCP/IP protocol is loaded and that a connection is established
through the system bus to the AC 800F, AC 700F, process- and gateway stations.
IP Address/Host Name
Enter the IP Address or host name of the station for download.
If you are using a redundant station you should specify both
addresses (IP address 1 and IP address 2) and/or both host names.
After pressing the Download button, the current version of the boot EPROM is
loaded to the addressed CPU module or the controller.
If you have more than one AC 800F, AC 700F, process station and/or gateway
station, you must carry out this procedure for each station.
Redundancy for the AC 700F controller is not supported in this version.
Load Profibus Module EPROM
The EPROMs in the Profibus modules of connected AC 800F controllers can be
loaded with the current version.
Once the IP address or host name of a AC 800F controller has been entered, the
current EPROM version is loaded to all the Profibus modules of the controller
concerned.
If you are using a redundant station you should specify both addresses (IP address 1
and IP address 2) and/or both host names.
Load HSE Module EPROM
The EPROMs in the HSE modules of connected AC 800F controllers can be loaded
with the current version.
70
Section 2 Freelance Installation
Settings for Control Builder F
Once the IP address or host name of a AC 800F controller has been entered, the
current EPROM version is loaded to all the HSE modules of the controller
concerned.
If you are using a redundant station you should specify both addresses (IP address 1
and IP address 2) and/or both host names.
I/O EPROM Import
Current versions of EPROMs for the Rack I/O modules can be imported to the PC
from a floppy disk or a file directory.
To load the I/O EPROMs into the appropriate modules you must select the I/O
modules and start the load instance in the commissioning mode of
Control Builder F.
Enter the drive name and/or directory path or select the directory where the I/O
EPROM files are located, using the browser button.
When the Import button is clicked all I/O EPROM files are imported from the
specified directory into the system.
71
Settings for Control Builder F
Section 2 Freelance Installation
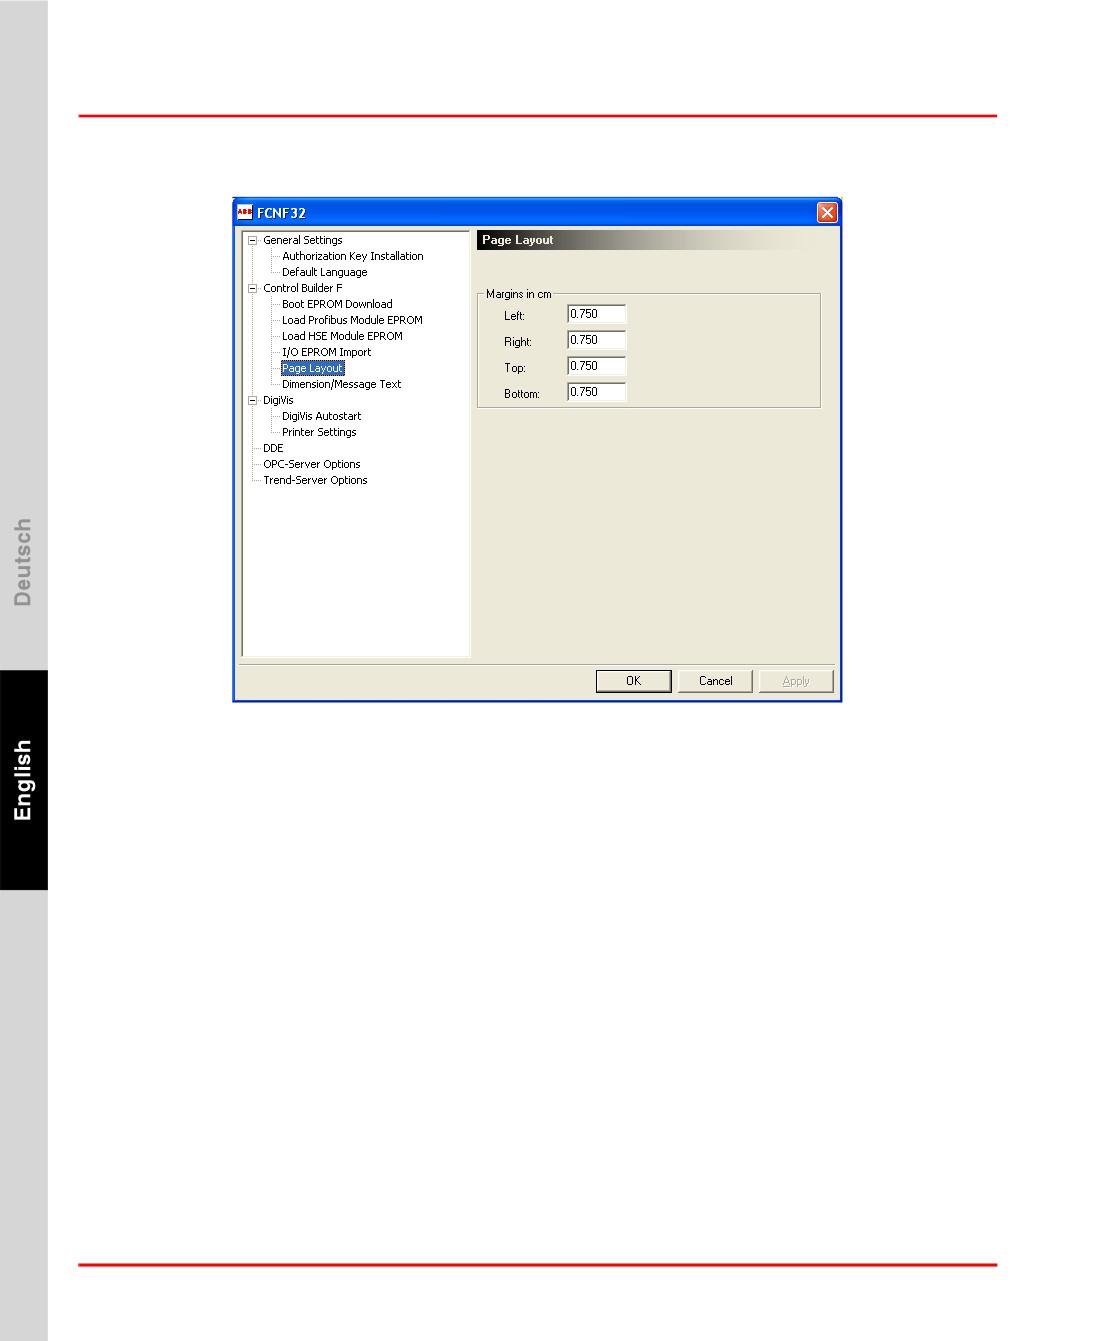
Page Layout
tb500_34.bmp
This dialog enables the printed page layout to be specified for the project
documentation.
Dimension/Message Text
Language
The selection list contains the language abbreviations of the files with the
dimensioning and message texts, which have already been installed on your PC.
When these are installed, a file “digit<language>.str”, e.g. digitus.str, is copied into
the installation directory. A language code should be selected, and the
corresponding file will then be copied to “digitool.str”. The texts of this file are used
when creating the user program in Control Builder F and when loading the program
to the operator station.
72
Section 2 Freelance Installation
Settings for Control Builder F
Select the language that will be used in the operator station.
Selection is only possible, if more than one language is installed.
Import
The Load button loads all files with the name “digit<language>.str” from the
specified directory into the installation directory; these files can then be made
available to Control Builder F through the Language setting dialog.
The default files can be modified using a text editor. The file structure cannot be
altered.
The texts are defined as follows under the section [PARA]:
DIMENSION_0 = dim_text1
DIMENSION_1 = dim_text2
DIMENSION_2 = dim_text3
NOTIFICATION_0 = messagetext1
NOTIFICATION_1 = messagetext2
NOTIFICATION_2 = messagetext3
Use this dialog if you have adapted the standard file to your project requirements
using a text editor.
73
Settings for DigiVis
Section 2 Freelance Installation
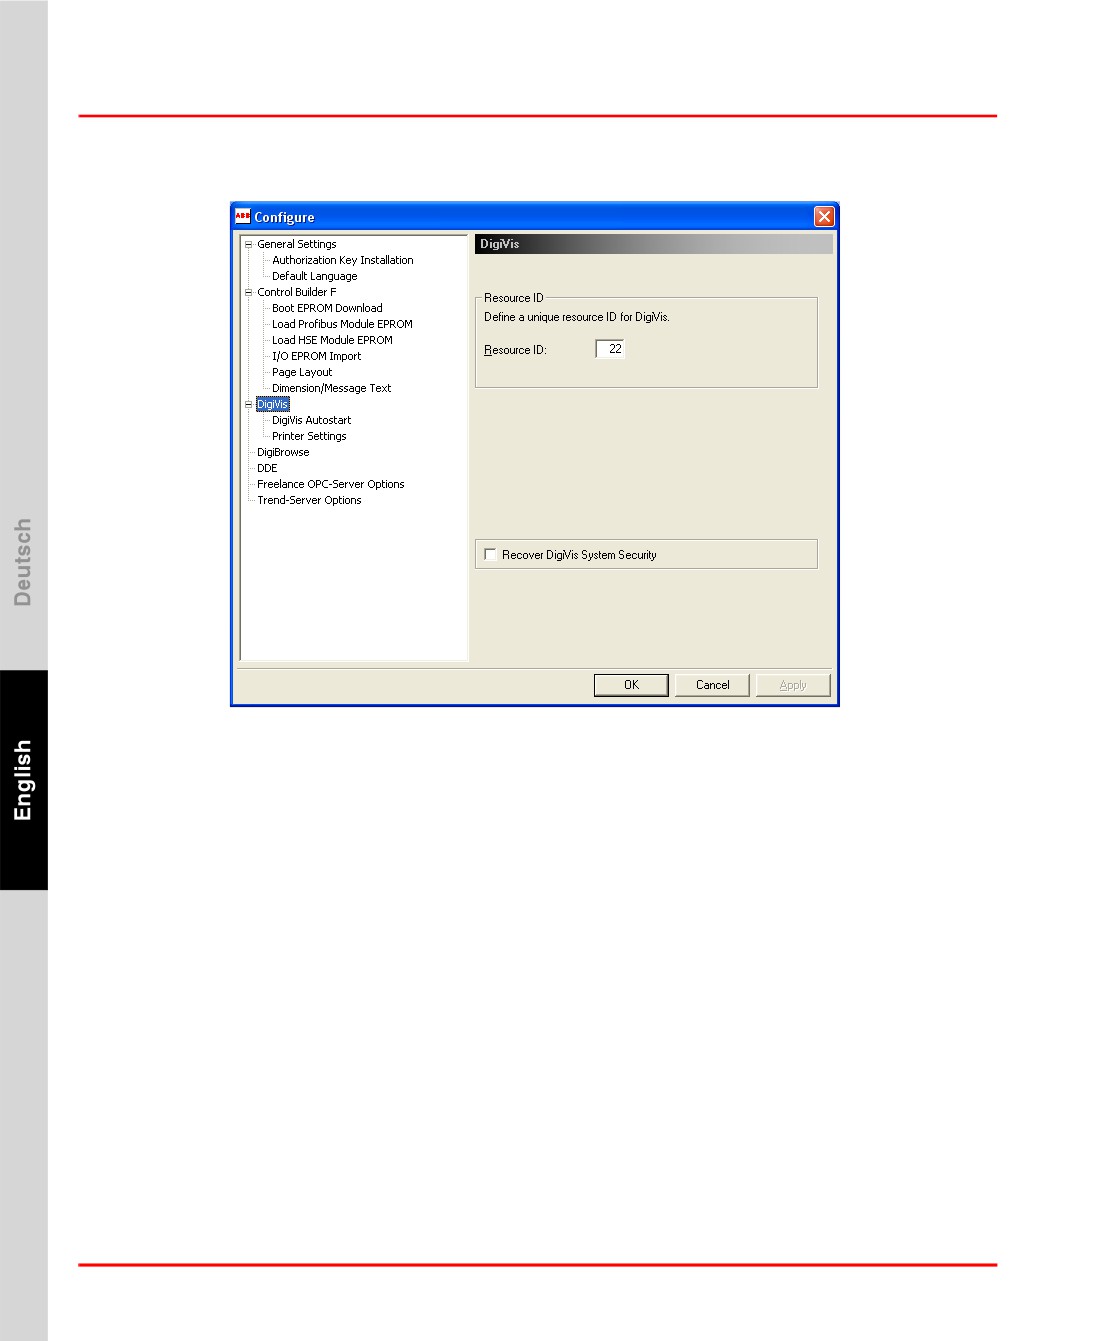
Settings for DigiVis
tb500_23.bmp
Resource ID Several software packages can be run at the same time on a PC. To
enable these software packages to be addressed unambiguously,
each one must be assigned a unique number, the resource
identification number.
All the resources within a Control Builder F project must also have
a unique resource ID.
Recover DigiVis System Security
This is only necessary if the message “DigiVis system security
corrupted! Please use the Configure tool to recover” appears when
DigiVis is started, e.g. after network software has been re-installed.
A message is displayed when system security has been successfully
restored.
DigiVis Autostart
DigiVis can be installed such that it is launched automatically after Windows starts.
74
Section 2 Freelance Installation
Settings for DigiBrowse
Yes, start DigiVis automatically (Recommended)
PC is restarted, windows logs in automatically with Auto Logon
user and DigiVis is launched.
Only those applications that have been started before the start of
DigiVis can be reached by the DigiVis user by means of ALT+TAB
keys.
No, start DigiVis manually
DigiVis will not be started automatically. DigiVis can be started
using the Start menu.
Printer Settings
Two printers are supported per operator station. One printer should be used for the
continuous output of the signal sequence log. The other printer is then available for
printing the operation logs or disturbance course logs. One of the two printers is also
used for hard copies.
Printer 1
Choose a printer installed under Windows, e.g. for continuous
stationery.
Printer 2
Choose a printer installed under Windows, e.g. a color printer.
Hardcopy Printer 1 / 2
Choose one of the installed printers to output a hardcopy from the
operator.
For hardcopies do not choose a printer which is used for producing signal
sequence logs.
Margins of Printer 1/2 in cm
The page layout for the two installed printers is defined.
Settings for DigiBrowse
The dialog is used to specify whether or not the user can delete archive files within
Browse.
75
Settings for DDE
Section 2 Freelance Installation
Settings for DDE
Resource ID Several software packages can be run at the same time on a PC. To
enable these software packages to be addressed unambiguously,
each one must be assigned a unique number, the resource
identification number.
All the resources within a Control Builder F project must also have
a unique resource ID.
DDE is supported with Freelance Systems running on Windows XP and not
supported with Freelance Systems running on Windows 7.
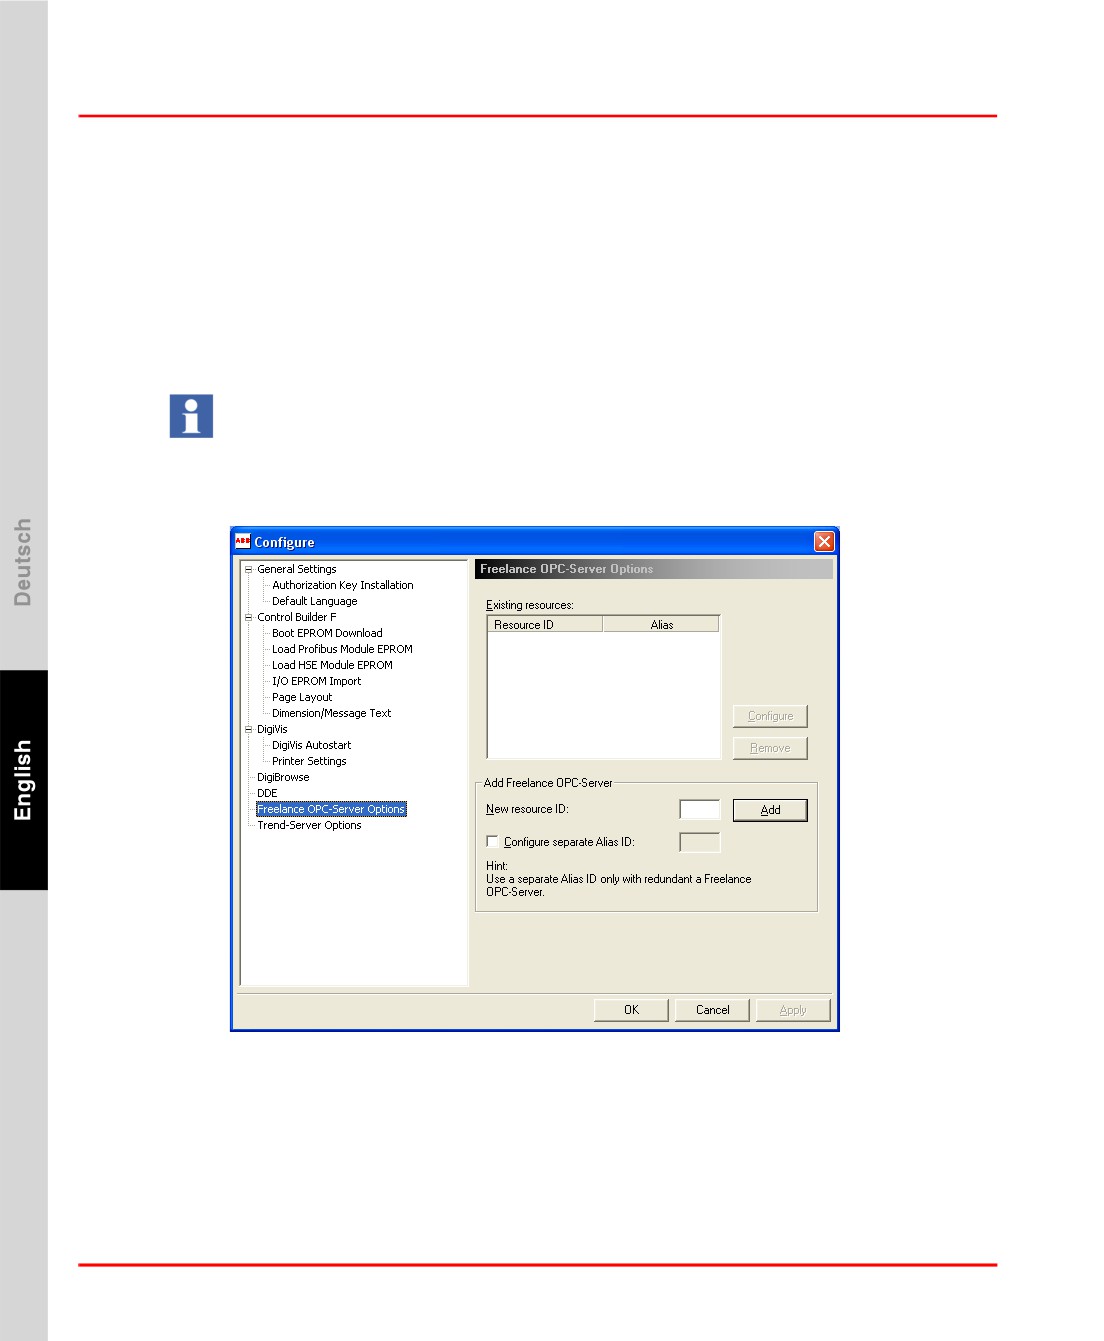
Settings for OPC Server
tb500_26.bmp
New resource ID
During the installation the OPC-Server software is installed on the
PC, but no instance is created. Enter the resource ID under which
the OPC Server shall be executed.
76
Section 2 Freelance Installation
Settings for OPC Server
Several software packages can be run at the same time on a PC. To
enable these software packages to be addressed unambiguously,
each one must be assigned a unique number, the resource
identification number.
All the resources within a Control Builder F project must also have
a unique resource ID.
Add
After entering a resource ID, this button is used to create an instance
of the OPC Server. In this way you can create several OPC Server
instances on one PC.
Configure Separate Alias ID
In addition to the resource ID which is used for communication
within a Freelance projects, a second resource ID can be
configured. To establish a redundant OPC connection for an
Operate IT Process Portal A operating system, two different
resource IDs are required. This checkbox must not be selected for
standard applications.
Existing Resources
The list shows the resource IDs of the OPC Server F instances
created on this PC.
Configure
Allows to run the OPC Server selected in the list with another user
account.
Remove
When a list entry is selected, this instance of the OPC Server F is
deleted.
Deleting the last instance of the OPC Server F on a computer does not
automatically delete the OPC Server software.
77
Settings for Trend Server
Section 2 Freelance Installation
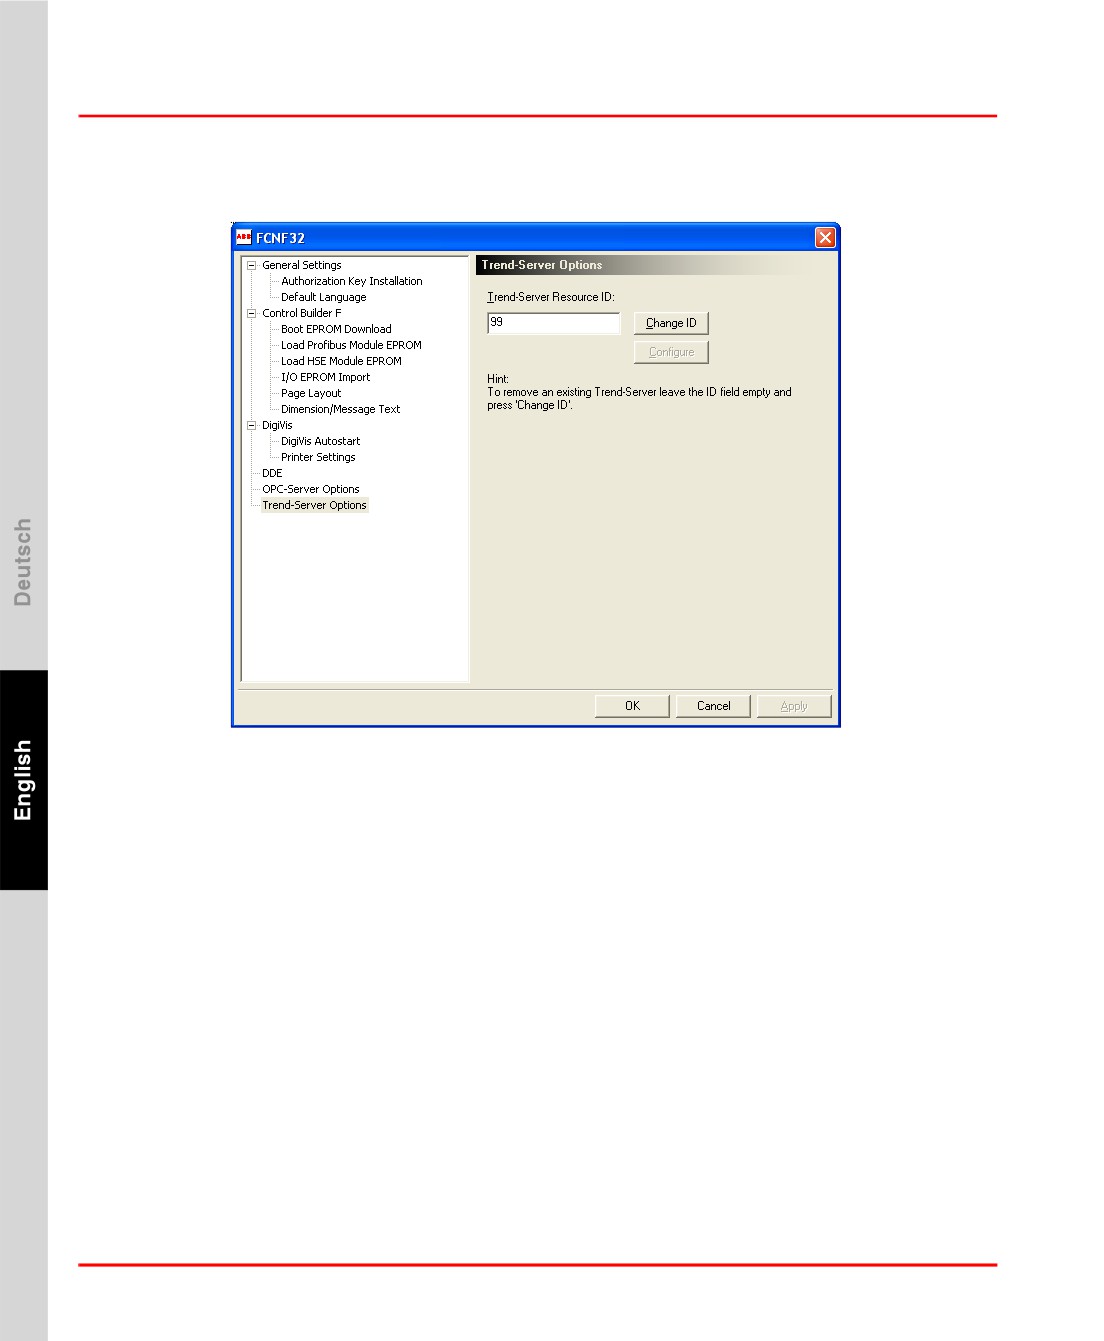
Settings for Trend Server
tb500_28.bmp
Trend-Server Resource ID
During the installation the software is installed on the PC, but no
instance is created. Enter the resource ID under which the Trend
Server shall be executed.
Several software packages can be run at the same time on a PC. To
enable these software packages to be addressed unambiguously,
each one must be assigned a unique number, the resource
identification number.
All the resources within a Control Builder F project must also have
a unique resource ID.
Change ID
An instance of the Trend Server is created after entering a resource
ID. If you want to use the Trend Server under a different resource
ID, edit the displayed number before once more pressing the
Change ID button.
78
Section 2 Freelance Installation
Installation Complete
If you want to delete the Trend Server from the local PC, delete the
displayed number before pressing Change ID.
Configure
Allows to run the Trend-Server with another user account.
Confirm Changes
Once all the settings have been made, click OK accept all changes and to finish the
Configure tool.
Installation Complete
We wish you every success using Freelance to perform your automation tasks.
Control Builder F will greatly reduce the effort required. Not least because of
standards such as Windows and IEC 61131-3, this is an innovative product which is
setting standards in this field through its use of a common database for configuring
the user programs and for display.
Should you have unexpected problems during installation, please contact your local
Freelance provider or your local ABB office.
Checking the Installation with Check
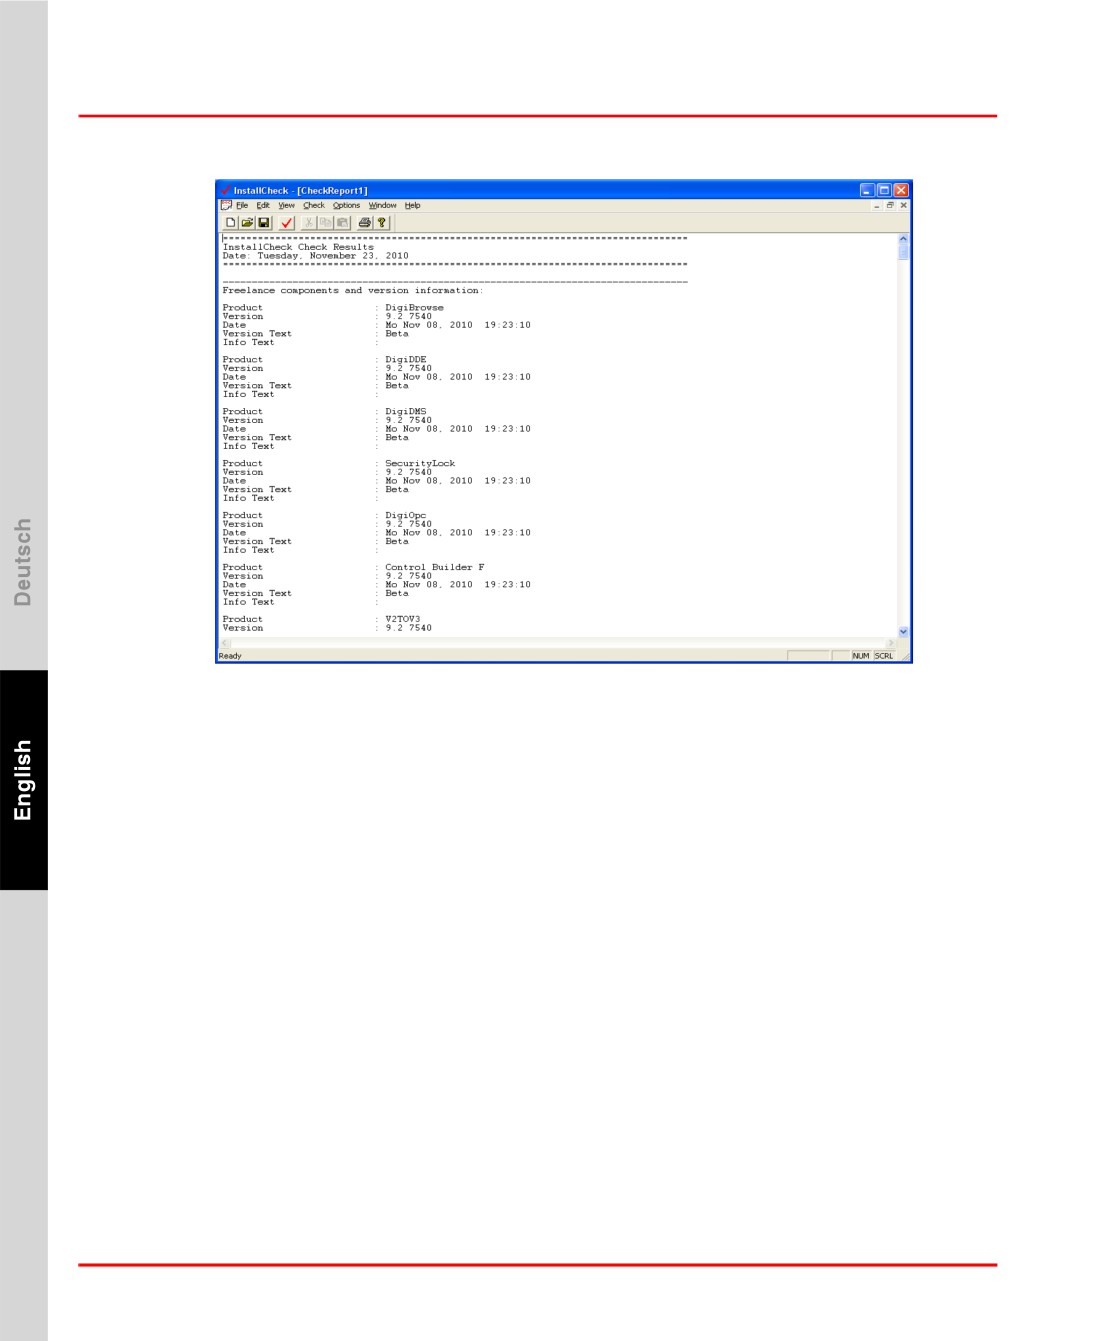
The test program Check can be used to check the installation.
> Start > All Programs > ABB Industrial IT > Freelance V9.2SP1
> Tools > Check
79
OPC Tunnel
Section 2 Freelance Installation
tb005.bmp
Check > All Components initiates a full test of all the installed Freelance
components. All the files that have been installed are checked.
The Check program can also be started from Control Builder F from the menu item
Help / Info / System information.
A test log can be output, allowing you to compare the nominal status and the actual
status. The log can be output to a file or a printer.
OPC Tunnel
The OPC Tunnel is a new feature introduced in Freelance version 9.2. The tunnel
simplifies the communication and configuration between OPC servers and their
clients in a distributed environment. This software is used to communicate between
the DigiVis nodes and OPC/Trend servers as well.
80
Section 2 Freelance Installation
Installation of OPC Tunnel Server
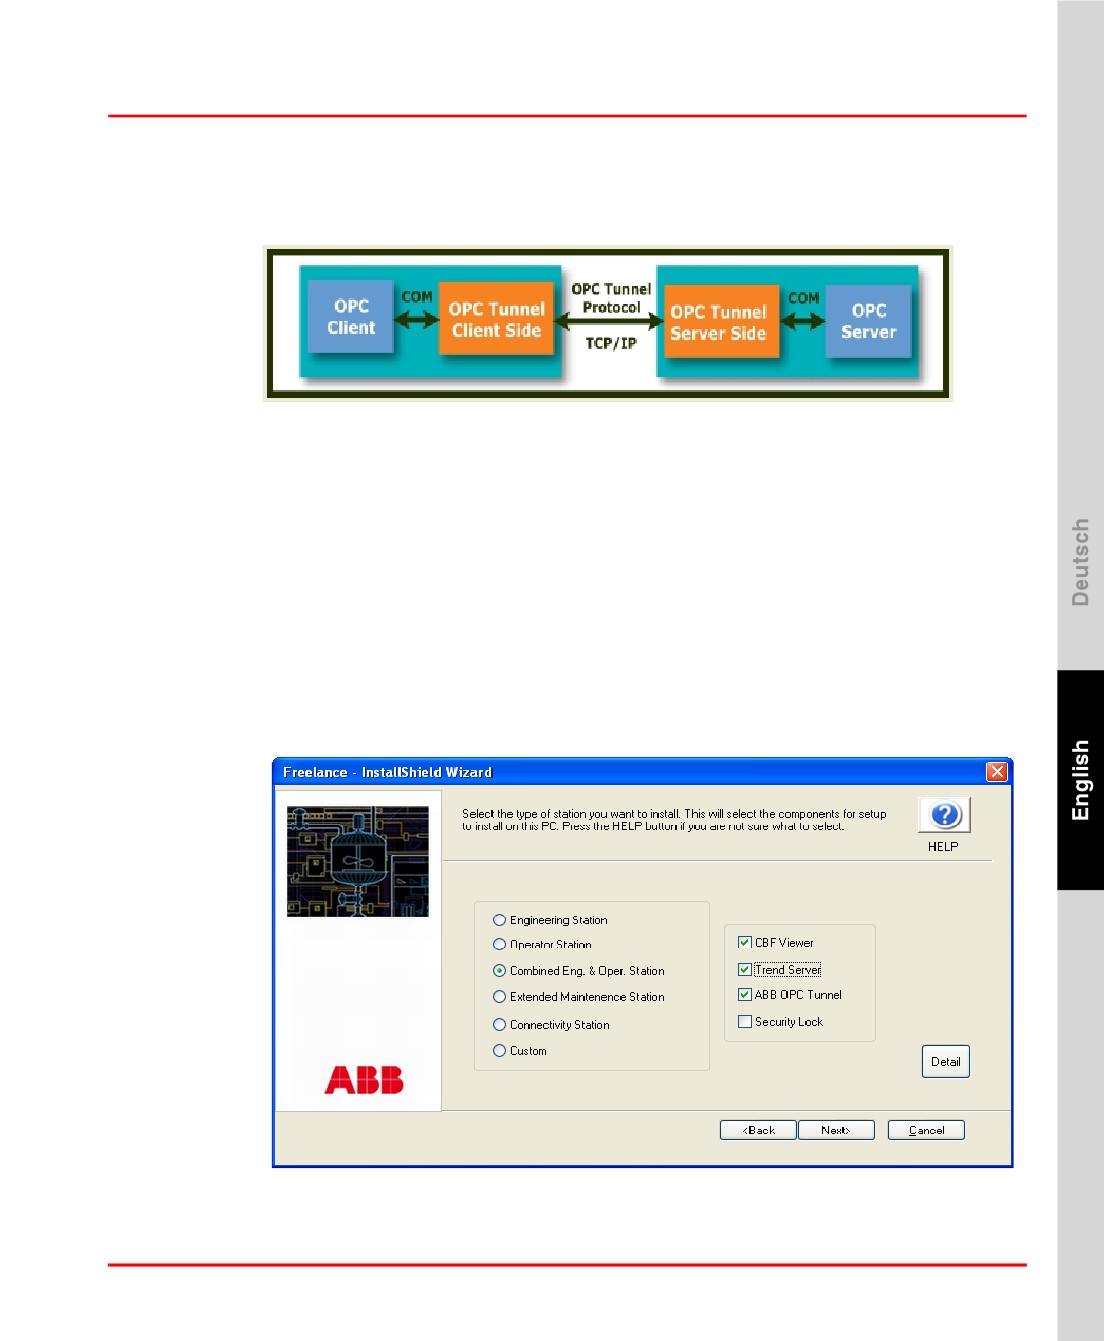
The OPC Tunnel Software has three major components: OPC Tunnel Client, OPC
Tunnel Server and OPC Tunnel Configurator.
Tunnel Architecture.bmp
The OPC Tunnel Client side is integrated into the Control Builder F and DigiVis and
will start automatically.
The OPC Tunnel Server has a separate configuration tool which is not part of
Control Builder F or DigiVis.
The OPC Tunnel Configurator is used to setup the communication parameters of the
tunnel.
Installation of OPC Tunnel Server
The Freelance setup installs the OPC Tunnel if the checkbox against it in the
“Workplace Type” dialog is selected.
tb500_2.bmp
81
Configuration of the OPC Tunnel
Section 2 Freelance Installation
The OPC Tunnel server must always be installed on the same PC as the OPC
server.
Configuration of the OPC Tunnel
To start the OPC Tunnel Configurator:
> Start > Programs > ABB Industrial IT > Freelance > OPC Tunnel >
Configurator
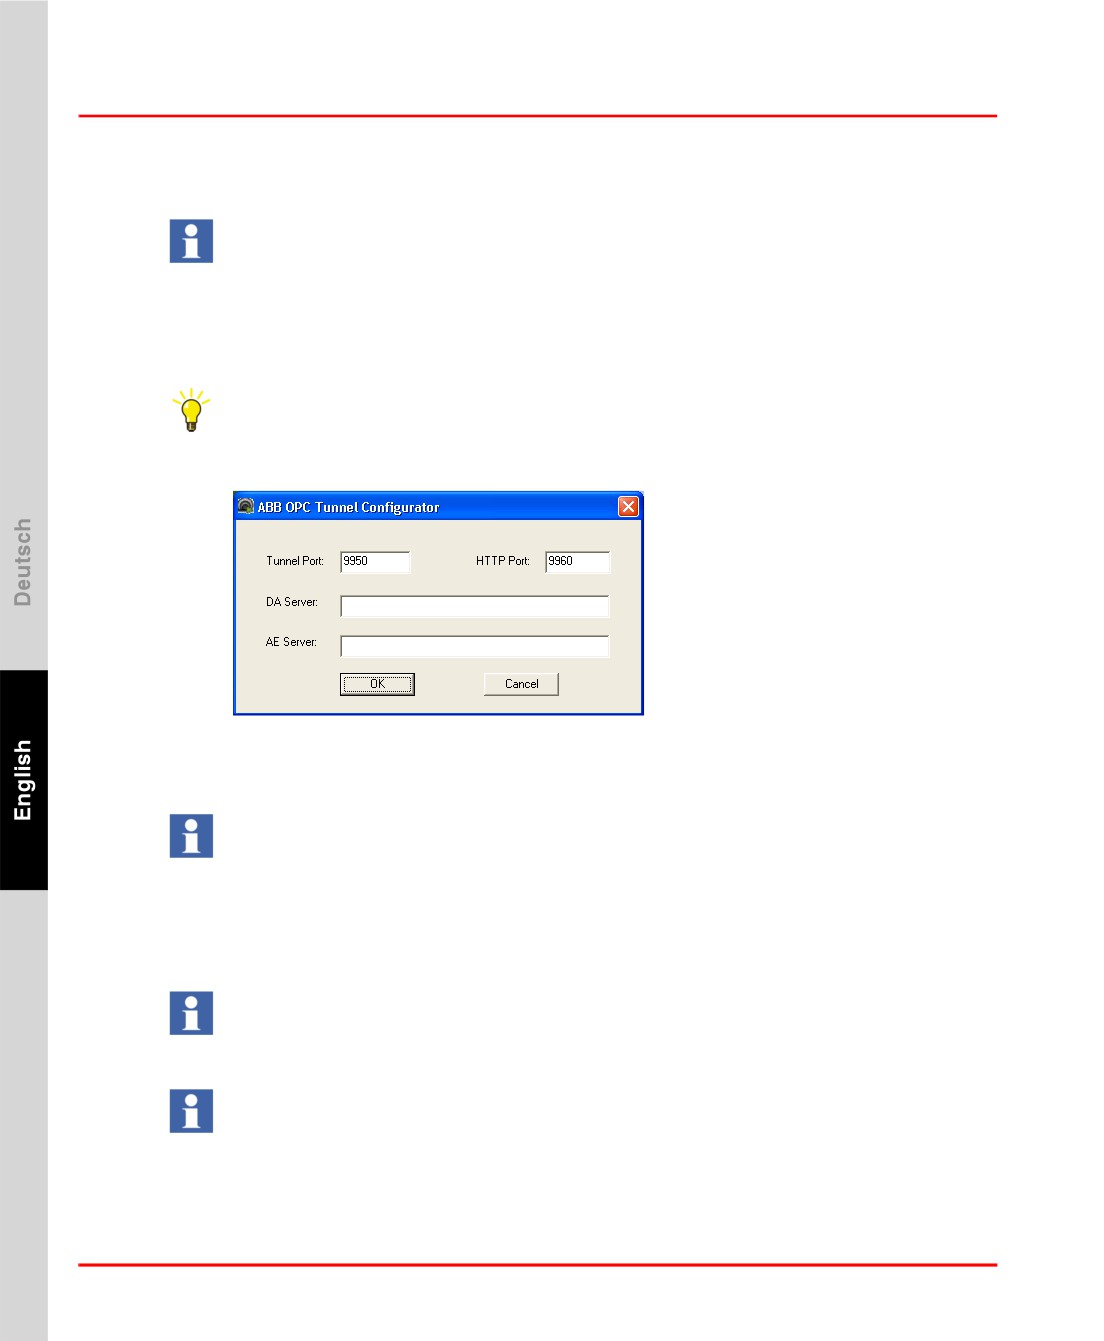
The following dialog shows up:
Tunnel Configurator.bmp
This dialog is used to specify the Prog ID of the OPC DA and OPC AE servers and
the port numbers that are used for these services.
The Freelance OPC Server names are:
DA Server: Freelance2000OPCServer.<ResID>
AE Server: Freelance2000OPCAEServer.<ResID>
The last two digits <ResID> of the Prog ID is the unique resource ID assigned to
the server.
The default port for the Tunnel is 9950. If the user changes this, then the
corresponding changes have to be made in the OPC Gateway D-GS resource
configuration (P-Tree).
The Trend Server does not use AE items.
In case of a Trend Server the DA server must be configured and AE server should
be empty.
82
Section 2 Freelance Installation
OPC Tunnel System Tray
Click on OK to save the values.
Now restart the OPC Tunnel:
If not already running, start the OPC Tunnel System Tray with
> Start > All Programs > ABB Industrial IT > Freelance > OPC tunnel >
System Tray
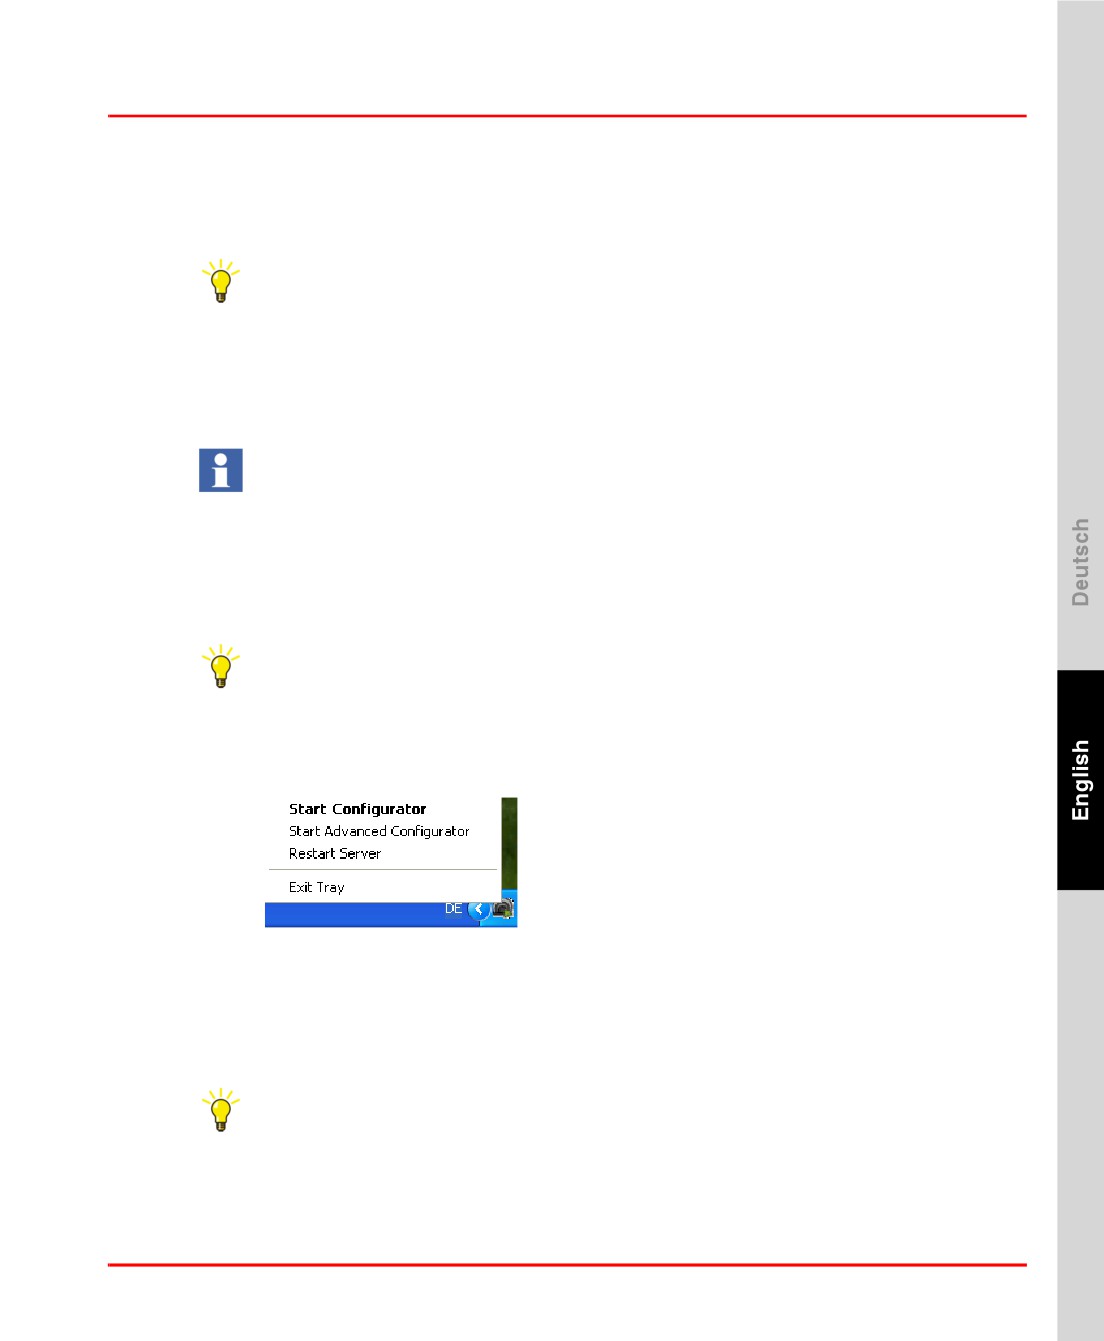
In the task bar tray right click the OPC Tunnel System Tray icon.
Select Restart Server
It is necessary that the OPC Tunnel must be restarted when there is a change in
the tunnel configuration.
OPC Tunnel System Tray
Easy access to the OPC Tunnel configurator is made possible by starting the OPC
Tunnel System Tray.
Start > All Programs > ABB Industrial IT > Freelance > OPC tunnel >
System Tray
The status of the OPC Tunnel is indicated by an icon in the windows tray. The OPC
Tunnel components can be reached by using the right mouse click on this icon as
shown below.
Tunnel System Tray.bmp
Diagnostics of the OPC Tunnel
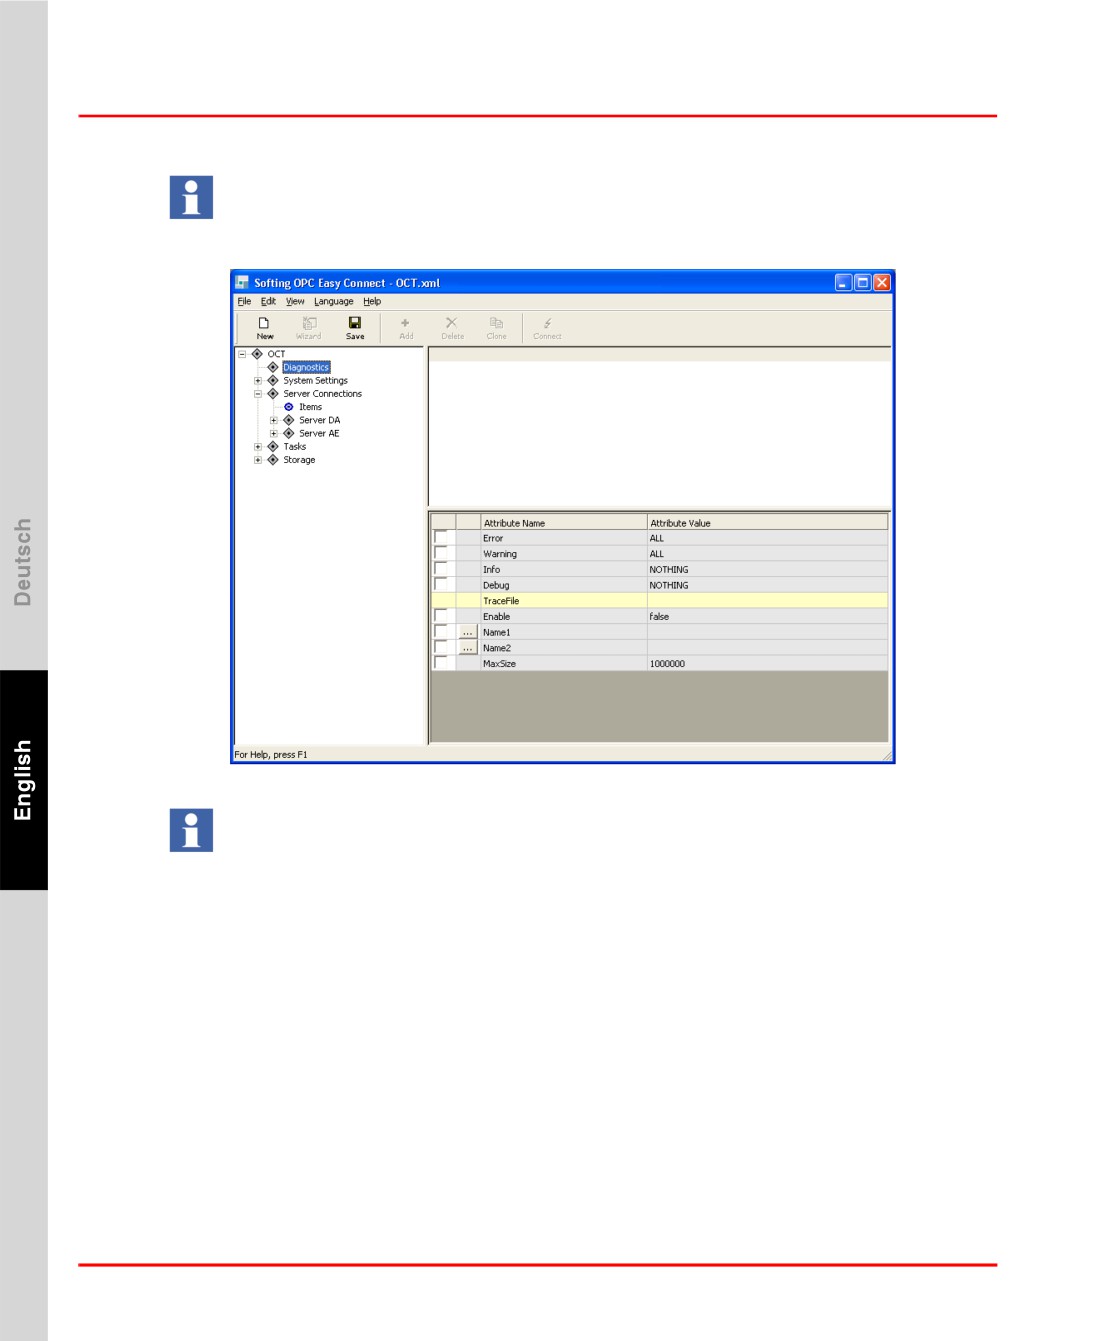
Diagnostic data of the OPC Tunnel can be captured in a log file using this
functionality of the Advanced Configurator.
Start > All Programs > ABB Industrial IT > Freelance > OPC tunnel >
Advanced Configurator
83
FTP Server
Section 2 Freelance Installation
This functionality is recommended to be used only by L3/L4 support personnel
or by advanced users of the system.
Tunnel Diagnostics.bmp
The log files (E.g. Trace.txt) are first created in the path <Freelance_Installation_
Folder>\OPCTunnel and the paths for the same are specified in the Diagnostics
Window.
FTP Server
DigiVis and ControlBuilder F have built-in FTP Clients. For some features like
automatic archiving an FTP server can be used. This chapter explains the basic
installation of an FTP server.
The recommended FTP server to use together with Freelance is the Microsoft FTP
server. It is delivered with certain versions of Windows and can be installed via the
Windows “Add or Remove Programs” control panel. It runs as a service process and
uses the maintenance infrastructure of the internet information server.
84
Section 2 Freelance Installation
FTP Server
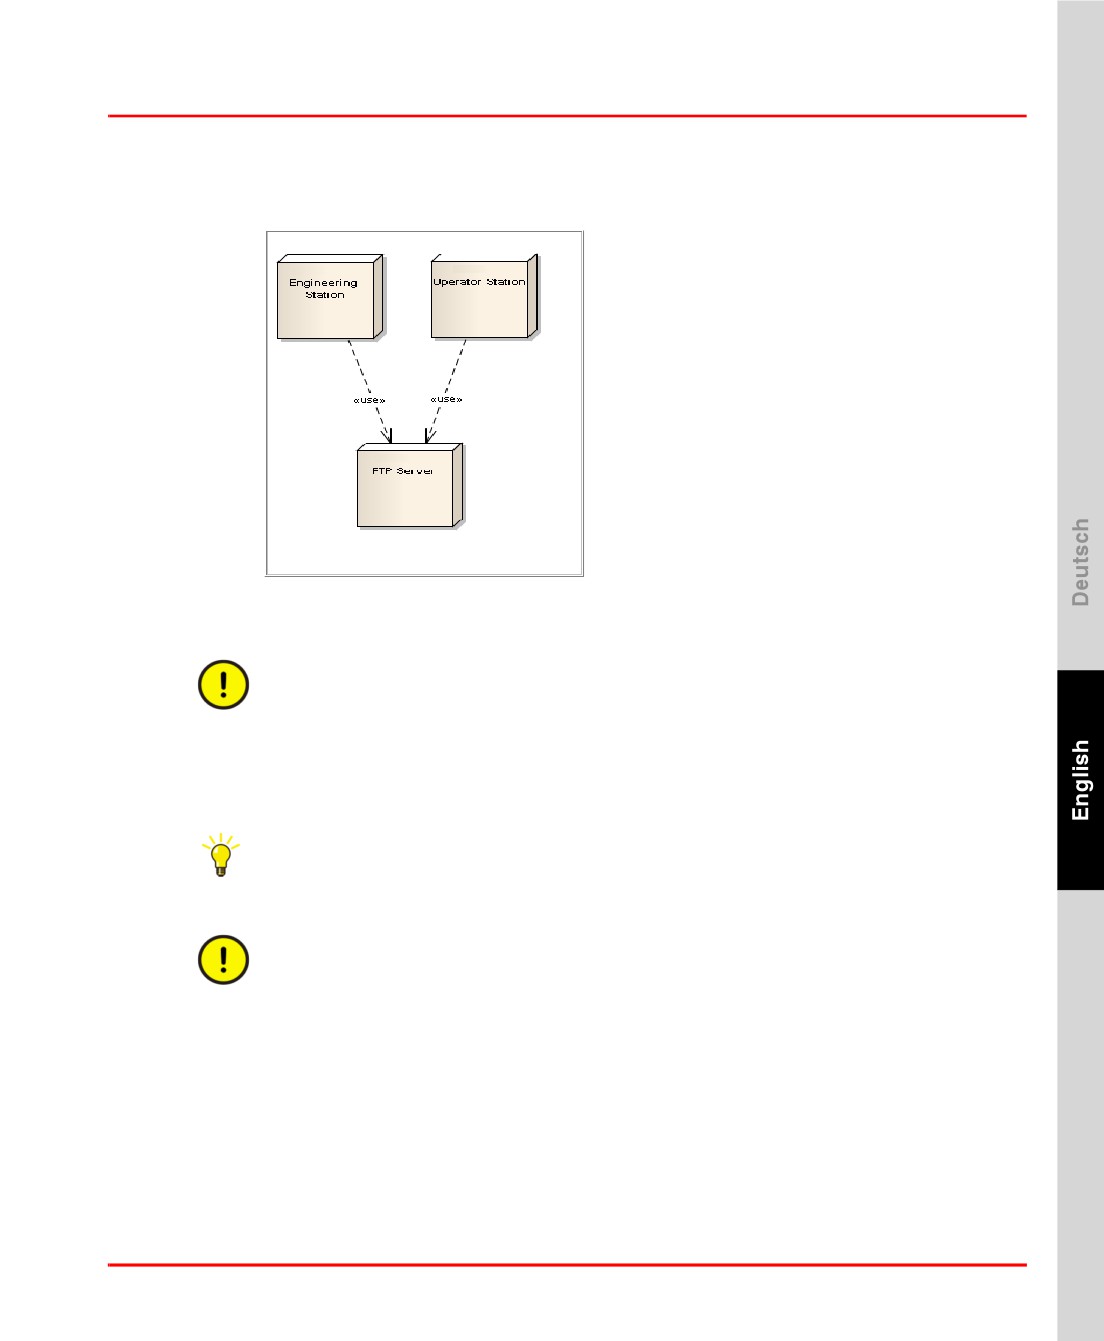
For data safety reasons, it is recommended to run the FTP server on a separate
machine within the controller network. A typical network setup could look like this:
FTP Scenerio.bmp
For security reasons use a specific FTP login user with limited rights for FTP
server login. For example create a Windows user called “FreelancerFTP” for that
purpose on the machine that hosts the FTP server.
Use a unique password for FTP operations.
It is not necessary to create this Windows user on the FTP client machines.
The FTP user must have all access rights to the FTP server root directory and all
subdirectories on file system level. Otherwise it may not be possible to read or
write files.
In the described basic configuration FTP passwords are transmitted as clear text
over the network.
Clarify a secure FTP setup with the network and system administrators.
The following chapters about FTP server installation and configuration are kept as
simple as possible. The intention is to give a working starting point that can be
customized as required.
85
FTP Server under Windows XP
Section 2 Freelance Installation
FTP Server under Windows XP
FTP Server Installation
> Start > Control Panel > Add or Remove Programs
Click on the Add/Remove Windows Components icon
Select the Internet Information Services (IIS)
Click on the Details... button
Check File Transfer Protocol (FTP) Service
Ensure that the Internet Information Services Snap-In is checked as well
Click OK
Click Next
The FTP server is installed now.
86
Section 2 Freelance Installation
FTP Server under Windows XP
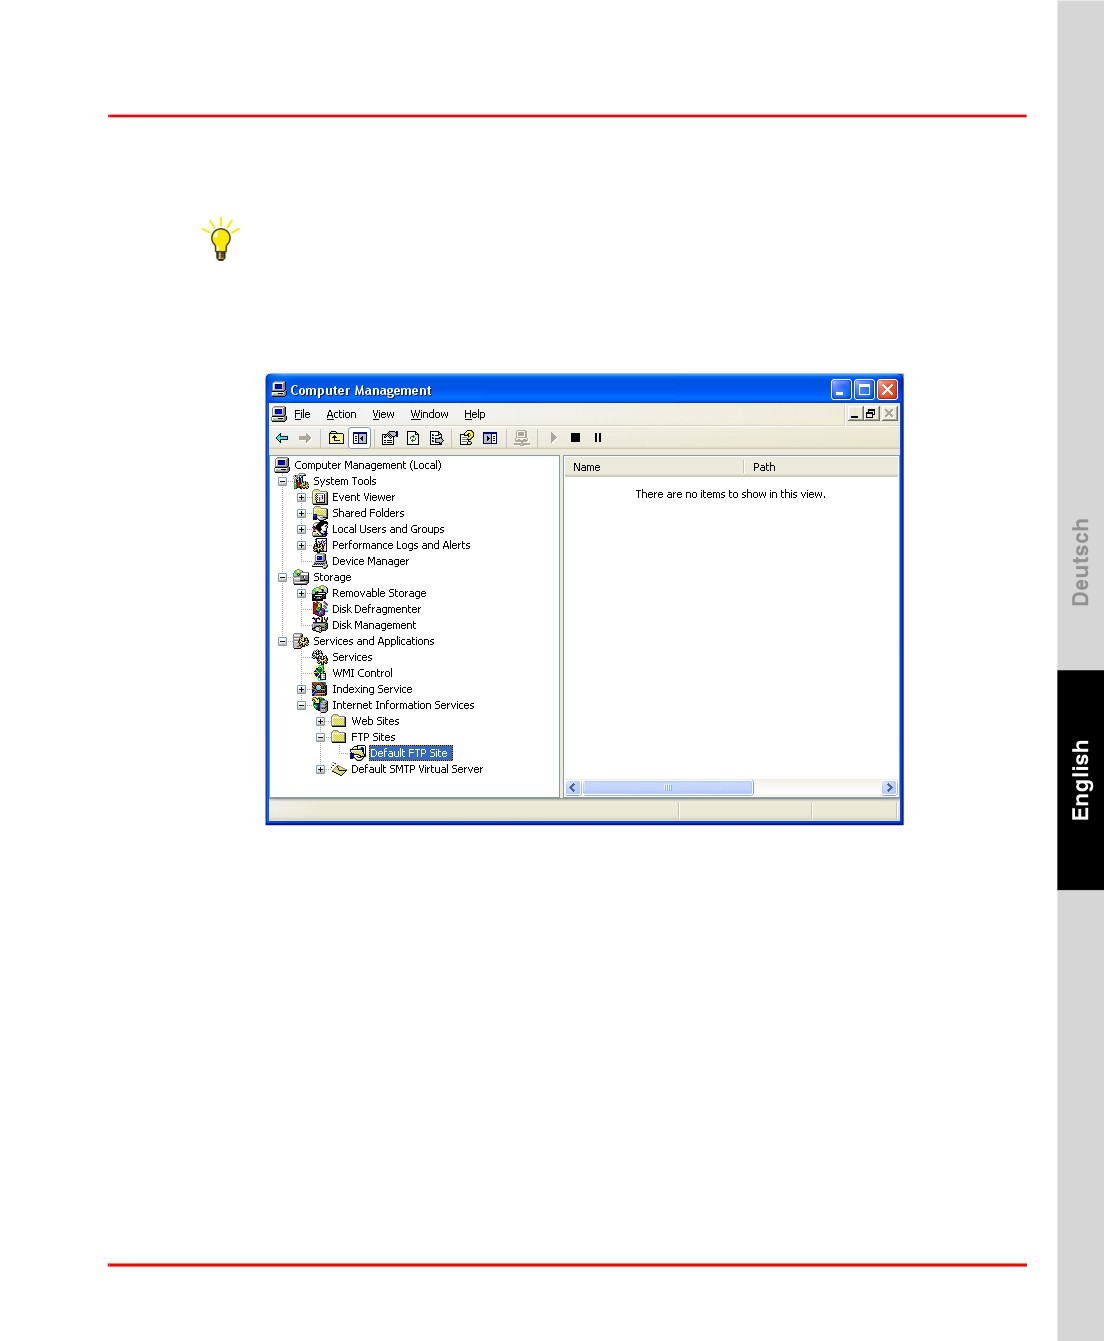
FTP Server Configuration
> Start > Control Panel > Administrative Tools
Double-click Computer Management
Expand Services and Applications > Internet Information Services > FTP
Sites > Default FTP Site.
FTP WinXP Default FTP Site.bmp
Right-click Default FTP Site and select Properties. The configuration dialog for
the FTP server is displayed now.
87
FTP Server under Windows XP
Section 2 Freelance Installation
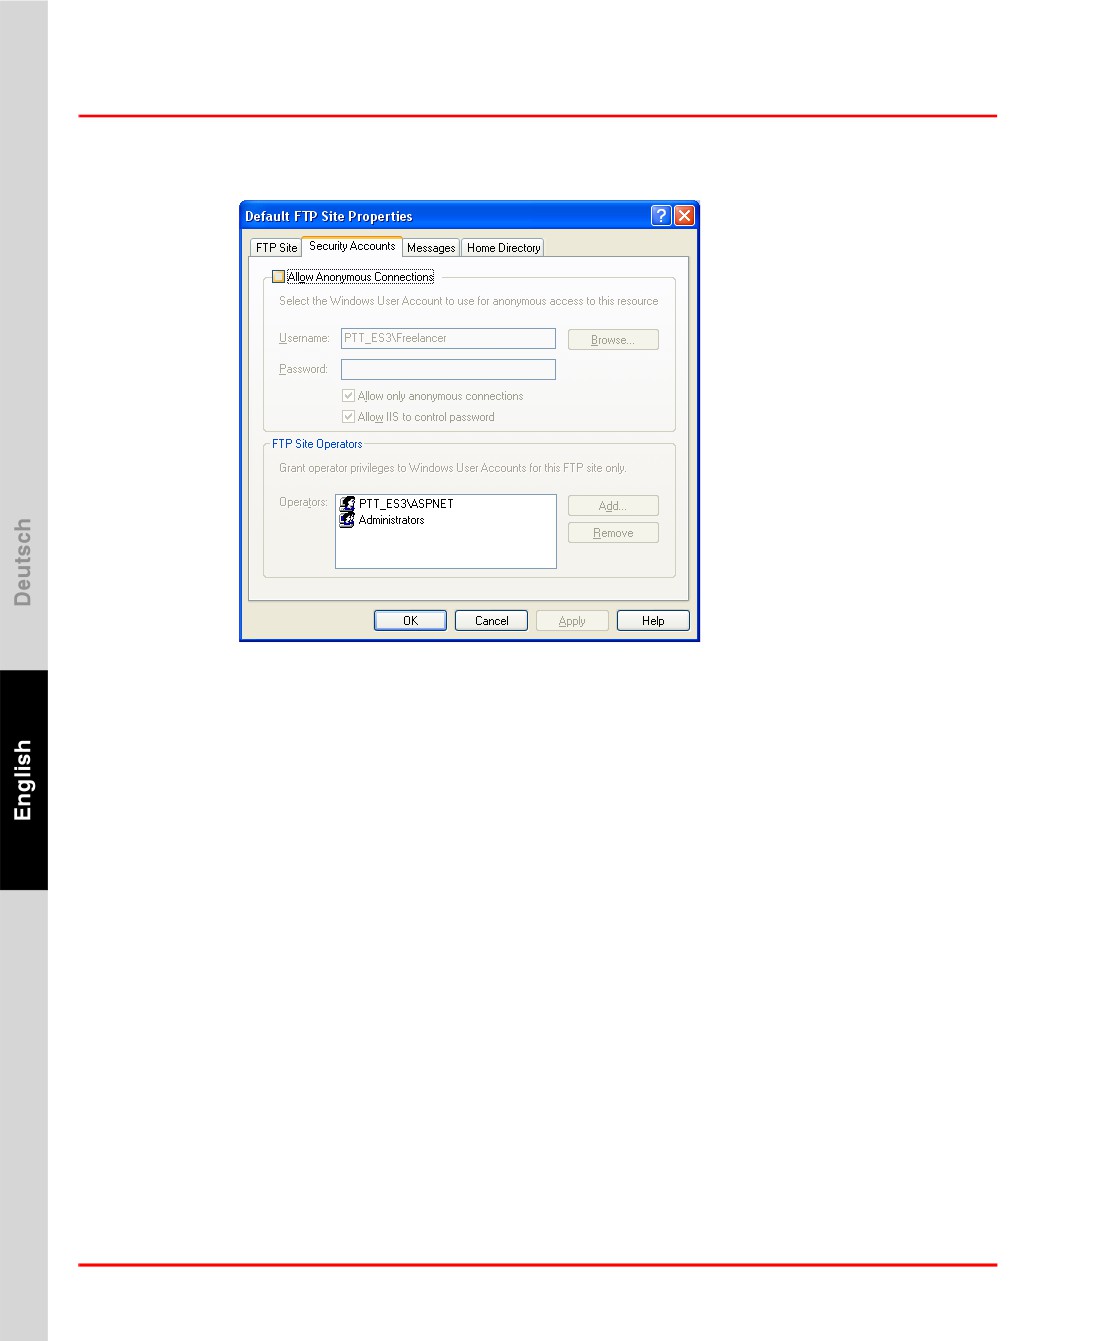
FTP WinXP FTP Security.bmp
Click the Security Accounts tab.
88
Section 2 Freelance Installation
FTP Server under Windows XP
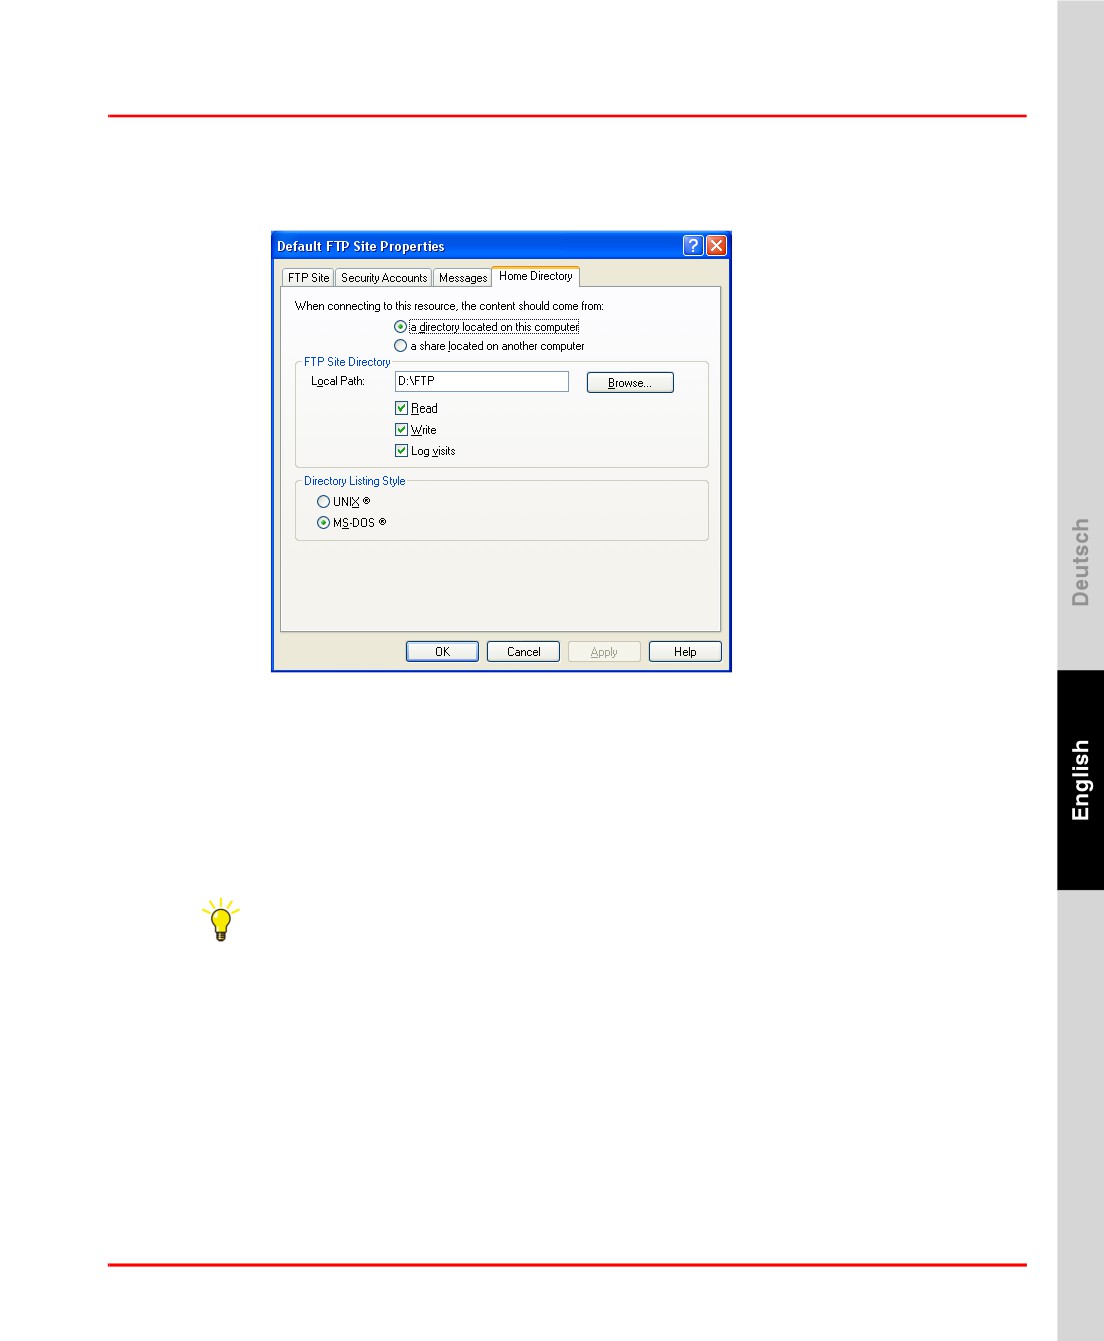
Clear the check box Allow Anonymous Connections to disallow anonymous
access.
FTP WinXP Default FTP Site Properties.bmp
Click the Home Directory tab.
Select an appropriate FTP Site Directory directory.
Check all three access levels Read, Write and Log visits.
Click OK to finish the FTP server setup. The basic FTP server configuration is
complete now.
The FTP login user - e.g. “FreelancerFTP” - must have the necessary access
rights to the FTP site directory - here “D:\FTP” - and subdirectories on file
system level. Otherwise he might not be able to read or write files, even if the
server allows it.
89
FTP Server under Windows 7
Section 2 Freelance Installation
FTP Server under Windows 7
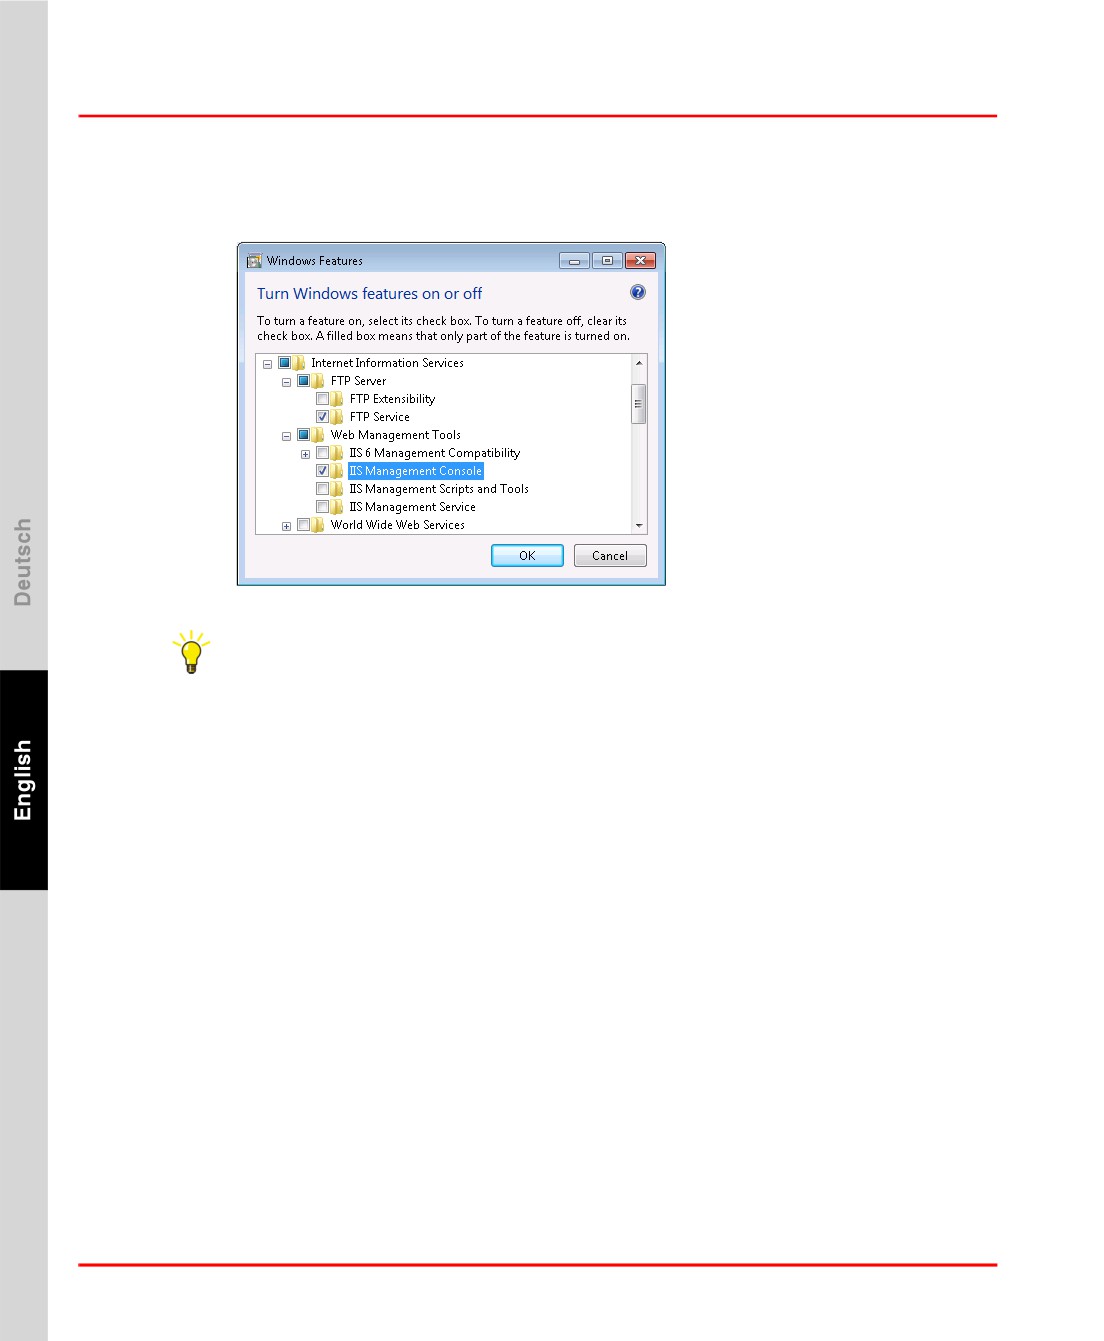
FTP Server Installation.
FTP Server Win7 Windows Features.bmp
> Start > Control Panel > Programs > Programs and Features
Click Turn Windows features on or off in the left navigation bar.
The Windows Features are displayed.
Expand Internet Information Services > FTP Server and Select FTP Server
Expand Internet Information Services > Web Management Tools and select
IIS Management Console
Click OK
The FTP server is installed now
90
Section 2 Freelance Installation
FTP Server under Windows 7
FTP Server Configuration
> Start > Control Panel > System and Security > Administrative Tools
Double-click Computer Management
Expand Services and Applications > Internet Information Services
The IIS Management Console is displayed. It has a left tree area named
“Connections”, a right area called “Actions” and context dependent area in
the middle..
> In the Connections tree, expand the root node
> Select Sites
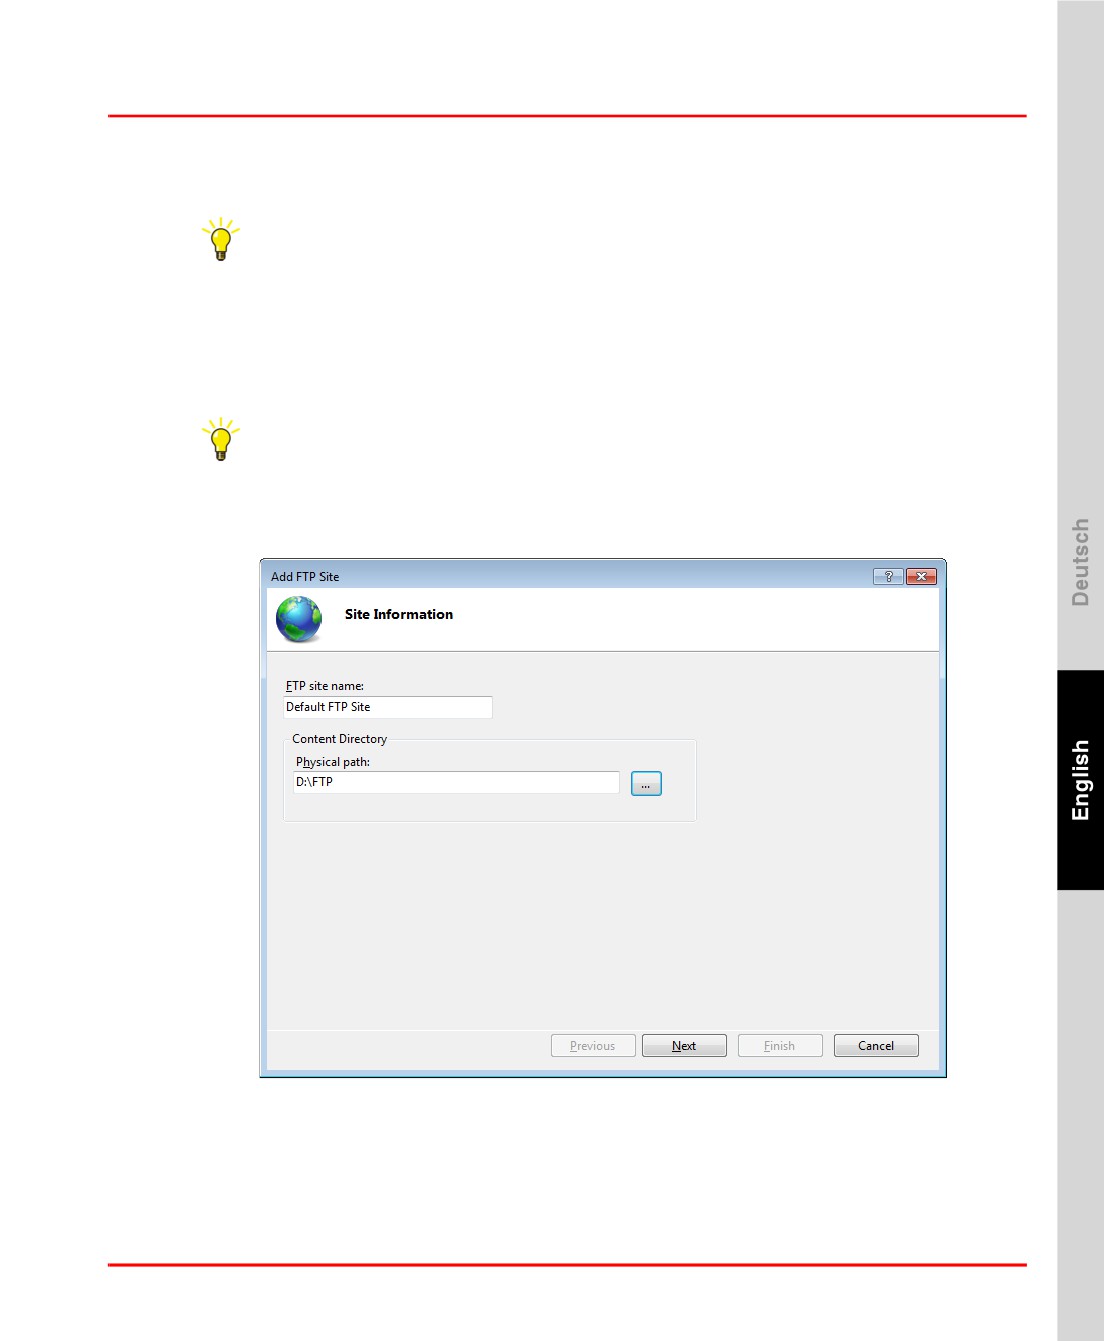
> Right-click on Sites and then select Add FTP Site
A wizard to configure an FTP site opens.
FTP Add FTP Site us.bmp
Enter the FTP site properties:
91
FTP Server under Windows 7
Section 2 Freelance Installation
FTP site name:
Enter a free choosable name your site, e.g. “Default FTP Site”.
Content Directory:
Select a root directory path for the FTP site. Below this directory all
content of the FTP site is stored.
Click Next.
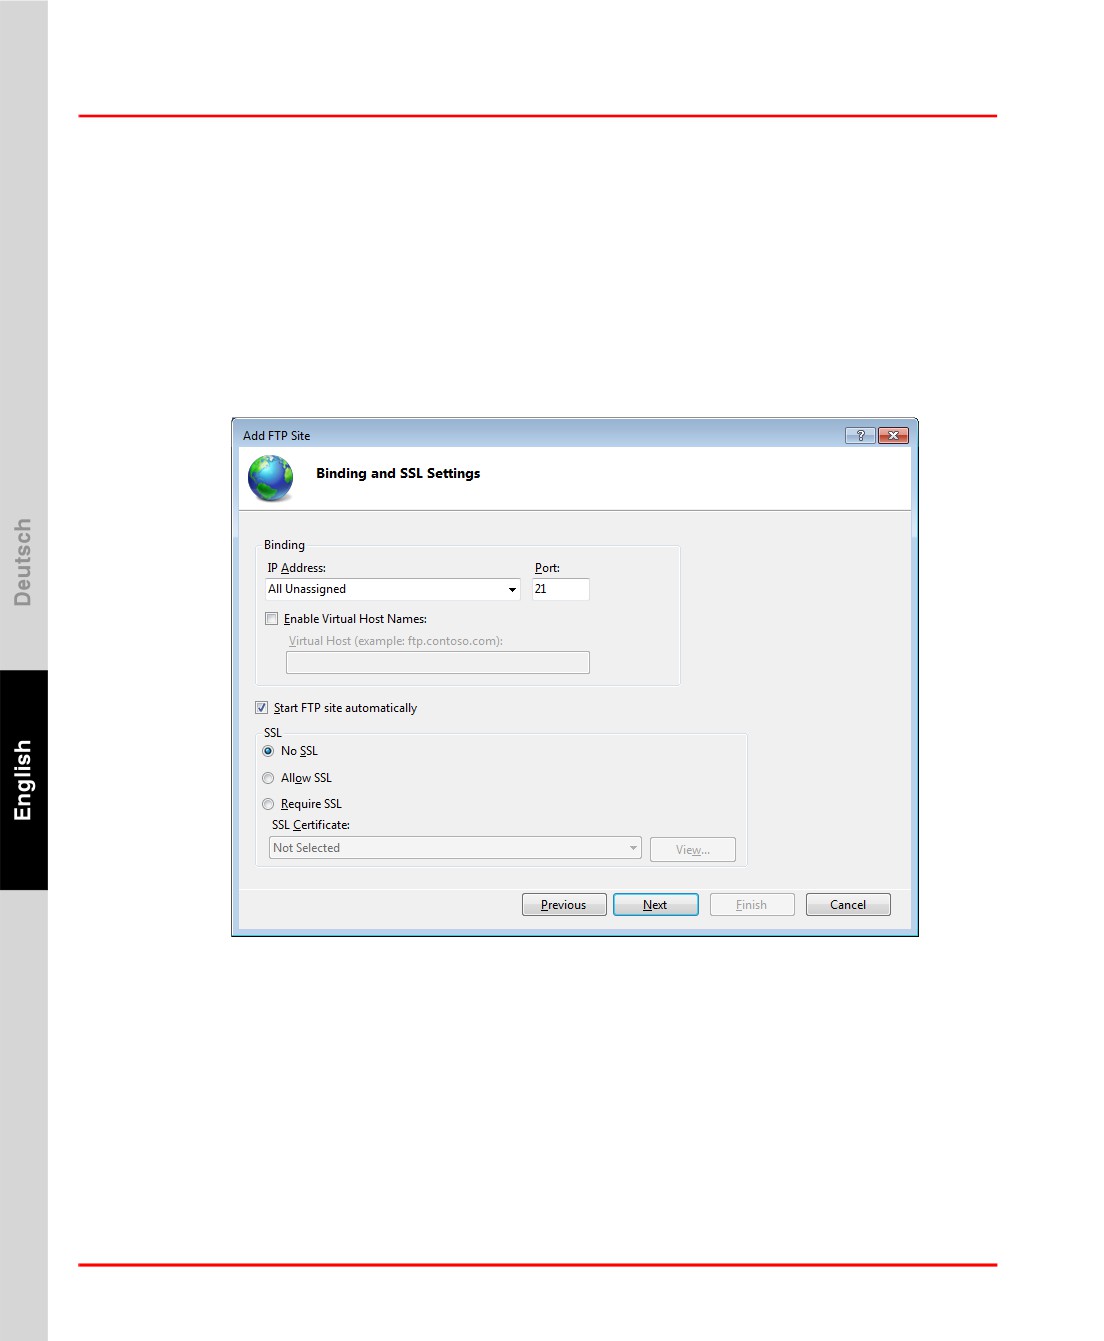
The Bindings and SSL Settings can be configured now.
FTP Binding and SSL figure us.bmp
Select No SSL instead of Require SSL.
Click Next to continue the wizard.
92
Section 2 Freelance Installation
FTP Server under Windows 7
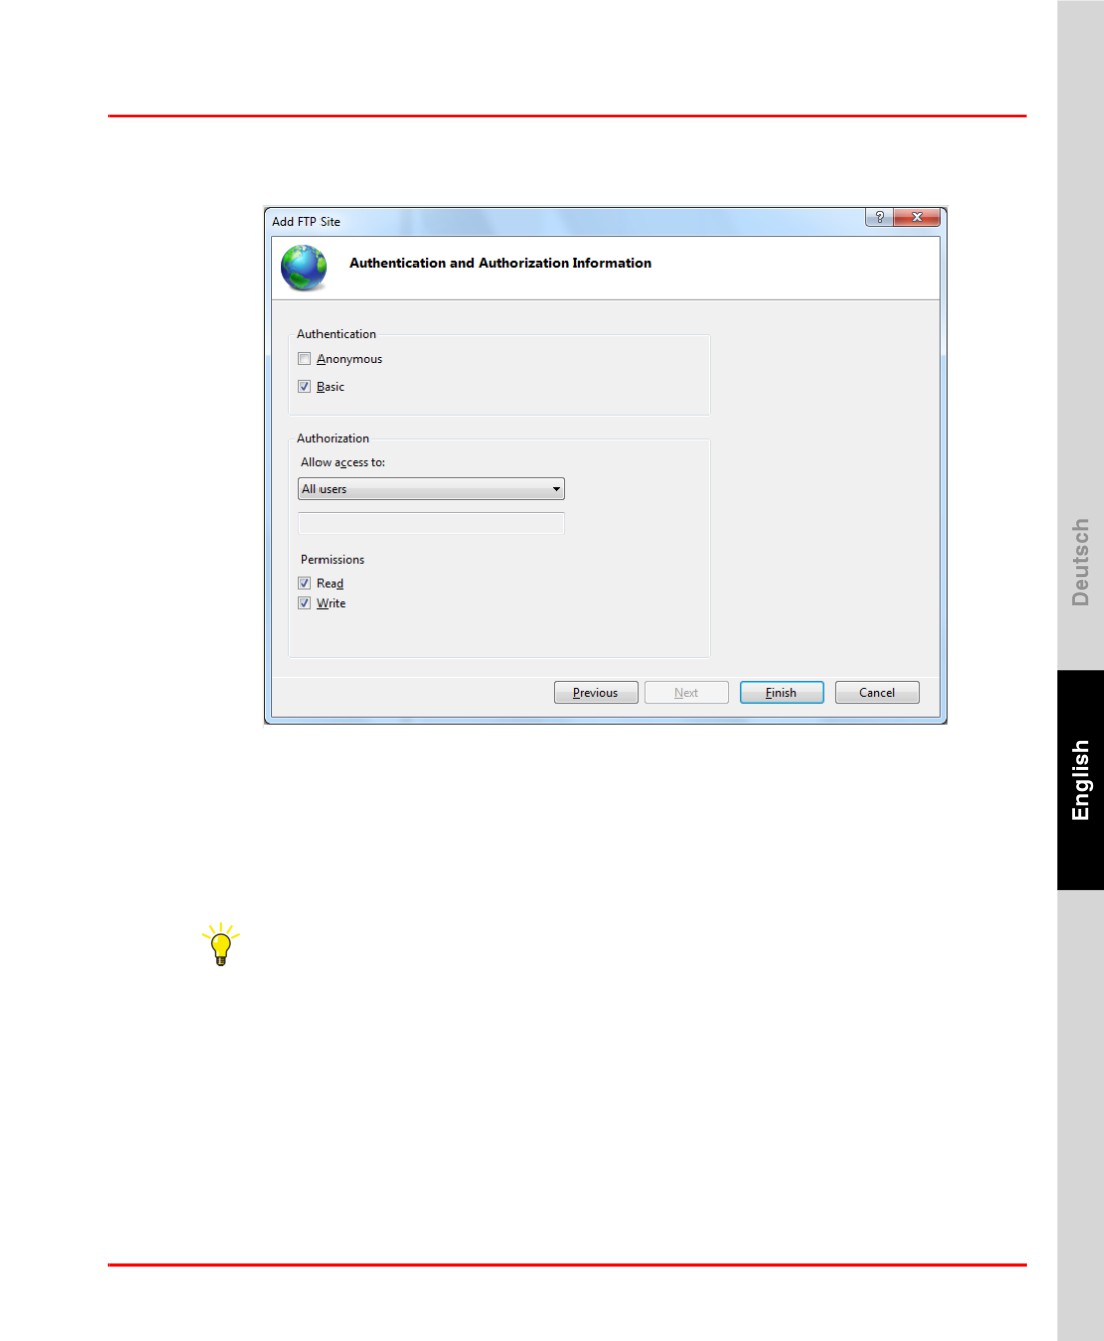
The Authentication and Authorization Information page is shown.
FTP Basic Authentication us.bmp
Enable Basic Authentication.
Under Authorization, select All users from the Allow access list.
Under Permissions, select both Read, Write.
Click Finish. The basic FTP server configuration is complete now..
The FTP login user - e.g. “FreelancerFTP” - must have the necessary access
rights to the FTP site directory - here “D:\FTP” - and subdirectories on file
system level. Otherwise he might not be able to read or write files, even if the
server allows it.
Enable FTP Firewall Rules
When the FTP server is installed the Windows Firewall with Advanced Security will
still block all external FTP traffic. To prepare external access, the FTP server
93