ABB Freelance Getting Started (Version 9.2 SP1) - page 2
For Installation of DigiVis: Setting the Theme and Screen Resolution
Section 2
Windows XP New
> Start > Control Panel > Appearance and Themes > Display
Applearance:
> Tab Themes > Select Windows XP as theme.
Resolution:
> Tab Settings > Select resolution 1280 x 1024 pixels
Windows 7 New
> Start > Control Panel > Appearance and Personalization
Appearance:
> Personalization > Select Windows 7 Basic as theme
Resolution:
> Display > Click Adjust resolution > Select resolution 1280 x 1024 pixels
Settings for the Conventional-Design DigiVis User Interface
For the conventional-design user interface, a resolution of 1024 x 768 pixels is
recommended. Under Windows XP select the “Windows Classic” theme. Under
Windows 7 select the “Windows 7 Basic” theme.
34
Section 2 Freelance Installation For Installation of DigiVis: Additional Steps to disallow Operating
Windows XP Conventional
> Start > Control Panel > Appearance and Themes > Display
Appearance:
> Tab Themes > Select Windows Classic as theme
Resolution:
> Tab Settings > Select resolution 1024 x 768 pixels
Windows 7 Conventional
> Start > Control Panel > Appearance and Personalization
Appearance:
> Personalization > Select Windows 7 Basic as theme.
Resolution:
> Display > Click Adjust resolution > Select resolution 1024 x 768 pixels
For Installation of DigiVis: Additional Steps to disallow Operating System Access
Operator stations shall be configured to disallow operating system access. Freelance
and especially DigiVis is designed to support this.
Windows XP
There are additional steps necessary to disallow Operating System access:
The task bar property “Keep the task bar on top of other windows” must be disabled:
> Right click the taskbar
> Properties
Disable “Keep the task bar on top of other windows”
Background Information
When you start DigiVis in Production Mode the Windows Start button is disabled.
There is no minimize button in DigiVis. This behavior has been implemented
because of security concerns. The DigiVis user cannot switch to other applications.
35
Network and IP Address Settings
Section 2 Freelance Installation
Only those applications that have been started before the start of DigiVis can be
reached by the DigiVis user by pressing the ALT+TAB keys.
The Windows operating system can be reached from the DigiVis menu (Tools /
System / Operating system) after entering a password. With this action the Windows
start button is enabled and is displayed with text. This is not a security problem, as
long as the task bar is in the background of DigiVis. DigiVis is not able to suppress
the task bar in all cases. If the task bar is configured “Keep the task bar on top of
other windows” it is shown in front of DigiVis. Therefore, the task bar property
“Keep the task bar on top of other windows” must be disabled to make sure that the
DigiVis user has no access to other applications.
Network and IP Address Settings
The Network protocol used by Freelance is TCP/IP. No other protocol is required.
A proper operation with other network protocols is not guaranteed.
IP addresses and/or host names can be used for addressing the stations and resources
in a project.
For the PCs connected over a Local Area Network (LAN), the use of IP addresses
from 172.16.1.20 up to 172.16.1.255 are recommended.
36
Section 2 Freelance Installation
Network and IP Address Settings
IP Address Settings
Windows XP
> Start > Control Panel > Network and Internet Connections > Network
Connections
> Right-click a network adapter and select Properties
> Select Internet Protocol TCP/IP and click Properties
Windows 7
> Start > Control Panel > Click Network and Internet
> Click Network and Sharing Center > Click Change adapter settings
> Right-click a network adapter and select Properties
> Select Internet Protocol Version 4 (TCP/IPv4) and click Properties
Enter an IP address and Subnet mask for the Network Adapter:
IP address:
172.16.x.x e.g. 172.16.1.20
Subnet mask:
255.255.240.0
Subnet Mask for Time Synchronization
Besides the Windows PCs the process stations need a valid network configuration
too.
There is a coding switch on the rear panel of the CPU module with which the
resource ID of the process station is set. For the AC 800F the coding switch is
located on the Ethernet module. The resource ID is normally used as part of the IP
address.
If the coding switch is not set to zero and set to a value from 1 to F, then the subnet
mask and the IP address are assigned as 255.255.240.0 and 172.16.1.x respectively,
(where x = 1,...,15 as determined by the coding switch setting 1,...,F). If the coding
switch of a process station or an AC 800F is set to 0 (zero), then the IP address and
subnet mask can be assigned as required.
This means that in order to permit time synchronization, all stations must be located
in the same subnet. The subnet masks 255.255.240.0 and IP addresses 172.16.x.y
37
Network and IP Address Settings
Section 2 Freelance Installation
with x = 0... 15 and y = 0... 255 must also be configured for the freely configurable
stations (PCs or components with coding switch set to 0).
If other subnet masks than 255.255.240.0 are used, make shure that they are
contiguous. The equivalent bit pattern must start and then continue with 1 values.
It may change to zeroes once and must then end with zeroes.
Valid Example:
11111111 11111111 11110000 00000000 = 255.255.240.0
Invalid Example:
11111111 11111111 11111001 00000000 = 255.255.249.0
Note: In the Windows XP / 7 entry masks you cannot enter invalid values.
Stations which are connected over a router do not participate in either normal time
synchronization or in lateral communication. The function “Ext. time server” (see
Engineering Manual, System Configuration, Project Tree) can be used to
implement time synchronization for external process stations.
Parameters for DNS Server and WINS
No parameters need to be set for DNS or WINS, if the software is running as a
standalone system. The default network settings of the Windows XP/ Windows 7
installation can be used unchanged to operate a Freelance system. The TCP/IP
protocol must be used on all PCs.
Usage of Host Names
When configuring a project, symbolic names can be used for the computers and
process stations instead of IP addresses. With the aid of the hosts file, the system
can translate these names into physical addresses. This file must first be edited
according to the requirements.
When Windows is installed an example file is created on the computer:
<Windows directory>\system32\drivers\etc\hosts
Edit this file according to your requirements. A value must be entered for each
computer and each process station that is to be configured using not an IP address
but a name. (The names may be up to 14 characters in length):
<IP address>
<name>
38
Section 2 Freelance Installation
Network and IP Address Settings
Example:
172.16.1.1
station1
172.16.1.123
opc_gwy
Administrative rights are necessary to edit the hosts file.
In Windows 7 start the text editor as Administrator or disable the User Access
Control for editing.
Network Configuration Check
To check the network configuration between a Windows PC and a controller station
or between two Windows PCs one can utilize the ping command.
> Start > Run.. > Enter cmd > Press [Enter]
A windows console window opens (prompt).
Now enter the ping command to check, if a connection to the address or host
name can be established.
Eg: Enter ping 172.16.1.20 to check the connection to the station with the IP
address 172.16.1.20.
If the connection is ok, the pinged station or computer will reply and a time value
how long the sent package took to return is printed out. If the connection is not
ok, a request timed out message is displayed.
If the DNS name resolution is used, this can also be tested with the ping
command. Eg: Enter ping opc_gwy.
39
User Account Configuration
Section 2 Freelance Installation
Windows 7 Firewall Settings to Use the Ping Command
To check the connection to a Windows 7 computer, the firewall rules on the
Windows 7 target machine need to be adjusted. By default, the Windows 7 firewall
blocks incoming ping requests.
Open the configuration of the advanced Windows 7 Firewall on the target
machine (not the machine where the ping is entered):
> Start > Control Panel > System and Security > Administrative Tools
> Windows Firewall with Advanced Security.
Enable the inbound firewall rules named File and Printer Sharing (Echo
Request - ICMPv4-In) to allow ping requests to this computer.”
User Account Configuration
For the installation a user with administrative rights is needed.
Later on the creation of DigiVis users is supported via the Configure tool (See
General Settings on page 66).
Windows XP
Under Windows XP it is possible to limit the rights of the DigiVis users. This can be
achieved by changing the account type of the DigiVis user from Computer
Administrator to Limited. The Limited user is member of the Windows Users
user group only.
Windows7
All users using Freelance applications under Windows 7 need administrative rights.
They should be member of the Windows Administrators user group.
Configure the Antivirus Program
Certain antivirus programs on a Freelance PC can cause problems in Control
Builder F, e.g. when a project is created, and in DigiVis, e.g. when a project is
loaded into DigiVis.
To avoid access problems, exclude these directories from virus scanning:
1. the <Freelance_Installation_Folder>\proj directory and
2. the Temp-directory of the logged in user.
40
Section 2 Freelance Installation
Upgrade an Existing Version to the New Version
The Temp-directory depends on the logged in Windows user. The typical location
of the Temp-directory of the user “Freelancer” is
Windows XP:
"C:\Documents and Settings\Freelancer\Local Settings\Temp"
Windows 7:
"C:\Users\Freelancer\AppData\Local\Temp”.
You may need to exclude the Temp-directories for all users working with
Freelance.
Antivirus programs can affect the installation procedure of the Freelance
software. Because of that it is recommended to disable Antivirus programs like
McAfee Antivirus before the setup is executed and enable them after the setup
has finished.
Upgrade an Existing Version to the New Version
Upgrading means changing from a Freelance version to a newer version. In this
process, existing project configurations can be taken over without any problem, if
the upgrade is within a main version (e.g. from V8.1 to V8.2) or also from one main
version to the following one (e.g. from V8 to V9). If the required upgrade involves
skipping one or more main versions (e.g. from V6 to V9), contact your local ABB
Service Organization.
If the Control Builder F project is created in Windows XP and opened in
Windows 7, the timezone setting will be lost.
To set time zone
Open the CBF project on the Windows 7 system
CBF Project tree > Right-click on CONF node > Click Header > Timezone
Notes to Follow Before Performing an Upgrade
Checklist
You should check that all the project files have been exported from
the “old” Control Builder F or DigiTool version.
41
Notes to Follow Before Performing an Upgrade
Section 2 Freelance Installation
Check that the function block parameters in the project files are
documented.
Back up Project Files from Older Versions
Existing projects from a former version must be exported (create *.CSV file) using
your old Control Builder F / DigiTool version, before starting the setup of the new
software version.
Before the export of the project data, you must make shure that all parameters,
which have been changed either from the operator station or during commissioning
mode, are stored in the project file using the CORRECT option. Each parameter
modified with a’ WRITE’ command is set while the loading of the process station
on its original value. With the function Load/Parameters it is possible to save all
modified parameters:
> Start Control Builder F
> Open project
> Switch to Commissioning mode
> Load > Parameters > Only different > Correct parameters
Document Function Block Parameters
It is recommended that you document the parameters of the function blocks in the
projects. In the event of incompatible changes to the function block library which
cannot be handled automatically by the system, it may be necessary to re-enter
parameters.
Export the Project
Save the project in a *.CSV file:
> Export project file (*.CSV format)
> Exit Control Builder F
42
Section 2 Freelance Installation
Upgrade from V9.1 to V9.2 SP1
See also Engineering Manual, System Configuration, Project Manager,
Exporting a project.
In projects created with version 3.3 and earlier the same name could be used for
function blocks (tags) and variables. As of version 4.1, conflicts between the
names of tags and variable names are no longer allowed and will be corrected
instead!
With import of a project all conflicting names are removed automatically by
suffixing the current variable names with ..._var. In the variable list, changed
variable names can easily be selected with the search function. The cross-
reference function allows you to easily detect changed variable names and to
modify them, if necessary.
Upgrade from V9.1 to V9.2 SP1
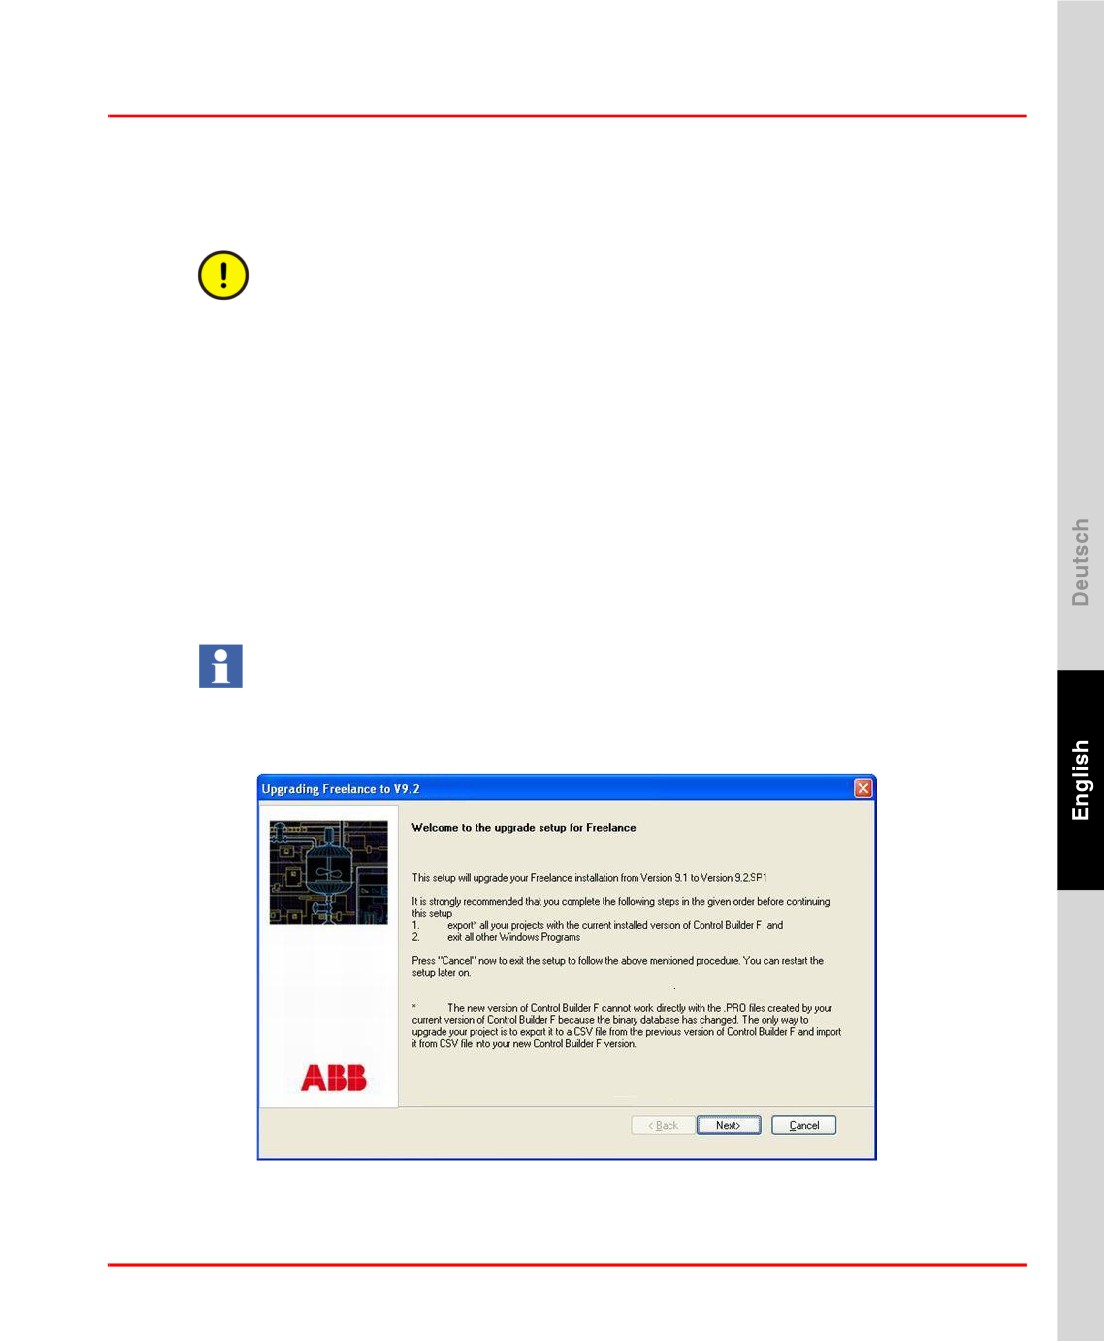
If Freelance V9.1 is already installed on the system and the user runs the setup then
the “upgrade screen” is displayed
If a Freelance version prior to V9.1 is found on the system, then the setup
displays a warning. This prior version must first be uninstalled before V9.2 SP1
can be installed on the System.
Setup Upgrade 91 to 92SP1.bmp
43
Upgrade from V9.2 to V9.2 SP1
Section 2 Freelance Installation
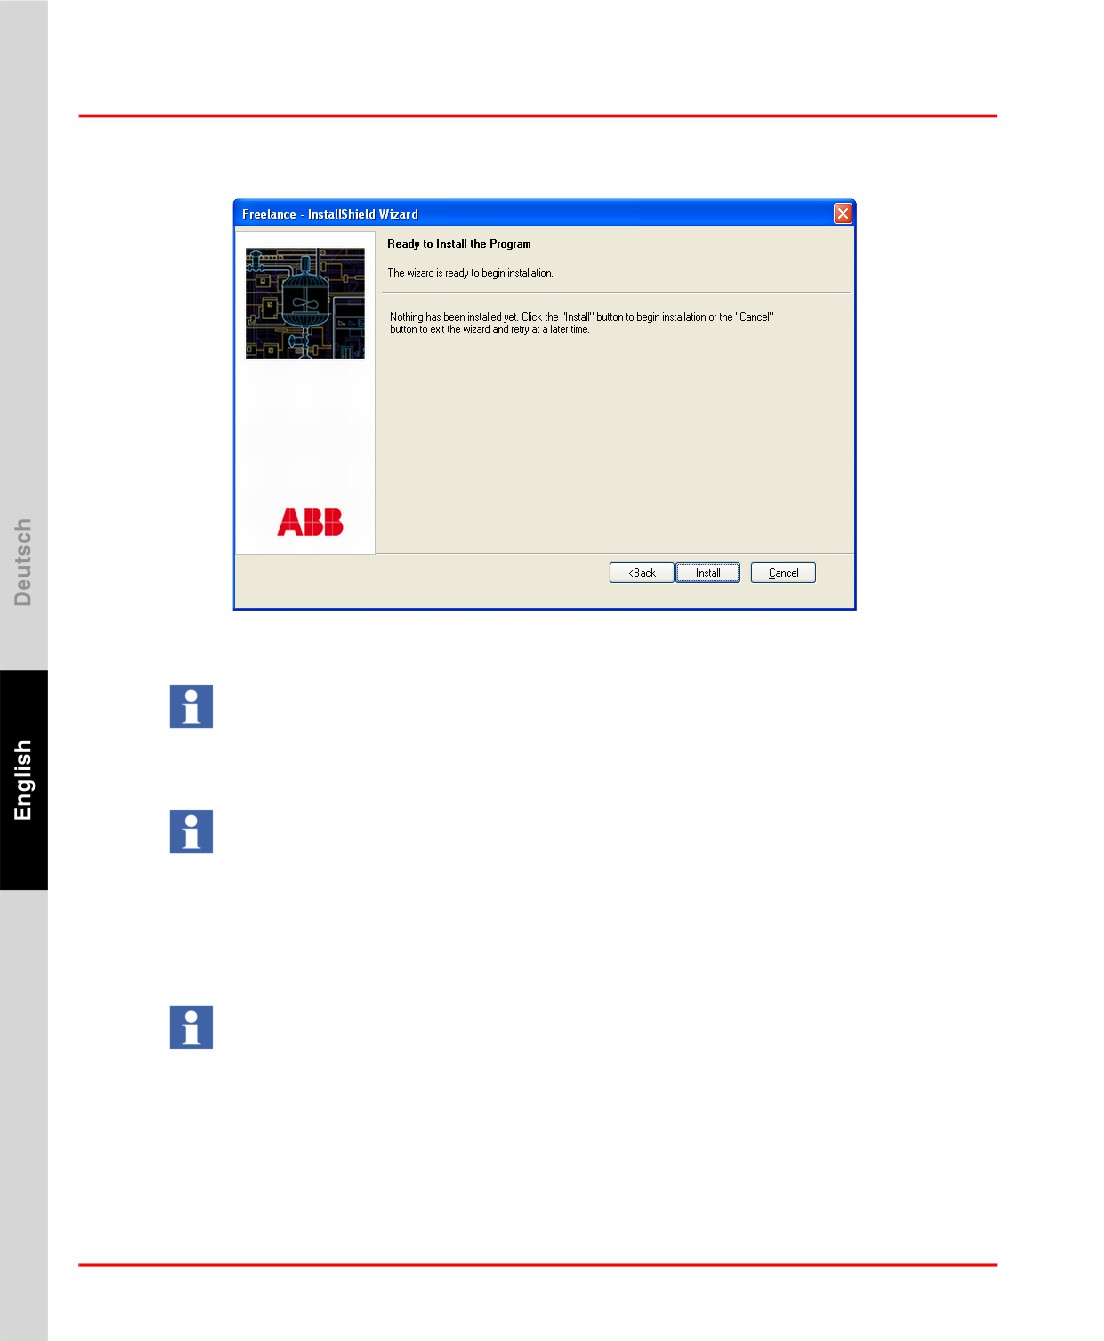
Click Next.
Setup Ready to Upgrade.bmp
Click Install. The existing V9.1 features will be upgraded to V9.2 SP1.
The upgrade option reinstalls only those features that are installed using V9.1. If
during an upgrade from V9.1, the setup finds that OPC Gateway or Trend Server
is already installed, then the setup installs OPC tunnel and if Control Builder F is
found installed then the setup installs the Bulk Data Manager.
To add new features after the upgrade has finished, run the setup again. The setup
goes into the Maintenance mode.
Upgrade from V9.2 to V9.2 SP1
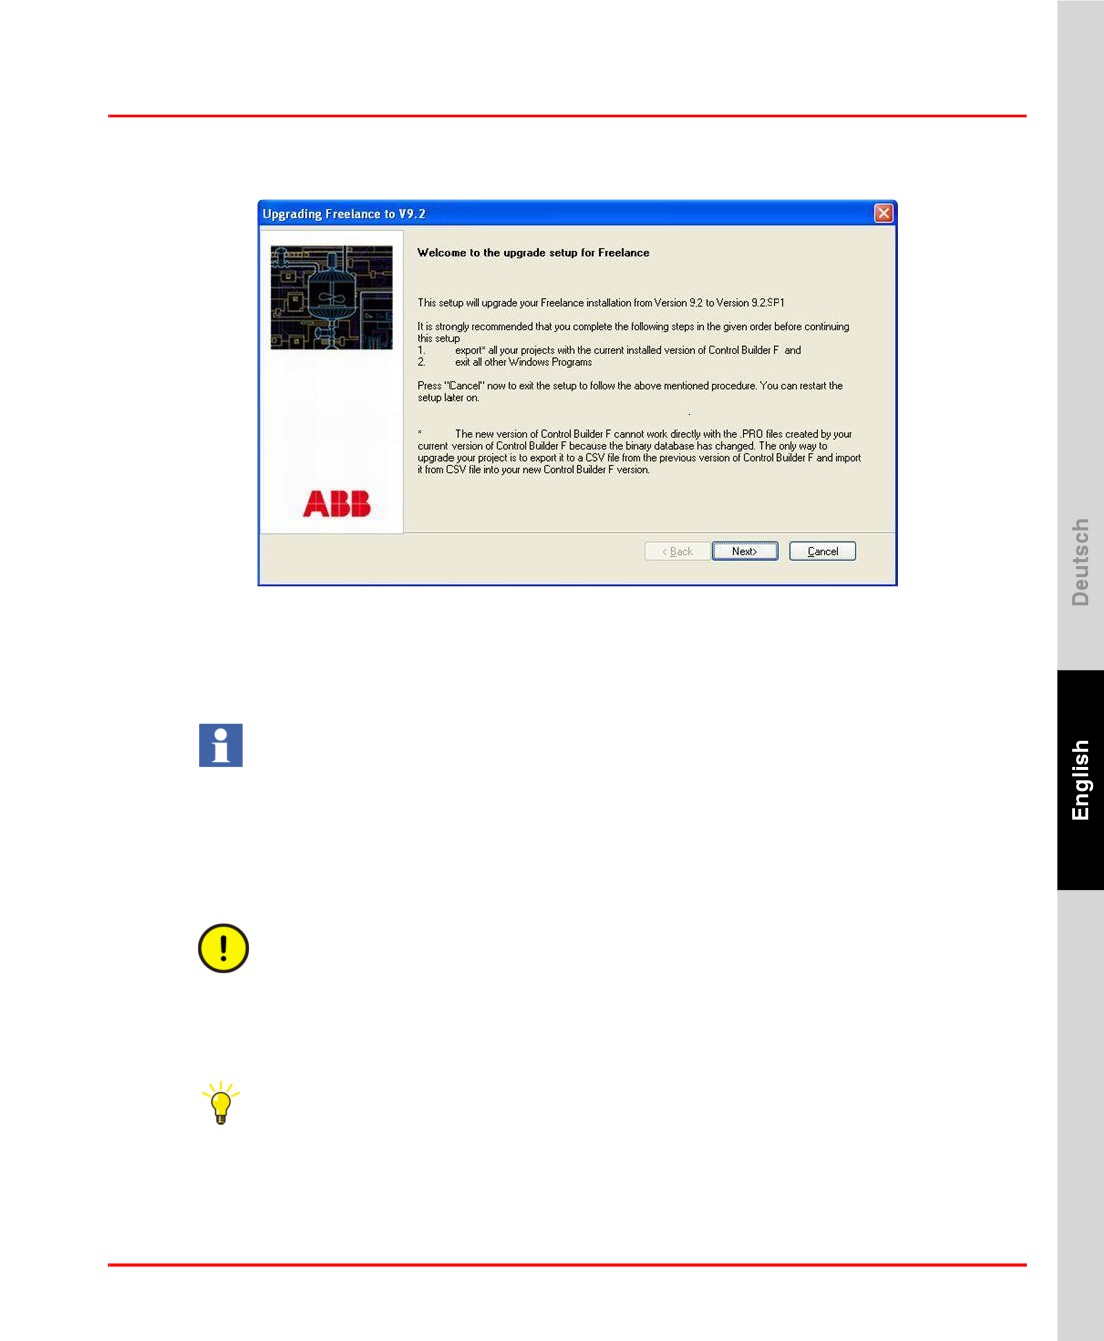
If Freelance V9.2 is already installed on the System and the user runs the setup then
the “upgrade screen” is displayed.
If a Freelance version prior to V9.1 is found on the system, then the setup
displays a warning. This prior version must first be uninstalled before V9.2 can
be installed on the System.
44
Section 2 Freelance Installation
Uninstall Before a New Installation
Setup Upgrade 92 to 92SP1.bmp
Click Next.
In the next screen click Install. The existing V9.2 features will be upgraded to V9.2
SP1.
To add new features after the upgrade has finished, run the setup again. The setup
goes into the Maintenance mode then.
Uninstall Before a New Installation
If the previously described upgrade scenarios do not apply, it may be necessary to
uninstall the software.
Ensure that the software that is uninstalled is not needed anymore before
uninstalling it. E.g. for exporting old projects.
Freelance versions lower than 9.1 can be unistalled via the Windows Add or
Remove Programs control panel:
> Start > Control Panel > Add or Remove Programs
> Select the program to uninstall. E.g. Control Builder F / Freelance V8.1
> Click on the Remove button
45
Start Setup
Section 2 Freelance Installation
Since version 9.1 the Freelance software setup contains a remove option (See
Remove option on page 65):
> Insert the installation CD of the installed Freelance version
> Start the Windows Explorer
> Select the CDROM drive
> Open file Autoplay.exe. E.g. E:\Autoplay
> Select the installed language
> Click Freelance software
> Click OK for Warning message
> Select Remove and proceed until the software is uninstalled.
It is recommended that the third party software such as OPC tunnel, S-800 DTM,
S900 DTM, FDT shared components, FDT Base container, CBF Viewer etc. that
are installed by the Freelance Setup are uninstalled using the Remove option.
After an uninstallation the new software can be installed as given in the following
steps.
Start Setup
To install the Freelance software, insert the Freelance Software CD in the CD drive.
The CD autoplay dialog starts automatically, if the Autoplay function is enabled in
Windows. If this function is disabled then start the dialog manually.
> Start the Windows Explorer
> Select the CDROM drive
> Open file Autoplay.exe. E.g. E:\Autoplay
First select the language for the software in the Language screen.
46
Section 2 Freelance Installation
Start Setup
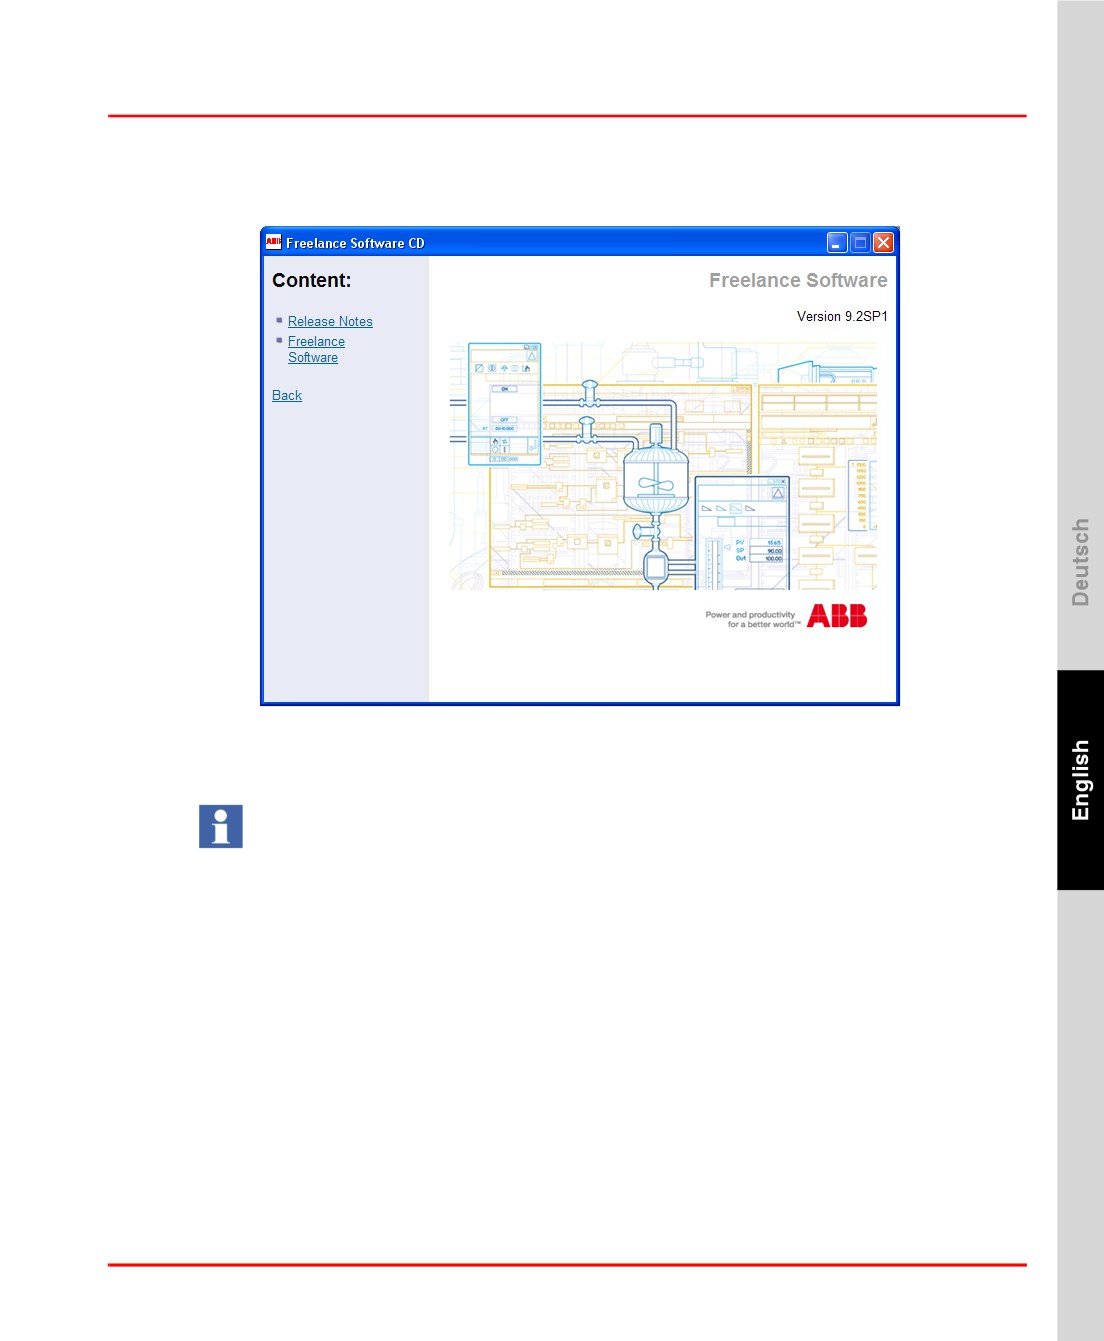
After the language selection, the Content screen is displayed. It shows the different
content packages available on the CD.
tb499.bmp
Release Notes This option opens the document “Release Notes” for reading, which
lists the new features of this version.
You will need a PDF-Reader like the Adobe Acrobat Reader to open the
document.
Freelance Software This option starts the Freelance Software Installation. It allows
the selection of the Freelance software packages that can be
installed.
Back
Go back to the language selection.
Read the Release Notes and then proceed with the selection of Freelance Software
to start the software installation as described in the next chapter.
47
Install Freelance Software
Section 2 Freelance Installation
Install Freelance Software
General notes on operation in the setup procedure
Buttons in the Dialog Boxes:
Next
Continue the installation with the next dialog box.
Back
Returns to previous window.
The installation can be aborted at any time by clicking Cancel.
Installation Preconditions
In case you are a user of earlier versions of Control Builder F or DigiTool:
Before you continue be sure you have exported all your current Control Builder F
or DigiTool projects with your currently installed Control Builder F or DigiTool
program. If you have any doubts cancel this setup now and export all of your
projects with your currently installed Control Builder F or DigiTool version.
We also strongly recommend that you document the parameters of the function
blocks currently used in your projects. You may have to reenter them in case of
incompatible changes made to the function block library that can not be treated
by the built-in update utilities.
See also Upgrade an Existing Version to the New Version on page 41.
In Windows operating systems, before starting the setup, it is recommended to
disable virus scan programs like McAfee Antivirus.
If a previous version of the Freelance software already exists on the system then
the setup displays a warning asking for it to be removed from your System.
See Uninstall Before a New Installation on page 45 for detailed instructions.
User Account Control Settings in Windows 7
The User Account Control (UAC) is a new feature in Windows 7. The instructions
to disable the User Account Control are applicable for Windows 7 only. To ensure
48
Section 2 Freelance Installation
User Account Control Settings in Windows 7
the proper operation of Freelance, it is highly recommended to disable the UAC
feature in the Windows 7 environment.
UAC handling by the Freelance Setup
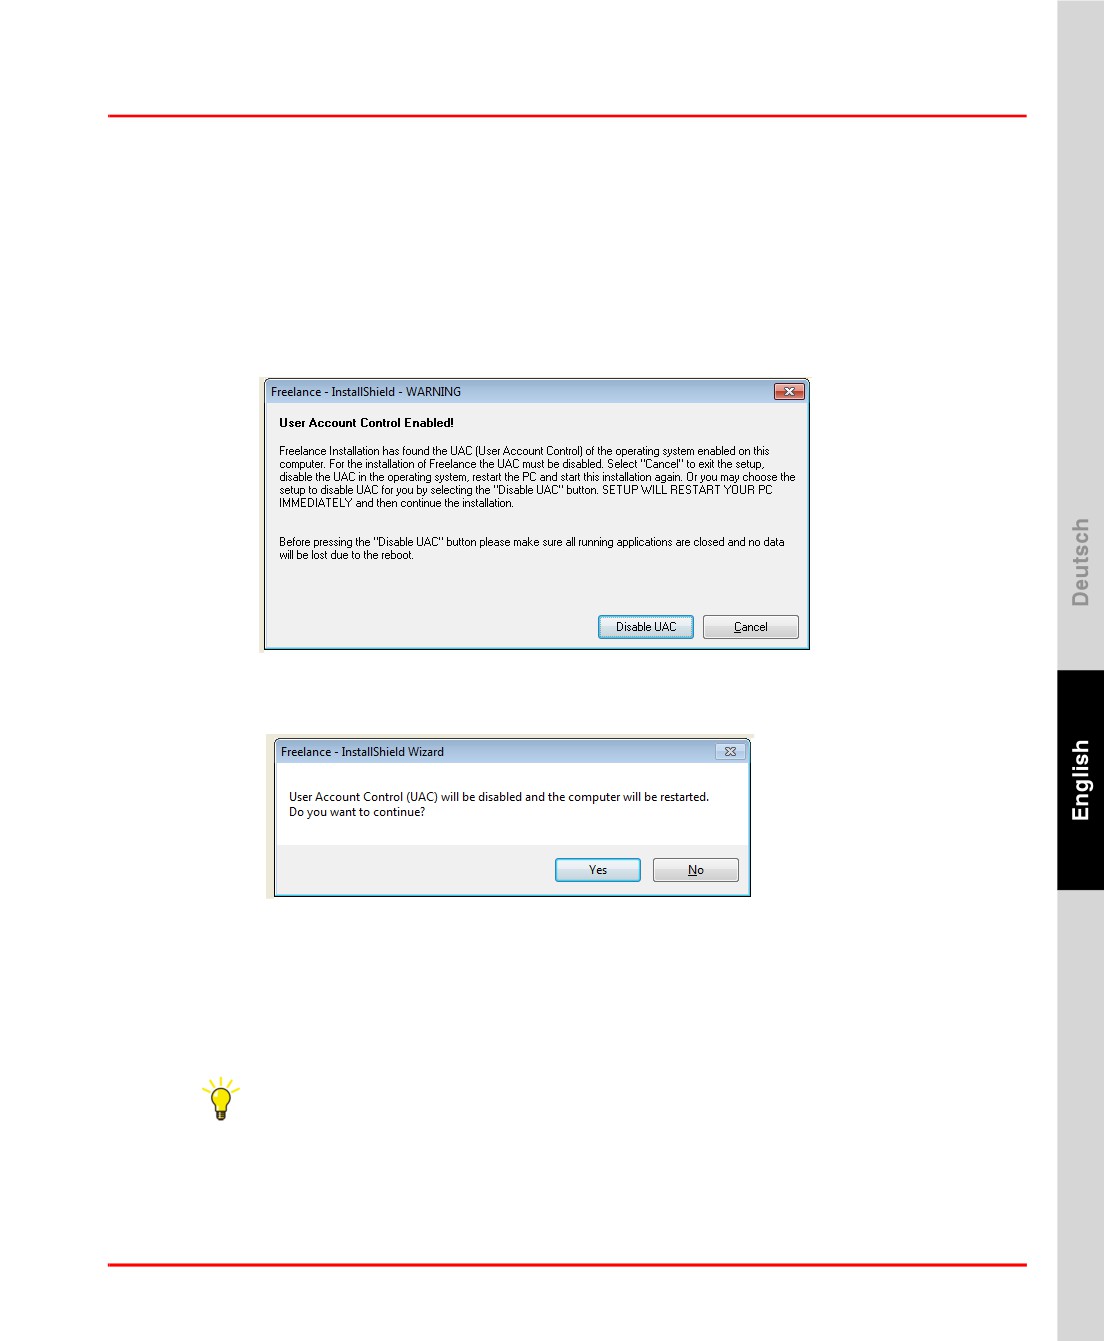
The Freelance setup detects, if the UAC configuration is not appropriate and shows
this warning:
UAC1.bmp
Click Disable UAC to disable the UAC. The setup will disable the UAC and restart
the PC. Ensure that you have no unsaved work and click Yes to restart the computer.
UAC2.bmp
After the restart, setup will continue with the Freelance Installation.
Verifying the User Account Control settings
The UAC setting can be verified, after the installation of Freelance:
> Start > Control Panel > User Accounts and Family Safety
> User Accounts > Change User Account control settings
The slider bar must be in the Never Notify position.
49
User Account Control Settings in Windows 7
Section 2 Freelance Installation
Welcome Screen
The Welcome Screen reminds the user about important steps to do before the
software is installed.
Once you have clicked Next the License agreement screen is displayed.
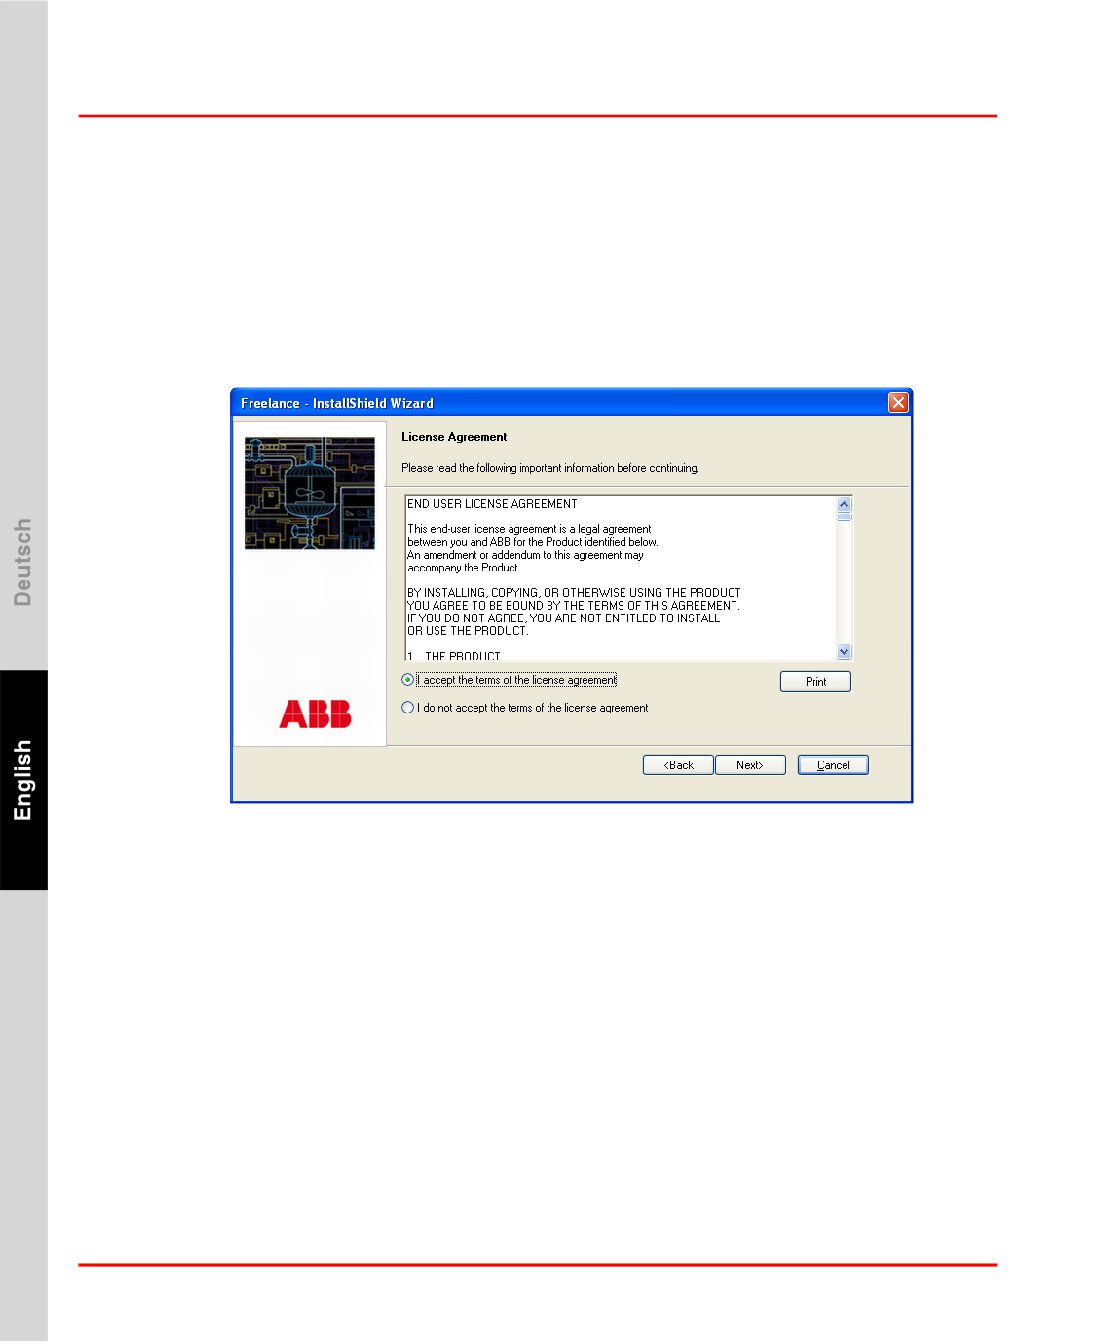
License Agreement
tb500.bmp
Select I accept the terms of the license agreement to accept the license.
On clicking Next the “Setup type” screen is displayed.
50
Section 2 Freelance Installation
Selecting a Setup type
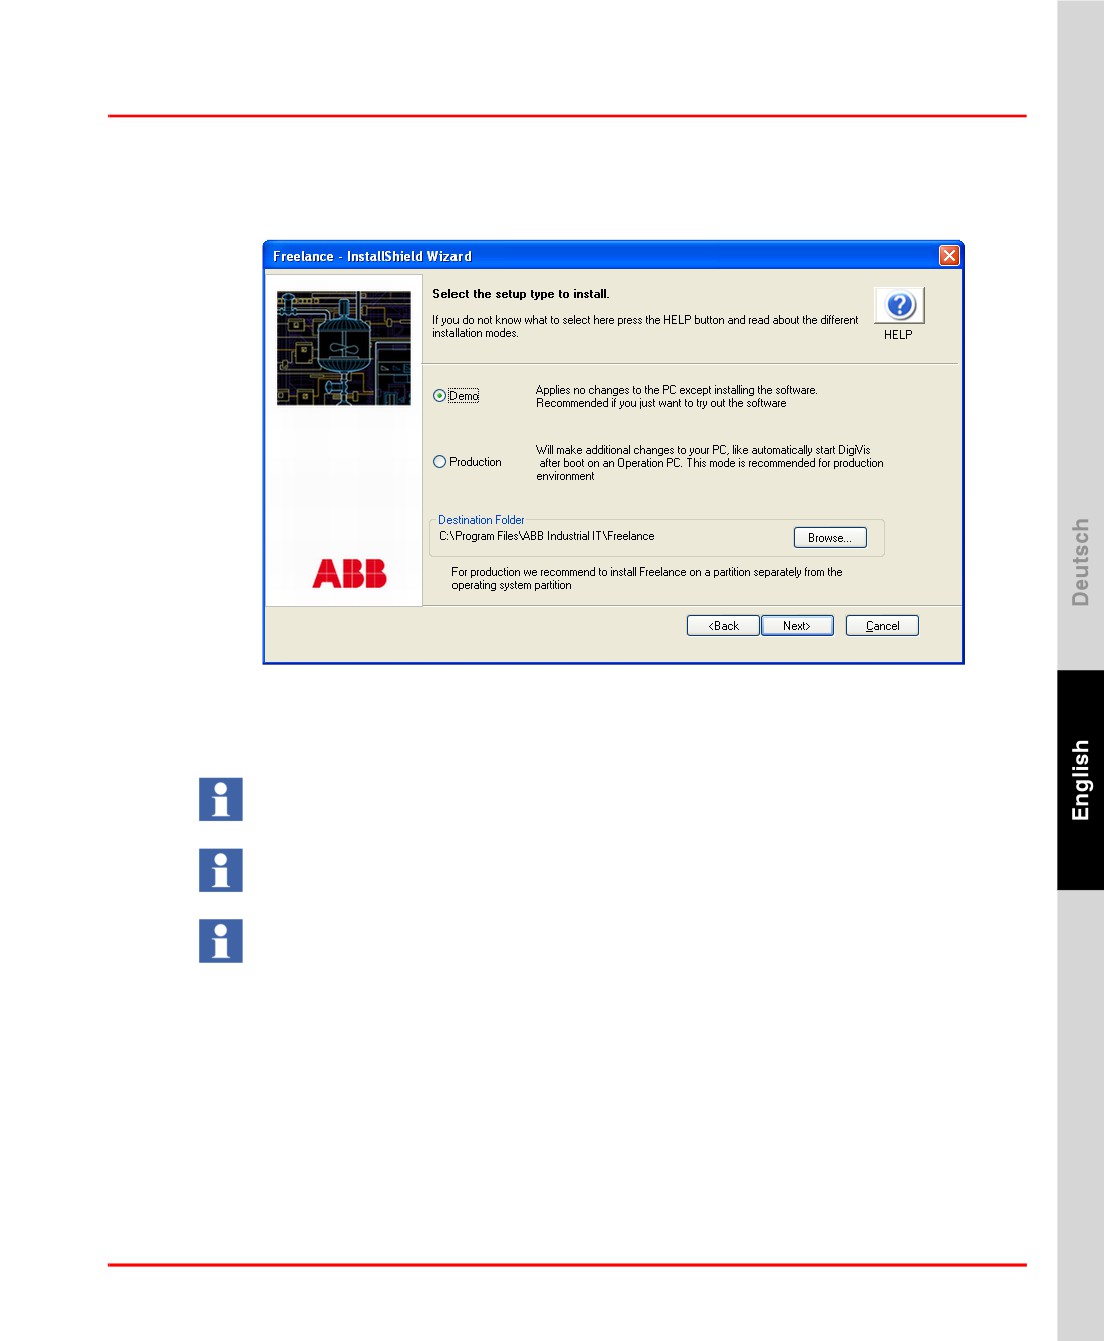
Selecting a Setup type
Choose the desired Setup type.
tb500_1.bmp
Demo
To install the Software for demo purpose or as a try out.
Production
To install the Software in the production environment.
A detailed description on each of the Setup types can be obtained by clicking on
the Help icon provided on the top right side of the screen.
The destination folder for the installation can be changed using the Browse
button.
The default destination directory for the installation in Production mode is
E:\Program Files\ABB Industrial IT\Freelance
For Production we recommended that Freelance Software is installed on a
partition separate from the one where the Operating System is installed
Destination Directory for Installation
By default, Freelance software programs are installed in directory
C:\Program Files\ABB Industrial IT\ Freelance
51
Selecting a Setup type
Section 2 Freelance Installation
(for Demo)
or
E:\Program Files\ABB Industrial IT\ Freelance
(for Production)
The following subdirectories are created below the installation directory:
...\bitmaps
Bitmap files for the hardware devices in the DigiVis
system display
...\bpr
Operation logs
...\curv
Trend archives
...\ddesrv
DDE Server
...\dmsapi
Application interface
...\doc
Project documentation
...\eprom
FLD files for EPROM updates
...\exe
dll and exe files for Control Builder F
...\export
Exported project files or program sections
...\ff
Files from FOUNDATION Fieldbus Standard
...\gsd
Profibus device master data files
...\macros
Macros for the graphic editor
...\opcsrv
OPC Server
...\OPCTunnel
Installation folder for OPC Tunnel Server
...\proj
Default for Project files
...\proj\BDM
Default for Bulk Data Manager Templates and files
...\reports
Default for Excel reports
...\sap
Disturbance course logs
...\setctrl
Setup control
...\setups
Setup history
...\sfp
Signal sequence logs
...\ucurv
Reserved
...\VisHelp
Online Help for DigiVis (High resolution and low reso-
lution)
...\wave
Wave files for alarm messages in DigiVis
52
Section 2 Freelance Installation
Workplace Type DEMO Mode
Workplace Type DEMO Mode
Selecting this mode will install the software on the system for a try-out. No license
is needed and all functionalities of the software are available to the user. The validity
of this mode is however limited to 100 days
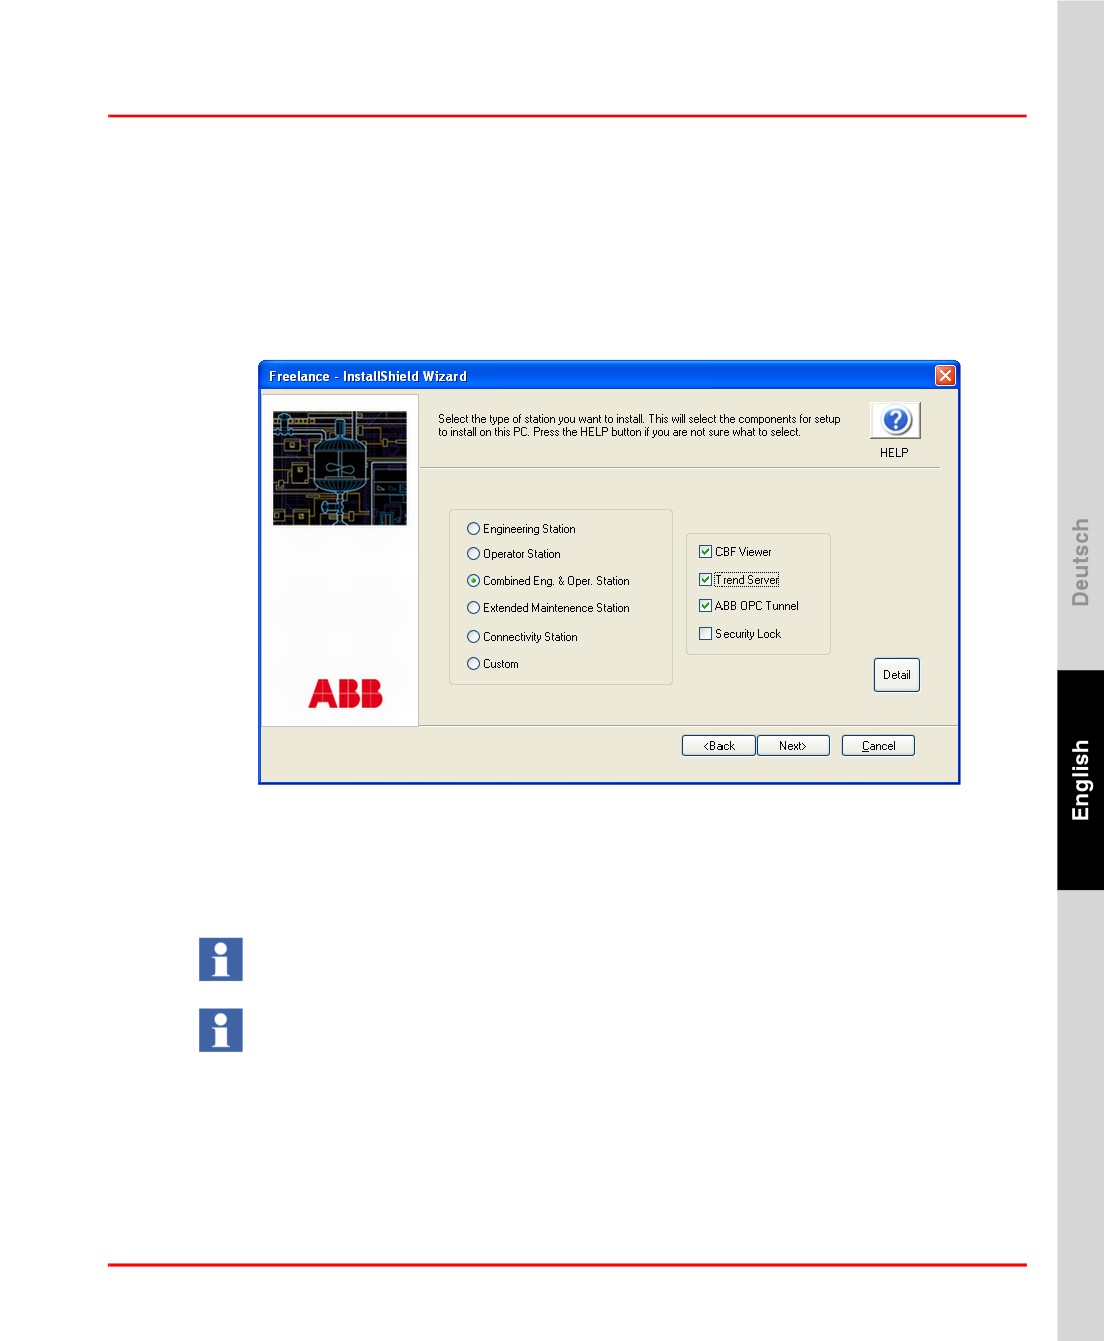
Selecting the setup type Demo from the Setup type screen and clicking on Next will
display the “Workplace Type” screen.
tb500_2.bmp
The default selection for the Demo mode is shown in the screen shot above,
However the user can choose any one of the workplace types that are listed on the
screen. The Custom workplace type is describen in the chapter CUSTOM Workplac
Type Option on page 55.
A detailed description of each of the workplace types can be obtained by clicking
on the Help icon provided on the top right side of the screen
The Detail button can be used to view the feature tree showing the components
that will be installed for the workplace type that is selected, in the chosen mode.
This is just a view of the feature tree and the user cannot select or deselect the
components in this view.
Clicking on next brings up the “Ready to install” dialog. Refer to Ready to install
dialog. on page 59.
53
Workplace Type PRODUCTION Mode
Section 2 Freelance Installation
Workplace Type PRODUCTION Mode
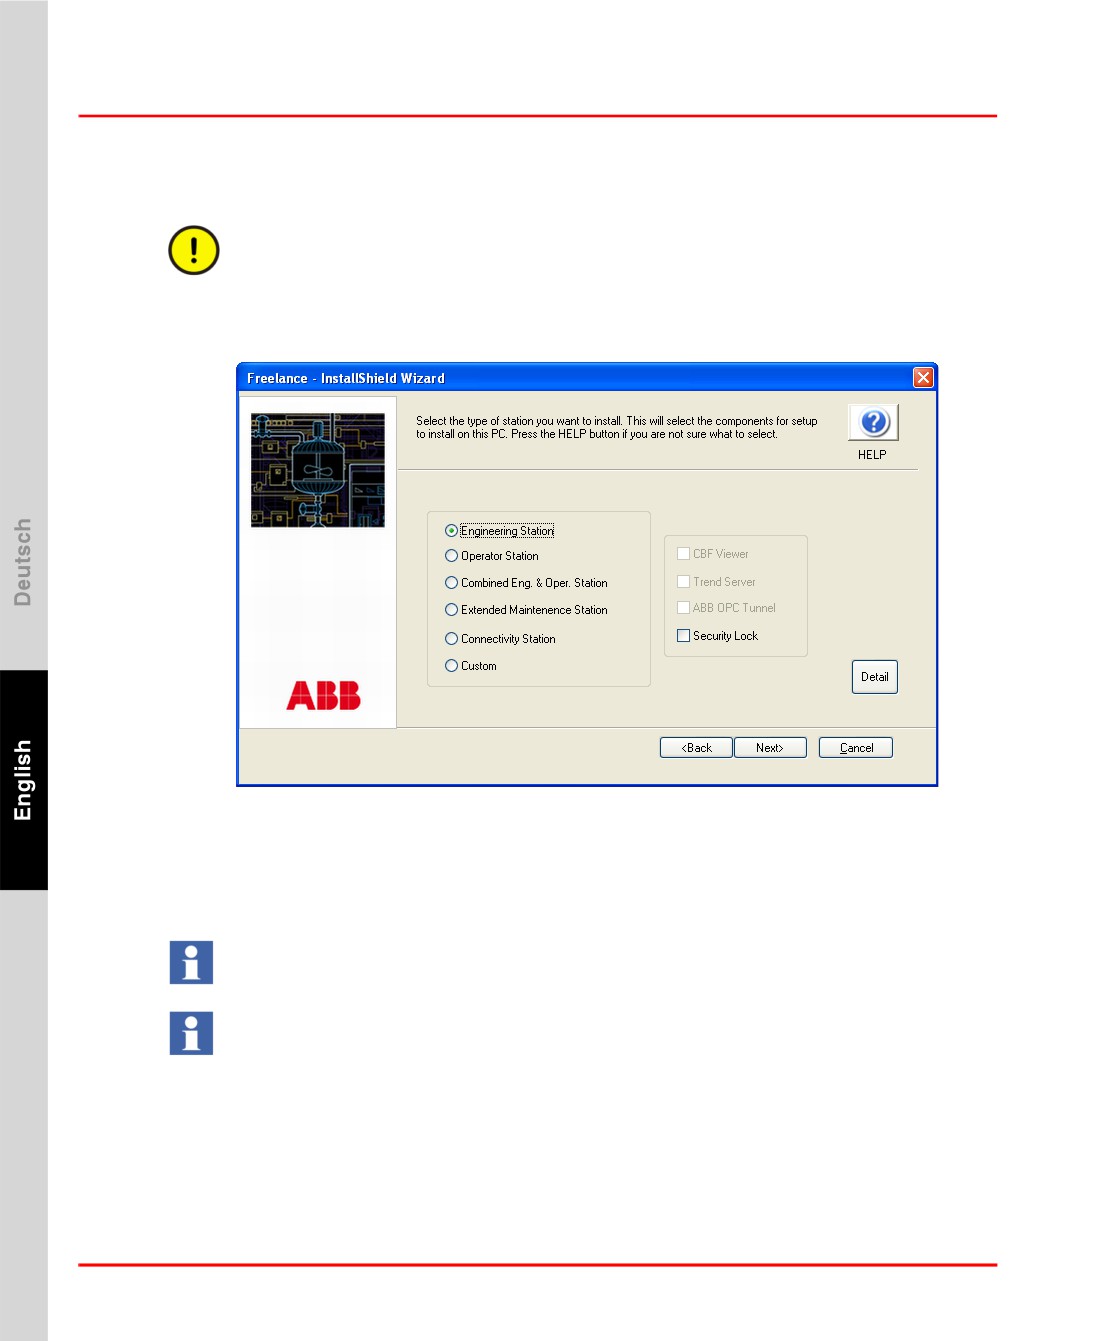
This mode will modify the setting on the PC besides installing the Software.
License keys should be provided for installing the selected components.
Selecting the setup type Production from the Setup type screen and clicking on
Next will display the “Workplace Type” screen.
tb500_8.bmp
The default selection for the production mode is shown in the screenshot above.
However the user can choose any one of the workplace types that are listed on the
screen. The Custom workplace type is describen in the chapter CUSTOM Workplac
Type Option on page 55.
A detailed description of each of the workplace types can be obtained by clicking
on the Help icon provided on the top right side of the screen
The Detail button can be used to view the feature tree showing the components
that will be installed for the workplace type that is selected, in the chosen mode.
This is just a view of the feature tree and the user cannot select or deselect the
components in this view.
54
Section 2 Freelance Installation
Workplace Type PRODUCTION Mode
Clicking on Next brings up the “Ready to install” dialog. Refer to Ready to install
dialog. on page 59
CUSTOM Workplac Type Option
This Option is recommended for advanced users of the Freelance software. It gives
the user most flexibility in terms of selecting or deselecting the components to be
installed. On selecting the Custom option in the “Workplace type” screen and
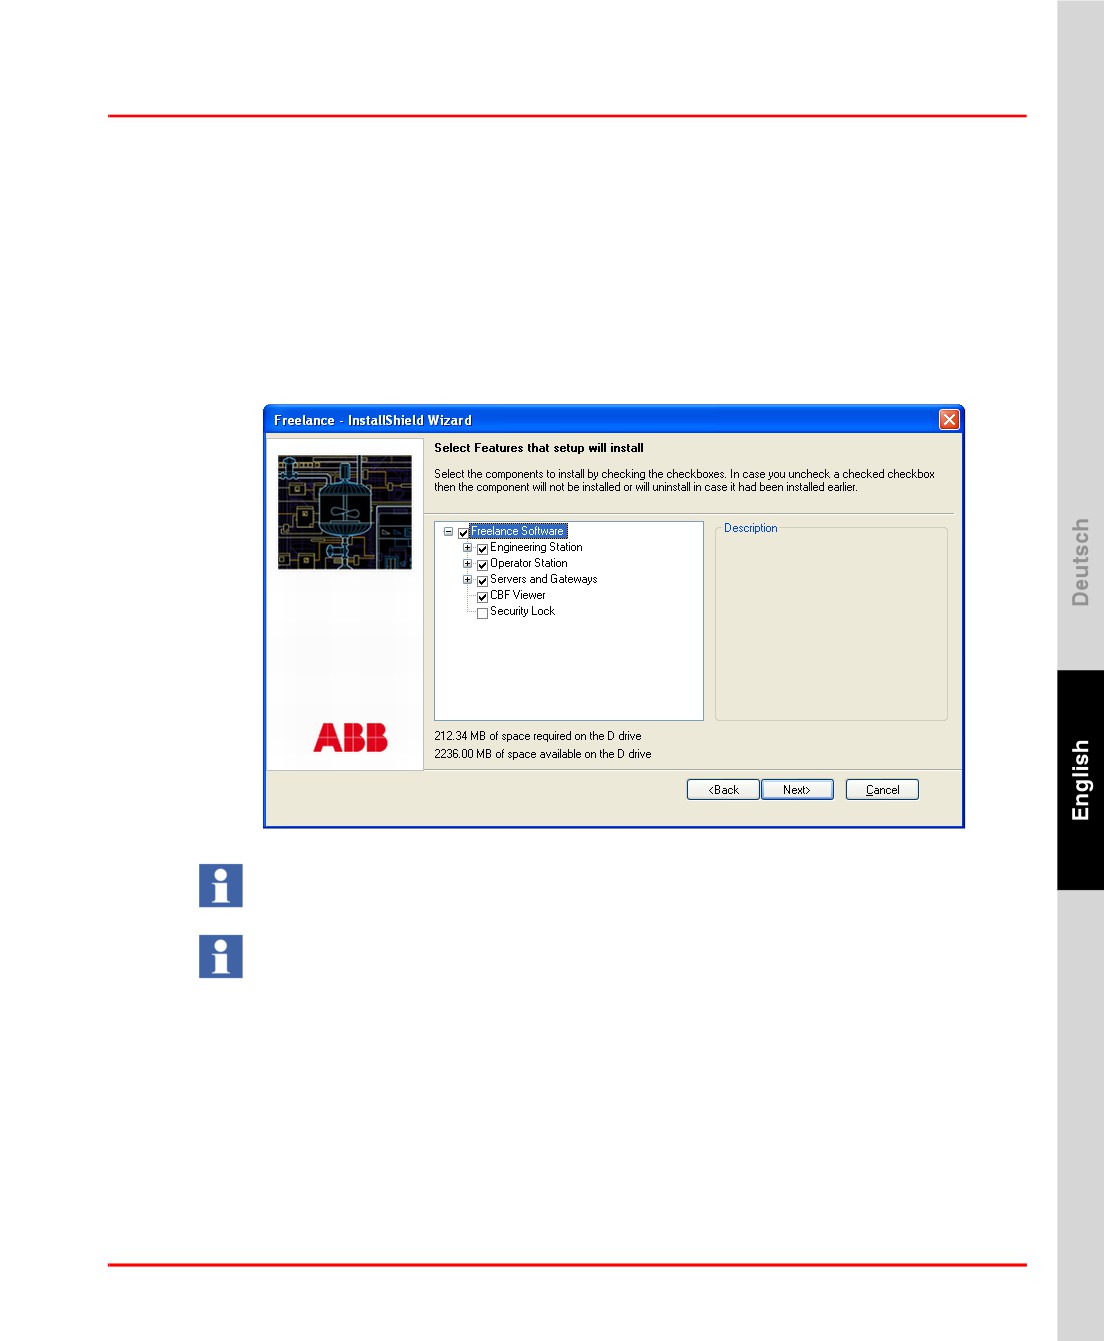
clicking on Next the “feature tree” is displayed.
tb500_9.bmp
Click on a component name in the feature tree and a brief description of that
component will be displayed on the right side.
The space required on the drive as shown in the screen above does not include the
requirements for FDT-shared components/base container, DTM for S800/S900,
CBF viewer, Hardkey, CBF/DigiVis Help.
Select Software Packages to Be Installed
In the features tree dialog box, select the software packages that are to be installed
on the PC by clicking on the checkbox in front of the Component.
55
Workplace Type PRODUCTION Mode
Section 2 Freelance Installation
The Freelance software features are listed in a tree structure in the dialog. The check
box in front of each feature indicates the state of that component on the PC.
(blank) The component will not be installed.
(checked) The component will be installed
(checked and grayed) The component is a dependency for some
other component that is selected and is automatically selected and
installed together with that component.
Clicking on Next brings up the “Ready to install” dialog. Refer to Ready to install
dialog. on page 59
Freelance Base Software Packages
The following software packages can be installed with this setup:
Freelance Software
•
Engineering Station
- Control Builder F
Software package for configuring and commissioning process,
gateway and operator stations for Freelance projects
- CBF Help
Online Help for Control Builder F
- Profibus FDT Library
Software for Configuring PROFIBUS installations with the help of
FDT/DTM interfaces, version FDT 1.2 in Control Builder F
projects
- FDT1.2
- FDT1.2 Components
56
Section 2 Freelance Installation
Workplace Type PRODUCTION Mode
To configure the field devices in Control Builder F using DTMs, you
have to install these additional software components in addition to
the FDT libraries.
- FDT Shared Components
- FDT Base container
-DTM for S800
-DTM for S900
-
Foundation Field Bus
Software for configuring FOUNDATION Fieldbus devices
-
Bonus Pack
- Controller Emulator
This software package can be used to emulate process stations. A
project configuration can be tested in the absence of any existing
hardware.
- Bulk Data Manager
Freelance Bulk Data Manager is a tool that allows manipulation of
large data sets during engineering with Control Builder F with the
help of Microsoft Excel. Functionality provided comprises Import /
Export of tag and variable lists, multiplying of typical application
solutions and parameter change for complete sets of function
blocks.
The newly introduced bonus features viz. S800/S900 Function Blocks, S800
Modbus Function Block, 3D library, S700 Template etc., are installed during the
Setup and do not appear as options in the Feature Tree.
•
Operator Station
- DigiVis
Software for an operator station for operating and observing the
processes configured using Control Builder F
- DigiVis Help
57
Workplace Type PRODUCTION Mode
Section 2 Freelance Installation
Online help for the DigiVis operator station software
- DigiBrowse
Software package for viewing archived trends and logs
•
Servers and Gateways
- OPC Gateway
Gateway for interfacing Freelance projects with other application
programs via an OPC server. should be installed on a Connectivity
Station.
- Trend Server
The Trend Server is a special OPC Server that supports user defined
trend displays. Only one Trend Server is allowed in a Freelance
system and should be installed on an Operator Station or a
dedicated Connectivity Station.
- DDE
DDE server for interfacing Freelance projects with other
application programs through a DDE interface.
DDE is supported with Freelance Systems running on Windows XP and not
supported with Freelance Systems running on Windows 7.
- Application Programming Interface (API)
- OPC Tunnel
Used to link OPC server / Trend server with DigiVis. Install this on
the machine running OPC server or Trend server
•
CBF viewer
Used to view real-time data in DigiVis for the application programs
(FBD, SFC etc.) from Control Builder F.
•
Security Lock
Access control for Control Builder F and Digivis
58
Section 2 Freelance Installation
Workplace Type PRODUCTION Mode
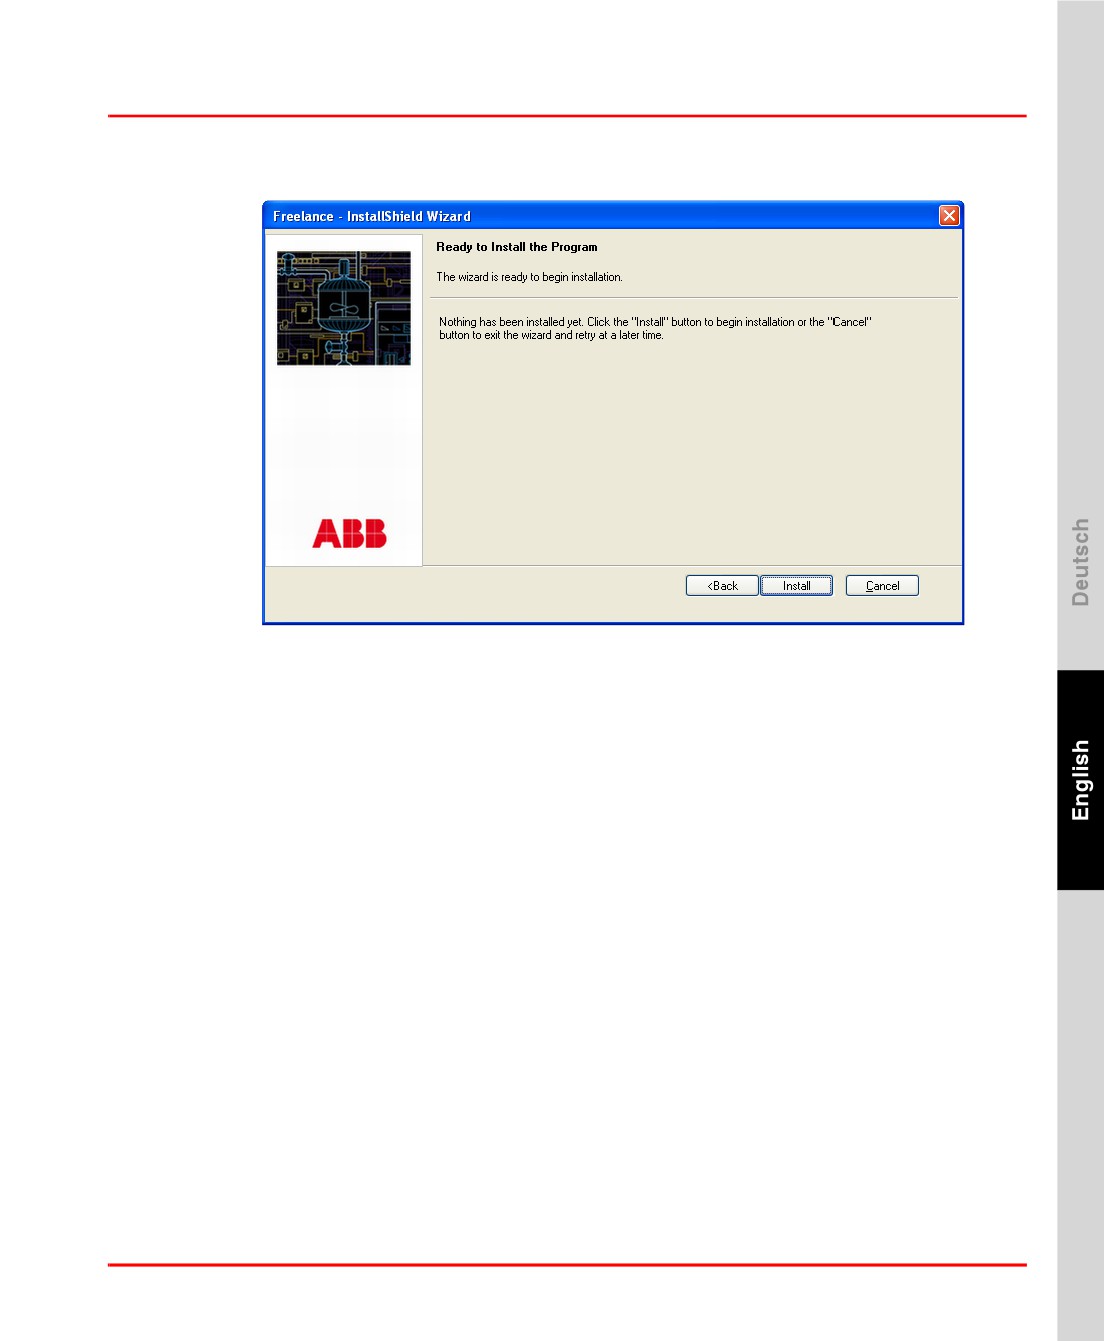
Ready to install dialog.
tb500_11.bmp
Clicking on the Install button will install the selected components.
The installation process takes some time. The time needed for installation
depends on the number of components selected.
59
Import Data from Previous Versions
Section 2 Freelance Installation
Installation of HBGina.
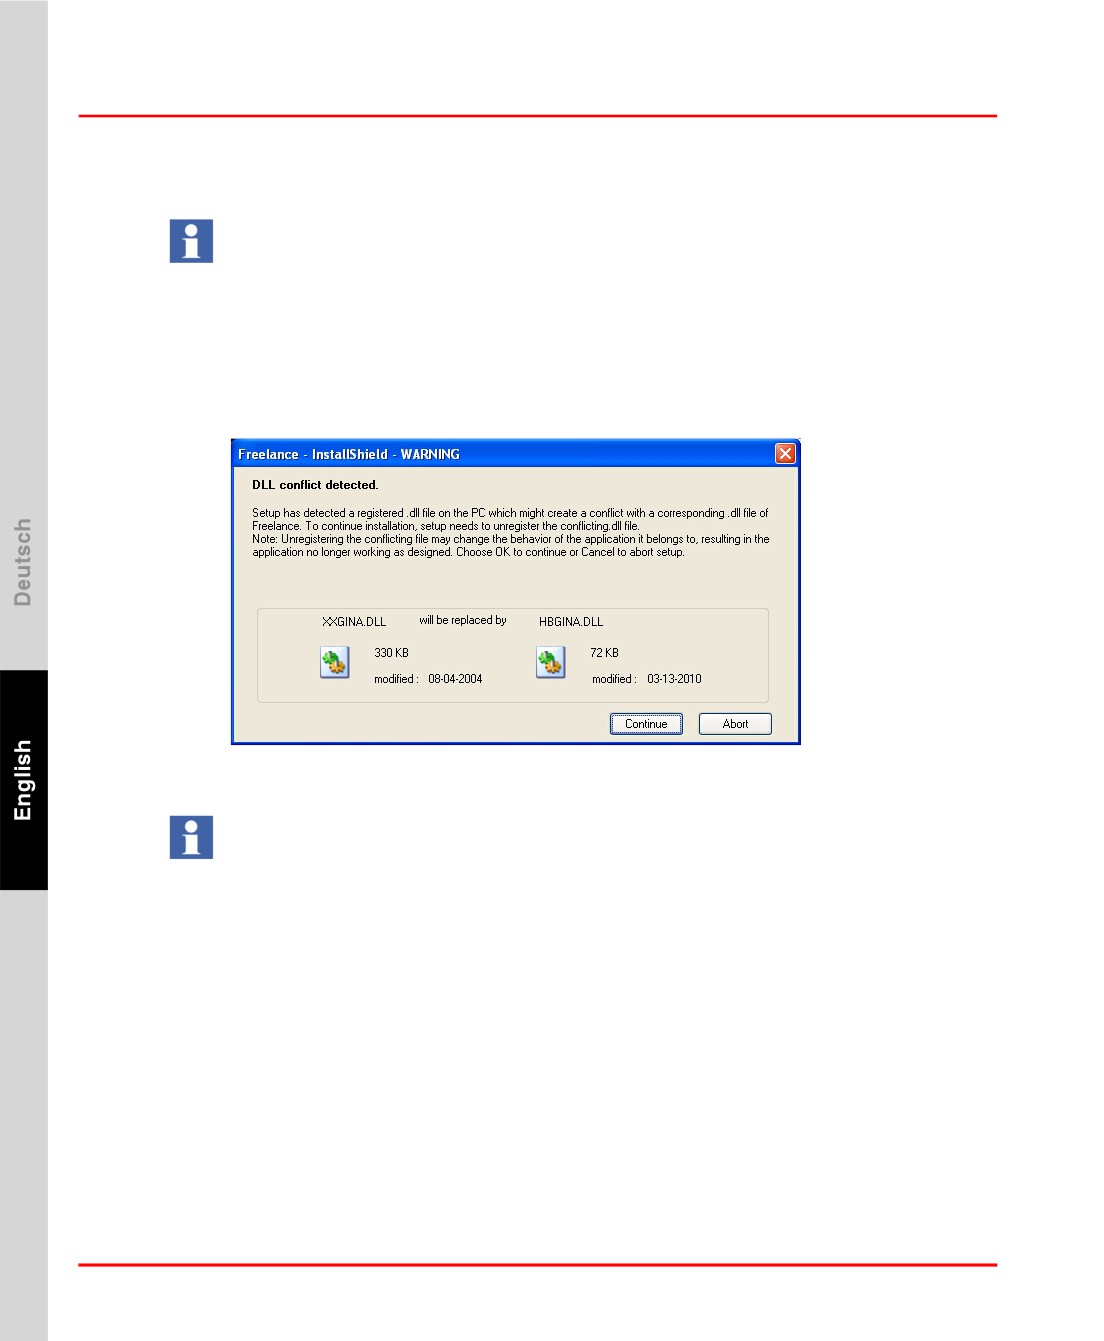
Freelance uses its own dll (HBGina.dll) for Graphical identification and
authentication in Windows XP.
If during the installation a conflict with the installed authentication is detected on
the PC, a warning message is displayed. Continuing the installation will install
the HBGina.dll of the Freelance software. As a result, certain related
functionality of other applications might be impacted.
HBGINA.jpg
In Windows 7 Professional, HBGina.dll is not used.
In
After the installation of the software packages the setup continues with the data
import of previous versions.
Import Data from Previous Versions
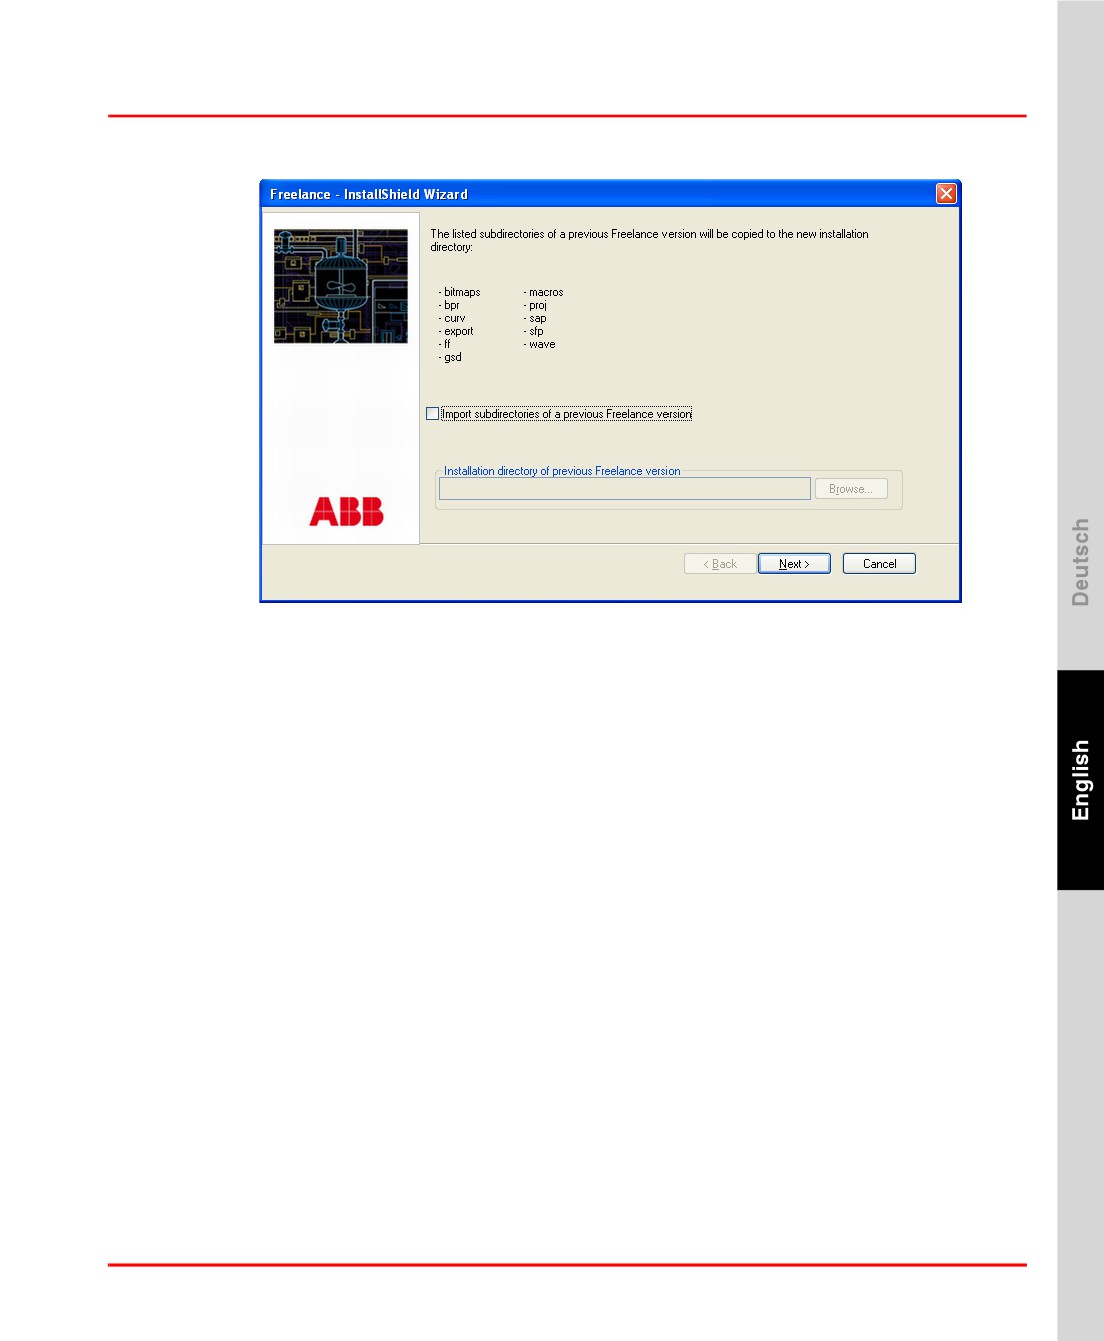
The dialog Freelance Software Setup / Import directory will be displayed when
the installation has been completed.
If you had installed a previous Freelance version and now want to install the
software in a different directory than before you can use this dialog to copy all
project and archive data into the new Freelance installation directory.
60
Section 2 Freelance Installation
Import Data from Previous Versions
tb500_14.bmp
If the project data are to be copied into the new directory, activate checkbox Import
subdirectories of a previous Freelance version and Browse to the directory name
of the previously used Freelance version.
Clicking the Next button copies the data from the previous version, if so desired.
The configuration screen is displayed thereafter.
Modify initial Installation Settings
The Configure dialog can be used to customize the installation to your computer
and requirements. The settings can be modified retroactively after the installation
has been completed without having to carry out the installation again.
For a detailed description of the configuration dialog refer to chapter Modify
Installation Settings on page 66.
Click OK on the “Configuration screen” to end this installation part. A screen
indicating the completion of the installation is displayed as follows.
61
Import Data from Previous Versions
Section 2 Freelance Installation
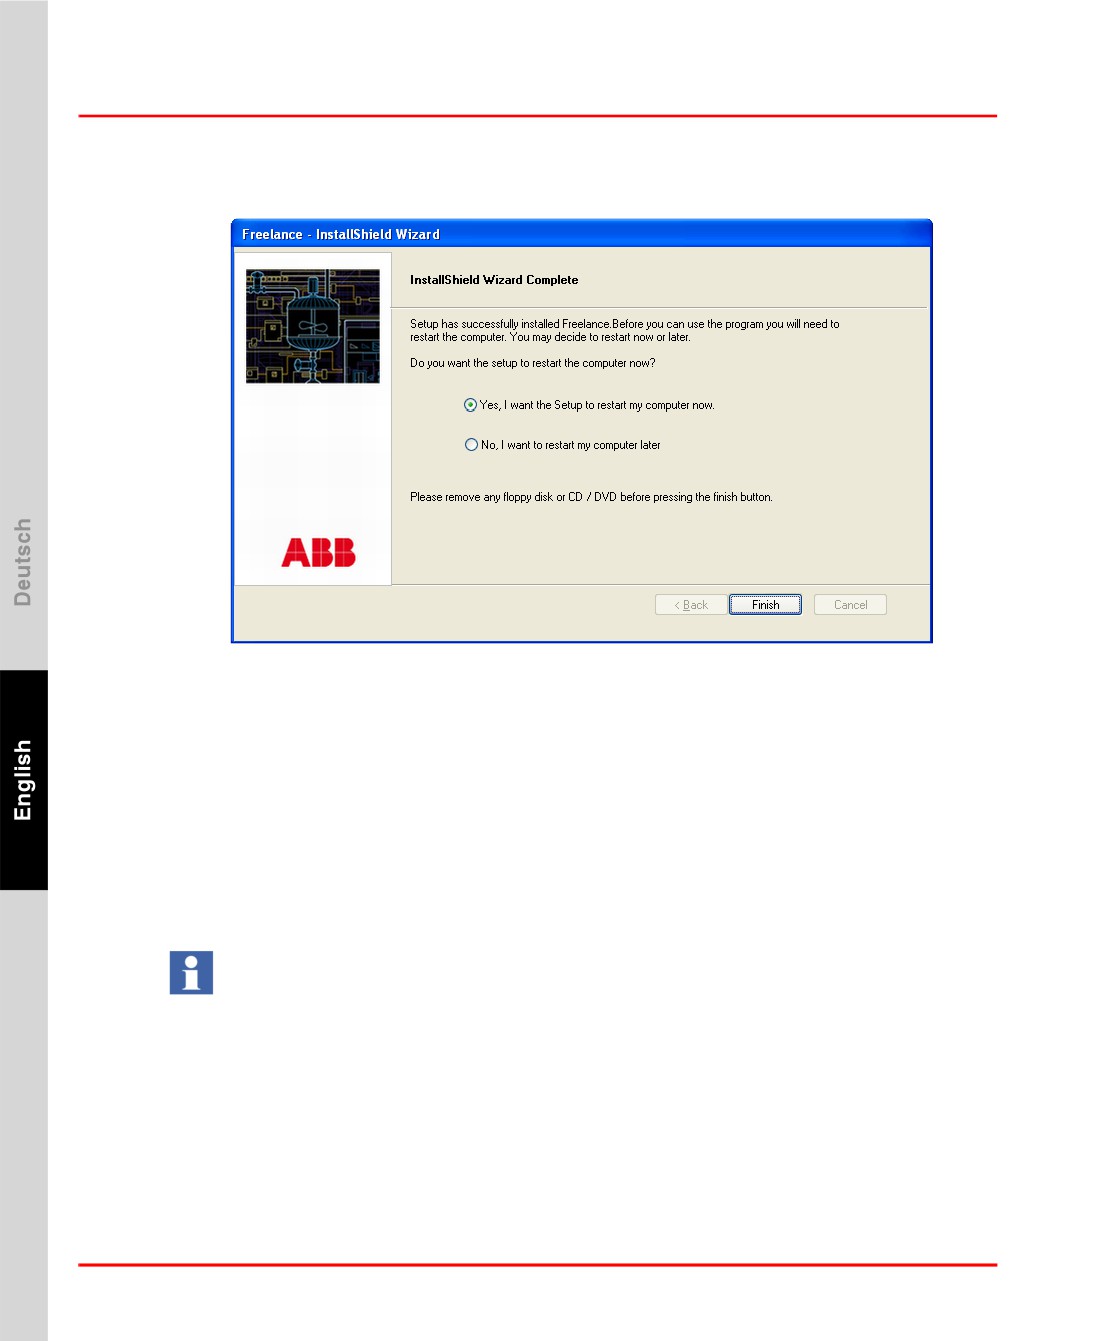
Finishing the Installation
tb500_31.bmp
Choose the desired boot action:
Yes
To restart computer now.
No
Install the additional Freelance products, then restart the computer
once after completing all installation procedures.
The Finish button is used to complete the installation.
If relevant, a message informing the user that the computer must be rebooted is
displayed. If you want to install additional Freelance products on this computer it is
sufficient to restart the computer once after completing all installation procedures.
In case you have installed the CBF viewer you need to call it up once in order to
start the CBF viewer configuration wizard. For details please refer to installation
guide of the CBF viewer which has been installed together with the software.
62
Section 2 Freelance Installation
Maintenance mode
Maintenance mode
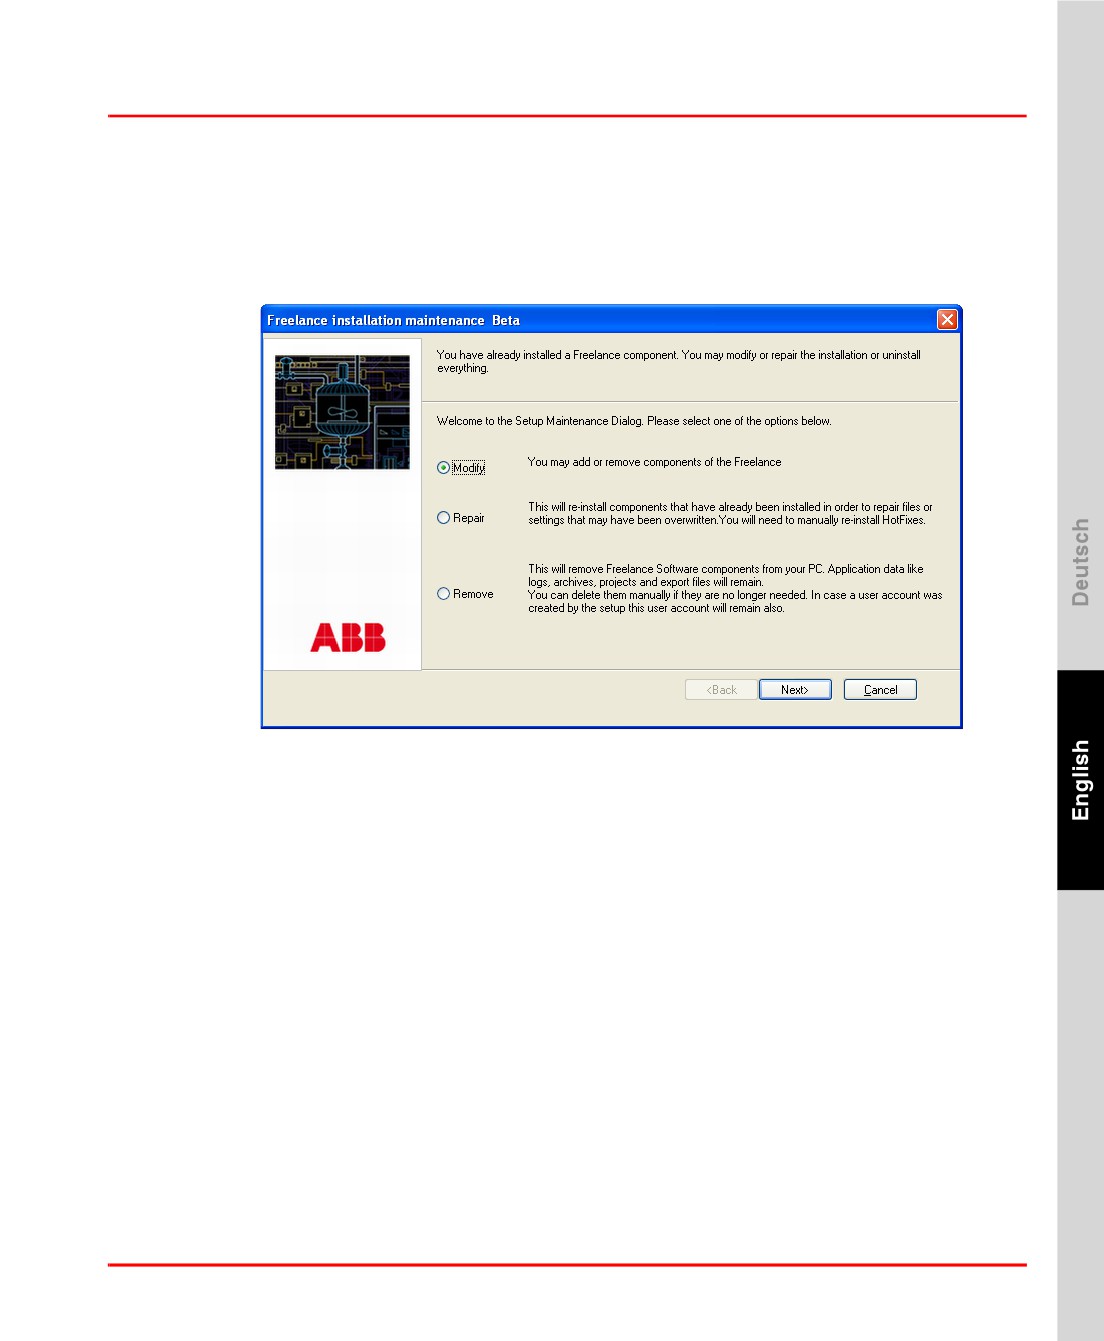
If the setup program is started on a PC where one or more Freelance components of
the same version are already installed on the System, then setup goes into
Maintenance mode.
tb500_12.bmp
63