New MG3. Service Manual - part 14


  Index      Manuals     New MG3. Service Manual


Search            copyright infringement  


Content      ..     12      13      14      15     ..


New MG3. Service Manual - part 14


EMERGENCY INFORMATION

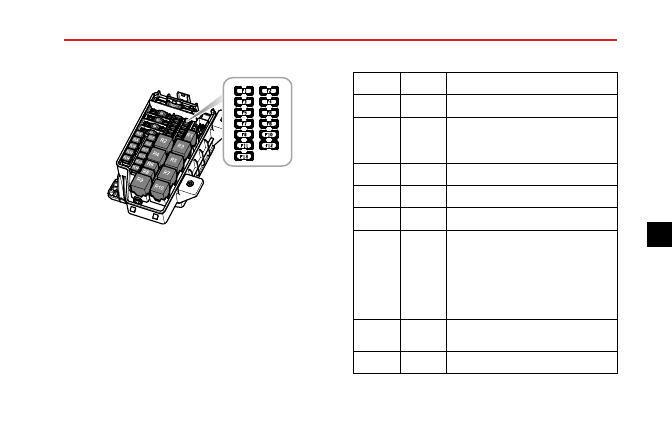
Engine Compartment Fuse Box

F

L 6

F L 8

F L 1 0

F L 1 2

F L 1 4

F L 7

F L 1

F L 2

F L 3

F L 4

F L 5

R 2

R 4

R 6

R 8

R 9

R 1 0

R 7

R 5

R 1

F L 9

F L 1 1

F L 1 3

F L 1 5

F L 1 6

R

3

Check or Replace a Fuse

1 Switch off the ignition switch and all electrical

equipment, disconnect the battery negative cable.

2 Press the catch to open the fuse box cover.

3 Check if any fuse is blown.

4 If the fuse is blown, replace it with another fuse of the

same ampere value.

Fuse Specification

Code

Specs

Function

F1

10A

Right front dipped beam

F2

5A

Downstream oxygen sensor, Intake
camshaft solenoid valve, Exhaust
camshaft solenoid valve

F3

10A

Left front dipped beam

F4

10A

A/C compressor clutch relay

F5

5A

Engine control module

F6

5A

A/C compressor clutch relay,
Canister control valve, A/C medium
pressure switch, Cooling fan relay
box, Fuel pump relay, Starter relay,
Clutch position switch, Start stop
switch

F7

30A

Front wiper enable relay, front
wiper speed relay

F8

5A

Upstream oxygen sensor

209

5

-------------------------------------------------------------------------------------------------------------------------------------------------------------

EMERGENCY INFORMATION

Code

Specs

Function

F9

15A

Daytime running lamp

F10

10A

Right front main beam, instrument
pack main beam indicator

F11

10A

Left front main beam

F12

30A

Ignition coil, Fuel injector, Neutral
position switch, Engine control
module

F13

-

-

FL1

200A

Alternator, fuse in engine
compartment fuse boxF4,FL11

FL2

40A

SCS unit (pump)

FL3

40A

Cooling fan relay box

FL4

60A

Fuse in passenger compartment
fuse boxF20,F22,F24,F26

FL5

80A

Fuse in passenger compartment
fuse boxF1,F3,F5,F7,F9,F25,F27,
HRW relay

FL6

25A

SCS system (valve)

FL7

50A

Ignition switch

FL8

25A

Body control module

FL9

30A

DC/DC, Fuse in passenger
compartment fuse
boxF28,F30,F32,F34

FL10

25A

Body control module

FL11

30A

Blower relay

FL12

25A

Body control module

FL13

30A

Starter relay

FL14

25A

Body control module

FL15

30A

Main beam relay, Daytime running
lamp relay, Position lamp relay

FL16

-

-

210

-------------------------------------------------------------------------------------------------------------------------------------------------------------

EMERGENCY INFORMATION

Bulb Replacement

Bulb Specification

Bulb

Type

Dipped Beam and Main
Beam

HB3LL 60W

Front Side
Lamps/Daytime Running
Lamp

LED

Front Indicator Lamps

PY21W 21W

Side Turn Signal Lamps

WY5W 5W

Reverse Lamps

LED

Rear Fog Lamps

P21W 21W

Bulb

Type

Rear Side Lamps

LED

Brake Lamp

P21W 21W

License Plate Lamps

W5W 5W

Rear Indicator Lamps

WY16W 16W

High Mounted Stop Lamp W5W 5W

Interior Lights

C10W 10W

Boot Lamp

R10W 10W

Note: BulbHB3LL is identical withHB3in shape and structure, and is only superior in reliability and service life.

Note: MG only recommends replacement bulbs that completely meet the manufacturers specifications.

211

5

-------------------------------------------------------------------------------------------------------------------------------------------------------------

EMERGENCY INFORMATION

Bulb Replacement

Before replacing any bulb, turn off the ignition switch and
lighting switch to avoid any possibility of a short circuit.

Note: Only replace bulbs with the same type and
specification.

Take care NOT to touch the glass with your fingers; always
use a cloth to handle the bulb. If necessary, clean the glass
with methylated spirits to remove fingerprints.

If in doubt, when replacing bulbs, contact an Authorised
MG Repairer.

Dipped/Main Beam Headlamp Bulb Renewal

1 Open

the

bonnet——see

“Bonnet”

in

the

“Maintenance” section.

2 Disconnect the battery negative terminal.

3 Identify and locate the headlamp bulb cover plug.

4 Remove the cover plug.

5 Rotate the bulb anti-clockwise and remove.

6 Remove the wiring connector from the bulb.

7 Refit the wiring connector to the bulb.

212

-------------------------------------------------------------------------------------------------------------------------------------------------------------

EMERGENCY INFORMATION

8 Locate the bulb in the lamp, rotate clockwise until fully

secured.

9 Locate the cover plug.

10 Connect the negative battery terminal.

11 Test headlamp operation.

12 Close

the

bonnet——see

“Bonnet”

in

the

“Maintenance” section.

Front Direction Indicator Bulb Renewal

1 Open

the

bonnet——see

“Bonnet”

in

the

“Maintenance” section.

2 Disconnect the battery negative terminal.

3 Identify and locate the front indicator bulb cover plug.

4 Rotate the cover anti-clockwise and remove the cover

plug.

5 Rotate the bulb holder anti-clockwise and remove.

6 Remove the bulb from the holder.

7 Install the bulb into the holder.

213

5

-------------------------------------------------------------------------------------------------------------------------------------------------------------

EMERGENCY INFORMATION

8 Locate the bulb holder in the lamp, rotate clockwise

until fully secured.

9 Locate the cover plug, rotate clockwise until fully

secured.

10 Connect the negative battery terminal.

11 Test lamp operation.

12 Close

the

bonnet——see

“Bonnet”

in

the

“Maintenance” section.

Rear Stop Lamp Bulb

1 Open the tailgate.

2 Disconnect the battery negative terminal.

3 Using a suitable 10 mm spanner/socket wrench,

remove the 2 screws securing the lamp to the body.

4 Release the lamp assembly and remove away from the

body.

214

-------------------------------------------------------------------------------------------------------------------------------------------------------------

EMERGENCY INFORMATION

5 Rotate the bulb holder in an anti-clockwise direction.

6 Remove bulb holder and remove bulb.

7 Fit bulb to bulb holder.

8 Insert bulb holder in lamp assembly, rotate clockwise

until fully secure.

9 Ensure lamp seal is correctly located.

10 Position lamp to body, start both screw fixings, tighten

to 3-5 Nm.

11 Reconnect battery negative terminal.

12 Test lamp operation.

13 Close tailgate.

215

5

-------------------------------------------------------------------------------------------------------------------------------------------------------------

EMERGENCY INFORMATION

Rear Direction Indicator Bulb

1 Open the tailgate.

2 Disconnect the battery negative terminal.

3 Using a suitable 10 mm spanner/socket wrench,

remove the 2 screws securing the lamp to the body.

4 Release the lamp assembly and remove away from the

body.

5 Rotate the bulb holder in an anti-clockwise direction.

6 Remove bulb holder and remove bulb.

7 Fit bulb to bulb holder.

8 Insert bulb holder in lamp assembly, rotate clockwise

until fully secure.

9 Ensure lamp seal is correctly located.

216

-------------------------------------------------------------------------------------------------------------------------------------------------------------

EMERGENCY INFORMATION

10 Position lamp to body, start both screw fixings, tighten

to 3-5 Nm.

11 Reconnect battery negative terminal.

12 Test lamp operation.

13 Close tailgate.

License Plate Lamp Bulbs

1 Disconnect the battery negative terminal.

2 Using a suitable pry bar or lever, insert the tool

between the lamp lens and rear bumper lamp aperture
(protect the paintwork using masking tape and use the
N/S gap).

3 Carefully lever the lamp out of the aperture.

4 Twist and remove the bulb holder.

5 Release the bulb from the bulb holder.

6 Insert the new bulb in the lamp bulb holder.

7 Refit and secure the bulb holder.

8 Position the lamp in the bumper lamp aperture, push

until fully secured.

9 Connect battery negative terminal.

10 Test lamp operation.

217

5

-------------------------------------------------------------------------------------------------------------------------------------------------------------

EMERGENCY INFORMATION

Side Repeater Bulb (Mirror)

1 Remove the door mirror glass by manually tilting the

glass upwards.

2 Remove the bulb holder from the mirror base.

3 Remove bulb from the bulb holder.

4 Insert the new bulb in the lamp bulb holder.

5 Position the bulb holder in the mirror base – fully

locate.

6 Refit the mirror glass.

7 Connect battery negative terminal.

8 Test lamp operation.

218

-------------------------------------------------------------------------------------------------------------------------------------------------------------

EMERGENCY INFORMATION

Rear Fog lamp

1 Access the rear fog lamp bulb holder – this can be

achieved from the underside of the rear bumper on
the OS.

2 Rotate the bulb holder and remove from lamp.

3 Remove bulb.

4 Fit bulb to bulb holder.

5 Insert bulb holder into lamp, rotate to secure.

6 Refit the mirror glass.

7 Connect battery negative terminal.

8 Test lamp operation.

Interior Lights

1 Disconnect the battery negative terminal.

2 Use a suitable tool or small flat bladed screwdriver to

gently prise front end of the lens, and remove the lens.

3 Remove the old bulb and fit the new bulb to the bulb

holder.

4 Connect battery negative terminal.

5 Test lamp operation.

219

5

-------------------------------------------------------------------------------------------------------------------------------------------------------------

EMERGENCY INFORMATION

Boot Lamp

1 Disconnect the battery negative terminal.

2 Insert a suitable tool or small flat bladed screwdriver

into the indent on one of the narrow sides of the lens
and carefully remove the unit from its location.

3 Remove the old bulb and fit the new bulb to the bulb

holder.

4 Connect battery negative terminal.

5 Test lamp operation.

220

-------------------------------------------------------------------------------------------------------------------------------------------------------------

-------------------------------------------------------------------------------------------------------------------------------------------------------------

MAINTENANCE

Maintenance

Routine Maintenance

The safety, reliability and performance of your car will
depend partly on how well it is maintained. You must
ensure that maintenance is carried out when required and
according to the information contained in the ‘Service
Schedule’.

Servicing

For Next Service

*

,please refer to “Information Centre”

in “Instruments and Controls” section. After each service,
‘Next Service' will be reset by the local MG Authorised
Repairer, which performed the maintenance.

Note: If a service is not carried out (or the display is
not reset by the local MG Authorised Repairer after
service), the service display cannot provide correct
information.

Service History

Ensure your local MG Authorised Repairer fills in the
Service Records after each service.

Brake Fluid Replacement

Replace the brake fluid according to the information
contained in the “Service Schedule”.

Note: Brake fluid replacement will be an additional
cost.

Coolant Replacement

Replace the engine coolant (mixed solution of antifreeze
and water) according to the information contained in the
“Service Schedule”.

Note: Coolant replacement will be an additional cost.

Emission Control

Your car is fitted with emission and evaporative control
equipment designed to meet specific territorial and legal
requirements.

Incorrect engine settings may adversely

affect exhaust emissions, engine performance and fuel
consumption, as well as causing high temperatures, which
could result in damage to the catalytic converters and
engine.

222

-------------------------------------------------------------------------------------------------------------------------------------------------------------

MAINTENANCE

IMPORTANT

You should be aware that unauthorised replacement,
modification or tampering with this equipment by an
owner or motor vehicle repairer could result in the
manufacturer’s warranty being deemed as invalid. In
addition, engine settings must not be tampered with.

Owner Maintenance

Any significant or sudden drop in fluid levels,
or uneven tyre wear, should be reported
without delay. For further information, refer
to an MG Authorised Repairer.

In addition to the routine services referred to previously,
a number of simple checks must be carried out more
frequently. You can carry out these checks yourself and
advice is given on the pages that follow.

Daily Checks

• Operation of lights, horn, direction indicators, wipers,

washers and warning lights.

• Operation of seat belts and brakes.

• Look for fluid deposits underneath the car that might

indicate a leak.

• Check tyre appearance.

Weekly Check

• Engine oil level.

• Coolant level.

• Brake fluid level.

• Windscreen washer fluid level.

• Operate air conditioning.

Note: The engine oil level should be checked more
frequently if the car is driven for prolonged periods at
high speeds.

Special Operating Conditions

If your car is frequently used in dusty conditions, or
operated in extreme climates where sub-zero or very
high ambient temperatures are normal, more frequent
attention may need to be paid to servicing requirements.
You need to carry out special maintenance operations
(refer to Service Portfolio or contact your MG Authorised
Repairer).

223

6

-------------------------------------------------------------------------------------------------------------------------------------------------------------

MAINTENANCE

Safety in the Garage

Cooling fans may commence operating after
the engine is switched off, and continue
operating for a number of minutes.

Keep

clear of all fans while working in the engine
compartment.

If you need to carry out maintenance, observe the
following safety precautions at all times:

• Keep your hands and clothing away from drive belts and

pulleys.

• If the car has been driven recently, DO NOT TOUCH

exhaust and cooling system components until the engine
has cooled.

• DO NOT TOUCH electrical leads or components

while the engine is running, or with the ignition switch
on.

• NEVER leave the engine running in an unventilated area

- exhaust gases are poisonous and extremely dangerous.

• DO NOT work underneath the car with a wheel

changing jack as the only means of support.

• Ensure that sparks and naked lights are far away from

the engine compartment.

• Wear protective clothing and work gloves.

• Remove watches and jewelry before working in the

engine compartment.

• DO NOT allow tools or metal parts of the car to make

contact with the battery leads or terminals.

Toxic Liquid

Fluids used in motor vehicles are poisonous and should not
be consumed or brought into contact with open wounds.
These include: battery acid, coolant, brake fluid, power
steering fluid, fuel, engine oil and windscreen washer
additives.

For your own safety, ALWAYS read and observe all
instructions printed on labels and containers.

Used Engine Oil

Prolonged contact with engine oil may cause serious skin
disorders, including dermatitis and cancer of the skin.
Wash thoroughly after contact. Used engine oil should

224

-------------------------------------------------------------------------------------------------------------------------------------------------------------


Content      ..     12      13      14      15     ..