New MG3. Service Manual - part 3
 

  Index      Manuals     New MG3. Service Manual


Search            copyright infringement  


Content      ..     1      2      3      4      ..


New MG3. Service Manual - part 3


INSTRUMENTS AND CONTROLS

Rearview Mirrors

Exterior Rearview Mirrors

Note: Objects viewed in exterior rearview mirrors may
appear further away than they actually are.

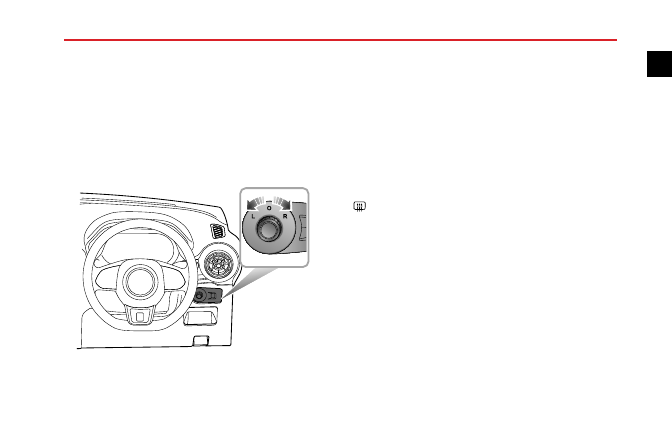
Exterior Rearview Mirror Glass Adjustment

• Rotate the knob to select left (L) or right (R) rearview

mirror.

• Push the knob in the desired direction to adjust the

angle of the exterior rearview mirror glass.

• Upon completion of the adjustment, rotate the knob

back to the central position, this will ensure no
accidental adjustment of the mirror.

Exterior Rearview Mirror Heating

*

The exterior rearview mirrors have integral heating
elements which disperse ice or mist from the glass. The
heating elements operate while the Heated Rear Window

is switched on.

Note: The heated rear window and exterior rearview
mirror heating elements only work while the engine is
running.

33

1

-------------------------------------------------------------------------------------------------------------------------------------------------------------

INSTRUMENTS AND CONTROLS

IMPORTANT

• Exterior

rearview

mirror

glass

adjustments

are operated by electrical motors.

Operating

them directly by hand may damage the internal
components.

• Washing or flushing exterior rearview mirrors with

high pressure water jets or car washes may result in
electrical motor failure.

Exterior Rearview Mirror Folding

The exterior rearview mirrors can be manually folded
rearward, so that the vehicle can easily pass through a
narrow passage.

34

-------------------------------------------------------------------------------------------------------------------------------------------------------------

INSTRUMENTS AND CONTROLS

Interior Rearview Mirror

Before driving, adjust the body of the mirror by hand to
achieve the best possible view to the rear. The manual
dipping function of the interior rear-view mirror helps to
reduce glare from the headlights of following vehicles at
night.

Manual Anti-dazzle of Interior Rearview Mirror

Move the lever at the base of the interior rearview mirror
to change its angle so as to achieve the anti-dazzle function.
Normal visibility is restored by pulling the lever back again.

Note: In some circumstances, the view reflected in a
‘dipped’ manual mirror can confuse the driver as to the
precise location of following vehicles.

35

1

-------------------------------------------------------------------------------------------------------------------------------------------------------------

INSTRUMENTS AND CONTROLS

Sunvisor

The vanity mirror on the driver side should
only be used when the car is stationary.

Sunvisors are arranged on the roof ahead of both the driver
and the front passenger. Some sunvisors (1) are provided
with simple vanity mirror (2), depending on the vehicle
configuration. Pull down the sunvisor, open the cover to
use the vanity mirror.

36

-------------------------------------------------------------------------------------------------------------------------------------------------------------

INSTRUMENTS AND CONTROLS

Windows

Power Operated Window Switch

1
2
3
4
5

1 Front Right Window Switch

2 Front Left Window Switch

3 Rear Right Window Switch

4 Rear Left Window Switch

5 Rear Window Isolation Switch

Window Operation

Ensure children are kept clear when raising or
lowering a window.

Improper use or activation of the electric
windows by children could cause serious harm
or even death. It is the responsibility of the
driver and adult passengers to ensure that
when carrying children the necessary steps
are taken to isolate the window operation.
This should include the removal of the
ignition key when children are left alone in
the vehicle.

Press the switch (1 ~ 4) to lower the window, and pull
the switch to raise the window. Release the switch, the
window will stop moving (unless in "one-touch" mode).

Note: The front and rear passenger windows can also
be operated by individual window switches, mounted
on each door.

The rear window switches will not

function if the rear window isolation switch on the
driver door has been activated.

37

1

-------------------------------------------------------------------------------------------------------------------------------------------------------------

INSTRUMENTS AND CONTROLS

Note: When the ignition switch is in the ACC or
ON/RUN/START position, the power windows can be
operated (doors should be closed).

Rear Window Isolation Switch

Press the switch (5) to isolate the rear window controls,
and press again to restore control.

Note: It is recommended that you ISOLATE the rear
window switches when carrying children.

"One-touch" Down

The driver's window control switch (1) has 2 positions.

Short press the window control switch to the "2" position
and release. The window automatically descends to fully
open.

Window movement can be stopped at a desired position
at any time by briefly pulling up the corresponding switch
during descent.

Note: DO NOT operate the power window controls
continuously several times in a short time frame,

in some cases the power window controls may be
disabled to protect the motor. If this occurs, please
wait a few seconds until the motor cools down.

38

-------------------------------------------------------------------------------------------------------------------------------------------------------------

INSTRUMENTS AND CONTROLS

Interior Light

Interior Lights

1

2

Manual Operation

Press the button 1 to turn the interior light on, press the
button 2 to turn off.

Automatic Operation

When the ignition switch is set to OFF or ACC , the
interior light illuminates when the door is opened. The
interior light will extinguish automatically after about 30
seconds when the door is closed.

When the ignition switch is set to ON/RUN/START,the
interior light illuminates when the door is opened. The
interior light will extinguish automatically after about 3
seconds when the door is closed.

When the door is closed and the ignition switched to
the ON/RUN/START position within the 30 second delay
period the interior light will extinguish immediately

39

1

-------------------------------------------------------------------------------------------------------------------------------------------------------------

INSTRUMENTS AND CONTROLS

Front Console Power Socket

Please ensure the socket blanking plug is
inserted when the power socket is not in use.
This will ensure no debris or foreign objects
enter the socket preventing its use or cause
short circuits.

The 12V power socket has a voltage rating of
12V, and the maximum power of 120 Watt,
please DO NOT use any electrical appliance
that exceeds this rating.

Extended use of the accessory power socket
and USB socket when the engine is switched
off will cause premature discharging of the
vehicle battery.

The 12V power socket is located in the centre console in
front of the gear shift lever. It can be used as a power supply
when the ignition switch is in the ACC or ON/RUN/START
positions when the blanking plug is removed.

1

Located to the right of the power socket is one USB socket.
It can be used to provide a 5V power supply or a data
transmission connection.

40

-------------------------------------------------------------------------------------------------------------------------------------------------------------

INSTRUMENTS AND CONTROLS

Storage Devices

Instructions

• Please close all storage devices when the car is in

motion.

Leaving these storage devices open may

cause personal injuries in cases of a sudden start-off,
emergency braking and a car accident.

• Do not place inflammables or disposable cigarette

lighters in any storage devices.

The heat in hot

conditions may ignite flammable materials or disposable
cigarette lighters and lead to a fire.

Glove Box

Pull the handle to open the glove box.

Push the lid forward to close the glove box. Make sure the
glove box is fully closed when the car is driving.

41

1

-------------------------------------------------------------------------------------------------------------------------------------------------------------

INSTRUMENTS AND CONTROLS

Cup Holder

DO NOT place hot drinks in the cup holder
whilst driving. Spillage may result in personal
injury or damage.

The cup holder is on the left of the hand brake.

42

-------------------------------------------------------------------------------------------------------------------------------------------------------------

-------------------------------------------------------------------------------------------------------------------------------------------------------------

AIR CONDITIONING AND AUDIO SYSTEMS

Ventilation

2

5

0

000

0

000

0

000

0

000

2

0

000

0

000

1

5

0

000

0

00 0

1

3

3

0

000

0

0 0 0

4

4

1 Side Vents
2 Windscreen Vents
3 Centre Vent
4 Front Seat Feet Vents
5 Front Side Window Vents

44

-------------------------------------------------------------------------------------------------------------------------------------------------------------

AIR CONDITIONING AND AUDIO SYSTEMS

The heating, ventilation and air conditioning * system
provides fresh, heated or cooling air to the interior of the
car. Fresh air is drawn in through the air intake grille under
the front windscreen and the A/C filter.

Always keep the air intake grille clear of obstructions such
as leaves, snow or ice.

Particle/Pollen Filter

The particle/pollen filter helps to keep the car interior free
from pollen and dust. To remain fully effective, the filter
should be replaced at the recommended service interval.

Vents

Centre Vents

Direct the air flow by moving the control in the centre of
the louvres up or down, or from side to side.

45

2

-------------------------------------------------------------------------------------------------------------------------------------------------------------

AIR CONDITIONING AND AUDIO SYSTEMS

Side Vents

Rotate the thumb-wheel clockwise to open the side vents,
rotate the thumb-wheel counterclockwise to close the side
vents. Direct the air flow by moving the control in the
centre of the louvres up or down, or from side to side.

46

-------------------------------------------------------------------------------------------------------------------------------------------------------------

AIR CONDITIONING AND AUDIO SYSTEMS

Manual Temperature Control

*

Control Panel

1

5

2

4

0

6

3

1

2

3

5

4

1 Temperature Control Knob

2 Air Recirculation Button

3 Blower Motor Speed Control

4 Heated Rear Window Button

5 Air Distribution Control Knob

Temperature Control

Rotate the Temperature Control Knob clockwise to
increase the air temperature inside the car or rotate
anti-clockwise to decrease.

Air Recirculation

Press to operate, the

LED

in the switch

illuminates, the air inside the car is recirculated and the air
intake is closed, preventing the entry of traffic fumes.

When the ignition is switched off, the air recirculation
control flap stays in current position.

Note: Leaving the system in recirculation mode can
cause the windscreen to mist. If this happens, switch
off recirculation and rotate the air distribution knob to
Windscreen/Demist mode and adjust the blower speed
to maximum.

Blower Motor Speed Control

Rotate the Blower Motor Speed Control clockwise/
counterclockwise to increase/decrease the blower speed.

47

2

-------------------------------------------------------------------------------------------------------------------------------------------------------------

AIR CONDITIONING AND AUDIO SYSTEMS

The blower is switched off when the blower motor control
is set to 0, and the blower motor speed increases gradually
from 1 to 6.

Note: To turn off the system, adjust the blower motor
control to 0; to turn on the system, adjust the blower
motor control to other position.

Heated Rear Window

The heating elements on the inside of the rear
screen are easily damaged. DO NOT scrape
or scratch the inside of the glass. DO NOT
stick labels over the heating elements.

Press to operate; the

LED

in the switch will

illuminate indicating the heated rear window is switched
on. The

LED

extinguishes when the heated rear window

is turned off.

The heated rear window will switch off

automatically after

15

minutes.

Note: The heated rear window will only function with
the engine operating.

Air Distribution

Rotate the Air Distribution Control Knob, select the air
distribution mode as required.

For 'face'. Directs air to the side and centre

vents.

For 'face + feet'. Directs air to the footwell, side

and centre vents.

For 'feet'. Directs air to the footwell vents.

Note: In this mode, a small amount of air will be
directed to the side 

, windscreen and front side

window vents.

For 'feet + windscreen'.

Directs air to the

windscreen, front side window and footwell vents.

Note: In this mode, a small amount of air will be
directed to the side vents.

48

-------------------------------------------------------------------------------------------------------------------------------------------------------------


Content      ..     1      2      3      4      ..