Buick-Terraza (2005 year). Manual - part 24
 

  Index      Buick     Buick-Terraza (2005 year) - manual in english


Search            copyright infringement  


Content      ..     22      23      24      25     ..


Buick-Terraza (2005 year). Manual - part 24


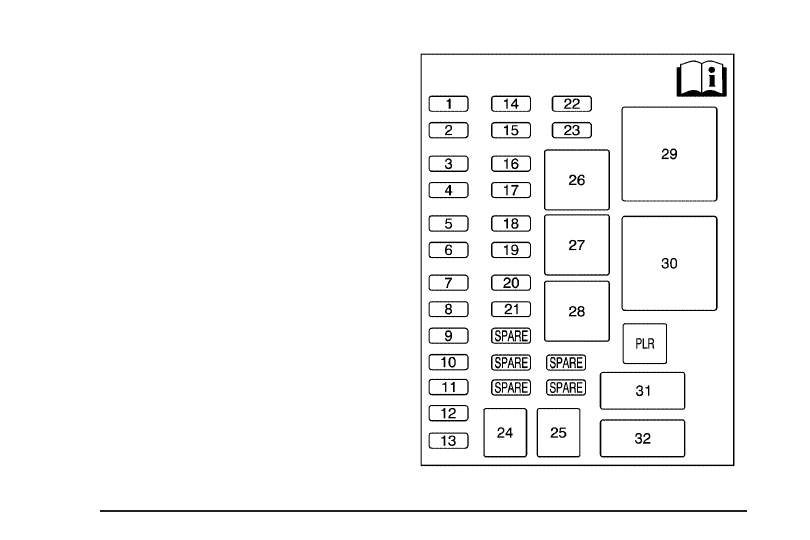
Instrument Panel Fuse Block

The instrument panel fuse block is located under the
instrument panel on the passenger’s side of the vehicle.

Your vehicle may not have all of the fuses listed.

5-88

-------------------------------------------------------------------------------------------------------------------------------------------------------------

Fuses

Usage

1

Trunk, Door Locks

2

Electronic Level Control

3

Rear Wiper

4

Radio Amplifier

5

Interior Lamps

6

OnStar

®

7

Keyless Entry Module

8

Cluster, Heating, Ventilation,
Air Conditioning

9

Cruise Switch

10

Steering Wheel Illumination

11

Power Mirror

12

Stoplamp, Turn Lamps

13

Heated Seats

14

Blank

15

Electronic Level Control

16

Heated Mirror

17

Center High-Mounted Stoplamp,
Back-up Lamps

18

Blank

19

Canister Ventilation

Fuses

Usage

20

Park Lamps

21

Power Sliding Door

22

Blank

23

Blank

24

Left Power Sliding Door

25

Right Power Sliding Door

Relays

Usage

26

Blank

27

Blank

28

Park Lamps

29

Retained Accessory Power

30

Rear Defog

PLR

Fuse Puller

Circuit

Breakers

Usage

31

Power Seats

32

Power Window

5-89

-------------------------------------------------------------------------------------------------------------------------------------------------------------

Underhood Fuse Block

The underhood fuse block is located in the engine compartment. For more information on location see
Engine Compartment Overview on page 5-12.

Your vehicle may not have all the fuses listed.

5-90

-------------------------------------------------------------------------------------------------------------------------------------------------------------

Fuses

Usage

1

Right High Beam

2

Fuel Pump

3

Diode

SPARE

Spare

SPARE

Spare

4

Left High Beam

SPARE

Spare

SPARE

Spare

SPARE

Spare

5

Not Used

6

Air Conditioning Clutch

7

Horn

8

Left Low Beam

9

Powertrain Control Module,
Electronic Throttle Control

10

Not Used

11

Transmission Solenoid

12

Right Low Beam

Fuses

Usage

13

Anti-lock Brake System

14

Powertrain Control Module Ignition

15

Electronic Ignition

16

Fuel Injector

17

Climate Control, RPA,
Cruise Control

18

Electronic Throttle Control

19

Engine Sensor, Evaporator

20

Airbag

21

Not Used

22

Emission, All-Wheel Drive

23

Auxiliary Power

24

Front Windshield Washer

25

AC/DC Inverter

26

Rear Blower

27

Front Blower

28

Front Windshield Wiper

5-91

-------------------------------------------------------------------------------------------------------------------------------------------------------------

J-Case Fuses

Usage

PLR

Fuse Puller

29

Fan 1

30

Starter Solenoid

31

Anti-lock Brake System Motor

32

Blank

33

Fan 2

34

Front Blower High

35

Battery Main 3

36

Rear Defogger

37

Battery Main 2

38

Battery Main 1

Relays

Usage

RUN RLY

Starter

LO BEAM

Low Beam

FUEL PUMP

Fuel Pump

HORN

Horn

AC/CLTCH

Air Conditioning Clutch

HI BEAM

High Beam

PWR/TRN

Powertrain

WPR2

Wiper 2

WPR1

Wiper 1

FAN 1

Fan 1

CRNK

Crank

IGN MAIN

Ignition Main

FAN2

Fan 2

FAN3

Fan 3

BLANK

Not Used

5-92

-------------------------------------------------------------------------------------------------------------------------------------------------------------

Capacities and Specifications

The following approximate capacities are given in English and metric measurements. See Recommended Fluids and
Lubricants 
on page 6-11 for more information.

Application

Capacities

English

Metric

Air Conditioning Refrigerant Systems

Front A/C

1.7 lbs

0.8 kg

Front and Rear A/C

2.2 lbs

1.0 kg

Automatic Transaxle — Pan Removal and Replacement

7.4 quarts

7.0 L

AWD Automatic Transaxle — Pan Removal and
Replacement

8.7 quarts

8.3 L

Cooling System

Front A/C

11.3 quarts

10.7 L

Front and Rear A/C

12.8 quarts

12.2 L

Engine Oil with Filter

4.5 quarts

4.3 L

Fuel Capacity

Regular

20.0 gallons

75.7 L

Extended

25.1 gallons

95.0 L

Wheel Nut Torque

100 ft lb

140

Y

All capacities are approximate. When adding, be sure to fill to the approximate level, as recommended in this
manual. Recheck fluid level after filling.

Engine

VIN Code

Transaxle

Spark Plug Gap

3.5L V6

8

Automatic

0.060 inches (1.52 mm)

5-93

-------------------------------------------------------------------------------------------------------------------------------------------------------------

-------------------------------------------------------------------------------------------------------------------------------------------------------------

Maintenance Schedule

Introduction

Important: Keep engine oil at the proper level and
change as recommended.

Have you purchased the GM Protection Plan? The Plan
supplements your new vehicle warranties. See your
Warranty and Owner Assistance booklet or your dealer
for details.

Maintenance Requirements

Notice: Maintenance intervals, checks, inspections,
replacement parts, and recommended fluids and
lubricants as prescribed in this manual are
necessary to keep your vehicle in good working
condition. Any damage caused by failure to follow
scheduled maintenance may not be covered by
warranty.

Your Vehicle and the Environment

Proper vehicle maintenance not only helps to keep your
vehicle in good working condition, but also helps the
environment. All recommended maintenance is
important. Improper vehicle maintenance can even
affect the quality of the air we breathe. Improper fluid
levels or the wrong tire inflation can increase the level
of emissions from your vehicle. To help protect our
environment, and to keep your vehicle in good condition,
be sure to maintain your vehicle properly.

6-2

-------------------------------------------------------------------------------------------------------------------------------------------------------------

Using the Maintenance Schedule

We at General Motors want to help you keep your
vehicle in good working condition. But we do not know
exactly how you will drive it. You may drive very
short distances only a few times a week. Or you may
drive long distances all the time in very hot, dusty
weather. You may use your vehicle in making deliveries.
Or you may drive it to work, to do errands or in many
other ways.

Because of all the different ways people use their
vehicles, maintenance needs vary. You may need more
frequent checks and replacements. So please read
the following and note how you drive. If you have any
questions on how to keep your vehicle in good condition,
see your GM Goodwrench

®

dealer.

This schedule is for vehicles that:

carry passengers and cargo within recommended
limits. You will find these limits on the tire and
loading information label. See Loading Your Vehicle
on page 4-32.

are driven on reasonable road surfaces within legal
driving limits.

use the recommended fuel. See Gasoline Octane
on page 5-5.

The services in Scheduled Maintenance on page 6-4
should be performed when indicated. See Additional
Required Services 
on page 6-6 and Maintenance
Footnotes 
on page 6-7 for further information.

{

CAUTION:

Performing maintenance work on a vehicle
can be dangerous. In trying to do some jobs,
you can be seriously injured. Do your own
maintenance work only if you have the
required know-how and the proper tools and
equipment for the job. If you have any doubt,
see your GM Goodwrench

®

dealer to have a

qualified technician do the work.

Some maintenance services can be complex. So,
unless you are technically qualified and have the
necessary equipment, you should have your
GM Goodwrench

®

dealer do these jobs.

When you go to your GM Goodwrench

®

dealer for

your service needs, you will know that GM-trained and
supported service technicians will perform the work
using genuine GM parts.

If you want to purchase service information, see Service
Publications Ordering Information 
on page 7-11.

6-3

-------------------------------------------------------------------------------------------------------------------------------------------------------------

Owner Checks and Services on page 6-8 tells you
what should be checked, when to check it and what
you can easily do to help keep your vehicle in
good condition.

The proper replacement parts, fluids and lubricants to
use are listed in Recommended Fluids and Lubricants
on page 6-11 and Normal Maintenance Replacement
Parts 
on page 6-13. When your vehicle is serviced,
make sure these are used. All parts should be replaced
and all necessary repairs done before you or anyone
else drives the vehicle. We recommend the use of
genuine GM parts.

Scheduled Maintenance

When the CHANGE OIL SOON message comes on,
it means that service is required for your vehicle. Have
your vehicle serviced as soon as possible within the
next 600 miles (1 000 km). It is possible that, if you
are driving under the best conditions, the engine oil
life system may not indicate that vehicle service
is necessary for over a year. However, your engine
oil and filter must be changed at least once a year
and at this time the system must be reset. Your
GM Goodwrench

®

dealer has GM-trained service

technicians who will perform this work using genuine
GM parts and reset the system.

If the engine oil life system is ever reset accidentally,
you must service your vehicle within 3,000 miles
(5 000 km) since your last service. Remember to reset
the oil life system whenever the oil is changed. See
Engine Oil Life System on page 5-16 for information on
the Engine Oil Life System and resetting the system.

When the CHANGE OIL SOON message appears,
certain services, checks and inspections are required.
Required services are described in the following for
“Maintenance

I

” and “Maintenance

II

.” Generally,

it is recommended that your first service be
Maintenance

I

, your second service be Maintenance

II

and that you alternate Maintenance

I

and Maintenance

II

thereafter. However, in some cases, Maintenance

II

may be required more often.

Maintenance

I

— Use Maintenance

I

if the CHANGE

OIL SOON message comes on within 10 months
since the vehicle was purchased or Maintenance

II

was performed.

Maintenance

II

— Use Maintenance

II

if the previous

service performed was Maintenance

I

. Always use

Maintenance

II

whenever the message comes on

10 months or more since the last service or if the
message has not come on at all for one year.

6-4

-------------------------------------------------------------------------------------------------------------------------------------------------------------

Scheduled Maintenance

Service

Maintenance

I

Maintenance

II

Change engine oil and filter. See Engine Oil on page 5-13. Reset oil life system.
See Engine Oil Life System on page 5-16An Emission Control Service.

Lubricate chassis components. See footnote #.

Visually check for any leaks or damage. See footnote (k).

Inspect engine air cleaner filter. If necessary, replace filter. See Engine Air
Cleaner/Filter 
on page 5-17An Emission Control Service. See footnotes †
and (g).

Rotate tires and check inflation pressures and wear. See Tire Inspection and
Rotation 
on page 5-54.

Inspect brake system. See footnote (a).

Check engine coolant and windshield washer fluid levels and add fluid as
needed.

Perform any needed additional services. See “Additional Required Services”
in this section.

Inspect suspension and steering components. See footnote (b).

Inspect engine cooling system. See footnote (c).

Inspect wiper blades. See footnote (d).

Inspect restraint system components. See footnote (e).

Lubricate body components. See footnote (f).

Check transaxle fluid level and add fluid as needed.

Inspect throttle system. See footnote (j).

6-5

-------------------------------------------------------------------------------------------------------------------------------------------------------------

Additional Required Services

The following services should be performed at the first maintenance service (

I

or

II

) after the indicated miles (kilometers)

shown for each item.

Additional Required Services

Service and Miles (Kilometers)

25,000

(41 500)

50,000

(83 000)

75,000

(125 000)

100,000

(166 000)

125,000

(207 500)

150,000

(240 000)

Inspect fuel system for damage or leaks.

Inspect exhaust system for loose or
damaged components.

Replace engine air cleaner filter. See
Engine Air Cleaner/Filter on page 5-17.
An Emission Control Service.

Change automatic transaxle fluid and
filter (severe service). See footnote (h).

Change automatic transaxle fluid and
filter (normal service).

Replace spark plugs and inspect spark
plug wires. An Emission Control Service.

Engine cooling system service (or
every five years, whichever occurs first).
An Emission Control Service.
See footnote (i).

Inspect engine accessory drive belt.
An Emission Control Service.

6-6

-------------------------------------------------------------------------------------------------------------------------------------------------------------

Maintenance Footnotes

† The U.S. Environmental Protection Agency or the
California Air Resources Board has determined that the
failure to perform this maintenance item will not nullify
the emission warranty or limit recall liability prior to
the completion of the vehicle’s useful life. We, however,
urge that all recommended maintenance services be
performed at the indicated intervals and the
maintenance be recorded.

Lubricate the suspension, steering linkage, transaxle
shift linkage and the underbody contact points and
linkage.

(a) Visually inspect brake lines and hoses for proper
hook-up, binding, leaks, cracks, chafing, etc. Inspect
disc brake pads for wear and rotors for surface
condition. Inspect other brake parts, including calipers,
parking brake, etc. Check parking brake adjustment.

(b) Visually inspect front and rear suspension and
steering system for damaged, loose or missing parts,
signs of wear or lack of lubrication. Inspect power
steering lines and hoses for proper hook-up, binding,
leaks, cracks, chafing, etc.

(c) Visually inspect hoses and have them replaced if
they are cracked, swollen or deteriorated. Inspect
all pipes, fittings and clamps; replace with genuine

GM parts as needed. To help ensure proper operation,
a pressure test of the cooling system and pressure
cap and cleaning the outside of the radiator and
air conditioning condenser is recommended at least
once a year.

(d) Visually inspect wiper blades for wear or cracking.
Replace blade inserts that appear worn or damaged
or that streak or miss areas of the windshield.

(e) Make sure the safety belt reminder light and all your
belts, buckles, latch plates, retractors and anchorages
are working properly. Look for any other loose or
damaged safety belt system parts. If you see anything
that might keep a safety belt system from doing its
job, have it repaired. Have any torn or frayed safety belts
replaced. Also look for any opened or broken airbag
coverings, and have them repaired or replaced.
(The airbag system does not need regular maintenance.)

(f) Lubricate all key lock cylinders, hood latch
assemblies, secondary latches, pivots, spring anchor
and release pawl, hood and door hinges, rear folding
seats, liftgate hinges, fuel door hinge, power sliding door
cable and sliding door track(s). More frequent lubrication
may be required when exposed to a corrosive
environment. Applying silicone grease on weatherstrips
with a clean cloth will make them last longer, seal
better and not stick or squeak.

6-7

-------------------------------------------------------------------------------------------------------------------------------------------------------------

(g) If you drive regularly under dusty conditions, inspect
the filter at each engine oil change.

(h) Change automatic transaxle fluid and filter if the
vehicle is mainly driven under one or more of these
conditions:

− In heavy city traffic where the outside temperature

regularly reaches 90°F (32°C) or higher.

− In hilly or mountainous terrain.

− When doing frequent trailer towing.

− Uses such as found in taxi, police or delivery

service.

(i) Drain, flush and refill cooling system. See Engine
Coolant 
on page 5-21 for what to use. Inspect hoses.
Clean radiator, condenser, pressure cap and filler neck.
Pressure test the cooling system and pressure cap.

(j) Check system for interference or binding and
for damaged or missing parts. Replace parts as needed.
Replace any components that have high effort or
excessive wear. Do not lubricate accelerator or cruise
control cables.

(k) A fluid loss in any vehicle system could indicate a
problem. Have the system inspected and repaired
and the fluid level checked. Add fluid if needed.

Owner Checks and Services

These owner checks and services should be performed
at the intervals specified to help ensure the safety,
dependability and emission control performance of your
vehicle. Your GM Goodwrench

®

dealer can assist

you with these checks and services.

Be sure any necessary repairs are completed at once.
Whenever any fluids or lubricants are added to your
vehicle, make sure they are the proper ones, as shown
in Recommended Fluids and Lubricants on page 6-11.

At Each Fuel Fill

It is important to perform these underhood checks at
each fuel fill.

Engine Oil Level Check

Check the engine oil level and add the proper oil if
necessary. See Engine Oil on page 5-13 for further
details.

Notice: It is important to check your oil regularly
and keep it at the proper level. Failure to keep your
engine oil at the proper level can cause damage
to your engine not covered by your warranty.

6-8

-------------------------------------------------------------------------------------------------------------------------------------------------------------

Engine Coolant Level Check

Check the engine coolant level and add
DEX-COOL

®

coolant mixture if necessary.

See Engine Coolant on page 5-21 for further details.

Windshield Washer Fluid Level Check

Check the windshield washer fluid level in the windshield
washer tank and add the proper fluid if necessary.

At Least Once a Month

Tire Inflation Check

Visually inspect your vehicle’s tires and make sure they
are inflated to the correct pressures. Do not forget to
check the spare tire. See Tires on page 5-47 for further
details. Check to make sure the spare tire is stored
securely. See Changing a Flat Tire on page 5-62.

Tire Wear Inspection

Tire rotation may be required for high mileage highway
drivers prior to the Engine Oil Life System service
notification. Check the tires for wear and, if necessary,
rotate the tires. See Tire Inspection and Rotation
on page 5-54.

At Least Once a Year

Starter Switch Check

{

CAUTION:

When you are doing this inspection, the
vehicle could move suddenly. If the vehicle
moves, you or others could be injured.

1. Before you start, be sure you have enough room

around the vehicle.

2. Firmly apply both the parking brake and the regular

brake. See Parking Brake on page 2-37 if
necessary.

Do not use the accelerator pedal, and be ready to
turn off the engine immediately if it starts.

3. Try to start the engine in each gear. The starter

should work only in PARK (P) or NEUTRAL (N).
If the starter works in any other position, contact
your GM Goodwrench

®

dealer for service.

6-9

-------------------------------------------------------------------------------------------------------------------------------------------------------------

Automatic Transaxle Shift Lock Control
System Check

{

CAUTION:

When you are doing this inspection, the
vehicle could move suddenly. If the vehicle
moves, you or others could be injured.

1. Before you start, be sure you have enough room

around the vehicle. It should be parked on a level
surface.

2. Firmly apply the parking brake. See Parking Brake

on page 2-37 if necessary.

Be ready to apply the regular brake immediately if
the vehicle begins to move.

3. With the engine off, turn the ignition to RUN, but do

not start the engine. Without applying the regular
brake, try to move the shift lever out of PARK (P)
with normal effort. If the shift lever moves out
of PARK (P), contact your GM Goodwrench

®

dealer for service.

Ignition Transaxle Lock Check

While parked, and with the parking brake set, try to turn
the ignition to LOCK in each shift lever position.

The ignition should turn to LOCK only when the
shift lever is in PARK (P).

The key should come out only in LOCK.

Contact your GM Goodwrench

®

dealer if service is

required.

Parking Brake and Automatic Transaxle
Park (P) Mechanism Check

{

CAUTION:

When you are doing this check, your vehicle
could begin to move. You or others could be
injured and property could be damaged. Make
sure there is room in front of your vehicle in
case it begins to roll. Be ready to apply the
regular brake at once should the vehicle begin
to move.

6-10

-------------------------------------------------------------------------------------------------------------------------------------------------------------


Content      ..     22      23      24      25     ..