Saturn Vue (2010 year). Manual - part 22
 

  Index      Saturn     Saturn Vue (2010 year) - manual in english


Search            copyright infringement  


Content      ..     20      21      22      23     ..


Saturn Vue (2010 year). Manual - part 22


Vehicle Care

10-77

10. Now start the vehicle with the

good battery and run the
engine for a while.

11. Press the unlock symbol on the

remote keyless entry
transmitter to disarm your
security system, if equipped.

12. Try to start the vehicle that had

the dead battery. If it will not
start after a few tries, it
probably needs service.

Notice: If the jumper cables are
connected or removed in the
wrong order, electrical shorting
may occur and damage the
vehicle. The repairs would not be
covered by the vehicle warranty.
Always connect and remove the
jumper cables in the correct
order, making sure that the
cables do not touch each other
or other metal.

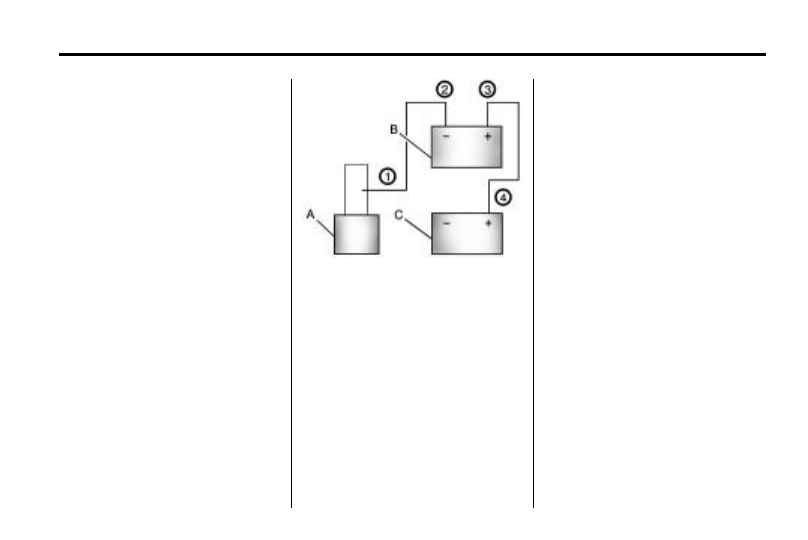
Jumper Cable Removal

A. Heavy, Unpainted Metal Engine

Part or Remote Negative (−)
Terminal

B. Good Battery or Remote

Positive (+) and Remote
Negative (−) Terminals

C. Dead Battery or Remote

Positive (+) Terminal

To disconnect the jumper cables
from both vehicles, do the following:

1. Disconnect the black

negative (−) cable from the
vehicle that had the dead
battery.

2. Disconnect the black

negative (−) cable from the
vehicle with the good battery.

3. Disconnect the red positive (+)

cable from the vehicle with the
good battery.

4. Disconnect the red positive (+)

cable from the other vehicle.

5. Return the underhood fuse block

cover to its original position,
if applicable.

-------------------------------------------------------------------------------------------------------------------------------------------------------------

10-78

Vehicle Care

Towing

Towing the Vehicle

To avoid damage, the disabled
vehicle should be towed with all
four wheels off the ground.
Consult your dealer/retailer or a
professional towing service if the
disabled vehicle must be towed.

To tow the vehicle behind
another vehicle for recreational
purposes — such as behind a
motorhome, see Recreational
Vehicle Towing following.

Recreational Vehicle
Towing

Recreational vehicle towing means
towing the vehicle behind another
vehicle – such as behind a
motorhome. The two most common
types of recreational vehicle towing
are known as dinghy towing and
dolly towing. Dinghy towing is
towing the vehicle with all four
wheels on the ground. Dolly towing
is towing the vehicle with two
wheels on the ground and two
wheels up on a device known as
a dolly.

Here are some important things
to consider before recreational
vehicle towing:

.

What is the towing capacity
of the towing vehicle?
Be sure to read the tow
vehicle manufacturer's
recommendations.

.

What is the distance that will be
travelled? Some vehicles have
restrictions on how far and how
long they can tow.

.

Is the proper towing equipment
going to be used? See your
dealer/retailer or trailering
professional for additional
advice and equipment
recommendations.

.

Is the vehicle ready to be
towed? Just as preparing the
vehicle for a long trip, make
sure the vehicle is prepared
to be towed.

-------------------------------------------------------------------------------------------------------------------------------------------------------------

Vehicle Care

10-79

Dinghy Towing

Front-wheel‐drive and
all-wheel-drive vehicles may be
dinghy towed from the front.
These vehicles can also be towed
by placing them on a platform trailer
with all four wheels off of the
ground. For other towing options,
see “Dolly Towing” following in this
section.

For vehicles being dinghy towed,
the vehicle should be run at the
beginning of each day and at each
RV fuel stop for about five minutes.
This will ensure proper lubrication of
transmission components.

To tow the vehicle from the front
with all four wheels on the ground:

1. Position the vehicle that will be

towed and secure it to the
towing vehicle.

2. Turn the ignition key to

ACC/ACCESSORY.

3. Shift the transmission to

N (Neutral).

4. Turn fog lamps and all

accessories off.

5. To prevent the battery from

draining while the vehicle is
being towed, remove the
2 amp IGN SW fuse from the
instrument panel fuse block
and store it in a safe location.
See Instrument Panel Fuse
Block on page 10‑40

-------------------------------------------------------------------------------------------------------------------------------------------------------------

10-80

Vehicle Care

Notice: If the vehicle is towed
without performing each of the
steps listed under “Dinghy
Towing,” the automatic
transmission could be damaged.
Be sure to follow all steps of the
dinghy towing procedure prior to
and after towing the vehicle.

Notice: If the vehicle has a
four‐speed automatic
transmission, it can be dinghy
towed from the front for unlimited
miles at 105 km/h (65 mph).
The vehicle could be damaged If
105 km/h (65 mph) is exceeded
while towing the vehicle. The
repairs would not be covered by
the vehicle warranty. Never
exceed 105 km/h (65 mph) while
towing the vehicle.

Once the destination has been
reached:

1. Set the parking brake.

2. Shift the transmission to

P (Park).

3. Reinstall the 2 amp IGN SW

fuse to the instrument panel
fuse block.

4. Turn the ignition key to

LOCK/OFF and remove the
key from the ignition.

Notice: Too much or too little
fluid can damage the
transmission. Be sure that the
transmission fluid is at the
proper level before towing with
all four wheels on the ground.

Notice: Do not tow a vehicle
with the front drive wheels on
the ground if one of the front
tires is a compact spare tire.
Towing with two different tire
sizes on the front of the vehicle
can cause severe damage to the
transmission.

Dolly Towing
(All-Wheel‐Drive Vehicles)

All-wheel‐drive vehicles should not
be towed with two wheels on the
ground. To properly tow these
vehicles, they should be placed on
a platform trailer with all four wheels
off of the ground or dinghy towed
from the front.

-------------------------------------------------------------------------------------------------------------------------------------------------------------

Vehicle Care

10-81

Dolly Towing
(Front-Wheel‐Drive Vehicles)

To tow the vehicle from the front
with the rear wheels on the ground,
do the following:

1. Put the front wheels on a dolly.

2. Move the shift lever to P (Park).

3. Set the parking brake.

4. Clamp the steering wheel in a

straight-ahead position with a
clamping device designed for
towing.

5. Remove the key from the

ignition.

6. Secure the vehicle to the dolly.

7. Release the parking brake.

Towing the Vehicle From
the Rear

Notice: Towing the vehicle from
the rear could damage it. Also,
repairs would not be covered by
the vehicle warranty. Never have
the vehicle towed from the rear.

-------------------------------------------------------------------------------------------------------------------------------------------------------------

10-82

Vehicle Care

Appearance Care

Exterior Care

Cleaning Exterior Lamps/
Lenses

Use only lukewarm or cold water, a
soft cloth and a car washing soap to
clean exterior lamps and lenses.
Follow instructions under “Washing
the Vehicle” later in this section.

Finish Care

Occasional waxing or mild polishing
of the vehicle by hand may be
necessary to remove residue from
the paint finish. Approved cleaning
products can be obtained from your
dealer/retailer.

If the vehicle has a basecoat/
clearcoat paint finish, the clearcoat
gives more depth and gloss to the
colored basecoat. Always use
waxes and polishes that are
non-abrasive and made for a
basecoat/clearcoat paint finish.

Notice: Machine compounding
or aggressive polishing on a
basecoat/clearcoat paint finish
may damage it. Use only
non-abrasive waxes and polishes
that are made for a basecoat/
clearcoat paint finish on the
vehicle.

Foreign materials such as calcium
chloride and other salts, ice melting
agents, road oil and tar, tree sap,
bird droppings, chemicals from
industrial chimneys, etc., can
damage the vehicle's finish if they
remain on painted surfaces. Wash
the vehicle as soon as possible.
If necessary, use non-abrasive
cleaners that are marked safe for
painted surfaces to remove foreign
matter.

Exterior painted surfaces are
subject to aging, weather and
chemical fallout that can take their
toll over a period of years. To keep
the paint finish looking new, keep
the vehicle garaged or covered
whenever possible.

Protecting Exterior Bright
Metal Parts

Bright metal parts should be
cleaned regularly to keep their
luster. Wash with water or use
chrome polish on chrome or
stainless steel trim, if necessary.

Use special care with aluminum
trim. To avoid damaging protective
trim, never use auto or chrome
polish, steam or caustic soap to
clean aluminum. A coating of
wax, rubbed to high polish, is
recommended for all bright
metal parts.

Washing the Vehicle

To preserve the vehicle's finish,
keep it clean by washing it often.

Do not wash the vehicle in
direct sunlight and use a car
washing soap.

-------------------------------------------------------------------------------------------------------------------------------------------------------------

Vehicle Care

10-83

Notice: Certain cleaners contain
chemicals that can damage the
emblems or nameplates on the
vehicle. Check the cleaning
product label. If it states that it
should not be used on plastic
parts, do not use it on the vehicle
or damage may occur and it
would not be covered by the
warranty.

Do not use cleaning agents that are
petroleum based or that contain
acid or abrasives, as they can
damage the paint, metal or plastic
on the vehicle. Approved cleaning
products can be obtained from
your dealer/retailer. Follow all
manufacturer directions regarding
correct product usage, necessary
safety precautions and appropriate
disposal of any vehicle care
product.

Rinse the vehicle well, before
washing and after to remove all
cleaning agents completely. If they
are allowed to dry on the surface,
they could stain.

Dry the finish with a soft, clean
chamois or an all-cotton towel to
avoid surface scratches and water
spotting.

High pressure car washes could
cause water to enter the vehicle.
Avoid using high pressure washes
closer than 30 cm (12 inches) to the
surface of the vehicle. Use of power
washers exceeding 8,274 kPa
(1,200 psi) can result in damage or
removal of paint and decals.

Notice: Conveyor systems on
some automatic car washes could
damage the vehicle. There may
not be enough clearance for the
undercarriage. Check with the car
wash manager before using the
automatic car wash.

Weatherstrips

Silicone grease on weatherstrips
will make them last longer, seal
better, and not stick or squeak.
Apply silicone grease with a clean
cloth. During very cold, damp
weather frequent application may
be required. See “Fluids and
Lubricants” in the Index of the
“Maintenance and Warranty and
Owner assistance Information”
manual.

-------------------------------------------------------------------------------------------------------------------------------------------------------------

10-84

Vehicle Care

Aluminum Wheels

Notice: Chrome wheels and other
chrome trim may be damaged if
the vehicle is not washed after
driving on roads that have been
sprayed with magnesium,
calcium or sodium chloride.
These chlorides are used on
roads for conditions such as ice
and dust. Always wash the
vehicle's chrome with soap and
water after exposure.

Notice: Using strong soaps,
chemicals, abrasive polishes,
cleaners, brushes, or cleaners
that contain acid on aluminum or
chrome-plated wheels, could
damage the surface of the
wheel(s). The repairs would not
be covered by the vehicle
warranty. Use only approved
cleaners on aluminum or
chrome-plated wheels.

Keep the wheels clean using a soft
clean cloth with mild soap and
water. Rinse with clean water.

After rinsing thoroughly, dry with a
soft clean towel. A wax may then be
applied.

Notice: Using chrome polish on
aluminum wheels could damage
the wheels. The repairs would not
be covered by the vehicle
warranty. Use chrome polish on
chrome wheels only.

The surface of these wheels is
similar to the painted surface of the
vehicle. Do not use strong soaps,
chemicals, abrasive polishes,
abrasive cleaners, cleaners with
acid, or abrasive cleaning brushes
on them because the surface could
be damaged. Do not use chrome
polish on aluminum wheels.

Notice: Driving the vehicle
through an automatic car wash
that has silicone carbide tire
cleaning brushes, could damage
the aluminum or chrome-plated
wheels. The repairs would not be
covered by the vehicle warranty.

Never drive a vehicle that has
aluminum or chrome-plated
wheels through an automatic car
wash that uses silicone carbide
tire cleaning brushes.

Windshield and Wiper Blades

Clean the outside of the windshield
with glass cleaner.

Clean the rubber blades using a lint
free cloth or paper towel soaked
with windshield washer fluid or a
mild detergent. Wash the windshield
thoroughly when cleaning the
blades. Bugs, road grime, sap, and
a buildup of vehicle wash/wax
treatments may cause wiper
streaking. Replace the wiper blades
if they are worn or damaged.

Wipers can be damaged by:

.

Extreme dusty conditions

.

Sand and salt

.

Heat and sun

.

Snow and ice, without proper
removal

-------------------------------------------------------------------------------------------------------------------------------------------------------------

Vehicle Care

10-85

Tires

Use a stiff brush with tire cleaner to
clean the tires.

Notice: Using petroleum-based
tire dressing products on the
vehicle may damage the paint
finish and/or tires. When applying
a tire dressing, always wipe off
any overspray from all painted
surfaces on the vehicle.

Sheet Metal Damage

If the vehicle is damaged and
requires sheet metal repair or
replacement, make sure the body
repair shop applies anti-corrosion
material to parts repaired or
replaced to restore corrosion
protection.

Original manufacturer replacement
parts will provide the corrosion
protection while maintaining the
vehicle warranty.

Finish Damage

Any stone chips, fractures or deep
scratches in the finish should be
repaired right away. Bare metal will
corrode quickly and may develop
into major repair expense.

Minor chips and scratches can be
repaired with touch-up materials
available from your dealer/retailer.
Larger areas of finish damage can
be corrected in your dealer's/
retailer's body and paint shop.

Underbody Maintenance

Chemicals used for ice and snow
removal and dust control can collect
on the underbody. If these are not
removed, corrosion and rust can
develop on the underbody parts
such as fuel lines, frame, floor pan,
and exhaust system even though
they have corrosion protection.

At least every spring, flush these
materials from the underbody with
plain water. Clean any areas where
mud and debris can collect. Dirt
packed in close areas of the frame
should be loosened before being
flushed. Your dealer/retailer or an
underbody car washing system can
do this.

Chemical Paint Spotting

Some weather and atmospheric
conditions can create a chemical
fallout. Airborne pollutants can fall
upon and attack painted surfaces on
the vehicle. This damage can take
two forms: blotchy, ring-shaped
discolorations, and small, irregular
dark spots etched into the paint
surface.

-------------------------------------------------------------------------------------------------------------------------------------------------------------

10-86

Vehicle Care

Interior Care

The vehicle's interior will continue to
look its best if it is cleaned often.
Dust and dirt can accumulate on the
upholstery and cause damage to
the carpet, fabric, leather, and
plastic surfaces. Stains should be
removed quickly as extreme heat
could cause them to set rapidly.

Lighter colored interiors may require
more frequent cleaning.
Newspapers and garments that can
transfer color to home furnishings
can also transfer color to the
vehicle's interior.

Remove dust from small buttons
and knobs with a small brush with
soft bristles.

Your dealer/retailer has products for
cleaning the vehicle's interior. When
cleaning the vehicle's interior, only
use cleaners specifically designed
for the surfaces that are being
cleaned. Permanent damage can
result from using cleaners on
surfaces for which they were not
intended. Apply the cleaner directly
to the cleaning cloth to prevent
over-spray. Remove any accidental
over-spray from other surfaces
immediately.

Notice: Using abrasive cleaners
when cleaning glass surfaces on
the vehicle, could scratch the
glass and/or cause damage to the
rear window defogger. When
cleaning the glass on the vehicle,
use only a soft cloth and glass
cleaner.

Cleaners can contain solvents that
can become concentrated in the
vehicle's interior. Before using
cleaners, read and adhere to all
safety instructions on the label.
While cleaning the vehicle's interior,
maintain adequate ventilation by
opening the vehicle's doors and
windows.

Do not clean the interior using the
following cleaners or techniques:

.

Never use a knife or any other
sharp object to remove a soil
from any interior surface.

.

Never use a stiff brush. It can
cause damage to the vehicle's
interior surfaces.

.

Never apply heavy pressure or
rub aggressively with a cleaning
cloth. Use of heavy pressure can
damage the interior and does
not improve the effectiveness of
soil removal.

-------------------------------------------------------------------------------------------------------------------------------------------------------------

Vehicle Care

10-87

.

Use only mild, neutral-pH soaps.
Avoid laundry detergents or
dishwashing soaps with
degreasers. Using too much
soap will leave a residue that
leaves streaks and attracts dirt.
For liquid cleaners, about
20 drops per 3.78 L (1 gal) of
water is a good guide.

.

Do not heavily saturate the
upholstery while cleaning.

.

Damage to the vehicle's interior
may result from the use of many
organic solvents such as naptha,
alcohol, etc.

Fabric/Carpet

Use a vacuum cleaner with a soft
brush attachment to remove dust
and loose dirt. A canister vacuum
with a beater bar in the nozzle
may only be used on floor carpet
and carpeted floor mats. For soils,
always try to remove them first
with plain water or club soda.

Before cleaning, gently remove as
much of the soil as possible using
one of the following techniques:

.

For liquids: gently blot the
remaining soil with a paper
towel. Allow the soil to absorb
into the paper towel until no
more can be removed.

.

For solid dry soils: remove as
much as possible and then
vacuum.

To clean:

1. Saturate a lint-free, clean white

cloth with water or club soda.

2. Remove excess moisture.

3. Start on the outside edge of the

soil and gently rub toward the
center. Continue cleaning, using
a clean area of the cloth each
time it becomes soiled.

4. Continue to gently rub the

soiled area.

5. If the soil is not completely

removed, use a mild soap
solution and repeat the cleaning
process with plain water.

If any of the soil remains, a
commercial fabric cleaner or spot
lifter may be necessary. Test a small
hidden area for colorfastness before
using a commercial upholstery
cleaner or spot lifter. If the locally
cleaned area gives any impression
that a ring formation may result,
clean the entire surface.

A paper towel can be used to blot
excess moisture from the fabric or
carpet after the cleaning process.

-------------------------------------------------------------------------------------------------------------------------------------------------------------

10-88

Vehicle Care

Leather

To remove dust, a soft cloth
dampened with water can be used.
If a more thorough cleaning is
necessary, a soft cloth dampened
with a mild soap solution can be
used. Allow the leather to dry
naturally. Do not use heat, steam,
or spot lifters or spot removers,
or shoe polish on leather. Many
commercial leather cleaners
and coatings that are sold to
preserve and protect leather
may permanently change the
appearance and feel of the leather
and are not recommended. Do not
use silicone or wax-based products,
or those containing organic solvents
to clean the vehicle's interior
because they can alter the
appearance by increasing the gloss
in a non-uniform manner.

Instrument Panel, Vinyl, and
Other Plastic Surfaces

To remove dust, a soft cloth
dampened with water can be used.
If a more thorough cleaning is
necessary, a clean soft cloth
dampened with a mild soap solution
can be used to gently remove dust
and dirt. Never use spot lifters or
removers on plastic surfaces.
Many commercial cleaners and
coatings that are sold to preserve
and protect soft plastic surfaces
may permanently change the
appearance and feel of the interior
and are not recommended. Do not
use silicone or wax-based products,
or those containing organic solvents
to clean the vehicle's interior
because they can alter the
appearance by increasing the
gloss in a non-uniform manner.

Some commercial products may
increase gloss on the instrument
panel. The increase in gloss may
cause annoying reflections in the
windshield and even make it difficult
to see through the windshield under
certain conditions.

Care of Safety Belts

Keep belts clean and dry.

{

WARNING

Do not bleach or dye safety belts.
It may severely weaken them.
In a crash, they might not be able
to provide adequate protection.
Clean safety belts only with mild
soap and lukewarm water.

-------------------------------------------------------------------------------------------------------------------------------------------------------------

Service and Maintenance

11-1

Service and
Maintenance

General Information

General Information . . . . . . . . . . 11-1

Scheduled Maintenance

Scheduled Maintenance . . . . . 11-2

Recommended Fluids,
Lubricants, and Parts

Recommended Fluids and

Lubricants . . . . . . . . . . . . . . . . . . 11-7

Maintenance Replacement

Parts . . . . . . . . . . . . . . . . . . . . . . . 11-9

Maintenance Records

Maintenance Records . . . . . . 11-10

General Information

Notice: Maintenance intervals,
checks, inspections,
recommended fluids, and
lubricants are necessary to keep
this vehicle in good working
condition. Damage caused by
failure to follow scheduled
maintenance 
might not be
covered by the vehicle warranty.

Proper vehicle maintenance helps to
keep the vehicle in good working
condition, improves fuel economy,
and reduces vehicle emissions for
better air quality.

Because of all the different ways
people use vehicles, maintenance
needs vary. The vehicle might need
more frequent checks and services.
Please read the information under
Scheduled Maintenance. To keep
the vehicle in good condition, see
your dealer/retailer.

The maintenance schedule is for
vehicles that:

.

carry passengers and cargo
within recommended limits on
the Tire and Loading Information
label. See Vehicle Load Limits
on page 9‑22
.

.

are driven on reasonable road
surfaces within legal driving
limits.

.

are driven off-road in the
recommended manner. See
Off-Road Driving on page 9‑8.

.

use the recommended fuel. See
Recommended Fuel on
page 9‑48
.

-------------------------------------------------------------------------------------------------------------------------------------------------------------

11-2

Service and Maintenance

{

WARNING

Performing maintenance work can
be dangerous. Some jobs can
cause serious injury. Perform
maintenance work only if you
have the required know-how and
the proper tools and equipment.
If in doubt, see your dealer/
retailer to have a qualified
technician do the work. See
Doing Your Own Service Work on
page 10‑4
.

At your General Motors dealer/
retailer, you can be certain that you
will receive the highest level of
service available. Your dealer/
retailer has specially trained service
technicians, uses genuine GM
replacement parts, as well as, up to
date tools and equipment to ensure
fast and accurate diagnostics.

The proper replacement parts,
fluids, and lubricants to use are
listed in Recommended Fluids and
Lubricants on page 11‑7 
and
Maintenance Replacement Parts on
page 11‑9
We recommend the use
of genuine parts from your dealer/
retailer.

Rotation of New Tires

To maintain ride, handling, and
performance of the vehicle, it is
important that the first rotation
service for new tires be performed
when they have 8 000 to 13 000 km
(5,000 to 8,000 miles). See Tire
Rotation on page 10‑57
.

Scheduled
Maintenance

When the Change Engine Oil
Light Displays

Change engine oil and filter. See
Engine Oil on page 10‑8An
Emission Control Service.

When the change engine oil light
displays, service is required for the
vehicle as soon as possible, within
the next 1 000 km/600 miles.
If driving under the best conditions,
the engine oil life system might not
indicate the need for vehicle service
for more than a year. The engine oil
and filter must be changed at least
once a year and the oil life system
must be reset. Your dealer/retailer
has trained service technicians who
will perform this work and reset the
system. If the engine oil life system
is reset accidentally, service the
vehicle within 5 000 km/3,000 miles
since the last service. Reset the oil

-------------------------------------------------------------------------------------------------------------------------------------------------------------

Service and Maintenance

11-3

life system whenever the oil is
changed. See Engine Oil Life
System on page 10‑10
.

When the change engine oil light
displays, certain services, checks,
and inspections are required. The
services described for
Maintenance I should be performed
at every engine oil change.
The services described for
Maintenance II should be
performed when:

.

Maintenance I was performed
the last time the engine oil was
changed.

.

It has been 10 months or more
since the change engine oil light
has displayed or since the last
service.

Maintenance I

.

Change engine oil and filter. See
Engine Oil on page 10‑8An
Emission Control Service.

.

Engine coolant level check. See
Engine Coolant on page 10‑15.

.

Windshield washer fluid level
check. See Washer Fluid on
page 10‑22
.

.

Tire inflation check. See Tire
Pressure on page 10‑50
.

.

Tire wear inspection. See Tire
Inspection on page 10‑57
.

.

Rotate tires. See Tire Rotation
on page 10‑57
.

.

Fluids visual leak check (or
every 12 months, whichever
occurs first). A leak in any
system must be repaired and the
fluid level checked.

.

Engine air cleaner filter
inspection (vehicles driven in
dusty conditions only). See
Engine Air Cleaner/Filter on
page 10‑12
.

.

Brake system inspection (or
every 12 months, whichever
occurs first).

Maintenance II

.

Perform all services described in
Maintenance I.

.

Steering and suspension
inspection. Visual inspection for
damaged, loose, or missing
parts or signs of wear.

.

Engine cooling system
inspection. Visual inspection of
hoses, pipes, fittings, and
clamps and replacement,
if needed.

.

Windshield wiper blade
inspection for wear, cracking,
or contamination and windshield
and wiper blade cleaning,
if contaminated. See Exterior
Care on page 10‑82
Worn or
damaged wiper blade
replacement. See Wiper Blade
Replacement on page 10‑29
.

-------------------------------------------------------------------------------------------------------------------------------------------------------------

11-4

Service and Maintenance

.

Body hinges and latches, key
lock cylinders, folding seat
hardware, and sunroof
(if equipped) lubrication. See
Recommended Fluids and
Lubricants on page 11‑7
. More
frequent lubrication may be
required when vehicle is
exposed to a corrosive
environment. Applying silicone
grease on weatherstrips with a
clean cloth makes them last
longer, seal better, and not stick
or squeak.

.

Restraint system component
check. See Safety System
Check on page 3‑23
.

.

Automatic transmission fluid
level check and adding fluid,
if needed. See Automatic
Transmission Fluid on
page 10‑12
.

.

Engine air cleaner filter
inspection. See Engine Air
Cleaner/Filter on page 10‑12
.

.

Passenger compartment air filter
replacement (or every
12 months, whichever occurs
first). More frequent replacement
may be required if vehicle is
driven regularly under dusty
conditions.

Additional Required Services

At Each Fuel Stop

.

Engine oil level check. See
Engine Oil on page 10‑8.

.

Engine coolant level check. See
Engine Coolant on page 10‑15.

.

Windshield washer fluid level
check. See Washer Fluid on
page 10‑22
.

Once a Month

.

Tire inflation check. See Tire
Pressure on page 10‑50
.

.

Tire wear inspection. See Tire
Inspection on page 10‑57
.

Once a Year

.

See Starter Switch Check on
page 10‑27
.

.

See Automatic Transmission
Shift Lock Control System
Check on page 10‑28
.

.

See Ignition Transmission Lock
Check on page 10‑28
.

.

See Park Brake and P (Park)
Mechanism Check on
page 10‑29
.

.

Engine cooling system and
pressure cap pressure check.
Radiator and air conditioning
condenser outside cleaning. See
Cooling System on page 10‑14.

.

Exhaust system and nearby heat
shields inspection for loose or
damaged components.

.

Accelerator pedal check for
damage, high effort, or binding.
Replace if needed.

-------------------------------------------------------------------------------------------------------------------------------------------------------------


Content      ..     20      21      22      23     ..