Pontiac G5 (2008 year). Manual - part 20
 

  Index      Pontiac     Pontiac G5 (2008 year) - manual in english


Search            copyright infringement  


Content      ..     18      19      20      21     ..


Pontiac G5 (2008 year). Manual - part 20


3. Remove the retainer (A) that holds down the jack,

wheel wrench (B) and spare tire (C).

4. Remove the spare tire by gently pulling it up and

out of the trunk.

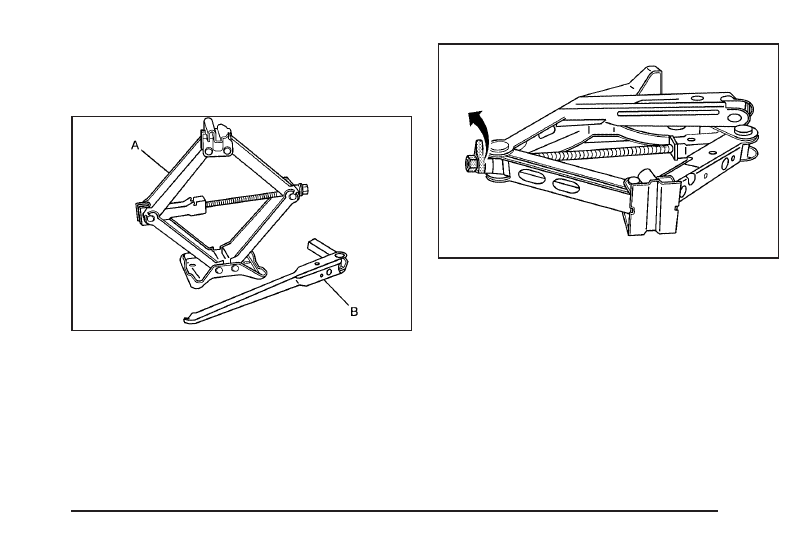
The tools you will be using include the jack (A) and
wheel wrench (B).

You will need to turn the plastic wheel nut
counterclockwise to loosen the wheel wrench from
the jack.

5-77

-------------------------------------------------------------------------------------------------------------------------------------------------------------

Press the button and then pull on the end of the wheel
wrench to extend the handle.

Removing the Flat Tire and
Installing the Spare Tire

1. It is recommended that you do a safety check

before preceding. See Changing a Flat Tire on
page 5-72

2. If your vehicle has plastic wheel covers, use the

wheel wrench to loosen the plastic wheel nut caps.

Once you have loosened the plastic wheel nut caps
with the wheel wrench, you can finish loosening
them with your fingers. The plastic nut caps do not
come off.

5-78

-------------------------------------------------------------------------------------------------------------------------------------------------------------

3. Using the flat end of the wheel wrench, pry along

the edge of the wheel cover until it comes off.

Store the wheel cover in the trunk until you have
the flat tire repaired or replaced.

4. Use the wheel wrench to loosen all the wheel nuts.

Do not remove them yet.

5. It is recommended that you do a safety check

before preceding. See Changing a Flat Tire on
page 5-72 
for more information.

Notice: Make sure that the jack lift head is in the
correct position or you may damage your vehicle.
The repairs would not be covered by your warranty.

6. Position the jack lift head at the jack location

nearest the flat tire. The front location is about
8 inches (20 cm) behind the front wheel opening.
The rear location is about 4 inches (10 cm) in front
of the rear wheel opening.

5-79

-------------------------------------------------------------------------------------------------------------------------------------------------------------

7. Raise the jack head until it fits firmly in the vehicle’s

frame, where the notch is located, nearest the
flat tire.

8. Put the compact spare tire near the flat tire.

{

CAUTION:

Getting under a vehicle when it is jacked up is
dangerous. If the vehicle slips off the jack, you
could be badly injured or killed. Never get under
a vehicle when it is supported only by a jack.

{

CAUTION:

Raising your vehicle with the jack improperly
positioned can damage the vehicle and even
make the vehicle fall. To help avoid personal
injury and vehicle damage, be sure to fit the
jack lift head into the proper location before
raising the vehicle.

9. Raise the vehicle by turning the jack handle

clockwise. Raise the vehicle far enough off the
ground so there is enough room for the compact
spare tire to fit under the vehicle.

10. Remove all of the

wheel nuts.

5-80

-------------------------------------------------------------------------------------------------------------------------------------------------------------

{

CAUTION:

Rust or dirt on a wheel, or on the parts to which
it is fastened, can make wheel nuts become
loose after time. The wheel could come off and
cause an accident. When you change a wheel,
remove any rust or dirt from places where the
wheel attaches to the vehicle. In an emergency,
you can use a cloth or a paper towel to do this;
but be sure to use a scraper or wire brush later,
if needed, to get all the rust or dirt off. See
Changing a Flat Tire 
on page 5-72.

11. Remove any rust or dirt

from the wheel bolts,
mounting surfaces, and
spare wheel.

12. Place the compact spare tire on the wheel-mounting

surface.

{

CAUTION:

Never use oil or grease on studs or nuts.
Because the nuts might come loose. The
vehicle’s wheel could fall off, causing a crash.

13. Reinstall the wheel nuts with the rounded end of

the nuts toward the wheel. Tighten each nut by
hand until the wheel is held against the hub.

14. Lower the vehicle by turning the jack handle

counterclockwise. Lower the jack completely.

5-81

-------------------------------------------------------------------------------------------------------------------------------------------------------------

{

CAUTION:

Incorrect or improperly tightened wheel nuts
can cause the wheel to come loose and even
come off. This could lead to a crash. If you
have to replace them, be sure to get new
original equipment wheel nuts. Stop
somewhere as soon as you can and have the
nuts tightened with a torque wrench to the
proper torque specification. See Capacities
and Specifications 
on page 5-102 for wheel nut
torque specification.

Notice: Improperly tightened wheel nuts can lead
to brake pulsation and rotor damage. To avoid
expensive brake repairs, evenly tighten the wheel
nuts in the proper sequence and to the proper
torque specification. See Capacities and
Specifications 
on page 5-102 for the wheel nut
torque specification.

15. Tighten the wheel nuts firmly in a crisscross

sequence, as shown.

Notice: Wheel covers will not fit on your vehicle’s
compact spare. If you try to put a wheel cover
on the compact spare, the cover or the spare could
be damaged.

4-Wheel Nuts

5-Wheel Nuts

5-82

-------------------------------------------------------------------------------------------------------------------------------------------------------------

Storing a Flat or Spare Tire
and Tools

{

CAUTION:

Storing a jack, a tire, or other equipment in the
passenger compartment of the vehicle could
cause injury. In a sudden stop or collision,
loose equipment could strike someone.
Store all these in the proper place.

A. Cover
B. Retainer
C. Jack and Wheel

Wrench

D. Stow Bolt

Extension Rod

E. Spare Tire
F. Bolt

Base Model

5-83

-------------------------------------------------------------------------------------------------------------------------------------------------------------

A. Cover
B. Retainer
C. Jack and Wheel

Wrench

D. Stow Bolt

Extension Rod

E. Spare Tire
F. Foam Support
G. Bolt

To store a flat or spare tire and tools:

1. Remove the stow bolt extension rod and sleeve

from the jack.

2. Screw the stow bolt extension rod and the sleeve

into the existing spare tire bolt.

3. If your vehicle has aluminum wheels, first remove

the center cap with your hand or the wheel wrench.

4. Place the flat tire face down into the spare tire tub.

5. Re-attach the wheel wrench to the jack.

6. Place the jack into the center of the flat tire, being

careful not to scratch the inside of the wheel.

7. Remove the plastic sleeve from the stow bolt

extension rod. Secure the jack and road wheel
using the larger plastic retainer.

The compact spare tire is for temporary use only.
Replace the compact spare with a full-size tire as soon
as possible.

Uplevel Model

5-84

-------------------------------------------------------------------------------------------------------------------------------------------------------------

Compact Spare Tire

Although the compact spare tire was fully inflated when
the vehicle was new, it can lose air after a time.
Check the inflation pressure regularly. It should be
60 psi (420 kPa).

After installing the compact spare on the vehicle, stop
as soon as possible and make sure the spare tire is
correctly inflated. The compact spare is made to perform
well at speeds up to 65 mph (105 km/h) for distances up
to 3,000 miles (5 000 km), so you can finish your trip
and have the full-size tire repaired or replaced at your
convenience. Of course, it is best to replace the spare
with a full-size tire as soon as possible. The spare tire
will last longer and be in good shape in case it is
needed again.

Notice: When the compact spare is installed,
do not take your vehicle through an automatic
car wash with guide rails. The compact spare can
get caught on the rails. That can damage the tire and
wheel, and maybe other parts of your vehicle.

Do not use the compact spare on other vehicles.

And do not mix the compact spare tire or wheel with
other wheels or tires. They will not fit. Keep the spare
tire and its wheel together.

Notice: Tire chains will not fit your compact spare.
Using them can damage your vehicle and can
damage the chains too. Do not use tire chains on
your compact spare.

5-85

-------------------------------------------------------------------------------------------------------------------------------------------------------------

Appearance Care

Interior Cleaning

Your vehicle’s interior will continue to look its best if it is
cleaned often. Although not always visible, dust and
dirt can accumulate on your upholstery. Dirt can damage
carpet, fabric, leather, and plastic surfaces. Regular
vacuuming is recommended to remove particles
from your upholstery. It is important to keep your
upholstery from becoming and remaining heavily soiled.
Soils should be removed as quickly as possible. Your
vehicle’s interior may experience extremes of heat
that could cause stains to set rapidly.

Lighter colored interiors may require more frequent
cleaning. Use care because newspapers and garments
that transfer color to your home furnishings may also
transfer color to your vehicle’s interior.

When cleaning your vehicle’s interior, only use cleaners
specifically designed for the surfaces being cleaned.
Permanent damage may result from using cleaners on
surfaces for which they were not intended. Use glass
cleaner only on glass. Remove any accidental over-spray
from other surfaces immediately. To prevent over-spray,
apply cleaner directly to the cleaning cloth.

Notice: If you use abrasive cleaners when cleaning
glass surfaces on your vehicle, you could scratch
the glass and/or cause damage to the rear window
defogger. When cleaning the glass on your vehicle,
use only a soft cloth and glass cleaner.

Many cleaners contain solvents that may become
concentrated in your vehicle’s breathing space.
Before using cleaners, read and adhere to all safety
instructions on the label. While cleaning your vehicle’s
interior, maintain adequate ventilation by opening
your vehicle’s doors and windows.

Dust may be removed from small buttons and knobs
using a small brush with soft bristles.

Your dealer/retailer has a product for cleaning your
vehicle’s glass. Should it become necessary, you can
also obtain a product from your dealer/retailer to remove
odors from your vehicle’s upholstery.

5-86

-------------------------------------------------------------------------------------------------------------------------------------------------------------

Do not clean your vehicle using:

A knife or any other sharp object to remove a soil
from any interior surface.

A stiff brush. It can cause damage to your vehicle’s
interior surfaces.

Heavy pressure or aggressive rubbing with a
cleaning cloth. Use of heavy pressure can damage
your interior and does not improve the effectiveness
of soil removal.

Laundry detergents or dishwashing soaps with
degreasers can leave residue that streaks and
attracts dirt. For liquid cleaners, about 20 drops
per gallon (3.78 L) of water is a good guide.
Use only mild, neutral-pH soaps.

Too much cleaner that saturates the upholstery.

Organic solvents such as naptha, alcohol, etc. that
can damage your vehicle’s interior.

Fabric/Carpet

Use a vacuum cleaner with a soft brush attachment
frequently to remove dust and loose dirt. A canister
vacuum with a beater bar in the nozzle may only
be used on floor carpet and carpeted floor mats.
For any soil, always try to remove it first with plain water
or club soda. Before cleaning, gently remove as much
of the soil as possible using one of the following
techniques:

For liquids: gently blot the remaining soil with a
paper towel. Allow the soil to absorb into the
paper towel until no more can be removed.

For solid dry soils: remove as much as possible
and then vacuum.

5-87

-------------------------------------------------------------------------------------------------------------------------------------------------------------

To clean:

1. Saturate a lint-free, clean white cloth with water or

club soda.

2. Wring the cloth to remove excess moisture.

3. Start on the outside edge of the soil and gently rub

toward the center. Continue cleaning, using a clean
area of the cloth each time it becomes soiled.

4. Continue to gently rub the soiled area until the

cleaning cloth remains clean.

5. If the soil is not completely removed, use a mild

soap solution and repeat the cleaning process
that was used with plain water.

If any of the soil remains, a commercial fabric cleaner or
spot lifter may be necessary. When a commercial
upholstery cleaner or spot lifter is to be used, test a
small hidden area for colorfastness first. If the locally
cleaned area gives any impression that a ring formation
may result, clean the entire surface.

After the cleaning process has been completed, a paper
towel can be used to blot excess moisture from the
fabric or carpet.

Instrument Panel, Vinyl, and Other
Plastic Surfaces

A soft cloth dampened with water may be used to
remove dust. If a more thorough cleaning is necessary,
a clean soft cloth dampened with a mild soap solution
can be used to gently remove dust and dirt. Never use
spot lifters or removers on plastic surfaces. Many
commercial cleaners and coatings that are sold to
preserve and protect soft plastic surfaces may
permanently change the appearance and feel of your
interior and are not recommended. Do not use silicone
or wax-based products, or those containing organic
solvents to clean your vehicle’s interior because they
can alter the appearance by increasing the gloss in a
non-uniform manner.

Some commercial products may increase gloss on your
instrument panel. The increase in gloss may cause
annoying reflections in the windshield and even make it
difficult to see through the windshield under certain
conditions.

5-88

-------------------------------------------------------------------------------------------------------------------------------------------------------------

Care of Safety Belts

Keep belts clean and dry.

{

CAUTION:

Do not bleach or dye safety belts. If you do,
it may severely weaken them. In a crash,
they might not be able to provide adequate
protection. Clean safety belts only with mild
soap and lukewarm water.

Weatherstrips

Silicone grease on weatherstrips will make them last
longer, seal better, and not stick or squeak. Apply
silicone grease with a clean cloth. During very cold,
damp weather frequent application may be required.
See Recommended Fluids and Lubricants on page 6-12.

Washing Your Vehicle

The best way to preserve your vehicle’s finish is to keep
it clean by washing it often.

Notice: Certain cleaners contain chemicals that can
damage the emblems or nameplates on your
vehicle. Check the cleaning product label. If it states
that it should not be used on plastic parts, do not use
it on your vehicle or damage may occur and it would
not be covered by the warranty.

Do not wash the vehicle in direct sunlight. Use a
car washing soap. Do not use cleaning agents that are
petroleum based or that contain acid or abrasives,
as they can damage the paint, metal or plastic on your
vehicle. Approved cleaning products can be obtained
from your dealer/retailer. See Vehicle Care/Appearance
Materials 
on page 5-94. Follow all manufacturers’
directions regarding correct product usage, necessary
safety precautions and appropriate disposal of any
vehicle care product.

5-89

-------------------------------------------------------------------------------------------------------------------------------------------------------------

Rinse the vehicle well, before washing and after to
remove all cleaning agents completely. If they are
allowed to dry on the surface, they could stain.

Dry the finish with a soft, clean chamois or an all-cotton
towel to avoid surface scratches and water spotting

High pressure car washes may cause water to enter the
vehicle. Avoid using high pressure washes closer
than 12 inches (30 cm) to the surface of the vehicle.
Use of power washers exceeding 1,200 psi (8 274 kPa)
can result in damage or removal of paint and decals.

Cleaning Exterior Lamps/Lenses

Use only lukewarm or cold water, a soft cloth and a car
washing soap to clean exterior lamps and lenses.
Follow instructions under Washing Your Vehicle on
page 5-89
.

Finish Care

Occasional waxing or mild polishing of your vehicle by
hand may be necessary to remove residue from the
paint finish. You can get approved cleaning products
from your dealer/retailer. See Vehicle Care/Appearance
Materials 
on page 5-94.

If your vehicle has a basecoat/clearcoat paint finish, the
clearcoat gives more depth and gloss to the colored
basecoat. Always use waxes and polishes that are
non-abrasive and made for a basecoat/clearcoat
paint finish.

Notice: Machine compounding or aggressive
polishing on a basecoat/clearcoat paint finish may
damage it. Use only non-abrasive waxes and
polishes that are made for a basecoat/clearcoat
paint finish on your vehicle.

Foreign materials such as calcium chloride and other
salts, ice melting agents, road oil and tar, tree sap, bird
droppings, chemicals from industrial chimneys, etc.,
can damage your vehicle’s finish if they remain on
painted surfaces. Wash the vehicle as soon as possible.
If necessary, use non-abrasive cleaners that are marked
safe for painted surfaces to remove foreign matter.

5-90

-------------------------------------------------------------------------------------------------------------------------------------------------------------

Exterior painted surfaces are subject to aging, weather
and chemical fallout that can take their toll over a
period of years. You can help to keep the paint finish
looking new by keeping your vehicle garaged or covered
whenever possible.

Protecting Exterior Bright Metal Parts

Bright metal parts should be cleaned regularly to keep
their luster. Washing with water is all that is usually
needed. However, you may use chrome polish on
chrome or stainless steel trim, if necessary.

Use special care with aluminum trim. To avoid damaging
protective trim, never use auto or chrome polish, steam
or caustic soap to clean aluminum. A coating of wax,
rubbed to high polish, is recommended for all bright
metal parts.

Windshield and Wiper Blades

Clean the outside of the windshield with glass cleaner.

Clean the rubber blades using a lint free cloth or
paper towel soaked with windshield washer fluid or a
mild detergent. Wash the windshield thoroughly
when cleaning the blades. Bugs, road grime, sap, and a
buildup of vehicle wash/wax treatments may cause
wiper streaking. Replace the wiper blades if they are
worn or damaged.

Wipers can be damaged by:

Extreme dusty conditions

Sand and salt

Heat and sun

Snow and ice, without proper removal

5-91

-------------------------------------------------------------------------------------------------------------------------------------------------------------

Aluminum or Chrome-Plated Wheels
and Trim

Your vehicle may have either aluminum or
chrome-plated wheels.

Keep the wheels clean using a soft clean cloth with mild
soap and water. Rinse with clean water. After rinsing
thoroughly, dry with a soft clean towel. A wax may then
be applied.

Notice: Chrome wheels and other chrome trim may
be damaged if you do not wash your vehicle after
driving on roads that have been sprayed with
magnesium, calcium or sodium chloride. These
chlorides are used on roads for conditions such as
ice and dust. Always wash your vehicle’s chrome
with soap and water after exposure.

Notice: If you use strong soaps, chemicals,
abrasive polishes, cleaners, brushes, or cleaners
that contain acid on aluminum or chrome-plated
wheels, you could damage the surface of the
wheel(s). The repairs would not be covered by your
warranty. Use only approved cleaners on aluminum
or chrome-plated wheels.

The surface of these wheels is similar to the painted
surface of your vehicle. Do not use strong soaps,
chemicals, abrasive polishes, abrasive cleaners,
cleaners with acid, or abrasive cleaning brushes on
them because you could damage the surface. Do not
use chrome polish on aluminum wheels.

Notice: Using chrome polish on aluminum wheels
could damage the wheels. The repairs would not
be covered by your warranty. Use chrome polish on
chrome wheels only.

Use chrome polish only on chrome-plated wheels, but
avoid any painted surface of the wheel, and buff off
immediately after application.

Notice: If you drive your vehicle through an
automatic car wash that has silicone carbide tire
cleaning brushes, you could damage the aluminum
or chrome-plated wheels. The repairs would not
be covered by your warranty. Never drive a vehicle
equipped with aluminum or chrome-plated wheels
through an automatic car wash that uses silicone
carbide tire cleaning brushes.

5-92

-------------------------------------------------------------------------------------------------------------------------------------------------------------


Content      ..     18      19      20      21     ..