Oldsmobile Bravada (2004 year). Manual - part 22


  Index      Oldsmobile     Oldsmobile Bravada (2004 year) - manual in english


Search            copyright infringement  


Content      ..     20      21      22      23     ..


Oldsmobile Bravada (2004 year). Manual - part 22


-------------------------------------------------------------------------------------------------------------------------------------------------------------
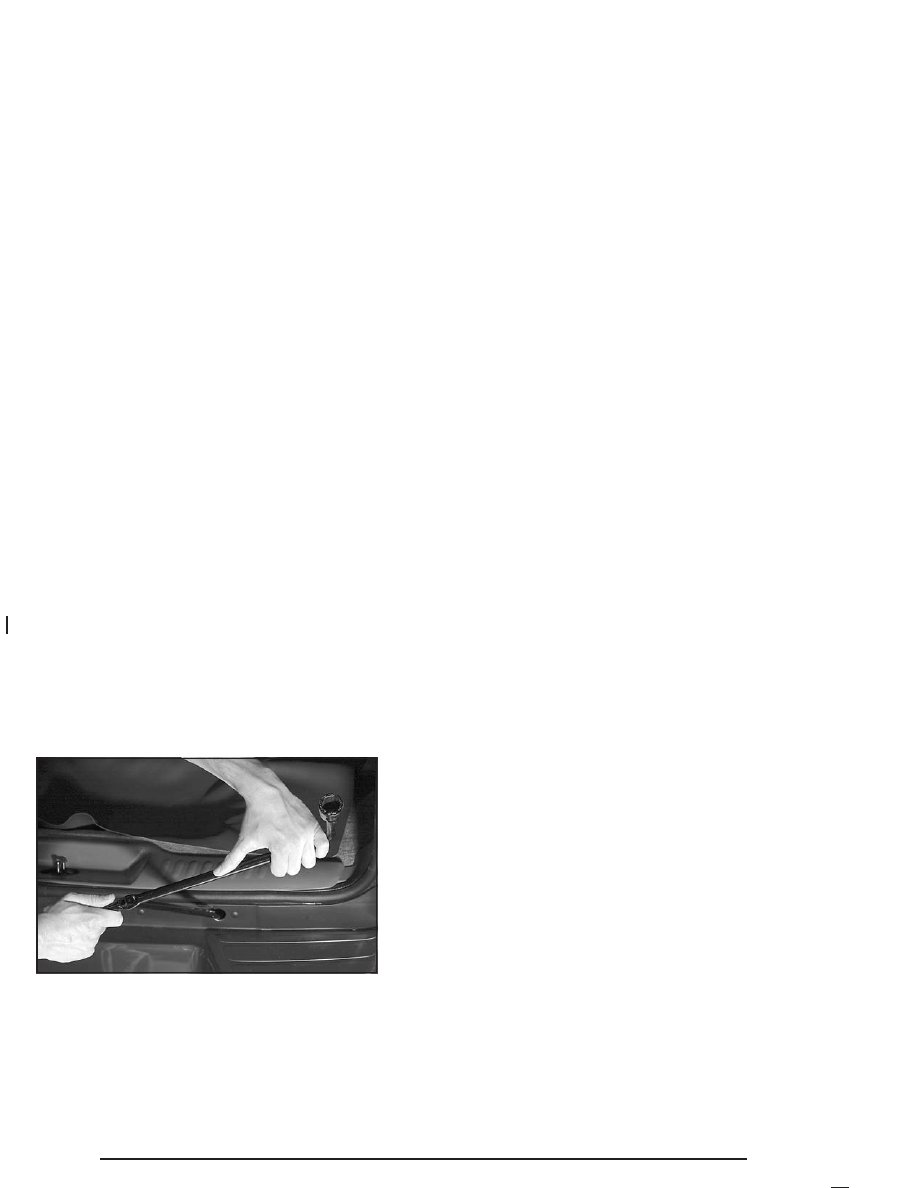
10. Disconnect the jack handle from the jack and

carefully remove the jack. Use one hand to push
against the spare while firmly pulling the jack out
from under the spare tire with the other hand.

If the spare tire is hanging from the cable, insert the
socket end of the extension connected to the wheel
wrench into the hoist shaft hole in the bumper, on an
angle, and turn the wheel wrench counterclockwise
to lower the spare the rest of the way.

11. Tilt the retainer at the end of the cable and pull it

through the wheel opening. Pull the tire out from
under the vehicle.

12. If the cable is hanging under the vehicle, turn the

wheel wrench clockwise to raise the cable back up.

Have the hoist assembly inspected as soon as you can.
You will not be able to store a spare or flat tire using
the hoist assembly until it has been repaired or replaced.

5-80

-------------------------------------------------------------------------------------------------------------------------------------------------------------

-------------------------------------------------------------------------------------------------------------------------------------------------------------

Removing the Flat Tire and Installing
the Spare Tire

1. Using the wheel

wrench, loosen all the
wheel nuts. Don’t
remove them yet.

2. Turn the jack adjusting knob clockwise by hand to

raise the jack lift head.

3. Place the handle, extension and wheel wrench onto

the jack.

A. Front

Frame/Rear
Axle

B. Jack

C. Handle
D. Extension
E. Wheel Wrench

4. Place the jack in the appropriate position nearest

the flat tire.

Front

Rear

5-81

-------------------------------------------------------------------------------------------------------------------------------------------------------------

-------------------------------------------------------------------------------------------------------------------------------------------------------------

{

CAUTION:

Getting under a vehicle when it is jacked up is
dangerous. If the vehicle slips off the jack you
could be badly injured or killed. Never get under
a vehicle when it is supported only by a jack.

{

CAUTION:

Raising your vehicle with the jack improperly
positioned can damage the vehicle and even
make the vehicle fall. To help avoid personal
injury and vehicle damage, be sure to fit the
jack lift head into the proper location before
raising the vehicle.

5. Raise the vehicle by turning the jack handle

clockwise. Raise the vehicle far enough off the
ground so there is enough room for the spare tire
to fit.

6. Remove all the wheel nuts and take off the flat tire.

5-82

-------------------------------------------------------------------------------------------------------------------------------------------------------------

-------------------------------------------------------------------------------------------------------------------------------------------------------------

7. Remove any rust or dirt

from the wheel bolts,
mounting surfaces
and spare wheel.

{

CAUTION:

Rust or dirt on the wheel, or on the parts to
which it is fastened, can make the wheel nuts
become loose after a time. The wheel could
come off and cause an accident. When you
change a wheel, remove any rust or dirt from
the places where the wheel attaches to the
vehicle. In an emergency, you can use a cloth
or a paper towel to do this; but be sure to use
a scraper or wire brush later, if you need to, to
get all the rust or dirt off.

{

CAUTION:

Never use oil or grease on studs or nuts. If
you do, the nuts might come loose. Your wheel
could fall off, causing a serious accident.

8. Place the spare on the wheel mounting surface.

9. Put the nuts on by

hand. Make sure the
rounded end is
toward the wheel.

10. Tighten each nut by hand until the wheel is held

against the hub. If a nut can’t be turned by hand,
use the wheel wrench and see your dealer as soon
as possible.

5-83

-------------------------------------------------------------------------------------------------------------------------------------------------------------

-------------------------------------------------------------------------------------------------------------------------------------------------------------

11. Lower the vehicle by turning the jack handle

counterclockwise. Lower the jack completely.

12. Use the wheel wrench

to tighten the wheel
nuts firmly in a
crisscross sequence as
shown.

{

CAUTION:

Incorrect wheel nuts or improperly tightened
wheel nuts can cause the wheel to come loose
and even come off. This could lead to an
accident. Be sure to use the correct wheel
nuts. If you have to replace them, be sure to
get new GM original equipment wheel nuts.
Stop somewhere as soon as you can and have
the nuts tightened with a torque wrench to the
proper torque specification. See “Capacities
and Specifications” in the Index for wheel nut
torque specification.

5-84

-------------------------------------------------------------------------------------------------------------------------------------------------------------

-------------------------------------------------------------------------------------------------------------------------------------------------------------

Notice: Improperly tightened wheel nuts can lead
to brake pulsation and rotor damage. To avoid
expensive brake repairs, evenly tighten the wheel
nuts in the proper sequence and to the proper
torque specification. See “Capacities and
Specifications” in the index for the wheel nut torque
specification.

Storing a Flat or Spare Tire and Tools

{

CAUTION:

Storing a jack, a tire, or other equipment in the
passenger compartment of the vehicle could
cause injury. In a sudden stop or collision,
loose equipment could strike someone. Store
all these in the proper place.

{

CAUTION:

The underbody-mounted spare tire needs to be
stored with the valve stem pointing up. If the
spare tire is stored with the valve stem
pointing downward, its secondary latch won’t
work properly and the spare tire could loosen
and suddenly fall from your vehicle. If this
happened when your vehicle was being driven,
the tire might contact a person or another
vehicle, causing injury and, of course, damage
to itself as well. Be sure the
underbody-mounted spare tire is stored with
its valve stem pointing up.

Notice: An aluminum wheel with a flat tire should
always be stored under the vehicle with the
hoist. However, storing it that way for an extended
period could damage the wheel. To avoid this,
always stow the wheel properly with the valve stem
pointing up and have the wheel repaired as soon
as possible.

5-85

-------------------------------------------------------------------------------------------------------------------------------------------------------------

-------------------------------------------------------------------------------------------------------------------------------------------------------------

Follow this diagram to store the underbody-mounted
spare.

A. Wheel Wrench

B. Hoist Shaft

C. Extension

D. Retainer

E. Spare or Flat Tire (Valve

Stem Pointed Up)

1. Put the tire on the ground at the rear of the vehicle,

with the valve stem pointed up and to the rear.

2. Pull the retainer through the wheel.

3. Put the socket end of the extension, on an angle,

through the hole in the rear bumper and into the
hoist shaft.

4. Raise the tire fully against the underside of the

vehicle by turning the wheel wrench clockwise
until you hear two clicks or feel it skip twice.
The spare tire hoist cannot be overtightened.

5. Make sure the tire is stored securely. Push, pull,

and then try to turn the tire. If the tire moves, use
the wheel wrench and socket end of the extension
to tighten the cable.

Return the jack, wheel wrench and wheel blocks to the
proper location under the rear seat of the vehicle.
Return the rear seat to its proper position.

(A) Push and Pull, (B) Rotate or Turn

5-86

-------------------------------------------------------------------------------------------------------------------------------------------------------------

-------------------------------------------------------------------------------------------------------------------------------------------------------------

A. Handle

B. Wheel Wrench

C. Instruction Label

D. Extension

E. Wheel Blocks and Jack

Spare Tire

Your vehicle, when new, had a fully inflated spare tire.
A spare tire may lose air over time, so check its
inflation pressure regularly. See Inflation - Tire Pressure
on page 5-64 and “Loading Your Vehicle” for information
regarding proper tire inflation and loading your vehicle.
For instruction on how to remove, install or store a spare
tire, see Changing a Flat Tire on page 5-74.

After installing the spare tire on your vehicle, you should
stop as soon as possible and make sure the spare is
correctly inflated. Have the damaged or flat road
tire repaired or replaced as soon as you can and
installed back onto your vehicle. This way, a spare tire
will be available in case you need it again.

5-87

-------------------------------------------------------------------------------------------------------------------------------------------------------------

-------------------------------------------------------------------------------------------------------------------------------------------------------------

Appearance Care

Remember, cleaning products can be hazardous. Some
are toxic. Others can burst into flames if you strike a
match or get them on a hot part of the vehicle. Some are
dangerous if you breathe their fumes in a closed
space. When you use anything from a container to clean
your vehicle, be sure to follow the manufacturer’s
warnings and instructions. And always open your doors
or windows when you are cleaning the inside.

Never use these to clean your vehicle:

Gasoline

Benzene

Naphtha

Carbon Tetrachloride

Acetone

Paint Thinner

Turpentine

Lacquer Thinner

Nail Polish Remover

They can all be hazardous — some more than
others — and they can all damage your vehicle, too.

Do not use any of these unless this manual says you
can. In many uses, these will damage your vehicle:

Alcohol

Laundry Soap

Bleach

Reducing Agents

Cleaning the Inside of Your Vehicle

Use a vacuum cleaner often to get rid of dust and
loose dirt. Wipe vinyl, leather, plastic and painted
surfaces with a clean, damp cloth.

Cleaning Fabric/Carpet

Your dealer has cleaners for the cleaning of fabric
and carpet. They will clean normal spots and stains
very well.

You can get GM-approved cleaning products from your
dealer. See Vehicle Care/Appearance Materials on
page 5-96
.

5-88

-------------------------------------------------------------------------------------------------------------------------------------------------------------

-------------------------------------------------------------------------------------------------------------------------------------------------------------

Here are some cleaning tips:

Always read the instructions on the cleaner label.

Clean up stains as soon as you can — before
they set.

Carefully scrape off any excess stain.

Use a clean cloth or sponge, and change to a clean
area often. A soft brush may be used if stains are
stubborn.

If a ring forms on fabric after spot cleaning, clean
the entire area immediately or it will set.

Using Cleaner on Fabric

1. Vacuum and brush the area to remove any

loose dirt.

2. Always clean a whole trim panel or section. Mask

surrounding trim along stitch or welt lines.

3. Follow the directions on the container label.

4. Apply cleaner with a clean sponge. Do not saturate

the material and do not rub it roughly.

5. As soon as you have cleaned the section, use a

sponge to remove any excess cleaner.

6. Wipe cleaned area with a clean, water-dampened

towel or cloth.

7. Wipe with a clean cloth and let dry.

Special Fabric Cleaning Problems

Stains caused by such things as catsup, coffee (black),
egg, fruit, fruit juice, milk, soft drinks, vomit, urine
and blood can be removed as follows:

1. Carefully scrape off excess stain, then sponge the

soiled area with cool water.

2. If a stain remains, follow the cleaning instructions

described earlier.

3. If an odor lingers after cleaning vomit or urine, treat

the area with a water and baking soda solution:
1 teaspoon (5 ml) of baking soda to 1 cup (250 ml)
of lukewarm water.

4. Let dry.

Stains caused by candy, ice cream, mayonnaise, chili
sauce and unknown stains can be removed as follows:

1. Carefully scrape off excess stain.

2. Clean with cool water and allow to dry completely.

3. If a stain remains, follow the cleaner instructions

described earlier.

5-89

-------------------------------------------------------------------------------------------------------------------------------------------------------------

-------------------------------------------------------------------------------------------------------------------------------------------------------------

Cleaning Vinyl

Use warm water and a clean cloth.

Rub with a clean, damp cloth to remove dirt. You
may have to do this more than once.

Things like tar, asphalt and shoe polish will stain if
you do not get them off quickly. Use a clean cloth
and vinyl cleaner. See your dealer for this product.

Cleaning Leather

Use a soft cloth with lukewarm water and a mild soap or
saddle soap and wipe dry with a soft cloth. Then, let
the leather dry naturally. Do not use heat to dry.

For stubborn stains, use a leather cleaner.

Never use oils, varnishes, solvent-based or abrasive
cleaners, furniture polish or shoe polish on leather.

Soiled or stained leather should be cleaned
immediately. If dirt is allowed to work into the finish,
it can harm the leather.

Cleaning the Top of the Instrument
Panel

Use only mild soap and water to clean the top surfaces
of the instrument panel. Sprays containing silicones
or waxes may cause annoying reflections in the
windshield and even make it difficult to see through the
windshield under certain conditions.

Cleaning Interior Plastic Components

Use only a mild soap and water solution on a soft cloth
or sponge. Commercial cleaners may affect the
surface finish.

Cleaning Glass Surfaces

Glass should be cleaned often. GM Glass Cleaner or a
liquid household glass cleaner will remove normal
tobacco smoke and dust films on interior glass. See
Vehicle Care/Appearance Materials on page 5-96.

Notice: If you use abrasive cleaners when cleaning
glass surfaces on your vehicle, you could scratch
the glass and/or cause damage to the rear window
defogger and the integrated radio antenna. When
cleaning the glass on your vehicle, use only a soft
cloth and glass cleaner.

5-90

-------------------------------------------------------------------------------------------------------------------------------------------------------------

-------------------------------------------------------------------------------------------------------------------------------------------------------------

Care of Safety Belts

Keep belts clean and dry.

{

CAUTION:

Do not bleach or dye safety belts. If you do, it
may severely weaken them. In a crash, they
might not be able to provide adequate
protection. Clean safety belts only with mild
soap and lukewarm water.

Weatherstrips

Silicone grease on weatherstrips will make them last
longer, seal better, and not stick or squeak. Apply
silicone grease with a clean cloth at least every six
months. During very cold, damp weather more frequent
application may be required. See Recommended
Fluids and Lubricants 
on page 6-13.

Cleaning the Outside of Your
Vehicle

The paint finish on your vehicle provides beauty, depth
of color, gloss retention and durability.

5-91

-------------------------------------------------------------------------------------------------------------------------------------------------------------

-------------------------------------------------------------------------------------------------------------------------------------------------------------

Washing Your Vehicle

The best way to preserve your vehicle’s finish is to keep it
clean by washing it often with lukewarm or cold water.

Don’t wash your vehicle in the direct rays of the sun.
Use a car washing soap. Don’t use strong soaps
or chemical detergents. Be sure to rinse the vehicle
well, removing all soap residue completely. You can get
GM-approved cleaning products from your dealer.
See Vehicle Care/Appearance Materials on page 5-96.
Don’t use cleaning agents that are petroleum based,
or that contain acid or abrasives. All cleaning agents
should be flushed promptly and not allowed to dry on the
surface, or they could stain. Dry the finish with a soft,
clean chamois or an all-cotton towel to avoid surface
scratches and water spotting.

High pressure car washes may cause water to enter
your vehicle.

Cleaning Exterior Lamps/Lenses

Use only lukewarm or cold water, a soft cloth and a car
washing soap to clean exterior lamps and lenses.
Follow instructions under “Washing Your Vehicle.”

Finish Care

Occasional waxing or mild polishing of your vehicle by
hand may be necessary to remove residue from the
paint finish. You can get GM-approved cleaning products
from your dealer. See Vehicle Care/Appearance
Materials 
on page 5-96.

If your vehicle has a “basecoat/clearcoat” paint finish.
The clearcoat gives more depth and gloss to the colored
basecoat. Always use waxes and polishes that are
non-abrasive and made for a basecoat/clearcoat paint
finish.

Notice: Machine compounding or aggressive
polishing on a basecoat/clearcoat paint finish may
damage it. Use only non-abrasive waxes and
polishes that are made for a basecoat/clearcoat
paint finish on your vehicle.

5-92

-------------------------------------------------------------------------------------------------------------------------------------------------------------

-------------------------------------------------------------------------------------------------------------------------------------------------------------

Foreign materials such as calcium chloride and other
salts, ice melting agents, road oil and tar, tree sap, bird
droppings, chemicals from industrial chimneys, etc.,
can damage your vehicle’s finish if they remain
on painted surfaces. Wash the vehicle as soon as
possible. If necessary, use non-abrasive cleaners that
are marked safe for painted surfaces to remove
foreign matter.

Exterior painted surfaces are subject to aging, weather
and chemical fallout that can take their toll over a
period of years. You can help to keep the paint finish
looking new by keeping your vehicle garaged or covered
whenever possible.

Protecting Exterior Bright Metal Parts

Bright metal parts should be cleaned regularly to keep
their luster. Washing with water is all that is usually
needed. However, you may use chrome polish on
chrome or stainless steel trim, if necessary.

Use special care with aluminum trim. To avoid damaging
protective trim, never use auto or chrome polish,
steam or caustic soap to clean aluminum. A coating of
wax, rubbed to high polish, is recommended for all
bright metal parts.

Cleaning the Windshield, Backglass
and Wiper Blades

If the windshield is not clear after using the windshield
washer, or if the wiper blade chatters when running,
wax, sap or other material may be on the blade or
windshield.

Clean the outside of the windshield with a full-strength
glass cleaning liquid. The windshield is clean if beads do
not form when you rinse it with water.

Grime from the windshield will stick to the wiper blades
and affect their performance. Clean the blade by
wiping vigorously with a cloth soaked in full-strength
windshield washer solvent. Then rinse the blade
with water.

Check the wiper blades and clean them as necessary;
replace blades that look worn.

5-93

-------------------------------------------------------------------------------------------------------------------------------------------------------------

-------------------------------------------------------------------------------------------------------------------------------------------------------------

Cleaning Aluminum Wheels

Keep your wheels clean using a soft clean cloth with
mild soap and water. Rinse with clean water. After
rinsing thoroughly, dry with a soft clean towel. A wax
may then be applied.

The surface of these wheels is similar to the painted
surface of your vehicle. Don’t use strong soaps,
chemicals, abrasive polishes, abrasive cleaners,
cleaners with acid, or abrasive cleaning brushes on
them because you could damage the surface. Do not
use chrome polish on aluminum wheels.

Don’t take your vehicle through an automatic car wash
that has silicone carbide tire cleaning brushes. These
brushes can also damage the surface of these wheels.

Cleaning Tires

To clean your tires, use a stiff brush with tire cleaner.

Notice: Using petroleum-based tire dressing
products on your vehicle may damage the paint
finish and/or tires. When applying a tire dressing,
always wipe off any overspray from all painted
surfaces on your vehicle.

Sheet Metal Damage

If your vehicle is damaged and requires sheet metal
repair or replacement, make sure the body repair shop
applies anti-corrosion material to parts repaired or
replaced to restore corrosion protection.

Original manufacturer replacement parts will provide the
corrosion protection while maintaining the warranty.

Finish Damage

Any stone chips, fractures or deep scratches in the
finish should be repaired right away. Bare metal
will corrode quickly and may develop into major repair
expense.

Minor chips and scratches can be repaired with touch-up
materials avaliable from your dealer. Larger areas of
finish damage can be corrected in your dealer’s
body and paint shop.

5-94

-------------------------------------------------------------------------------------------------------------------------------------------------------------

-------------------------------------------------------------------------------------------------------------------------------------------------------------

Underbody Maintenance

Chemicals used for ice and snow removal and dust
control can collect on the underbody. If these are not
removed, corrosion and rust can develop on the
underbody parts such as fuel lines, frame, floor pan and
exhaust system even though they have corrosion
protection.

At least every spring, flush these materials from the
underbody with plain water. Clean any areas where mud
and debris can collect. Dirt packed in close areas of
the frame should be loosened before being flushed.
Your dealer or an underbody car washing system can
do this for you.

Chemical Paint Spotting

Some weather and atmospheric conditions can create a
chemical fallout. Airborne pollutants can fall upon and
attack painted surfaces on your vehicle. This damage
can take two forms: blotchy, ring-shaped discolorations,
and small, irregular dark spots etched into the paint
surface.

Although no defect in the paint job causes this, GM will
repair, at no charge to the owner, the surfaces of
new vehicles damaged by this fallout condition within
12 months or 12,000 miles (20 000 km) of purchase,
whichever occurs first.

5-95

-------------------------------------------------------------------------------------------------------------------------------------------------------------


Content      ..     20      21      22      23     ..