Oldsmobile Bravada (2004 year). Manual - part 20


  Index      Oldsmobile     Oldsmobile Bravada (2004 year) - manual in english


Search            copyright infringement  


Content      ..     18      19      20      21     ..


Oldsmobile Bravada (2004 year). Manual - part 20


-------------------------------------------------------------------------------------------------------------------------------------------------------------
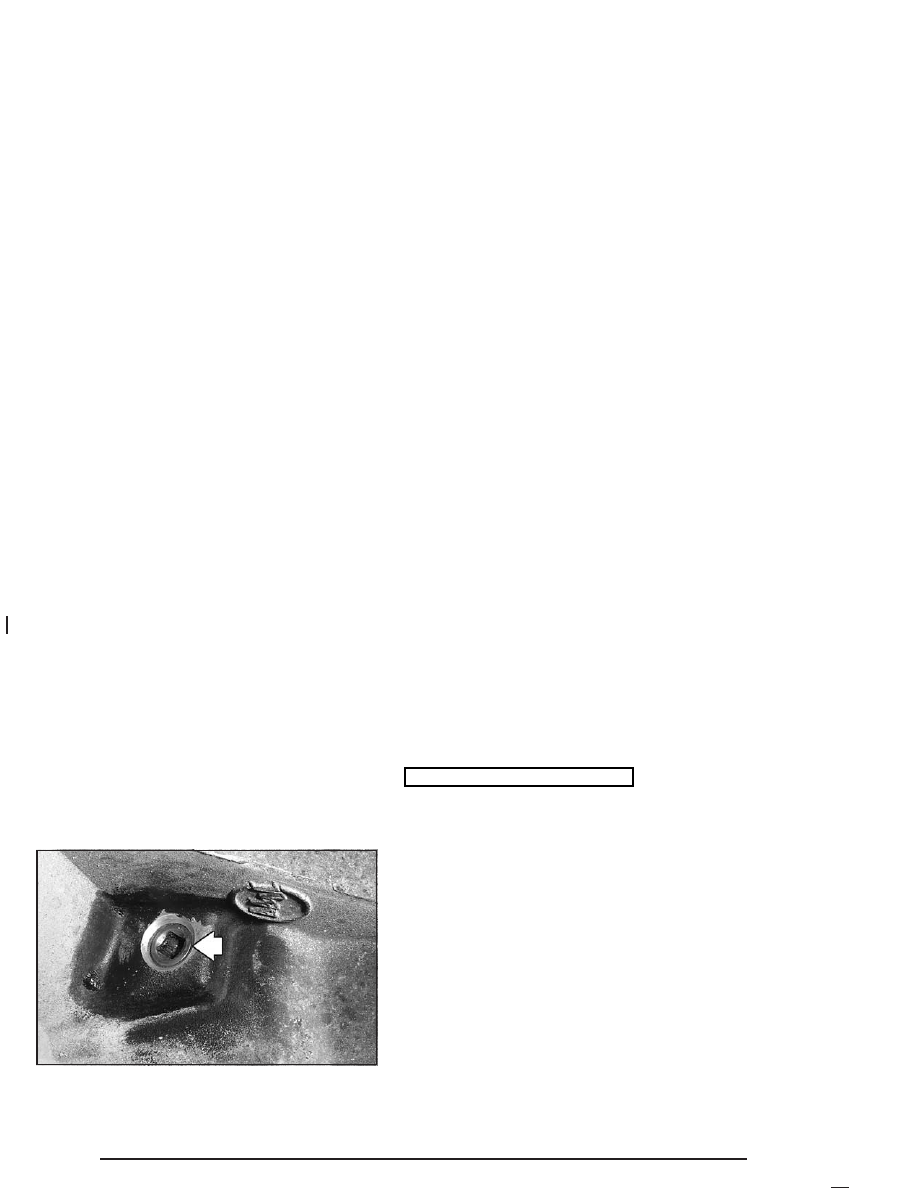
Rear Axle

When to Check Lubricant

It is not necessary to regularly check rear axle fluid
unless you suspect there is a leak or you hear an
unusual noise. A fluid loss could indicate a problem.
Have it inspected and repaired.

How to Check Lubricant

To get an accurate reading, the vehicle should be on a
level surface.

The proper level is from 0 to 3/8 inch (0 to 10 mm)
below the bottom of the filler plug hole.

What to Use

To determine what kind of lubricant to use, see
Recommended Fluids and Lubricants on page 6-13.

Front Axle

Front Axle

When to Check Lubricant

It is not necessary to regularly check front axle fluid
unless you suspect there is a leak or you hear an
unusual noise. A fluid loss could indicate a problem.
Have it inspected and repaired.

5-48

-------------------------------------------------------------------------------------------------------------------------------------------------------------

-------------------------------------------------------------------------------------------------------------------------------------------------------------

How to Check Lubricant

To get an accurate reading, the vehicle should be on a
level surface.

If the level is below the bottom of the filler plug hole,
you may need to add some lubricant.

When the differential is cold, add enough lubricant to
raise the level to 1/2 inch (12 mm) below the filler
plug hole.

When the differential is at operating temperature
(warm), add enough lubricant to raise the level to
the bottom of the filler plug hole.

What to Use

To determine what kind of lubricant to use, see
Recommended Fluids and Lubricants on page 6-13.

5-49

-------------------------------------------------------------------------------------------------------------------------------------------------------------

-------------------------------------------------------------------------------------------------------------------------------------------------------------

Bulb Replacement

For the type of bulbs, see Replacement Bulbs on
page 5-51
.

For any bulb changing procedure not listed in this
section, contact your dealer.

Taillamps and Turn Signal Lamps

1. Open the liftgate.

2. Remove the two

screws from the
lamp assembly.

3. Pull the assembly away from the vehicle.

4. Unclip the wiring harness (A) and remove the three

socket retaining screws (B).

5-50

-------------------------------------------------------------------------------------------------------------------------------------------------------------

-------------------------------------------------------------------------------------------------------------------------------------------------------------

5. Remove the socket by releasing the retaining tabs.

6. Holding the socket, pull the bulb to release it

from the socket.

7. Push the new bulb into the socket until it clicks.

8. Reinstall the socket and screws.

9. Reconnect the wiring harness.

10. Reinstall the lamp assembly and tighten the screws.

11. Close the liftgate.

Replacement Bulbs

Exterior Lamp

Bulb Number

Taillamps

3157

Rear Turn Signal Lamps

3157

For any bulb not listed here, contact your dealer.

5-51

-------------------------------------------------------------------------------------------------------------------------------------------------------------

-------------------------------------------------------------------------------------------------------------------------------------------------------------

Windshield Wiper Blade
Replacement

Windshield wiper blades should be inspected at least
twice a year for wear or cracking.

Notice: Allowing the wiper blade arm to touch the
windshield when no wiper blade is installed
could damage the windshield. Any damage that
occurs would not be covered by your warranty. Do
not allow the wiper blade arm to touch the
windshield.

1. To remove the old wiper blades, lift the wiper arm

until it locks into a vertical position.

A. Blade Assembly
B. Arm Assembly
C. Locking Tab
D. Blade Pivot
E. Hook Slot
F. Arm Hook

5-52

-------------------------------------------------------------------------------------------------------------------------------------------------------------

-------------------------------------------------------------------------------------------------------------------------------------------------------------

2. Press down on the blade assembly pivot locking

tab. Pull down on the blade assembly to release it
from the wiper arm hook.

3. Remove the insert from the blade assembly. The

insert has two notches at one end that are locked
by the bottom claws of the blade assembly. At
the notched end, pull the insert from the blade
assembly.

4. To install the new wiper insert, slide the insert (D),

notched end last, into the end with two blade
claws (A). Slide the insert all the way through the
blade claws at the opposite end (B). The plastic
caps (C) will be forced off as the insert is fully
inserted.

5. Be sure that the notches are locked by the bottom

claws. Make sure that all other claws are properly
locked on both sides of the insert slots.

5-53

-------------------------------------------------------------------------------------------------------------------------------------------------------------

-------------------------------------------------------------------------------------------------------------------------------------------------------------

A. Claw in Notch
B. Correct Installation
C. Incorrect Installation

6. Put the blade assembly pivot in the wiper arm hook.

Pull up until the pivot locking tab locks in the
hook slot.

7. Carefully lower the wiper arm and blade assembly

onto the windshield.

5-54

-------------------------------------------------------------------------------------------------------------------------------------------------------------

-------------------------------------------------------------------------------------------------------------------------------------------------------------

Backglass Wiper Blade Replacement

See Windshield Wiper Blade Replacement on page 5-52
for instructions on how to change the backglass wiper
blade. The backglass wiper blade will not lock in a
vertical position like the windshield wiper blade, so care
should be used when pulling it away from the vehicle.

Tires

Your new vehicle comes with high-quality tires made by
a leading tire manufacturer. If you ever have questions
about your tire warranty and where to obtain service,
see your GM Warranty booklet for details. For additional
information refer to the tire manufacturer’s booklet
included with your vehicle’s Owner’s Manual.

{

CAUTION:

Poorly maintained and improperly used tires
are dangerous.

Overloading your tires can cause
overheating as a result of too much
friction. You could have an air-out and a
serious accident. See “Loading Your
Vehicle” in the Index.

Underinflated tires pose the same danger
as overloaded tires. The resulting accident
could cause serious injury. Check all tires
frequently to maintain the recommended
pressure. Tire pressure should be checked
when your tires are cold.

Overinflated tires are more likely to be cut,
punctured or broken by a sudden
impact — such as when you hit a pothole.
Keep tires at the recommended pressure.

Worn, old tires can cause accidents. If your
tread is badly worn, or if your tires have
been damaged, replace them.

5-55

-------------------------------------------------------------------------------------------------------------------------------------------------------------

-------------------------------------------------------------------------------------------------------------------------------------------------------------

Tire Sidewall Labeling

Useful information about a tire is molded into the
sidewall. The following illustrations are examples of a
typical P-Metric and a LT-Metric tire sidewall.

P-Metric Tire

5-56

-------------------------------------------------------------------------------------------------------------------------------------------------------------

-------------------------------------------------------------------------------------------------------------------------------------------------------------

(A) Tire Size Code: The tire size code is a combination
of letters and numbers used to define a particular
tire’s width, height, aspect ratio, construction type and
service description. See the “Tire Size Code” illustration
later in this section for more detail.

(B) Tire Performance Criteria Specification (TPC
Spec): 
Original equipment tires designed to GM’s
specific tire performance criteria have a TPC
specification code molded onto the sidewall. GM’s TPC
specifications meet or exceed all federal safety
guidelines.

(C) Department of Transportation (DOT): The
Department of Transportation (DOT) code indicates that
the tire is in compliance with the U.S. Department of
Transportation Motor Vehicle Safety Standards.

(D) Tire Identification Number (TIN): The letters and
numbers following DOT code are the Tire Identification
Number (TIN). The TIN shows the manufacturer
and plant code, tire size, and date the tire was
manufactured. The TIN is molded onto both sides of the
tire, although only one side may have the date of
manufacture.

(E) Tire Ply Material: The type of cord and number of
plies in the sidewall and under the tread.

(F) Uniform Tire Quality Grading (UTQG): Tire
manufacturers are required to grade tires based on three
performance factors: treadwear, traction and
temperature resistance. For more information, see
Uniform Tire Quality Grading on page 5-68.

(G) Maximum Cold Inflation Load Limit: Maximum
load that can be carried and the maximum pressure
needed to support that load. For information on
recommended tire pressure see Inflation - Tire Pressure
on page 5-64 and Loading Your Vehicle on page 4-43.

5-57

-------------------------------------------------------------------------------------------------------------------------------------------------------------

-------------------------------------------------------------------------------------------------------------------------------------------------------------

(A) Tire Size: The tire size code is a combination of
letters and numbers used to define a particular
tire’s width, height, aspect ratio, construction type and
service description. See the “Tire Size” illustration
later in this section for more detail.

(B) Tire Performance Criteria Specification
(TPC Spec): 
Original equipment tires designed to GM’s
specific tire performance criteria have a TPC
specification code molded onto the sidewall. GM’s TPC
specifications meet or exceed all federal safety
guidelines.

(C) Dual Tire Maximum Load: Maximum load that can
be carried and the maximum pressure needed to
support that load when used in a dual configuration. For
information on recommended tire pressure see
Inflation - Tire Pressure on page 5-64 and Loading Your
Vehicle 
on page 4-43.

LT-Metric Tire

5-58

-------------------------------------------------------------------------------------------------------------------------------------------------------------

-------------------------------------------------------------------------------------------------------------------------------------------------------------

(D) Department of Transportation (DOT): The
Department of Transportation (DOT) code indicates that
the tire is in compliance with the U.S. Department of
Transportation Motor Vehicle Safety Standards.

(E) Tire Identification Number (TIN): The letters and
numbers following DOT code are the Tire Identification
Number (TIN). The TIN shows the manufacturer
and plant code, tire size, and date the tire was
manufactured. The TIN is molded onto both sides of the
tire, although only one side may have the date of
manufacture.

(F) Tire Ply Material: The type of cord and number of
plies in the sidewall and under the tread.

(G) Single Tire Maximum Load: Maximum load that
can be carried and the maximum pressure needed
to support that load when used as a single. For
information on recommended tire pressure see
Inflation - Tire Pressure on page 5-64 and Loading
Your Vehicle 
on page 4-43.

Tire Size

The following examples show the different parts
of a tire size.

(A) Passenger (P-Metric) Tire: The United States
version of a metric tire sizing system. The letter “P” as
the first character in the tire size means a passenger
vehicle tire engineered to standards set by the U.S.
Tire and Rim Association.

Passenger (P-Metric) Tire

5-59

-------------------------------------------------------------------------------------------------------------------------------------------------------------

-------------------------------------------------------------------------------------------------------------------------------------------------------------

(B) Tire Width: The three-digit number indicates the
tire section width in millimeters from sidewall to sidewall.

(C) Aspect Ratio: A two-digit number that indicates
the tire height-to-width measurements. For example, if
the tire size aspect ratio is “75,” as shown in item “C” of
the illustration, it would mean that the tire’s sidewall is
75% as high as it is wide.

(D) Construction Code: A letter code is used to
indicate the type of ply construction in the tire. The letter
“R” means radial ply construction; the letter “D” means
diagonal or bias ply construction; and the letter “B”
means belted-bias ply construction.

(E) Rim Diameter: Diameter of the wheel in inches.

(F) Service Description: The service description
indicates the load range and speed rating of a tire. The
load index can range from 1 to 279. Speed ratings
range from “A” to “Z”.

(A) Light Truck (LT-Metric) Tire: The United States
version of a metric tire sizing system. The letter “LT” as
the first two characters in the tire size means a light
truck tire engineered to standards set by the U. S. Tire
and Rim Association.

(B) Tire Width: The three-digit number indicates the
tire section width in millimeters from sidewall to sidewall.

(C) Aspect Ratio: A two-digit number that indicates
the tire height-to-width measurements. For example, if
the tire size aspect ratio is “75,” as shown in item “C” of
the illustration, it would mean that the tire’s sidewall is
75% as high as it is wide.

Light Truck (LT-Metric) Tire

5-60

-------------------------------------------------------------------------------------------------------------------------------------------------------------

-------------------------------------------------------------------------------------------------------------------------------------------------------------

(D) Construction Code: A letter code is used to
indicate the type of ply construction in the tire. The letter
“R” means radial ply construction; the letter “D” means
diagonal or bias ply construction; and the letter “B”
means belted-bias ply construction.

(E) Rim Diameter: Diameter of the wheel in inches.

(F) Service Description: The service description
indicates the load range and speed rating of a tire. The
load index can range from 1 to 279. Speed ratings
range from “A” to “Z”. The light truck tire size example
above shows dual or single tire configurations.

Tire Terminology and Definitions

Air Pressure: The amount of air inside the tire pressing
outward on each square inch of the tire. Air pressure
is expressed in pounds per square inch (psi) or
kilopascal (kPa).

Accessory Weight: This means the combined weight
of optional accessories. Some examples of optional
accessories are, automatic transmission, power steering,
power brakes, power windows, power seats, and air
conditioning.

Aspect Ratio: The relationship of a tire’s height to
its width.

Belt: A rubber coated layer of cords that is located
between the plies and the tread. Cords may be made
from steel or other reinforcing materials.

Bead: The tire bead contains steel wires wrapped by
steel cords that hold the tire onto the rim.

Bias Ply Tire: A pneumatic tire in which the plies are
laid at alternate angles less than 90 degrees to the
centerline of the tread.

Cold Inflation Pressure: The amount of air pressure in
a tire, measured in pounds per square inch (psi) or
kilopascals (kPa) before a tire has built up heat
from driving. See Inflation - Tire Pressure on page 5-64.

Curb Weight: This means the weight of a motor
vehicle with standard and optional equipment including
the maximum capacity of fuel, oil and coolant, but
without passengers and cargo.

DOT Markings: A code molded into the sidewall of a
tire signifying that the tire is in compliance with the U.S.
Department of Transportation motor vehicle safety
standards. The DOT code includes the Tire Identification
Number (TIN), an alphanumeric designator which can
also identify the tire manufacturer, production plant,
brand and date of production.

GVWR: Gross Vehicle Weight Rating, see Loading
Your Vehicle 
on page 4-43.

5-61

-------------------------------------------------------------------------------------------------------------------------------------------------------------

-------------------------------------------------------------------------------------------------------------------------------------------------------------

GAWR FRT: Gross Axle Weight Rating for the front
axle, see Loading Your Vehicle on page 4-43.

GAWR RR: Gross Axle Weight Rating for the rear axle,
see Loading Your Vehicle on page 4-43.

Intended Outboard Sidewall: The side of an
asymmetrical tire, that must always face outward when
mounted on a vehicle.

Kilopascal (kPa): The metric unit for air pressure.
There are 6.9 kPa’s to one psi.

Light Truck (LT-Metric) Tire: A tire used on light duty
trucks and some multipurpose passenger vehicles.

Load Index: An assigned number ranging from 1 to 279
that corresponds to the load carrying capacity of a tire.

Maximum Inflation Pressure: The maximum air
pressure to which a cold tire may be inflated. The
maximum air pressure is molded onto the sidewall.

Maximum Load Rating: The load rating for a tire at the
maximum permissible inflation pressure for that tire.

Maximum Loaded Vehicle Weight: The sum of curb
weight; accessory weight; vehicle capacity weight;
and production options weight.

Normal Occupant Weight: The number of occupants a
vehicle is designed to seat multiplied by 150 pounds
(68 kg). See Loading Your Vehicle on page 4-43.

Occupant Distribution: Designated seating positions.

Outward Facing Sidewall: The side of a asymmetrical
tire that has a particular side that faces outward
when mounted on a vehicle. The side of the tire that
contains a whitewall, bears white lettering or bears
manufacturer, brand and or model name molding that is
higher or deeper than the same moldings on the
other sidewall of the tire.

Passenger (P-Metric) Tire: A tire used on passenger
cars and some light duty trucks and multipurpose
vehicles.

Recommended Inflation Pressure: Vehicle
manufacturer’s recommended tire inflation pressure and
shown on the tire placard. See Inflation - Tire Pressure
on page 5-64 and Loading Your Vehicle on page 4-43.

Radial Ply tire: A pneumatic tire in which the ply cords
that extend to the beads are laid at 90 degrees to the
centerline of the tread.

Rim: A metal support for a tire and upon which the tire
beads are seated.

5-62

-------------------------------------------------------------------------------------------------------------------------------------------------------------

-------------------------------------------------------------------------------------------------------------------------------------------------------------

Sidewall: The portion of a tire between the tread and
the bead.

Speed Rating: An alphanumeric code assigned to a
tire indicating the maximum speed at which a tire
can operate.

Traction: The friction between the tire and the road
surface. The amount of grip provided.

Tread: The portion of a tire that comes into contact
with the road.

Treadwear Indicators: Narrow bands, sometimes
called “wear bars,” that show across the tread of a tire
when only 2/32 inch of tread remains. See When It
Is Time for New Tires 
on page 5-66.

UTQGS: Uniform Tire Quality Grading Standards, a tire
information system that provides consumers with
ratings for a tire’s traction, temperature and treadwear.
Ratings are determined by tire manufacturers using
government testing procedures. The ratings are molded
into the sidewall of the tire. See Uniform Tire Quality
Grading 
on page 5-68.

Vehicle Capacity Weight: The number of designated
seating positions multiplied by 150 lbs. (68 kg) plus
the rated cargo load. See Loading Your Vehicle
on page 4-43.

Vehicle Maximum Load on the Tire: Load on an
individual tire due to curb weight, accessory weight,
occupant weight and cargo weight.

Vehicle Placard: A label permanently attached to a
vehicle showing the original equipment tire size
and recommended inflation pressure. See Loading Your
Vehicle 
on page 4-43.

5-63

-------------------------------------------------------------------------------------------------------------------------------------------------------------


Content      ..     18      19      20      21     ..