Oldsmobile Bravada (2004 year). Manual - part 19


  Index      Oldsmobile     Oldsmobile Bravada (2004 year) - manual in english


Search            copyright infringement  


Content      ..     17      18      19      20     ..


Oldsmobile Bravada (2004 year). Manual - part 19


-------------------------------------------------------------------------------------------------------------------------------------------------------------
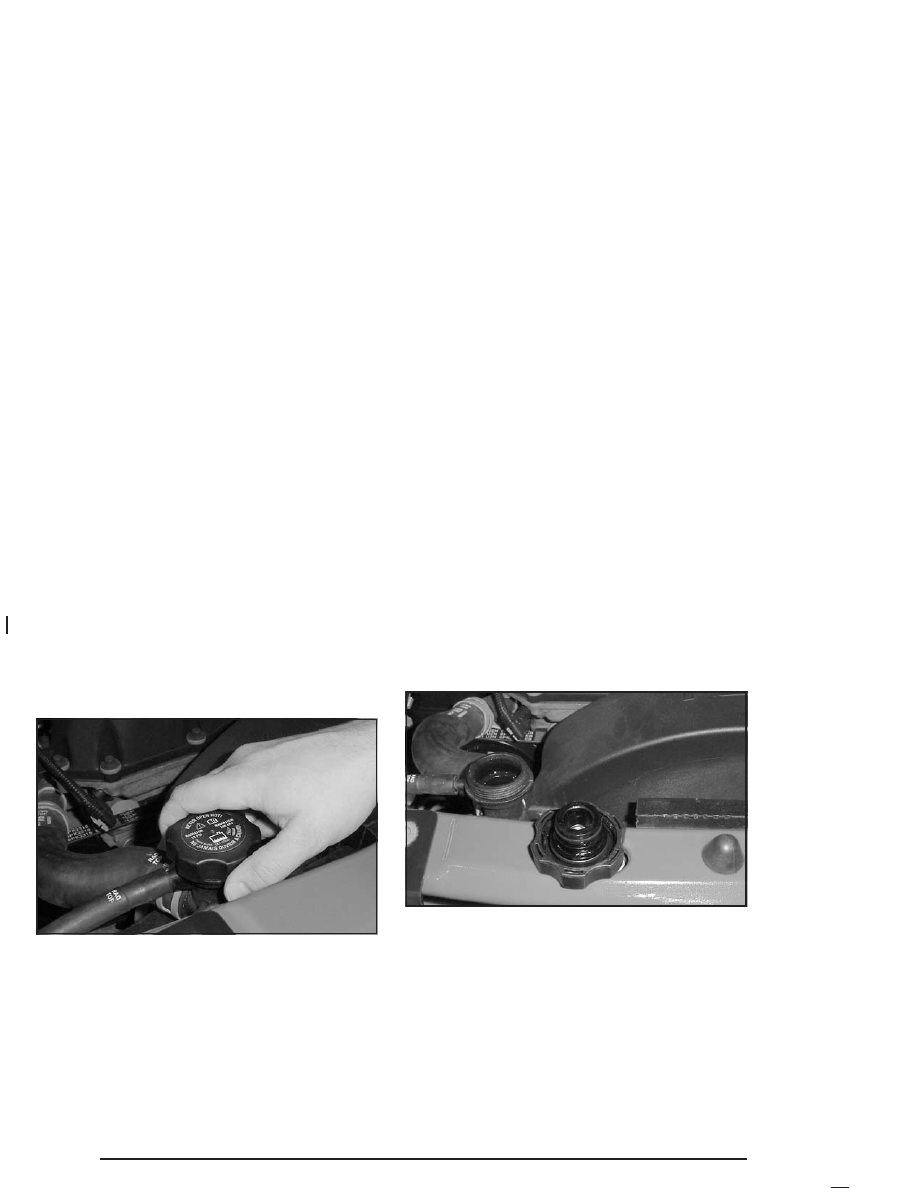
How to Add Coolant to the Radiator

1. You can remove the radiator pressure cap when

the cooling system, including the radiator pressure
cap and upper radiator hose, is no longer hot.
Turn the pressure cap slowly counterclockwise
about one full turn.

If you hear a hiss, wait for that to stop. A hiss
means there is still some pressure left.

2. Then keep turning the pressure cap. Remove the

pressure cap.

5-32

-------------------------------------------------------------------------------------------------------------------------------------------------------------

-------------------------------------------------------------------------------------------------------------------------------------------------------------

3. Fill the radiator with the proper DEX-COOL

®

coolant mixture, up to the base of the filler
neck. See Engine Coolant on page 5-23 for more
information about the proper coolant mixture.

4. Then fill the coolant recovery tank to the FULL

COLD mark.

5. Put the cap back on the coolant recovery tank, but

leave the radiator pressure cap off.

5-33

-------------------------------------------------------------------------------------------------------------------------------------------------------------

-------------------------------------------------------------------------------------------------------------------------------------------------------------

6. Start the engine and let it run until you can feel the

upper radiator hose getting hot. Watch out for the
engine cooling fan.

7. By this time, the coolant level inside the radiator

filler neck may be lower. If the level is lower, add
more of the proper DEX-COOL

®

coolant mixture

through the filler neck until the level reaches
the base of the filler neck.

8. Then replace the pressure cap. At any time during

this procedure if coolant begins to flow out of the
filler neck, reinstall the pressure cap. Be sure
the pressure cap is hand-tight.

Engine Fan Noise

This vehicle has a clutched engine cooling fan. When
the clutch is engaged, the fan spins faster to provide
more air to cool the engine. In most everyday driving
conditions the clutch is not engaged. This improves fuel
economy and reduces fan noise. Under heavy vehicle
loading, trailer towing, and/or high outside temperatures,
the fan speed increases when the clutch engages. So
you may hear an increase in fan noise. This is
normal and should not be mistaken as the transmission
slipping or making extra shifts. It is merely the cooling
system functioning properly. The fan will slow down
when additional cooling is not required and the clutch
disengages.

You may also hear this fan noise when you start the
engine. It will go away as the fan clutch disengages.

5-34

-------------------------------------------------------------------------------------------------------------------------------------------------------------

-------------------------------------------------------------------------------------------------------------------------------------------------------------

Power Steering Fluid

The power steering fluid
reservoir is located in the
engine compartment
on the passenger’s side of
the vehicle. See Engine
Compartment Overview 
on
page 5-12 
for reservoir
location.

When to Check Power Steering Fluid

It is not necessary to regularly check power steering fluid
unless you suspect there is a leak in the system or
you hear an unusual noise. A fluid loss in this system
could indicate a problem. Have the system inspected
and repaired.

How to Check Power Steering Fluid

Turn the key off, let the engine compartment cool down,
wipe the cap and the top of the reservoir clean, then
unscrew the cap and wipe the dipstick with a clean rag.
Replace the cap and completely tighten it. Then
remove the cap again and look at the fluid level on the
dipstick.

The level should be at the C (cold) mark. If necessary,
add only enough fluid to bring the level up to the mark.

What to Use

To determine what kind of fluid to use, see
Recommended Fluids and Lubricants on page 6-13.
Always use the proper fluid. Failure to use the proper
fluid can cause leaks and damage hoses and seals.

5-35

-------------------------------------------------------------------------------------------------------------------------------------------------------------

-------------------------------------------------------------------------------------------------------------------------------------------------------------

Windshield Washer Fluid

What to Use

When you need windshield washer fluid, be sure to read
the manufacturer’s instructions before use. If you will
be operating your vehicle in an area where the
temperature may fall below freezing, use a fluid that has
sufficient protection against freezing.

Adding Washer Fluid

Open the cap with the
washer symbol on it. Add
washer fluid until the
tank is full. See Engine
Compartment Overview 
on
page 5-12 
for reservoir
location.

Notice:

When using concentrated washer fluid, follow
the manufacturer’s instructions for adding
water.

Do not mix water with ready-to-use washer fluid.
Water can cause the solution to freeze and
damage your washer fluid tank and other parts
of the washer system. Also, water does not
clean as well as washer fluid.

Fill your washer fluid tank only three-quarters
full when it is very cold. This allows for
expansion if freezing occurs, which could
damage the tank if it is completely full.

Do not use engine coolant (antifreeze) in your
windshield washer. It can damage your washer
system and paint.

5-36

-------------------------------------------------------------------------------------------------------------------------------------------------------------

-------------------------------------------------------------------------------------------------------------------------------------------------------------

Brakes

Brake Fluid

Your brake master cylinder reservoir is filled with DOT-3
brake fluid. See Engine Compartment Overview on
page 5-12 
for the location of the reservoir.

There are only two reasons why the brake fluid level in
the reservoir might go down. The first is that the
brake fluid goes down to an acceptable level during
normal brake lining wear. When new linings are put in,
the fluid level goes back up. The other reason is
that fluid is leaking out of the brake system. If it is, you

should have your brake system fixed, since a leak
means that sooner or later your brakes will not work
well, or will not work at all.

So, it is not a good idea to “top off” your brake fluid.
Adding brake fluid will not correct a leak. If you add fluid
when your linings are worn, then you will have too
much fluid when you get new brake linings. You should
add (or remove) brake fluid, as necessary, only when
work is done on the brake hydraulic system.

{

CAUTION:

If you have too much brake fluid, it can spill on
the engine. The fluid will burn if the engine is
hot enough. You or others could be burned,
and your vehicle could be damaged. Add brake
fluid only when work is done on the brake
hydraulic system. See “Checking Brake Fluid”
in this section.

Refer to the Maintenance Schedule to determine when
to check your brake fluid. See Scheduled Maintenance
on page 6-4.

5-37

-------------------------------------------------------------------------------------------------------------------------------------------------------------

-------------------------------------------------------------------------------------------------------------------------------------------------------------

Checking Brake Fluid

You can check the brake fluid without taking off the cap.

Just look at the brake fluid
reservoir. The fluid level
should be above MIN. If it
is not, have your brake
system checked to
see if there is a leak.

After work is done on the brake hydraulic system,
make sure the level is above the MIN but not over
the MAX mark.

What to Add

When you do need brake fluid, use only DOT-3 brake
fluid. Use new brake fluid from a sealed container
only. See Recommended Fluids and Lubricants on
page 6-13
.

Always clean the brake fluid reservoir cap and the area
around the cap before removing it. This will help
keep dirt from entering the reservoir.

{

CAUTION:

With the wrong kind of fluid in your brake
system, your brakes may not work well, or they
may not even work at all. This could cause a
crash. Always use the proper brake fluid.

Notice:

Using the wrong fluid can badly damage brake
system parts. For example, just a few drops of
mineral-based oil, such as engine oil, in your
brake system can damage brake system parts so
badly that they will have to be replaced. Do not
let someone put in the wrong kind of fluid.

If you spill brake fluid on your vehicle’s painted
surfaces, the paint finish can be damaged. Be
careful not to spill brake fluid on your vehicle. If
you do, wash it off immediately. See Appearance
Care 
on page 5-88.

5-38

-------------------------------------------------------------------------------------------------------------------------------------------------------------

-------------------------------------------------------------------------------------------------------------------------------------------------------------

Brake Wear

Your vehicle has four-wheel disc brakes.

Disc brake pads have built-in wear indicators that make
a high-pitched warning sound when the brake pads
are worn and new pads are needed. The sound
may come and go or be heard all the time your vehicle
is moving (except when you are pushing on the
brake pedal firmly).

{

CAUTION:

The brake wear warning sound means that
soon your brakes will not work well. That
could lead to an accident. When you hear the
brake wear warning sound, have your vehicle
serviced.

Notice: Continuing to drive with worn-out brake
pads could result in costly brake repair.

Some driving conditions or climates may cause a brake
squeal when the brakes are first applied or lightly
applied. This does not mean something is wrong with
your brakes.

Properly torqued wheel nuts are necessary to help
prevent brake pulsation. When tires are rotated, inspect
brake pads for wear and evenly tighten wheel nuts in
the proper sequence to GM torque specifications.

Brake linings should always be replaced as complete
axle sets.

Brake Pedal Travel

See your dealer if the brake pedal does not return to
normal height, or if there is a rapid increase in
pedal travel. This could be a sign of brake trouble.

Brake Adjustment

Every time you make a brake stop, your disc brakes
adjust for wear.

5-39

-------------------------------------------------------------------------------------------------------------------------------------------------------------

-------------------------------------------------------------------------------------------------------------------------------------------------------------

Replacing Brake System Parts

The braking system on a vehicle is complex. Its many
parts have to be of top quality and work well together if
the vehicle is to have really good braking. Your
vehicle was designed and tested with top-quality GM
brake parts. When you replace parts of your braking
system — for example, when your brake linings
wear down and you need new ones put in — be sure
you get new approved GM replacement parts. If you do
not, your brakes may no longer work properly. For
example, if someone puts in brake linings that are wrong
for your vehicle, the balance between your front and
rear brakes can change — for the worse. The braking
performance you have come to expect can change
in many other ways if someone puts in the wrong
replacement brake parts.

Battery

Your new vehicle comes with a maintenance free
ACDelco

®

battery. When it is time for a new battery, get

one that has the replacement number shown on the
original battery’s label. We recommend an ACDelco

®

battery. See Engine Compartment Overview on
page 5-12 
for battery location.
Warning: Battery posts, terminals and related
accessories contain lead and lead compounds,
chemicals known to the State of California to cause
cancer and reproductive harm. Wash hands after
handling.

5-40

-------------------------------------------------------------------------------------------------------------------------------------------------------------

-------------------------------------------------------------------------------------------------------------------------------------------------------------

Vehicle Storage

If you are not going to drive your vehicle for 25 days
or more, remove the black, negative (

) cable from

the battery. This will help keep your battery from
running down.

{

CAUTION:

Batteries have acid that can burn you and gas
that can explode. You can be badly hurt if you
are not careful. See Jump Starting 
on
page 5-41 
for tips on working around a battery
without getting hurt.

Contact your dealer to learn how to prepare your
vehicle for longer storage periods.

Also, for your audio system, see Theft-Deterrent
Feature 
on page 3-94.

Jump Starting

If your battery has run down, you may want to use
another vehicle and some jumper cables to start your
vehicle. But please use the following steps to do it safely.

{

CAUTION:

Batteries can hurt you. They can be dangerous
because:

They contain acid that can burn you.

They contain gas that can explode or
ignite.

They contain enough electricity
to burn you.

If you do not follow these steps exactly, some
or all of these things can hurt you.

Notice: Ignoring these steps could result in costly
damage to your vehicle that would not be covered
by your warranty.

Trying to start your vehicle by pushing or pulling it
will not work, and it could damage your vehicle.

1. Check the other vehicle. It must have a 12-volt

battery with a negative ground system.

5-41

-------------------------------------------------------------------------------------------------------------------------------------------------------------

-------------------------------------------------------------------------------------------------------------------------------------------------------------

Notice: If the other vehicle’s system is not a 12-volt
system with a negative ground, both vehicles can
be damaged. Only use vehicles with 12-volt systems
with negative grounds to jump start your vehicle.

2. Get the vehicles close enough so the jumper cables

can reach, but be sure the vehicles aren’t touching
each other. If they are, it could cause a ground
connection you don’t want. You wouldn’t be able to
start your vehicle, and the bad grounding could
damage the electrical systems.

To avoid the possibility of the vehicles rolling, set
the parking brake firmly on both vehicles involved in
the jump start procedure. Put an automatic
transmission in PARK (P) or a manual transmission
in NEUTRAL before setting the parking brake. If
you have a four-wheel-drive vehicle, be sure
the transfer case is not in NEUTRAL.

Notice: If you leave your radio or other accessories
on during the jump starting procedure, they could
be damaged. The repairs would not be covered
by your warranty. Always turn off your radio and
other accessories when jump starting your vehicle.

3. Turn off the ignition on both vehicles. Unplug

unnecessary accessories plugged into the cigarette
lighter or accessory power outlets (if equipped).
Turn off the radio and all lamps that aren’t needed.
This will avoid sparks and help to save both
batteries. And it could save your radio!

4. Open both hoods and locate the batteries. Find the

positive (+) and negative (

) terminals on each

battery. Your vehicle has a remote negative (

) jump

starting terminal. You should always use this
remote terminal instead of the terminal on the
battery. The remote negative (

) terminal is located

on the front engine lift bracket and is marked
GND. See Engine Compartment Overview on
page 5-12 
for more information on location.

5-42

-------------------------------------------------------------------------------------------------------------------------------------------------------------

-------------------------------------------------------------------------------------------------------------------------------------------------------------

{

CAUTION:

Using a match near a battery can cause battery
gas to explode. People have been hurt doing
this, and some have been blinded. Use a
flashlight if you need more light.

Be sure the battery has enough water. You do
not need to add water to the ACDelco

®

battery

installed in your new vehicle. But if a battery
has filler caps, be sure the right amount of
fluid is there. If it is low, add water to take care
of that first. If you do not, explosive gas could
be present.

Battery fluid contains acid that can burn you.
Do not get it on you. If you accidentally get it
in your eyes or on your skin, flush the place
with water and get medical help immediately.

{

CAUTION:

Fans or other moving engine parts can injure
you badly. Keep your hands away from moving
parts once the engine is running.

5. Check that the jumper cables don’t have loose or

missing insulation. If they do, you could get a
shock. The vehicles could be damaged too.

Before you connect the cables, here are some basic
things you should know. Positive (+) will go to
positive (+) or to a remote positive (+) terminal if the
vehicle has one. Negative (

) will go to a heavy,

unpainted metal engine part or to a remote
negative (

) terminal if the vehicle has one. Don’t

connect positive (+) to negative (

) or you’ll get a

short that would damage the battery and maybe
other parts too. And don’t connect the negative (

)

cable to the negative (

) terminal on the dead battery

because this can cause sparks.

5-43

-------------------------------------------------------------------------------------------------------------------------------------------------------------

-------------------------------------------------------------------------------------------------------------------------------------------------------------

6. Connect the red

positive (+) cable to the
positive (+) terminal of
the dead battery. Use a
remote positive (+)
terminal if the vehicle
has one.

7. Don’t let the other end

touch metal. Connect it
to the positive (+)
terminal of the good
battery. Use a remote
positive (+) terminal
if the vehicle has one.

5-44

-------------------------------------------------------------------------------------------------------------------------------------------------------------

-------------------------------------------------------------------------------------------------------------------------------------------------------------

8. Now connect the black

negative (

) cable to

the negative (

)

terminal of the good
battery. Use a remote
negative (

) terminal

if the vehicle has one.

Don’t let the other end touch anything until the next
step. The other end of the negative (

) cable

doesn’t go to the dead battery. It goes to a heavy,
unpainted metal engine part or to the remote
negative (

) terminal on the vehicle with the dead

battery. The remote negative (

) terminal on

your vehicle is located on the front engine lift
bracket and is marked “GND.”

9. Connect the other end

of the negative (

)

cable to the remote
negative (

) terminal on

the vehicle with the
dead battery.

10. Now start the vehicle with the good battery and run

the engine for a while.

11. Try to start the vehicle that had the dead battery. If

it won’t start after a few tries, it probably needs
service.

Notice: If the jumper cables are removed in the
wrong order, electrical shorting may occur and
damage the vehicle. The repairs would not be
covered by your warranty. Remove the jumper
cables in the correct order, making sure that the
cables do not touch each other or other metal.

5-45

-------------------------------------------------------------------------------------------------------------------------------------------------------------

-------------------------------------------------------------------------------------------------------------------------------------------------------------

A. Heavy, Unpainted Metal Engine Part or Remote

Negative (

) Terminal

B. Good Battery or Remote Positive (+) and Remote

Negative (

) Terminals

C. Dead Battery or Remote Positive (+) Terminal

To disconnect the jumper cables from both vehicles, do
the following:

1. Disconnect the black negative (

) cable from the

vehicle that had the dead battery.

2. Disconnect the black negative (

) cable from the

vehicle with the good battery.

3. Disconnect the red positive (+) cable from the

vehicle with the good battery.

4. Disconnect the red positive (+) cable from the other

vehicle.

Jumper Cable Removal

5-46

-------------------------------------------------------------------------------------------------------------------------------------------------------------

-------------------------------------------------------------------------------------------------------------------------------------------------------------

All-Wheel Drive

Transfer Case

When to Check Lubricant

It is not necessary to regularly check fluid unless you
suspect there is a leak or you hear an unusual noise.
A fluid loss could indicate a problem. Have it inspected
and repaired.

How to Check Lubricant

To get an accurate
reading, the vehicle should
be on a level surface.

If the level is below the bottom of the filler plug hole,
you’ll need to add some lubricant. Add enough lubricant
to raise the level to the bottom of the filler plug hole.
Use care not to overtighten the plug.

What to Use

To determine what kind of lubricant to use, see
Recommended Fluids and Lubricants on page 6-13.

5-47

-------------------------------------------------------------------------------------------------------------------------------------------------------------


Content      ..     17      18      19      20     ..