Oldsmobile Bravada (2004 year). Manual - part 17


  Index      Oldsmobile     Oldsmobile Bravada (2004 year) - manual in english


Search            copyright infringement  


Content      ..     15      16      17      18     ..


Oldsmobile Bravada (2004 year). Manual - part 17


-------------------------------------------------------------------------------------------------------------------------------------------------------------
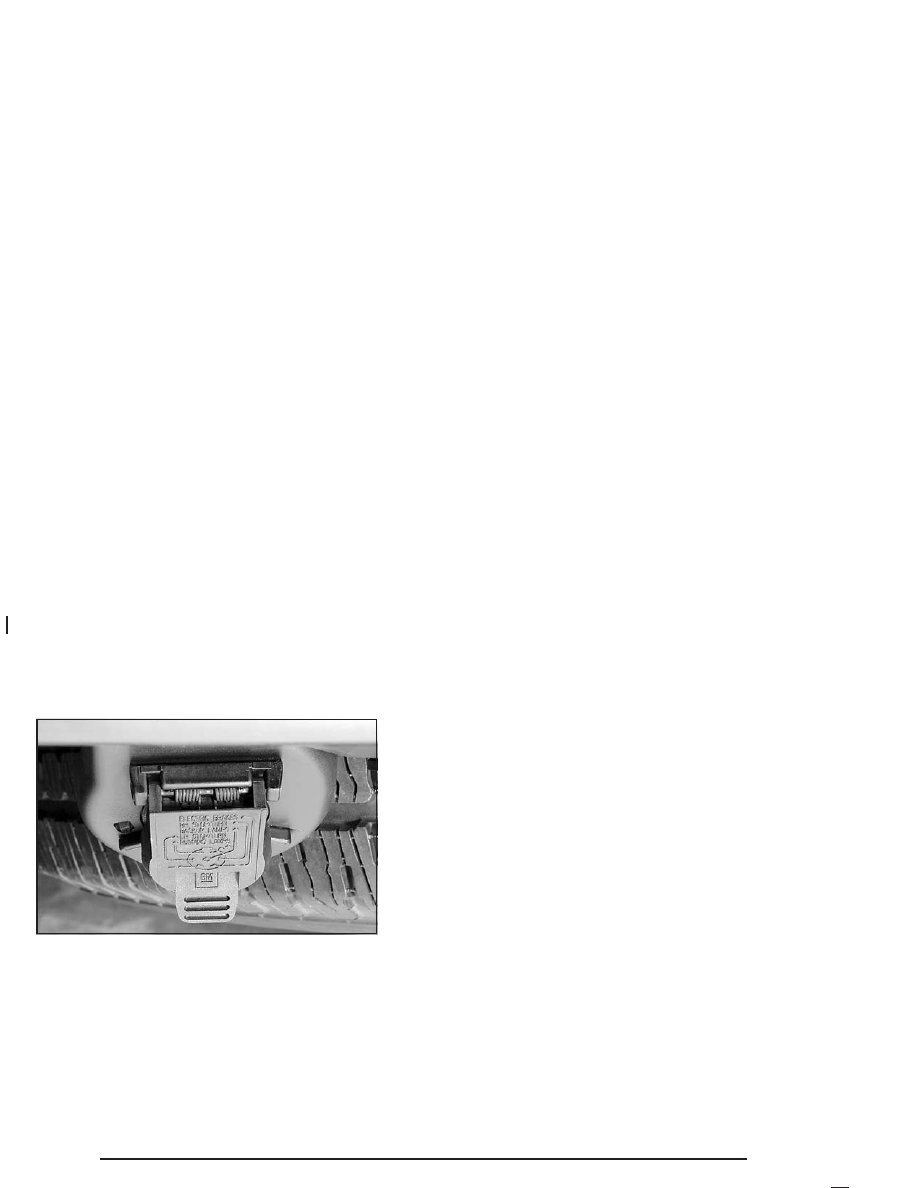
Trailer Wiring Harness

Your vehicle may be equipped with the seven-wire
trailer towing harness. This harness has a seven-pin
universal heavy-duty trailer connector that is attached to
a bracket on the hitch platform.

The seven-wire harness contains the following trailer
circuits:

Yellow: Left Stop/Turn Signal

Dark Green: Right Stop/Turn Signal

Brown: Running Lamps

White: Ground

Light Green: Back-up Lamps

Red: Battery Feed

Dark Blue: Electric Brakes

If you need to tow a light-duty trailer with a standard
four-way round pin connector, an adapter connector is
available from your dealer.

Your vehicle is also equipped with wiring for an electric
trailer brake controller. These wires are located
inside the vehicle on the driver’s side under the
instrument panel. These wires should be connected to
an electric trailer brake controller by your dealer or
a qualified service center.

4-60

-------------------------------------------------------------------------------------------------------------------------------------------------------------

-------------------------------------------------------------------------------------------------------------------------------------------------------------

Service ............................................................5-3

Doing Your Own Service Work .........................5-3
Adding Equipment to the Outside of Your

Vehicle ......................................................5-4

Fuel ................................................................5-4

Gasoline Octane ............................................5-4
Gasoline Specifications ....................................5-5
California Fuel ...............................................5-5
Additives .......................................................5-6
Fuels in Foreign Countries ...............................5-6
Filling Your Tank ............................................5-7
Filling a Portable Fuel Container .......................5-9

Checking Things Under

the Hood ....................................................5-10
Hood Release ..............................................5-10
Engine Compartment Overview .......................5-12
Engine Oil ...................................................5-14
Engine Air Cleaner/Filter ................................5-19
Automatic Transmission Fluid .........................5-20
Engine Coolant .............................................5-23
Radiator Pressure Cap ..................................5-25
Engine Overheating .......................................5-26
Cooling System ............................................5-28
Engine Fan Noise .........................................5-34
Power Steering Fluid .....................................5-35

Windshield Washer Fluid ................................5-36
Brakes ........................................................5-37
Battery ........................................................5-40
Jump Starting ...............................................5-41

All-Wheel Drive ..............................................5-47

Rear Axle .......................................................5-48

Front Axle ......................................................5-48

Bulb Replacement ..........................................5-50

Taillamps and Turn Signal Lamps ...................5-50
Replacement Bulbs .......................................5-51

Windshield Wiper Blade Replacement ..............5-52

Tires ..............................................................5-55

Inflation - Tire Pressure .................................5-64
Tire Inspection and Rotation ...........................5-65
When It Is Time for New Tires .......................5-66
Buying New Tires .........................................5-67
Uniform Tire Quality Grading ..........................5-68
Wheel Alignment and Tire Balance ..................5-69
Wheel Replacement ......................................5-69
Tire Chains ..................................................5-71
Accessory Inflator .........................................5-71
If a Tire Goes Flat ........................................5-73
Changing a Flat Tire .....................................5-74
Spare Tire ...................................................5-87

Section 5

Service and Appearance Care

5-1

-------------------------------------------------------------------------------------------------------------------------------------------------------------

-------------------------------------------------------------------------------------------------------------------------------------------------------------

-------------------------------------------------------------------------------------------------------------------------------------------------------------

-------------------------------------------------------------------------------------------------------------------------------------------------------------

Service

Your dealer knows your vehicle best and wants you to
be happy with it. We hope you will go to your dealer
for all your service needs. You will get genuine GM parts
and GM-trained and supported service people.

We hope you will want to keep your GM vehicle all GM.
Genuine GM parts have one of these marks:

Doing Your Own Service Work

If you want to do some of your own service work, you
will want to use the proper service manual. It tells
you much more about how to service your vehicle than
this manual can. To order the proper service manual,
see Service Publications Ordering Information on
page 7-12
.

Your vehicle has an air bag system. Before attempting
to do your own service work, see Servicing Your Air
Bag-Equipped Vehicle 
on page 1-55.

You should keep a record with all parts receipts and list
the mileage and the date of any service work you
perform. See Maintenance Record on page 6-16.

{

CAUTION:

You can be injured and your vehicle could be
damaged if you try to do service work on a
vehicle without knowing enough about it.

Be sure you have sufficient knowledge,
experience, the proper replacement parts
and tools before you attempt any vehicle
maintenance task.

CAUTION:

(Continued)

5-3

-------------------------------------------------------------------------------------------------------------------------------------------------------------

-------------------------------------------------------------------------------------------------------------------------------------------------------------

CAUTION:

(Continued)

Be sure to use the proper nuts, bolts and
other fasteners. “English” and “metric”
fasteners can be easily confused. If you
use the wrong fasteners, parts can later
break or fall off. You could be hurt.

Adding Equipment to the Outside of
Your Vehicle

Things you might add to the outside of your vehicle can
affect the airflow around it. This may cause wind
noise and affect windshield washer performance. Check
with your dealer before adding equipment to the
outside of your vehicle.

Fuel

Use of the recommended fuel is an important part of the
proper maintenance of your vehicle.

Gasoline Octane

Use regular unleaded gasoline with a posted octane of 87
or higher. If the octane is less than 87, you may get a
heavy knocking noise when you drive. If this occurs, use
a gasoline rated at 87 octane or higher as soon as
possible. Otherwise, you might damage your engine. A
little pinging noise when you accelerate or drive uphill is
considered normal. This does not indicate a problem
exists or that a higher-octane fuel is necessary. If you are
using 87 octane or higher-octane fuel and hear heavy
knocking, your engine needs service.

5-4

-------------------------------------------------------------------------------------------------------------------------------------------------------------

-------------------------------------------------------------------------------------------------------------------------------------------------------------

Gasoline Specifications

It is recommended that gasoline meet specifications
which were developed by automobile manufacturers
around the world and contained in the World-Wide Fuel
Charter which is available from the Alliance of
Automobile Manufacturers at www.autoalliance.org.
Gasoline meeting these specifications could provide
improved driveability and emission control system
performance compared to other gasoline.

In Canada, look for the
“Auto Makers’ Choice”
label on the pump.

California Fuel

If your vehicle is certified to meet California Emission
Standards (see the underhood emission control label), it
is designed to operate on fuels that meet California
specifications. If this fuel is not available in states
adopting California emissions standards, your vehicle
will operate satisfactorily on fuels meeting federal
specifications, but emission control system performance
may be affected. The malfunction indicator lamp may
turn on (see Malfunction Indicator Lamp on page 3-36 )
and your vehicle may fail a smog-check test. If this
occurs, return to your authorized GM dealer for
diagnosis. If it is determined that the condition is caused
by the type of fuel used, repairs may not be covered
by your warranty.

Canada Only

5-5

-------------------------------------------------------------------------------------------------------------------------------------------------------------

-------------------------------------------------------------------------------------------------------------------------------------------------------------

Additives

To provide cleaner air, all gasolines in the United States
are now required to contain additives that will help
prevent engine and fuel system deposits from forming,
allowing your emission control system to work properly.
You should not have to add anything to your fuel.
However, some gasolines contain only the minimum
amount of additive required to meet U.S. Environmental
Protection Agency regulations. General Motors
recommends that you buy gasolines that are advertised
to help keep fuel injectors and intake valves clean. If your
vehicle experiences problems due to dirty injectors or
valves, try a different brand of gasoline.

Gasolines containing oxygenates, such as ethers and
ethanol, and reformulated gasolines may be available in
your area to contribute to clean air. General Motors
recommends that you use these gasolines, particularly if
they comply with the specifications described earlier.

Notice: Your vehicle was not designed for fuel that
contains methanol. Do not use fuel containing
methanol. It can corrode metal parts in your fuel
system and also damage the plastic and rubber
parts. That damage would not be covered under
your warranty.

Some gasolines that are not reformulated for low
emissions may contain an octane-enhancing additive
called methylcyclopentadienyl manganese tricarbonyl
(MMT); ask the attendant where you buy gasoline
whether the fuel contains MMT. General Motors does
not recommend the use of such gasolines. Fuels
containing MMT can reduce the life of spark plugs and
the performance of the emission control system may
be affected. The malfunction indicator lamp may turn on.
If this occurs, return to your authorized GM dealer for
service.

Fuels in Foreign Countries

If you plan on driving in another country outside the
United States or Canada, the proper fuel may be hard
to find. Never use leaded gasoline or any other fuel
not recommended in the previous text on fuel. Costly
repairs caused by use of improper fuel would not
be covered by your warranty.

To check the fuel availability, ask an auto club, or
contact a major oil company that does business in the
country where you will be driving.

5-6

-------------------------------------------------------------------------------------------------------------------------------------------------------------

-------------------------------------------------------------------------------------------------------------------------------------------------------------

Filling Your Tank

{

CAUTION:

Fuel vapor burns violently and a fuel fire can
cause bad injuries. To help avoid injuries to
you and others, read and follow all the
instructions on the pump island. Turn off your
engine when you are refueling. Do not smoke
if you are near fuel or refueling your vehicle.
Keep sparks, flames and smoking materials
away from fuel. Do not leave the fuel pump
unattended when refueling your vehicle — this
is against the law in some places. Keep
children away from the fuel pump; never let
children pump fuel.

The fuel cap is located behind a hinged door on the
driver’s side of your vehicle.

5-7

-------------------------------------------------------------------------------------------------------------------------------------------------------------

-------------------------------------------------------------------------------------------------------------------------------------------------------------

While refueling, hang the fuel cap by the tether using
the hook located on the inside of the filler door.

To remove the fuel cap, turn it slowly to the left
(counterclockwise).

{

CAUTION:

If you spill fuel and then something ignites it,
you could be badly burned. Fuel can spray out
on you if you open the fuel cap too quickly.
This spray can happen if your tank is nearly
full, and is more likely in hot weather. Open
the fuel cap slowly and wait for any “hiss”
noise to stop. Then unscrew the cap all the
way.

Be careful not to spill fuel. Don’t top off or overfill your
tank, and wait a few seconds after you’ve finished
pumping before you remove the nozzle. Clean fuel from
painted surfaces as soon as possible. See Cleaning
the Outside of Your Vehicle 
on page 5-91.

When you put the fuel cap back on, turn it to the right
(clockwise) until you hear a clicking sound. Make
sure you fully install the cap. The diagnostic system can
determine if the fuel cap has been left off or improperly
installed. This would allow fuel to evaporate into the
atmosphere. See Malfunction Indicator Lamp on
page 3-36
.

5-8

-------------------------------------------------------------------------------------------------------------------------------------------------------------

-------------------------------------------------------------------------------------------------------------------------------------------------------------

{

CAUTION:

If a fire starts while you are refueling, do not
remove the nozzle. Shut off the flow of fuel by
shutting off the pump or by notifying the
station attendant. Leave the area immediately.

Notice: If you need a new fuel cap, be sure to get the
right type. Your dealer can get one for you. If you get
the wrong type, it may not fit properly. This may
cause your malfunction indicator lamp to light and
may damage your fuel tank and emissions system.
See Malfunction Indicator Lamp 
on page 3-36.

Filling a Portable Fuel Container

{

CAUTION:

Never fill a portable fuel container while it is in
your vehicle. Static electricity discharge from
the container can ignite the gasoline vapor.
You can be badly burned and your vehicle
damaged if this occurs. To help avoid injury to
you and others:

Dispense gasoline only into approved
containers.

Do not fill a container while it is inside a
vehicle, in a vehicle’s trunk, pickup bed or
on any surface other than the ground.

Bring the fill nozzle in contact with the
inside of the fill opening before operating
the nozzle. Contact should be maintained
until the filling is complete.

Do not smoke while pumping gasoline.

5-9

-------------------------------------------------------------------------------------------------------------------------------------------------------------

-------------------------------------------------------------------------------------------------------------------------------------------------------------

Checking Things Under
the Hood

{

CAUTION:

Things that burn can get on hot engine parts
and start a fire. These include liquids like fuel,
oil, coolant, brake fluid, windshield washer and
other fluids, and plastic or rubber. You or
others could be burned. Be careful not to drop
or spill things that will burn onto a hot engine.

Hood Release

1. To open the hood, first

pull the handle located
inside the vehicle
on the lower driver’s
side of the instrument
panel.

5-10

-------------------------------------------------------------------------------------------------------------------------------------------------------------

-------------------------------------------------------------------------------------------------------------------------------------------------------------

2. Then go to the front of the vehicle and release the

secondary hood release.

3. Lift the hood; release the hood prop from its

retainer and put the hood prop into the slot in
the hood.

Before closing the hood, be sure all filler caps are on
properly. Then lift the hood to relieve pressure on the
hood prop. Remove the hood prop from its slot in the
hood and return the prop to its retainer. Then pull the
hood down firmly to close. It will latch when dropped from
6 to 8 inches (15 to 20 cm) without pressing on the hood.

5-11

-------------------------------------------------------------------------------------------------------------------------------------------------------------

-------------------------------------------------------------------------------------------------------------------------------------------------------------

Engine Compartment Overview

When you open the hood you’ll see the following:

5-12

-------------------------------------------------------------------------------------------------------------------------------------------------------------

-------------------------------------------------------------------------------------------------------------------------------------------------------------

A. Coolant Recovery Tank. See Engine Coolant on

page 5-23.

B. Engine Air Cleaner/Filter. See Engine Air

Cleaner/Filter on page 5-19.

C. Windshield Washer Fluid Reservoir. See Windshield

Washer Fluid on page 5-36.

D. Power Steering Fluid Reservoir. See Power Steering

Fluid on page 5-35.

E. Automatic Transmission Dipstick. See Automatic

Transmission Fluid on page 5-20.

F. Engine Oil Dipstick. See Engine Oil on page 5-14.

G. Radiator Pressure Cap. See Radiator Pressure Cap

on page 5-25.

H. Engine Oil Fill Cap. See Engine Oil on page 5-14.

5-13

-------------------------------------------------------------------------------------------------------------------------------------------------------------

-------------------------------------------------------------------------------------------------------------------------------------------------------------

I. Remote Negative (-) Terminal Marked “GND

. See

Jump Starting on page 5-41.

J. Brake Master Cylinder. See Brakes on page 5-37.

K. Battery. See Battery on page 5-40.

L. Engine Compartment Fuse Block. See “Engine

Compartment Fuse Block” under Fuses and Circuit
Breakers 
on page 5-99.

Engine Oil

Checking Engine Oil

It is a good idea to check your engine oil every time you
get fuel. In order to get an accurate reading, the oil
must be warm and the vehicle must be on level ground.

The engine oil dipstick handle is a yellow loop. See
Engine Compartment Overview on page 5-12 for
the location of the engine oil dipstick.

Turn off the engine and give the oil several minutes to
drain back into the oil pan. If you don’t, the oil
dipstick might not show the actual level.

Pull out the dipstick and clean it with a paper towel or
cloth, then push it back in all the way. Remove it again,
keeping the tip down, and check the level.

5-14

-------------------------------------------------------------------------------------------------------------------------------------------------------------

-------------------------------------------------------------------------------------------------------------------------------------------------------------

When to Add Engine Oil

If the oil is at or below the L mark, then you will need to
add at least one quart of oil. But you must use the
right kind. This section explains what kind of oil to use.
For engine oil crankcase capacity, see Capacities
and Specifications 
on page 5-105.

Notice: Do not add too much oil. If your engine has
so much oil that the oil level gets above the F
mark that shows the proper operating range, your
engine could be damaged.

See Engine Compartment
Overview 
on page 5-12 for
the location of the
engine oil fill cap.

Be sure to add enough oil to put the level somewhere in
the proper operating range. Push the dipstick all the
way back in when you are through.

5-15

-------------------------------------------------------------------------------------------------------------------------------------------------------------


Content      ..     15      16      17      18     ..