Oldsmobile Bravada (2004 year). Manual - part 16


  Index      Oldsmobile     Oldsmobile Bravada (2004 year) - manual in english


Search            copyright infringement  


Content      ..     14      15      16      17     ..


Oldsmobile Bravada (2004 year). Manual - part 16


-------------------------------------------------------------------------------------------------------------------------------------------------------------
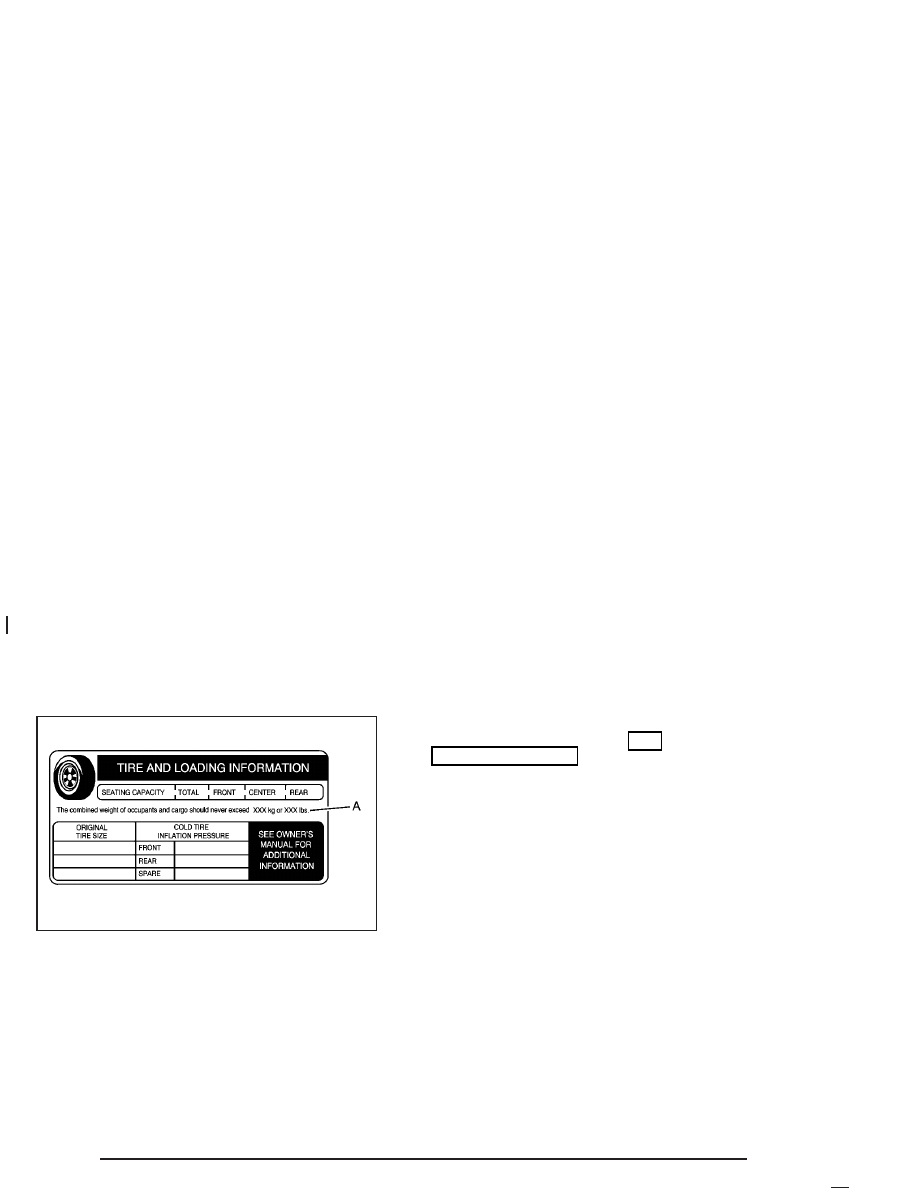
Tire and Loading Information Label

A. Vehicle Capacity Weight

The Tire and Loading Information label is attached to
the center pillar, near the driver’s door latch. Vehicles
without a center pillar will have the Tire and Loading
Information label attached to the driver’s door edge. This
label lists the number of people that can be in your
vehicle and the total weight it can carry. This weight is
called the vehicle capacity weight.

The Tire and Loading Information label also tells you
the size and recommended inflation pressure for
the original equipment tires on your vehicle. For more
information on tires and inflation see Tires on page 5-55
and Inflation - Tire Pressure on page 5-64.

If your vehicle does not have the Tire and Loading
Information label, the Certification/Tire label shows the
tire size and recommended inflation pressures
needed to obtain the Gross Vehicle Weight Rating
(GVWR) and the Gross Axle Weight Rating (GAWR) for
the front and rear axles. See “Certification/Tire Label”
later in this section.

4-44

-------------------------------------------------------------------------------------------------------------------------------------------------------------

-------------------------------------------------------------------------------------------------------------------------------------------------------------

Steps for Determining Correct Load Limit

1. Locate the statement “The combined weight of

occupants and cargo should never exceed XXX
pounds” on your vehicle placard.

2. Determine the combined weight of the driver and

passengers that will be riding in your vehicle.

3. Subtract the combined weight of the driver and

passengers from XXX kilograms or XXX pounds.

4. The resulting figure equals the available amount of

cargo and luggage load capacity. For example, if the
“XXX” amount equals 1400 lbs. and there will be five
150 lb. passengers in your vehicle, the amount of
available cargo and luggage load capacity is 650 lbs.
(1400

750 (5 x 150) = 650 lbs.).

5. Determine the combined weight of luggage and

cargo being loaded on the vehicle. That weight
may not safely exceed the available cargo
and luggage load capacity calculated in Step 4.

6. If your vehicle will be towing a trailer, the load from

your trailer will be transferred to your vehicle.
Consult this manual to determine how this reduces
the available cargo and luggage load capacity of
your vehicle.

See Towing a Trailer on page 4-50 for important
information on towing a trailer, towing safety rules and
trailering tips.

Loading Your Vehicle

Item

Description

Total

A

Vehicle Capacity Weight

for Example 1

=

1,000 lbs

(453 kg)

B

Subtract Occupant

Weight 150 lbs

(68 kg)

×

2

=

300 lbs (136 kg)

C

Available Occupant and

Cargo Weight=

700 lbs (317 kg)

Example 1

4-45

-------------------------------------------------------------------------------------------------------------------------------------------------------------

-------------------------------------------------------------------------------------------------------------------------------------------------------------

Loading Your Vehicle

Item

Description

Total

A

Vehicle Capacity Weight

for Example 2

=

1,000 lbs

(453 kg)

B

Subtract Occupant

Weight 150 lbs

(68 kg)

×

5

=

750 lbs (340 kg)

C

Available Cargo

Weight =

250 lbs. (113 kg)

Loading Your Vehicle

Item

Description

Total

A

Vehicle Capacity Weight

for Example 3

=

1,000 lbs

(453 kg)

B

Subtract Occupant

Weight 200 lbs

(91 kg)

×

5

=

1,000 lbs

(453 kg)

C

Available Cargo

Weight =

0 lbs. (0 kg)

Refer to your vehicle’s tire and loading information label
for specific information about your vehicle’s capacity
weight and seating positions. The combined weight of
the driver, passengers and cargo should never
exceed your vehicle’s capacity weight.

Example 2

Example 3

4-46

-------------------------------------------------------------------------------------------------------------------------------------------------------------

-------------------------------------------------------------------------------------------------------------------------------------------------------------

Certification/Tire Label

The Certification/Tire label is found on the driver’s door
edge, above the door latch. The label shows the
size of your original tires and the inflation pressures
needed to obtain the gross weight capacity of your
vehicle. This is called the Gross Vehicle Weight Rating
(GVWR). The GVWR includes the weight of the
vehicle, all occupants, fuel, cargo and trailer tongue
weight, if pulling a trailer.

The Certification/Tire label also tells you the maximum
weights for the front and rear axles, called Gross
Axle Weight Rating (GAWR). To find out the actual
loads on your front and rear axles, you need to go

to a weigh station and weigh your vehicle. Your dealer
can help you with this. Be sure to spread out your
load equally on both sides of the centerline.

Never exceed the GVWR for your vehicle, or the GAWR
for either the front or rear axle.

If you do have a heavy load, you should spread it out.

Similar appearing vehicles may have different GVWRs
and payloads. Please note your vehicle’s
Certification/Tire label or consult your dealer for
additional details.

{

CAUTION:

Do not load your vehicle any heavier than the
GVWR, or either the maximum front or rear
GAWR. If you do, parts on your vehicle can
break, and it can change the way your vehicle
handles. These could cause you to lose
control and crash. Also, overloading can
shorten the life of your vehicle.

Using heavier suspension components to get added
durability might not change your vehicle’s weight ratings.
Ask your dealer to help you load your vehicle
the right way.

4-47

-------------------------------------------------------------------------------------------------------------------------------------------------------------

-------------------------------------------------------------------------------------------------------------------------------------------------------------

Notice: Overloading your vehicle may cause
damage. Repairs would not be covered by your
warranty. Do not overload your vehicle.

If you put things inside your vehicle-like suitcases, tools,
packages, or anything else-they will go as fast as the
vehicle goes. If you have to stop or turn quickly, or
if there’s a crash, they’ll keep going.

{

CAUTION:

Things you put inside your vehicle can strike
and injure people in a sudden stop or turn, or
in a crash.

Put things in the cargo area of your
vehicle. Try to spread the weight evenly.

Never stack heavier things, like suitcases,
inside the vehicle so that some of them
are above the tops of the seats.

Do not leave an unsecured child restraint
in your vehicle.

When you carry something inside the
vehicle, secure it whenever you can.

Do not leave a seat folded down unless
you need to.

There’s also important loading information for off-road
driving in this manual.

Electronically Controlled Air
Suspension System

Your vehicle may be equipped with an electronically
controlled air suspension system that automatically
keeps your vehicle level as you load and unload. The
system includes a compressor, two height sensors
and two air springs supporting the rear axle.

The system also has an internal clock to prevent
overheating. If the system overheats, all leveling function
stops until the system cools down. During this time,
the indicator light on the air inflator system will be
flashing.

The ignition has to be on for the system to inflate, in
order to raise the vehicle to the standard ride height after
loading. The system can lower the vehicle to the
standard ride height after unloading with the ignition on
and also for up to 30 minutes after the ignition has
been turned off.

You may hear the compressor operating when you load
your vehicle, and periodically as the system adjusts
the vehicle to the standard ride height.

Load leveling will not function normally with the inflator
hose attached to the inflator outlet. Remove the inflator
hose from the outlet during loading and unloading.

4-48

-------------------------------------------------------------------------------------------------------------------------------------------------------------

-------------------------------------------------------------------------------------------------------------------------------------------------------------

If the vehicle is parked for an extended period of time,
some bleed down of the suspension is normal. Upon
starting the vehicle, proper height will be achieved.

Overload Protection

The air suspension system is equipped with overload
protection. Overload protection is designed to protect the
air suspension system, and it is an indicator to the
driver that the vehicle is overloaded. When the overload
protection mode is on, it will not allow damage to the
air compressor. However, do not overload the vehicle.
See Loading Your Vehicle on page 4-43.

If the suspension remains at a low height, the rear axle
load has exceeded GAWR (Gross Axle Weight
Rating). When the overload protection mode is activated,
the compressor operates for about 30 seconds to one
minute without raising the vehicle depending on the
amount of overload. This will continue each time
the ignition is turned on until the rear axle load is
reduced below GAWR.

Indicator Light

The indicator light on the inflator switch in the rear
passenger compartment also serves as an indicator for
internal system error. If the indicator light is flashing
without the load leveling function or the inflator being
active, turn off the ignition. The next day turn on
the ignition and check the indicator light. The vehicle
can be driven with the light flashing, but if it is you
should have the vehicle serviced as soon as possible.

Adding a Snow Plow or Similar
Equipment

Your vehicle was neither designed nor intended for a
snow plow.

Notice: Adding a snow plow or similar equipment
to your vehicle can damage it, and the repairs would
not be covered by warranty. Do not install a snow
plow or similar equipment on your vehicle.

4-49

-------------------------------------------------------------------------------------------------------------------------------------------------------------

-------------------------------------------------------------------------------------------------------------------------------------------------------------

Towing a Trailer

{

CAUTION:

If you do not use the correct equipment and
drive properly, you can lose control when you
pull a trailer. For example, if the trailer is too
heavy, the brakes may not work well — or even
at all. You and your passengers could be
seriously injured. Pull a trailer only if you have
followed all the steps in this section. Ask your
dealer for advice and information about towing
a trailer with your vehicle.

Notice: Pulling a trailer improperly can damage
your vehicle and result in costly repairs that would
not be covered by your warranty. Always follow
the instructions in this section and check with your
dealer for more information about towing a trailer
with your vehicle.

To identify the trailering capacity of your vehicle, you
should read the information in “Weight of the Trailer” that
appears later in this section.

Trailering is different than just driving your vehicle by
itself. Trailering means changes in acceleration, braking,
handling, durability and fuel economy. Successful,
safe trailering takes correct equipment, and it has to be
used properly.

That’s the reason for this part. In it are many time-tested,
important trailering tips and safety rules. Many of
these are important for your safety and that of your
passengers. So please read this section carefully before
you pull a trailer.

4-50

-------------------------------------------------------------------------------------------------------------------------------------------------------------

-------------------------------------------------------------------------------------------------------------------------------------------------------------

If You Do Decide To Pull A Trailer

If you do, here are some important points:

There are many different laws, including speed limit
restrictions, having to do with trailering. Make sure
your rig will be legal, not only where you live
but also where you’ll be driving. A good source for
this information can be state or provincial police.

Consider using a sway control. See “Hitches” later
in this section.

Don’t tow a trailer at all during the first 500 miles
(800 km) your new vehicle is driven. Your engine,
axle or other parts could be damaged.

Then, during the first 500 miles (800 km) that you
tow a trailer, don’t drive over 50 mph (80 km/h)
and don’t make starts at full throttle. This helps your
engine and other parts of your vehicle wear in at
the heavier loads.

You can tow in DRIVE (D). You may want to shift
the transmission to THIRD (3) or, if necessary, a
lower gear selection if the transmission shifts
too often (e.g., under heavy loads and/or hilly
conditions).

Three important considerations have to do with weight:

the weight of the trailer,

the weight of the trailer tongue

and the weight on your vehicle’s tires.

4-51

-------------------------------------------------------------------------------------------------------------------------------------------------------------

-------------------------------------------------------------------------------------------------------------------------------------------------------------

Weight of the Trailer

How heavy can a trailer safely be?

It depends on how you plan to use your rig. For example, speed, altitude, road grades, outside temperature and how
much your vehicle is used to pull a trailer are all important. And, it can also depend on any special equipment that
you have on your vehicle.

Vehicle

Axle Ratio

Max.Trailer Wt.

*GCWR

2WD

3.42

5,300 lbs. (2 404 kg)

10,000 lbs. (4 536 kg)

3.73

5,700 lbs. (2 585 kg)

10,500 lbs. (4 763 kg)

4.10

6,200 lbs. (2 812 kg)

11,000 lbs. (4 990 kg)

AWD

3.42

5,100 lbs. (2 313 kg)

10,000 lbs. (4 536 kg)

3.73

5,500 lbs. (2 495 kg)

10,500 lbs. (4 736 kg)

4.10

6,100 lbs. (2 767 kg)

11,000 lbs. (4 990 kg)

*The Gross Combination Weight Rating (GCWR) is the
total allowable weight of the completely loaded
vehicle and trailer including any passengers, cargo,
equipment and conversion. The GCWR for your vehicle
should not be exceeded.

You can ask your dealer for our trailering information or
advice, or you can write us at:

Oldsmobile Customer Assistance Center
P.O. Box 33171
Detroit, MI 48232-5171

In Canada, write to:

General Motors of Canada Limited
Customer Communication Centre, 163-005
1908 Colonel Sam Drive
Oshawa, Ontario L1H 8P7

4-52

-------------------------------------------------------------------------------------------------------------------------------------------------------------

-------------------------------------------------------------------------------------------------------------------------------------------------------------

Weight of the Trailer Tongue

The tongue load (A) of any trailer is an important weight
to measure because it affects the total or gross weight
of your vehicle. The Gross Vehicle Weight (GVW)
includes the curb weight of the vehicle, any cargo you
may carry in it, and the people who will be riding in
the vehicle. If you have a lot of options, equipment,
passengers or cargo in your vehicle, it will reduce the
tongue weight your vehicle can carry, which will
also reduce the trailer weight your vehicle can tow. And
if you will tow a trailer, you must add the tongue load
to the GVW because your vehicle will be carrying
that weight, too. See Loading Your Vehicle for more
information about your vehicle’s maximum load capacity.

The trailer tongue weight (A) should be 10 percent
to 15 percent of the total loaded trailer weight, up to a
maximum of 400 lbs. (181 kg) with a weight carrying
hitch. The trailer tongue weight (A) should be 10 percent
to 15 percent of the total loaded trailer weight, up to a
maximum of 900 lbs. (408 kg) with a weight distributing
hitch.

Do not exceed the maximum allowable tongue weight
for your vehicle. Choose the shortest hitch extension
that will position the hitch ball closest to the vehicle.
This will help reduce the effect of trailer tongue weight
on the rear axle.

4-53

-------------------------------------------------------------------------------------------------------------------------------------------------------------

-------------------------------------------------------------------------------------------------------------------------------------------------------------

After you’ve loaded your trailer, weigh the trailer and then
the tongue, separately, to see if the weights are proper. If
they aren’t, you may be able to get them right simply by
moving some items around in the trailer.

Total Weight on Your Vehicle’s Tires

Be sure your vehicle’s tires are inflated to the upper limit
for cold tires. You’ll find these numbers on the
Certification label at the rear edge of the driver’s door or
see Loading Your Vehicle for more information. Then be
sure you don’t go over the GVW limit for your vehicle, or
the GAWR, including the weight of the trailer tongue. If
you use a weight distributing hitch, make sure you don’t
go over the rear axle limit before you apply the weight
distribution spring bars.

Hitches

It’s important to have the correct hitch equipment.
Crosswinds, large trucks going by and rough roads are
a few reasons why you’ll need the right hitch.

Weight Distributing Hitches and Weight
Carrying Hitches

When using a weight-distributing hitch, the hitch must
be adjusted so the distance (A) remains the same both
before and after coupling the trailer to the tow vehicle.

If you use a step-bumper hitch, the bumper could
be damaged in sharp turns. Make sure there is ample
room when turning to avoid contact between the
trailer and the bumper.

(A) Body to Ground Distance, (B) Front of Vehicle

4-54

-------------------------------------------------------------------------------------------------------------------------------------------------------------

-------------------------------------------------------------------------------------------------------------------------------------------------------------

If you will be pulling a trailer that, when loaded, will
weigh more than 5,000 lbs (2 270 kg) be sure to use a
properly mounted weight-distributing hitch and sway
control of the proper size. This equipment is very
important for proper vehicle loading and good handling
when driving. Always use a sway control if the trailer
will weigh more than these limits. You can ask a
hitch dealer about sway controls.

Safety Chains

You should always attach chains between your vehicle
and your trailer. Cross the safety chains under the
tongue of the trailer to help prevent the tongue from
contacting the road if it becomes separated from
the hitch. Instructions about safety chains may be
provided by the hitch manufacturer or by the trailer
manufacturer. Follow the manufacturer’s
recommendation for attaching safety chains and do not
attach them to the bumper. Always leave just enough
slack so you can turn with your rig. Never allow
safety chains to drag on the ground.

Trailer Brakes

If your trailer weighs more than 1,500 lbs. (680 kg)
loaded, then it needs its own brakes — and they must
be adequate. Be sure to read and follow the instructions
for the trailer brakes so you’ll be able to install, adjust
and maintain them properly.

Your trailer’s brake system can tap into the vehicle’s
hydraulic brake system only if:

The trailer parts can withstand 3,000 psi
(20 650 kPa) of pressure.

The trailer’s brake system will use less than
0.02 cubic inch (0.3 cc) of fluid from your vehicle’s
master cylinder. Otherwise, both braking systems
won’t work well. You could even lose your brakes.

If everything checks out this far, then make the brake
fluid tap at the port on the master cylinder that
sends fluid to the rear brakes. But don’t use copper
tubing for this. If you do, it will bend and finally break off.
Use steel brake tubing.

4-55

-------------------------------------------------------------------------------------------------------------------------------------------------------------

-------------------------------------------------------------------------------------------------------------------------------------------------------------

Driving with a Trailer

{

CAUTION:

If you have a rear-most window open and you
pull a trailer with your vehicle, carbon
monoxide (CO) could come into your vehicle.
You can not see or smell CO. It can cause
unconsciousness or death. See Engine
Exhaust 
on page 2-27. To maximize your safety
when towing a trailer:

Have your exhaust system inspected for
leaks, and make necessary repairs before
starting on your trip.

Keep the rear-most windows closed.

If exhaust does come into your vehicle
through a window in the rear or another
opening, drive with your front, main
heating or cooling system on and with the
fan on any speed. This will bring fresh,
outside air into your vehicle. Do not use
the climate control setting for maximum air
because it only recirculates the air inside
your vehicle. See Climate Control System
in the Index.

Towing a trailer requires a certain amount of experience.
Before setting out for the open road, you’ll want to get
to know your rig. Acquaint yourself with the feel of
handling and braking with the added weight of the trailer.
And always keep in mind that the vehicle you are
driving is now a good deal longer and not nearly as
responsive as your vehicle is by itself.

Before you start, check all trailer hitch parts and
attachments, safety chains, electrical connection, lamps,
tires and mirror adjustment. If the trailer has electric
brakes, start your vehicle and trailer moving and then
apply the trailer brake controller by hand to be sure
the brakes are working. This lets you check your
electrical connection at the same time.

During your trip, check occasionally to be sure that the
load is secure, and that the lamps and any trailer
brakes are still working.

4-56

-------------------------------------------------------------------------------------------------------------------------------------------------------------

-------------------------------------------------------------------------------------------------------------------------------------------------------------

Following Distance

Stay at least twice as far behind the vehicle ahead as
you would when driving your vehicle without a trailer.
This can help you avoid situations that require
heavy braking and sudden turns.

Passing

You’ll need more passing distance up ahead when
you’re towing a trailer. And, because you’re a good deal
longer, you’ll need to go much farther beyond the
passed vehicle before you can return to your lane.

Backing Up

Hold the bottom of the steering wheel with one hand.
Then, to move the trailer to the left, just move that hand
to the left. To move the trailer to the right, move your
hand to the right. Always back up slowly and, if possible,
have someone guide you.

Making Turns

Notice: Making very sharp turns while trailering
could cause the trailer to come in contact with the
vehicle. Your vehicle could be damaged. Avoid
making very sharp turns while trailering.

When you’re turning with a trailer, make wider turns than
normal. Do this so your trailer won’t strike soft shoulders,
curbs, road signs, trees or other objects. Avoid jerky or
sudden maneuvers. Signal well in advance.

Turn Signals When Towing a Trailer

The arrows on your instrument panel will flash whenever
you signal a turn or lane change. Properly hooked up,
the trailer lamps will also flash, telling other drivers
you’re about to turn, change lanes or stop.

When towing a trailer, the arrows on your instrument
panel will flash for turns even if the bulbs on the trailer
are burned out. Thus, you may think drivers behind
you are seeing your signal when they are not. It’s
important to check occasionally to be sure the trailer
bulbs are still working.

4-57

-------------------------------------------------------------------------------------------------------------------------------------------------------------

-------------------------------------------------------------------------------------------------------------------------------------------------------------

Driving On Grades

Reduce speed and shift to a lower gear before you start
down a long or steep downgrade. If you don’t shift
down, you might have to use your brakes so much that
they would get hot and no longer work well.

You can tow in DRIVE (D). You may want to shift the
transmission to THIRD (3) or a lower gear, under heavy
loads or hilly conditions.

When towing at high altitude on steep uphill grades,
consider the following: Engine coolant will boil at a lower
temperature than at normal altitudes. If you turn your
engine off immediately after towing at high altitude
on steep uphill grades, your vehicle may show signs
similar to engine overheating. To avoid this, let the
engine run while parked (preferably on level ground)
with the automatic transmission in PARK (P) for a
few minutes before turning the engine off. If you do get
the overheat warning, see Engine Overheating on
page 5-26
.

Parking on Hills

{

CAUTION:

You really should not park your vehicle, with a
trailer attached, on a hill. If something goes
wrong, your rig could start to move. People
can be injured, and both your vehicle and the
trailer can be damaged.

But if you ever have to park your rig on a hill, here’s
how to do it:

1. Apply your regular brakes, but don’t shift into

PARK (P) yet. When parking uphill, turn your wheels
away from the curb. When parking downhill, turn
your wheels into the curb.

2. Have someone place chocks under the trailer

wheels.

3. When the wheel chocks are in place, release the

regular brakes until the chocks absorb the load.

4. Reapply the regular brakes. Then apply your

parking brake, and then shift into PARK (P).

5. Release the regular brakes.

4-58

-------------------------------------------------------------------------------------------------------------------------------------------------------------

-------------------------------------------------------------------------------------------------------------------------------------------------------------

When You Are Ready to Leave After
Parking on a Hill

1. Apply your regular brakes and hold the pedal down

while you:

start your engine,

shift into a gear, and

release the parking brake.

2. Let up on the brake pedal.

3. Drive slowly until the trailer is clear of the chocks.

4. Stop and have someone pick up and store

the chocks.

Maintenance When Trailer Towing

Your vehicle will need service more often when you’re
pulling a trailer. See the Maintenance Schedule for more
on this. Things that are especially important in trailer
operation are automatic transmission fluid (don’t overfill),
engine oil, axle lubricant, belt, cooling system and
brake system. Each of these is covered in this manual,
and the Index will help you find them quickly. If
you’re trailering, it’s a good idea to review these sections
before you start your trip.

Check periodically to see that all hitch nuts and bolts
are tight.

4-59

-------------------------------------------------------------------------------------------------------------------------------------------------------------


Content      ..     14      15      16      17     ..