Oldsmobile Bravada (2004 year). Manual - part 23


  Index      Oldsmobile     Oldsmobile Bravada (2004 year) - manual in english


Search            copyright infringement  


Content      ..     21      22      23      24     ..


Oldsmobile Bravada (2004 year). Manual - part 23


-------------------------------------------------------------------------------------------------------------------------------------------------------------
Vehicle Care/Appearance Materials

See your GM dealer for more information on purchasing
the following products.

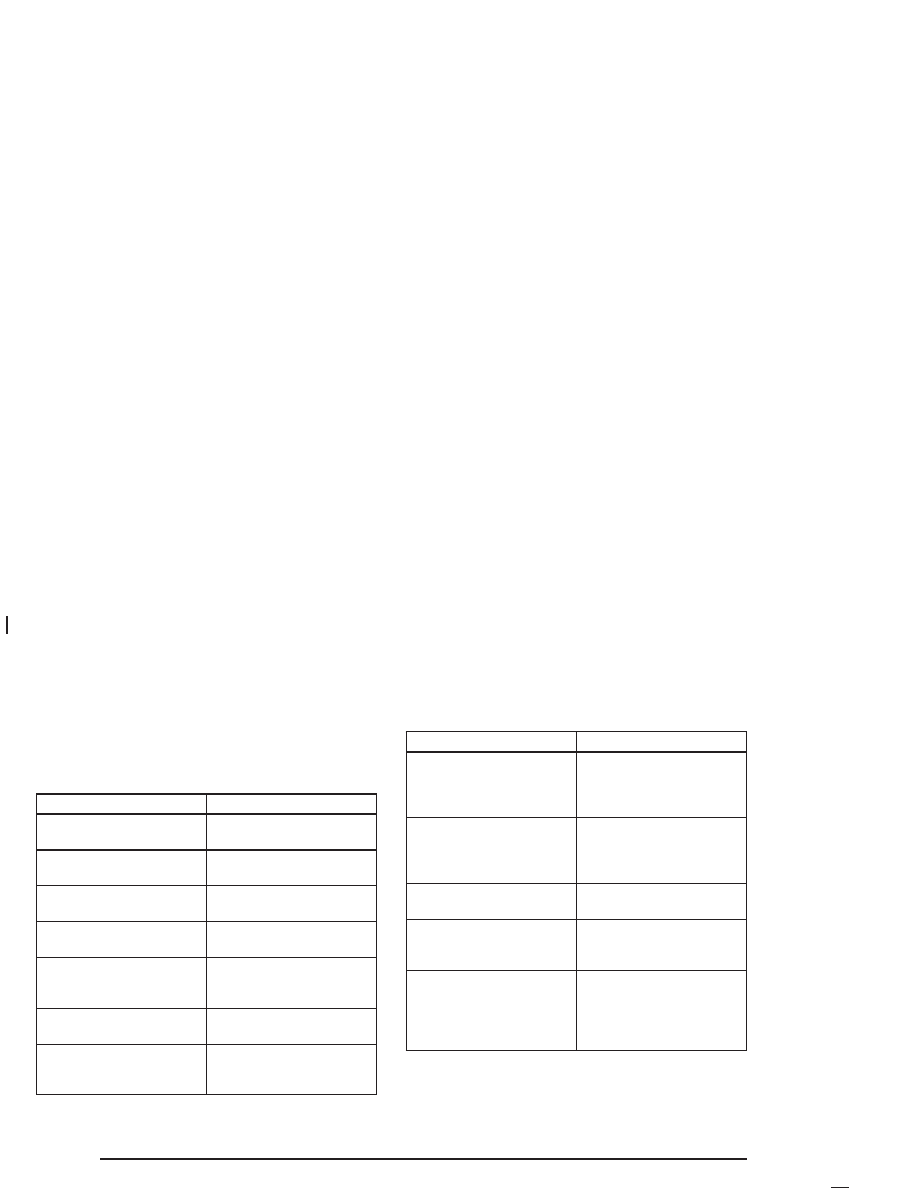
Vehicle Care/Appearance Materials

Description

Usage

Polishing Cloth
Wax-Treated

Interior and exterior
polishing cloth.

Tar and Road Oil
Remover

Removes tar, road oil and
asphalt.

Chrome Cleaner and
Polish

Use on chrome or
stainless steel.

White Sidewall Tire
Cleaner

Removes soil and black
marks from whitewalls.

Vinyl Cleaner

Cleans vinyl tops,
upholstery and
convertible tops.

Glass Cleaner

Removes dirt, grime,
smoke and fingerprints.

Chrome and Wire Wheel
Cleaner

Removes dirt and grime
from chrome wheels and
wire wheel covers.

Vehicle Care/Appearance Materials

(cont’d)

Description

Usage

Finish Enhancer

Removes dust,
fingerprints, and surface
contaminants. Spray on
wipe off.

Swirl Remover Polish

Removes swirl marks,
fine scratches and other
light surface
contamination.

Cleaner Wax

Removes light scratches
and protects finish.

Foaming Tire Shine Low
Gloss

Cleans, shines and
protects in one easy step,
no wiping necessary.

Wash Wax Concentrate

Medium foaming
shampoo. Cleans and
lightly waxes.
Biodegradable and
phosphate free.

5-96

-------------------------------------------------------------------------------------------------------------------------------------------------------------

-------------------------------------------------------------------------------------------------------------------------------------------------------------

Vehicle Care/Appearance Materials

(cont’d)

Description

Usage

Spot Lifter

Quickly and easily
removes spots and stains
from carpets, vinyl and
cloth upholstery.

Odor Eliminator

Odorless spray odor
eliminator used on
fabrics, vinyl, leather and
carpet.

See your General Motors parts department for these
products. See Recommended Fluids and Lubricants
on page 6-13.

Vehicle Identification

Vehicle Identification Number (VIN)

This is the legal identifier for your vehicle. It appears on
a plate in the front corner of the instrument panel, on
the driver’s side. You can see it if you look through the
windshield from outside your vehicle. The VIN also
appears on the Vehicle Certification and Service Parts
labels and the certificates of title and registration.

Engine Identification

The 8th character in your VIN is the engine code. This
code will help you identify your engine, specifications
and replacement parts.

5-97

-------------------------------------------------------------------------------------------------------------------------------------------------------------

-------------------------------------------------------------------------------------------------------------------------------------------------------------

Service Parts Identification Label

You’ll find this label on the inside of the glove box. It’s
very helpful if you ever need to order parts. On this
label is:

your VIN,

the model designation,

paint information and

a list of all production options and special
equipment.

Be sure that this label is not removed from the vehicle.

Electrical System

Add-On Electrical Equipment

Notice: Don’t add anything electrical to your vehicle
unless you check with your dealer first. Some
electrical equipment can damage your vehicle and
the damage wouldn’t be covered by your warranty.
Some add-on electrical equipment can keep other
components from working as they should.

Your vehicle has an air bag system. Before attempting
to add anything electrical to your vehicle, see
Servicing Your Air Bag-Equipped Vehicle on page 1-55.

Headlamps

The headlamp wiring is protected by four fuses. An
electrical overload will cause a lamp to go on and off. If
this happens, have your headlamp wiring checked
right away.

Windshield Wiper Fuses

The windshield wiper motor is protected by a circuit
breaker and a fuse. If the motor overheats due to heavy
snow or ice, the wiper will stop until the motor cools.
If the overload is caused by some electrical problem, be
sure to get it fixed.

Power Windows and Other Power
Options

Circuit breakers protect the power windows and other
power accessories. When the current load is too heavy,
the circuit breaker opens and closes, protecting the
circuit until the problem is fixed or goes away.

5-98

-------------------------------------------------------------------------------------------------------------------------------------------------------------

-------------------------------------------------------------------------------------------------------------------------------------------------------------

Fuses and Circuit Breakers

The wiring circuits in your vehicle are protected from
short circuits by a combination of fuses and circuit
breakers. This greatly reduces the chance of fires
caused by electrical problems.

Look at the silver-colored band inside the fuse. If the
band is broken or melted, replace the fuse. Be sure you
replace a bad fuse with a new one of the identical
size and rating.

If you ever have a problem on the road and don’t have
a spare fuse, you can borrow one that has the same
amperage. Just pick some feature of your vehicle
that you can get along without — like the radio or
cigarette lighter— and use its fuse, if it is the correct
amperage. Replace it as soon as you can.

Engine Compartment Fuse Block

The fuse block is located under the hood in the engine
compartment on the driver’s side of the vehicle. See
Engine Compartment Overview on page 5-12 for more
information on location.

Remove the primary cover by pressing the two locking
tabs. Remove the secondary cover by snapping off
while lifting.

5-99

-------------------------------------------------------------------------------------------------------------------------------------------------------------

-------------------------------------------------------------------------------------------------------------------------------------------------------------

5-100

-------------------------------------------------------------------------------------------------------------------------------------------------------------

-------------------------------------------------------------------------------------------------------------------------------------------------------------

Fuses

Usage

1

Electrically-Controlled Air
Suspension

2

Passenger’s Side High-Beam
Headlamp

3

Passenger’s Side Low-Beam
Headlamp

4

Back-Up-Trailer Lamps

5

Driver’s Side High-Beam Headlamp

6

Driver’s Side Low-Beam Headlamp

7

Rear Window Washer, Headlamp
Washer

8

Active Transfer Case

9

Windshield Washer

10

Powertrain Control Module B

11

Fog Lamps

12

Stop Lamp

13

Cigarette Lighter

14

Ignition Coils

15

Blank

16

TBC-Ignition 1

17

Crank

Fuses

Usage

18

Air Bag

19

Trailer Electric Brake

20

Cooling Fan

21

Horn

22

Ignition E

23

Electronic Throttle Control

24

Instrument Panel Cluster, Driver
Information Center

25

Automatic Shift Lock Control System

26

Backup

27

Engine 1

28

Powertrain Control Module 1

29

Oxygen Sensor

30

Air Conditioning

31

Truck Body Controller

32

Trailer

33

Anti-Lock Brakes (ABS)

34

Ignition A

35

Blower Motor

36

Ignition B

5-101

-------------------------------------------------------------------------------------------------------------------------------------------------------------

-------------------------------------------------------------------------------------------------------------------------------------------------------------

Fuses

Usage

50

Passenger’s Side Trailer Turn

51

Driver’s Side Trailer Turn

52

Hazard Flashers

53

Electric Adjustable Pedals

54

A.I.R. Solenoid

56

A.I.R. Pump

Relays

Usage

37

Blank or Headlamp Wash

38

Rear Window Washer

39

Fog Lamps

40

Horn

41

Fuel Pump

42

Windshield Washer

43

High-Beam Headlamp

44

Air Conditioning

45

Cooling Fan

46

Headlamp Driver Module

47

Starter

49

Electric Adjustable Pedal

55

A.I.R. Solenoid

Miscellaneous Usage

48

Instrument Panel Battery

49

Fuse Puller

Rear Underseat Fuse Block

The rear underseat fuse block is located under the rear
seat on the driver’s side of the vehicle.

5-102

-------------------------------------------------------------------------------------------------------------------------------------------------------------

-------------------------------------------------------------------------------------------------------------------------------------------------------------

Fuses

Usage

01

Right Door Control Module

02

Left Door Control Module

03

Endgate Module 2

04

Truck Body Controller 3

05

Rear Fog Lamps

06

Blank

07

Truck Body Controller 2

08

Power Seats

09

Rear Wiper

10

Driver Door Module

11

Amplifier

12

Passenger Door Module

13

Rear Climate Controls

14

Left Rear Parking Lamps

15

Blank

16

Vehicle Center High-Mounted Stop
Lamp

17

Right Rear Parking Lamps

18

Locks

19

Liftgate Module/Driver Seat Module

20

Sunroof

21

Lock

23

Blank

24

Unlock

5-103

-------------------------------------------------------------------------------------------------------------------------------------------------------------

-------------------------------------------------------------------------------------------------------------------------------------------------------------

Fuses

Usage

25

Blank

26

Blank

27

OH Battery/OnStar

®

System

29

Rainsense™ Wipers

30

Parking Lamps

31

Truck Body Controller Accessory

32

Truck Body Controller 5

33

Front Wipers

34

Vehicle Stop

35

Blank

36

Heat Ventilation Air Conditioning B

37

Front Parking Lamps

38

Left Turn Signal

39

Heat Ventilation Air Conditioning 1

Fuses

Usage

40

Truck Body Controller 4

41

Radio

42

Trailer Park

43

Right Turn Signal

44

Heat Ventilation Air Conditioning

45

Rear Fog Lamps

46

Auxiliary Power 1

47

Ignition 0

48

Four-Wheel Drive

49

Blank

50

Truck Body Controller Ignition

51

Brakes

52

Truck Body Controller Run

5-104

-------------------------------------------------------------------------------------------------------------------------------------------------------------

-------------------------------------------------------------------------------------------------------------------------------------------------------------

Capacities and Specifications

Engine

VIN Code

Transmission

Spark Plug Gap

“VORTEC™ ” 4200 L6

S

M30

0.042 inches (1.07 mm)

Application

Capacities

English

Metric

Wheel Nut Torque

100 lb ft

140

Y

Cooling System

13.9 quarts

13.1 L

Air Conditioning Refrigerant R/134a

1.9 lbs.

0.85 kg

Engine Oil with Filter

7.0 quarts

6.6 L

Transmission

(Drain and Refill)

5.0 quarts

4.7 L

Differential Fluid
Rear

3.6 pints

1.7 L

Front

1.7 pints

0.8 L

Fuel Tank

22.0 gallons

83.3 L

All capacities are approximate. When adding, be sure to fill to the appropriate level, as recommended in this
manual. Recheck the fluid level after filling.

5-105

-------------------------------------------------------------------------------------------------------------------------------------------------------------

-------------------------------------------------------------------------------------------------------------------------------------------------------------

NOTES

5-106

-------------------------------------------------------------------------------------------------------------------------------------------------------------

-------------------------------------------------------------------------------------------------------------------------------------------------------------

-------------------------------------------------------------------------------------------------------------------------------------------------------------

-------------------------------------------------------------------------------------------------------------------------------------------------------------

Maintenance Schedule

Introduction

Important: Keep engine oil at the proper level and
change as recommended.

Have you purchased the GM Protection Plan? The Plan
supplements your new vehicle warranties. See your
Warranty and Owner Assistance booklet or your dealer
for details.

Maintenance Requirements

Notice: Maintenance intervals, checks, inspections,
replacement parts and recommended fluids and
lubricants as prescribed in this manual are necessary
to keep your vehicle in good working condition. Any
damage caused by failure to follow scheduled
maintenance may not be covered by warranty.

Your Vehicle and the Environment

Proper vehicle maintenance not only helps to keep your
vehicle in good working condition, but also helps the
environment. All recommended maintenance is
important. Improper vehicle maintenance can even
affect the quality of the air we breathe. Improper fluid
levels or the wrong tire inflation can increase the level of
emissions from your vehicle. To help protect our
environment, and to keep your vehicle in good condition,
be sure to maintain your vehicle properly.

Using Your Maintenance Schedule

We at General Motors want to help you keep your
vehicle in good working condition. But we do not know
exactly how you will drive it. You may drive very
short distances only a few times a week. Or you may
drive long distances all the time in very hot, dusty
weather. You may use your vehicle in making deliveries.
Or you may drive it to work, to do errands or in many
other ways.

Because of all the different ways people use their
vehicles, maintenance needs vary. You may need more
frequent checks and replacements. So please read
the following and note how you drive. If you have any
questions on how to keep your vehicle in good condition,
see your GM Goodwrench dealer.

6-2

-------------------------------------------------------------------------------------------------------------------------------------------------------------

-------------------------------------------------------------------------------------------------------------------------------------------------------------

This schedule is for vehicles that:

carry passengers and cargo within recommended
limits. You will find these limits on the tire and
loading information label. See Loading Your Vehicle
on page 4-43.

are driven on reasonable road surfaces within legal
driving limits.

are driven off-road in the recommended manner.
See Operating Your All-Wheel-Drive Vehicle Off
Paved Roads 
on page 4-16.

use the recommended fuel. See Gasoline Octane
on page 5-4.

The services in Scheduled Maintenance on page 6-4
should be performed when indicated. See Additional
Required Services 
on page 6-6 and Maintenance
Footnotes 
on page 6-8 for further information.

{

CAUTION:

Performing maintenance work on a vehicle can
be dangerous. In trying to do some jobs, you
can be seriously injured. Do your own
maintenance work only if you have the
required know-how and the proper tools and
equipment for the job. If you have any doubt,
see your GM Goodwrench dealer to have a
qualified technician do the work.

Some maintenance services can be complex. So,
unless you are technically qualified and have the
necessary equipment, you should have your GM
Goodwrench dealer do these jobs.

6-3

-------------------------------------------------------------------------------------------------------------------------------------------------------------

-------------------------------------------------------------------------------------------------------------------------------------------------------------

When you go to your GM Goodwrench dealer for your
service needs, you will know that GM-trained and
supported service technicians will perform the work
using genuine GM parts.

If you want to get service information, see Service
Publications Ordering Information 
on page 7-12.

Owner Checks and Services on page 6-9 tells you what
should be checked, when to check it and what you can
easily do to help keep your vehicle in good condition.

The proper replacement parts, fluids and lubricants to
use are listed in Recommended Fluids and Lubricants
on page 6-13 and Normal Maintenance Replacement
Parts 
on page 6-15. When your vehicle is serviced,
make sure these are used. All parts should be replaced
and all necessary repairs done before you or anyone
else drives the vehicle. We recommend the use of
genuine GM parts.

Scheduled Maintenance

When the CHANGE ENGINE OIL light comes on, it
means that service is required for your vehicle. Have
your vehicle serviced as soon as possible within the next
600 miles (1 000 km). It is possible that, if you are
driving under the best conditions, the engine oil
life system may not indicate that vehicle service is
necessary for over a year. However, your engine oil and
filter must be changed at least once a year and at

this time the system must be reset. Your GM
Goodwrench dealer has GM-trained service technicians
who will perform this work using genuine GM parts
and reset the system.

If the engine oil life system is ever reset accidentally,
you must service your vehicle within 3,000 miles
(5 000 km) since your last service. Remember to reset
the oil life system whenever the oil is changed. See
Engine Oil on page 5-14 for information on the Engine
Oil Life System and resetting the system.

When the CHANGE ENGINE OIL light appears, certain
services, checks and inspections are required.
Required services are described in the following for
“Maintenance

I

” and “Maintenance

II

.” Generally,

it is recommended that your first service be
Maintenance

I

, your second service be Maintenance

II

and that you alternate Maintenance

I

and Maintenance

II

thereafter. However, in some cases, Maintenance

II

may be required more often.

Maintenance

I

— Use Maintenance

I

if the CHANGE

ENGINE OIL light comes on within ten months since
vehicle was purchased or Maintenance

II

was

performed.

Maintenance

II

— Use Maintenance

II

if the previous

service performed was Maintenance

I

. Always use

Maintenance

II

whenever the light comes on ten months

or more since the last service or if the light has not
come on at all for one year.

6-4

-------------------------------------------------------------------------------------------------------------------------------------------------------------

-------------------------------------------------------------------------------------------------------------------------------------------------------------

Scheduled Maintenance

Service

Maintenance

I

Maintenance

II

Change engine oil and filter. Reset oil life system. See Engine Oil on
page 5-14
An Emission Control Service.

Visually check for any leaks or damage. See footnote (j).

Inspect engine air cleaner filter. If necessary, replace filter. See Engine Air
Cleaner/Filter 
on page 5-19An Emission Control Service. See footnote †.

Rotate tires and check inflation pressures and wear. See Tires on page 5-55.

Inspect brake system. See footnote (a).

Check engine coolant and windshield washer fluid levels and add fluid as
needed.

Perform any needed additional services. See “Additional Required Services” in
this section.

Inspect suspension and steering components. See footnote (b).

Inspect engine cooling system. See footnote (c).

Inspect wiper blades. See footnote (d).

Inspect restraint system components. See footnote (e).

Lubricate body components. See footnote (f).

Check transmission fluid level and add fluid as needed.

6-5

-------------------------------------------------------------------------------------------------------------------------------------------------------------


Content      ..     21      22      23      24     ..