Genesis G90 (2017 year). Manual - part 12
 

  Index      Genesis     Genesis G90 (2017 year) - manual in english


Search            copyright infringement  


Content      ..     10      11      12      13     ..


Genesis G90 (2017 year). Manual - part 12


3-104

Convenient features of your vehicle

Windshield washers 

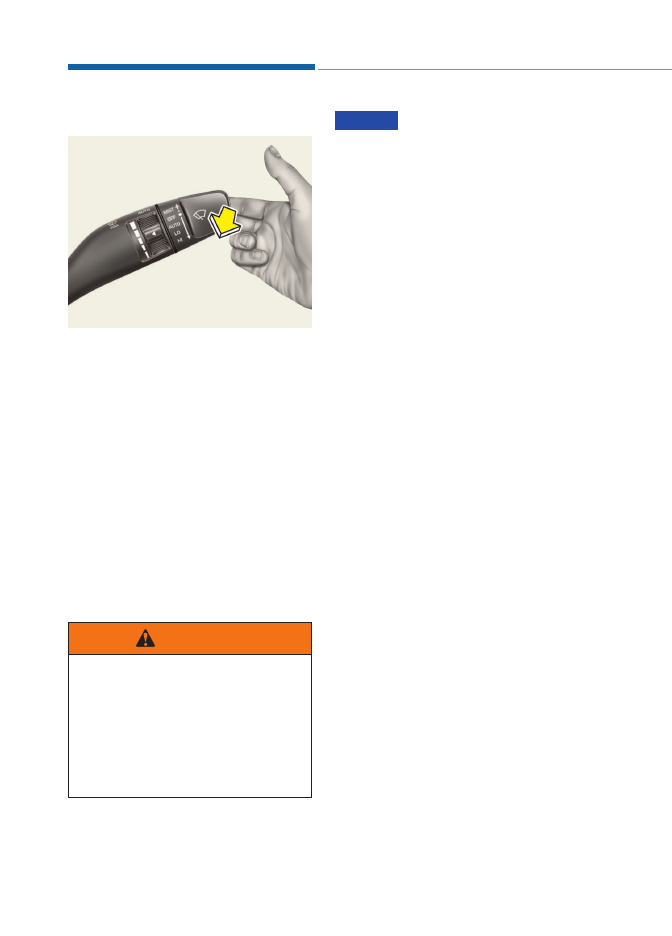
In the OFF (O) position, pull the lever
gently toward you to spray washer
fluid on the windshield and to run the
wipers 1-3 cycles. The spray and
wiper operation will continue until you
release the lever. If the washer does
not work, you may need to add wash-
er fluid to the washer fluid reservoir.
If equipped with the Headlamp
Washer, washer fluid will be sprayed
on the headlamp at the same time you
operate the windshield washer when:
1. The Engine Start/Stop button is in

the ON position.

2. The light switch is in the headlamp

position.

• To prevent possible damage to

the washer pump, do not oper-
ate the washer when the fluid
reservoir is empty.

• To prevent possible damage to

the wipers or windshield, do not
operate the wipers when the
windshield is dry.

• To prevent damage to the wiper

arms and other components, do
not attempt to move the wipers
manually.

• To prevent possible damage to

the wipers and washer system,
use anti-freezing washer fluids
in the winter season or cold
weather.

NOTICE

OHI046422L

When the outside temperature is
below freezing, ALWAYS warm
the windshield using the
defroster to prevent the washer
fluid from freezing on the wind-
shield and obscuring your vision
which could result in an acci-
dent and serious injury or death.

WARNING

-------------------------------------------------------------------------------------------------------------------------------------------------------------

3-105

03

Rear view camera (if equipped)

The Rear View Camera will activate
when the engine is running and the
shift lever is in the R (Reverse) posi-
tion.
This is a supplemental system that
helps provide a view of the area
behind the vehicle through the A/V
display while the vehicle is in the R
(Reverse) position.

Do not use any cleanser contain-
ing acid or alkaline detergents
when cleaning the lens. Use only a
mild soap or neutral detergent,
and rinse thoroughly with water.

Information 

Always keep the camera lens clean. The
camera may not work normally if the
lens is covered with dirt or snow.

i

NOTICE

D

DR

RIIV

VE

ER

R  A

AS

SS

SIIS

ST

T  S

SY

YS

ST

TE

EM

M

OHI046477L

OHI046476

The rear camera display is not a
safety device. It only serves to
assist the driver in identifying
objects directly behind the mid-
dle of the vehicle. The camera
does NOT cover the complete
area behind the vehicle.

WARNING

• Never rely solely on the rear

camera display when backing-
up.

• ALWAYS look around your

vehicle to make sure there are
no objects or obstacles
before moving the vehicle in
any direction to prevent a col-
lision.

• Always pay close attention

when the vehicle is driven
close to objects, particularly
pedestrians, and especially
children.

WARNING

-------------------------------------------------------------------------------------------------------------------------------------------------------------

3-106

Convenient features of your vehicle

Parking assist system 
(if equipped)

The Parking Assist System assists
the driver during movement of the
vehicle by chiming if any object is
sensed within approximately 100 cm
(40 in) in front and 120 cm (47 in)
behind the vehicle.
This system is a supplemental sys-
tem that senses objects within the
range and location of the sensors, it
cannot detect objects in other areas
where sensors are not installed.

OHI046402

OHI046403

Front Sensors

Rear Sensors

• ALWAYS look around your

vehicle to make sure there are
not any objects or obstacles
before moving the vehicle in
any direction to prevent a col-
lision.

• Always pay close attention

when the vehicle is driven
close to objects, particularly
pedestrians, and especially
children.

• Be aware that some objects

may not be visible on the
screen or be detected by the
sensors, due to the objects
distance, size or material, all
of which can limit the effec-
tiveness of the sensor.

WARNING

-------------------------------------------------------------------------------------------------------------------------------------------------------------

3-107

03

Operation of the Parking Assist
System

Operating condition

• This system will activate when the

Parking Assist System button is
pressed with the engine running.

• The Parking Assist System button

turns on automatically and acti-
vates the Parking Assist System
when you move the shift lever to
the R (Reverse) position. However,
if the vehicle speed exceeds 10
km/h (6 mph), the system will not
warn you even though objects are
detected, and if the vehicle speed
exceeds 20 km/h (12 mph), the
system will turn off automatically.
To turn on the system, press the
Parking Assist System button.

• When more than two objects are

sensed at the same time, the clos-
est one will be recognized first.

OHI046405L

Type A

OHI046406L

■ 

Type B

-------------------------------------------------------------------------------------------------------------------------------------------------------------

3-108

Convenient features of your vehicle

Distance 

from object 

Warning indicator

Warning sound

When driving 

forward

When driving 

rearward

100cm~61cm Front

-

Buzzer beeps 

intermittently

120cm~61cm Rear

-

Buzzer beeps 

intermittently

60cm~31cm

Front

Buzzer beeps 

frequently

Rear

-

Buzzer beeps 

frequently

30cm

Front

Buzzer sounds 

continuously

Rear

-

Buzzer sounds 

continuously

• The indicator may differ from the illustration as objects or sensors

status. If the indicator blinks, we recommend that the system be
checked by an authorized retailer of Genesis Branded products.

• If the audible warning does not sound or if the buzzer sounds inter-

mittently when shifting into R (Reverse) position, this may indicate a
malfunction with the Parking Assist System. If this occurs, we recom-
mend that you have your vehicle checked by an authorized retailer of
Genesis Branded products as soon as possible.

NOTICE

Types of warning sound and indicator

-------------------------------------------------------------------------------------------------------------------------------------------------------------

3-109

03

Non-operational conditions of
Parking Assist System

Parking Assist System may not
operate normally when:

• Moisture is frozen to the sensor.
• The sensor is covered with dirt or

debris such as snow or ice, or the
sensor cover is blocked.

• The  Parking Assist button is off.

There is a possibility of Parking
Assist System malfunction when:

• Driving on uneven road surfaces

such as unpaved roads, gravel,
bumps, or gradient.

• Objects generating excessive noise

such as vehicle horns, loud motor-
cycle engines, or truck air brakes
can interfere with the sensor.

• Heavy rain or water spray is present.
• Wireless transmitters or mobile

phones are present near the sensor.

• Any non-factory equipment or

accessories have been installed, or
if the vehicle bumper height or sen-
sor installation has been modified.

• The  sensor is covered with dirt or

debris such as snow or ice.

Detecting range may decrease when:

• Outside air temperature is extremely

hot or cold.

• Undetectable objects smaller than

1 m and narrower than 14 cm in
diameter.

The following objects may not be
recognized by the sensor:

• Sharp or slim objects such as

ropes, chains or small poles.

• Objects, which tend to absorb sen-

sor frequency such as clothes,
spongy material or snow.

Parking assist system precau-
tions

• The parking assist system may not

operate consistently in some cir-
cumstances depending on the
speed of the vehicle and the
shapes of the objects detected.

• The parking assist system may mal-

function if the vehicle bumper height
or sensor installation has been
modified or damaged. Any non-fac-
tory installed equipment or acces-
sories may also interfere with the
sensor performance.

• The sensor may not recognize

objects less than 40 cm (15 in)
from the sensor, or it may sense an
incorrect distance. Use caution.

• When the sensor is blocked with

snow, dirt, debris, or ice, the park-
ing assist system may be inopera-
tive until the snow or ice melts, or
the debris is removed. Use a soft
cloth to wipe debris away from the
sensor.

• Do not push, scratch or strike the

sensor with any hard objects that
could damage the surface of the
sensor. Sensor damage could occur.

• Do not spray the sensors or its sur-

rounding area directly with a high
pressure washer. Doing so may
cause the sensors to fail to operate
normally.

Your new vehicle warranty does
not cover any accidents or dam-
age to the vehicle or injuries to
its occupants related to a
Parking Assist System. Always
drive safely and cautiously.

WARNING

-------------------------------------------------------------------------------------------------------------------------------------------------------------

3-110

Convenient features of your vehicle

Around View Monitoring (AVM)
system

The Around View Monitoring (AVM)
system is a driving assist system. It
guides the driver to safely park the
vehicle by providing an around view
image on the screen.
Press the AVM button to turn on the
AVM system with the engine running.
Re-press the AVM button again to
turn off the AVM system.

Operating conditions

- When the Engine Start/Stop button

is in the ON position

- When the shift lever is in the D

(Drive), N (Neutral), or R (Reverse)
position. (It does not operate with
the shift lever in P (Park).)

- When vehicle speed is lower than

20km/h

Always keep the camera lens
clean. The camera may not work
normally if the lens is covered
with foreign substances.

NOTICE

OHI046408L

1) Front camera
2) Left/Right

camera

3) Rear camera

The Around View Monitoring
(AVM) System is a supplemental
system to assist you in parking.
However, the screen displays an
integrated image, which com-
bines 4 images from the front/
rear/right/left cameras.
Therefore, the actual parking line
locations may differ from the
image displayed on the screen.
ALWAYS look around your vehi-
cle to make sure there are no
objects or obstacles before mov-
ing the vehicle.

CAUTION

OHI046409

-------------------------------------------------------------------------------------------------------------------------------------------------------------

3-111

03

Information 

• When vehicle speed is over 20km/h,

the AVM system will turn off. The
system will not automatically turn
on again, even though vehicle speed
gets below 20 km/h. Push the AVM
button again, to turn on the system.

• When the vehicle is backing up, the

AVM system will turn ON regard-
less of vehicle speed or AVM button
status. However, if vehicle speed is
over 10 km/h when driving forward,
the AVM system will turn off. 

• A warning appears on the AVM sys-

tem when: 
- The trunk is opened
- The driver's door is opened
- The passenger's door is opened
- The outside rearview mirror is

folded

• If the AVM system is not operating

normally, we recommend the system
be checked by an authorized retail-
er of Genesis Branded products.

For more information, please refer to
the separate manual that was supplied
with your vehicle.

i

OHI046409

-------------------------------------------------------------------------------------------------------------------------------------------------------------

To prevent damage to the conduc-
tors bonded to the inside surface
of the rear window, never use
sharp instruments or window
cleaners containing abrasives to
clean the window.

Information 

If you want to defrost and defog the
front windshield, refer to “Windshield
Defrosting and Defogging” in this
chapter.

Rear window defroster

The defroster heats the window to
remove frost, fog and thin ice from
the interior and exterior of the rear
window, while engine is running.

• To activate the rear window

defroster, press the rear window
defroster button located in the cen-
ter facia switch panel. The indicator
on the rear window defroster but-
ton illuminates when the defroster
is ON.

• To turn off the defroster, press the

rear window defroster button again.

Information 

• If there is heavy accumulation of

snow on the rear window, brush it off
before operating the rear defroster.

• The rear window defroster automat-

ically turns off after approximately
20 minutes or when the Engine
Start/Stop button is in the OFF posi-
tion.

Outside mirror defroster

If your vehicle is equipped with the
outside mirror defrosters, they will
operate at the same time you turn on
the rear window defroster.

Front wiper deicer

If your vehicle is equipped with the
wiper deicer, it will operate at the
same time you turn on the rear win-
dow defroster.

i

i

NOTICE

D

DE

EF

FR

RO

OS

ST

TE

ER

R

3-112

Convenient features of your vehicle

OHI046303

Type A

OHI046304

■ 

Type B

-------------------------------------------------------------------------------------------------------------------------------------------------------------

A

AU

UT

TO

OM

MA

AT

TIIC

C  C

CL

LIIM

MA

AT

TE

E  C

CO

ON

NT

TR

RO

OL

L  S

SY

YS

ST

TE

EM

M

3-113

03

Front
1. Driver’s temperature control knob
2. Driver’s AUTO button
3. OFF button
4. Driver’s fan speed control button
5. SYNC button
6. Passenger’s AUTO button
7. Passenger’s temperature control knob
8. Driver’s mode selection button
9. Air conditioning button
10. Front windshield defroster button
11. Rear window defroster button

12. Air intake control button  
13. Passenger’s mode selection button 
14. AQS (Air quality system) button
15. Passenger’s fan speed control button

Rear
16. Rear fan speed control knob
17. Rear mode selection button 
18. Rear OFF button
19. Rear AUTO button
20. Rear temperature control knob
21. LCD display 

Front

• Type  A

• Type  B

■ Rear

OHI046300L/OHI046301L/OHI046302L

-------------------------------------------------------------------------------------------------------------------------------------------------------------

3-114

Convenient features of your vehicle

Operating the blower when the
Engine Start/Stop button is in the
ON position could cause the bat-
tery to discharge. Operate the
blower when the engine is run-
ning.

Automatic heating and air con-
ditioning

1. Press the AUTO button.
The modes, fan speeds, air intake
and air-conditioning will be controlled
automatically according to the tem-
perature setting.

2. Turn the temperature control knob

to set the desired temperature.

Information 

• To turn the automatic operation off,

select any button of the following:
- Mode selection button
- Front windshield defroster button

(Press the button one more time to
deselect the front windshield
defroster function. The 'AUTO'
sign will illuminate on the LCD
display once again.)

- Fan speed control button
The selected function will be con-
trolled manually while other func-
tions operate automatically.

• For your convenience, use the

AUTO button and set the tempera-
ture to 23°C (73°F). 

i

NOTICE

OHI046305

OHI046306

OHI046308

OHI046307

■ Front

• Driver’s side

• Passenger’s side

Type A

• Driver’s side

• Passenger’s side

■ 

Type B

• Driver’s side

• Passenger’s side

■ Rear

-------------------------------------------------------------------------------------------------------------------------------------------------------------

Information 

Never place anything near the sensor
to ensure better control of the heating
and cooling system.

Manual heating and air condi-
tioning

The heating and cooling system can
be controlled manually by pushing
buttons other than the AUTO button.
In this case, the system works
sequentially according to the order of
buttons selected. When pressing any
button except the AUTO button while
using automatic operation, the func-
tions not selected will be controlled
automatically.
1.Start the engine.
2.Set the mode to the desired posi-

tion.
To improve the effectiveness of
heating and cooling;
- Heating:
- Cooling:

3.Set the temperature control to the

desired position.

4.Set the air intake control to the out-

side (fresh) air position.

5.Set the fan speed control to the

desired speed.

6.If air conditioning is desired, turn

the air conditioning system on.

Press the AUTO button in order to
convert to full automatic control of
the system.

The climate control system settings
will be maintained, even when the
engine is turned OFF. However, the
climate control system settings will
be initialized when the battery has
been discharged, or when the cables
have been disconnected. In this
case, adjust the climate control sys-
tem settings again.

i

3-115

03

OHI046309

-------------------------------------------------------------------------------------------------------------------------------------------------------------

Mode selection 

3-116

Convenient features of your vehicle

OHI046312

Rear outlet vents (F)
The rear outlet vents are controlled by the rear climate control system.
However, external conditions and manual settings also have influences on the
actual operation of the rear outlet vents by blocking air flows or changing air
flow volumes.
The rear outlet vents may blow slightly cooler air when the heater is operat-
ing due to some heat loss through the air ducts from the front of the vehicle.
To prevent this, the rear outlet vents may not blow any air immediately after a
cold start when the outside temperature is detected to be extremely low in
winter and the engine has not sufficiently warmed up.

-------------------------------------------------------------------------------------------------------------------------------------------------------------

Front mode selection button
The mode selection button controls
the direction of the air flow through
the ventilation system.

The air flow outlet port is converted
as follows:

Information 

The passenger’s side cannot select the
Floor & Defrost (

) mode.

Face-Level (B, D, F, G)

Air flow is directed toward the upper
body and face. Additionally, each
outlet can be controlled to direct the
air discharged from the outlet.

Bi-Level (B, C, D, E, F, G)

Air flow is directed towards the face
and the floor.

Floor & Defrost (A, C, E, D)

Most of the air flow is directed to the
floor and the windshield with a small
amount directed to the side window
defrosters.

Floor-Level (A, C, E, D)

Most of the air flow is directed to the
floor, with a small amount of the air
being directed to the windshield and
side window defrosters.

i

3-117

03

OHI046310

■ Driver’s side

■ Passenger’s side

-------------------------------------------------------------------------------------------------------------------------------------------------------------

Rear mode selection button
If you press the rear mode selection
button, you can adjust the rear mode
individually.
To adjust the rear mode  individually,
the LOCK button on the rear armrest
must be deactivated (button indicator
off). If the LOCK button is activated
(button indicator on), the rear mode
will operate same as the front mode.
For more information on the LOCK but-
ton, refer to “Rear Switches Operating
Limitation” in chapter 2.

The air flow outlet port is converted
as follows:

Face-Level (G, F)

Air flow is toward the upper body and
face

Bi-Level (G, E, F)

Air flow is toward the face and floor

Floor-Level (F)

Air flow is toward the floor.

Information 

If the 

indicator illuminates on the

LCD display of the rear climate control
system, the air flow will be blocked,
and the rear mode selection button will
become inoperable in the below situa-
tions. 
- The front windshield defroster is ON. 
- The auto defogging system operates. 
- Right after the heating and air condi-

tioning system is operated in winter. 

- The climate control system is turned

OFF after turning ON the front
defroster button. 

To operate the rear mode selection but-
tons again, turn OFF the front
defroster button while operating the
climate control system.

i

3-118

Convenient features of your vehicle

OHI046311L

-------------------------------------------------------------------------------------------------------------------------------------------------------------

Defrost-Level (A)

Most of the air flow is directed to the
windshield with a small amount of air
directed to the side window defrosters.

Instrument panel vents

The outlet vents can be opened or
closed separately using the thumb-
wheel. To close the vent, rotate it left
(

) to the maximum position. To

open the vent, rotate it right (

) to

the desired position.
Also, you can adjust the direction of
air delivery from these vents using
the vent control lever as shown.

3-119

03

OHI046315

■ Front

OHI046316

■ Rear

OHI046313

Type A

OHI046314

■ 

Type B

-------------------------------------------------------------------------------------------------------------------------------------------------------------


Content      ..     10      11      12      13     ..